

Page 1

DOPPIA PORTA
................................................................................................da pag.1 a pag.2
IT
DOUBLE DOOR
DOUBLE PORTE
DOPPELTÜRKÜHLGERÄTE
DOS PUERTAS
DUAS PORTAS
ΔΙΠΛΗ ΠΟΡΤΑ
DWUDRZWIOWA
KOMBINOVANÁ CHLADNIČKA
DUBBELE DEUR
KAKSIOVINEN
DOBBEL DØR
DUBBELDÖRR
............................................................................................... page 3 to page 4
...................................................................................................................pages 5 à 6
.................................................................................Seite 7 bis Seite 8
..............................................................................................de pág.9 a pág.10
..............................................................................................da pág. 11 à pág.12
..................................................................................... αό σελ. 13 έως σελ. 14
.............................................................................................................od str. 15 do str.16
..........................................................................................pag. 19 t/m pag. 20
........................................................................................................... sivut 21-22
.......................................................................................... fra side 23 til side 24
...................................................................................... från sida 25 till sida 26
...................................................................... od strany 17 do strany 18
GB
FR
DE
ES
PT
EL
PL
CZ
NL
FI
NO
SV
TO DØRE ............................................................................................................................. fra s. 27 til s.28
DA
Page 2

DOPPIA PORTA
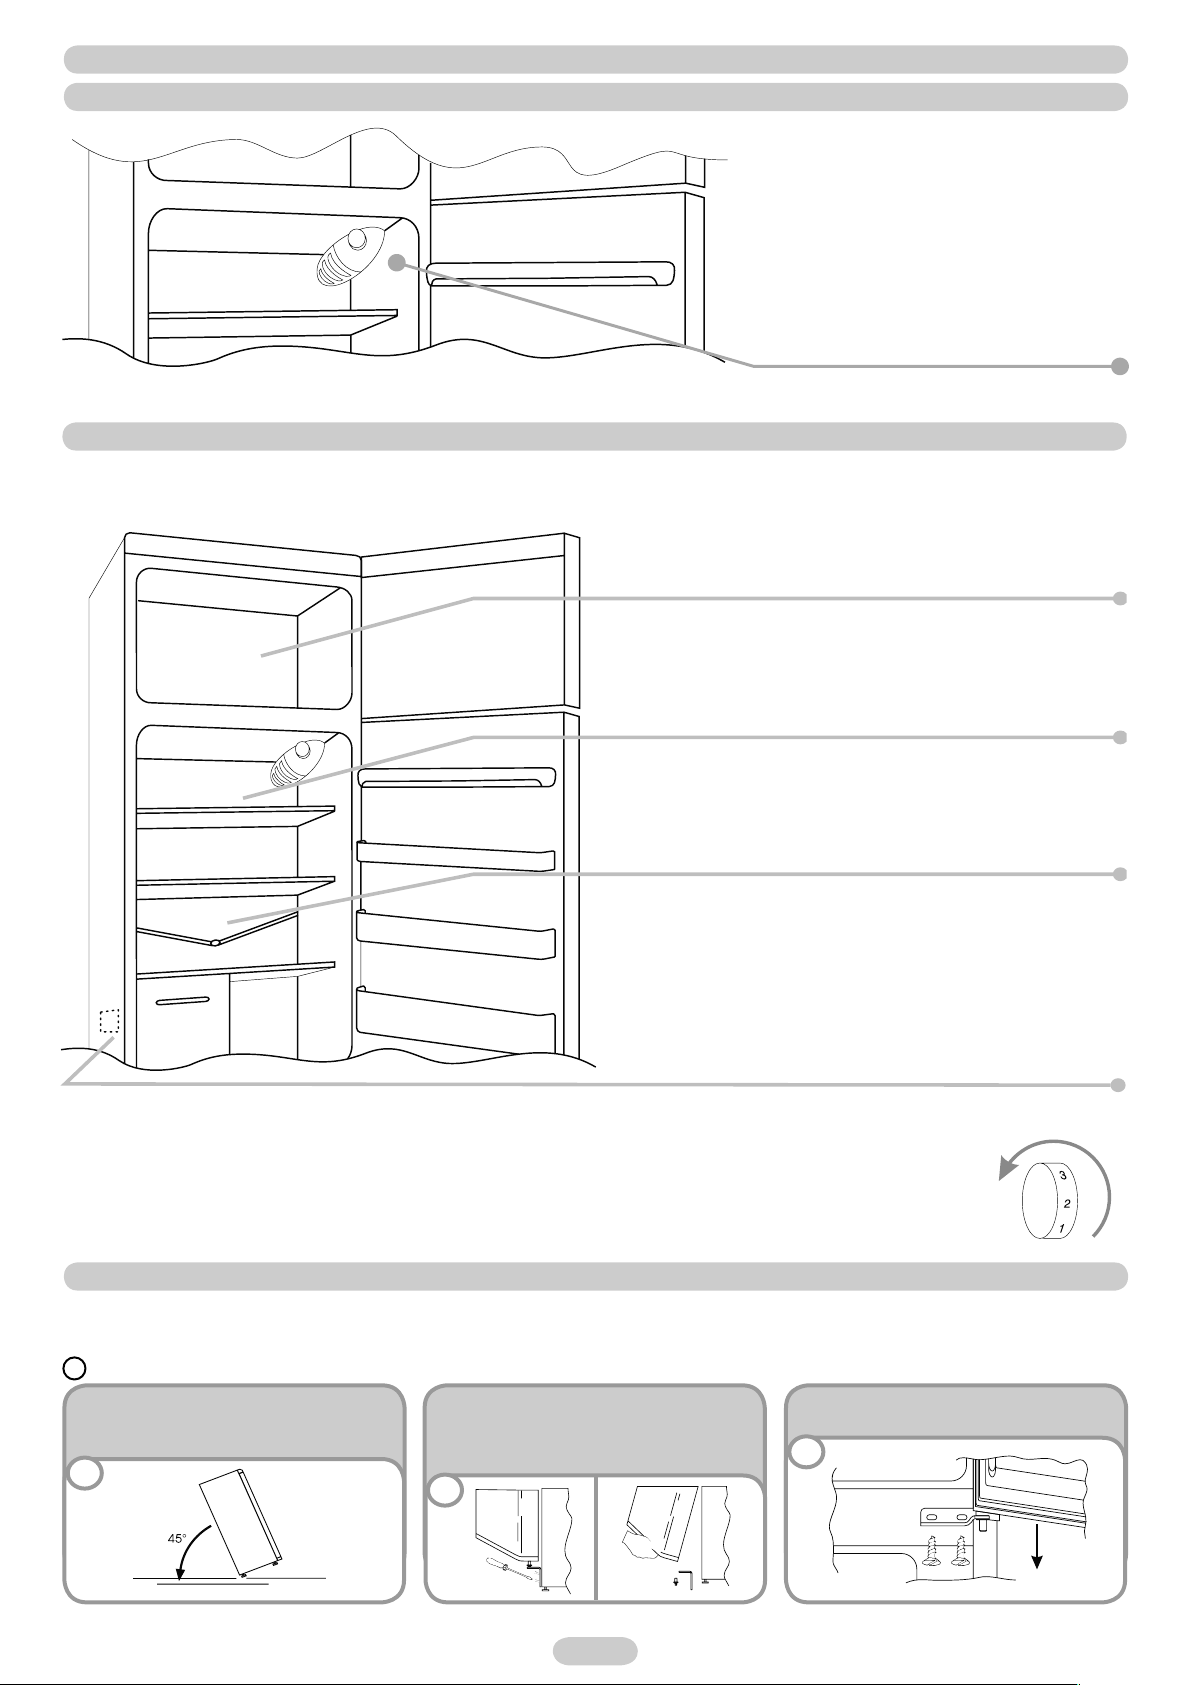
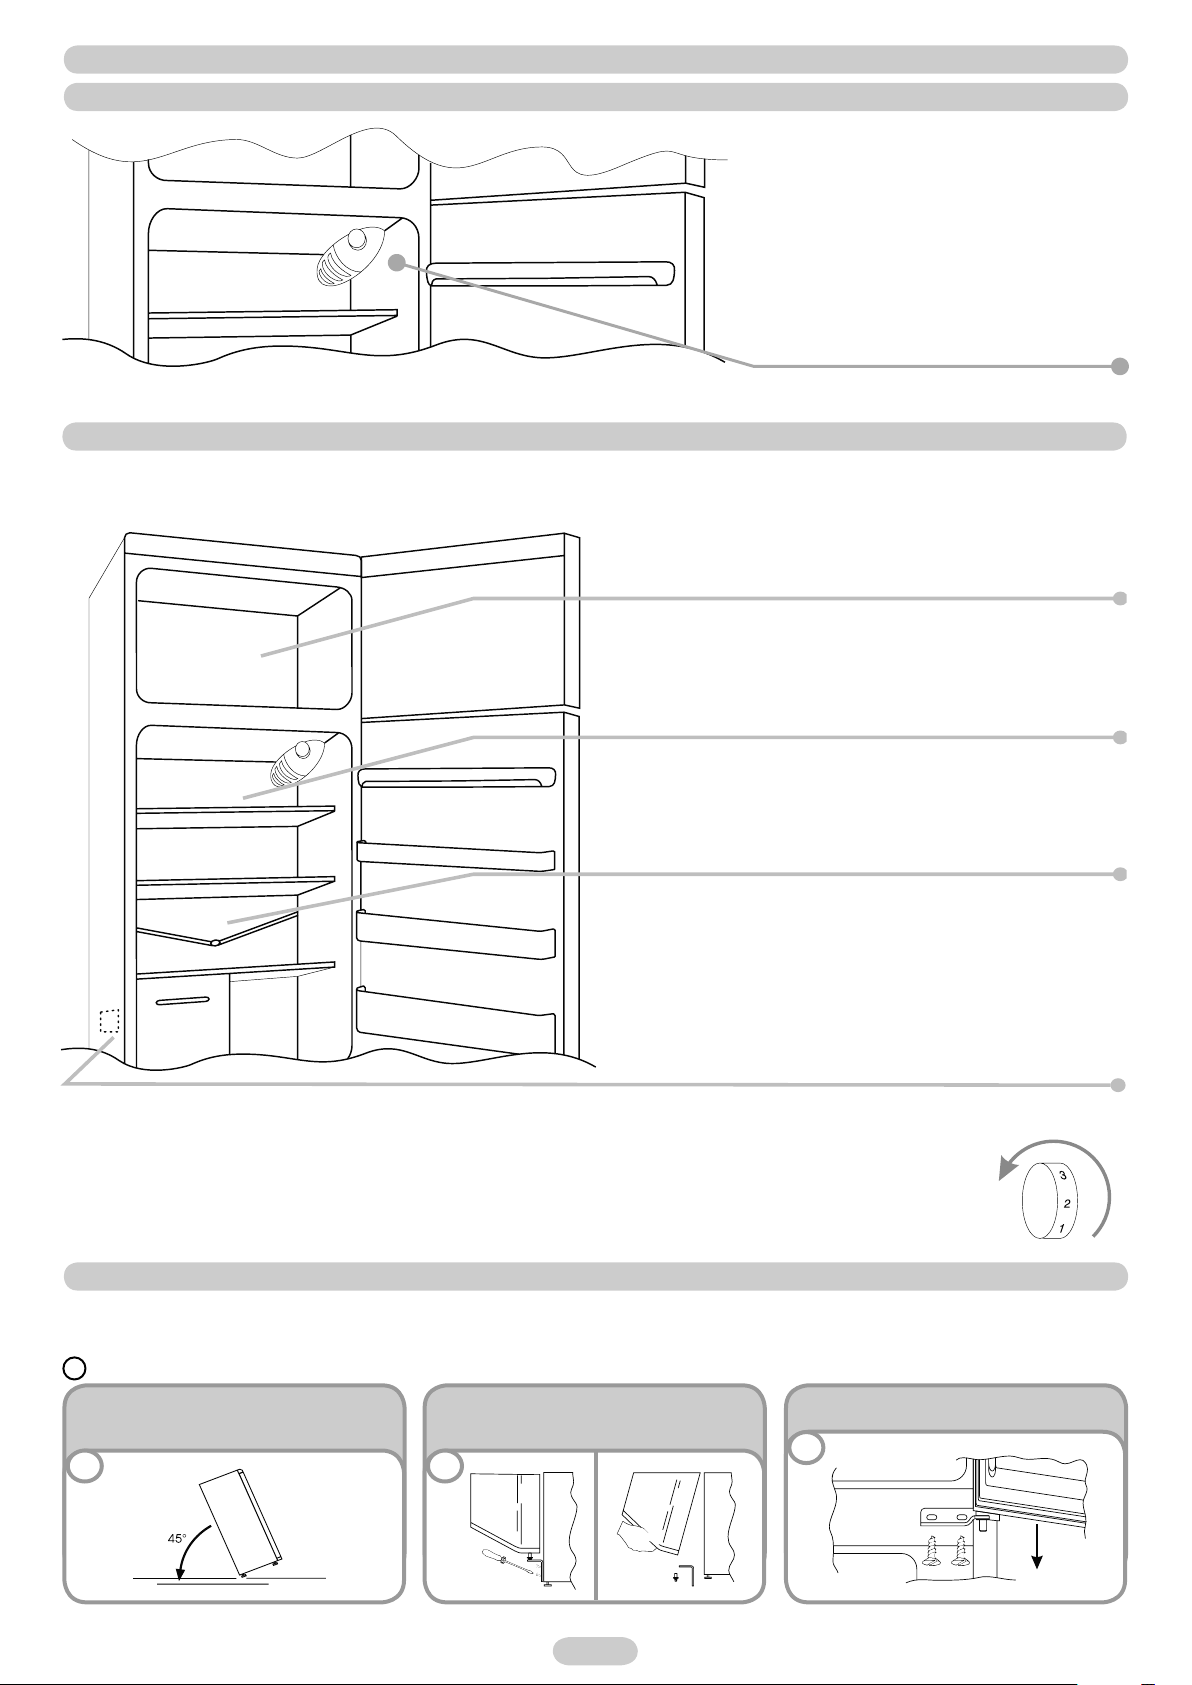
QUADRO COMANDI
La scatola termostato per il controllo
dell‘apparecchio è collocata all‘interno della
cella frigo in alto a destra. Per essere certi
che l‘apparecchio stia funzionando accertarsi
che la manopola termostato non sia sulla
posizione „0“.
LO SBRINAMENTO e CONGELAZIONE
La quantità massima di alimenti che è possibile congelare è indicata nella targhetta matricola, (vedi figura 2)
La congelazione è garantita in qualsiasi posizione della manopola.
(Figura 2)
In questo prodotto lo sbrinamento della cella frigo avviene
automaticamente
E‘ consigliabile sbrinare la zona congelatore quando lo
strato di ghiaco supera i 3 mm di spessore
La presenza di un lieve strato di brina o di gocce d‘acqua
durante il funzionamento è da considerarsi normale
E‘ importante mantenere sempre pulito il condotto di
scarico ed evitare di porre i cibi a contatto con la parete
della cella
NB. In questa posizione è possibile trovare la targa matricola, contenente i dati da comunicare all‘ Assistenza Tecnica qualora
si vericasse un guasto.
Importante: In presenza di temperatura ambiente molto calda, l‘apparecchio potrebbe funzionare in continuo,
con conseguente formazione anomala di brina sulla parete di fondo della cella frigo. In questi casi è necessario
ruotare la manopola frigo su numeri più bassi (1-2).
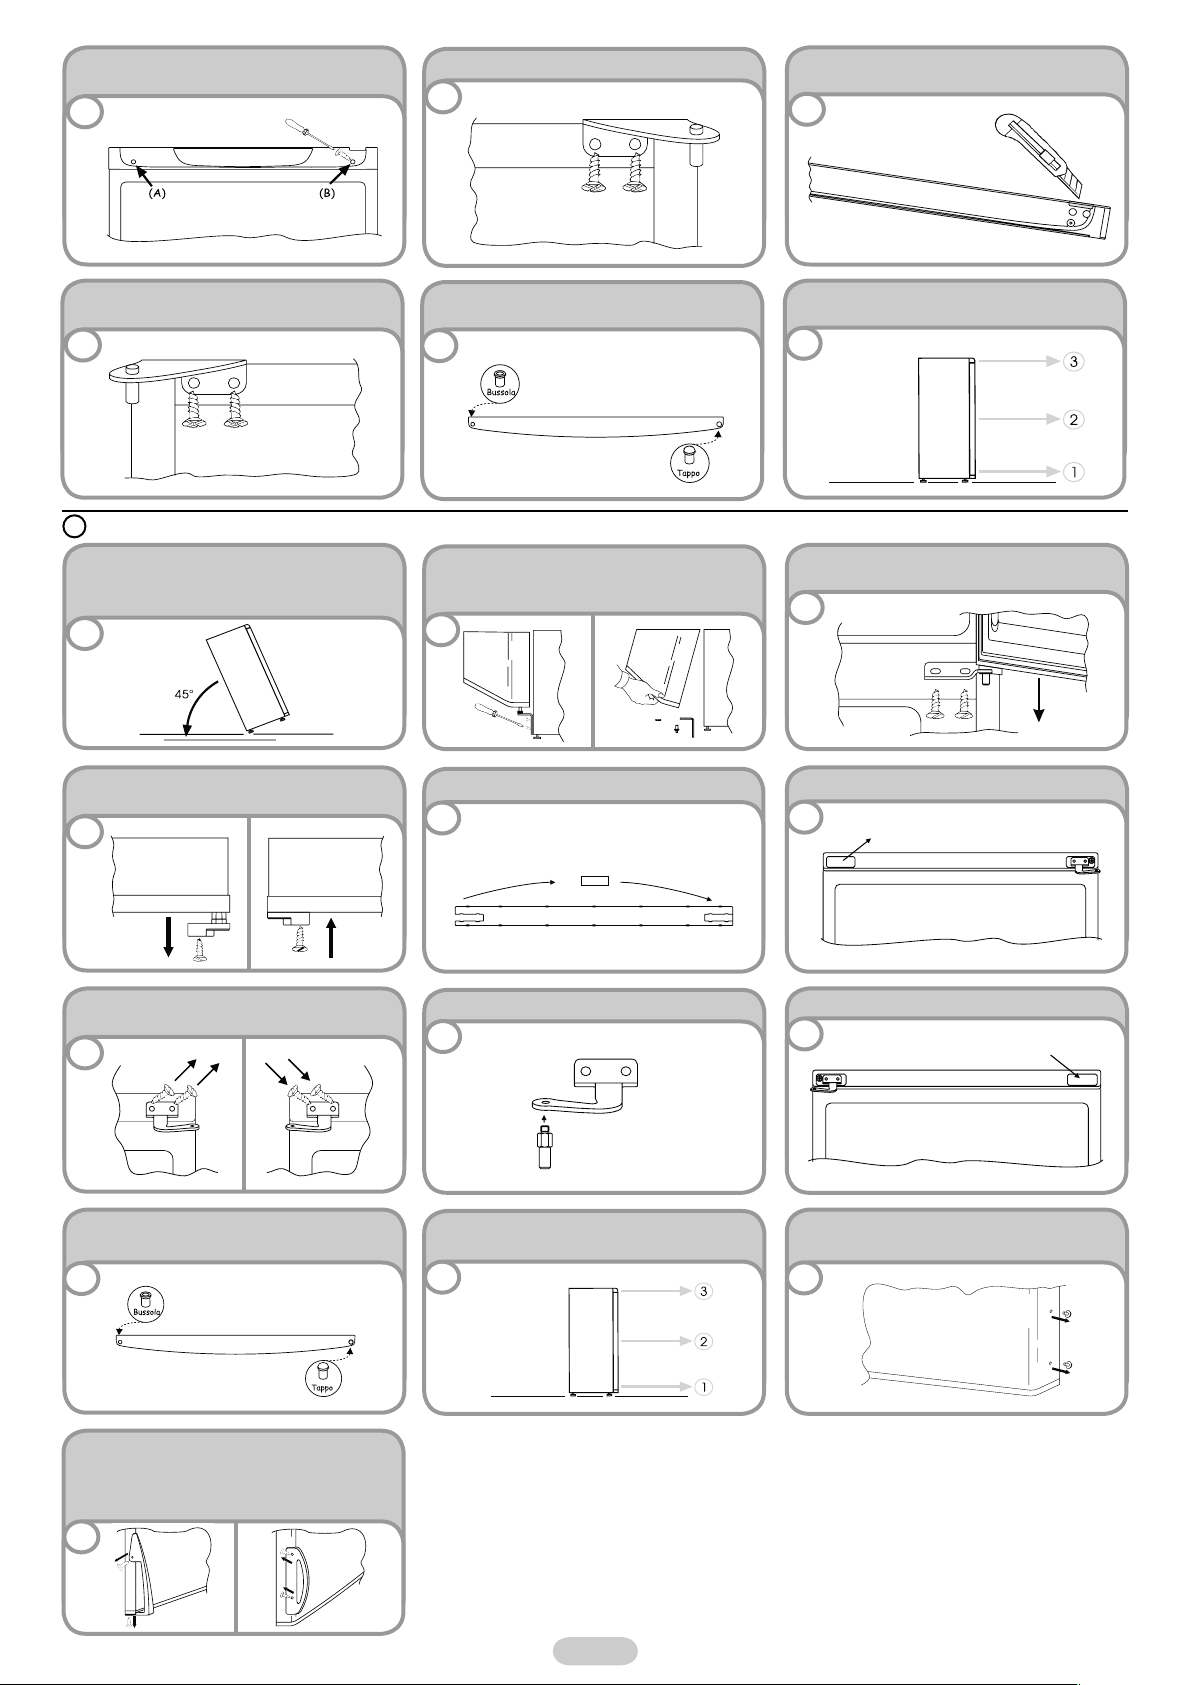
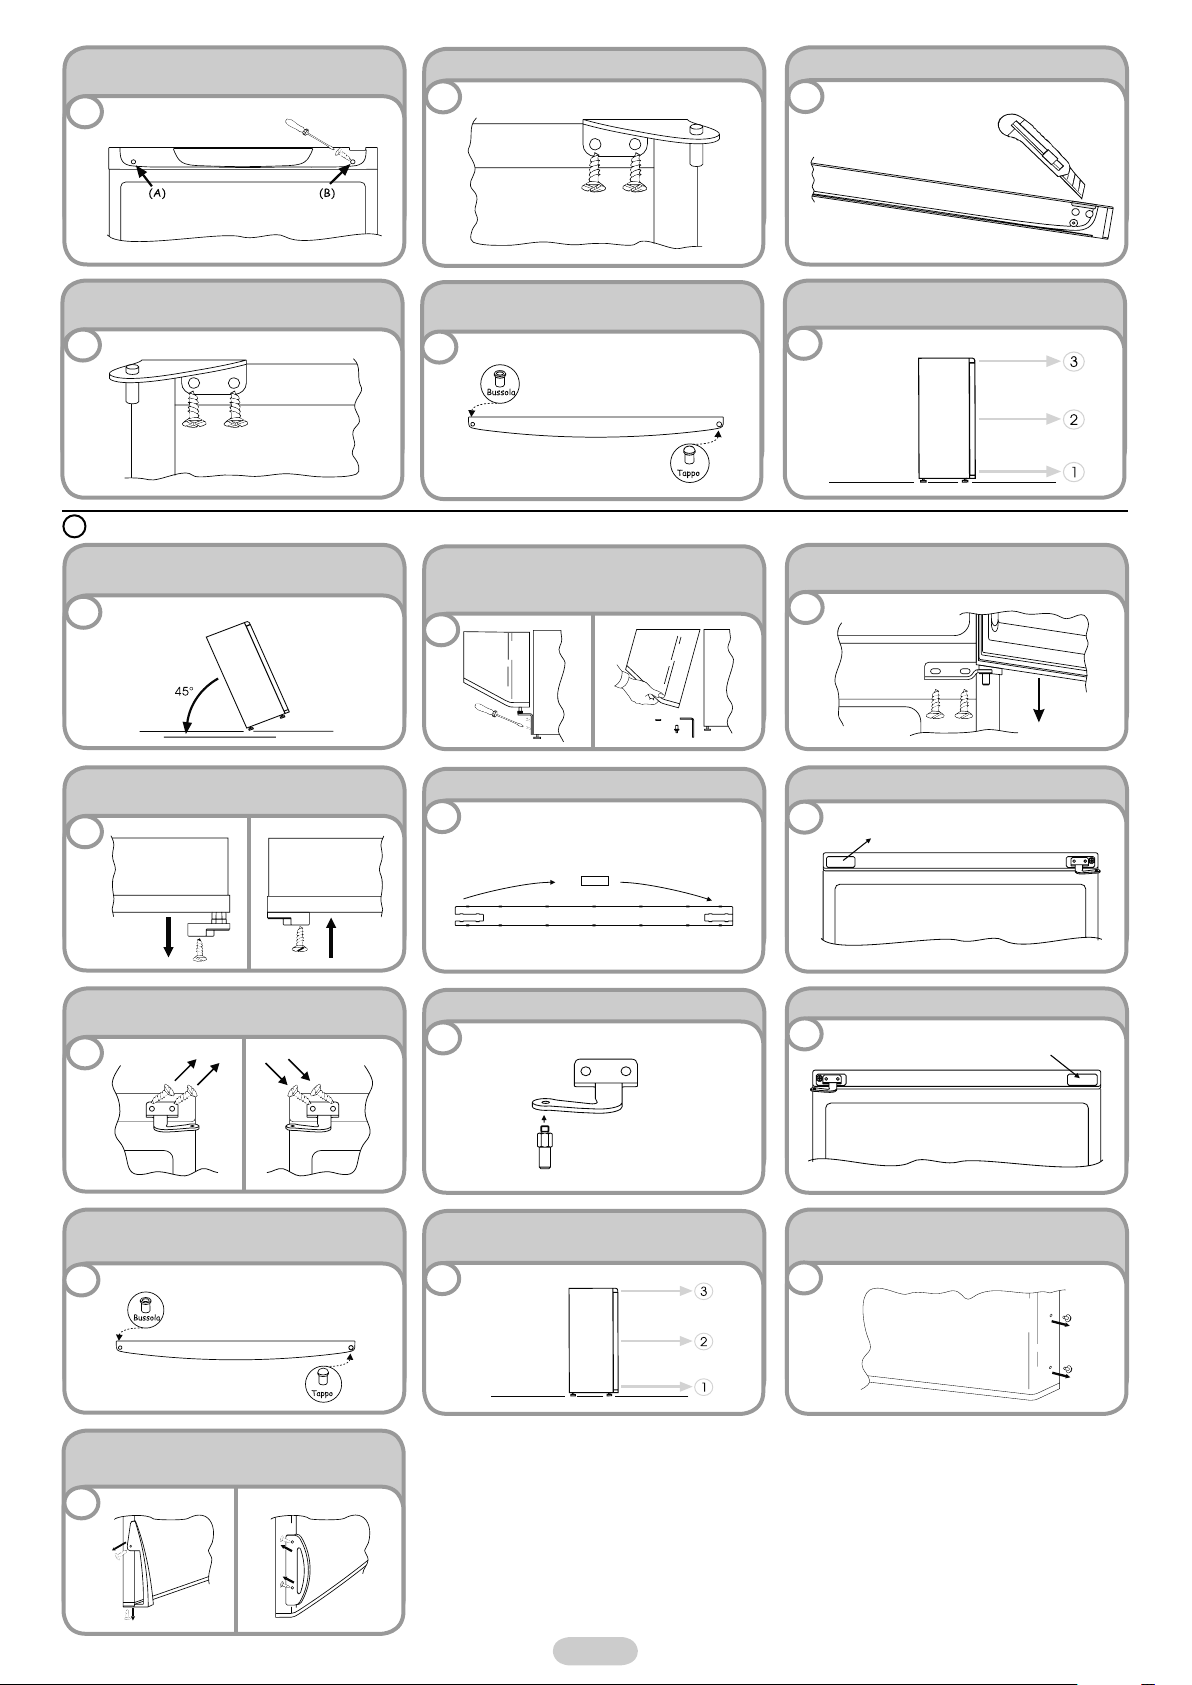
INVERSIONE DEL SENSO DI APERTURA DELLE PORTE
Per invertire il senso di apertura delle porte seguire le indicazioni in relazione al tipo di testata e di cerniera di cui il vostro prodotto
è costituito.
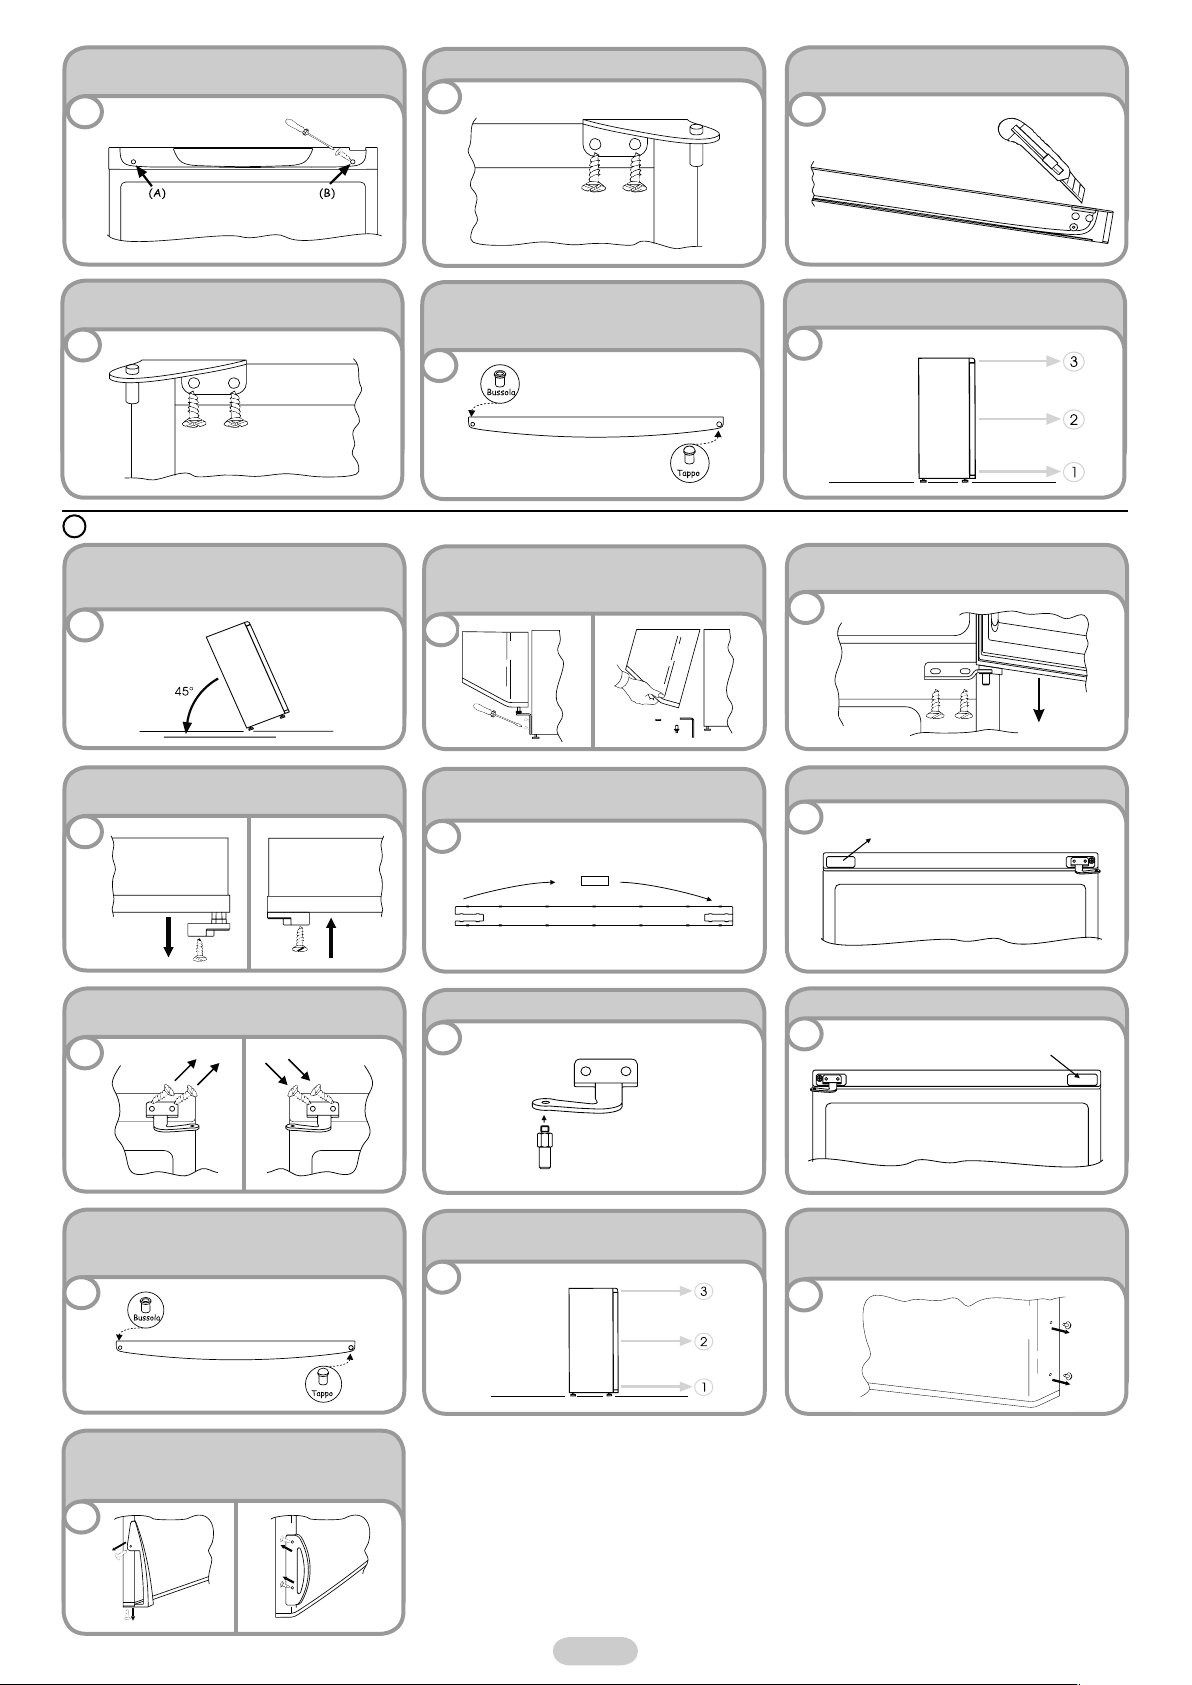
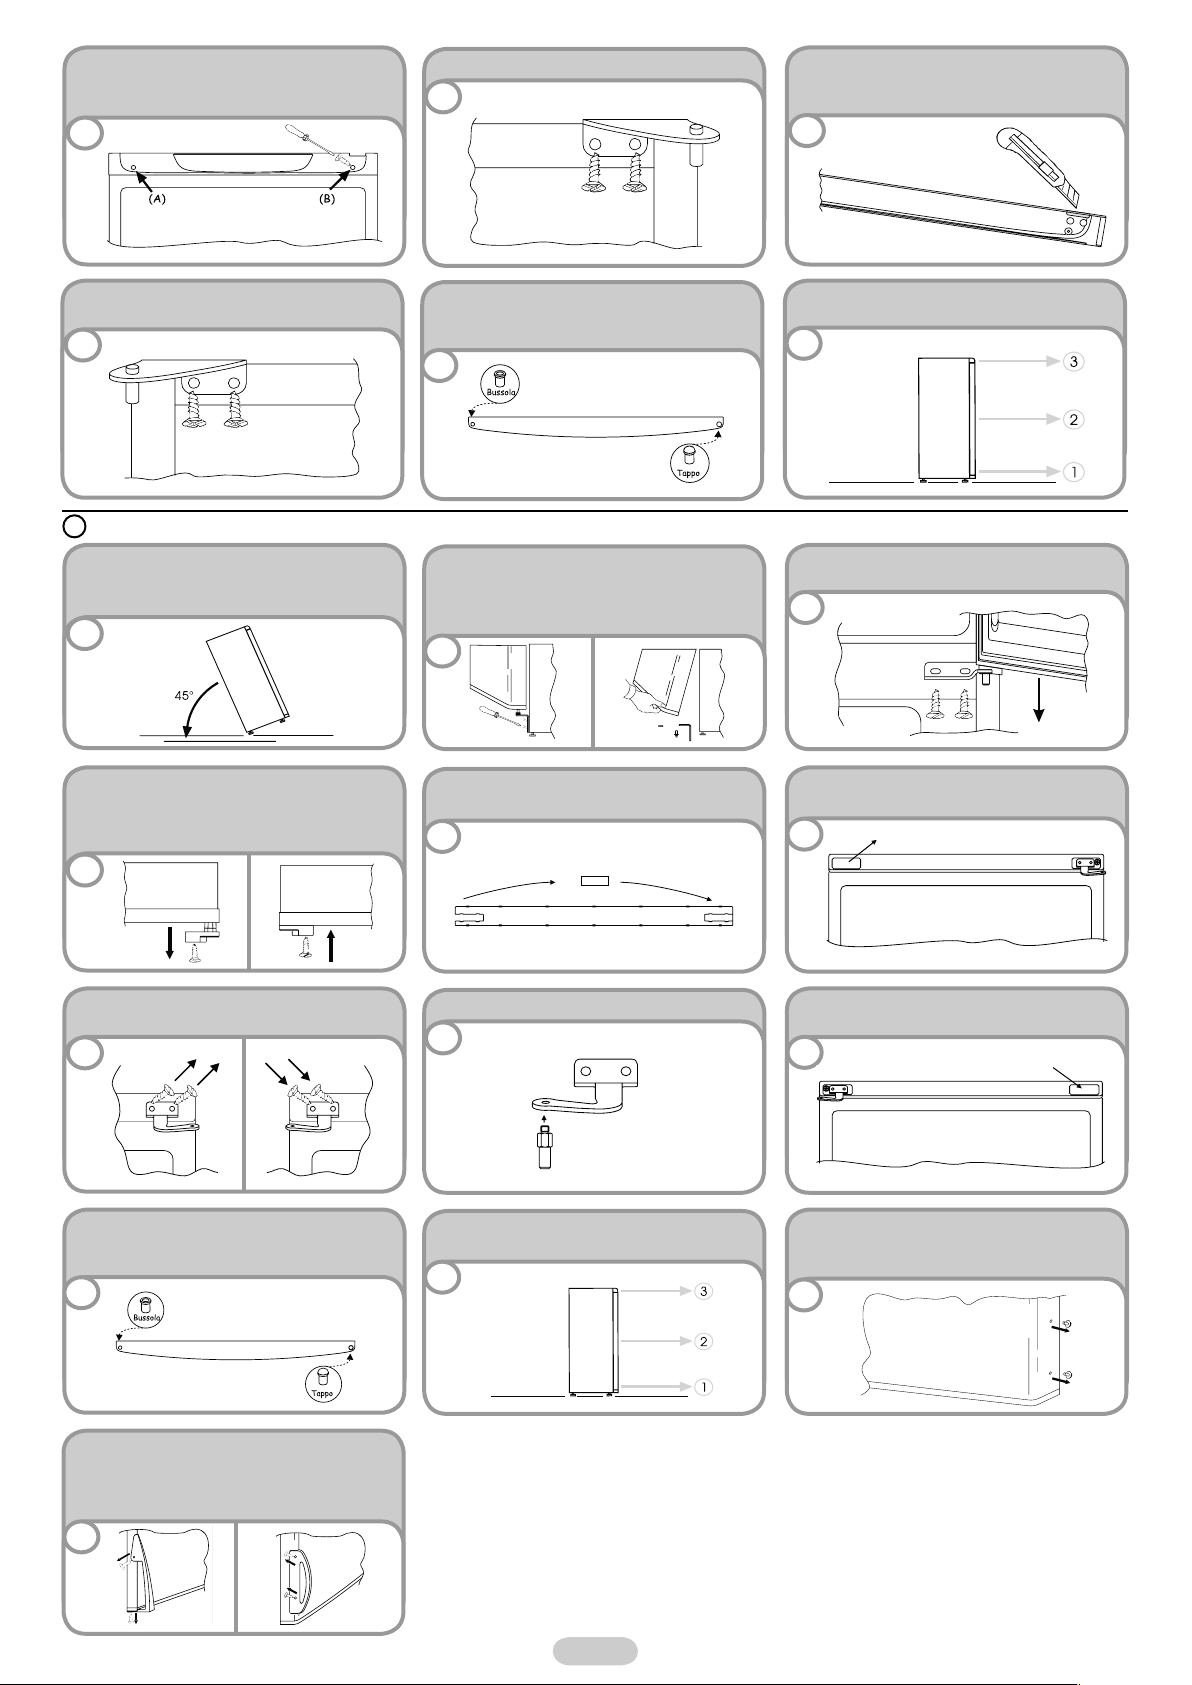
A
Sdraiare o inclinare di 45° il frigorifero, per
facilitare le operazioni nella parte inferiore dello
stesso
1
Togliere la cerniera inferiore destra svitando
le viti, il perno e le rondelle, quindi togliere la
porta inferiore
2
1 IT
Svitare la vite centrale e togliere la porta
superiore
3
Page 3

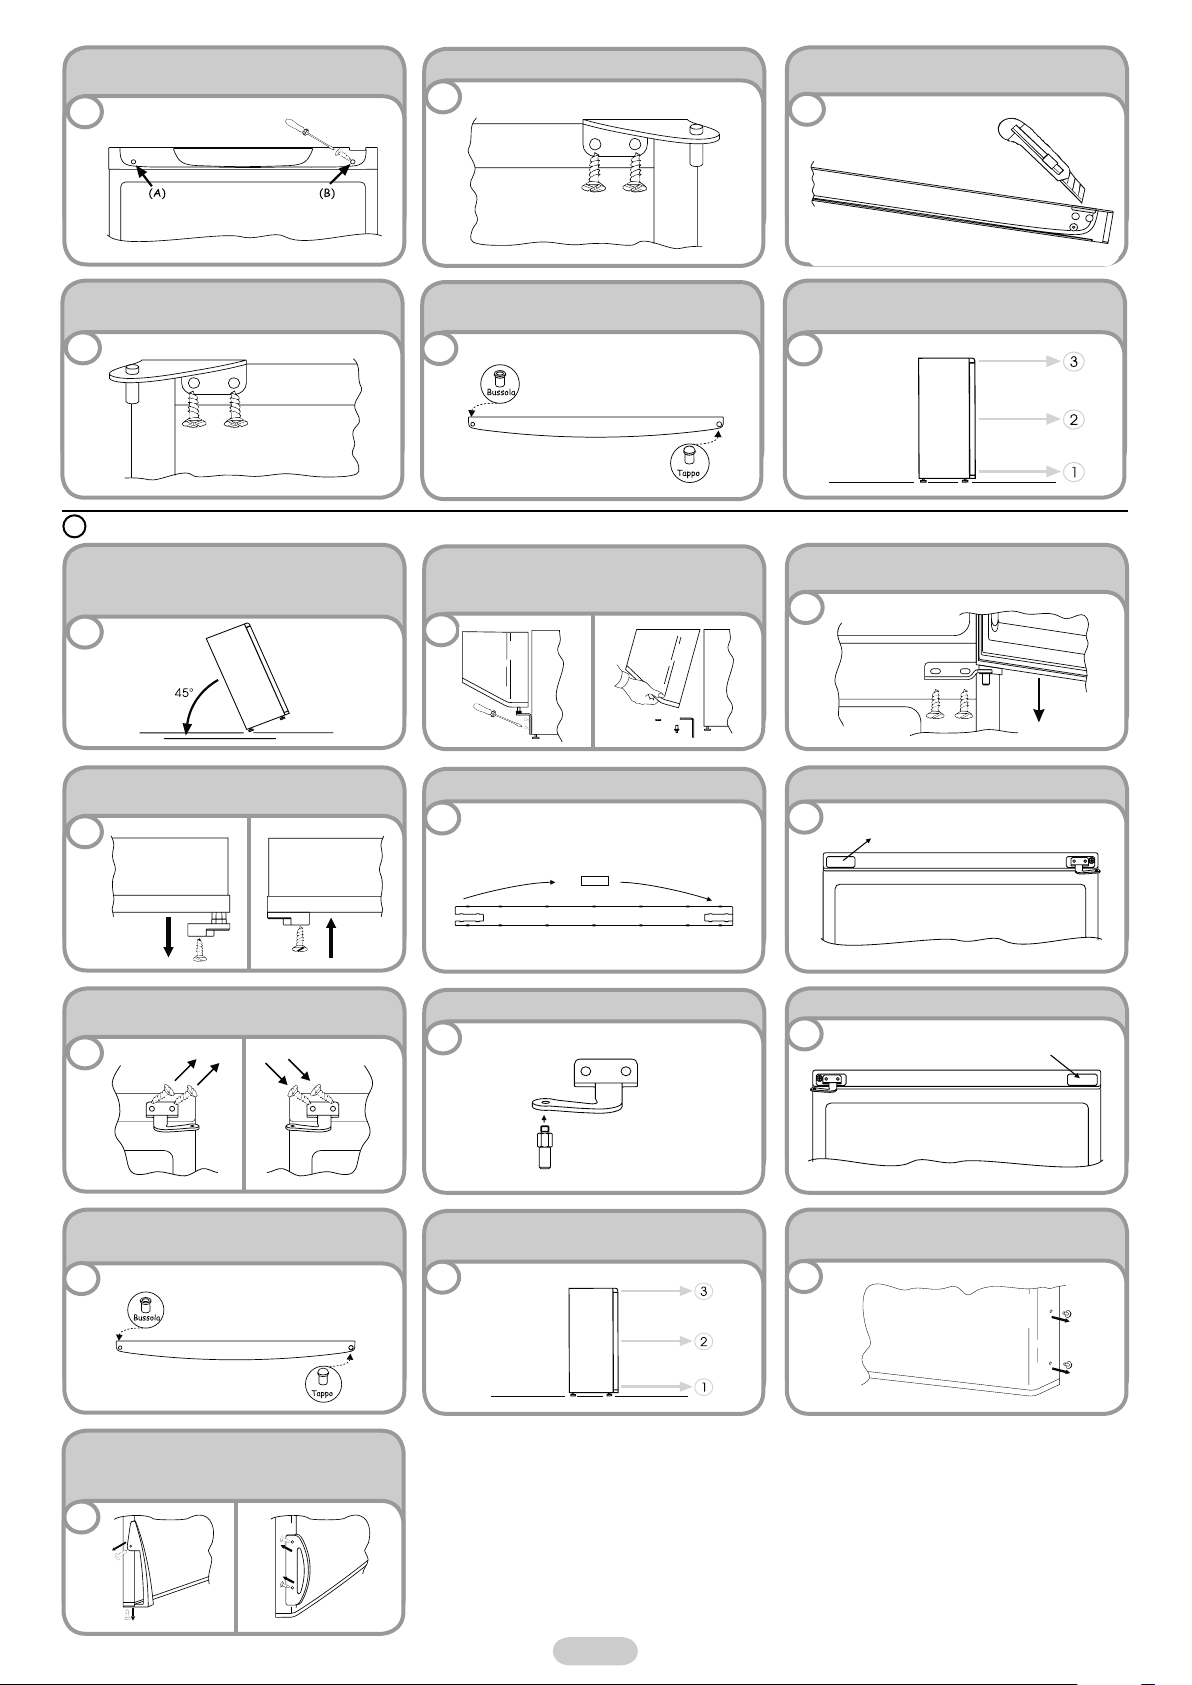
Togliere i tappi (A) e (B), svitare le viti ed estrarre
parzialmente il cruscotto.
4
Svitare la cerniera destra
5
Incidere e rompere l‘asola sinistra del cruscotto
nella zona dell Impronta
6
Dalla busta accessori in dotazione, prelevare
e fissare la cerniera superiore sinistra
7
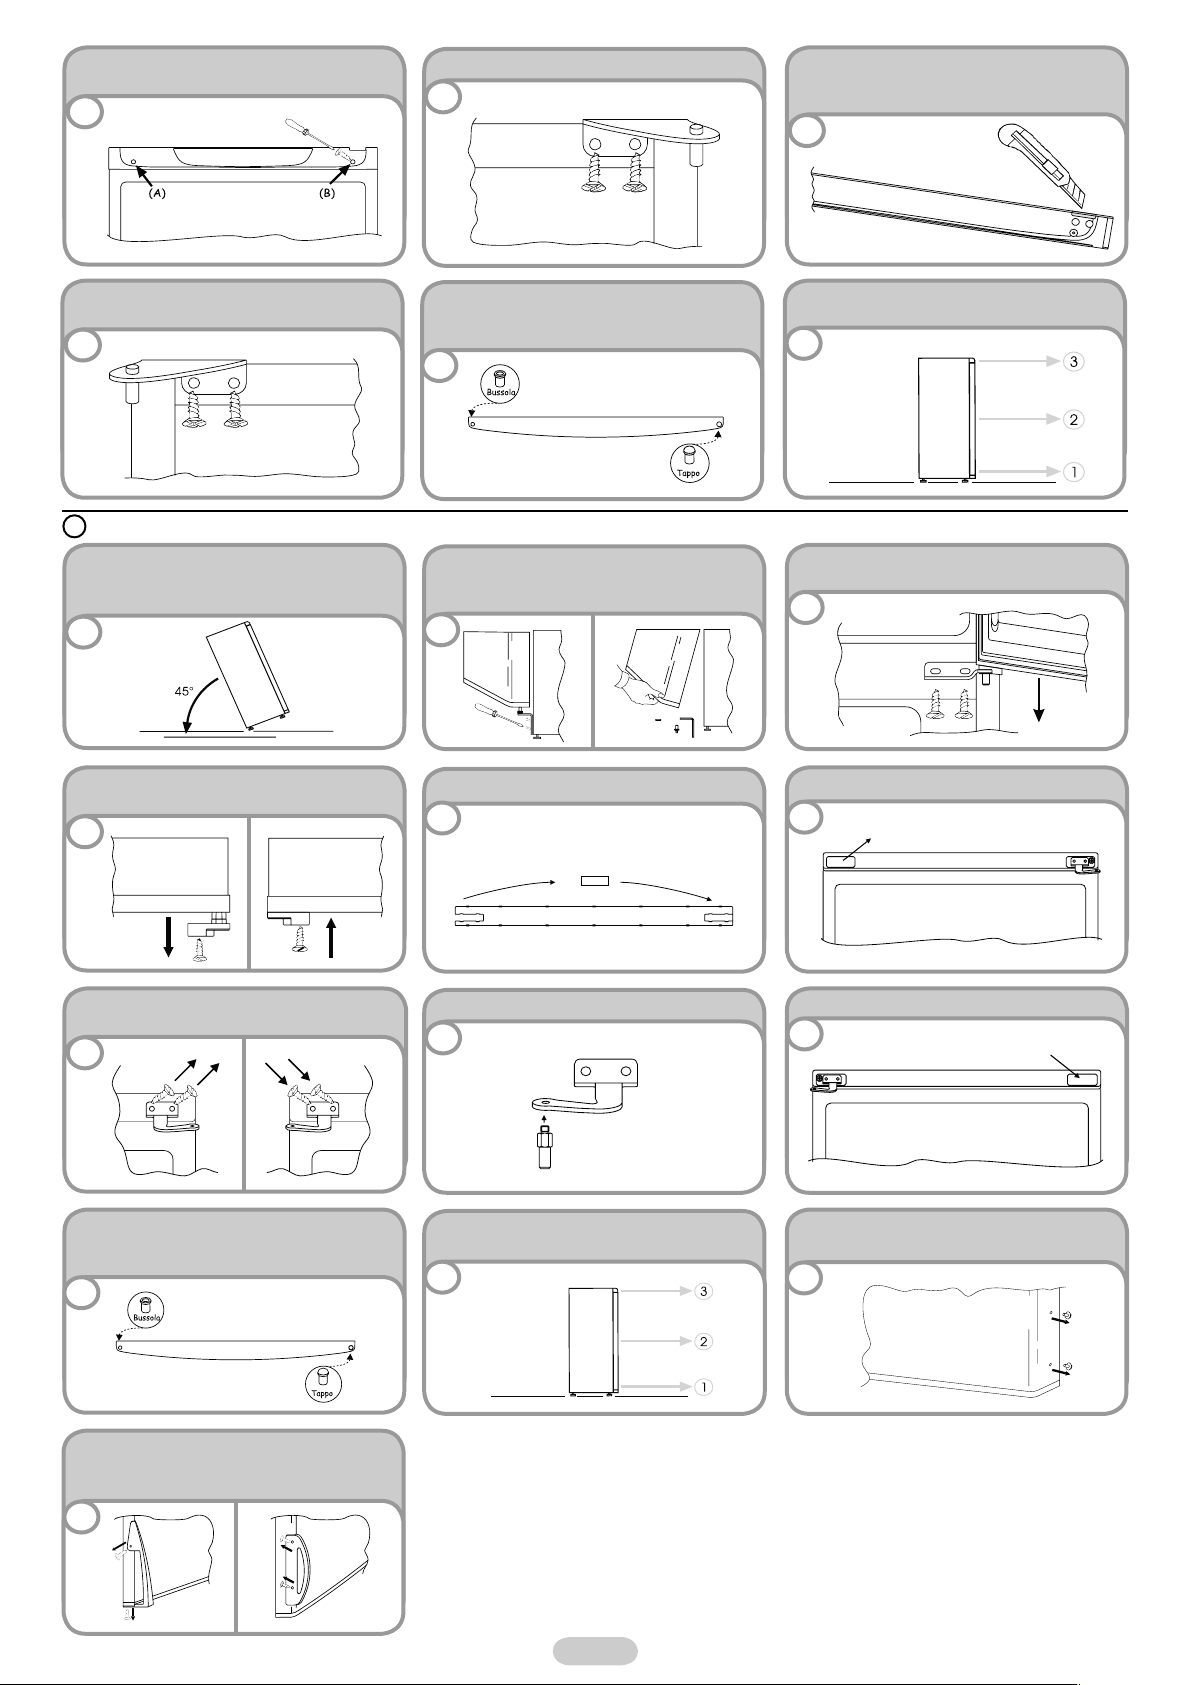
B
Sdraiare o inclinare di 45° il frigorifero, per
facilitare le operazioni nella parte inferiore dello
stesso
1
Svitare il fermo dalla porta frigo e montare quello
in dotazione sull‘altro lato
4
Rimuovere il tappo sulla parte sinistra e inserirlo
sulla parte destra delle testatine centrali e
inferiore.
8
Togliere la cerniera inferiore destra svitando
le viti, il perno e le rondelle, quindi togliere la
porta inferiore
2
Invertire la posizione del tappo di chiusura della
testata
5
Rimontare le cerniere e le porte operando dal
basso verso l‘alto, 1 2 3
9
Svitare la cerniera centrale e togliere la porta
superiore
3
Togliere il tappo di chiusura del cruscotto
6
Dalla busta accessori in dotazione, prelevare e
fissare la cerniera superiore sinistra
7
Rimuovere il tappo sulla parte sinistra e inserirlo
sulla parte destra delle testatine centrali e
inferiore.
10
Svitare le maniglie dal lato sinistro e rimontarle
sul lato destro del prodotto.
Posizionare i tappini sul lato sinistro.
13
Inserire il perno della cerniera.
8
Rimontare le cerniere e le porte operando dal
basso verso l‘alto. 1 2 3
11
Mettere il tappo di chiusura del cruscotto
9
Per effettuare la reversibilità delle maniglie:
Togliere i tappini estetici sul lato destro delle
porte
12
2 IT
Page 4

DOUBLE DOOR
CONTROL PANEL
DEFROSTING and FREEZING
The rating plate states the maximum quantity of foods that can be frozen, (see figure 2).
Freezing is guaranteed with any knob setting.
(Figure 2)
Defrosting of the fridge compartment occurs automatically
in this product.
We recommend you defrost the freezer area when the
layer of frost is more than 3 mm thick.
The thermostat box to control the appliance
is located inside the fridge compartment on
the top right. To check whether the appliance
is functioning, make sure that the thermostat
knob is not set on „0“.
A small amount of frost or drops of water on the back
of the fridge compartment when the fridge is working is
normal
Make sure the water outlet is always clean. Make
sure foods do not touch the back or sides of the fridge
compartment
NB. This is the rating plate. If you need to contact our Service Department in the event of faults, remember to give them the
information on the plate.
Important: If the room temperature is very warm, the appliance may work continuously and a layer of frost
will deposit on the back of the fridge compartment. In this case, turn the knob to lower settings (1-2).
REVERSING THE OPENING OF THE DOORS
In order to reverse the opening of the doors, follow the indications in relation to the insert and hinge type your product is made up of.
A
Place or tilt the fridge at a 45° angle, since
it is necessary to work on the bottom of the
appliance
1
Remove the bottom hinge by removing the
screws, the plug and washers, then remove the
bottom door
2
3 EN
Remove the middle screw and remove the top
door
3
Page 5
Remove the caps (A) and (B), loosen the screws
and partially remove the panel.
4
Unscrew the right hinge
5
Mark and break the left-hand slot on the panel,
in the insert area
6
Flip the top left-hand hinge found in the
accessories kit
7
B
Place or tilt the fridge at a 45° angle, since
it is necessary to work on the bottom of the
appliance
1
Unscrew the hinge from the fridge door and
mount the one supplied on the other side
4
Remove the plug on the left-hand side and
insert it on the right hand-side of the central
and lower inserts.
8
Remove the bottom hinge by removing the
screws, the plug and washers, then remove the
bottom door.
2
Invert the position of the closure plug of the
insert
5
Reassemble the hinges and doors working from
bottom to top, 1 2 3
9
Unscrew the central hinge and remove the top
door
3
Remove the closure plug of the panel
6
Flip the top left-hand hinge found in the
accessories kit
7
Remove the plug on the left-hand side and
insert it on the right hand-side of the central
and lower inserts.
10
Unscrew the handles from the left hand-side and
move them to the right hand-side of the product.
Position the outer caps on the left hand-side.
13
Insert the pin in the hinge.
8
Reassemble the hinges and doors working from
bottom to top. 1 2 3
11
Place the closure plug of the panel
9
To reverse the handles: Remove the outer caps
from the right-hand side of the doors
12
4 EN
Page 6

DOUBLE PORTE
PANNEAU DE COMMANDE
Le thermostat commandant l'appareil se
trouve en haut à droite à l'intérieur du
réfrigérateur. Pour vérifier que l'appareil
fonctionne, assurez-vous que le bouton du
thermostat ne se trouve pas en position „0“.
DEGIVRAGE et CONGELATION
La plaque de signalétique indique la quantité d'aliments maximale pouvant être congelée. (voir image 2).
La congélation est garantie peu importe la position du bouton.
(Image 2)
Le dégivrage de la partie réfrigératique est automatique
sur cet appareil.
Nous vous conseillons de dégivrer le congélateur quand
la couche de givre atteint 3mm d'épaisseur.
La présence d’une fine pellicule de givre, ou de gouttes
d’eau, est normale durant le fonctionnement de.
Assurez-vous de toujours maintenir propre la zone
d'évacuation d'eau. Assurez-vous que les aliments
ne soient pas en contact avec le fond ou les côtés du
réfrigérateur.
NB. Ceci est la plaque d'signalétique. Si vous devez contacter notre service après vente en cas de dysfonctionnement, pensez
à fournir les informations figurant sur cette plaque.
Important : Si la température de la pièce est trop élevée, il se peut que l'appareil fonctionne de façon
continue et qu'une couche de givre se forme dans le fond du réfrigérateur. Dans ce cas, positionnez le
bouton sur les réglages les plus bas. (1-2).
INVERSER LE SENS D'OUVERTURE DES PORTES
Afin d’inverser le sens d’ouverture des portes, suivez les instructions relatives au type de charnière dont votre appareil est équipé.
A
Allongez l’appareil au sol ou à un angle de 45°
car il est nécessaire d’intervenir sur le bas de
1
Retirez la charnière du bas en retirant les vis,
le cache et les rondelles, puis enlevez la porte
du bas.
2
5 FR
Retirez la vis du milieu et enlevez la porte du
haut
3
Page 7
Retirez les caches (A) et (B), desserrez les
vis et enlevez partiellement le bandeau.
4
Devissez la charnière de droite.
5
Marquez puis découpez une fente sur le
côté gauche du panneau au niveau de la
zone d'insertion.
6
Fixez la charnière supérieure gauche que
vous trouverez dans le kit d'accessoires.
7
B
Allongez l’appareil au sol ou à un angle de 45°
car il est nécessaire d’intervenir sur le bas de
l’appareil.
1
Devissez la charnière de la porte du réfrigérateur
et installez celle fournie de l'autre côté.
4
Retirez le cache du côté gauche et insérezle dans les inserts du milieu et du bas sur le
côté droit.
8
Retirez la charnière du bas en retirant les vis,
le cache et les rondelles, puis enlevez la porte
du bas.
2
Inversez la position du cache
5
Remontez les charnières et les portes en partant
du bas vers le haut, 1 * 2 * 3
9
Dévissez la charnière centrale et retirez la porte
du haut.
3
Retirez le cache du panneau
6
Fixez la charnière supérieure gauche que vous
trouverez dans le kit d'accessoires.
7
Retirez le cache du côté gauche et insérez-le
dans les inserts du milieu et du bas sur le côté
droit.
10
Devissez les poignées à gauche et déplacez-les
à droite de l'appareil. Positionnez les caches
extérieurs du côté gauche.
13
Inséres le goujon dans la charnière.
8
Remontez les charnières et les portes en
commençant par le bas. 1 2 3
11
Replacez le cache du panneau
9
Pour inverser les poignées : Retirez les caches
extérieurs sur le côté droit des portes.
12
6 FR
Page 8
DOPPELTÜRKÜHLGERÄTE
SCHALTBRETT
Die Thermostatbox zur Steuerung des
Gerätes befindet sich oben rechts im Inneren
des Kühlraums. Um zu prüfen, ob das Gerät
in Betrieb ist, stellen Sie sicher, dass der
Thermostatknopf nicht auf „0“ gestellt ist.
ABTAUEN UND EINFRIEREN
Das Matrikelschild gibt die maximale Anzahl von Nahrungsmitteln an, die eingefroren werden können (siehe Abbildung 2).
Einfrieren ist bei jeder Einstellung des Drehknopfes garantiert.
(Abbildung 2)
Das Abtauen des Kühlraums geschieht bei diesem
Produkt automatisch.
Wir empfehlen Ihnen, das Gefrierfach abzutauen, wenn
die Frostschicht stärker als 3 mm ist.
Beim normalen Betrieb des Kühlschranks entsteht auf
der Rückseite des Kühlraums ein wenig Frost oder ein
paar Wassertropfen.
Vergewissern Sie sich, dass die Wasserablaufrinne immer
sauber ist. Achten Sie darauf, dass die Nahrungsmittel nicht
die Rückseite oder die Seitenwände des Kühlschranks
berühren.
Hinweis: Hier befindet isch das Matrikelschild. Wenn Sie bei einer Störung den Kundendienst kontaktieren müssen, geben
Sie die Informationen auf diesem Schild an.
Wichtiger Hinweis: Wenn die Raumtemperatur sehr warm ist, wird das Gerät unter Umständen ständig
laufen und auf der Rückseite des Kühlraums wird sich eine Frostschicht ablagern. Stellen Sie den
Drehknopf in diesem Fall auf eine niedrigere Einstellung (1-2).
TÜRANSCHLAGWECHSEL
Um den Türanschlag zu wechseln, befolgen Sie die Anweisungen A oder B, je nach Ausführung und Bauart der Tür und der Scharniere,
die ihr Gerät verwendet.
A
Stellen oder kippen Sie den Kühlschrank in
einem 45°-Winkel, da es notwendig ist, an der
Unterseite des Gerätes zu arbeiten.
Entfernen Sie das untere Scharnier, indem
Sie die Schrauben, den Stift und die
Unterlegscheiben entfernen. Entfernen Sie
anschließend die untere Tür.
Entfernen Sie die mittlere Schraube und
enfernen Sie die obere Tür.
3
1
2
7 DE
Page 9
Entfernen Sie die Schutzkappen (A) und (B),
lösen Sie die Schrauben und ziehen Sie die
Stirnwand teilweise heraus.
4
Schrauben Sie das rechte Scharnier ab.
5
Ritzen Sie die linke Öse der Stirnwand ein und
stechen Sie diese an der markierten Stelle im
Bereich des Einsatzes durch.
6
Nehmen Sie aus dem Zubehör das obere
linke Scharnier und befestigen Sie es.
7
B
Stellen oder kippen Sie den Kühlschrank in
einem 45°-Winkel, da es notwendig ist, an der
Unterseite des Gerätes zu arbeiten.
1
Schrauben Sie das Scharnier von der
Kühlschranktür ab und befestigen Sie
dasmitgelieferte Scharnier auf der anderen
Seite.
4
Entfernen Sie die Stopfen auf der linken Seite
und setzen Sie diese auf der rechten Seite der
mittleren und unteren Einsätze ein.
8
Entfernen Sie das untere Scharnier, indem
Sie die Schrauben, den Stift und die
Unterlegscheiben entfernen. Entfernen Sie
anschließend die untere Tür.
2
Tauschen Sie die Position des Verschlussstopfens
am Einsatz um.
5
Bauen Sie die Scharniere und die Türen wieder
an, beginnen Sie dabei von unten, 1 2 3
9
Schrauben Sie das mittlere Scharnier heraus
und entfernen Sie die obere Tür.
3
Entfernen Sie den Verschlussstopfen der
Stirnwand.
6
Nehmen Sie aus dem Zubehör das obere linke
Scharnier und befestigen Sie es.
7
Entfernen Sie die Stopfen auf der linken Seite
und setzen Sie diese auf der rechten Seite der
mittleren und unteren Einsätze ein.
10
Schrauben Sie die Kappen von der linken Seite
ab und bringen Sie sie an der rechten Seite des
Produktes an. Befestigen Sie dann erneut die
Zierkappen an der linken Seite.
13
Stecken Sie den Bolzen in das Scharnier.
8
Bringen Sie die Scharniere und Türen wieder an,
beginnen Sie dabei von unten. 1 2 3
11
Befestigen Sie den Verschlussstopfen auf der
Stirnwand.
9
Um die Griffe nach der anderen Richtung
auszurichten: Nehmen Sie die Zierkappen an
der rechten Seite der Türen ab.
12
8 DE
Page 10

DOS PUERTAS
PANEL DE MANDOS
La caja del termostato que controla la
aplicación se encuentra ubicada dentro del
compartimento del frigorífico en la zona
superior derecha. Para comprobar si la
aplicación está funcionando, asegúrese de
que la rueda del termostato no esté fijada
en „0“.
DESCONGELACIÓN y CONGELACIÓN
La placa indicadora muestra la cantidad máxima de comida que puede ser congelada, (véase figura 2).
La congelación está garantizada en cualquier posición de la rueda.
(Figura 2)
La descongelación del compartimento del frigorífico tiene
lugar de forma automática en este producto.
Le aconsejamos que descongele el congelador cuando
la bandeja de hielo haya alcanzado un espesor de 3 mm
como mínimo.
Un pequeño goteo de agua en la parte interna del
compartimento del frigorífico mientras esté funcionando
es totalmente normal.
Asegúrese de mantener siempre limpio el desagüe.
Asegúrese de que las comidas no tocan la parte trasera
del compartimento del congelador.
NOTA: Esta es la placa indicadora. Si necesita contactar con nuestro servicio de atención al cliente en caso de fallos
o defectos, no olvide indicarle la información contenida en dicha placa.
IMPORTANTE: Si la temperatura de la habitación es muy alta, el aparato seguirá funcionando pero una
capa de hielo se formará en la parte trasera del compartimento del frigorífico. En este caso, gire el
interruptor para alcanzar temperaturas inferiores (1-2).
INVERTIR EL SENTIDO DE APERTURA DE LAS PUERTAS
Para invertir el sentido de apertura de las puertas, siga las siguientes instrucciones en función del tipo de orificio y de bisagra que
contenga su producto.
A
Coloque o incline el frigorífico respetando un
ángulo de 45°, ya que será necesario para poder
trabajar sobre la parte inferior del aparato.
Saque la bisagra inferior, desatornillando las
tuercas, sacando el enchufe y las arandelas y
a continuación, saque la puerta inferior
Saque el tornillo intermedio y la puerta
superior
3
1
2
9 ES
Page 11

Quite las tapas (A) y (B), ajustadas por los
tornillos y saque una parte de la caja de
mandos.
4
Desapriete la bisagra derecha.
5
Marque y perfore la ranura de la parte izquierda
del panel, situada en la zona de inserción.
6
Ajuste la bisagra del lado superior izquierdo
que se encuentra en su kit de accesorios.
7
B
Coloque o incline el frigorífico respetando un
ángulo de 45°, ya que será necesario para poder
trabajar sobre la parte inferior del aparato.
1
Desajuste la bisagra de la puerta del refrigerador
e instale la bisagra de la parte opuesta.
4
Quite la clavija de la parte izquierda e
introdúzcala en la parte derecha de la hendidura
central e inferior.
8
Saque la bisagra inferior, desatornillando las
tuercas, sacando el enchufe y las arandelas y
a continuación, saque la puerta inferior.
2
Invierta la posición de la clavija de cierre de la
hendidura
5
Una las bisagras y las puertas de arriba a
abajo.1 2 3
9
Desatornille la bisagra central y saque la puerta
superior
3
Saque la clavija de cierre del panel
6
Ajuste la bisagra del lado superior izquierdo que
se encuentra en su kit de accesorios.
7
Quite la clavija de la parte izquierda e introdúzcala
en la parte derecha de la hendidura central e
inferior.
10
Desajuste las asas situadas en la parte izquierda
y colóquelas en la parte derecha del producto.
A continuación, coloque las tapas externas en
la parte izquierda.
13
Introduzca la clavija en la bisagra.
8
Una las bisagras y las puertas de arriba a abajo.
1 2 3
11
Coloque la clavija de cierre del panel
9
Para invertir el sentido de las asas: Quite las
tapas exteriores situadas el la parte derecha
de las puertas.
12
10 ES
Page 12

DUAS PORTAS
PAINEL DE CONTROLO
A caixa do termóstato que controla o
equipamento está localizada dentro do
compartimento do frigorífico no lado superior
direito. Para verificar se o equipamento está
a funcionar, certifique-se de que o botão do
termóstato não está regulado para „0“.
DESCONGELAÇÃO e CONGELAÇÃO
A placa de identificação indica a quantidade máxima de alimentos que podem ser congelados (ver figura 2).
A congelação é garantida com qualquer definição do botão.
(Figura 2)
A descongelação do compartimento do frigorífico ocorre
automaticamente neste produto.
Recomendamos que descongele a zona do congelador
quando a camada de gelo tiver mais de 3 mm de
espessura.
A presença de uma camada fina de gelo ou de gotas
de água na parte posterior do frigorífico durante
o funcionamento é normal.
É importante manter a conduta de água sempre limpa.
Evite guardar os alimentos encostados às partes posterior
ou laterais do compartimento do frigorífico
Obs.: Esta é a placa de identificação. Se necessitar de entrar em contacto com a Assistência Técnica em caso de avaria, deve
fornecer-lhes a informação indicada na placa.
Importante: se a temperatura ambiente estiver muito quente, o aparelho pode continuar a funcionar de
forma contínua e uma camada de gelo irá formar-se na parte posterior do frigorífico. Neste caso, rode
o botão para programações mais baixas (1-2).
INVERTER A ABERTURA DAS PORTAS
Para inverter a abertura das portas, siga as indicações relacionadas com o tipo de dobradiça e fecho do equipamento.
A
Deite ou incline o frigorífico a 45°, para
facilitar as operações na parte inferior do
mesmo
1
Retire o fecho inferior, removendo os parafusos,
a ficha e as anilhas e depois retire a porta
inferior
2
11 PT
Retire o parafuso do meio e remova a porta
superior
3
Page 13
Retire as tampas (A) e (B), desaperte os
parafusos e remova parcialmente o painel.
4
Desaparafuse o fecho da direita
5
Faça uma incisão e parta a aba da esquerda
do painel na zona marcada
6
No saquinho dos acessórios fornecidos,
procure o fecho superior da esquerda
7
B
Deite ou incline o frigorífico a 45°, para
facilitar as operações na parte inferior
do mesmo
1
Desaperte o fecho da porta do frigorífico e
coloque o fecho fornecido no outro lado
4
Retire a tampa no lado esquerdo e insira-a no
lado direito dos fechos centrais e inferiores.
8
Retire o fecho inferior, removendo os parafusos,
a ficha e as anilhas e depois retire a porta
inferior.
2
Inverta a posição da ficha da inserção
5
Monte os fechos e as portas debaixo para cima,
1 2 3
9
Desaparafuse o fecho central e retire a porta
superior
3
Retire o tampão de fecho do painel
6
No saquinho dos acessórios fornecidos, procure
o fecho superior da esquerda
7
Retire a tampa no lado esquerdo e insira-a no
lado direito dos fechos centrais e inferiores.
10
Desaperte os puxadores do lado esquerdo
e desloque-os para o lado direito e, em seguida,
no lado esquerdo das portas, coloque as tampas
anteriormente retiradas.
13
Insira o pino no fecho.
8
Monte de novo os fechos e as portas de cima
para baixo. 1 2 3
11
Coloque o tampão de fecho do painel
9
Para inverter os puxadores: retire as tampas
exteriores da parte direita das portas
12
12 PT
Page 14
ΔΙΠΛΗ ΠΟΡΤΑ
ΠΙΝΑΚΑΣ ΕΛΕΓΧΟΥ
Το κουτί θερμοστάτη για τον έλεγχο της
συσκευής βρίσκεται στο εσωτερικό του
χώρου συντήρησης στο πάνω δεξιό μέρος.
Για να ελέγξετε αν η συσκευή λειτουργεί,
βεβαιωθείτε ότι το κουμπί του θερμοστάτη
δεν έχει ρυθμιστεί στο „0“.
ΑΠΟΨΥΞΗ και ΚΑΤΑΨΥΞΗ
Η πινακίδα στοιχείων αναφέρει τη μέγιστη ποσότητα τροφίμων που μπορεί να καταψυχθεί (βλέπε εικόνα 2).
Η κατάψυξη των τροφίμων είναι εγγυημένη για οποιαδήποτε ρύθμιση του κουμπιού.
(Εικόνα 2)
Στο προϊόν αυτό, η απόψυξη του χώρου συντήρησης
λαμβάνει χώρα αυτόματα.
Συνιστούμε να εκτελείτε απόψυξη του χώρου της
κατάψυξης όταν στάθμη πάγου έχει πάχος μεγαλύτερο
από 3 χιλιοστά.
Μια μικρή ποσότητα πάγου ή σταγόνες νερού στο πίσω
μέρος του χώρου της συντήρησης είναι φυσιολογικό
φαινόμενο όταν λειτουργεί το ψυγείο.
Να βεβαιώνεστε ότι η δίοδος αποστράγγισης του νερού
είναι πάντα καθαρή. Βεβαιωθείτε ότι τα τρόφιμα δεν
αγγίζουν το πίσω ή τα πλευρικά τοιχώματα του χώρου
συντήρησης
ΣΗΜΕΙΩΣΗ: Αυτή είναι η πινακίδα στοιχείων. Αν χρειάζεται να απευθυνθείτε στο Τμήμα Σέρβις της εταιρείας μας, θυμηθείτε
να αναφέρετε τις πληροφορίες που αναφέρονται στην πινακίδα.
Σημαντική παρατήρηση: Αν η θερμοκρασία του δωματίου είναι πολύ υψηλή, η συσκευή μπορεί να
εργάζεται συνεχώς και στο πίσω τοίχωμα του χώρου συντήρησης θα αποτεθεί ένα στρώμα πάχνης. Στην
περίπτωση αυτή, γυρίστε το κουμπί σε χαμηλότερες ρυθμίσεις (1-2).
ΑΝΤΙΣΤΡΟΦΗ ΤΗΣ ΦΟΡΑΣ ΑΝΟΙΓΜΑΤΟΣ ΣΤΙΣ ΠΟΡΤΕΣ
Για να αντιστρέψετε τη φορά ανοίγματος στις πόρτες, ακολουθήστε τις οδηγίες, ανάλογα με τον τύπο προσαρμογέα και μεντεσέ που
περιλαμβάνονται στη δική σας συσκευή.
Α
Τοποθετήστε ή γείρετε το ψυγείο σε γωνία 45°,
αφού είναι απαραίτητο να εργαστείτε στην
κάτω πλευρά της συσκευής
1
Αφαιρέστε τον κάτω μεντεσέ αφού αφαιρέσετε
τις βίδες, τον πείρο και τις ροδέλες και κατόπιν
αφαιρέστε την κάτω πόρτα
2
Αφαιρέστε το μεσαίο μεντεσέ και κατόπιν
αφαιρέστε την πάνω πόρτα
3
13 EL
Page 15

Αφαιρέστε τα καπάκια (Α) και (Β), ξεβιδώστε τις
βίδες και αφαιρέστε μερικώς τον πίνακα.
4
Ξεβιδώστε το δεξιό μεντεσέ
5
Σημαδέψτε και σπάστε την αριστερή υποδοχή
στον πίνακα, στην περιοχή του προσαρμογέα
6
Τοποθετήστε τον πάνω αριστερό μεντεσέ που
βρίσκεται στο κιτ των αξεσουάρ
7
Β
Τοποθετήστε ή γείρετε το ψυγείο σε γωνία 45°,
αφού είναι απαραίτητο να εργαστείτε στην κάτω
πλευρά της συσκευής
1
Ξεβιδώστε το μεντεσέ από την πόρτα του
ψυγείου και βιδώστε τον παρεχόμενο μεντεσέ
στην άλλη πλευρά
4
Αφαιρέστε την τάπα της αριστερής πλευράς και
τοποθετήστε τη στη δεξιά πλευρά του κεντρικού
και κατώτερου προσαρμογέα.
8
Αφαιρέστε τον κάτω μεντεσέ αφού αφαιρέσετε
τις βίδες, τον πείρο και τις ροδέλες και κατόπιν
αφαιρέστε την κάτω πόρτα
2
Αλλάξτε θέση στην τάπα σφραγίσματος του
προσαρμογέας
5
Συναρμολογήστε πάλι τους μεντεσέδες και τις
πόρτες εργαζόμενοι από το κάτω προς το πάνω
μέρος, 1 2 3
9
Ξεβιδώστε τον κεντρικό μεντεσέ και αφαιρέστε
την πάνω πόρτα
3
Αφαιρέστε την τάπα σφραγίσματος του πίνακα
6
Τοποθετήστε τον πάνω αριστερό μεντεσέ που
βρίσκεται στο κιτ των αξεσουάρ
7
Αφαιρέστε την τάπα της αριστερής πλευράς και
τοποθετήστε τη στη δεξιά πλευρά του κεντρικού
και του κατώτερου προσαρμογέας.
10
Ξεβιδώστε τις λαβές από την αριστερή πλευρά
και μεταφέρετέ τις στη δεξιά πλευρά της
συσκευής. Τοποθετήστε τα εξωτερικά καπάκια
στην αριστερή πλευρά.
13
Τοποθετήστε τον πείρο στο μεντεσέ.
8
Συναρμολογήστε πάλι τους μεντεσέδες και τις
πόρτες από το κάτω μέρος προς το επάνω.
1 2 3
11
Τοποθετήστε την τάπα σφραγίσματος του
πίνακα
9
Για να αντιστρέψετε τις λαβές: Αφαιρέστε τα
εξωτερικά καπάκια από τη δεξιά πλευρά των
πορτών
12
14 EL
Page 16
DWUDRZWIOWA
PANEL STEROWANIA
Skrzynka termostatu sterującego urządzeniem
znajduje się wewnątrz zamrażarki, w jej
prawej górnej części. Aby sprawdzić, czy
urządzenie działa, ustaw pokrętło termostatu
na pozycji innej niż „0".
ROZMRAŻANIE I ZAMRAŻANIE
Na tabliczce znamionowej umieszczono informację o maksymalnej ilości produktów, jaką można zamrozić (patrz rysunek 2).
Urządzenie zamraża przy każdym ustawieniu pokrętła.
(rysunek 2)
W tym urządzeniu rozmrażanie zamrażarki jest
wykonywane automatycznie.
Zalecamy rozmrożenie zamrażarki, gdy grubość warstwy
lodu przekracza 3 mm.
Niewielka ilość lodu lub wody w tylnej części lodówki
podczas jej pracy jest zjawiskiem normalnym.
Należy dbać o to, aby odpływ wody był zawsze czysty.
Produkty nie powinny dotykać tylnej ani bocznych ścianek
lodówki.
Uwaga: To jest tabliczka znamionowa. W razie problemów, kiedy zachodzi konieczność skontaktowania się z serwisem, należy
podać informacje umieszczone na tej tabliczce.
Ważne: W wysokiej temperaturze otoczenia urządzenie może działać bez przerwy, a w tylnej części
zamrażarki może odkładać się warstwa lodu. W takim przypadku pokrętło należy ustawić na niższą wartość
(1-2).
ODWRACANIE KIERUNKU OTWIERANIA DRZWI
W celu odwrócenia kierunku otwierania drzwi należy postępować zgodnie ze wskazówkami odpowiednimi dla danego urządzenia oraz
z uwzględnieniem specyficznych zawiasów tego urządzenia.
A
Urządzenie ustawić lub przechylić pod kątem
45°, ponieważ będzie konieczne wykonywanie
czynności na spodzie urządzenia.
Zdjąć dolny zawias, usuwając wkręty, zatyczkę
i podkładki, a następnie zdjąć dolne drzwi.
2
Odkręcić środkowy wkręt i zdjąć górne drzwi.
3
1
15 PL
Page 17

Usunąć zatyczki (A) i (B), odkręcić wkręty
i częściowo wyciągnąć listwę.
4
Odkręcić prawy zawias.
5
Naciąć i wyłamać otwór w zaznaczonym miejscu
po lewej stronie.
6
Z woreczka z akcesoriami wyjąć i zamocować
lewy zawias.
7
B
Urządzenie ustawić lub przechylić pod kątem
45°, ponieważ będzie konieczne wykonywanie
czynności na spodzie urządzenia.
1
Odkręcić zawias od drzwi lodówki i z drugiej
strony zamocować zawias dostarczony w
zestawie.
4
Usunąć zatyczkę z lewej strony i włożyć ją z
prawej strony wkładu środkowego i dolnego.
8
Zdjąć dolny zawias, usuwając wkręty, zatyczkę
i podkładki, a następnie zdjąć dolne drzwi.
2
Odwrócić zatyczkę we wkładce
5
Ponownie założyć zawiasy i drzwi, zaczynając
od dołu, 1 * 2 * 3.
9
Odkręcić środkowy zawias i zdjąć górne drzwi.
3
Usunąć zatyczkę z panelu
6
Z woreczka z akcesoriami wyjąć i zamocować
lewy zawias.
7
Usunąć zatyczkę z lewej strony i włożyć ją
z prawej strony wkładu środkowego i dolnego.
10
Odkręcić uchwyty z lewej strony drzwi i przełożyć
je na prawą. Następnie założyć zatyczki z lewej
strony drzwi.
13
Włożyć trzpień do zawiasu.
8
Ponownie złożyć zawiasy i drzwi, idąc od dołu
ku górze. 1 2 3
11
Założyć zatyczkę panelu
9
Przekładanie uchwytów: Usunąć zatyczki
z prawej strony drzwi.
12
16 PL
Page 18

KOMBINOVANÁ CHLADNIČKA
OVLÁDACÍ PANEL
ODMRAZOVÁNÍ a MRAŽENÍ
Popisný štítek stanovuje maximální množství potravin, které lze zmrazit (viz obrázek 2).
Mražení je zaručeno ve všech polohách ovladače.
(Obrázek 2)
V tomto zařízení je odmrazování chladničky
automatické.
Doporučujeme odmrazovat prostor mrazničky, pokud je
vrstva námrazy silnější než 3 mm.
Termostat určený k ovládání spotřebiče je
umístěný uvnitř chladničky vpravo nahoře.
Pokud chcete zkontrolovat, že zařízení
opravdu funguje, přesvědčete se, že termostat
není nastavený v poloze „0“.
Malé množství námrazy nebo kapek vody na zadní
stěně prostoru chladničky je normální, pokud je
chladnička v provozu
Kontrolujte, zda je odvod vody volně průchodný. Ujistěte
se, že se potraviny nedotýkají zadní stěny nebo stran
chladničky.
Poznámka: Toto je popisný štítek. Potřebujete-li v případě závad kontaktovat servisní oddělení, nezapomeňte jim poskytnout
informace uvedené na tomto štítku.
Důležité: Pokud je teplota v místnosti velmi vysoká, může spotřebič pracovat nepřetržitě a vrstva námrazy
se bude ukládat na zadní stěně chladničky. V takovém případě nastavte ovladač na nižší nastavení (1-2).
OTOČENÍ SMĚRU OTEVÍRÁNÍ DVEŘÍ
Pokud chcete otočit otevírání dveří, postupujte podle označení v závislosti na typu závěsů a výplně, kterými je váš výrobek vybaven.
A
Chladničku nakloňte v 45° úhlu, protože
potřebujete zpřístupnit spodek zařízení.
1
Demontujte spodní závěs uvolněním šroubů,
krytky a podložek, potom sundejte spodní
dvířka.
2
17 CZ
Demontujte prostřední šroub a sundejte horní
dvířka.
3
Page 19

Odstraňte západky (A) a (B), uvolněte šrouby
a částečně sejměte desku.
4
Odšroubujte pravý závěs.
5
Označte a vylomte levý otvor v desce, v části
výplně.
6
Přetočte horní levý závěs, který je součástí
sady s příslušenstvím.
7
B
Chladničku nakloňte v 45° úhlu, protože
potřebujete zpřístupnit spodek zařízení.
1
Odšroubujte závěs z dveří chladničky
a namontujte ten, který je součástí dodávky,
na druhou stranu.
4
Odstraňte krytku na levé straně a vložte ji na
pravou stranu střední a spodní výplně.
8
Demontujte spodní závěs uvolněním šroubů,
krytky a podložek, potom sundejte spodní
dvířka.
2
Otočte polohu uzávěru výplně.
5
Namontujte zpět závěsy a dvířka, postupujte
zdola nahoru, 1 2 3
9
Demontujte prostřední závěs a sundejte horní
dvířka.
3
Demontujte uzávěr panelu.
6
Přetočte horní levý závěs, který je součástí
sady s příslušenstvím.
7
Odstraňte krytku na levé straně a vložte ji
na pravou stranu střední a spodní výplně.
10
Odšroubujte rukojeti z levé strany a přesuňte je
na pravou stranu, poté dejte vnější západky na
levou stranu dveří.
13
Vložte do závěsu čep.
8
Namontujte zpět závěsy a dvířka, postupujte
zdola nahoru. 1 2 3
11
Namontujte uzávěr panelu.
9
Obrácení rukojetí: Odstraňte vnější západky
z pravé strany dveří.
12
18 CZ
Page 20

DUBBELE DEUR
BEDIENINGSPANEEL
De thermostaatregelaar van het apparaat
bevindt zich rechtsboven in het koelkastgedeelte.
Om te controleren of het apparaat functioneert
dient u erop te letten dat de knop van de
thermostaat niet op „0“ staat.
ONTDOOIEN en VRIEZEN
Het maximum aantal in te vriezen producten staat aangegeven op het typeplaatje (zie figuur 2).
Het apparaat vriest ongeacht de instelling van de knop.
(Figuur 2)
Het koelkastcompartiment van dit apparaat wordt
automatisch ontdooid.
Wij adviseren u het diepvriescompartiment te ontdooien
wanneer de ijsaanslag dikker dan 3 mm is.
Een kleine hoeveelheid vorst of druppels water aan de
achterkant van het diepvriescompartiment is normaal als
de diepvriezer in werking is.
Zorg ervoor dat de wateruitloop altijd schoon is. Zorg
ervoor, dat de in de koelkast aanwezige producten de
achterkant of zijkanten van het koelkastcompartiment
niet aanraken.
N.B. Dit is het typeplaatje. Als u in geval van storingen contact van met onze Serviceafdeling opneemt, dient u de gegevens
van het typeplaatje altijd op te geven.
Belangrijk: Als de kamertemperatuur relatief hoog is kan het zijn dat het apparaat voortdurend werkt en
er ijsafzetting op de achterkant van het koelkastcompartiment gevormd zal worden. Als dit zo is dient de
knop op een lagere stand ingesteld te worden (1-2).
HET WIJZIGEN VAN DE MANIER WAAROP DE DEUREN OPENEN
Om de deuren op een andere manier te openen, volgt u de instructies die zijn gegeven met betrekking tot het type hang- en sluitwerk
waarvan uw product werd gemaakt.
A
Zet de koelkast onder een hoek van 45°,
zodat u aan de onderzijde van het apparaat
kunt werken
1
Verwijder het onderste scharnier door de
schroeven, dopje en volgring te verwijderen, en
verwijder vervolgens de onderste deur
2
Verwijder de middelste schroef en verwijder de
bovenste deur
3
19 NL
Page 21

Verwijder de dopjes (A) en (B), draai de schroeven
los en verwijder het paneel gedeeltelijk.
4
Schroef het rechterscharnier los
5
Markeer en breek de uitsparing aan de linkerzijde
van het paneel, in het insteekgedeelte
6
Monteer het links-boven-scharnier dat zich in
de accessoireskit bevindt
7
B
Zet de koelkast onder een hoek van 45°, zodat
u aan de onderzijde van het apparaat kunt
werken
1
Schroef het scharnier van de koelkastdeur los
en bevestig het meegeleverde scharnier aan
de andere zijde
4
Verwijder het dopje aan de linkerzijde en plaats
het aan de rechterzijde van de middelste en
onderste inzetstukken.
8
Verwijder het onderste scharnier door de
schroeven, dopje en volgring te verwijderen, en
verwijder vervolgens de onderste deur
2
Draai de positie van de afdekplug van het
inzetstuk om
5
Breng de scharnieren en deuren weer aan door
van onder naar boven te werken, 1 2 3
9
Schroef het middelste scharnier los en verwijder
de bovenste deur
3
Verwijder de afdekplug van het paneel
6
Monteer het links-boven-scharnier dat zich in de
accessoireskit bevindt
7
Verwijder de dopjes aan de linkerzijde en plaats
deze aan de rechterzijde van de middelste en
onderste inzetstukken.
10
Schroef de handgrepen aan de linkerzijde los
en monteer deze aan de rechterzijde van de
deuren. Plaats de pluggen aan de linkerzijde
van de deuren.
13
Steek de pen in het scharnier.
8
Breng de scharnieren en deuren weer aan door
van onder naar boven te werken, 1 * 2 * 3.
11
Plaats de afdekplug van het paneel
9
Voor het omdraaien van de handgrepen
verwijdert u de pluggen aan de rechterzijde
van de deuren
12
20 NL
Page 22

KAKSIOVINEN
OHJAUSPANEELI
SULATUS ja PAKASTUS
Arvokilvessä ilmoitetaan pakastettavien elintarvikkeiden enimmäismäärä (katso kuva 2)
Pakastus taataan kaikissa nupin asennoissa.
(Kuva 2)
Jääkaappiosaston sulatus tapahtuu automaattisesti.
Suosittelemme, että sulatat pakastimen, kun huurteen
paksuus on yli 3 mm.
Laitteen säätöön tarkoitettu termostaattilaatikko
sijaitsee jääkaappiosaston sisällä oikealla
ylhäällä. Kun haluat tarkastaa, että laite
toimii, varmista, että termostaattinuppi ei ole
asennossa "0“.
Pieni määrä huurretta tai vesipisaroita jääkaapin
takaosassa on normaalia silloin, kun jääkaappi toimii
normaalisti
Varmista, että veden poistoaukko on aina puhdas.
Varmista, että elintarvikkeet eivät kosketa jääkaapin
takaosaa tai sivuja.
Huom! Arvokilpi on kiinnitetty tähän. Jos sinun tarvitsee ottaa yhteyttä huoltoon vikatilanteessa, muista ilmoittaa kilven
tiedot.
Tärkeää: Jos huoneen lämpötila on erittäin lämmin, laite saattaa käydä koko ajan ja jääkaapin takaosaan
muodostuu huurrekerros. Käännä tässä tapauksessa valitsin alhaisempaan asentoon (1-2).
OVIEN KÄTISYYDEN VAIHTAMINEN
Kun haluat vaihtaa ovien kätisyyden, noudata ohjeita oman tuotteesi ja saranatyypin mukaisesti.
A
Laita jääkaappi lattialle tai kallista sitä 45°,
koska on tarpeen työskennellä laitteen
pohjassa.
1
Irrota alasarana avaamalla ruuvit, tulppa
ja alusrenkaat, irrota sitten alaovi.
2
21 FI
Irrota keskimmäinen ruuvi ja irrota yläovi.
3
Page 23

Poista tulpat (A) ja (B), kierrä ruuvit auki ja poista
paneeli osittain.
4
Ruuvaa oikea sarana irti.
5
Lävistä paneelissa oleva vasemmanpuoleinen
lovi merkin kohdalta.
6
Ota vasen yläsarana laitteen mukana
toimitettavasta välinepakkauksesta ja aseta se
paikalleen.
7
B
Laita jääkaappi lattialle tai kallista sitä 45°,
koska on tarpeen työskennellä laitteen
pohjassa.
1
Ruuvaa sarana irti jääkaapin ovesta ja asenna
toimitettu ovi toiselle puolelle.
4
Poista tulppa vasemmalta puolelta ja laita se
oikealle puolelle keskimmäiseen ja alempaan
reikään.
8
Irrota alasarana avaamalla ruuvit, tulppa ja
alusrenkaat, irrota sitten alaovi.
2
Vaihda suojatulppa toiselle puolelle.
5
Kokoa saranat ja ovet paikalleen järjestyksessä
ylhäältä alas, 1 2 3
9
Ruuvaa keskimmäinen sarana irti ja irrota
yläovi.
3
Poista paneelin suojatulppa.
6
Ota vasen yläsarana laitteen mukana
toimitettavasta välinepakkauksesta ja aseta se
paikalleen.
7
Poista tulppa vasemmalta puolelta ja laita se
oikealle puolelle keskimmäiseen ja alempaan
reikään.
10
Ruuvaa kahvat irti vasemmalta ja siirrä ne
oikealle. Aseta sitten tapit ovien vasemmalle
puolelle.
13
Laita tappi saranaan.
8
Asenna saranat ja ovet paikoilleen alhaalta
ylöspäin. 1 2 3
11
Laita paneelin suojatulppa paikalleen.
9
Kahvojen kätisyyden vaihto: Poista tapit ovien
oikealta puolelta.
12
22 FI
Page 24

DOBBEL DØR
KONTROLLPANEL
Termostatboksen som kontrollerer apparatet
befinner seg oppe til høyre i kjøledelen. For å
kontrollere at apparatet virker, må du sjekke
at termstatens bryter ikke står på „0“.
AVISING OG FRYSING
Merkeskiltet oppgir den maksimale mengden av matvarer som kan fryses ned, (se figur 2).
Uansett bryterens innstilling er du garantert frysing.
(Figur 2)
Avising av kjøledelen foregår automatisk på dette
produktet.
Vi anbefaler at du aviser frysedelen når islaget blir tykkere
enn 3 mm.
Det er normalt med litt rim og vanndråper bakerst i
kjøleskapet når det er i drift.
Forsikre deg om at avløpshullet alltid er rent. Pass på
at matvarene ikke kommer i kontakt med veggene til
kjøleskapet.
N.B. Dette er merkeskiltet. Hvis du blir nødt til å kontakte vår serviceavdeling i tilfelle feil, oppgi dataene på merkeskiltet.
Viktig: Dersom romtemperaturen er veldig høy, vil apparatet sannsynligvis fungere uten stans. Dette
kan forårsake at det danner seg unormalt mye rim på den bakre kjøleskapsveggen. Dersom dette skulle
oppstå, vrir du knappen til en lavere innstilling (1-2).
OMHENGLING AV DØRENE
For å snu døråpningen, følg instruksjonene i forhold til montering og hengseltypen for ditt produkt.
A
Plasser eller vipp kjøleskapet i en vinkel
på 45°, siden du må arbeide fra apparatets
underside
1
Fjern det nederste hengseley ved å fjerne skruer,
plugg og lister, fjern så den nedre døren
2
23 NO
Fjern midtskruen og fjern den øverste døren
3
Page 25
Fjern hettene (A) og (B), skru av skruene og
trekk dekselet delvis av.
4
Skru ut det høyre hengslet
5
Marker den venstre åpningen på panelet
6
Snu det øverste, venstre henglset som du
finner i tilbehøret
7
B
Plasser eller vipp kjøleskapet i en 45° vinkel, slik
at du kan arbeide fra apparatets underside
1
Skru av hengslet på kjøleskapsdøren og monter
den som følger med på den andre siden
4
Fjern pluggen fra venstre siden og sett den inn
på høyre side.
8
Fjern nederste hengsle ved å skru ut skruene,
fjern pluggen og pakningene før du fjerner den
nederste døren.
2
Klargjør åpningen for lukkepluggen
5
Remonter hengsler og dører og arbeid nedenfra
og oppover, 1 2 3
9
Skru ut det midtre hengslet og fjern den øverste
døren
3
Fjern lukkepluggen på panelet
6
Snu det øverste, venstre hengslet som du finner
i tilbehøret
7
Fjern pluggen på venstre side og flytt den til
høyre side.
10
Skru av håndtakene og flytt dem over på høyre
side. Flytt så hettene over på venstre side.
13
Sett pluggen inn i hengslet.
8
Monter hengsler og dører ved å arbeide
nedenfra og oppover. 1 2 3
11
Plasser lukkepluggen på panelet
9
For å flytte håndtakene til motsatt side: Fjern
hettene som sitter på dørens høyre side
12
24 NO
Page 26

DUBBELDÖRR
KONTROLLPANEL
Termostatboxen för att kontrollera apparaten
är placerad inuti kylskåpsutrymmet uppe
till höger. För att kontrollera om apparaten
fungerar, säkerställ att termostatvredet inte
är inställt på „0“.
AVFROSTNING och INFRYSNING
Den maximala mängden matvaror som kan frysas in finns angiven på märkplåten, (se figur 2).
Infrysningen är säkerställd med vilken vredinställning som helst.
(Figur 2)
Avfrostning av kylutrymmet sker automatiskt på denna
produkt.
Vi rekommenderar att du frostar av frysen när frostlagret
har blivit mer än 3 mm tjockt.
Det är normalt att en liten mängd frost eller vattendroppar
bildas på baksidan av kylutrymmet när kylskåpet
fungerar.
Säkerställ att vattenutloppet är alltid rent. Se till att matvaror
inte vidrör baksidan eller sidorna i kylutrymmet.
OBS!: Detta är märkplåten. Om du behöver kontakta service för eventuella fel, kom ihåg att ge dem informationen som finns
på den här plåten.
Viktigt: Om rumstemperaturen är mycket hög, kan apparaten fungera kontinuerligt och ett frostlager
avsätter sig då på baksidan av kylutrymmet. I det här fallet, vrid vredet till en lägre inställning (1-2).
OMHÄNGNING AV DÖRRAR
För att hänga om dörrarna, följ anvisningarna rörande insats och gångjärnstyp som din produkt är försedd med.
A
Placera eller vält kylskåpet i en 45° vinkel,
eftersom det är nödvändigt att arbeta på
botten av av apparaten.
1
Avlägsna det undre gångjärnet genom att
avlägsna skruvarna, pluggen och brickorna,
avlägsna sedan bottendörren
2
25 SV
Avlägsna den mittersta skruven och avlägsna
den övre dörren
3
Page 27

Avlägsna täckpluggarna (A) och (B), skruva
loss skruvarna och avlägsna delvis panelen
.
4
Skruva loss det högra gångjärnet.
5
Markera och bryt den vänstra springan på
panelen, i inpassningsområdet .
6
Fäst det övre vänstra gångjärnet som ligger i
tillbehörssatsen
7
B
Placera eller vält kylskåpet i en 45° vinkel,
eftersom det är nödvändigt att arbeta på botten
av av apparaten.
1
Skruva loss gångjärnet från kylskåpsdörren och
montera det medlevererade på den motsatta
sidan
4
Ta bort pluggen på den vänstra sidan och sätt i
den på den högra sidan av den mellersta och
undre insatsen.
Återmontera gångjärnen och dörrarna uppifrån
och ner 1 2 3
9
8
Avlägsna det undre gångjärnet genom att
avlägsna skruvarna, pluggen och brickorna,
avlägsna sedan bottendörren.
Skruva loss det mittersta gångjärnet och
avlägsna den övre dörren
3
2
Kasta om läget av insatsens förslutningsplugg5Avlägsna panelens förslutningsplugg
6
Fäst det övre vänstra gångjärnet som ligger i
tillbehörssatsen
7
Ta bort pluggen på den vänstra sidan och sätt i
den på den högra sidan av den mellersta och
undre insatsen.
10
Skruva loss handtagen från den vänstra sidan
och flytta dem till produktens högra sida, placera
sedan de yttre täckpluggarna på den vänstra
sidan av dörrarna.
13
Sätt i stiftet i gångjärnet.
8
Montera gångjärnen och dörrarna från botten
och uppåt. 1 2 3
11
Placera panelens förslutningsplugg
9
För att kasta om handtagen: Ta bort de yttre
täckpluggarna från dörrens högra sida
12
26 SV
Page 28

TO DØRE
KONTROLPANEL
Afrimning og nedfrysning
'Typeskiltet angiver den maksimale mængde madvarer, der kan nedfryses, (se figur 2).
Frysefunktionen fungerer uanset termostatknappens stilling.
(Figur 2)
Dette produkt har automatisk afrimning af
køleafdelingen.
Vi anbefaler, at fryseren afrimes, hvis rimlaget er mere
end 3 mm tykt.
Den termostatboks, der styrer temperaturen
i skabet, sidder indvendig i køleafdelingen
foroven til højre. Når det kontrolleres, om skabet
fungerer, skal det sikres, at termostatknappen
ikke står på „0“.
En smule rim eller vanddråber bagest i køleafdelingen,
når skabet kører, er helt normalt
Sørg for, at vandafløbet altid er rent. Sørg for, at madvarer
ikke rører bagest eller på siderne inde i køleskabet
NB. Dette er typeskiltet. Hvis De har behov for at kontakte vores kundeservice i forbindelse med fejl, skal De bruge de
oplysninger, der står på typeskiltet.
Vigtigt: Ved meget høj rumtemperatur kører skabet måske kontinuerligt med det resultat, at der afsættes et
lag rim bagest i køleafdelingen. I så fald skal knappen drejes til en lavere indstilling (1-2).
DØRHÆNGSLING I MODSAT SIDE
Hvis dørene ønskes hængslet i den modsatte side, henvises til de medfølgende anvisninger vedrørende de ophæng og hængsler, der
er anvendt i Deres model.
A
For at kunne arbejde på skabets bund er det
nødvendigt at anbringe eller tippe det i en
vinkel på 45°
1
Fjern det nederste hængsels skruer, plug og
spændeskiver, og tag den nederste dør af
2
Fjern den midterste skrue, og tag den øverste
dør af
3
27 DA
Page 29
Fjern hætterne (A) og (B), løsn skruerne, og
fjern panelet delvist.
4
-Skru højre hængsel af
5
Marker og bryd rillen i panelet i venstre side af
panelet i indsætningsområdet.
6
Slå let på øverste venstre hængsel, som
findes i tilbehørssættet
7
B
For at kunne arbejde på skabets bund er det
nødvendigt at anbringe eller tippe det i en
vinkel på 45°
1
Skru hængslet af køleskabsdøren, og monter det
medfølgende hængsel i den modsatte side.
4
Fjern propperne i venstre side, og sæt dem i i
højre side i midterste og nederste ophæng.
8
Fjern det nederste hængsel ved at fjerne skruer,
plug og spændeskiver, hvorefter den nederste
dør tages af.
2
Flyt ophængets prop til den anden side
5
Sæt hængsler og døre på igen nedefra og
opefter 1 2 3
9
Skru det midterste hængsel af, og fjern den
øverste dør
3
Tag dækproppen ud af panelet
6
Slå let på øverste venstre hængsel, som findes
i tilbehørssættet
7
Fjern propperne i venstre side, og sæt den i
i højre side i midterste og nederste ophæng.
10
Skru håndtagene af på venstre side, og flyt dem
til skabets højre side. Sæt dækpropperne i på
venstre side.
13
Sæt stiften i hængslet.
8
Saml hængslerne og dørene igen fra bunden og
opefter. 1 2 3
11
Sæt proppen i panelet.
9
Sådan vendes håndtagene: Fjern dækpropperne
på højre side af dørene
12
28 DA
Page 30

Page 31

Page 32

Z STUDIO > 11-2006 – 41018270
 Loading...