

Page 1
TM
Upright Cleaner
TM
Aspirateur vertical
Elite
MC
Rewind
Owner’s Manual
Guide de l’utilisateur
MC
ENGLISH > pp. 1-12
Review this manual before
operating the cleaner.
Lire attentivement ces instructions
avant d’utiliser l’appareil.
hoover.com
hoover.ca
# 59881084
Page 2

Thank you for choosing a HOOVER® product
Please enter the COMPLETE model and serial numbers in the spaces provided.
Model___________________________________
Hint: Attach your sales receipt to this owner’s manual.
Verification of date of purchase may be required for warranty service of your
HOOVER product.
Be sure to fill out and return the product registration card included with your
cleaner (see back of manual).
Contents
Important Safeguards ....................... 2
Assembling Cleaner .......................... 3
Carton Contents ................................ 3
Cleaner Descriptions ........................ 4
How To Use ....................................... 4
Cleaning Tools ............................... 5
If You Have a Problem .................... 10
Lubrication ........................................ 9
Maintenance...................................... 6
Emptying Dirt Cup ......................... 6
Cleaning Filters ............................. 7
Replacing Belt ............................... 8
Replacing Headlight ...................... 8
Replacing Agitator Brush Roll ....... 9
Thermal Protector ......................... 9
Authorized Service ......................10
Clearing Blockages ..................... 11
Warranty ..........................................11
Important Safeguards!
When using an electrical appliance, always follow basic precautions, including the following:
READ ALL INSTRUCTIONS BEFORE USING THIS APPLIANCE
WARNING: To reduce the risk of fire, electric shock, or injury:
• Do not use outdoors or on wet surfaces.
• Close supervision is necessary when any appliance is used by or near children.
Do not allow vacuum cleaner to be used as a toy or to run unattended at any
time.
• Keep hair, loose clothing, fingers, feet and all parts of body away from openings,
rotating agitator and other moving parts. Do not operate cleaner in bare feet or
when wearing open toe shoes or sandals.
• Do not pick up anything that is burning or smoking, such as cigarettes, matches,
or hot ashes.
• Do not use to pick up flammable or combustible materials such as gasoline or
fine wood sandings or use in areas where they may be present.
• Avoid picking up hard, sharp objects with the cleaner. They may damage the
cleaner.
• Always turn off this appliance before connecting or disconnecting hose.
• Do not use without dirt cup or filters in place. Empty cup and clean filters fre quently when picking up very fine materials such as powder.
• Use extra care when cleaning on stairs.
• Do not put any object into openings. Do not use with any opening blocked; keep
free of dust, lint, hair, or anything that may reduce air flow.
• Do not pull or carry by cord, use cord as a handle, close door on cord or pull
cord around sharp edges or corners. Do not run appliance over cord. Keep cord
away from heated surfaces.
• Always disconnect cord from electrical outlet before servicing the cleaner.
• Unplug cleaner when not in use. Turn off all controls before unplugging.
• Do not unplug by pulling on cord. To unplug, grasp the plug, not the cord. Never
handle plug or appliance with wet hands.
• Hold onto the plug while cord is being rewound to prevent cord from whipping.
• The use of an extension cord is not recommended.
• Do not use with damaged cord or plug. If appliance is not working as it should,
has been dropped, damaged, left outdoors, or dropped into water, take it to a
Hoover Sales and Service Center or Authorized Hoover Warranty Service Dealer
(Depot).
• Use vacuum cleaner only for its intended use as described in the instructions.
Use only attachments recommended by Hoover; others may cause hazards.
© 2005, ©2008 Healthy Gain Investments,
Ltd. All rights reserved.
2
WARNING:
California to cause cancer. Wash hands after handling.
This product contains chemicals known to the State of
Save these instructions!
Page 3
If you need any assistance:
LOCK
Visit our website at hoover.com. Click on the “Service” button to find the service outlet nearest you OR
Call 1-800-944-9200 for an automated referral of authorized service outlet locations (U.S. only) OR
Call 1-800-263-6376 to speak with a representative in our Consumer Response Center.
Please do not return this product to the store
.
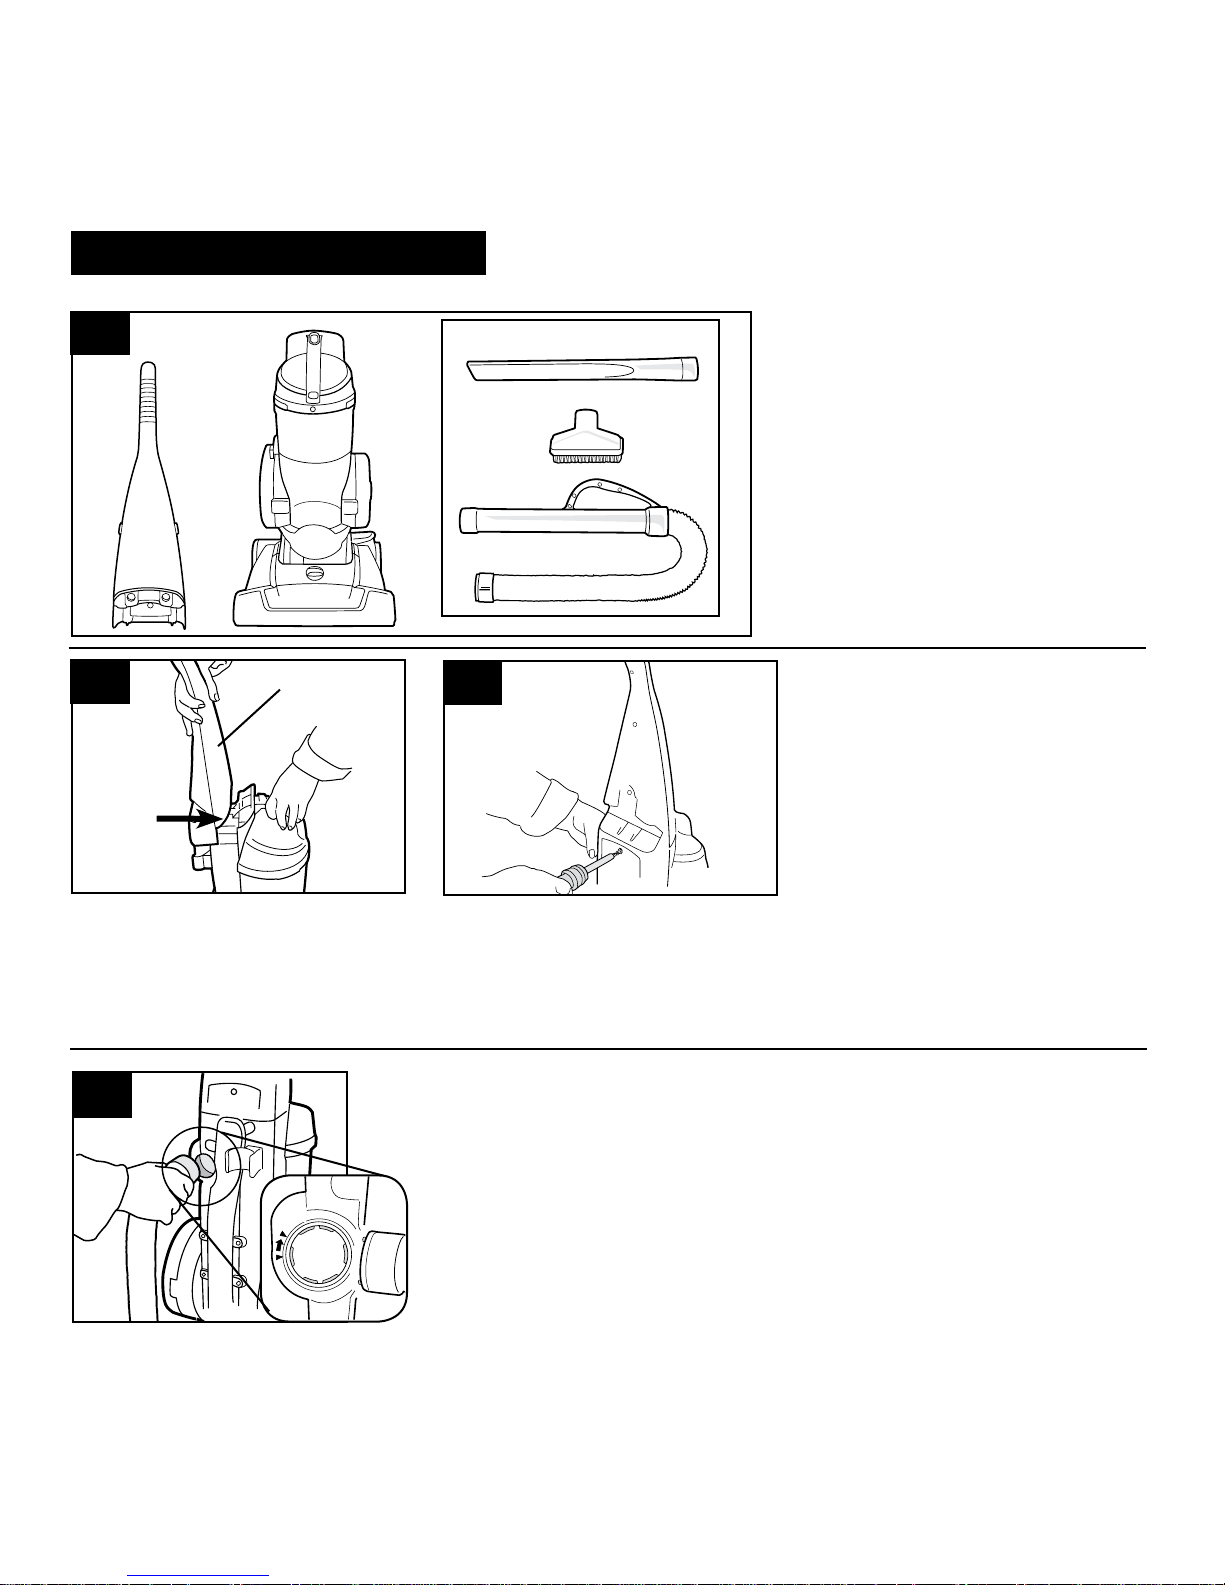
Assembling cleaner
Carton contents
1-1
B
1-2
A
A
Di
1-3
C
D
A. Handle section and screw (taped
to handle)
B. Cleaner body
C. Cleaning tools
D. Hose
Remove all parts from carton and
identify each item shown.
Make sure all parts are located before
disposing of packing materials.
Attach handle
Slide handle section (A) onto back of
handle.
1-5
Position hose
Align end of hose with projections over
slots in dirt duct on back of cleaner.
Twist to lock in place.
The hose connector allows the hose to
swivel.
Push screw into hole on back of
handle. Tighten screw securely with a
Phillips screwdriver.
LOCK
3
Page 4
C
O
R
D
R
E
T
R
A
C
T
A
B
L
E
C
O
R
D
S
Y
S
T
E
M
1-6
R
E
T
R
A
C
T
A
B
L
E
C
O
R
D
S
Y
S
T
E
M
R
E
T
R
A
C
T
A
B
L
E
C
O
R
D
S
Y
S
T
E
M
I
J
K
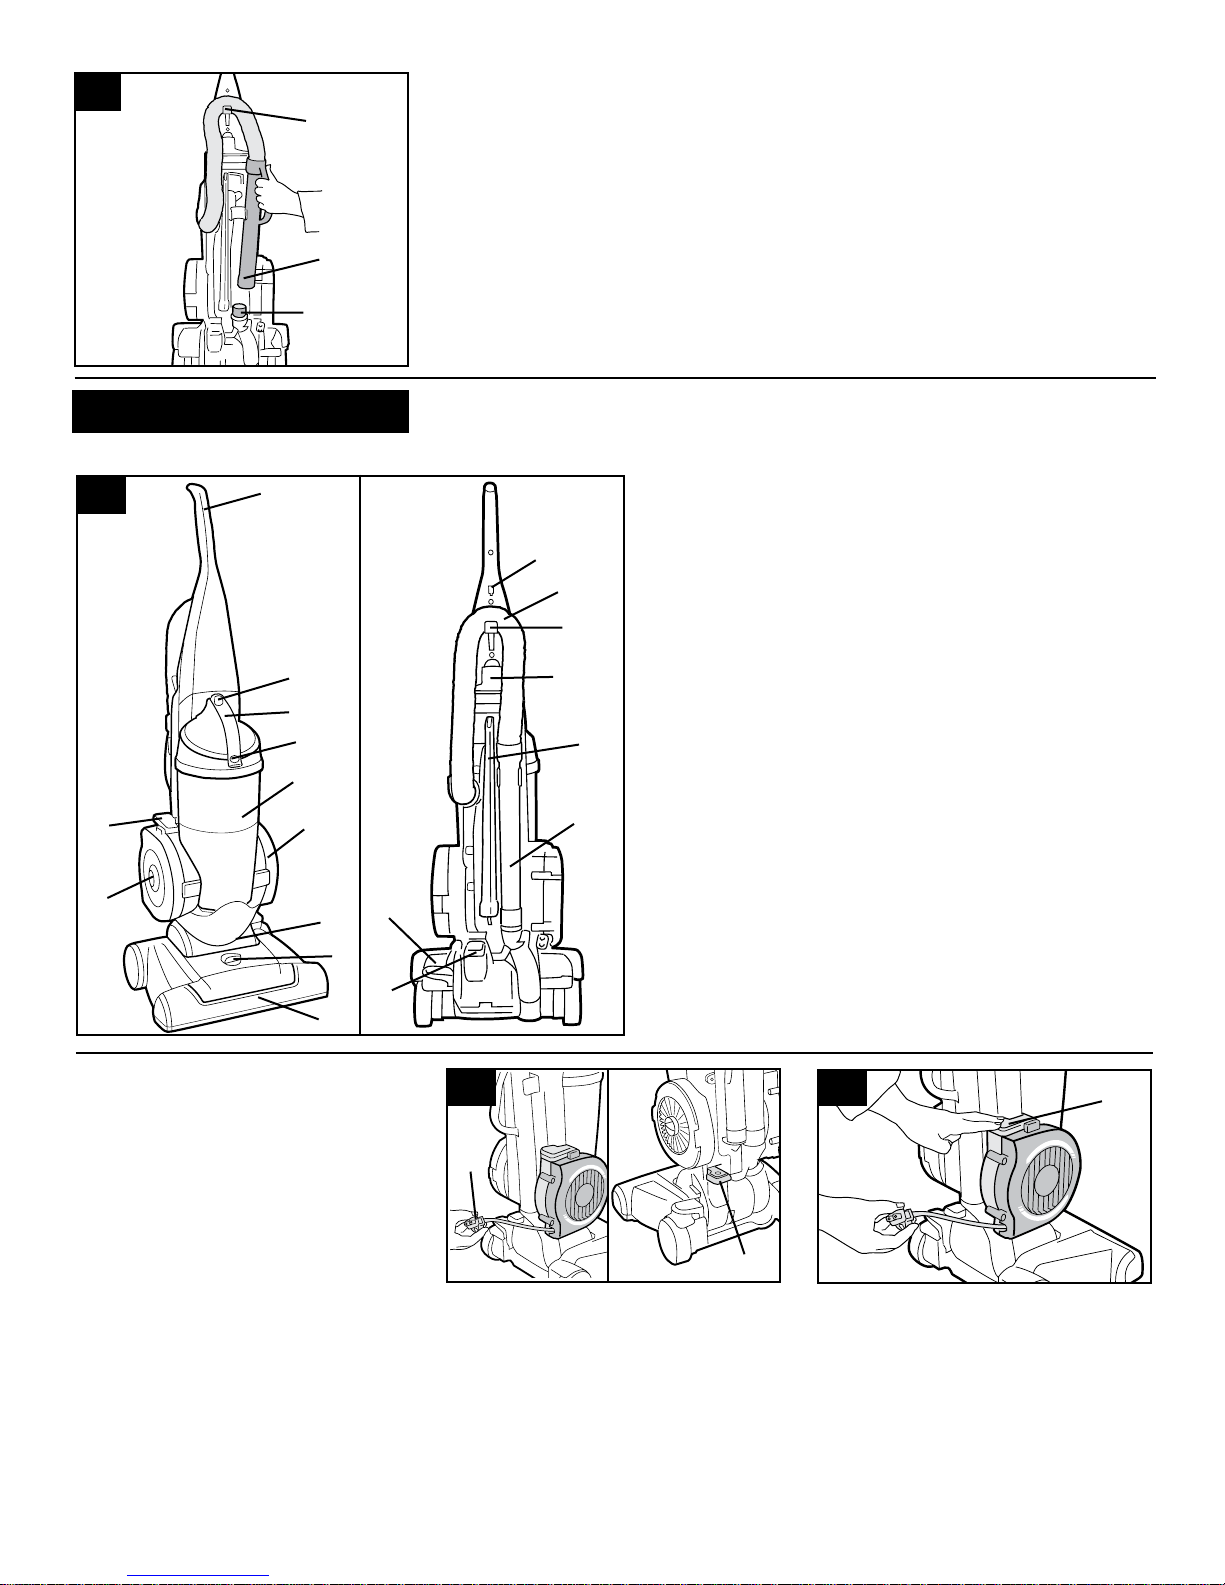
2. How to use
Cleaner description
2-1
11
10
1
2
3
4
5
6
7
8
18
19
Wrap hose over hook (I).
Push hose end (J) firmly onto tube (K) as
shown.
1. Handle grip
2. Dirt cup release button
3. Carrying handle/Dirt
12
13
14
15
16
17
cup handle
4. Air flow indicator
5. Dirt cup assembly
6. Long lasting HEPA
filter
7. Headlight
8. Nozzle control knob:
turn knob to correct
setting for height of carpet
being cleaned.
9. Furniture nozzle: helps
prevent cleaner from
marking furniture.
10. Cord reel
11. Cord rewind button:
press button to rewind cord
for storage. Hold plug
until cord is rewound.
12. Cord hook
13. Hose
14. Hose holder
15. Combination tool
16. Crevice wand
17. Hose handle
18. ON/OFF pedal
19. Handle release pedal:
step on pedal to lower handle to
operating or low positions.
Operate cleaner only at
voltage specified on data
plate on back of cleaner.
This cleaner is intended for
household use.
9
Polarized plug
To reduce the risk of electric shock, this
appliance has a polarized plug (one
blade is wider than the other). This plug
will fit in a polarized outlet only one way.
If the plug does not fit fully in the outlet,
reverse the plug. If it still does not fit,
contact a qualified electrician to install
the proper outlet. Do not change the
plug in any way.
4
2-2
A
B
ON-OFF pedal
Grasp end of plug (A) and pull to
desired cord length. Plug cord into electrical outlet.
To turn cleaner ON, step on ON/OFF
pedal (B) once.
To turn cleaner OFF, step on pedal
again.
2-3
C
Cord rewind
Grasp the end of the plug and pull
to release cord from cord reel. After
desired cord length is reached, the cord
will lock into position.
To return cord for storage, hold plug
and press on button (C) at top of cord
reel. To prevent cord from whip-
ping, hold plug until cord is
rewound.
Continued >>
Page 5
2-4
2-5
2-6
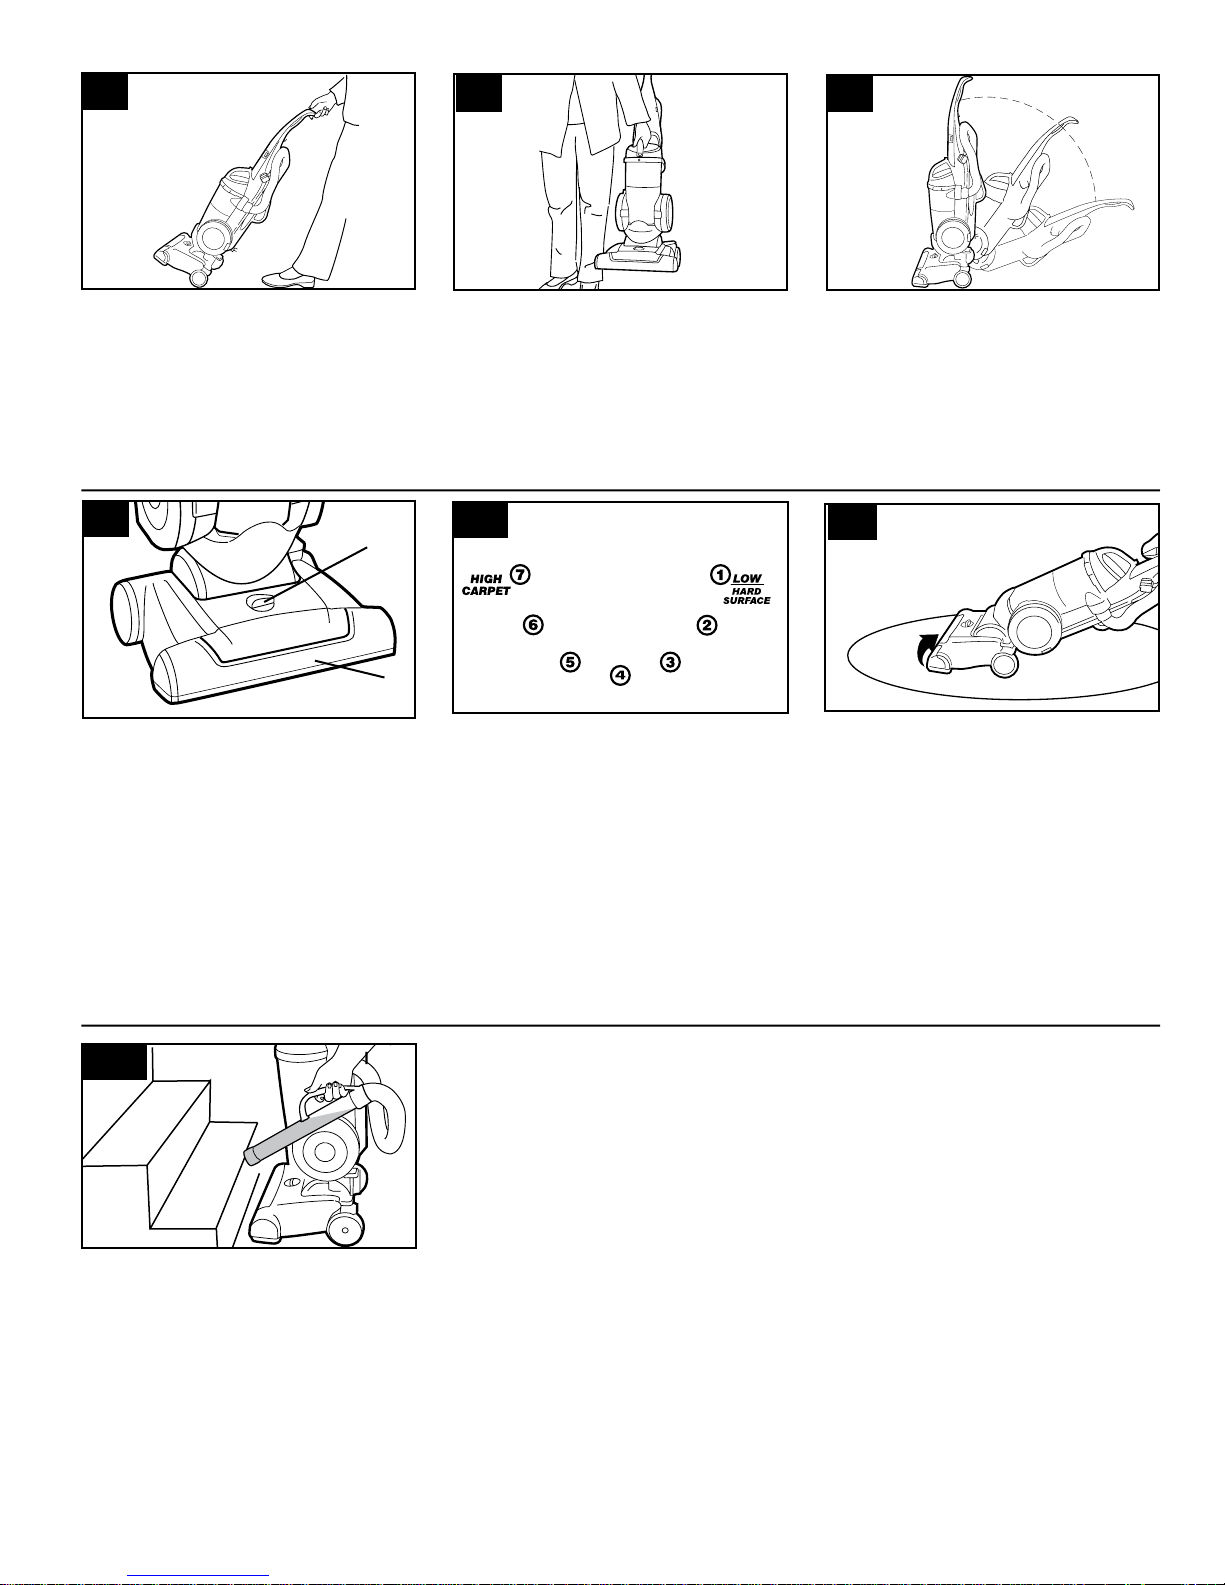
Transporting cleaner
To move your cleaner from room to
room, put handle in upright position, tilt
cleaner back on rear wheels and push
forward.
2-7
B
A
Carpet height
adjustment
The cleaning of carpet and rugs takes
place at the nozzle (A).
When it is necessary to raise and
lower the nozzle for various carpet pile
heights, place handle in upright position
and turn the nozzle control knob (B) to
the desired setting.
The nozzle will not move into the
adjusted position until the cleaner
handle is lowered to the operating
position.
Carrying cleaner
The cleaner can also be moved by using
the carrying handle, located on the top
of the dirt cup.
2-8
Settings
For maximum cleaning performance, the following carpet height
settings are recommended:
• Lowest setting: for all types of
carpet and hard surface flooring.
Note: If the cleaner is difficult to push,
turn knob to the next higher setting.
• Higher settings: for very deep pile
carpet, where easier pushing effort is
desired, while maintaining good cleaning performance.
Handle positions
The handle of your cleaner has three
positions; upright for storage and
when using cleaning tools; operating
position for general operation on carpet and floors; low for reaching under
low furniture. Step on handle release
pedal to lower handle.
2-9
Cleaning lightweight
flexible rugs
Stand on one end of rug and move
cleaner toward other end or edge.
Before reaching edge, push down on
handle. This will lift up the nozzle (front
of cleaner) as shown and will prevent
rug from clinging to cleaner. Continue
to lift up nozzle so that when you have
reached the edge, it is completely
off the rug. Move cleaner back to start
again, lower nozzle, and use only forward strokes.
2-10
Stair cleaning
Use the hose and for stair cleaning.
Clean from bottom to top.
When using cleaning tools, the
agitator will continue to rotate.
CAUTION: To avoid personal injury or unnecessary wear to
carpet, and to prevent the cleaner
from falling, always place it at
bottom of stairs.
Cleaning tools
Tools allow for cleaning surfaces above
the floor and for reaching hard to clean
areas.
The cleaner is ready for tool use when
handle is in upright position.
CAUTION: The agitator continues
to rotate while cleaner handle is
in upright position. Avoid tipping
cleaner or setting it on furniture,
fringed area rugs or carpeted
stairs during tool use.
How to clean tools
To clean the hose, wipe off dirt with a
cloth dampened in a mild detergent.
Rinse with a damp cloth.
Cleaning tools may be washed in warm
water with a detergent. Rinse and air dry
before using.
5
Page 6
2-11
2-12
C
D
B
2-13
F
A
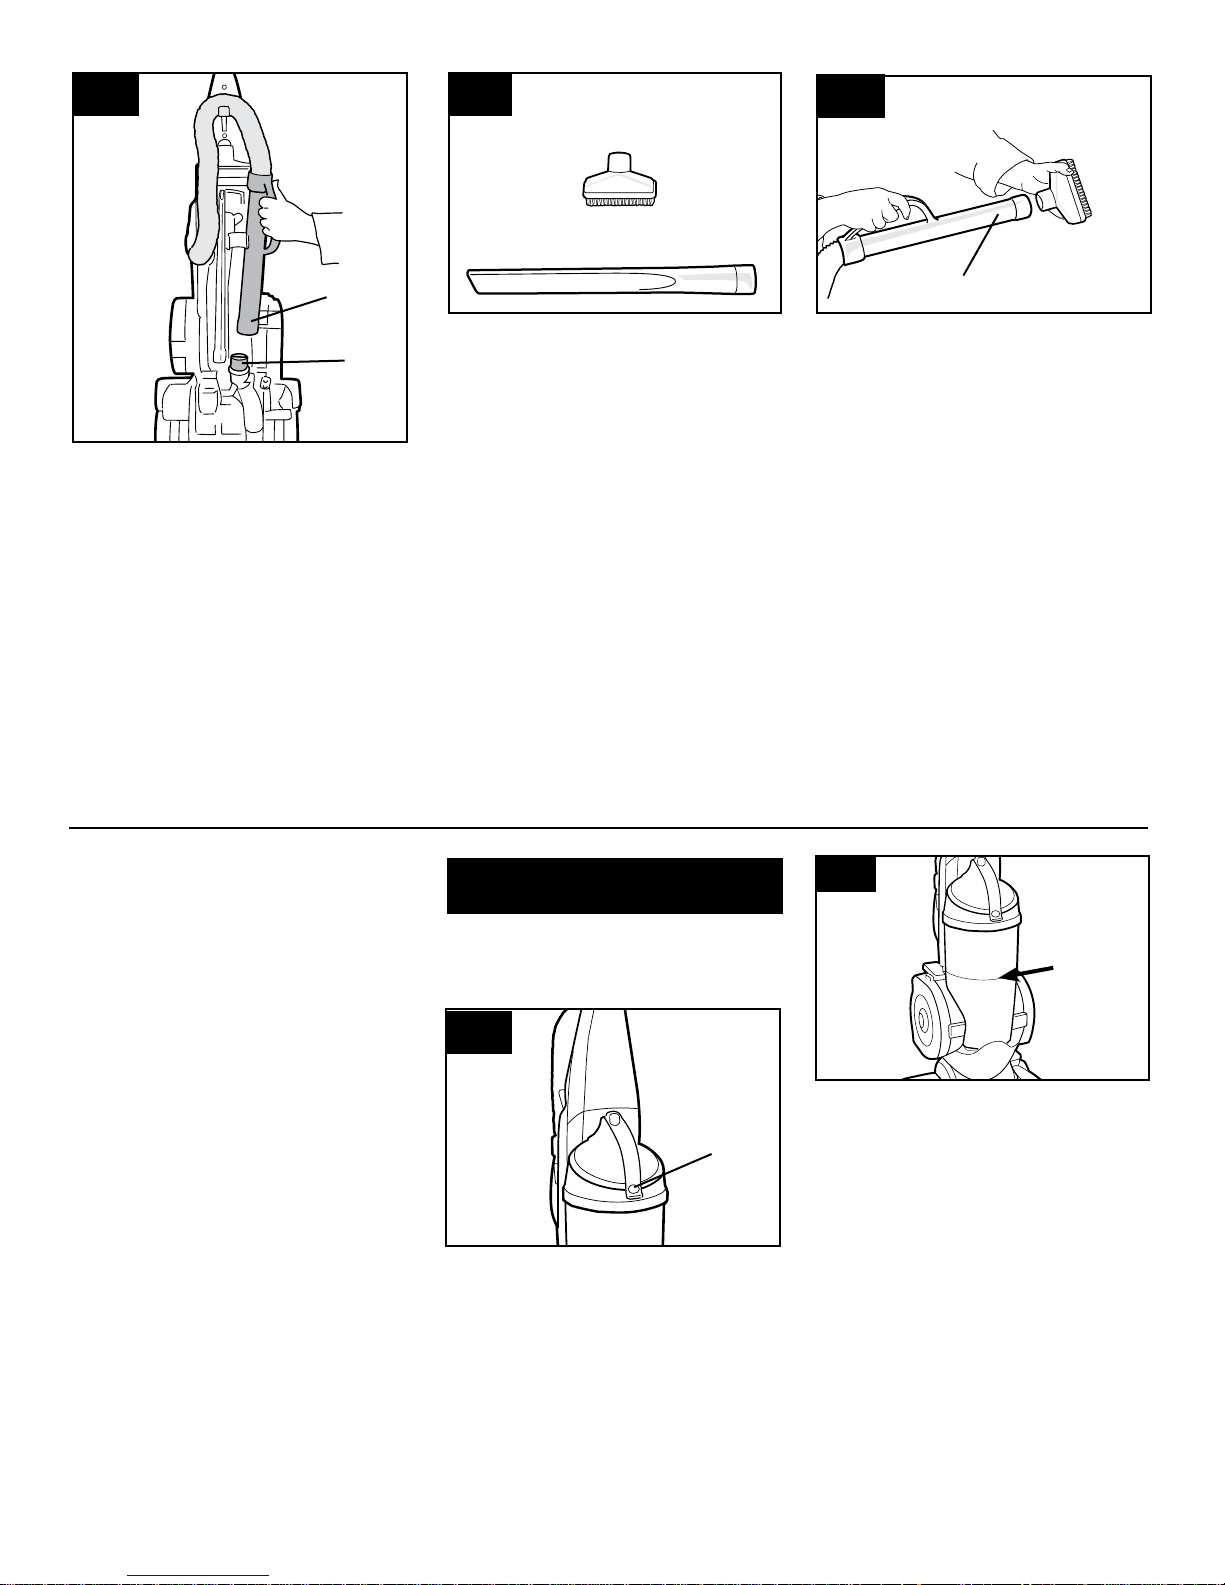
Removing hose
When using cleaning tools, cleaner
handle should be in the upright
position. Also, turn cleaner OFF
before disconnecting and connecting hose to hose tube (A).
To use hose, lift hose end (B) as shown.
When you are finished cleaning with the
tools, reposition hose end onto tube.
Select proper tool
C. Dusting Brush use with brush
attached for carved furniture, table tops,
books, lamps, lighting fixtures, venetian
blinds, baseboards, shutters, and registers.
D. Crevice wand may be used in tight
spaces, corners and along edges in
such places as dresser drawers, upholstered furniture, stairs and baseboards.
It can also be used for extra reach with
the dusting brush.
3. Maintenance
Attach wand and tools
Attach tool to the hose (F) by pushing it
firmly onto hose.
Twist wand or tool slightly to tighten or
loosen the connection.
3-2
Familiarize yourself with these home
maintenance tasks as proper use and
care of your cleaner will ensure continued cleaning effectiveness.
A
3-1
Dirt cup
When to empty
A
Air flow indicator
The indicator (A) will show yellow when
the dirt cup is full or there is a blockage
or clog in the system. Turn cleaner
OFF and unplug. Check the dirt cup
and empty if necessary. Turn cleaner
back on. If the indicator still shows
yellow, follow the instructions under
“Clearing blockages”.
6
It is recommended that the dirt cup be
emptied before the dirt reaches the fill
line (A), or after every use if preferred.
CAUTION: Very fine materials,
such as face powder or cornstarch, may seal the filter and
cause loss of suction. When using
the cleaner for this type of dust,
empty the cup and clean the
filters often.
Continued >>
Page 7

3-3
L
I
F
E
T
I
M
E
H
E
P
A
F
I
L
T
E
R
S
Y
S
T
E
M
L
I
F
E
T
I
M
E
H
E
P
A
F
I
L
T
E
R
S
Y
S
T
E
M
B
3-4
3-5
C
D
How to empty
Disconnect cleaner from electrical outlet. Do not use the cleaner
without dirt cup or filters in place.
Press dirt cup release button (B) and
pivot cup out.
Cleaning filters
Lifetime HEPA filter
If you wish to clean this filter, it may be
removed and cleaned.
3-6
A
Holding dirt cup over trash receptacle, press dirt cup door release rod
(C) on back of dirt cup to open dirt cup
door (D).
Empty dirt cup.
Close and snap dirt cup door shut.
3-7
B
Remove the HEPA filter (B) and brush
with the combination tool to clean or tap
side of filter against a trash receptacle.
Return the HEPA filter into the filter cavity.
Place bottom of dirt cup in first. Pivot
cup into cleaner body.
Press dirt cup firmly until you hear a
click to ensure that it is locked in place.
3-8
D
C
Align tab (C) on filter cover with slot
(D). Press cover closed until you hear a
snap.
Press on the tab (A) located on the side
of the filter cover to remove.
Dirt cup filter
assembly
How to clean
Disconnect cleaner from electrical
outlet. Do not use cleaner without
dirt cup or filters in place.
3-9
A
Remove dirt cup as described in Fig.
3-3.
Twist dirt cup lid (A) counterclockwise
until arrows on lid and dirt cup align.
Remove lid with filter cartridge from dirt
cup.
3-10
Dirt and debris can then be cleaned
from the filter cartridge by brushing with
the cleaner’s combination tool.
3-11
Twist the filter cartridge counterclockwise, aligning arrows on lid and cartridge. Remove pleated filter from inside
cartridge.
7
Page 8

3-12 3-13
Headlight replacement
What to buy
This cleaner uses a 13 volt, T-3 114 wedge
base bulb, Hoover part No. 27313-107.
3-14
Tap filter against side of trash container
to remove dirt or brush with the cleaner’s
combination tool.
Return pleated filter to inside the filter
cartridge.
3-15
Installing bulb
Pull old bulb straight out of socket. Push
new bulb straight into socket until locked
in place.
Excessive force is not required.
Reposition lens and secure with the
screws.
Replace the filter assembly in the dirt
cup lid, aligning arrows and twisting
clockwise to lock into position.
Replace dirt cup lid onto dirt cup by
aligning arrows on lid and dirt cup and
twisting clockwise.
Replace dirt cup as described in Fig. 3-5.
Belt replacement
The belt on your Hoover cleaner causes
the agitator to rotate and is important for
the effective operation of the cleaner.
The belt is located under the bottom
plate of the cleaner and should be
checked from time to time to be sure it is
in good condition.
When to replace
Disconnect cleaner from electrical
outlet.
To check belt, remove bottom plate as
shown in Fig. 3-16. Replace belt if it is
stretched, cut or broken.
Removing lens
Disconnect cleaner from electrical
outlet.
Press handle release pedal and place
handle in lowest position.
Using a Phillips screwdriver, remove the
two screws as shown and lift off lens.
What to buy
To assure effective operation, use only
genuine HOOVER belts with your cleaner. When purchasing a new belt, ask for
HOOVER part No. 38528-040 (belt
package part No. 40201-190).
3-16
A
How to replace
Disconnect cleaner from electrical
outlet.
Removing bottom plate
Place handle in lowest position and turn
cleaner over so bottom side is up. Remove
the 5 screws as shown with a Phillips
screwdriver. Lift off bottom plate (A).
8
3-17
C
B
Removing belt
Remove agitator brush roll (B) and used
belt (C).
Discard used belt.
3-18
D
Installing new belt
With lettering on outside of belt, and
positioned as shown, slide new belt over
motor pulley (D).
Continued ‹
Page 9

3-19
3-20
H
3-21
G
E
Replacing agitator brush roll
Insert agitator through belt and place belt
in belt guide (E) on agitator.
Should the agitator shield (F) become
dislodged while replacing the belt or the
agitator, reposition it as shown noting the
placement of its belt guide (G).
F
The agitator brush roll
When to replace
When agitator brushes are worn, the agitator should be replaced.
To check condition of brushes, discon-
nect cleaner from electrical outlet.
3-22
I
Securing agitator
Grasp agitator firmly and fit it into position by first sliding end opposite the belt
into the rectangular slot (H) on side of
cleaner.
Pull other side of agitator (I) into place.
Turn agitator making sure belt turns
freely and is not pinched between agitator and bottom of cleaner.
What to buy
When purchasing a new agitator, ask for
HOOVER part No. 48414-113.
How to replace
Disconnect cleaner from electrical
outlet.
Remove bottom plate, belt and agitator
following directions in “The belt” section
beginning with
Fig. 3-16.
Discard old agitator.
Continue following the directions in “The
belt” section to reposition belt, new agitator and bottom plate.
Replacing bottom plate
Reposition bottom plate and 5 Phillips
head screws. Tighten screws securely.
Lubrication
The motor is equipped with bearings
that contain sufficient lubrication for the
life of the motor. The addition of lubricant could cause damage. Therefore,
do not add lubricant to motor
bearings.
Move edge of a card across bottom
plate while turning agitator. To maintain
cleaning effectiveness, replace agitator if
brushes do not touch card.
Thermal protector
An internal thermal protector has been
designed into your cleaner to protect it
from overheating.
When the thermal protector activates, the cleaner will stop running. If this happens, proceed as fol-
lows:
1. Turn the cleaner OFF and
disconnect it from the electrical
outlet.
2. Check filters for dirt accumulation.
3. Refer to “Clearing blockages” sec-
tion.
4. When cleaner is unplugged and
the motor cools for 30 minutes,
the thermal protector automatically
resets and cleaning may continue.
If the thermal protector continues to
activate after following the above steps,
your cleaner may need servicing (see
“Service” section).
9
Page 10

Service
To obtain approved HOOVER service
and genuine HOOVER parts, locate the
nearest Hoover Sales and Service
Center or Authorized Hoover
Warranty Service Dealer (Depot)
by:
• checking the Yellow Pages under
“Vacuum Cleaners -
Household” OR -
• checking the Service section of
Hoover on-line at hoover.com
OR -
• calling 1-800-944-9200 for an
automated referral of authorized
service outlet locations (U.S.
only).
Do not send your cleaner to Hoover,
Inc., in Glenwillow, Ohio for service, this
will only result in delay.
If further assistance is needed, contact the Hoover Consumer Response
Center, Phone: 1-263-6376.
In Canada, contact Hoover Canada, Carson
Building, 100 Carson Street, Etobicoke,
Ontario M8W 3R9, Phone:
1-800-263-6376 Mon-Fri 8AM-7PM EST.
Always identify your cleaner by the
complete model number when
requesting information or ordering
parts. (The model number appears on
the back of the cleaner.)
4. If you have a
problem
If a minor problem occurs, it usually can
be solved quite easily when the cause is
found by using the checklist below.
Problem: Cleaner won’t run
Possible Cause
Possible Solution
• Not firmly plugged in
• Plug unit in firmly
• No voltage in wall receptacle
• Check fuse or breaker
• Blown fuse or tripped breaker
• Replace fuse or reset breakerF
• Thermal protector activated
• Unplug cleaner and allow cleaner
to cool for 30 minutes (this will
reset the thermal protector)
Problem: Cleaner/tools won’t
pick up
Possible Cause
Possible Solution
• Broken or worn belt
• Replace belt
• Agitator brush roll worn
• Replace brush roll
• Dirt cup full
• Empty dirt cup
• Filters dirty
• Clean filters
• Incorrect carpet height setting
• Move nozzle control knob to
lower setting
• Blockage in air flow passages
• Clear blockage
Problem: Cleaner hard to push
Possible Cause
Possible Solution
• Incorrect carpet height setting
• Move carpet height control to a
higher setting
Problem: Smoky/burning smell
detected
Possible Cause
Possible Solution
• Belt broken or stretched
• Replace agitator brush roll belt
as described in Figs. 3-16 through
3-21 in the Maintenance section
10
Continued
Page 11

Clearing blockages
Disconnect cleaner from electrical
outlet.
Low suction or pick up may be due to
a blockage in the system. Refer to the
following steps to check for blockages
continuing with each step until the
blockage is found:
1. Check fullness of dirt cup; empty if
needed.
4-1
A
Checking airflow path
2. Plug cleaner in and turn ON. Check for
suction at end of hose (A).
If there is suction, continue with step 3.
If there is no suction, check for block-
age in hose and dirt tube as follows:
Look into opening (D) for blockages and
4-2
C
3. Turn cleaner OFF and unplug.
Check connection at hose tube (C);
remove any blockage.
4-3
D
Checking under bottom plate
4. Turn cleaner OFF and unplug.
5. Remove bottom plate, belt and agitator (Figs. 3-15 and 3-16).
remove.
6. Remove agitator shield (see Fig. 3-18)
and remove any loose debris which may
have accumulated under it.
11
Page 12

Page 13

Aspiradora vertical
Elite™ Rewind™
Manual del
propietario
Gracias por haber elegido un producto HOOVER®
Anote los números COMPLETOS de modelo y serie a continuación.
Modelo ___________________________________
Consejo: Adjunte su recibo de compra a este Manual del propietario.
Para obtener el servicio de garantía de su producto HOOVER puede requerirse la
verificación de la fecha de compra.
Asegúrese de llenar y devolver la tarjeta adjunta de registro del producto incluida
con su aspiradora (vea la contraportada).
ESPAÑOL:
p. 13-19
Contenido
Ensamblado de la aspiradora.............14
Contenido de la caja ...........................14
Descripción de la aspiradora .............14
Cómo usar la aspiradora .............. 14-16
Accesorios de limpieza ...................15
Si tiene un problema .................... 18-19
Salvaguardias importantes .................13
Lubricación .........................................17
Mantenimiento ....................................16
Servicio autorizado .........................18
Limpieza de los filtros .....................16
Eliminación de obstrucciones ........19
Vaciado del depósito para polvo ....16
Reemplazo del rodillo de
escobillas del agitador ..................17
Reemplazo de la correa ..................17
Reemplazo de la luz delantera .......16
Protector térmico ...............................17
Garantía ..............................................19
Lea este manual antes
de hacer funcionar
la aspiradora.
¡Salvaguardas importantes!
Al usar un aparato eléctrico, observe siempre las precauciones básicas,
incluyendo las siguientes:
LEA TODAS LAS INSTRUCCIONES ANTES DE USAR ESTE APARATO
ADVERTENCIA:
• No use este aparato a la intemperie ni en superficies mojadas.
• Es necesaria una supervisión estricta cuando cualquier aparato es utilizado por los
niños o cerca de ellos. No permita que la aspiradora sea usada como un juguete ni
que funcione sin atención en ningún momento.
• Mantenga el cabello, la ropa holgada, los dedos de las manos y pies y todas las
partes del cuerpo alejados de las aberturas, del agitador rotatorio y otras piezas en
movimiento. No haga funcionar la aspiradora descalzo ni cuando calce sandalias o
zapatos que dejen los dedos de los pies al descubierto.
• No aspire nada que se esté quemando o echando humo, como cigarrillos, cerillos o
cenizas calientes.
• No use este aparato para aspirar materiales inflamables o combustibles como
gasolina o restos de madera lijada ni en áreas donde pudieran encontrarse
presentes.
• Evite recoger objetos duros o afilados con la aspiradora. Éstos pueden dañar la
aspiradora.
• Apague siempre este aparato antes de conectar o desconectar la manguera.
• No use la aspiradora sin tener el depósito para polvo o los filtros en su lugar.
Cambie el depósito y limpie los filtros con frecuencia cuando aspire materiales muy
finos como talco.
• Tenga especial cuidado al limpiar escaleras.
• No coloque ningún objeto en las aberturas. No la use con ninguna abertura
obstruida; manténgala libre de polvo, pelusa, cabello o cualquier cosa que pueda
reducir el flujo de aire.
• No la jale ni la transporte por el cordón, ni tampoco use el cordón como mango,
no cierre la puerta sobre el cordón ni jale el mismo alrededor de bordes afilados ni
esquinas. No pase el aparato sobre el cordón. Mantenga el cordón alejado de las
superficies calientes.
• Desenchufe siempre el cordón de la toma de corriente eléctrica antes de prestar
servicio a la aspiradora.
• Desenchufe el cordón cuando la aspiradora no esté en uso. Antes de
desenchufarla, apague todos los controles.
• No la desenchufe jalando el cordón. Para desenchufarla, sujete el enchufe y no el
cordón. Nunca toque el enchufe ni el aparato con las manos mojadas.
• Sujete el enchufe mientras rebobina el cordón para evitar que éste dé latigazos.
• No se recomienda el uso de cordones de extensión.
• No use el aparato si el cordón o el enchufe está dañado. Si el aparato no está
funcionando apropiadamente, se ha dejado caer, se ha dañado, se ha dejado a la
intemperie o se ha dejado caer en agua, llévelo a un Centro de ventas y servicio
de Hoover o a un Concesionario autorizado de servicio de garantía de Hoover
(Depósito).
• Use la aspiradora solamente para lo que ha sido diseñada según se describe en las
instrucciones. Use solamente los accesorios recomendados por Hoover; el uso de
otros accesorios puede ser peligroso.
Para reducir el riesgo de incendios, choques
eléctricos o lesiones:
© 2005, ©2008 Healthy Gain Investments,
Ltd. All rights reserved.
ADVERTENCIA:
en el estado de California por ser causantes de cáncer. Lávese las manos después de
manipularlo.
Este producto contiene substancias químicas conocidas
¡Guarde estas instrucciones!
13
Page 14

Use estas instrucciones en
español junto con las figuras
provistas en el manual de
inglés.
Si necesita asistencia:
Visite hoover.com. Haga clic en el
botón “Service” para encontrar el centro
de servicio más cercano a usted O
Llame al 1-800-944-9200 para
obtener una referencia automatizada de
las ubicaciones de los centros de servicio
autorizados (solamente en EE.UU.) O
Llame al 1-330-499-9499 para hablar con
un representante en nuestro Centro de
respuesta al cliente.
Por favor, no devuelva este
producto a la tienda.
Ensamblado de
la aspiradora
1-1
Contenido de la caja
A. Sección del mango y tornillo
(fijado con cinta en el mango)
B. Cuerpo de la aspiradora
C. Accesorios de limpieza
D. Manguera
Saque todos los componentes de la
caja e identifique cada pieza que se
muestra.
Asegúrese de encontrar todas las
piezas antes de desechar el material
de embalaje.
1-2
Coloque el mango
Deslice la sección del mango (A) sobre la
parte posterior del mango.
1-3
Empuje el tornillo en el agujero de la parte
posterior del mango. Apriete bien el tornillo
con un destornillador Phillips.
1-5
Coloque el mango
Alinee el extremo de la manguera con las
proyeccións encima de las ranuras en el
tubo de polvo en la parte posterior de la
aspiradora. Gírelo para trabarlo en su lugar.
El conector de la manguera permite que ésta
gire.
1-6
Enrolle la manguera sobre el gancho (G).
Empuje firmemente el extremo de la
manguera (H) en el tubo (I) como se
muestra.
2. Cómo usar la
aspiradora
2-1
Descripción de la
aspiradora
1. Asidero del mango
2. Botón para soltar el depósito para
polvo
3. Asa para transportar/mango del
depósito para polvo
4. Indicador de flujo de aire
5. Conjunto del depósito para polvo
6. Filtro HEPA de larga duración
7. Luz delantera
8. Perilla de control de la boquilla:
gire la perilla a la posición correcta para la
altura de la alfombra que está aspirando.
9. Boquilla para muebles: ayuda a
evitar que la aspiradora haga marcas en los
muebles.
10. Bobina para el cordón
11. Botón para rebobinar el cordón:
presione el botón para rebobinar el cordón
para guardarlo. Sujete el enchufe hasta que
el cordón esté enrollado.
12. Gancho para el cordón
13. Manguera
14. Soporte para la manguera
15. Accesorio combinado
16. Accesorio para hendiduras
17. Asa de la manguera
18. Pedal de encender/apagar
19. Pedal para soltar el mango: pise el
pedal para bajar el mango a la posición de
funcionamiento o baja.
Enchufe polarizado
Para disminuir el riesgo de choque eléctrico,
este aparato tiene un enchufe polarizado
(una patilla es más ancha que la otra). Este
enchufe podrá introducirse en una toma de
corriente polarizada, sólo de una manera.
Si el enchufe no encaja completamente en
la toma de corriente, inviértalo. Si aun así
no encaja, comuníquese con un electricista
calificado para que le instale la toma de
corriente adecuada. No modifique el
enchufe de manera alguna.
2-2
Pedal de encender/
apagar
Tome el extremo del enchufe (A) y jálelo a
la longitud deseada del cordón. Enchufe el
cordón en una toma de corriente eléctrica.
Para encender la aspiradora (ON), pise el
pedal de encender y apagar (B) una vez.
Para apagar la aspiradora, pise el pedal de
nuevo.
2-3
Enrollado del cordón
Tome el extremo del enchufe y jálelo para
soltar el cordón de su bobina. Cuando
consiga la longitud deseada del cordón, éste
se trabará en su lugar.
Para guardar el cordón, sujete el enchufe
y presione el botón (C) en la parte superior
de la bobina para el cordón. Para evitar
que el cordón dé latigazos, sujete
el enchufe hasta que el cordón esté
enrollado.
2-4
Traslado de la
aspiradora
Para mover la aspiradora de una habitación
a otra, coloque el mango en la posición
vertical, incline la aspiradora hacia atrás
sobre las ruedas traseras y empújela hacia
delante.
2-5
Transporte de la
aspiradora
También se puede mover la aspiradora
usando el asidero de transporte, ubicado
encima del depósito para polvo.
14
Haga funcionar la aspiradora
solamente con el voltaje especificado
en la placa de datos que se encuentra
en su parte posterior.
Esta aspiradora ha sido diseñada para
uso doméstico.
2-6
Posiciones del
mango
El mango de su aspiradora tiene tres
Page 15

posiciones: vertical, para guardarla y
usar los accesorios de limpieza; posición
de funcionamiento, para uso general
sobre alfombras y pisos; y baja, para
aspirar debajo de muebles de poca altura.
Para bajar el mango, pise el pedal para
destrabarlo.
2-7
Ajuste de la altura
para alfombras
La limpieza de las alfombras de pared a
pared y de área tiene lugar en la boquilla (A).
Cuando sea necesario elevar y bajar la
boquilla para limpiar alfombras de distintos
espesores, coloque el mango en posición
vertical y gire la perilla de control de la
boquilla (B) a la posición deseada.
La boquilla no se moverá a la
posición de ajuste hasta después de
bajar el mango de la aspiradora a la
posición de funcionamiento.
2-8
Posiciones
HIGH CARPET–Alfombra alta
LOW/HARD SURFACE–Baja/Superficie
dura
Para obtener el máximo rendimiento
de limpieza, se recomiendan las siguientes
posiciones según la altura de la alfombra:
• Posición más baja: para todo tipo de
alfombras y pisos con revestimientos duros.
Nota: Si le cuesta mucho empujar la
aspiradora, gire la perilla a la siguiente
posición más alta.
• Posiciones más altas: para alfombras de
gran espesor, en cuyo caso se desea facilitar
el esfuerzo al empujar para mantener una
buena limpieza.
2-9
Limpieza de
alfombras livianas y
flexibles
Párese sobre un extremo de la alfombra y
pase la aspiradora hacia el otro extremo o
borde. Antes de llegar al borde, empuje el
mango hacia abajo. Esto levantará la boquilla
(parte delantera de la aspiradora) como se
muestra y evitará que la alfombra se adhiera a
la aspiradora. Continúe levantando la boquilla
de modo que cuando llegue al borde esté
completamente separada de la alfombra.
Retroceda la aspiradora para comenzar otra
vez, baje la boquilla y pásela solamente hacia
delante.
2-10
Limpieza de
escaleras
Use la manguera para limpiar las escaleras.
Limpie de abajo hacia arriba.
Durante el uso de los accesorios de
limpieza, el agitador continúa girando.
PRECAUCIÓN: Para evitar lesiones
personales o el desgaste innecesario
de la alfombra, y para impedir que se
caiga la aspiradora, colóquela siempre
en la parte inferior de las escaleras.
Accesorios de
limpieza
Los accesorios le permiten limpiar superficies
que están a mayor altura que el piso y llegar a
áreas difíciles de limpiar.
La aspiradora está lista para usarse con los
accesorios cuando el mango está en
posición vertical.
PRECAUCIÓN: El agitador continúa
girando mientras el mango de la
aspiradora está en posición vertical.
Al usar los accesorios, evite inclinar la
aspiradora o colocarla sobre muebles,
alfombras con flecos o escaleras
alfombradas.
Cómo limpiar los
accesorios
Para limpiar la manguera, limpie el polvo con
un paño humedecido en detergente suave.
Enjuague con un paño húmedo.
Los accesorios de limpieza se pueden lavar
en agua tibia con un detergente. Enjuáguelos
y deje que se sequen al aire libre antes de
usarlos.
2-11
Para sacar la
manguera
Cuando use los accesorios de limpieza, el
mango de la aspiradora deberá estar
en posición vertical. Asimismo, apague
la aspiradora antes de desconectar
y conectar la manguera al tubo de la
manguera (A).
Para usar la manguera, levante el extremo de
la manguera (B) como se muestra.
Cuando haya terminado de limpiar con los
accesorios, vuelva a colocar el extremo de la
manguera sobre el tubo.
2-12
Selección del
accesorio apropiado
C. Uso del accesorio combinado con
la escobilla incluida para muebles tallados,
superficies de las mesas, libros, lámparas,
accesorios de iluminación, persianas
venecianas, zócalos, postigos de ventanas y
rejillas de ventilación.
Saque la escobilla para limpiar muebles
tapizados, cortinajes, colchones, prendas de
vestir y escaleras alfombradas.
D. El accesorio para hendiduras se
puede usar en lugares estrechos, esquinas
y en los bordes de sitios como cajones de
cómodas, muebles tapizados, escaleras
y zócalos. También se puede usar para
dar alcance adicional a la escobilla para
desempolvar.
2-13
Colocación del tubo
de extensión y de los
accesorios
Coloque el accesorio en la manguera (F),
empujándolo firmemente sobre la manguera.
Gire el tubo de extensión o el accesorio
ligeramente para apretar o aflojar la conexión.
3. Mantenimiento
Familiarícese con estas tareas de
mantenimiento en el hogar, ya que el uso
y cuidado adecuados de su aspiradora
asegurarán la eficacia en la limpieza por
largo tiempo.
3-1
Indicador de flujo de
aire
El indicador (A) mostrará el color amarillo
cuando el depósito para polvo esté lleno
o haya un bloqueo o una obstrucción en
el sistema. Apague la aspiradora y
desconéctela. Verifique el depósito para
polvo y vacíelo si es necesario. Vuelva a
encender la aspiradora. Si el indicador
sigue mostrando el color amarillo, siga
las instrucciones que se encuentran en la
sección “Eliminación de obstrucciones”.
3-2
Depósito para polvo
Cuándo vaciarlo
15
Page 16

Se recomienda que el depósito para polvo
se vacíe antes que lo aspirado llegue hasta
la línea punteada, en la parte posterior del
depósito para polvo o, si se prefiere, después
de cada uso.
PRECAUCIÓN: Los materiales muy
finos, tales como el talco facial o
la maicena, podrían sellar el filtro y
ocasionar que disminuya la succión.
Cuando use la aspiradora para
retirar material de esta índole, vacíe
el depósito y cambie los filtros a
menudo.
3-3
Cómo vaciarlo
Desconecte la aspiradora de la toma
de corriente eléctrica. No use la
aspiradora sin tener el depósito para
polvo o los filtros en su lugar.
Presione el botón para soltar el depósito para
polvo (B) y gire para sacar el depósito.
3-4
Sujetando el depósito para polvo
sobre el recipiente de basura, oprima la
varilla para soltar la puerta del depósito para
polvo (C) en la parte posterior del depósito
para abrir la puerta del depósito para polvo
(D).
Vacíe el depósito para polvo.
Encaje la puerta del depósito para polvo para
cerrarla.
3-5
Coloque primero la parte inferior del depósito
para polvo. Gire el depósito para insertarlo en
el cuerpo de la aspiradora.
Presione el depósito para polvo firmemente
hasta que escuche un chasquido para
asegurarse de que está trabado en su lugar.
Limpieza de los
filtros
Filtro HEPA de larga
duración
Sin embargo, si desea limpiar este filtro,
puede sacarlo para limpiarlo.
3-6
Presione la lengüeta (A) ubicada en el
costado de la cubierta del filtro para sacarlo.
3-7
Saque el filtro HEPA (B) y cepíllelo con el
accesorio combinado para limpiarlo o golpee
el costado del filtro contra un recipiente de
1616
basura. Instale el filtro HEPA de nuevo en la
cavidad del filtro.
3-8
Alinee la lengüeta (C) de la cubierta del
filtro con la ranura (D). Cierre la cubierta
presionándola hasta escuchar que encaja.
Conjunto del filtro
del depósito para
polvo
Cómo limpiarlo
Desconecte la aspiradora de la toma
de corriente eléctrica. No use la
aspiradora sin tener el depósito para
polvo o los filtros en su lugar.
3-9
Saque el depósito para polvo como se
describe en la figura 3-3.
Gire la tapa del depósito para polvo (A) en
sentido contrario a las agujas del reloj hasta
que las flechas de la tapa y el depósito
para polvo se alineen. Saque la tapa con el
cartucho del filtro del depósito para polvo.
3-10
La suciedad y los residuos se pueden limpiar
del cartucho del filtro cepillándolo con el
accesorio combinado de la aspiradora.
3-11
Gire el cartucho del filtro en sentido contrario
a las agujas del reloj, alineando las flechas
de la tapa y el cartucho. Saque el filtro
plisado del interior del cartucho.
3-12
Golpee el filtro contra el costado de un
recipiente de basura para eliminar la
suciedad o cepíllelo con el accesorio
combinado de la aspiradora.
Vuelva a colocar el filtro plisado en el interior
del cartucho de filtro.
3-13
Vuelva a colocar el conjunto del filtro en
la tapa del depósito para polvo, alineando
las flechas y girándolo en el sentido de las
agujas del reloj para fijarlo en su lugar.
Vuelva a colocar la tapa del depósito para
polvo sobre el depósito alineando las
flechas de la tapa y del depósito para polvo y
girándola en sentido de las agujas del reloj.
Vuelva a colocar el depósito para polvo
como se describe en la figura 3-5.
Reemplazo de la luz
delantera
Qué comprar
Esta aspiradora usa un bombillo de 13
voltios de base en cuña, tipo T-3114, pieza
No. 27313-107 de Hoover.
3-14
Para sacar la lente
Desconecte la aspiradora de la toma
de corriente eléctrica.
Presione el pedal para soltar el mango y
coloque el mango en la posición más
baja.
Con un destornillador Phillips, saque los dos
tornillos como se muestra y levante la lente.
3-15
Para instalar el bombillo
Saque el bombillo usado, directamente
de su receptáculo. Inserte uno nuevo y
empújelo hasta que quede fijo en su lugar.
No se requiere usar fuerza excesiva.
Vuelva a colocar la lente y asegúrela con los
tornillos.
Reemplazo de la
correa
La correa de su aspiradora Hoover hace
posible que el agitador gire y es importante
para el funcionamiento eficaz de la
aspiradora Está ubicada debajo de la placa
inferior de la aspiradora y se debe revisar
periódicamente para asegurarse de que esté
en buenas condiciones.
Cuándo reemplazarla
Desconecte la aspiradora de la toma
de corriente eléctrica.
Para revisar la correa, saque la placa inferior
como se muestra en la figura
3-16. Reemplace la correa si está estirada,
rota o cortada.
Qué comprar
Para asegurar un funcionamiento eficaz, use
solamente correas genuinas HOOVER con
su aspiradora. Cuando compre una correa
nueva, pida la pieza No. 38528-040 de
HOOVER (paquete de correa con número
de pieza
40201-190).
3-16
Cómo reemplazarla
Desconecte la aspiradora de la toma
de corriente eléctrica.
Separación de la placa inferior
Coloque el mango en la posición baja y
voltee la aspiradora de manera que la parte
Page 17

inferior esté hacia arriba. Quite los 5 tornillos
con un destornillador Phillips, como se
muestra. Saque la placa
inferior (A).
3-17
Para sacar la correa
Saque el rodillo de escobillas del agitador (B)
y la correa usada (C).
Deseche la correa usada.
3-18
Para instalar la correa nueva
Con las letras en la parte de afuera de la
correa, y colocadas como se muestra,
deslice la nueva correa sobre la polea del
motor (D).
3-19
Reemplazo del rodillo de
escobillas del agitador
Introduzca el agitador a través de la correa
y coloque la correa en la guía para la correa
(E) del agitador.
Si el protector del agitador (F) queda fuera
de lugar mientras reemplaza la correa o
el agitador, vuelva a colocarlo como se
muestra, observando la ubicación de la guía
para la correa (G).
3-20
Para sujetar de manera segura
el agitador
Sujete firmemente el agitador y colóquelo
en posición, deslizando primero el extremo
opuesto de la correa en la ranura rectangular
(H) al costado de la aspiradora.
Jale el otro lado del agitador (I) para ponerlo
en su lugar.
Gire el agitador, asegurándose que la correa
gire libremente y no quede presionada entre
el agitador y la parte inferior de la aspiradora.
3-21
Reposición de la placa inferior
Vuelva a poner en posición la placa inferior
y los cuatro (5) tornillos Phillips. Apriete bien
los tornillos.
El rodillo de escobillas
del agitador
Cuándo reemplazarlo
El agitador se debe reemplazar cuando las
escobillas del agitador estén gastadas.
Para revisar la condición de las escobillas,
desconecte la aspiradora de la toma
de corriente eléctrica.
3-22
Pase el borde de una tarjeta a lo ancho
de la placa inferior, mientras hace girar el
agitador. Para mantener una limpieza eficaz,
reemplace el agitador si las escobillas no
tocan la tarjeta.
Qué comprar
Cuando compre un agitador nuevo, pida la
pieza No. 59157-074 de HOOVER.
Cómo reemplazarlo
Desconecte la aspiradora de la toma
de corriente eléctrica. Saque la placa
inferior, la correa y el agitador siguiendo
las instrucciones de la sección “Cómo
reemplazarla”, comenzando con la figura 3-16.
Deseche el agitador usado.
Continúe siguiendo las instrucciones de la
sección “Cómo reemplazarla” para volver a
colocar la correa, el agitador nuevo y la placa
inferior en su lugar.
Lubricación
El motor tiene cojinetes que cuentan con
suficiente lubricación para la vida útil del
motor. La adición de lubricantes podría
causar daños. Por lo tanto, no añada
lubricante a los cojinetes del motor.
Protector térmico
Su aspiradora tiene incorporado un
protector térmico para impedir el
sobrecalentamiento.
Cuando el protector térmico se activa,
la aspiradora deja de funcionar. Si esto
sucede, proceda de la siguiente manera:
1. Apague la aspiradora y
desconéctela de la toma de
corriente eléctrica.
2. Revise si se ha acumulado polvo en los
filtros.
3. Consulte la sección “Eliminación de
obstrucciones”.
4. Una vez que la aspiradora
esté desconectada y el motor
se haya enfriado durante 30
minutos, el protector térmico se activa
automáticamente y se puede seguir
pasando la aspiradora.
Si el protector térmico sigue activándose
después de efectuar los pasos anteriores,
es probable que su aspiradora necesite
reparación (vea la sección “Servicio”).
3-23
Cómo reemplazarlo
1. Saque el accesorio de la manguera
y voltéelo de manera que la parte inferior
mire hacia arriba. Con un destornillador
Phillips, saque los (2) tornillos de ambos
costados del accesorio y saque la placa
inferior (A).
cerrarla. Vuelva a colocar los (2) tornillos
Servicio
Para obtener el servicio aprobado HOOVER
y piezas genuinas HOOVER, localice
el Centro de ventas y servicio de
Hoover o el Concesionario autorizado
de servicio de garantía de Hoover
(Depósito) más cercano, ya sea:
• consultando las páginas amarillas de
la guía de teléfonos, bajo “Aspiradoras
-Domésticas” (“Aspiradoras - Artículos del
hogar”) O -
• consultando la sección “Service”
(Servicio) de Hoover en Internet,
www.hoover.com O -
• llamando al 1-800-944-9200 para
obtener una referencia automatizada de
las ubicaciones de los centros de servicio
autorizados (solamente en EE.UU.).
No envíe su aspiradora a Hoover en
Glenwillow, Ohio para obtener servicio; esto
sólo ocasionará demoras.
Si necesita información adicional,
comuníquese con el Centro de respuesta al
cliente de Hoover, al teléfono
1-440-263-6376.
En Canadá, comuníquese con Hoover
Canada, Carson Building, 100 Carson
Street, Etobicoke, Ontario M8W 3R9,
Teléfono: 1-800-263-6376.
Al solicitar información u ordenar piezas,
identifique siempre su aspiradora por el
número completo de modelo. (El número
de modelo figura en la parte posterior de la
aspiradora).
4. Si tiene un
problema
Si ocurre un problema menor,
generalmente puede resolverse con
bastante facilidad cuando se halla la causa,
usando la siguiente lista de verificación.
Problema: La aspiradora no
funciona
Causa posible
Solución posible
• No está bien enchufada
• Enchúfela bien
• No hay voltaje en la toma de
corriente de la pared
• Revise el fusible o el disyuntor
• Fusible quemado o se disparó el
disyuntor
• Reemplace el fusible o reajuste el
disyuntor
• Protector térmico activado
• Desenchufe la aspiradora y déjela
enfriar durante 30 minutos (esto
reajustará el protector térmico)
17
17
Page 18

Problema: Los accesorios de la
aspiradora no aspiran
Causa posible
Solución posible
• La correa está rota o desgastada
• Reemplace la correa
• El rodillo de escobillas del
agitador está desgastado
• Reemplace el rodillo de escobillas
• El depósito para polvo está lleno
• Vacíe el depósito para polvo
• Filtros sucios
• Limpie los filtros
• Ajuste incorrecto de la altura para
alfombras
• Mueva la perilla de control de la
boquilla a una posición más baja
• Obstrucción en los pasos del flujo
de aire
• Elimine la obstrucción
Problema: Dificultad para desplazar
la aspiradora
Causa posible
Solución posible
• Ajuste incorrecto de la altura para
alfombras
• Coloque el control de la altura para
alfombras en una posición más alta
Problema: Se detecta un olor a
humo/quemado
Causa posible
Solución posible
• Correa rota o estirada
• Reemplace la correa del rodillo de
escobillas del agitador como se
describe en las figuras 3-16 a 3-21
en la sección de Mantenimiento.
Problema: El rodillo de
escobillas del accesorio de mano
turboaccionado no gira
manera si la manguera o el tubo para el
polvo están obstruidos:
4-2
3. Apague la aspiradora y
desconéctela. Revise la conexión en el
tubo de la manguera (C); elimine cualquier
obstrucción.
4-3
Revisión por debajo de la placa
inferior
4. Apague la aspiradora y
desconéctela.
5. Saque la placa inferior, la correa y el
agitador (figuras 3-16 y 3-17).
Mire dentro de la abertura (D) para ver si hay
obstrucciones y elimínelas.
6. Saque el protector del agitador (vea
la figura 3-19) y elimine cualquier
desperdicio suelto que se haya podido
acumular debajo de éste.
Si hay una obstrucción durante
el uso del accesorio de mano
turboaccionado:
4-4
7 Desconecte el accesorio de mano
turboaccionado de la manguera.
Revise la abertura del conector
para accesorios (E) para ver si hay
obstrucciones y elimínelas.
Saque la placa inferior y la turbina como
se describe en las figuras 3-22 y 3-27.
Elimine cualquier obstrucción del canal
de la turbina (F).
Vuelva a colocar la correa, la turbina, el
rodillo de escobillas y la placa inferior.
Eliminación de
obstrucciones
Desconecte la aspiradora de la toma
de corriente eléctrica.
La succión o aspiración baja se puede deber
a una obstrucción en el sistema. Consulte
los siguientes pasos a fin de revisar si hay
obstrucciones, siguiendo cada paso
hasta que encuentre la obstrucción:
1. Revise el nivel de llenado del depósito
para polvo; vacíelo si es necesario.
4-1
Revisión del paso del
flujo de aire
2. Enchufe la aspiradora y enciéndala.
Revise si hay succión en el extremo de la
manguera (A).
Si hay succión, continúe con el paso 3.
Si no hay succión, revise de la siguiente
18
Page 19

19
Page 20

Printed in Mexico / Imprime au Mexique ®59881084 8-08
#
 Loading...