

Page 1

Classic
ROBOT
Edge Cleaning Side Brushes
Cliff Sensor
Includes Additional
Accessories
Robot Vacuum
Cleaner
Lightweight
200
MILLILITRES
Water Capacity
Page 2
3
5
1
2
76
4
8
10
11
129
13 15 1614
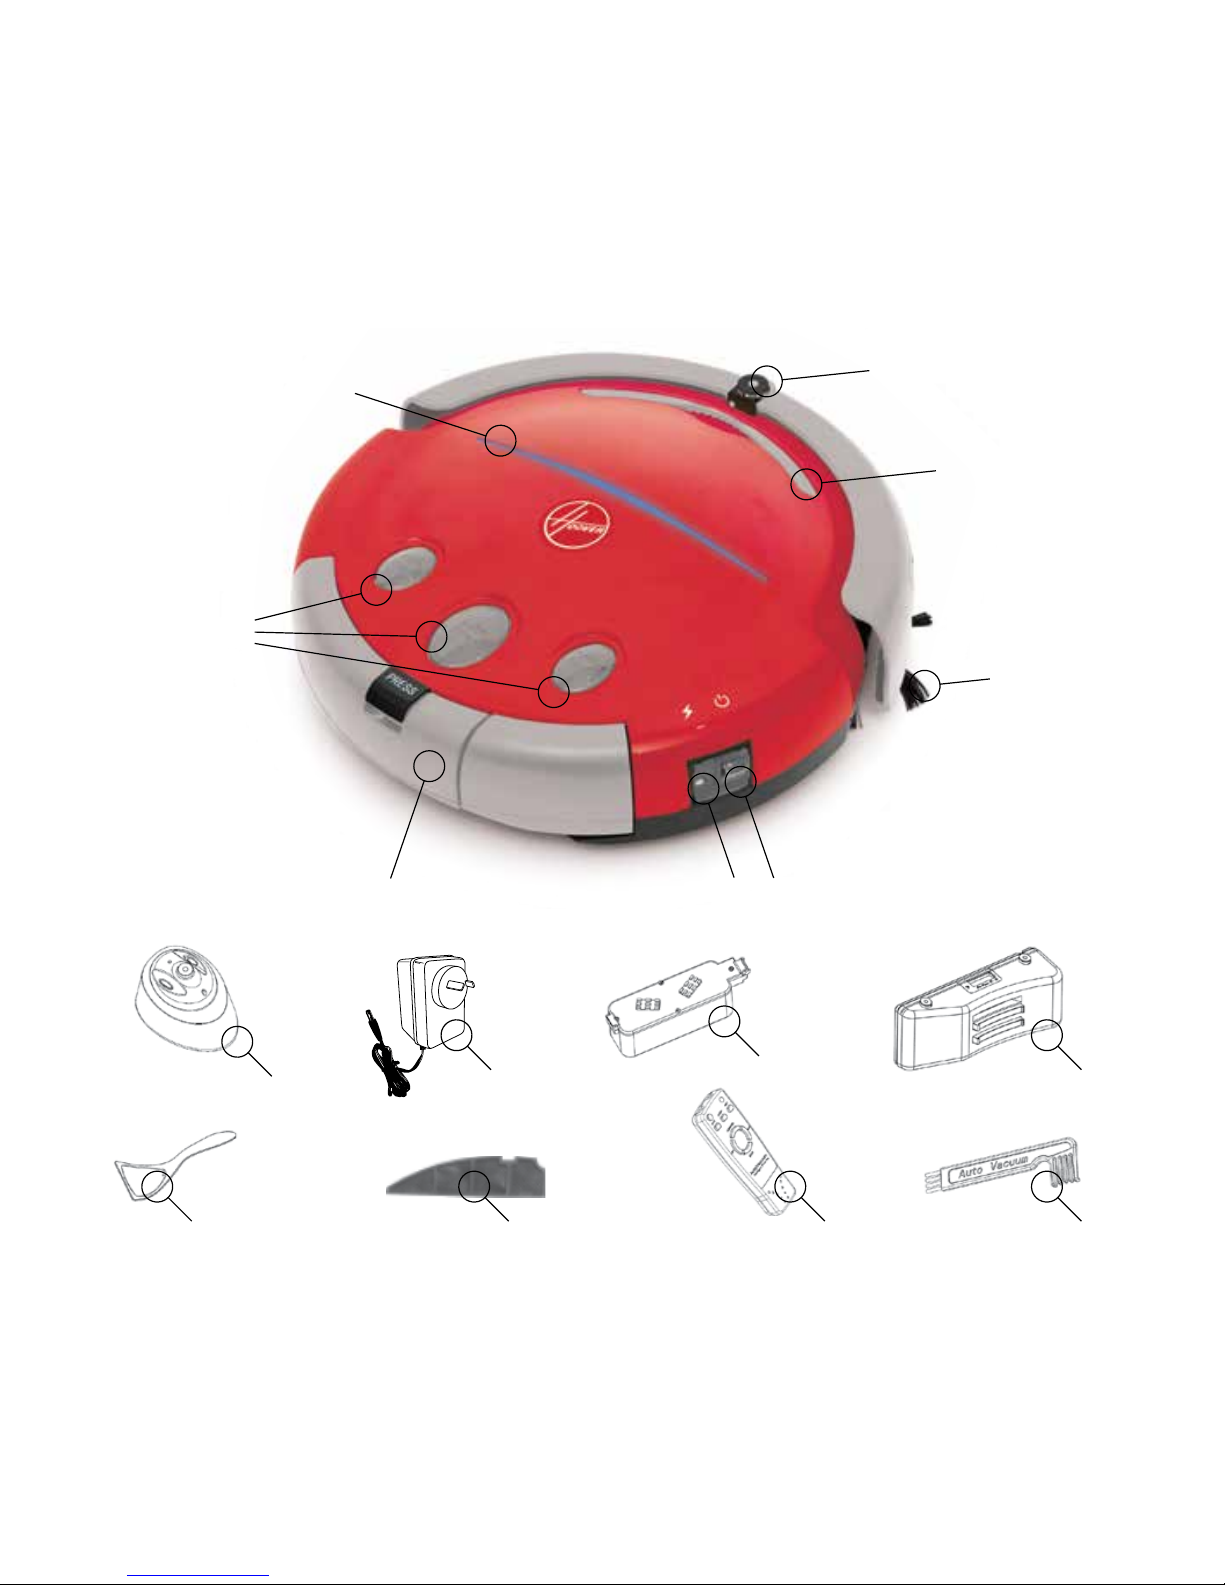
Batteries not included. Remote control - 2 x AAA size battery required. Virtual Wall - 2 x D size battery required.
Page 3

2240 Robot
Specifications:
Voltage: 14.4V
Input of charging base: 24V 1A
Features
Please contact Hoover Customer Care 1300 360 845,
NZ (09) 263 7573 to find your local spare parts provider.
Congratulations on the purchase of your new HOOVER vacuum cleaner. There are many useful
features built into your vacuum cleaner and we recommend that you carefully read this instruction
manual so that you may take best advantage of them.
Features:
1. Infrared Sensor
2. Battery Life Indicator (light on = Power on)
3. Easy Grab Handle
4. Operating Buttons
5. Side Brush
6. Removable Dust Bin
7. Battery Charger Socket
8. Power Switch
9. Virtual Wall Unit
10. Mains Power Adaptor
11. Rechargeable Battery Pack (Installed)
12. Charging Base Plate
13. Spoon
14. Filter
15. Remote Controller
16. Cleaning Brush
Page 4
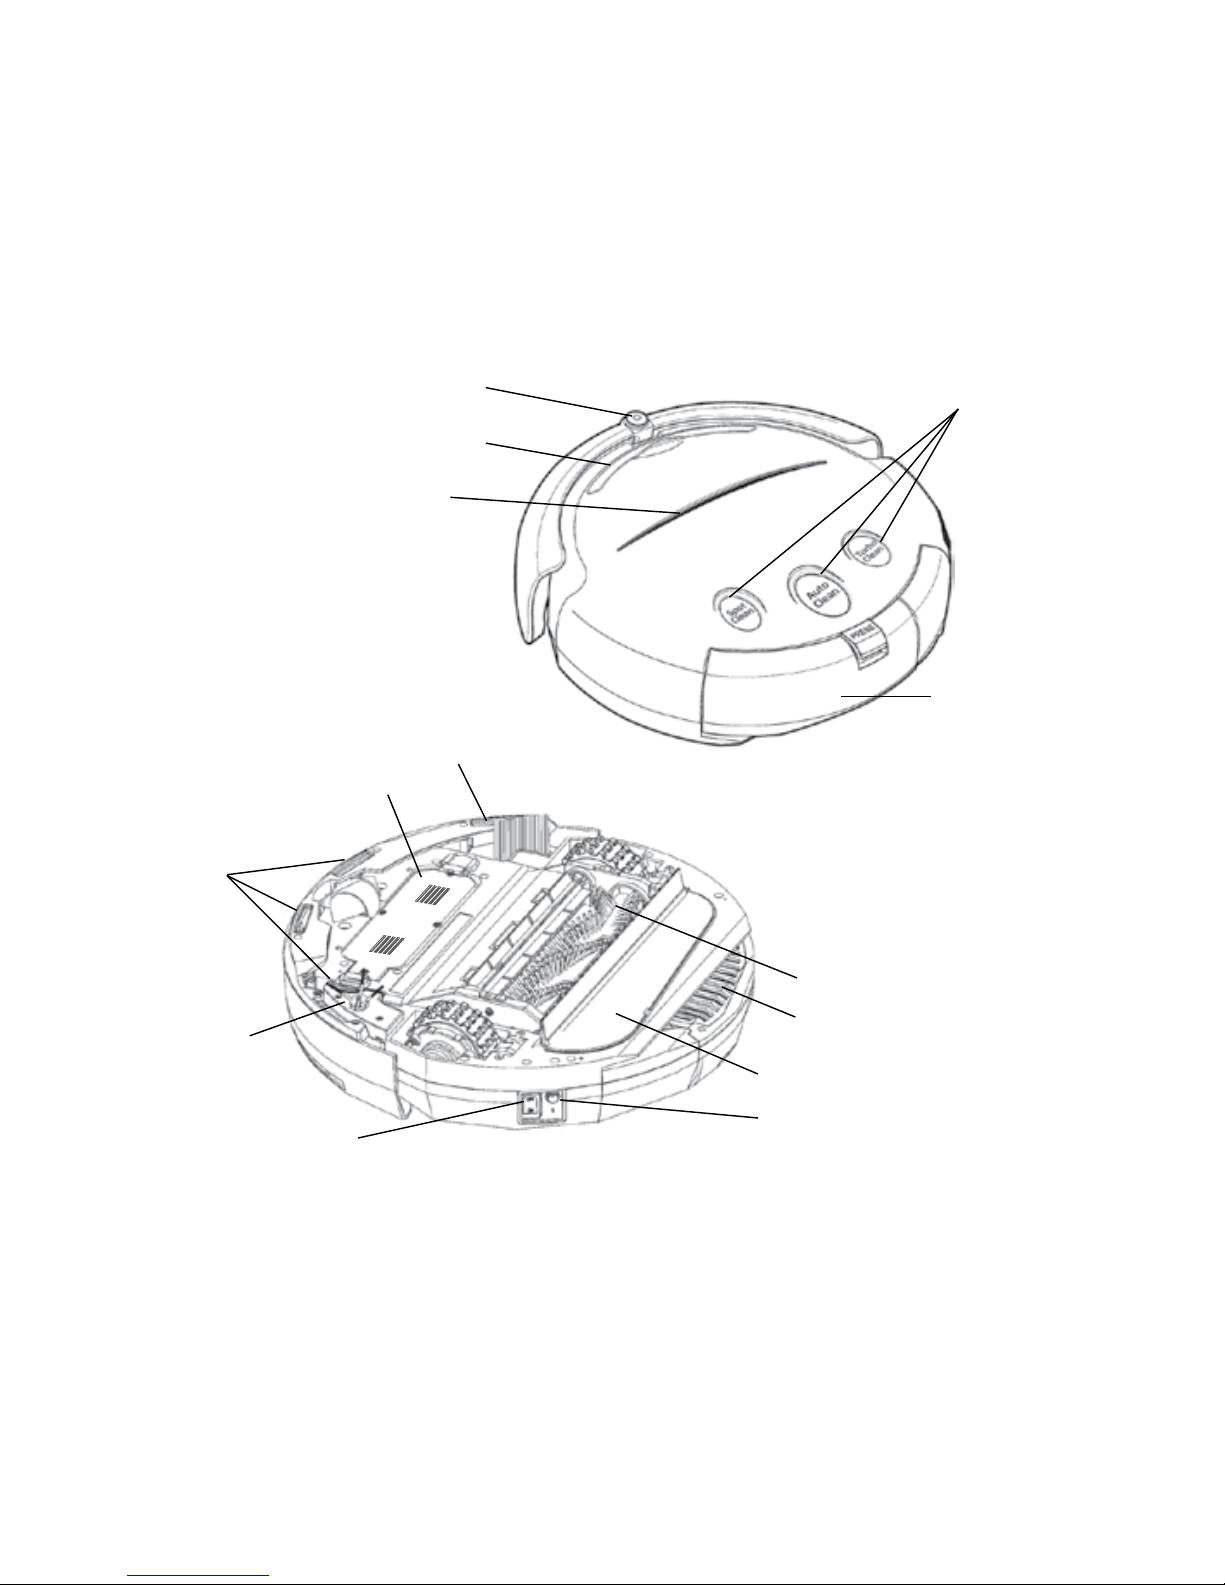
Infrared
sensor
Sensors
Sensors
Side brush
Rechargeable
battery
(not shown)
Opera
ting
buttons
Removable
dust bin
Easy to
grab handle
Battery
life indicator
Power
switch
Battery
charger socket
Vacuum inlet lid
Main brush
Filter
Robot Vacuum
Page 5
Features
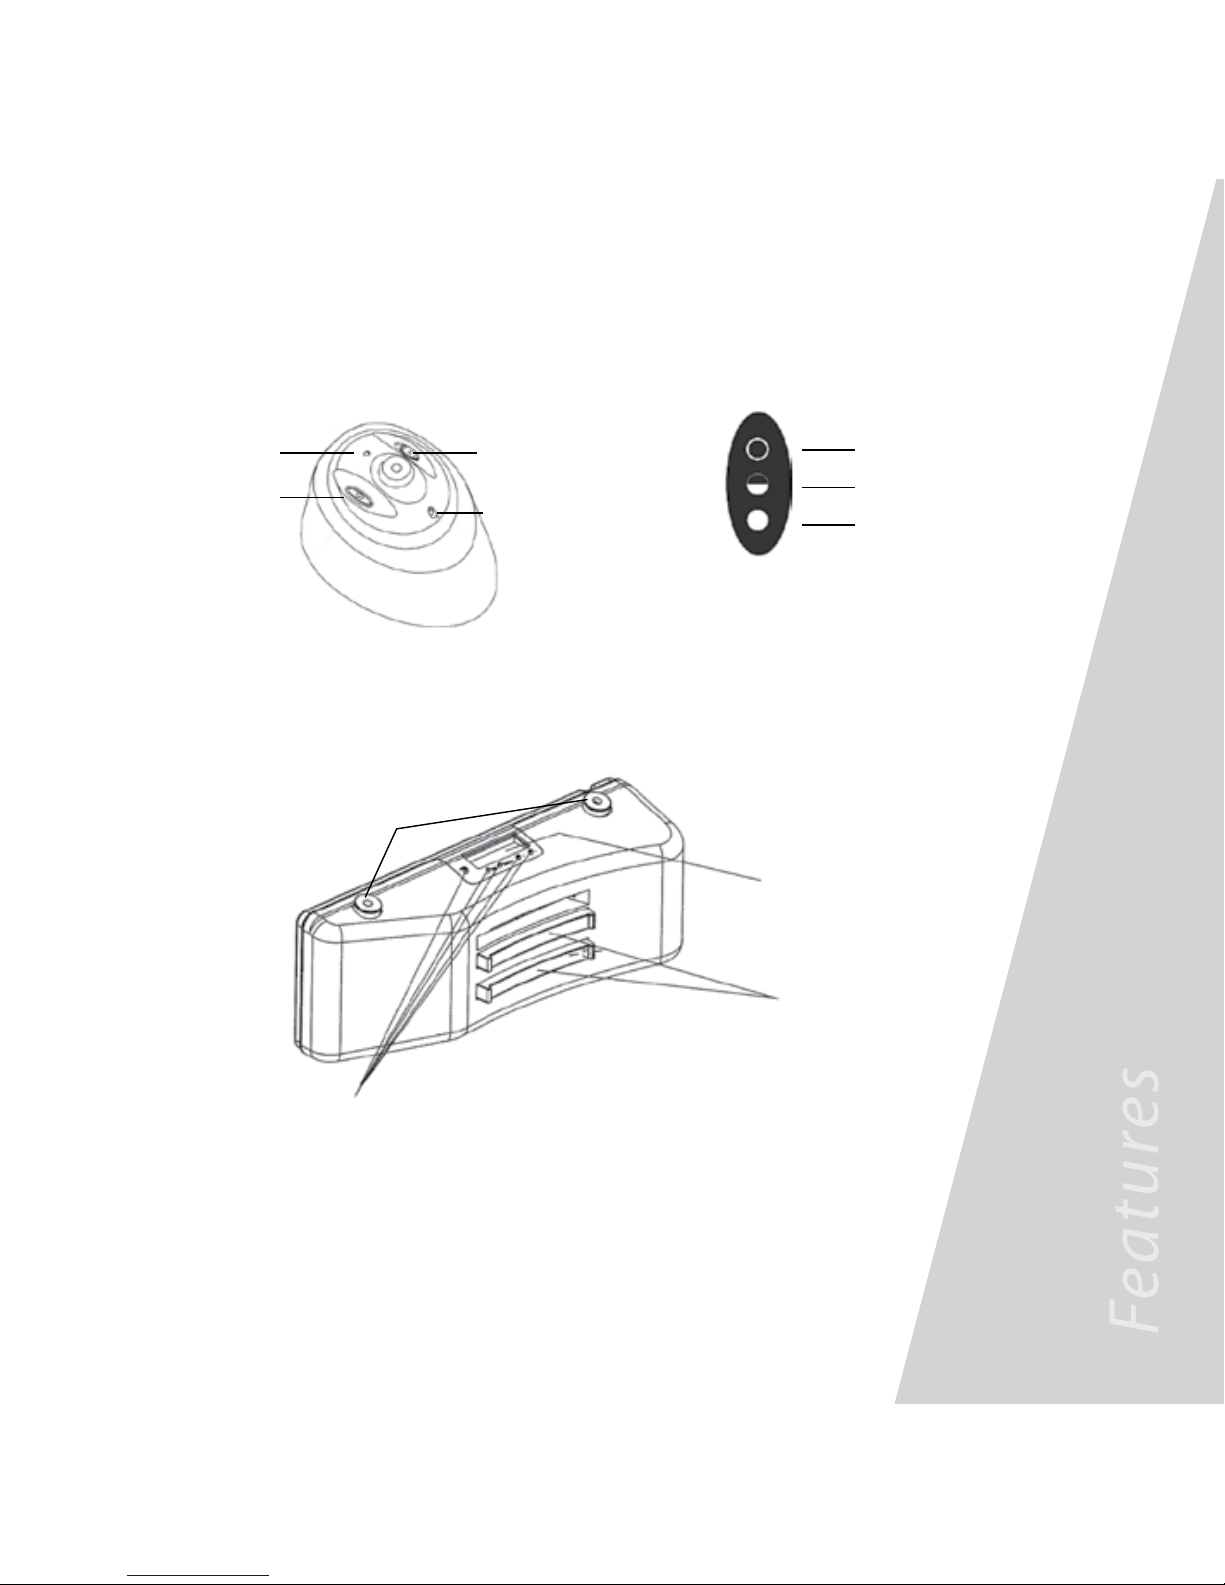
Virtual Wall unit
0-5m
0-3m
0-1.5m
LCD Display
Function setting key
Signal sensor
Charging base plate
The Virtual Wall Unit has three
setting options to choose from
depending on the size of the r
oom.
Power indicator
Power switch
Range selector switch
Infrared wave emitter
Charging Station
CAUTION! Do not use the infrared wave emitter to point at the eyes!
Page 6

Before you Begin
This cleaner must be operated in accordance with these instructions and used only for domestic household
cleaning to remove DRY dirt and dust from household carpets, flooring, walls and fabrics. This cleaner is not
fit to be used as an industrial cleaner hence will void the manufacturer’s warranty if used inappropriately.
Please read these instructions thoroughly
This will ensure you obtain full benefit from your new cleaner. Keep this Instruction Manual in a handy place
for future reference.
Important
Always switch the cleaner off and remove the plug from the electricity supply before cleaning your
appliance, when not in use, or attempting any maintenance task. The cleaner must only be connected to
an AC supply at the voltage shown on the rating plate. This cleaner should only be used for its intended
purpose as described in these instructions.
Precautionary measures:
1. Do not operate the vacuum cleaner too close to heaters, radiators, and other hot surfaces.
2. Before inserting the plug into the wall, make sure your hand is dry.
3. Before turning on the vacuum cleaner, remove any large or sharp objects from the floor or
cleaning surface in order to prevent damage to the filter.
4. When you want to pull the plug from the wall, do not use the power cable, gently pull the
plug from the power socket.
5.
If the hose inlet, combination floor tool or telescopic tube are blocked, you should switch off
the cleaner straight away and remove from mains power. First clear the blocked substance
before attempting to start the vacuum cleaner again.
Page 7

Warning
WARNING:
Electricity can be extremely dangerous. This
appliance is powered by rechargeable Ni-MH
batteries and is provided with a charging base
plate. Please ensure the voltage marked on the
mains power adaptor is suitable for connection to
standard mains power outlet voltage.
REMINDERS:
• Always store the appliance indoors. Do not
use outdoors or expose the appliance to the
elements, humidity or heating sources (oven,
fireplace, wet floor).
• Do not expose the Robot or accessories to
excessive heat/cold (Keep between 0-30°C).
• Do not drop the Robot or use any accessory if it
has been dropped, damaged, left outdoors or
dropped in water.
• Never unplug or pull the mains power adaptor
by the power cord.
• Never pick up matches, hot ash, cigarette ends,
or sharp objects.
• Do not spray with, or pick up flammable liquids,
cleaning fluids, aerosols, or their vapours, as this
may increase the risk of fire/explosion.
• Do not continue to use your Robot if it appears
to be faulty. If the mains power adaptor power
cord is damaged, stop using it IMMEDIATELY:
to avoid a safety hazard, only an authorised
Godfrey’s Service technician must replace the
Power Cord.
• This Robot is for use on wooden flooring, rubber,
ceramic tile, linoleum and short pile carpet.
• Do not use to clean stairs.
After Use:
Return the Robot to the Charger Base
Station. Always switch off and disconnect
the mains power adaptor before cleaning
or attempting any maintenance task. If
the Robot will not be used for a long
time (several weeks), unplug the
Charger Base Station according to the
instructions in this User Manual.
Safety with children, the
elderly or infirm:
This cleaner is not a toy.
Do not let children play with
the appliance or its controls.
Please supervise the use of the
appliance by older children,
the elderly or the infirm.
Safety Precautions and Warnings
Page 8

Safety Precautions and Warnings
C AUTION
No one else can disassemble, maintain or transform
the product except the maintenance technicians
designated by our company, or it may cause fire,
electric shock or personal injury.
Don’t use other chargers only the one supplied with
the unit or it may cause product damage, electric
shock or fire due to high voltage.
Don’t touch high-voltage power cable of the electric
appliance with your hands or it may cause electric
shock.
Don’t bend the power cable overly or place weight
on it, or it may cause power cable damage, fire or
electric shock.
Don’t twist clothes or any part of the body (head,
finger, etc.) into the brush or wheel of the Robot, or
it may cause personal injury.
Don’t approach cigarette, lighter, match and other
heat objects or combustible materials such as the
gasoline cleaner.
ATTENTION
Don’t forget to turn off the power while transporting
or storing the cleaner for long or the battery may
be damaged.
Insert the power cable of the charger well or it may
cause electric shock, short circuit, smoking or fire.
Check that the charger and socket are connected
well, or it may cause charging failure or even fire.
Remove all easily damaged objects (including
luminous objects, fabrics, glass bottles, etc.) before
using, or it may cause damage to these objects or
affect the use of the cleaner.
Please use the cleaner cautiously in the presence of
children to avoid frightening or harming them.
v
Don’t stand or sit on the cleaner, or it may cause
damage to the cleaner or personal injury.
Don’t allow the cleaner to suck up any water or
other liquids to avoid damage to the product and
harm to yourself.
Don’t use the cleaner on small tables and chairs or
other small spaces, otherwise the cleaner may be
damaged.
Don’t use the cleaner outdoors, or it may cause
damage to the product.
Don’t use the cleaner in commercial places, or the
cleaner may be damaged by excessive use.
Don’t leave movable threads, wire and other objects
with the length of more than 150mm on the ground
or the brush may be entangled.
The cleaner is not for by the disabled (people with
physical or mental handicap) or children. Users of
the cleaner should read the manual before operating
the unit.
Page 9

Assembly
Assembly
WARNING! The cleaner should be switched off and disconnected from
the mains power supply before assembling.
Wall xing plate
Battery charger socket
Outlet
Outlet
Battery charger socket
Setting the Auto Charging Base Plate
1. The cleaner may be charged directly by the charger as well as by the auto
charging base plate. If the battery is about to run out, the indicator will turn
blue and the cleaner will automatically stop cleaning and seek the charging
base plate for charging when machine is set under turbo and timing mode.
Page 10

Assembly (continued)
2. For charging with auto charging base plate, the plug of charger should be inserted into the
DC socket at the back of the base plate, meanwhile, the screen on the base plate will display
the time, etc.
3. The charging base plate must be correctly installed and be placed on the floor with the back on
the wall and no object under it. The base plate may be fixed on the wall by the soft glue on the
wall fixing plate space. (Remove the paper from the wall fixing plate and fix the charging base
plate on the wall with the adhesive).
4. In order to prolong the life of the battery, it should be charged for 8-9 hours for the first use or
when being used again after a long time. It can only reach its best performance after 2-3 cycles
of charging and discharging.
5. While charging, the charging light (on top of the unit) will flash indicating that the battery is being
charged, once full charged, the charging light will remain on.
6. If the room is too large and the cleaner cannot find the charging base plate immediately, you may
manually return it to the base plate.
Place the cleaner 1.5m
away from the base
plate, and then press the
power switch and Turbo
Clean key. Alternatively,
return the cleaner near to
the base plate and it will
automatically find it and
begin to charge.
Page 11

Assembly
Clock Timing
Clock key Timing key
1
a. Press the clock key to adjust the time of clock
as shown.
b. Press the clock key three times and respectively
adjust hour, minute and week. Press +/- key to
adjust the specific parameters. After setting the
time, press the clock key and the clock setting
is ok. At this time, there is “1” before the time
displayed in the screen.
Press the timing key to set the alarm time,
and the cleaner will automatically work as
per the set specified time with the specific
operating methods:
a. Press timing key to set the hour. It can
be adjusted by the key +/-.
b. Press timing key again to set the minutes.
It can be adjusted by the key +/-.
c. Press timing key three times and the screen will display OFF. At such time, the
alarm function is off. If you want to turn on the alarm, you may press + key, the
screen will display ON and then press the timing key again.
d. After it displays ‘ON’ for alarm setting, there will be “2” displayed before the time
in the screen.
CAUTION! The time intervals between the pre-set time set by the
timing key and the standard time set by the clock key is above 4.5
hours. The timing cleaning function will be affected merely when
the battery is fully charged for 4.5 hours.
Clock Function
Timing Clean Function
Clock key Timing key
Clock Timing
2
Page 12

Assembly (continued)
Clock key Timing key
Clock Timing
Full
go key
Power key
Directio
n
keys
Turbo clean key
Auto clean key
Spo
t clean key
Indicator
SPOT
CLEAN
FORWARD
LEFT
BACK
RIGHT
AUTO
CLEAN
TURBO
CLEAN
a. The cleaner will automatically work after being
fully charged.
b. Press the full go key there will be a broom icon displayed
at lower right corner of the screen, which means the
function is on. Press the key again; the broom icon will
disappear, which means the function is off.
c. There is a charging dynamic image flashing on the screen
when the cleaner is charging on the auto charging base
plate. Meanwhile, the battery indicator will flash. If it turns
green, it means it has been fully charged and is able to
work. Generally, the charging time is 4-6 hours.
The cleaner can be controlled manually using the infrared
remote control. The three setting keys are the same as the
ones that are on the unit. The direction keys can operate the
cleaner to work in different directions.
a. The P key is for powering on/off. Press the P key, the
indicator on the panel will turn off and the cleaner
enters sleep mode, which enables the unit to save
energy when not in use.
b. Press the P key again, the indicator will turn on, and
the unit will enter the standby stage, waiting for the
next command.
c. When the virtual wall and remote control are used in
the same area, as they all use the infrared signal, this may
lead to temporary failure of the remote control, you may
operate the remote control after turning off the virtual
wall or when the unit is far away from the Virtual Wall.
Auto Cleaning Function
Infared Remote Control
Page 13

Instructions for Use
1. Please ensure the battery is fully charged
before starting the cleaner.
2. Please ensure any unfixed articles are
removed from the floor space before using
the cleaner, and ensure that there are no
spikes on the edges of the carpet or power
cables lying on the floor.
3. Turn on its main power start button,
there are three start buttons: Spot, Auto
and Turbo, representing three different
cleaning modes. In addition, there is a
timing work mode:
a. Spot mode (S):
The cleaner can make repeated screw type cleaning within the scope of 3 feet of
diameter, focusing to clean a spot for 4 minutes. This mode is applicable for cleaning
a room that is dirty in some places.
b. Auto mode (M):
The cleaner will automatically clean the room for 30 minutes. This mode is applicable
for cleaning small rooms.
c. Turbo mode (L):
The cleaner won’t stop running until complete consumption of its power. The
working time is excess 60 minutes. If the auto charging base plate is used, the
cleaner will automatically return to it for charging.
d. Timing mode:
The cleaning time can be set by the time setting key on the charging base
plate. The cleaner will leave the auto charging base plate to work as per
the pre-set time and the cleaning time is 60 minutes, and then it will
automatically return to the socket for charging.
It’s better to put the
Virtual Wall Unit
behind the door.
Infrared ray
Instructions for Use
Page 14

Instructions for Use (continued)
4. If you don’t want your cleaner to clean those areas beyond your desired cleaning area,
please place the Virtual Wall Unit at the proper place.
5. When the wrong start button is pressed, the other start switch needs to be pressed twice
before cleaning.
6. The max working time for the cleaner is about 60 mins, which can meet the requirements for
cleaning a normal room. If the battery power is about to run out, the battery life indicator will
become blue, and it will stop working.
Intelligent Path Judgment
The Intelligent Robotic Vacuum is self controlled and can avoid any obstruction. It will also change
direction before falling down steps.
CAUTION! Ensure all small objects such as vases, small paper boxes etc are removed
from cleaning area. These can be knocked down during cleaning.
Page 15

Instructions for Use
Helpful Hints
1. For the purpose of ensuring the cleaner is automatically charged, regularly wipe the charging
contact at the front of the unit and the charging dome on the base plate with a dry cloth, so
as to keep it free of dust, otherwise it may result in poor contact.
2. The charging base plate should be installed in as open place as possible, and do not place any
obstacle within the range of 1.5m of the charging base plate, this will affect auto charging.
3. The Cleaner should be matched with the attached charger. Do not use any other charger
and battery to avoid damage to the unit.
4. In order to prolong the life of the battery, it should be charged for 8-9 hours for the first
use or when being used again after a long time. It only can reach its best performance
after 2-3 cycles of charging and discharging.
5. If the cleaner is switched on but stops after the short music playing, this may mean the
battery is low or off and charging is required.
6. Do not use the cleaner on high-pile carpets.
7. Avoid using the cleaner where there are objects such as clothing, power cables,
towels,etc. As these things may entangle the brushes of the cleaner.
8. It is good to turn off the power switch after use and must be fully charged if it’s not
used for a long time. Take the battery out of the unit and store the battery and unit
in a cool, dry place when not in use.
Page 16

Maintenance
IMPORTANT!
Ensure the vacuum cleaner is not connected to the power supply
when performing any maintenance procedures. Use a damp cloth and mild
detergent when cleaning the appliance.
Emptying the Dust Bin
1. Turn off the power switch.
2. Press down the bin clip
and pull out the dustbin.
3. Empty the dustbin.
4. When inserting the
dustbin, press the clip on
the bin to facilitate return.
Cleaning the Filter
1. Turn the dustbin upside down.
2. Press the bottom slightly, remove the filter gently.
3. Clear the dirt on the filter mesh.
4. Fit the filer back to the dustbin. Press the clip slightly and put the dustbin back into the cleaner.
Page 17

Maintenance
Cleaning the Main Brushes of the Cleaner
1. Turn off the power switch and put the cleaner on a flat surface upside down.
2. Using right thumb, push forward the locking rod and lift up the cover; using left
hand, hold the middle hairbrush and lift up.
3. Clean the chamber where the brush is located and the contaminants on the brushes.
4. Wipe out dirt on the metal shaft and
bearing of the brush coupler and the
brushes (this may not be necessary to
do after every use). If necessary, you may
add a little lubricant to it.
5. Put the brush coupler and brushes back
and tighten the screw.
Page 18

Maintenance (continued)
Cleaning the Vacuum Inlet Lid
1. Turn off the power switch; turn the cleaner upside down on
flat surface.
2. Remove the vacuum inlet lid out as per following drawing.
3. Clean the vacuum inlet lid and the fan-shaped mechanism
to ensure good ventilation.
4. Guide the hinge tabs on the vacuum inlet lid back into their
holes carefully.
CAUTION! Please open the vacuum cover as shown:
1. Pressing the board as No.1;
2. Pushing the buckle slightly as No.2;
3. Rotate it up as No.3.
3
2
1
Replacing the Side Brush
The side brush is a consumable and will wear out over time.
1. Screw out the two screws.
2. Turn the side brush to the extent
that the screwdriver can be inserted,
loosen the screen, take off the old
brush and replace with a new one.
3. Install the side brush and bottom
housing in adverse order.
Page 19

Troubleshooting
Troubleshooting
Problem Solution
Cleaner is falling down stairs
(ie: not changing direction when
Cleaner is falling down stairs (ie: not changing direction
when stairs are sensed). Wipe away the dust for the
probe at the bottom of the front plate with a dry cloth.
Cleaner stops running and all
indicators are on during cleaning.
Ensure there are no large objects blocking the main
brush or the wheels and clean the dust bin if full.
Cleaner is rotating in the one
position abnormally.
Ensure there are no large objects blocking the main
brush or the wheels and clean the dust bin if full.
The virtual wall doesn’t work.
Place the virtual wall unit in the right place. Replace
the battery for the virtual wall if the green indicator
keeps flashing.
The battery will not charge.
Check whether the battery is correctly installed and
you should hear two sounds when installing the
battery. Then check whether the contact on the front
plate and dome on the base plate is dirty. If it can’t be
charged on the base plate directly use the charger for
the unit to charge.
Cleaner can not find the
charging base plate.
The wrong mode has been selected, the robot can only
find the charging base plate under turbo and timing
mode. The base plate will produce an infrared signal and
it only returns to the base plate after finding the signal.
You should confirm the power is on for the base plate
and do not use the virtual wall near the base plate as its
signal may affect the robot’s ability to find the position of
the base plate. If the room is large, it is possible that the
cleaner won’t find the base plate after cleaning. In such
circumstances, you should replace the base plate and do
not put any obstacles within 3-4m around it.
Cleaner does not perform
timing cleaning function.
Check whether there is power failure for the charging
base plate or while in operation. If the displayed
parameters change, it should re-set them again.
Problems and Solutions
If you come across a problem, please use the checklist of troubleshooting tips before
ringing Hoover Customer Care.
Page 20

Call Hoover Floorcare
with any product queries
Australia 1300 360 845
New Zealand (09) 263 7573
To find out more about our range,
visit: www.hoover.com.au
www.hoover.co.nz
email: sales@hooverfloorcare.com.au
Your Hoover cleaner, in the case of domestic use, has
a one year parts and labour warranty against product
defects and failures when the product is used in
accordance with the terms and conditions of this
warranty statement.
This warranty commences from the original date of
purchase and is not transferable; please retain your
original proof of purchase for any warranty claims.
This warranty is valid only in the country where the
cleaner is purchased.
The cleaner must be operated in accordance with
these instructions and used only for domestic
household cleaning to remove DRY dirt and dust from
household carpets, flooring and fabrics. This cleaner
is not fit to be used as an industrial cleaner, and is
not designed for the collection of vitreous building
material including particle board, construction
products and similar products such as wood/fibres,
cement, fillers, fibre glass etc or excessive or frequent
sand. The infrequent pick-up of these materials in
these circumstances may be harmful to your cleaner
and may void the manufacturer’s warranty.
Accessories and consumables including dust bags
and filters, unless defective in manufacture, are not
subject to this warranty. In order to prolong the life
of accessories and consumables, regular care and
maintenance is recommended.
When properly used and cared for, your cleaner
will render excellent service; refer to the instruction
manual for further details, as misuse or failure to
follow the instructions makes this warranty void.
In the event of service or advice being needed, please
contact Hoover Floorcare Asia Pacific Pty Ltd, Level
1, Building 2 Brandon Business Park, 530 Springvale
Road, Glen Waverley Victoria 3150, or on 1300 360 845,
Monday-Friday 9am-5pm EST. The decision to repair or replace
the cleaner is at the sole discretion of Hoover Floorcare. If
Hoover Floorcare decide to repair or replace the cleaner, it will
do so at its own cost.
Hoover Floorcare is unable to accept responsibility under this
warranty for any repair work not carried out by an authorised
Hoover Service Agent or from the use of non-genuine
parts. If any part is no longer available or manufactured,
Hoover Floorcare will replace it with a genuine functional
replacement part. This warranty does not apply to the
cost of replacing any parts of the product due to normal
wear and tear, alterations, improper installation, physical
abuse, misuse or accidental damage. Any transportation
costs involved in the repair of defective parts shall be
borne by the claimant.
If proof of purchase cannot be provided at the time
of a warranty claim or service, any work carried out
on the cleaner is chargeable.
The repair or replacement of the cleaner under
this warranty does not extend the original period
of warranty.
The benefits conferred by this warranty are in
addition to all other rights and remedies in
respect of the product as outlined under the
Competition and Consumer Act and other
State and Territory laws.
“Our goods come with guarantees that
cannot be excluded in the Australian
Consumer Law. You are entitled to a
replacement or refund for a major failure
and for compensation for any other
reasonably foreseeable loss or damage.
You are also entitled to have the goods
repaired or replaced if the goods fail to
be of acceptable quality and the failure
does not amount to a major failure.”
V1 07/13
Conditions of warranty
 Loading...