

Page 1
Instruction
Book
Instructions for installation and use
Washing Machine
Page 2

Introduction
Please read and follow these instructions carefully and operate the machine
accordingly. This booklet provides important guidelines for safe use, installation,
maintenance and some useful advice for best results when using your machine.
Please complete the information below referencing your products details found on the
rating plate that is attached to the porthole of your machine:
Model Number:___________________
Serial Number (16 digits): _ _ _ _ _ _ _ _ _ _ _ _ _ _ _ _
Our customer service advisors will require this information whenever you contact
Hoover. Please keep all documentation in a safe place for future reference or for any
future owners.
Delivery information
Please check that the following items are delivered with the appliance:
● Instruction manual
● Guarantee card
● Blanking plugs
● Inlet hose
Check that no damage has occurred to the machine during transit.
Guarantee
Your new Hoover appliance comes with a 12-month call-out, parts and labour
guarantee. Registering your appliance also gives you an additional 4-year parts
guarantee absolutely free. To activate both your 12-month and 4 year guarantees, you
must register your appliance within 30 days, quoting your model number, serial
number, plus the date and price of you purchase.
Register your appliance now by calling
08444 810 157
or register online
www.hoover.co.uk
If you would like to register for an additional 4 years labour protection, please ask our
service advisor for cost details, or complete the enclosed form.
2
3
Page 3
Caring for the environment
Together, we share the responsibility to safeguard our environment for future
generations.
At Hoover, that means continually developing new, intelligent technologies to produce
electrical appliances that perform more efficiently and use less electricity and less
water. This significantly reduces the carbon footprint from your appliance.
Our ongoing commitment will ensure that we will continue to develop more intelligent,
more efficient appliances for future generations.
European Directive
2002/96/EC
This appliance is marked according to the European directive
2002/96/EC on Waste Electrical and Electronic Equipment
(WEEE).
By ensuring this product is disposed of correctly, you will help
prevent potential negative consequences for the environment and
human health, which could otherwise be caused by inappropriate
waste handling of this product.
The symbol on the product indicates that this product may not be
treated as household waste. Instead it shall be handed over to the
applicable collection point for the recycling of electrical and
electronic equipment.
Disposal must be carried out in accordance with local
environmental regulations for waste disposal.
For more detailed information about treatment, recovery and
recycling of this product, please contact your local city office, your
household waste disposal service or the shop where you purchased
the product.
4
5
08444 995599
11 kg
0.05 ÷ 0.8 MPa
85 cm
60 cm
64 cm
Page 4
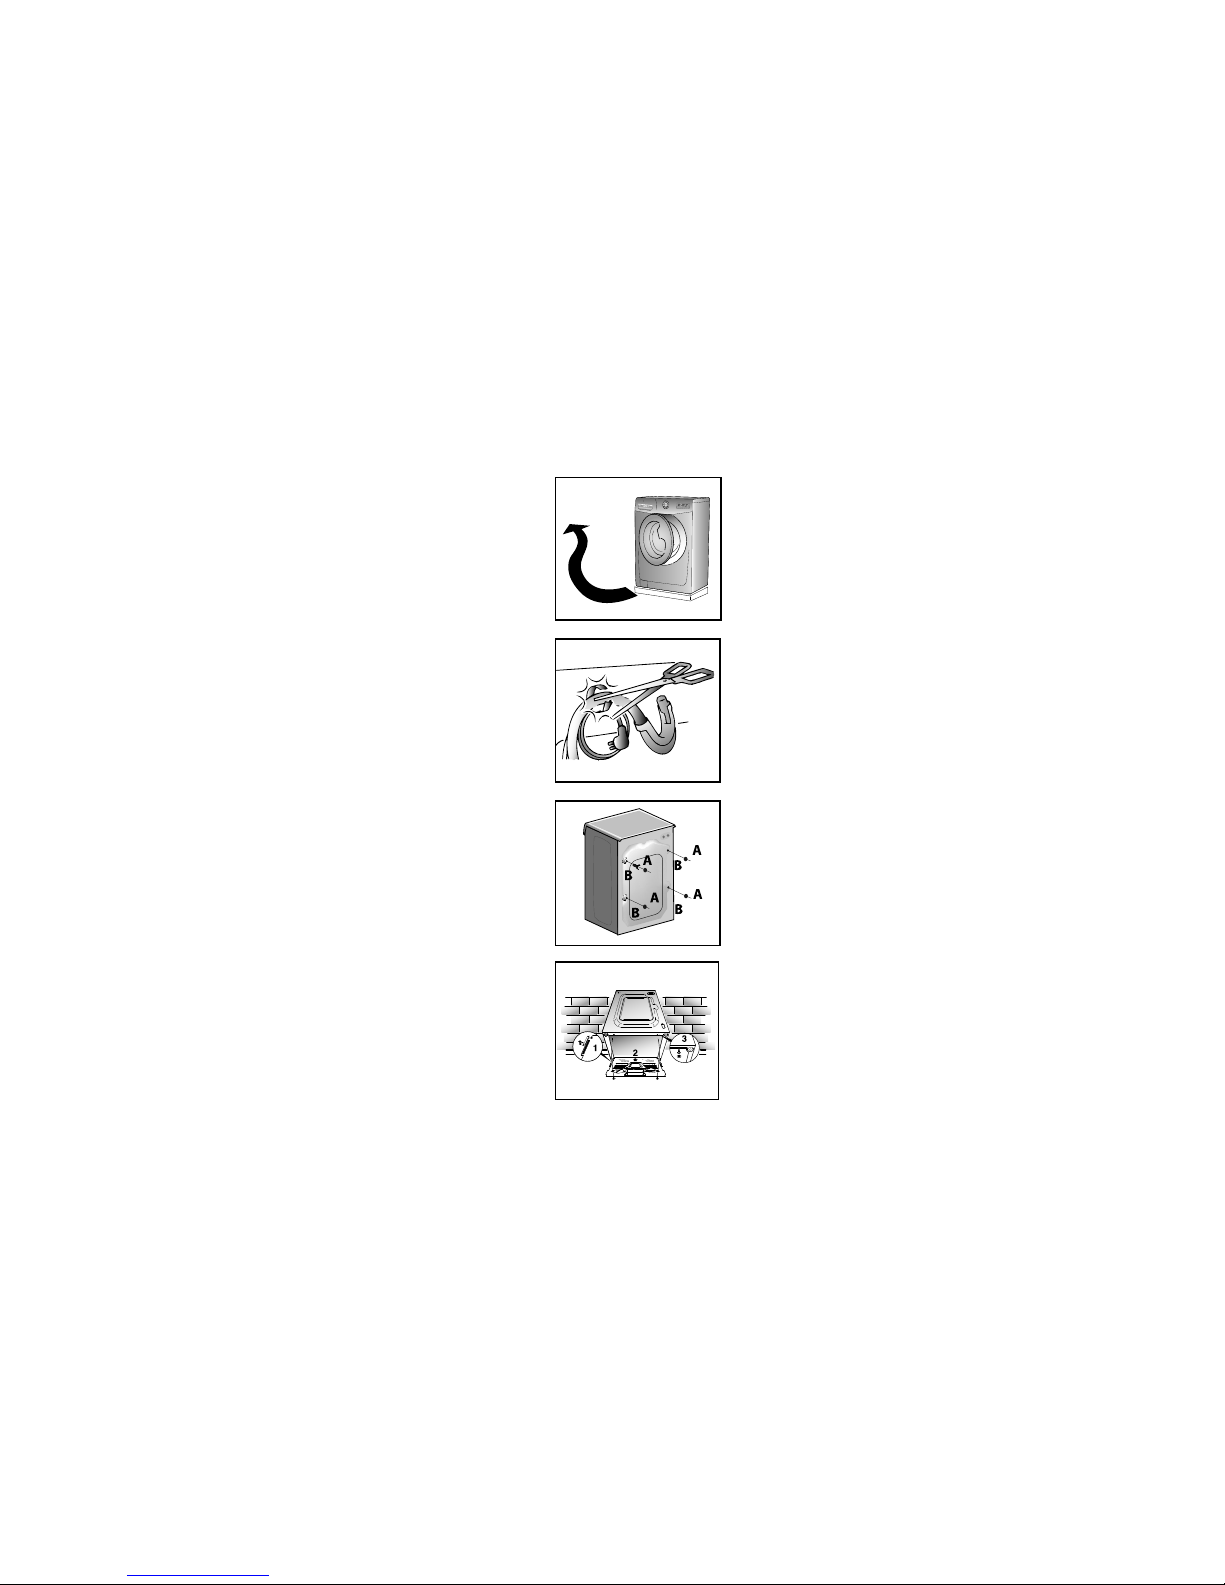
Unpacking the Product
Remove the machine from its packaging close to the final location of the machine.
Step 1. Remove all outer packaging from the
machine. Check there is no damage to the machine
before continuing the installation process.
Step 2. Carefully cut through the hose-retaining clip
at the rear of the machine, taking care not to cut
the hose itself.
Step 3. Remove the 4 retaining screws at the rear
of the machine, as indicated in the image on the
left. Use the blanking plugs provided in the
instruction booklet pack to cover the holes once the
screws have been removed.
Step 4. Tilt the machine forward and apply the
insulation base panel (corrugated plastic) to the
base of the machine using the self-adhesive strips.
All packaging materials used are environmentally friendly and recyclable. Please help
dispose of the packaging via environmentally friendly means. Your local council will be
able to give you details of current means of disposal.
7
6
Page 5

Water Supply
This machine should only be connected to a cold-water supply. The cold-water
pressure should be between 0.5 and 8 bar (0.05-0.8 Mpa).
Do not connect the machine to a single outlet instantaneous water heater.
Before connecting the fill hose, check that the water is running from the water supply
tap to be used. Let the water flow from the tap until the water runs clear before
connecting to the machine. The water supply tap should be accessible when the
machine is installed.
The water-stop device protects against water damages
caused by leaks on the fill hose which could develop
due to natural ageing of the hose.
In the water-stop system the leaking water fills the
corrugated hose and activates a stop valve which cuts
off the water supply to the machine.
This fault is shown by a red sector on the window "A".
Would this occur, please refer to your Service Agent.
9
8
Safety antitwist device
(press and twist to remove
the washer)
➝
A
Page 6
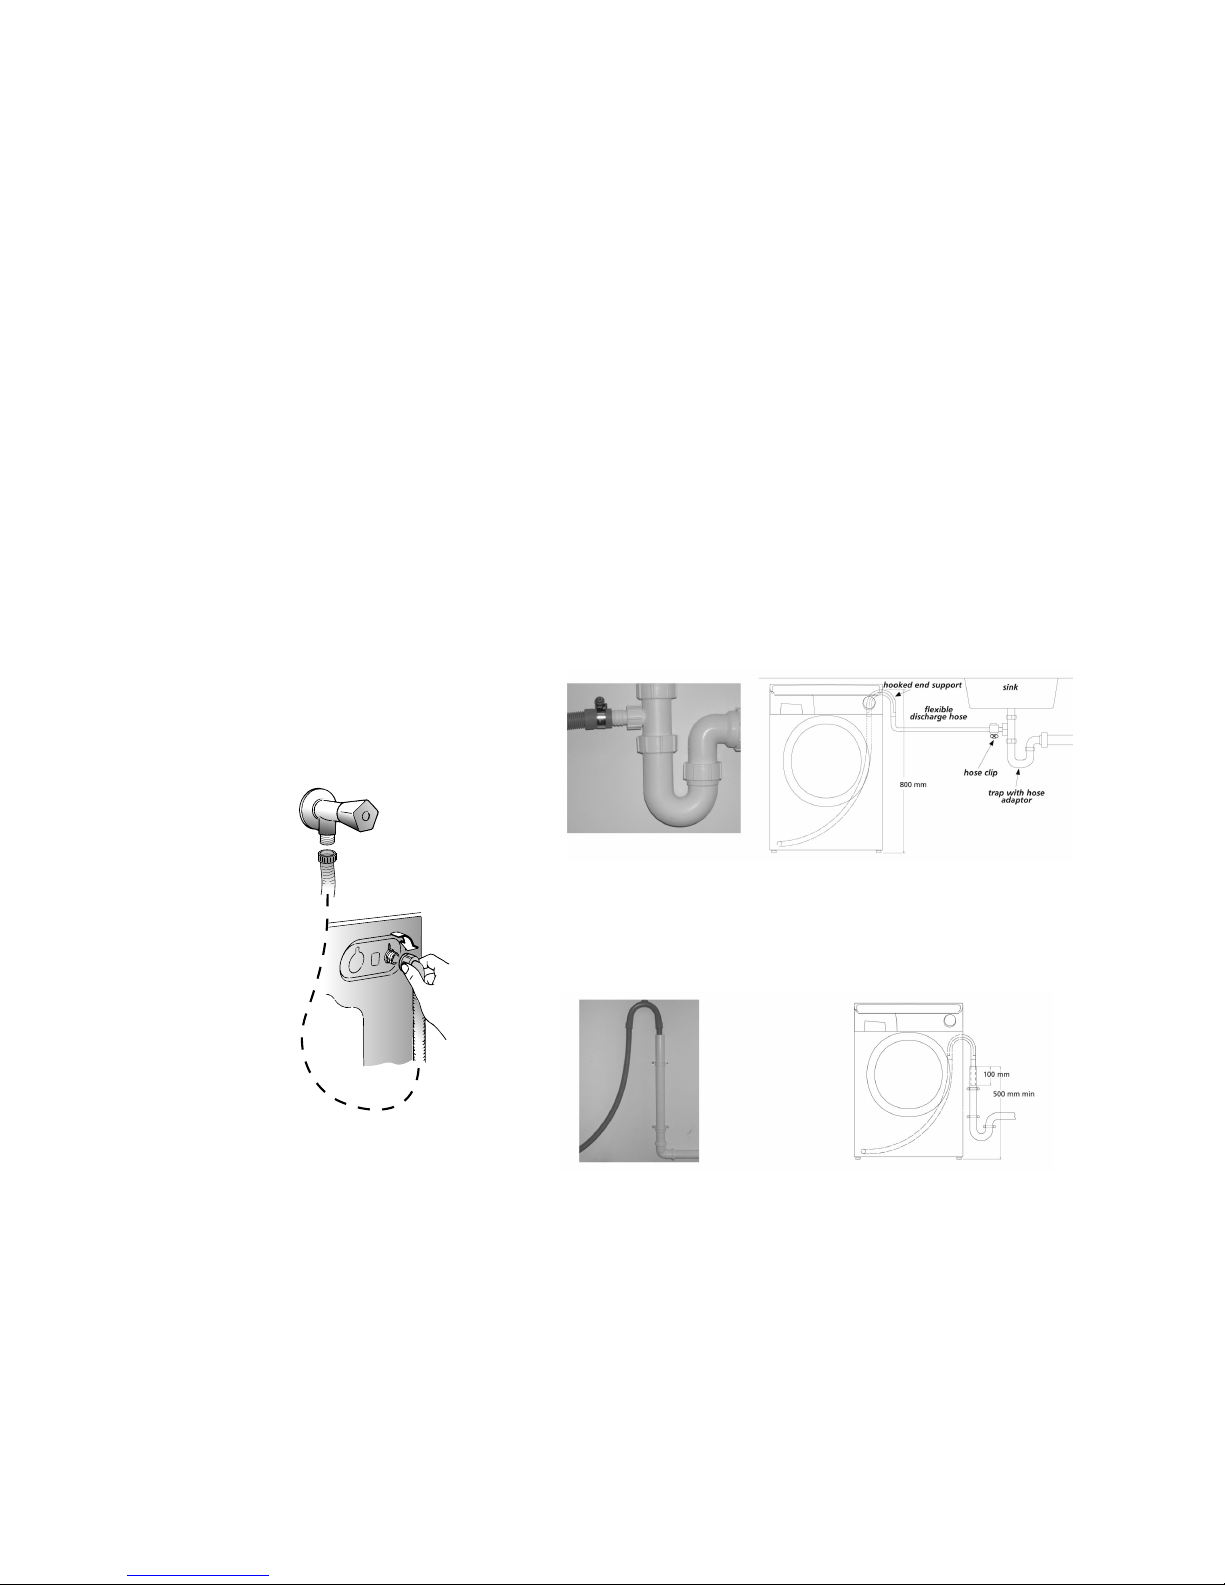
Connecting the drainage pipe
This machine must be connected in accordance with the water supply regulations.
Water bylaws prohibit connection to a surface water drain.
Decide which plumbing option suits you best then follow the instructions below:
Option 1 - Waste pipe connection (waste trap)
Fit the hooked end support to the outlet pipe and position it at least 800mm off the
floor.
After removing the blanking plug, or cutting the membrane from the waste system,
securely fix the outlet pipe to the drainage system, using a hose clip.
Secure the hooked end support up to at least 800mm to avoid water being drawn
back into the machine.
Option 2 - Into a standpipe
Ensure that the standpipe is not located near an electrical socket.
Fit the hooked end support to the outlet pipe. Install the hose into the standpipe
ensuring that the pipe is at least 500mm from the floor.
Insert the outlet pipe approximately 100mm into the standpipe.
11
10
Page 7

Step 5. Select the spin programme and press the Start Pause button to start the
machine. If the machine takes longer than one minute to empty check the drain hose
for kinks.
Installation testing is now complete.
Now you have successfully installed the machine we advise that you run the machine
to ensure the drum is thoroughly clean after testing and storage. Select Cottons 90°C
programme and run the machine for a complete cycle using only wash detergent and
water.
This programme will take approximately 2 hours to complete.
13
12
Page 8

The Control Panel
Turning the Machine On
Pressing the ON/OFF ( ) button will turn the machine on.
Start Pause Button
START
After selecting the programme and the required options press the Start Pause button
once to start the wash cycle. There will be a short time delay to the start of the
programme while the machine sets the wash parameters for the selected programme
and options. The Door Locked and KG Mode indicator lights will also illuminate a few
seconds after pressing the Start Pause button.
In some programs in the initial phase of the cycle there are planned spin sequences to
ensure optimal wash results.
PAUSE
The programme may be paused at any time during the wash cycle by holding down
the Start Pause button for about two seconds. The door locked indicator light will
remain illuminated for approximately 2 minutes. The door can be opened when this
indicator goes out. To restart the programme, press the Start Pause button once again.
Cancelling and Changing the Programme
To cancel the programme hold down the START/PAUSE button for about five seconds.
Select a new programme and start as detailed above.
Temperature
Button
15
LCD
Display
Delay Start
Button
Start/Pause
Button
On/Off
Button
Night
& Day
Stain
Blaster
Sensitive
Care
Pre
Wash
Rinse
Hold
Easy Iron
Wash Time
Button
Programme
Buttons
Spin Speed
Button
Control
Panel
Door
Handle
Adjustable
Feet
14
Page 9

Spin Speed
When a programme is selected the maximum spin speed allowed for that programme
appears on the display. Pressing the Spin Speed button will reduce the speed by
100rpm each time the button is pressed. The minimum speed is 400rpm, or continuing
to press the button will eliminate the final spin completely.
Delay Start
This indicator shows the number of hours time delay, once the delay start has been set.
Wash Cycle Time
When a programme is selected the display automatically shows the maximum cycle
duration for a full load, which can vary, depending on the options selected. Once the
programme has started you will be kept informed constantly of the time remaining to
the end of the wash.
Wash Length Indicator
Once the programme has been selected the indicator light will automatically show
the wash time set for that programme. Selecting a different wash time the relevant
indicator will light up.
KG Mode Indicator
Available on Cotton and Synthetic cycles, during the first 4 minutes of the cycle the
indicator lights and wash time will flash. This means the intelligent sensor is weighing
the laundry and will adjust the cycle time, water and electricity consumption
accordingly.
Buttons Indicator Light
These light up when the relevant buttons are pressed.
If an option is selected but it is not compatible with the selected programme then the
symbol first flashes and then goes off.
Maximum Loading Capacity And Detergent Indicator
When a programme is selected on the display is shown the maximum load of laundry
suitable for that cycle and the relative detergent quantity.
Detergent:
20% of the maximum quantity
50% of the maximum quantity
maximum quantity
The detergent quantity suggested can be vary depending on how much the fabrics are soiled.
Maximum load
Every levels shown on the display is the 10% of the maximum loading capacity.
When a programme is selected the maximum capacity suggested is shown on the
display. For the programmes where the KG MODE function is active, the appliance in
the first minutes it calculates the real laundry loaded, updating the levels on the display
in real time.
17
Wash Cycle Time/
Delay Start Indicator
Kg Mode
Indicator
Wash Length
Indicator
16
Buttons
Indicator
Door locked
Indicator
Maximum loading capacity and
detergent Indicator
Page 10

Sensitive Care
The Sensitive Care option washes your clothes in a deeper than normal water level to
provide gentler washing for especially delicate fabrics, while detergent is removed
thoroughly with five extra rinses. Perfect for people with delicate skin, this option can
be selected on all Cotton and Synthetic cycles.
This option does not need to be selected on the Delicate, Woollen or Silk programmes,
as it is already an integrated part of the wash cycles.
Easy Iron
This function, selectable on Mixed and Delicate cycles, minimizes creases as much as
possible with a uniquely designed anti-crease system that is tailored to specific fabrics.
The water is gradually cooled throughout the final two rinses with no spinning and
then a delicate spin assures the maximum relaxation of the fabrics.
Delay Start
This option allows you to delay the start of your wash cycle by up to 24 hours. By
pressing the Delay Start button, the time delay will be shown on the display (h00). This
will increase in one-hour intervals each time the Delay Start button is pressed.
Continue to press the button until the required time is reached, then press the Start
Pause button to activate the machine. The machine will start its cycle once the required
number of hours has passed.
To cancel the Delay Start option, press and hold the button for 5 seconds until the
display shows the settings for the selected programme. To start this programme, press
the Start Pause button. To cancel the process, press the ON/OFF button or select
another programme.
Temperature
When a programme is selected the display will show the recommended wash temperature. The Temperature button can be used to decrease or increase the temperature of
your chosen wash cycle. Each time the button is pressed, the new temperature level is
shown on the Wash Temperature Indicator.
19
18
Page 11

Automatic Features
KG Mode (Half Load)
Available on the Cottons and Synthetics cycles, the intelligent sensor adjusts the water
level and programme length throughout each phase of the cycle according to how
much laundry you load into the machine. The KG Mode indicator will light up when
the intelligent sensor is weighing the laundry.
The washing machine is fitted with a self-adjusting water level system. This system
enables the machine to use the optimum amount of water needed to wash and rinse
the laundry in relation to the particular load. This results in a reduction of the water
and electricity used without in any way compromising the washing and rinsing
performance. The amount of water and electricity used will always be appropriate for
the clothes load size.
The washing machine automatically ensures excellent washing results at minimum cost
whilst respecting the environment.
Out of Balance protection
This model is fitted with an electronic sensor device that checks if the load is balanced
correctly. If the load is slightly unbalanced the machine will re-balance it automatically
and then carry out the normal spin. If, after several attempts, balance is not restored a
reduced spin speed will be used. If loads are seriously unbalanced the spin stage will
be cancelled. This helps limit vibration, reduce noise and improve the washing
machine's reliability and life.
8 Pulse Technology
This washing machine is equipped with an innovative system that by means of 8 high
pressure jets, sprays a mixture of water and detergent directly into the load.
The “inverter motor” technology used in this machine manages the drum movement
during the start up of each programme, in conjunction with the 8 high pressure jets
spraying the detergent mixture into the load, the cycle includes a set of spin actions
that helps the detergent solution to penetrate into the fibers, helping dirt removal and
ensuring the best available wash performance.
The spin cycle at the beginning of the wash is therefore a normal phase of the
program and should not be regarded as a malfunction of the machine.
The 8 pulse system is also used during the rinse phase where the high pressure jets aid
the complete removal of detergent residues trapped in the clothes.
21
20
Page 12

Rinse
This programme carries out three rinses with an intermediate spin (which can be
reduced or excluded by using the Spin Speed option). It can be used for rinsing any
type of fabric e.g. use after hand washing.
Spin & Drain
The spin programme completes the spin at the maximum spin speed, this can be
reduced by using the Spin Speed option button or excluded if you want drain only.
All in One
Thanks to 8 pulse technology, this innovative programme, allows you to wash fabrics
such as cottons, synthetics and mixed fabrics at 20°C with a performance which is
comparable to a 40°C wash.
The consumption of this program is about 50% of a conventional 40°C. Cottons wash.
Important Wash Performance Advice
● New, coloured garments should be washed separately for at least 5 or 6 washes
● Certain large dark items such as jeans and towels should always be washed separately
● Never mix NON COLOURFAST fabrics
All Delicate
The rocking movements of the drum, combined with the action of the 8 jets, deliver a
perfect result also on Delicates at 30°.
8 Pulse Technology helps the pre-mix of water and soap, penetrating deeply into the
fibers; the inverter motor moves the drum in a way to optimize the distribution of the
pre-mix of water and soap, without damaging clothes. The result of this combination
guarantees a more accurate stain removal and treats the fabrics with extreme care.
All Baby
You can wash all baby clothes together, at medium temperature, resulting in hygienic
and perfectly clean items when combined with heavy duty soap. This is possible thanks
to the ideal pre-dose of water and detergent, that is sprayed onto the laundry through
the 8 jets activating the enzymes at 50°C.
Rapid Programme
The Rapid programme allows a washing cycle to be completed in just 14 minutes! This
programme is particularly suited to slightly dirty cottons and mixed fabrics.
Using the Wash Time button on the Rapid cycle will enable you to select either a 14,
30 or 44 minute wash cycle.
When selecting the rapid programme, please note that we recommend you use only
20% of the recommended quantities shown on the detergent pack.
For information about these programmes please refer to the programmes table.
22
23
Page 13

24
25
Fabric Type
Water
Temp
Recommended
(C°)
Water
Temp
MAX
(C°)
Spin
Speed
MAX
(RPM)
Max
Load
Size
(kg)
Cottons, Non-
fast Coloureds,
mixed fabrics
Mixed fabrics
and synthetics
Mixed fabrics
Machine
washable wool
& Silk
-
-
Cottons
& Mixed
fabrics
Delicates
Cottons
& Mixed
fabrics
Lightly dirty
Cottons and
Synthetics
40
40
30
30
-
-
60
30
20
30
30
30
1400
1000
400
800
1000
1400
1400
600
1000
1000
1000
1000
90
60
30
30
-
-
60
30
20
40
40
40
11
5,5
4
2
-
-
7
2
11
2
3
4
Length of Programme (1) Detergent
Short
2:01
1:23
0:54
0:52
0:28
0:10
1:30
1:03
1:29
0:14
-
-
Med.
2:36
1:53
-
-
-
-
2:05
-
2:04
-
0:30
-
Long
3:56
2:03
-
-
-
-
2:43
-
2:42
-
-
0:44
2
✓
✓
✓
✓
-
-
✓
✓
✓
✓
✓
✓
✓
✓
✓
✓
-
-
✓
✓
✓
✓
✓
✓
1
Only with the
prewash button
selected
Only with the
prewash button
selected
-
-
-
-
-
-
-
-
-
-
1) For the programmes shown you can adjust the duration and
intensity of the wash using the Wash Time button.
2) Using the Wash Time button on the Rapid cycle will enable you to
select either a 14, 30 or 44 minute wash cycle.
**
2)
Rinse
Spin &
Drain
Page 14

● Amount of laundry
It is possible to reduce the amount of detergent when washing only a small amount
of laundry.
For smaller loads use less detergent.
The dosages shown on the packaging of detergents for washing delicates often already
refer to a reduced wash size.
Always follow the dosage instructions on the detergent packaging.
An over dosing of detergent can cause excessive foaming.
If the appliance detects the presence of excessive foam, it may exclude the spinning
phase or extend the duration of the program and increase water consumption.
Dispensing instructions
The detergent drawer is split into 3 compartments:
● The first, labelled "1", is for detergent
utilised during Prewash.
● The second, labelled "2", is for detergent
utilised during the main wash.
● The third, labelled is for special additives
such as fabric softeners, fragrances, starch,
brighteners etc.
Dispensing in the drum
Liquid detergents and some tablets are dispensed via the machine drum using the
recommended dispensing device which is placed upright on top of the wash load
towards the back of the drum. Some tablets are designed to be placed in the dispenser
drawer, check the detergent pack for details.
Do not put any items into the drawer other than detergents that are designed to be
dispensed from the drawer as they may cause blockage or damage.
Laundry
Items to avoid
We recommend that you do not wash underwired bras in the machine. Should the
wires become detached they could cause damage to your clothes and the machine. If
the wash care label states that the bra is machine washable then we advise placing it
in a wash bag.
26
27
Page 15

Running a Wash Cycle
This section summarises the main points when completing a wash cycle. For detailed
explanations of features, options and details of the machine refer to the relevant
section in the instruction manual.
Preparing the laundry
Select and sort the laundry according to the wash care labels found on each garment.
Loading the laundry
Open the door. Put the laundry in the washing machine. Close the door by pushing it
until it clicks, ensuring that no items of laundry are obstructing the lock or door seal.
Putting detergent in machine
Open the drawer, choose the detergent and put in the recommended amount.
Do not exceed the dosage stated below:
Close the drawer again.
Note: Liquid detergents and some concentrated powders and tablets that are to be
placed directly into the drum should be placed in the recommended dispensing device.
Selecting the wash programme
Refer to the Programme Guide or the programme descriptions on the front of the
machine to select the most suitable programme. Switch on the appliance by the
ON/OFF button and select the required programme. Check that the tap is turned on
and that the discharge hose is positioned correctly. Select the required wash options.
Starting the wash cycle
Press the Start Pause button. The Door Locked indicator and KG Mode lights will
illuminate.
After a few seconds the wash cycle will begin. During the first 4 minutes of
Compartment
Wash
Maximum quantity of
powder/liquid
Prewash (option)
Main Wash
(all programmes)
Fabric Conditioner
100 ml
200 ml
200 ml
1
2
28
29
Page 16

Care and Maintenance
The washing machine needs very little maintenance, but regular attention to a few small
details will ensure the continued performance of your washing machine.
Do not use abrasive cleaners, scouring pads, solvent-based cleaners or polishes; wiping
the outside of the machine with a damp cloth will suffice.
Cleaning the soap dispenser
It is advisable to clean the compartments occasionally to remove detergents and
additives. To do this you need to do the following:
Step 1. Pull the drawer out firmly from the machine, but without forcing it.
Step 2. Clean the compartments and the siphon cover under warm running water.
Step 3. Clean the outlet of the soap dispenser to remove any residue of soap powder.
Step 4. Replace the drawer.
Cleaning the door glass
Regularly clean the door glass with a damp cloth. A build up of soiling and residues from
the water may result in water leaking from the door.
Do not use abrasive cleaners as they can scratch the surface.
Cleaning the filter
The washing machine is fitted with a special
filter to prevent items such as coins, buttons,
etc. blocking the discharge hose. These may be
retrieved by:
Step 1. Opening the filter cover.
Step 2. Pull out the corrugated hose (only
available on certain models), remove the
stopper and drain the water into a container.
Step 3. Before removing the filter, place an
absorbent towel below the filter cap to collect
the small amount of water that is likely to be
inside the pump.
30
31
Page 17

Problem Solving Guide
Defects you can remedy yourself
Before calling Hoover Service for technical advice please run through the following
checklist. A charge will be made if the machine is found to be working or has been
installed incorrectly or used incorrectly. If the problem persists after completing the
recommended checks, please call Hoover Service (tel: 08705 400 600); they may be
able to assist you over the telephone.
NOTE:
The initial spin at the beginning of the washing cycle is a
normal phase of the program and not a machine fault.
The machine will not start…
● Close the door. Check that there is power to the machine. Select a programme
and press Start Pause. Check if the door locked light is illuminated.
If it is not, check the following:
1. Is the machine connected to the electrical supply?
2. Is the electrical supply OK? Check another socket.
3. Has the fuse on the machine blown? If so, replace it.
● If the door locked light is illuminated and the machine does not start this means
that the machine cannot fill with water, check the following:
1. Is the water supply to the machine switched on?
2. Are the pipes kinked or restricted in any way?
Water does not drain away… (error 3 will be displayed)
● Ensure that there is not a blockage in the drain hose or the hose is not kinked.
● Is the drain hose installed correctly? If connected to the sink waste make sure you
have cut the membrane or removed the bung from the under sink drainage unit.
● Check for foreign bodies in the filter. If present, clean the filter.
● If you have found any of the above problems correct them and run the machine
through a spin cycle to drain the water.
32
33
Page 18

The door will not open…
● Has the programme finished? Is the “END” word on the display? If not the programme
is not complete. Has the door locked light gone out? If not wait a further two
minutes and the light will go out and you will be able to open the door.
● Has the programme finished but the door remains locked? The display reads
Error 2. Switch off the appliance and this will allow the door to open.
● If water remains in the drum refer to 'Water does not drain away…' above.
Problem with the dispenser…
● Not all the detergent has been flushed away.
1. Check the water supply tap is fully turned on.
2. Check the inlet hose is not kinked.
● The dispenser drawer will not close properly.
1. Check the drawer is aligned properly
2. Check the drawer is not clogged with detergent (see Care and
Maintenance)
● Steam is coming from the dispenser. The machine is designed to vent through the
drawer, this is nothing to worry about.
Error 9 is displayed…
●
Cancel the programme by
pressing the ON/OFF button.
Wait 10-15 seconds,
select again the programme and press the START/PAUSE button to
switch the machine on.
Remember, you may be charged for the service call if incorrect installation or misuse
causes a problem with your machine.
If the following error codes are displayed, switch OFF the machine and contact Hoover
Service: 0, 1, 4, 5, 7 and 8.
Note: The use of environmentally friendly, phosphate-free detergents (check detergent
information on pack) can have the following effects:
● Waste water from rinsing may be cloudier because of the presence of a white
powder (zeolites) held in suspension, without the rinse performance being adversely
affected.
● Presence of white powder on laundry after washing, which is not absorbed by
the fabric and does not alter the colour of the fabric.
● The presence of foam in the final rinsing water is not necessarily an indication of
poor rinsing. Carrying out more rinse cycles does not serve any purpose in such
cases.
34
35
Page 19

After Sales Service
Customer Service
At Hoover, we aim to make appliances that are reliable and long lasting. However,
should your appliance need to be serviced during its working life, no one is more
qualified to maintain your appliance than our own Hoover Service engineers. To book
a service call or to ask our customer service advisors for help on using your appliance,
please call:
08444 995599
or contact us online
www.hoover.co.uk
Please have your model and serial numbers at hand when calling our service
department, as they will require this information.
(Telephone lines open: Monday to Friday 8.30am to 5pm, Saturday 9am to 5pm,
Sunday 10am to 4pm). We may record your phone calls with our representatives to
monitor and improve the quality of service we provide.
Guarantee
Your new Hoover appliance automatically comes with a 12-month call out, parts and
labour guarantee.
Register your appliance now by calling
08444 810 157
or register online
www.hoover.co.uk
Providing that you register your purchase, Hoover guarantees all parts of this product
for 5 years from the date of purchase. During the first year Hoover approved
engineers will replace or repair all defective parts free of charge, except for parts
subject to fair wear and tear, such as interior lamps.
In years 2-5 replacement parts will be supplied free only if fitted in the UK or Republic
of Ireland by Hoover and the appropriate labour charges paid. An extended warranty
may be purchased to also cover the labour costs. Please ask our customer service
advisors for cost details or complete the enclosed form.
To qualify for benefits under the guarantee, you must be able to provide proof of date
of purchase and the appliance must have been supplied, maintained and used in
accordance with Hoover instructions.
36
37
Page 20

01204 556 111
or online
www.hoover.co.uk
01685 721222
or view our full range online
www.hoover.co.uk
38
39
Page 21

12.06 - 41037591 - www.graficaestampa.it - Printed in Italy - Imprimé en Italie
EN
®
 Loading...