

Page 1
ScanPal®2
Application Generator
User's Guide
Page 2

Disclaimer
Honeywell International Inc. (“HII”) reserves the right to make changes in specifications and
other information contained in this document without prior notice, and the reader should in all
cases consult HII to determine whether any such changes have been made. The information
in this publication does not represent a commitment on the part of HII.
HII shall not be liable for technical or editorial errors or omissions contained herein; nor for
incidental or consequential damages resulting from the furnishing, performance, or use of
this material.
This document contains proprietary information that is protected by copyright. All rights are
reserved. No part of this document may be photocopied, reproduced, or translated into
another language without the prior written consent of HII.
Web Address: www.honeywellaidc.com
Trademarks
ScanPal2 is a trademark or registered trademark of Metrologic Instruments Inc. or Honeywell
International Inc.
Patents
For patent information, please refer to www.honeywellaidc.com/patents
©2001-2011 Honeywell International Inc. All rights reserved.
.
Page 3

Table of Contents
1. INTRODUCTION................................................................................................................................2
2. H
OW TO USE THE APPLICATION GENERATOR ................................................................................2
3. M
AIN MENU.....................................................................................................................................2
4. FORM .............................................................................................................................................3
4.1 P
ROPERTIES OF A FORM ...................................................................................................................4
4.1.1. F
4.1.2. E
4.1.3. N
4.1.4. D
4.1.5. T
4.1.6. L
4.1.7. R
4.2 P
4.2.1. D
4.2.2. P
4.2.3. I
4.2.4. M
4.2.5. M
4.2.6. L
4.2.7. M
5. MENU .............................................................................................................................................8
5.1. S
6. LOOKUP ........................................................................................................................................9
6.1. M
6.2. O
6.3. F
6.4. K
7. BAR CODE...................................................................................................................................10
7.1. S
7.1.1. C
7.1.2. I
7.1.3. I
7.1.4. C
7.1.5. UPCE .......................................................................................................................................12
7.1.6. EAN8 .......................................................................................................................................12
7.1.7. UPCA.......................................................................................................................................12
7.1.8. EAN13 .....................................................................................................................................13
7.1.9. MSI ..........................................................................................................................................13
7.1.10. P
7.2. S
7.3. R
7.4. T
7.5. R
7.6. S
8. SETTINGS....................................................................................................................................17
9. STARTUP .....................................................................................................................................18
9.1. P
9.2. D
9.3. R
10. U
10.1. 232_R
10.2. IR_R
11. Q&A ............................................................................................................................................21
ONT...........................................................................................................................................4
SC .............................................................................................................................................4
EXT...........................................................................................................................................4
ATE S TAM P ................................................................................................................................4
IME STAMP ................................................................................................................................4
OOKUP: .....................................................................................................................................4
ECORD:.....................................................................................................................................4
ROPERTIES FOR EACH FIELD OF A FORM .........................................................................................5
ATA T Y PE ..................................................................................................................................5
ROMPT ......................................................................................................................................5
NPUT ..........................................................................................................................................5
IN LENGTH ...............................................................................................................................5
AX LENGTH ..............................................................................................................................6
OOKUP ......................................................................................................................................6
ORE PROPERTIES ......................................................................................................................6
PECIFICATIONS FOR EACH FIELD OF A MENU .................................................................................8
EMBER LENGTH & NUMBER OF FIELDS .......................................................................................9
FFSET & LENGTH.........................................................................................................................9
IELD PROPERTY ............................................................................................................................9
EY FIELD......................................................................................................................................9
YMBOLOGY AND ITS PARAMETERS..............................................................................................10
ODE39 ....................................................................................................................................10
TALY / FRENCH PHARMACODE .................................................................................................11
NDUSTRIAL / INTERLEAVE / MATR I X 25 ...................................................................................11
ODABAR..................................................................................................................................11
LESSEY..................................................................................................................................13
CAN MODE.................................................................................................................................14
EAD REDUNDANCY....................................................................................................................15
IME OUT .....................................................................................................................................15
EAD NEGATIVE BARCODE..........................................................................................................15
UPPORTED SYMBOLOGIES ..........................................................................................................15
ROGRAM START FROM ................................................................................................................18
ATA FIELD DELIMITER ................................................................................................................18
EDEFINE SYSTEM PROMPTS AND MESSAGES ...............................................................................18
TILITIES.....................................................................................................................................19
EAD .................................................................................................................................19
EAD ...................................................................................................................................20
Application Generator (v4.00)
-1-
Page 4

1. Introduction
1. Introduction
1. Introduction1. Introduction
The Application Generator is designed to let users
of ScanPal 2 Portable Data Terminal to define their
own data collection templates quickly and easily
on a PC without writing any program code. The
user is presented with a terminal Window screen
on the PC to simulate the program's running
sequences on the actual terminal. A new
application can be designed on-screen in minutes,
downloaded to the terminal and data collection can
commence immediately.
2.
2. How to use the Application Generator
How to use the Application Generator
2. 2.
How to use the Application GeneratorHow to use the Application Generator
Click right button on the presented window or
click left button on the POWER key. The main
menu will then be brought up.
3. Main Menu
3. Main Menu
3. Main Menu3. Main Menu
The main menu contains the following commands,
l New: To create a new application template.
l Open: To open an application template file.
l Save: Save current editing template to the
file.
l Save As: Save current editing template to a
new file.
l Edit: To edit the current application template.
l COM port: To configure the COM port
settings for communication.
l Download program: Download the current application template to terminal.
l Download lookup file: Download lookup file(s) to terminal.
l Receive data: Receive data from the terminal.
l About: Show information about the Application Generator.
l Exit: To close the Application Generator.
Application Generator (v4.00)
-2-
Page 5
A template is composed of Forms, Menus, Lookup files, Barcode settings, System
settings and Startup configuration. The user can also specify the format of each
transaction record for the terminal.
4. FORM
4. FORM
4. FORM4. FORM
A form is a data collection template with input prompts. All data will be saved in a
transaction file automatically after user completes the input of a form. The length and
data type for each input field can be specified. Each form can have up to 8 input
fields. The maximum data length for each field is 50 characters. Totally up to 10
different forms can be defined.
Application Generator (v4.00)
-3-
Page 6

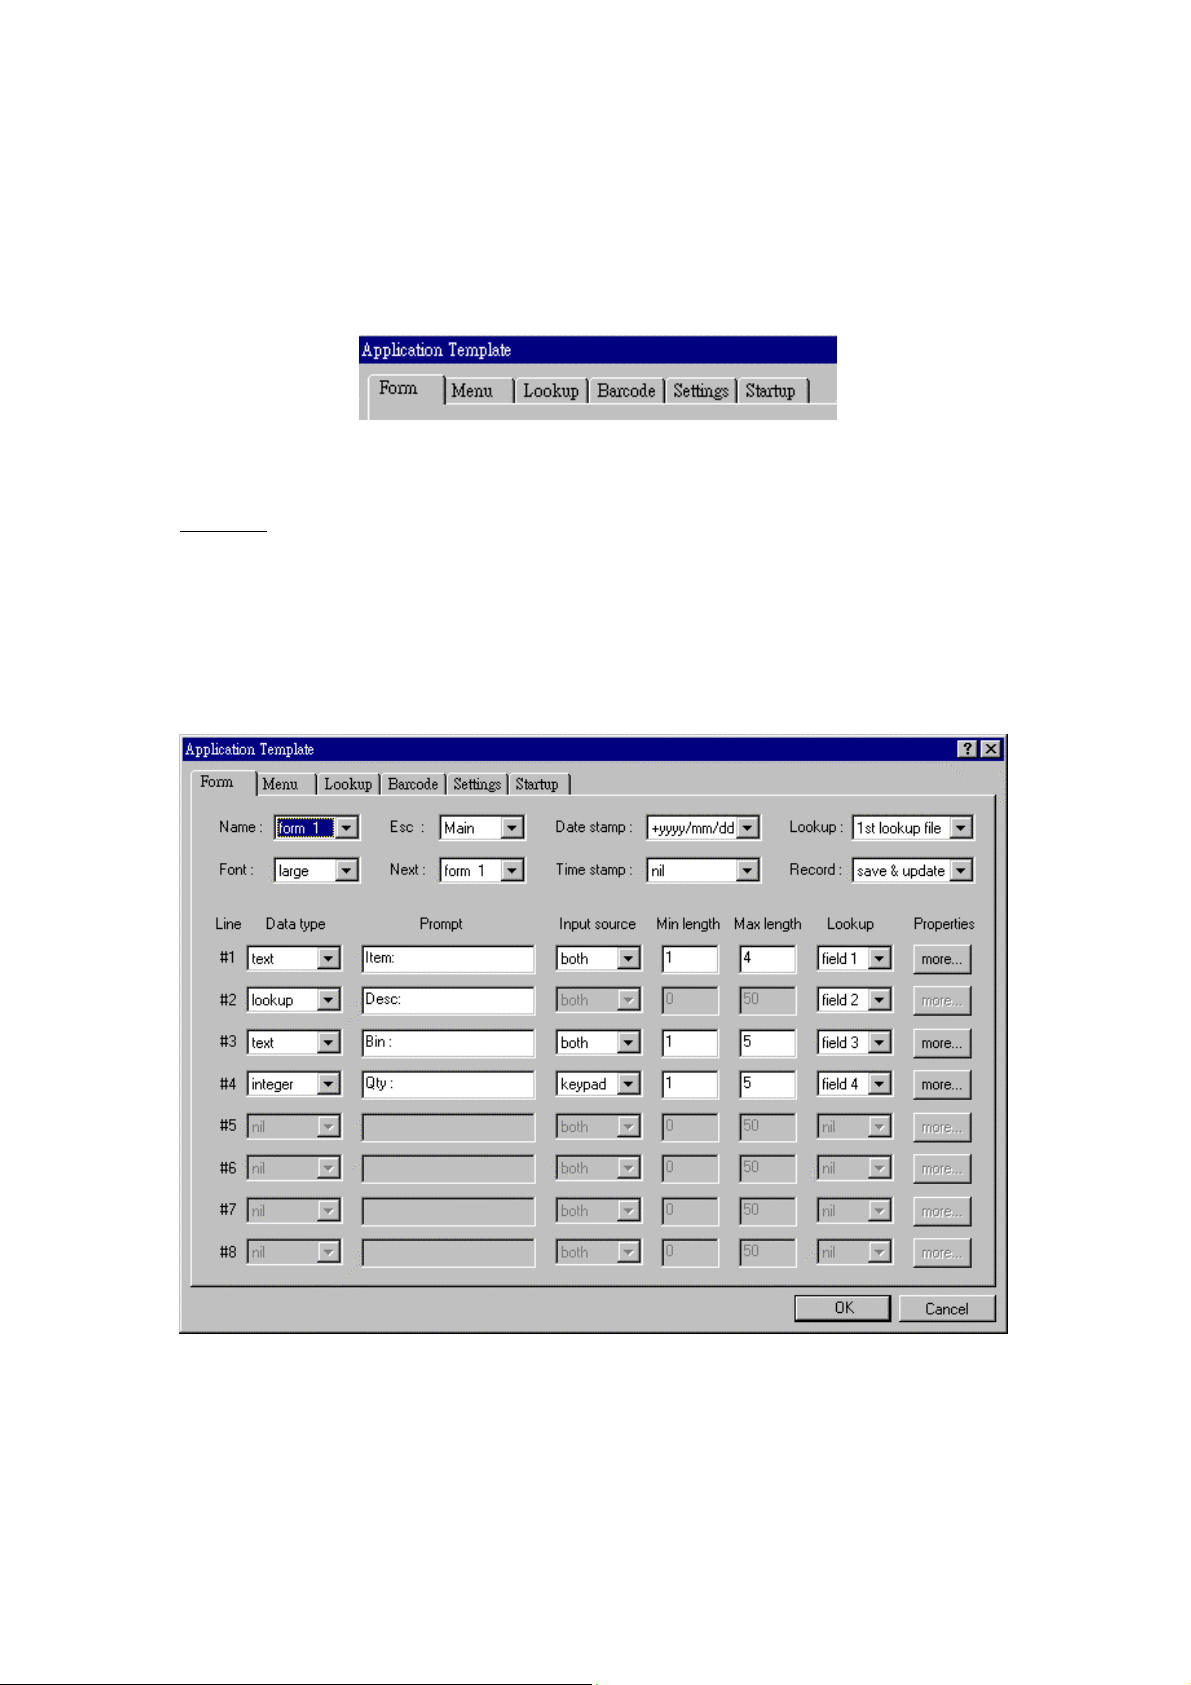
4.1 Properties of a form
4.1 Properties of a form
4.1 Properties of a form4.1 Properties of a form
The properties of a Form are as follows,
4.1.
4.1.1. Font
1. Font
4.1.4.1.
1. Font1. Font
Specify the font size to be used in this form. Up to 20x8 characters can be shown on
the display for small font, and 15x4 characters for large font.
4.1.2
4.1.2. Esc
. Esc
4.1.24.1.2
. Esc. Esc
Specify what will be shown if the user hits the ESC key.
4.1.
4.1.3. Next
3. Next
4.1.4.1.
3. Next3. Next
Specify what will be shown after the user completes the data input of current form.
4.1.
4.1.4. Date stamp
4. Date stamp
4.1.4.1.
4. Date stamp4. Date stamp
Choose the format of the date stamp to be added to the transaction record. If the
format start with a '+', then the date stamp will be appended to the record; on the
contrary, if the format end with a '+', then the date stamp will be placed in front of the
record.
4.1.
4.1.5. Time stamp
5. Time stamp
4.1.4.1.
5. Time stamp5. Time stamp
Choose the format of the time stamp to be added to the transaction record. If the
format start with a '+', then the time stamp will be appended to the record; on the
contrary, if the format end with a '+', then the time stamp will be placed in front of the
record.
4.1.
4.1.6. Lookup
6. Lookup::::
4.1.4.1.
6. Lookup6. Lookup
Specify the lookup file to be used by this form.
4.1.
4.1.7. Record
7. Record::::
4.1.4.1.
7. Record7. Record
Specify how to process the input data.
l Save: Save the data as a transaction record.
l Update lookup: If a lookup file is used by this form, the user can choose to
update the lookup file with the input data.
l Save & Update: Not only save the data as a transaction record, but also update
the current used lookup file.
Application Generator (v4.00)
-4-
Page 7

l Pass down: Do not save the data, just pass it down to the next form or menu.
l Output record: Instead of saving the data, output the collected data directly.
l Output screen: Output the whole screen, including the prompts and the
collected data.
4.2 Properties for each field of a form
4.2 Properties for each field of a form
4.2 Properties for each field of a form4.2 Properties for each field of a form
The properties for each field of a form are as follows,
4.2.
4.2.1. Data type
1. Data type
4.2.4.2.
1. Data type1. Data type
l Nil: Not to be used. No prompt, no input field at all.
l Text: Any character (eg. $1a2b3c+-*/...)
l Integer: Integer number (eg. 123)
l Real: Real number (eg. 4.56)
l Letter: Alphabet only (A to Z)
l Fix: No input field, only the prompting string will be saved in the transaction
data.
l Prompt: No input field, and the prompting string will not be saved.
l Lookup: The input will come from the specified lookup field whenever
the data of one input field matches the key field in the lookup record of the
lookup file. Unlike the other types (text, integer, real, and letter), the data of
lookup type can not be changed by the user.
l Extension: Use the same data type as previous line, but can not have any
prompts. The maximum data length is determine by the maximum data length
of previous field deducts previous field's prompt length.
l Boolean: Only accepts '0' / '1' or 'Y' / 'N' input.
l Counter: Show the record counts.
4.2.
4.2.2. Prompt
2. Prompt
4.2.4.2.
2. Prompt2. Prompt
Specify the prompting string for each input field.
4.2.
4.2.3. Input
3. Input
4.2.4.2.
3. Input3. Input
Specify the source from which data is input, can be either scanner or Keypad, or both.
4.2.
4.2.4. Min length
4. Min length
4.2.4.2.
4. Min length4. Min length
The minimum required length for the data entered.
Application Generator (v4.00)
-5-
Page 8

4.2.
4.2.5. Max length
5. Max length
4.2.4.2.
5. Max length5. Max length
The maximum acceptable length for the data entered. If the maximum length is longer
than the field length, the entered data will scroll to the left or move to next field if the
data type of the next field is EXTENSION. The maximum length can be up to 50.
4.2.
4.2.6. Lookup
6. Lookup
4.2.4.2.
6. Lookup6. Lookup
Specify the lookup field to be referred to. If the specified lookup field is the key field
of a lookup file, all input fields that refer to a lookup field will be filled with the
lookup data once this input data matches the data of the key field. Note that a referred
lookup field prefixed with '+' means any updated data for that lookup field will be
added to the original lookup data; and a referred lookup field prefixed with '-' means
any updated data for that lookup field will be subtracted from the original lookup data.
4.2.
4.2.7. More properties
7. More properties
4.2.4.2.
7. More properties7. More properties
l Fix Data length: Specify data length of the input field. If the checkbox is
checked, then the data length will be fixed to this value, i.e., if the data entered
is longer than this value, it will be truncated; if less than this value, spaces (or
0's) will be added in front of or end of the transaction data depending on the
"Left" or "Right" alignment. If the checkbox is unchecked, the data length of
this field is free, i.e., it depends on the length of the data entered (between
minimum length and maximum length specified for this input field). Initial
value or text allows you to assign an initial value or text for this input field.
l Add prefix code: Adds a prefix code to the data entered. The prefix code can
be any text (eg. "ABC[;123+-"] or ASCII values that separated by space (eg.
35 42" is equal to "#*").
l Add suffix code: Adds a suffix code to the data entered. The suffix code can be
any text (eg. "ABC[;123+-"] or ASCII values that separated by space (eg. "35
42" is equal to "#*").
l Bar code length: Specify the valid length of the barcode. The default starting
position of each barcode is 1, and the maximum length is 20.
l Check leading code: The leading code check allows you to verify the bar code
input. If the leading code is not matched, the input barcode will be rejected.
l Auto ENTER: The auto ENTER means whenever a bar code is read, a carriage
return will be appended to (Scan + ENTER) or added before (ENTER + Scan)
the data so the user need not to press the ENTER key to move to the next field.
Application Generator (v4.00)
-6-
Page 9

Examples of......
1. Fixed data length
Value + Settings Scanned Bar code Transaction data
4 + Left-aligned (padded with space) 123456789 1234,
4 + Right-aligned (padded with space) 123456789 6789,
10 + Left-aligned (padded with space) 7654321 7654321___
10 + Right-aligned (filled with 0) 7654321 0007654321
2. Barcode Input
- Read partial barcode (for all barcode types)
Start Position Max Length Scanned Bar code Transaction data
310123456789 3456789
32123456789 34
- Check Leading Code
Leading Code Scanned Bar code Transaction data
1 123456789 123456789
5 123456789 (ScanPal2 will not accept this code)
- Read partial bar code + Check Leading Code
Start P. Max L. Leading Code Scanned Bar code Transaction data
3 10 3 123456789 3456789
3 10 1 123456789 (SP2 won't accept this code)
If the start position is the e.g. 3rd Character the leading code digit will be also the 3
character of the bar code.
Application Generator (v4.00)
rd
-7-
Page 10

5.
5. MENU
MENU
5.5.
MENU MENU
A menu is a list of selection items. The user can define up to 10 different menus.
Below are the specifications for each field of a menu,
5.1. S
5.1. Specifications for each field of a menu
pecifications for each field of a menu
5.1. S5.1. S
pecifications for each field of a menupecifications for each field of a menu
l Name: Select a name (menu ID) for the current menu.
l Prompt: Specify the caption for the current menu. This is optional.
l Esc: Specify what will be brought up if the user hits the ESC key.
l Font size: Specify the font size to be used in this menu.
l Item Name: Specify the name of each item for the menu.
l Next: Specify what will be brought up after selecting the current item.
l Data:
Ø Save prompt: Save the menu caption in transaction data if the menu item is
used.
Ø Save selected item: Save selected menu item in transaction data if the menu
is used.
Ø Pass to next: Do not save the above data, just pass it to the next menu or
form.
Application Generator (v4.00)
-8-
Page 11

6.
6. LOOKUP
LOOKUP
6.6.
LOOKUP LOOKUP
A lookup file is a database file created for information reference. Up to three lookup
files can be created. A lookup file includes the following properties,
6.1
6.1. Member length & Number of fields
. Member length & Number of fields
6.16.1
. Member length & Number of fields. Member length & Number of fields
Specify the maximum record length and the number of fields for the database file to
be created.
6.
6.2.
2. Offset
Offset & Length
OffsetOffset
& Length
& Length & Length
6.6.
2. 2.
Define the data offset (the start position) and length for each field.
6.
6.3. Field property
3. Field property
6.6.
3. Field property3. Field property
Specify whether the data field is fixed length or delimited. If it is delimited, then you
need to specify the delimiter with an ASCII code
6.4.
6.4. Key field
Key field
6.4. 6.4.
Key fieldKey field
Select the key field for creating index file of the database. If an input field refers to a
key field, then the data in the other referred field will be shown once the entered data
match with the key field data.
Application Generator (v4.00)
-9-
Page 12

7. BAR CODE
7. BAR CODE
7. BAR CODE7. BAR CODE
This section describes user configurable parameters that are pertaining to bar code
symbologies.
7.1. Symbology and its parameters
7.1. Symbology and its parameters
7.1. Symbology and its parameters7.1. Symbology and its parameters
7.1.1. Code39
7.1.1. Code39
7.1.1. Code397.1.1. Code39
• Standard / Full ASCII Code 39 : User can choose to read either
Standard Code 39 or Full ASCII Code 39 by configuring this
parameter.
• Start/Stop Transmission : This parameter specifies whether the
start/stop characters of Code 39 are included in the data being
transmitted.
• Checksum Verification : This parameter specifies whether the scanner
will perform checksum verification when decoding barcodes. If the
checksum is incorrect, the barcode will not be read.
• Checksum Transmission : This parameter specifies whether the
checksum character are included in the data being transmitted.
Application Generator (v4.00)
-10-
Page 13

7.1.2. Italy / French Pharmacode
7.1.2. Italy / French Pharmacode
7.1.2. Italy / French Pharmacode7.1.2. Italy / French Pharmacode
For Italy /French Pharmacode, there is always a checksum character included in the
barcode. So the checksum verification is always performed when decoding these
symbologies. User though can choose whether the checksum character is to be
transmitted or not. The start / stop transmission of this code shares the same setting of
Code 39.
• Checksum Transmission : This parameter specifies whether the
checksum character are included in the data being transmitted.
7.1.3. Industrial / Interleave / Matrix 25
7.1.3. Industrial / Interleave / Matrix 25
7.1.3. Industrial / Interleave / Matrix 257.1.3. Industrial / Interleave / Matrix 25
• Start / Stop Selection : This parameter provides the readability of all 2
of 5 symbology variants. For example, flight tickets actually use an
Industrial 25 barcode but with Interleave 25 start / stop. In order to
read this barcode, the start / stop selection parameter of Industrial 25
should set to ‘Interleave 25’.
• Checksum Verification : This parameter specifies whether the scanner
will perform checksum verification when decoding barcodes. If the
checksum is incorrect, the barcode will not be read.
• Checksum Transmission : This parameter specifies whether the
checksum character are included in the data being transmitted.
• Code Length Qualification : Because of the weak structure of the 2 of
5 codes, a partial scan has a high probability of decoding as a valid but
shorter 2 of 5 codes (known as short scan). To prevent this kind of
undesired reading, the Code Length settings can help to insure that the
correct code is read by qualifying the allowable code length. Code
length parameters can be configured in two ways: Fixed Code Length
or Max / Min code length. If the fixed code length is selected, up to 2
fixed lengths can be specified. And if max / min code length is
selected, the max length and the min length must be specified, and the
scanner will only accept those codes with lengths fall between max /
min length specified.
• Read Odd Number of Digits : This parameter is available only to the
Interleave 25. This parameter must be enabled in order to read
Interleave 25 labels that contain odd number of digits.
7.1.4. Codabar
7.1.4. Codabar
7.1.4. Codabar7.1.4. Codabar
• Start/Stop Transmission : This parameter specifies whether the
start/stop characters of Codabar are included in the data being
transmitted.
Application Generator (v4.00)
-11-
Page 14

• Start / Stop Selection : Four different start / stop pairs can be selected
• CLSI Conversion : If this parameter is enabled, the scanner will
7.1.5. UPCE
7.1.5. UPCE
7.1.5. UPCE7.1.5. UPCE
• System Number Selection : The UPCE comes with 2 flavors : System
• Convert to UPCA : If this parameter is enabled, the UPCE read will
• System Number Transmission : If this parameter is enabled, the
• Checksum Transmission : If this parameter is enabled, the checksum
as start / stop characters as listed below.
abcd / abcd
abcd / tn*e
ABCD / ABCD
ABCD / TN*E
perform the CLSI conversion when a 14 digits Codabar barcode is
read.
Number 0 and System Number 1. These two differ in the way data
are encoded. The system number 1 is the new UPCE extension to the
ordinary UPCE (system number 0). User can have the choice of
enabling both system numbers or just system number 0.
Warning : Because of the way system number 1 is encoded, if both
system numbers are enabled, user might suffer from short scanning
UPCA or EAN13 into UPCE system number 1 barcodes.
be expanded into UPCA, and the following processing will follow the
parameters configured for UPCA.
system number will be included in the data being transmitted.
character will be included in the data being transmitted.
7.1.6. EAN8
7.1.6. EAN8
7.1.6. EAN87.1.6. EAN8
• Convert to EAN13 : If this parameter is enabled, the EAN8 read will
• Checksum Transmission : If this parameter is enabled, the checksum
7.1.7. UPCA
7.1.7. UPCA
7.1.7. UPCA7.1.7. UPCA
• Convert to EAN13 : If this parameter is enabled, the UPCA read will
• System Number Transmission : If this parameter is enabled, the
be expanded into EAN13, and the following processing will follow the
parameters configured for EAN13.
character will be included in the data being transmitted.
be expanded into EAN13, and the following processing will follow the
parameters configured for EAN13.
system number will be included in the data being transmitted.
Application Generator (v4.00)
-12-
Page 15

• Checksum Transmission : If this parameter is enabled, the checksum
7.1.8. EAN13
7.1.8. EAN13
7.1.8. EAN137.1.8. EAN13
• ISBN / ISSN Conversion : If these parameters are enabled, the
• Checksum Transmission : If this parameter is enabled, the checksum
7.1.9. MSI
7.1.9. MSI
7.1.9. MSI7.1.9. MSI
• Checksum Verification : Three kinds of checksum calculations can be
• Checksum Transmission : User can control how the checksum is
• Code Length Qualification : Because of the weak structure of the
character will be included in the data being transmitted.
scanner will convert the code read into ISBN or ISSN code if the
formats are correct (EAN13 codes start with 978 or 979 for ISBN, and
977 for ISSN).
character will be included in the data being transmitted.
implemented into MSI code : Single Modulo 10, Double Modulo 10,
or Modulo 11 & 10 checksum. If the checksum character is incorrect,
the barcode will not be read.
transmitted by configuring this parameters.
1) Transmitted
2) Last digit not transmitted
3) Last 2 digits not transmitted
MSI code, a partial scan has a high probability of decoding as a valid
but shorter MSI codes (known as short scan). To prevent this kind of
undesired readings, the Code Length settings can help to ensure that
the correct code is read by qualifying the allowable code length. Code
length limitations can be set in 2 ways: Fixed Code Length and Max /
Min code length. If the fixed code length is selected, up to 2 fixed
lengths can be specified. And if max / min code length is selected, the
max length and the min length must be specified, and the scanner will
only accept those codes with lengths fall between max / min length
specified.
7.1.10. Plessey
7.1.10. Plessey
7.1.10. Plessey7.1.10. Plessey
• Convert to UK Plessey : If this parameter is enabled, the scanner will
• Checksum Transmission : If this parameter is enabled, the checksum
change each occurrence of the character ‘A’ into character ‘X’ in the
code.
characters (two characters) will be transmitted together with data.
Application Generator (v4.00)
-13-
Page 16

7.2. Scan Mode
7.2. Scan Mode
7.2. Scan Mode7.2. Scan Mode
There are eight scan modes supported by the CCD scanner. User can choose the
desired scan mode depending on the application requirements. But, if the scanner is a
switch-less scanner, only Continuous mode or Testing mode can be selected (other
scan modes involve trigger switch interaction). The supported scan modes are
described below.
• Auto Off Mode : The scanner will start scanning once the switch is
triggered. The scanning continues until either a barcode is read or a
preset scanning period (Scanner Time-Out Duration) is expired.
• Continuous Mode : The scanner is always scanning.
• Auto Power Off Mode : The scanner will start scanning once the
switch is triggered. The scanning continues until a preset scanning
period (Scanner Time-Out Duration) is expired. Unlike the Auto Off
mode, the scanner will continue to scan and the scanning period is recounted each time there is a successful read.
• Alternate Mode : The scanner will start scanning once the switch is
triggered. The scanner will continue scanning until the switch is
triggered again.
• Momentary Mode : The scanner will be scanning as long as the
switch is depressed.
• Repeat Mode : The scanner is always scanning just like Continuous
Mode. But now the switch acts like a “re-transmit button”. If the
switch is triggered within 1 second after a good read, the same data
will be transmit again without actually reading the barcode. This “retransmit button” can be triggered as many times as user desired, as
long as the time between each triggering does not exceed 1 second.
This scan mode is most useful when the same barcode is to be read
many times.
• Laser Mode : This is the scan mode most often used on laser scanners.
The scanner will start scanning once the switch is pressed. The
scanning continues until either a barcode is read, the switch is released
or a preset scanning period (Scanner Time-Out Duration) is expired.
• Test Mo de : The scanner is always scanning. The scanner will decode
repeatedly even with the same barcode.
• Aiming Mode : By selecting this mode, user needs to trigger twice for
a decoding. That is, the first trigger is for aiming only, while the
second trigger will truly start to decode. After first trigger, the scanner
will keep on scanning for one second so that user may take aim. But
Application Generator (v4.00)
-14-
Page 17

user must press the second trigger within this period (default to one
second), otherwise it will be reset and user has to take aim again. This mode
is used when two consecutive bar codes are printed too closed that users
need to take aim and make sure they don't read the wrong barcode. There is
a system global variable AIMING_TIMEOUT that can be used to change the
default one-second time-out duration. The unit for this variable is 5ms.
7.3. Read Redundancy
7.3. Read Redundancy
7.3. Read Redundancy7.3. Read Redundancy
This parameter is used to specify the levels of reading (decoding) security. If No
Redundancy is selected, only one successful decoding can make the reading valid. If
Three Times Redundancy is selected, it will take 3 successful decodes to make the
reading valid. It is obvious that the more redundancy the user selects, the higher the
reading security and thus the slower the reading speed. The user must compromise
between decoding security and decoding speed if the security feature is needed.
7.4. Time out
7.4. Time out
7.4. Time out7.4. Time out
This parameter is used to limit the maximum scanning period when the scan mode is
either Auto Off Mode or Auto Power Off Mode. This time-out duration is specified in
units of second. The default time-out duration is ten seconds.
7.5. Read Negative Barcode
7.5. Read Negative Barcode
7.5. Read Negative Barcode7.5. Read Negative Barcode
The CCD scanner can be configured to read negative barcodes. Normally, barcodes
are printed with the color of the bars darker than that of the spaces. But for negative
barcodes, they are printed in the opposite sense just like negative films. The spaces of
the negative barcodes are printed with a color darker than that of the bars.
7.6. Supported Symbologies
7.6. Supported Symbologies
7.6. Supported Symbologies7.6. Supported Symbologies
Most of the popular barcode symbologies are supported. Each symbology can be
individually enabled or disabled. The scanner will automatically discriminate and
recognize all the symbologies that are enabled. The supported barcode symbologies
are listed below.
• Code 39 (Standard / Full ASCII)
• Italy Pharmacode
• French Pharmacode
Application Generator (v4.00)
-15-
Page 18

• Industrial 25
• Interleave 25
• Matrix 25
• Codabar (NW-7)
• UPCA (with or without Addon)
• UPCE (with or without Addon)
• EAN8 (with or without Addon)
• EAN13 (with or without Addon)
• Code 93
• Code 128
• EAN 128
• MSI
• Plessey
Application Generator (v4.00)
-16-
Page 19

8. SETTINGS
8. SETTINGS
8. SETTINGS8. SETTINGS
The system settings include the following:
• Define a password (up to 10 digits) for security checking.
• Enable / disable security checking for system utilities and settings.
• Configure the system settings.
• Configure the settings for keyboard wedge interface.
Application Generator (v4.00)
-17-
Page 20

9. STARTUP
9. STARTUP
9. STARTUP9. STARTUP
9.1. Program start from
9.1. Program start from
9.1. Program start from9.1. Program start from
Specify which to be executed first when the program start to run.
9.2.
9.2. Data field delimiter
Data field delimiter
9.2. 9.2.
Data field delimiterData field delimiter
Specify the delimiters for the data fields. The delimiter can have up to two characters.
You can type in the characters of the delimiters or specify them with ASCII codes.
9.3.
9.3. Redefine system prompts and messages
Redefine system prompts and messages
9.3.9.3.
Redefine system prompts and messages Redefine system prompts and messages
All the prompts and messages used in the application generator can be redefined by
the user's local language. However, only English letters can be used in current system.
Application Generator (v4.00)
-18-
Page 21

10. Utilities
10. Utilities
10. Utilities10. Utilities
There are two utilities included in the ScanPal 2 Application Generator packet.
10.1. 232_Read
10.1. 232_Read
10.1. 232_Read10.1. 232_Read
To receive transaction data from ScanPal 2 via RS-232 port. The optional command
line arguments are [filename],[COM port],[Baud rate],[File mode],[Add Return],
[Add Line-Feed],[Show Error], and [View Data]
l COM port: can be 1 to 6
l Baud rate:
Ø 1 -- 115200 bps
Ø 2 -- 57600 bps
Ø 3 -- 38400 bps
Ø 4 -- 19200 bps
Ø 5 -- 9600 bps
l File mode:
Ø 1 -- overwrite
Ø 2 -- append
Ø 3 -- new name
l Add Return:
Ø 1 -- add Return character to each record
Ø 0 -- do not add Return character
l Line-Feed:
Ø 1 -- add Line-Feed character to each record
Ø 0 -- do not add Line-Feed character
l Show Error:
Ø 1 -- show messages in case of error
Ø 0 -- do not show error message
l View Data:
Ø 1 -- view the received data
Ø 0 -- do not view the received data
u For example,
Ø 232_read data.txt,1,1,1,1,1,0,0 // filename, COM port, Baud rate and File
mode ,CR,LF, error messages ,view data are given
Ø 232_read data.txt,1,1,1 // filename, COM port, Baud rate and File
mode are given
Ø 232_read data.txt,2,2 // filename, COM port, Baud rate
Ø 232_read data.txt,3 // filename, COM port
Ø 232_read // select from dialog box
Application Generator (v4.00)
-19-
Page 22

10.2. IR_Read
10.2. IR_Read
10.2. IR_Read10.2. IR_Read
To receive transaction data from ScanPal 2 via IR Transceiver. The command line
arguments and usage are same as 232_READ.EXE.
Application Generator (v4.00)
-20-
Page 23

11. Q&A
11. Q&A
11. Q&A11. Q&A
(1). How do I update the kernel program?
Press "7" "9" and power keys simultaneously to enter the system menu, then
turn off the power and press "1" "7" and power keys simultaneously to
enter the kernel menu. Select "Update kernel" then download the kernel
program from the PC.
(2). How do I download my user program?
If you are in the kernel menu, just select "Program download" to download
user program (any *.SHX files except the kernel program). If you are in
the system menu, select "6. Version" then select "2. Download".
(3). How do I download my application program created by the generator?
From the main menu of the terminal, select "3. Utility" and then select
"6. Download program". On the PC side, select "Download program" from the
menu of the Application Generator. Note the COM port settings for both side
should be matched.
Application Generator (v4.00)
-21-
Page 24

Honeywell Scanning & Mobility
9680 Old Bailes Road
Fort Mill, SC 29707
www.honeywellaidc.com
00-02849
8/01
 Loading...