

Honeywell VISTA-15PSIA, VISTA-20P, VISTA-20PSIA, VISTA-15P User Manual

ADEMCO VISTA SERIES
K5309-1V6 12/08 Rev. A
VISTA-20P / VISTA-20PSIA
VISTA-15P / VISTA-15PSIA
Security Systems
User Guide

IMPORTANT!
PROPER INTRUSION PROTECTION
For proper intrusion coverage, sensors should be located at ev ery possible point of
entry to a home or comm ercial premises . This would include a ny skylights that m ay
be present, and the upper windows in a multi-level building.
In addition, we recom mend that radio backup be used i n a security system so that
alarm signals can s till be sent t o the Central Moni toring Station in the event th at the
telephone lines are out of order (alarm signals are normally sent over the phone
lines).
EARLY WARNING FIRE DETECTION
Early warning fire detection is im portant in a home. Sm oke and heat detector s have
played a key role in reducing fire deaths in the United States. With regard to the
number and placement of smoke/heat detectors, we subscribe to the
recommendations contained in the National Fire Protection Association's National
Fire Alarm Code (NFPA 7 2). These recommendations c an be found on page 47 of
this manual.
SYSTEM COMPATIBILITY NOTICE
Your Honeywell secur ity system is designe d for use with devices manufactured or
approved by Honeywell f or use with your securit y system. Your Hone ywell security
system is not designed for use with any device that may be attached to your
security system's keypad or other communicating bus if Honeywell has not
approved such device for use with your security system. Use of any such
unauthorized device may cause damage or compromise the performance of your
security system and aff ec t the val idit y of your Hon e ywe ll l imited warranty. When you
purchase devices that have been manufactured or approved by Honeywell, you
acquire the assurance that these devices have been thoroughly tested to ensure
optimum performance when used with your Honeywell security system.
About This Manual
This manual is a ste p-b y-step guide that will ac qua int you wit h the system's features
and benefits. It defines the components and their functions, describes their
operation, and provides clear step-by-step instructions for norm al and emergency
procedures. Keep th is manual in a con venient place so that you can refer to it as
necessary.
– 2 –

Table of Contents
System Overview...................................................................................................................................... 5
Introduction....................................................................................................................................... 5
System Basics.................................................................................................................................... 5
Using the Voice Message Center......................................................................................................7
About The Keypads ..................................................................................................................................8
General Information..........................................................................................................................8
Fixed-Word Display Keypad........................................................................................................... 10
Functions of the Keypads.......................................................................................................................11
Entry/Exit Delays................................................................................................................................... 14
Entry Delay......................................................................................................................................14
Exit Delay........................................................................................................................................14
Exit Alarms...................................................................................................................................... 15
Checking For Open Zones......................................................................................................................16
Using the [∗] Key to Display and Announce System Status..........................................................16
Arming the System.................................................................................................................................17
STAY Mode: Arms Perimeter Only, Entry Delay On ....................................................................17
NIGHT-STAY Mode: Arms Perimeter Only, Plus Selected Zones................................................ 17
INSTANT Mode: Arms Perimeter Only, Entry Delay Off............................................................. 17
AWAY Mode: Arms Entire System, Entry Delay On.....................................................................17
MAXIMUM Mode: Arms Entire System, Entry Delay Off............................................................17
Arming Commands..........................................................................................................................18
Single Button Arming.....................................................................................................................19
Single Button “Step” Arming.......................................................................................................... 19
Keyswitch................................................................................................................................................ 20
Using the Keyswitch .......................................................................................................................20
Disarming and Silencing Alarms...........................................................................................................21
Using the [OFF] key........................................................................................................................21
Bypassing Protection Zones...................................................................................................................22
Using the BYPASS Key...................................................................................................................22
Quick Bypass...................................................................................................................................23
Chime Mode............................................................................................................................................ 24
Using the Chime Mode.................................................................................................................... 24
Using the Voice Chime....................................................................................................................24
Date and Time........................................................................................................................................25
Viewing the Current Date and Time.............................................................................................. 25
Setting the Date and Time.............................................................................................................. 25
Panic Keys...............................................................................................................................................26
Using Panic Keys.............................................................................................................................26
– 3 –

Table of Contents (continued)
Macro Key Programming & Usage........................................................................................................ 27
About Macro Keys ...........................................................................................................................27
Example of Macro Programming....................................................................................................28
Using a Programmed Macro Key....................................................................................................28
Using Device Commands........................................................................................................................29
Paging Feature.......................................................................................................................................30
About Automatic Paging.................................................................................................................30
About Manual Paging......................................................................................................................31
Latch Key Paging............................................................................................................................31
Security Codes & Authority Levels........................................................................................................32
About Security Codes......................................................................................................................32
Authority Level Definitions............................................................................................................32
How to Assign Security Codes and Attributes...............................................................................33
Accessing Other Partitions (VISTA-20P Series)...................................................................................34
About Accessing Partitions............................................................................................................. 34
Using the GoTo Command..............................................................................................................35
Multi-Partition Arming................................................................................................................... 35
Common Zone Operation (VISTA-20P Series)...............................................................................36
Scheduling...............................................................................................................................................37
About Scheduling.............................................................................................................................37
Creating Schedules..........................................................................................................................37
Event Logging Procedures......................................................................................................................39
About Event Logging....................................................................................................................... 39
Viewing the Event Log.................................................................................................................... 39
Testing the System................................................................................................................................. 41
Trouble Conditions.................................................................................................................................42
Maintaining Your System...................................................................................................................... 45
Fire Alarm System .................................................................................................................................46
Quick Guide to Basic System Functions................................................................................................50
Summary of Audible/Visual Notifications............................................................................................. 51
Regulatory Statements and Warnings..................................................................................................53
System Features..................................................................................................................................... 55
User Setup.......................................................................................................................................56
Paging Setup....................................................................................................................................57
List of Output Devices.....................................................................................................................58
Owner’s Insurance Premium Credit Request........................................................................................ 59
Limitations Of This System.......................................................................................................................
Warranty.....................................................................................................................................................
– 4 –

Introduction
Congratulati ons on your own ership of a Honey well Security Sy stem. You've mad e a
wise decision in choosing it, for it represents the latest in security protection
technology today. This system provides:
• Three forms of protection: burglary, fire* and emergency
• At least one keypad which provides control of system and displays system status
• Various sensors for perimeter and interior burglary protection
• Smoke or combustion detectors* designed to provide early warning in case of fire.
Your system m ay also hav e been progra mmed to autom atically s end alarm or sta tus
messages over the phone lines to a Central Monitoring Station.
* Commercial installations and some residential systems may not include fire
protection – check with your installer.
NOTE: Features and procedures described in this manual apply to the
VISTA-20P/VISTA-20PSIA (VISTA-20P series) and VISTA-15P/VISTA-15PSIA
(VISTA-15P series) security systems. Differences are noted where applicable.
System Basics
Burglary Protection
• Several modes of burglary protection: Stay, Night-Stay, Away, Instant, Maximum.
STAY: arms perimeter zones only and entry delay is on
INSTANT: same as STAY, except entry delay is off
NIGHT-STAY: arms perimeter zones and selected interior zones; entry delay on
AWAY: arms perimeter and all interior zones, entry delay is on
MAXIMUM: same as AWAY, except entry delay is off
• You can BYPASS selected zones while leaving the rest of the system armed.
• C HIME mod e alert s you t o th e op enin g of pr otec ted do ors and w ind ow s whil e the
system is disarmed .
Fire Protection
• Fire protection is always active (if installed) and an alarm sounds if a fire
condition is detected
• If necessary, you can manually initiate a fire alarm using the keypad (if
programmed).
• Refer to the Fire Alarm System section for information regarding fire protection,
smoke detectors and planning emergency exit routes.
Security Codes
• You were assigned a 4-digit security code (master code) during installation.
• Use your security code when arming and disarming the system, and when
performing other system fun ctions.
• Other users can be assigned different security codes, each with different
authority levels, which define the system functions a particular user can perform.
System Overview
– 5 –

System Overview (cont’d)
Zones and Partitions
• The system sensing devices have been assigned to various “zones,” which are
specific areas of protection (e.g., front door, kitchen window, etc.).
• Zone numbers are displayed at the keypad when an alarm or trouble condition
occurs on a sensor.
• Partitions (VISTA-20P Series) provide two independent areas of protection, with
each partition containing a group of zones that can be armed and disa rmed
without affecting other zones or users.
• Partitioned systems (VISTA-20P Series) can include a common zone area, which
is an area shared by users of both partitions (such as a lobby in a building).
Arming, Step-Arming and Disarming Burglary Protection
• The system must be armed before the burglary protection can sense intrusions.
• To arm your system, enter your security code followed by the desired arming key.
• If programmed, you can press the [#] key in place of your security code when
arming the system (e.g., instead of entering your 4-digit security code + [3-STAY]
to arm the system in STAY mode, you can press [#] + [3-STAY]).
• You can also use the step-arming feature if programmed, to arm the system. This
is a function key that allows you to arm the system in one of three modes by
simply pressing the key repeatedly.
• To disarm the system, enter your security code then press the [OFF] key.
Alarms
• When an alarm occurs, both the keypad and external sounders sound, and the
keypad displays the zone(s) causing the alarm.
• If your system is connected to a Central Monitoring Station, an alarm message is
also sent. (Delayed Reporting Note: Message reporting is delayed 30 seconds
by default to reduce false alarms. If desired, this delay can be removed or can be
increased to 45 seconds. See your installer if you want the delay time changed.)
• To stop the alarm sounding, simply di sarm the sy s te m .
Memory of Alarm
• When an alarm condition occurs, the keypad displays the number(s) of the
zone(s) that caused the problem, and displays the type of alarm.
• The message remains displayed even after disarming the system, but can be
cleared with another “off” sequence.
Phone Access
• If included, a phone module permits you to access the system via a touch-tone
phone, either on-premises or by call-in when away.
• When you call in, the phone module announces system status over the telephone,
and you can arm/disarm the system and perform most function commands
remotely using the teleph one keys.
• Complete information for using these features is provided with the voice module.
– 6 –
System Overview (cont’d)
Function Keys
• The “A,” “B,” “C,” and “D” keys can be programmed to perform various functions.
• Functions include: activate a panic alarm, arm the system, provide step arming,
switch lights on/off, send a message to a pager, display Time/Date, and start a
programmed Macro sequence.
Paging Feature
• If programmed, the system can automatically send certain system condition
messages to up to four (VISTA-20P Series) or two (VISTA-15P Series) pagers .
• The pager displays code numbers identifying the type of condition that has occurred.
Scheduling
• Your system can be programmed to automatically perform certain functions (e.g.,
arm the system) at a predetermined time each day.
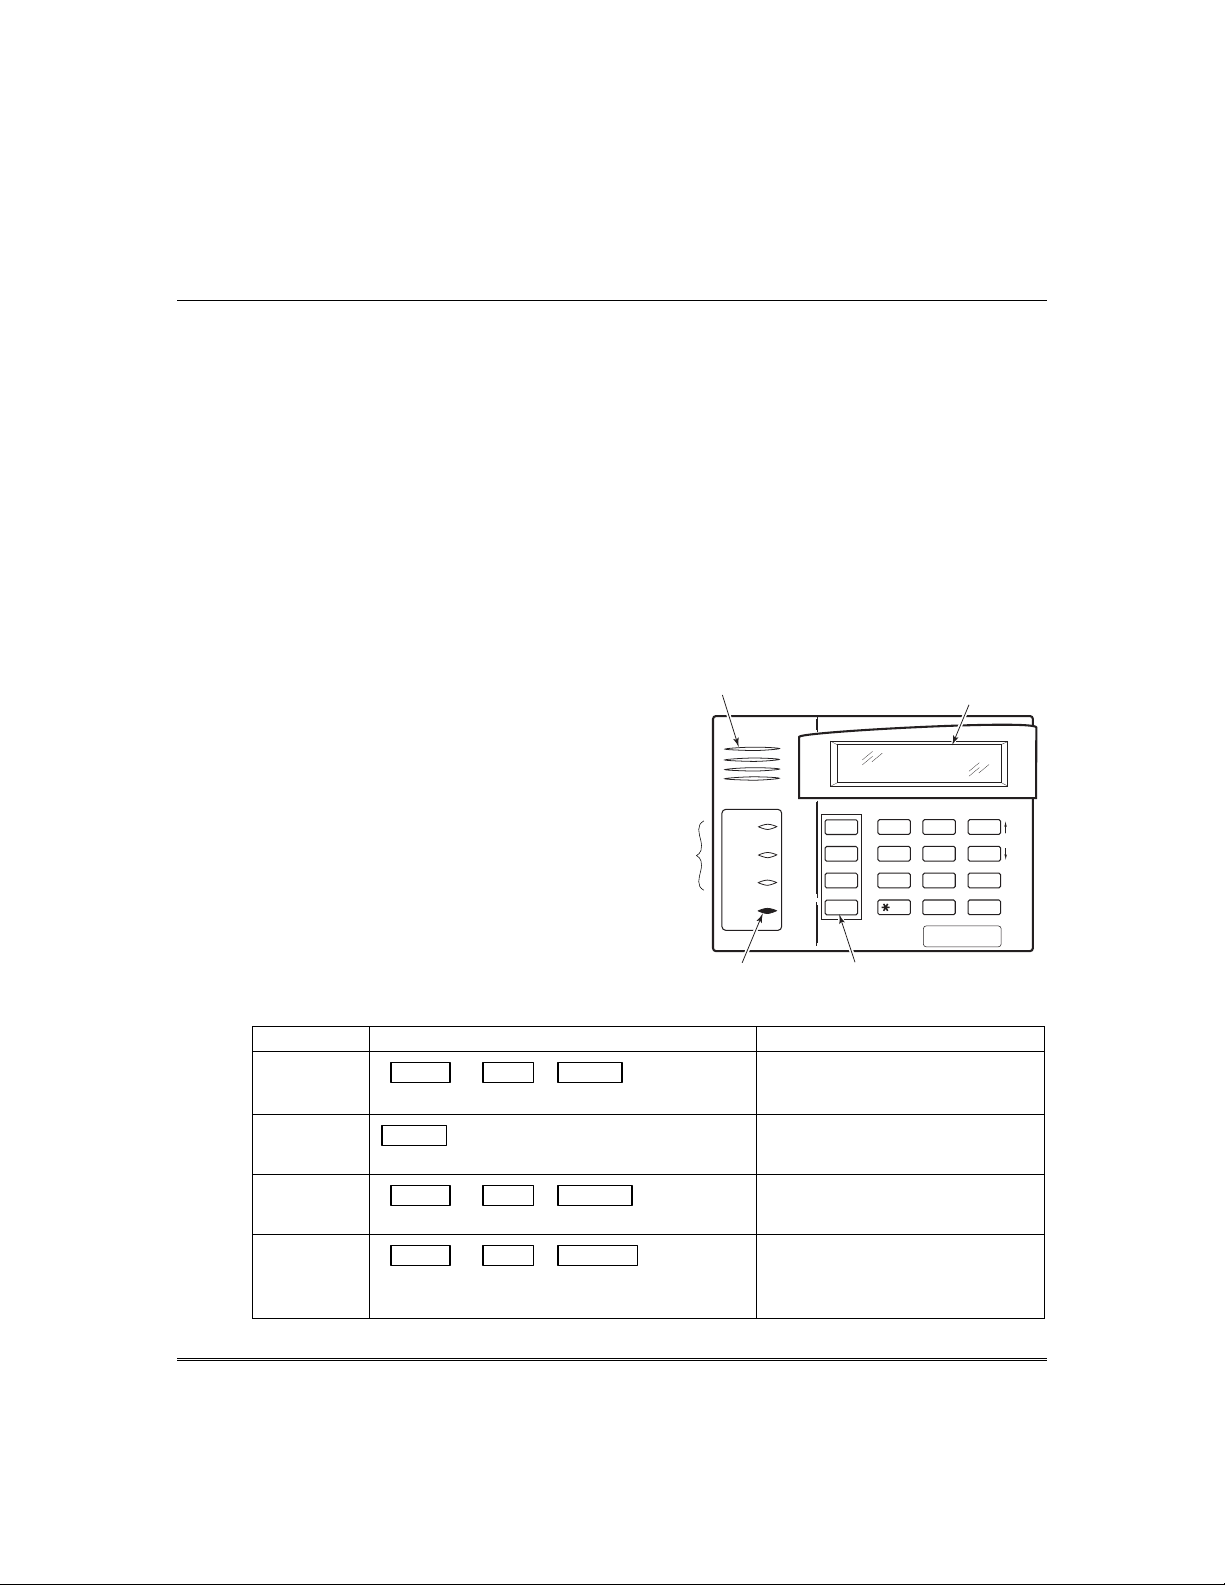
Using the Voice Message Center (if Voice Keypad is installed)
Voice keypads feature a voice message
center that lets y ou record and playback
one message.
• The message can be up to 2.5-minutes
long
• The message remains in memory until
a new message is recorded.
• The volume control is adjustable.
• Refer to the procedures below when
using the Message Center functions.
Message Center Functions
To… Press these keys… Notes…
record a
message
end
recording
play a
message
adjust the
volume
#
FUNCTION
1 OFF
+
0
VOICE
1 OFF
+
RECORD
RECORD
#
FUNCTION
#
FUNCTION
+
+
0
VOICE
0
VOICE
+
+
3 STAY
PLAY
2 AWAY
VOLUME
volume key [3] ↑ (up) or [6] ↓ (down)
SPEAKER
LEDs
MICROPHONE
, then press
ARMED
READY
MESSAGE
MIC
FUNCTION
KEYS
The red MESSAGE LED lights.
Message remains in memory until a
new message is recorded.
The red MESSAGE LED flashes,
indicating message waiting.
The recorded message plays and the
red MESSAGE LED turns off.
Adjusting message volume also
adjusts status volume. Volume
cannot be adjusted while playing.
1
RECORD
4
7
STATUS
OFF
MAX
INSTANT
READY
2
VOLUME
5
8
0
VOICE
AWAY
TEST
CODE
LCD
DISPLAY
3
PLAY
6
9
#
FUNCTION
STAY
BYPASS
CHIME
6160V-003-V0
– 7 –

About The Keypads
General Information
Your keypads allow you to control all system functions and feature the following:
• A telephone style (digital) keypad
• Liquid Crystal Displays (LCD) that show the nature and location of all occurrences
• Built-in sounder that sounds during alarms and troubles. The sounder also "beeps"
during certain system functions and also when depressing any of the keys (to
acknowledge the key press).
• Backlighting of the LCD display windows. Backlighting turns on when any key is
pressed or when entering the premises through any assigned entry/exit door. This
feature is helpful when a keypad is located in a dimly lit area.
• Some keypads have a voice feature that announces the nature and location of all
system occurrences. Voice keypads also announce any faulted entry/exit or
perimeter zone when Chime mode is on. Ask your installer if this option has been
programmed for your system.
IMPORTANT: If the keypad beeps rapidly upon entering the premises, it indicates that an
alarm has occurred during your absence and an intruder may still be on the premises.
LEAVE IMMEDIATELY and CONTACT THE POLICE from a nearby safe location.
Your keypads are functionally the same, but may have different types of displays,
depending on the type installed with your system.
Alpha Display 2-line alpha display keypads feature a 2-line, 32-character
Fixed-Word Display Fixed-Word display keypads are functionally identical to
Voice Keypads Voice Keypads (if installed), are functionally the same as other
• Voice announcements of system status (see Checking for
• Voice chime, which can alert you to the opening of doors and
• Message center, which lets you record and pla yback
alphanumeric LCD that displays system messages in friendly
English. These keypads can also be programmed with custom
zone descriptors.
Alpha display keypads, but the LCD display uses predesignated words to identify the nature and location of
occurrences.
keypads, except that these keypads can provide the following:
Open Zones section)
windows while the system is disarmed (see Voice Chime in
Chime mode section)
messages (see Using the Voice Message Center in the
System Overview section).
– 8 –
About The Keypads (cont’d)
ARMED
READY
1
4
7
OFF
MAX
INSTANT
READY
AWAY
2
TEST
5
CODE
8
0
Standard Fixed-Word Display Keypad
ARMED
READY
MESSAGE
MIC
3
6
9
#
STAY
BYPASS
CHIME
6150-00-001-V0
ARMED
READY
1
4
7
Standard Alpha Display Keypad
TEST
STAY
3
PLAY
BYPASS
6
CHIME
9
#
FUNCTION
OFF
1
RECORD
MAX
4
INSTANT
7
READY
STATUS
AWAY
2
VOLUME
5
CODE
8
0
VOICE
OFF
MAX
INSTANT
READY
STAY
AWAY
3
2
TEST
BYPASS
6
5
CHIME
CODE
9
8
#
0
6160-00-001-V0
6160V-00-006-V0
Voice-Capable Alpha Display Keypad
– 9 –

About The Keypads (Cont’d)
FIXED-WORD DISPLAY KEYPAD
AWAY: All burglary zones, interior and
perimeter, are armed.
STAY: Perimeter burglary zones, such as
protected windows and doors, are
armed.
NIGHT-STAY: NIGHT and STAY indicators both
light when perimeter burglary
zones plus pre-selected interior
zones (set by the installer) are
armed.
INSTANT: Entry delay is turned off:
Lit with STAY = Instant mod e
Lit with AWAY = Maximum mode
BYPASS: This appears when one or more burglary protection zones have been
bypassed.
NOT READY: Appears when burglary portion of t he system is not ready for arming (due
to open protection zones). The system is ready to arm when this message
disappears and the READY indicator light comes on.
NO AC: Appears when AC power has been cut off. System is operating on backup
battery power.
AC: Appears when AC power is present.
CHIME: Appears when the chime feature is activated.
BAT: Low battery condition in a wireless sensor (if zone number displayed) or
low system battery (if no zone number displayed).
ALARM: Appears when an intrusion has been detected and the system is armed
(also appears during a fire alarm or audible emergency alarm).
Accompanied by the protection zone in alarm.
CHECK: Appears when a malfunction is discovered in the system at any time, or if
an open is detected in a fire zone at any time, or a fault in a DAY/NIGHT
burglary zone during a disarmed period. Accompanied by a display of
zone number in trouble.
FIRE: Appears when a fire alarm is generated. Accompanied by a display of the
zone in alarm.
A FIRE display also appears when a fire alarm is manually activated,
accompanied by a display of the fire emergency key zone number.
CANCELED: Appears when an alarm has been silenced by the Code + OFF sequence
and will remain on until another Code + OFF sequence is keyed.
ALARM
FIRE
CHECK INSTANT CANCELED
FIXED-WORD DISPLAY
AWAY
BYPASS
STAY
NIGHT NO AC
PHONE TEST
NOT READY
CHIME BAT
6150disp
– 10 –
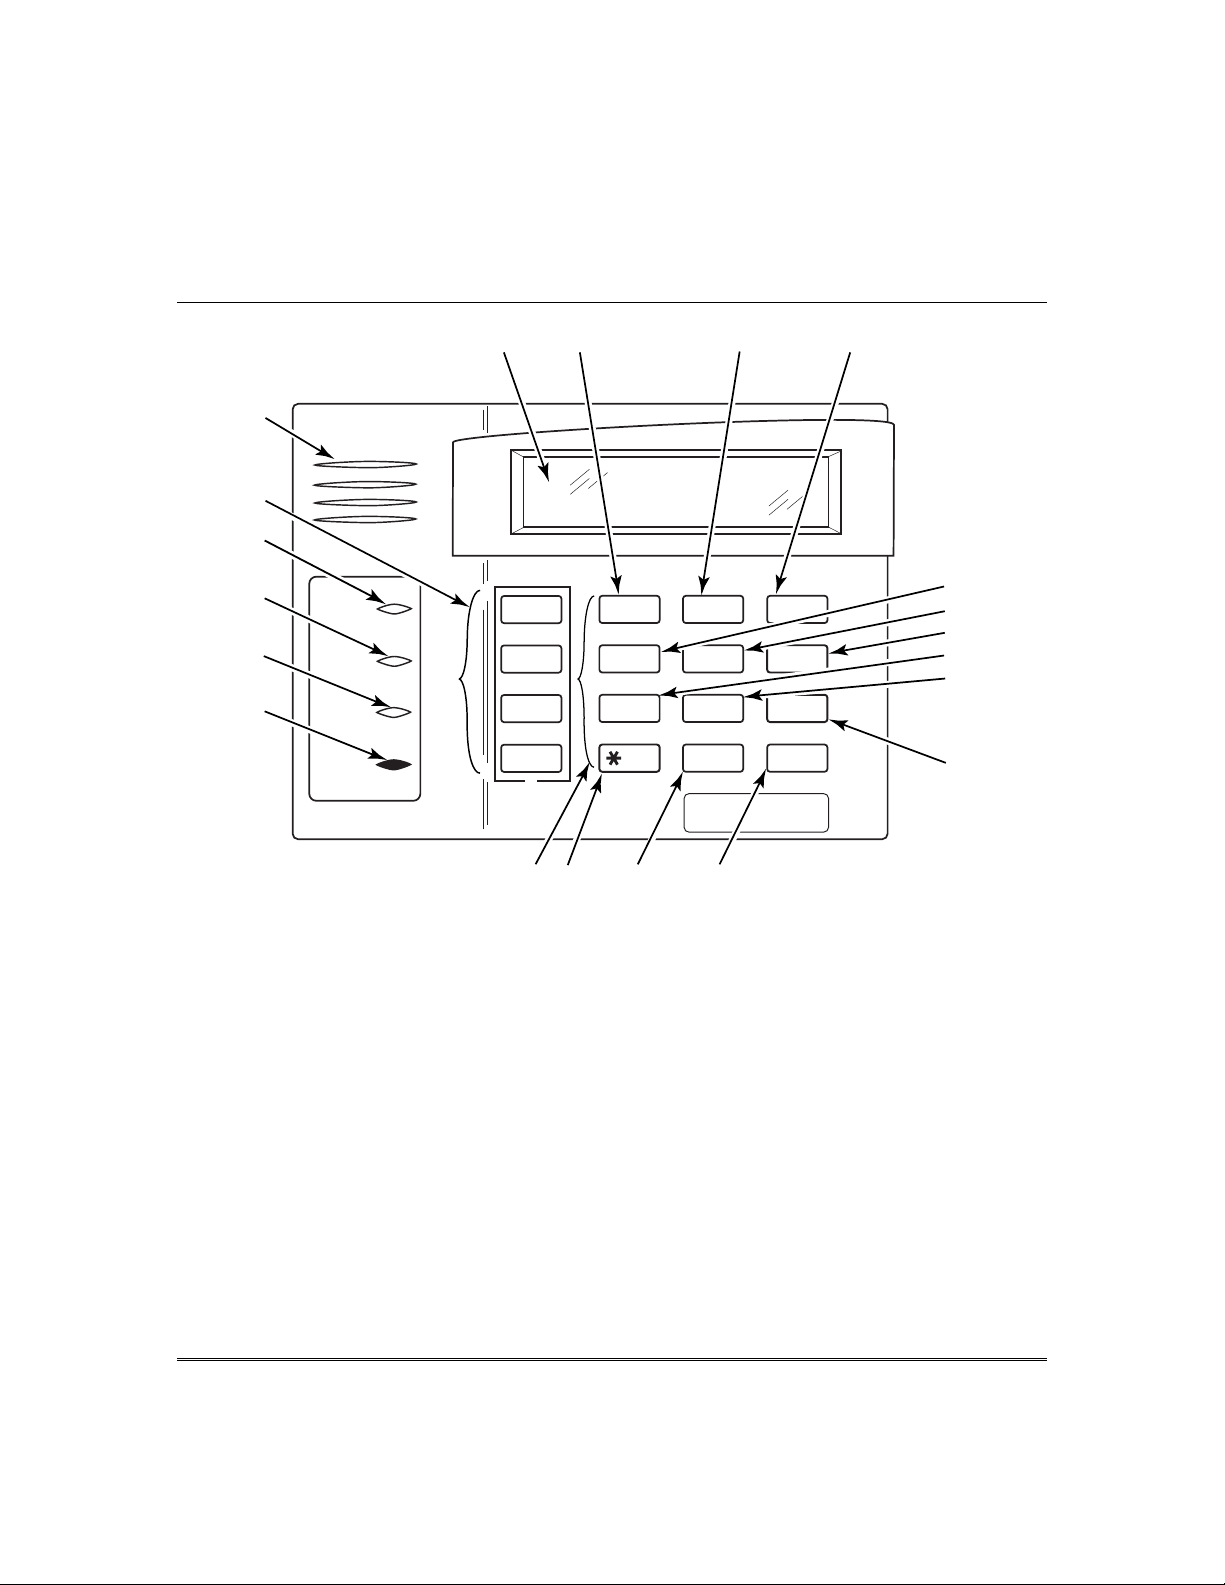
Functions of the Keypads
20
19
18
1
2
34
17
16
15
ARMED
READY
MESSAGE
MIC
14
13
OFF
1
RECORD
MAX
4
INSTANT
7
READY
STATUS
12
AWAY
2
VOLUME
TEST
5
CODE
8
0
VOICE
11
STAY
3
PLAY
BYPASS
6
CHIME
9
#
FUNCTION
5
6
7
8
9
10
6160V-00-007-V0
Voice-capable 2-line Alpha keypad
(shown with flip-down front door removed)
IMPORTANT!
• Match the numerical callouts in the above graphic with the corresponding number on the
following pages for a descript ion of usage.
• When entering codes and commands, sequential key depressions must be made within 4-5
seconds of one another. If 4-5 seconds elapse without a key depression, the entry will be
aborted and must be repeated from its beginning. Be sure to observe this precaution when
performing any of the procedures in this manual.
• If you make a mistake while entering a security code, stop, press the [✱] key, and then
start over. If you stop in the middle while entering a code, and then immediately start
the entry over, an erroneous code might be entered.
– 11 –

Functions of the Keypads (cont’d)
NOTE: The functions printed directly on the
keys indicate their primary purpose; the
functions printed u nder some of th e keys (sh own
in brackets under the respective key), indicate
their alternate or secondary purpose.
1. DISPLAY WIND OW
Alpha Display Keypads: 2-line, 32-
character Liquid Crystal Disp lay (LCD)
keypads that display protection point
identification, system status, and
messages.
Fixed-Word Display Keypads:
Display protection zone ID and system
status messages using pre-designated
words in the LCD display area.
2. 1
OFF
Disarms burglary portion of
system, silence s alarms and audible
the
trouble indicators, and clears visual
display after problem's correction.
[RECORD] On Voice keypads, used in
conjunction with the FUNCTION and
VOICE keys to record up to a 2.5minute message.
3. 2
AWAY
system,
Arms the entire burglary
perimeter and interior.
[VOLUME] On Voice keypads, used in
conjunction with the FUNCTION and
desired volume control keys ↑ [3] or ↓
[6] to adjust the volume of a recorded
message or voice sy s tem s tatus.
4. 3
STAY Arms perimeter portion of
burglary system only. Interior
protection is not armed, allowing
movement within premises without
causing an alarm. If pressed twice in
succession, arms system in Night-Stay
mode.
[PLAY] On Voice keypads, used in
conjunction with the FUNCTION and
VOICE keys to play the recorded
message.
[ ↑↑↑↑ ] On Voice keypads, used in
conjunction with the FUNCTION and
VOLUME keys to raise the message
and voice system status volume.
5. 4
MAX Arms the entire burglary
system, perimeter and interior, but
without entry delay feature. Entering
via an entry/exit door will cause an
alarm.
6. 5
TEST Tests the system and alarm
sounder if disarmed. Refer to Testing
The System section for test procedures.
7. 6
BYPASS Removes individual
protection zones from being monitored
by the system.
[ ↓↓↓↓ ] On Voice keypads, used in
conjunction with the FUNCTION and
VOLUME keys to lower the message
and voice system status volume.
8. 7
INSTANT Arms in manner similar to
the STAY mode, but without the entry
delay feature.
Entering via an entry/exit door will
cause an alarm.
9. 8
CODE Used to assign additional
security codes and attributes for other
users of the system.
10. 9
CHIME
off.
Turns CHIME mode on and
When on, the op en ing of wi ndow s or
doors while th e system is disarmed w ill
sound 3 beeps at the keypad(s).
– 12 –

Functions of the Keypads (cont’d)
11. # This key can be used for "Quick
Arming" of th e system withou t use of a
security code (if programmed).
[FUNCTION] On Voice ke y p ads, en abl e s
the desired voice or volume function.
12. 0
[VOICE] On Voice key pads, enabl es the
RECORD, VOLUME and PLAY
functions.
13. ∗
protection zones.
[STATUS] On Voice keypads, a
momentary press of the STATUS key
annunciates the current system status.
Pressing the STATUS key a second
time annunciates and displays system
and/or zone faults (if they exist).
14. KEYS 0–9: Used to enter the security
code(s) and to perform their associated
system functions.
READY Used to display all open
15. MIC
On voice keypads, microphone for
Message Center recordings.
16. MESSAGE LED INDICATOR : (RED)
On Voice keypads, flashes red when
message waiting or lights red (steady)
when in record mode.
17. READY LED INDICATOR: (GREEN)
Lit when the system is ready to be
armed (no faults present). While the
system is disarmed, this indicator will
go on and off as protection zones are
closed and open ed.
18. ARMED LED INDICATOR: (RED)
Lit when the system has been armed.
19. FUNCTION KEYS: Keys A, B, C, D
may have been programmed for a
variety of functions, including panic
(emergency) functions. For details, see
the Function Keys section.
20. INTERNAL SPEAKER: The built-in
speaker mimics the alarm sounder
during alarms, and will also "beep"
during certain system functions. The
speaker also prov ides v oic e play bac k for
any recorded messages.
– 13 –

Entry/Exit Delays
Entry Delay
Entry Delays give you time to disarm the system when you re-enter through the
designated entrance door. There are two entry delays (if programmed). The first is for
your primary entrance and the second can be used for a secondary entrance, where a
longer delay is required to walk to the keypad to disarm the system.
You must disarm the system before the entry delay period ends, or an alarm will
occur. The keypad beeps during the entry delay period, reminding you to disarm the
system. The beeps stop when a code is entered, but will restart after about 15 seconds
if an invalid code is entered.
You can also arm the system with no entry delay at all by using the INSTANT or
MAXIMUM arming modes. These modes provide greater security while on the
premises or while away for extended periods of time.
See your installer for your delay times.
Partition 1____________________________________________________________________________
Exit Delay:
seconds Entry Delay 1: seconds
NOTE: Entry/Exit times set for partition 1 also apply to the Common Zone of the VISTA-20P Series.
Partition 2 (on V IS T A - 2 0 P S e r i e s only)_______________________________________________
Entry Delay 2:
Exit Delay
Exit delay gives you time to leave through the designated exit door(s) without
setting off an alarm. Exit delay begins immed iately after arming your system in
any arming mode and Alpha Display keypads display the message “You May Exit
Now.” When “You may exit no w” disappears, the system is fully armed. If
programmed, a slow beeping will sound during the exit delay period until the last
10 seconds, which then changes to fast beeping (alerting you to the end of exit
delay). If you cannot leave within this delay time period, you should stop, disarm
the system, and start over to avoid a false alarm.
Exit Delay Restart (if programmed): If you wish to open the entry/exit door to let
someone in after arming STAY, you can restart the exit time delay at any time –
simply press the [✱] key, then let that person in (the perimeter zones remain
armed). The system automatically rearms the entry/exit door when the exit delay
expires, thereby avoiding having to disarm the system and then rearm it again.
Additionally, when the system is armed AWAY, reopening and closing the
entry/exit door before exit delay time expires (e.g., re-entering to get a forgotten
item), will reset the exit delay time once.
Entry Delay 2:
Exit Delay:
seconds Entry Delay 1: seconds
seconds
seconds
– 14 –

Exit Alarms
Exit Error Conditions
Whenever you arm the system, the exit delay begins. If an entry/exit door or interior
zone is faulted before exit delay expires and remains faulted (e.g., exit door left open),
the system sounds an alarm and starts the entry delay timer. If you disarm the
system before the entry delay ends, the alarm sound stops and the message "ALARM
CANCELED " or "CA" is displayed on the keypad, along with a zone number
indicating the faulted zone. No message is sent to the Central Monitoring Station.
To clear the exit error condition, the open zone must be made intact; to clear the
display, enter your code plus OFF.
If you do not disarm the system before the entry delay ends and the faulted zone
remains open, the alarm sound continues and an "exit alarm" message is sent to the
Central Monitoring Station (after the installer-programmed dial delay expires). T he
message "EXIT ALARM" or "EA" is displayed on the keypad, along with a zone
number indicating the faulted zone. To stop the alarm, the system must be disarmed
(your code plus OFF); to clear the display, enter your code plus OFF a second time.
An “exit alarm” also results if an entry/exit door or interior zone is faulted within two
minutes after the end of the exit delay.
Your system may have been programmed for this feature to minimize false alarms sent to the Central Monitoring
Station. Ask your installer if "Exit Alarm" is active i n your syst em. If so, check thi s box.
Entry/Exit Delays (cont’d)
VISTA-20PSIA/VISTA-15PSIA: The Exit Error condition works the same as described above,
except that in addition to the “EXIT ALARM” message, a “zone alarm” message is also sent to
the Central Monitoring Station. In addition, if an entry/exit door or interior zone is faulted
within two minutes after the end of the exit delay, a “Recent Closing” cond ition occurs instead of
the “exit alarm.” Refer to the next paragraph for details.
“Recent Closing” Condition (VISTA-20PSIA/VISTA-15PSIA only)
A Recent Closing condition is similar to the Exit Error condition described a bove, but occurs if
an entry/exit door or interior zone is faulted within two minutes after the initial exit delay
expires. If you disarm the system within the two minutes, the alarm sound stops and the
message "ALARM CANCELED " or "CA" is displayed on the keypad, along with a zone number
indicating the faulted zone. No message is sent to the Central Monitoring Station.
If you do not disarm the system within two minutes and the faulted zone remains open, the
alarm sound continues and a “recent closing” and a “zone alarm” message are sent to the
Central Monitoring Station (after the installer-programmed dial delay expires). The alarm
message along with a faulted zone number is displayed on the keypad. To stop the alarm, the
system must be disarmed (your code plus OFF); to clear the display, enter your code plus OFF a
second time.
– 15 –

Checking For Open Zones
Using the [∗∗∗∗] Key to Display and Announce System Status
Before arming your system, all protected doors, windows and other protection zones
must be closed or bypassed; otherwise the keypad will display a "Not Ready"
message.
Use the READY key to display all faulted zones, making it easier for you to identify
and secure any open zone.
1. Press [✱] (do not enter code first) to displ ay faulted
zones.
2. Secure or bypass the zones displayed.
The keypad’s READY indicator lights when all
protection zones have been either closed or bypassed.
3. Arm the system as desired.
Alpha Display:
DISARMED
HIT ∗ FOR FAULTS
Fixed-Word Display:
Zone no. and “NOT READY”
Voice Status: Voice keypads (if installed), can announce system status and faulted
zones (up to 3 zone descriptors) if the Voice Status feature is turned on.
To turn the Voice Status feature on /off:
(also turns on Voice Chime mode; see Chime mode section)
# + 0 + 2 + 4
To announce Status: Press [#] FUNCTION + [0] VOICE + [∗] STATUS key.
(Announces current system status; e.g., “Disarmed Ready to
Arm.”)
To announce faults Press [#] FUNCTION + [0] VOICE + [∗] STATUS + [∗] again.
and status: (Announces up to three faulted zones with their zone
descriptors, if programmed.)
– 16 –

Arming the System
STAY Mode: Arms Perimeter Only, Entry Delay On
• Used when you want to arm the system with persons staying inside (or if you have
pets that are moving throughout the premises).
• The perimeter sensors are armed, but interior sensors are left disarmed.
• Exit delay begins (you can leave through the entry/exit door, if desired).
• An alarm sounds if any protected window or non-entry/exit door is opened.
• You may otherwise move freely within the premises.
• Persons entering later can enter through an entry/exit door, but they must disarm
the system within th e entry delay period to avoid sounding an alarm.
NIGHT-STAY Mode: Arms Perimeter Only, Plus Selected Zones
• Use NIGHT-STAY mode to provide increased security while staying inside.
• Arms same as STAY mode, but also arms preselected interior sensors (programmed
by your installer), while other interior sensors are left disarmed.
• Persons entering later can enter through an entry/exit door but they must disarm
the system and must not violate any of the programmed interior zones to avoid
sounding an alarm.
• IMPORTANT: When NIGHT-STAY mode is on, the selected interior zones are
armed and cause an alarm if anyone enters those areas (e.g., waking in the middle
of the night). To avoid sounding an alarm, you must disarm the system before any
activity takes place in those interior zones.
INSTANT Mode: Arms Perimeter Only, Entry Delay Off
• Used when staying inside and do not expect anyone to use an entry/exit door.
• Arms same as STAY mode.
• An alarm sounds immediately if any protected perimeter window or any door is
opened, including entry/exit doors.
• IMPORTANT: Arming the system in this mode greatly increases the chance of
false alarms. Use extreme care in selecting this mode of arming.
AWAY Mode: Arms Entire System, Entry Delay On
• Used when nobody will be staying inside (including pets).
• The entire system (interior and perimeter) is armed.
• Exit delay begins letting you leave through the entry/exit door.
• An alarm sounds if a protected window or any door is opened, or if any movement
is detected inside your premises.
• You can re-enter through an entry/exit door, but you must disarm the system
within the entry delay period to avoid sounding an alarm.
MAXIMUM Mode: Arms Entire System, Entry Delay Off
• Used when leaving the premises for extended periods (e.g., vacation).
• Arms same as Away mode, but entry delay is off.
• An alarm sounds same as Away mode, and sounds upon opening entry/exit doors.
– 17 –
Arming the System (cont’d)
Arming Commands
Before arming, close all perimeter doors and windows and make sure the Ready to Arm
message is displayed.
Mode Press these keys… Keypad Confirms By…
STAY
NIGHTSTAY
INSTANT
AWAY
MAXIMUM
† Arming Ding: In addition to the keypad beeps, the external sounder emits a short “ding” sound after arming, if
programmed to do so. The ding confirms that the system is armed, and may occur immediately after the command or be
delayed (until arm/disarm report is sent or exit delay expires). Ask your installer about how this feature is set for your system.
security code + 3 STAY
security code + 3 STAY + 3 STAY
security code + 7 INSTANT
security code + 2 AWAY
security code +
Quick Arming
If "Quick Arming " was pr ogramm ed by th e insta ller, th e
of the security c od e w hen arm in g the sy s t em in any of the arming mode s ( ex c e p t Nig h tStay). However, the security code must always be used when manually
disarming the system.
Function Key Arming
For any arming command, a function key may have also been programmed for your
system. If so, y ou can press and hold the ap propri ate fu nction key f or 2 sec onds t o arm
the system. See your installer for the designated functions (see Single Button
Arming section).
Refer to the Accessing Other Partitions section for information on multi-partition
arming (VISTA-20P Series only).
4 MAX
• three beeps
†
• armed STAY message displayed
• red ARMED indicator lights
• three beeps
†
• NIGHT-STAY message displayed
• red ARMED indicator lights
†
• three beeps
• armed STAY message displayed
• red ARMED indicator lights
Note that entry delay is turned off.
†
two beeps
, or, if programmed, beeping for
duration of exit dela y
• armed AWAY message displayed
• red ARMED indicator lights
Leave the premises through an entry/exit
door during the exit delay period to avoid
causing an alarm. The keypad beeps
rapidly during the last 10 seconds of the
exit delay to warn you that it is ending.
• same as AWAY (described above)
Note that entry delay is turned off.
[#] key can be pressed in place
– 18 –

Single Button Arming
The “A”, “B”, “C”, and/or “D” keys on your keypad may have been programmed for
single-button arming. Note that while it is not necessary to use a security code for
arming (by using the Quick Arm method described previously), a security code must
always be used when manually disarming the system.
If Single-Button Arming is programmed:
• A function key has been assigned to a specific type of arming: STAY mode,
NIGHT-STAY mode, AWAY mode, or STEP-ARMING (see Step-Arming
paragraph).
• You DO NOT need to enter your user code before pressing the function key but
you always need your security code to DISARM the system.
Before arming, close all perimeter doors and windows.
1. Press and hold the assigned function key for 2
seconds (no code is required). Function key s are
shown below.
A
B
OFF
MAX
Arming the System (cont’d)
Alpha Display:
DISARMED
AWAY
TEST
STAY
321
BYPASS
654
READY TO ARM
Fixed-Word Display: Green LED lit
C
D
INSTANT
READY
*
2. The keypad begins beeping and displays the
armed message. The red ARMED indicator also
lights.
Single Button “Step” Arming
Single-Button “Step” arming may be programmed into one of the lettered keys (A, B,
C, or D). Check with your installer to see if this has been done in your system.
If Step-Arming is programmed:
• The assigned key provides a choice of three levels of security.
• The selected key can be pressed once, twice, or three times, increasing the level of
security with each press, as follows
Key
Ø
A, B, C, D
First Press
Armed-STAY Armed NIGHT-STAY Armed-AWAY
Ø
CODE
CHECK
987
#0
keypad_keys-00-001-V0
Second Press
Ø
Alpha Display:
ARMED***AWAY***
YOU MAY EXIT NOW
Fixed-Word Display: AWAY
Third Press
Ø
– 19 –
Keyswitch
Using the Keyswitch
Your system may be equipped with a keyswitch for use when arming and disarming.
Red and green lights on the keyswitch plate indicate the status of your system as
follows:
Green Light: Lights when the syst em is disarmed and ready to be armed (no
open zones). If the system is disarmed and the green light is off, it
indicates the system is not ready (one or more zones are open).
Red Light: Lights or flashes when system is armed in AWAY or STAY mode.
See your installer for the meanings of the lit red light:
Lit Steady = syst em arm ed A WA Y or
system armed STAY and exit delay has expired
Flashing = system armed STAY and exit delay timer active
Rapid flashing = an alarm has occurred (memory of alarm).
Before arming, close all perimeter doors and windows.
To arm in the AWAY mode:
Turn the key to the right for 1/2 second and release.
Keypads beep twice and the red indicator lights or
flashes.
To arm in the STAY mode:
Turn the key to the right and hold for longer than 1
second, then release. Keypads beep three times and
the red indicator lights or flashes.
To disarm the system:
Turn the key to the right and release. The red light
turns off
(if programmed)
– 20 –
 Loading...