

Page 1

What is a thermostatic radiator valve (TRV)?
User Manual
Thermostatic
Radiator Valve
Installation options
50051974-001 Rev. A
...an explanation for householders
TRVs sense the air temperature around them and
regulate the flow of water through the radiator which
they are fitted to. They do not control the boiler.
They should be set at a level that gives you the room
temperature you want. These settings may have to be
different in each room, and you should set the TRVs to
suit each room and then leave them to do their job.
Turning a TRV to a higher setting will not make the room
heat up any faster. How quickly the room heats up
depends on the boiler size and setting, and the radiator
size. Turning the TRV to a lower setting will result in the
room being controlled at a lower
temperature, and saves energy.
TRVs need a free flow of air to
sense the temperature, so they
must not be covered by curtains
or blocked by furniture.
TRVs cannot turn off the boiler when the whole house
is warm. To do that, you will need a room thermostat as
well. The radiator in the room with the room thermostat
should normally have a TRV, but, if it does, keep the
TRV on the maximum setting and adjust the room
thermostat as explained with the instructions.
This manual applies to the following homexperttm by Honeywell products
TRV15AHC: Angled TRV Kit — Chrome
TRV15SHC: Straight TRV Kit — Chrome
TRV15AHW: Angled TRV Kit — White
TRV15SHW: Straight TRV Kit — White
TRV15AHWC: Angled TRV Kit — Chrome & White
TRV15SHWC: Straight TRV Kit — Chrome & White
®
Valve installation
Thermostatic
radiator valve (TRV)
OUT (cool) OUT (cool)
OUT (cool) OUT (cool)
NOTE: If you are not experienced in equipment installation, we recommend that these
procedures be done by a professional installer.
ALLOW RADIATOR TO COOL BEFORE INSTALLATION: To avoid injury, turn off boiler or stop
hot water flow to radiator and allow it to cool before installation.
Lockshield valve
(optional)
IN (hot) IN (hot)
IN (hot) IN (hot)
The TRV can be installed on either side
of the radiator, in a vertical or horizontal
position, as shown at left.
If a lockshield valve is also used on the
same radiator, install it on the opposite
side of the radiator, as shown.
Remove protective cap and connect fittings to radiator and hot water source as shown below. If necessary, cut
supplied copper tubes to an entry depth of 10 mm into the TRV to ensure a secure connection.
Cap
TRV
NOTE: Keep the protective cap. You can remove the thermostat sensor (see next page) and
screw the cap back into place to prevent water overflow if you must remove the radiator later.
TRV
Connection to radiator
Connection to
hot water pipe
Page 2
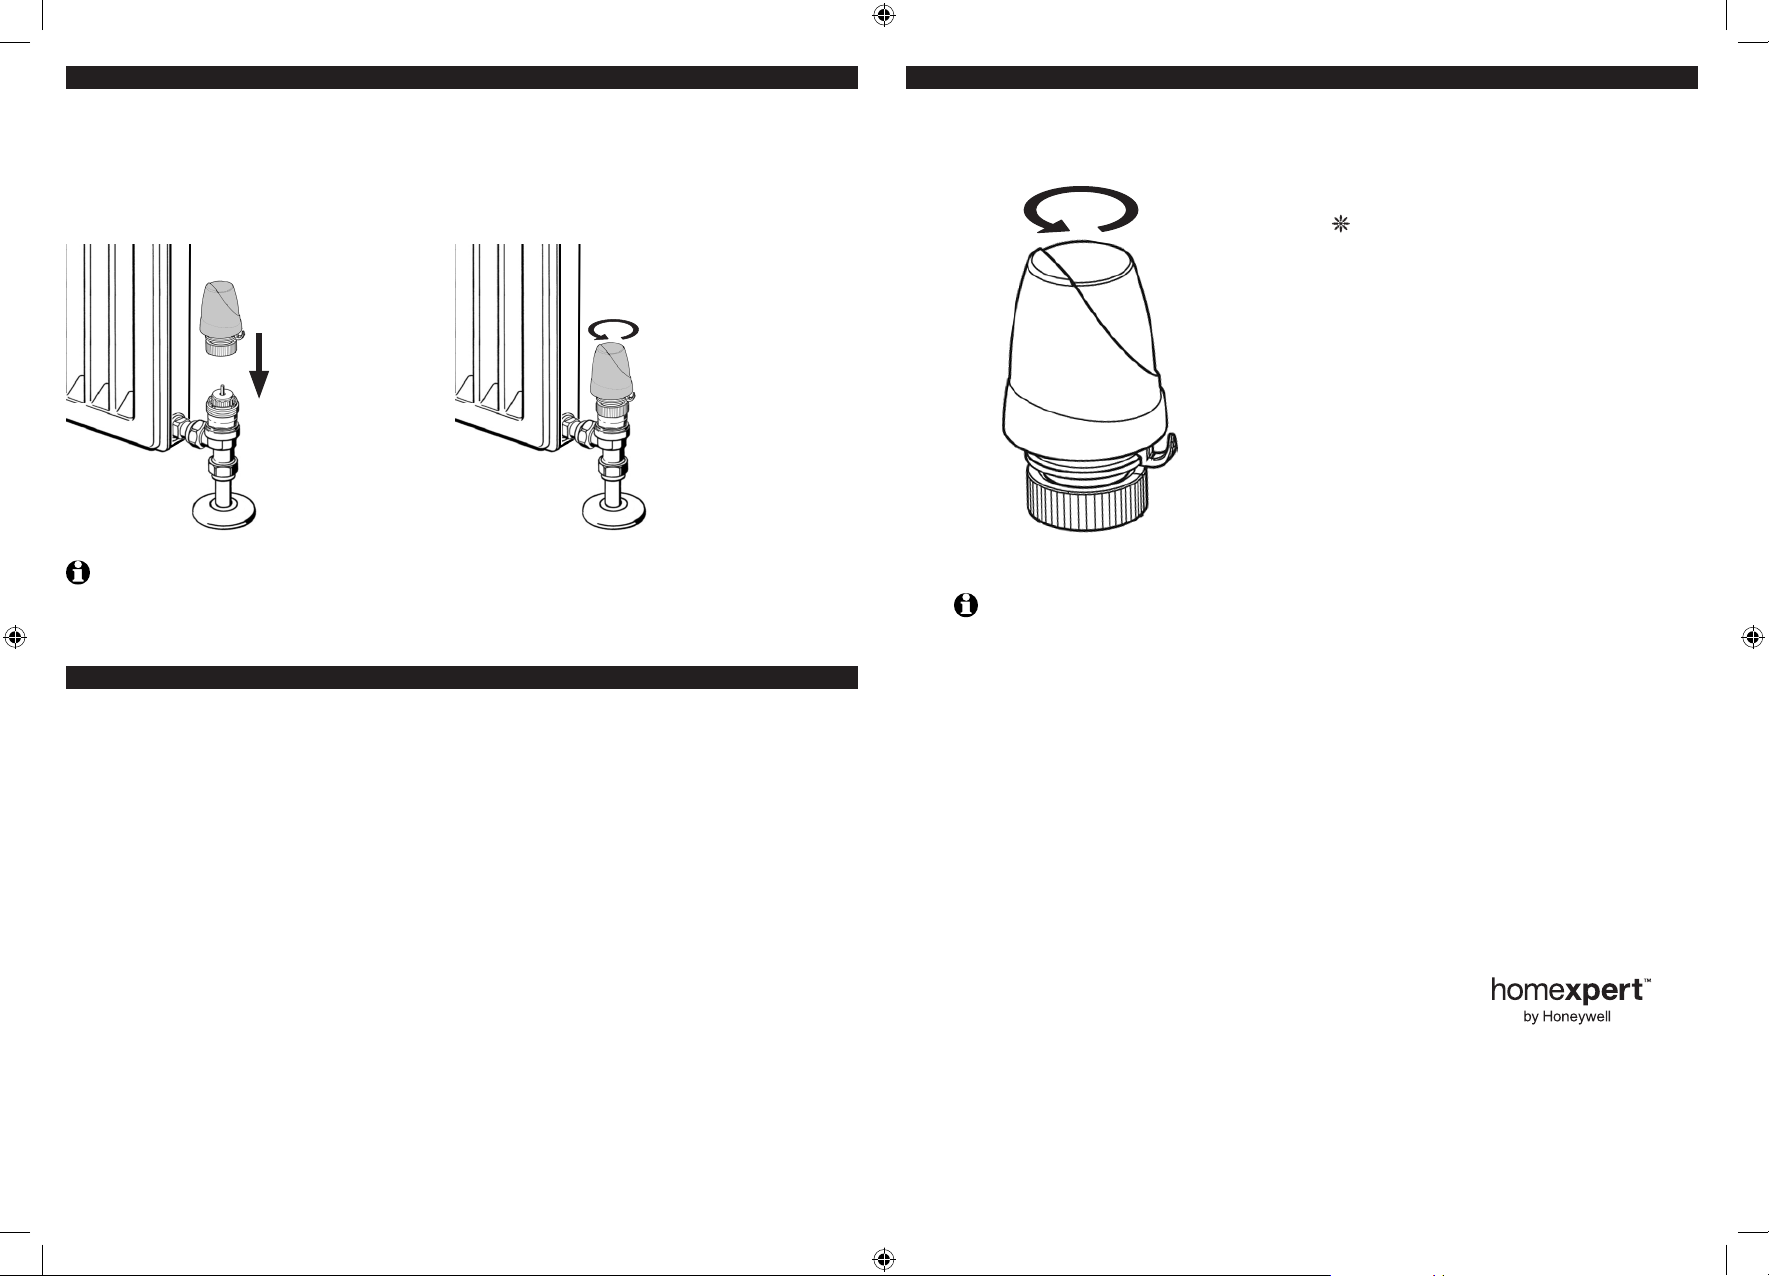
Sensor installation
Temperature control
Check all fittings to make sure connections are secure before installing the thermostat sensor. Center the sensor
over the radiator valve, push down and screw firmly into place as shown below.
After installation, set the sensor to an appropriate temperature level, then turn on the boiler or open valves as
needed to resume hot water flow to the radiator. Watch carefully to check for leaks. If leaks occur, stop hot water
flow to the radiator immediately and check all fittings.
Temperature
sensor
Hand-tighten only.
Do not use tools.
Radiator
valve
NOTE: To ensure accurate temperature control, make sure the TRV is exposed to a free flow of
room air, and is not blocked by draperies or furniture.
Limited warranty
Turn the sensor to control temperature at each radiator fitted with a TRV. Settings are marked with numbers rather
than temperatures, because heating systems vary. An approximate guide follows, below. You may have to adjust
the sensor for a day or two, to get the proper setting for the temperature you prefer.
0 1° C (potential hazard of freezing)
* 6° C (frost protection level)
1 12° C
Turn to regulate
temperature
2 16° C
3 20° C
4 24° C
5 28° C
4
NOTE: Temperatures listed above are estimates based on typical performance after vertical mounting.
Temperatures may vary by 1° to 2° C if the TRV is installed in other positions.
1
23
Honeywell warrants this product for 1 year from date
of purchase. We undertake to replace or repair at our
discretion, products should they become defective
within 1 year solely as a result of faulty materials and or
workmanship.
Understandably if the product has not been installed or
maintained in accordance with Honeywell’s instructions,
has not been used appropriately or if any attempt has
been made to rectify, dismantle or alter the product in
any way the warranty will be invalidated.
This product warranty states Honeywell’s entire liability.
It does not extend to cover consequential loss or
damage or installation costs arising from a defective
product.
If the product is defective, please return it together with
a proof of purchase or receipt to the place of purchase.
This does not affect your statutory rights.
If you require further information about this product,
call the homexperttm by Honeywell technical helpline on
0845 604 2893.
For a full list of terms and conditions please visit
www.homexpertbyhonyewell.com.
Honeywell
The Arnold Centre
Paycocke Road
Basildon, Essex
SS14 3EA
Technical Help Desk: 0845 604 2893 50051974-001 Rev. A
www.homexpertbyhoneywell.com © 2010 Honeywell International Inc
homexperttm by Honeywell is a trademark of Honeywell International Inc. All rights reserved.
 Loading...