

Honeywell TH404 Owners Manual
TH404
Programmable Thermostat
Owner’s Guide

Table of contents
Overview
About your new thermostat .............. 1
Quick reference to controls .............. 2
Quick reference to screen display .... 3
Installation
Removing the faceplate.................... 4
Wiring ............................................... 5
Installing the thermostat ................... 6
Quick start-up / Setting the clock...... 7
Operating modes
Automatic (Auto) mode..................... 8
Manual (Man) mode ......................... 9
Away mode..................................... 10
Countdown mode ............................11
Configuration
Default schedule............................. 12
Modifying the schedule................... 13
Setup menu ....................................14
Setup procedure ............................. 16
Appendices
In case of difficulty .......................... 17
Specifications.................................. 18
3-year limited warranty ...................19
Customer assistance...................... 20
TH404
About your new thermostat
This thermostat has been designed to control an electric heating system such as
a baseboard heater, a radiant ceiling, a convector or a fan-forced heater.
The thermostat CANNOT be used with:
• a resistive load under 0.83 A
• a resistive load over 10.4 A
• a system driven by a contactor or a relay (inductive load)
• a central heating system
SUPPLIED PARTS
• One (1) thermostat
• Two (2) 6-32 mounting screws
• Two (2) solderless connectors
1
Owner’s Guide
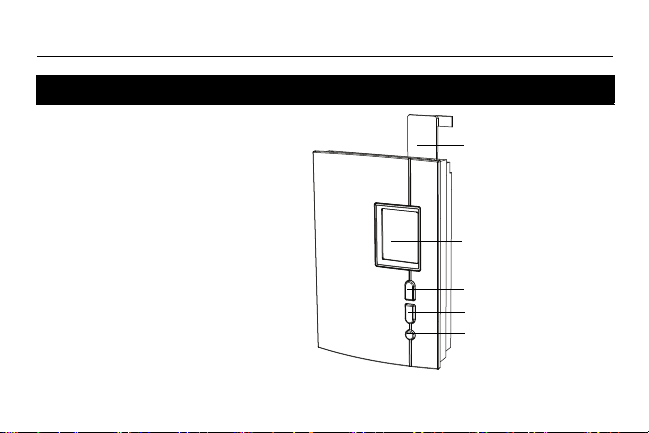
Up button
Down button
Select button
Help tab
Slide up at the
right and remove
to view information
on both sides.
Screen
Quick reference to controls
• To turn the screen backlight on,
press the Select button once. The
backlight will remain on for 12
seconds.
• To display the setpoint
temperature, press the Up or
Down button once. The setpoint
will be displayed for 5 seconds.
• To modify the setpoint
temperature, press the Up or
Down button until the desired value
is displayed.
• To enter or exit the programming
mode, press the Select button and
hold for 3 seconds.
2
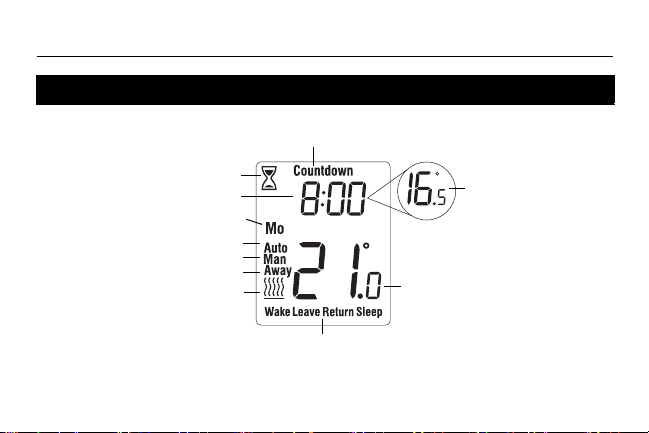
Quick reference to screen display
Ambient temperature
Heating intensity indicator
(No icon appears when
heating is off.)
Time
Periods (see page 12)
Countdown mode (see page 11)
Manual mode (see page 9)
Day
Automatic mode (see page 8)
Away mode (see page 10)
Setpoint temperature
(see page 2)
Flashes during
Countdown mode
3
TH404
Owner’s Guide
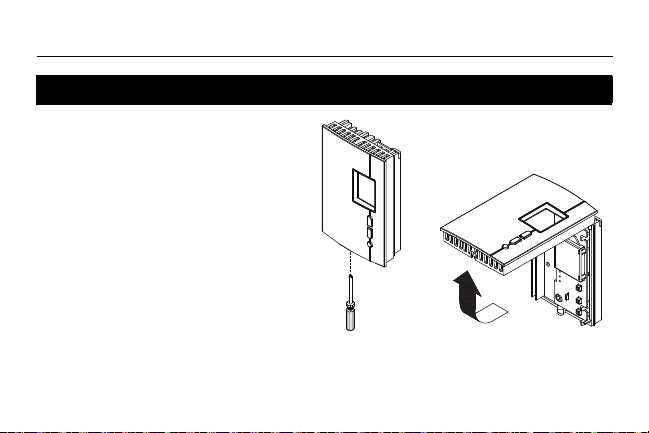
Removing the faceplate
TURN OFF POWER OF THE HEATING
SYSTEM AT THE MAIN ELECTRICAL
PANEL TO AVOID ELECTRIC SHOCK.
WAR NI NG: Installation must be carried
out by a certified electrician and must
comply with national and local electrical
codes.
Loosen the screw holding the faceplate to
the base. The screw cannot be completely
removed and remains captive on the base.
Remove the faceplate from the base by
pulling the bottom section.
4
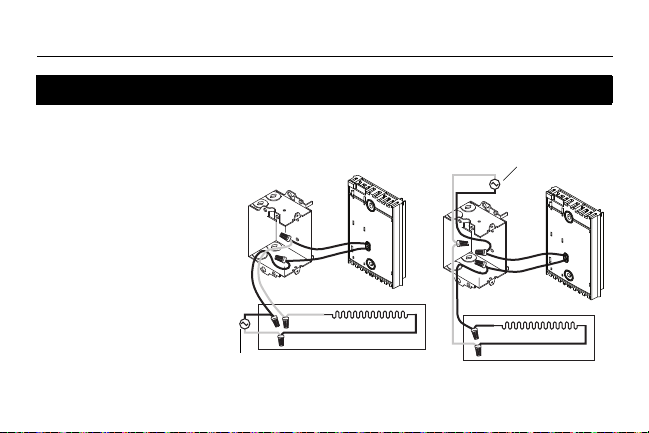
Wiring
2-wire installation
4-wire installation
Power supply
Power supply
Connect either one of the
thermostat wires to the
heater wire and the other
one to the power supply
wire using solderless
connectors for copper wires.
NOTE: Special CO/ALR
solderless connectors must
be used when connecting
with aluminium conductors.
TH404
5
Owner’s Guide
FAN switch
If you change the FAN switch position after you
have already applied power to the thermostat,
disconnect power to the thermostat at the
electrical panel for 3 seconds. The thermostat
will use the new setting when you reapply power.
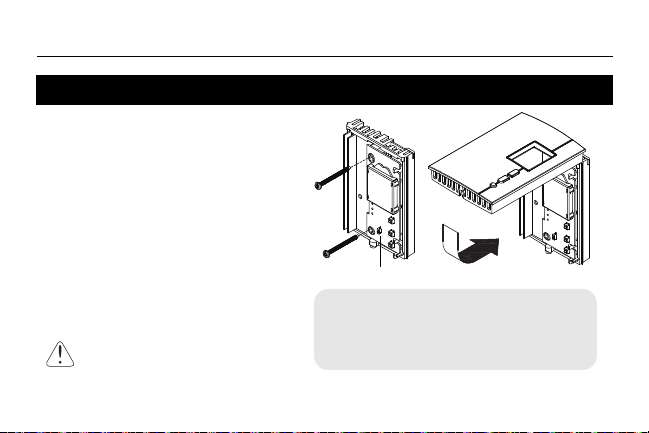
Installing the thermostat
1) Install the base onto an electrical box.
2) Place the FAN switch as follows:
Place at Yes if you have a fan-forced
heater (to prevent premature burnout
of the motor).
Leave at No for better temperature
regulation if you do not have a
fan-forced heater.
3) Reinstall the faceplate on the base and
secure it in place with the screw.
4) Apply power to the thermostat at the
main electrical panel.
Keep air vents at top and
bottom of thermostat clean and
unobstructed at all times.
6
TH404
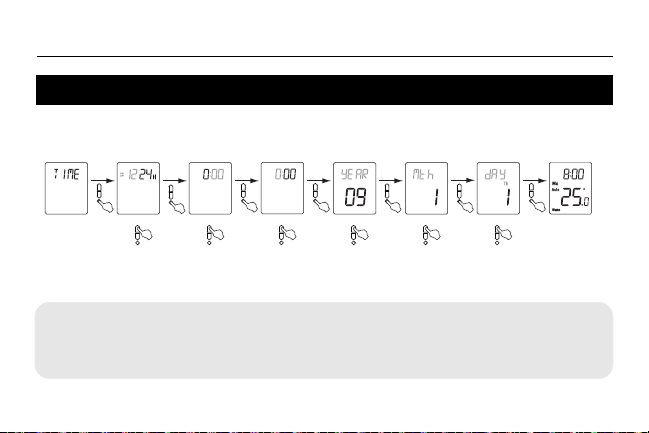
Quick Start-up / Setting the clock and date
When you power the thermostat, the Time menu flashes on the screen. Set the
thermostat’s clock and date as follows:
Time Menu
Select the format Set the hour
Set the minutes
Set the year
Set the month
Set the date
Normal display
NOTE: At any time, you can access the Time menu by pressing the Select button
for 3 seconds and then pressing the Down button once.
Your new thermostat is already preprogrammed
and is now controlling the temperature!
7
Owner’s Guide
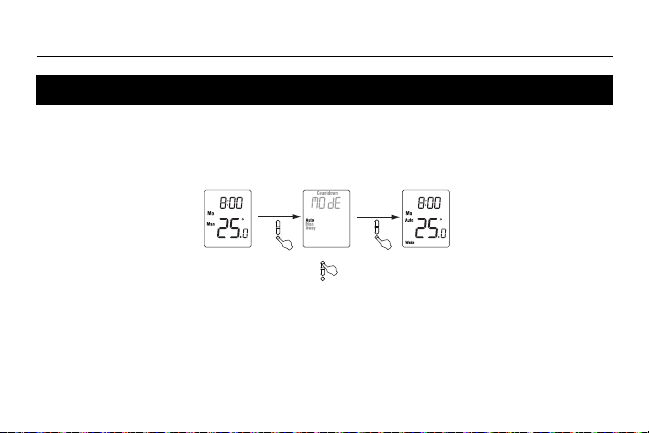
Automatic (Auto) mode
In Automatic mode, the thermostat follows the programmed schedule (see page 12).
To place the thermostat in Automatic (Auto) mode:
Normal display
Select Auto
Temporary override
While the thermostat is in Automatic mode, you can press the Up or Down button to modify
the temperature. The new temperature will be used until the end of the current period. Auto
will flash during the override. You can cancel the override by pressing the Select button twice
to return to Automatic mode.
8
Auto mode
TH404
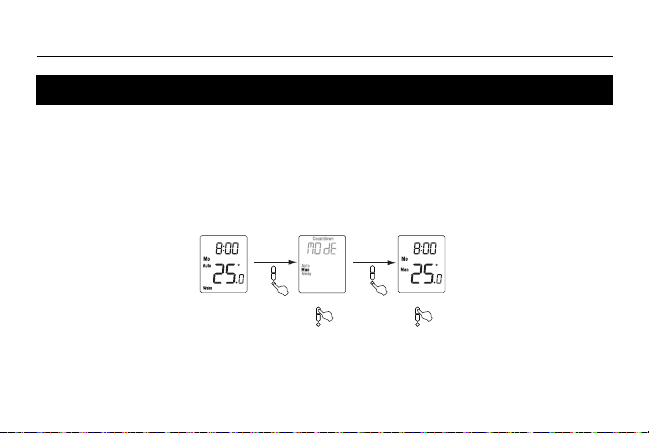
Manual (Man) mode
Use the Manual mode if you wish to keep the thermostat at the same
temperature indefinitely. In this mode, the thermostat will remain at this
temperature until you press the Up or Down button to change it.
To place the thermostat in Manual (Man) mode:
Normal display
Select Manual
9
Manual mode
Set temperature
Owner’s Guide
Normal display
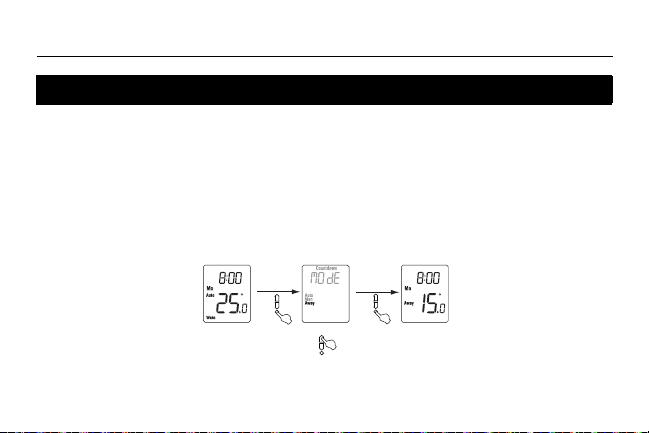
Away mode
Select Away
Away mode
The Away mode can be used when you are away for an undetermined length of time. For frost
protection while saving energy, the Away temperature is set by default at 15°C (59°F) and
cannot be modified by simply pressing the Up or Down button. To modify the Away
temperature, see page 16.
NOTE: The Away mode can also be used to prevent tampering of the setpoint temperature in
the summer season when heating is not required.
To place the thermostat in Away mode:
10
TH404
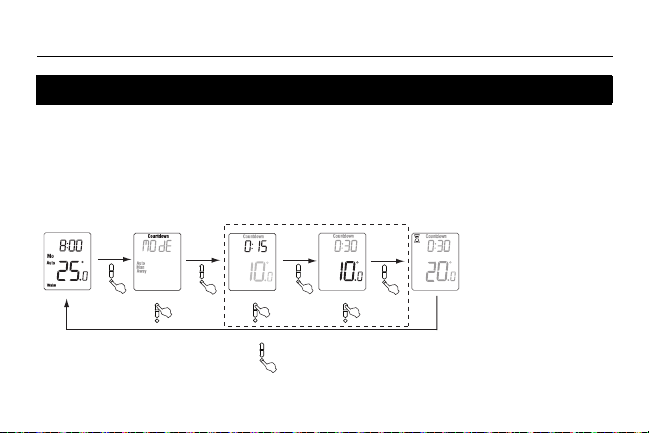
NOTE:
At any time during the
Countdown mode, you
can adjust the countdown time and temperature by performing the steps shown
inside the dotted rectangle.
Countdown mode
Use the Countdown mode if you wish to keep the same temperature for a predetermined length of
time. The choices of countdown times are: 15, 30 or 45 min, or 1, 2, 4, 8, 12 or 18 hr, or 1 to 14 days.
At the end of the countdown, the thermostat automatically returns to the previous mode and uses the
temperature programmed for that mode. At any time, you can cancel the Countdown mode by
pressing the Select button.
To place the thermostat in Countdown mode:
Normal display
Select Countdown
Optional (last settings are used by default)
Set time
To cancel the Countdown mode
Set temperature
11
Countdown
mode
Owner’s Guide
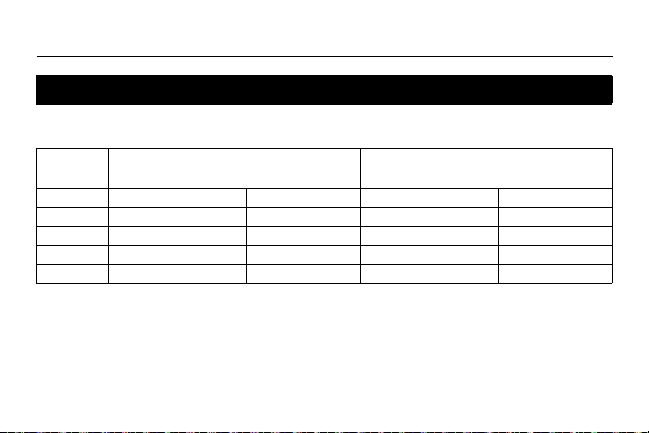
Default schedule
When placed in Automatic mode (see page 8), the thermostat follows the programmed
schedule. By default, the thermostat is programmed with the following schedule:
Monday to Friday
(Mo, Tu, We, Th & Fr)
Period Starting time Temperature Starting time Temperature
Wake 6:00 (6:00 AM) 21.0°C (70°F) 6:00 (6:00 AM) 21.0°C (70°F)
Leave 8:00 (8:00 AM) 16.5°C (62°F) -:-- Return 18:00 (6:00 PM) 21.0°C (70°F) -:-- Sleep 22:00 (10:00 PM) 16.5°C (62°F) 22:00 (10:00 PM) 16.5°C (62°F)
The schedule consists of 4 periods per day, which represents a typical work day. However, you
can program the thermostat to skip (cancel) the periods that do not apply to your situation. For
Leave
and
Return
example,
You can choose a different program every day; i.e., each period can have a different starting
time and a different temperature every day.
periods are skipped for the weekend in the default schedule.
12
Saturday and Sunday
(Sa & Su)
 Loading...