

Page 1
T4 Pro
Programmable Thermostat
TH4110U2005, TH4210U2002
User Guide
Package Includes:
• T4 Pro Thermostat
• UWP™ Mounting System
• Decorative Cover Plate
• Screws and Anchors
• 2 AA Batteries
• Thermostat Literature
Read before installing
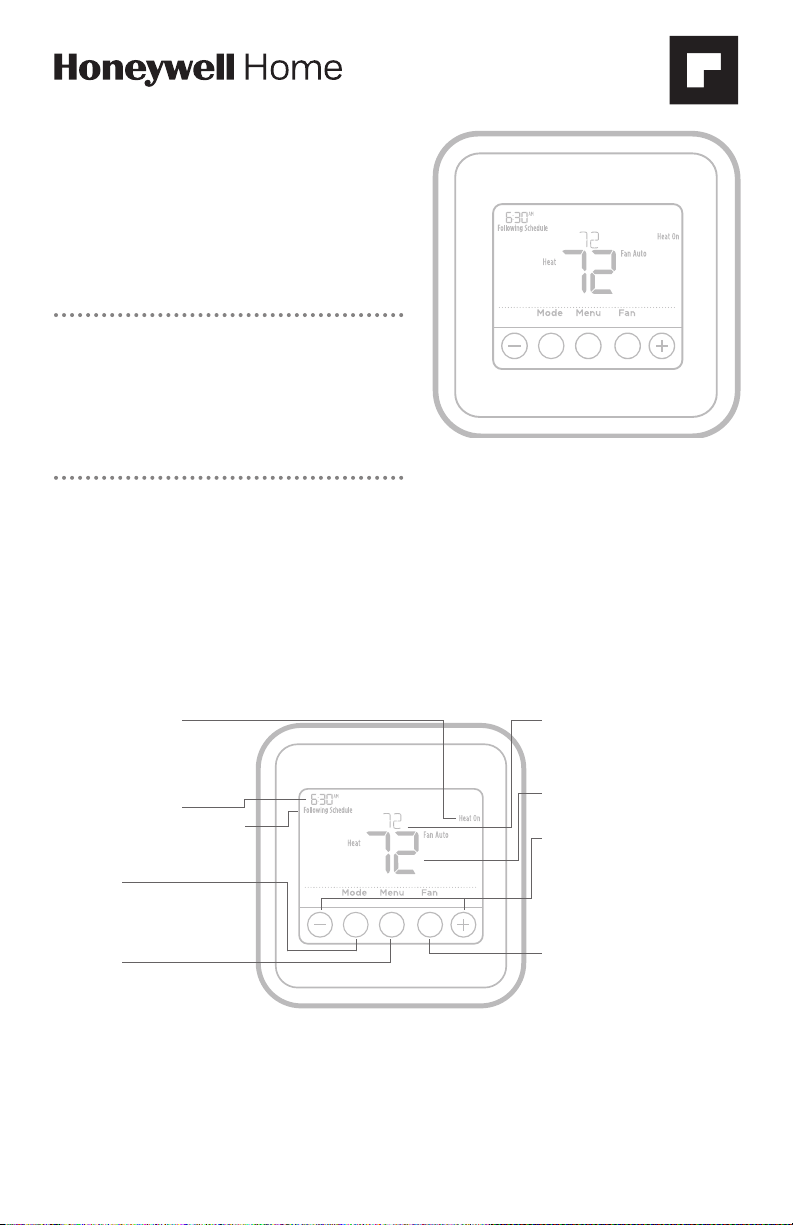
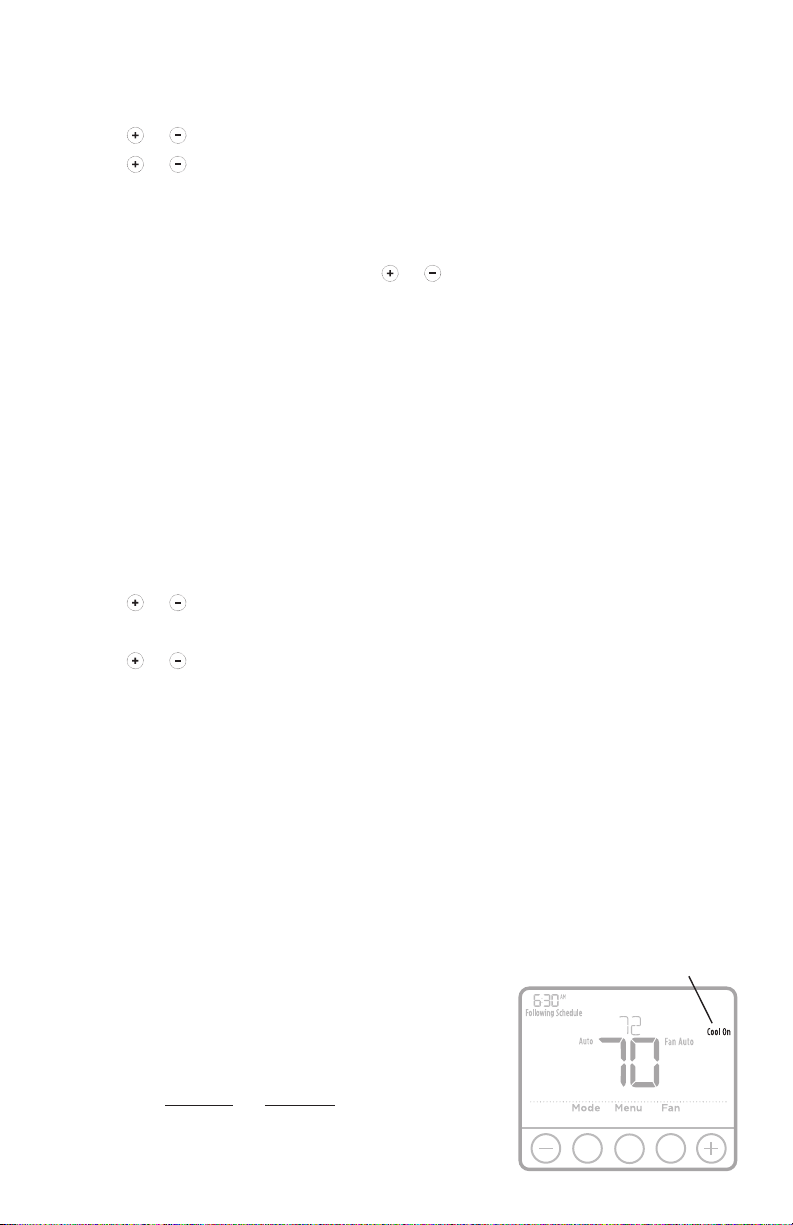
Thermostat controls
• System status
information
Cool On/Heat On/Em
Heat On, Recovery,
Compressor Protection
• Actual time
• Schedule information
Following time based
schedule
• Mode
Select system mode
Heat/Off/Cool/Auto/
EM Heat (emergency
heat)
• Menu
Press to display options.
Start here to set a
program schedule
• Indoor temperature
setpoint
Press + or – to change
temperature setting
• Actual indoor
temperature
• Temperature/
Navigation buttons
Press to increase or
decrease temperature
setpoint and to
navigate menus and
menu options
• Fan
Select Fan mode
Auto/On
The screen will wake up by pressing any of the five buttons. If powered by the C wire, the screen stays li t for 45 seconds
after you complete changes. If powered by b attery only, the scr een stays lit for 8 seconds. Depending on how your
thermostat w as installe d, the scree n light may always be on.
Customer assistance
For assistance with this product, please visit Honeywellhome.com/support
Page 2
System operation settings
1 Press the Mode button to cycle to the next
available System mode.
2 Cycle through the modes until the required
System mode is displayed and leave it to
activate.
NOTE: Available System modes vary by model and
system settings.
System modes:
‒ Auto
‒ Heat
‒ Cool
‒ Off
‒ Em. Heat ( TH4210U only)
Fan operation settings
1 Press the Fan button to cycle to the next
available Fan mode.
2 Cycle through the modes until the required Fan
mode is displayed and leave it to activate.
NOTE: Available Fan modes vary with system
settings.
Fan modes:
‒ Auto: Fan runs only when the heating or cooling system is
on.
‒ On: Fan is always on.
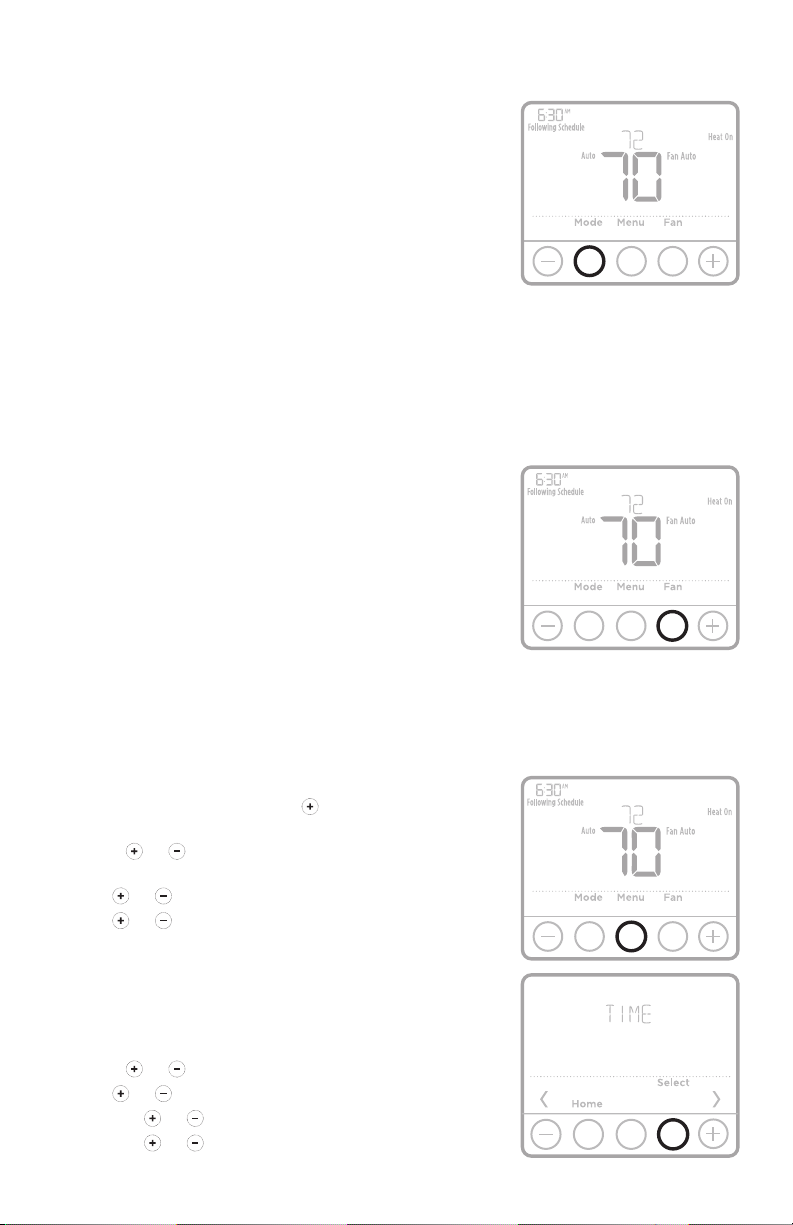
Set the time and date
Time
1 Press Menu, and then press to go to TIME.
Press Select.
2 Press or to choose between 12 or 24 hour.
Press Select.
3 Use or to adjust the hour. Press Select.
4 Use or to adjust the minutes. Press Select
to exit Time menu.
Date
1 If previously setting time, continue to Step
2. If at the Home screen, press Menu on your
thermostat.
2 Press or to go to DATE. Press Select.
3 Use or to adjust year. Press Select.
4 Use the or to adjust month. Press Select.
5 Use the or to adjust Date. Press Select to
save and exit Date menu.
2
Page 3
Program Schedule
Heat Cool
(10:00
You can program four time periods each day, with different settings for weekdays
and weekends. We recommend the pre-sets (shown in the table below), since they
can reduce your heating/cooling expenses.
Wake - Set to the time you wake up and the
temperature you want during the morning, until
you leave for the day.
Away - Set to the time you leave home and the
temperature you want while you are away (usually
an energy-saving level).
Home - Set to the time you return home and the
temperature you want during the evening, until
bedtime.
Sleep - Set to the time you go to bed and the
temperature you want overnight (usually an
energy-saving level).
NOTE: To temporarily or permanently override any of the above program
schedules, see page 4.
Wake
(6:00 am)
Away
(8:00 am)
Home
(6:00 pm)
Sleep
pm)
70 °78
62 °85
70 °78
62 °82
°
°
°
°
To adjust program schedules
1 Press Menu on your thermostat.
2 PROG is displayed. Press Select. Then ON
is displayed. (If you do not want to use a
schedule, press or to display OFF. Press
Select.) Press Select.
3 Press or to select day or set of days to
edit. Press Select.
4 Press or to select a schedule period to
edit (Wake, Away, Home, and Sleep). Press
Select.
5 ON is displayed. Press Select to keep the
schedule period on. Or press and then Select
to turn off the schedule period.
6 Time starts blinking. Press or to adjust
the schedule period start time. Press Select.
7 Temperature starts blinking. Press or
to adjust the “Heat” setpoint temperature.
Press Select. Press or to adjust the “Cool”
temperature setpoint. Press Select.
8 Repeat steps 4 through 7 for the remaining
schedule periods.
9 Press Home when you’re finished to save and
return to the home screen.
10 Schedule can be adjusted and turned ON or
OFF by returning to Menu and following the
steps provided above.
3
Page 4
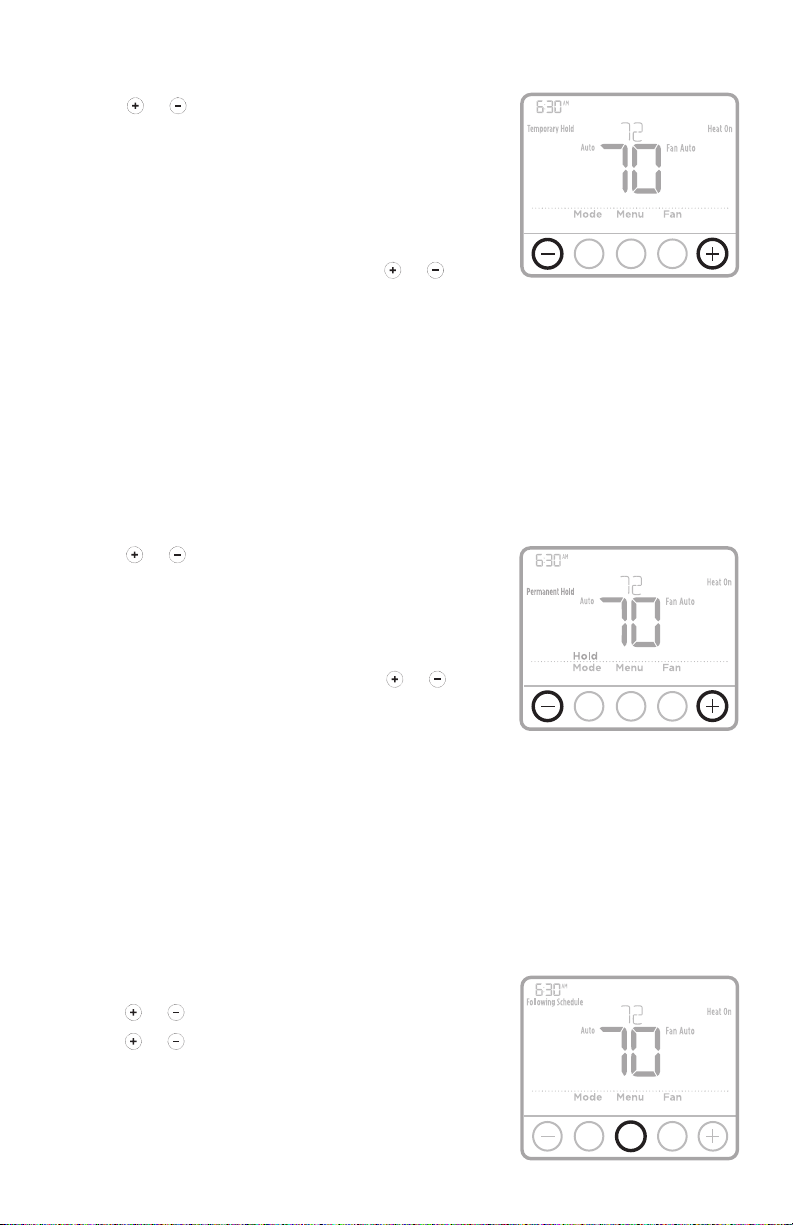
Program schedule override (temporary)
1 Press or to adjust the temperature.
2 Once at the desired setpoint temperature,
no further action is needed. The new
setpoint temperature will be held until the
next scheduled time period begins. For more
information on schedule time periods, see
“Program Schedule” on page 3.
3 To cancel the Temporary Hold, Press or
and then press Cancel.
Program schedule override (permanent)
1 Press or to adjust the temperature.
2 TEMPORARY HOLD is displayed and
the setpoint temperature flashes. While
it’s flashing, press Hold (Mode) button to
change to Permanent Hold.
3 To cancel the Permanent Hold, press or
and then press Cancel.
Setting degrees Fahrenheit (F) or Celcius (C)
1 Press Menu.
2 Press or to go to F / C. Press Select.
3 Press or for F or C. Then press Select.
4 Press Select to save and exit F / C menu.
4
Page 5
Adjusting keypad lockout
1 Press Menu on the thermostat.
2 Press or to go to LOCK. Press Select.
3 Press or to go to OFF, PART, or ON, and then press Select.
OFF: Unlocked, and full access allowed.
PART: Partial lockout, allowing only the temperature to be changed.
ON: No access allowed.
4 To unlock the keypad, press the CENTER button and then enter the password
“1234”. To enter the password, press or to change the first digit of the
number. Then press Select. Repeat this process to enter the second through
fourth digits of the number. Once all four numbers have been entered, press
Select again.
5 This will unlock the keypad.
6 If the code is incorrect, the screen will flash the lines "--".
7 Press Back to go back a step to enter the correct number and press Select.
NOTE: On some models, the keypad lockout setting is only available in the
installer menu and not available in the user menu.
Adjusting idle backlight display brightness
1 Press Menu on the thermostat.
2 Press or to go to LITE. Press Select.
3 Current brightness setting is displayed (15).
4 Press or to adjust backlight brightness.
5 Press Select to save and exit LITE menu.
NOTE: Backlight is only displayed if the C (common) wire is connected.
Adaptive Intelligent Recovery
Over time, the T4 Pro Thermostat “learns” how long it takes your system to reach
the temperature you want. It turns on the heating or cooling system earlier to
make sure you’re comfortable at the time you expect.
Built-in compressor protection
Damage can occur if the compressor is
restarted too soon after shutdown. This
feature forces the compressor to wait for a few
minutes before restarting.
During the wait time, the display will flash
the message Cool On (or Heat On if you have
a heat pump). When the safe wait time has
elapsed, the message stops flashing and the
compressor turns on.
5
Message flashes until safe
restart time has elapsed.
Page 6
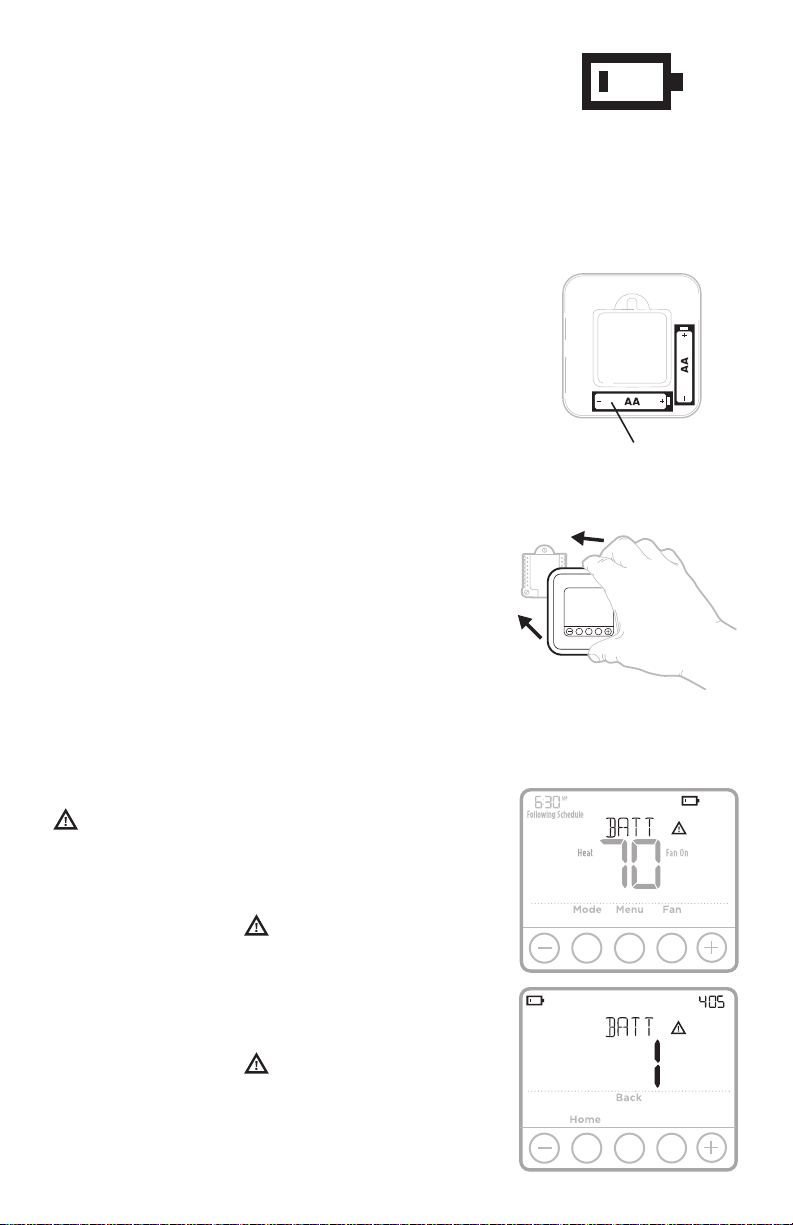
Battery replacement
Batteries are optional (to provide backup
power) if your thermostat was wired to run on
AC power when installed. If your thermostat
was not wired to run on AC power, then
batteries are required.
Install fresh batteries immediately when the
low battery icon appears. The icon appears
about two months before the batteries are
depleted.
Even if the low battery icon does not appear,
you should replace batteries once a year, or
before leaving home for more than a month.
If batteries are inserted within two minutes, the
time and day will not have to be reset. All other
settings are permanently stored in memory,
and do not require battery power.
NOTE: When replacing batteries, alkaline
batteries are recommended.
When the low battery
warning appears, press
gently to loosen the
thermostat and then
carefully pull it from the
wall mount.
Insert fresh alkaline AA
batteries and reinstall
thermostat.
Alerts
If there is an alert or reminder, the alert icon
appears on the Home screen.
Low Battery Warning
1 The batteries need to be replaced when
BAT T, the alert icon , and the battery icon
are displayed on the Home screen.
2 When the battery power is very low, the
thermostat’s backlight is disabled to save
battery power.
3 When battery power is critically low, only
BAT T, the alert icon , and the battery icon
are displayed.
6
Page 7
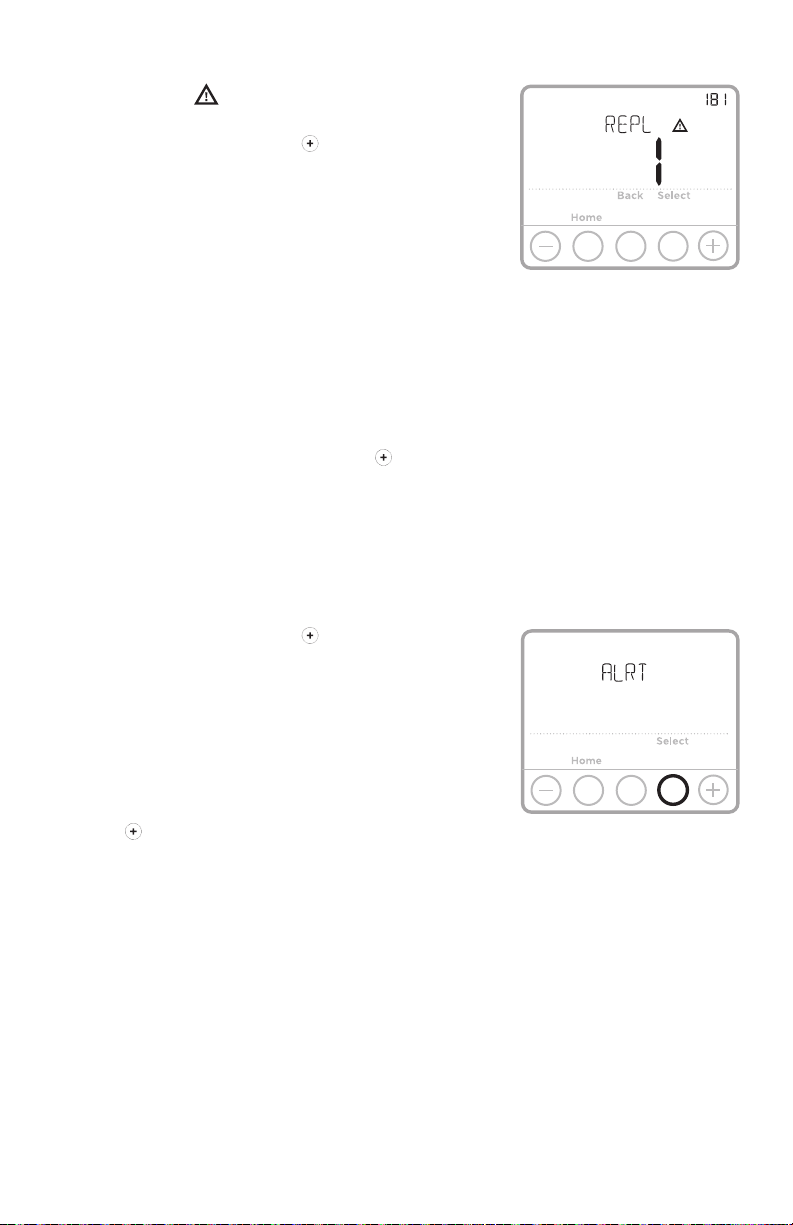
Air Filter Reminder
1 The alert icon appears on the Home
screen.
2 Press Menu, and then press until display
shows ALRT.
3 Press Select to display which alert(s) are
present.
4 The message REPL (REPLACE AIR FILTER)
appears.
5 The reminder can be snoozed or cleared.
Resideo recommends changing the air filter
before clearing the reminder.
6 To snooze, press Select. The word SNZE
(SNOOZE) appears.
7 Press Select again to snooze the reminder for
7 days.
8 To clear, press Select, and then press to go
to CLER (Clear).
9 Press Select to clear the air filter reminder.
Snoozing and Clearing Alerts or
Reminders*
1 Press Menu, and then press until display
shows ALRT.
2 Press Select to display which alert(s) are
present.
3 The word SNZE (SNOOZE) appears.
4 Press Select again to snooze the reminder for
7 days.
5 To clear the alert, press Select, and then
press to go to CLER (Clear).
6 Press Select to clear the reminder.
* Some alerts cannot be snoozed or cleared.
Please call your local heating and cooling
professional if this occurs. The heating and
cooling system may require service.
7
Page 8

Troubleshooting
If you have difficulty with your thermostat, please try the following suggestions.
Most problems can be corrected quickly and easily.
Display is
blank
• Check circuit breaker and reset if necessary.
• Make sure power switch for heating & cooling system is on.
• Make sure furnace door is closed securely.
• Make sure fresh AA alkaline batteries are correctly installed
(see page 6).
Heating
or cooling
system does
not respond
Temperature
settings do
not change
“Cool On” or
“Heat On” is
flashing
• Press Mode button to set system Heat (see page 2).
• Press Mode button to set system Cool (see page 2).
• Check circuit breaker and reset if necessary.
• Make sure power switch for heating & cooling system is on.
• Make sure furnace door is closed securely.
• Wait 5 minutes for the system to respond.
• If display says “unlock”; see page 5. If not, verify you are
• If you are in the correct mode, but you cannot set the heat
• Compressor protection feature is engaged. Wait 5 minutes
Electrical Ratings
Make sure the desired temperature is set higher than the
inside temperature.
Make sure the desired temperature is set lower than the
inside temperature.
in the correct mode (heat, cool, em heat or auto); see page
2.
from 40 °F to 90 °F (4.5 °C to 32 °C), or set the cool from
50 °F to 99 °F (10 °C to 37 °C), you may have range-stops
restricting your setting. Check with the installer to see if
they set range-stops.
for the system to restart safely, without damage to the
compressor (see page 5).
Terminal Voltage (50 Hz/60 Hz) Running Current
W Heating 20 Vac - 30 Vac 0.02 A - 1.0 A
W2 (Aux) Heating (TH4210U only) 20 Vac - 30 Vac 0.02 A - 1.0 A
E Emergency Heat (TH4210U only) 20 Vac - 30 Vac 0.02 A - 0.5 A
Y Compressor Stage 1 20 Vac - 30 Vac 0.02 A - 1.0 A
G Fan 20 Vac - 30 Vac 0.02 A - 0.5 A
O/B Changeover 20 Vac - 30 Vac 0.02 A - 0.5 A
L/A Input 20 Vac - 30 Vac 0.02 A - 0.5 A
8
Page 9

5-year limited warranty
For warranty information go to Honeywellhome.com/support
9
Page 10
33-00188EFS-09
CAUTION: ELECTRICAL HAZARD
Can cause electrical shock or equipment damage. Disconnect power before
beginning installation.
CAUTION: EQUIPMENT DAMAGE HAZARD
Compressor protection is bypassed during testing. To prevent equipment
damage, avoid cycling the compressor quickly.
CAUTION: MERCURY NOTICE
If this product is replacing a control that contains mercury in a sealed
tube, do not place the old control in the trash. Contact your local waste
management authority for instructions regarding recycling and proper
disposal.
CAUTION: ELECTRONIC WASTE NOTICE
The product should not be disposed of with other household waste. Check
for the nearest authorized collection centers or authorized recyclers.
The correct disposal of end-of-life equipment will help prevent negative
consequences for the environment and human health.
FCC statement at:
https://customer.resideo.com/enUS/support/residential/
codes-and-standards/FCC15105/Pages/default.aspx
Resideo Technologies Inc.
1985 Douglas Drive North, Golden Valley, MN 55422
https://www.honeywellhome.com/support
3300188EFS09 M.S. Rev. 0820 | Printed in United Stateswww.resideo.com
© 2020 Resideo Technologies, Inc. All rights reserved.
The Honeywell Home trademark is used under license
from Honeywell International, Inc. This product is manufactured by Resideo Technologies, Inc. and its affiliates.
Tous droits réservés. La marque de commerce Honeywell
Home est utilisée avec l’autorisation d’Honeywell
International, Inc.
Ce produit est fabriqué par Resideo Technologies, Inc. et
ses sociétés affiliées.
Todos los derechos reservados. La marca comercial
Honeywell Home se utiliza bajo licencia de Honeywell
International, Inc.
Este producto es fabricado por Resideo Technologies, Inc.
y sus afiliados.
Page 11

T4 Pro
Thermostat Programmable
TH4110U2005, TH4210U2002
Guide de l’utilisateur
La boîte comprend :
• Thermostat T4 Pro
• Système de montage UWP™
• Plaque de couvercle décorative
• Vis et chevilles
• 2 piles AA
• Documentation du thermostat
Lire avant l’installation
Commandes du thermostat
• Informations d’état du
système
Cool On (Refroidissement)/
Heat On (Chauffage),
Recovery (Récupération)/
Em Heat On (Urgence),
Compressor Protection
(Protection du compresseur)
• Heure actuelle
• Informations sur le
programme
Programme horaire activé
• Mode
Sélectionnez le mode du
système Heat/Off/Cool/
Auto/EM Heat (Chauffage/
Arrêt/Refroidissement/Auto/
Chauffage d’urgence)
• Menu
Appuyez pour afficher les
options. Commencez ici pour
configurer un programme.
• Point de consigne de
température intérieure
Appuyez sur les boutons + ou
- pour modifier le réglage de
la température
• Température intérieure
actuelle
• Boutons de température/
navigation
Appuyez sur pour augmenter
ou diminuer la température
de consigne et pour naviguer
dans les menus et options
de menu
• Ventilateur
Sélectionnez le mode
ventilateur Auto/On (Marche)
L’écran s’active sur pression de l ’un des cinq boutons. Si l’alimentation e st obtenue avec le fil C, l’écran res te allumé
pendant 45 secon des une fois les modifications terminée s. Si l’alimentation est obte nue par les pile s, l’écran reste
allumé pendant 8 se condes. En fonction de l’installation du thermost at, l’é cran peut re ster allumé e n permanence.
Service à la clientèle
Pour obtenir de l’aide avec ce produit, visitez Honeywellhome.com/support
Page 12

Réglages pour le fonctionnement du système
1 Appuyez sur le bouton Mode pour passer au prochain
mode de système disponible.
2 Faites défiler les modes jusqu’à ce que le mode de
système requis soit affiché, et laissez-le s’activer.
REMARQUE : Les modes de système disponibles varient
en fonction du modèle et des paramètres du système.
Modes de système :
‒ Auto (Automatique)
‒ Heat (Chauffage)
‒ Cool (Refroidissement)
‒ Off (Arrêt)
‒ Em. Heat (Chauffage d’urgence) (TH4210U
seulement)
Réglages pour le fonctionnement du ventilateur
1 Appuyez sur le bouton Fan (Ventilateur) pour passer
au prochain mode de ventilateur disponible.
2 Faites défiler les modes jusqu’à ce que le mode de
ventilateur requis soit affiché, et laissez-le s’activer.
REMARQUE : Les modes de ventilateur varient en
fonction des paramètres du système.
Modes du ventilateur :
‒ Auto (Automatique) : Le ventilateur fonctionne uniquement
lorsque le système de chauffage ou de refroidissement est en
marche.
‒ On (Marche) : Le ventilateur est toujours activé.
Réglage de l’heure et de la date
Heure
1 Appuyez sur Menu, puis appuyez sur jusqu’à ce que vous
arriviez à l’option TIME (Date et heure). Appuyez sur Select
(Sélectionner).
2 Appuyez sur ou pour choisir entre 12 ou 24 heures.
Appuyez sur Select (Sélectionner).
3 Appuyez sur ou pour régler l’heure. Appuyez sur Select
(Sélectionner).
4 Appuyez sur ou pour régler les minutes. Appuyez sur
Select (Sélectionner) pour quitter le menu Time (Heure).
Date
1 Si vous venez de régler l’heure, passez à l’étape 2. Si l’écran
d’accueil est affiché, appuyez sur le bouton Menu de votre
thermostat.
2 Appuyez sur ou pour aller à DATE. Appuyez sur Select
(Sélectionner).
3 Appuyez sur ou pour régler l’année. Appuyez sur Select
(Sélectionner).
4 Appuyez sur ou pour régler le mois. Appuyez sur Select
(Sélectionner).
5 Appuyez sur ou pour modifier la date. Appuyez sur
Select (Sélectionner) pour enregistrer et quitter le menu Date.
2
Page 13

Programmation
Heat Cool
Home
t
Vous pouvez programmer quatre périodes de temps par jour, avec des réglages différents
pour les jours de la semaine et les fins de semaine. Nous recommandons les paramètres
prédéfinis (illustrés dans le tableau ci-dessous), car ils permettent de réduire vos frais de
chauffage/refroidissement.
Wake (Réveil) - Réglez à l’heure du lever et à la
température voulue le matin, jusqu’à votre départ.
Away (Absent) - Réglez à l’heure de départ et à
la température voulue durant l’absence (en règle
générale à un niveau permettant d’économiser de
l’énergie).
Home (À la maison) - Réglez à l’heure du retour et
à la température voulue durant la soirée, jusqu’au
coucher.
Sleep (Sommeil) - Réglez à l’heure du coucher et à
la température voulue durant le sommeil (en règle
générale à un niveau d’économie d’énergie).
REMARQUE : Pour déroger à l’un des programmes
ci-dessus de manière temporaire ou permanente, consultez la page 4.
Wake (Réveil)
(6 h)
Away (Absent)
(8 h)
(À la maison)
(18 h)
Sleep (Coucher)
(22 h)
70 °78
62 °85
70 °78
62 °82
Pour régler le programme
1 Appuyez sur Menu sur le thermostat.
2 PROG s’affiche. Appuyez sur Select. ON s’affiche. (Si
vous ne voulez pas utiliser un programme, appuyez
sur ou pour afficher OFF. Appuyez sur Select.)
Appuyez sur Select.
3 Appuyez sur ou pour sélectionner le jour ou le
groupe de jours à modifier. Appuyez sur Select.
4 Appuyez sur ou pour sélectionner un
programme à modifier (Réveil, Absent, À la maison et
Coucher). Appuyez sur Select.
5 ON s’affiche. Appuyez sur Select pour conserver la
période du programme. Ou appuyez sur puis sur
Select pour désactiver la période du programme.
6 L’heure commence à clignoter. Appuyez sur ou
pour régler l’heure de début de la période. Appuyez
sur Select.
7 La température commence à clignoter. Appuyez
sur ou pour régler la température de consigne
du chauffage. Appuyez sur Select. Appuyez sur
ou pour régler la température de consigne du
refroidissement. Appuyez sur Select.
8 Répétez les étapes 4 à 7 pour les périodes restantes
du programme.
9 Appuyez sur Home une fois terminé et pour revenir à
l’écran d’accueil.
10 Le programme peut être réglé et ACTIVÉ ou
DÉSACTIVÉ en revenant au Menu et en suivant les
étapes indiquées ci-dessus.
Chauffage Refroidissemen
°
°
°
°
3
Page 14

Dérogation (temporaire) au programme
1 Appuyez sur ou pour régler la
température.
2 Une fois la température de consigne
souhaitée obtenue, aucune autre action
n’est requise. La nouvelle température
de consigne est utilisée jusqu’à ce que
la prochaine période commence. Pour
plus d’informations sur les périodes
du programme, consultez la section
Programmation à la page 3.
3 Pour annuler le maintien temporaire,
appuyez sur ou puis sur Cancel
(Annuler).
Dérogation (permanente) au programme
1 Appuyez sur ou pour régler la
température.
2 TEMPORARY HOLD (Maintien temporaire)
s’affiche et la température de consigne
clignote. Pendant le clignotement, appuyez
sur le bouton de mode Hold (Maintien) pour
passer au maintien permanent.
3 Pour annuler le maintien permanent,
appuyez sur ou puis sur Cancel
(Annuler).
Réglage des degrés Fahrenheit (F) ou Celsius (C)
1 Appuyez sur Menu.
2 Appuyez surr ou pour aller à F / C.
Appuyez sur Select.
3 Appuyez sur ou pour F ou C. Appuyez
ensuite sur Select.
4 Appuyez sur Select (Sélectionner) pour
sauvegarder et quitter le menu F/C.
4
Page 15

Réglage du verrouillage du clavier
1 Appuyez sur Menu sur le thermostat.
2 Appuyez sur ou pour aller à LOCK (Verrouillage). Appuyez sur Select.
3 Appuyer ou pour se rendre à OFF (arrêt), PART (partiel), ou ON (marche),
et puis appuyer sur Select (sélectionner).
OFF (arrêt) : Déverrouillé et accès total permis.
PART (partiel) : Verrouillage partiel, ne permet qu’à la température d’être
modifiée. ON (marche) : Aucun accès permis.
4 Pour déverrouiller le clavier, appuyer sur le bouton central et entrer le mot de
passe « 1234 ». Pour entrer le mot de passe, appuyer ou pour changer le
premier chiffre du numéro. Ensuite, appuyer sur Select (Sélectionner). Répéter
ce processus pour enter le deuxième, troisième et quatrième chiffres du
numéro. Lorsque les quatre chiffres ont été entrés, appuyer de nouveau sur
Select (Sélectionner).
5 Ceci permet de déverrouiller le clavier.
6 Si le code n’est pas correct, l’écran affiche les lignes « -- » qui clignotent.
7 Appuyez sur Back (Retour) pour revenir d’une étape et entrer le chiffre correct,
puis appuyez sur Select.
REMARQUE : Sur certains modèles, le paramètre de verrouillage du clavier est
disponible dans le menu de l’installateur uniquement, pas dans le menu de
l’utilisateur.
Réglage de la luminosité du rétroéclairage de veille
de l’écran
1 Appuyez sur l’option Menu du thermostat.
2 Appuyez sur ou jusqu’à ce que vous arriviez à l’option LITE (luminosité).
Appuyez sur Select (Sélectionner).
3 Le niveau actuel de luminosité est affiché (1 à 5).
4 Appuyez sur ou pour modifier la luminosité du rétroéclairage.
5 Appuyez sur Select (Sélectionner) pour sauvegarder et quitter le menu LITE
(luminosité).
REMARQUE : Le rétroéclairage ne fonctionne que si le câble « C » (neutre) est
branché.
Système de récupération intelligent adaptatif
Au fil du temps, le thermostat T4 Pro apprend à reconnaître le temps requis
par le système pour atteindre la température désirée. Il active préalablement le
chauffage ou le refroidissement pour garantir une température confortable au
moment voulu.
Protection intégrée du compresseur
Des dommages peuvent survenir si le
compresseur redémarre trop rapidement
après une interruption. Cette fonction
contraint le compresseur à attendre
quelques minutes avant de redémarrer.
Durant l’attente, le message Cool
On (ou Heat On dans le cas d’une
thermopompe) clignote. Une fois le délai
de sécurité écoulé, le message cesse de
clignoter et le compresseur démarre.
5
Le message
clignote
jusqu’à ce que
le système
puisse
démarrer en
toute sécurité.
Page 16

Remplacement des piles
Les piles sont facultatives (pour fournir une
alimentation de secours) si le thermostat
a été câblé sur le courant secteur lors de
l’installation. Si ce n’est pas le cas, les piles
sont requises.
Installez immédiatement des piles neuves
lorsque l’icône indiquant que la charge des
piles est faible s’affiche. Cette icône s’affiche
environ deux mois avant que les piles ne soient
complètement épuisées.
Même si l’icône ne s’affiche pas, remplacez
les piles au moins une fois par an ou avant
de quitter la maison pour une période de plus
d’un mois.
Si les piles sont insérées dans un intervalle
de 2 minutes, il ne sera pas nécessaire de
régler à nouveau l’heure et le jour. Tous les
autres réglages sont conservés en mémoire en
permanence et les piles ne sont pas requises.
REMARQUE : Il est recommandé de remplacer
les piles par des piles alcalines.
Lorsque l’avertissement
de charge faible des
piles s’affiche, appuyez
délicatement sur le thermostat
pour le retirer avec précaution
de son support mural.
Insérez les piles alcalines
AA neuves et réinstallez le
thermostat.
Notifications
En cas d’alerte ou de rappel, l’icône d’alerte
s’affiche sur l’écran d’accueil.
Avertissement de faible charge des
piles
1 Les piles doivent être remplacées lorsque
BAT T, l’icône d’alerte des piles et l’icône
des piles s’affichent sur l’écran d’accueil.
2 Lorsque la charge des piles est très faible, le
rétroéclairage du thermostat est désactiver
pour économiser la charge des piles.
3 Lorsque la charge des piles est extrêmement
faible, seuls BAT T, l’icône d’alerte des piles
et l’icône des piles sont affichés.
6
Page 17

Rappel de remplacement du filtre à air
1 L’icône d’alerte s’affiche sur l’écran
d’accueil.
2 Appuyez sur Menu, puis appuyez sur jusqu’à
ce que l’affichage montre ALRT (alerte).
3 Appuyer sur Select (Sélectionner), pour
afficher l’/les alerte(s) présente(nt).
4 Le message REPL (Remplacer le filtre à air)
s’affiche.
5 Le rappel peut être mis en pause ou effacé.
Resideo recommande de remplacer le filtre à
air avant d’effacer le rappel.
6 Pour mettre en pause, appuyez sur Select. Le
mot SNZE (Pause) s’affiche.
7 Appuyez une fois de plus sur Select pour
mettre le rappel en pause pendant 7 jours.
8 Pour l’effacer, appuyez sur Select, puis sur
pour aller à CLER (Effacer).
9 Appuyez sur Select pour effacer le rappel de
remplacement du filtre à air.
Mise en pause et effacement des
alertes et des rappels*
1 Appuyez sur Menu, puis appuyez sur
jusqu’à ce que l’affichage montre ALRT
(alerte).
2 Appuyer sur Select (Sélectionner), pour
afficher l’/les alerte(s) présente(nt).
3 Le mot SNZE (Pause) s’affiche.
4 Appuyez une fois de plus sur Select pour
mettre le rappel en pause pendant 7 jours.
5 Pour effacer l’alerte, appuyez sur Select, puis
sur pour aller à CLER (Effacer).
6 Appuyez sur Select pour effacer le rappel.
* Certaines alertes ne peuvent ni être mises
en pause ni effacées. Veuillez contacter
votre professionnel en chauffage et
refroidissement si cela se produit. Le
système de chauffage et de refroidissement
nécessite peut-être d’être réparé.
7
Page 18

Dépannage
En cas de difficultés avec le thermostat, essayez les suggestions suivantes. La
plupart des problèmes peuvent être réglés rapidement et facilement.
Rien n’apparaît
à l’écran
Le système de
chauffage ou de
refroidissement
ne répond pas
Les réglages
de température
ne changent
pas
Les mentions
« Cool On » ou
« Heat On »
clignotent
• Vérifiez le disjoncteur et réinitialisez-le si nécessaire.
• Assurez-vous que l’interrupteur de marche-arrêt du
système de chauffage et de refroidissement est sur
marche.
• Assurez-vous que la porte de l’appareil de chauffage est
bien fermée.
• Assurez-vous que des piles alcalines AA neuves sont
correctement installées (voir la page 6).
• Appuyez sur le bouton Mode pour régler le chauffage du
système (voir la page 2). Vérifiez que le réglage de
température est supérieur à la température intérieure.
• Appuyez sur le bouton Mode pour régler le refroidissement
du système (voir la page 2). Vérifiez que le réglage de
température est inférieur à la température intérieure.
• Vérifiez le disjoncteur et réinitialisez-le si nécessaire.
• Assurez-vous que l’interrupteur de marche-arrêt du
système de chauffage et de refroidissement est sur
marche.
• Assurez-vous que la porte de l’appareil de chauffage est
bien fermée.
• Attendez 5 minutes que le système réponde.
• Si l’écran affiche le message « déverrouiller », voir la
page 5. Autrement, assurez-vous d’être dans le mode
approprié (chauffage, climatisation, chauffage d’urgence
ou automatique); voir la page 2.
• Si vous êtes dans le mode approprié, mais que vous ne
pouvez pas régler le chauffage de 4,5 °C à 32 °C (40 °F
à 90 °F), ou régler la climatisation de 10 °C à 37 °C
(50 °F à 99 °F), il se pourrait que des butées de plage de
température limitent vos réglages. Informez-vous auprès
de l’installateur pour savoir si des butées de plage ont été
mises en place.
• La fonction de protection du compresseur est activée.
Attendez 5 minutes que le système redémarre en toute
sécurité, sans endommager le compresseur (voir la
page 5).
Caractéristiques électriques
Borne Tension (50 Hz/60 Hz) Courant de fonctionnement
W Chauffage 20 V c.a. - 30 V c.a. 0,02 A - 1,0 A
W2 Chauffage auxiliaire (TH4210U seulement) 20 V c.a. - 30 V c.a. 0,02 A - 1,0 A
E Chauffage d’urgence (TH4210U seulement) 20 V c.a. - 30 V c.a. 0,02 A - 0,5 A
Y Étage de compresseur 20 V c.a. - 30 V c.a. 0,02 A - 1,0 A
G Ventilateur 20 V c.a. - 30 V c.a. 0,02 A - 0,5 A
O/B Commutation 20 V c.a. - 30 V c.a. 0,02 A - 0,5 A
L/A Entrée 20 V c.a. - 30 V c.a. 0,02 A - 0,5 A
8
Page 19

Garantie limitée de 5 ans
Pour obtenir des renseignements à propos de la garantie, visitez
Honeywellhome.com/support
9
Page 20

33-00188EFS-09
MISE EN GARDE : RISQUE DE CHOC ÉLECTRIQUE
Peut provoquer des chocs électriques ou endommager le matériel. Couper
l’alimentation électrique avant d’effectuer le raccordement.
MISE EN GARDE : RISQUE DE DOMMAGES DE L’ÉQUIPEMENT
La protection du compresseur est annulée durant le test. Pour éviter
d’endommager l’équipement, éviter d’actionner le compresseur trop
rapidement.
MISE EN GARDE : AVIS RELATIF AU MERCURE
Si ce produit remplace un régulateur contenant du mercure dans un
tube scellé, ne pas mettre l’ancien régulateur à la poubelle. Contacter le
responsable de gestion des déchets local pour les instructions concernant
le recyclage et l’élimination.
MISE EN GARDE : AVIS DE DÉCHETS ÉLECTRONIQUES
Ne disposez pas ce produit avec les autres ordures ménagères. Recherchez
les centres de collecte ou de recyclage accrédités les plus proches. La mise
au rebut appropriée de l’équipement en fin de vie aidera à prévenir tout
effet potentiellement nuisible à l’environnement et à la santé humaine.
Déclaration de la FCC sur :
https://customer.resideo.com/enUS/support/residential/
codes-and-standards/FCC15105/Pages/default.aspx
Resideo Technologies Inc.
1985 Douglas Drive North, Golden Valley, MN 55422
www.resideo.com
© 2020 Resideo Technologies, Inc. All rights reserved.
The Honeywell Home trademark is used under license
from Honeywell International, Inc. This product is manufactured by Resideo Technologies, Inc. and its affiliates.
Tous droits réservés. La marque de commerce Honeywell
Home est utilisée avec l’autorisation d’Honeywell
International, Inc.
Ce produit est fabriqué par Resideo Technologies, Inc. et
ses sociétés affiliées.
Todos los derechos reservados. La marca comercial
Honeywell Home se utiliza bajo licencia de Honeywell
International, Inc.
Este producto es fabricado por Resideo Technologies, Inc.
y sus afiliados.
https://www.honeywellhome.com/support
3300188EFS09 M.S. Rev. 0820 | Imprimé aux ÉtatsUnis
Page 21

T4 Pro
Termostato Programable
TH4110U2005, TH4210U2002
Guía del usuario
El paquete incluye:
• Termostato T4 Pro
• Sistema de montaje UWP™
• Placa de cubierta decorativa
• Tornillos y tarugos
• 2 baterías AA
• Material de lectura sobre el
termostato
Leer antes de instalar
Controles del termostato
• Información del estado del
sistema
Cool On (refrigeración
activada)/Heat On (calefacción
activada)/Em Heat On
(emergencia), Recovery
(recuperación), Compressor
Protection (protección del
compresor)
• Hora real
• Información de la
programación
Sigue la programación en
función del cronograma
• Modo
Seleccione el modo del
sistema: Heat (calefacción)/Off
(apagado)/Cool (refrigeración)/
Auto (automático)/EM Heat
(calefacción de emergencia)
• Menú
Presione para mostrar las
opciones. Comience aquí para
configurar un cronograma del
programa.
La pantalla se activará presionando cual quiera de los cinco botones. Si el suministro de energía se realiza desde el cable C,
la pantalla pe rmanecerá iluminada durante 45 segundos de spués de que efectúa los cambios. Si el suminis tro de energía
se real iza desde las baterías únicamente, la pantalla p ermanecerá iluminada durante 8 segundos. Dependiendo de la forma
como se instaló su termost ato, la luz de l a pantalla puede est ar siempre encendida.
• Punto de r eferencia de la
temperatura interior
Presione + o – para cambiar
la configuración de
temperatura
• Temperatura real en
interiores
• Botones de regulación de la
temperatura/Navegación
Presione para aumentar
o disminuir el punto de
referencia de la temperatura y
para navegar por los menúes
y sus opciones
• Ventilador
Selección el modo del
ventilador Auto (automático)/
On (activado)
Asistencia al cliente
Para obtener ayuda sobre este producto, visite Honeywellhome.com/support
Page 22

Configuraciones de funcionamiento del sistema
1 Presione el botón Mode para pasar al siguiente modo
disponible del sistema.
2 Avance a través de los modos hasta que se muestre
el modo requerido del sistema y déjelo para activarlo.
NOTA: Los modos disponibles del sistema varían según
el modelo y las configuraciones del sistema.
Modos del sistema:
‒ Auto (Automático)
‒ Heat (Calefacción)
‒ Cool (Refrigeración)
‒ Off (Apagado)
‒ Em. Heat (Calefacción de emergencia)
(únicamente TH4210U)
Configuraciones de funcionamiento del ventilador
1 Presione el botón Fan (ventilador) para pasar al
siguiente modo de ventilador disponible.
2 Avance a través de los modos hasta que se muestre
el modo de ventilador requerido y déjelo para
activarlo.
NOTA: Los modos disponibles del ventilador varían
según las configuraciones del sistema.
Modos del ventilador:
‒ Auto (Automático): El ventilador funciona solo cuando el sistema
de calefacción o refrigeración está encendido.
‒ On (Encendido): El ventilador está siempre encendido.
Configuración de hora y fecha
Hora
1 Presione Menu (Menú) y, luego, el símbolo para ir a TIME
(Hora). Presione Select (Seleccionar).
2 Presione o para elegir entre 12 o 24 horas.
3 Use o para ajustar la hora. Presione Select
(seleccionar).
4 Use o para ajustar los minutos. Presione Select
(seleccionar).
Fecha
1 Si ha configurado la hora previamente, continúe con
el paso 2. Si está en la pantalla de inicio, presione
Menu (menú) en el termostato.
2 Presione o para ir a DATE (fecha) Presione Select
(seleccionar).
3 Use o para ajustar el año. Presione Select
(seleccionar).
4 Use o para ajustar el mes. Presione Select
(seleccionar).
5 Utilice los símbolos o para ajustar la fecha.
Presione Select (seleccionar) para guardar y salir del
menú de Fecha.
2
Page 23

Cronograma del programa
Heat Cool
Wake
Puede programar cuatro períodos de tiempo por día, con diferentes configuraciones
para los días de semana y los fines de semana. Recomendamos las configuraciones
preestablecidas (que se muestran en el cuadro a continuación), debido a que estas reducen
los gastos de calefacción y refrigeración.
Wake (Despertar) - Programe la hora en que se
despierta y la temperatura que desea durante la
mañana, hasta que se marche de su casa.
Away (Fuera) - Programe la hora en que se marcha
de su casa y la temperatura que desea mientras no
está en su casa (por lo general, un nivel de ahorro
de energía).
Home (En casa) - Programe la hora en que regresa
a su casa y la temperatura que desea durante la
tarde hasta que se va a dormir.
Sleep (Dormir) - Programe la hora en que se va a
dormir y la temperatura que desea durante toda
la noche (por lo general, un nivel de ahorro de
energía).
NOTA: Para anular de forma temporal o permanente cualquiera de los cronogramas del
programa anterior, consulte la página 4.
(Despertar)
(6:00 a.m.)
Away (Fuera)
(8:00 a.m.)
Home (En casa)
(6:00 p.m.)
Sleep (Dormir)
(10:00 p.m.)
Calefacción Refrigeración
70 °78
62 °85
70 °78
62 °82
Para ajustar los cronogramas del programa
1 Presione Menu (menú) en su termostato.
2 Aparecerá PROG. Presione Select (seleccionar). Aparece
ON (encendido). (Si no desea utilizar la configuración
del cronograma, presione o para mostrar OFF
[apagado]. Presione Select [seleccionar].) Presione Select
(seleccionar).
3 Presione o para seleccionar el día o grupo de días
para editar. Presione Select (seleccionar).
4 Presione o para seleccionar un período de
cronograma para editar (Wake [despertar], Away [fuera],
Home [en casa] y Sleep [dormir]). Presione Select
(seleccionar).
5 Aparecerá ON (encendido). Presione Select (seleccionar)
para mantener activado el período del cronograma. O
presione Select (seleccionar) para desactivar el período el
período del cronograma.
6 La hora comienza a destellar. Presione o para
ajustar la hora de inicio del período del cronograma.
Presione Select (seleccionar).
7 La temperatura comienza a parpadear. Presione o
para ajustar el punto de referencia de la temperatura
en “Heat” (calefacción). Presione Select (seleccionar).
Presione o para ajustar el punto de referencia de
la temperatura en “Cool” (refrigeración). Presione Select
(seleccionar).
8 Repita los pasos 4 al 7 para los períodos restantes del
cronograma.
9 Presione Home (pantalla de inicio) cuando haya
terminado para almacenar y regresar a la pantalla de
inicio.
10 El cronograma se puede ajustar y activar o desactivar
regresando al Menu (menú) y siguiendo los pasos
indicados anteriormente.
3
°
°
°
°
Page 24

Anulación del cronograma del programa (temporal)
1 Presione o para regular la temperatura.
2 Una vez que se encuentre en la temperatura
del punto de referencia deseado, no
necesita hacer nada más. El nuevo punto de
referencia de la temperatura se mantendrá
hasta que comience el siguiente período.
Para obtener información sobre los períodos
de tiempo del cronograma, consulte
“Cronograma del programa” en la página
3.
3 Para cancelar la pausa temporal, presione
o y luego presione Cancel (cancelar).
Anulación del cronograma del programa (permanente)
1 Presione o para regular la temperatura.
2 Las palabras TEMPORARY HOLD (pausa
temporal) se muestran y el punto de
referencia de la temperatura destella.
Mientras está destellando, presione el
botón Hold (pausa) para cambiar a pausa
permanente.
3 Para cancelar la pausa permanente,
presione o y luego presione Cancel
(cancelar).
Configuración de los grados Fahrenheit (F) o Centígrados (C)
1 Presione Menu (menú).
2 Presione o para ir a F / C. Presione
Select (seleccionar).
3 Presione o para F o C. Luego presione
Select (seleccionar).
4 Presione Select (Seleccionar) para guardar y
salir del menú F / C.
4
Page 25

Ajuste del bloqueo del teclado
1 Presione Menu (menú) en su termostato.
2 Presione o para ir a LOCK (bloqueo). Presione Select (seleccionar).
3 Presione o para ir a OFF (apagado), PART (parcial) u ON (encendido) y
seguidamente presione Select (seleccionar).
OFF (apagado): Desbloqueado y permite el acceso total.
PART (parcial): Bloqueo parcial, permitiendo solo el cambio de la temperatura.
ON (encendido): Acceso no permitido.
4 Para desbloquear el teclado, presione el botón central y seguidamente ingrese la
contraseña “1234”. Para ingresar la contraseña, presione o para cambiar
el primer dígito del número. Seguidamente presione Select (seleccionar). Repita
este proceso para ingresar del segundo al cuarto dígito del número. Una vez
que se hayan ingresado los cuatro números, presione Select (seleccionar)
nuevamente.
5 Esto desbloqueará el teclado.
6 Si el código es incorrecto, la pantalla destellará con las líneas “--”.
7 Presione Back (regresar) para retroceder un paso e ingresar el número correcto
y presionar Select (seleccionar).
NOTA: En algunos modelos, la configuración de bloqueo del teclado solo está
disponible en el menú del instalador y no en el menú del usuario.
Ajustar el brillo de la pantalla para la luz de fondo
inactiva
1 Presione Menu (Menú) en el termostato.
2 Presione or para ir a LITE (Luz). Presione Select (Seleccionar).
3 Se muestra la configuración actual del brillo (15).
4 Presione or para ajustar el brillo de la luz de fondo.
5 Presione Select (Seleccionar) para guardar y salir del menú LITE (Luz).
NOTA: la luz de fondo se muestra únicamente si el cable C (común) está
conectado.
Recuperación inteligente adaptable
Con el tiempo, el termostato T4 Pro “sabe” cuánto demora el sistema en alcanzar la
temperatura que desea. Este activa el sistema de calefacción o refrigeración más temprano
para que esté confortable a la hora que usted espera.
Protección del compresor incorporada
El compresor puede dañarse si se vuelve a
iniciar inmediatamente después de que se
haya apagado. Esta característica hace que el
compresor demore unos minutos antes de volver
a iniciarse.
Durante el tiempo de espera, la pantalla titilará
mostrando el mensaje Cool On (refrigeración
activada) (o Heat On [calefacción activada]
si tiene una bomba de calor). Cuando haya
transcurrido el tiempo de espera de seguridad,
el mensaje dejará de titilar y se encenderá el
compresor.
5
El mensaje titila hasta que haya
transcurrido el tiempo de reinicio
de seguridad.
Page 26

Reemplazo de las baterías
Las baterías son opcionales (para ofrecer
suministro de energía de respaldo) si su
termostato fue cableado para funcionar con
corriente CA cuando fue instalado. Si su
termostato no fue cableado para funcionar
con suministro de energía CA, necesita
baterías.
Instale baterías nuevas inmediatamente
cuando aparezca el icono de baterías con poca
carga. El icono aparece aproximadamente dos
meses antes de que se agoten las baterías.
Incluso si el icono de batería con poca carga
no aparece, debe reemplazar las baterías una
vez al año o antes de abandonar el hogar por
más de un mes.
Si coloca las baterías en el lapso de dos
minutos, no tendrá que volver a configurar
la hora y el día. Todos los otros ajustes están
almacenados de manera permanente en la
memoria y no requieren suministro energía de
la batería.
NOTA: Cuando reemplace las baterías, se
recomiendan las baterías alcalinas.
Cuando aparezca la
advertencia de batería
con poca carga, presione
suavemente para aflojar el
termostato y luego retírelo
cuidadosamente de la pared.
Inserte baterías AA alcalinas
nuevas y vuelva a instalar el
termostato.
Avisos
Si hay un aviso o recordatorio, el icono de alerta
aparece en la pantalla de inicio.
Advertencia de batería con poca carga
1 Las baterías se deben cambiar cuando
aparezca el icono de aviso BAT T (batería)
y el icono de la batería se muestre en la
pantalla de inicio.
2 Cuando el suministro de energía de la batería
esté muy bajo, la luz de fondo del termostato
se desactiva para ahorrar suministro de
energía de la batería.
3 Cuando el suministro de energía de la batería
esté extremadamente bajo, solo se mostrará
BAT T (batería), el icono de aviso y el icono
de la batería.
6
Page 27

Recordatorio del filtro de aire
1 Aparece el icono de aviso en la pantalla
de inicio.
2 Presione Menú, y después pulse hasta
que la pantalla muestra ALRT.
3 Presione Select (seleccionar) para mostrar
cuál(es) alerta(s) está(n) presente(s).
4 Aparece el mensaje REPL (reemplace el filtro
de aire).
5 El recordatorio se puede repetir o borrar.
Resideo recomienda el cambio del filtro de
aire antes de eliminar el recordatorio.
6 Para repetir el aviso, presione Select
(seleccionar). Aparece la palabra SNZE
(repetición del aviso).
7 Presione Select (seleccionar) nuevamente
para repetir el recordatorio en 7 días.
8 Para eliminar, presione Select (seleccionar) y
luego presione para ir a CLER (borrar).
9 Presione Select (seleccionar) para borrar el
recordatorio del filtro de aire.
Repetición del aviso y borrar todos
los avisos o recordatorios*
1 Presione Menú, y después pulse hasta que
la pantalla muestra ALRT.
2 Presione Select (seleccionar) para mostrar
cuál(es) alerta(s) está(n) presente(s).
3 Aparece la palabra SNZE (repetición del
aviso).
4 Presione Select (seleccionar) nuevamente
para repetir el recordatorio en 7 días.
5 Para eliminar el aviso, presione Select
(seleccionar) y luego presione para ir a
CLER (borrar).
6 Presione Select (seleccionar) para borrar el
recordatorio.
* Algunos avisos no se pueden repetir o
borrar. Si esto ocurre, llame a su profesional
local de calefacción y refrigeración. Es
posible que el sistema de calefacción y
refrigeración pueda necesitar servicio.
7
Page 28

Localización y solución de problemas
Si tiene dificultades con el termostato, intente seguir las sugerencias que se
indican a continuación. La mayoría de los problemas pueden solucionarse de
manera fácil y rápida.
La pantalla está
en blanco
El sistema de
calefacción o
refrigeración no
responde
Las
configuraciones
de la temperatura
no cambian.
El mensaje “Cool
On” (refrigeración
activada) (o “Heat
On”) (calefacción
activada) está
destellando.
• Revise el interruptor de circuito y, si es necesario, reinícielo.
• Asegúrese de que el interruptor de suministro de energía del
sistema de calefacción y refrigeración esté encendido.
• Asegúrese de que la puerta del sistema de calefacción esté bien
cerrada.
• Asegúrese de que las baterías AA alcalinas estén instaladas
correctamente (consulte la página 6).
• Presione Mode (modo) para configurar el sistema de calefacción
(consulte la pág. 2) Asegúrese de que la temperatura
deseada sea más alta que la temperatura interior.
• Presione Mode (modo) para configurar el sistema de refrigeración
(consulte la pág. 2) Asegúrese de que la temperatura
deseada sea más baja que la temperatura interior.
• Revise el interruptor de circuito y, si es necesario, reinícielo.
• Asegúrese de que el interruptor de suministro de energía del
sistema de calefacción y refrigeración esté encendido.
• Asegúrese de que la puerta del sistema de calefacción esté bien
cerrada.
• Espere 5 minutos para que responda el sistema.
• Si la pantalla dice “unlock” (desbloquear), consulte la
página 5. En caso contrario, compruebe que está utilizando
el modo correcto (calefacción, refrigeración, calefacción de
emergencia o automático). Consulte la página 2.
• Si está utilizando el modo correcto, pero no puede configurar la
calefacción entre 40 °F y 90 °F (4,5 °C y 32 °C) o la refrigeración
entre 50 °F y 99 °F (10 °C y 37 °C), es posible que haya rangos
de detención que restringen la configuración. Pregúntele al
instalador si configuró rangos de detención.
• La función de la protección del compresor está funcionando.
Espere 5 minutos para que el sistema se vuelva a iniciar de
forma segura, sin dañar el compresor (consulte la página 5).
Clasificaciones eléctricas
Terminal Voltaje
(50Hz/60Hz
W Calefacción 20 V CA - 30 V CA 0.02 A - 1.0 A
W2 Calefacción (Aux) (únicamente TH4210U) 20 V CA - 30 V CA 0.02 A - 1.0 A
E Calefacción de emergencia (únicamente TH4210U) 20 V CA - 30 V CA 0.02 A - 0.5 A
Y Etapa 1 del compresor 20 V CA - 30 V CA 0.02 A - 1.0 A
G Ventilador 20 V CA - 30 V CA 0.02 A - 0.5 A
O/B Cambio 20 V CA - 30 V CA 0.02 A - 0.5 A
L/A Entrada 20 V CA - 30 V CA 0.02 A - 0.5 A
8
Corriente de
funcionamiento
Page 29

Poliza de garantia
IMPORTADO EN MEXICO POR:
INSTROMET MEXICANA S DE R L DE C V
Avenida Insurgentes 2453, Piso 6,
Tizapan, Alvaro Obregon,
Ciudad de Mexico, CP 01090
Telefono: 01 (55) 800 00423
Instromet Mexicana S. de R.L. de C.V. garantiza que éste producto está libre de defectos en su mano de obra y materiales
contra cualquier defecto de fabricación y funcionamiento, bajo uso normal, por el término de 5 años a partir de la fecha de
la compra por el consumidor. Si se determina que el producto esta defectuoso o presenta algún funcionamiento erróneo,
Instromet Mexicana S. de R.L. de C.V. deberá reparar o reemplazar (a opción de Instromet) el producto bajo las siguientes
condiciones:
1. Regresar el producto y la póliza de garantía, acompañado de la factura de venta o algún otro comprobante de compra
fechado al establecimiento donde se realizó la compra, o a la siguiente dirección. En la cual también tendrá la
información para obtener las partes, componentes, consumibles y accesorios del producto: Av. Salvador Nava Martinez
3125, Col. Colinas del Parque. San Luis Potosi, SLP Mexico 78294.
2. O puedes llamar al centro de atención al cliente al 018000835925 para México (ver teléfonos para otros países)
donde se determinará si el producto debe regresarse o si se enviará un reemplazo del producto al consumidor sin
costo alguno cubriendo los gastos que se deriven del cumplimiento de la presente garantía incluyendo los gastos de
transporte. No es necesario pedir piezas ni accesorios. El producto será reemplazado bajo esta garantía.
Nota: Esta garantía no cubre gastos de mano de obra por re-instalación. No ampara el reemplazo de la pieza si el defecto
ocurre por daño causado por el consumidor o desgaste normal.
La única responsabilidad de Instromet será reparar o reemplazar el producto dentro de los términos establecidos más
arriba. Instromet Mexicana S. de R.L. de C.V. no será responsable de ninguna pérdida o daño de ningún tipo, incluidos los
daños incidentales o derivados, que resulten, de manera directa o indirecta, del incumplimiento de la garantía, expresa o
implícita, o de cualquier otra falla de este producto.
Esta garantía es la única garantía expresa que Instromet Mexicana S. de R.L. de C.V. ofrece respecto de este producto. La
duración de cualquier garantía implícita, incluidas las garantías de comerciabilidad e idoneidad para un fin específico, se
limita por el presente a la duración de dos años de esta garantía.
Esta garantía no es válida en los siguientes casos:
1. Cuando el producto haya sido utilizado en condiciones distintas a las normales (aquellas para las que está destinado).
2. Cuando el producto no ha sido operado de acuerdo con el instructivo de uso e instalación proporcionado.
3. Cuando el producto ha sido alterado o reparado por personas no autorizadas por Instromet Mexicana S. de R.L. de C.V.
Datos del producto:
Marca: _________________________ Modelo: _________________________ Número de serie: _________________________
Nombre del consumidor: _____________________________ Dirección (calle y número): ____________________________
Delegación o municipio: _____________________________________________________________________________________
Ciudad, estado y código postal: ______________________________________________________________________________
Sello del establecimiento y fecha de compra
9
Page 30

10
Page 31

11
Page 32

33-00188EFS-09
PRECAUCIÓN: PELIGRO DE ELECTROCUCIÓN
Puede causar descargas eléctricas o daños al equipo. Desconecte el
suministro eléctrico antes de comenzar la instalación.
PRECAUCIÓN: RIESGOS DE DAÑOS AL EQUIPO
Se evita la protección del compresor durante la prueba. Para prevenir daños
al equipo, evite encender y apagar rápidamente el compresor.
PRECAUCIÓN: AVISO SOBRE EL MERCURIO
Si este producto está reemplazando a un equipo de control existente que
contiene mercurio en un tubo sellado, no coloque dicho equipo en la basura.
Contacte al organismo encargado del manejo y disposición de desechos
de su localidad para obtener instrucciones sobre cómo reciclar y desechar
adecuadamente.
Declaración de la Comisión Federal de Comunicaciones (Federal
Communications Commission, FCC) en:
https://customer.resideo.com/enUS/support/residential/
codes-and-standards/FCC15105/Pages/default.aspx
Resideo Technologies Inc.
1985 Douglas Drive North, Golden Valley, MN 55422
www.resideo.com
© 2020 Resideo Technologies, Inc. All rights reserved.
The Honeywell Home trademark is used under license
from Honeywell International, Inc. This product is manufactured by Resideo Technologies, Inc. and its affiliates.
Tous droits réservés. La marque de commerce Honeywell
Home est utilisée avec l’autorisation d’Honeywell
International, Inc.
Ce produit est fabriqué par Resideo Technologies, Inc. et
ses sociétés affiliées.
Todos los derechos reservados. La marca comercial
Honeywell Home se utiliza bajo licencia de Honeywell
International, Inc.
Este producto es fabricado por Resideo Technologies, Inc.
y sus afiliados.
https://www.honeywellhome.com/support
3300188EFS09 M.S. Rev. 0820 | Impreso en EE. UU.
 Loading...