

Page 1
Warnings and cautions
WARNING
!
CAUTION
!
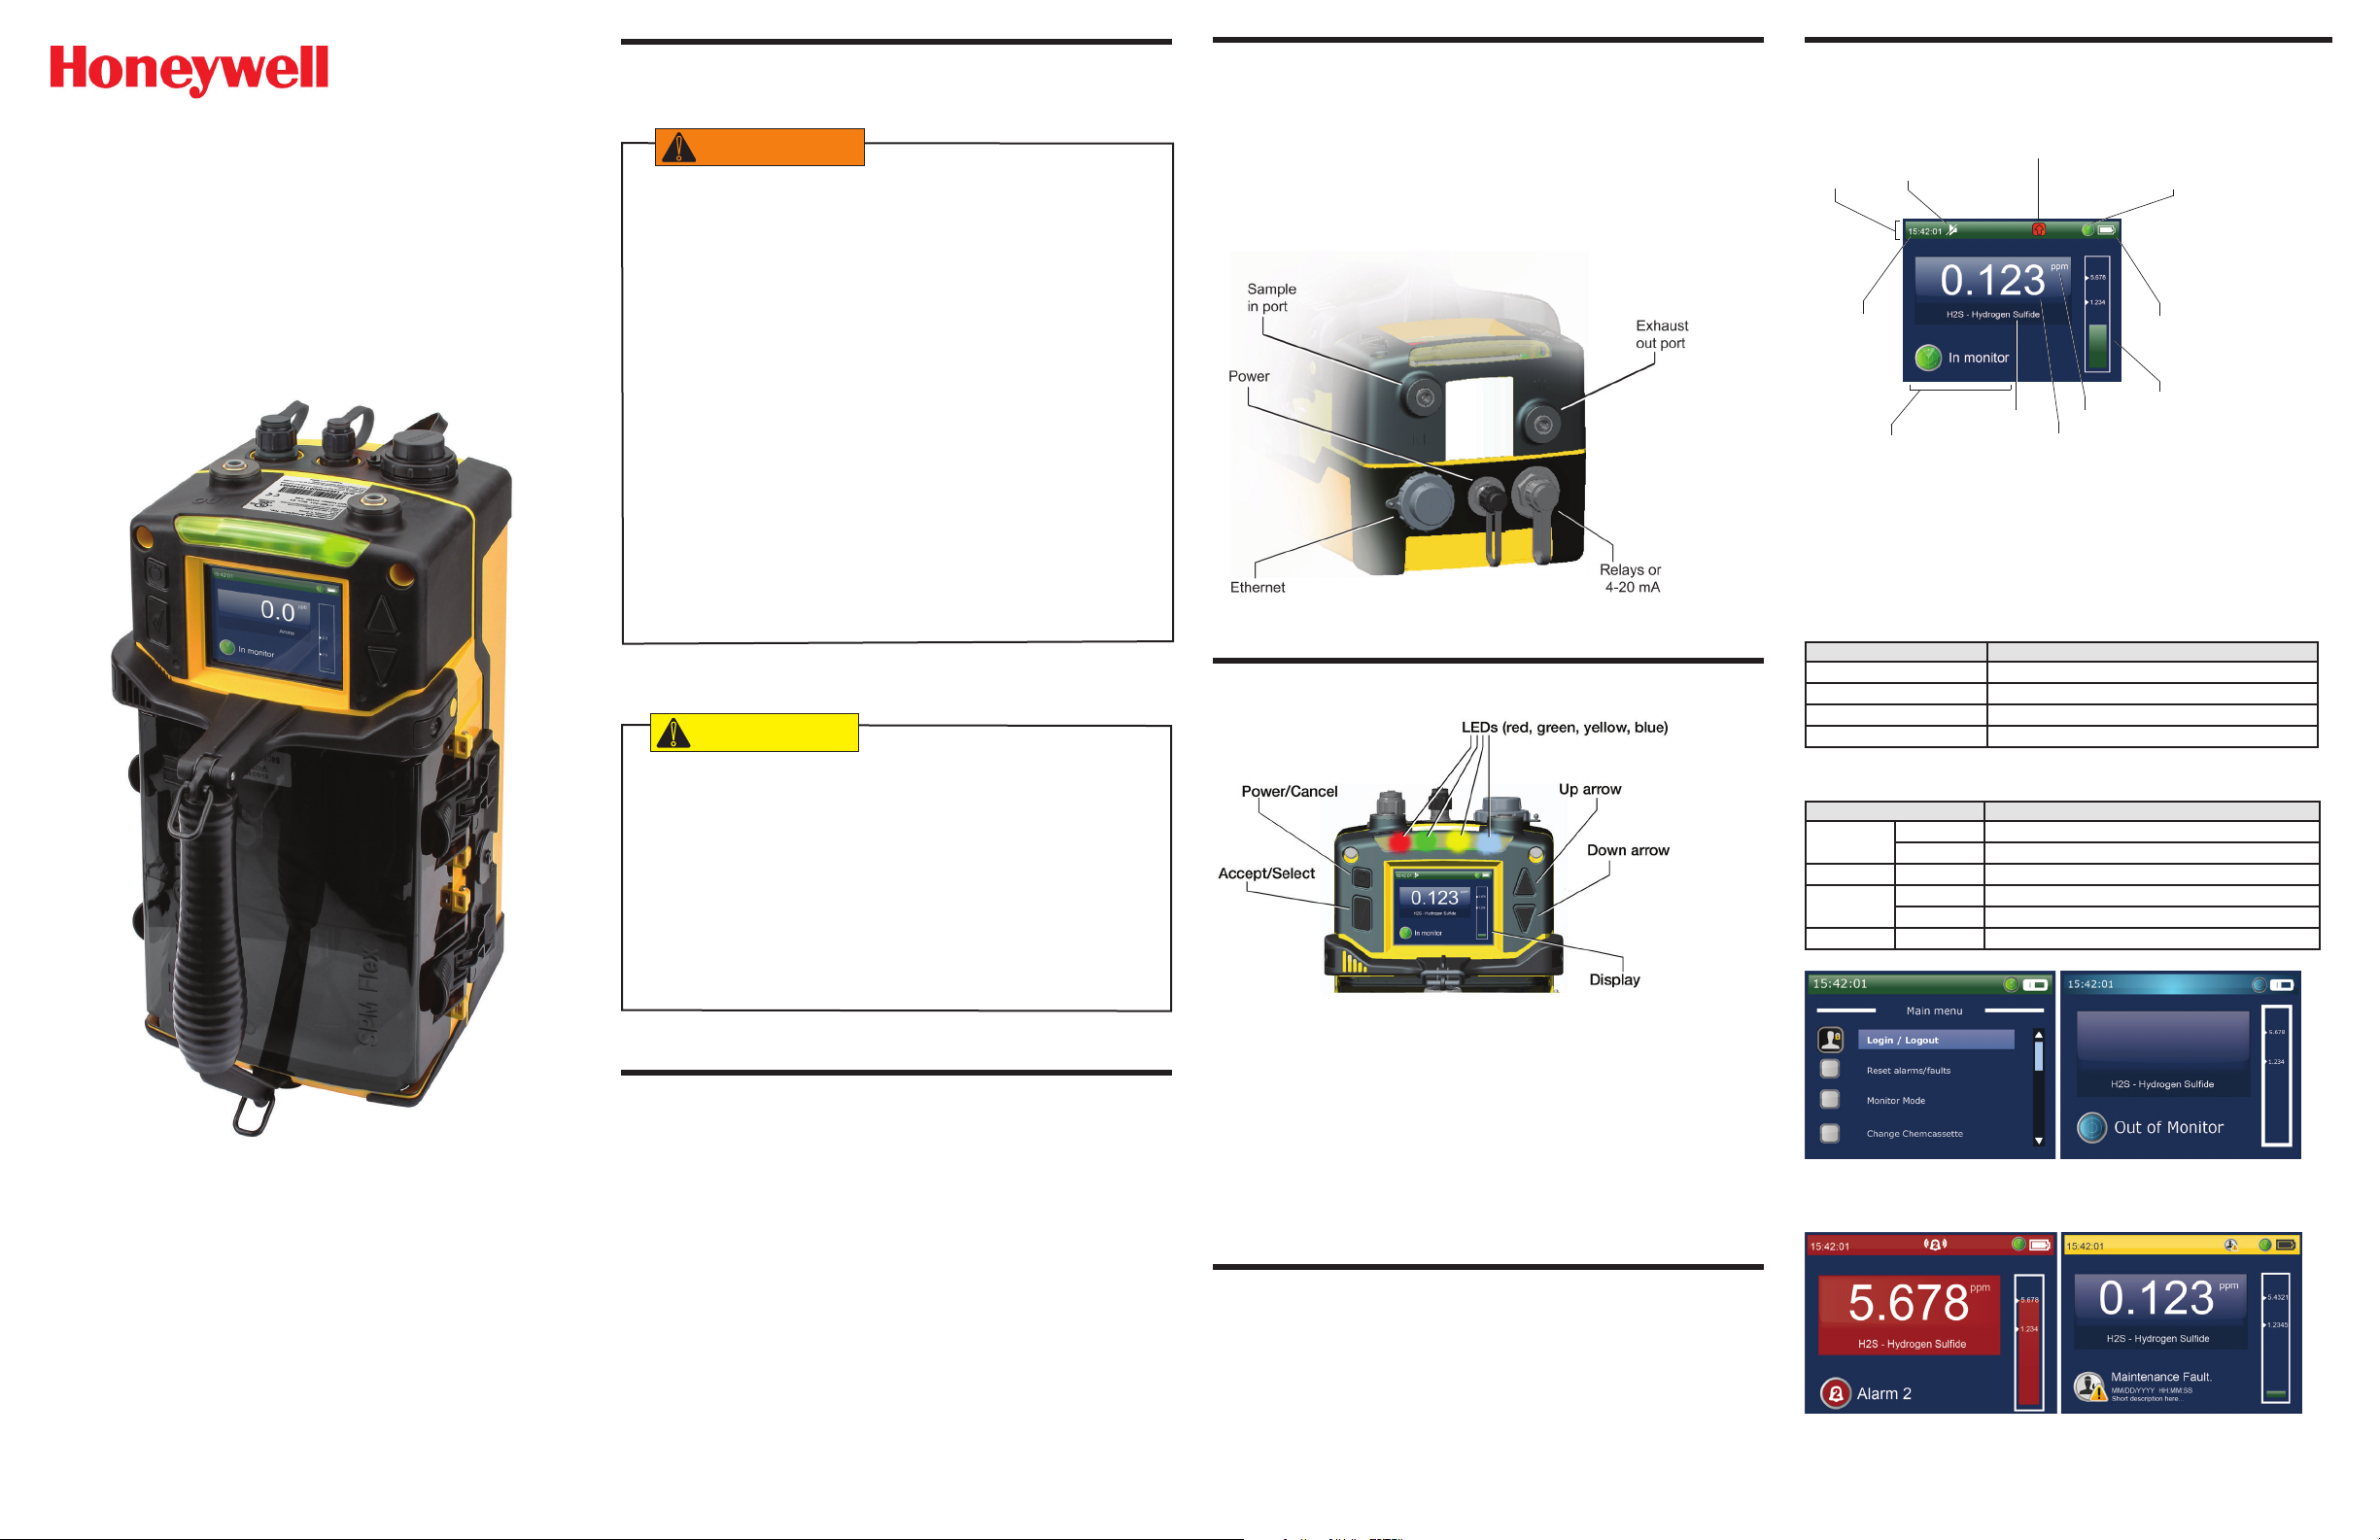
External connections
The display
SPM Flex® Single Point
Monitor Gas Detector
Quick Start Guide
• Operate and service the SPM Flex gas detector only as specied in this
quick start guide and the accompanying manual. Failure to do so may
impair the protection provided by the detector and may also void the
warranty.
• The battery is not eld-replaceable. Return the unit to Honeywell
Analytics if a battery replacement is necessary.
• Risk of re and burns. Do not open, crush, heat above 140ºF (60ºC), or
incinerate. Follow manufacturer’s instructions.
• Protection afforded by the SPM Flex gas detector may be impaired if it
is not used according to the manufacturer’s instructions.
• Do not operate two-way radios near the detector.
• Calibration, set-up, and test modes are intended for use by trained
personnel or service engineers only. Access to these modes can be
passcode protected.
• Follow local and site procedures when working with the SPM Flex
gas detector. If needed, ensure that the associated control panel is
inhibited in order to prevent false alarms. The following procedures
must be followed carefully and performed only by suitably trained
personnel.
• Use only accessories and parts meeting or exceeding Honeywell
Analytics’ specications.
• The SPM Flex detector must be installed only by qualied professional
personnel in accordance with local codes.
• The safety of any system incorporating the SPM Flex gas detector is
the responsibility of the assembler of the system.
• Position a permanently-installed SPM Flex gas detector so that it does
not interfere with access to the dedicated circuit breaker.
• Use the supplied power adaptor/connector only. (The adaptor is rated
for indoor use only.)
• Do not leave the optics gate open. Doing so may allow pressurized
gases to escape through the tubing into the unit and then
environment.
into the local
The detector is supplied with weather-sealed connectors for power,
Ethernet, and communications (for relays or 4-20 mA). See the SPM Flex
manual if the detector is being mounted in a xed location.
Portable detectors must be charged at least four hours. (They can be used
while charging.) Honeywell Analytics recommends leaving the detector
connected to the power source/charger when not in use to keep the battery
fully charged.
Figure 1:
terminals and ports
Turning the detector on and off
Figure 2: SPM Flex buttons and color LCD display
Figure 3 shows the common elements of the display.
Concentration
Sound
Status bar
Figure 3:
In the status bar, the color of the status bar changes according to the
conditions (blue = out of Monitor mode, green = status OK, yellow = fault,
red = alarm).
See Figure 10 (over) for the detector’s menu map.
The interface consists of a color LCD, a 4-button keypad, and four color
status LEDs. The menu options are navigated using these buttons:
The four LEDs provide at-a-glance information about the current state of
the detector:
on/o
Clock
Current status indicator
SPM Flex display - In Monitor mode
Interface Button Function
Up arrow Scroll up through lists of options
Down arrow Scroll down through lists of options
Accept/Select Accept a highlighted option
Power/Cancel Cancel
LED Description
Red
Green blinking The detector is active
Yellow
Blue solid Connected to external power
solid Alarm 1
blinking Alarm 2
solid Maintenance fault
blinking Instrument fault
indicator
Gas name
Gas concentration
Units
Monitor mode
Indicator
Battery
indicator
Bar graph
w/upper, lower
alarm limits
Unpacking the box
The contents of the box:
• the SPM Flex gas detector
• the handle assembly (for portable models only)
• power adaptor and cable
• shoulder strap (for portable models only)
• mounting bracket (for xed units only)
• a CD containing the Technical Manual
• this Quick Start Guide
Save the packaging to re-use for service requests.
1. Verify that the rocker switch under the cover is in the on position.
(Typically, it is switched off only for transport or service.) Do not power
up the detector with a ash drive attached.
2. Press and hold the Power/Cancel button until the green LED begins
blinking. The detector will then complete the start-up sequence.
3. To turn the detector off, press and hold the Power/Cancel button for 5
seconds or select “Power Off” from the menu.
Navigation
All SPM Flex menus are navigated by the four buttons shown in Figure 2.
Pressing either of the arrows or the Accept/Select button will access the
menu from the main display screen. The arrows are used to scroll up and
down through lists of options. The Accept/Select button is used to initiate a
highlighted option. During navigation, the Power/Cancel button will cancel a
command or, when pressed for more than 3 seconds, it will exit to the main
display.
Figure 4: Main menu Figure 5: Out of monitor mode
Figure 6: Alarm mode Figure 7: Maintenance fault
Part No. 1998M0846
Revision 02
April 2015
Page 2
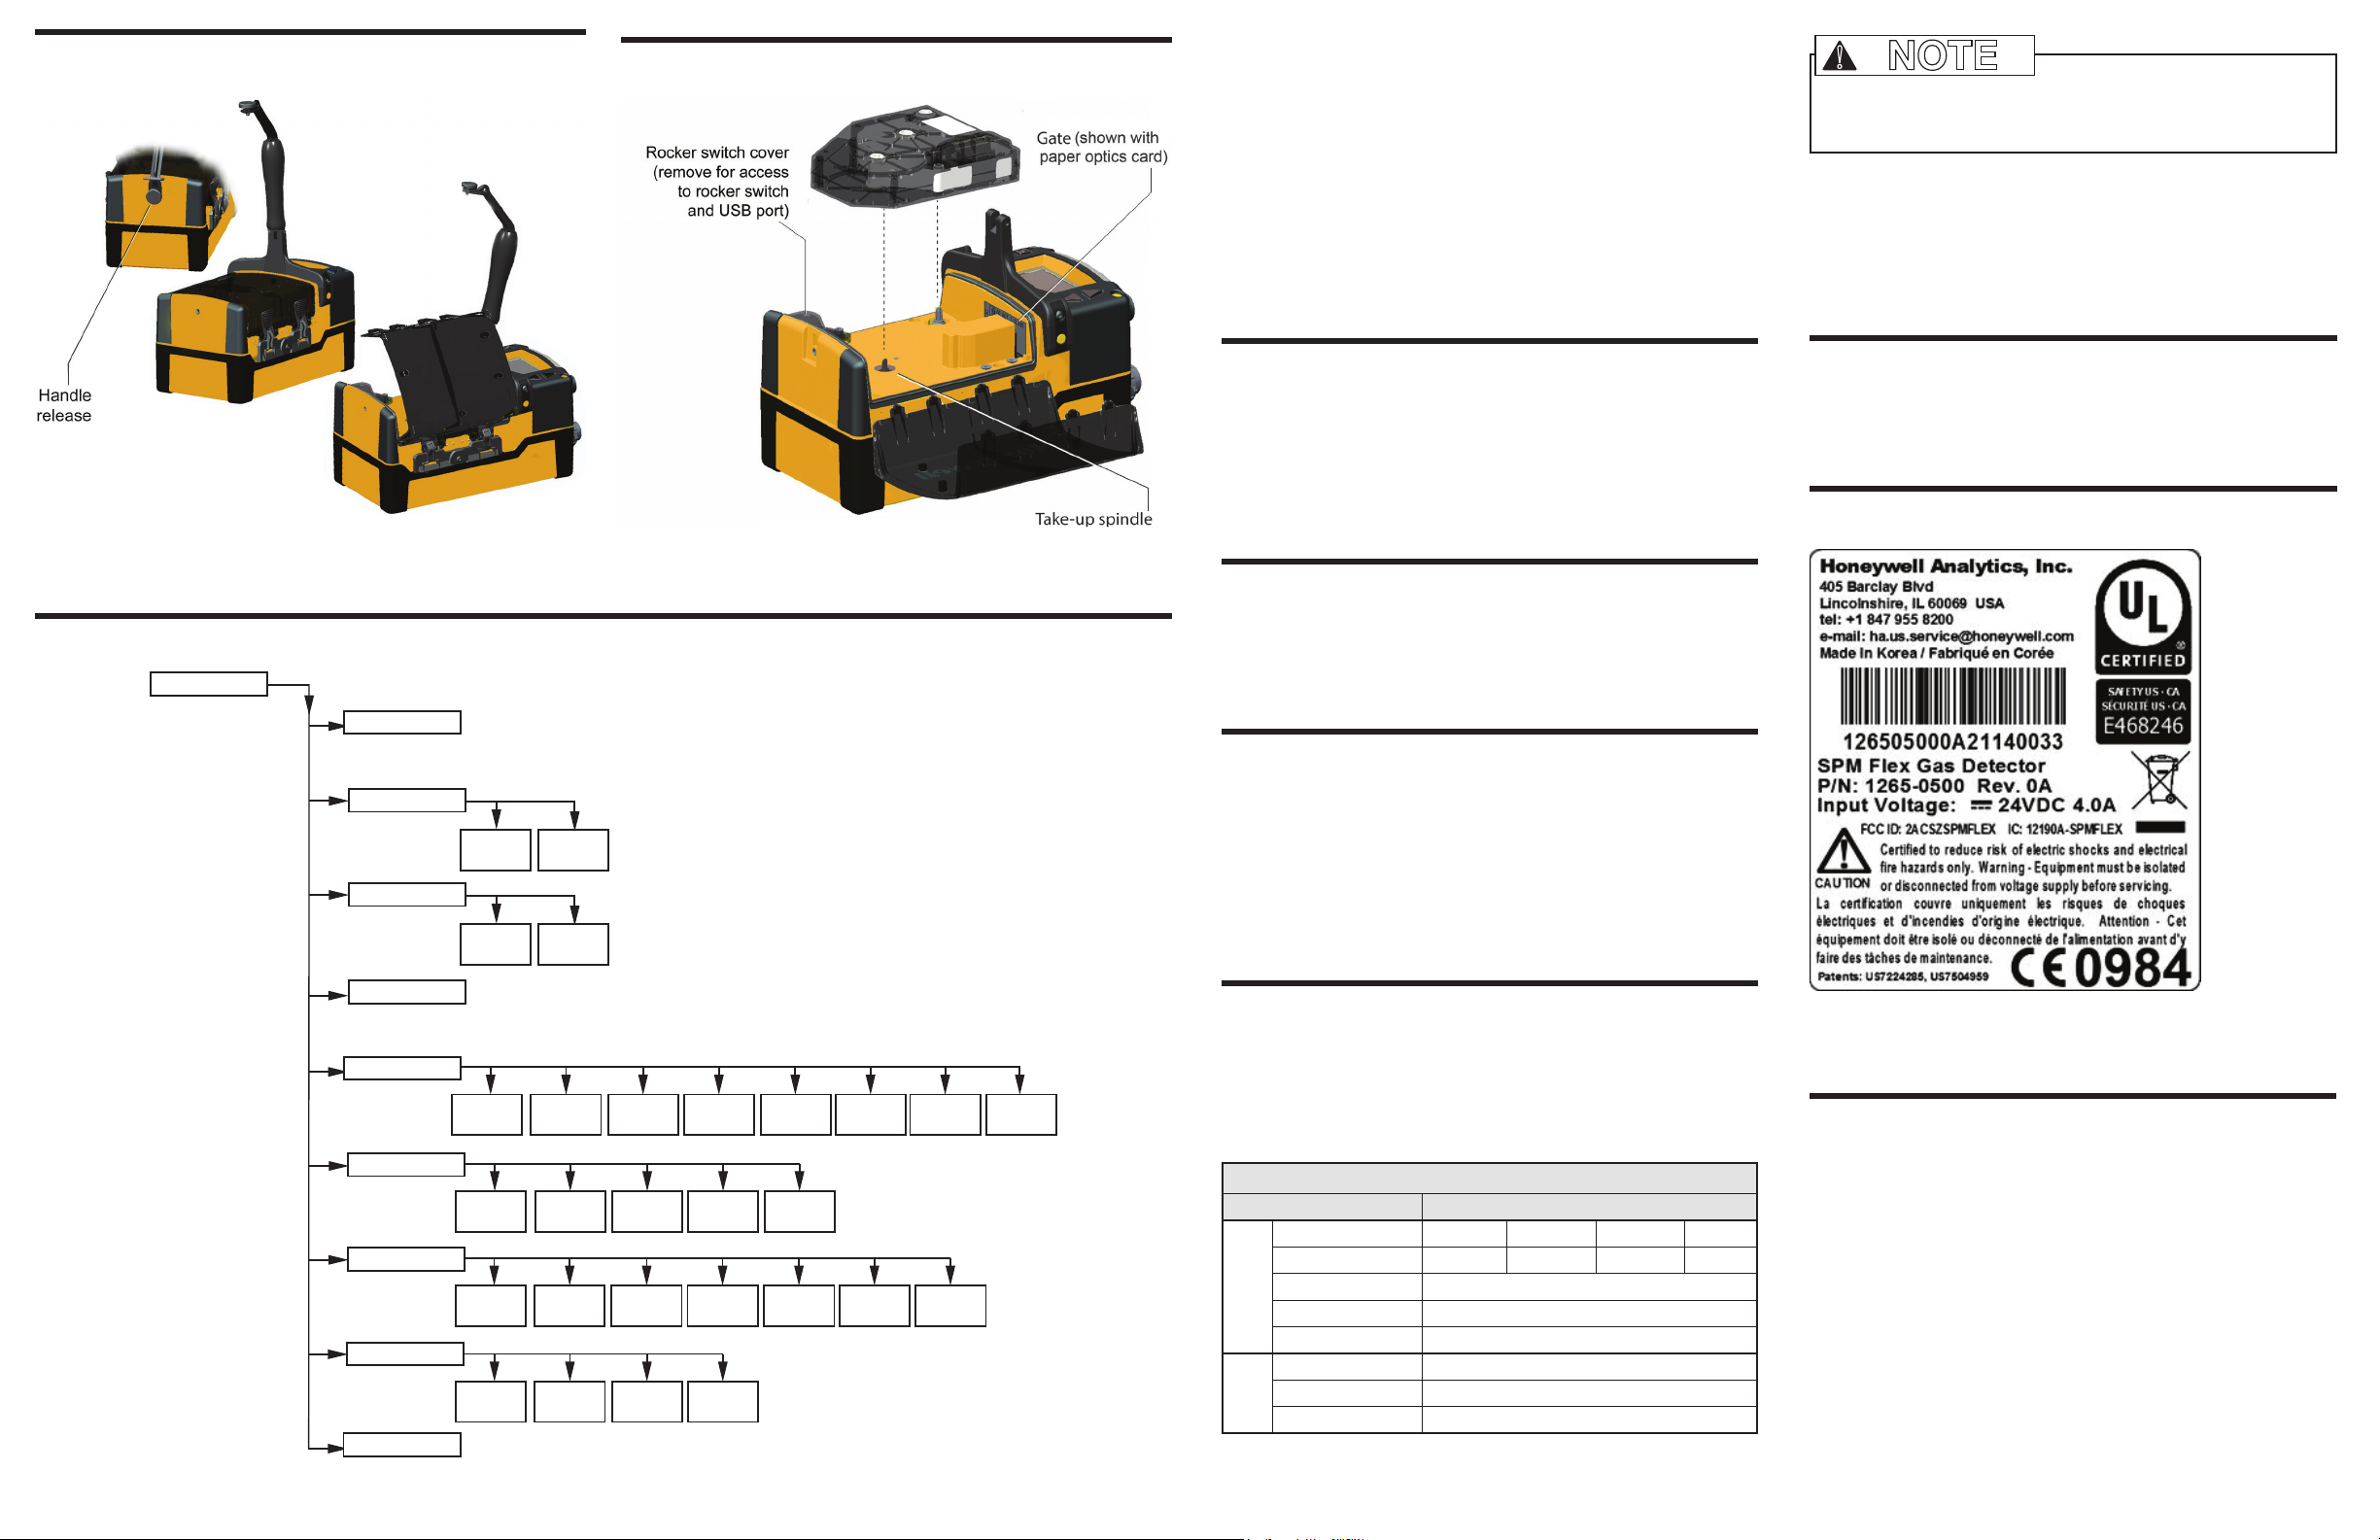
Opening the Chemcassette® cartridge door
Loading a Chemcassette® cartridge
1. Navigate to the “Change Chemcassette” menu option.
2. Follow the on-screen instructions to install or change the cartridge.
3. Remove the paper optics card from the gate.
4. Insert the Chemcassette cartridge in the detector (it will t in only
one orientation). The take-up spindle will rotate slightly to allow the
cartridge to snap into place easily.
5. Close the cover.
6. A summary of the current conguration will be displayed. Select
either to enter monitor mode or to remain out of monitor mode (i.e.,
idle).
!
NOTE
Use Teon Fluorinated Ethylene Polymer (FEP) tubing to ensure proper
sample transport.
The SPM Flex detector is supplied with the standard Ethernet, power,
and communications connectors installed. The Ethernet connector can
be removed and provides a 1-inch conduit port which allows a direct
connection to the PCB communication terminals. Refer to the
tubing
section of the user manual for more information.
Wiring and
Figure 8: Opening the Chemcassette cartridge door
Menu Map
Main Menu
Login/Logout
Reset Alarms & Faults
Monitor Mode
Reset all
Enter
monitor mode
Silence
audio alarm
Out of
monitor mode
Figure 9: Loading a Chemcassette cartridge
Removing a Chemcassette® cartridge
1. Navigate to Maintenance > Open/Close gate.
2. Select “Open Gate.”
3. Remove the cartridge.
4. Inert the optics card in the gate if the detector will be stored or
transported.
5. Select “Close Gate.”
Changing the selected gas
1. While out of monitor mode, navigate to Set-up > Monitoring > Gas.
2. Select “Current gas” and pick the desired gas from the selection box
3. Select “Save.”
Entering monitor mode
From the main menu, navigate to the “Monitor Mode” option and select
“Enter monitor mode.”
1. If a Chemcassette cartridge has been installed, the detector will enter
Monitor Mode.
2. If a Chemcassette cartridge has not been installed, a user with
the necessary passcode can inititate the Chemcassette wizard.
Otherwise, the detector will not enter monitor mode.
Attaching the shoulder strap
If the shoulder strap is to be used with a portable detector, attach its
spring clips to each of the rings on the detector’s handle.
Product label
Figure 10. SPM Flex menu map
Change Chemcassette
Review Mode
Maintenance
Setup
Test
Power Off
Event
History
Inhibit
General
Optics
Verification
Chem-
cassette
4-20 mA
Current Loop
Calibration
Monitoring Latching
Simulation
Gas
Settings
Flow Char-
acterization
Force
Relay
Network
Open/Close
Gate
Outputs Network
Force
4-20 mA
Additional
Status
Update
Program
Output
State
Security
Configuration
Manager
Wiring and tubing
The SPM Flex detector has exible installation options to allow the user to
select the one most suitable for a specic application. The 4-20 mA output
is a three-wire connection that is congurable as sink, source, or isolated.
SoftwareTrend/Plot
The detector is equipped with three relays.
Figure 11. SPM Flex label
Have questions?
Honeywell Analytics
Sample Tubing Specications
Description Maximum
Tubing length, ft. (m) 100 (30) 66 (20) 33 (10) 0
Transport time (sec) 19 13 7 1
Flow rate (cc/min.) 700-1200 (flow is set and controlled per calibration)
Inlet
Tubing OD, in. (mm) 0.25 (6.35)
Tubing ID, in. (mm) 0.125 (3.18)
Tubing length, ft. (m) 100 (30)
Outlet
Tubing OD, in. (mm) 0.25 (6.35)
Tubing ID, in. (mm) 0.188 (4.76)
The overall maximum load on the pump between the inlet and the exhaust should not exceed 10 inches H2O.
405 Barclay Boulevard
Lincolnshire, Ilinois 60069
Tel: +1 847 955 8200
Toll free: +1 800 538 0363
Fax: +1 847 955 8208
detectgas@honeywell.com
 Loading...