

Page 1

Captuvo™ SL22/42
Enterprise Sled for Apple®iPod touch®5 and iPhone®5
Quick Start Guide
Aller à www.honeywellaidc.com pour le français.
Vai a www.honeywellaidc.com per l'italiano.
Gehe zu www.honeywellaidc.com für Deutsch.
Ir a www.honeywellaidc.com para español.
Перейти на русскоязычный сайт www.honeywellaidc.com.
Pro češtinu jdi na www.honeywellaidc.com.
Pre slovenčinu choď na www.honeywellaidc.com.
Idź na stronę : www.honeywellaidc.com po quick start w języku polskim.
Türkçe için lütfen www.honeywellaidc.com sayfasını ziyaret ediniz.
Para Português, acesse www.honeywellaidc.com.br.
ᅤⷐ࿖ www.honeywellaidc.com㧔䬨ỻ炸ޕ
㞍䚳䷩ỻ䇰実䘣旮 www.honeywellaidc.com.
CAPTUVOSL22-42-QS Rev B
06/14
Page 2

Getting Started
Scan this bar code with your smartphone or visit
www.honeywellaidc.com/captuvoinstructions for a
Getting Started video.
The Captuvo SL22 Enterprise Sled (Agency Model: SL-ES-C) used
with the Apple
SL42 (Agency Model: SL-ES-C) used with the Apple iPhone®5
include an optional integrated imager for scanning all types of bar
codes. An optional magnetic stripe reader (MSR) for reading cards
with magnetic stripes is also available for non-healthcare sleds.
Note: An imager is standard with the healthcare devices.
Note: Honeywell is not an authorized Apple repair center. Please
Note: Refer to your Apple iPod touch and iPhone documentation for
®
iPod touch®5 mobile digital device and the Captuvo
return only your sled to us for repair. Honeywell is not liable
for any non-Honeywell product shipped to our repair center.
important product and safety information.
User Documentation
To download the sled documentation, visit www.honeywellaidc.com.
For more information about the sleds, visit www.honeywellaidc.com/
captuvo/sl22.html.
Note: Due to the availability of different models, your sled may look
slightly different from the illustrations included in this
document.
Page 3
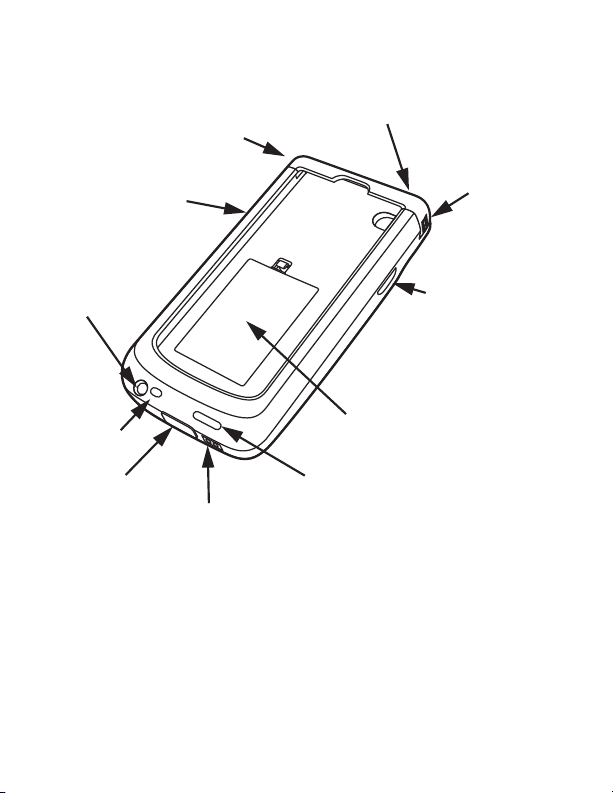
Front View
Door Release
(non-healthcare sleds
only)
Volume (SL42)/
Scan Buttons
Audio Jack
(non-healthcare
sleds only)
Speaker
Mini USB Port
(for charging)
On/Off Button
Door Release
(non-healthcare
sleds only)
Scan
Button
Battery Door
Speaker
Charging Contacts
(for charge base only)
Page 4
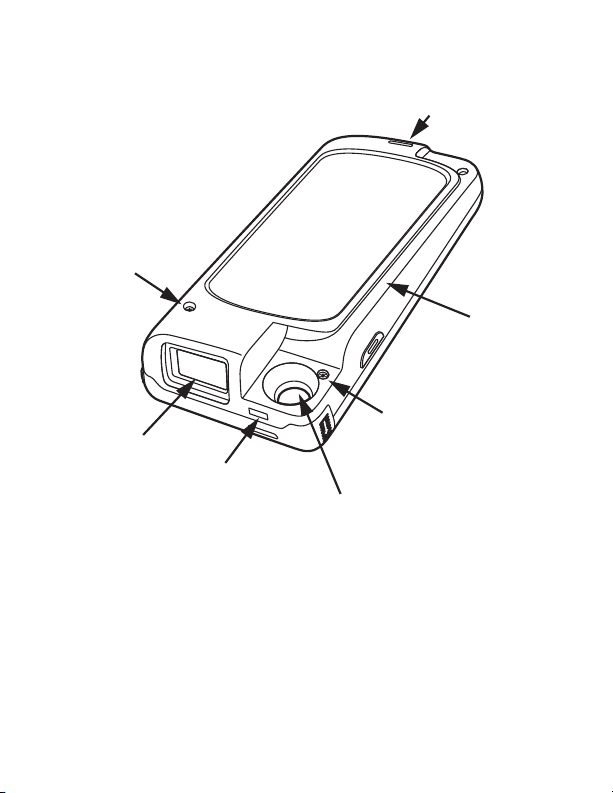
Back View – Non-Healthcare Sled
Lanyard Slot
Security Mechanism
(non-healthcare
sleds only)
Security Mechanism
Imager (optional)
LED
Main Camera Access
(non-healthcare
sleds only)
Magnetic
Stripe Reader
(optional)
Page 5
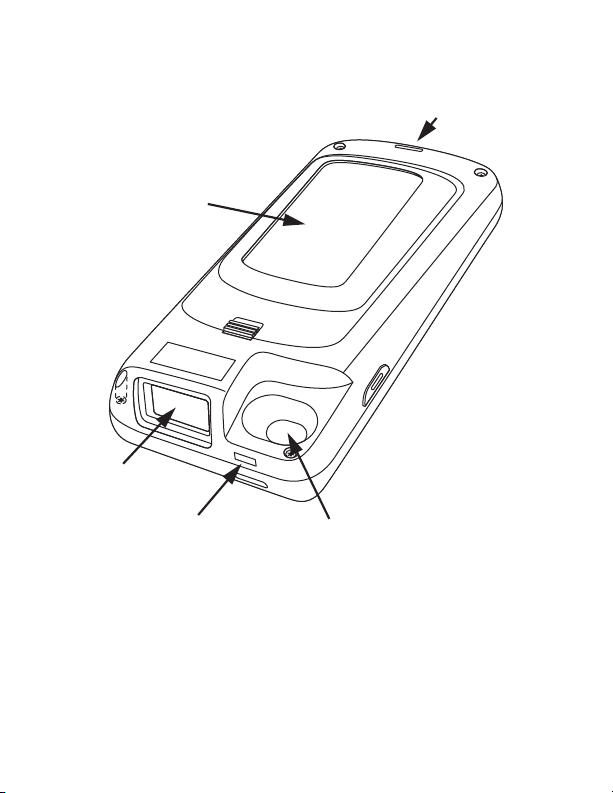
Back View – Healthcare Sled
Battery Door
Imager
Lanyard Slot
LED
Main Camera Access
Page 6

Inserting the Battery
Ensure all components are dry prior to mating sleds/batteries with
!
peripheral devices. Mating wet components may cause damage
not covered by the warranty.
We recommend use of Honeywell Li-Ion battery packs. Use of any
!
non-Honeywell battery may result in damage not covered by the
warranty.
There is a danger of explosion if the batteries are incorrectly
!
replaced. Replace the batteries with only the same or equivalent
type recommended by the manufacturer. Dispose of used batteries according to the recycle program for batteries as directed by
the governing agency for the country where the batteries are to be
discarded.
Page 7

Non-Healthcare Sled Battery (1150 mAh)
Battery Door
Battery
Page 8

Healthcare Sled Battery (3340 mAh)
Battery Door
Battery
Page 9

Installing the Apple Device into a NonHealthcare Sled
1. For non-healthcare sleds, open the door by pushing the top
toward the front of the sled.
2. Slide your device into the sled.
Note: Be careful that the connectors are not accidentally damaged.
Page 10

Installing the Apple Device into a Healthcare Sled
1. For healthcare sleds, remove the four TORX (T6) screws on the
back of the unit.
Note: If you are using an Apple iPhone 5c, carefully remove the
adapter that is pre-installed in the sled. If you are using an
Apple iPhone 5/5s, leave the adapter installed.
Adapter
Page 11

2. Place the Apple device into the sled and press the top and
bottom housings together and tighten the four screws. Be certain
not to over tighten the screws.
TORX®(T6)
Page 12

Non-Healthcare Sled Security Mechanism
Note: To reduce the risk of the Apple device being removed or
disengaging from the non-healthcare sled, we recommend
that you lock both of the security mechanisms.
TORX (T5)
Security Mechanism
Security Mechanism
Page 13

Charging Using Wall Adapter
Note: If you use the wall adapter, both the sled and the iOS device
charge.
Note: Use the adapter that came with the iPhone 5 packaging to
charge the phone and the sled.
Page 14

Charging using USB to PC
Note: When the iOS device is in the sled and it is connected to a PC/
laptop, only the sled charges. The iOS device cannot be
charged or updated via USB.
LED Indicators
Color Indication
Blink Red Sled’s battery power is low (8% and
below); needs charging.
Blink Green Sled’s battery is charging.
Solid Green Sled battery is fully charged.
Page 15

Demo Apps
To test scanning a bar code, download the Honeywell Price Check
application from the Apple App Store
demonstration purposes only and does not process any data.
SM
. This application is for
Application Software
The sleds require special application software. Please refer to
www.honeywellaidc.com/iosapps for information regarding software.
Reading Magnetic Stripe Cards
Page 16

Healthcare Housing Cleaning Directions (Healthcare models only)
Important: The following cleaning solutions have been
tested to assure safe cleaning of your sled’s disinfectantready housing. They are the only solutions approved for
use with this sled. Damage caused by the use of cleaners
other than those listed below may not be covered by the
warranty.
• Gentle dish soap and water
• 409®Glass and Surface Cleaner
• CaviWipes
• Clorox®Bleach (10%)
• Isopropyl Alcohol Wipes (70%)
• Sani-Cloth®HB
• Sani-Cloth®Plus
• Super Sani-Cloth
• Virex®256
• Windex®Blue
™
®
Operating Temperature
The maximum operating temperature range for the sleds is 0°C to
35°C (32°F to 95°F).
Technical Assistance
Contact information for technical support, product service, and
repair can be found at www.honeywellaidc.com.
Page 17

Limited Warranty
Refer to www.honeywellaidc.com/warranty_information for your
product’s warranty information.
Patents
For patent information, refer to www.hsmpats.com.
Disclaimer
Honeywell International Inc. (“HII”) reserves the right to make
changes in specifications and other information contained in this
document without prior notice, and the reader should in all cases
consult HII to determine whether any such changes have been
made. The information in this publication does not represent a commitment on the part of HII.
HII shall not be liable for technical or editorial errors or omissions
contained herein; nor for incidental or consequential damages
resulting from the furnishing, performance, or use of this material.
This document contains proprietary information that is protected by
copyright. All rights are reserved. No part of this document may be
photocopied, reproduced, or translated into another language without the prior written consent of HII.
2012-2014 Honeywell International Inc. All rights reserved.
Web Address: www.honeywellaidc.com
Apple and iPod touch are trademarks of Apple Inc., registered in the
U.S. and other countries. App Store is a service mark of Apple Inc.
“Made for iPod” and “Made for iPhone” mean that an electronic
accessory has been designed to connect specifically to iPod and
iPhone respectively, and has been certified by the developer to meet
Apple performance standards. Apple is not responsible for the oper-
Page 18

ation of this device or its compliance with safety and regulatory standards. Please note that the use of this accessory with iPod or
iPhone may affect wireless performance.
 Loading...