

Honeywell MP10CESWW Owner's Manual
OWNER’S MANUAL
Read and save these instructions before use
MANUAL DEL PROPIETARIO
Lea y guarde estas instrucciones antes de usar la unidad
MODE D'EMPLOI
Lire et conserver ces instructions avant utilisation
Voltage rating / Tensión / Tension nominale: 115V~60Hz
Power rating / Potencia / Puissance nominale: 1050W
Portable Air Conditioner
Aire Acondicionado Portátil
Climatiseur Portatif
Model / Modelo / Modèle: MP10CESWW
For product inquiries or support / Para consultas del producto o soporte /
Pour les questions sur les produits ou pour du soutien:
www.honeywellportableac.com
Customer Support / Atención al cliente / Soutien au client:
USA: 1-800-474-2147 CANADA: 1-888-209-0999
Made in China
Hecho en China
Fabriqué en Chine

SECTION PAGE
INDEX
Read all instructions carefully before setting up and operating the unit. Keep this
instruction manual for future reference. This manual is designed to provide important
information needed to setup, operate, maintain and troubleshoot your portable air
conditioner. Failure to follow these instructions may void the warranty.
1
1.
2.
3.
4.
5.
6.
7.
8.
9.
10.
11.
12.
1
2
3
4
6
7
10
13
14
15
16
17
INDEX ...............................................................................................................
THANK YOU......................................................................................................
USER TIPS........................................................................................................
SAFETY ............................................................................................................
PARTS DESCRIPTION.....................................................................................
INSTALLATION.................................................................................................
USE & OPERATION..........................................................................................
CLEANING & MAINTENANCE..........................................................................
WATER CONDENSATION DRAINAGE............................................................
TROUBLESHOOTING GUIDE..........................................................................
TECHNICAL SPECIFICATIONS.......................................................................
SERVICE AND WARRANTY.............................................................................

2
Congratulations on your purchase of this versatile Honeywell Portable Air Conditioner.
Honeywell Portable Air Conditioners are ideal for spot cooling. The compressor, condenser
and evaporator are housed in a compact unit. The air is filtered, dehumidified and cooled while
a flexible air outlet hose sends heat outside. The air conditioner includes a window venting kit.
No permanent installation is needed. The unit is easy to move from room to room and offers a
truly flexible air conditioning solution.
Auto Evaporation System - The unit automatically evaporates the condensate through the air
outlet hose. There is no need to empty the drainage tank except in very high humidity conditions.
Read and follow the instructions carefully.
THANK YOU
3
USER TIPS
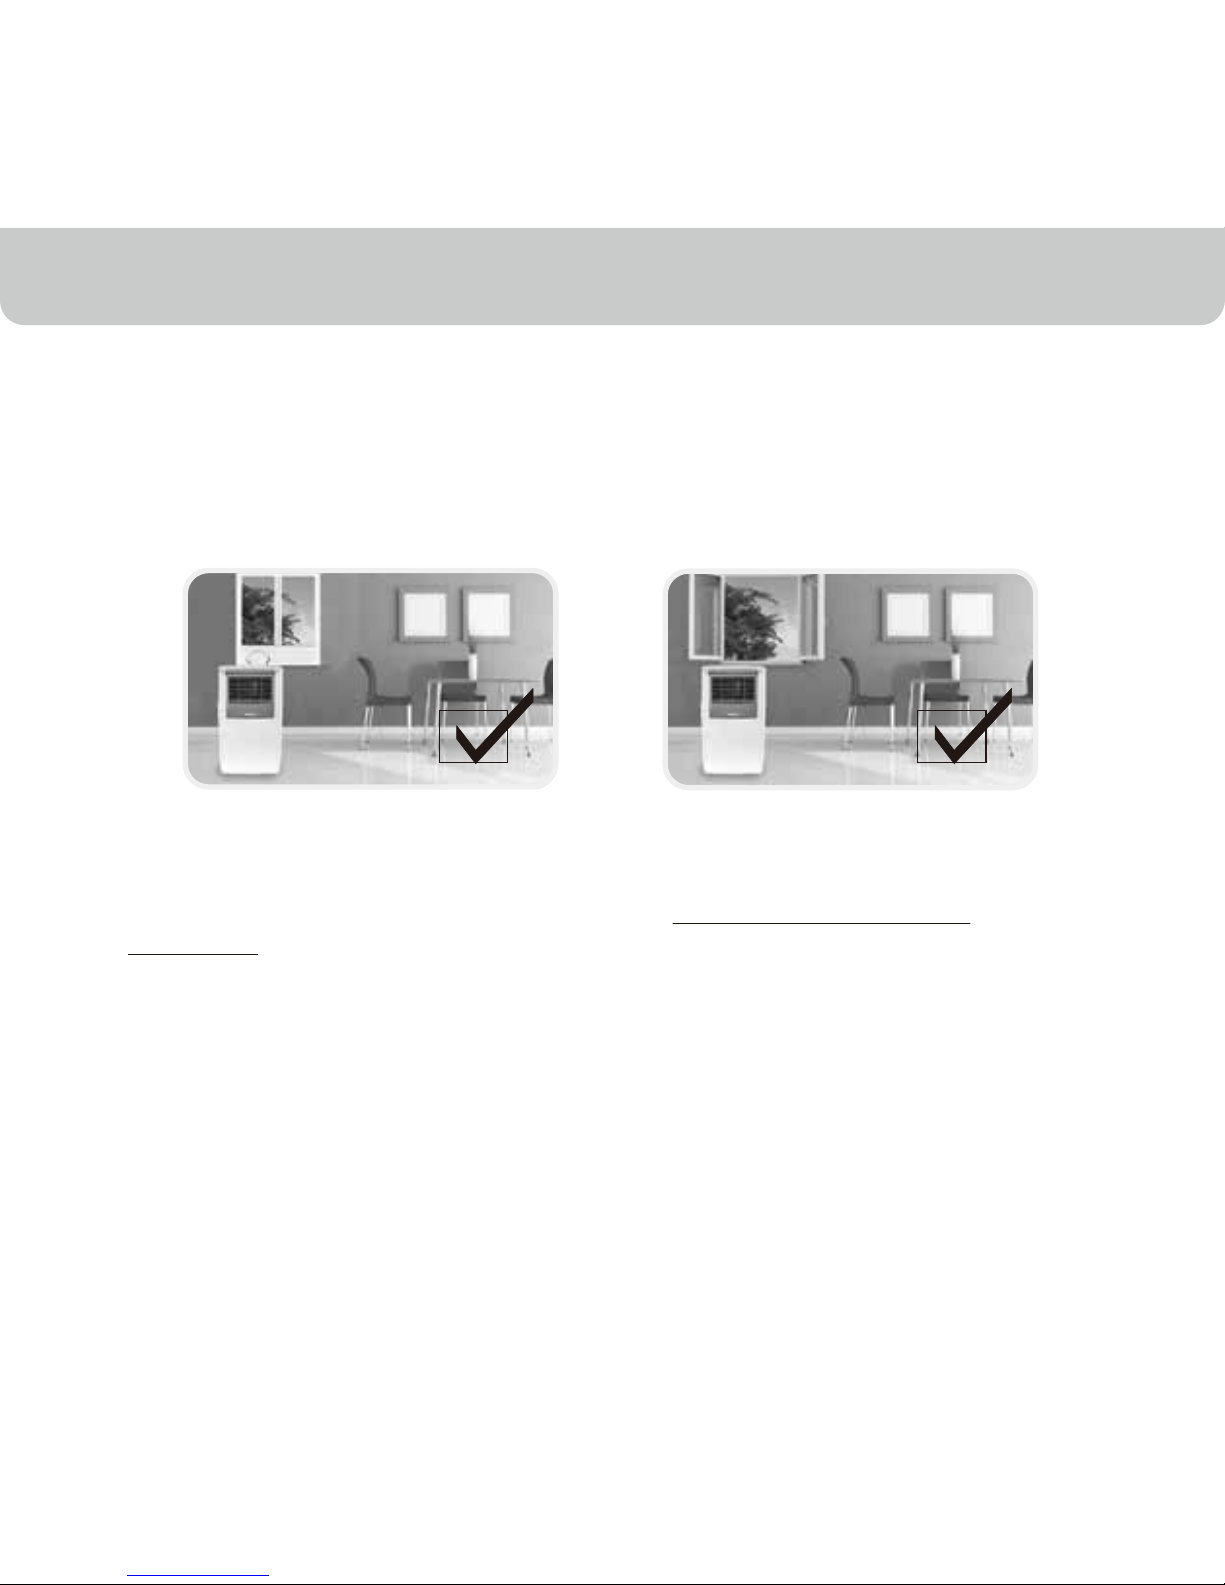
To ensure optimal efficiency of the product, keep doors and windows closed when it
is used as an air conditioner or dehumidifier.
If the product is being used with the fan function only, an open window could improve
air circulation.
Follow installation instructions to set up the unit.
Plug the unit into a properly grounded circuit.
Important: Before installing the unit, place it UPRIGHT for 20 minutes
before use to allow the refrigerant to stabilize.
•
•
Cooling and Dehumidifying Operation Fan Operation

4
SAFETY
WARNING
READ AND SAVE THESE INSTRUCTIONS
Improper handling can cause serious damage to the appliance.
DO NOT operate the unit with a damaged plug or loose wall outlet. If the power
cord is damaged, it must be replaced by the manufacturer or an authorized service agent.
DO NOT cover the air intake and exhaust when in use.
This appliance is not intended for use by children. Children should be supervised
and should not play on or around the appliance.
DO NOT place objects on or sit on the unit.
Always turn off and unplug the unit when cleaning or servicing.
If service is needed contact an authorized service agent.
Unplug the unit when stored or not in use.
1.
2.
3.
4.
5.
6.
7.

5
DO NOT run the power cord under carpeting and rugs.
Use caution to prevent tripping on cord.
DO NOT use in areas where gasoline, paint or other flammable goods are stored.
Basic safety precautions should always be followed when using electrical appliances.
This appliance has been manufactured for use in domestic environments and
should not be used for other purposes.
8.
9.
10.
11.
12.
SAFETY
6
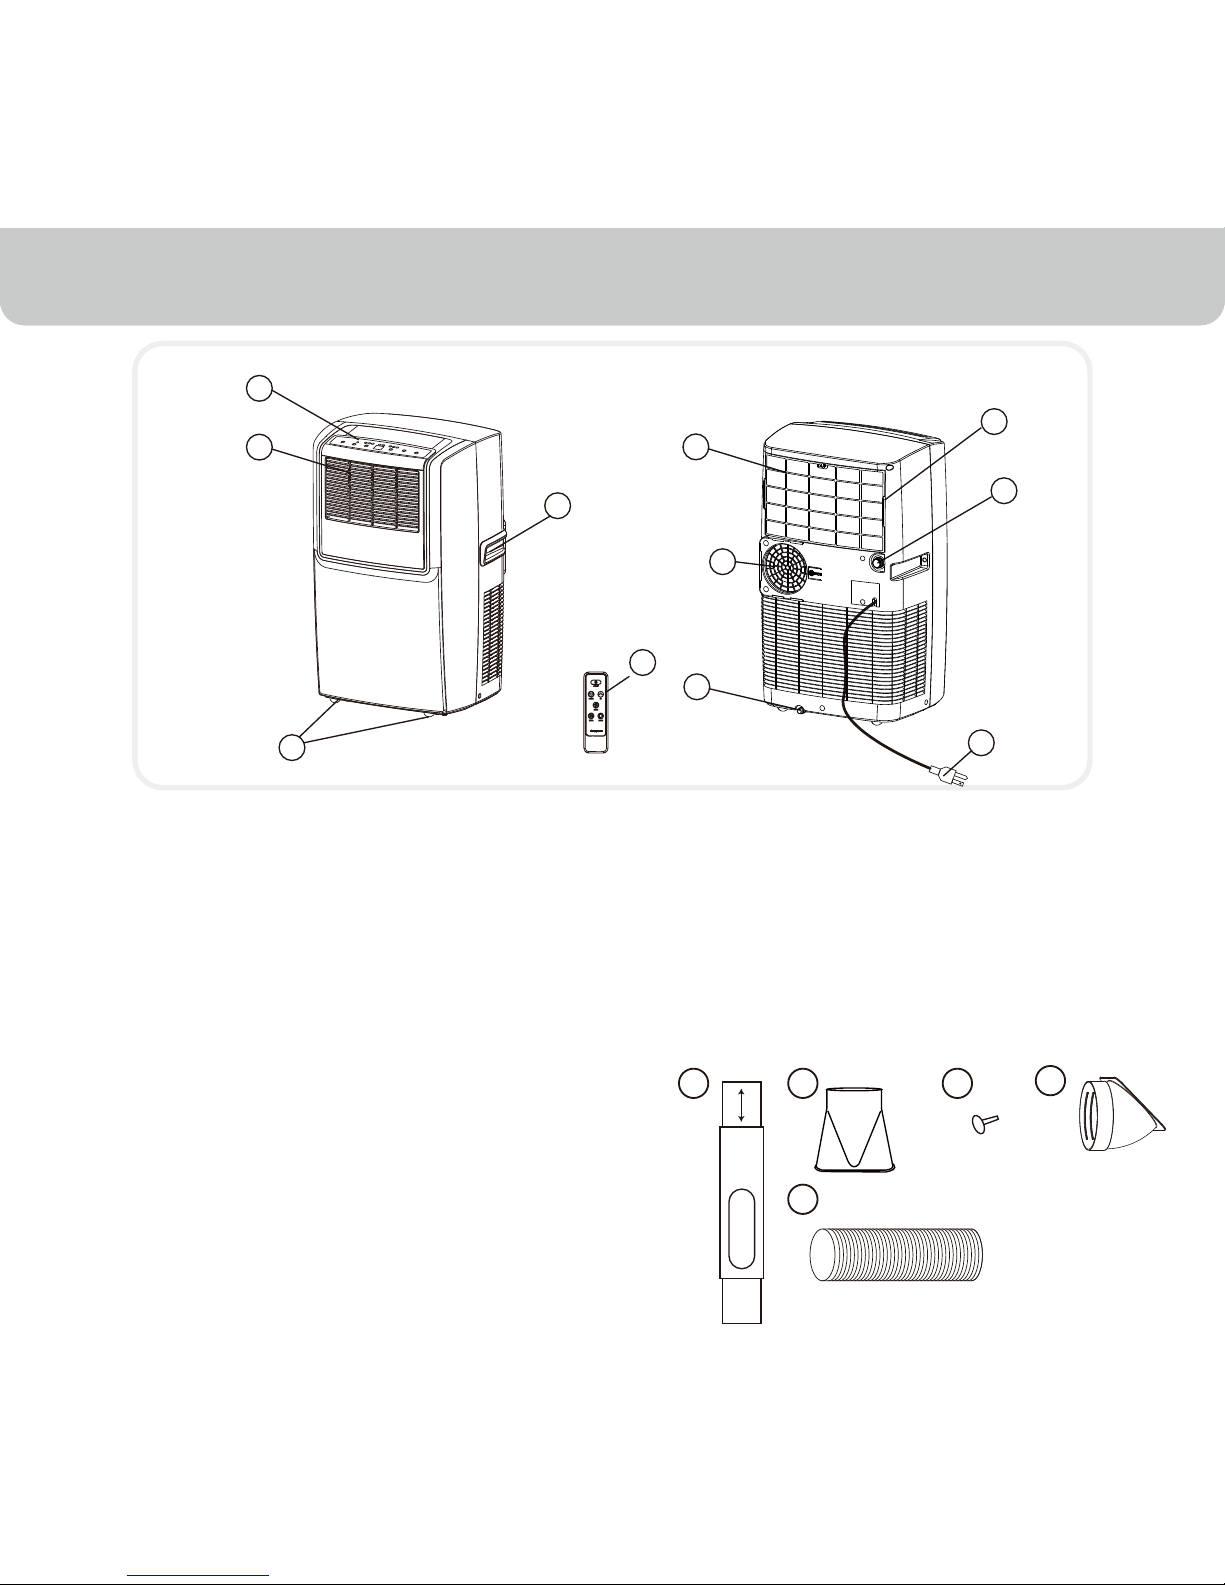
PARTS DESCRIPTION
1
2
5
3
x 1
x 1
x 2 x 1
Installation Kit:
1 Set
1 Piece
2 Pieces
1 Piece
1 Piece
4
1.
2.
3.
4.
5.
6.
Control Panel (Incl. Signal Receptor)
Air Outlet
Handle
Casters
Upper Drain Plug (De-humidifier Mode)
Air Filter
1.
2.
3.
4.
5.
Window Bracket Kit.............................
Window Bracket Panel Adapter..........
Plastic Pin...........................................
Hose Connector..................................
Plastic Hose........................................
7.
8.
9.
10.
11.
Back Grill
Lower Drain Plug (Air Conditioning Mode)
Power Supply Cord
Exhaust Hose Connector
Remote Control
11
3
5
6
1
2
4
7
9
10
8
7
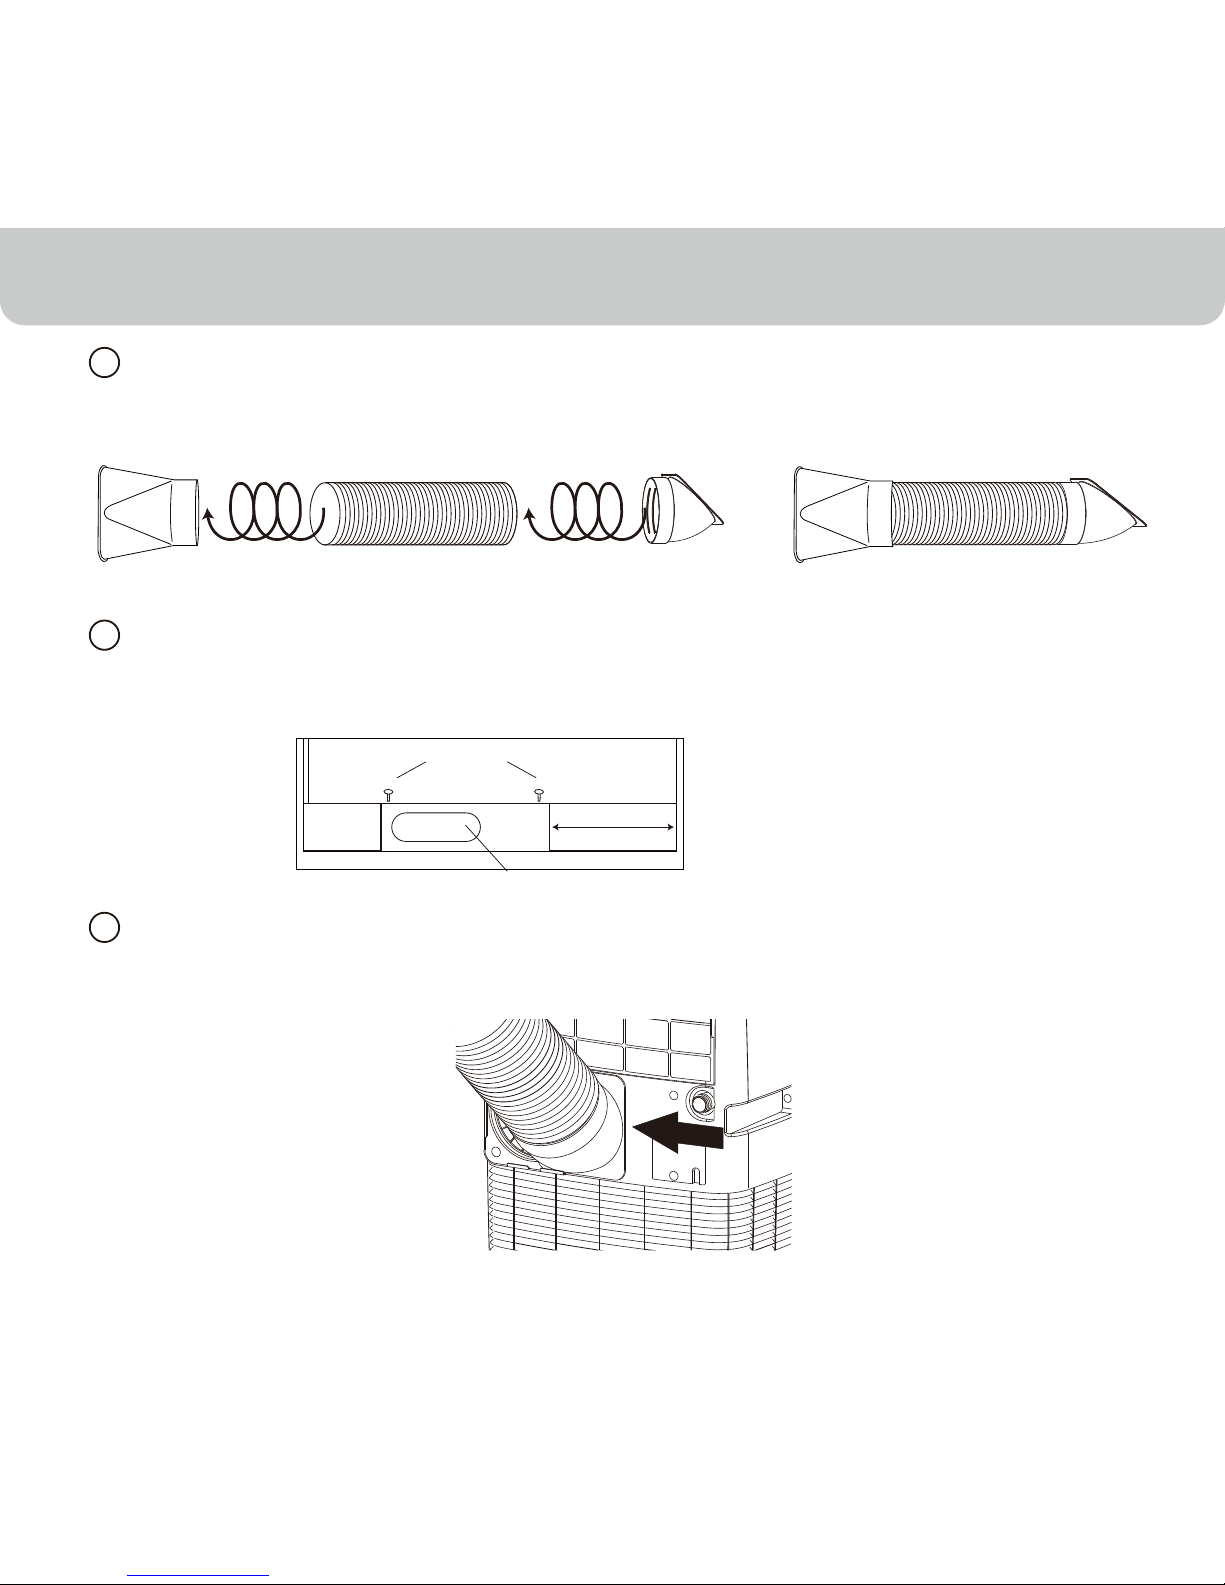
INSTALLATION
Install the plastic hose with window bracket adapter and hose connector on both sides.
Ensure proper fit on both ends.
Adjust the window bracket as per width or height of your window and insert the plastic
pins to fix at the desired position. There is a hole where the Plastic Hose will be inserted
later. Make sure this hole is not blocked.
Connect the plastic hose to the hose connector on back of the unit. Slide-in the hose
from right to left until it is locked in place.
Note: Do not install the window
bracket to your window. This step is
required only to adjust it to the
size of your window. The bracket
should be removed from the window
after the size is adjusted.
1
2
3
=
Plastic Pin
Hole for Plastic Hose

8
Connect the window bracket to the opposite end of the plastic hose. Ensure that
all connections are tight and installed properly.
Connect the window bracket to the window.
The Portable Air Conditioner is now ready to use.
INSTALLATION
4
5
6
9
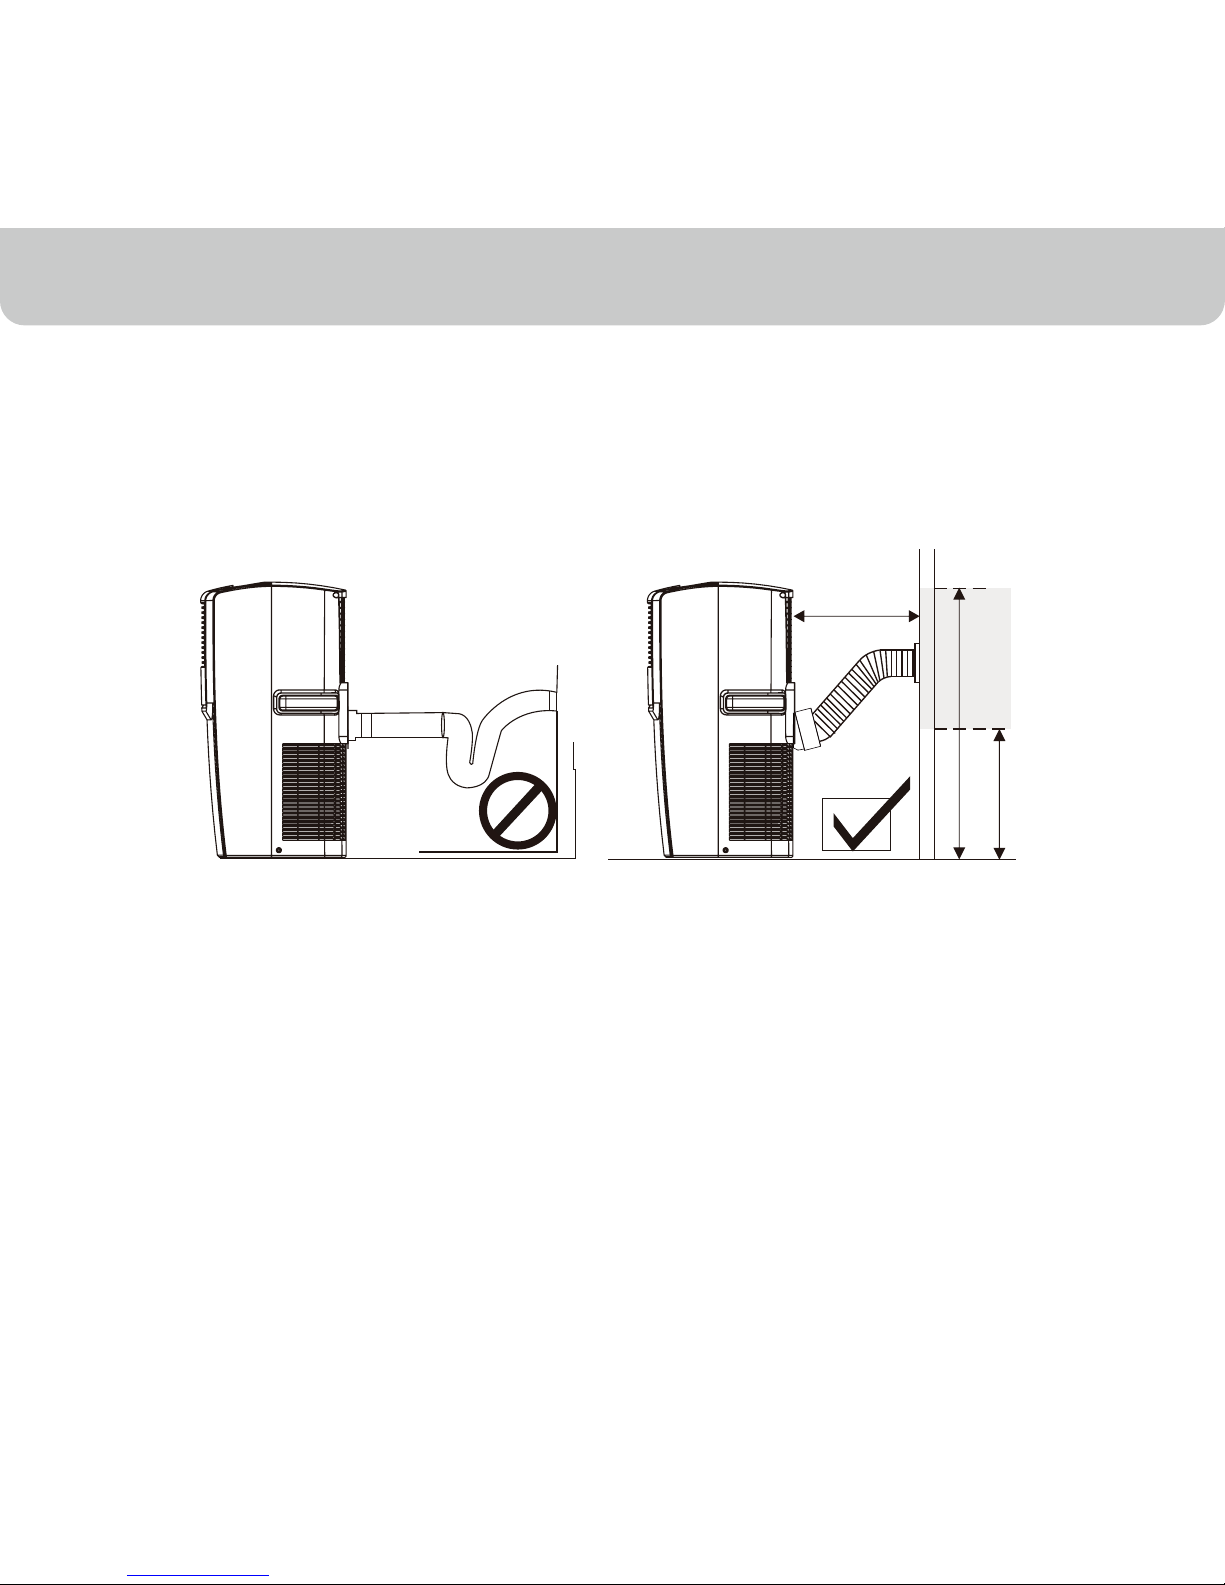
The supplied exhaust hose can be extended from 12 inches (1 foot) to 47 inches
(3.9 feet).
Do not bend (to the extent shown below) the exhaust hose.
A bent hose will block exhaust air and cause the unit to malfunction or shut-off.
The length of the exhaust hose is determined by the product specifications. Do not
replace or lengthen it as this could cause the unit to malfunction.
Make sure the back of the unit is at least 20 inches away from a wall.
Do not place the unit in front of curtains or drapes as this could obstruct the
airflow.
INSTALLATION
Note:
1.
2.
RECOMMENDEDNOT RECOMMENDED
Warning:
•
•
MIN. 14”
20”
MAX. 40”
10
USE & OPERATION
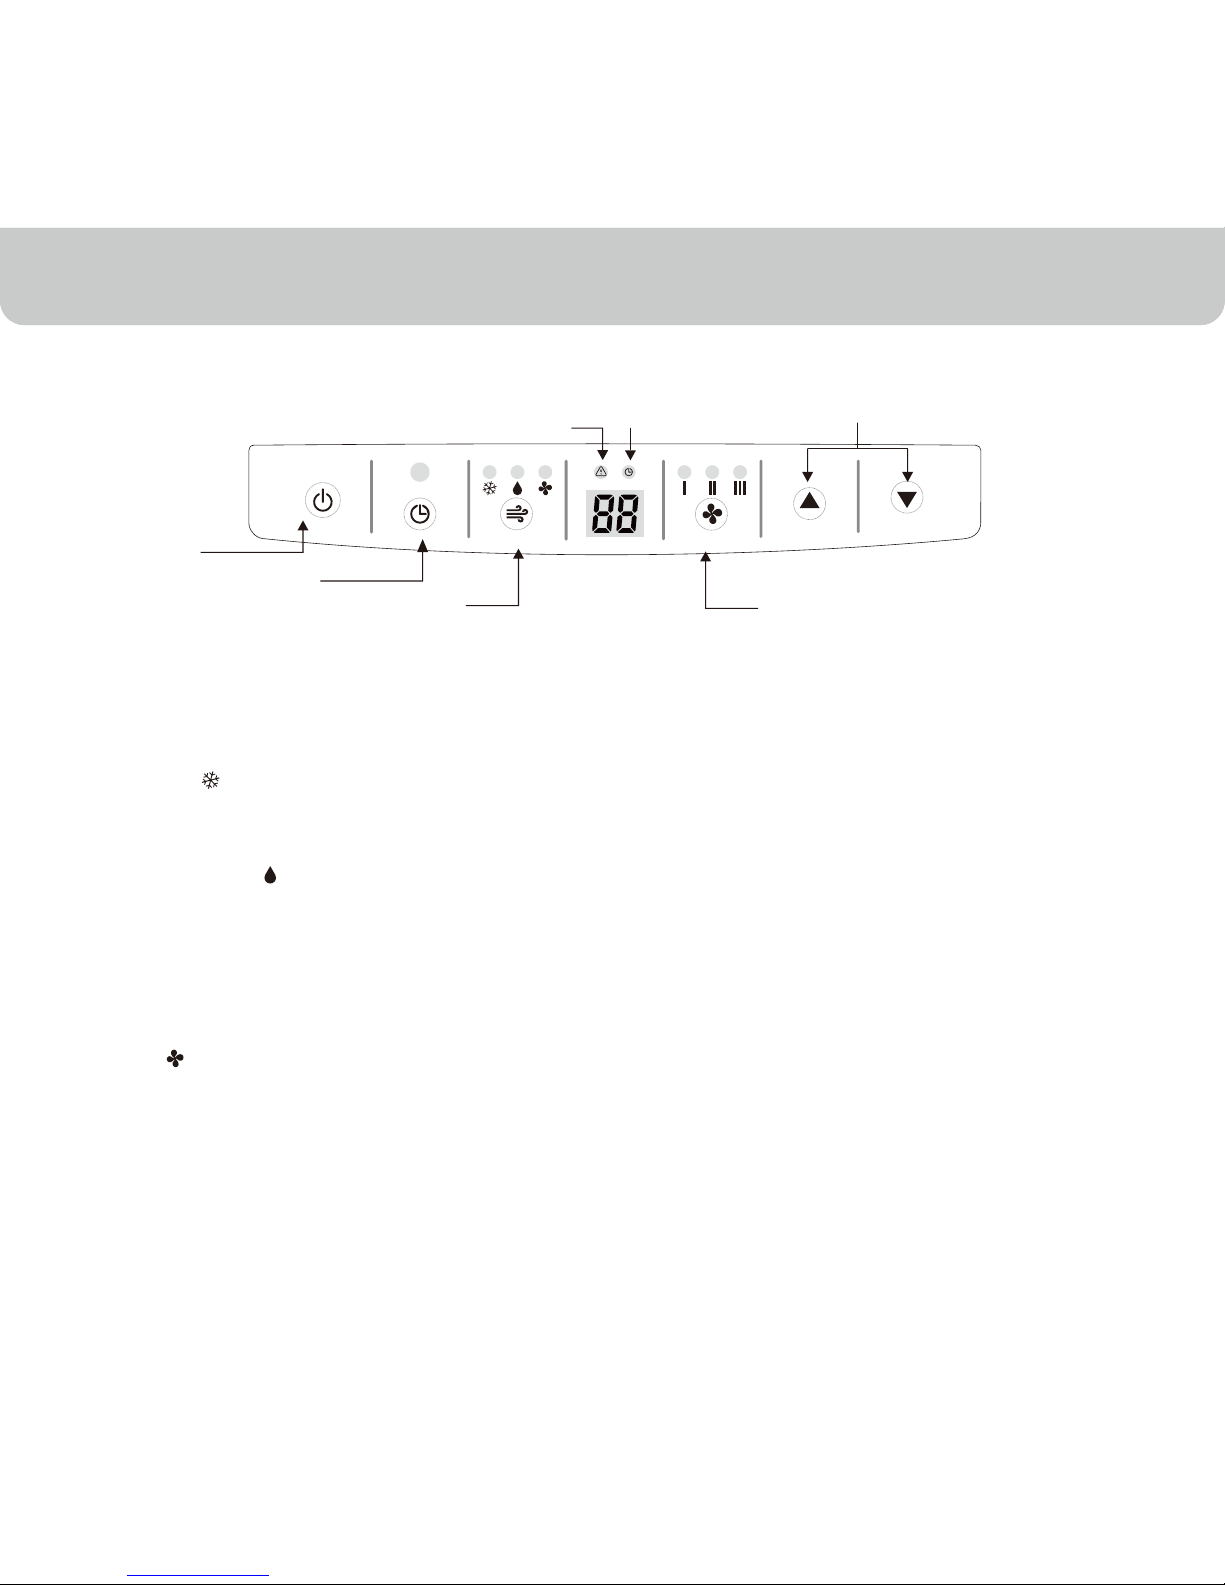
Control Panel
Warning Light
Timer Light
Power Control
Timer Control
Timer / Temperature
Set Controls
Mode Control
Fan Speed Control
After switching the air conditioner off, you must wait 3 minutes before switching it back on again.
Power Control
The Power Control turns the unit on and off.
Mode Control
3 settings: Cool, Dehumidify and Fan
A light will indicate which setting is being used.
• Cooling Mode
The unit works as an air conditioner. Adjust fan speed and air
temperature to suit your desired comfort level. Temperature
setting range is 61°F~89°F.
• Dehumidifying Mode
Air is dehumidified as it passes through the unit, without being in
full cooling mode. If room temperature is higher than 77°F
fan speed can be adjusted; otherwise fan speed is preset to LOW.
Note: If the unit will be used mainly as a dehumidifier, do not
connect the exhaust hose and let the warm air return in the
room. Continuous drainage is then necessary and more
efficient (see Continuous Draining).
• Fan Mode
For air circulation without air conditioner cooling.
Fan Speed Control
3 settings: High, Medium and Low.
Temperature / Timer Set Controls
• Used for adjusting the timer and thermostat.
• The default display is room temperature.
• In cooling mode, when ▼ or ▲ button is pressed, the set
temperature is displayed and may be adjusted.
After 10 seconds the display will revert back to room temperature.
Temperature is only adjustable in cool mode.
The timer is adjustable between 1~24 hours.
Note: By pressing both ▼ / ▲ set buttons at the same
time, the display will toggle between Celsius and Fahrenheit.
Timer Control
While the unit is turned on, press the timer button then press the
▼ or ▲ to select the number of hours you would like the unit to
continue to run. The unit will turn off automatically.
Auto turn off:
While unit is running, press the press the ▼ or ▲ button to select
the number of hours you want the unit to run in air conditioning
mode.
Auto turn on:
When unit is in a standby mode (plugged in with power light on),
then press the ▼ or ▲ button to select the number of hours until
you want the unit to automatically start running.
Warning Light
Condensed water may accumulate in the unit. If the internal tank
becomes full, the Warning Light will illuminate and the unit will not
operate until the unit has been drained (see Water Condensation
Drainage).
11
Note:
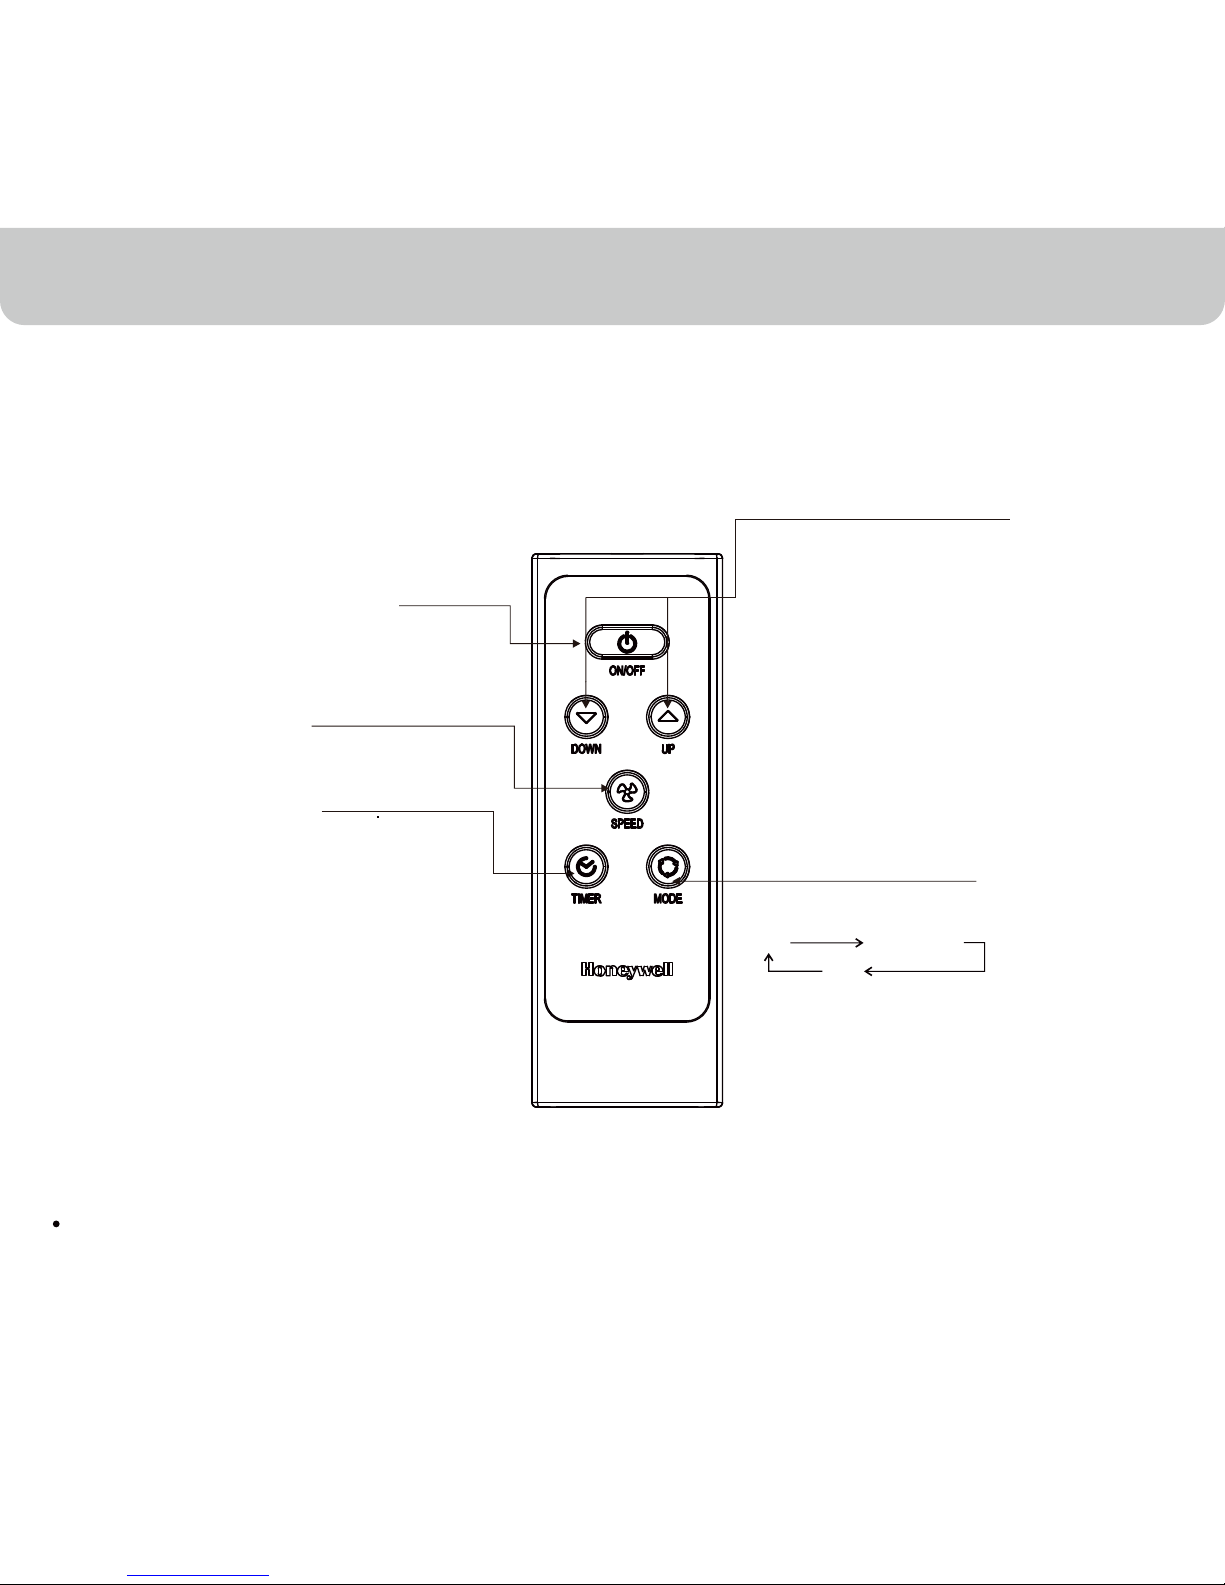
Do not place the remote control in direct sunlight.
Remote Control
The fully featured remote control will operate the same way as the air conditioner control
panel.
USE & OPERATION
Timer Control
Timer / Temperature Set Controls
Mode Control
Cool
Dehumidify
Fan
In running mode:
Auto switch off
In stand-by mode:
Auto switch on
Press “ ▼ “ or “▲“ button
to adjust the time
setting for 1 hour intervals.
• Used for adjusting the timer
and temperature.
• When “ ▼ “ or “▲“ key is
pressed in cool mode, the set
temperature is displayed and
may be adjusted. After 10
seconds the display will revert
back to room temperature.
• Timer setting is available from
1-24 hours by pressing the
key “ ▼ “ or “▲“
Press this button to change the
operation mode in the order of:
Power Control
ON / OFF
Fan Speed Control
• HIGH • MEDIUM • LOW
12
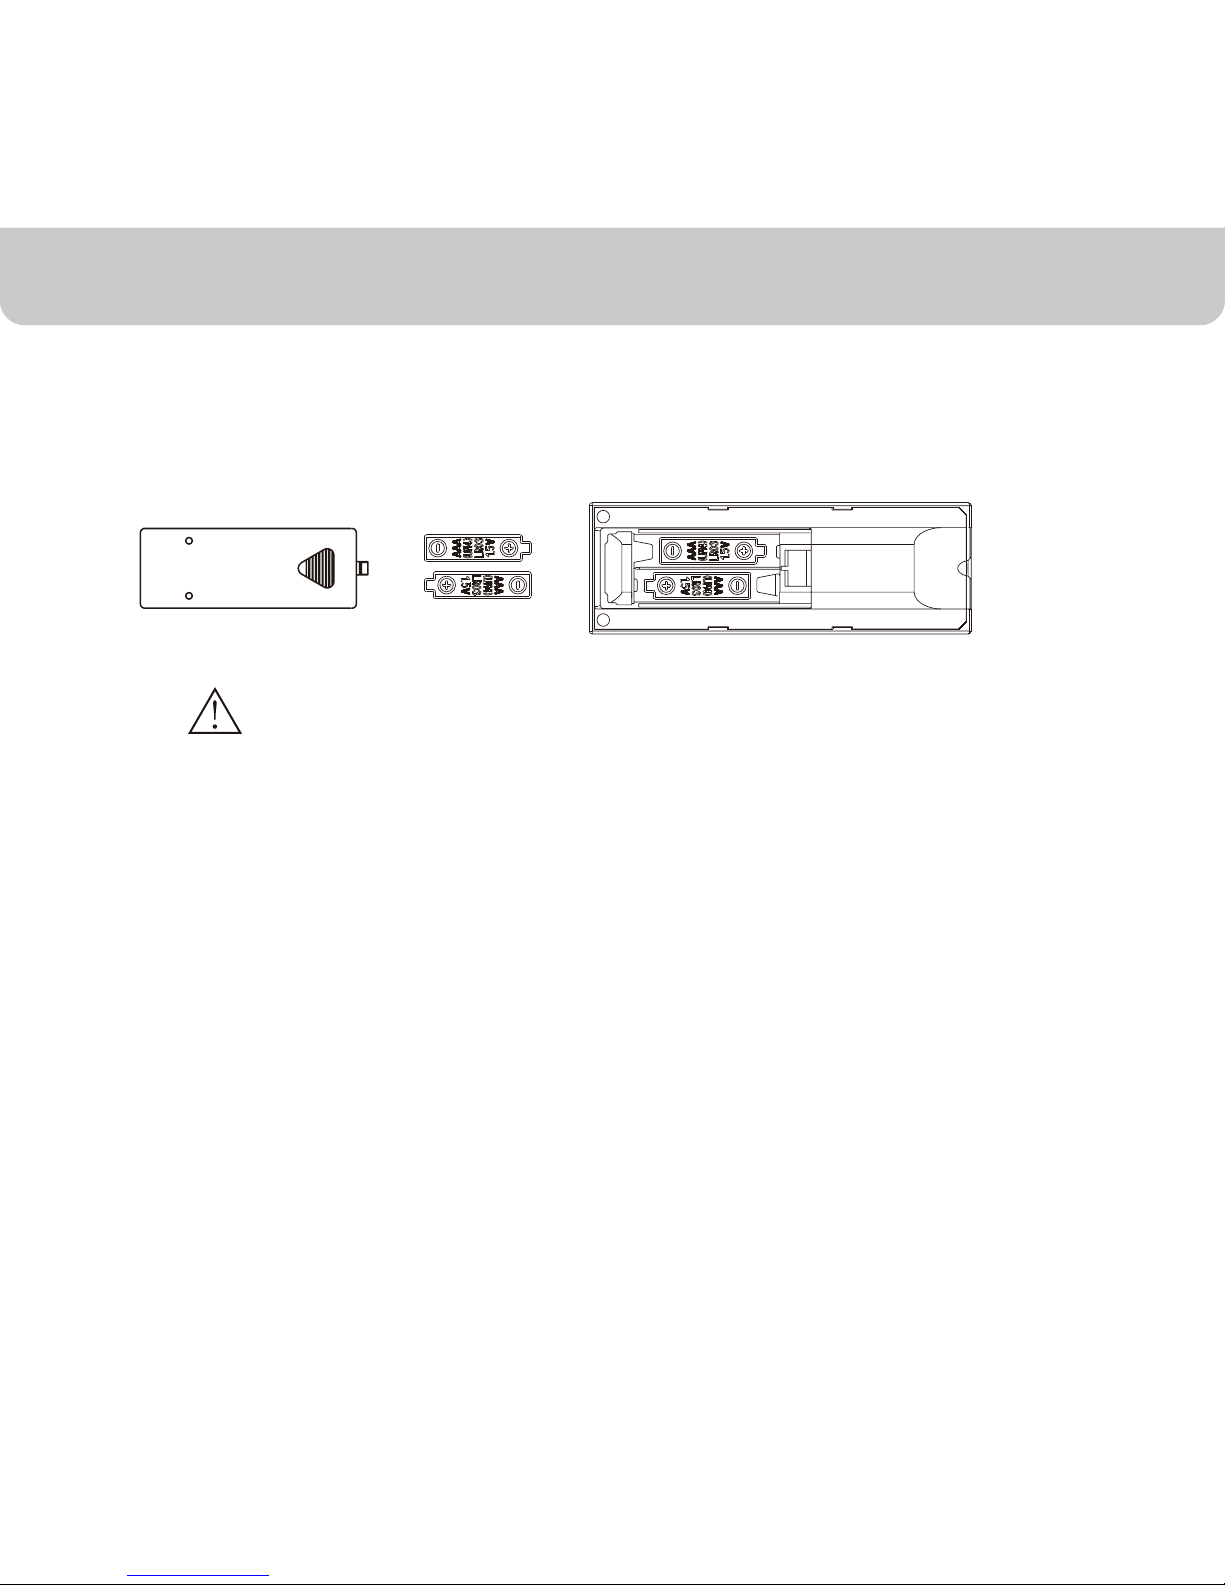
Battery Installation: Remove the cover on the back of the remote control and insert two AAA
batteries with ‘‘+’’ and ‘‘-’’ pointing in the proper direction according to the polarity markings.
USE & OPERATION
Caution
Use only two AAA or IEC R03 1.5V batteries.
Remove the batteries if the remote control is not in use for a month or longer.
All batteries should be replaced at the same time, do not mix with old batteries.
Properly dispose of used batteries.
•
•
•
•
This device complies with part 15 of the FCC Rules. Operation is subject to following two conditions: (1) this device may not cause harmful
interference, and (2) this device must accept any interference received, including interference that may cause undesired operation.
This equipment has been tested and found to comply with the limits for a Class B digital device, pursuant to part 15 of the FCC Rules. These
limits are designed to provide reasonable protection against harmful interference in a residential installation. This equipment generates, uses
and can radiate radio frequency energy and, if not installed and used in accordance with the instructions, may cause harmful interference to
radio communications. However, there is no guarantee that interference will not occur in a particular installation. If this equipment does cause
harmful interference to radio or television reception, which can be determined by turning the equipment off and on, the user is encouraged to try
to correct the interference by one or more of the following measures:
• Reorient or relocate the receiving antenna.
• Increase the separation between the equipment and the receiver.
• Connect the equipment to an outlet on a circuit different from that to which the receiver is connected.
• Consult the dealer or an experienced radio/ TV technician for help.
Caution: Any changes or modifications not expressly approved by the party responsible for compliance could void the user’s authority to operate
the equipment.
13
CLEANING & MAINTENANCE
Appliance Maintenance:
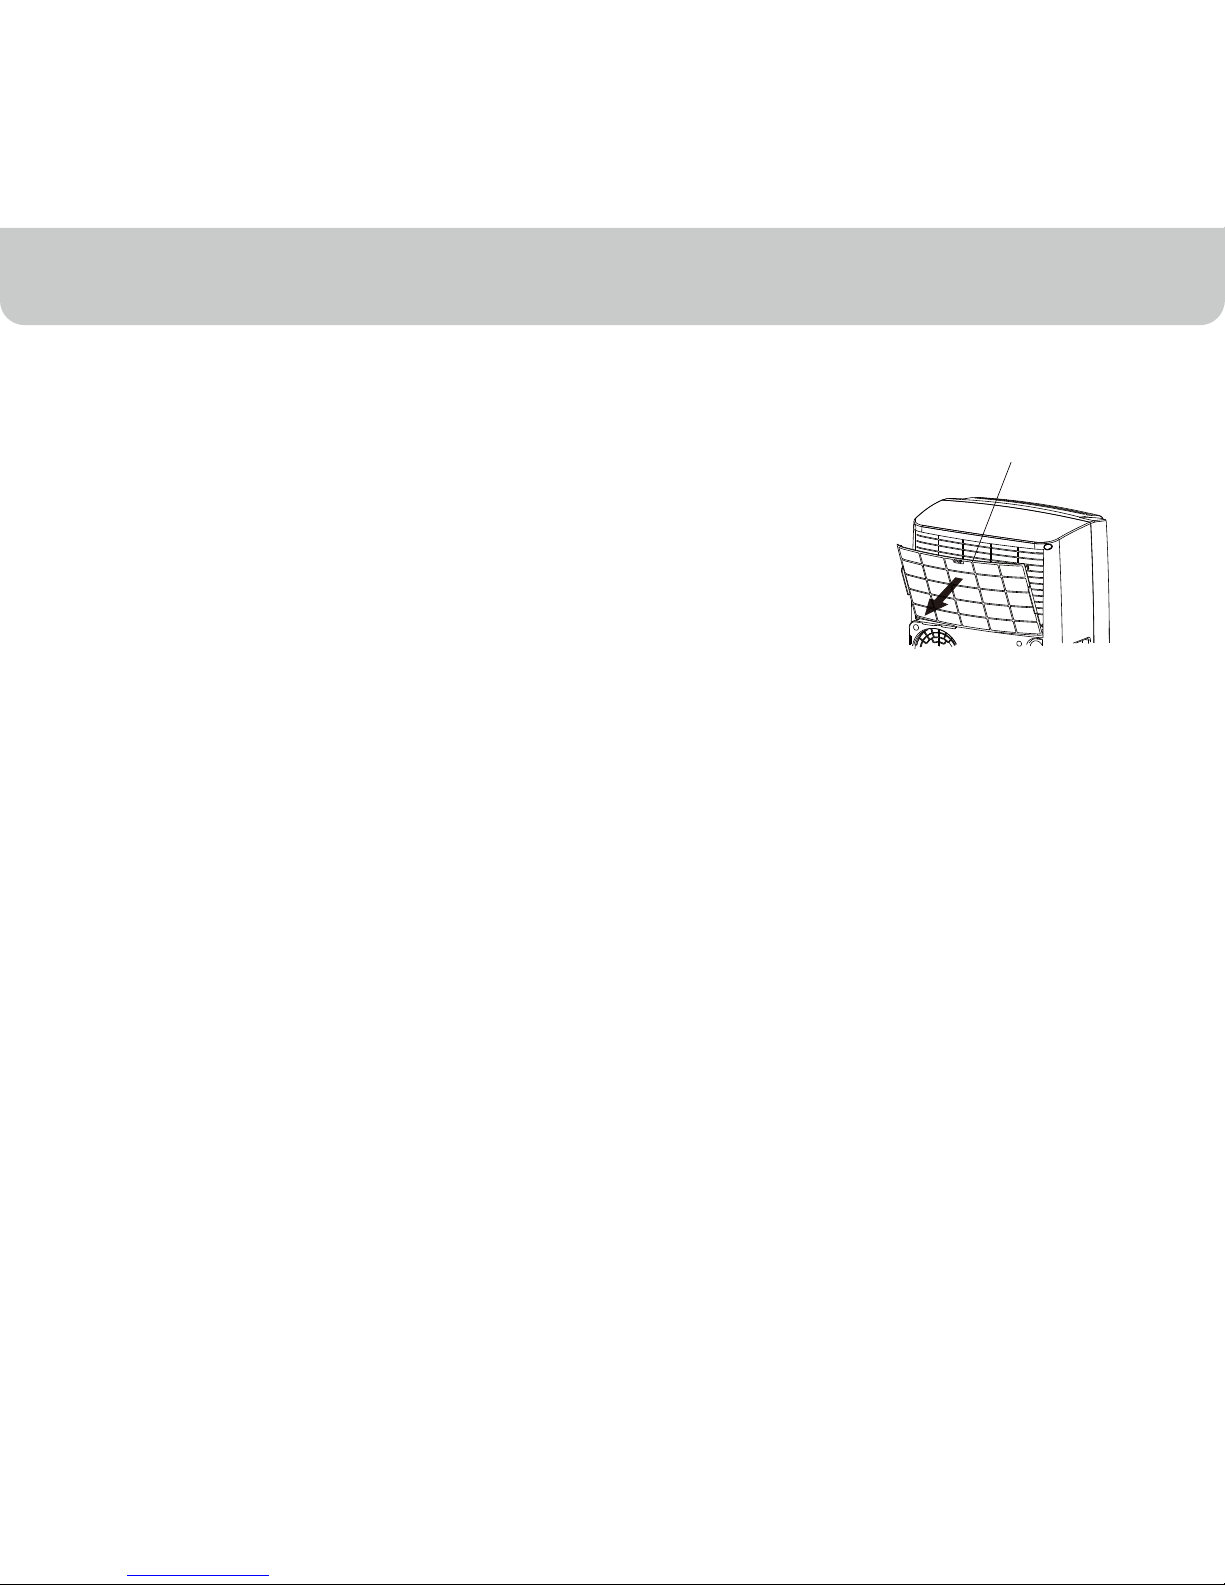
Air Filter Maintenance:
The air filter should be cleaned every two weeks.
Clean it as follows:
Turn off the appliance and remove the air filter.
Rinse it in lukewarm water. After cleaning, dry in a shaded and
cool place, then reinstall.
1.
2.
End of Season Storage & Maintenance:
If the appliance will not be used for a long time:
Be sure to drain the left-over water condensation. Remove the lower drain plug and use a
shallow pan to collect the water (make sure to replace the drain plug when finished).
To dry excess moisture, run the unit in Fan only mode for 30 minutes before storing.
Turn off and unplug the air conditioner from the power supply.
Remove the air filter and clean with water. Dry the air filter and then reinstall onto the unit.
Disconnecting the Window Installation Kit:
Cover the air conditioner with a cloth/ plastic bag before storage, to protect from dust and
scratches collecting on the surface of the unit.
It is recommended to coil the power cord and store it away from the floor to ensure the
cord is protected from bends and creases.
1.
2.
3.
4.
5.
6.
7.
Remove the plastic Hose from the unit by pressing the release button located on the
right side of the Hose and then sliding the Hose to the right side.
Remove the Window Bracket, Window Bracket Panel Adapter and Hose Connector.
It is recommended to store the Window Kit parts in a bag together with the Remote
Control and placing them together with the air conditioner unit.
If needed, you can clean the Window Kit with a damp cloth and water before storing.
Make sure all parts of the Window Kit are dry before storage.
-
-
-
-
Turn off the appliance before disconnecting the power supply.
Always clean the appliance with a soft dry cloth.
1.
2.
Air filter
14
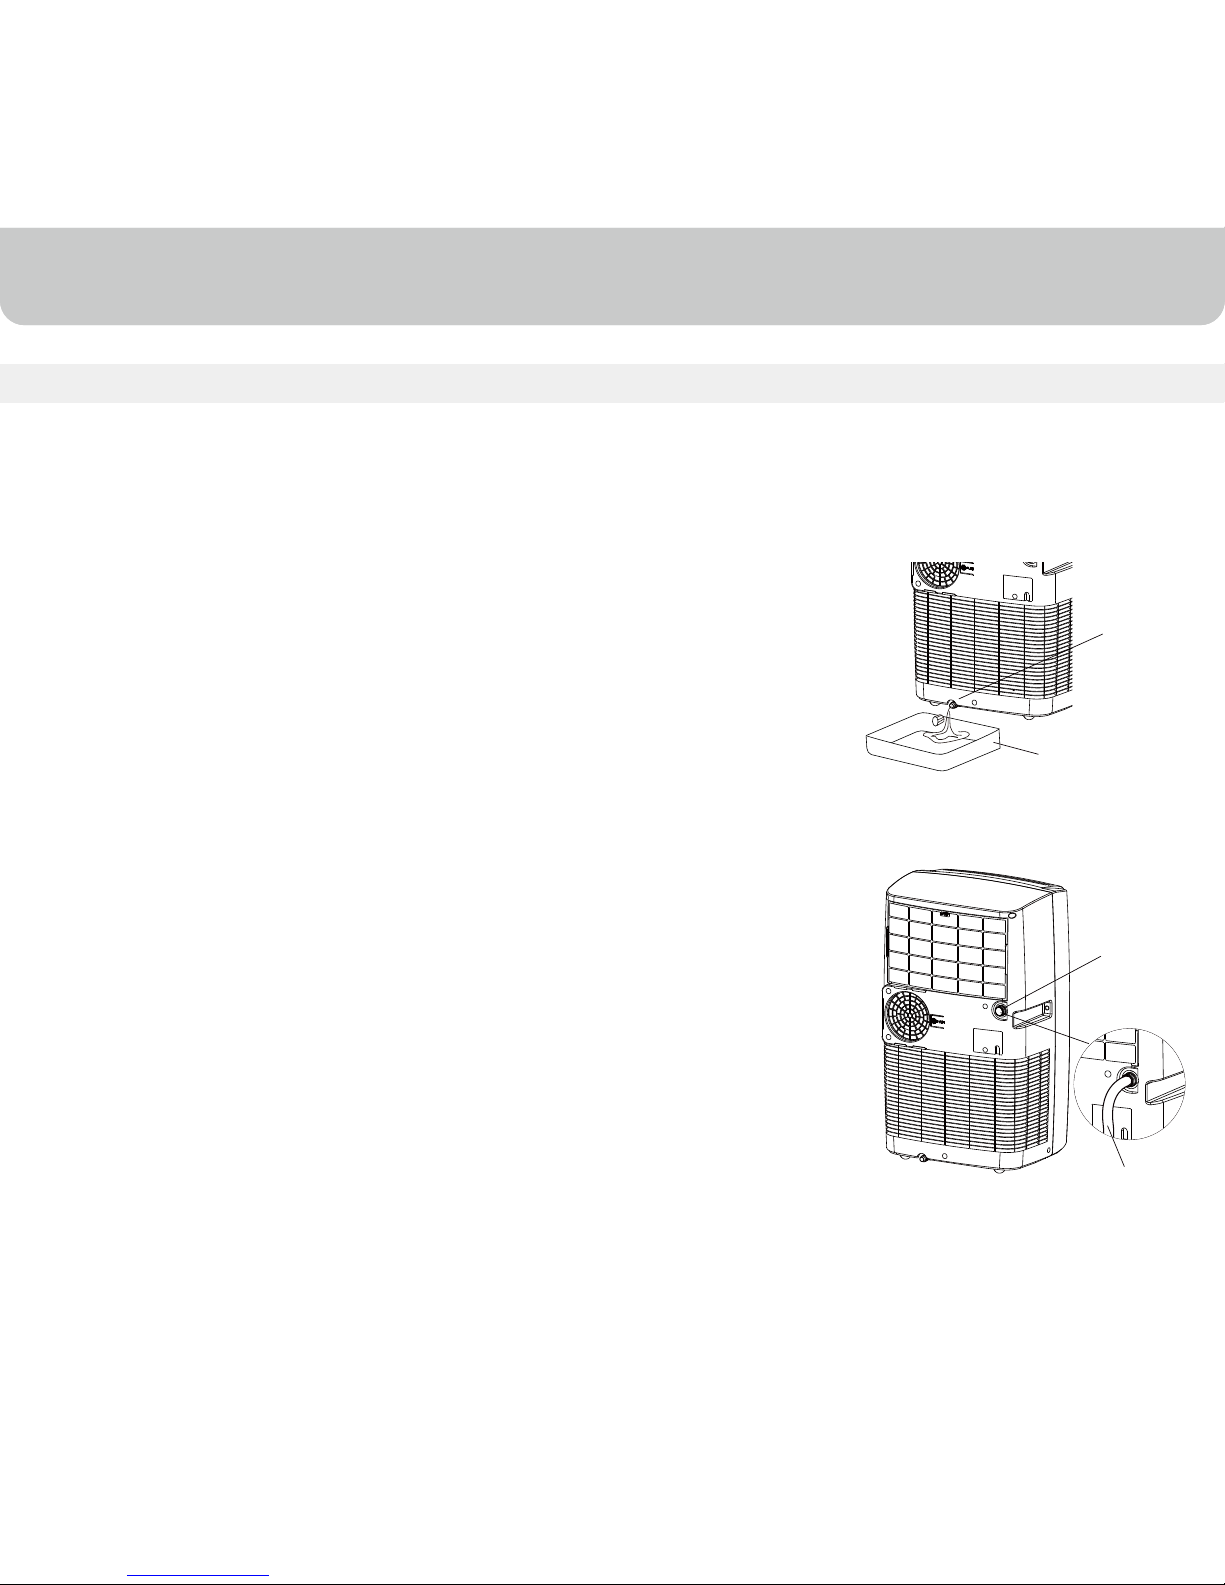
Unplug the unit from power source.
Place a shallow pan under the lower drain plug. See diagram.
Remove the lower drain plug.
Water will drain out and collect in the shallow pan.
After the water is drained, replace the lower drain plug firmly.
You can now turn on the unit.
Unplug the unit from the power source.
Remove the upper drain plug. While doing this some residual water
may spill so please have a pan to collect the water.
Connect the drain connector to a ¾” hose (not included).
See diagram.
The water can be continuously drained through the hose into a
floor drain or bucket.
You can now turn on the unit.
When there is excess water condensation inside the unit, the air conditioner stops running and
shows a warning light. This warning light indicates that the water condensation
needs to be drained using the following procedures:
WATER CONDENSATION DRAINAGE
Continous drainage for Dehumidifier Mode
While using the unit in dehumidifier mode, continuous drainage is
recommended.
Upper
Drain Plug
Manual Draining for AC & Dehumidifier Mode
Water Condensation Drainage
1.
2.
3.
4.
5.
6.
1.
2.
3.
4.
5.
Lower
Drain Plug
Water may need to be drained in high humidity areas
Shallow Pan
(Not included)
Water Drain Hose
(not included)
15
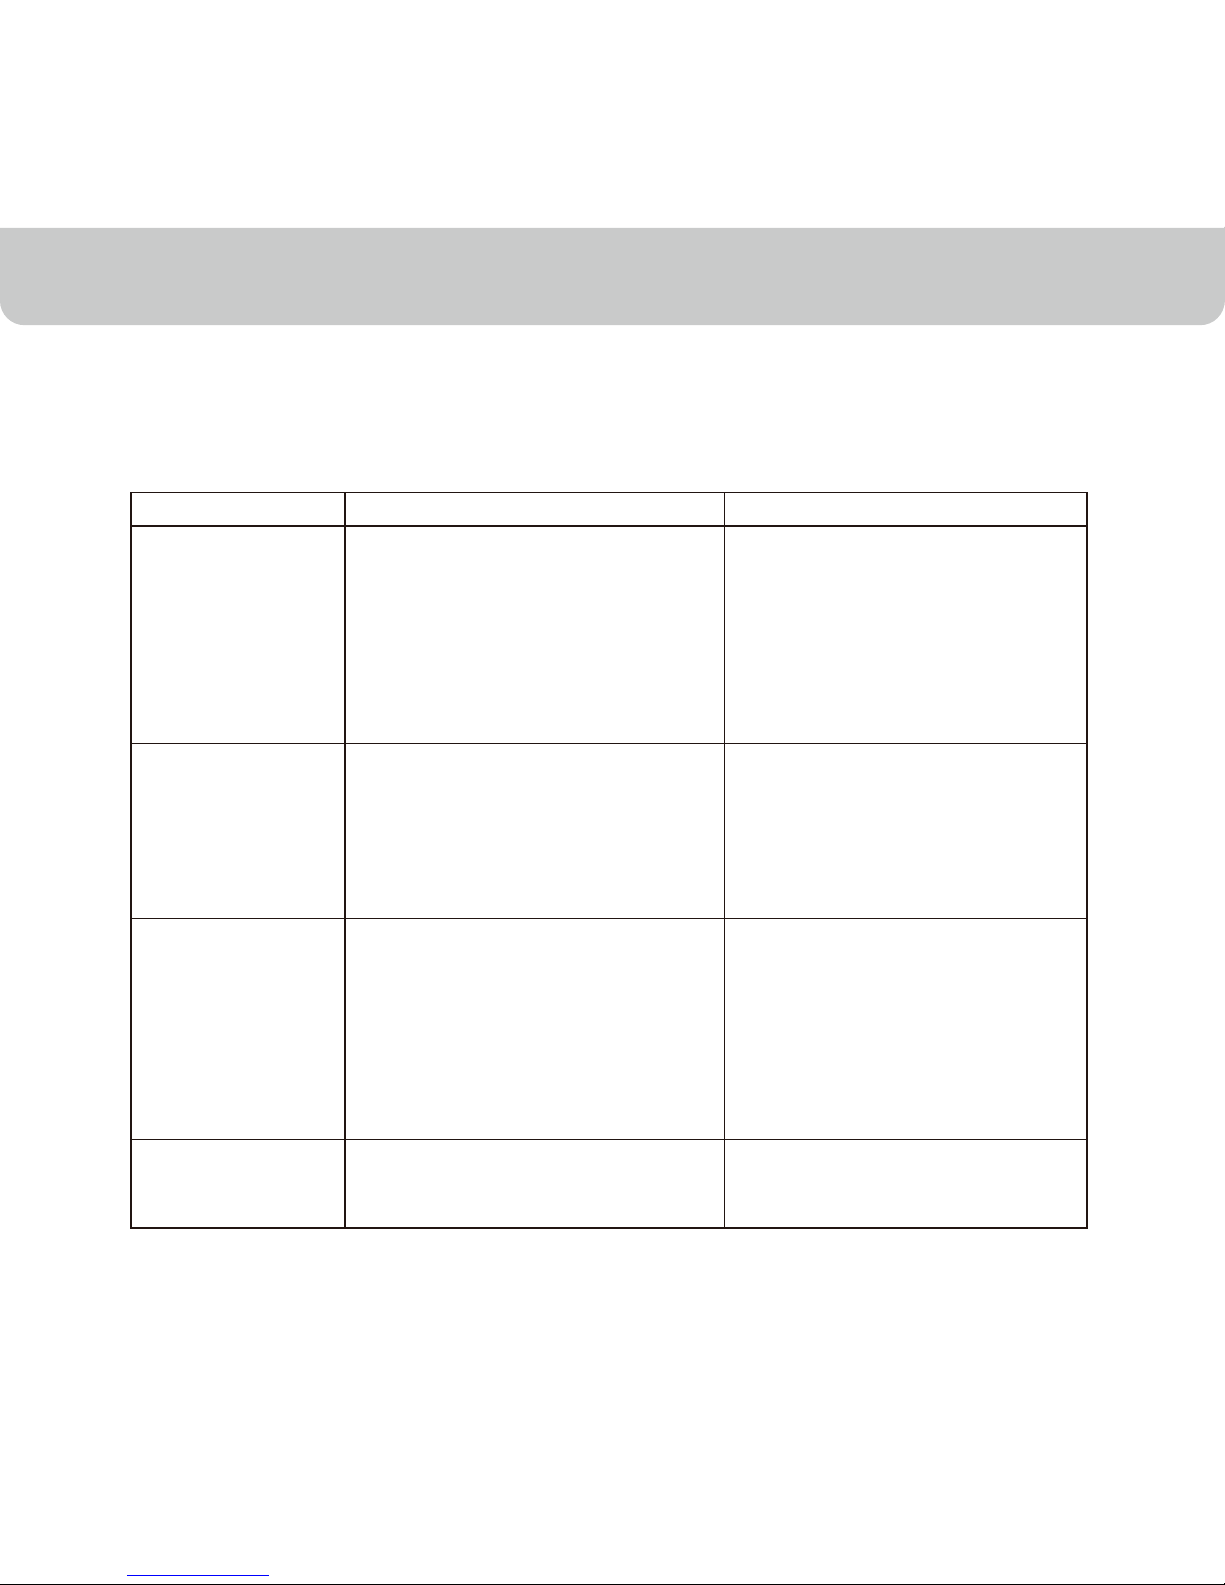
The following troubleshooting guide addresses the most common problems. If problems
persist, call customer service. Unplug and disconnect the appliance from the power
source before attempting to troubleshoot.
TROUBLESHOOTING GUIDE
Will not run and
water full indicator
light is ON
•
No electricity.
•
Batteries in the remote control need
to be replaced.
• The power cord is not properly
plugged in.
•
The safety LCDI plug has tripped.
• The thermostat temperature setting
is too close to room temperature.
• Air outlet is blocked.
• There are tight bends in the air
exhaust hose.
• A door or window is open.
•
Clean the air filter.
Reinstall exhaust hose properly.
Reduce temperature setting on
control panel.
Drain the water (see Water
Condensation Drainage).
Make sure the window or door
is closed.
• The exhaust hose is detached.
•
The air filter is dirty.
• Temperature setting is too high.
• Air outlet or intake is blocked.
• Excess water condensation inside
the tank.
• Check for power.
• Change remote control batteries.
• Remove and reconnect the power
cord.
Reset the safety LCDI plug, if
problem persists contact our
customer support.
•
•
The air conditioning
unit does not start
Problem Possible Cause
Solution
Runs a short while
only
Runs but no cooling
• Lower the set temperature.
Connect exhaust hose.
• Make sure the exhaust hose is
properly connected.
•
•
•
•
• Remove blockage.
16
TECHNICAL SPECIFICATIONS
Electrical products should be properly disposed of.
Please recycle where facilities exist. Check with your local authority
or retailer for recycling.
Description of Product Portable Air Conditioner
MP10CESWWModel
115 V~ 60 HzVoltage/Frequency
1050WPower Consumption
10000 BTUCooling capacity
Dehumidifying capacity 70 pints / 24 hours
R-410ARefrigerant Type
24 hour (ON / OFF)Timer
Dimensions (L) x (W) x (H)
17.4 X 14.4 X 28.9 inches
51.8 lbsWeight
 Loading...