

Page 1
Email: mxinfo@jmatek.com
Web: www.jmatek.com
Portable Air Conditioner
User Manual
Read and save these instructions before use
Aire Acondicionado Portátil
Manual Del Propietario
Lea y guarde estas instrucciones antes de usar la unidad
Model / Modelo: MM14CCSBB
Page 2

USER TIPS
THANK YOU
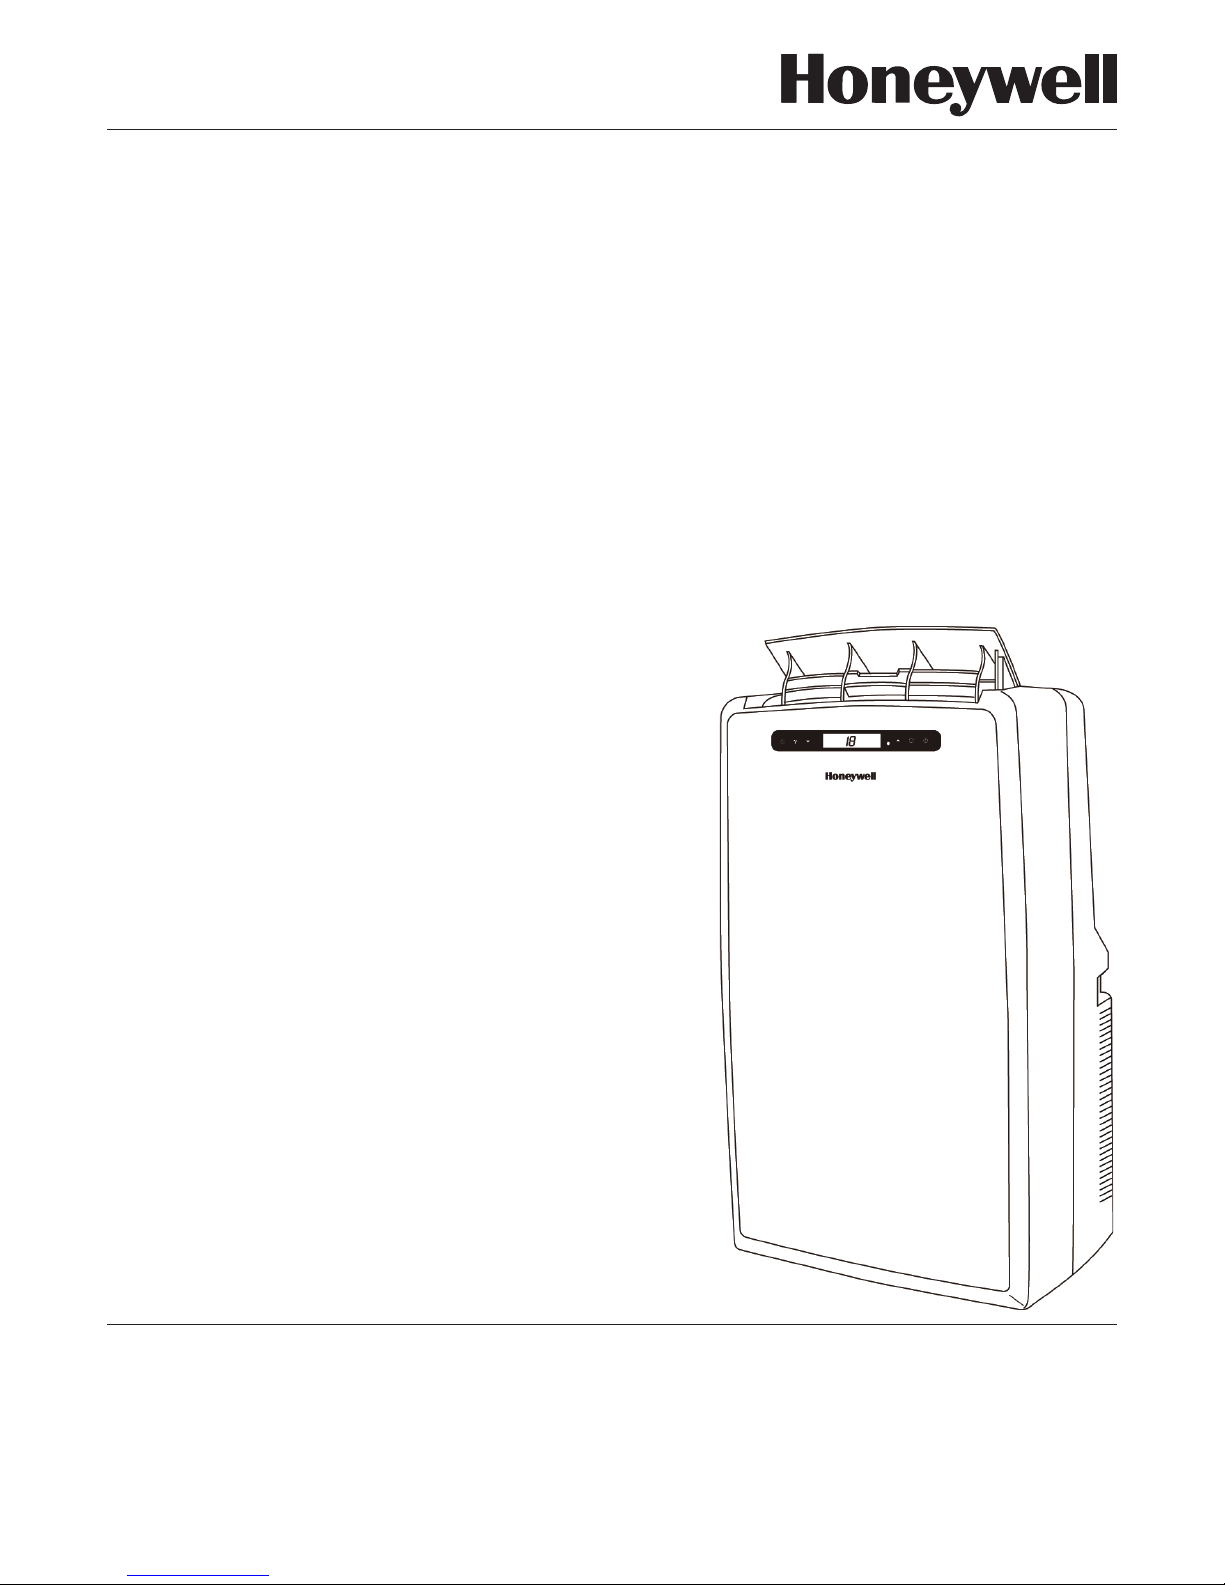
Congratulations on your purchase of this versatile Honeywell Portable Air Conditioner.
Honeywell Portable Air Conditioners are ideal for spot cooling. The compressor, condenser and
evaporator are housed in a compact unit. The air is filtered, dehumidified and cooled while a flexible air
outlet hose sends heat outside. The air conditioner includes a window venting kit.
No permanent installation is needed. The unit is easy to move from room to room and offers a truly
flexible air conditioning solution.
Auto Evaporation System - The unit automatically evaporates the condensate through the air
outlet hose. There is no need to empty the drainage tank except in very high humidity conditions.
Read and follow the instructions carefully.
•
•
Follow installation instructions to set up the unit.
Plug the unit into a properly grounded circuit.
Important:
Before installing the unit, place it UPRIGHT for 20 minutes before use to allow the refrigerant to
stabilize.
Manually adjust the air vent located at the top of the unit to adjust the direction of air flow.
USER TIPS
To ensure optimal efficiency of the product, keep doors and windows closed when it is used as an air
conditioner or dehumidifier. If the product is being used with the fan function only, an open window could
improve air circulation.
Cooling and Dehumidifying Operation Fan Operation
EN 1
Page 3
READ AND SAVE THESE INSTRUCTIONS
Improper handling can cause serious damage to the appliance.
WARNING:
•
•
•
•
•
•
•
•
•
•
•
•
DO NOT operate the unit with a damaged plug or loose wall outlet. If the power cord is damaged, it
must be replaced by the manufacturer or an authorized service agent.
DO NOT cover the air intake and exhaust when in use.
This appliance is not intended for use by children. Children should be supervised and should not play
on or around the appliance.
DO NOT place objects on or sit on the unit.
Always turn off and unplug the unit when cleaning or servicing.
If service is needed contact an authorized service agent.
Unplug the unit when stored or not in use.
DO NOT run the power cord under carpeting and rugs.
Use caution to prevent tripping on cord.
DO NOT use in areas where gasoline, paint or other flammable goods are stored.
Basic safety precautions should always be followed when using electrical appliances.
This appliance has been manufactured for use in domestic environments and should not be used for
other purposes.
SAFETY
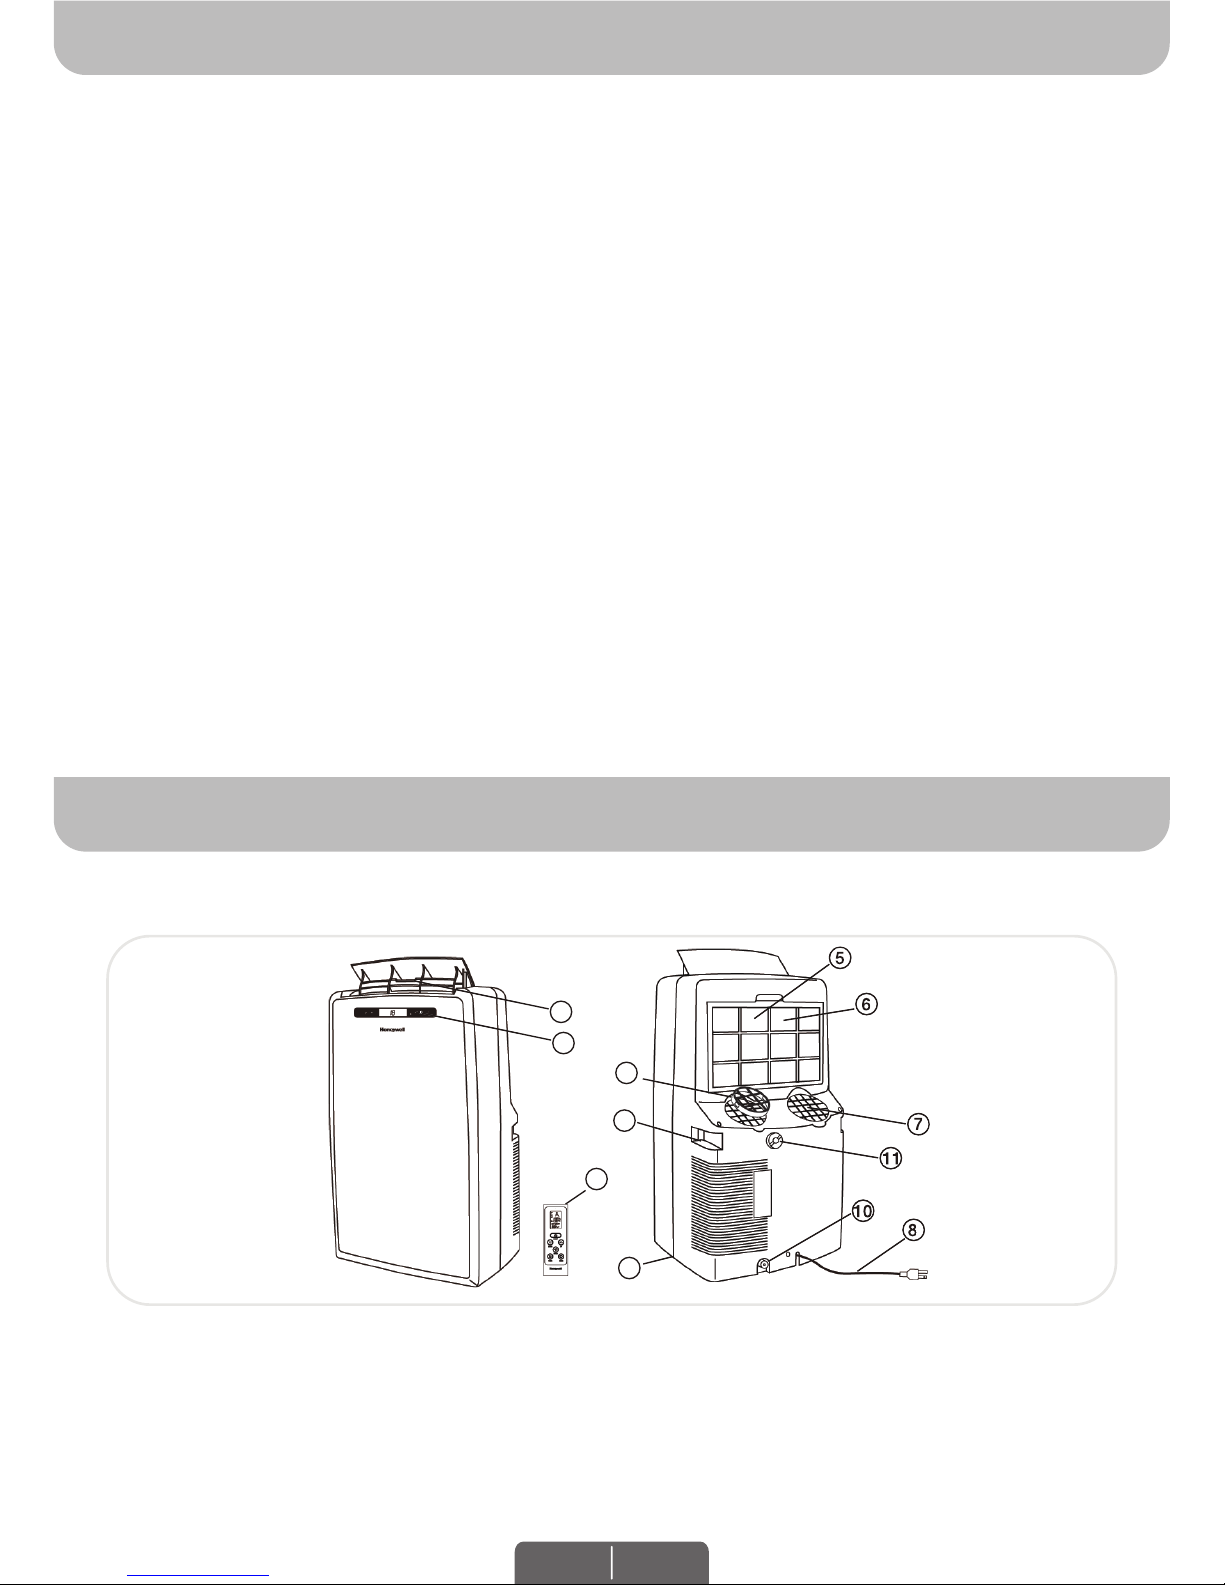
PARTS DESCRIPTION
5) Air Filter
6) Back Grill
7) Exhaust Hose Connector
8) Power Supply Cord
9) Remote Control
10) Lower Drain Plug
(Air Conditioning Mode)
11) Upper Drain Plug
(De-humidifier Mode)
1) Control Panel
(Incl. Signal Receptor)
2) Air Outlet
3) Handle
4) Casters
EN 2
12) Air inlet filter
1
2
5
6
11
4
3
12
7
9
8
10
5
6
11
8
1010
Page 4
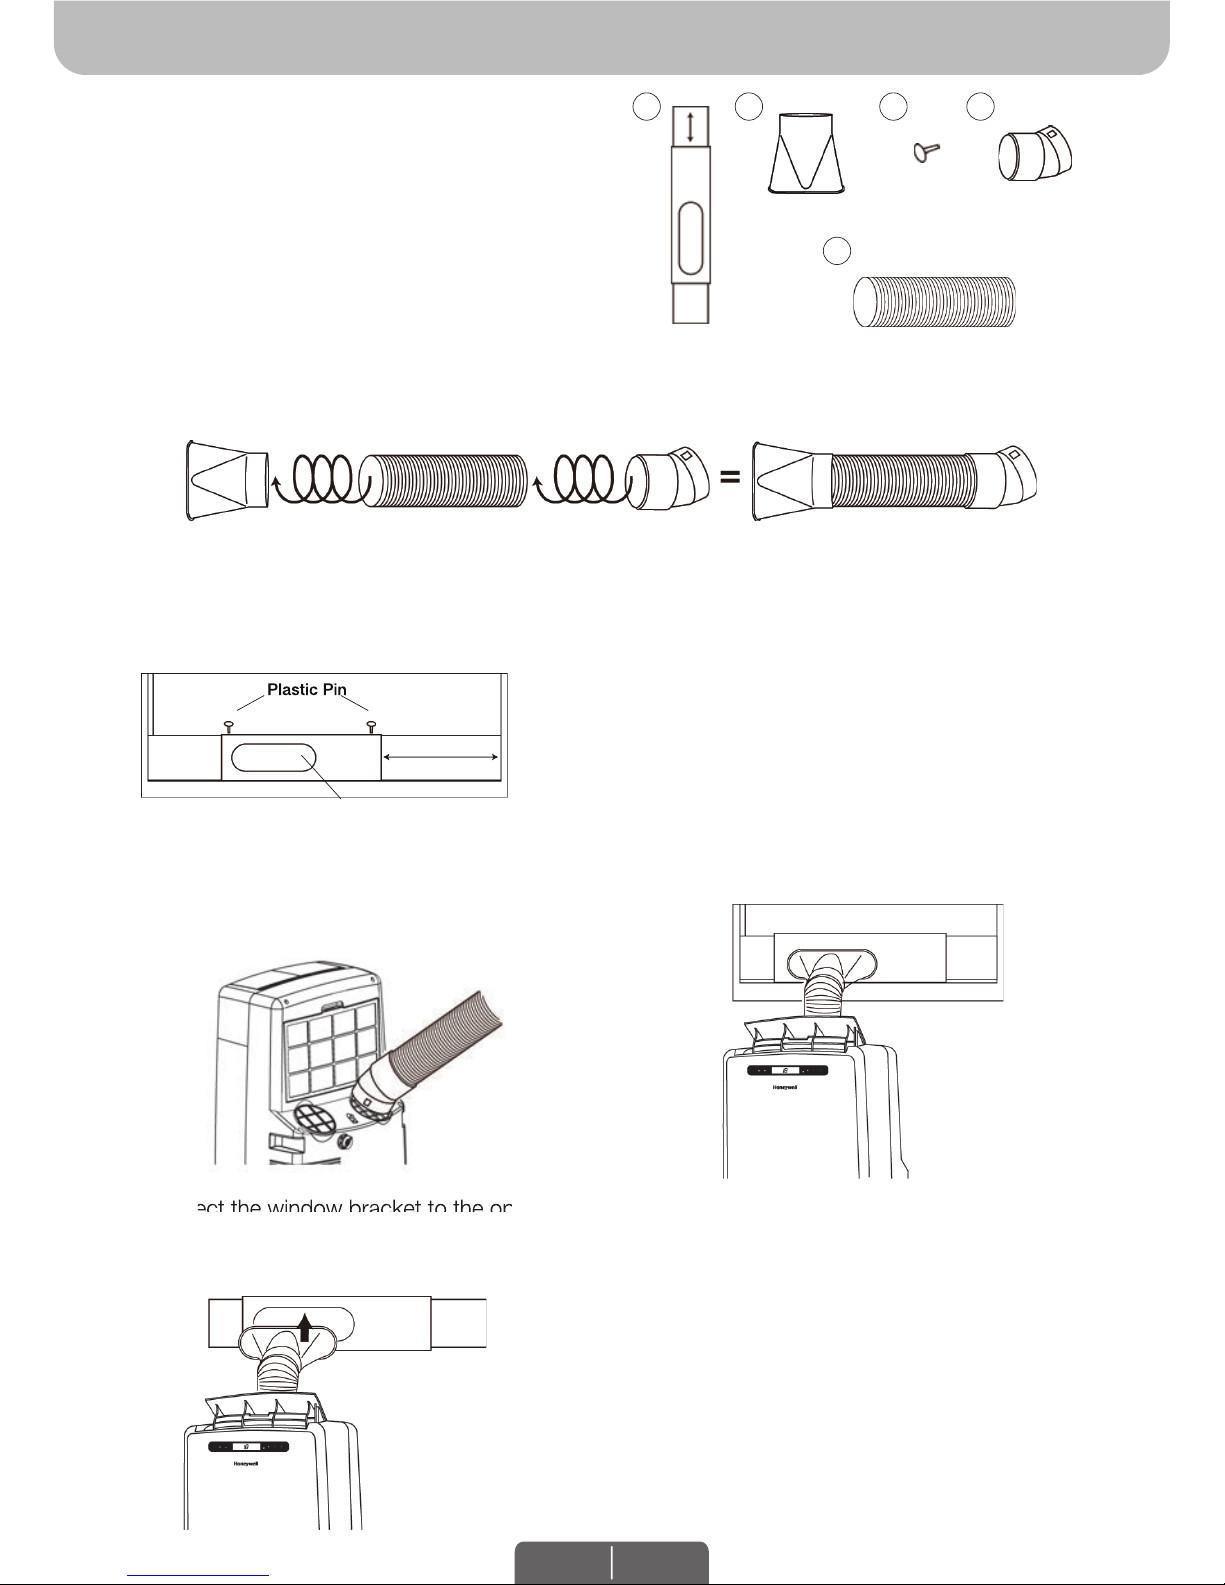
1. Install the plastic hose with window bracket adapter and hose connector on both sides.
Ensure proper fit on both ends.
2. Adjust the window bracket as per width or height of your window and insert the plastic pins to fix at
the desired position. There is a hole where the Plastic Hose will be inserted later. Make sure this hole
is not blocked.
3. Connect the plastic hose to the hose
connector on back of the unit.
Push-in until it
is locked in place.
4. Connect the window bracket to the opposite
end of the plastic hose. Ensure that all
connections are tight and installed properly.
Note:
Do not install the window bracket to your window. This
step is required only to adjust it to the size of your
window. The bracket should be removed from the
window after the size is adjusted.
INSTALLATION
1.
2.
3.
4.
5.
Window Bracket Kit.............................
Window Bracket Panel Adapter...........
Plastic Pin............................................
Hose Connector..................................
Plastic Hose........................................
Installation
Kit:
Installation Steps:
1 Set
1 Piece
2 Pieces
1 Piece
1 Piece
Plastic Pin
Hole for Plastic Hose
5. Connect the window bracket to the window.
6. The Portable Air Conditioner is now ready to
use.
1
2
5
3
x 1
x 1x 1
x 2 x 1
4
Plastic Pin
EN 3
Page 5
•
Cooling Mode
The unit works as an air conditioner. Adjust fan speed and air temperature to suit your desired comfort
level. Temperature setting range is 16°C- 32°C (61°F- 89°F).
INSTALLATION (CONTINUED)
NOTE:
1.2.The supplied exhaust hose can be extended from 30 cm to 120 cm / 12 inches to 47 inches.
Do not bend (to the extent shown below) the exhaust hose. A bent hose will block exhaust air and
cause the unit to malfunction or shut-off.
RECOMMENDEDNOT RECOMMENDED
••The length of the exhaust hose is determined by the product specifications. Do not replace or
lengthen it as this could cause the unit to malfunction.
Make sure the back of the unit is at least 50 cm / 20 inches away from the wall. Do not place the unit
in front of curtains or drapes as this could obstruct the airflow.
USE & OPERATION
TOUCH SCREEN CONTROL PANEL
POWER CONTROL
The Power Control turns the unit on and off.
MODE CONTROL
3 settings: Cool, Dehumidify, Fan.
A light will indicate which setting is currently being used.
(1) Timer Control
(4) Mode Control
(2) Fan Speed Control
(5) Power Control
(3) Timer / Temperature Set Controls
(6) Warning Light (when flashing)
50 cm / 20”
MIN. 36 cm / 14”
MAX. 102 cm / 40”
EN 4
MIN 35.6 cm
(1) (2) (3) (3) (4) (5) & (6)
50 cm / 20”
Page 6

••Dehumidifying Mode
Air is dehumidified as it passes through the unit, without being in full cooling mode. If room temperature is higher than 25°C (77°F) fan speed can be adjusted; otherwise fan speed is preset to LOW.
Note: If the unit will be used mainly as a dehumidifier, do not connect the exhaust hose and let the
warm air return in the room. Continuous drainage is then necessary and more efficient (refer to
Continuous Draining).
Fan Mode
For air circulation without air conditioner cooling.
USE & OPERATION (CONTINUED)
FAN SPEED CONTROL
3 settings: High, Medium and Low.
TIMER CONTROL
While the unit is turned on, press the timer button then press the ▼ or ▲ to select the number of hours
you would like the unit to continue to run. The unit will turn off automatically.
AUTO TURN OFF:
While unit is running, press the press the ▼ or ▲ button to select the number of hours you want the unit
to run in air conditioning mode.
AUTO TURN ON:
When unit is in a standby mode (plugged in with power light on), then press the ▼ or ▲ button to select
the number of hours until you want the unit to automatically start running.
TEMPERATURE / TIMER SET CONTROLS
WARNING LIGHT
Condensed water may accumulate in the unit. If the internal tank becomes full, the Power Control light
will flash and the unit will not operate until the unit has been drained (refer Water Condensation
Drainage).
After switching the air conditioner off, you must wait 3 minutes before switching it back on
again.
•
•
•
Used for adjusting the timer and thermostat.
The default display is room temperature.
In cooling mode, when ▼ or ▲ button is pressed, the set temperature is displayed and may be
adjusted. After 10 seconds the display will revert back to room temperature. Temperature is only
adjustable in cool mode. The time is adjustable between 1~24 hours.
Note: By pressing both ▼/ ▲ set buttons at the same time, the display will toggle between Celsius
and Fahrenheit.
FUNCTION BUTTONS (CONTINUED)
EN 5
Page 7

REMOTE CONTROL
The functions work the same as the portable air conditioner's Touch Screen Control Panel.
All key functions can be accessed from the remote control.
USE & OPERATION (CONTINUED)
•
•
•
Used for adjusting the timer and temperature.
When ▼ or ▲ key is pressed in cool mode, the
set temperature is displayed and may be
adjusted. After 10 seconds the display will
revert back to room temperature.
Timer setting is available from 1-24 hours by
pressing the key ▼ or ▲
Press this button to change the operation mode
in the order of:
ON / OFF
• HIGH • MEDIUM • LOW
In running mode: Auto switch off
In stand-by mode: Auto switch on
Press ▼ or ▲ button to adjust the
time setting for 1 hour intervals.
Temperature / Timer Set
Mode Control
Power Control
Fan Speed Control
Timer Control
Battery Installation: Remove the cover on the back of the remote control and insert two AAA batteries
with + and - pointing in the proper direction according to the polarity markings.
Use only two AAA or IEC R03 1.5V batteries.
Remove the batteries if the remote control is not in use for a month or longer.
All batteries should be replaced at the same time, do not mix with old batteries.
Properly dispose of used batteries.
•
•
•
•
•
Note:
Caution:
Cool Dehumidify
Fan
EN 6
ENC/APAG
ABAJO ARRIBA
VELOCIDAD
TIEMPO MODO
Page 8

CLEANING & MAINTENANCE
Appliance Maintenance:
Air Filter Maintenance:
The air filter should be cleaned every two weeks. Clean it as follows:
1.
2.
Turn off the appliance before disconnecting the power supply.
Always clean the appliance with a soft dry cloth.
1.2.Turn off the appliance and remove the air filter .
Rinse it in lukewarm water. After cleaning, dry in a shaded and
cool place, then reinstall.
End of Season Storage & Maintenance:
If the appliance will not be used for a long time:
CLEANING & MAINTENANCE (CONTINUED)
1.
2.
3.
4.
5.
6.
7.
Be sure to drain the left-over water condensation. Remove the lower drain plug and use a
shallow pan to collect the water (make sure to replace the drain plug when finished).
To dry excess moisture, run the unit in Fan only mode for 30 minutes before storing.
Turn off and unplug the air conditioner from the power supply.
Remove the air filter and clean with water. Dry the air filter and then reinstall onto the unit.
Disconnecting the Window Installation Kit:
Cover the air conditioner with a cloth/ plastic bag before storage, to protect from dust and scratches
collecting on the surface of the unit.
It is recommended to coil the power cord and store it away from the floor to ensure the cord is
protected from bents and creases.
Remove the Plastic Hose from the unit by pulling away from the unit at the same time.
Remove the Window Bracket, Window Bracket Panel Adapter and Hose Connector.
It is recommended to store the Window Kit parts in a bag together with the Remote Control and
placing them together with the air conditioner unit.
If needed, you can clean the Window Kit with a damp cloth and water before storing. Make sure all
parts of the Window Kit are dry before storage.
•
•
•
•
EN 7
Page 9

WATER CONDENSATION DRAINAGE
When there is excess water condensation inside the unit, the air conditioner stops running and
shows a warning light. This warning light indicates that the water condensation needs to be drained
using the following procedures:
Manual Draining for AC & Dehumidifier Mode
Water may need to be drained in high humidity areas.
Continuous Draining for Dehumidifier Mode
While using the unit in dehumidifier mode, continuous
drainage is recommended.
WATER CONDENSATION DRAINAGE
1.
2.
3.
4.
5.
6.
Unplug the unit from power source.
Place a shallow pan under the lower drain plug.
See diagram.
Remove the lower drain plug.
Water will drain out and collect in the shallow pan.
After the water is drained, replace the lower drain
plug firmly.
You can now turn on the unit.
1.
2.
3.
4.
5.
Unplug the unit from the power source.
Remove the upper drain plug. While doing this
operation some residual water may spill so
please have a pan to collect the water.
Connect the drain connector to a ¾” hose (not
included). See diagram.
The water can be continuously drained through
the hose into a floor drain or sink.
You can now turn on the unit.
Lower
Drain Plug
Shallow Pan
(Not included)
Water Drain Pipe
Upper
Drain Plug
EN 8
Lower
Drain Plug
Water Drain Pipe
Upper
Drain Plug
Page 10

TROUBLESHOOTING GUIDE
The following troubleshooting guide addresses the most common problems. If problems persist, call
customer service. Unplug and disconnect the appliance from the power source before attempting to
troubleshoot.
The air conditioning
unit does not start
Runs a short while
only
No electricity.
Batteries in the remote control need
to be replaced.
The power cord is not properly
plugged in.
The safety LCDI plug has tripped
(USA / Canada / Mexico only).
•
•
•
•
The thermostat temperature setting
is too close to room temperature.
Air outlet is blocked.
There are tight bends in the air
exhaust hose.
•
•
•
Check for power.
Change remote control batteries.
Remove and reconnect the
power cord.
Reset the safety LCDI plug, if
problem persists contact our
customer support (USA /
Canada / Mexico only).
•
•
•
•
Lower the set temperature.
Make sure the exhaust hose is
properly connected.
Connect exhaust hose as per
instructions on page 4.
•
•
•
Runs but no cooling A door or window is open.
The air filter is dirty.
The exhaust hose is detached.
Temperature setting is too high.
Air outlet or intake is blocked.
•
•
•
•
•
Make sure the window or door
is closed.
Clean the air filter.
Reinstall exhaust hose properly
(refer to Installation section).
Reduce temperature setting on
control panel.
Remove blockage.
•
•
•
•
•
Will not run and
water full indicator
light is ON
Excess water condensation inside
the tank.
• Drain the water (refer to Water
Condensation Drainage).
•
PROBLEM POSSIBLE CAUSE SOLUTION
EN 9
Page 11

USO RECOMENDADO
AGRADECIMIENTO
Felicidades por la compra de este versátil Acondicionador de aire portátil Honeywell.
Los acondicionadores de aire portátiles Honeywell son ideales para el enfriamiento de lugares. El
compresor, condensador y evaporador están alojados dentro de una unidad compacta. La unidad flitra,
deshumidifica y enfría el aire. Una manguera flexible de salida de aire envía el calor al exterior. Esta
unidad incluye un juego de accesorios para ventanas. Los acondicionadores de aire portátiles le ofrecen
una solución flexible para el acondicionamiento de aire.
Sistema de auto evaporación - La unidad automáticamente evapora la condensación a través de la
manguera de salida. No hay necesidad de vaciar el tanque de drenaje. Lea cuidadosamente estas
instrucciones.
•
•
Siga las instrucciones de instalación para configurar su unidad.
Conecte la unidad a un circuito conectado adecuadamente a tierra.
Importante:
Después de transportarlo coloque la unidad en posición vertical para permitir que el refrigerante se
estabilice y espere 20 minutos antes de usarlo.
Ajuste manualmente la ventila de aire localizada en la parte superior de la unidad, para ajustar la
dirección del flujo de aire.
USO RECOMENDADO
Para asegurar una eficiencia óptima del producto, recomendamos mantener las puertas y ventanas
cerradas cuando esté en operación como acondicionador de aire o deshumidificador. Si el producto se
usa tan sólo con la función de ventilador, coloque la unidad cerca de una ventana abierta, de manera que
la unidad pueda atraer el aire exterior, y el aire que circula en la habitación salga por la puerta.
Función Enfriamiento y Deshumidificador Función Ventilador
ES 1
Page 12

LEA Y GUARDE ESTAS INSTRUCCIONES
El manejo indebido puede ocasionar serios daños al aparato.
PRECAUCIÓN:
•
•
•
•
•
•
•
•
•
•
•
•
Si el cordón de alimentación es dañado, éste debe sustituirse por el Fabricante, por su agente de
servicio autorizado o por personal calificado con el fin de evitar un peligro.
No cubra la entrada de aire y de escape cuando está en uso.
Este aparato no está diseñado para ser usado por niños. Los niños deben ser supervisados para
asegurarse de que no jueguen con el aparato.
No coloque objetos sobre o se siente sobre la unidad.
Siempre apague y desconecta la unidad cuando la limpie o repare.
Si es necesario contacte a un agente de servicio autorizado.
Descontectar la unidad cuando no esté en uso o en reparación.
No haga funcionar el cable de alimentación debajo de alfombras y tapetes.
Tenga cuidado para evitar tropezar con el cable.
No lo use en áreas donde haya gasolina, pintura u otros inflamables almacenados.
Las precauciones básicas de seguridad siempre se deben seguir cuando se utilizan aparatos
eléctricos.
Este producto ha sido fabricado para uso habitacional y no debe ser utilizado para
otros propósitos.
SEGURIDAD
DESCRIPCIÓN DE PARTES
5) Filtro de Aire
6) Grilla Trasera
7) Conector de la Manguera
8) Cable de Corriente Eléctrica
9) Control Remoto
Tapón de Drenaje Inferior
(Modo Aire Acondicionado)
Tapón de Drenaje Superior
(Modo Deshumidificador)
Panel de Control
(Incluye Receptor de Señal)
Salida de Aire
Mango
Ruedas
1)
2)
3)
4)
10)
11)
ES 2
12)
1
2
5
6
11
4
3
12
7
9
8
10
5
6
7
8
1010
Filtro de Entrada de Aire
Page 13

1. Instale la manguera plástico a su adaptador del anaquel de ventana y el conector de mangera en
ambos lados. Asegurar un ajuste apropiado en ambos extremos.
2. Ajuste el anaquel de ventana según la anchura o la altura de su ventana, y luego inserte
un tornillo plástico para fijar en la posición deseada. Hay un agujero en el que se inserta la manguera
de plástico después. Asegúrese de que este agujero no se bloquea.
3. Conectar la manguera plástico al conector de
manguera sobre la parte posterior de su
unidad empuje. Empuje hasta que quede
asegurado en su lugar.
4. Conectar el soporte de ventana en el extremo
opuesto de la manguera de plástico.
Asegúrese de que las conexiones estén
apretadas y correctamente instaladas.
Nota:
No instale por el momento el anaquel de ventana a su
ventana, este paso es solo requerido para ajustar el
anaquel según el tamaño de su Ventana. El anaquel
tiene que ser quitado de la ventana después de que el
tamaño es ajustado.
INSTALACIÓN
1.
2.
3.
4.
5.
Equipo Deslizante para Ventana / Puerta....
Adaptador para Panel de Ventana..............
Perno de Plástico.......................................
Conector de Manguera
...............................
Manguera
Plástico......................................
Kit De Instalación:
Pasos de la Instalación:
1 Juego
1 Pieza
2 Piezas
1 Pieza
1 Pieza
Perno de Plástico
Agujero para la
Manguera de Plástico
5. Conectar el anaquel de ventana a su ventana.
6. Su Aire acondiconado portátil está listo para
usarse.
1
2
5
3
x 1
x 1x 1
x 2 x 1
4
Perno de Plástico
ES 3
Page 14

•
Modo de Enfriamiento
La unidad funciona como un acondicionador de aire. Ajuste la velocidad del ventilador y la temperatura
del aire para adaptarse a su nivel de confort deseado. Rango de temperatura ambiente
es de 16°C a 32°C (61°F a 89°F).
INSTALACIÓN (CONTINUACIÓN)
NOTA:
1.2.La manguera de salida proporcionada puede extenderse de 30 cm a 120 cm / 12” a 47”. Para
mejores resultados, use la menor longitud posible.
Impida cualquier doblez o lazo (como los que se muestran abajo) en la manguera de salida. Una
manguera doblada bloqueará el aire de salida y ocasionará que la unidad se apague inmediatamente.
RECOMENDADONO RECOMENDADO
••La longitud de la manguera de salida está especialmente diseñada de acuerdo con las especifica-
ciones del producto. No la reemplace o la alargue con ninguna otra manguera, pues esto podría
dañar su aparato.
Asegúrese que la parte trasera de la unidad esté a al menos 50 cm / 20” de distancia de la pared.
USO Y OPERACIÓN
PANEL DE CONTROL TÁCTIL
CONTROL DE ENERGÍA
El control de encendido enciende y apaga la unidad.
CONTROL DE MODO
3 configuraciones: Frío, Deshumidificación y Ventilador.
La luz LED indicará que configuración fue seleccionada.
(1) Control del Temporizador
(4) Control de Modo
(2) Control de Velocidad
(5) Control de Energía
(3) Ajuste de Temperatura / Temporizador
(6) Luz de Advertencia (cuando parpadea)
50 cm / 20”
ES 4
MIN 35,6 cm
(1) (2) (3) (3) (4) (5) & (6)
50 cm / 20”
MIN. 36 cm / 14”
MAX. 102 cm / 40”
Page 15

•
•
Modo de Deshumidificación
El aire se deshumidifica a medida que pasa a través de la unidad, sin estar en modo de enfriamiento
total. Si la temperatura ambiente es superior a 25°C
(77°F) velocidad del ventilador se puede ajustar,
de lo contrario la velocidad del ventilador está preajustado "BAJA".
Nota: Si la unidad se utiliza en modo deshumidificador, no conecte el tubo de escape y dejar el
retorno de aire caliente en la habitación. El drenaje continuo es entonces necesario y más eficaz
(Veáse Drenaje Continuo).
Modo de Ventilación
Para la circulación de aire sin enfriar.
USO Y OPERACIÓN (CONTINUACIÓN)
CONTROL DE VELOCIDAD
3 configuraciones: Alta, Media y Baja.
CONTROL DEL TEMPORIZADOR
Con la máquina en el modo de ejecución, pulse el botón del temporizador y pulse el botón ▼ o ▲ para
seleccionar el número de horas que desea que la unidad funcione. La unidad se apagará automáticamente.
APAGADO AUTOMÁTICO:
Con la máquina en el modo de ejecución, pulse el botón ▼ o ▲ para seleccionar el número de horas
que desea que la unidad funcione en modo de aire acondicionado.
ENCENDIDO AUTOMÁTICO:
Con la máquina en modo de espera (Enchufado con la luz piloto encendida), presione el botón ▼ o ▲
para seleccionar el número de horas hasta que la unidad se inicie automáticamente en funcionamiento.
AJUSTE DE TEMPERATURA / TEMPORIZADOR
LUZ DE ADVERTENCIA
El agua condensada se puede acumular en la unidad. Si el tanque interno se llena, la luz de encendido
parpadea y la unidad no funcionará hasta que el agua haya sido drenada (consulte el Drenado de Agua).
Después de apagar el acondicionador de aire, debe esperar 3 minutos antes de encenderlo de
nuevo.
•
•
•
Se usan para ajustar el termostato.
El valor predeterminado es la temperatura ambiente.
En modo de enfriamiento, cuando el botón ▼ o ▲ se presiona, la temperatura configurada se
despliega y puede ajustarse. Después de 10 segundos, la pantalla regresará a la temperatura
ambiente. La temperatura sólo es ajustable en el modo Frío y Calor. El tiempo es ajustable entre 1 y
24 horas.
Nota: Al presionar ambos botones ▼/ ▲ al mismo tiempo por más de 3 segundos, la pantalla
alternará entre Celsius y Fahrenheit.
BOTONES DE FUNCIONES (CONTINUACIÓN)
ES 5
Page 16

CONTROL REMOTO
Las funciones trabajan igual que los controles táctiles de los acondicionadores de aire portátil. Todas las
funciones de las teclas se puede acceder desde el control remoto.
USO Y OPERACIÓN (CONTINUACIÓN)
•
•
•
Se utiliza para ajustar el contador de tiempo y
temperatura.
Cuando ▼ o la tecla ▲ se pulsa en el modo
de frío y calefacción, la temperatura se visualiza
y se puede ajustar. Después de 10 segundos,
la pantalla volverá a la temperatura ambiente.
Ajuste del temporizador está disponible de 1
a
24 horas pulsando la tecla ▼ o ▲.
Pulsar este botón para cambiar el modo de
operación en el orden de:
Encendido / Apagado
• ALTA • MEDIA • BAJA
En el modo de ejecución:
Apagado automático.
En el modo de espera:
Encendido automático.
Presione ▼ o el botón ▲ para
ajustar el tiempo en intervalos de
1 hora.
Ajuste de Temperatura / Temporizador
Control de Modo
Control de Energía
Control de Velocidad del Ventilador
Control del Temporizador
Instalación de Baterías: quite la cubierta en la parte trasera del control remoto e inserte dos baterías
AAA con los polos “+” y “-“ apuntando a la dirección correcta.
Use sólo dos baterías AAA ó IEC R03 1,5V.
Retire las baterías si el control remoto no se va a utilizar por más de un mes.
Todas las baterías deben reemplazarse al mismo tiempo, no mezclar con baterías viejas.
Deshágase de las baterías usadas.
•
•
•
•
•
Nota:
Precaución:
Frío Deshumidificador
Ventilador
ES 6
ENC/APAG
ABAJO ARRIBA
VELOCIDAD
TIEMPO MODO
Page 17

LIMPIEZA Y MANTENIMIENTO
Mantenimiento del Aparato:
Mantenimiento del Filtro de Aire:
Es necesario limpiar el filtro de aire después de 2 semanas de uso.
Hágalo de la siguiente manera:
1.
2.
Apague el aparato antes de desconectarlo de la corriente eléctrica.
Limpie con un lienzo suave y seco.
1.2.Apague el aparato antes de quitar el filtro de aire.
Lave con una solución de detergente en agua tibia. Después de
limpiarlo, séquelo en un lugar sombreado y fresco, después
reinstale.
Almacenamiento y Mantenimiento al Terminar la Temporada:
Si la unidad no se usará por un periodo prolongado de tiempo:
LIMPIEZA Y MANTENIMIENTO (CONTINUACIÓN)
1.
2.
3.
4.
5.
6.
7.
Asegúrese de drenar la condensación del agua sobrante. Retire el tapón de drenaje inferior y utilizar
una bandeja de poca altura para recoger el agua (asegúrese de colocar el tapón de drenaje cuando
termine).
Para secar el exceso de humedad, haga funcionar la unidad en modo de sólo ventilador durante 30
minutos antes de guardarla.
Apague y desenchufe el acondicionador de aire de la fuente de alimentación.
Quite el filtro de aire y limpie con agua. Seque el filtro de aire y vuelva a instalarlo en la unidad.
Desconexión del kit de instalacion para Ventana:
Cubra la unidad de aire acondicionado con una bolsa de tela / plástico antes de su almacenamiento,
para proteger del polvo y rayones en la superficie de la unidad.
Se recomienda enrollar el cable de alimentación y almacenarlo lejos del piso para asegurarse de que
el cable esté protegido de inclinaciones y pliegues.
Retire la manguera de plástico de la unidad girándola hacia la derecha y alejándola de la unidad al
mismo tiempo.
Retire el soporte de ventana, el adaptador del soporte de ventana y la manguera de conexión.
Se recomienda almacenar las piezas del kit de ventana en una bolsa junto con el control remoto y
colocarlos junto con la unidad de aire acondicionado.
Si es necesario, puede limpiar el Kit de ventana con un paño húmedo y agua antes de guardarla.
Asegúrese de que todas las partes del kit de ventana estén secos antes de guardarlas.
•
•
•
•
ES 7
Page 18

DRENADO DE AGUA
Cualquiera que sea la acumulación de agua adentro de la unidad debe ser drenada, ya que la unidad
dejará de funcionar y mostrará un mensaje de error. Este error indicará que el agua necesita ser
drenada de acuerdo a algunos de los métodos:
Drenaje Manual para Modo AC y Deshumidificador
Si el área está en una zona muy húmeda, posiblemente
se necesitará el drenado del agua.
Drenaje Continuo para Modo Deshumidificador
Mientras utiliza la unidad en el modo deshumidificador, el drenaje continuo es recomendado.
DRENADO DE AGUA
1.
2.
3.
4.
5.
6.
Desenchufe la unidad de la fuente de alimentación.
Coloque una bandeja de poca altura debajo del tapón
de drenaje. Vea el diagrama.
Retire el tapón de drenaje.
El agua drenada se acumula en la bandeja.
Después de que el agua es drenada, cierre la tapa
firmemente.
Ahora puede encender la unidad.
1.
2.
3.
4.
5.
Desenchufe la unidad de la fuente de alimentación.
Retire el tapón de drenaje superior. Mientras se hace
esta operación se genera algún derramamiento de agua,
así que por favor tenga un recipiente para recoger el
agua.
Instalar el conector con ¾” de manguera (mangera no
es incluida). Vea el diagrama.
El agua se puede drenar continuamente a través de la
manguera en un desagüe en el piso o en un balde.
Ahora puede encender la unidad.
Tapones de
Drenaje
Inferior
Bandeja
(No incluida)
Tubo de Desagüe
de Agua
Tapón de
Drenaje
Superior
ES 8
Tapones de
Drenaje
Inferior
Tubo de Desagüe
Tapón de
Drenaje
Superior
Page 19

GUÍA DE SOLUCIONES
La siguiente guía solución de problemas aborda los problemas más comunes. Si los problemas
persisten, llame a servicio al cliente. Desconecte el aparato de la corriente eléctrica antes de intentar
reparar cualquier problema.
El equipo de aire
acondicionado no
opera
No hay electricidad.
Las pilas del control remoto están
agotadas.
El cable eléctrico no está enchufado
apropiadamente.
El dispositivo de seguridad en la
clavija LCDI se ha roto (USA /
CANADA / MEXICO solamente).
•
•
•
•
Revisar la corriente de luz.
Cambiar las baterias del control
remoto.
Remover y reconectar el cable
eléctrico.
Resetear el dispositivo protector,
si el problema persiste contactar
al servicio al cliente (USA /
CANADA / MEXICO solamente).
•
•
•
•
La unidad funciona
solo por un corto
tiempo
La temperatura es demasiado
parecida a la temperatura ambiental.
La salida de aire esta bloqueada por
algún objeto.
Existe polvo o pelusas en la
manguera de la salida de aire.
•
•
•
Disminuir la temperatura
establecida.
Revisar no haya obstáculos en la
salida de aire.
Conecte la manguera de escape
de acuerdo con instrucciones en
página 4.
•
•
•
Funciona pero no
enfría
Una puerta o ventana está abierta.
El filtro de aire está sucio.
La manguera de escape se
desconectó.
La temperatura configurada es
demasiado alta.
La salida o entrada de aire está
bloqueada.
•
•
•
•
•
Cerrar la puerta o ventana.
Limpiar o remplazar el filtro.
Conectar la manguera de aire
(consulte la Instalación sección).
Reducir la temperatura en el
panel de control.
Revisar que entre y salga
suficiente aire en el equipo.
•
•
•
•
•
No funciona en
absoluto y la luz
indicadora del
exceso de agua está
en ENCENDIDO
El tanque adentro de la unidad está
lleno.
• Drene el agua (consulte la
Drenado de Agua).
•
PROBLEMA POSIBLE CAUSA SOLUCIÓN
ES 9
Page 20

JMATEK MÉXICO SAPI DE CV
Santa Cruz Norte No. 21,
Col Del Valle, C.P. 03100,
México D.F.
Phone: 52 55 52116813
Email: mxinfo@jmatek.com
Web: www.jmatek.com
© 2015 JMATEK Limited. All rights reserved.
The Honeywell Trademark is used under license from
Honeywell International Inc.
Honeywell International Inc. makes no representations
or warranties with respect to these products.
These products are manufactured by JMATEK Limited.
© 2015 JMATEK Limited. Todos los derechos reservados.
La marca Honeywell es usada bajo licencia de
Honeywell International Inc.
Honeywell International Inc. no representa
ni garantiza este producto.
Este producto es fabricado por JMATEK Limited.
Aire Acondionado Portátil
Marca: HONEYWELL
Modelo: MM14CCSBB
ESPECIFICACIONES ELECTRICAS
115 V ~ 60 Hz 10,8 A
Consumo de energía en modo de operación: 1,0601 kWh
Consumo de energía en modo de espera: 0,490 Wh
ANTES DE USAR EL PRODUCTO LEA EL INSTRUCTIVO Y
CONSERVELO PARA FUTURAS REFERENCIAS
SUJETACABLES "Y" SI EL CORDON DE ALIMENTACION ES DAÑADO,
DEBE SER REEMPLAZADO POR EL FABRICANTE O SU AGENTE DE
SERVICIO O POR PERSONAL CALIFICADO PARA EVITAR RIESGO
Este aparato no se destina para utilizarse por personas (incluyendo niños)
cuyas capacidades físicas, sensoriales o mentales sean diferentes o estén
reducidas o carezcan de experiencia o conocimiento a menos que dichas
personas reciban una supervisión o capacitación para el funcionamiento
del aparato por una persona responsable de su seguridad.
Los niños deben de supervisarse para asegurar que ellos no empleen los
aparatos como juguete.
Antes de limpiar o dar mantenimiento, el aparato debe desconectarse del
suministro de energía.
Importador: Servicios Home Depot, S de R.L. de C.V.
AV. Ricardo Margain No. 605, Santa Engracia, San Pedro Garza Garcia,
Nuevo Leon, México, C.P. 66267
Tel: 01 800 004 6633
 Loading...