

Page 1
Customer Support : 1-800-474-21477
Portable Air Conditioner
OWNER’S MANUAL
Read these instructions before use
Model: MM14CCS
Voltage rating: 120V~60Hz
Power rating : 1400W
For product inquiries or support : www.honeywellportableac.com
Made in China
Page 2

INDEX
Read all instructions carefully before setting up and operating the unit. Please keep
this instruction manual for future reference. This manual is designed to provide you
with important information needed to setup, operate, maintain and troubleshoot your
portable air conditioner. Failure to follow these instructions may damage and/or impair
operation and void the warranty.
EGAPNOITCES
1.
INDEX .............................................................................................................. 1
THANK YOU.....................................................................................................
2.
3.
USER TIPS........................................................................................................
4.
SAFETY ............................................................................................................
5.
PARTS DESCRIPTION.....................................................................................
6.
INSTALLATION.................................................................................................
7.
USE & OPERATION..........................................................................................
CLEANING & MAINTENANCE..........................................................................
8.
WATER DRAINAGE..........................................................................................
9.
TROUBLESHOOTING GUIDE...........................................................................
10.
TECHNICAL SPECIFICATIONS.........................................................................
11.
SERVICE AND WARRANTY .............................................................................
12.
2
3
4
6
7
10
13
14
15
16
17
1
Page 3

THANK YOU
Congratulations on your purchase of this versatile Honeywell Portable Air Conditioner.
Honeywell Portable Air Conditioners are ideal for spot cooling. The compressor,
condenser and evaporator are housed in a compact unit. The air is filtered, dehumidified
and cooled while a flexible air outlet hose sends heat outside. The air conditioner
includes a window venting kit. No permanent installation is needed so the unit is easy to
move from room to room and offers a truly flexible air conditioning solution.
Auto Evaporation System - The unit automatically evaporates the condensate through
the air outlet hose. No need to empty the drainage tank except in very high humidity
conditions.
Please read the instructions carefully.
2
Page 4
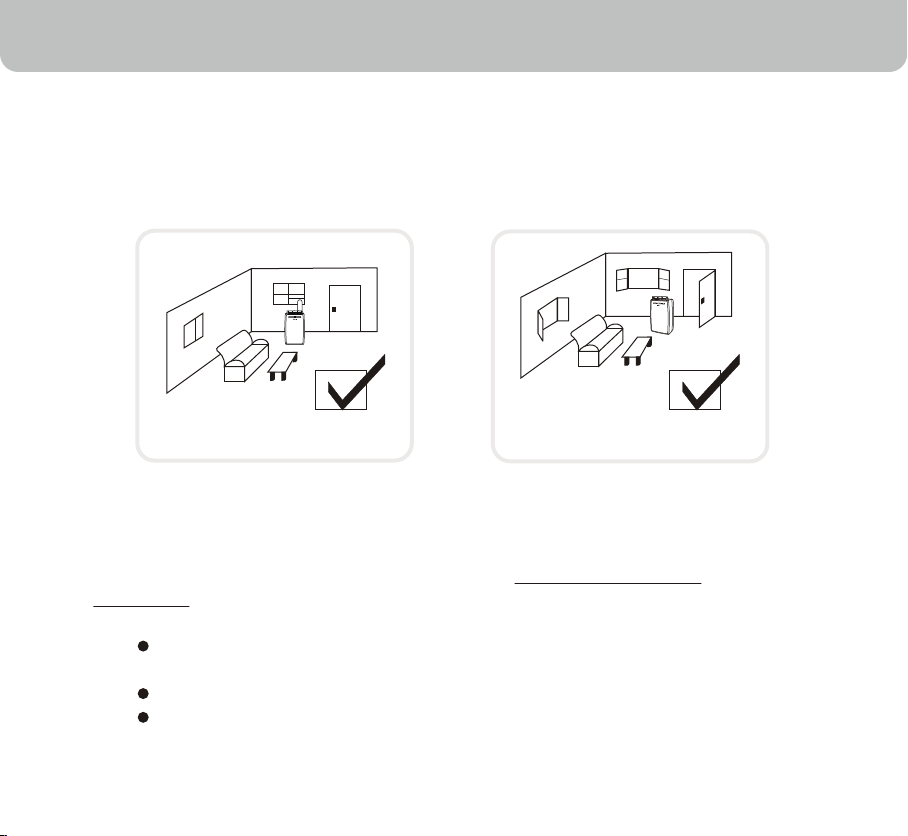
USER TIPS
To ensure optimal efficiency of the product, we recommend keeping doors and
windows closed when it is used as an air conditioner or dehumidifier.
If the product is being used with the fan function only, please position the unit near an
open window so that outside air is drawn into the unit, the air circulates in the room and
then exits via the door.
Cooling, Dehumidifying function Fan function
Important : After transporting the unit, place it UPRIGHT for 20 min.
before use to allow the refrigerant to stabilize.
Check that the unit is complete with all accessories as outlined in this
instruction manual.
Follow installation instructions to set up your unit.
Plug the unit into a properly grounded circuit.
3
Page 5

SAFETY
READ AND SAVE THESE INSTRUCTIONS
Improper handling can cause serious damage to the appliance.
WARNING
1.
DO NOT operate the unit with a damaged plug or loose socket point. If the power
cord is damaged, it must be replaced by the manufacturer or an authorized service agent.
2.
6.
7.
DO NOT cover the air intake and exhaust when in use.
3.
This appliance is not intended for use by children. Children should be supervised
and should not play on or around the appliance.
4.
DO NOT place objects on or sit on the unit.
5.
Always turn off and unplug the unit when cleaning or servicing.
If service is needed contact an authorized service agent.
Unplug the unit when stored or not in use.
4
Page 6

8.
DO NOT run the power cord under carpeting and rugs.
9.
Use caution to prevent tripping on cord.
10.
DO NOT use in areas where gasoline, paint or other flammable goods are stored.
11. Basic safety precautions should always be followed when using electrical appliances.
SAFETY
5
Page 7
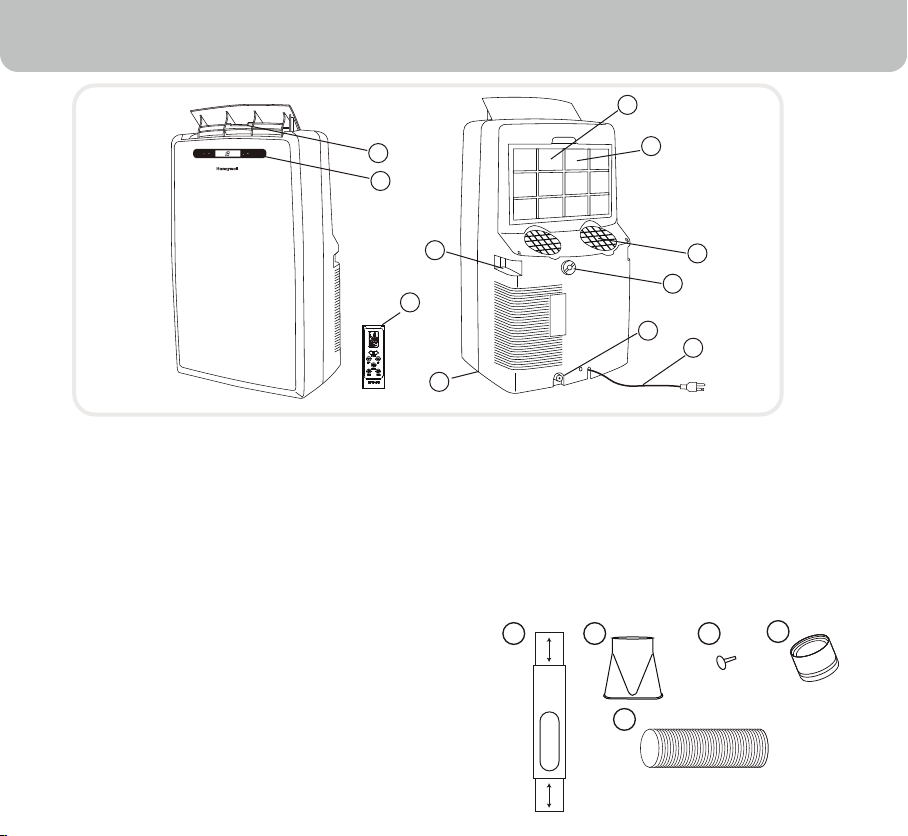
PARTS DESCRIPTION
6
2
1
1. Control Panel ( Incl. Signal Receptor)
2. Air Outlet
3. Handle
4. Caster
5. Water Drain Cap (De-humidifier mode)
6. Air Filter
Installation Kit :
1. Window Bracket Kit.............................
2. Window Bracket Panel Adapter..........
3. Plastic Screws....................................
4. Hose Connector..................................
5. Plastic Hose........................................
3
11
4
1 Set
1 Piece
2 Pieces
1 Piece
1 Piece
7
10
5
8
9
7. Back grill
8. Water drain Cap (Air Conditioning Mode)
9. Power Supply Cord
10. Hose Connector
11. Remote Control (Batteries not included)
1
2
3
x 1
5
4
x 2
x 1
x 1
6
Page 8

INSTALLATION
1
Install the plastic hose with window bracket adapter and hose connector on both sides.
Ensure proper fit on both ends.
=
Adjust the window bracket as per width or height of your window and insert a plastic screw
2
to fix at the desired position.
Note : Do not install the window
Plastic Screw
3
Connect the plastic hose to the hose connector on back of the unit.
bracket to your window. This step
is required only to adjust it to the
size of your window. The bracket
should be removed from the window
after the size is adjusted.
7
Push-in Rotate
Page 9

INSTALLATION
4
Connect the window bracket to the opposite end of the plastic hose. Ensure that
connections are tight and installed properly.
Connect the window bracket to the window.
5
The Portable Air Conditioner is now ready to use.
8
Page 10

INSTALLATION
NOTE:
1. The supplied exhaust hose can be extended from 12 inches (1 feet) to 47 inches
(3.9 feet).
2. Do not bend (to the extent shown below) the exhaust hose.
A bent hose will block exhaust air and cause the unit to malfunction or shut-off.
20”
35 cm
MIN.
MAX. 100 cm
RECOMMENDEDNOT RECOMMENDED
Warning:
• The length of the exhaust hose is designed acording to the product specifications.
Do not replace or lengthen it with any other pipe or hose as this could cause the
unit to malfunction.
• Make sure the back of the unit is at least 20 inches away from a wall.
Do not place the unit in front of curtains or drapes as this could obstruct the airflow.
9
Page 11
USE & OPERATION
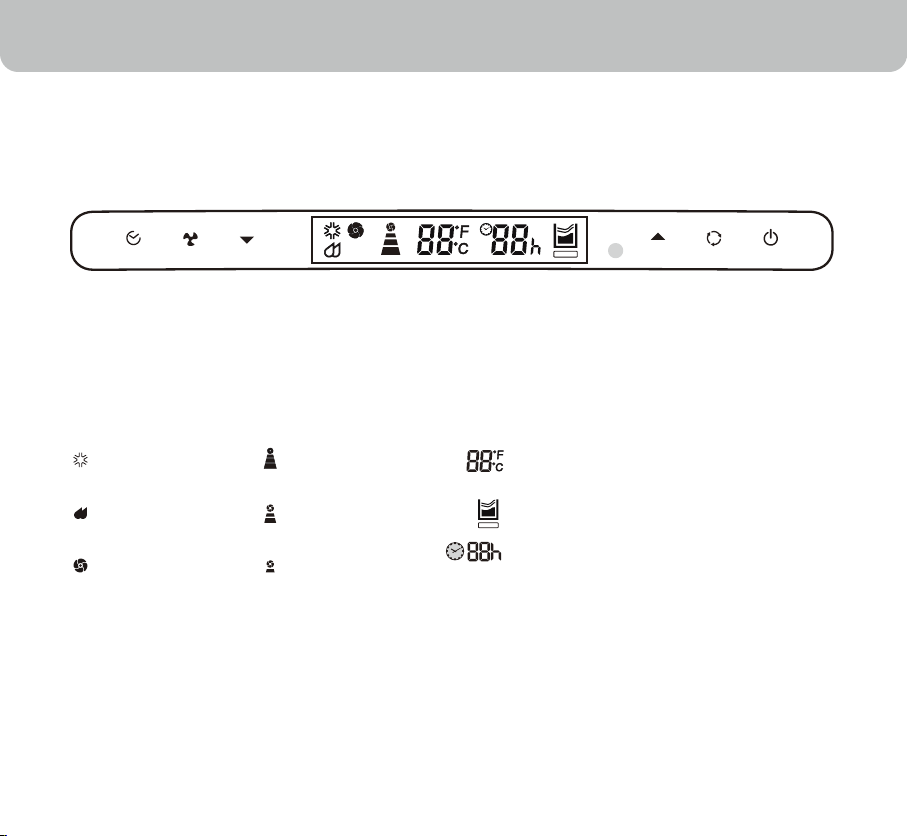
Indication symbols on LCD panel:
STOP
Cooling Mode High Fan Speed
Dehumidify
Mode
Medium Fan
Speed
Fan Mode Low Fan Speed
Display set temperature in Fahrenheit
or Celsius
Error – The machine will stop running
STOP
Display timer setting to automatically
turn on/off between 1 to 24 hours
10
Page 12

USE & OPERATION
Power Control
The power control turns the unit on and off.
Mode Control
The Mode Control has 3 settings:
• Cool • Dehumidify • Fan
The settings are adjusted with Mode Control button. A light
will indicate which setting is currently being used.
• Cooling Mode
When cooling mode is selected, the indicator light will shine.
During the cooling mode the air is cooled and hot air is
exhausted to the outside through the exhaust tube.
Adjust fan speed and air temperature to suit your desired
comfort level. Temperature setting range is 16°C ~ 32°C.
Note : The air exchange hoses must vent outside the
room when using cool mode.
• Dehumidify Mode
When dehumidify mode is selected, the indicator light will
shine. Air is dehumidified as it passes through the unit,
without being in full cooling mode If room temperature is
higher than 25 degree Celsius, fan speed can be adjusted;
otherwise fan speed is fixed to " LOW ".
Note : If the unit will be used mainly as dehumidifier, do
not connect the exhaust hose and let the warm air return
in the room. Continuous drainage is then necessary and
more efficient.
• Fan Mode
When fan mode is selected the indicator light will shine.
Air is circulated throughout the room with no cooling.
After switching the air conditioner off, you must wait 3 minutes before switching it back on again.
Note: unit does not need to be vented in Fan mode.
Fan Speed Control
The Fan Speed Control has 3 settings: High, Medium,
and Low.
Timer
Auto turn off :
With machine in running mode, press timer button to select
number of hours you would like the unit to run in air
conditioning mode until it automatically shuts off.
Auto turn on :
With machine in stand by mode, press timer button to select
number of hours until you would like the unit to automatically
start running in air conditioning mode.
Timer / Temp set controls
• Used for adjusting the timer and thermostat.
• The default display is room temperature.
In cooling mode, when “ “ or “ “ button is pressed, the set
•
temperature is displayed and may be adjusted.
After 10 seconds the display will revert back to room
temperature. Temperature is only adjustable in cool mode.
The time is adjustable between 1~24 hours.
Note : By pressing both “ “ / “ “ set buttons at the same
time, the display will toggle between Celsius and Fahrenheit.
Warning Light
Condensed water may accumulate in the unit. If the internal
tank becomes full, the Power Light will flash and the unit will
not operate until the unit has been drained.
11
Page 13

USE & OPERATION
REMOTE CONTROL (batteries not included)
12
Page 14

CLEANING & MAINTENANCE
Appliance Maintenance:
1.2.Turn off the appliance before disconnecting the power supply.
Always clean with a soft dry cloth.
Air Filter Maintenance:
The air filter should be cleaned after every two weeks of use.
Clean it as follows:
1.
Turn off the appliance and remove the air filters.
2.
Wash it with a solution of detergent in lukewarm water. After cleaning, dry in a
shaded and cool place, then reinstall.
Maintenance After Use:
If the appliance will not be used for a long time, be sure to drain the left-over
1.
water condensation by removing the water drain cap (Air Conditioner mode) located
on the lower backside of the air conditioner. Use a shallow pan to collect the water
while draining.
2.
To dry excess moisture, run the unit in fan mode for 30 minutes before storing.
3.
Clean and reinstall air filter.
4.
Remove air hose and window bracket and store with the portable air conditioner.
13
Page 15
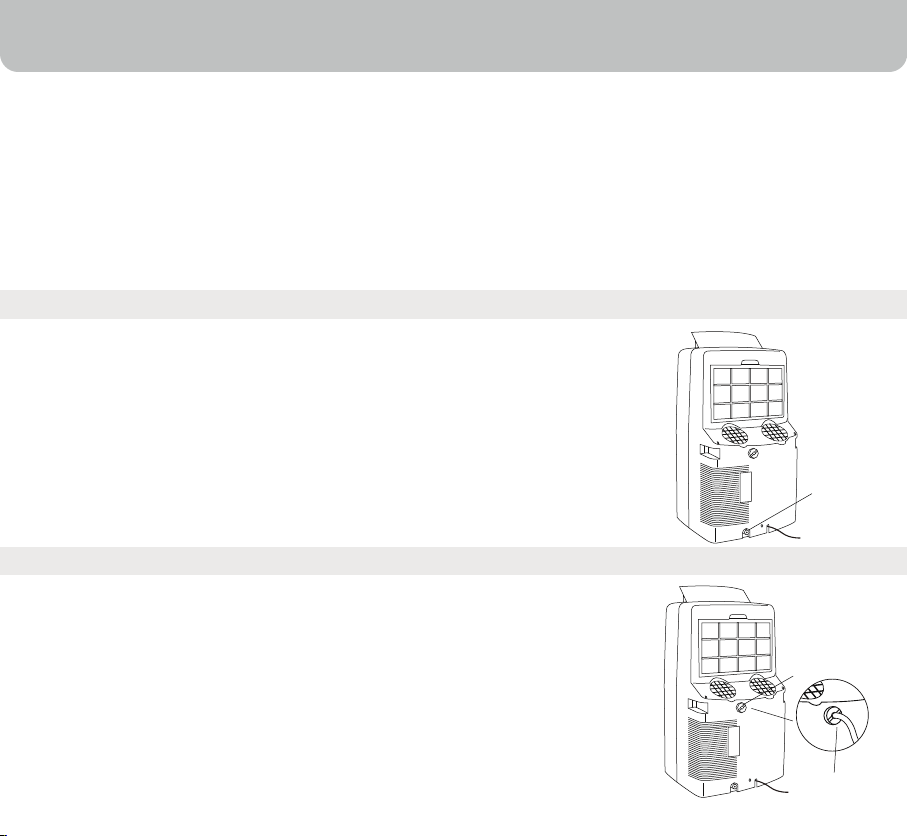
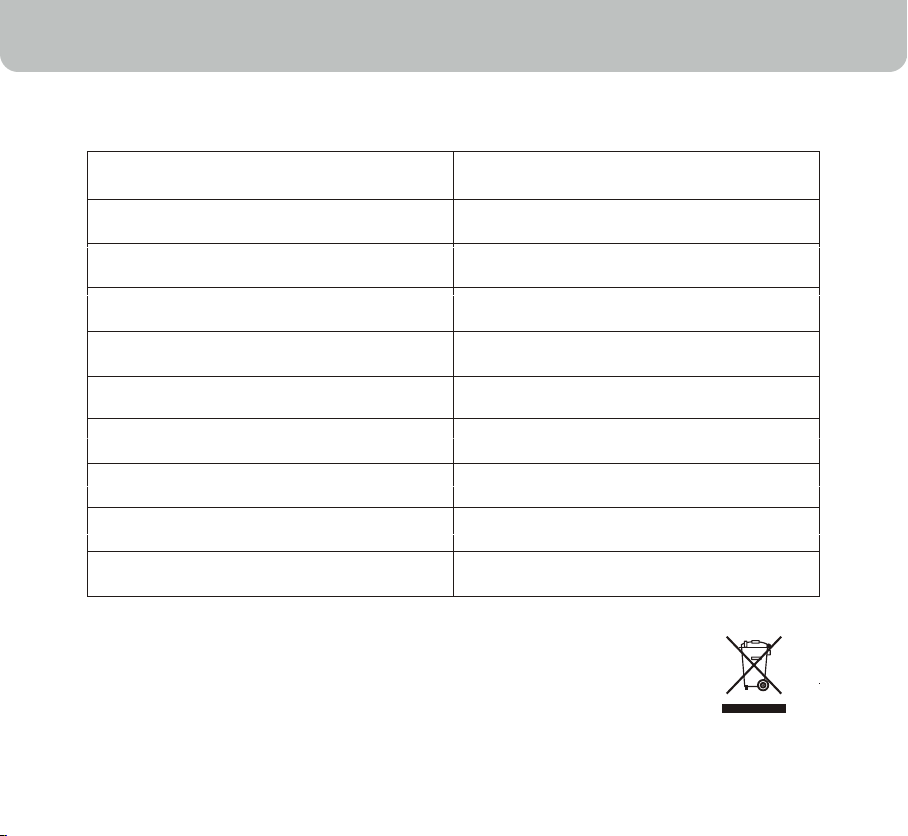
WATER DRAINAGE
Your machine is equipped with two drain plugs on the backside, De-humdifier mode and Air Conditioning mode. Water will need to be drained only in two conditions :
• De-humidifier mode
• Air Conditioning mode, when ambient humidity is very high.
Whenever there is excess water accumulation inside the unit, and it needs to be drained. The
machine will stop running and will show an error message. This error message indicates that the
water needs to be drained out using below given procedures :
Water Drain (Air Conditioning Mode)
•
Your machine is equipped with an Auto-Evaporation System, due to
which no water needs to be drained in Air Conditioning Mode.
•
However in high humidity areas, you may need to drain water from
this drain plug.
•
In order to drain water from this drain plug, please open the cap and
place a water tray under the drain plug.
•
Water will drain out automatically and will be collected in this tray.
Continuous Water Drain (De-humidifier Mode)
•
When the unit is running in de-humidifier mode you have to keep
emptying the water stored inside the water tank.
•
The unit has a threaded drain connection located on the back side
(refer to fig.).
•
Remove the drain plug, install the drain connector(5/8" universal
female mender) with 3/4" hose(locally purchased).
•
Once a hose is attached the water drains into the hose. The hose can
then be directed away from the dehumidifier into a floor drain.
Drain Plug
(AC Mode)
Drain Plug
(De-Humidifier
Mode)
Water Drain Pipe
14
Page 16

TROUBLESHOOTING GUIDE
The following troubleshooting guide addresses the most common problems. If problems
persist, call customer service. Unplug and disconnect the appliance from the power
source before attempting to troubleshoot.
Problem Possible Cause
No electricity.
•
•
The air conditioning
unit does not start
Runs a short while
only
Runs but no cooling
Will not run and
water full indicator
light is ON
Batteries in the remote control need
to be replaced
• The power cord is not properly
plugged in.
The safety GFI plug has tripped.
•
• The thermostat temperature setting
is too close to room temperature.
• Air outlet is blocked.
• There are tight bends in the air
exhaust hose.
• A door or window is open.
The air filter is dirty.
•
• The exhaust hose is detached.
• Temperature setting is too high.
• Air outlet or intake is blocked.
• Excess water condensation inside
the tank.
Solution
• Check for power.
• Change remote control batteries.
• Remove and reconnect the power
cord.
• Reset the safety GFI plug, if
problem persists contact our
customer support.
• Lower the set temperature.
• Make sure the exhaust hose is
properly connected.
• Connect exhaust hose as per
instructions on page 9.
• Make sure the windows and door
are closed.
Clean the air filter
•
• Reinstall exhaust hose properly
(Refer page 9, Installation)
• Reduce temperature setting on
control panel.
• Remove blockage.
• Drain the water through the drain
plug (Refer page 14, Water
Condensation Draingage).
15
Page 17
TECHNICAL SPECIFICATIONS
Results may vary according to application in different environments. Result will vary
on practical operation.
Description of Product Portable Air Conditioner
MM14CCS ledoM
ycneuqerF/egatloV
Power
Cooling Capacity
Dehumidifying capacity
Refrigerant
remiT
Dimensions (W) x (D) x (H) (mm)
Waste
electrical products should be properly disposed.
Please recycle where facilities exist. Check with your local authority
or retailer for recycling.
120 V~ 60 Hz
1400W
14000 BTU
95 pints/24 hours
A014-R
hour ( ON / OFF) 42
401 X 506 X 864mm
42.5 Kg th (Kg)gieW
16
Page 18

SERVICE AND WARRANTY
5-YEAR LIMITED WARRANTY
Read all the instructions before attempting to use this product.
1 year parts and labor, 5 years on all parts of the sealed system, consisting of the compressor,
evaporator, condenser and factory connected refrigerant tubing.
This warranty does not apply to any damage resulting from commercial, abusive, unreasonable
A.
use or supplemental damage. Defects that are the result of normal wear and tear will not be
considered manufacturing defects under this warranty.
JMA NORTH AMERICA LLC IS NOT LIABLE FOR INCIDENTAL OR CONSEQUENTIAL
DAMAGES OF ANY NATURE. ANY IMPLIED WARRANTY OF MERCHANTABILITY OR
FITNESS FOR A PARTICULAR PURPOSE ON THIS PRODUCT IS LIMITED IN DURATION
TO THE DURATION OF THIS WARRANTY.
Some jurisdictions do not allow the exclusion or limitation of incidental or consequential
damages or limitations on how long an applied warranty lasts, so the above limitations or
exclusions may not apply to you. This warranty gives you specific legal rights, and you
also may have other rights which vary from jurisdiction to jurisdiction. This warranty
applies only to the original purchaser of this product from the original date of purchase.
At its option, JMA NORTH AMERICA LLC will repair or replace this product if it is found to be
B.
detective in material or workmanship.
This warranty does not cover damage resulting from any unauthorized attempts to repair or
C.
from any use not in accordance with the instruction manual.
17
Page 19

SERVICE AND WARRANTY
Please read the Instruction Manual carefully before setting up or using this product. If you
D.
believe this product to be suffering from a manufacturing fault, or if you have inquiries about
this product, please contact our Customer Support:
CUSTOMER SUPPORT
JMA North America LLC
Ramsey, New Jersey, 07446.
Phone : 1-800-474-2147
Email : info@jmana.us
When contacting our Customer Support, please have the information below along with the
proof of purchase. All warranty requests must be accompanied by a proof of purchase, which
is a copy of the original receipt.
Model : .......................................................................................................................
Date of purchase: .......................................................................................................................
Purchased from : .......................................................................................................................
18
Page 20

Distributor:
JMA North America LLC
Ramsey New Jersey 07446
Customer Support: 1-800-474-2147
E-mail: info@jmana.us
www.honeywellportableac.com
MM14CCS_IM_Eng_USA_1
December 2012
© 2012 AirTek Int’l Corp. Ltd.
(JMATEK Int’l Group of Companies)
The Honeywell Trademark is used under license from
Honeywell International Inc.
Honeywell International Inc. makes no representation or
warranties with respect to this product.
 Loading...