

Page 1
®
60-2336-3
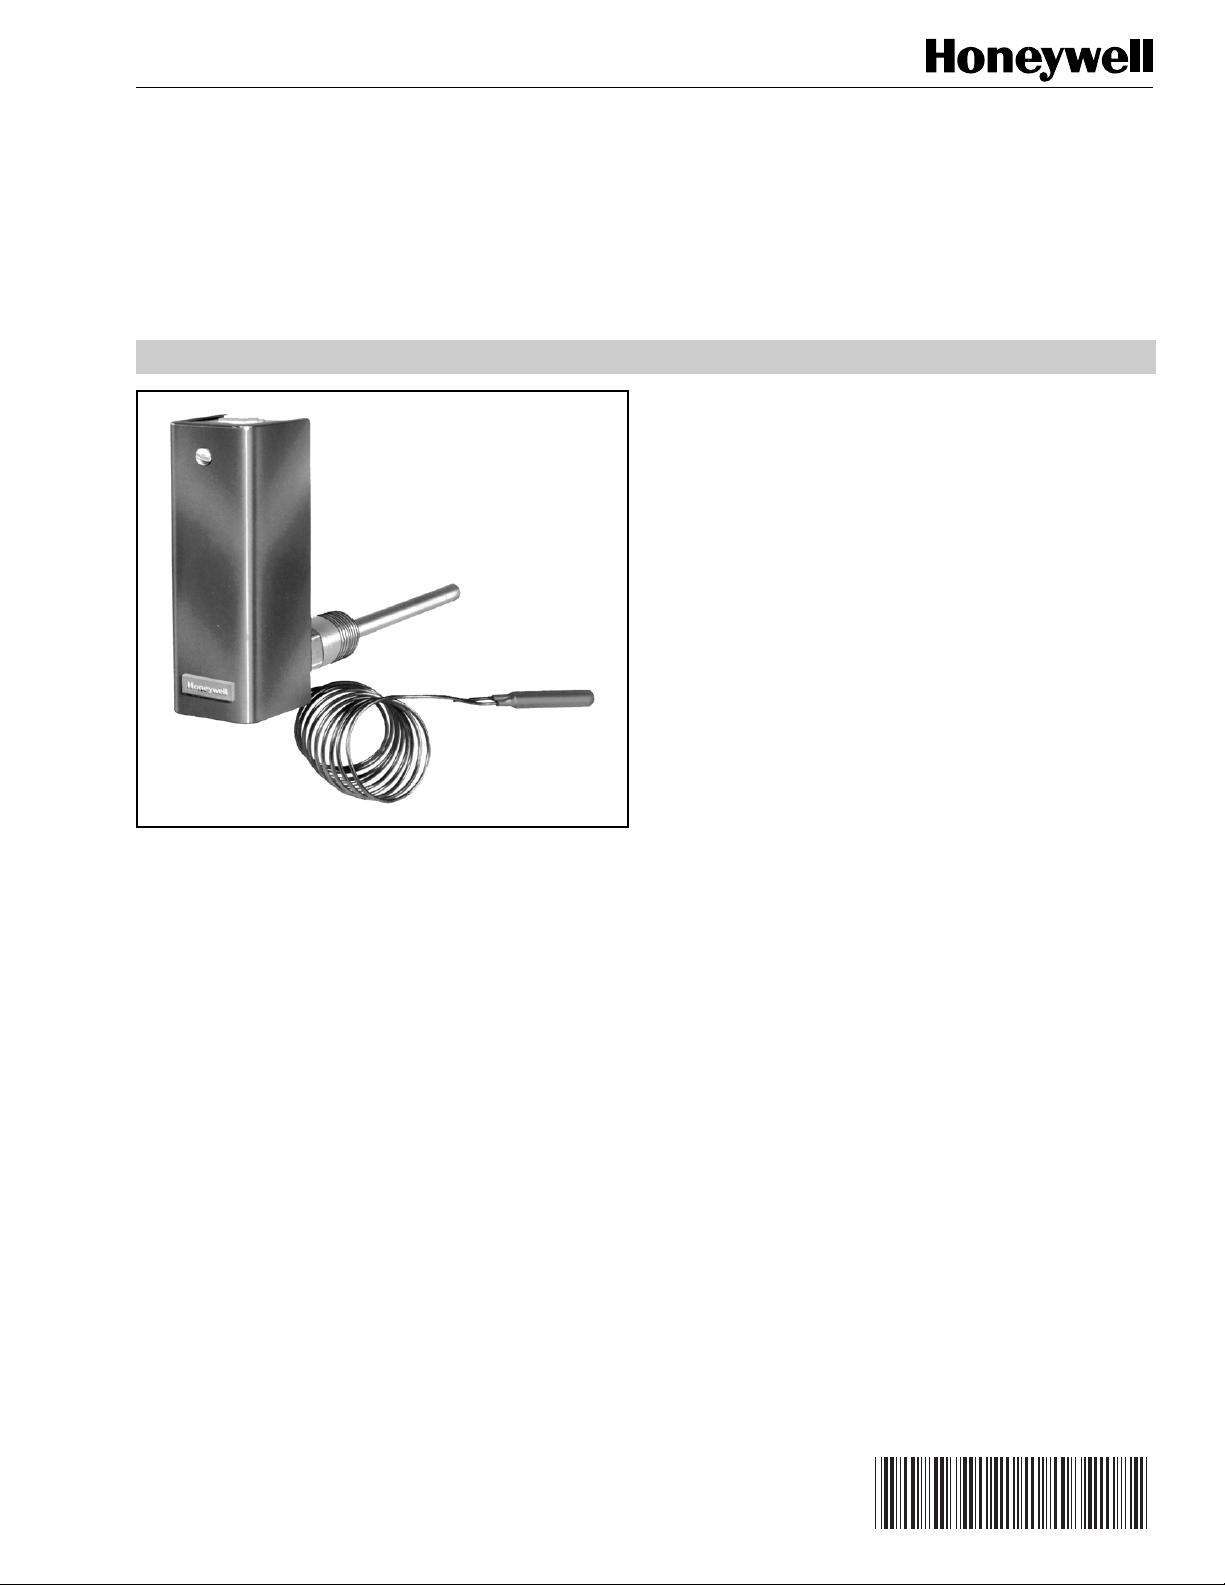
L8100A,B,C Aquastat
Controllers
FEATURES
• L8100A regulates tank temperature and provides
energy cutoff (ECO) action on a temperature rise past
the setpoint.
• L8100B regulates temperature and provides ECO
action on a temperature rise past the setpoint. This
model includes a second sensing element that senses
average water temperature to minimize stacking.
• L8100C includes a second sensing element that
senses average water temperature to minimize
stacking, but does not include ECO action.
• Fluid filled element operates single pole single throw
(spst) snap-acting Micro Switch™.
• Energy cutoff (ECO) switch enclosed in factory
installed well of L8100A,B interrupts the thermocouple
circuit or main valve before the tank reaches
maximum temperature of 210°F (99°C).
PRODUCT DATA
GENERAL
L8100A,B, and C are immersion type controllers for
regulating and limiting the tank temperature in water heaters.
As the water temperature rises past the setpoint, the
controller switches off the gas valve.
• Internal adjustment screw.
• Immersion well is factory installed to the controller.
• Special switch terminal provides three-wire hookup
from Aquastat® controller to gas valve.
• Four terminal models for manual reset with S86/
VR8204/VR8440.
Contents
General ............................................................................... 1
Features .............................................................................. 1
Specifications ...................................................................... 2
Ordering Information ........................................................... 2
Installation ........................................................................... 3
Operation and Checkout ..................................................... 8
® U.S. Registered Trademark
Copyright © 1995 Honeywell Inc. • All Rights Reserved
Page 2
L8100A,B,C Aquastat ® CONTROLLERS
SPECIFICATIONS
IMPORTANT
The specifications given in this publications do not
include normal manufacturing tolerances. Therefore,
an individual unit may not exactly match the listed
specifications. Also, this product is tested and
calibrated under closely controlled conditions, and
some minor differences in performance can be
expected when those conditions are changed.
Models:
L8100A Aquastat® Controller. Regulates water
temperature. Includes energy cutoff (ECO) switch that
breaks controller circuit on a temperature rise above
the setpoint.
L8100B Aquastat® Controller. Regulates water
temperature. Has a second sensing bulb that minimizes
stacking by sensing the average tank temperature.
Includes ECO switch which breaks controller circuit on
a temperature rise above the setpoint.
L8100C Aquastat® Controller. Regulates water
temperature. Has a second sensing bulb that minimizes
stacking by sensing the average tank temperature.
Electrical Ratings:
2A maximum at 24 Vac.
Differential:
Fixed, 5°F (3°C) for controller: 20°F (11°C) for ECO switch.
Capillary Length (for Remote Bulb):
24-5/8, 30, 39, 42, or 54 in. (625, 762, 991, 1067, or
1372 mm).
Insertion Depth:
See Fig. 2.
Insulation Depth:
See Fig. 2.
Finish:
Gray.
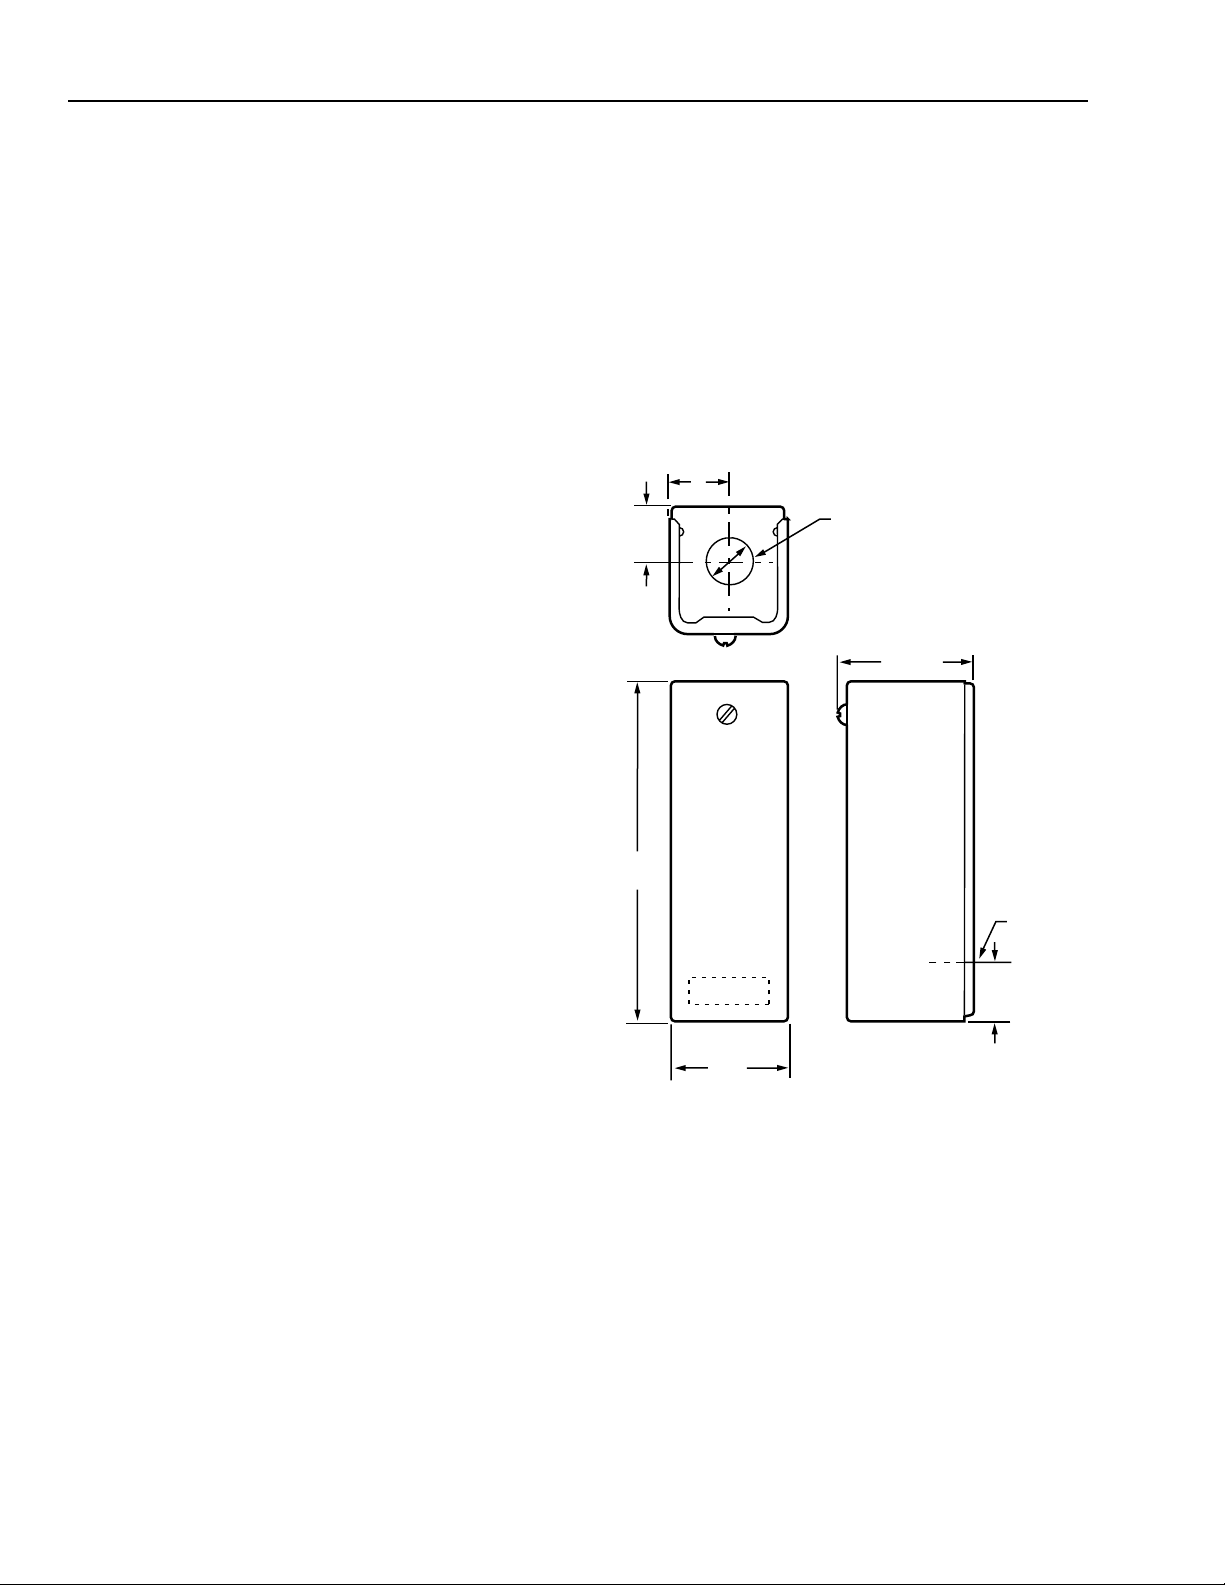
Dimensions:
See Fig. 1 for controller dimensions; see Fig. 2 for immersion
well dimensions.
1
(25)
15/16
(24)
KNOCKOUT FOR 3/4 IN. (19 MM)
CONDUIT
SIMILAR KNOCKOUT
ON BOTTOM
2-1/8 (54)
Maximum Tank Temperature:
210°F (99°C).
Temperature Range:
L8100A: 100°F to 240°F (38°C to 116°C) with factory set
stop to prevent setting above 160°F (71°C).
L8100B,C: 100°F to 180°F (38°C to 82°C).
Pressure Rating:
5-5/8
(144)
ELEMENT
255 psi (1758 kPa).
Sensing Bulb:
Liquid (toluene) filled; 3/8 in. (10 mm) capsule.
3/4
(19)
Immersion Well:
1/2 in (13 mm) or 3/4 in. (19 mm) NPT. See Fig. 2 for
dimensions. All zinc plated except L8100B1094 and
L8100B1185.
2 (51)
Fig. 1. Approximate dimensions of the L8100 Aquastat®
M4747
Controller in in. (mm).
ORDERING INFORMATION
When purchasing replacement and modernization products from your TRADELINE® wholesaler or distributor, refer to the
TRADELINE® Catalog or price sheets for complete ordering number, or specify:
If you have additional questions, need further information, or would like to comment on our products or services, please write or
phone:
1. Model number.
2. Application.
1. Your local Honeywell Home and Building Control Sales Office (check white pages of your phone directory).
2. Home and Building Control Customer Relations
Honeywell, 1885 Douglas Drive North
Golden Valley, Minnesota 55422-4386
In Canada—Honeywell Limited/Limitee, 35 Dynamic Drive, Scarborough, Ontario M1V 4Z9. International Sales and Service
offices in all principal cities of the world.
60-2336—3
2
Page 3

L8100A,B,C Aquastat ® CONTROLLERS
Available Options:
External adjustment screw and visible control point scale.
Factory set stop at 140°F (60°C).
Approvals:
Underwriters Laboratories Inc. Component Recognized:
File No. MP466, Guide Number MBPR2.
American Gas Association Design Certified: Report
Number 23-11B.
Part Available:
110641 Jumper to convert four-terminal L8100 to threeterminal L8100.
TANK WALL
1/2 OR 3/4 — 14 NPT
57
127
11
B
IN. MM
1-1/2 OR 2-1/2
3
7/16
38 OR 64
M4746
A
A INSULATION DEPTH
B INSERTION DEPTH
C WELL DIAMETER
CONTROLLER WELL REMOTE WELL
IN. MM
2-1/4
5
7/16
INSTALLATION
When Installing this Product...
쐃 Read instructions carefully. Failure to follow them could
damage the product or cause a hazardous condition.
쐇 Check ratings and descriptions given in the
specifications to make sure the product is suitable for
your application.
쐋 Installer must be a trained, experienced service
technician.
쐏 After installation is complete, check out product
operation as provided in these instructions.
CAUTION
Disconnect power before installation to prevent
electrical shock or equipment damage.
C
76
11
Mounting Direct Immersion Well
The manufacturer usually provides a tapping for insertion of
the controller sensing element. This tapping is located at a
point where typical water temperature can be measured.
Follow the instructions furnished by the system manufacturer,
if available, or use the procedure below. See Fig. 3.
Fig. 2. Approximate dimensions for the controller
immersion well and remote immersion well in in. (mm).
SENSING BULB AND
ECO SWITCH LOCATION
L8100A
THERMOCOUPLE
AND PILOT BURNER
MAIN BURNER
Fig. 3. Location of L8100A,B,C Aquastat® Controllers.
UPPER
SENSING BULB
L8100B,C
M4759
3
60-2336—3
Page 4
L8100A,B,C Aquastat ® CONTROLLERS
IMPORTANT
The controller immersion well is factory-installed to
the controller. Do not remove the immersion well,
this could damage the ECO switch.
쐃 If system is filled, drain to a point below the tapping.
쐇 Remove plug from tapping.
쐋 If tapping is suitable, carefully screw immersion well
into tapping. Do not tighten or apply force to the
controller case.
쐏 Fill tank. Make sure that well is screwed in tightly
enough to prevent leakage.
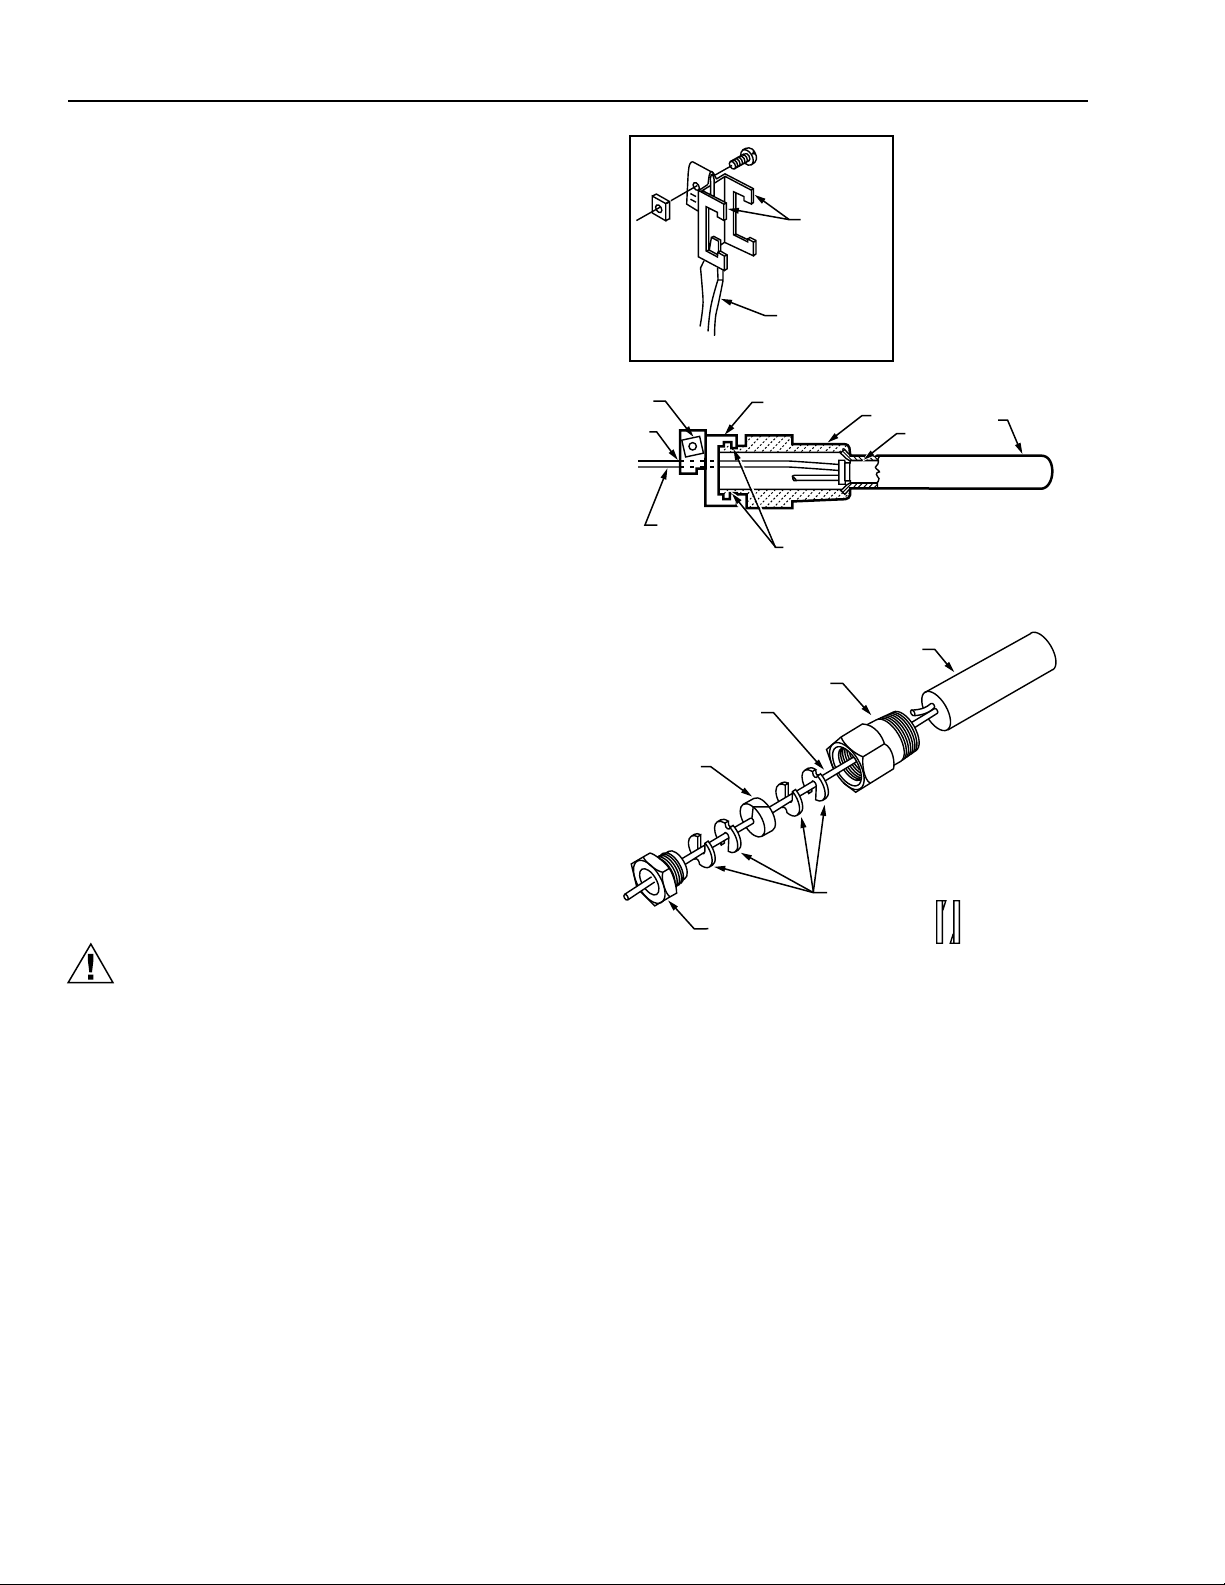
Mounting Remote Bulb (L8100B and L8100C)
The remote temperature sensing bulb is installed in an
INSERT— MOUNTING CLAMP
DRAW
NUT
B
immersion well (Fig. 4) or located near a capillary
compression fitting (Fig. 5) that extends into the upper portion
of the tank to prevent stacking.
Immersion Well Fitting
The immersion well must snugly fit the sensing bulb for good
thermal response. Install as follows:
쐃 Use tapping provided by tank manufacturer, if possible,
or select an area where typical water temperature is
best measured.
쐇 If tank is filled, drain to below point where bulb will be
installed.
쐋 Screw well into tank.
쐏 Insert bulb into well, pushing tubing until bulb bottoms
in well.
쐄 Attach mounting clamp end of well spud. Loosen draw
nut and spread jaws of clamp with screwdriver if
necessary.
쐂 With mounting clamp attached to well spud (make sure
jaws of clamp hook over ridge at end of spud, as shown
at points A in Fig. 4), adjust tubing to fit through
mounting clamp groove, as shown at point B in Fig. 4.
쐆 Tighten draw nut until mounting clamp is firmly attached
to well spud and tubing is held securely in place.
Fig. 4. Immersion well fitting for L8100 remote bulb.
CAPILLARY TUBING
COMPOSITION DISK
(SLOTTED)
TUBING
MOUNTING
CLAMP
BOILER PLUG
PACKING NUT
JAWS
SPREAD JAWS
TO FIT OVER
RIDGE ON
WELL SPUD
SCREWDRIVER
SPUD
BULB
A
IMMERSION
BULB
EXAMPLE OF SLOTTED WASHERS
ASSEMBLED
IN PAIRS:
WELL
M8777
M8816
CAUTION
Do not secure draw nut so tightly that mounting clamp
collapses tubing.
Capillary Compression Fitting
쐃 Use tapping provided by manufacturer, if possible, or
select an area where typical water temperature is best
measured.
쐇 If tank is filled, drain to below point where bulb will be
installed.
쐋 Screw fitting into boiler tank tapping.
쐏 Place packing nut on tubing.
쐄 Slide bulb completely through fitting.
쐂 Place composition disk and four slotted brass washers
on tubing in order shown in Fig. 5.
so slots are 180 degrees apart.
쐆 Slide seal assembly into fitting and tighten packing nut.
60-2336—3
Tu rn brass washers
Fig. 5. Capillary compression fitting for
L8100 remote bulb.
Wiring
Disconnect power supply before installation to prevent
electrical shock or equipment damage. All wiring must comply
with local codes and ordinances regarding wire size, type of
insulation, enclosure, etc. Fig. 6 through 11 show typical
Powerpile® (millivolt) gas control connections; Fig. 12 and 13
show typical connections for 24 Vac systems; Fig. 14 through
16 show an L8100 hookup with an S86E,F,G, or H
Intermittent Pilot System.
Some four-terminal models are shipped with jumper in place
for use as three-terminal models. Remove jumper for fourterminal operation.
4
Page 5

L8100A,B,C Aquastat ® CONTROLLERS
3
2
1
1
2
3
VS820
VALVE OPERATOR
COIL
PILOTSTAT® POWER
UNIT COIL
POWERPILE®
MILLIVOLT
GENERATOR
ECO SWITCH
CONTROLLER
L8100A,B
USE 3-TERMINAL VS820 GAS VALVE.
DOTTED LINE SHOWS INTERNAL WIRING.
SELECTED MODELS HAVE 3/16 AND 1/4 IN. TAB TERMINALS.
M4751
TH
TH
PP
PP
L8100A,B
CONTROLLER
ECO SWITCH
2
TH
TH
VS890
1
VALVE OPERATOR
COIL
PILOTSTAT® POWER
UNIT COIL
1
DOTTED LINE SHOWS INTERNAL WIRING.
SELECTED MODELS HAVE 3/16 AND 1/4 IN. TAB TERMINALS.
2
PP
PP
POWERPILE®
MILLIVOLT
GENERATOR
M4748
Fig. 6. L8100A,B hookup with VS890 where
controller cuts out main valve and ECO switch
cuts out pilot safety valve.
L8100A,B
CONTROLLER
ECO SWITCH
3
TH
VS820
GAS VALVE
1
2
3
TH
1
VALVE OPERATOR
COIL
USE 4-TERMINAL VS820 GAS VALVE.
DOTTED LINE SHOWS INTERNAL WIRING.
SELECTED MODELS HAVE 3/16 AND 1/4 IN. TAB TERMINALS.
PP
PP
2
PILOTSTAT® POWER
UNIT COIL
POWERPILE®
MILLIVOLT
GENERATOR
M4750
Fig. 8. L8100A,B hookup with four-terminal VS820
where controller cuts out main valve and ECO
switch cuts out pilot safety valve.
L8100A,B
CONTROLLER
ECO SWITCH
2
TH
TH
VS890
1
VALVE OPERATOR
COIL
PILOTSTAT® POWER
UNIT COIL
1
DOTTED LINE SHOWS INTERNAL WIRING.
SELECTED MODELS HAVE 3/16 AND 1/4 IN. TAB TERMINALS.
2
Fig. 7. L8100A,B hookup with VS890 where controller and
ECO switch are placed in series to cut out main valve.
PP
PP
POWERPILE®
MILLIVOLT
GENERATOR
M4749
Fig. 9. L8100A,B hookup with three-terminal VS820
where controller and ECO switch are placed in
series to cut out main valve.
5
60-2336—3
Page 6

L8100A,B,C Aquastat ® CONTROLLERS
L8100C
2
VS890
PP
PP
POWERPILE®
MILLIVOLT
GENERATOR
M4752
TH
TH
1
VALVE OPERATOR
COIL
PILOTSTAT® POWER
UNIT COIL
1
DOTTED LINE SHOWS INTERNAL WIRING.
INSTALL FIELD JUMPER BETWEEN TERMINALS TH AND PP.
2
Fig. 10. L8100C hookup with VS890 to cut out main valve.
L8100C
L8100A,B
1
L1
(HOT)
CONTROLLER
L2
ECO SWITCH
3
PP
TH
V800
TH
2
VALVE OPERATOR
COIL
1
POWER SUPPLY. PROVIDE DISCONNECT MEANS AND
OVERLOAD PROTECTION AS REQUIRED.
2
DOTTED LINE SHOWS INTERNAL WIRING.
3
SELECTED MODELS HAVE 3/16 AND 1/4 IN. TAB TERMINALS.
PP
Fig. 12. L8100A, B hookup with V800 to
cut out main valve.
L8100C
M4754
VS820
PP
TH
TH
PP
1
VALVE OPERATOR
COIL
PILOTSTAT® POWER
UNIT COIL
1
DOTTED LINE SHOWS INTERNAL WIRING.
POWERPILE®
MILLIVOLT
GENERATOR
M4753
Fig. 11. L8100C hookup with three-terminal VS820 to cut
out main gas valve.
1
L1
(HOT)
L2
PP
TH
V800
TH
2
VALVE OPERATOR
COIL
1
POWER SUPPLY. PROVIDE DISCONNECT MEANS AND
OVERLOAD PROTECTION AS REQUIRED.
2
DOTTED LINE SHOWS INTERNAL WIRING.
PP
M4755
Fig. 13. L8100C hookup with V800 to cut out main valve.
60-2336—3
6
Page 7

L8100A,B,C Aquastat ® CONTROLLERS
L8100A,B
CONTROLLER
3
25V
25V
TH-R
TH-W
S86E,F,G,H
MV/PV
2
MV
GND
TO GAS
PV
VALVE
GND
M4756
L1
(HOT)
L2
1
2
3
1
POWER SUPPLY. PROVIDE DISCONNECT MEANS AND OVERLOAD PROTECTION AS REQUIRED.
S86E AND F MODELS ARE AVAILABLE WITH OR WITHOUT TH-R AND TH-W TERMINALS.
SELECTED MODELS HAVE 3/16 AND 1/4 IN. TAB TERMINALS.
ECO SWITCH
Fig. 14. Three-terminal L8100A,B hookup with S86E,F,G,H intermittent pilot system.
L8100A,B
CONTROLLER
3
ECO SWITCH
S86E,F,G,H
L1
(HOT)
L2
1
2
3
1
25V
25V
TH-R
TH-W
POWER SUPPLY. PROVIDE DISCONNECT MEANS AND OVERLOAD PROTECTION AS REQUIRED.
S86E AND F MODELS ARE AVAILABLE WITH OR WITHOUT TH-R AND TH-W TERMINALS.
SELECTED MODELS HAVE 3/16 AND 1/4 IN. TAB TERMINALS.
MV
MV/PV
PV
GND
2
GND
M4758
TO GAS
VALVE
Fig. 15. Four-terminal L8100A,B hookup with S86E,F,G,H intermittent pilot system.
7
60-2336—3
Page 8

L8100A,B,C Aquastat ® CONTROLLERS
L8100A,B
CONTROLLER
ECO SWITCH
L1
(HOT)
L2
1
S86H
3
25V
25V
TH-R
TH-W
MV
MV/PV
GND
PV
VR8440 VALVE
GND
TERMINALS
2
TH-TR
1
POWER SUPPLY. PROVIDE DISCONNECT MEANS AND OVERLOAD PROTECTION AS REQUIRED.
FACTORY-INSTALLED WIRES, DO NOT REMOVE.
2
SELECTED MODELS HAVE 3/16 AND 1/4 IN. TAB TERMINALS.
3
Fig. 16. Four-terminal L8100B manual reset hookup with S86H and VR8440.
OPERATION AND CHECKOUT
Operation
When tank temperature rises past the setpoint, the liquid fill in
the sensing element expands and activates the snap-acting
switch, closing the gas valve. When the water temperature
drops below the differential, the switch opens the gas valve
and the burner begins heating the water. The ECO switch will
break the circuit to the Powerpile® millivolt generator or 24
Vac main valve before the water temperature rises to 210°F
(99°C).
TH
M4757
TR
The second element of the L8100B,C is located at the top of
the tank. These two elements sense the average temperature
in the tank. If a stacking condition begins, the L8100B,C will
close the valve before the top tank temperature becomes
excessive.
Adjusting
Adjust the control point to agree with the manufacturer’s
recommendations. To adjust, remove the cover and set the
scale to the desired control point (see Fig. 17).
SETPOINT SCALE
60-2336—3
Fig. 17. Internal view of the L8100.
8
CONTROLLER
TERMINALS
ECO SWITCH TERMINALS
(ON L8100A,B ONLY)
M4760
Page 9

Checkout
Check to verify the Aquastat® controller was installed and
adjusted properly. Put the system into operation and observe
the action of the device through several cycles to make
certain that it provides proper control of the system. Further
adjustments can then be made to meet more exact comfort
requirements.
L8100A,B,C Aquastat ® CONTROLLERS
9
60-2336—3
Page 10

L8100A,B,C Aquastat ® CONTROLLERS
60-2336—3
10
Page 11

L8100A,B,C Aquastat ® CONTROLLERS
11
60-2336—3
Page 12

L8100A,B,C Aquastat ® CONTROLLERS
Home and Building Control
Honeywell Inc.
1985 Douglas Drive North
Golden Valley, MN 55422
Home and Building Control
Honeywell Limited-Honeywell Limitée
740 Ellesmere Road
Scarborough, Ontario
M1P 2V9
60-2336—3 G.R. Rev. 10-95 Printed in U.S.A.
60-2336—3
12
Helping You Control Your World
QUALITY IS KEY
customer.honeywell.com
 Loading...