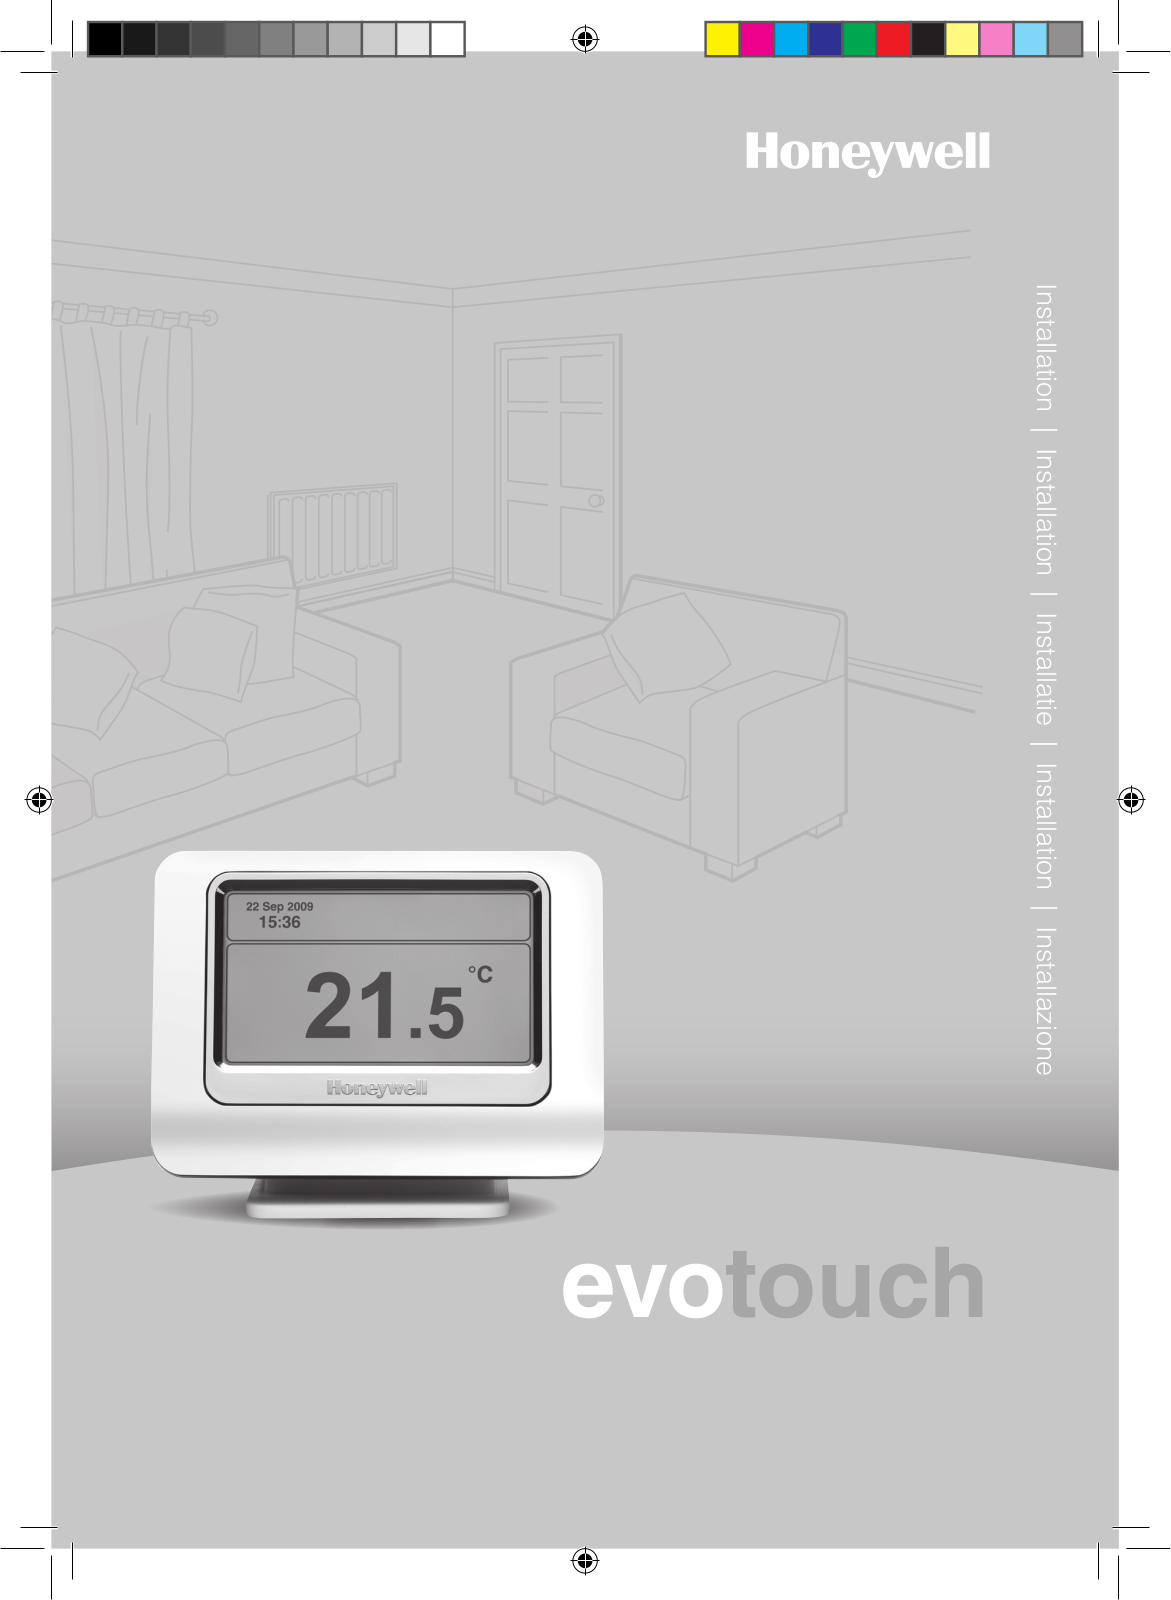
Honeywell EVOTOUCH User Manual

Installation | Installation | Installatie | Installation | Installazione

1

evotouch

ENGLISH

Product overview

The Honeywell evotouch comfort control system is a programmable zoning controller with the following key features:

Features

Large touch-screen display for intuitive operation by finger.

Wall or table-top mounting.

Configuration

Step-by-step configuration procedure binds the controller to each of the devices in the system.

Control

Wireless control to boiler, radiator controllers, room sensors, and under floor heating controllers.

Independent control of up to 8 zones, to optimise comfort and minimise energy usage.

Optimum Start feature automatically calculates when to start heating to achieve the correct temperature.

Automatic Summer/Winter time change.

Choice of Guided Configuration, for simple applications, or Expert Configuration, for customising the configuration.

Note: evohome system packs are already preconfigured (see system pack contents sheet).

Programmability

Up to 6 periods per day in each of the 8 zones.

Holiday mode reduces the temperature for 1 to 99 days.

Economy mode reduces the temperature settings in all zones, to reduce fuel bills.

Future expansion

• A USB port, for future updates.

Installation

The product is shipped with pre-charged batteries. However, for maximum time off the dock, place the product on charge.

Two mounting options are available:

A wall-mounted dock.

A table top stand.

When removed from the stand/dock the evotouch will remain powered for about 2 hours before needing to be replaced for charging.

2

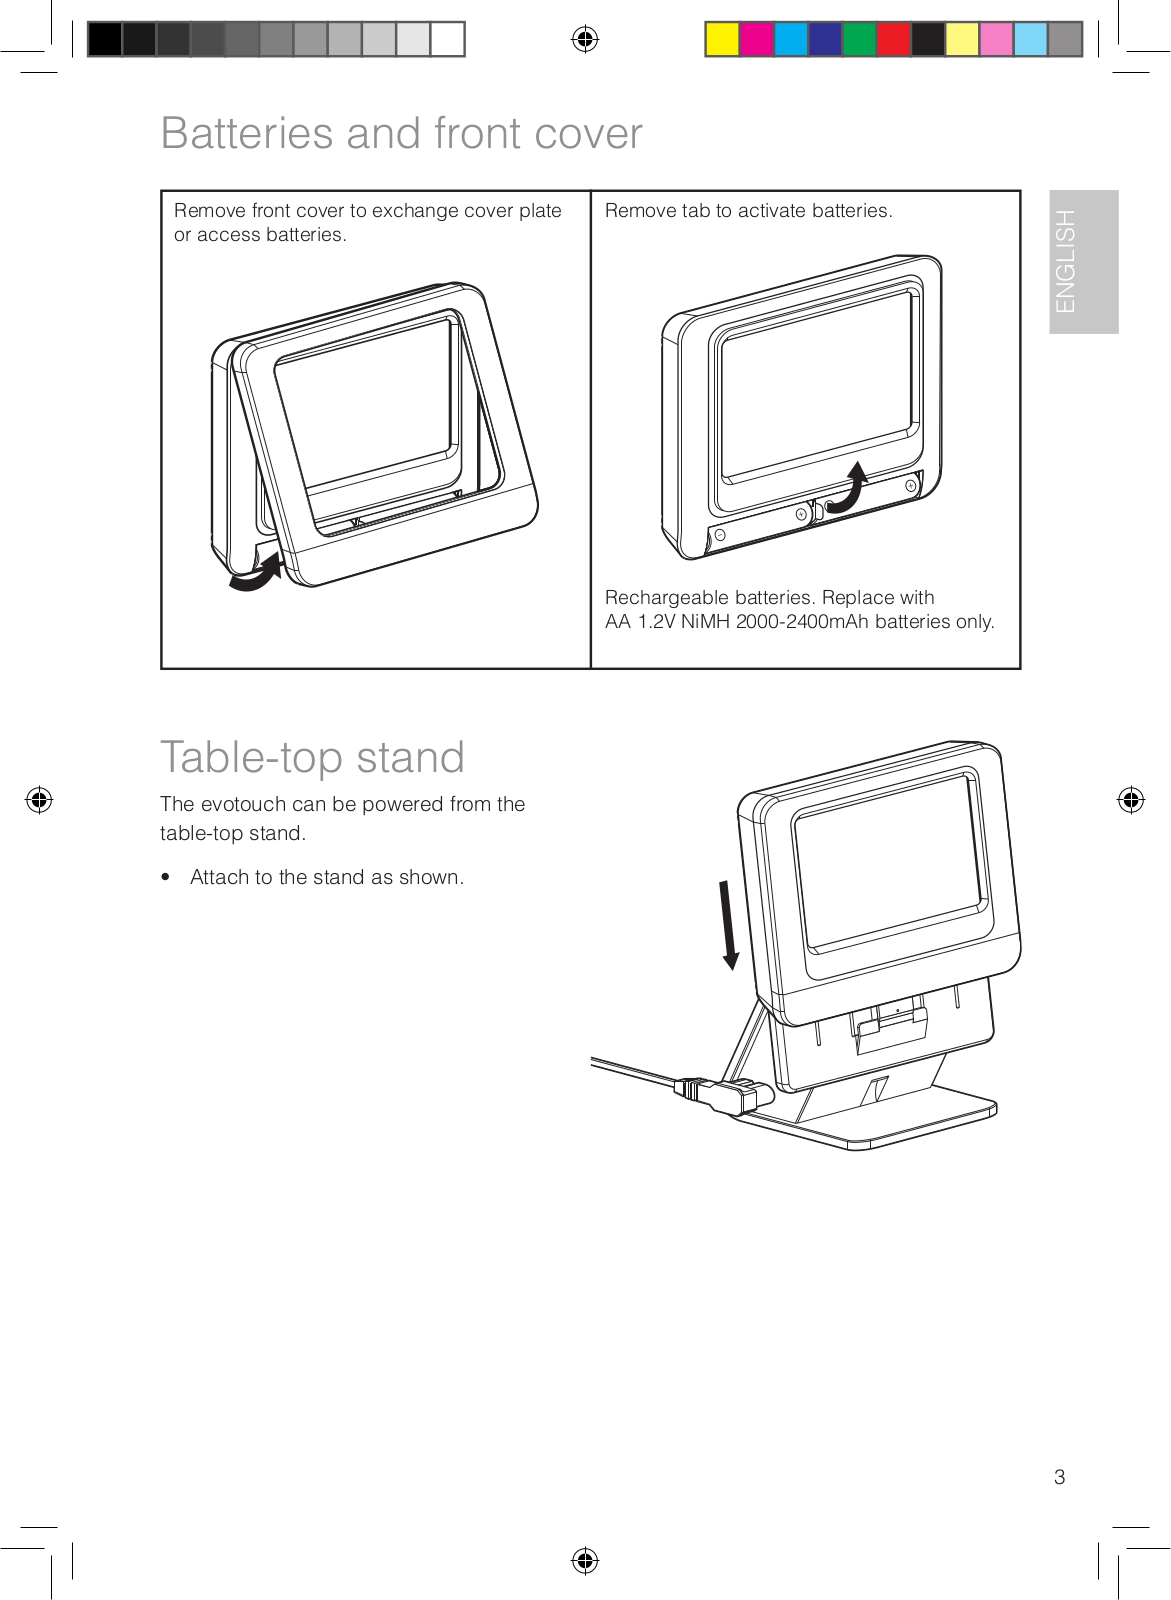
Batteries and front cover

Remove front cover to exchange cover plate

Remove tab to activate batteries.

or access batteries.


Rechargeable batteries. Replace with

AA 1.2V NiMH 2000-2400mAh batteries only.

Table-top stand

The evotouch can be powered from the table-top stand.

• Attach to the stand as shown.

ENGLISH

3

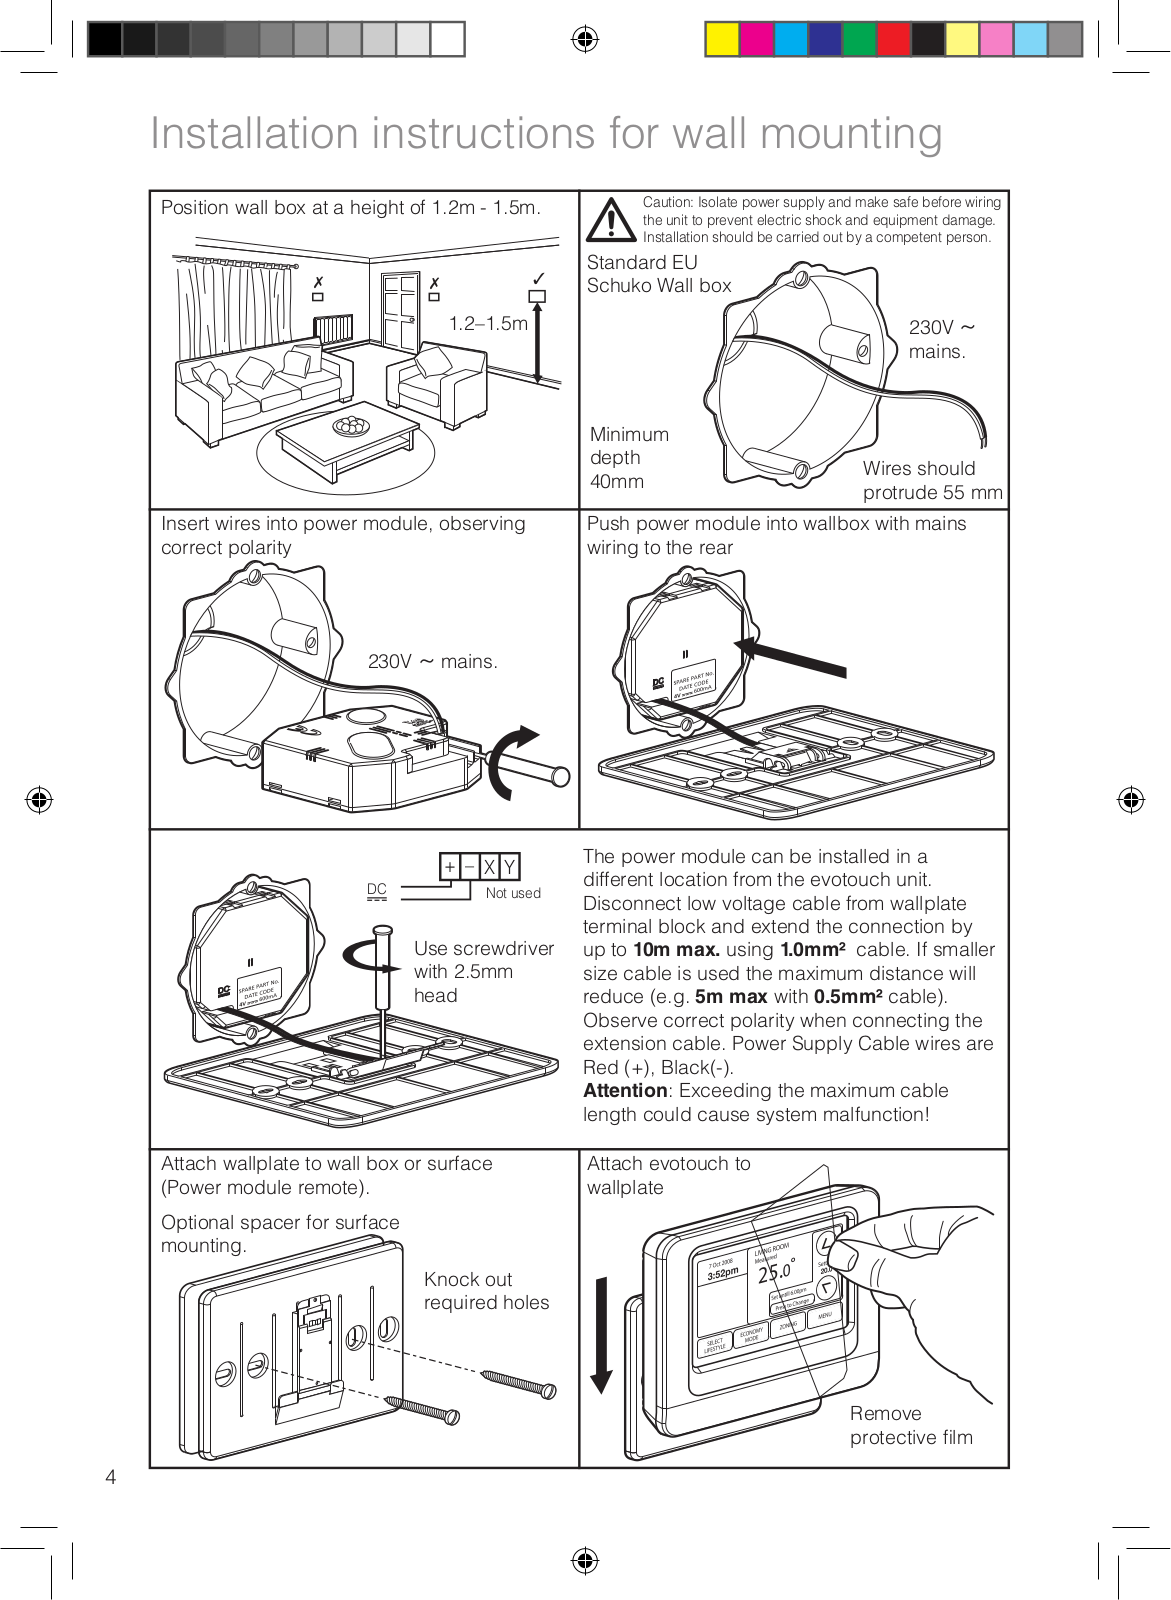
Installation instructions for wall mounting

Position wall box at a height of 1.2m - 1.5m.

Caution: Isolate power supply and make safe before wiring


the unit to prevent electric shock and equipment damage.


Installation should be carried out by a competent person.


Standard EU


Schuko Wall


1.2–1.5m


230V ~


mains.


Minimum


depth

Wires should


40mm


protrude 55 mm


Insert wires into power module, observing


Push power module into wallbox with mains

correct polarity


wiring to the rear


230V ~ mains.


+ – X Y

The power module can be installed in a


different location from the evotouch unit.

DC

Not used

Disconnect low voltage cable from wallplate


Use screwdriver

terminal block and extend the connection by


up to 10m max. using 1.0mm² cable. If smaller


with 2.5mm

size cable is used the maximum distance will


head

reduce (e.g. 5m max with 0.5mm² cable).


Observe correct polarity when connecting the


extension cable. Power Supply Cable wires are


Red (+), Black(-).


Attention: Exceeding the maximum cable


length could cause system malfunction!

Attach wallplate to wall box or surface

Attach evotouch to

(Power module remote).


wallplate

Optional spacer for surface


mounting


Knock out


required holes


Remove


protective film

4

Setting up evotouch

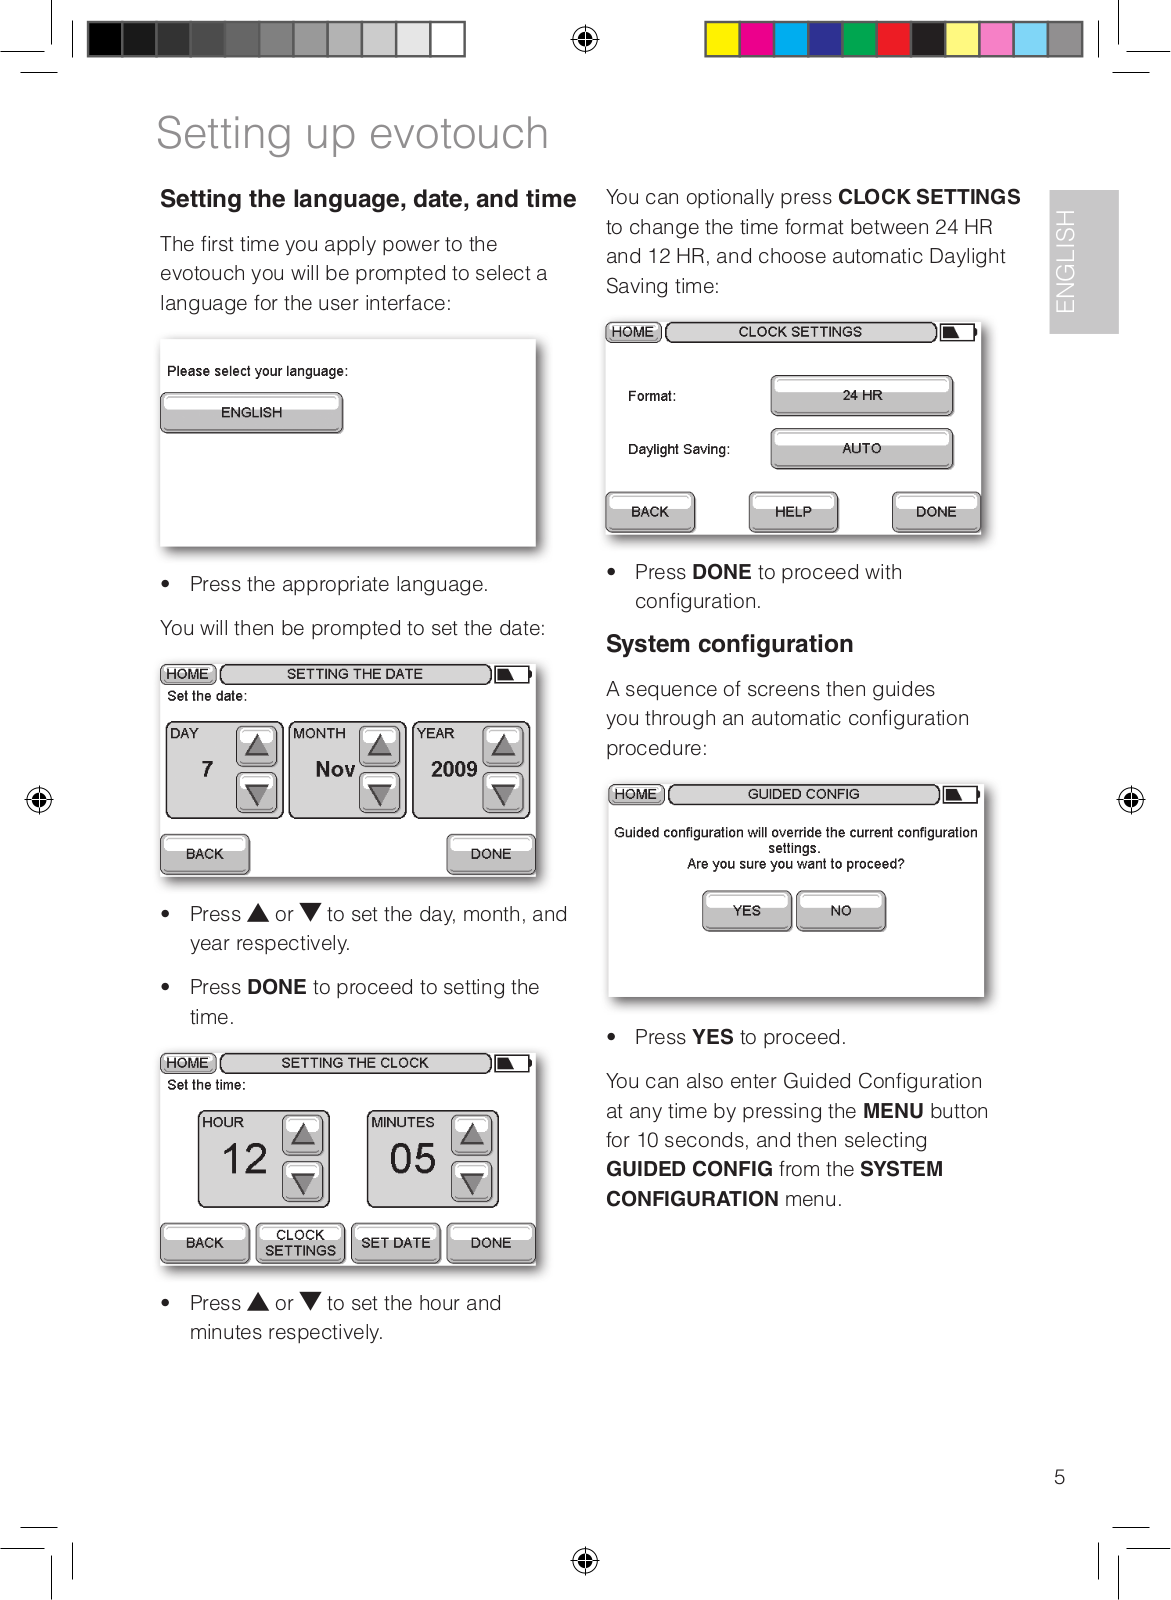
Setting the language, date, and time

The first time you apply power to the evotouch you will be prompted to select a language for the user interface:

• Press the appropriate language.

You will then be prompted to set the date:

Press or to set the day, month, and year respectively.

Press DONE to proceed to setting the time.

Press or to set the hour and minutes respectively.

You can optionally press CLOCK SETTINGS to change the time format between 24 HR and 12 HR, and choose automatic Daylight Saving time:

Press DONE to proceed with configuration.

System configuration

A sequence of screens then guides you through an automatic configuration procedure:

• Press YES to proceed.

You can also enter Guided Configuration at any time by pressing the MENU button for 10 seconds, and then selecting

GUIDED CONFIG from the SYSTEM CONFIGURATION menu.

ENGLISH

5

Configuration – General Features

Binding

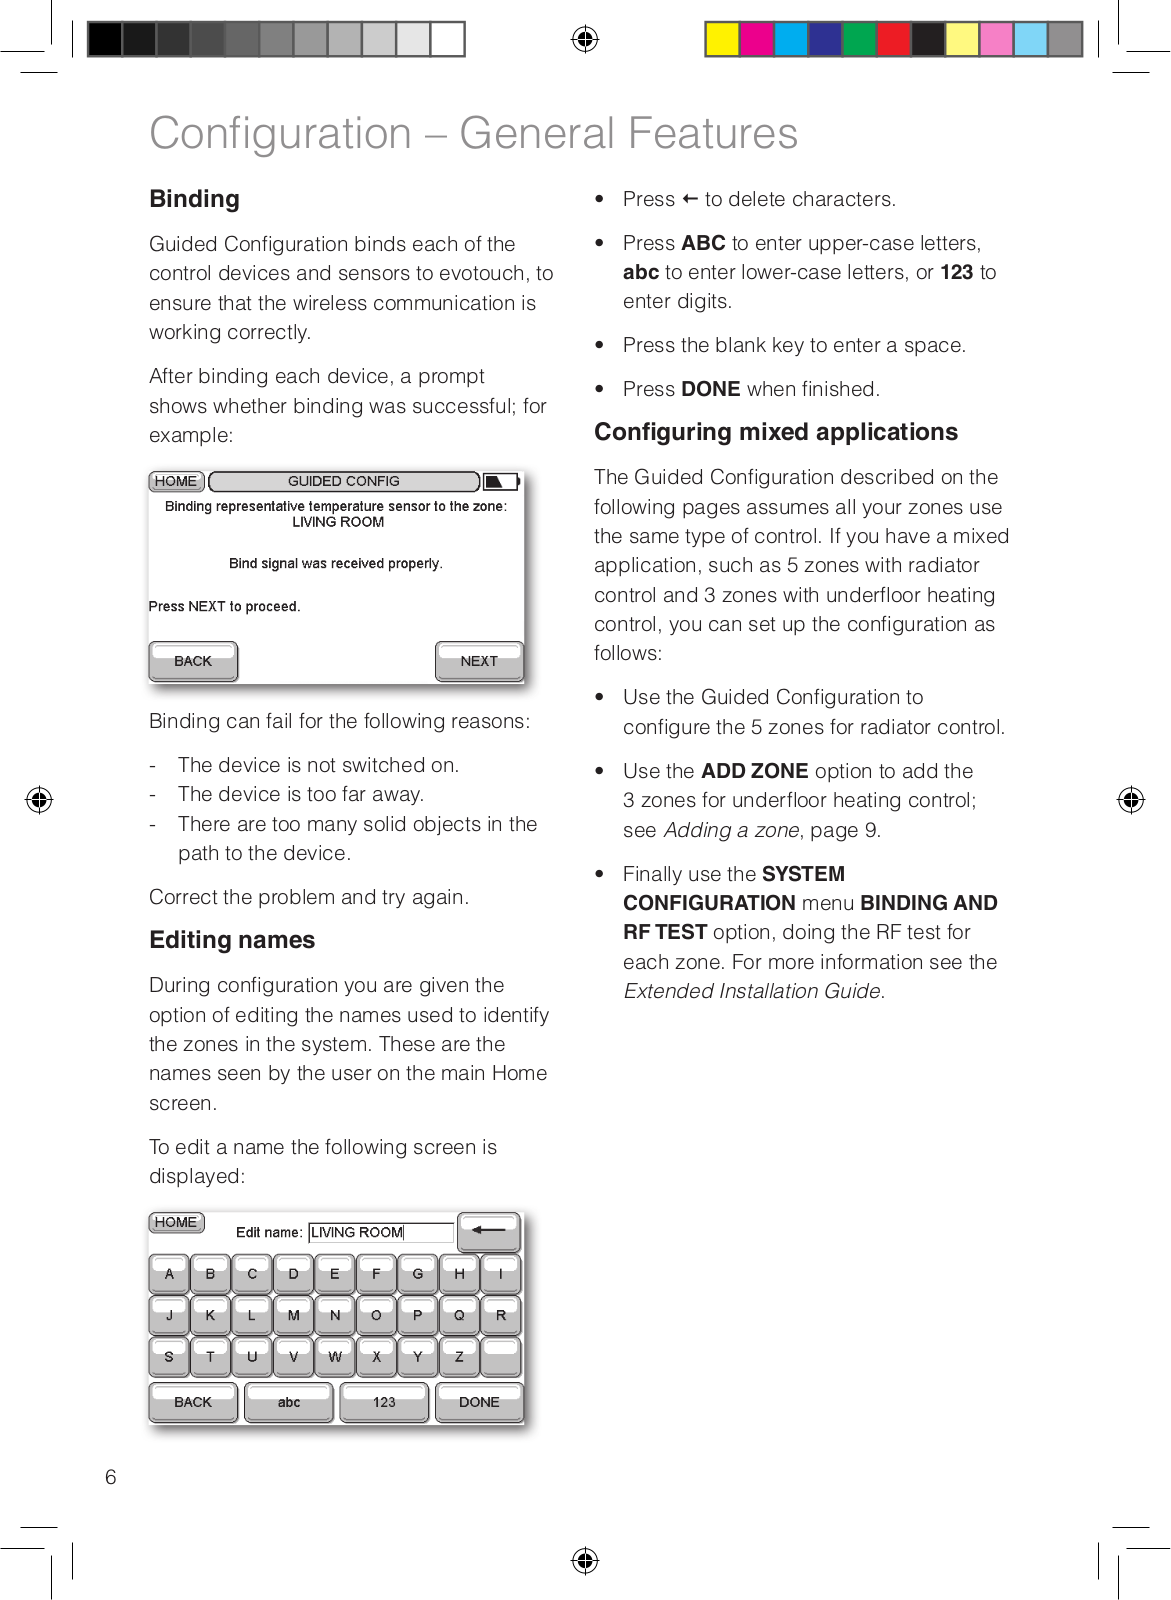
Guided Configuration binds each of the control devices and sensors to evotouch, to ensure that the wireless communication is working correctly.

After binding each device, a prompt shows whether binding was successful; for example:

Binding can fail for the following reasons:

-The device is not switched on.

-The device is too far away.

-There are too many solid objects in the path to the device.

Correct the problem and try again.

Editing names

During configuration you are given the option of editing the names used to identify the zones in the system. These are the names seen by the user on the main Home screen.

To edit a name the following screen is displayed:

Press to delete characters.

Press ABC to enter upper-case letters, abc to enter lower-case letters, or 123 to enter digits.

Press the blank key to enter a space.

Press DONE when finished.

Configuring mixed applications

The Guided Configuration described on the following pages assumes all your zones use the same type of control. If you have a mixed application, such as 5 zones with radiator control and 3 zones with underfloor heating control, you can set up the configuration as follows:

Use the Guided Configuration to configure the 5 zones for radiator control.

Use the ADD ZONE option to add the 3 zones for underfloor heating control; see Adding a zone, page 9.

Finally use the SYSTEM CONFIGURATION menu BINDING AND RF TEST option, doing the RF test for each zone. For more information see the

Extended Installation Guide.

6

Guided Configuration

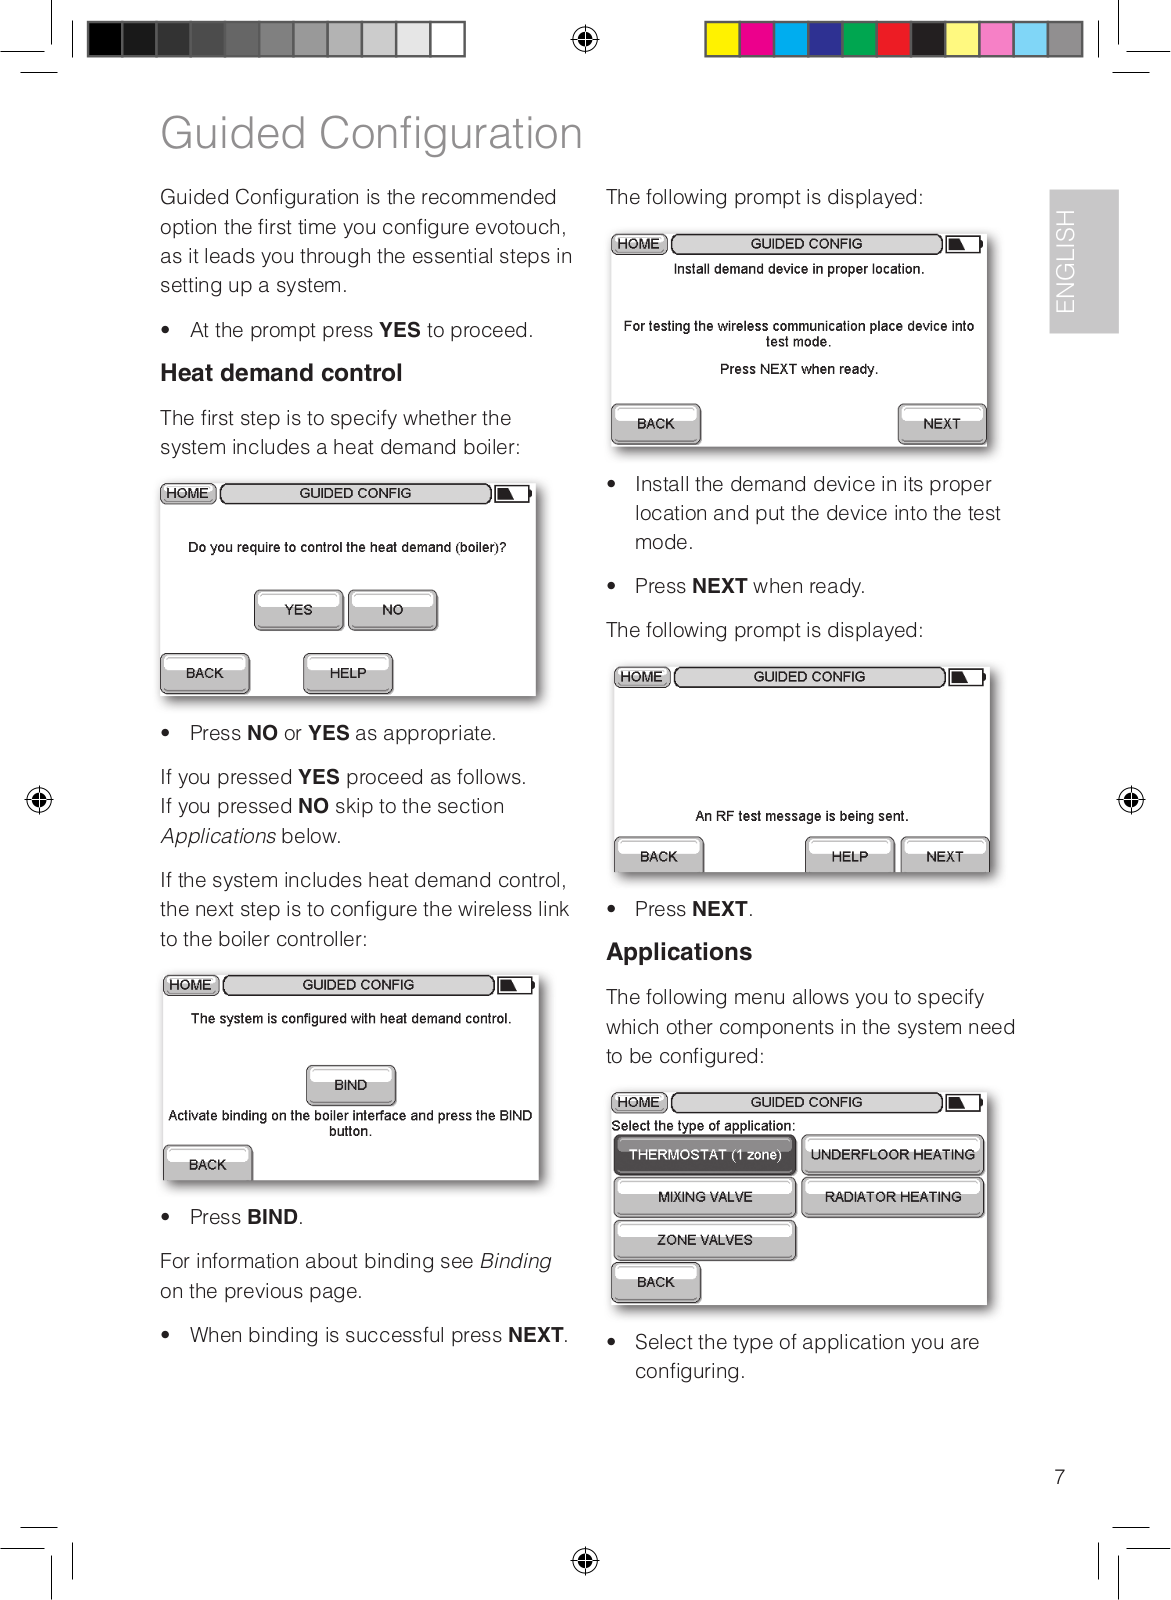
Guided Configuration is the recommended option the first time you configure evotouch, as it leads you through the essential steps in setting up a system.

• At the prompt press YES to proceed.

Heat demand control

The first step is to specify whether the system includes a heat demand boiler:

• Press NO or YES as appropriate.

If you pressed YES proceed as follows. If you pressed NO skip to the section

Applications below.

If the system includes heat demand control, the next step is to configure the wireless link to the boiler controller:

• Press BIND.

For information about binding see Binding on the previous page.

• When binding is successful press NEXT.

The following prompt is displayed:

Install the demand device in its proper location and put the device into the test mode.

Press NEXT when ready.

The following prompt is displayed:

• Press NEXT.

Applications

The following menu allows you to specify which other components in the system need to be configured:

Select the type of application you are configuring.

ENGLISH

7

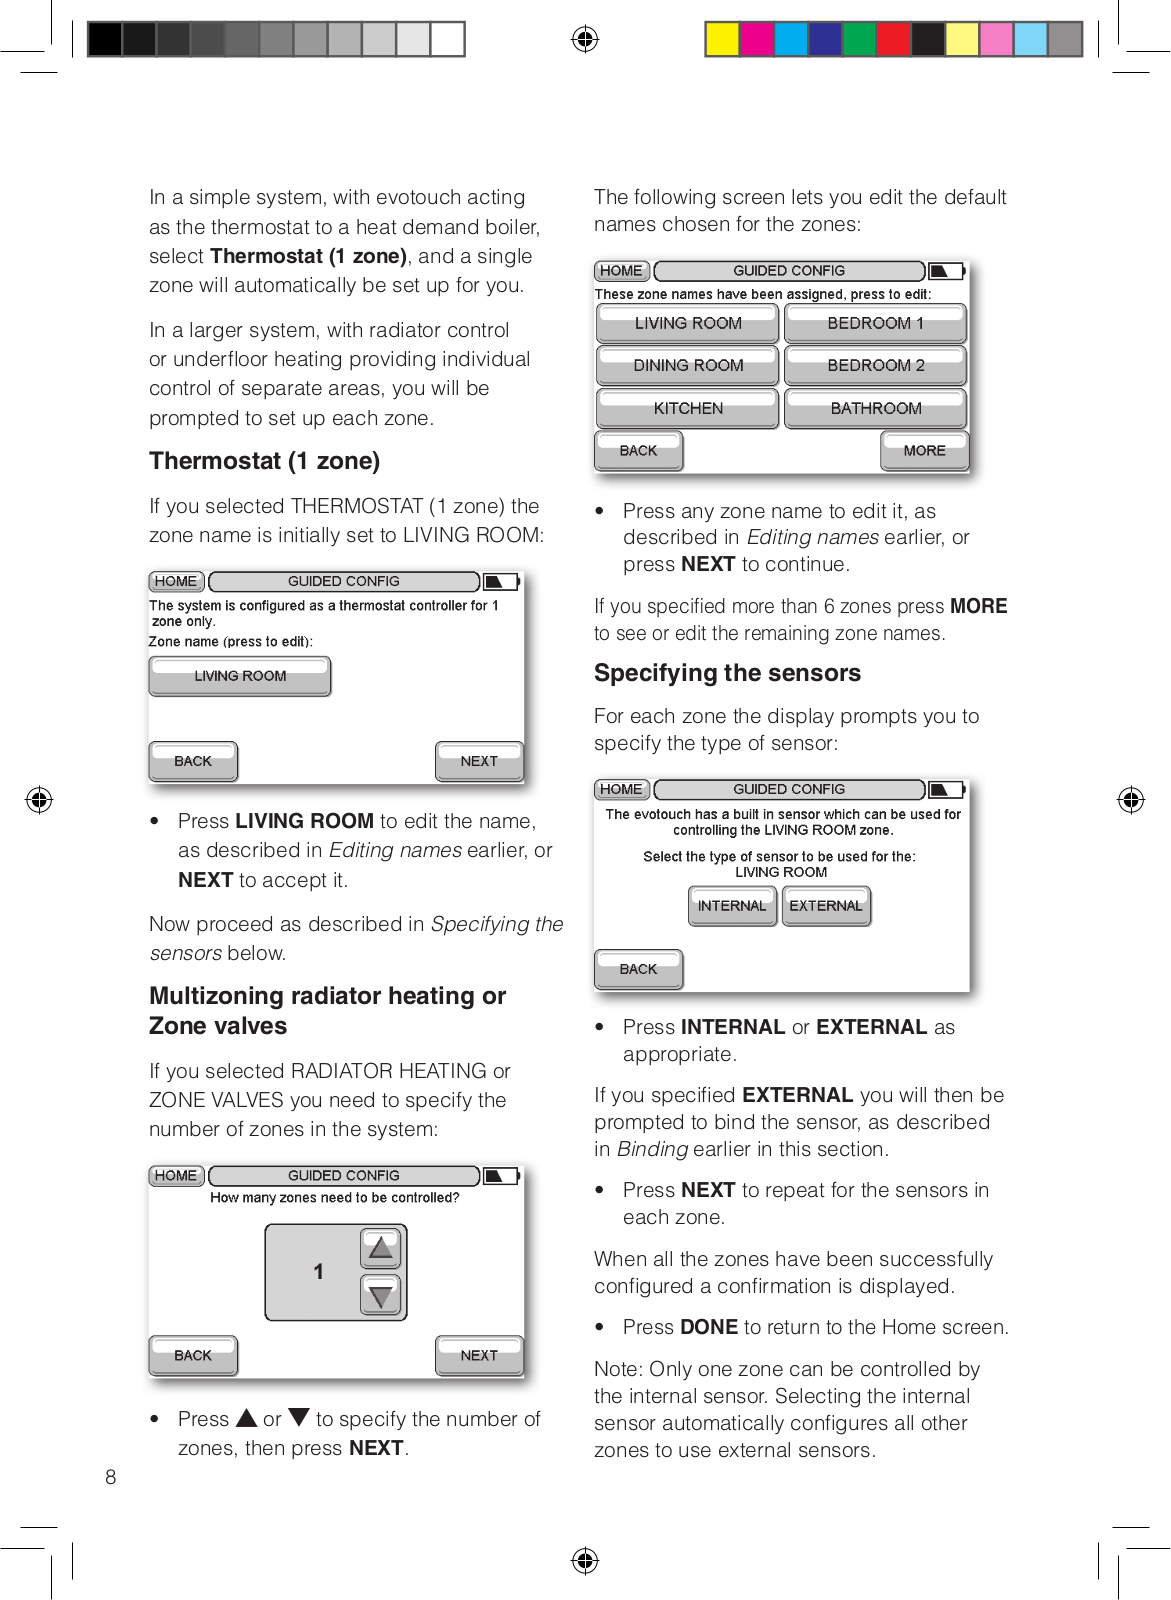
In a simple system, with evotouch acting as the thermostat to a heat demand boiler, select Thermostat (1 zone), and a single zone will automatically be set up for you.

In a larger system, with radiator control or underfloor heating providing individual control of separate areas, you will be prompted to set up each zone.

Thermostat (1 zone)

If you selected THERMOSTAT (1 zone) the zone name is initially set to LIVING ROOM:

The following screen lets you edit the default names chosen for the zones:

Press any zone name to edit it, as described in Editing names earlier, or press NEXT to continue.

If you specified more than 6 zones press MORE to see or edit the remaining zone names.

Specifying the sensors

For each zone the display prompts you to specify the type of sensor:

Press LIVING ROOM to edit the name, as described in Editing names earlier, or

NEXT to accept it.

Now proceed as described in Specifying the sensors below.

Multizoning radiator heating or Zone valves

If you selected RADIATOR HEATING or ZONE VALVES you need to specify the number of zones in the system:

Press or to specify the number of zones, then press NEXT.

Press INTERNAL or EXTERNAL as appropriate.

If you specified EXTERNAL you will then be prompted to bind the sensor, as described in Binding earlier in this section.

Press NEXT to repeat for the sensors in each zone.

When all the zones have been successfully configured a confirmation is displayed.

• Press DONE to return to the Home screen.

Note: Only one zone can be controlled by the internal sensor. Selecting the internal sensor automatically configures all other zones to use external sensors.

8

Adding a zone

This section explains how to add a zone to an existing configuration, such as after adding an HR80 Radiator Controller to provide independent control of a room.

Press MENU from the home screen to display the Main Menu.

Press ZONING MENU on the Main Menu to display the Zoning Menu.

Press ZONING CONFIG on the Zoning

Menu.

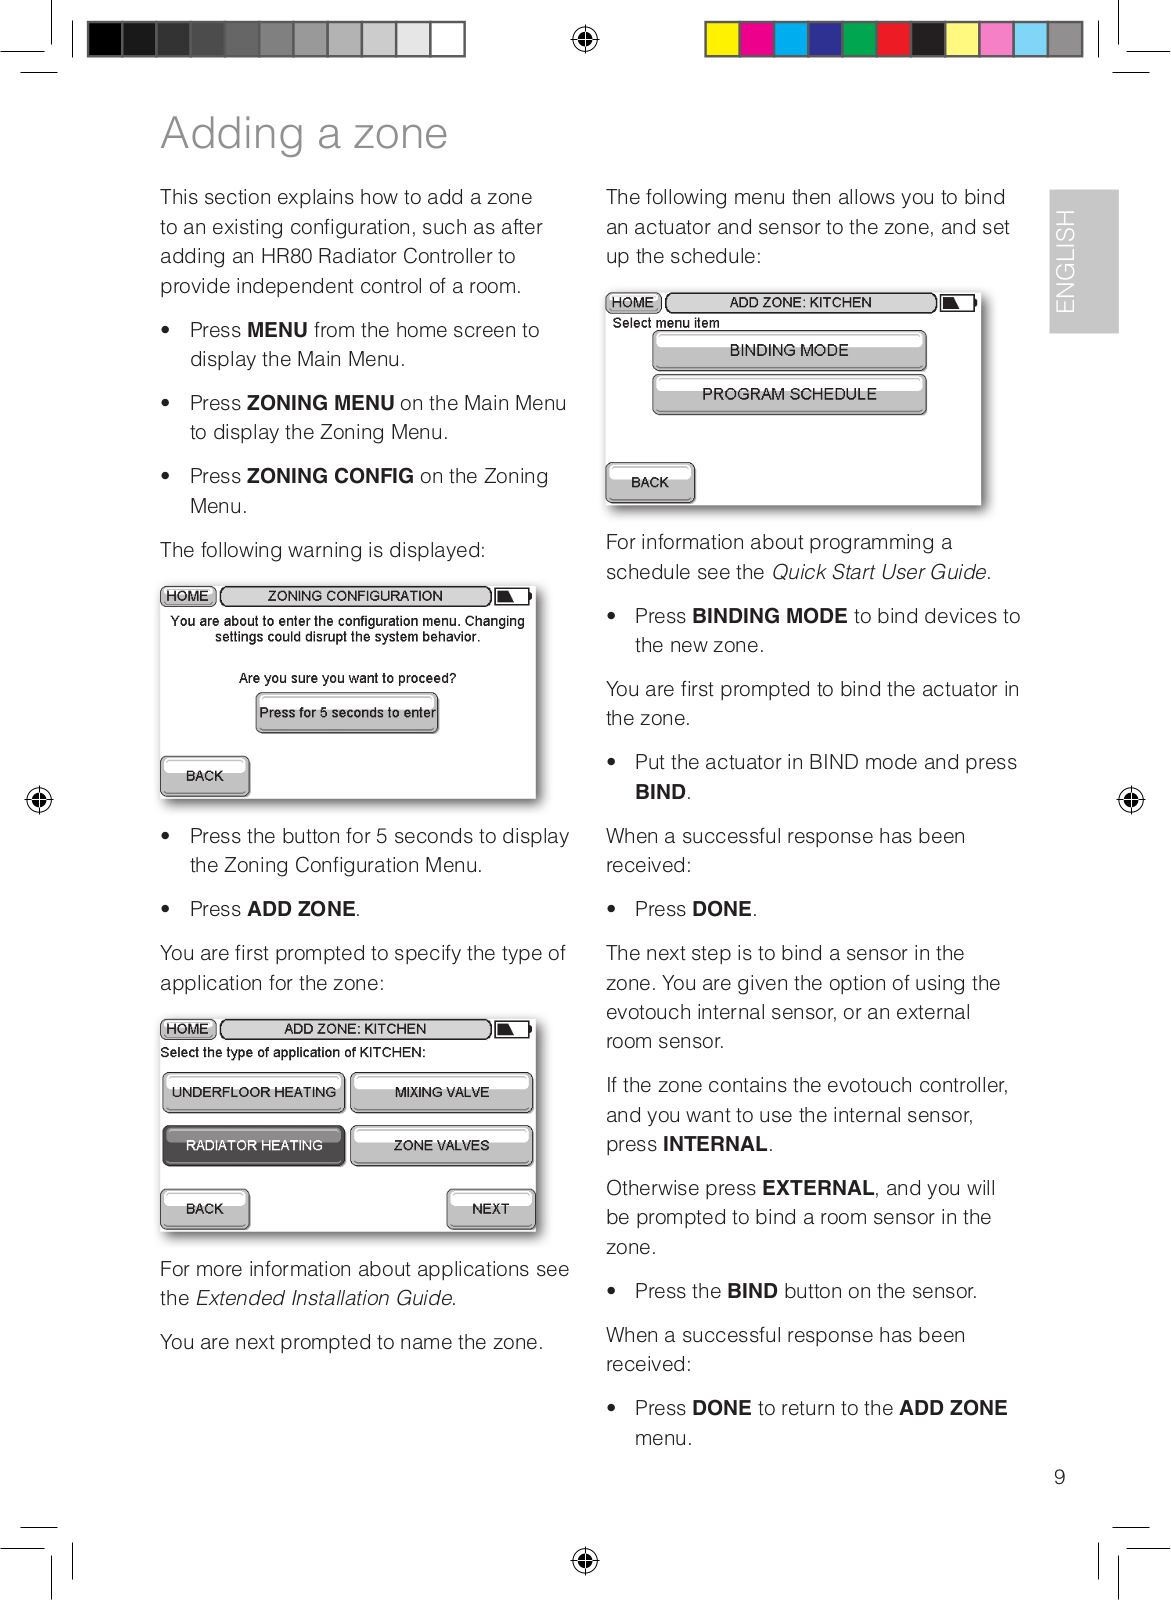
The following warning is displayed:

Press the button for 5 seconds to display the Zoning Configuration Menu.

Press ADD ZONE.

You are first prompted to specify the type of application for the zone:

For more information about applications see the Extended Installation Guide.

You are next prompted to name the zone.

The following menu then allows you to bind an actuator and sensor to the zone, and set up the schedule:

For information about programming a schedule see the Quick Start User Guide.

Press BINDING MODE to bind devices to the new zone.

You are first prompted to bind the actuator in the zone.

Put the actuator in BIND mode and press

BIND.

When a successful response has been received:

• Press DONE.

The next step is to bind a sensor in the zone. You are given the option of using the evotouch internal sensor, or an external room sensor.

If the zone contains the evotouch controller, and you want to use the internal sensor, press INTERNAL.

Otherwise press EXTERNAL, and you will be prompted to bind a room sensor in the zone.

• Press the BIND button on the sensor.

When a successful response has been received:

Press DONE to return to the ADD ZONE menu.

ENGLISH

9

Three simple system applications

19

.5


Relay module

Boiler Relay or Opentherm Bridge

Boiler

0 .. 100% ON/OFF

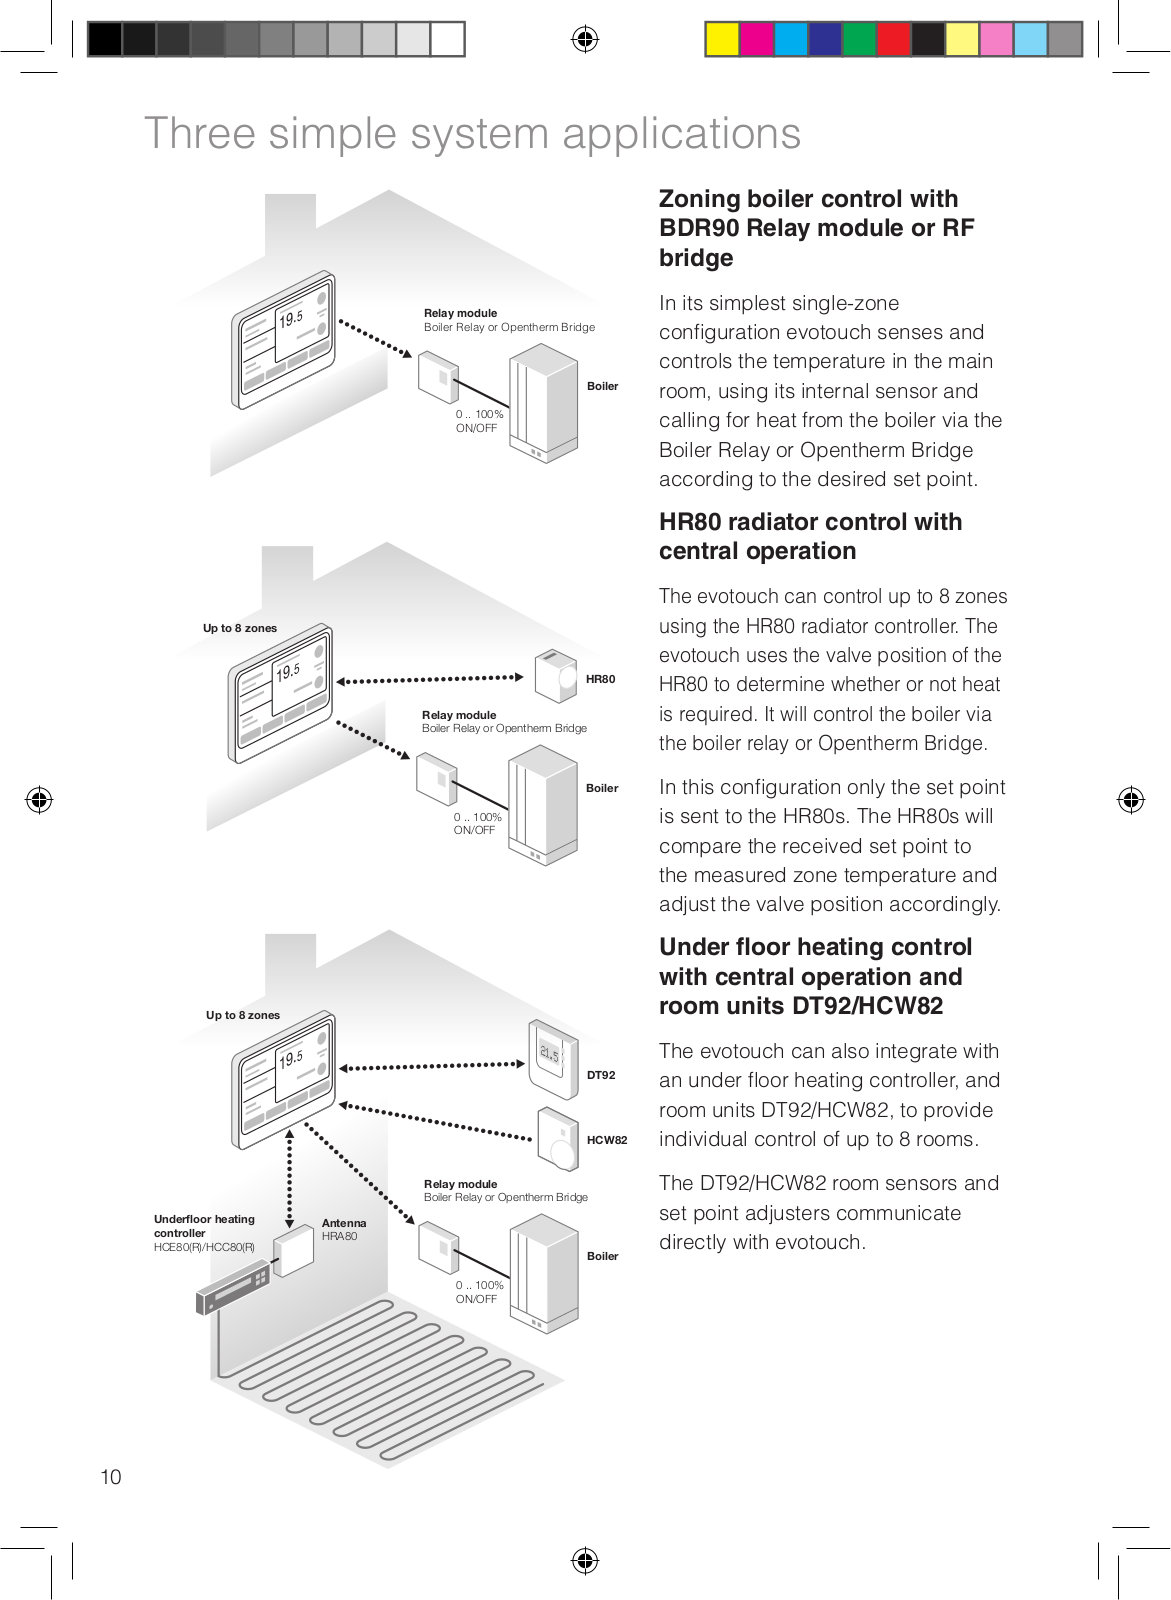
Zoning boiler control with BDR90 Relay module or RF bridge

In its simplest single-zone configuration evotouch senses and controls the temperature in the main room, using its internal sensor and calling for heat from the boiler via the

Boiler Relay or Opentherm Bridge according to the desired set point.

Up

19

.5


Up

19

HR80

Relay module

Boiler Relay or Opentherm Bridge

Boiler

0 .. 100% ON/OFF

DT92


HCW82


Relay module


Boiler Relay or Opentherm Bridge

Underfloor heating

Antenna

controller

HRA80

HCE80(R)/HCC80(R)

Boiler


0 .. 100%


ON/OFF

HR80 radiator control with central operation

The evotouch can control up to 8 zones using the HR80 radiator controller. The evotouch uses the valve position of the

HR80 to determine whether or not heat is required. It will control the boiler via the boiler relay or Opentherm Bridge.

In this configuration only the set point is sent to the HR80s. The HR80s will compare the received set point to the measured zone temperature and adjust the valve position accordingly.

Under floor heating control with central operation and room units DT92/HCW82

The evotouch can also integrate with an under floor heating controller, and room units DT92/HCW82, to provide individual control of up to 8 rooms.

The DT92/HCW82 room sensors and set point adjusters communicate directly with evotouch.

10

Troubleshooting

This section gives suggested answers to typical problems that installers may encounter:

Problem

Solution


Display stays blank

Check that power is reaching the dock/table-top


stand.


Check that the power is connected correctly.


The evotouch fails when removed from

Check that the batteries are fitted correctly.

dock/table-top stand

Check the polarity of the batteries.


The temperature readout is not displayed

Check the binding and communication between


the evotouch and sensor.


If there is no remote sensor, check that Internal


Remote Sensor has been specified in the Zoning


Configuration.


If External Remote Sensor has been specified,


check that it is functioning correctly


Room temperature does not match setpoint

Check that the boiler is functioning correctly.


Check that the actuator is functioning correctly.


Check that a local override has not been applied.


Check that the zone has been programmed


correctly.


Technical data


Electrical


Power module

Input voltage: 230VAC ±10%


Output voltage: 4VDC ±0.2V, max 2.6W

Room unit power supply input

4VDC ±0.2V, max. 2.6W

Low voltage cable length (max)

10m, 1.0mm²; 5m, 0.5 mm²

Battery type (rechargeable)

Type AA 1.2V NiMH 2000-2400mAh

RF Communication


RF operation band

ISM (868.0 – 870.0) MHz, RX Class 2

RF communication range

30m in a residential building environment

Environmental & Standards


Operating temperature

0 to 40°C

Storage temperature

-20 to +50°C

Humidity

10 to 90% relative humidity non condensing

IP Protection Class

IP30

Mechanical


Dimensions

139 x 101 x 21mm (WxHxD)

ENGLISH

11

Safety information

Approvals

Conforms to protection requirements of the following directives:

EMC: 2004/108/EC

LVD: 2006/95/EC

R&TTE: 1995/5/EC

EMC compliance considerations

Refer to Code of Practice standards

EN61000-5-1 and -2 for guidance.

Caution: Isolate power supply and make safe before wiring the unit to prevent electric shock and equipment damage. Installation should be carried out by a competent person.

Location of device

evotouch should be installed in an open space for best performance as it is a radio frequency device. Leave at least 30cm distance from any metal objects including wall boxes and at least 1 metre from any other electrical equipment eg. radio, TV, PC etc. Do not mount onto metal wall boxes.

For the best temperature control performance evotouch should not be placed near heat or cool sources (e.g. cooker, lamp, radiator, doorways, windows).

Disclaimer

This product and its associated documentation and packaging are protected by various intellectual property rights belonging to Honeywell Inc and its subsidiaries and existing under the laws of the UK and other countries. These intellectual and property rights may include patent applications, registered designs,

unregistered designs, registered trade marks, unregistered trade marks and copyrights.

Honeywell reserves the right to modify 12 this document, product and functionality

without notice. This document replaces any previously issued instructions and is only applicable to the product(s) described.

This product has been designed for applications as described within this document. For use outside of the scope as described herein, refer to Honeywell for guidance. Honeywell cannot be held responsible for misapplication of the product(s) described within this document.

PLEASE RESPECT YOUR ENVIRONMENT!

Take care to dispose of this product and any packaging or literature in an appropriate way.

WEEE directive 2002/96/EC Waste Electrical and Electronic Equipment directive

At the end of the product life dispose of the packaging and product in a corresponding recycling centre.

Do not dispose of the unit with the usual domestic refuse.

Do not burn the product.

Remove the batteries.

Dispose of the batteries according to the local statutory requirements and not with the usual domestic refuse.

Manufactured for and on behalf of the Environmental and Combustion Controls Division of Honeywell Technologies Sàrl, ACS-ECC EMEA, Z.A. La Pièce 16, 1180 Rolle, Switzerland by its Authorised

Representative Honeywell Inc.

Honeywell Control Systems Ltd.

Arlington Business Park,

Bracknell, Berkshire

RG12 1EB

Technical Help Desk: 08457 678999 www.honeywelluk.com

DEUTSCH

Produktübersicht

Das Honeywell Komfortsystem evotouch ist ein programmierbares Bediengerät zur Raumregelung mit folgenden

Hauptfunktionen:

Vorteile

Großes Touch Screen Display für die intuitive Bedienung mit den Fingern.

Wandoder Tischhalterung.

Wechselbare Frontabdeckungen mit verschiedenen Farben.

Konfiguration

Durch die einfache Konfiguration werden die Geräte im System schrittweise mit dem evotouch verbunden.

Regelung

Funksteuerung für Heizkessel, Heizkörperregler, Raumfühler und Regler von Fußbodenheizungen.

Die unabhängige Regelung der 8 Räume sorgt für einen erhöhten Komfort und einen geringeren Energieverbrauch.

Über die optimale Start-Funktion wird automatisch berechnet, wann sich die Heizung einschalten soll, damit die richtige Raumtemperatur zum gewünschten Zeitpunkt erreicht wird.

Automatische Zeitumschaltung für Sommer-/Winterzeit.

Ausgewählt werden kann eine geführte Konfiguration für einfache Applikationen oder die Experten-Konfiguration

für die individuelle Anpassung der

Konfiguration.

Hinweis: evohome Systempakete sind bereits vorkonfiguriert (siehe im Paket beiliegende Anleitung)!

Programmierbarkeit

Bis zu 6 Perioden (Schaltpunkte) pro Tag für jeden der 8 Räume.

Mit der Urlaubsfunktion wird die Raumtemperatur für 1 bis 99 Tage abgesenkt.

Mit dem Economy Mode (Sparmodus) werden die Temperatureinstellungen in allen Räumen abgesenkt, um Heizkosten zu sparen.

Zukünftige Erweiterungen

Über eine PC-USB-Schnittstelle können zukünftige Software-Erweiterungen vorgenommen werden.

Installation

Das evotouch-Bediengerät wird mit geladenen AKKUs geliefert. Laden Sie die AKKUs vollständig auf, bevor Sie das evotouch für längere Zeit außerhalb des Spannungsversorgungsgeräts verwenden.

Es gibt zwei Möglichkeiten das Gerät zu montieren bzw. aufzustellen:

Als Wandgerät mit Unterputz-Netzteil.

Als Tischgerät mit integriertem Netzteil.

Wenn das evotouch aus der Halterung genommen wird, ist es ca. 2 Stunden betriebsbereit, danach muss es wieder aufgeladen werden.

DEUTSCH

13

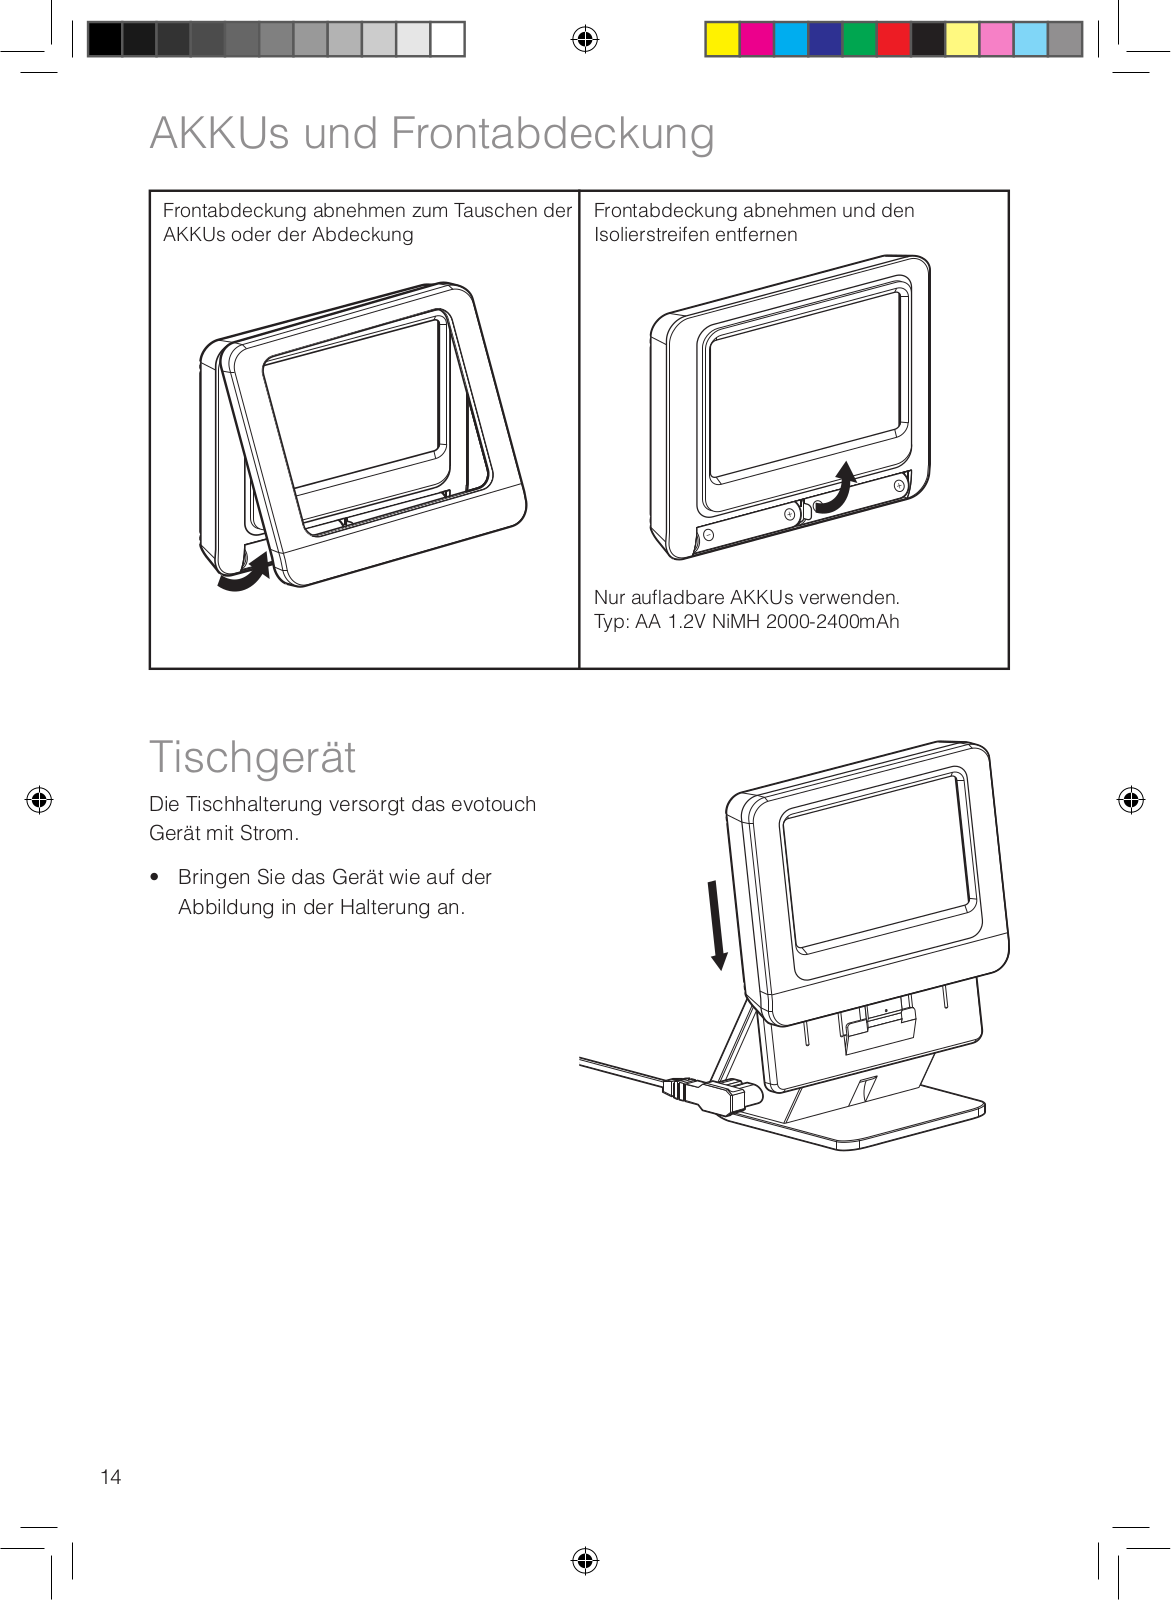
AKKUs und Frontabdeckung

Frontabdeckung abnehmen zum Tauschen der

Frontabdeckung abnehmen und den

AKKUs oder der Abdeckung

Isolierstreifen entfernen

Nur aufladbare AKKUs verwenden.

Typ: AA 1.2V NiMH 2000-2400mAh

Tischgerät

Die Tischhalterung versorgt das evotouch

Gerät mit Strom.

• Bringen Sie das Gerät wie auf der Abbildung in der Halterung an.

14

Honeywell EVOTOUCH User Manual

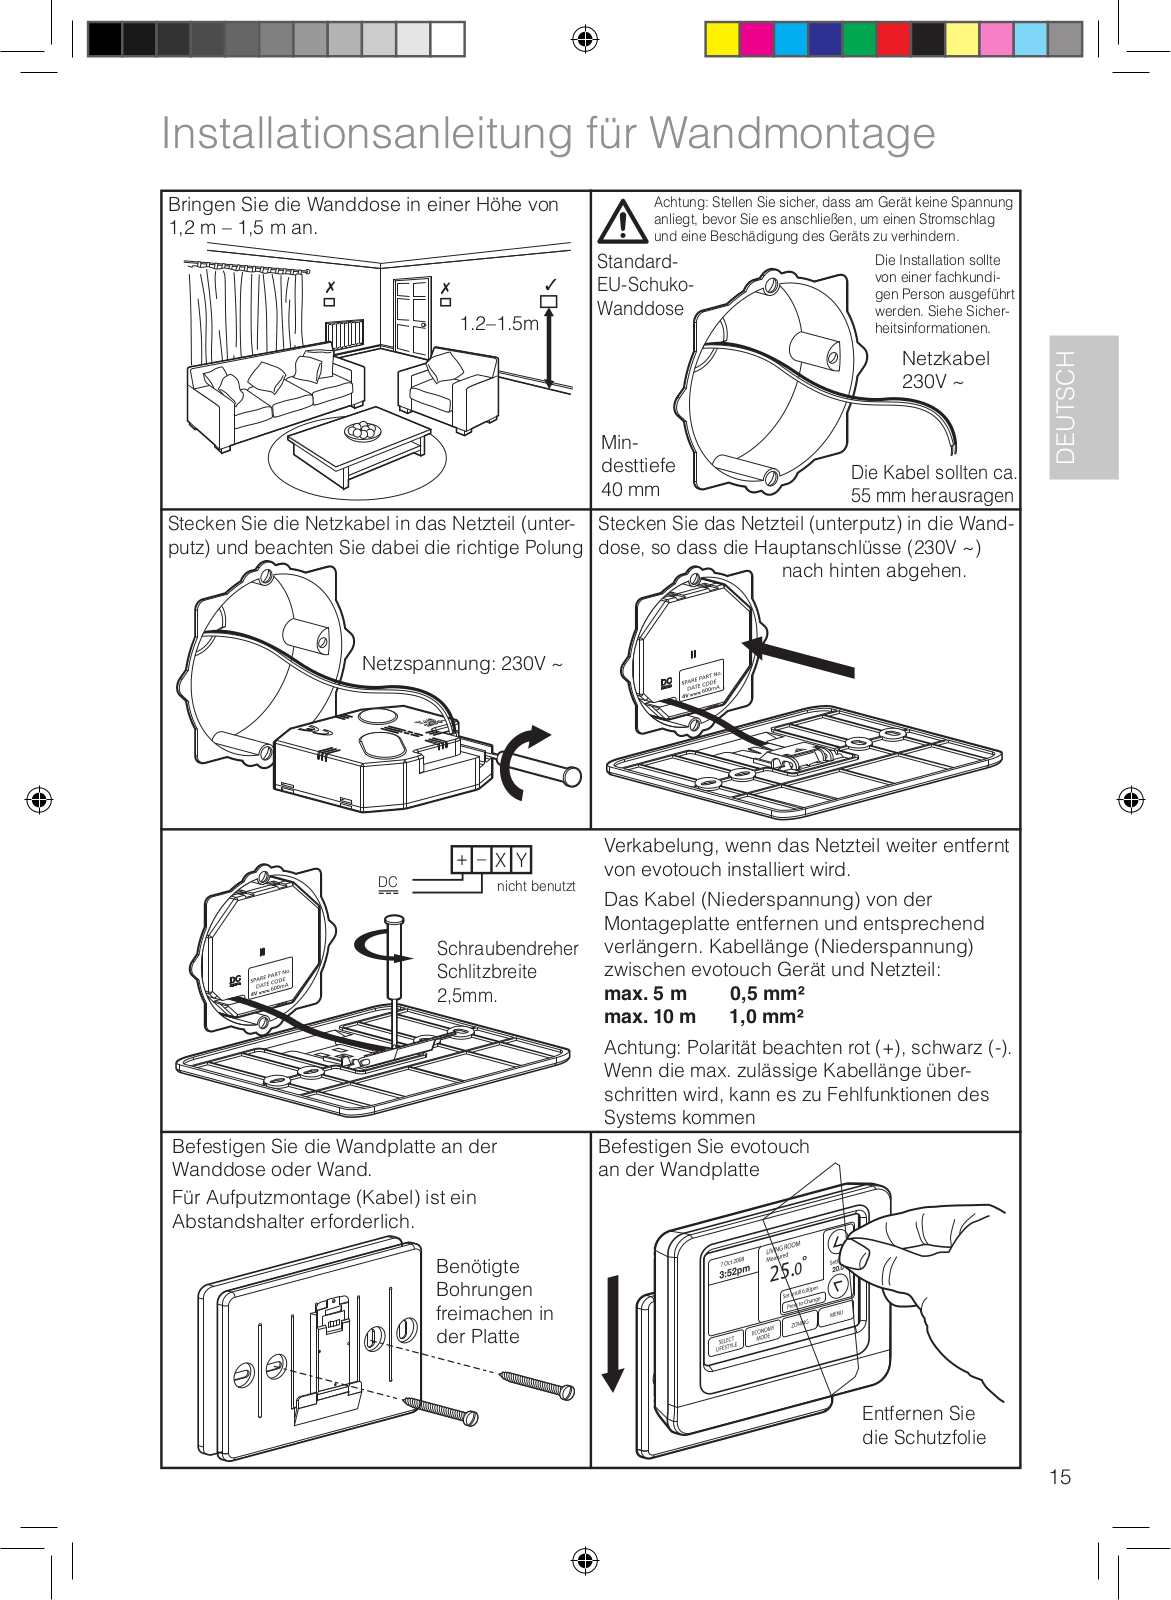
Installationsanleitung für Wandmontage

Bringen Sie die Wanddose in einer Höhe von

Achtung: Stellen Sie sicher, dass am Gerät keine Spannung

1,2 m – 1,5 m an.


anliegt, bevor Sie es anschließen, um einen Stromschlag


und eine Beschädigung des Geräts zu verhindern.


Standard-

Die Installation sollte


EU-Schuko

von einer fachkundi-

gen Person ausgeführt


Wanddose


1.2–1.5m

werden. Siehe Sicher-


heitsinformationen.


Netzkabel


230V ~


Min-


desttiefe

Die Kabel sollten ca.


40 mm


55 mm herausragen


Stecken Sie die Netzkabel in das Netzteil (unter-

Stecken Sie das Netzteil (unterputz) in die Wand-

putz) und beachten Sie dabei die richtige Polung

dose, so dass die Hauptanschlüsse (230V ~)


nach hinten abgehen.


Netzspannung: 230V ~


+ – X Y

Verkabelung, wenn das Netzteil weiter entfernt


von evotouch installiert wird.

DC

nicht benutzt

Das Kabel (Niederspannung) von der


Montageplatte­ entfernen und entsprechend


Schraubendreher

verlängern. Kabellänge (Niederspannung)


Schlitzbreite

zwischen evotouch Gerät und Netzteil:


2,5mm.

max. 5 m

0,5 mm²


max. 10 m

1,0 mm²


Achtung: Polarität beachten rot (+), schwarz (-).


Wenn die max. zulässige Kabellänge über-


schritten wird, kann es zu Fehlfunktionen des


Systems kommen

Befestigen Sie die Wandplatte an der

Befestigen Sie evotouch

Wanddose oder Wand.


an der Wandplatte

Für Aufputzmontage (Kabel) ist ein

Abstandshalter erforderlich.

Benötigte

Bohrungen freimachen in der Platte

Entfernen Sie die Schutzfolie

DEUTSCH

15

Voreinstellungen von evotouch

Einstellung von Sprache, Datum und Uhrzeit

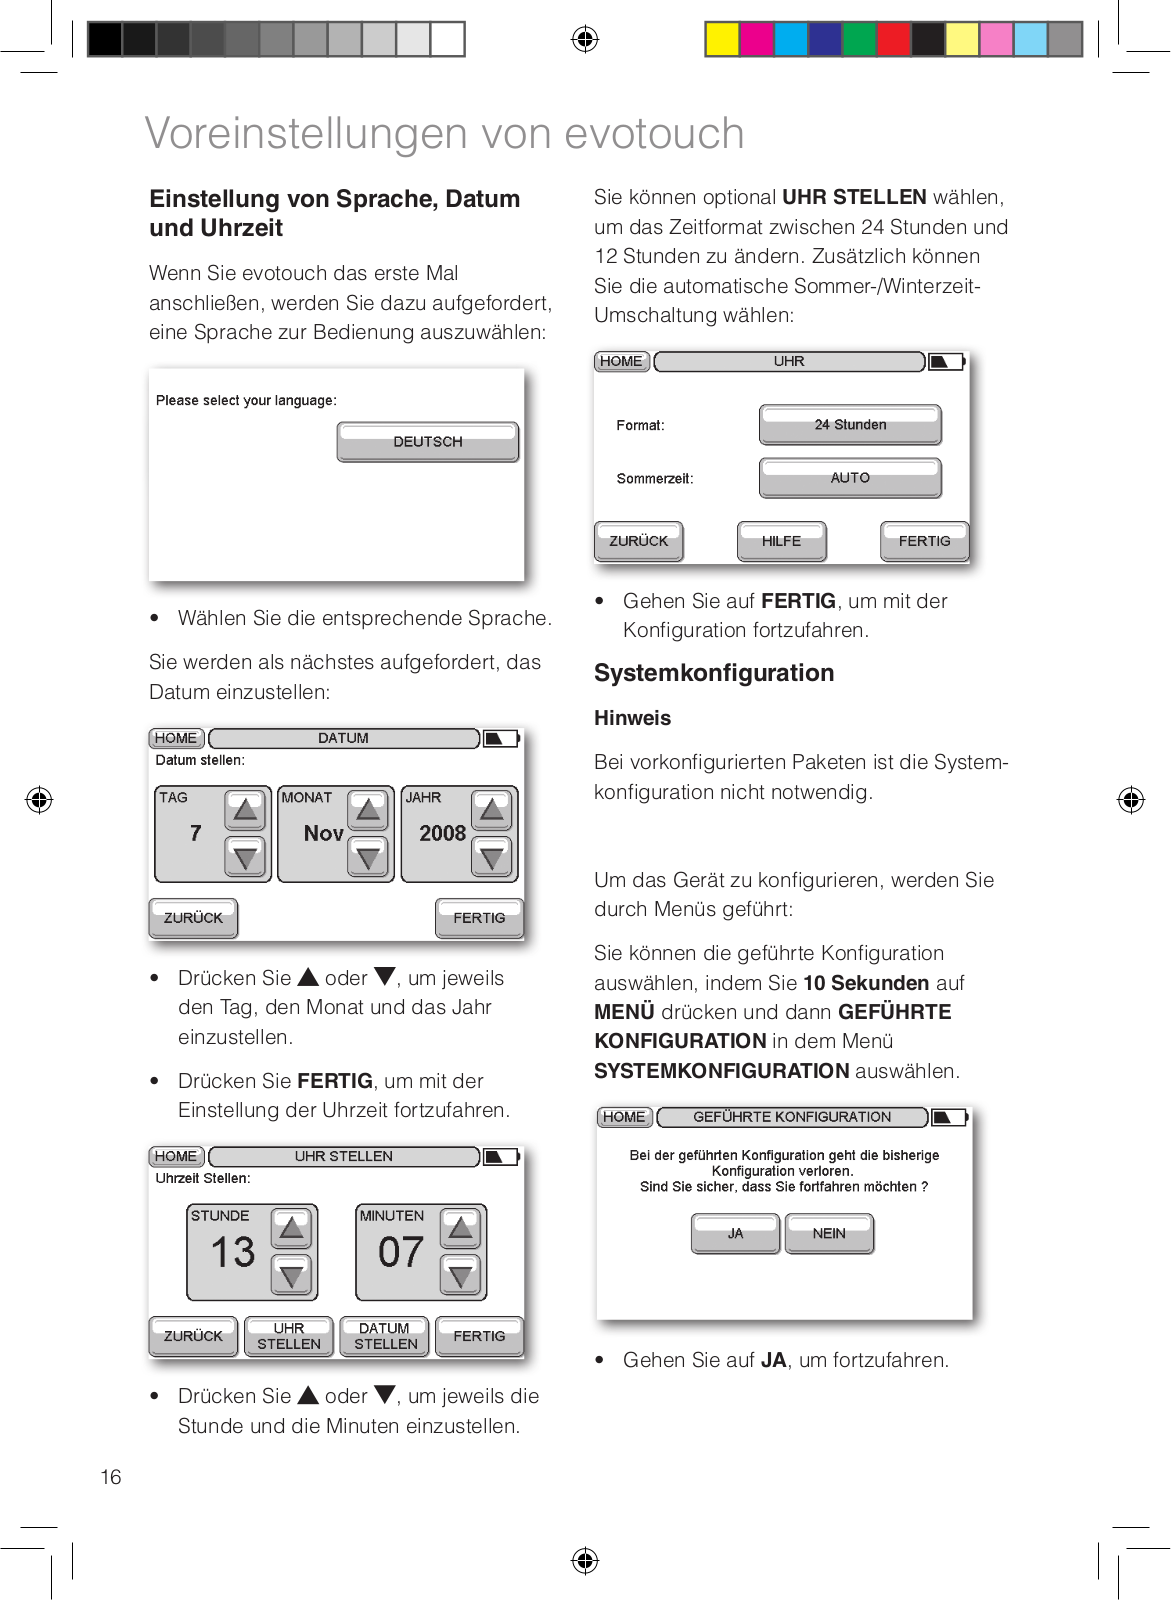
Wenn Sie evotouch das erste Mal anschließen, werden Sie dazu aufgefordert, eine Sprache zur Bedienung auszuwählen:

Sie können optional UHR STELLEN wählen, um das Zeitformat zwischen 24 Stunden und 12 Stunden zu ändern. Zusätzlich können Sie die automatische Sommer-/Winterzeit- Umschaltung wählen:

• Wählen Sie die entsprechende Sprache.

Sie werden als nächstes aufgefordert, das

Datum einzustellen:

Drücken Sie oder , um jeweils den Tag, den Monat und das Jahr einzustellen.

Drücken Sie FERTIG, um mit der Einstellung der Uhrzeit fortzufahren.

Gehen Sie auf FERTIG, um mit der

Konfiguration fortzufahren.

Systemkonfiguration

Hinweis

Bei vorkonfigurierten Paketen ist die Systemkonfiguration nicht notwendig.

Um das Gerät zu konfigurieren, werden Sie durch Menüs geführt:

Sie können die geführte Konfiguration auswählen, indem Sie 10 Sekunden auf MENÜ drücken und dann GEFÜHRTE KONFIGURATION in dem Menü SYSTEMKONFIGURATION auswählen.

• Gehen Sie auf JA, um fortzufahren.

Drücken Sie oder , um jeweils die Stunde und die Minuten einzustellen.

16

Konfiguration – Allgemeine Funktionen

Binding (Verbinden)

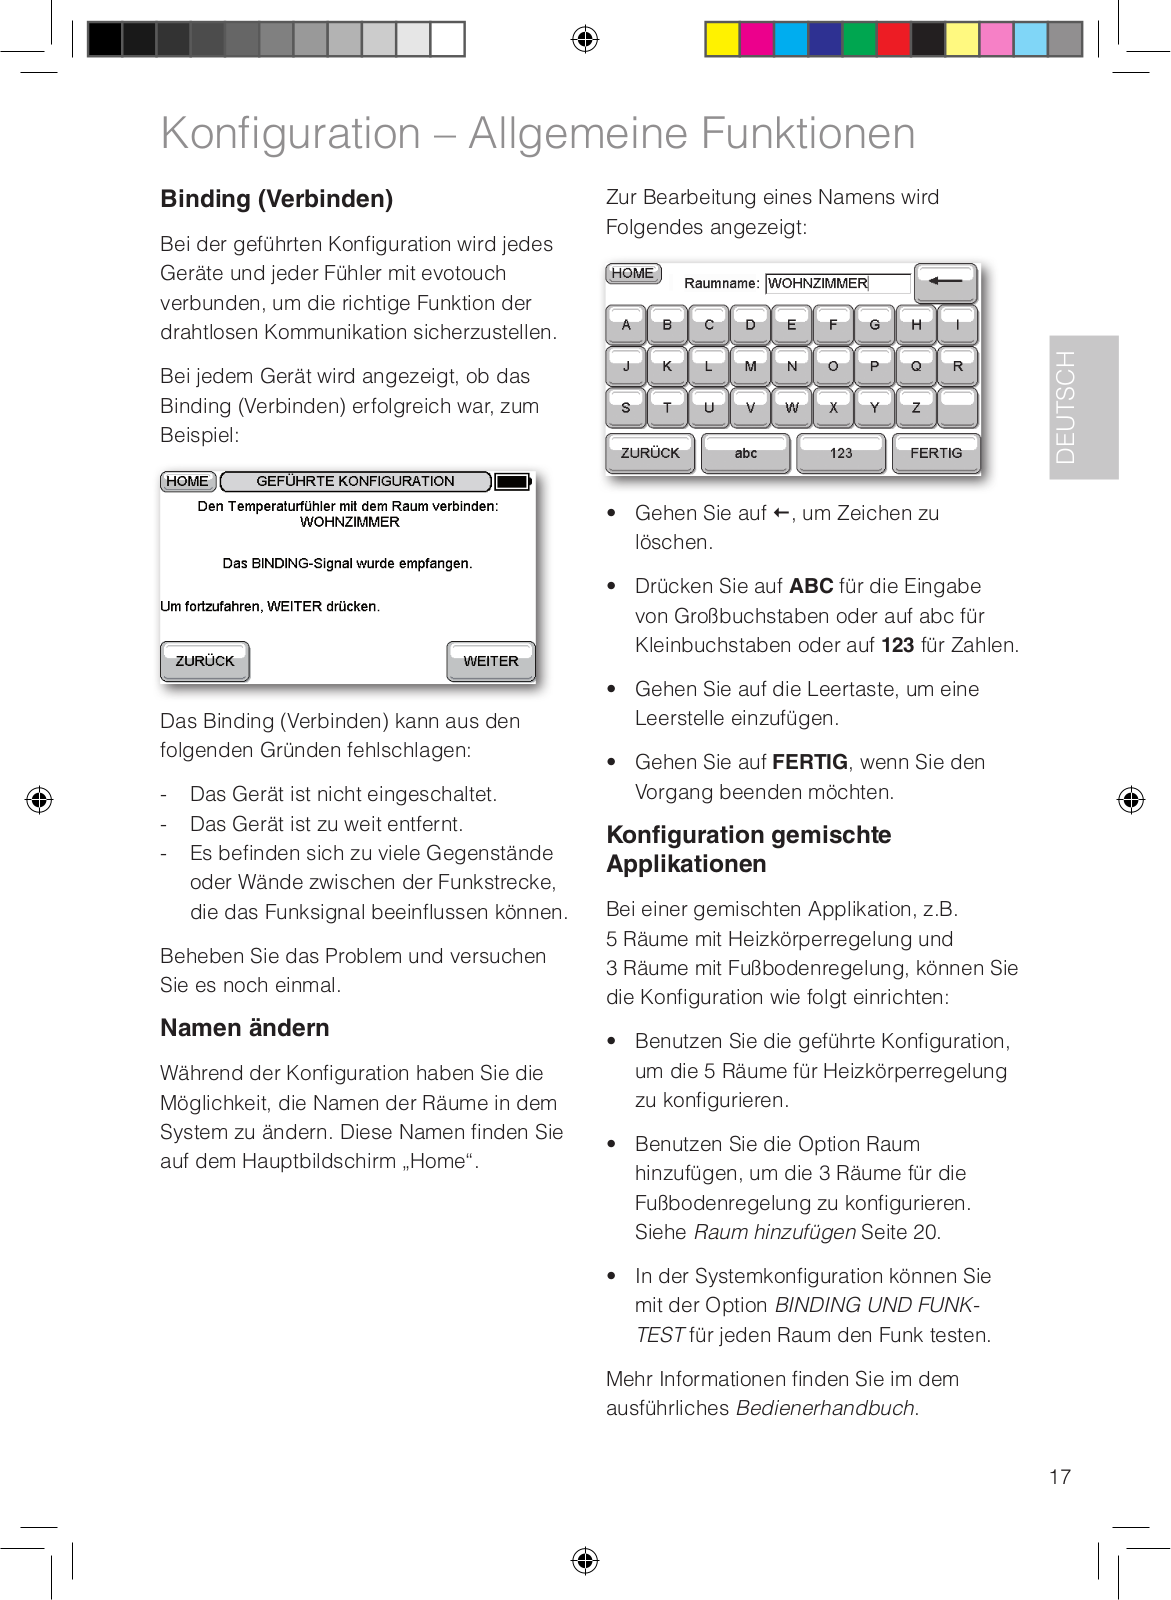
Bei der geführten Konfiguration wird jedes Geräte und jeder Fühler mit evotouch verbunden, um die richtige Funktion der drahtlosen Kommunikation sicherzustellen.

Bei jedem Gerät wird angezeigt, ob das Binding (Verbinden) erfolgreich war, zum Beispiel:

Das Binding (Verbinden) kann aus den folgenden Gründen fehlschlagen:

-Das Gerät ist nicht eingeschaltet.

-Das Gerät ist zu weit entfernt.

-Es befinden sich zu viele Gegenstände oder Wände zwischen der Funkstrecke, die das Funksignal beeinflussen können.

Beheben Sie das Problem und versuchen Sie es noch einmal.

Zur Bearbeitung eines Namens wird Folgendes angezeigt:

Gehen Sie auf , um Zeichen zu löschen.

Drücken Sie auf ABC für die Eingabe von Großbuchstaben oder auf abc für Kleinbuchstaben oder auf 123 für Zahlen.

Gehen Sie auf die Leertaste, um eine Leerstelle einzufügen.

Gehen Sie auf FERTIG, wenn Sie den Vorgang beenden möchten.

Konfiguration gemischte

Applikationen

Bei einer gemischten Applikation, z.B. 5 Räume mit Heizkörperregelung und

3 Räume mit Fußbodenregelung, können Sie die Konfiguration wie folgt einrichten:

Namen ändern

Während der Konfiguration haben Sie die Möglichkeit, die Namen der Räume in dem System zu ändern. Diese Namen finden Sie auf dem Hauptbildschirm „Home“.

Benutzen Sie die geführte Konfiguration, um die 5 Räume für Heizkörperregelung zu konfigurieren.

Benutzen Sie die Option Raum hinzufügen, um die 3 Räume für die Fußbodenregelung zu konfigurieren. Siehe Raum hinzufügen Seite 20.

In der Systemkonfiguration können Sie mit der Option BINDING UND FUNKTEST für jeden Raum den Funk testen.

Mehr Informationen finden Sie im dem ausführliches Bedienerhandbuch.

DEUTSCH

17

Geführte Konfiguration

Die geführte Konfiguration wird Benutzern empfohlen, die evotouch das erste Mal konfigurieren. Sie werden dabei durch die grundlegenden Schritte für die Voreinstellung eines Systems geführt.

Gehen Sie auf JA, wenn die Anzeige kommt, um fortzufahren.

Kesselrückgriff

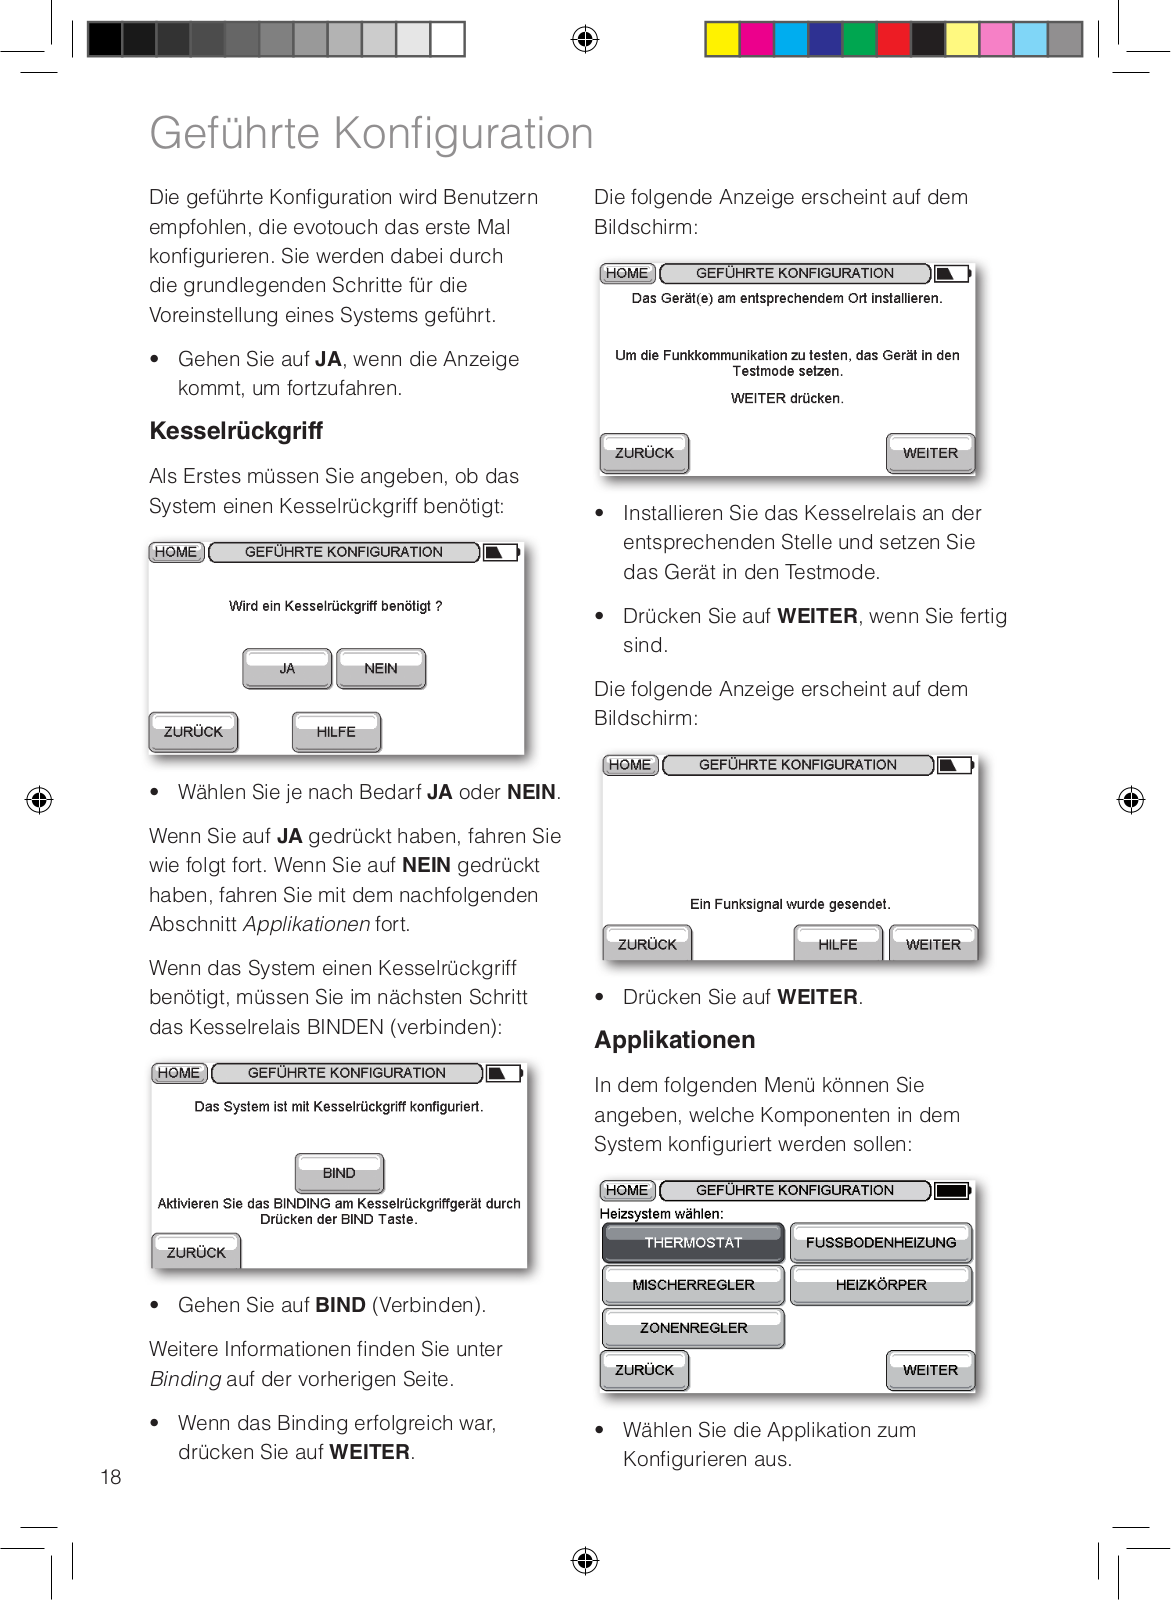
Als Erstes müssen Sie angeben, ob das System einen Kesselrückgriff benötigt:

• Wählen Sie je nach Bedarf JA oder NEIN.

Wenn Sie auf JA gedrückt haben, fahren Sie wie folgt fort. Wenn Sie auf NEIN gedrückt haben, fahren Sie mit dem nachfolgenden Abschnitt Applikationen fort.

Wenn das System einen Kesselrückgriff benötigt, müssen Sie im nächsten Schritt das Kesselrelais BINDEN (verbinden):

• Gehen Sie auf BIND (Verbinden).

Weitere Informationen finden Sie unter Binding auf der vorherigen Seite.

Wenn das Binding erfolgreich war, drücken Sie auf WEITER.

18

Die folgende Anzeige erscheint auf dem Bildschirm:

Installieren Sie das Kesselrelais an der entsprechenden Stelle und setzen Sie das Gerät in den Testmode.

Drücken Sie auf WEITER, wenn Sie fertig sind.

Die folgende Anzeige erscheint auf dem Bildschirm:

• Drücken Sie auf WEITER.

Applikationen

In dem folgenden Menü können Sie angeben, welche Komponenten in dem System konfiguriert werden sollen:

Wählen Sie die Applikation zum

Konfigurieren aus.

Loading...
+ 42 hidden pages