

Page 1
Models 5103S-5107S / 5103-5108 / 5112DOJ / 5112-5113 /
5103GS-5107GS / 5103G-5108G / 5112G-DOJ / 5112G-5113G
Read this manual carefully and never store it inside the safe!
ENGLISH
Operation & Installation Guide
Steel Security Safe
with Programmable Digital Lock
Page 2

Welcome / Package Contents .........................................................................Page 1
Override Access Key / Install Batteries...........................................................Page 2
Locking Safe / Unlocking Safe.........................................................................Page 3
Entering The Wrong Code / Secure Lockout Period /
If You Forget Your Passcode............................................................................Page 4
Replacing Batteries / Care and Maintenance / Removable Shelf................Page 5
Anchoring Your Safe.........................................................................................Page 6
Consumer Assistance..............................................................................Page 7
Ordering Additional Keys / Safe Identification Record..............................Page 8
Notes.......................................................................................................Page 9
Warranty Information...............................................................................Back Cover
For Your Protection
• Do not remove the Serial Number tag from the safe.
• Never Store Override Access Keys inside safe.
• Record all Safe Identication Numbers on Safe Identication Record (page 8).
• Save this manual and NEVER keep it inside the safe.
Index
Page 3

The following list outlines the items and quantities of each included with your new safe. Please
carefully check the list to confirm all items have been received. If any item is missing, please contact
Consumer Assistance (See page 7 for contact information).
Operation Manual (1 ea.)
Override Access Keys (2 ea.)
“AA” Batteries (4 ea.)
Mounting Hardware (1 set)
Your Honeywell Steel Security Safe will provide years of safe and secure protection for your valuables,
important documents and other personal items. All Honeywell safes are designed and built using the
highest manufacturing standards to ensure maximum user satisfaction under a variety of conditions.
With proper care, your Honeywell safe will provide “Peace of Mind” for many years to come.
Thank you and enjoy!
1
Attention: DO NOT RETURN SAFE TO STORE
If you are missing parts or have difficulty operating your safe, please contact our Consumer Assistance
Department by telephone. Store will not accept returned products without prior authorization. You must
first contact our consumer assistance department. (See page 7 for contact information)
WELCOME
PACKAGE CONTENTS
4
1
2
ABC
DEF
JKL
GHI
PRS
CLEAR
LOCK
TUV
OPER
WXY
MNO
3
5
6
9
8
7
0
Page 4
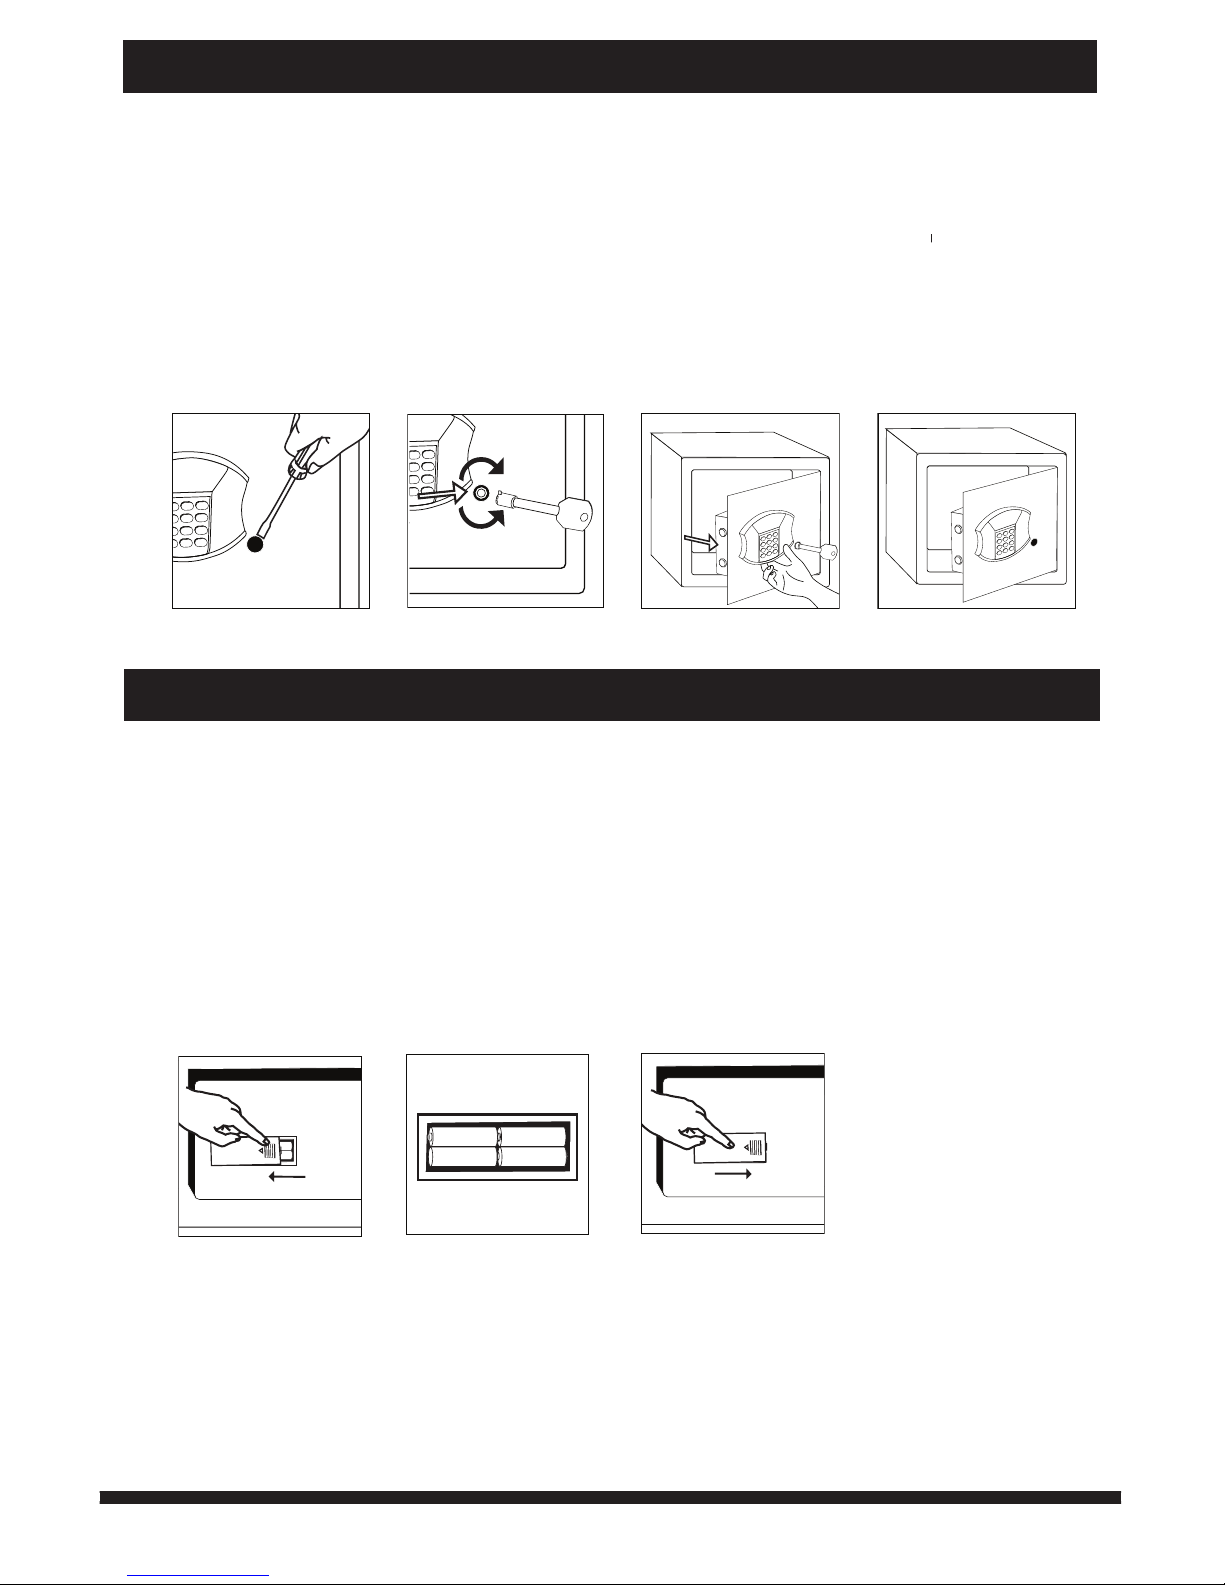
For your convenience, we have included 4 “AA” batteries that provide the power for the electronic
locking system. These batteries must be installed before using your safe. The battery compartment is
located inside the safe on the lock cover panel.
1. Remove battery compartment cover on inside door (Figure 1).
2. Insert 4 “AA” batteries (included). Ensure the batteries are installed in the correct direction, with
regard to polarity (+ and -) (Figure 2).
3. Replace the battery cover (Figure 3).
4. Proceed to the “Locking Safe” section on next page.
2
INSTALL BATTERIES
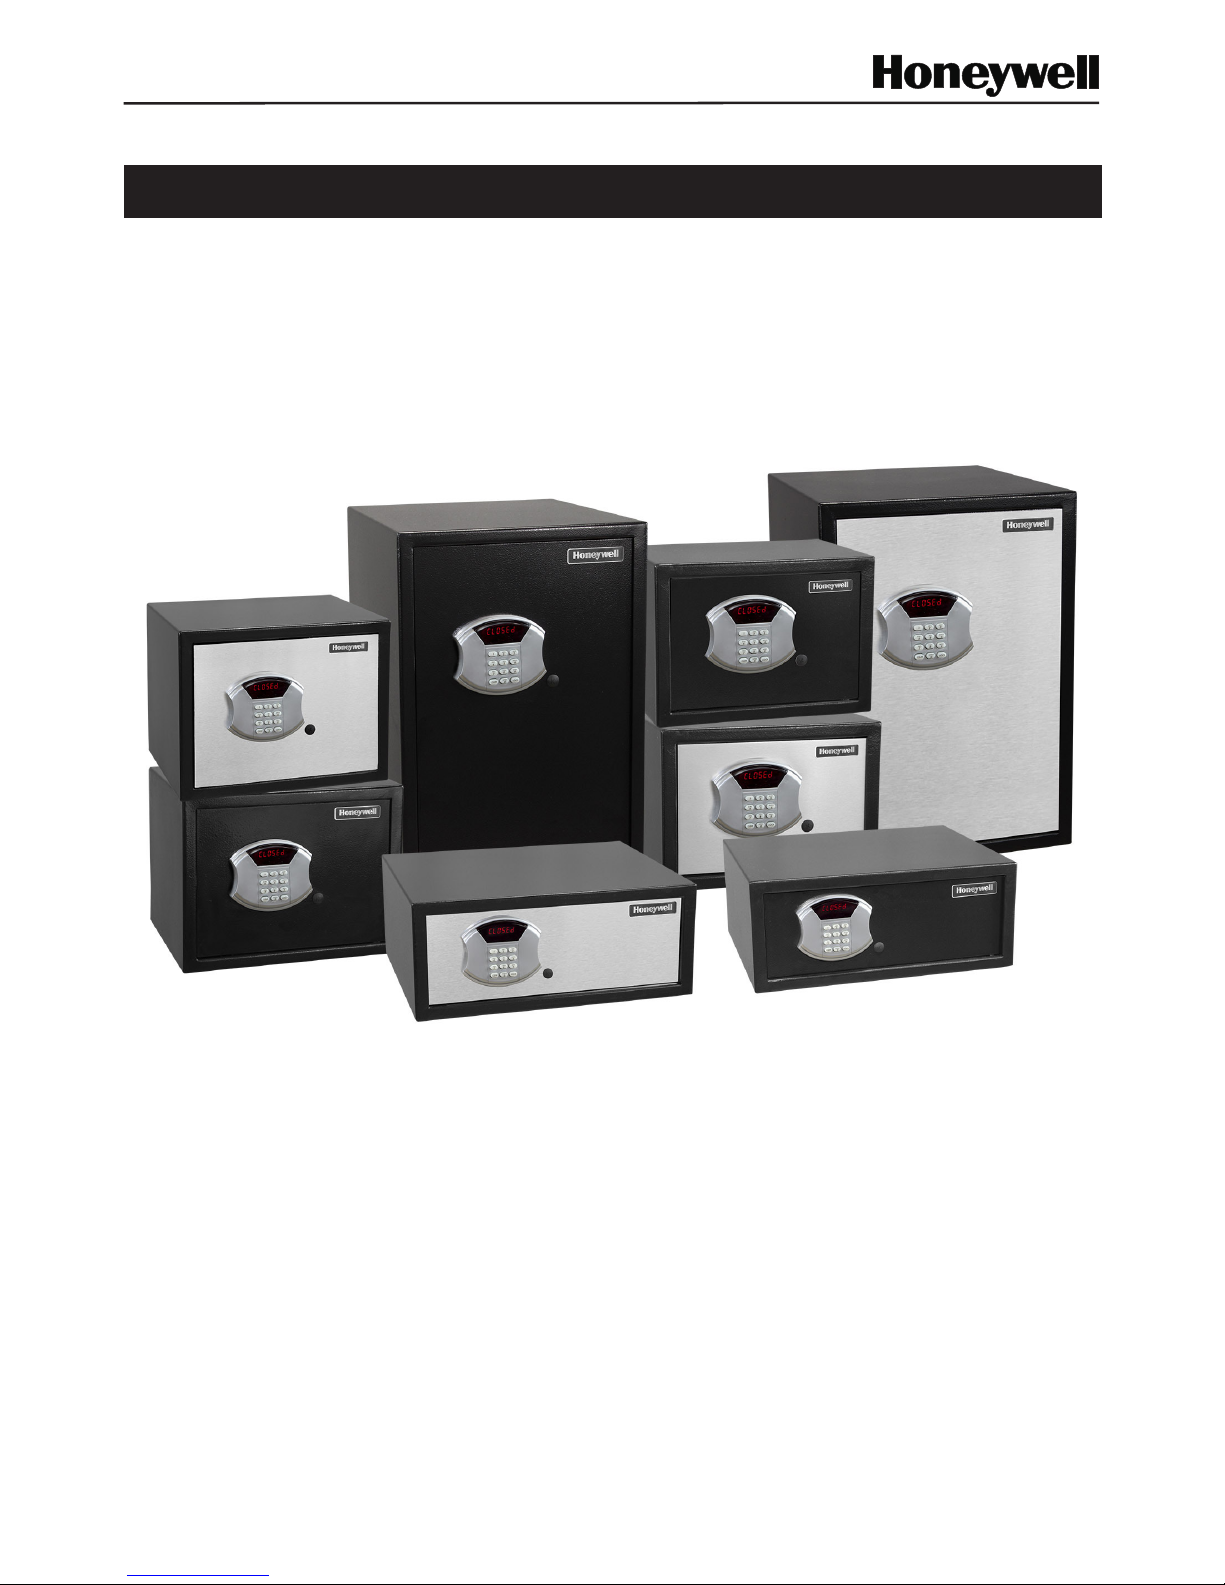
OVERRIDE ACCESS KEY
Your safe is equipped with an override access key which allows immediate access in case you forget
your user codes or the batteries need to be installed or replaced. There are 2 versions of this safe,
one in which the key turns to the left and another in which the key turns to the right.
1. Remove override key cover with small screwdriver (Figure 1).
2. Insert override key and turn left (or right for some versions) to unlock safe (Figure 2).
3. Pull door open using handle located at the bottom of the keypad (Figure 3).
4. Remove override access key and store it in a safe place away from the safe. Replace the
cover over the key lock and proceed to “Install Batteries” (Figure 4).
4
1
2
ABC
DEF
JKL
H
I
R
S
A
R
LOCK
TUV
OPER
WXY
MNO
3
5
6
9
8
7
0
AA
+
-
AA
+
-
AA
+
-
AA
+
-
2
ABC
DEF
JKL
LOCK
TUV
OPER
WXY
MNO
3
5
6
9
8
0
AA
+
-
AA
+
-
AA
+
-
AA
+
-
4
1
2
ABC
DEF
JKL
GHI
PRS
CLEAR
LOCK
TUV
OPER
WXY
MNO
3
5
6
9
8
7
0
AA
+
-
AA
+
-
AA
+
-
AA
+
-
4
1
2
ABC
DEF
JKL
GHI
PRS
CLEAR
LOCK
TUV
OPER
WXY
MNO
3
5
6
9
8
7
0
Figure 1
Figure 1
Figure 2
Figure 2
Figure 3
Figure 3
Figure 4
Page 5

3
1. To open safe enter the new pass code that was used to lock the safe in Step 1 of the
“LOCKING SAFE” section above (Figure 1).
2. Immediately after entering the code, press the “LOCK” key (Figure 2).
3. Lock bolts should receed into the unlocked position (Figure 3).
4. The LED will display and you can then pull door open using the handle located at the
bottom of the keypad (Figure 4).
NOTE: You can relock the safe by entering any 3-6 digit Pass Code followed by the “LOCK” key
The lock design allows for a new user code each time that the safe is locked
1. Enter any 3-6 digit Pass Code, for example “1”-“5”–“9” (Figure 1).
2. Immediately after entering the code, press the “LOCK” key (Figure 2).
3. Lock bolts should extend into the locked position (Figure 3).
4. The LED will display for 3 seconds followed by the active code entered as a reminder.
(Figure 4 & 5).
PRIVACY MODE: To prevent the LED displaying the pass code entered, press “CLEAR” prior to
entering a code.
LOCK SOUND: To turn “beep” sound On or Off, press the “CLEAR” button twice.
LOCKING SAFE
UNLOCKING SAFE
Figure 1
Figure 1
Figure 2
Figure 2
Figure 3
Figure 3
Figure 4
Figure 4
Figure 5
4
1
2
ABC
DEF
JKL
GHI
PRS
CLEAR
LOCK
TUV
OPER
WXY
MNO
3
5
6
9
8
7
0
Page 6

4
If you forget your passcode AND your key turns to the RIGHT:
1. Insert Override Key and turn to the right to unlock the safe.
2. With the key in the open position, press the “CLEAR” button and the LED will display .
3. Turn the Override Key to the left and remove it from lock.
4. The safe will be unlocked after entering any 3-6 digit code followed by pressing the
“LOCK” button.
5. The safe is returned to normal operation. You may enter any new 3-6 digit code followed by
pressing the “LOCK” button.
If you forget your passcode AND your key turns to the LEFT:
1. Screen must be blank. Wait 30 seconds after pressing any key.
2. Insert Override Key and turn to the left to unlock the safe.
3. With the key in the open position, press the “CLEAR” button and the LED will display .
4. Turn the Override Key to the right and remove it from lock.
5. The safe will be unlocked after entering any 3-6 digit code followed by pressing the
“CLEAR” button.
6. The safe is returned to normal operation. You may enter any new 3-6 digit code followed by
pressing the “LOCK” button.
IF YOU FORGET YOUR PASSCODE
SECURE LOCKOUT PERIOD
If a wrong code is entered 3 times in a row, the digital keypad will
begin a ve-minute lockout period. During this period the LED will
display
and the keypad will become disabled. Once the
lockout period has expired, the safe can be unlocked using the
active code.
NOTE:
You may use the Override Access Key to open safe, but keypad
will complete the full lockout period.
ENTERING THE WRONG CODE
4
1
2
ABC
DEF
JKL
GHI
MNO
3
5
6
Figure 1 Figure 2
1. If you press a wrong key while entering your code, you may press “CLEAR” to reset prior
to pressing “LOCK” (Figure 1).
2. If you have entered the wrong code followed by “LOCK”, the LED panel will display
(Figure 2).
4
1
2
ABC
DEF
JKL
GHI
MNO
3
5
6
Page 7

5
REMOVABLE SHELF
Models 5103S, 5103, 5104, 5107S, 5107, 5108, 5112DOJ, 5113
5103GS, 5103G, 5104G, 5107GS, 5107G, 5108G, 5112GDOJ, 5113G
If your safe is equipped with a removable shelf, it can easily be removed to accommodate the storage
of taller or larger items.
1. Empty shelf of all contents and remove any carpeting
2. Remove by lifting and tilting to side to fit through door opening.
DO NOT discard shelf. It is recommended that you keep it for future needs.
CARE AND MAINTENANCE
When properly maintained, your safe will continue to operate for many years. In order to ensure
optimum performance of your safe, please follow these simple precautions:
CLEAN HANDS - Never attempt to operate the digital keypad if your hands have excessive dirt, debris
or liquids on them.
CLEAN SAFE – To clean the surface of your safe, it is recommended that you use a mild cleaner (e.g.,
window cleaner) to avoid scratching or discoloring the surface. Always wipe dry and NEVER use
abrasive cleansers on the safe or digital keypad.
MOISTURE – We recommend that you place delicate items such as pictures or intricate jewelry into an
air-tight container before storing them in your safe. Avoid placing your safe in areas of high humidity.
For optimum performance, the safe should be opened and aired out for at least 20 minutes every two
weeks.
For future reference, store this Operation and Installation Guide in a secure area away from the safe.
DO NOT DISCARD!
REPLACING BATTERIES
You may check the battery power at any time by pressing the “LOCK” key just once. The LED display
will show one of the following messages:
: Battery power is good (Figure 1).
: Battery power is low and batteries should be replaced (Figure 2).
Weak or dead batteries should be replaced immediately and all 4 batteries should be changed.
It is NOT RECOMMENDED to use Non-alkaline or rechargeable batteries. Remember to always
remove the batteries from the safe if not using it for an extended period of time.
NOTE: The active code will not be erased if the batteries become weak or are removed.
4
1
2
ABC
DEF
JKL
GHI
MNO
3
5
6
4
1
2
ABC
DEF
JKL
GHI
MNO
3
5
6
Figure 1 Figure 2
Page 8

6
You may bolt your safe to the wall or floor to added theft protection and resistance to tipping. Your
safe has pre-drilled bolt-down holes in the back panel and in the floor.
To secure your safe to the wall and/or floor:
1. Select a suitable and convenient location for your safe.
2. Empty the safe and remove the carpet.
3. Locate the predrilled holes on the inside of safe.
4. Place your safe in the desired location.
5. Line up the predrilled holes and mark the floor or wall through the holes (Figure 1).
NOTE: It is not recommended to attempt to bolt to both floor and wall.
6. Move the safe aside to clear marked spots for drilling.
7. Drill holes appropriate for hardware being used and the mounting surface (Figure 2).
INCLUDED: (2 each – bolts, washers and masonry anchors).
8. Place the safe back over the holes and install the fasteners as required (Figure 3).
9. Once completed, replace the carpet.
NOTE: Bolting/unbolting of the unit is at the consumer’s expense and discretion. LH Licensed
Products is not responsible for any costs incurred if the unit is to be replaced.
If you have any questions about mounting the safe, please check with your local home center/
hardware retailer or independent contractor.
ANCHORING YOUR SAFE
4
1
2
ABC
DEF
JKL
GHI
PRS
CLEAR
LOCK
TUV
OPER
WXY
MNO
3
5
6
9
8
7
0
Figure 1 Figure 2 Figure 3
Page 9

7
EMAIL: LHLPCustomerService@LHLPinc.com
WEBSITE: www.honeywellsafes.com
ADDRESS: Consumer Assistance Dept.
LH Licensed Products, Inc., 860 East Sandhill Avenue Carson, CA 90746 USA
TELEPHONE: US/Canada 1-877-354-5457 (Toll Free)
Mexico 01-800-288-2872 After English voice recording stops you must then enter 800-860-1677
to complete your call. (Toll Free)
Australia 0011-800-5325-7000 (Toll Free)
Germany/New Zealand 00-800-5325-7000 (Toll Free)
Other Countries XX*-310-323-5722 (Toll Charges Apply)
XX*- Dial U.S. Country Code first
CALL CENTER HOURS: US/Canada 7am – 5pm (Pacific**) Mon – Fri (Subject to change)
CALL BACK HOURS: Other Countries 7am – 8pm (Pacific**) Mon – Fri (Subject to change)
Pacific Time**- Local time in Los Angeles, CA, USA
* Insert correct Country Code
** Local Time based on Los Angeles California USA
INTERNATIONAL CALL BACK HOURS:
If you need to speak with a consumer assistant and cannot contact us during the Call
Center hours above, please send an email or leave a telephone message, including your Name,
Telephone Number and the best time for us to contact you during the Call Back hours above and we
will make our every effort to contact you and help answer any of your questions or concerns.
CONSUMER ASSISTANCE
Page 10

8
The following information is required to order keys:
1. PROOF OF OWNERSHIP (1 of 2 Options Below)
A) SALES RECEIPT & IDENTIFICATION – INTERNATIONAL ORDERS ONLY!
•CopyofsalesreceiptshowingStore,Date&ProductDescription.
•CopyofyourpictureI.D.(Driverslicense,passport,regularI.D.).
B) PRODUCT OWNERSHIP VERIFICATION FORM
If sales receipt is not available, contact us by email or telephone to request a “Product
Ownership Verification Form”.
2. ORDER INFORMATION
CONTACT
•Name&ShippingAddress
•E-mailaddress(IfAvailable)
•TelephoneNumber
•BestTimetoContactYou
3. PLACING AN ORDER
•Tobegintheorderprocess,contactusbytelephone,email,ormail
4. METHOD OF PAYMENT
•Visa,MasterCard,CheckorMoneyOrder
NOTE: For pricing please contact Consumer Assistance. Contact information is located on the back
cover of this manual. Payment method and pricing subject to change.
Model Number:
Serial Number:
Override Access Key Number:
ORDERING ADDITIONAL OVERRIDE ACCESS KEYS
SAFE IDENTIFICATION RECORD
PRODUCT
•Model#
•Serial#
•LockKey#
•QuantityofKeysOrdered
Page 11

9
NOTES
Page 12

LH Licensed Products, Inc., (“LHLP, Inc.”) warrants that for a period of seven (7) years from the date
of purchase, this product will be free from structural or mechanical defects resulting from materials or
workmanship. LHLP, Inc., at its sole option and as the purchaser’s sole remedy under this warranty,
will repair or replace this product or any component of the product found to be defective during
the warranty period. Replacement or repair will be made with a new or remanufactured product or
component. If the product is no longer available, replacement may be made with a similar product of
equal or greater value.
THIS IS YOUR EXCLUSIVE WARRANTY.
Our goods come with guarantees that cannot be excluded under the Australian Consumer Law.
You are entitled to a replacement or refund for a major failure and for compensation for any other
reasonably foreseeable loss or damage. You are also entitled to have the goods repaired or replaced
if the goods fail to be of acceptable quality and the failure does not amount to a major failure.
This warranty is only valid for the original retail purchaser from the date of initial retail purchase and
is not transferable. You must keep the original sales receipt. Proof of purchase is required to obtain
warranty service.
LHLP, Inc. dealers, service centers, or retail stores selling this product do not have the right to alter,
modify or in any way change the terms and conditions of this warranty.
This warranty does not apply to the finish on the product. This warranty does not cover normal
wear and tear of parts or damage resulting from any of the following: negligent use or misuse of the
product, use contrary to the operating instructions, disassembly, repair or alteration by anyone other
than LHLP, Inc. or an authorized service center, improper installation, or exposure to extremes of
heat or humidity. Further, the warranty does not cover Acts of God, such as fire, flood, earthquakes,
hurricanes and tornadoes.
LHLP, Inc. shall not be liable for any incidental or consequential damages caused by the breach of
any express or implied warranty or otherwise relating to the sale of this product. LHLP, Inc. is also
not responsible for: costs associated with removing or installing the product; damage or loss of
the contents of the product; nor for the unauthorized removal of the contents; or damages incurred
during shipment.
THE ABOVE WARRANTY IS IN LIEU OF ALL OTHER WARRANTIES, EXPRESS OR IMPLIED,
INCLUDING ANY WARRANTIES OF MERCHANTABILITY OR FITNESS FOR A PARTICULAR
PURPOSE, AND LHLP, INC. DISCLAIMS ANY AND ALL OTHER COVENANTS AND WARRANTIES.
Except to the extent prohibited by applicable law, any implied warranty of merchantability or
fitness for a particular purpose is limited in duration to the duration of the above warranty period.
Some states, provinces or jurisdictions do not allow the exclusion or limitation of incidental or
consequential damages or limitations on how long an implied warranty lasts, so the above limitations
or exclusion may not apply to you. This warranty gives you specific legal rights, and you may also
have other rights that vary from state to state, or province to province, or jurisdiction to jurisdiction.
The Honeywell Trademark is used under license from Honeywell International Inc. Honeywell
International Inc. makes no representations or warranties with respect to this product.
M5103E-5103GE-20160531 www.honeywellsafes.com
Limited Warranty
Manufactured by:
LH Licensed Products, Inc.
860 East Sandhill Avenue
Carson, CA 90746
 Loading...