

Page 1
5
L1
T1
L1
L1
ELECTRIC
HEATER
L2
1
2
4
3
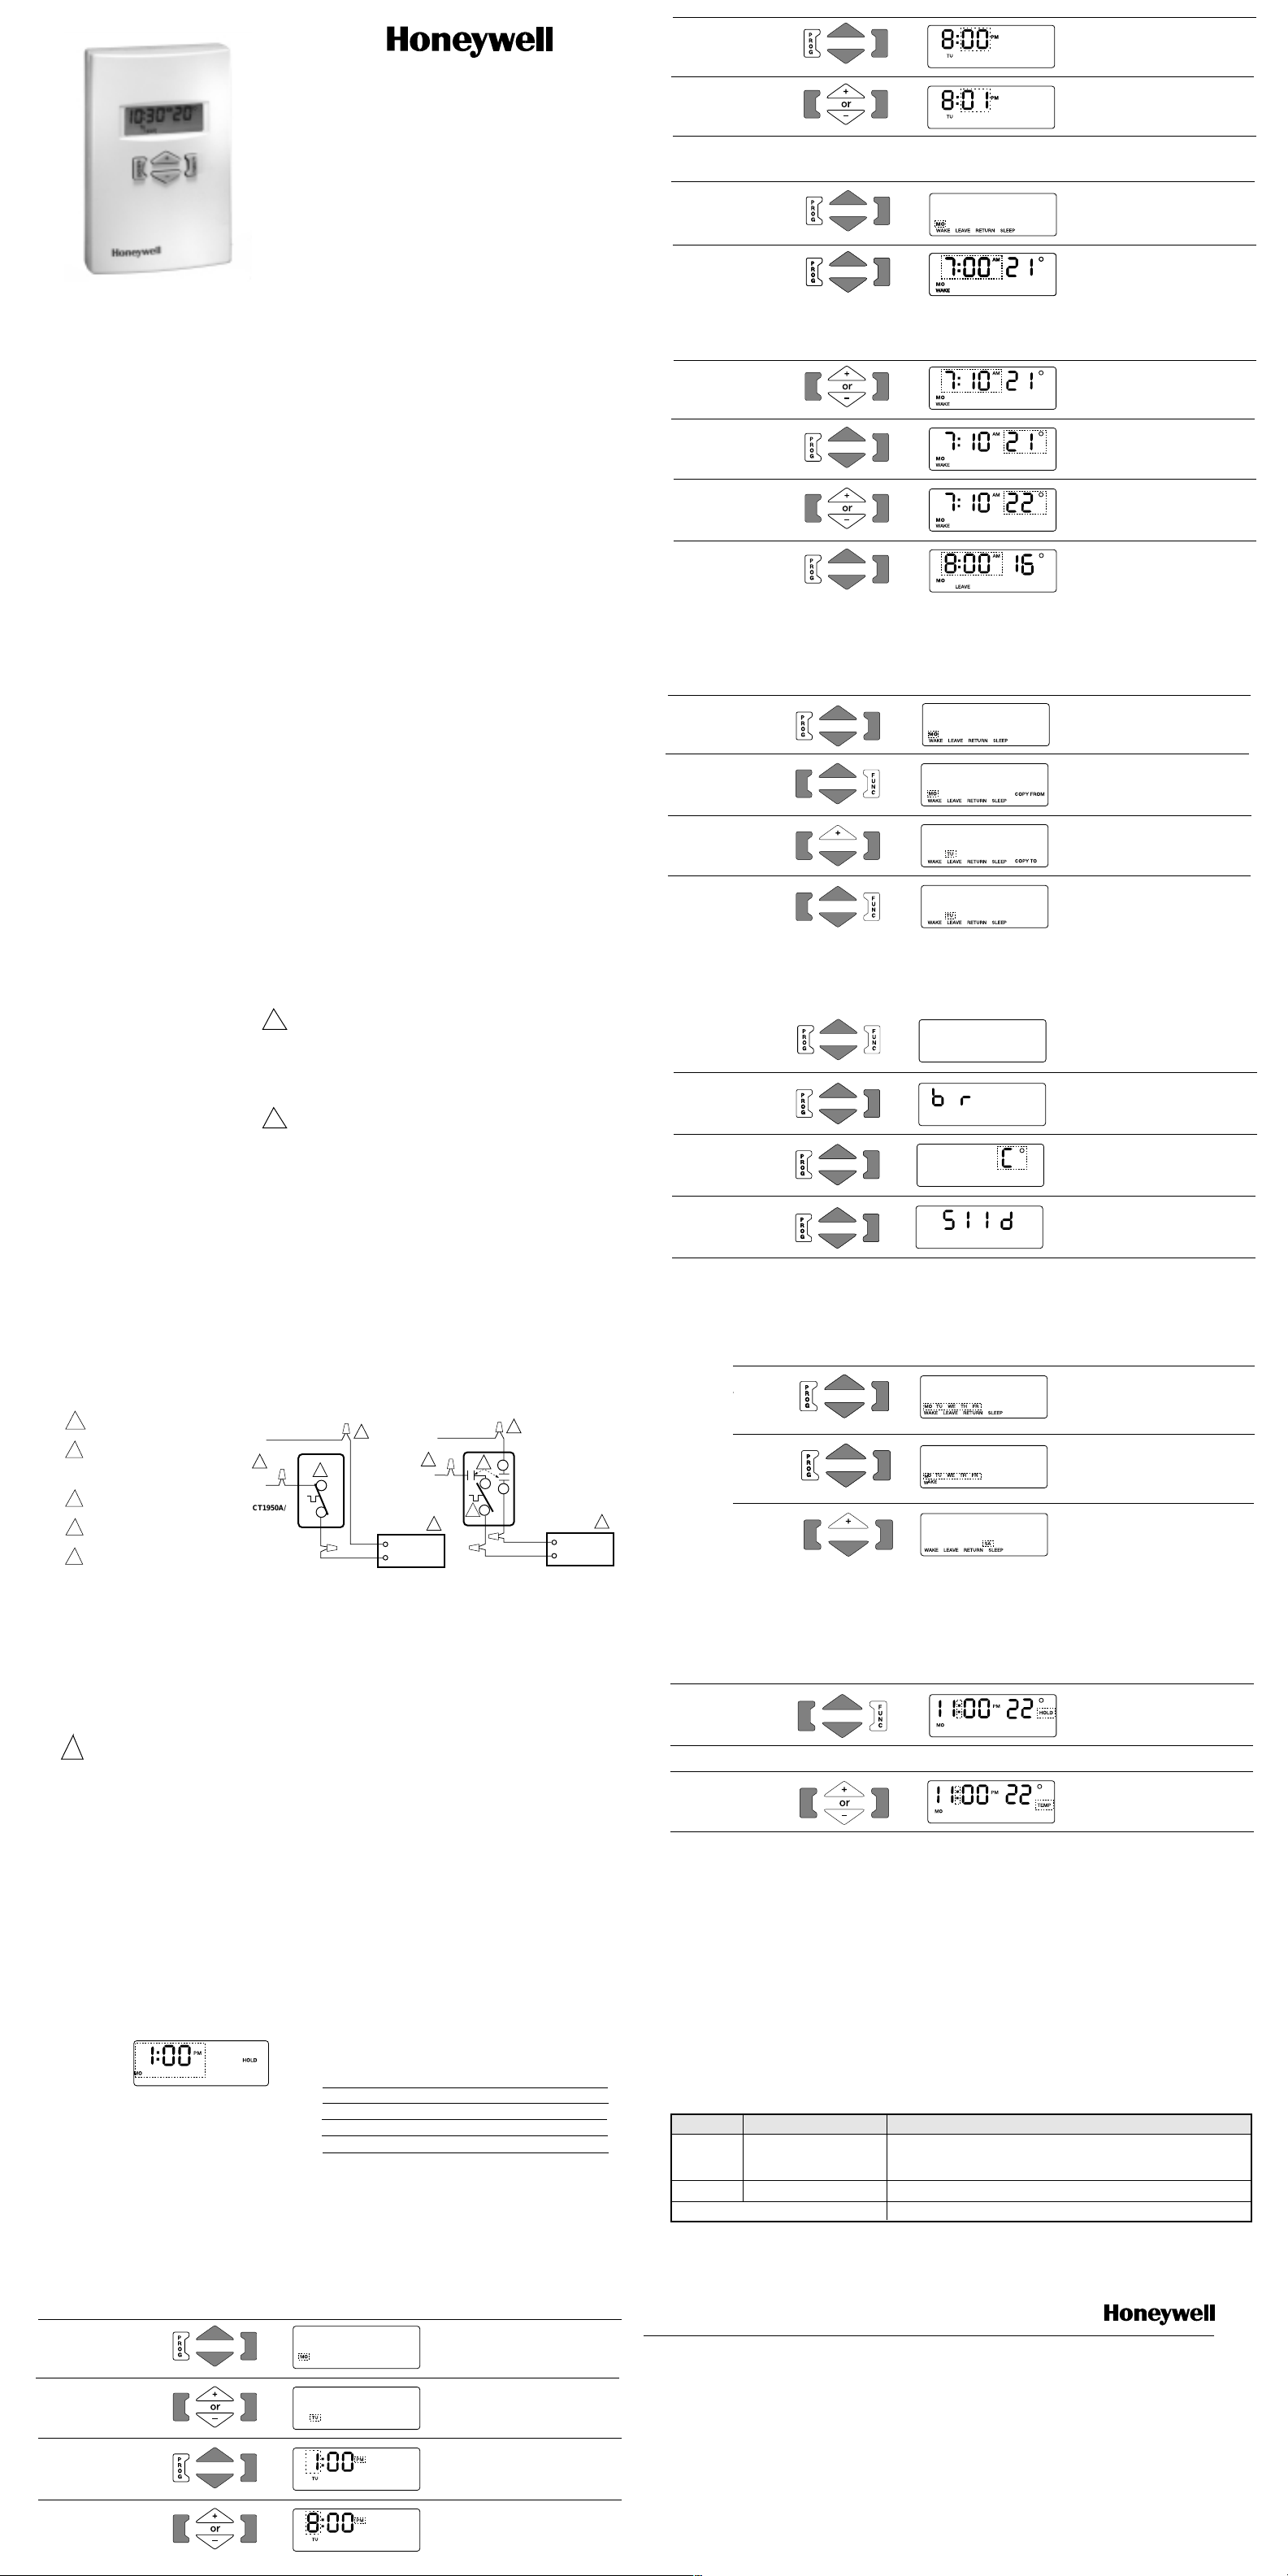
CT1950A/
L1
T1
ELECTRIC
HEATER
2
4
3
RED
5
L2
T2
BLACK
BLACK
BLACK
1
CT1950B
BLACK
RED
(A)
(B)
L2
CT1957A
CT1950A/
Display MINUTE of the Day
Your CT1950/CT1957 Programmable Electronic Line
Voltage Thermostat fea tures digital temperature
sensing and control for energy efficient
precision operation. It will provide the flexibility
of 5-1-1 day or 7 day programming and
exceptional comfort control of resistance-rated
heating equipment.The patented CoolSwitch™
design offers long service life.
Depending on local climate, night and day setback of space temperature can save up to 28%
of the energy used to heat a controlled zone.
According to the Electric Power Research
Institute, precision temperature control also offers
up to 12% energy saving during comfort periods
compared with conventional bi-metallic electric
heating thermostats.
CT1950/CT1957
Chronotherm
™
Electronic
Programmable
Line Voltage
Thermostat
Contents
Specifications . . . . . . . . . . . . . . . . . . . . . . . . . . . 2
Installation. . . . . . . . . . . . . . . . . . . . . . . . . . . . . . 3
Wiring . . . . . . . . . . . . . . . . . . . . . . . . . . . . . . . . . 4
Thermostat Programming. . . . . . . . . . . . . . . . . . . 6
Initial Power-Up . . . . . . . . . . . . . . . . . . . . . . 6
Clock . . . . . . . . . . . . . . . . . . . . . . . . . . . . . . 7
Schedule: 7 days . . . . . . . . . . . . . . . . . . . . . 8
5-1-1 days . . . . . . . . . . . . . . . . . . . . . . . . . 12
Reset . . . . . . . . . . . . . . . . . . . . . . . . . . . . . . 6
Additional Functions . . . . . . . . . . . . . . . . . . . . . 11
Change Display . . . . . . . . . . . . . . . . . . . . . 11
Temporary Program Override . . . . . . . . . . . 13
Indefinite Program Override . . . . . . . . . . . . 13
Copy Program From One Day to Another . . 10
Checkout. . . . . . . . . . . . . . . . . . . . . . . . . . . . . . 14
6
Change MINUTE of the Day
THERMOSTAT PROGRAMMING – TEMPERATURE SETUP 7 Day Mode (factory default setting)
Step
7
8
Note; Broken line outline indicates flashing characters
Step
9
10
11
12
Press This Key Display will look like this
8
Press This Key Display will look like this
9
Scroll through to display showing the first
day of programming [beginning with
MOnday]
Display WAKE time
Change WAKE time in 10 minute
increments
Display WAKE setpoint temperature
Change WAKE setpoint temperature
Display LEAVE time.
Repeat the adjustments suggested in
steps 9 - 11 for the LEAVE,RETURN and
SLEEP periods
Description
Description
SPECIFICATIONS
MODELS: CT1950A/CT1957A - SPST; Makes heating circuit on temperature fall.
CT1950B - DPST; Makes heating circuit on temperature fall.Breaks both sides of 240 volt line with switch in "OFF" position.
Operating range: -20 to +104°F [-30 to +40°C], 5 to 95% RH, non-condensing.
CONTROL RANGE:
7 to 27°C [45 to 80°F] in 1° increments. Factory set at 16°C [61°F] .
SWITCHING:
Patented CoolSwitch™ thyristor with relay conductor.
WIRING CONNECTIONS:
6" [150 mm] stranded copper leadwires suitable for connection to aluminum wiring if approved special service CO/ALR connectors are
used.
ELECTRICAL RATINGS,NON-INDUCTIVE:
16 A (3800W) maximum,2 A (500W) minimum @ 240V, 60 Hz. (12 ft. of baseboard maximum)
SENSING ELEMENT:
Electronic thermistor.
2
INSTALLATION
! WARNING
• This thermostat is a line voltage (240 Vac) control.Do not install it unless you are completely familiar and competent with house
wiring. If improperly handled, there can be a risk of 240 Volt electric shock hazard which may cause serious injury or death.
• The CT1950/CT1957 is rated for normal full load current on a dual residential 20 A circuit breaker or fuse block. Do not use on circuits
protected by higher-rated over-current protection devices.Some sustained fault conditions can cause product failure.
• Do NOT connect to voltage different from device rating.
! CAUTION
• Disconnect power supply before making wiring connections to prevent electrical shock or equipment damage.
• All wiring must comply with applicable codes and ordinances.
• Thermostats are designed to be used with appliances having a limit control.
• Maximum load for thermostat must not exceed 3800W, otherwise a potential fire hazard exists.
(ie. greater than 12 ft. of baseboard)
LOCATION:
Install a vertical switch box for mounting the CT1950/CT1957 approximately 1.5 m (5 ft.) above the floor on an inside wall where the thermo-
stat will be subjected to average room temperature. The thermostat must be placed away from concealed warm or cold water pipes,
air ducts, or drafts from hallways, fireplaces or stairways to sense temperature properly.Do not place thermostat above heater.
3
COPY FROM – AND COPY TO – ANOTHER DAY
Step
13
14
15
16
Note:To exit the programming mode at any time, press
and hold the PROG key for 3 seconds.
THERMOSTAT PROGRAMMING –
Press This Key Display will look like this
ADDITIONAL FUNCTIONS
To change display
17
18
Convert to
°C or °F
19
Convert 5-1-1
to 7-day
20
10
FF FF
36
11
Description
Select and display the day to be copied,
e.g. MOnday
Press key to display COPY FROM
Select and display TUesday program period
(pressing key will display COPY TO)
Finally,press FUNC to enter this
program.
Repeat process for each day copied
Broken line outline indicates
flashing characters
Press and hold both the PROG and FUNC
keys. Initially a random 4 digit/letter
display will occur.
Press PROG key and continue –
(“b” will appear for b model only).
Press PROG key a second time to
display C°. Use [+] key to change to
F° if desired (or F° to C°)
Press PROG key a third time to
display “5 1 1 d”; press [+] key to
change mode to 7-day programming
(or vice versa)
WIRING:
1. Disconnect power while installing.
Double check that thermostat is rated for voltage and amperage of load to be controlled.
2. Remove cover as needed by carefully prying at the top or bottom edge with a coin or slot screwdriver.
Fig. 1 Wiring
1 Power supply.Provide disconnect means
and overload protection as required.
2 Special service CO/ALR solderless
connections must be used when
connecting aluminum conductors;
otherwise, a fire hazard may result.
3 Thermostat breaks heating circuit on
temperature rise.
4 Thermostat is designed to be used with
appliances equipped with a limit control.
5 B Model thermostat breaks both sides of
line with switch in OFF position
4
WIRING cont’d
3. When replacing an old line voltage wall thermostat, remove it carefully to avoid damage to the insulation on the wiring. Check the old
insulation for cracks, nicks, or fraying and apply certified electrical tape where necessary to achieve adequate insulation, or replace
the wires in an approved fashion.
4. Attach wires with solderless wire connectors approved for the size and number of wires to be connected. Be sure that all wire connectors
are tight.
CAUTION: Do not short 240 V supply wires with thermostat connected. This will damage the CT1950/CT1957 and void the warranty.
!
WARNING: To avoid risk of fire hazard,all connections to aluminum conductors must be made using approved
CO/ALR solderless connectors.
5. Secure thermostat to the electrical box with captive mounting screws. Installation Hint: Prebend the solid conductors, then push them
and the wire connectors into the electrical box before tightening the mounting screws.
6. Snap cover in place.
7. Turn power on.
THERMOSTAT PROGRAMMING
THERMOSTAT PROGRAMMING
Step
21
22
23
Note: Broken line outline indicates flashing characters
ADDITIONAL FUNCTIONS cont’d
: 5-1-1 Day Mode (refer to steps 17-20)
Press This Key Display will look like this
TO INDEFINITELY OVERRIDE A PROGRAM
Step
24
Press This Key Display will look like this
TO TEMPORARILY OVERRIDE A PROGRAM
25
Description
Scroll through the displays until the
screen shows the MOnday to FRiday
schedule with the WAKE, LEAVE
RETURN and SLEEP options
Follow the same programming
proceedure as steps 8–12
Program SAturday and SUnday
separately or use the “Copy From –
Copy To” feature (steps 13–16)
cont’d
12
Description
Press and release FUNC key to activate
the HOLD mode.
Press and hold PROG key to return to
RUN mode.
Press and hold [+] or [-] key until TEMP
appears on screen; adjust temperature [+] or
[-] as desired.Thermostat will return to normal
program status automatically in next period
THERMOSTAT PROGRAMMING
On first power up, the thermostat display will show a self test
00E
status,
blank for one second, followed by this display —
(broken line indicates
section is flashing.)
The thermostat will begin temperature
control with the default setpoint at 61°F
(16°C) in the HOLD mode. It will continue to operate in this
manner until the user presses PROG and proceeds to set the
clock (Step 1) below.
Note: To Change display or functions (e.g.to °C or °F,or
programming from 5-1-1 to 7-day) see instructions on
Additional Functions, p. 11.
FACTORY SET PROGRAMMING
The thermostat is preset with a factory set schedule for 7
display for about 15 seconds, then go
THERMOSTAT PROGRAMMING
Step
1
2
3
4
Press This Key Display will look like this
INITIAL POWER-UP
CLOCK SETUP
5
days (see Table 1 below). After the clock is set up, if the factory
set schedule is satisfactory,no more programming is required. The
thermostat will revert to normal RUN mode either by pressing and
holding the PROG key for 3 seconds, or left untouched for 5 minutes.
Table 1 – Initial Factory Schedule for 7-day
Event Time Temperature
WAKE 6:00 a.m. 21°C (70°F)
LEAVE 8:00 a.m. 16°C (61°F)
RETURN 6:00 p.m. 21°C (70°F)
SLEEP 10:00 p.m. 16°C (61°F)
THERMOSTAT RESET The reset key is accessed by inserting
a bent paperclip or similar wire into the small hole next to
the [+] key (with cover removed).This will reset the clock
only,programmed schedule will be retained.
6
Description
Display DAYof the Week
Change DAYof the Week
Display HOUR of the Day
7
Change HOUR of the Day
13
CHECKOUT
When the thermostat is first powered up (or after 8 hours of continuous power loss), the display will blink for 2 seconds,
then undergo a self test, indicated by
checkout is complete, and the thermostat is ready to program.
To verify the thermostat is turning on the baseboard heater, repeatedly press the [+] key until the displayed setpoint
exceeds the room temperature.The [°] symbol should be flashing. Feel near the baseboard heating element and the unit
should be starting to generate heat.
Press and hold the PROG key and the thermostat will return to its former RUN mode.
TROUBLE SHOOTING
Display Code
OLOAd
06E
Connected load exceeded
3800W
Power failure detected
Cause
Missing segment or other abnormal display
Automation and Control Solutions
Honeywell Honeywell Limited-Honeywell Limité e
1985 Douglas Drive North 35 Dynamic Drive
Golden Valley, MN 55422 Scarborough, Ontario
G.H. • 6/02 • © Honeywell Limited 69-1644EF
for 15 seconds. Once the display shows 1:00 pm flashing, the internal
OOE
Action
Ensure that total wattage of baseboard connected do not exceed 3800W.
A fire hazard exists if wattage exceeds 3800W.Push reset key to clear
and reset clock.
Push reset key to clear and reset clock.
Push reset key to clear and reset clock.If problem persist call Honeywell.
14
MIV 4Z9
Page 2
5
L1
T1
L1
PLINTHE
CHAUFFANTE
L2
1
2
4
3
NOIR
NOIR
CT1950A
L1
T1
L1
PLINTHE
CHAUFFANTE
L2
1
2
4
5
ROUGE
ROUGE
L2
T2
NOIR
NOIR
3
CT1950B
CT1950A/
CT1957A
Affiche la minute en cours
Le thermostat électronique programmable
tension secteur CT1950/CT1957 offre la souplesse de
la programmation sur sept jours et le confort exceptionnel des appareils à résistance. Sa conception
CoolSwitchMCbrevetée lui procure une durée de
vie d'une longueur exceptionnelle. Selon le climat
local, le décalage de la température le jour et la
nuit peut faire économiser jusqu'à 28 % de
l'énergie servant au chauffage des zones. Selon
l'Electric Power Research Institute, la régulation
précise de la température permet également de
réaliser jusqu'à 12 % d'économie d'énergie
pendant les périodes de confort comparativement
aux thermostats à bilame pour chauffage
électrique.
Thermostat
électronique
programmable
tension secteur
Chronotherm
CT1950/CT1957
Table des matières
Caractéristiques . . . . . . . . . . . . . . . . . . . . . . . . . .2
Installation . . . . . . . . . . . . . . . . . . . . . . . . . . . . . .3
Raccordement . . . . . . . . . . . . . . . . . . . . . . . . . . .4
Programmation du thermostat . . . . . . . . . . . . . . . .6
Première mise en service . . . . . . . . . . . . . . . .6
Remise à l’état initial . . . . . . . . . . . . . . . . . . .6
Réglage de l’horloge . . . . . . . . . . . . . . . . . . .7
Horaire : 7 jours . . . . . . . . . . . . . . . . . . . . . . .8
Copie de l’horaire d’une journée à une autre 10
Fonctions additionnelles . . . . . . . . . . . . . . . . . . .11
Modification de l’affichage . . . . . . . . . . . . . .11
Horaire : 5-1-1 jours . . . . . . . . . . . . . . . . . . .12
Dérogation temporaire au programme . . . . .13
Dérogation indéfinie au programme . . . . . . .13
Vérification . . . . . . . . . . . . . . . . . . . . . . . . . . . . .14
6
Change la minute en cours
PROGRAMMATION DU THERMOSTAT – RÉGLAGE DE LA TEMPÉRATURE,horaire 7 jours (horaire par défaut réglé en usine)
Étape
7
8
Remarque : le trait pointillé indique que le segment
de l’affichage clignote.
Étape
9
10
11
12
Appuyer sur cette touche L'écran affiche ceci
Appuyer sur cette touche L'écran affiche ceci
8
9
Description
Appuyer sur la touche PROG jusqu’à ce
l’écran affiche le premier jour à programmer en commençant par lundi (MO).
Affiche l’heure du réveil (WAKE)
Description
Change l’heure du réveil par tranches
de dix minutes
Affiche le point de consigne du réveil
(WAKE)
Change le point de consigne du réveil
(WAKE)
Affiche l’heure de départ (LEAVE)
Reprendre les étapes de 9 à 11 pour les
périodes LEAVE (départ),RETURN (retour)
et SLEEP (coucher)
CARACTÉRISTIQUES:
MODÈLES CT1950A/CT1957A: Unipol., unidir.; Fermeture du circuit de chauffage sur une baisse de température.
CT1950B: Bipol., unidir.; Fermeture du circuit de chauffage sur une baisse de température. Ouverture des deux côtés d'une
GAMME DE RÉGLAGE : 7 à 27 °C [45 à 80 °F], un degré à la fois.
Réglé en usine à 16 °C [61 °F]. [Point de consigne à la mise en service et en mode de maintien (HOLD) jusqu'à ce que le programme
soit entré en mémoire.]
COMMUTATION :
Commutateur à thyristor breveté CoolSwitch
RACCORDEMENT ÉLECTRIQUE :
Conducteurs torsadés en cuivre de 150 mm [6 po] convenant à des raccords à du fil d'aluminium si on utilise des connecteurs approuvés
CO/ALR pour service spécial.
CARACTÉRISTIQUES ÉLECTRIQUES NOMINALES, NON INDUCTIVES :
16 A (3 800 W) maximum,2 A (500 W) minimum à 240 V, 60 Hz. (Maximum de 12 pi de plinthes chauffantes raccordées)
ÉLÉMENT SENSIBLE :
Thermistor électronique.
INSTALLATION
• Ce thermostat est un régulateur tension secteur (240 V c.a.).Une personne qui n'a pas une excellente connaissance et une
grande familiarité avec l'électricité résidentielle ne devrait pas l'installer.Une mauvaise manipulation pourrait provoquer un choc
électrique de 240 volts, ce qui peut provoquer des blessures graves et entraîner la mort.
• Le CT1950 peut accepter un courant de pleine charge dans un coupe-circuit ou un bloc à fusibles résidentiel double de 20 A.Ne
pas l'utiliser dans des circuits protégés par des dispositifs à charge plus élevée. Certains états défectueux soutenus peuvent
endommager l'appareil
• Ne pas raccorder l'appareil à une source dont la tension est différente.
• Couper l'alimentation avant d'effectuer les raccords pour éviter les chocs électriques et les domma ges au matériel.
• Tout le câblage doit être conforme aux codes et aux règlements locaux.
• Les thermostats sont conçus pour être utilisés avec des appareils comportant un limiteur.
• La charge maximale du thermostat ne doit pas dépasser 3 800 W, sinon, il peut y avoir des risques d’incendie.
(c.à.d. plus de 12 piécs de plinthes chauffantes)
EMPLACEMENT :
Installer une boîte de commutation verticale qui recevra le CT1950/CT1957 à environ 1, 5 m (5 pi) du sol, sur un mur intérieur où le thermostat
pourra capter la température ambiante moyenne. Pour capter la température convenablement, le thermostat doit être éloigné des
sources de froid ou de chaleur dissimulées, des canalisations d'eau, des gaines d'air et des courants d'air provenant de corridors, de
ligne de 240 volts lorsque l'interrupteur est à la position « OFF».
MC
avec commutation par relais.
2
! AVERTISSEMENT
! MISE EN GARDE
3
COPIE DE L'HORAIRE D'UNE JOURNÉE À UNE AUTRE
Étape
13
14
15
16
Remarque. Pour sortir du mode de programmation, appuyer sur
la touche PROG et la maintenir enfoncée pendant trois secondes;
l’affichage reviendra alors au mode de fonctionement (RUN).
Appuyer sur cette touche L'écran affiche ceci
PROGRAMMATION DU THERMOSTAT
Étape
Pour changer
l’affichage
17
18
Passer des degrés
C aux degrés F
19
Pour passer de 7
jours à 5+1+1
20
Appuyer sur cette touche L'écran affiche ceci
Description
Exemple : Passer au lundi
Choisir l'horaire du lundi pour le copier
Choisir le jour pour y copier l'horaire
du lundi
Copier le programme d’une autre journée.
La même méthode sert à copier
n'importe quel programme d'une
journée à une autre.
10
Remarque : le trait pointillé indique que le
segment de l’affichage clignote.
– FONCTIONS ADDITIONNELLES
Description
Appuyer simultanément sur les touches
FF FF
36
11
PROG et FUNC et les maintenir enfoncées
jusqu’à ce que l’écran affiche 4 chiffres ou
lettres aléatoires (p. ex. FF FF).
Appuyer sur PROG pour continuer –
(“b” apparaîtra seulement pour le modèle b).
Appuyer sur PROG une deuxième fois
puis ajuster au moyen des touche [+]
ou [-] pour afficher °C ou °F.
Appuyer sur PROG une troisième fois pour
afficher «5-1-1 d»; appuyer sur [+] pour
passer au mode 7-jours (ou vice versa).
RACCORDEMENT :
1. Couper l'alimentation électrique avant de procéder à l'installation.
Vérifier à nouveau si le thermostat convient à la tension d'alimentation et à l'intensité de la charge à commander.
2.Retirer le couvercle au besoin en le soulevant avec soin par le rebord du haut ou du bas à l'aide d'une pièce de monnaie ou d 'un tournevis
droit.
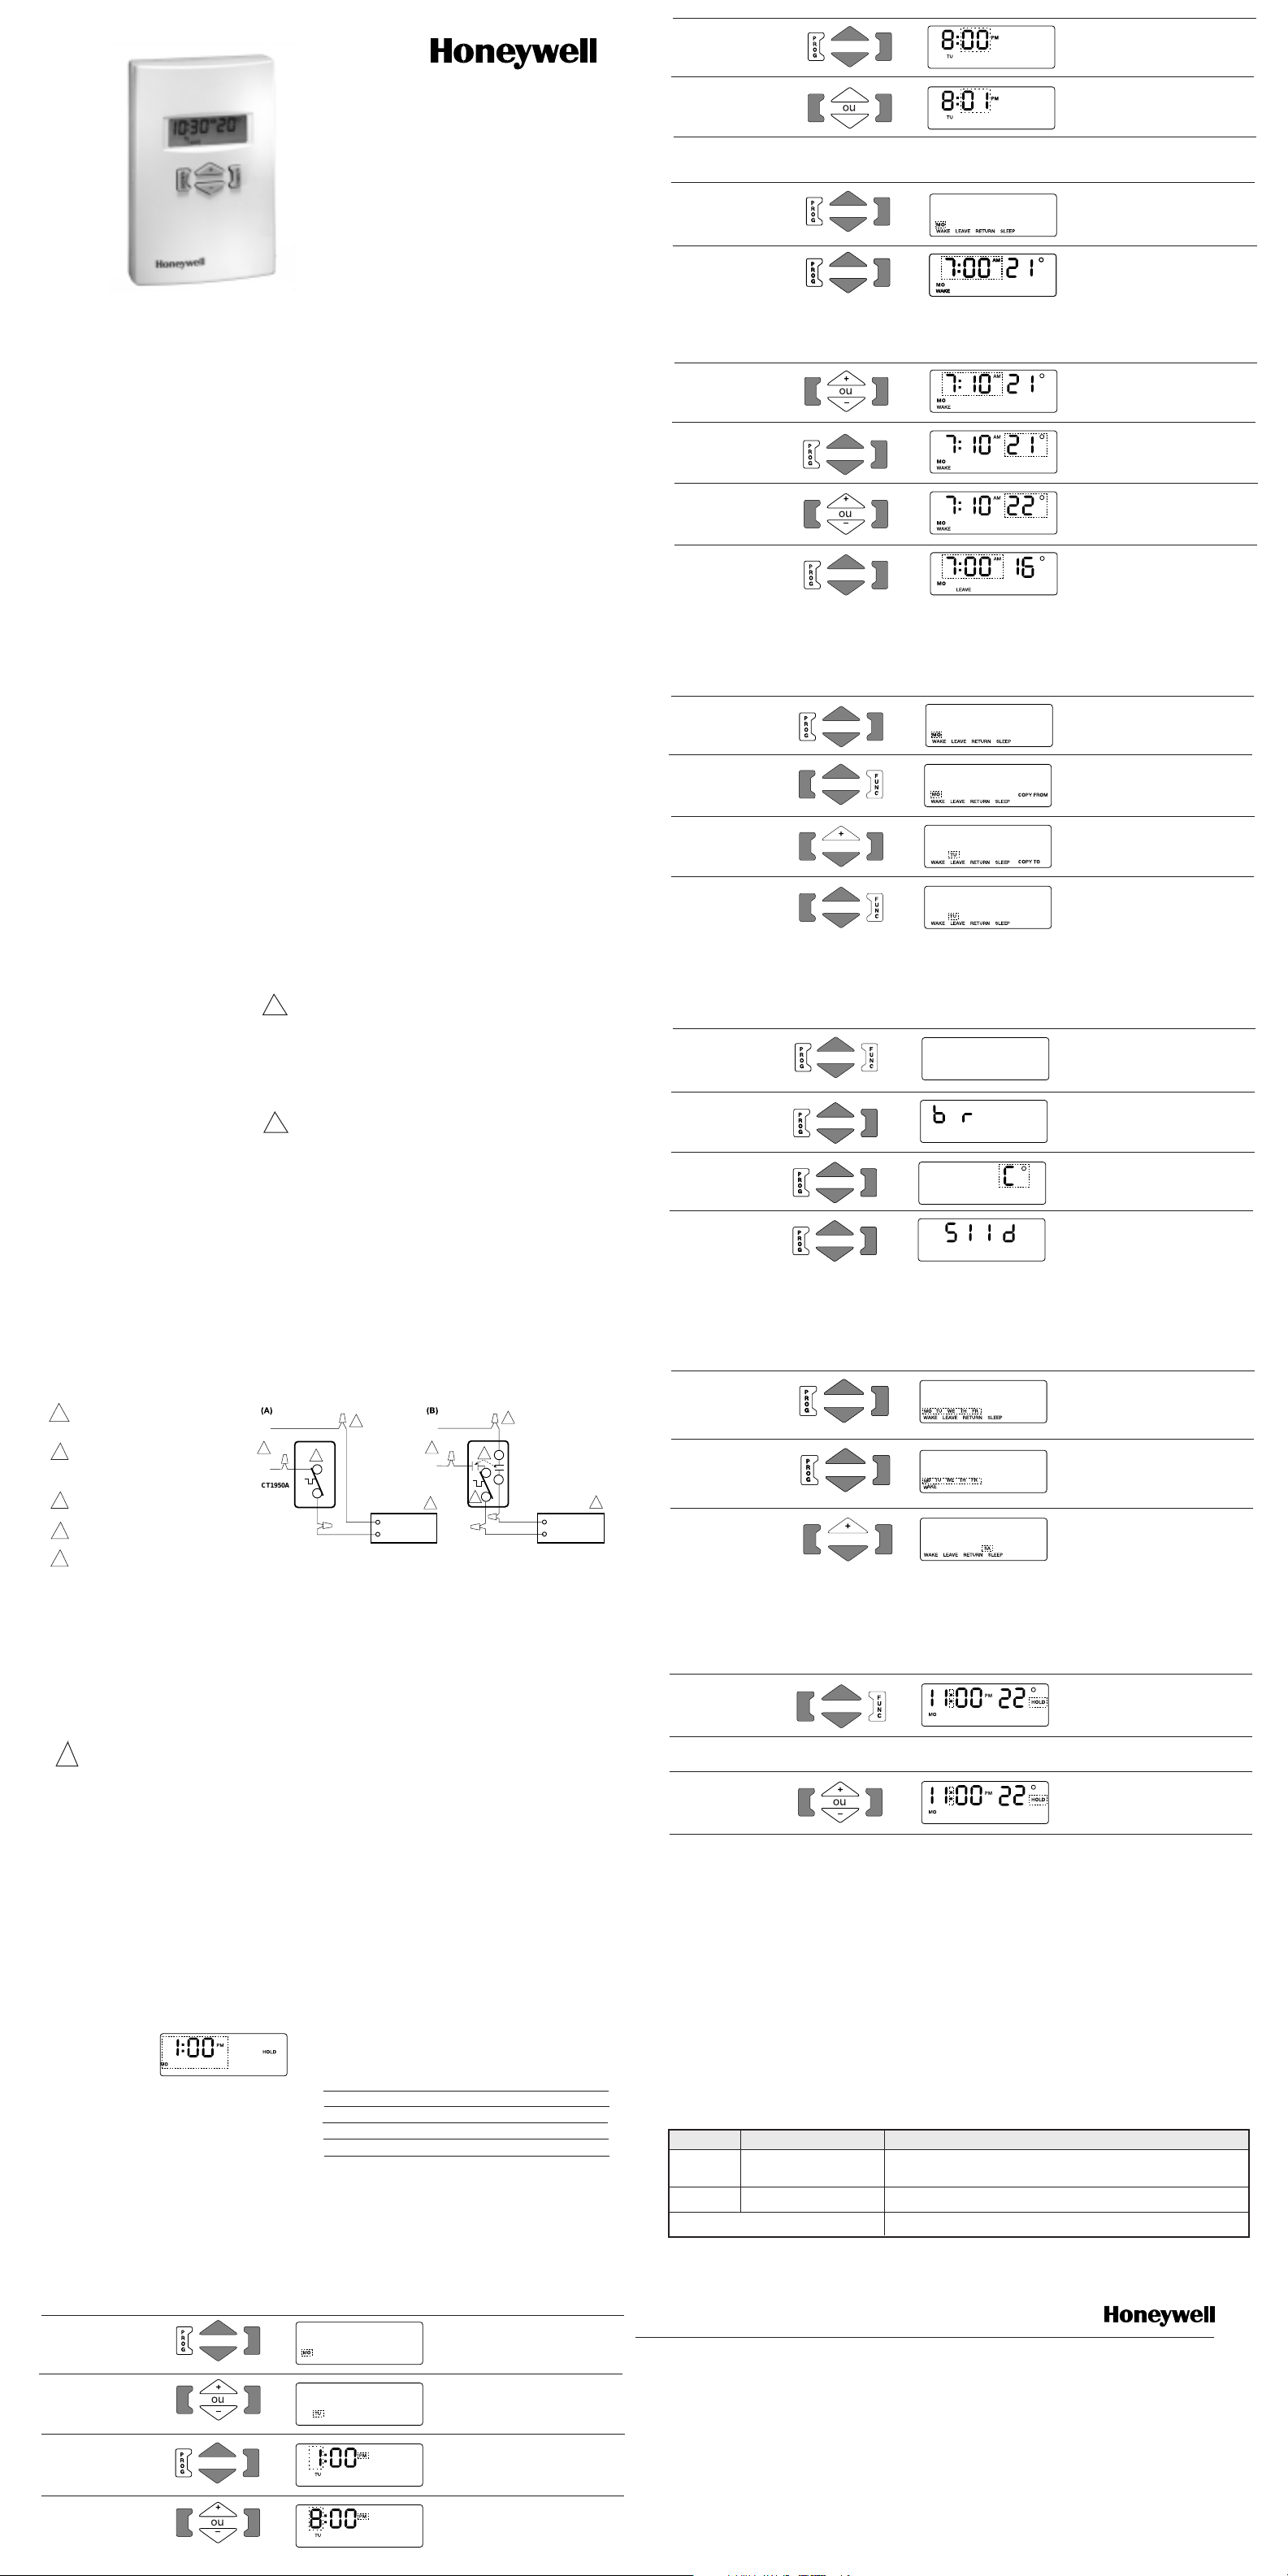
Fig. 1 Raccordement
1 Alimentation.Fournir au besoin un dispositif
de coupure et une protection contre les
surcharges.
2 Utiliser des connecteurs sans soudure pour
service spécial CO/ALR lors du raccordement
de conducteurs d'aluminium; sinon, il
pourrait y avoir des risques d'incendie.
3 Le thermostat interrompt le circuit de
chauffage lorsque la température augmente.
4 Le thermostat est conçu pour une utilisation
avec des appareils qui comportent un limiteur.
5 Le thermostat de modèle B interrompt le
circuit aux deux extrémités de la ligne vers
la charge lorsque l'interrupteur est à la
position OFF.
RACCORDEMENT (suite)
3. Lors du remplacement d'un ancien thermostat mural tension secteur,il faut retirer l'ancien thermostat avec soin en évitant d'endommager
l'isolant qui entoure les fils.Vérifier l'isolant et s'assurer qu'il n'est pas fissuré, entaillé ou effiloché et appliquer du ruban électrique certifié au besoin pour obtenir une isolation convenable, ou remplacer les fils selon les méthodes approuvées.
4. Fixer les fils au moyen de connecteurs sans soudure approuvés pour la taille et le nombre des fils à raccorder.S'assurer que tous les connecteurs sont bien resserrés.
MISE EN GARDE : Ne pas court-circuiter les fils d'alimentation 240 V avec le thermostat raccordée. Cette pratique pourrait
!
AVERTISSEMENT : Pour éviter tout risque d'incendie,toutes les connexions à des conducteurs d'aluminium doivent être faites
5. Fixer le thermostat à la boîte électrique au moyen des vis imperdables. Conseils d'installation : plier d'abord les conducteurs solides et
repousser les connecteurs dans la boîte électrique avant de serrer les vis de fixation.
6. Rabattre le couvercle en place. Refermer la porte du couvercle une fois le thermostat réglé.
7. Rétablir le courant.
endommager le thermostat et aurait pour effet d'annuler la garantie.
avec des connecteurs sans soudure CO/ALR approuvés.
4
PROGRAMMATION DU THERMOSTAT - FONCTIONS ADDITIONNELLES (suite)
HORAIRE : 5-1-1 JOURS (voir étapes 17 à 20)
Étape
21
22
23
Remarque : le trait pointillé indique que le segment
de l’affichage clignote.
Appuyer sur cette touche L'écran affiche ceci
12
POUR DÉROGER INDÉFINIMENT AU PROGRAMME
Étape
24
Appuyer sur cette touche L'écran affiche ceci
POUR DÉROGER TEMPORAIREMENT AU PROGRAMME
25
Description
Appuyer sur la touche PROG jusqu’à ce
l’écran affiche l’horaire du lundi au
vendredi (MO à FR) avec les options
WAKE,LEAVE,RETURN et SLEEP.
Suivre les étapes de programmation
de 8 à 12.
Programmer Samedi (SA) et dimanche
(SU) séparément ou utiliser la fonction
qui permet de copier l’horaire d’une
journée à une autre (étapes 13 à 16).
(à suivre)
Description
Pour passer au mode de maintien
(HOLD) et régler la température au point
de consigne de maintien pour une durée
indéfinie
Pour passer au mode temporaire et régler
la température à un nouveau point de
consigne jusqu’au prochain événement
prévu à l’horaire (p. ex. Retour)
PROGRAMMATION DU THERMOSTAT
À la première mise en service, l'écran du thermostat affiche
un état d'auto-diagnostic pendant environ
15 secondes; il n'affiche ensuite rien pendant une seconde,
puis affiche ce qui suit –
(le trait pointillé indique
que le segment de
l'affichage clignote).
Le thermostat commencera alors à régler la température au
point de consigne par défaut, qui est 16°C (61°F) au mode de
maintien (HOLD). Il fonctionnera ainsi jusqu'à ce que l'utilisateur appuie sur la touche PROG et règle l'horloge (Étape 1).
Remarque : Pour changer l’affichage ou les fonctions (p. ex.
pour passer des degrés C aux degrés F ou de la programmation 5-1-1 jours à celle de 7 jours), consulter la section
Fonction additionnelles à la page 11.
PROGRAMME RÉGLÉ EN USINE
Le thermostat est programmé à l'usine sur sept jours (voir le
Tableau 1 ci-dessous).Une fois l'horloge réglée à la bonne
00 E
PROGRAMMATION DU THERMOSTAT
Étape
1
2
3
4
Appuyer sur cette touche L'écran affiche ceci
5
PREMIÈRE MISE EN SERVICE
heure, et si le programme de l'usine convient, aucune autre programmation n'est requise. Le thermostat revient à son mode de
fonctionnement normal si l'on appuie sur la touche PROG en la
retenant pendant 3 secondes ou encore si on ne la touche pas
pendant 5 minutes.
Tableau 1 – Programme réglé en usine sur 7 jours
Événement Heure Température
WAKE (réveil) 6 h 00 21°C (70°F)
LEAVE (départ) 8 h 00 16°C (61°F)
RETURN (retour) 18 h 00 21°C (70°F)
SLEEP (coucher) 22 h 00 16°C (61°F)
RÉARMEMENT DU THERMOSTAT
On accède au bouton de réarmement du thermostat en insérant un
trombone déplié ou un fil de fer similaire dans la petite ouverture
située près de la touche [+] (couvercle enlevé).L'horloge est remise
à l'heure et l'horaire programmé reste le même.
6
RÉGLAGE DE L’HORLOGE
Description
Affiche le jour de la semaine
Change le jour de la semaine
Affiche l’heure en cours
Change l’heure en cours
7
13
VÉRIFICATION
Lorsque le thermostat est alimenté pour la première fois (ou après une panne de courant continue de huit heures),
l'affichage clignote pendant deux secondes et le thermostat effectue un auto-diagnostic illustré par les caractères
Pour vérifier si le thermostat fait fonctionner la plinthe chauffante, appuyer sur la touche [+] jusqu'à ce que le point de
consigne affiché dépasse la température ambiante.
Le symbole [°] se met alors à clignoter. On devrait maintenant sentir de la chaleur près de l'élément de chauffage;
l'appareil devrait commencer à dégager de la chaleur.
Appuyer sur la touche PROG et la maintenir enfoncée et le thermostat reviendra au mode de fonctionnement [RUN].
DÉPANAGE
Segment manquant ou autre affichage anormal
pendant 15 secondes. Cet auto-diagnostic est suivi d'un affichage clignotant (1:00 PM); la vérification
OOE
interne est terminée et le thermostat peut être programmé de nouveau.
Code affiché
OLOAd
06E
La charge raccordée dépasse
3800 W
Détection d'une panne courant
Cause
Mesures à prendre
Vérifier que la puissance raccordée maximale des plinthes chauffantes ne dépasse pas 3 800
W. Une puissance raccordée dépassant 3 800 W pose des risques d'incendie. Appuyer sur le
bouton de réarmement pour effacer le message et remettre l'horloge à l'heure.
Appuyer sur le bouton de réarmement pour effacer le message et remettre l'horloge
à l'heure.
Appuyer sur le bouton de réarmement pour effacer le message et remettre l'horloge à
l'heure. Si le problème persiste, communiquer avec Honeywell.
14
Automation and Control Solutions
Honeywell Howeywell Limited-Honeywell Limitéee
1985 Douglas Drive North 35 Dynamic Drive
Golden Valley, MN 55422 Scarborough, Ontario
MIV 4Z9
G.H. • 6/02 • Printed in U.S.A. 69-1644EF
 Loading...