

Page 1

Portable Evaporative Air Cooler
User Manual
Read and save these instructions before use
www.honeywellaircoolers.com
E-mail: info@honeywellaircoolers.com
Model: CS07AE
Page 2
1
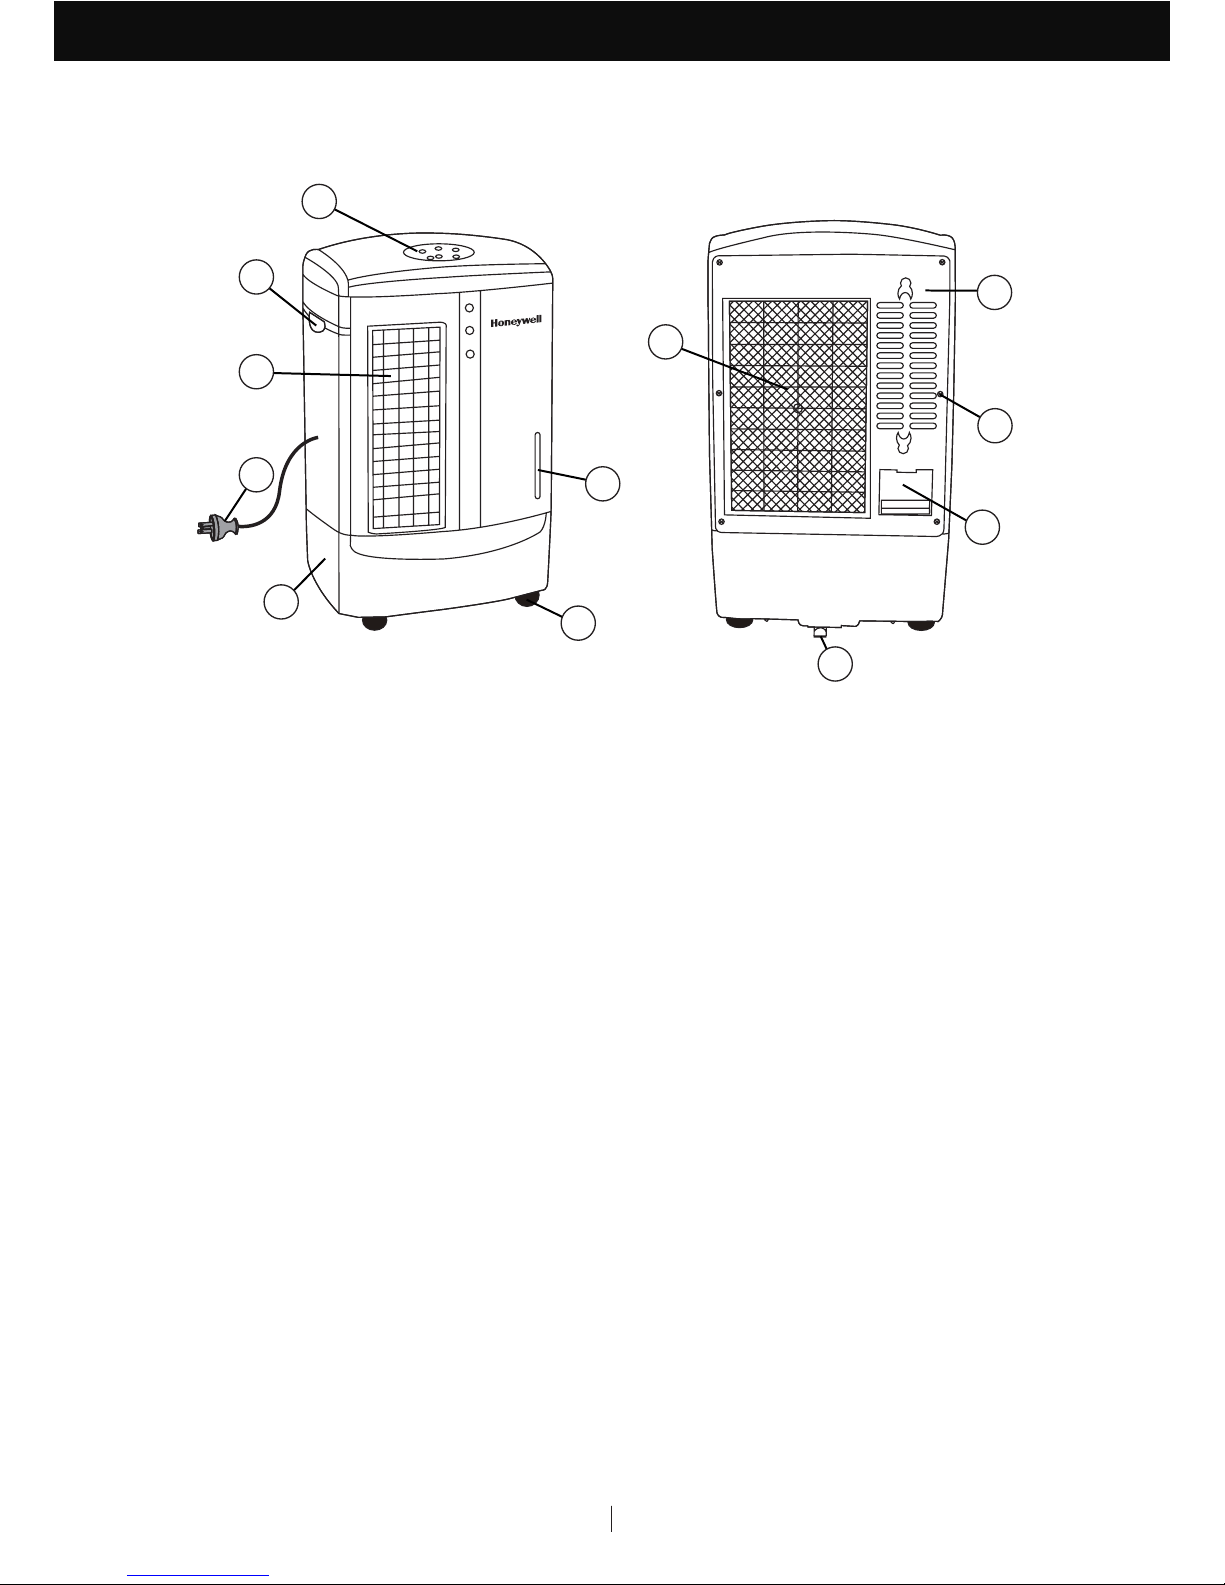
PARTS DESCRIPTION
EN
1) Control Panel 7) Water Tank
2) Handle 8) Rear Grill
3) Louvers 9) Rear Grill Screw
4) Power Cord & Plug 10) Honeycomb Cooling Media
5) Water Level Indicator 11) Water Fill Door
6) Casters 12) Drain Plug
1
5
6
2
7
9
3
4
10
11
12
8
WARNING -- READ AND SAVE THE AIR COOLER SAFETY & MAINTENANCE GUIDE AND USER
MANUAL BEFORE USING THIS PRODUCT. FAILURE TO FOLLOW THESE INSTRUCTIONS MAY
DAMAGE AND/ OR IMPAIR ITS OPERATION AND VOID THE WARRANTY. IN CASE THERE IS
ANY INCONSISTENCY OR CONFLICT BETWEEN THE ENGLISH VERSION AND ANY OTHER
LANGUAGE VERSION OF THE CONTENT OF THIS MATERIAL, THE ENGLISH VERSION SHALL
PREVAIL.
Page 3
2
123
S
R
N
4
21
0.5
USE & OPERATION
EN
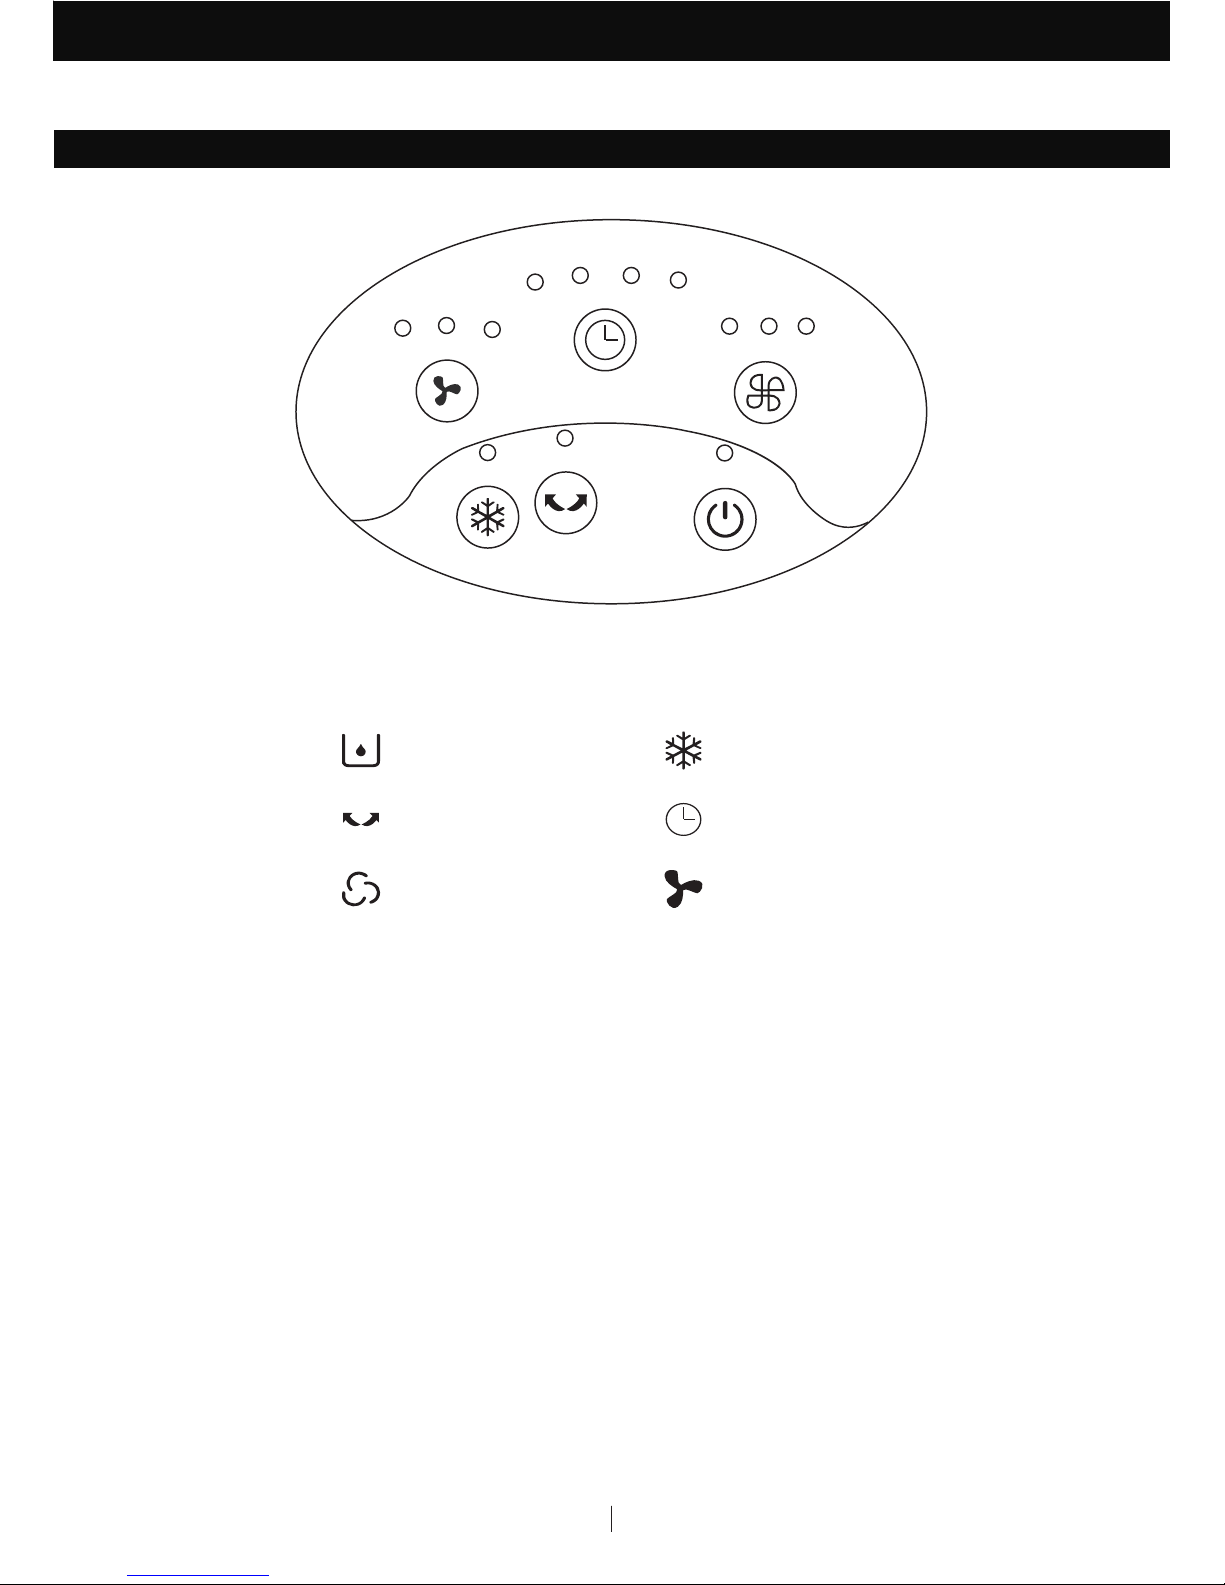
CONTROL PANEL
Icons on Display Screen
Power ON / OFF
Swing
Fan speed
1 = Low
2 = Medium
3 = High
N = Normal
R = Random
S = Sleep
Cool
Timer Setting
Wind Type
Page 4

3
USE & OPERATION
EN
POWER
Press the button to turn the unit on. The cooler will start automatically at medium speed. After a
few seconds the speed will switch to low. To turn the unit off, press the button again.
SWING
Press the button until the indicator light is illuminated on the control
panel. The louvers will begin to move left to right automatically.
Vertical Air Flow - You can manually adjust the louvers to change vertical air flow.
FUNCTION BUTTONS
COOL
Press the button until the indicator light is illuminated on the control
panel. This activates evaporative cooling. The water pump will operate and you
will feel the cooler air after the Honeycomb Cooling Media is completely wet.
When the indicator light is switched OFF, the unit can still function in a fan
only mode (without evaporative cooling).
TIMER
Press the button until the desired time duration setting is selected. When the set time has passed,
the unit will automatically turn off (unit remains in Standby mode until power cord is unplugged from
electrical socket). The TIMER function allows you to program the unit for up to 7.5 hours of use.
SPEED
Press the button repeatedly to change the speed between 3 - 2 - 1.
The indicator light will show the selected speed:
WIND TYPE
Press the button to select your desired wind type: N - R - S.
You can select either High, Medium or Low fan speeds.
The fan speed alternates between High, Medium and Low and off to mimic a natural
breeze.
This mode is for comfort during the night. When SLEEP mode is selected, the
airflow will start at a higher speed for 30 minutes and reduce to a lower speed
for 30 minutes. When the speed reaches Low speed, the fan will run in low speed
continuously until you switch OFF the unit. You may set the starting speed to be
High, Medium or Low. If you start the SLEEP mode with High speed, the fan will run
for 30 minutes in High speed, then 30 minutes in Medium speed and finally switch
to Low speed continuously. If you start the SLEEP mode with Medium speed, then
the fan will run for 30 minutes in this speed before changing to a continuous Low
speed.
Normal (N)
Random (R)
Sleep (S)
:
:
:
LOUVER
MOVEMENT
Low (1)Medium (2)High (3)
Page 5

4
USE & OPERATION (CONTINUED)
EN
REMOTE CONTROL
ON / OFF
COOL
SWING
TIMER
SPEED
WIND TYPE
POWER :
:
:
:
:
:
ON / OFF
Controls cooling or fan option
Controls the motion of the louvers
Controls the Timer function for automatic off
Switch between Normal, Random & Sleep
Low / Medium / High
COOL
SWING
WIND TYPE
SPEED
TIMER
NOTE:
•
•
•
•
•
•
•
•
•
•
The remote control requires AAA (2 x 1.5V) batteries for replacement.
Open the battery compartment at the back of the remote control and insert the batteries inside.
Care must be taken to insert the batteries according to the correct polarity (+ / –) markings
shown inside the battery compartment.
Always point the remote control signal transmitter towards the unit when operating. Make sure
that the signal path is not obstructed.
Remove the batteries if the unit is not going to be used for an extended period of time.
Do not drop the remote control.
Do not mix different types of batteries such as alkaline, carbon-zinc, or rechargeable batteries.
Do not mix old and new batteries.
Do not recharge the battery.
Exhausted batteries are to be removed from the product and safely disposed of as per local
regulations.
Do not dispose of batteries in fire. Batteries may explode or leak.
WARNING: Caution for ingestion of the small battery. Keep away from children and animals.
Page 6
5
CAUTION:
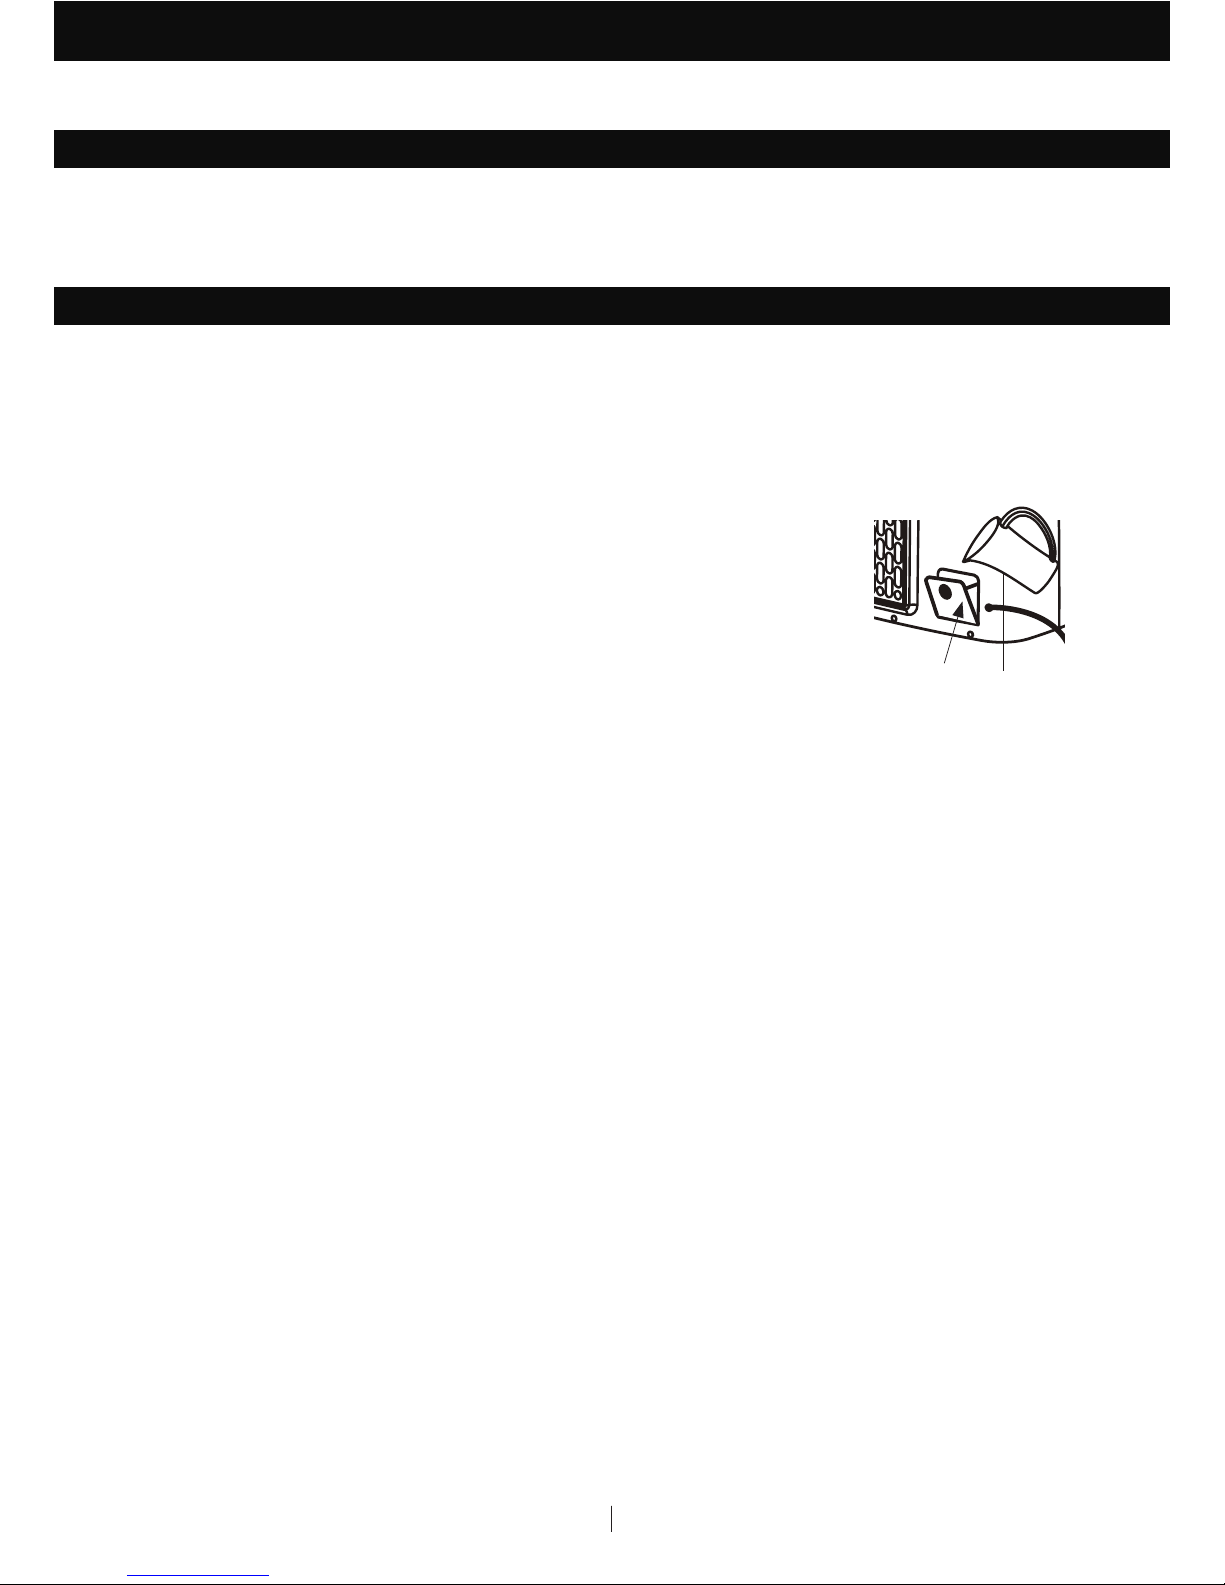
Unplug the unit from the electrical power outlet before emptying or refilling the water tank.
Open the Water Fill Door located on the back of the unit.
The Water Level Indicator is located at the front of the unit. Refill the water
tank when water level is low. Do not fill water above the "Max." water level
mark to avoid water droplets collecting on the louvers. Check the water
level in the tank before running the COOL function. Make sure that the
water in the tank is above the minimum water level mark. Running the unit
in COOL mode with inadequate water may cause pump failure.
Note: The water capacity refers to the total volume of water that can be contained within the air
cooler water tank and water distribution system. The water capacity in the tank at the “Max.” indicator
level may be lower than the actual water capacity of the air cooler.
WARNING: Do not fill water tank with dirty water or salt water. This can damage the unit and Honeycomb
media.
USE & OPERATION (CONTINUED)
EN
COOLER LOCATION
FILLING WITH WATER
Make sure to position the air cooler correctly before you set up and start using the product. Please
refer to the COOLER LOCATION section of the separate Safety & Maintenance Guide.
Water Fill Door
Page 7

6
Move the unit to a location where the water can be drained. Remove the cap from the Drain plug
located at the bottom of the unit. Allow the tank to empty.
Refill the water tank with clean water, up to the maximum level and drain it completely.
Use a damp cloth to remove the dirt and dust from the surface of the unit. Never use corrosive
elements or chemicals to clean this product.
When the product is not in use, store the unit in a dry place out of direct sunlight.
•
•
•
•
USE & OPERATION (CONTINUED)
EN
Below are instructions on how to clean and maintain your air cooler. If the cooler will not be used for
a long period of time, please refer to the STORAGE & MAINTENANCE GUIDELINES located in the
separate Safety & Maintenance Guide.
WARNING:
Before cleaning the unit, switch the unit OFF and disconnect from the electrical socket.
CLEANING & DRAINING THE WATER TANK
Page 8
7
USE & OPERATION (CONTINUED)
EN
CLEANING THE Carbon Dust Filter* AND HONEYCOMB COOLING MEDIA
The appliance is supplied with a Carbon Dust Filter* and Honeycomb Cooling Media.
The Carbon Filter* and Honeycomb Cooling Media are located inside the Rear Grill. See Figure 1
for instructions on how to remove them from the unit for cleaning and maintenance.
Do not run the unit in COOL mode with stale water in the tank. You must empty the water tank
and refill with fresh water, especially if the tank has not been cleaned in a long time.
The cleaning frequency for the Honeycomb media depends on local air and water conditions.
In areas where the mineral content of water is high, mineral deposits may build up on the
Honeycomb Cooling Media and restrict air flow. Draining the water tank and refilling with fresh
water at least once a week will help reduce mineral deposits. If mineral deposits remain on the
Honeycomb Cooling Media, the media should be removed and washed under fresh water. The
media should be cleaned every two months or sooner, depending on your needs.
For best results allow the Honeycomb Cooling Media to dry after each use by turning off the cool
function 15 minutes before turning the unit off.
•
•
•
•
•
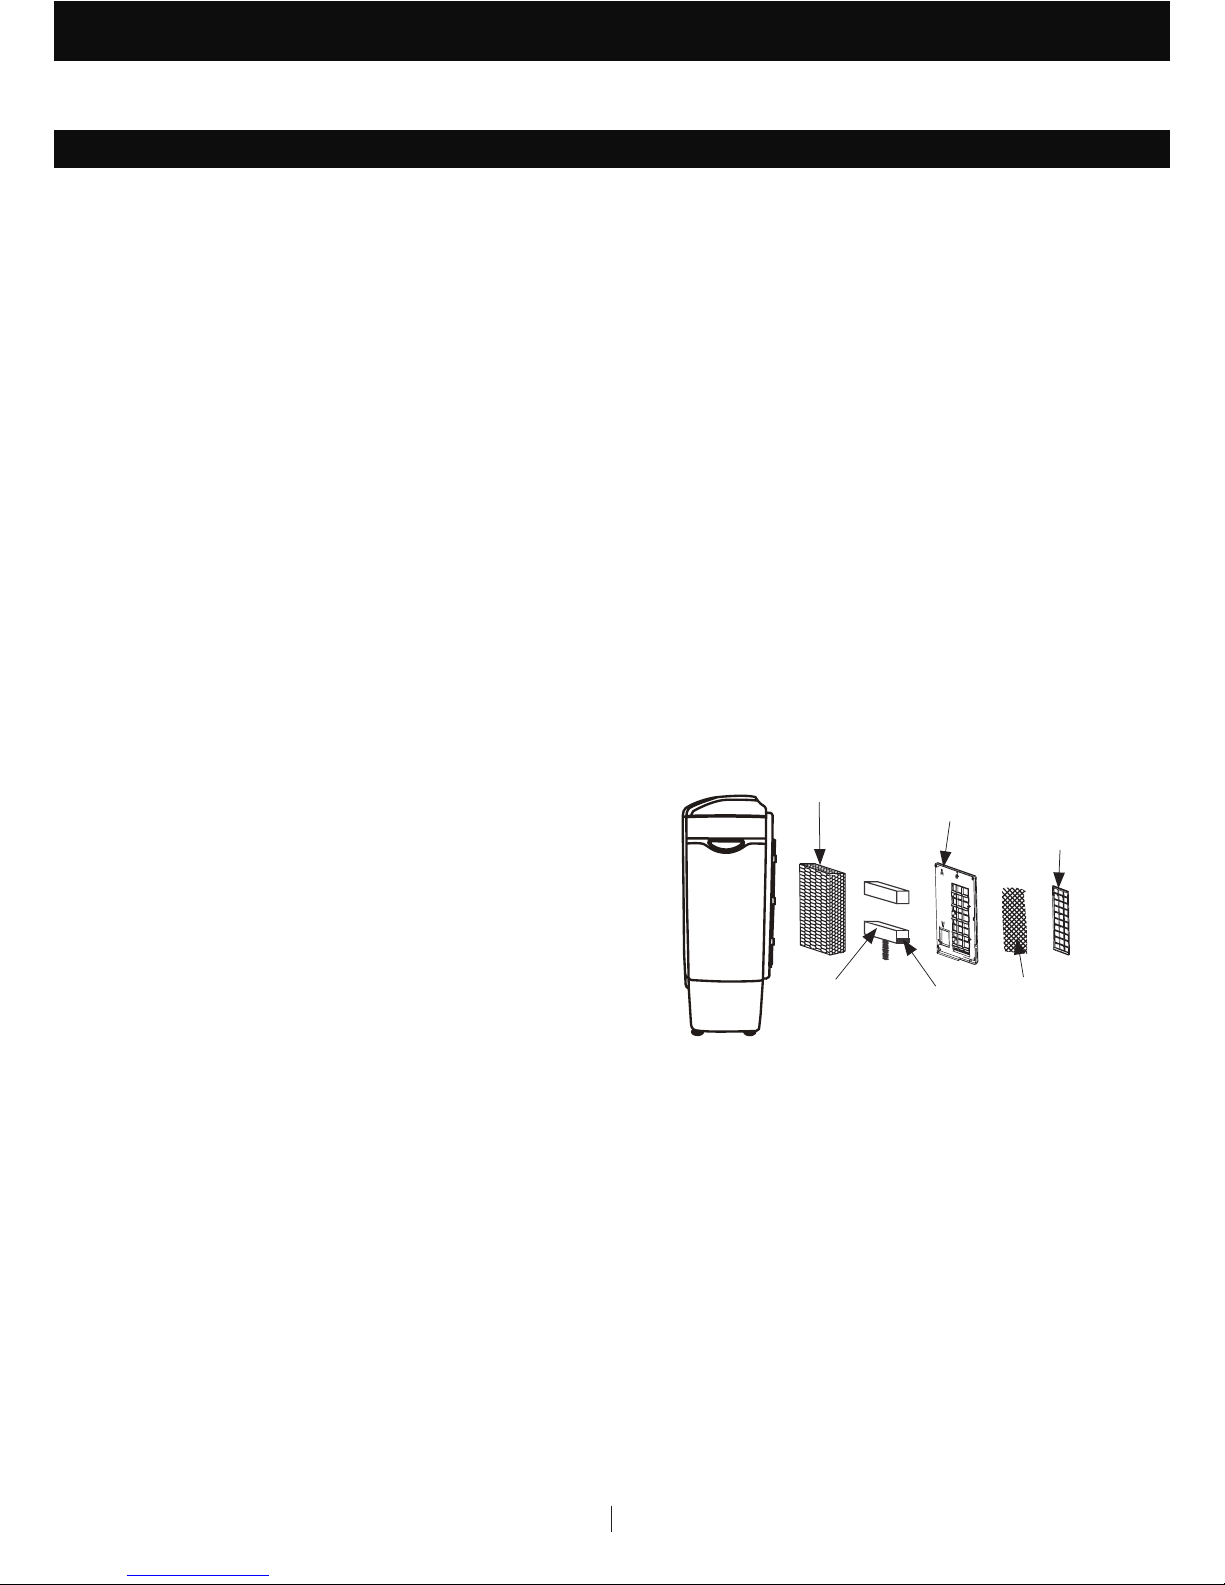
Remove all the screws from the Rear Grill of the
Air Cooler.
Carefully pull out the Rear Grill from the cooler.
Slide out the Carbon Filter* and clean with water.
To release the Honeycomb Media, remove the
Rear Frame screws and pull the Rear Frame away
from the unit.
Remove the screws from the bottom Honeycomb
Frame and slide out the Honeycomb Cooling
Media. Replace or clean media with water and a
damp cloth as needed.
1.
2.
3.
4.
5.
Removing the Carbon Dust Filter*/ Honeycomb Cooling Media:
WARNING: DO NOT operate the Air Cooler when
the Rear Grill, Rear Frame or Honeycomb Frame is
removed from the Air Cooler, or if any of these are
loose-fitting on the air cooler. Doing so can cause
serious injury or dangerous electric shock.
*Applicable for models with Carbon Dust Filter only.
Figure 1:
Rear Grill
Honeycomb
Cooling Media
Honeycomb
Frame
Rear Frame
Screws
Carbon Dust
Filter
Page 9

JMATEK Limited
Manulife Financial Centre,
Kwun Tong, Hong Kong
Phone: 85225595522
Email: info@jmatek.com
Web: www.jmatek.com
Made in China
© 2017 JMATEK Limited. All rights reserved.
The Honeywell Trademark is used under license
from Honeywell International Inc.
Honeywell International Inc. makes no
representations or warranties with respect to this product.
This product is manufactured by Airtek Int'l Corp. Ltd.
(subsidiary of JMATEK Ltd.).
 Loading...