

(2) REMOVE
COVER
LED
(1) INSERT
SCREWDRIVER
IN GROOVE
AND TWIST
PLACE LEVEL AGAINST
THESE POINTS TO ENSURE
UNIT IS VERTICAL.
AURORA-002
X1
A
B
B
A
X2
TOP
LED
ENABLE/DISABLE
JUMPER LINK
PULSE
PROCESSING
SELECTION
JUMPER LINK
AURORA-004
0
22.5'
22.5'
10'
20'
30'
35'
0
7'
0
10'
20'
30'
35'
SIDE VIEW
TOP VIEW
ALTERNATE COUNT POLARITY
EACH ZONE CONSISTS OF 2 FIELDS
AURORA / AURORA-T
INSTALLATION INSTRUCTIONS
GENERAL INFORMATION
These passive infrared motion detectors are versatile wall-mounted
units employing Fresnel lenses and offering efficient protection
patterns for commercial and residential applications. Best coverage
will be obtained if mounting is selected such that the likely direction of
intruder motion is across the pattern.
When installed per the guidelines, the Split-Zone Optics technology in
the Aurora Series provides reasonable false alarm protection against
pets and other animals up to 40 lbs.
SPECIFICATIONS
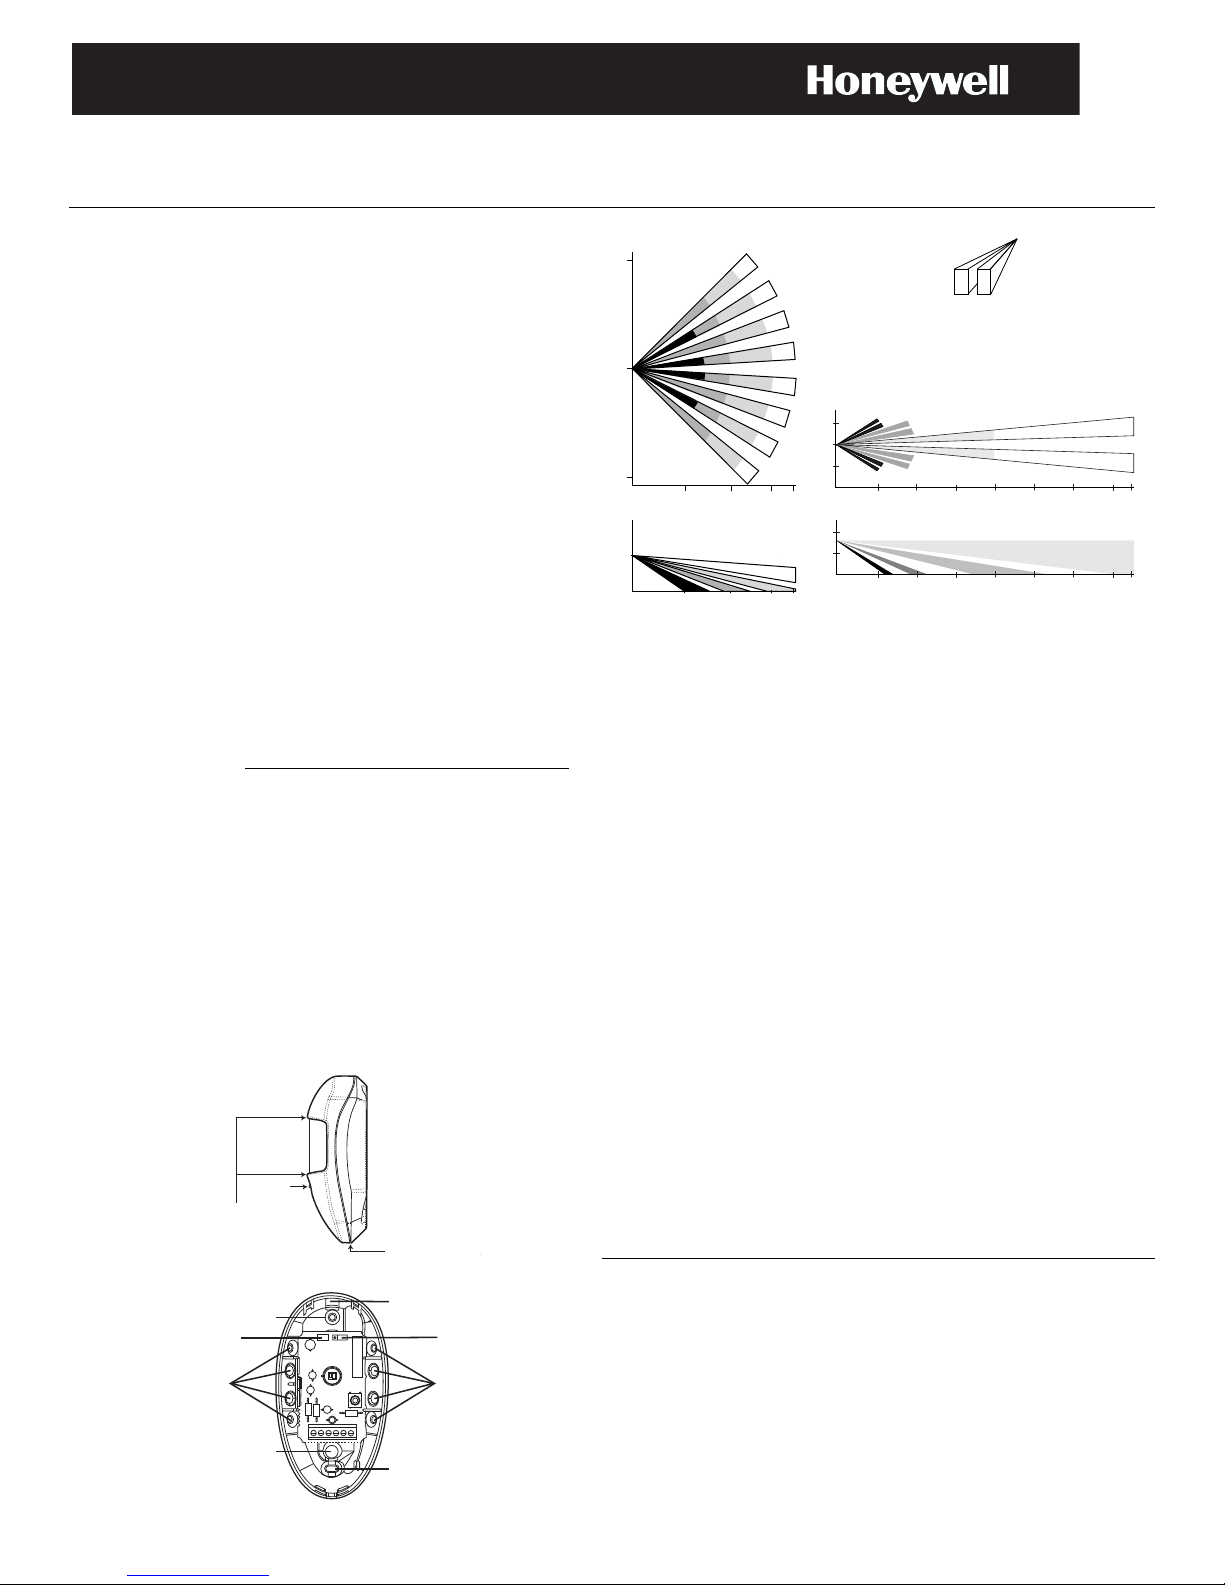
Detection Method: Passive Infrared
Coverage: Pet Immune Lens,
35 ft x 45 ft (10.6m x 13.7m), 90°
Detection Zones: Pet Immune Lens - 28 zones
(8 over 8 long range, 8 intermed, 4 short range)
Pulse Processing: Intermediate, Standard, Harsh
(use “Standard” for pet immune applications)
Temperature Comp.: Advanced dual-slope temperature
Detectable Walk Rate: 0.5 - 10 ft/Sec (0.15 - 3m/Sec)
Mount Height: 7.0 ft recommended (2.1m)
Indicator: Red LED with enable/disable link
Alarm Relay: Form A, SPST, 90mA@16VDC,
15-ohm protective resistor
Input Voltage: 8 - 16VDC (Aurora and Aurora-T)
(voltage reversal makes PIR inoperative)
Current: Model w/LED alarm w/o LED standby
Aurora 10mA 4mA 4mA
Aurora-T 10mA 4mA 4mA
All currents nominal at 12VDC.
Standby: Power source should be capable of at least 4
Tamper: Normally closed (with cover on), rated at 0.5A,
Operating Temp.: 14°F - 122°F (-10°C to +50°C)
Operating Humidity: Up to 95% RH (max.), non-condensing
Dimensions: 2.9”W x 4.1”H x 1.5”D (max protrusion)
(60mm x 104mm x 38mm)
Approvals/Listing: UL639, ULC S306,
EN 50131-1; Security Grade 2, Environment
Class II
Figure 2. Cover Removal
compensation adjusts for ambients both
above and below body temperature
hours of battery standby
30VDC (Aurora-T only)
For Connection to an EN 60950 Class II
Limited Power Source
Figure 3. Detector Base
Passive Infrared Motion Detectors
TOP VIEW
5
0
5
10 20 30 40 50 60 70 75
0
SIDE VIEW
10
5
0
10 20 30 40 50 60 70 75
0
INSTALLATION
For optimal pet immunity performance, be sure to follow all the guidelines
described in “Special Instructions for Installations Containing Pets.”
A. Normal Surface Mounting
Mount the unit to a firm vertical surface. The wall wiring hole should be no
more than 5/16” (8mm) in diameter.
1. Remove the front cover as shown in Figure 2.
2. Refer to Figure 3. Knockout holes “A” in the base are for normal surface
mounting on a wall (remove PC board for full access to holes). For
corner mounting, see B. Corner Mounting. Also break out the desired
wire entry hole at this time, marked X1 or X2 in Figure 3.
3. Feed wiring through the wire access hole. Make sure wires have
sufficient slack to allow the PC board to be moved up and down freely
when the wires are connected to the board’s terminals.
4. Mount the base. A level may be used on the front case to ensure that
the unit is vertical (see Figure 2).
5. Replace the PC board, positioning it to the appropriate setting (see
Vertical Lens Adjustment table later in this document). Note the
mounting orientation of this detector: terminal strip at the bottom!
6. Refer to the WIRING CONNECTIONS section before replacing the front
cover.
B. Corner Mounting
1. Remove the front cover as shown in Figure 2.
2. Knockout holes “B” in the base are used for corner mounting on a wall.
Mount in selected corner with 4 screws.
3. Replace the PC board, positioning it to the appropriate setting (see
Vertical Lens Adjustment table later in this document). Note the
mounting orientation of this detector: terminal strip at the bottom!
4. Refer to the WIRING CONNECTIONS section before replacing the front
cover.
Special Instructions for Installations Containing Pets
To take full advantage of the pet immunity in the Aurora Series, the
guidelines below should be followed:
• Mount the center of the detector 7 ft (2.1m) high.
• Set the PIR sensitivity for Standard (STD).
• Mount where animals cannot come within six feet of the detector by
climbing on furniture, boxes, or other objects.
• Do not aim the detector at stairways that can be climbed by animals.
NOTE: This unit will provide immunity to false alarms for an individual
animal or a group of animals whose total weight is equal to or less than 40
lbs when the room temperature is above 50°F (10°C).

2 Corporate Center Drive, Suite 100
P.O. Box 9040, Melville, NY 11747
Copyright © 2013 Honeywell International Inc.
www.honeywell.com/security
1 2 3 4
TO CLOSED CIRCUIT
PROTECTIVE LOOP
12VDC POWER
CONNECTS
HERE (OBSERVE
POLARITY)
+
WIRING DETAILS
5 6
TO TAMPER LOOP
(AURORA-T/AURORA-AT ONLY)
AURORA-005
WIRING CONNECTIONS
Bring all wires in through the wire access hole and connect to the screw
terminals (see Figure 4 for wiring details). Seal any openings in the base
with foam or RTV (not supplied) to prevent drafts or insects from entering
the unit. Apply power only after all connections have been made and are
inspected.
Figure 4. Wiring Connections
LED ENABLE/DISABLE OPTION
See Figure 3 for location of LED enable/disable jumper link.
To enable the LED, remove the LED enable/disable jumper link. To
disable the LED, replace the jumper link. See Figure 5 for proper
positioning of the link.
LED ENABLE/DISABLE
LED ENABLE:
LED DISABLE:
LINK OFF
LINK ON
PULSE PROCESSING
INT:
STD:
HARSH:
Figure 5. Selectable Options
PULSE PROCESSING OPTION
See Fig. 3 for location of Pulse Processing selection jumper link.
Intermediate Pulse Processing (INT): This is the recommended setting
for any location where an intruder is expected to cover only a small portion
of the protected area. It tolerates normal environments on this setting.
NOTE: NOT recommended for pet immune applications.
Standard Pulse Processing (STD): This is the recommended setting for
most applications, including pet immune applications. It tolerates
environmental extremes on this setting.
Harsh Pulse Processing (HARSH): This is the recommended setting for
the severest of environments and should only be used in locations where
an intruder is expected to cover moderate to large portions of the protected
area.
VERTICAL LENS ADJUSTMENT
Use the table below and see Fig. 6 for vertical lens adjustment.
Vertical Lens Adjustment Table
PCB Notch Setting and
Range (feet)
Mtg. Ht (ft) notch 3 notch 4 notch 5
6.5 29 13 9
7 35* 16 10
7.5 35 19 12
8 35 22 14
9 35 27 18
* Pet immunity: Mount at 7ft., notch 3 only.
USE NOTCH 3
POSITION FOR
BOTH PET
IMMUNE AND
LONG RANGE
LENSES.
ÊK3119V4eŠ
K3119V4 9/10 Rev. B
Figure 6. PCB Vertical Lens Adjustment
For the latest warranty information, please go to:
www.honeywell.com/security/hsc/resources/wa
LINK ON
LEFT 2 POSTS
NO LINKS
CONNECTED
LINK ON
RIGHT 2 POSTS
NOTCHES
1
2
3
4
5
AURORA-001-V0
WARRANTY INFORMATION
TEST PROCEDURES
NOTE: This detector should be tested at least once each year.
IMPORTANT: Two-minute warm-up time is required after applying power.
Testing should be conducted with the protected area cleared of all people.
Disarm the system’s control during testing to prevent unwanted alarms.
1. Remove front cover and set Pulse Processing Option to the setting that
will be used for this detector in the installation. The LED must be
enabled at this time (see Figure 5).
2. Replace front cover and walk through protective zones, observing that
the detector’s LED lights whenever motion is detected (the LED serves
as a Walk-Test indicator during this procedure).
The absolute range of all PIR units is subject to variation because of
different types of clothing, backgrounds, and ambient temperature. For this
reason, ensure that the most likely intruder routes are well within the PIR’s
protective zones and that Walk-Testing is carried out along these routes.
After the Walk-Test is complete, the LED may be disabled (see Figure 5).
TROUBLESHOOTING
Intermittent Alarm (LED Operative)
A. Rapid temperature change. Check for electric or gas heaters, open
flames, electric arcs, etc.
Remedy: Locate source and reposition detector.
B. Drafts causing drapes, light fixtures, display material to move.
Remedy: Eliminate source of motion.
Intermittent or Continuous Alarm
A. DC voltage supplied to detector is inadequate or intermittent, or polarity
is reversed.
Remedy: Ensure that polarity is corrected, adequate voltage is
supplied, wiring is intact (no opens/shorts), and connections secure.
B. Protective loop is interrupted (open).
Remedy: Determine whether interruption is in protective loop wiring or
at detector’s alarm relay contacts. Disconnect protective loop at
detector relay contact terminals. Check continuity across terminals. If
absent (and proper voltage is supplied to the detector), return unit for
replacement. If present, check protective loop wiring.
LED Inoperative
A. LED jumper link ON.
Remedy: Remove LED jumper link (see Figure 5).
B. LED malfunction.
Remedy: Check for broken/shorted leads. Return unit for replacement.
Detection Area Changes
A. Repositioned furniture or equipment in the protected area.
Remedy: Caution customer about layout changes. Reposition detector.
B. Mounting surface is unstable. A few degrees of vertical shift can
change range substantially.
Remedy: Mount on secure surface.
Panel Indicates Continuous Fault In Zone Of Protection Containing
PIRs (PIR’s alarm LED not lit)
Too many detectors being used in the zone. Each detector adds 15 ohms
of series resistance and the zone’s allowable loop resistance is being
exceeded.
Remedy: Reduce the number of detectors used in the zone until the series
resistance is within the allowable loop resistance permitted by the control.
FEDERAL COMMUNICATIONS COMMISSION (FCC) PART 15
The user shall not make any changes or modifications to the equipment unless authorized by the Installation Instructions
or User's Manual. Unauthorized changes or modifications could void the user's authority to operate the equipment.
CLASS B DIGITAL DEVICE STATEMENT
This equipment has been tested to FCC requirements and has been found acceptable for use. The FCC requires the
following statement for your information:
This equipment generates and uses radio frequency energy and if not installed and used properly, that is, in strict
accordance with the manufacturer's instructions, may cause interference to radio and television reception. It has been
type tested and found to comply with the limits for a Class B computing device in accordance with the specifications in
Part 15 of FCC Rules, which are designed to provide reasonable protection against such interference in a residential
installation. However, there is no guarantee that interference will not occur in a particular installation. If this equipment
does cause interference to radio or television reception, which can be determined by turning the equipment off and on,
the user is encouraged to try to correct the interference by one or more of the following measures:
• If using an indoor antenna, have a quality outdoor antenna installed.
• Reorient the receiving antenna until interference is reduced or eliminated.
• Move the radio or television receiver away from the receiver/control.
• Move the antenna leads away from any wire runs to the receiver/control.
• Plug the receiver/control into a different outlet so that it and the radio/ television receiver are on different branch circuits.
• Consult the dealer or an experienced radio/TV technician for help.
This Class B digital apparatus complies with Canadian ICES-003.
Cet appareil numérique de la classe B est conforme à la norme NMB-003 du Canada.
FCC/IC STATEMENT
This device complies with Part 15 of the FCC rules and RSS 210 of Industry Canada. Operation is subject to the
following two conditions: (1) This device may not cause harmful in terference, and (2) This device must accept any
interference received, including interference that may cause undesired operation.
Cet appareil est conforme à la partie 15 des règles de la FCC & de RSS 210 des Industries Canada. Son fonctionnement
est soumis aux conditions suivantes: (1) Cet appareil ne doit pas causer d' interférences nuisibles. (2) Cet appareil doit
accepter toute interférence reçue y compris les interférences causant une réception indésirable.
 Loading...