

Honeywell AlarmNet 360 Online Help Manual

AAllaarrm
m
N
Neett
336600
OOnnlliinnee HHeellpp GGuuiiddee
Hints for use:
• When viewing in a web browser, hit F11 to toggle full screen mode.
• Use the bookmarks panel or table of contents to jump to the desired topic. Each page header has a quick link Tab to the table
of contents, and a quick link Tab to the list of AlarmNet tasks.
• When viewing on mobile devices, use the table of contents to jump to the desired topic. You may also use the page header
quick links.
800-11248 11/13/15 Rev. J

Table of Contents
Overview ............................................................................................................................................................................ 1
What’s New? ...................................................................................................................................................................... 1
Accessing AlarmNet 360 ............................................................................................................................................... 1
Obtaining a Central Station Account.................................................................................................................................................. 1
Obtaining a Dealer Account ............................................................................................................................................................... 1
Logging In .......................................................................................................................................................................................... 2
Navigating AlarmNet 360 .................................................................................................................................................................. 2
Finding the right AlarmNet tool ................................................................................................................................. 4
Tools .................................................................................................................................................................................... 6
DEVICES ► Device Status (central station) ........................................................................................................................................ 6
DEVICES ► Device History (central station)....................................................................................................................................... 8
DEVICES ► SIM Activation / Status (central station and dealer) ....................................................................................................... 8
DEVICES ► Substitution PIN Generation (central station) ............................................................................................................... 10
ACCOUNTS ► View Accounts (central station) ................................................................................................................................ 10
AlarmNet Service Types ....................................................................................................................................................................... 12
ACCOUNTS ► Communication Failures (central station) ................................................................................................................. 14
ACCOUNTS ► Account Generation (central station) ....................................................................................................................... 16
ACCOUNTS ► Account Cancellation (central station) ...................................................................................................................... 17
Creating Batch Files for Multiple Account Cancellations ..................................................................................................................... 18
ACCOUNTS ► Coverage Maps (central station and dealer) ............................................................................................................. 19
MY COMPANY ► My Profile (central station and dealer) ................................................................................................................ 19
MY COMPANY ► Manage Users (central station and dealer).......................................................................................................... 19
User Authority Levels ........................................................................................................................................................................... 20
Adding a user ........................................................................................................................................................................................ 21
Editing a user ........................................................................................................................................................................................ 22
MY COMPANY ► Dealer Services Config (central station) ............................................................................................................... 24
MY COMPANY ► My History (central station and dealer) ............................................................................................................... 25
MY COMPANY ► Web Usage (central station) ................................................................................................................................ 25
MY COMPANY ► Company Information (central station super users, and dealer managers) ......................................................... 27

Managing Company Information and Staff Notifications..................................................................................................................... 27
DEVICES ► Device Programming ► Program/Replace (central station and dealer) ........................................................................ 28
Editing the Account .............................................................................................................................................................................. 29
Adding IP Video Devices (TC1 ready) .................................................................................................................................................... 30
DEVICE PROGRAMMING ► Program/ Replace Device(central station and dealer) .......................................................................... 32
DEVICE PROGRAMMING ► Program/Replace Device (central station and dealer) .......................................................................... 34
Accounts ► Manage TC 2.0 Accounts (central station and dealer) .................................................................................................. 35
Adding IP Video Devices ....................................................................................................................................................................... 35
Adding TUX series Automation Devices ............................................................................................................................................... 36
Deleting a TC2 Account or Location ..................................................................................................................................................... 37
Resetting the TC2 account username, email, or password .................................................................................................................. 38
DEVICES ► Device Programming ► Take Ownership (central station and dealer) .......................................................................... 38
API DOCUMENTS (central station and dealer) ................................................................................................................................. 39
What is an API? .................................................................................................................................................................................... 39
Why are APIs needed? ......................................................................................................................................................................... 39
How APIs work? .................................................................................................................................................................................... 39
Where can I find APIs? ......................................................................................................................................................................... 39
REPORTS (central station and dealer) .............................................................................................................................................. 41
My Dashboard ...................................................................................................................................................................................... 41
Top Noisy Accounts .............................................................................................................................................................................. 44
NOTIFICATION (central station and dealer) ..................................................................................................................................... 44
Understanding Total Connect Services.................................................................................................................. 45
Reference Information ................................................................................................................................................ 50
Total Connect 2.0 Compatible Devices............................................................................................................................................. 50
Agreement Documents ................................................................................................................................................ 51
Technical Support ......................................................................................................................................................... 51
AlarmNet360 Online Help Guide
Tasks
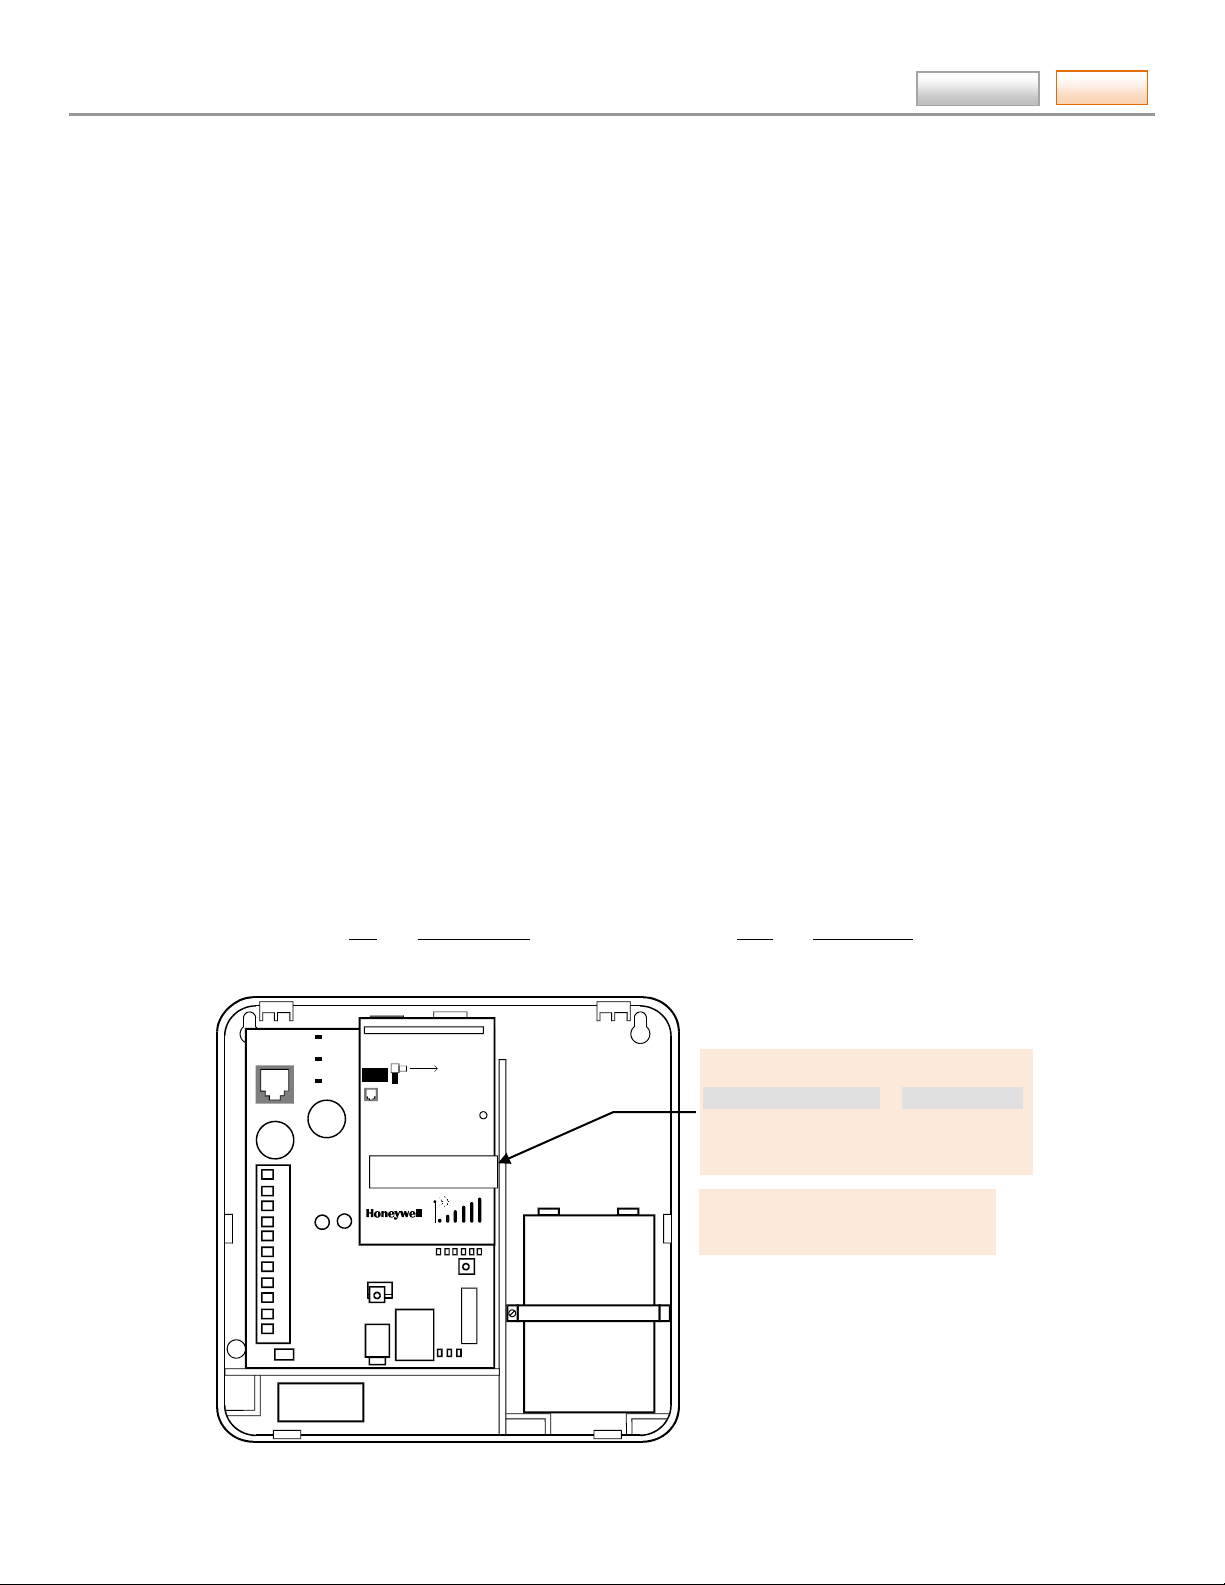
FOR EXTERNAL ANTENNA
50 OHM MMCX ONLY
PRIMARY POWER: 9 - 16.5 VAC
BATTERY: 8V. 3.1 AHr FOR 24 Hr BACKUP
FCC ID: GIPMC56 IC: 267W-MC56
RSSI
MODE 1
MO
DE 2
WEB
GPRS
GSM
Sim= 12345678901234567890
Mac=00D02D0055555 Mac CRC b0b0
Imei=123456789012345
01-05-2010 10:24:17 IGSM V
7720P PROGRAMMING PORT
NOT FOR TELEPHONE SERVICE USE
TRANSMIT
This information is also available
Overview
This guide explains how to use the AlarmNet 360 online web application. AlarmNet 360 is a web based tool set for
central station and dealer/installation companies to enable programming and testing of their AlarmNet communication
devices and to create remote access service accounts. These tasks are easily accomplished from any PC with internet
access. AlarmNet 360 enables you to perform the following:
• Search, display, and edit customer accounts.
• Add, delete, or replace communication devices, IP video, and automation devices.
• Display communication device types, their MAC IDs, and edit device information.
• Program, configure, test, and verify the status of devices.
• View, add, delete and edit user profiles.
• View a history of all AlarmNet 360 activity by company users.
• Create Total Connect accounts for your customers.
• Enables you to email AlarmNet 360 with questions or comments.
What’s New?
Reports
Accessing AlarmNet 360
Contents
Obtaining a Central Station Account
Central Stations can sign up by contacting AlarmNet Administration at 800-222-6525 and
selecting option 3. (Administration hours are Monday thru Friday, 8:00 am to 5:00 pm ET)
Obtaining a Dealer Account
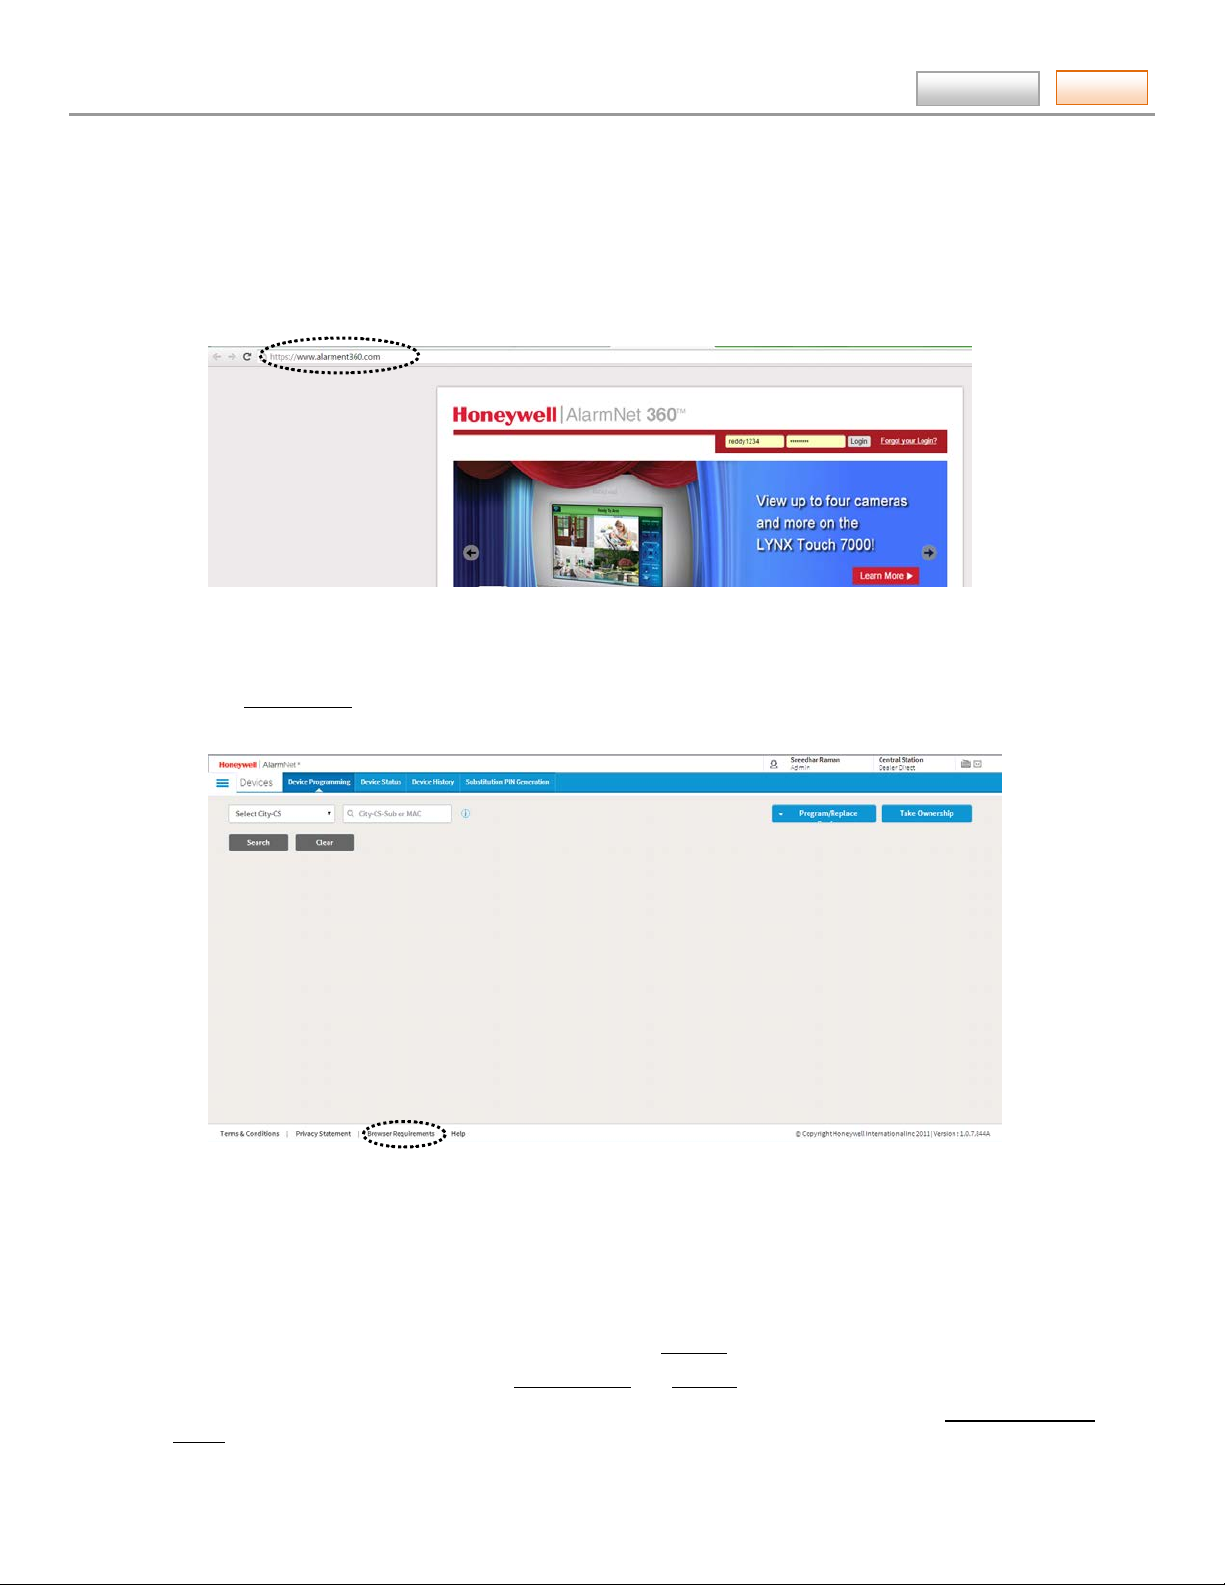
Dealers must sign up online by visiting the AlarmNet 360 website:
https://www.alarmnet360.com
Then simply complete the Dealer Signup procedure to obtain your User Name and Password. For validation purposes you
will need to provide a city and central station ID number and have the MAC and CRC number from one of your
communication devices. If you do not know your AlarmNet city and central station ID number , please ca ll your ce ntr al
station.
Sim= 12345678901234567890
Mac=00D02D0055555 Mac CRC b0b0
Imei=123456789012345
01-05-2010 10:24:17 IGSMV
on the product box.
– 1 –
Tasks
Only one sign-up per dealer is necessary; additional log in accounts for dealer personnel must be created by the initial
user. Lastly you need a computer with internet access and a web browser.
Logging In
1. To access AlarmNet 360 visit the following link: https://www.alarmnet360.com
2. Navigate to the AlarmNet 360 home page using either the desktop shortcut (created in the last step) or by typing the
3. Enter your User Name, and Password then press [Login].
AlarmNet360 Online Help Guide
After the page loads this is a good time to create a desktop or favorites bar shortcut by positioning the cursor over
the address icon, left click the mouse and drag it to the desktop or favorites bar.
address into the browser's address field. The Login page appears.
The Device Status window appears.
Note: You can change the default landing page using the My Company > My Profile option.
Contents
4. Click on the Browser Requirements and ensure your browser meets the requirements.
Navigating AlarmNet 360
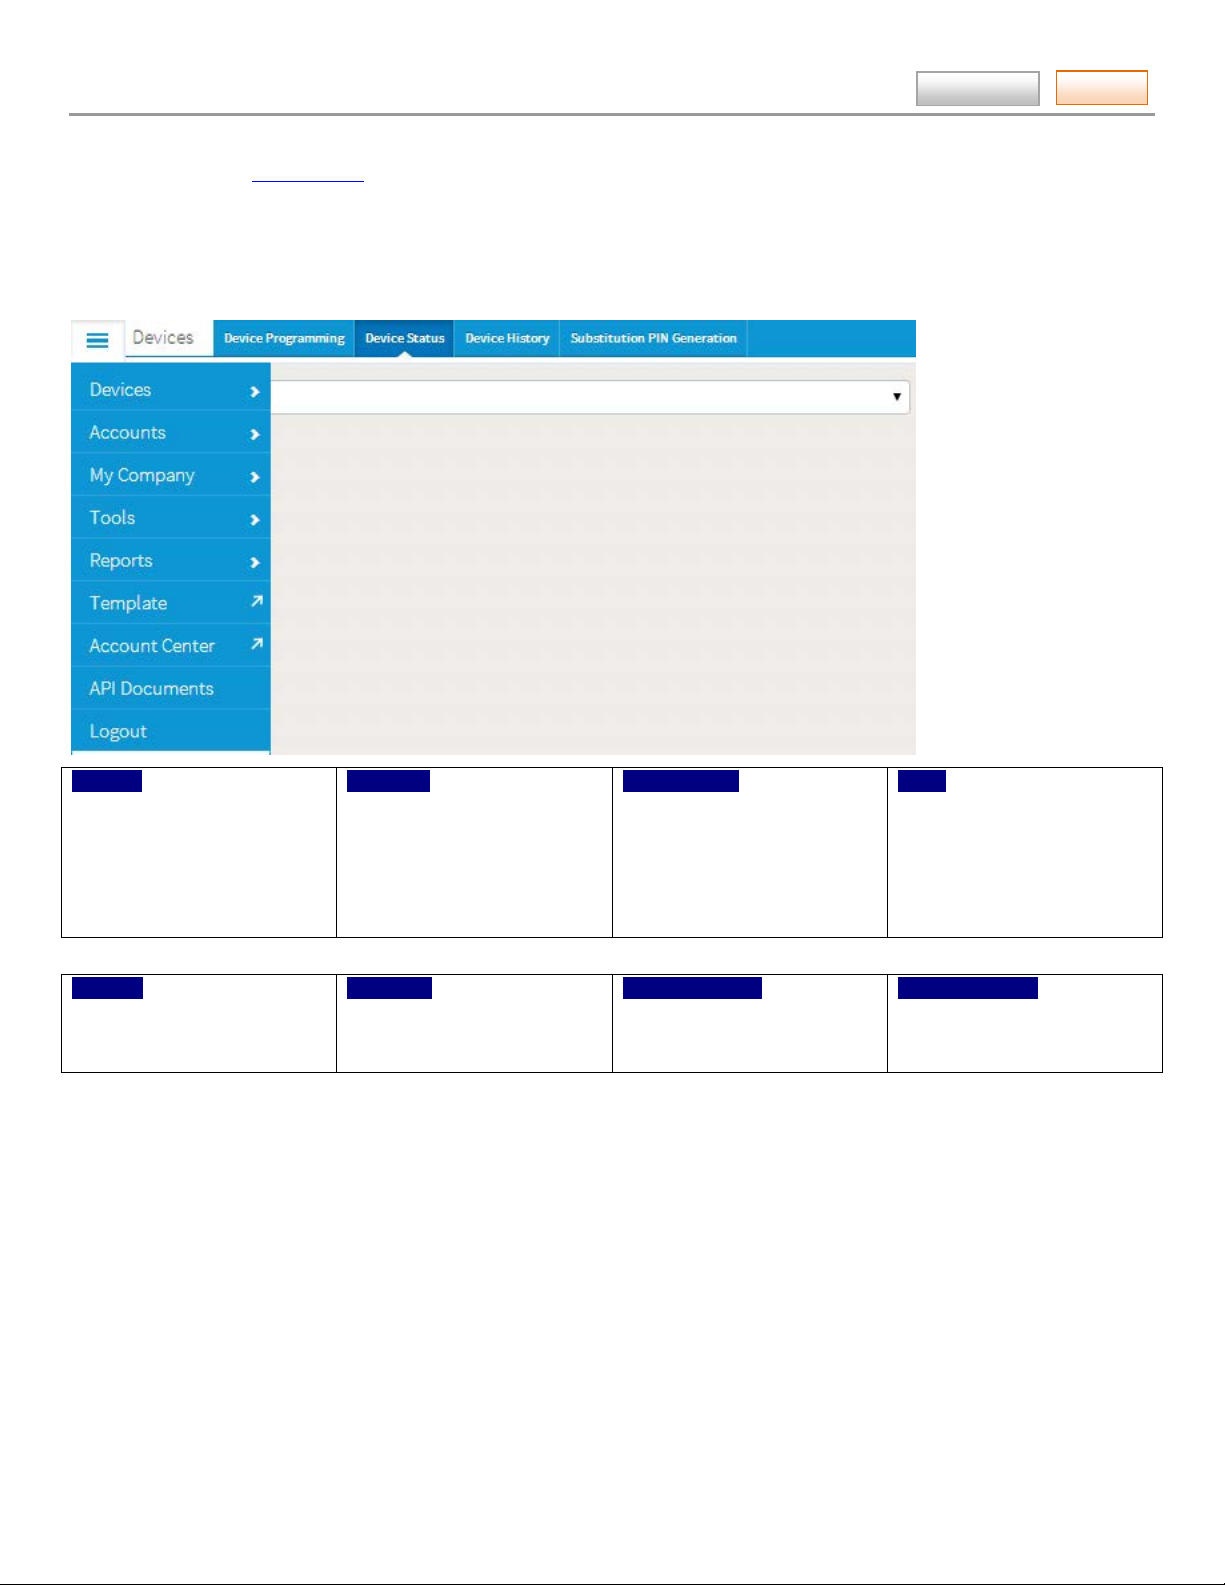
AlarmNet 360 is easy to navigate. Navigation starts with the Tool Bar at the top.
The AlarmNet 360 site is used by both the Central Station and Dealers.
Note: Since the Central Station has access to everything the Dealer has access to; tools such as Take Ownership of
Device can also be used by the Central Station.
– 2 –
Tasks
Devices
Accounts
My Company
►
Tools
Reports
Template
Account Center
API Documents
Further, each Central Station or Dealer can create subusers and assign Authority Levels and Features to their subusers.
(See the “
At the tool bar, selecting a category brings up the associated tools. When a tool is selected, an information window
appears where you can view, edit, add, or delete information. Some information can be printed, or saved as a file.
Manage Users
Central Station Tool Bar
AlarmNet360 Online Help Guide
” tool.)
Contents
► Device Programming
► Device Status
► Device History
► Substitution PIN Generation
► Generate Reports
► My Dashboard
► View Accounts
► Communication Failures
► Account Generation
► Account Cancellation
► Manage TC 2.0 Accounts
► Company Information
► Dealer Services Config.
► Manage Users
► Web Usage
► My History
My Profile
► Cellular Activation/Status
► Coverage Maps
– 3 –

AlarmNet360 Online Help Guide
Tasks
Finding the right AlarmNet tool
The AlarmNet 360 website is a collection of tools that enable you to manage communicator devices, accounts, users,
check status, activate SIMs, etc.
The revised AlarmNet 360 interface is easy to navigate. It uses tool bar tabs that groups associated tools. For each tool,
the workflow has been improved to naturally move you through a series of screens to complete a task.
For instance, programming communication devices is now accomplished using two wizards; Program New Device and
Replace Other Device. Each wizard steps you through the proper procedure so the task is done easily and completely.
Below is a table showing various tasks and where the corresponding tool is located. Lastly, the tasks are hot linked,
allowing you to jump to the proper help file topic.
Please use this table as a roadmap for finding the right tool for the task.
Task Location
account, cancellat i on
Account Center, portal access
accounts, editing Devices ► Device Programming
accounts, generation
account reports, generate (central station) Tool Bar ► Reports.
account, view
automation devices, TUX series, adding
(use this when adding to an existing system)
automation devices, TUX series, enrolling
(use this when TUX will stand alone)
automation devices, TUX series, replacing
AlarmNet billing, payment
API documents, request for
cancelling accounts
communication failures
company information, manage
coverage maps
customer notifications
dealer services, enable remote & video serv.
device, history
device, program new
device, replace
device, show programmed devices
device, status
device, substituti o n PI N gen eration
Contents
Accounts ► Account Cancellation
Option available only for Central Stations
Tool Bar ►Account Center (Log in, then refer to the online help)
(Use Action column pulldown menu.)
Accounts ► Account Generation
Option available only for Central Stations
(dealer) Tool Bar ► Reports
Accounts ► View Accounts
(central station) Accounts ► Manage TC 2.0 Accounts
(dealer) Accounts ► Manage TC 2.0 Accounts
Devices ► Device Programming ► Program/Replace Device
Devices ► Device Programming ► Program/Replace Device
Tool Bar ►Account Center (Log in, then refer to the online help)
Option available only for Central Stations
Tool Bar ► API Documents
Accounts ► Account Cancellation
Option available only for Central Stations
Accounts ► Communication Failures
Option available only for Central Stations
My Company ► Company Information
(central station) Utilities ► Coverage Maps
(dealer) Utilities ► Coverage Maps
Tool Bar ► Customer Notification
My Company ► Dealer Services Config.
Option available only for Central Stations
Devices ► Device History
Devices ► Device Programming ► Program/ Replace Device
Devices ► Device Programming ► Program/ Replace Device
Devices ► Device Programming
Devices ► Device Status
Devices ► Substitution PIN Generation
Option available only for Central Stations
– 4 –

AlarmNet360 Online Help Guide
Tasks
Task
Location
Contents
device, take ownership (central station) Devices ► Device Programming, then at the blue
tool bar, select Take Ownership.
(dealer) Devices ► Device Programming ► Take Ownership
editing, account
IP devices (TC1), adding, editing, deleting
Devices ► Device Programming
Devices ► Device Programming
IP devices (TC2), adding, editing, deleting (central station) Accounts ► Manage TC 2.0 Accounts
(dealer) Accounts ► Manage TC 2.0 Accounts
notifications, customer
Tool Bar ► Customer Notification
ownership of device, task (central station) Devices ► Device Programming ► Take Ownership.
(dealer) Devices ► Device Programming ► Take Ownership
PIN generation, substitution
Devices ► Substitution PIN Generation
Option available only for Central Stations
program new device
Devices ► Device Programming
reports, accou n t , generate (central station) Tool Bar ► Reports.
(dealer) Tool Bar ► Reports
resetting the TC2 account username, email or
password
SIM, activation/status
TC1 account, edit, delete
(central station) Accounts ► Manage TC 2.0 Accounts
(dealer) Accounts ► Manage TC 2.0 Accounts
Utilities ► SIM Activation/Status
Devices ► Device Programming
(Use Action column pulldown menu.)
TC2 accounts, manage, edit, delete (central station) Accounts ► Manage TC 2.0 Accounts
(dealer) Accounts ► Manage TC 2.0 Accounts
TC2 accounts, reset username, email, or
password
TUX series automation devices, adding
(use this when adding to an existing system)
TUX series automation devices, enrolling
(central station) Accounts ► Manage TC 2.0 Accounts
(dealer) Accounts ► Manage TC 2.0 Accounts
(central station) Accounts ► Manage TC 2.0 Accounts
(dealer) Accounts ► Manage TC 2.0 Accounts
Devices ► Device Programming ► Program/ Replace Device
(use this when TUX will stand alone)
TUX series automation devices, replacing
users, manage
users, my history
users, my profile
users, web usage
video device configuration
Devices ► Device Programming ► Program/ Replace Device
My Company ► Manage Users
My Company ► My History
My Company ► My Profile
My Company ► Web Usage
Devices ► Device Programming
(use to configure TC1 or TC2 devices)
– 5 –
AlarmNet360 Online Help Guide
Tasks
Ping Commands
Test Alarm (Cell)
-
Show device
Tools
Each tool will be discussed in the order they appear on the Tool Bar.
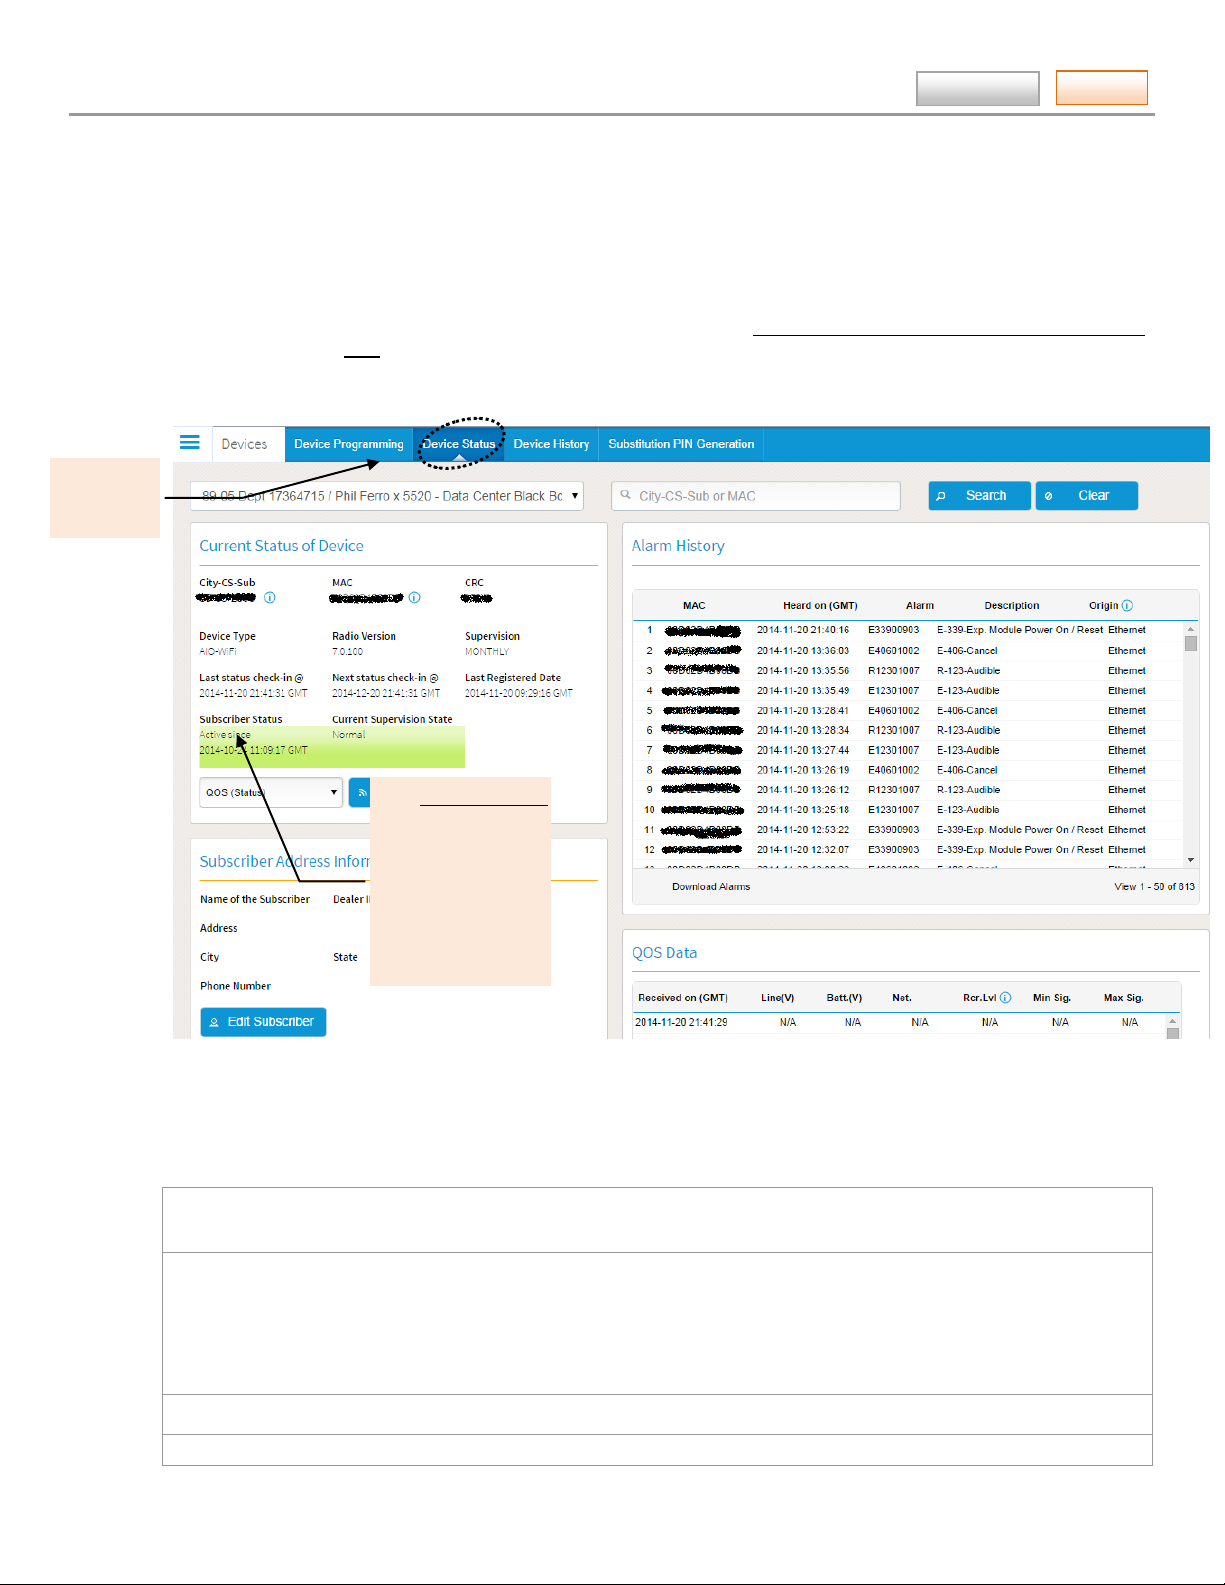
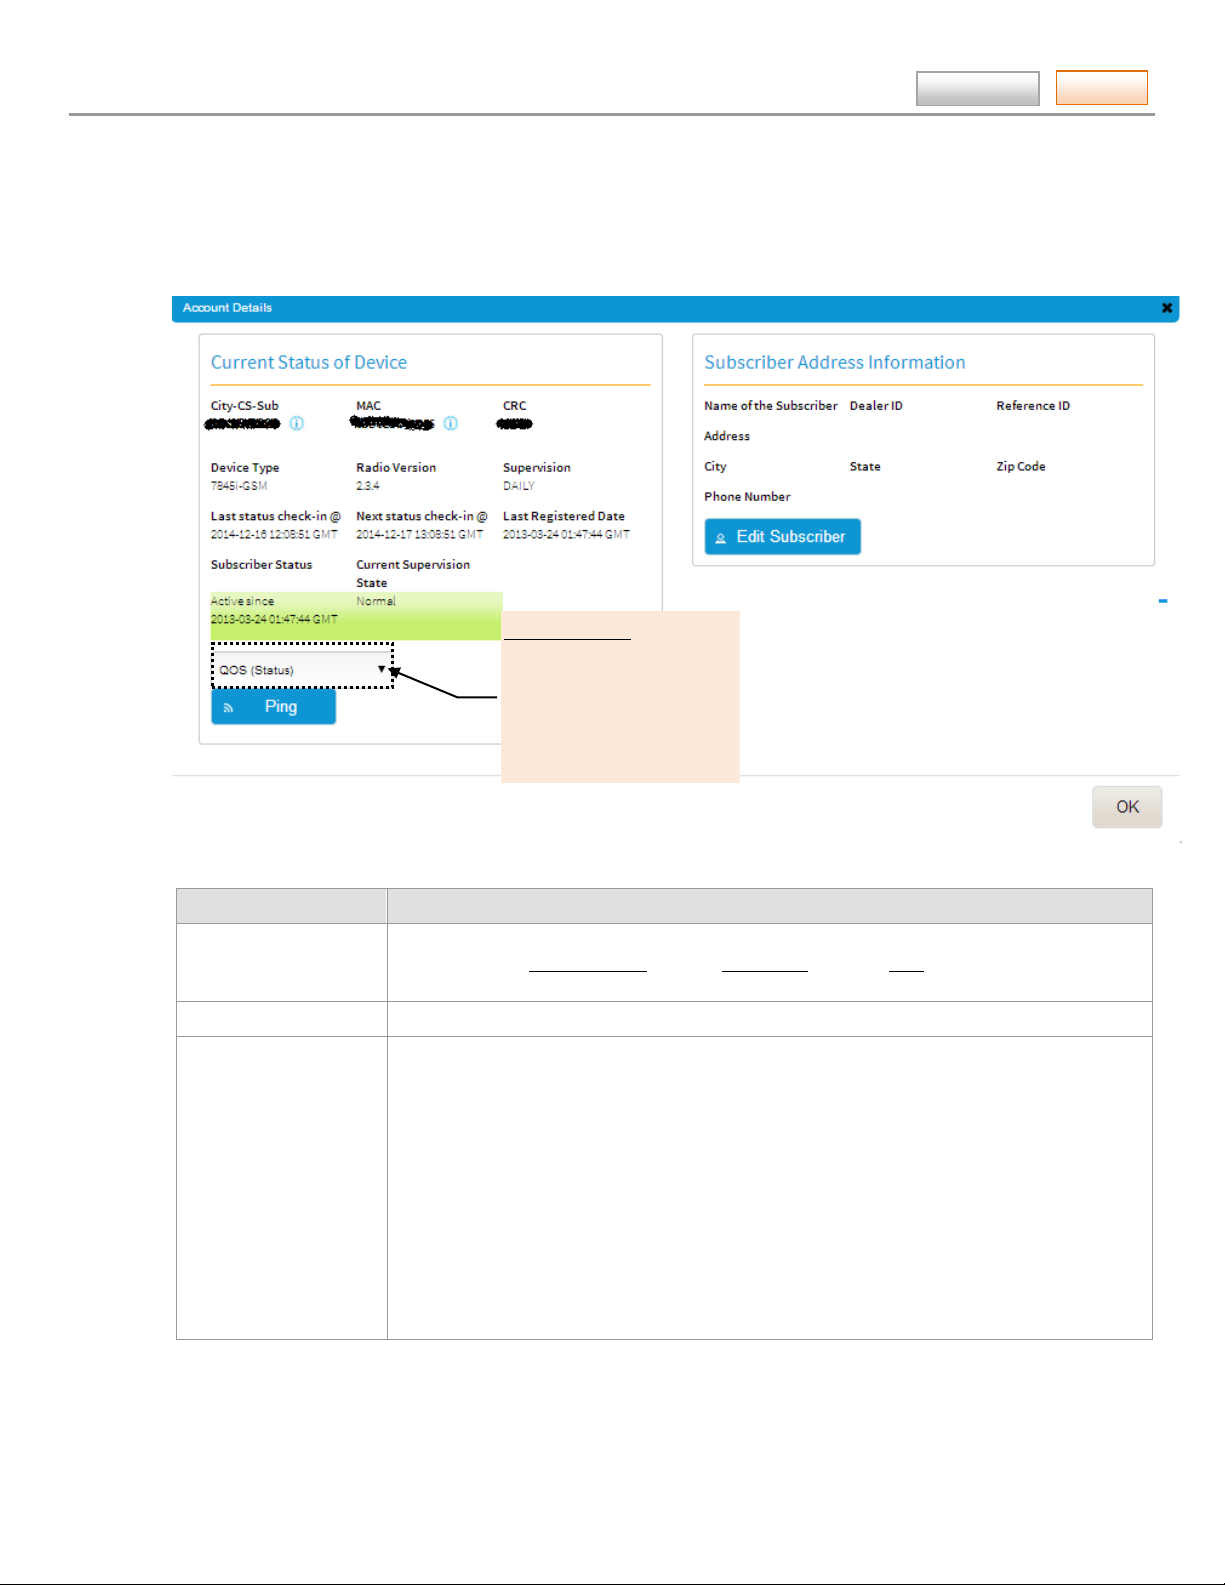
DEVICES ► Device Status (central station)
This tool enables you to quickly check the status of a particular AlarmNet communication device.
Find the device by performing a search. You can search by entering the City code, Central Station and Subscriber number,
or you can search by MAC. Enter the data and click the Search button. A detailed status screen for the device is then
displayed.
status.
Contents
Test Alarm
Test Alarm (Ethernet)
Register
Reset
(Choices are depend
ent on the device.)
All detailed information is grouped in subcategories and are described below.
Current Status of the Device:
This includes; MAC number, CRC, Device (communication type), Device Type (such as IGSMV4G), and Radio Version.
Subscriber Status:
New – The account has not been registered.
Active – The device has been activated in AlarmNet.
Partially Cancelled – The account number is ready for re-use.
Full Cancelled – The account number has been shutoff and cannot be re-used until changed to Partially Cancelled.
Last Registered Date: Displays the date and time the account was last registered.
Supervision: Indicates the supervision window of the device.
– 6 –

AlarmNet360 Online Help Guide
Tasks
For example:
Contents
US UL LINE SEC [5 minute supervision] WEEKLY [7 day supervision]
CN UL LINE SEC [3 minute supervision] MONTHLY [30 day supervision]
DAILY [24 Hour supervision] NO SUPERVISION
Last Status Check IN: Last Date and Time the device checked in.
Next Status Check IN: Next scheduled check-in Date and Time.
Current State: Shows the condi t ion of the Sub s cribe r. NORMAL, or COMM FAIL [Communication Failure]
Ping Commands: These commands will depend on the device. T h i s dro p-down field allows you to send a command to
a GSM type device. [Commands marked with ** are limited to; 2 every 24hrs per account.] After making your choice,
click Ping.
QOS (Status) – Sends a command to have the GMS device report QOS status. (GSM type devices only.)
Test Alarm – Sends a command forcing the device to send a test message of 555555559 to the central station.
(Devices with Ethernet and GSM: it will try Ethernet first. If Ethernet is not available, it will try GSM.)
Test Alarm (Wired Ethernet)** – Sends a command using the Ethernet to force the device to respond with a
test message of 555555559 to be delivered to the central station. (For Internet devices only.)
Test Alarm (Cell)** – Sends a command using GSM to force the dev i c e t o r espond with a test m essage of
555555559 to be delivered to the central station. (For GSM devices only.)
Register – This command appears for certain users only. It forces the device to register or re-register on the
AlarmNet Network. (For G SM Devices only.)
Reset – This command appears for certain users only. It forces the device to reset and power up. A 5551 5555 6
will be sent to the central station. (For GSM devices only.)
Current Status of SIM
The basic information associated with the SIM. Its history can be accessed by clicking the “View SIM History” button.
Subscriber Address Information
The basic information associated with the subscriber and device location. This information can be edited by clicking the
“Edit Subscriber” button.
Sticky Notes
Enables you to attach notes to this device or user as needed.
Alarm History
Displays the Alarms from the device and gives the ability to download the last 30 days of information if needed.
– 7 –
AlarmNet360 Online Help Guide
Tasks
Show device
Contents
QOS Data (Quality of Service)
Shows basic information about the signal levels and input voltages of the device. (only available on AlarmNet GSM type
devices.)
Network Good
2G –20 dBm to –89 dBm –90 dBm to –98 dBm –99 dBm to –104 dBm –105 dBm and under
3G /4G –20 dBm to –90 d Bm –91 dBm to –100 dBm –101 dBm to –106 dBm –107 dBm and under
OK Marginal Bad
Received on (GMT) – The date and time that the quality of service message came into the node. It is expressed as
month/day/year and hour: minutes: seconds. The time is based on Greenwich Mean Time and is displayed in 24-hour
military time.
Line (V) – This quantity represents the instantaneous DC voltage within the radi o after t he input power has been
rectified; we are not measuring the voltage at the input terminals. This quantity is dependent on which wall transformer
is used but is typically between 10.5 and 26 volts.
AC input: The QOS voltage will be approximately 1.414 times the input voltage.
DC input: The QOS voltage will be approximately the same as the input voltage.
Battery (V) – This quantity represents the voltage of the battery backup in the device at the instant the QOS data was
sent. This quantity expresses an under load value that should reside above 6.0 volts to be considered normal.
Net. – Indicates the communication network used.
Receiver Level – The instantaneous relative level of the strength of the signal at the receiver at the time the data was
transmitted. (Range: –150dBm to –10dBm, stronger)
Min Signal – The lowest relative level of the strength of the signal at the receiver since the last check in message was
transmitted. (Range: –150dBm to –10dBm, stronger)
Max Signal – The highest relative level of the strength of the signal at the receiver since the last check in message was
transmitted. (Range: –150dBm to –10dBm, st r o n ger )
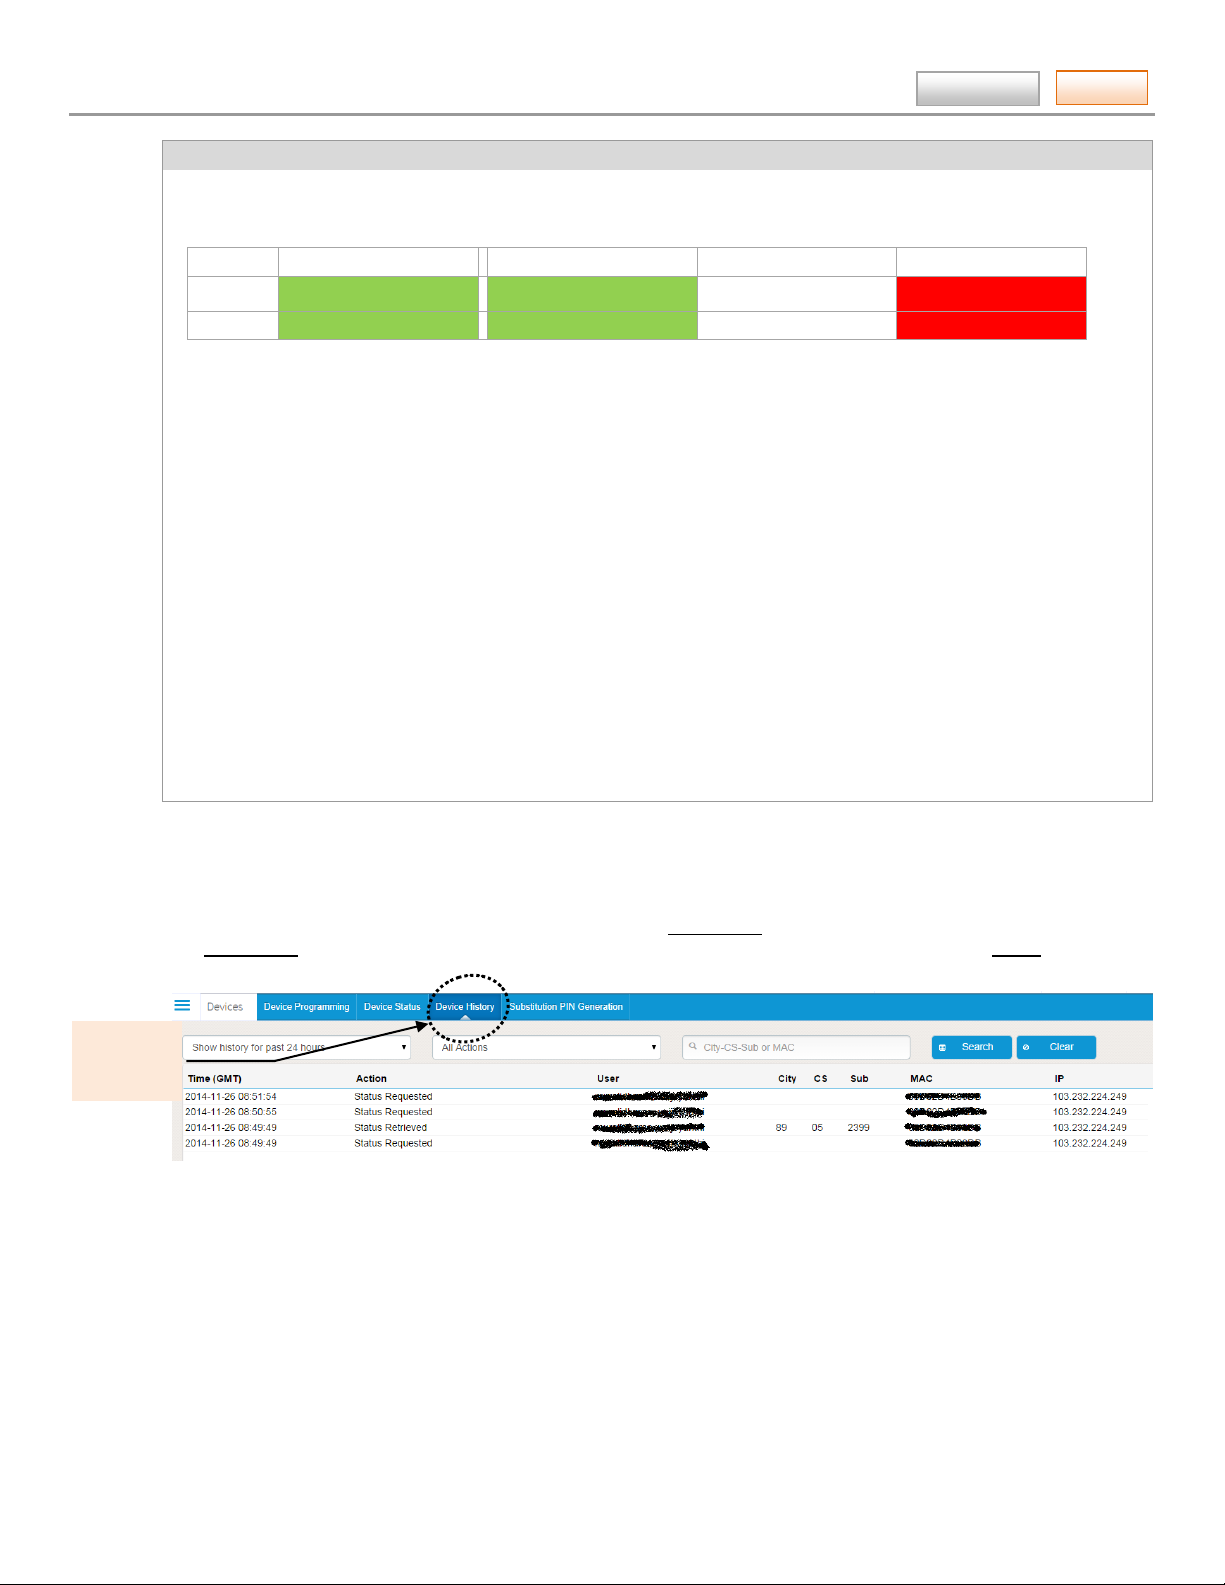
DEVICES ► Device History (central station)
This tool is useful when you want the device history. Use the Time Period drop-down menu to choose the range, enter
the City-CS-Sub information, and click Search. You can also filter the displayed information using the Action drop-down
menu.
history.
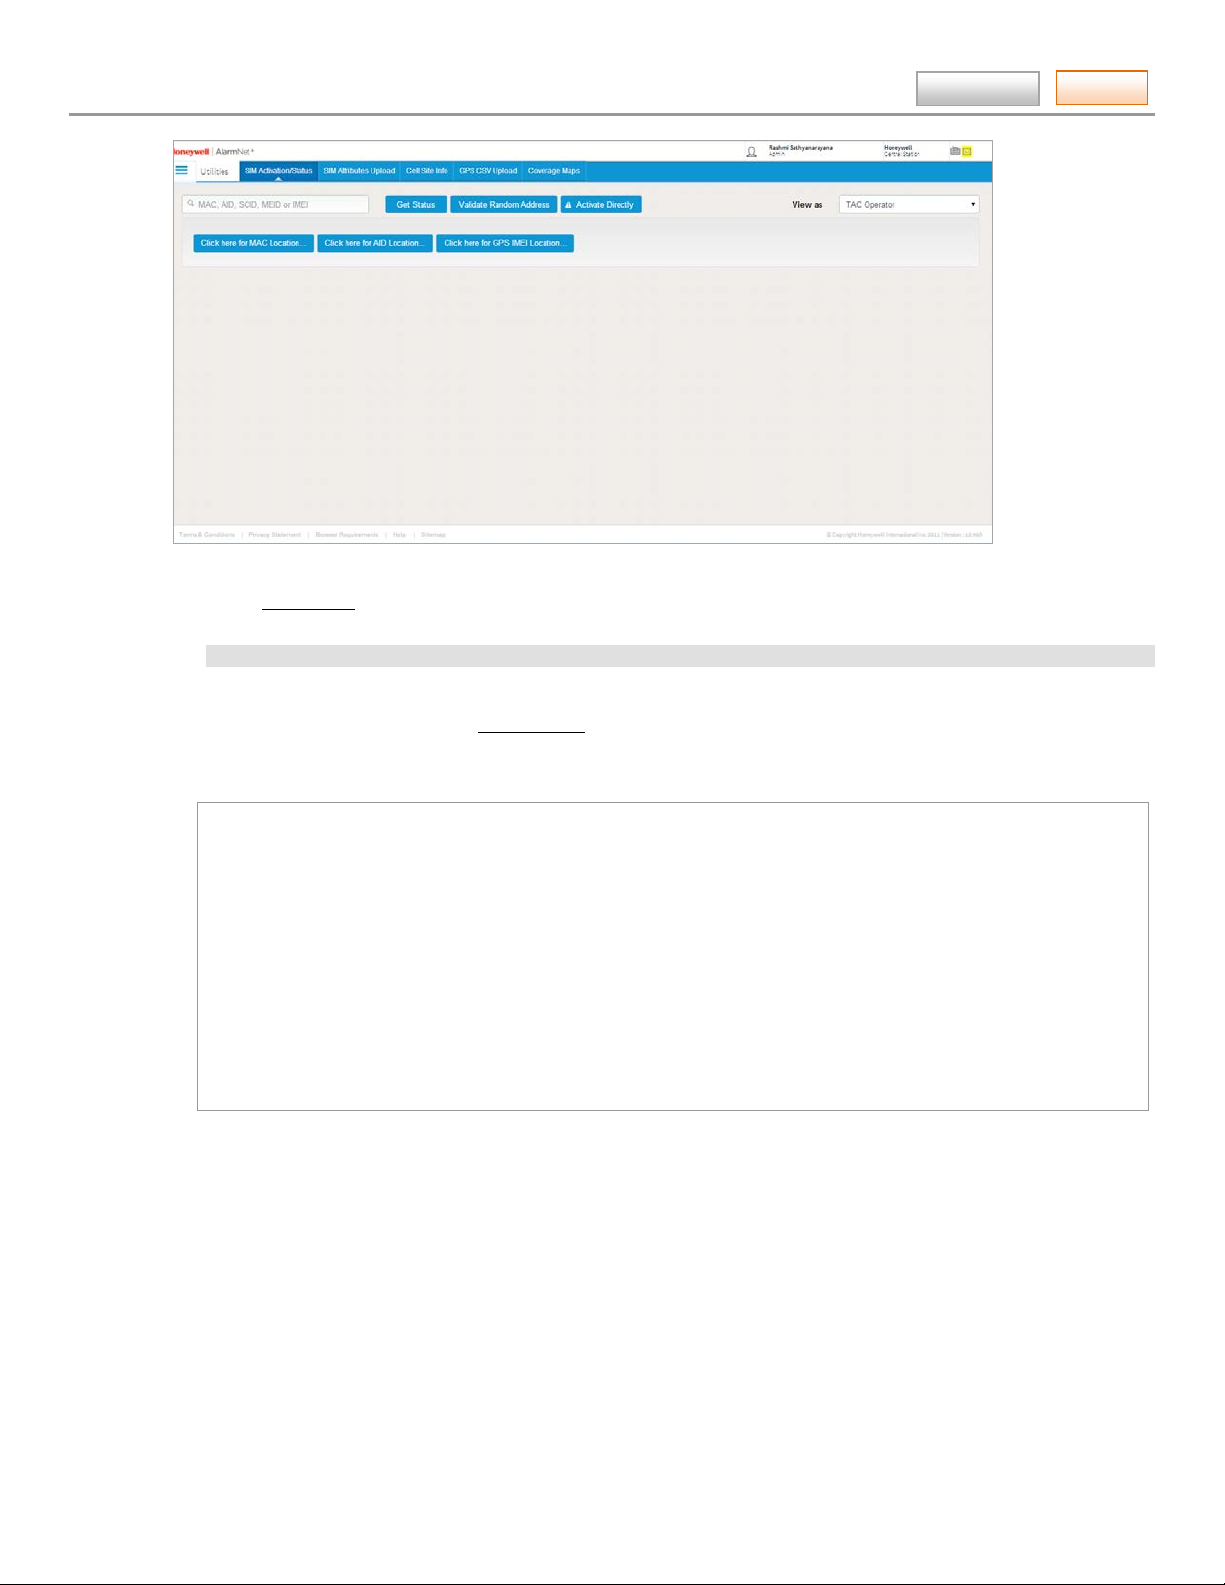
DEVICES ► SIM Activation / Status (central station and dealer)
This tool enables you to view the status of a SIM (Subscriber Identity Module) for a particular GSM or i-GSM series
communication device or to activate the SIM. The SIM must be activated in order for the security system to report to
AlarmNet.
Note, the SIM is activated when using the “
activated at the factory.
Utilities
” tool presented later in this guide. By default, all the SIMs are pre-
– 8 –
AlarmNet360 Online Help Guide
Tasks
Contents
1. Start by checking if the SIM is already activated.
2. In the MAC or AID field, enter the number. (Choose MAC for a SIM; or choose AID for the VISTA-GSM module used
with the VISTA-21iP control panel.) Then click Get Status.
NOTE: The SIMs used in the Canadian modules are all pre-activated.
3. If the SIM is already activated, its Current State will show it as SIM is activated (in green).
4. If the SIM is not activated, under Provision SIM, enter the CRC (or AID), and notification email so AlarmNet can notify
you when the SIM is activated. Then click Activate, a confirmation screen appears.
5. When you receive notice the SIM is activated, you will be asked to complete the process by:
To complete the activation process for mac number (00D02Dxxxxxx) please do the
following:
1) Power-Cycle the device by removing the input power and battery.
2) Apply input power and plug in the battery.
To program and register the radio logon to https://www.alarmnet360.com, or use a
7720p programmer, or call AlarmNet Technical Support at 800-222-6525:
Select 'Technical Support'(Option #1) followed by 'Alarmnet GSM Device
Activation/Registration'(Option #1) or for Lynx Touch, use the touch screen 'program
radio' screen.
Monday-Friday 8:00amET to 10:00pmET, and Saturdays 9:00amET – 5:30pmET.
If device is already programmed, registration can be completed as follows:
* Triple clicking the tamper switch on the device.
* Using a 7720P programmer, press the SHIFT key then the UP ARROW key.
* For Lynx Touch, use the touch screen registration command.
– 9 –
AlarmNet360 Online Help Guide
Tasks
Check All and Toggle
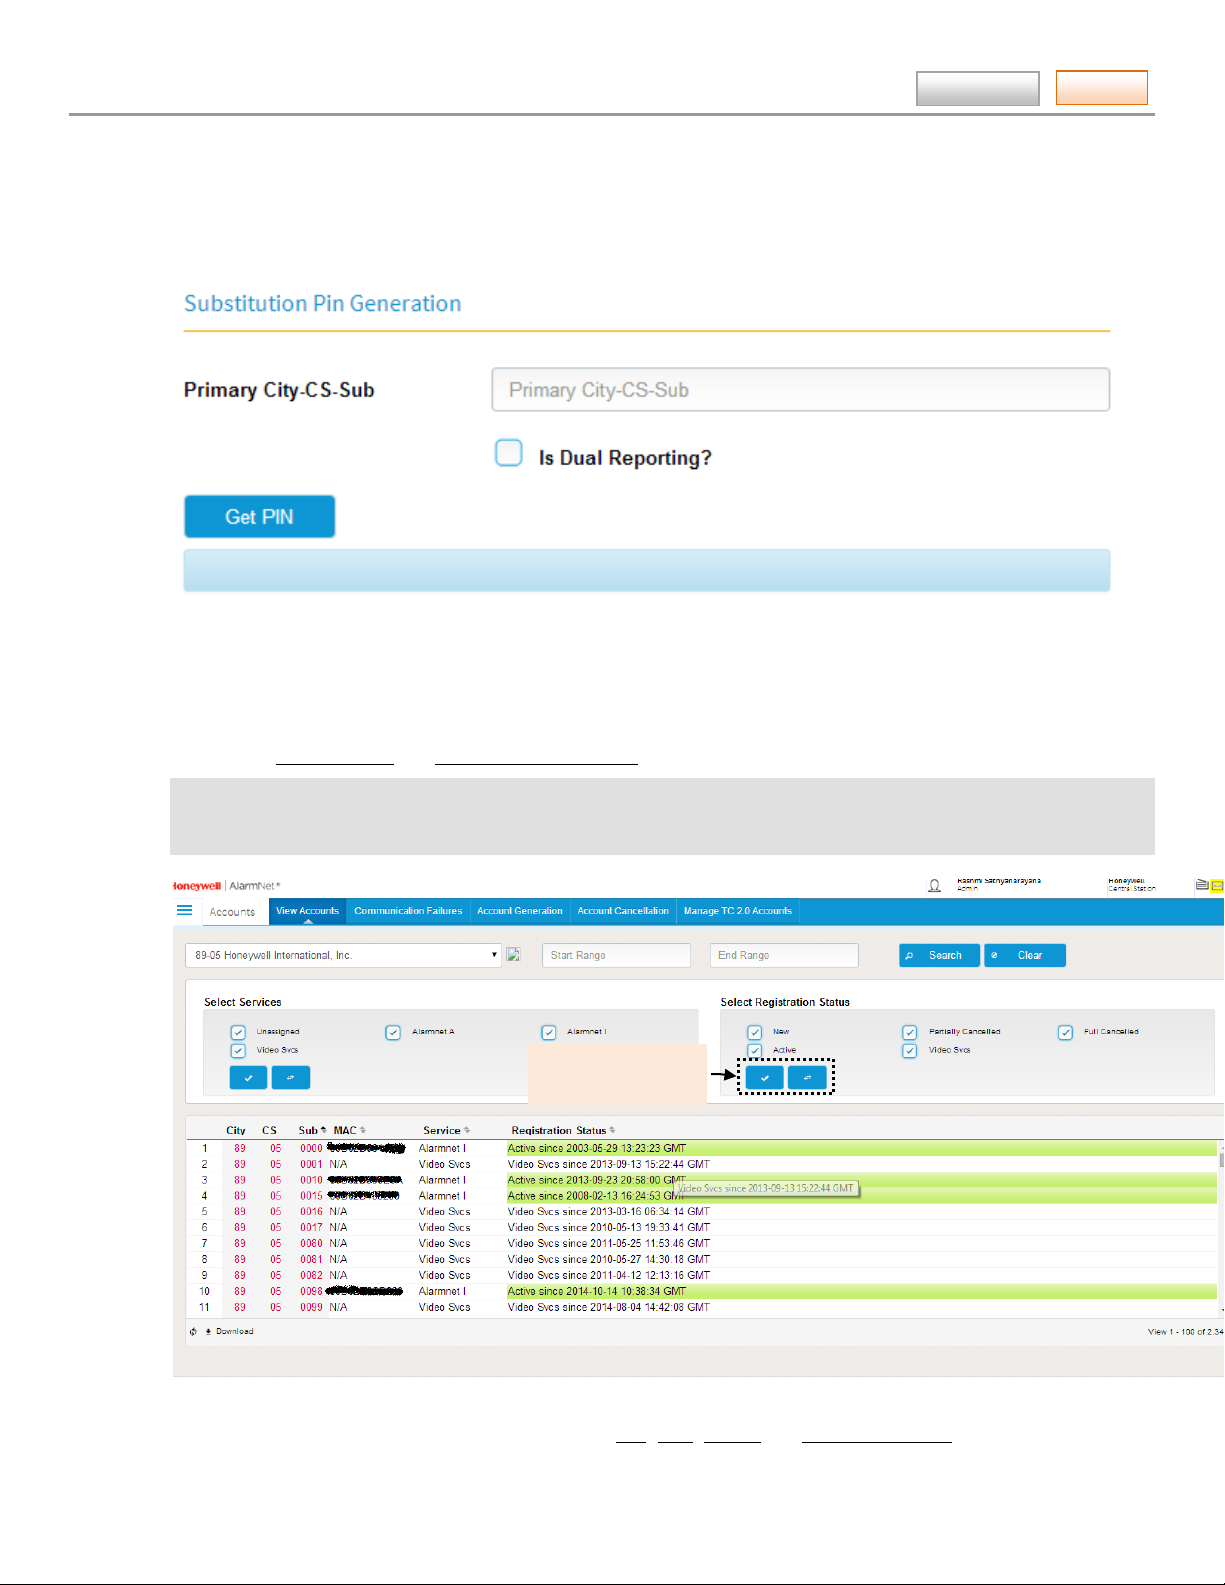
DEVICES ► Substit ut ion PIN Gen erat ion (cent ra l station )
This tool enables you to generate a substitution PIN for communication devices when replacement is required. It provides
an easy method to transfer the old device City, CS, and Subscriber number to the new device.
Read the on-screen instructions, then fill in the fields.
Upon completion, click Get PIN.
Contents
ACCOUNTS ► View Accounts (central station)
This tool enables you to view accounts. Fill in the Start Range and End Range fields. You can further filter the search
by using the Select Services and Select Registration Status check boxes.
Note there are security restrictions on what accounts a user can view. These restrictions are as follows:
SuperUser, or Manager – Has access to all the accounts for their company at all branch locations.
Branch Manager, or Branch User – Has access only to those accounts the user has been authorized to view.
buttons.
Upon completion, click Submit. The search results are displayed.
The search results can be further sorted by clicking the Sub, MAC, Service and Registration Status column heads. The
resultant sorted data can also be downl o aded as a .csv (comma separated values) file for use by a spreadsheet.
– 10 –
AlarmNet360 Online Help Guide
Tasks
Ping Commands
QOS
Test Alarm
Register
Reset
Software Version Request
Contents
For any particular account, detailed information can be displayed by double clicking the account’s Sub number. An
account details pop-up window appears.
Terms . . . Definition
Start/End Range Filter the search by specifying a range of values to limit the subscriber numbers in the
results. Enter a Starting Range value or End Range value, or both. Note, the End Range
must be greater than the Starting Range.
Select Services Filter the search by using the check boxes to select the service type.
Select Registration
Status
Filter the search by using the check boxes to select the account status.
New – Account number is not currently associated with any devices and is ready for use.
Cancelled, service removed (Partial) – The device has been cancelled by the central
station and is no longer connected to the network. A new device may be registered to
this account at any time.
Cancelled, still installed (Full) – The device has been cancelled by the central station but
may still be powered and transmitting. A new device may be registered to this account
after submitting a can cellation as “Removed from Service”, and then confirming that
status has been changed on AlarmNet 360.
Active – The device is actively using the network and may be billed.
Video Svcs – All the account number appearing (in the color black) indicates it is a video
service account.
– 11 –

AlarmNet360 Online Help Guide
Tasks
AlarmNet Service Types
Contents
Terms . . . Definition
Account Details pop-
up window
Pop-Up Window for; “A” type service
Pop-up Window for; I, or Video Svcs
The information below lists the Communication Device along with the applicable AlarmNet service type.
Double clicking the account’s Sub number causes a details pop-up window to appear.
• The pop-up window will close after 5 minutes. If the pop-up is refreshed or any work is
done in the pop-up window, it will reset the time to close back to 5 minutes.
• If the browser window is closed without logging out, ensure all pop-up windows are
closed to log off the session. If no action is taken the pop-ups will close after 5 minutes.
• Closing the browser may not always log the user off the session. The user should
always explicitly log out and not just close the browser window.
No information will be transferred if the user navigates to another page.
If the user navigates to Device Status, Progammerless Registration, or Substitution Pin
Generation, the information will be filled out with the selected account informati on der ive d
from clicking Details or the last pop-up the user was working with for I, or Video Svcs
service only.
If the user clicked on Details and navigates to another page and then retur ns back to the
View Accounts web page, all search criteria will be remembered on the View Accounts page,
if the user continues working with the same account during the entire process.
If the user starts off in Device Status, Progammerless Registration, Substitution Pin
Generation, or Outages, select a valid account to work with, then navigates to View
Accounts. Search crit eria for the account will be set up automatically.
AlarmNet – A
7720 series (1 way)
7820 series (1 way)
7920 series (2 way)
AlarmNet – I
GSMV, IGSMV, GSMV4G, IGSMV4G
GSMV-EX
GSMHS, IGSMHS, IGSMHS4G
GSMX, GSMX4G
GSMCF, IGSMCF
IGSMCFP4G
IPGSM-COM, IPGSM-DP, and IPGSM-DPC series
IPGSM-4G
ILP5, GSMVLP, GSMVLP5, GSMVLP4G, GSMVL P 5 4G
7845GSM, 7845i-GSM, and 7845i-ent series
7847i
7810PC
8132i (Symphony)
Note: Information above also applies to the Canadian product equivalents.
– 12 –

AlarmNet360 Online Help Guide
Tasks
Contents
– 13 –
AlarmNet360 Online Help Guide
Tasks
Ping Commands
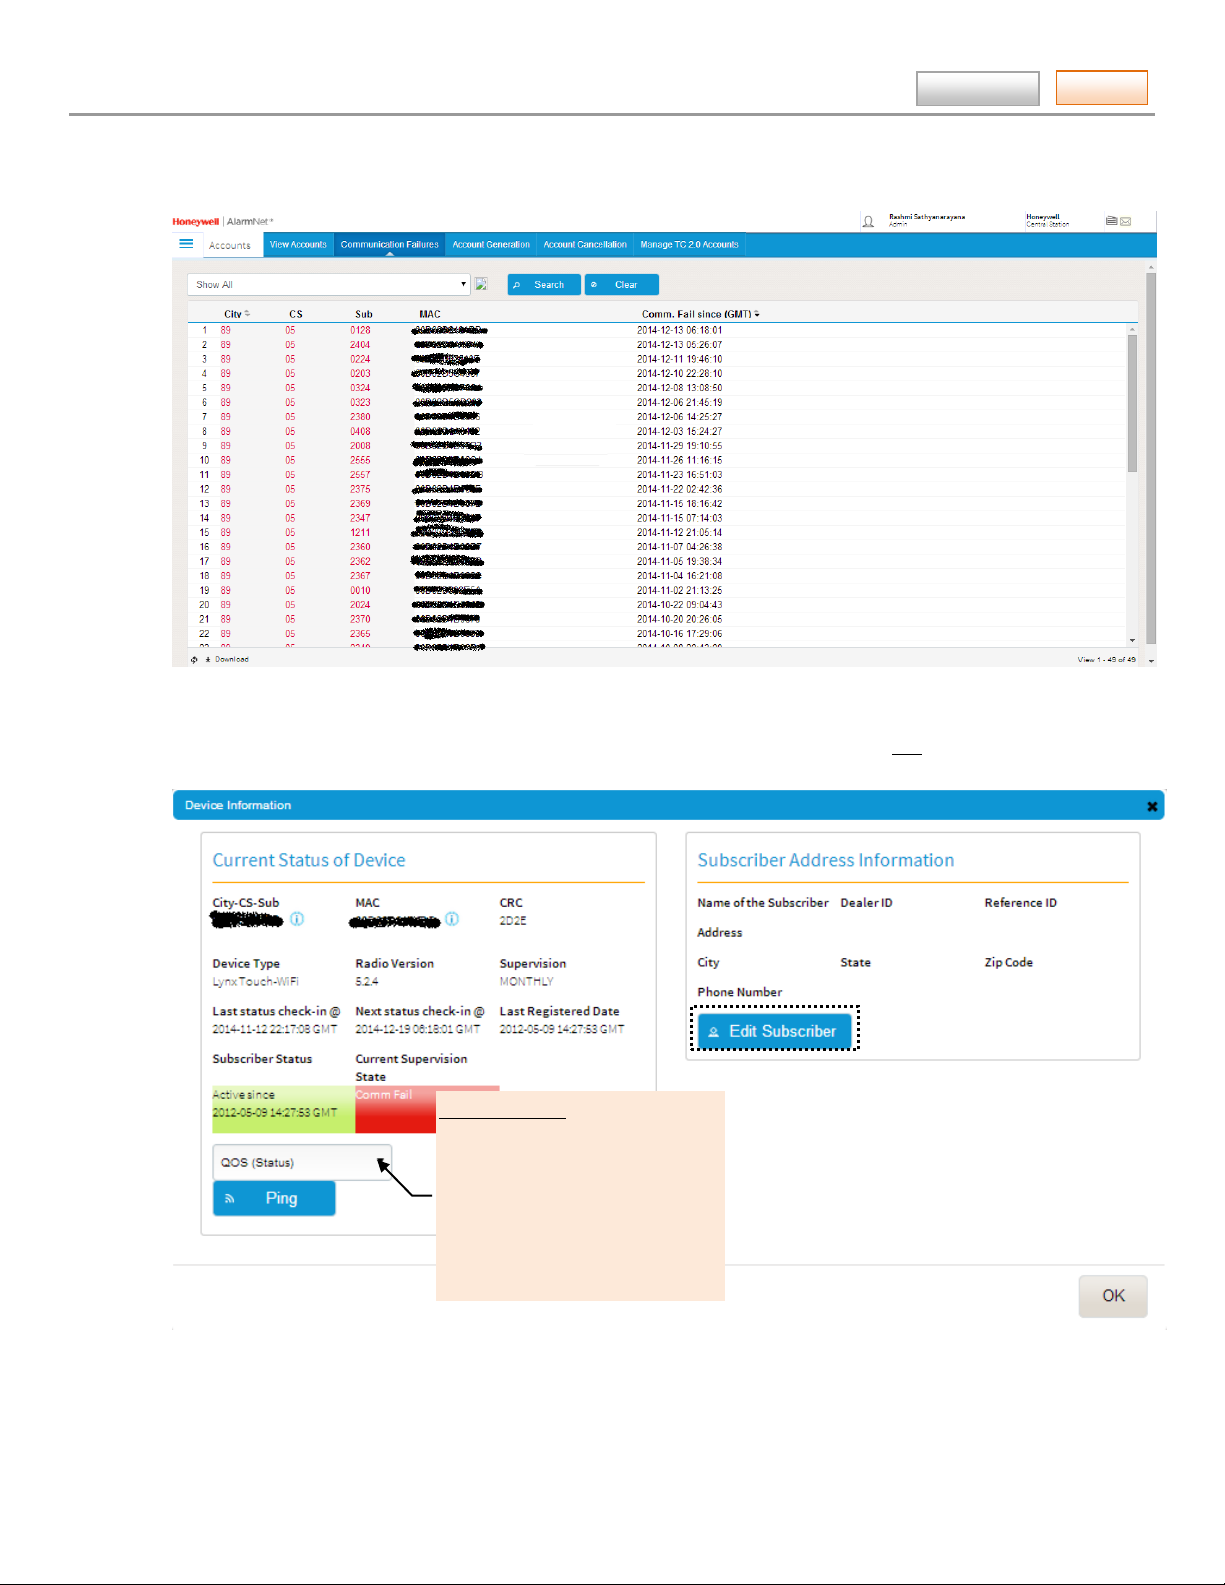
ACCOUNTS ► Communication Failures (central station)
This tool enables you to view which devices are experiencing communication failures.
Make your selections from the drop-down field. Upon completion, click Search. A listing of all communication devices
that experienced failures will be listed.
For any particular account, detailed information can be displaye d by clicki ng the account’s Sub number. A device
information details pop-up window appears.
Contents
QOS
Test Alarm
Test Alarm (Ethernet)
Test Alarm (Cell)
Register
Reset
Software Version Request
– 14 –
 Loading...