

Page 1

TTTT
TTTT
oooo
oooo
uuuu
uuuu
AAAA
AAAA
cccc
cccc
AAAA
AAAA
DDDD
DDDD
hhhh
hhhh
DDDD
DDDD
EEEE
EEEE
CCCC
CCCC
EEEE
MMMM
MMMM
eeee
eeee
EEEE
nnnn
nnnn
MMMM
CCCC
OOOO
6666
6666
6666
eeee
eeee
6666
2222
2222
yyyy
yyyy
2222
2222
7777
7777
MMMM
CCCC
CCCC
tttt
tttt
eeee
eeee
CCCC
OOOO
OOOO
rrrr
rrrr
OOOO
KKKK
KKKK
User Guide
pppp
pppp
7777
7777
1111
1111
aaaa
aaaa
1111
1111
CCCC
CCCC
dddd
dddd
CCCC
CCCC
VVVV
VVVV
ssss
ssss
K6249V1 6/07 Rev. A
Page 2

Table of Contents
ABOUT THE TOUCHCENTER......................................................................... 4
Introduction ............................................................................................... 4
The TouchCenter Interface ........................................................................ 4
Navigating through the TouchCenter .......................................................... 5
About Your Home Screen .......................................................................... 5
TouchCenter "Arming" Screen ................................................................... 7
SYSTEM OVERVIEW ...................................................................................... 9
Introduction to Your System....................................................................... 9
Burglary Protection.................................................................................... 9
Partitions
Zones
Entry/Exit Delays
Alarms
Memory of Alarm
Fire Protection......................................................................................... 10
User Codes............................................................................................. 11
Extended Functionality............................................................................. 11
Safe Mode............................................................................................... 11
SECURITY SYSTEM OPERATION ................................................................ 13
Introduction to Security System Operation................................................ 13
How to Arm the System........................................................................... 13
How to Arm Multiple Partitions ................................................................. 15
How to Display Faults.............................................................................. 16
How to Bypass Zones.............................................................................. 18
How to Remove Bypassed Zones ............................................................ 21
How to Disarm the System....................................................................... 23
How to Check the Status of Other Partitions............................................. 26
How to Send Emergency Messages......................................................... 28
How to View the Event Log...................................................................... 29
FIRE ALARM SYSTEM OPERATION............................................................. 31
Introduction to Fire Alarm System Operation............................................. 31
In Case of Fire Alarm............................................................................... 31
Silencing and Clearing a Fire Alarm ......................................................... 31
USER CODE SETUP..................................................................................... 33
Introduction to User Code Setup.............................................................. 33
............................................................................................ 9
................................................................................................. 9
.............................................................................. 10
.............................................................................................. 10
.............................................................................. 10
2
Page 3

Table of Contents (Cont'd)
Authority Levels....................................................................................... 33
How to Access User Setup ...................................................................... 34
How to Add a User .................................................................................. 35
How to Delete a User............................................................................... 39
How to Edit a User................................................................................... 40
ADVANCED SYSTEM FEATURES ................................................................ 42
Introduction to Advanced System Features............................................... 42
Console Emulation Mode......................................................................... 42
How to Enter Console Emulation Mode .................................................... 42
VOICE MESSAGES (6271CV ONLY)............................................................. 44
Introduction to Recording and Retrieving Messages.................................. 44
Recording a Voice Message .................................................................... 45
Retrieving and Deleting a Voice Message ................................................ 46
SUMMARY OF TOUCHCENTER LED OPERATION ...................................... 47
TouchCenter LED Operation.................................................................... 47
TOUCHCENTER SETUP ............................................................................... 48
How to Access TouchCenter Setup Options ............................................. 48
How to Access Setup............................................................................... 48
How to Adjust the Touch Screen Contrast................................................ 50
How to Adjust the Volume........................................................................ 51
How to Select Screen Backlight Off Activation Time.................................. 52
How to Select Homepage After Time........................................................ 54
How to Set the Time and Date ................................................................. 56
TOUCHCENTER OPERATING MODES ......................................................... 61
Operating Modes (Chime, Voice, and Voice Chime).................................. 61
How to Access Operating Modes ............................................................. 61
MAINTAINING YOUR SYSTEM ..................................................................... 63
How to Clean your TouchCenter .............................................................. 63
Routine Care........................................................................................... 64
GLOSSARY................................................................................................... 65
3
Page 4

About the TouchCenter
Introduction
Congratulations on your ownership of an Honeywell Security System.
You've made a wise decision in choosing it, for it represents the latest
in security protection technology today.
This security system offers you burglary protection and may provide
fire and emergency protection. To realize the full potential of the
system, it is important that you feel comfortable operating it. Your
system may consist of:
• One or more 6271C (Color) and/or 6271CV (Color and Voice)
TouchCenter Keypads
• One or more other keypads for system control
• Various sensors for perimeter and interior burglary protection,
plus a selected number of strategically placed smoke or
combustion detectors
• Lighting/switching devices.
UL
The system uses microcomputer technology to monitor all zones, and
provides appropriate information for display on the TouchCenter
and/or other keypads used with the system. Your system may also
have been programmed to automatically transmit alarm or status
messages over the phone lines to a central alarm monitoring station.
The home lighting feature has not been evaluated by UL.
The TouchCenter Interface
The TouchCenter is an intuitive, graphical interface that combines
security and optionally, home lighting control. With clear, simple
controls on a touch-screen interface, the entire family will find the
TouchCenter both easy to learn and easy to use.
As a security and home-automation interface, the TouchCenter may
be used for:
• Quick and easy security system operation
• Message storage and retrieval (6271CV ONLY)
• Home lighting control
4
Page 5
About the TouchCenter (Cont'd)
Navigating through the TouchCenter
Navigation through the TouchCenter typically begins from the
"Home" screen. This is the TouchCenter’s main default screen
(starting screen) and is the first screen you will see when the
TouchCenter is powered up and initialized. It is from this screen that
you will select from the main menu. Once you have made your
selection, you will navigate through various sub-menus by touching
buttons or icons to perform the function you desire.
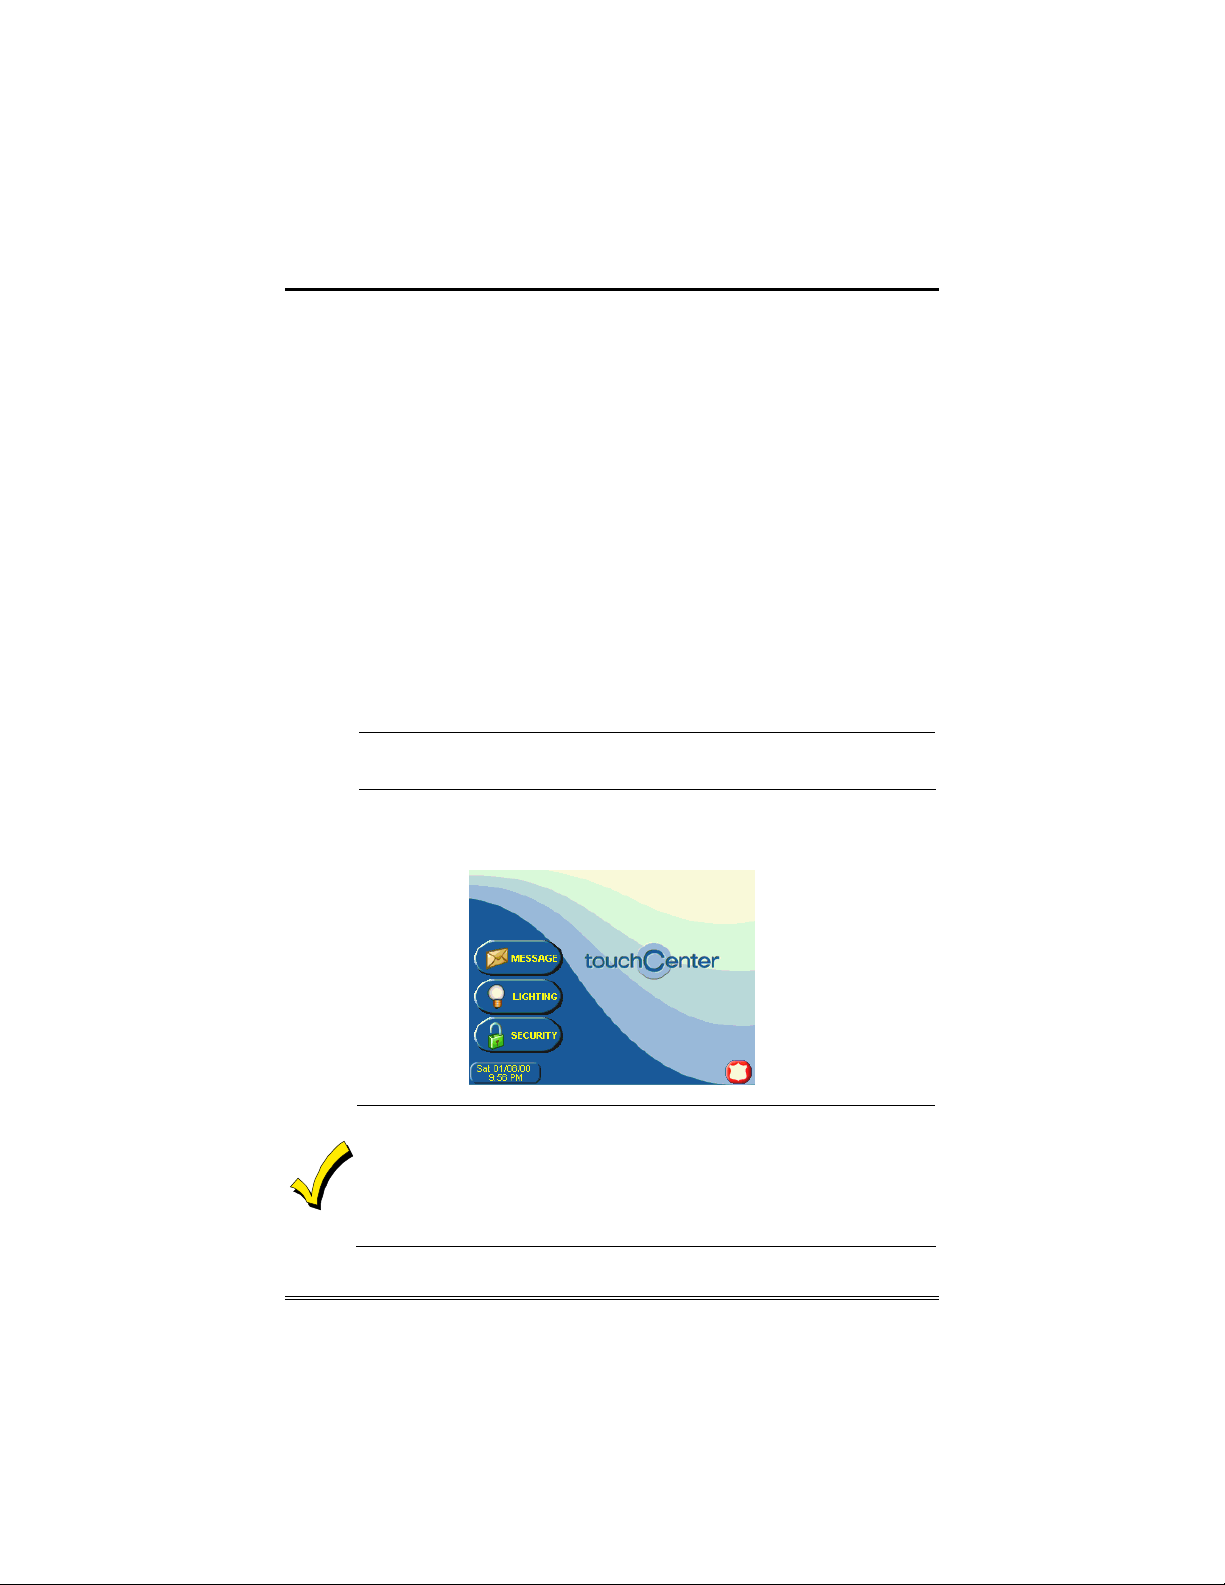
About Your Home Screen
Your "Home" screen is the gateway to your TouchCenter Keypad.
From this screen you can:
• control your security system, and optionally,
• control your message center (6271CV ONLY), and
• control the premises lighting.
UL
Your "Home" screen is displayed most of the time, except when you
select another screen option.
The home lighting feature has not been evaluated by UL.
• The background and buttons shown on the “Home” screen in this
manual are for example only. Your system installer may have
changed the actual background and buttons shown on your “Home”
screen.
• The Message button applies to the 6271CV Only. This button is not
on the 6271C.
5
Page 6

About the TouchCenter (cont'd)
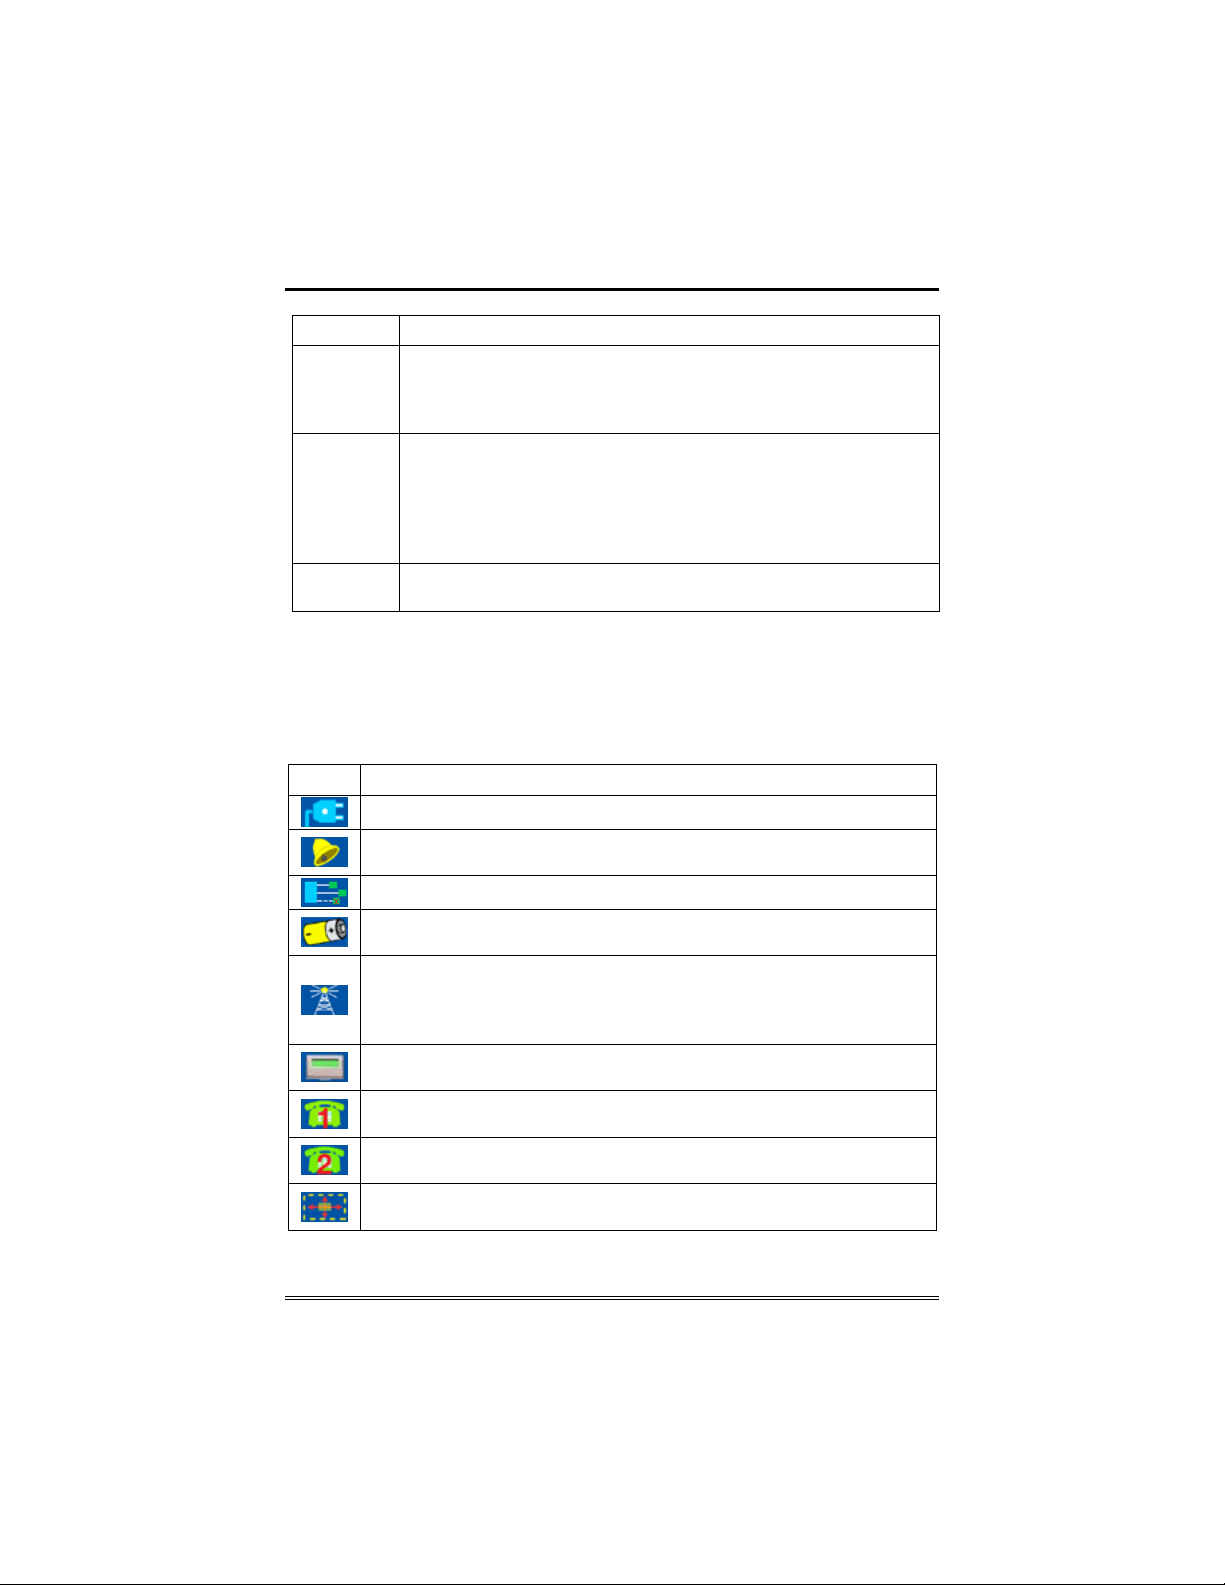
Navigation Icon Descriptions
To aid in the navigation of the TouchCenter, a set of user-friendly
icons has been provided. The appearance, function, and location of
these icons is described below:
ICON LOCATION FUNCTION
"Home"
screen
"Home"
screen
"Home"
screen
Upper left
corner of
most screens
Upper right
corner of
most screens
Lower right
corner of
screen
Allows you to record and retrieve voice
messages. (6271CV Only)
Allows you to turn certain devices on and
off (if installed and programmed by your
installer.)
Accesses "Arming" screen.
Note: The lock symbol and lock color in
the button indicates security system
status.
Unlocked and green – system disarmed
Unlocked and yellow – system disarmed
and a system trouble exists
Locked and red – system armed
Returns you to the TouchCenter "Home"
screen. This icon is called the Home
button within the text of this document.
Reverts to the last screen viewed. This
icon is called the Back button within the
text of this document.
Displays Emergency functions (as
programmed by your installer). This icon
is called the Panic button within the text
of this document.
Note: This icon is displayed and active
on all screens except while in the Clean
Screen mode and during an LCD Display
test in Diagnostics.
6
Page 7

About the TouchCenter (Cont'd)
TouchCenter "Arming" Screen
From the "Home" screen, press SECURITY to access the TouchCenter
"Arming" screen. Use this picture and the table that follows to
become familiar with the TouchCenter security functions.
Note: The Voice Status Icon (
indicates that the TouchCenter is a 6271CV. This button causes the
TouchCenter to announce system status if depressed at least 10
seconds following its last depression. Note that Voice must be enabled
for this button to function correctly during an alarm condition.
ITEM FUNCTION
AWAY
STAY
Press this button to arm when no one will be staying on the
premises. When armed in AWAY, the system will sound an
alarm if a protected door or window is opened, or if any
movement is detected inside the premises. You may leave
through the entrance door during the exit delay period without
causing an alarm. You may also re-enter through the entrance
door, but must disarm the system with your User Code within the
entry delay period or an alarm will occur.
Press this button to arm when you are staying home, but might
expect someone to use the entrance door later.
When armed in STAY, the system will sound an alarm if a
protected door or window is opened, but you may otherwise move
freely throughout the premises. Late arrivals can enter through
the entrance door without causing an alarm, but they must disarm
the system within the entry delay period or an alarm will occur.
NOTE (6271CV only): On some residential systems, if you press
the Voice Status Icon while armed in the Stay Mode, the exit
delay time will restart (if the feature was enabled by your
installer).
) shown in the above illustration
7
Page 8
About the TouchCenter (cont'd)
ITEM FUNCTION
NIGHT
MultiPartitions
MORE
CHOICES
System Troubles
The “Arming” screen also displays an Icon(s) if a system trouble(s)
occurs. The system trouble Icon is displayed to the left of the Panic
button. If a trouble Icon is shown, contact your alarm company. The
following Icons may be shown as applicable to your system:
ICON MEANING
Press this button to arm when you are staying home and do not
expect anyone to use the entrance door.
Your installer may have
configured NIGHT Mode differently; have him/her describe the
actual settings of this mode.
Check this circle when you want to arm more than one partition.
When Multi-Partitions is checked, all partitions within the system
can be armed at one time (if the user is so authorized). When the
Arm Multi-Partitions circle does not contain a check mark, each
partition must be armed individually. Note: This option may not
be shown for some single partition systems.
Press this button for more Security, Lighting, and TouchCenter
setup features.
AC Loss – The system is not receiving AC power.
Bell Failure – The system bell or siren has a problem. Note: This Icon
will be displayed when interfacing with residential panels only.
Expander Failure – The system has a failure in an expansion module.
Low Battery – The system battery, that powers the system during an
AC power loss, is low.
LRR Supervision Failure – The Long Range Radio or Alarmnet –I
used to communicate with the central station has a supervision
failure. Note: This Icon will be displayed when interfacing with
residential panels only.
Pager Failure – The system cannot communicate with an assigned
pager.
Phone Line 1 Failure – The system is not able to communicate with
the central monitoring station over the primary phone line.
Phone Line 2 Failure – The system is not able to communicate with
the central monitoring station over the secondary phone line.
Wireless Failure – The system is not able to communicate with its
wireless devices.
8
Page 9

System Overview
Introduction to Your System
This system offers you burglary protection and may offer fire and
emergency protection. Monitoring is accomplished with various
contact and motion sensors for perimeter and interior burglary
protection, plus the system may have strategically placed smoke,
heat, or combustion detectors.
Burglary Protection
The burglary protection portion of your system must be turned on or
"armed" before it will sense burglary alarm conditions. Your system
provides three modes of burglary protection: Away, Stay, and Night,
and even allows you to “bypass” selected zones of protection while
leaving the rest of the system armed (e.g. this enables you to arm the
system but leave upper-story windows open.)
The system also provides a Chime mode (6271C and 6271CV) and
Voice mode (6271CV), for alerting users to the opening and closing of
doors and windows even while the system is disarmed.
Partitions
This system may be configured to arm and disarm more than one
area, each as if it had its own control. These areas are called
partitions. Partitions are used when the user wants to disarm certain
areas while leaving other areas armed, or to limit access to certain
areas to specific individuals. Each user of the system can be
authorized to operate all or only some partitions, and can be given
different privileges in each. Information about Partitions is
presented later in this document.
Zones
Your system's sensing devices have been assigned to various "zones."
For example, the sensing device on your Entry/Exit door may have
been assigned to zone 01, sensing devices on windows in the master
bedroom to zone 02, and so on. These numbers will appear on the
display, along with an alpha descriptor for that zone (if programmed),
when an alarm or trouble condition occurs.
9
Page 10

System Overview (cont'd)
Entry/Exit Delays
Your system has preset time delays, referred to as exit delay and
entry delay. Whenever you arm your system, exit delay gives you
time to leave through the designated exit door without setting off an
alarm. Exit delay begins immediately after entering any arming
command, and applies to all modes of arming protection. If
programmed, a slow beeping will sound throughout the exit delay
period. Additionally if programmed, a rapid beeping may sound
during the final 10 seconds of the exit delay period.
Note: 6271CV Only – On some systems, pressing the Voice Status
Icon restarts the exit delay. Refer to your control panel User Guide to
see if this is applicable on your system.
Entry delay gives you time to disarm the system when you reenter
through the designated entrance door. But the system must be
disarmed before the entry delay period ends, or an alarm will occur.
The keypad will beep during the entry delay period, reminding you to
disarm the system. Ask your installer about the delay times
programmed into your system.
Alarms
When an alarm occurs, the TouchCenter (and any other keypads) and
external sounders will sound, and the zone(s) causing the alarm are
displayed. If your system is connected to a central monitoring station,
an alarm message will also be sent. To stop the alarm sounding,
simply disarm the system.
Memory of Alarm
When an alarm condition occurs, the number(s) of the zone(s) that
caused the problem are displayed, along with the type of alarm. These
remain displayed until cleared.
Note: If you change screens, the alarm in memory can be viewed and
cleared by selecting the Display Faults button on the Arming Screen.
Fire Protection
The optional fire protection portion of your security system (if used) is
always on and will sound an alarm if a fire condition is detected.
Note: If a fire or smoke detector develops a low battery, a “Fire
Maintenance” message is displayed. To determine which zone is
causing the problem, go to “Display Faults” to determine which zone
has the low battery indication.
10
Page 11

System Overview (Cont'd)
User Codes
Each user must be assigned a name with a corresponding 4-digit user
code in order to gain access to various features and functions. Users
for the system are programmed in a central user setup location that
provides the specific questions for authorization level, partition
assignment, and RF button assignment.
Extended Functionality
Extended functions are advanced functions that can be accessed
through a standard alpha keypad or through the console emulation
mode on your TouchCenter touch screen. Refer to your Control Panel
User Guide for these features.
Safe Mode
The TouchCenter contains a Safe Mode of operation. In the rare event
that the TouchCenter cannot successfully communicate in its graphic
mode with the control panel, the Safe Mode is a backup mode that
ensures that you can communicate with your system. In this mode,
the TouchCenter operates much like a standard non-graphic keypad
so that you can control your system until the problem is corrected.
If this situation occurs, the TouchCenter presents you with a message
of “Problems detected. Start Keypad in Safe Mode?” and requests a
“Yes” or “No” response. If you answer with “Yes”, the TouchCenter
will go into the Safe Mode. If you answer with “No”, the TouchCenter
will try communicating with the panel again. After 5 consecutive
times of receiving no response, the TouchCenter will enter the Safe
Mode automatically.
Note: Use care when providing the “Yes” or “No” response. Touching
the screen outside the prescribed area may cause the backgound to
come to the front. If this occurs, the Yes/No message that disappeared
will time out in 30 seconds even though it is not visible. Then the
keypad will reset into the Normal Mode (or Safe Mode if this is the
third time that the warning message appeared).
While in the Safe Mode, the Home screen will display the Security
button, Panic Button, and a message at the bottom of the screen as
shown below:
11
Page 12

System Overview (cont'd)
Note that this is a limited mode of operation. While in this mode:
• You can use the Security button to access the Console Emulation
Mode of operation to try to clear your faults, disarm the system, or
enter additional Alpha Keypad commands specified in you panel
User Guide. You can perform almost all functions that you can
perform from a standard non-graphic alpha keypad.
• You can depress the “Panic” key and generate Emergency
Messages as defined in the panels home partition for this
TouchCenter.
• The Armed and Ready LEDs on the front of the TouchCenter will
indicate the TouchCenter’s home partition status. The Message
(6271CV) or Trouble (6271C) LED is not active in the Safe Mode.
• The Chime mode will function in the Safe Mode: however, you will
not have Voice, Voice Chime, or Message capability if using the
6271CV.
• When in Safe Mode, the lock on the Security button on the Home
screen will always be shown in the unlocked position. Refer to the
Armed LED for the true armed status of your system.
• When an alarm occurs in the Safe Mode, it is displayed on the
Console mode screen only. It will not be shown on the Home screen
and the lock on the Home screen will not change color – it will
always be shown in yellow.
To Exit the Safe Mode:
1. Press the ! SAFE MODE ! bar. You will be presented with the
following popup message:
2. Select “Yes” to return to the Normal Mode of operation. The
TouchCenter will reset and normal operation will return as long as
the original conditions that caused the entry into Safe Mode do not
still exist.
12
Page 13

Security System Operation
Introduction to Security System Operation
You can arm your system in one of three arming modes: Away, Stay,
and Night. The following table lists the three different arming modes
and the results of each.
FEATURES FOR EACH ARMING MODE
Arming
Mode
Away Yes Yes Yes Yes
Stay Yes Yes Yes No
Night* Yes
*Your installer may have configured Night Mode differently; have
your installer write the actual zone settings above.
How to Arm the System
Arming the system in any mode is performed in the same way, as
described below.
Note: Close all perimeter windows and doors before arming.
Exit
Delay
Entry
Delay
Yes (set for Away or
Stay Mode)
No (set for Instant or
Maximum Mode)
Perimeter
Armed
Yes
Interior
Armed
Yes (set for Away
or Maximum
Mode)
No (set for Stay or
Instant Mode)
1. From the "Home" screen, press the SECURITY button. The "Arming" screen
is displayed.
13
Page 14

Security System Operation (cont'd)
SCREEN ACTION
2. On the "Arming" screen, press the
selected arming button.
Note: If Quick Arm is Not enabled in your
system, you will receive a message to
enter your User Code.
o The TouchCenter beeps twice
(Away and Night Maximum Modes) or
3 times (Stay and Night Instant
Modes)
o a DISARM button appears
o a text message appears stating
which zones are arming and whether
or not there is an entry delay
o the screen changes to display
the remaining exit delay time, and
o an "open lock" appears next the
the arming buttons as follows:
Away – Next to the Away button
Arming (typical)
Armed (typical)
Stay – Next to the Stay button
Instant – Next to the Night button
Night – Next to the Night button
o The exit delay time continues to
decrement to one.
When exit delay time expires, the screen
automatically changes to indicate the
system is "Armed" and the "lock" next to
the button changes color and to a closed
lock. The system is now armed in the
selected mode.
14
Page 15

Security System Operation (Cont'd)
How to Arm Multiple Partitions
Note: Some systems may not have multiple partitions and the “Arm
Multi-Partitions” button may not be displayed.
To arm multiple partitions:
1. From the "Home" screen, press the SECURITY button. The "Arming" screen
is displayed.
SCREEN ACTION
2. Make certain the Multi-Partitions button
is checked.
3. Press the appropriate arming mode
button.
Note: If any zones are bypassed, a
Display Faults button will also be
displayed on this screen.
4. When prompted, enter the user code
authorized to access other partition(s).
If the user code is accepted, the system
displays the partitions that the user has
access to.
Note: A user may have access to some or
all of the available partitions!
You have two arming options:
To arm one or more partitions, highlight
the partition(s) to be armed by touching it
on the screen, then press ARM
SELECTED.
Press ARM ALL to arm all available
partitions.
15
Page 16

Security System Operation (cont'd)
How to Display Faults
The Display Faults function is used when you see a Not Ready Fault
message and want to determine were the fault is and what type of
fault it is.
To display faults do the following:
1. From the "Home" screen, press the SECURITY button. The "Arming" screen
is displayed.
SCREEN ACTION
2. From the "Arming" screen, press the
DISPLAY FAULTS button. The "Display
Faults" screen is displayed showing a
listing of faulted and/or bypassed zones.
The following symbols may be displayed
on the "Display Faults" screen.
Zone in alarm
Zone has trouble
Zone is faulted
Zone has low battery
Zone is bypassed
3. As applicable, take corrective action
such as closing a window or door to
correct the fault. If the fault cannot be
corrected, you may chose to bypass a
zone by touching the zone to select it and
depressing the BYPASS SELECTED
button or bypass all faulted zones by
depressing the BYPASS ALL button.
The "User Authorization" screen is
• Residential systems will not allow you to bypass fire or emergency
zones. On commercial systems, a specified user may be allowed to
bypass fire and system zones if the user was enabled by your system
installer.
• To bypass zones the system must be disarmed first.
• Limits apply as to how many zones can be bypassed at one time.
These limits are ten zones on residential and five zones on
commercial systems.
displayed with the instructions "To
Bypass Zones, Enter Code".
16
Page 17

Security System Operation (Cont'd)
4. Enter your 4-digit user code. The
"Arming" screen is displayed showing the
system status as Ready-Bypass
17
Page 18

Security System Operation (cont'd)
How to Bypass Zones
The Bypass function is used when you want to arm your system with
one or more zones left open. Bypassed zones are unprotected and will
not cause an alarm when violated while your system is armed.
• Residential systems will not allow you to bypass fire or emergency
zones. On commercial systems, a specified user may be allowed to
bypass fire and system zones if the user was enabled by your
system installer.
• To bypass zones, the system must be disarmed first.
• Limits apply as to how many zones can be bypassed at one time.
These limits are ten zones on residential systems and five zones on
commercial systems.
To bypass zones do the following:
1. From the "Home" screen, press the SECURITY button. The "Arming" screen
is displayed.
SCREEN ACTION
2. From the "Arming" screen, press the
MORE CHOICES button. The "More
Choices" screen is displayed.
Note: If any zones are bypassed or
faulted, a Display Faults button will also
be displayed on this screen.
18
3. Press the SHOW ZONES button on
the "More Choices" screen.
While the TouchCenter is requesting and
receiving the zone data from the control
panel, the screen displays "Please Wait!".
Then the zones, along with their current
status, are displayed.
Page 19

Security System Operation (Cont'd)
SCREEN ACTION
4. Highlight the zone(s) to be bypassed
by touching it on the screen when the
zones are displayed.
5. Press the BYPASS SELECTED
button. The "User Authorization" screen
is displayed with the instructions "To
Bypass Zones, Enter Code".
Note: If zones have already been
bypassed, the top of this screen will
indicate “Ready Bypass” and the screen
will contain a Clear Bypasses button.
6. Enter your 4-digit user code. The
"More Choices" screen is displayed
showing the system status as Ready-
Bypass
19
Page 20

Security System Operation (cont'd)
SCREEN ACTION
7. Press the BACK button to return to the
“Arming” screen.
20
Page 21

Security System Operation (Cont'd)
How to Remove Bypassed Zones
A bypassed zone will automatically be unbypassed when you disarm
the system. If a zone is bypassed, you can remove the bypass as
follows:
SCREEN ACTION
1. View bypassed zones by pressing the
SHOW ZONES button.
While the TouchCenter is requesting and
receiving the zone data from the control
panel, the screen displays "Please Wait!".
Then the zones, along with their current
status, are displayed.
2. Remove zone bypasses by pressing
the CLEAR BYPASSES button.
Note: Bypassed zones are indicated by
the Bypass icon
.
21
Page 22

Security System Operation (cont'd)
SCREEN ACTION
3. The "User Authorization" screen is
displayed with the instructions To Clear
Bypasses, Enter Code.
Note: If the system is armed and you
unbypass a zone, it will disarm the
system.
Enter your 4-digit user code. The "More
Choices" screen is displayed showing the
system as Ready to Arm.
Note: This will not occur if any zone(s) is
open (not ready).
22
Page 23

Security System Operation (Cont'd)
How to Disarm the System
IMPORTANT: If you return and the main burglary sounder is on,
DO NOT enter the premises, but call the police from a nearby safe
location. If you return after an alarm has occurred and the main
sounder has shut itself off, the TouchCenter will beep rapidly upon
entering, indicating that an alarm has occurred during your absence.
LEAVE IMMEDIATELY and CONTACT THE POLICE from a
nearby safe location.
The system may be disarmed using either of two methods. One
method is employed when you enter the premises and the other is
when you have been in the premises with the system armed (i.e., Stay
and Night arming modes).
To disarm the system when entering the premises:
The TouchCenter will automatically display the Entry Delay Active
screen when you enter the premises:
Enter your Code. The partition will be
disarmed and the "Arming" screen is
displayed showing the system as Ready
to Arm.
Note: If you have a commercial system
and a time window has been defined for
when you may disarm the system, the
system will not disarm if you are outside
that time window.
23
Page 24

Security System Operation (cont'd)
To disarm the system when already in the premises:
SCREEN ACTION
1. Press the DISARM button on the
"Armed" screen. The "User Authorization"
screen is displayed with the instructions
“To Disarm, Enter Code”.
2. Enter your 4-digit user code.
If the Arm Multi-Partitions button on the
“Armed” screen is not checked, the
TouchCenter beeps once, the system will
disarm, and the "Arming" screen is
displayed showing the system as Ready
to Arm or Not Ready Fault if any zone is
faulted (open).
If the Arm Multi-Partitions button on the
“Armed” screen is checked, the Partition
No. & Description screen is displayed
listing the partitions to which you have
access.
3. Press the DISARM ALL button if you
wish to disarm the system. The
TouchCenter beeps once and the
"Arming" screen is displayed showing the
system as Ready to Arm or not ready if
any zone is faulted (open).
Note: If you wish to disarm only selected
partitions, you must first highlight the
partition(s) to be disarmed, then press the
DISARM SELECTED button. The
TouchCenter beeps once and the
"Arming" screen is displayed showing the
system as Ready to Arm or not ready if
any zone is faulted (open).
24
Page 25

Security System Operation (Cont'd)
SCREEN ACTION
Note: Once the system is disarmed, the
TouchCenter will return to the "Home"
screen after the selected “To Home Page
After” time has expired. This time is
selected on the “Setup” screen.
25
Page 26

Security System Operation (cont'd)
How to Check the Status of Other Partitions
This system supports between one and eight Partitions (depending on
the system.) Partitioning enables a single physical alarm system to
control up to eight areas of protection (partitions) depending on the
system you have purchased. Each TouchCenter and other keypad is
assigned a default partition for display purposes, and will show only
that partition's information.
Note: A letter “H” following the partition name or number indicates
that this is the default partition for the TouchCenter.
For example, if your physical site is a four-apartment housing unit,
your alarm system may be configured with four partitions. Each
apartment’s zones (door, windows, smoke detectors, etc.) are assigned
to separate partitions, giving each apartment independent
arming/disarming control of its own partition (area). A landlord or
manager may be granted access to all partitions, so he/she can control
the entire system.
If a user is so authorized, a TouchCenter or other keypad in one
partition can be used to perform system functions in another
partition. (Note that only those partitions authorized and
programmed by the installer can be accessed in this manner.)
To check the status of other partitions perform the following:
1. From the "Home" screen, press the SECURITY button. The "Arming" screen
is displayed.
SCREEN ACTION
2. Press the "Current Partition" tab (lower
edge of the screen; in this case it displays
Main H). The "User Authorization" screen
is displayed with the instructions “For
Authorized Partitions, Enter Code”.
26
Page 27

Security System Operation (Cont'd)
SCREEN ACTION
3. Enter the code authorized to access
other partition(s).
If the code is accepted, the system
displays the partitions that user has
access to.
Note: A code may have access to some
or all of the available partitions.
This screen displays the available
partitions (in this case, Partitions 1 (Main),
2, and 3), and their current status.
The current partition is shown at the top of
the display (in this example, the device is
attached to Partition 1 (Main H). To
change this assignment, select the
appropriate button (e.g. press P2 to
switch control to Partition 2).
Note: After leaving this screen when
using a residential panel, the selected
partition in the TouchCenter will
automatically revert back to the
TouchCenter’s home partition after two
minutes. When using commercial panels,
you must select the TouchCenter’s home
partition to return to it.
27
Page 28

Security System Operation (cont'd)
How to Send Emergency Messages
• Emergency messages are optional and may not be available on your
system. Ask your system installer if emergency messages are
available on your system.
• The Emergency screen cannot be accessed while running a screen
diagnostic test or while in the clean screen mode.
An emergency message for fire, panic, or medical can be sent to the
central monitoring station from the Emergency screen. The
Emergency screen can be accessed by activating the "PANIC" Icon
located on the lower right corner of the screen.
Once the Emergency screen is accessed, perform the following to
send an emergency message.
SCREEN ACTION
On the Emergency screen press and hold
(for at least 2 seconds) the associated
alarm button for the type of emergency
message you want to send (FIRE, PANIC,
or MEDICAL). When the message is
sent, the associated "Message Sent"
statement is displayed in the text box to
the right of the buttons. You are
immediately returned to the screen from
which you pressed the “PANIC” Icon.
28
Page 29

Security System Operation (Cont'd)
How to View the Event Log
Your system has the ability to record various events in a history log
wherein each event is recorded with the time and date of its
occurrence. The control panel must be programmed to record various
system events in installer programming mode.
To view the Event Log, perform the following:
1. From the "Home" screen, press the SECURITY button. The "Arming" screen
is displayed.
SCREEN ACTION
2. From the "Arming" screen press the
MORE CHOICES button. The "More
Choices" screen is displayed.
3. Press the EVENT LOGS button on the
"More Choices" screen. The "Event Log"
screen is displayed.
Note: While TouchCenter is requesting
and receiving the event log data from the
control panel, the "Event Log" screen
displays "Please Wait!".
29
Page 30

Security System Operation (cont'd)
SCREEN ACTION
The first six events will be displayed.
To view all items, press the Show More
button and press the up/down arrows to
scroll through the event log.
Notes:
• When All Partitions or All Events
button is pressed, and more than 100
events exist, the Show More button
text will change to read Next>>. If you
press the Next>> button, a
<<Previous button will be shown. The
Next>> and <<Previous buttons will
show the next 100 or previous 100
events.
• The Next>> and <<Previous buttons
will be shown for commercial panels
only when 100 or more events are in
the log. They will not be shown for
residential panels.
30
Page 31

Fire Alarm System Operation
Introduction to Fire Alarm System Operation
Your fire alarm system (if installed) is on 24 hours a day, providing
continuous protection. In the event of an emergency, the installed
smoke and heat detectors will automatically send signals to your
Control/Communicator, triggering a loud interrupting sound from the
keypad. An interrupted sound will also be produced by optional
exterior sounders. A FIRE message will appear at your keypad and
remain on until you silence the alarm.
In Case of Fire Alarm
1. Should you become aware of a fire emergency before your
detectors sense the problem, go to your nearest keypad and
manually initiate an alarm by pressing the panic key assigned as
FIRE emergency (if programmed by the installer) and hold down
for at least 2 seconds.
2. Evacuate all occupants from the premises.
3. If flames and/or smoke are present, leave the premises and notify
your local Fire Department immediately.
Silencing and Clearing a Fire Alarm
1. Silence, acknowledge, and clear the alarm by:
Residential systems –
a. Press “Touch here to Silence” on the display to silence the
alarm.
b. Press the CLEAR button followed by your code. This will
acknowledge the alarm and disarm the system (if armed).
c. Press the DISPLAY FAULTS button on the Arming screen.
The faulted fire zone will be displayed.
d. Press the CLEAR button and then enter your code. This will
clear the Fire Alarm from the system.
Commercial systems –
a. Enter your code. This will silence and acknowledge the alarm
and disarm the system (if armed).
b. Press the DISPLAY FAULTS button on the Arming Screen.
The faulted zones will be displayed.
31
Page 32

Fire Alarm System Operation (cont'd)
c. Press the CLEAR button and then enter your code. This will
clear the Fire Alarm from the system.
2. If the keypad does not indicate a READY condition after the
second sequence, press the DISPLAY FAULTS key on the Arming
screen to display the zone(s) that are faulted. Be sure to check
that smoke detectors are not responding to smoke or heat
producing objects in their vicinity. In this case, eliminate the
source of heat or smoke.
3. If this does not remedy the problem, there may still be smoke in
the detector. Clear it by fanning the detector for about 30 seconds.
4. When the problem has been corrected, clear the display by
entering the DISPLAY FAULTS button on the Arming screen,
selecting the fire zone, pressing the CLEAR button and then
entering you user code.
Note: Contact your Security Company for servicing if you have
further problems with your fire system.
32
Page 33

User Code Setup
Introduction to User Code Setup
Each user must be assigned a name with a corresponding 4-digit user
code in order to gain access to various features and functions. The
TouchCenter can hold the identity for 10 Users in its memory. If
additional Users are needed, define the additional Users using the
Console Emulation Mode.
Users for the system are programmed in a central user setup location
that provides the specific questions for authorization levels assigned
to different users. You may want these users to be the same, but
there are situations in which you may want a user to have limited
capabilities. These capabilites are defined by the Authority Level
assigned each user.
Authority Levels
Authority levels define the system functions a particular user can
perform. Depending on the authority assigned to you, there are
certain system functions you may be prohibited from performing. The
following information describes the authority levels that can be
assigned through the TouchCenter and provides the equivalent
authority level name that you will find if you are reading your alarm
system manuals. The authority levels that can be assigned through
the TouchCenter are as follows:
Center
Authority
Level
Master Can perform all security functions,
Normal Perform security functions (arm,
Functions
add/delete users in assigned
partition, program scheduled
events, and change partition
master code
disarm)
Equivalent System Name Touch-
Residential
Systems
Partition
Master
Standard
User
Commercial
Systems
Level 1
Master
Level 3
Operator A
33
Page 34

User Code Setup (cont'd)
Guest Can arm the system in assigned
partitions, but cannot disarm the
system unless the system was
armed with this code.
Note: Do not assign this level if
Quick Arm is enabled in your
system.
No Access Used to restrict access from a
partition.
Guest Level 4
Operator B
N/A N/A
How to Access User Setup
Access User Setup as follows:
1. From the "Home" screen, press the SECURITY button. The "Arming" screen
is displayed.
SCREEN ACTION
2. Press the MORE CHOICES button.
The "More Choices" screen is displayed.
34
3. Press the SETUP button on the "More
Choices" screen. The "Setup" screen is
displayed.
Page 35

SCREEN ACTION
How to Add a User
Add a user as follows:
User Code Setup (Cont'd)
4. Press the USER SETUP button on the
“Setup” screen. The User Setup screen
is displayed.
SCREEN ACTION
Note: Three selections are available: add
a user, edit a user, or delete a user.
1. To add a user, press the ADD USER
button. The "User Authorization" screen
is displayed with the instructions "Enter
Authorized Code".
35
Page 36

User Code Setup (cont'd)
SCREEN ACTION
2. Enter your Authorized code. The “User
Options” screen is displayed.
Note: The authorized code for adding
users is dependent upon the system you
have. Check with your system installer to
determine who can add users.
3. Press the box next to Enter User
Name. The Enter Data keyboard screen
is displayed.
4. Type in the user name (6 characters
max.) and press the OK button. The
“User Options” screen is displayed with
Enter User Code… displayed.
Notes:
• Use the Shift button for capital letters.
• Use the BS (Backspace) button to
make corrections.
• The @#$ button is not available for use
at this time. These characters cannot
be saved to the control panel.
5. Touch the box next to Enter User
Code… The "User Authorization" screen
is displayed with the instructions Enter 4
Digits.
36
Page 37

User Code Setup (Cont'd)
SCREEN ACTION
6. Enter the 4-digit code for this user.
The “User Options” screen is displayed
with the user’s name and code displayed.
7. Select the partitions and access level
for this user. After the access level is
selected, the Allow Arm/Disarm from
other partitions box becomes available
when interfacing with commercial panels.
(On residential panels, this box is
automatically selected and can not be
deselected.)
If this user is to be able to Arm and
Disarm from other partitions in commercial
panels, touch this box.
8. Touch the box below the User
Number. The "User Number" screen is
displayed with the instructions to Enter 3
Digits.
Note:When assigning User Numbers for
residential panels, enter 0 as the first of
the three digits.
9. Enter the 3-digit user number for this
user. The “User Options” screen is
displayed with the user’s name, number,
and code displayed.
37
Page 38

User Code Setup (cont'd)
SCREEN ACTION
10. If this user is assigned an RF button
zone, touch the box below the RF Button
Zone. The "RF Button Zone " screen is
displayed with the instructions to enter 3
digits. If interfacing to a residential panel,
enter 0 as the first digit. Enter the RF
Button Zone number that was previously
programmed in the control panel. Note
that the RF Button Zone does not appear
for every user. The User Options screen
will be redisplayed.
11. Press the SAVE button. The system
will save the configuration. When the
save is complete, the User Setup screen
is displayed with the new user’s name
shown.
38
Page 39

How to Delete a User
Delete a User as follows:
SCREEN ACTION
User Code Setup (Cont'd)
1. From the User Setup screen, touch
the circle next to the user to be deleted
and press the DELETE USER button.
The "User Authorization" screen is
displayed with the instructions "Enter
Authorized Code:".
2. Enter your Authorized code. The
“Delete Confirmation” screen is displayed.
Note: The authorized code for deleting
users is dependent upon the system you
have. Check with your system installer to
determine who can delete users.
3. Press the appropriate button. The
User Setup screen is displayed.
39
Page 40

User Code Setup (cont'd)
SCREEN ACTION
How to Edit a User
Note: You can not edit a User’s name. To modify a User name, you
must delete the User and re-enter User.
Edit a user as follows:
Note: You can not edit a User’s name. To modify a User name, you
must delete the User and re-enter User.
SCREEN ACTION
1. From the User Setup screen, touch
the circle next to the user to be edited and
press the EDIT USER button. The "User
Authorization" screen is displayed with the
instructions "Enter Authorized Code:".
40
2. Enter your Authorized code. The “User
Options” screen is displayed.
Note: The authorized code for editing
users is dependent upon the system you
have. Check with your system installer to
determine who can edit users.
Page 41

User Code Setup (Cont'd)
SCREEN ACTION
3. Select the options needed for this user
and press the SAVE button. The
configuration changes are saved and you
are returned to the User Setup screen.
41
Page 42

Advanced System Features
Introduction to Advanced System Features
While most of the commonly used security functions are available
from the TouchCenter’s advanced user interface, there are some less
used, advanced features that can either be accessed through Console
Emulation mode on the TouchCenter or a standard alpha keypad. To
use features not supported by the TouchCenter, refer to your Control
Panel User Guide.
Console Emulation Mode
Console Emulation Mode allows you to use a TouchCenter interface
just as you would a regular system keypad. All commands shown in
Console Emulation mode can also be executed from a standard alpha
keypad.
Notes:
• It is recommended that you do not use the Console Emulation
Mode to enter GOTO commands. Unsatisfactory operation may
result from issuing GOTO commands in Console Emulation.
• Two button panics (1 & *, 3 & #, and * & #) do not function in the
Console Emulation Mode. The A, B, C, and D buttons do function if
programmed as panic keys. Check with your system installer for
details.
• Commercial systems with Alpha keypads have a feature where if
you depress a key for 5 seconds, you will receive self help messages
about the pressed key or holding the * key for 5 seconds will
provide zone descriptors. These features do not function in the
TouchCenter as all key presses are instantaneous.
How to Enter Console Emulation Mode
To access the TouchCenter "Keypad," do the following:
42
Page 43

Advanced System Features (Cont'd)
1. From the "Home" screen, press the SECURITY button. The "Arming" screen
is displayed.
SCREEN ACTION
2. Press the MORE CHOICES button.
The "More Choices" screen is displayed.
3. Press the CONSOLE MODE button on
the "More Choices" screen. The "Keypad"
screen is displayed.
4. Perform functions as you would from a
regular alpha keypad.
43
Page 44

Voice Messages (6271CV Only)
Introduction to Recording and Retrieving Messages
The 6271CV provides the capability of recording voices messages for
others on the premises. The number of messages is not limited
however; the total time of all messages added together cannot exceed
262 seconds.
Note: The voice messages are stored in the memory of the 6271CV.
All messages will be lost if the 6271CV loses power or if it is reset.
Voice messages are recorded and retrieved using the “Message
Center” screen. The below illustration identifies the various areas
and buttons on the “Message Center” screen.
MESSAGE LIST
WINDOW
PLAY MESSAGE
VOLUME
BACKUP ONE
MESSAGE AND
PLAY
ADVANCE ONE
MESSAGE AND
PLAY
RECORD
44
DELETE STOP RECORDING TIME
REMAINING (SECONDS)
Message Center Screen
6271CV-001-V1
Page 45

Voice Messages (Cont'd)
Recording a Voice Message
To record a voice message, do the following:
1. From the "Home" screen, press the Message button. The "Message Center"
screen is displayed.
SCREEN ACTION
2. Press the Record button and record
your message while staying within
approximately one foot of the
TouchCenter and speaking at a normal
voice volume. As you are recording your
message, the remaining time counter
counts down to indicate the total
remaining time available and a “Recording
New Memo…” message is displayed
above the message list window.
3. Press the Stop button when you are
done recording the message. The
message indicator will be flashing and the
message will be listed in the message list
window.
4. To record additional messages, repeat
steps 2 and 3 above or to exit, depress
the BACK or HOME button and the
“Home” screen will be displayed.
45
Page 46

Voice Messages (Cont'd)
Retrieving and Deleting a Voice Message
To retrieve a voice message, do the following:
1. From the "Home" screen, press the MESSAGE button. The "Message
Center" screen is displayed.
SCREEN ACTION
2. Select the message you wish to listen
to by touching it in the message list and
then pressing the Play Message button.
As the message is being played, a “Play
(x): Voice Memo…” message is displayed
above the message list window.
When the end of the message is reached,
the playback will stop.
3. To listen to the next message, press
the Advance One Message and Play
button.
Note: At anytime you may highlight a
message you want to listen to and press
the Play Message button as described in
step 2 above.
4. If you wish to delete messages, press
the Delete button. The “Delete Memo”
screen will be displayed. You can press
the Del Selected button to delete only the
currently selected message and return to
the “Message Center” screen, Del All
button to delete all messages and return
to the “Message Center” screen,
or the Cancel button to return to the
“Message Center” screen without deleting
any messages.
5. To exit, depress the BACK or HOME
button and the “Home” screen will be
displayed.
46
Page 47

Summary of
TouchCenter LED Operation
TouchCenter LED Operation
The TouchCenter has three LEDs labeled - ARMED, READY and
TROUBLE (6271C) or MESSAGE (6271CV). The ARMED LED is red,
READY LED is green and TROUBLE or MESSAGE LED is yellow.
Each LED's on and off state has different meanings as described
below.
LED DESCRIPTION
ARMED ON – Security system is armed.
OFF – Security system is not armed.
READY ON – Security system is disarmed and ready to arm.
OFF – Security system is armed or disarmed but not ready. If
disarmed, faults or troubles are present.
MESSAGE
(6271CV)
TROUBLE
(6271C)
FLASHING – The 6271CV contains new message(s) for the
User
OFF – No new messages.
ON – The Security System has one or more Trouble(s).
OFF – No Trouble.
47
Page 48

TouchCenter Setup
How to Access TouchCenter Setup Options
Setup allows you to make changes to the way your TouchCenter is
operating. The options that can be changed are:
• Adjust the touch screen contrast
• Adjust the TouchCenter sounder volume
• Change the time interval that must pass prior to the TouchCenter
turning off the touch screen backlight
• Change the time interval that must pass prior to the TouchCenter
returning to the “Home” screen
Additionally, you may enter the User Setup screen, Advanced
Setup screen (if enabled by your system installer), or Clean Screen
(maintenance mode) from the "Setup" screen by pressing the
corresponding button.
The “Advanced Setup” button may provide access to additional options
if enabled by your system installer. Ask your system installer to explain
any options accessable with this button.
How to Access Setup
Access the "Setup" features as follows:
1. From the "Home" screen, press the SECURITY button. The "Arming" screen
is displayed.
SCREEN ACTION
2. Press the MORE CHOICES button.
The "More Choices" screen is displayed.
48
Page 49

TouchCenter Setup (Cont'd)
SCREEN ACTION
3. Press the SETUP button on the "More
Choices" screen. The "Setup" screen is
displayed.
49
Page 50

TouchCenter Setup (Cont'd)
How to Adjust the Touch Screen Contrast
You may adjust the touch screen contrast as follows:
If… Then…
you want to increase contrast
you want to decrease contrast
If you have made any changes in the contrast settings, when you exit
this screen you will be presented with a pop-up asking if you want to
remember the new settings.
CONTRAST
SLIDEBAR
INDICATOR
move the slide bar above the current
contrast setting.
move the slide bar below the current
contrast setting.
50
Touch Screen Contrast Control
Page 51

TouchCenter Setup (Cont'd)
How to Adjust the Volume
You may adjust the TouchCenter sounder volume by pressing your
finger on the TouchCenter slide bar associated with the "Volume"
scale and doing the following:
If… Then…
you want to increase volume
you want to decrease volume
If you have made any changes in the volume settings, when you exit
this screen you will be presented with a pop-up asking if you want to
remember the new settings.
VOLUME
SLIDE BAR
INDICATOR
move the slide bar above the current volume
setting..
move the slide bar below the current volume
setting.
TouchCenter Volume Control
51
Page 52

TouchCenter Setup (Cont'd)
How to Select Screen Backlight Off Activation Time
When the TouchCenter is not active, it will automatically turn the
backlight off after the selected backlight off time has expired (unless
“Never” option is selected). To select the screen backlight time, do the
following:
SCREEN ACTION
1. On the "Setup" screen, press the
Backlight Off After: "arrow" button. A
drop-down list displaying the time period
options is displayed.
2. Select the time period option you want
by pressing it. The drop-down list closes
automatically and the selection is
displayed.
Note: Additional options can be viewed
by using the up/down "arrows" to scroll
through the time period options.
52
Page 53

TouchCenter Setup (Cont'd)
SCREEN ACTION
3. Press either the "Home" or "Back"
button. A Settings Changed! pop-up
window is displayed asking “Remember
New Settings?“ Select Yes to save the
change or No to discard the change.
When the Update is complete the
TouchCenter goes to the "Home" screen
or "More Choices" screen depending on
whether you pressed the "Home" or
"Back" button, respectively.
53
Page 54

TouchCenter Setup (Cont'd)
How to Select Homepage After Time
When the TouchCenter is not active, it will automatically return to
the “Home” screen after the selected to To Homepage After time has
expired (unless “Never” option is selected). To select the To
Homepage After time, do the following:
SCREEN ACTION
1. On the "Setup" screen, press the To
Homepage After "arrow" button. A drop-
down list displaying the time period
options is displayed.
2. Select the time period option you want
by pressing it. The drop-down list closes
automatically and the selection is
displayed.
54
Page 55

TouchCenter Setup (Cont'd)
SCREEN ACTION
3. Press either the "Home" or "Back"
button. A Settings Changed! pop-up
window is displayed asking “Remember
New Settings?“ Select Yes to save the
change or No to discard the change.
When the Update is complete the
TouchCenter goes to the "Home" screen
or "More Choices" screen depending on
whether you pressed the "Home" or
"Back" button, respectively.
55
Page 56

TouchCenter Setup (Cont'd)
How to Set the Time and Date
You can set the time and date from the Set Time & Date screen.
Pressing the Time and Date button located at the bottom of the
TouchCenter screen displays the Set Time & Date screen.
• When the time is set it will be stored in the TouchCenter and sent
to the control panel when you press the Apply button and answer
Yes to the following prompt. Additionally, when using the
TouchCenter with a residential panel, the panel will download its
time into the TouchCenter once an hour after the clock is set.
• If Get Time is pressed, the TouchCenter will download the time
and date from the control panel and exit the Set Time & Date
screen. Note: This button appears with residential panels only.
• If DST On (Daylight Savings Time) is selected, the TouchCenter
will adjust for Daylight Savings time at the month, week and
time chosen.
To set the time and date, press the Time and Date button located at
the bottom of the screen and do the following:
SCREEN ACTION
1. On the "Time and Date" screen, press
the Month/Day/Year "arrow" button in the
“Settings” area of the screen. A dropdown list displaying the Month/Day/Year
display formats is displayed.
56
2. Select the display format you want by
pressing it. The drop-down list closes
automatically and the selection is
displayed.
Page 57

TouchCenter Setup (Cont'd)
SCREEN ACTION
3. Select if you want a 12-hour or 24-hour
format for your time display by touching
the circle to the left of the 12 Hour display
in the “Settings” area of the screen. A
check mark in the circle indicates a 12hour display format.
4. Select if you want Daylight Savings
Time to affect your system clock by
pressing the DST button in the “Settings”
area of the screen. The Daylight Savings
Screen will be displayed.
5. Select if you want Daylight Savings
Time to affect your system clock by
touching the circle to the left of the DST
On display. A check mark in the circle
indicates that Daylight Savings Time is
applicable.
6. On the "Daylight Savings" screen,
press the Month "arrow" button in the
“Start DST” area of the screen. A dropdown list displaying the Months is
displayed.
7. Select the month you want by pressing
it. The drop-down list closes automatically
and the selection is displayed.
8. On the "Daylight Savings" screen,
press the Weekend "arrow" button in the
“Start DST” area of the screen. A dropdown list displaying the weeks is
displayed.
9. Select the week you want by pressing
it. The drop-down list closes automatically
and the selection is displayed.
10. On the "Daylight Savings" screen,
press the Month "arrow" button in the
“End DST” area of the screen. A dropdown list displaying the Months is
displayed.
11. Select the month you want by
pressing it. The drop-down list closes
automatically and the selection is
displayed.
57
Page 58

TouchCenter Setup (Cont'd)
SCREEN ACTION
12. On the "Daylight Savings" screen,
press the Weekend "arrow" button in the
“End DST” area of the screen. A dropdown list displaying the weeks is
displayed.
13. Select the week you want by pressing
it. The drop-down list closes automatically
and the selection is displayed.
14. On the "Daylight Savings" screen,
press the "arrow" button to the right of the
time (1 AM or 2 AM) on the screen. A
drop-down list displaying 1 AM and 2AM
is displayed.
15. Select the time you want by pressing
it. The drop-down list closes automatically
and the selection is displayed.
16. Press the APPLY button to save your
Daylight Savings Time setup. The “Time
and Date screen is displayed.
17. On the "Time and Date" screen, press
the Month "arrow" button. A drop-down
list displaying the months is displayed.
18. Select the current month by pressing
it. The drop-down list closes automatically
and the selection is displayed.
58
19. On the "Time and Date" screen, press
the Year that is being displayed. A Year
screen is displayed with the instructions to
Enter 4 digits for the year.
Page 59

TouchCenter Setup (Cont'd)
SCREEN ACTION
20. Enter the four digits for the current
year.
The window closes automatically and the
selection is displayed.
21. Select if it is AM or PM by pressing on
the AM or PM display on the screen. Each
depression switches the AM/PM display.
22. Select the day of the month by
touching the proper day in the display.
The selected date will be highlighted on
the screen.
23. On the "Time and Date" screen, press
the Hour that is being displayed. An hour
screen is displayed with the instructions to
Enter 2 digits for the hour.
24. Enter the two digits for the current
hour.
The window closes automatically and the
selection is displayed.
59
Page 60

TouchCenter Setup (Cont'd)
SCREEN ACTION
25. On the "Time and Date" screen, press
the Minutes that is being displayed. An
minute screen is displayed with the
instructions to Enter 2 digits for the
minutes.
26. Enter the two digits for the current
minute.
The window closes automatically and the
selection is displayed.
27. On the "Time and Date" screen, press
the Apply button. A confirmation screen
is displayed.
60
28. Press the Yes button to save the time
changes in your security system or press
the No button to have the changes affect
the TouchCenter only.
Note: A Yes response is recommended.
Page 61

TouchCenter Operating Modes
Operating Modes (Chime, Voice, and Voice Chime)
Operating modes allows you to turn the TouchCenter chime mode on
or off. Additionally, when using the 6271CV you may also turn the
voice mode on or off. The operating modes provide the following
features:
• Chime Mode – When selected, a request is sent to the alarm panel
requesting that the panel chime the TouchCenter whenever a
change in zone status occurs.
• Voice Mode (6271CV Only) – When selected, a request is sent to
the alarm panel requesting that the panel initiate TouchCenter
voice enunciation whenever a change in system status occurs such
as Armed, Disarmed, or Alarms.
• Voice Chime Mode (6271CV Only) – The chime mode and voice
more are in effect with the chime followed by voice enunciation.
How to Access Operating Modes
Access the "Operating Modes" feature as follows:
1. From the "Home" screen, press the SECURITY button. The "Arming" screen
is displayed.
61
SCREEN ACTION
2. Press the MORE CHOICES button.
The "More Choices" screen is displayed.
Page 62

TouchCenter Operating Modes (cont'd)
SCREEN ACTION
3. Press the OPERATING MODES
button on the "More Choices" screen.
The "User Authorization" screen is
displayed with the instructions "Enter
Authorized Code".
4. Enter your “Master” code. The
"Operating Modes" screen is displayed.
5. Touch the Chime Mode button to turn
the Chime Mode on or off. A checkmark
appears in the button when the Chime
Mode is “ON”. Note that it may take a few
seconds for the Chime Mode to take
effect.
6. (6271CV Only) Touch the Voice Mode
button to turn the Voice Mode on or off. A
checkmark appears in the button with the
Voice Mode is “ON” Note that if the Chime
Mode and Voice Mode are both selected,
the Voice Chime button will automatically
be selected.
Press the “HOME” or “BACK” button after
making your selection. When the
TouchCenter exits the “Operating Modes”
screen, your selection is saved.
62
Page 63

Maintaining Your System
How to Clean your TouchCenter
IMPORTANT: Do not use an abrasive cleaning agent or abrasive
cloth when cleaning your TouchCenter or damage to the TouchCenter
may occur.
The Emergency screen cannot be accessed while running in the clean
screen mode.
Clean the TouchCenter as follows:
1. From the "Home" screen, press the SECURITY button. The "Arming" screen
is displayed.
SCREEN ACTION
2. Press the MORE CHOICES button.
The "More Choices" screen is displayed.
63
3. Press the SETUP button on the "More
Choices" screen. The "Setup" screen is
displayed.
Page 64

Maintaining Your System (cont'd)
SCREEN ACTION
4. Press the CLEAN SCREEN button. A
pop-up window displaying “Touch Screen
will be disabled so that you may wipe
the screen clean. Please use a damp,
soft cloth. DO NOT use any liquids,
sprays, or ammonia-based cleansers.
Press CONTINUE to disable
touchscreen.
When the Continue button is pressed the
“Touch Screen Disabled for => 30
Seconds” message is displayed. During
these 30 seconds the touch screen should
be wiped clean of fingerprints using a mild
soap solution and a soft cloth. When the
counter reaches zero, the window
automatically closes and the touch screen
is active.
Note: Do not spray cleaning agent directly
on the screen, spray it on cloth then wipe
surface area.
Routine Care
• Treat the components of your security system as you would any
other electrical equipment. Do not slam sensor-protected doors or
windows.
• Keep dust from accumulating on the keypad and all protective
sensors, particularly on motion sensors and smoke detectors.
The keypad case and sensors should be carefully dusted with a dry
soft cloth. Do not spray water or any other fluid on the units.
64
Page 65

Glossary
The following terms are used throughout the guide.
Arm/Disarm: “Armed” simply means that the burglary portion of
your system is turned ON and is in a state of readiness. “Disarmed”
means that the burglary system is turned OFF, and must be rearmed
to become operational. However, even in a “disarmed” state,
“emergency” and “fire” portions of your system are still operational.
Bypass: To intentionally leave a specific zone unprotected while the
rest of the system is armed.
Console Emulation: Console Emulation Mode allows you to use a
TouchCenter interface just as you would a regular system keypad.
All commands shown in Console Emulation mode can also be
executed from a standard alpha keypad.
Day/Night Zone: An area of protection whose violation causes a
trouble indication during the disarmed (DAY) mode and an alarm
during the armed (NIGHT) mode.
Delay Zone: An area of protection containing doors most frequently
used to enter or exit (typically, a front door, back door, or door from
the garage into the building). The delay zone allows sufficient time
for authorized entry or exit without causing an alarm. Consult your
installer for the entry and exit delay times that have been set for your
system during installation and record them on the separate sheet
provided in this guide.
Home Screen: The screen that is normally displayed on the
TouchCenter when entries are not being made. The TouchCenter will
return to this screen with the “Home” button is pressed or when an
entry is not received for a pre-set period of time.
Keypad: This is the device through which you operate your system.
It contains numbered pushbuttons similar to those on telephones or
calculators. These keys control the arming or disarming of the
system, and perform other functions that were previously described
in this manual.
Lighting Button: A button on the Home screen that allows you to
control lights or other devises if so programmed by your system
installer.
65
Page 66

Glossary (Cont'd)
Master Code: A 4-digit code that gives users access to all of the
system’s functions, including the ability to program other users in the
system. See also “User Code.
Message Button: A button on the Home screen that allows you to
record and retrieve voice messages. (6271CV Only)
Night: An arming mode for the system. Your system installer set the
type of arming and the zones armed when using this mode.
Partition: An independent group of zones that can be armed and
disarmed without affecting other zones or users.
User Code: A 4-digit code that gives users access to the system’s
basic functions. See also “Master Code.”
Zone: A specific protection point (e.g., door or window).
66
Page 67

NOTES
Page 68

NOTES
Page 69

NOTES
Page 70

NOTES
Page 71

NOTES
Page 72

ONE YEAR LIMITED WARRANTY
Honeywell International Inc., acting through its Security & Custom Electronics business
("Seller"), 2 Corporate Center Drive, Melville, NY 11747, to be free from defects in
materials and work manship for one year from date of original purchase, under normal use
and service. Seller's obligation is limited to repairing or replacing, at its option, free of
charge for parts, labor, or transportation, any product prov en to be defective in materials or
workmanship under normal use and service. Seller shall have no obligation under this
warranty or otherwis e if the product is altered or improperly repaired or serviced by anyone
other than the Seller. In case of defect, contact the security professional who installed and
maintains your security equipment or the Seller for product repair.
This one year Limited Warranty is in lieu of all other ex press warranties, obligations or
liabilities. THERE ARE NO EXPRESS WARRANTIES, WHICH EXTEND BEYOND THE
FACE HEREOF. ANY IMPLIED WARRANTIES, OBLIGATIONS OR LIABILITIES MADE
BY SELLER IN CONNECTION WITH THIS PRODUCT, INCLUDING ANY IMPLIED
WARRANTY OF MERCHANTABILITY, OR FITNESS FOR A PARTICULAR PURPOSE
OR OTHERWISE, ARE LIMITED IN DURATION TO A PERIOD OF ONE YEAR FROM
THE DATE OF ORIGINAL PURCHASE. ANY ACTION FOR BREACH OF ANY
WARRANTY, INCLUDING BUT NOT LIMITED TO ANY IMPLIED WARRANTY OF
MERCHANTABILITY, MUST BE BROUGHT WITHIN 12 MONTHS FROM DATE OF
ORIGINAL PURCHASE. IN NO CASE SHALL SELLER BE LIABLE TO ANYONE FOR
ANY CONSEQUENTIAL OR INCIDENTAL DAMAGES FOR BREACH OF THIS OR ANY
OTHER WARRANTY, EXPRESS OR IMPLIED, OR UPON ANY OTHER BASIS OF
LIABILITY WHATSOEVER, EVEN IF THE LOSS OR DAMAGE IS CAUSED BY THE
SELLER'S OWN NEGLIGENC E OR FAULT. Some states do not allow limitation on how
long an implied warranty lasts or the exclusion or limitation of incidental or consequential
damages, so the above limitation or exclusion may not apply to you.
Seller does not represent that the product may not be compromised or circumvented; that
the product will prev ent any personal injury or property loss by burglary, robbery, fire or otherwise; or that the product will in all cases provide adequate warning or protection. Buyer
understands that a properly installed and maintained alarm may only reduce the risk of a
burglary, robbery, fire or other events occurring without providing an alarm, but it is not
insurance or a guarantee that such will not occur or that there will be no personal injury or
property loss as a result. CONSEQUENTLY, SELLER SHALL HAVE NO LIABILITY FOR
ANY PERSONAL INJURY, PROPERTY DAMAGE OR OTHER LOSS BASED ON A
CLAIM THE PRODUCT FAILED TO GIVE WARNING. HOWEVER, IF SELLER IS HELD
LIABLE, WHETHER DIRECTLY OR INDIRECTLY, FOR ANY LOSS OR DAMAGE
ARISING UNDER THIS LIMITED WARRANTY OR OTHERWISE, REGARDLESS OF
CAUSE OR ORIGIN, SELLER'S MAXIMUM LIABILITY SHALL NOT IN ANY CASE
EXCEED THE PURCHASE PRICE OF THE PRODU CT, WHICH SHALL BE TH E
COMPLETE AND EXCLUSIVE REMEDY AGAINST SELLER. This warranty gives you
specific legal rights, and you may also have other rights which vary from state to state. N o
increase or alteration, written or verbal, to this warranty is authorized.
ÊK6249V1eŠ
K6249V1 6/07 Rev. A
2 Corporate Center Drive, Melville, NY 11747
Copyright © 2007 Honeywell International Inc.
www.honeywell.com/security
 Loading...