

Honeywell 950003 User Manual
Prepare for File Transfer
1. Make sure the remote device has file sharing enabled. It must support the OBEX File Transfer server profile.
Note: If the other device is also using the Bluetooth Connection Kit, you can enable file sharing by tapping the Bluetooth icon. In the pop-up menu, tap Transfer via Bluetooth | Enable File Sharing.
2. Now you are ready to browse the remote device. Tap on the Bluetooth icon. In the pop-up menu, tap Transfer via Bluetooth | Browse Remote Device.
3. If your mobile computer has no devices in the Bluetooth Devices Folder that supports OBEX File Transfer, then it will begin to search for Bluetooth devices nearby.
4. Select the Bluetooth device you wish to browse. If the desired device is not listed, tap Find.
5. Your mobile computer will begin to establish a file sharing connection.
5 - 34 |
Dolphin® 9500/9550 Mobile Computer User’s Guide |

6. After the devices successfully connect, the Bluetooth File Explorer will appear. Half of the screen shows contents of the remote device, while the other half shows contents of your device (the local device). The very bottom of the screen reports the connection status.
Send/Receive File(s) or Folder(s)
1. Select the file(s) or folder(s) that you wish to transfer. You can only select items from one device per transfer session.
Single-tap items to select them for transfer.
Double-tap on a folders to open it and see its contents.
2. |
There are two different ways to initiate the transfer. |
• |
Tap on the File menu. Select Send to remote or Get from remote, as applicable. The inappropriate option should be gray. |
• |
Tap on the Send to remote icon or Get from remote icon, as applicable. The inappropriate icon should be gray. |
3. |
A screen will report the status of the transfer. |
Dolphin® 9500/9550 Mobile Computer User’s Guide |
5 - 35 |
4. After the transfer, a copy of each selected item should appear in the other device.
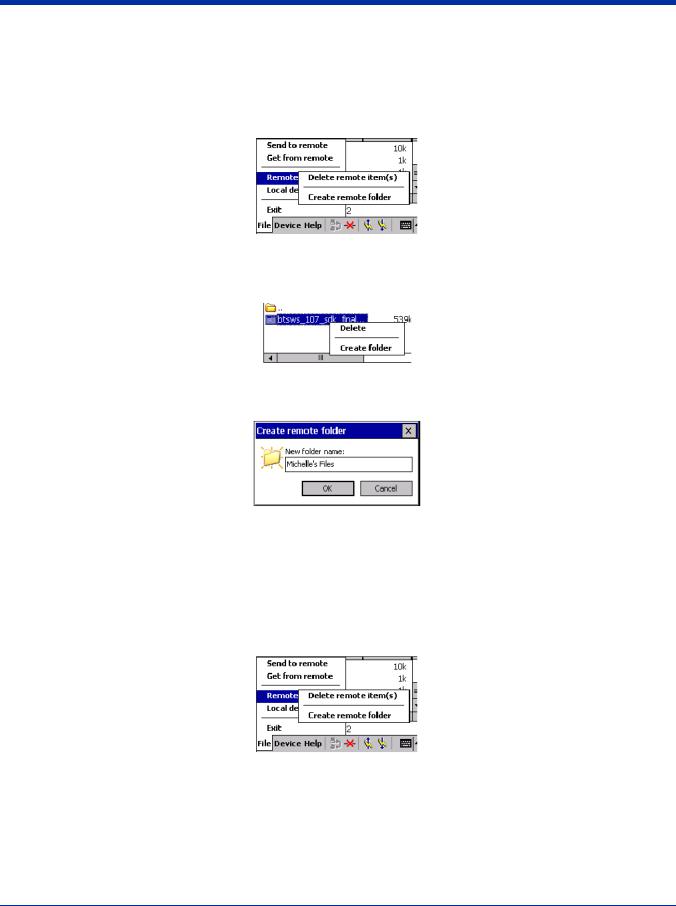
Create a Folder
1.Tap on the File menu. Select Remote device or Local device, wherever you want to create a folder, then tap Create remote folder or Create local folder, as applicable.
2. Alternatively, on the Dolphin 9500/9550, you can tap and hold your stylus on an item in either the remote or local device that you wish to put in a new folder. In the pop-up menu, select Create folder.
3. In the next screen, enter a name for your new folder. Tap OK.
4. The new folder should be listed under the appropriate device.
Delete File(s) or Folder(s)
1.Select item(s) that you wish to delete. You can only delete item(s) from one device at a time.
2.Tap on the File menu. Select Remote device or Local device, wherever the item(s) are located, then tap Delete remote item(s) or Delete local item(s), as applicable.
5 - 36 |
Dolphin® 9500/9550 Mobile Computer User’s Guide |
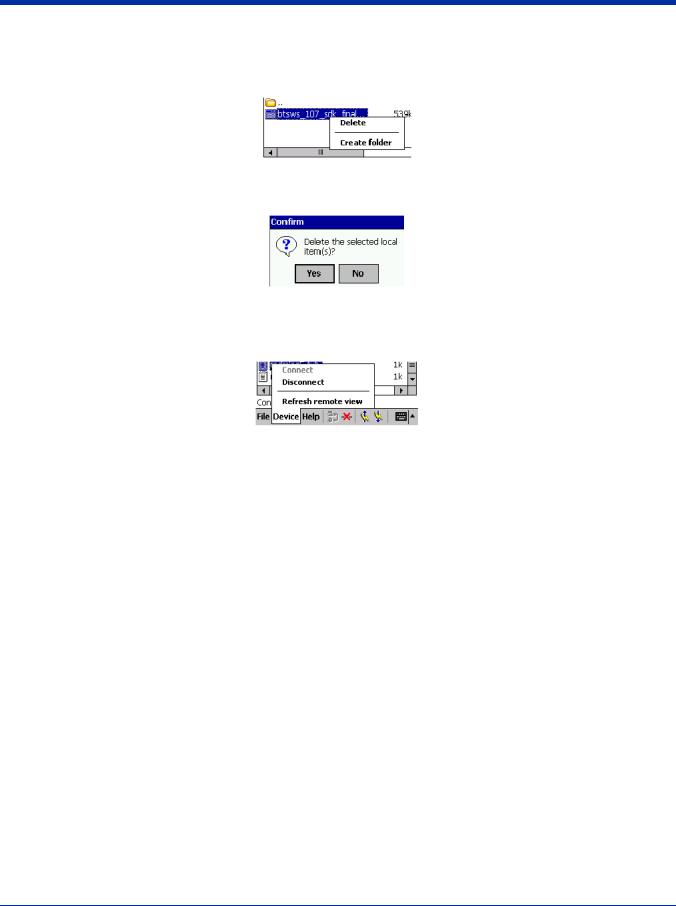
3. Tap and hold your stylus an item in either the remote or local device that you wish to put in a new folder. In the pop-up menu, select Delete folder.
4. In the Confirm screen, tap Yes.
Refresh Remote View
1. Tap on the Device menu. Select Refresh remote view.
2.Your local device will begin to read the contents of the remote device.
3.After a few seconds, the view of the contents of the remote device will be refreshed.
Connect/Disconnect
To connect to the remote device, do the following:
1.Make sure the remote device has file sharing enabled.
2.Start the connection process by either of two methods:
•·Tap on the Device menu. Select Connect.
•·Tap on the Connect icon.
3. In the next screen, select the device you wish to connect to. Tap Select. Your mobile computer will attempt to connect to the device selected.
To disconnect from the remote device, do the following:
1. Start the disconnection process by either of two methods:
•Tap on the Device menu. Select Disconnect.
•Tap on the Connect icon.
2. Your mobile computer will disconnect from the remote device. Afterwards, no contents will be listed for the remote device.
Dolphin® 9500/9550 Mobile Computer User’s Guide |
5 - 37 |
Exit Bluetooth File Explorer
To exit the Bluetooth File Explorer, tap File | Exit.
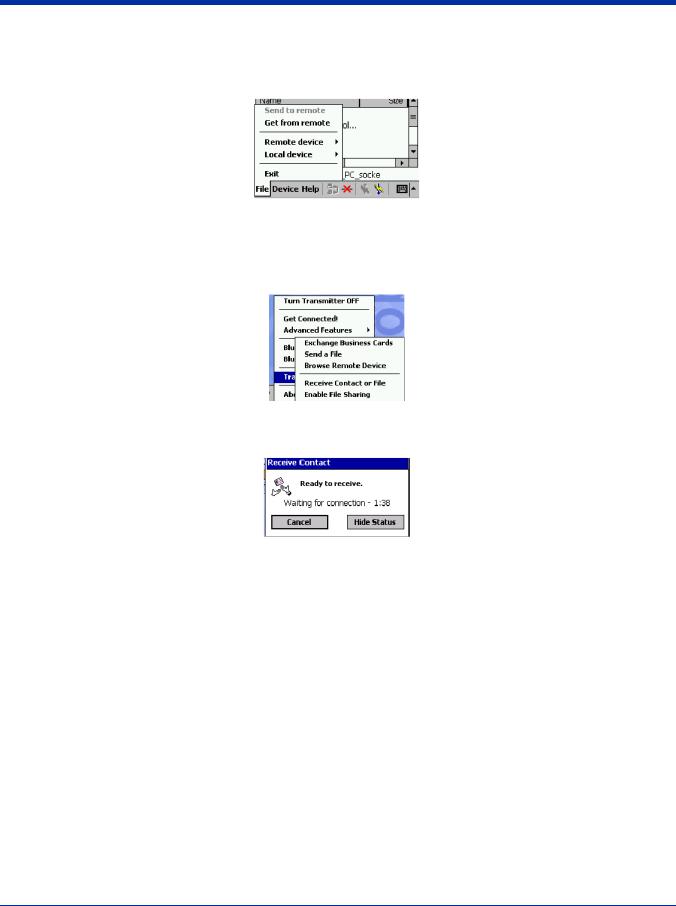
Receive Contact or File
1. Tap on the Bluetooth icon. In the pop-up menu, tap Transfer via Bluetooth | Receive Contact or File.
2. The Receive Contact or File status screen will appear. Your mobile computer will wait two minutes for the contact or file.
3.After successfully connecting to the remote device, the screen will report Connected then disappear. The new contact or file should now be on your device.
4.If two minutes passes before you receive the item, tap Wait Again.
5.After you receive the file or contact, the "Receive Contact or File" feature is automatically disabled.
5 - 38 |
Dolphin® 9500/9550 Mobile Computer User’s Guide |
Enable File Sharing
1.Tap on the Bluetooth icon. In the pop-up menu, tap Transfer via Bluetooth | Enable File Sharing.
2.The Enable File Sharing status screen will appear. Your mobile computer will wait two minutes for the remote device to connect.
3.After successfully connecting to the remote device, the screen will report Connected.
4.If two minutes passes before you connect, tap Wait Again.
5.File sharing will be enabled until you end it by tapping Cancel.
The Dialer
This section explains how to assign a dialing prefix and use the Dialer to dial a number directly from your Contacts list. The Dialer makes it quick and easy to perform dial-up networking.
If you have not done so already, be sure to run the Dialer Installer from the Bluetooth Card Installation CD. While installing the program, you can also assign the dialing prefix.
Note: The Dialer has been verified to work with Nokia and Ericsson phones and is known not to work with the Motorola 270c, NTT Docomo Paldio 633S or Sony au C413S phone. Results may vary with other phones that are not listed as being supported by the Bluetooth system.
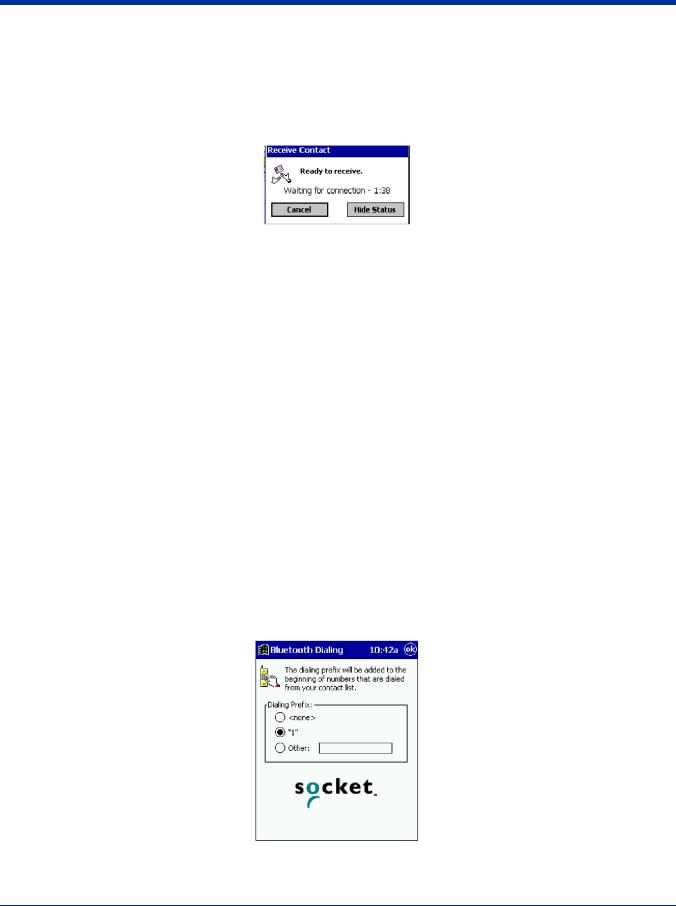
Assign a Dialing Prefix
If you have not already assigned a dialing prefix during the install process, you can do so by following these steps:
1.Go to Start | Settings | System. Tap on Dialer.
2.Select the appropriate Dialing Prefix, then tap ok.
Dolphin® 9500/9550 Mobile Computer User’s Guide |
5 - 39 |

Use the Dialer
1.To use the dialer, the mobile computer must already be connected to the Bluetooth phone. You can use the Get Connected! Wizard to do this. Also, the Bluetooth phone must be selected as your favorite.
2.Go to Start | Contacts.
3.Tap and hold your stylus on the contact you wish to dial to. In the pop-up menu, select Dial Contact. Alternatively, you can tap on Tools and select Dial Contact.
4. If you have multiple phone numbers for a contact, a screen will appear listing them, including any dialing prefix you may have assigned. Select the phone number you wish to dial.
5. Your mobile computer will connect to your phone and begin dialing.
Note: The Dialer can dial a phone number containing any of the 17 following non-numeric characters:
* # + . / ! @ - \ space A B C D T P W
5 - 40 |
Dolphin® 9500/9550 Mobile Computer User’s Guide |
Additionally, the following string can be included in a phone number:
(',')
The Dialer can not dial a phone number containing non-numeric characters other than those listed above.
HHP recommends that you follow the standard Microsoft Outlook format for phone numbers.
Get Connected Wizard
The Get Connected! Wizard guides you through a one-time setup process that prepares the mobile computer and phone for Bluetooth connections. The wizard varies depending on what phone you want to connect to.
Ericsson, Nokia 6210, NTT DoCoMo, Sony Phones
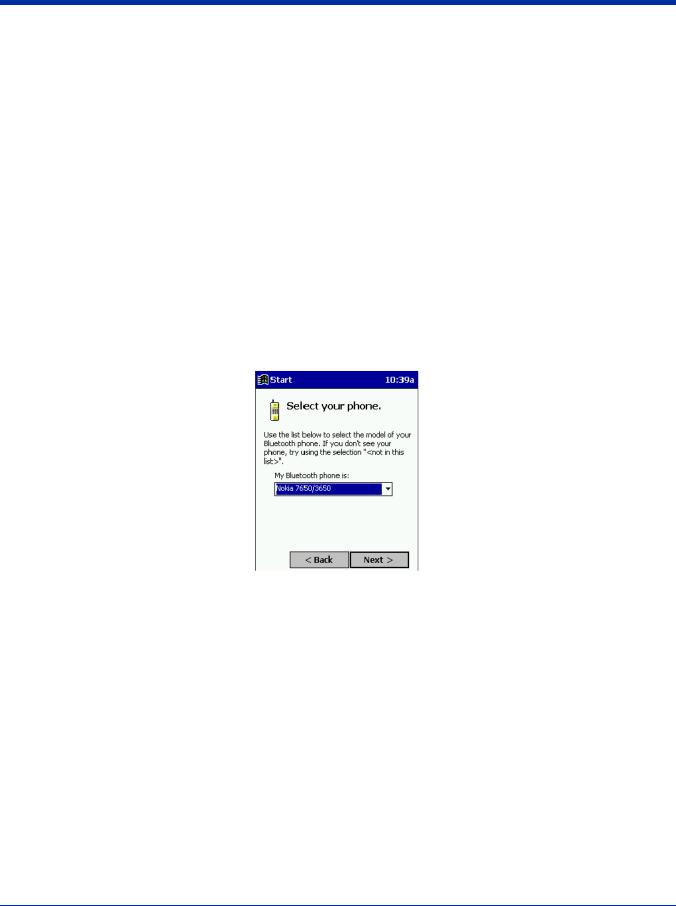
1.Tap on the Bluetooth task tray icon. In the pop-up menu, select Get Connected!
2.Follow the Bluetooth "Get Connected!" Wizard. In the second screen, use the drop-down list to select your Bluetooth phone. The wizard will provide tailored instructions based on your selection.
3. Follow the next screen(s) to prepare your specific phone for Bluetooth connections. You may need to do 1, 2 or all of the following steps:
a.Naming your Bluetooth phone
b.Setting your Bluetooth phone in Discoverable mode
c.Preparing your Bluetooth passkey.
Dolphin® 9500/9550 Mobile Computer User’s Guide |
5 - 41 |
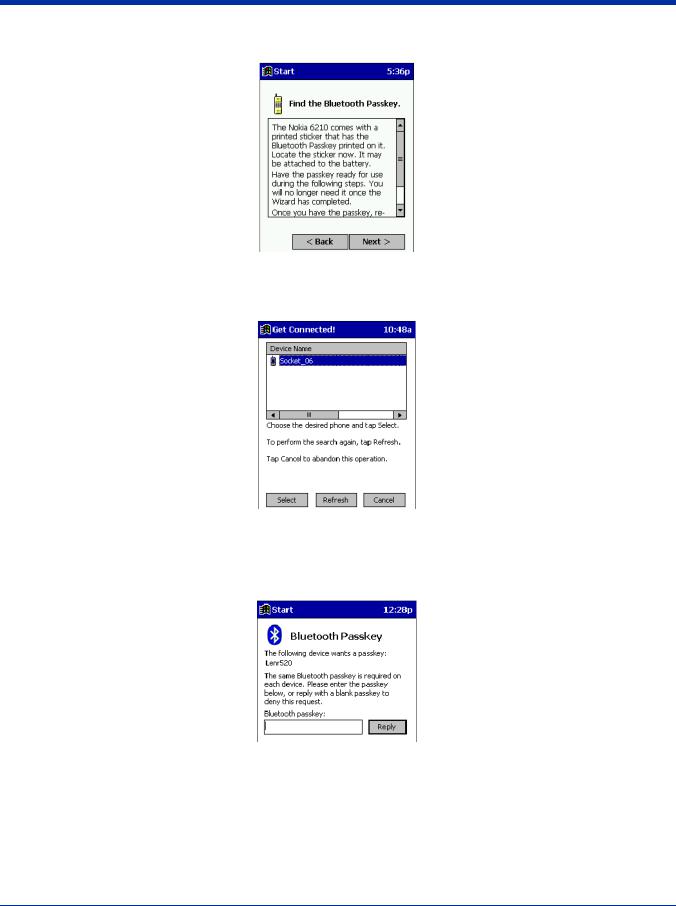
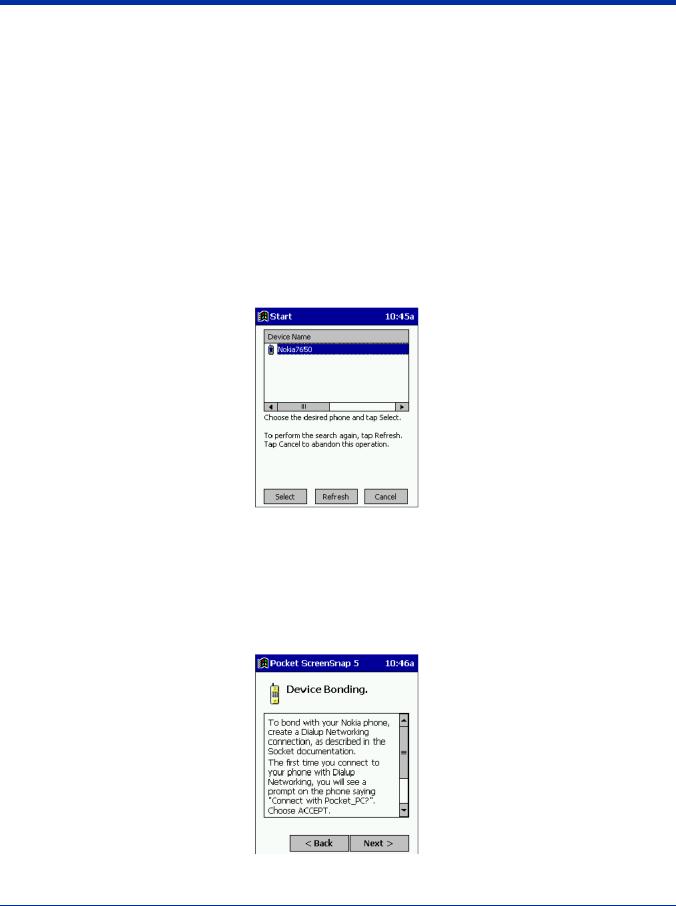
4. When the search is complete, a list of the discovered Bluetooth phones will appear. Choose the phone you wish to connect to, and tap Select. A service discovery phase will begin, about 5-10 seconds.
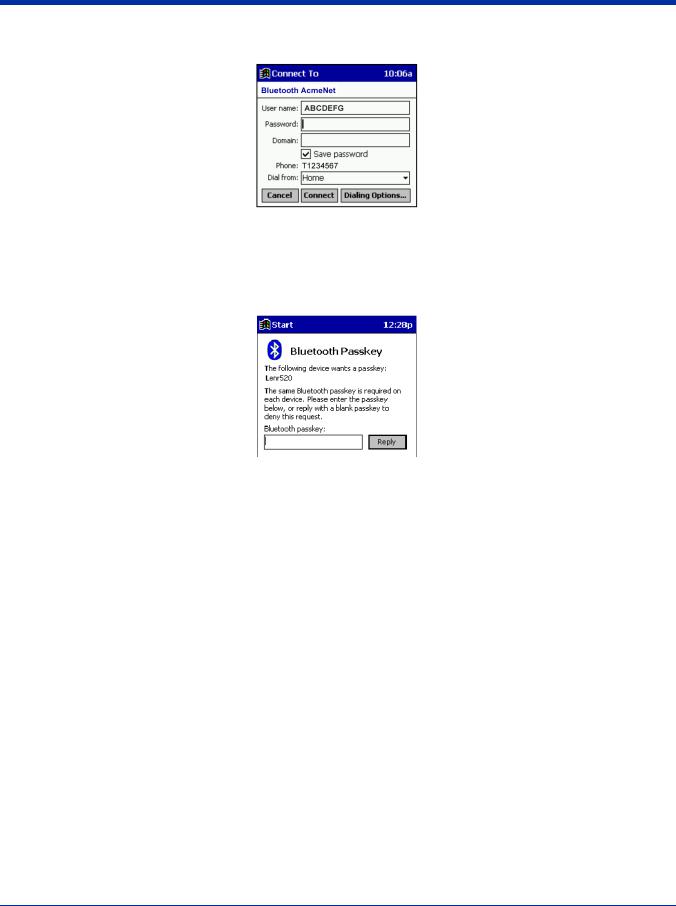
5.As prompted in the next screen, prepare your phone for bonding. For instructions on setting your phone to "Bondable" or "Pairable" mode, refer to your phone manual. Have your passkey ready, then tap Next>.
6.In the next screen, enter the passkey. Tap Reply.
7. The mobile phone may then either automatically accept the passkey or ask you to enter one. If prompted for a passkey, use the same one you entered on the mobile computer.
Ericsson T68/T68i only: When the phone asks you if you want to bond, select 2: Add to paired devices. Do not tap ACCEPT.
8. Tap Finish. After successfully connecting, the phone will appear in the Bluetooth Devices folder. In the Today screen, the Bluetooth icon will also blink. You will not need to run the Get Connected! Wizard again unless you plan to switch between different phones.
5 - 42 |
Dolphin® 9500/9550 Mobile Computer User’s Guide |
Note: You may also switch between different phones by assigning a new "favorite phone" in the Bluetooth Devices folder.
Motorola Timeport 270C, Nokia 3650/6310/7650/8910/8910i
1.Tap on the Bluetooth task tray icon  . In the pop-up menu, select Get Connected!
2.Follow the Bluetooth "Get Connected!" Wizard. In the second screen, use the drop-down list to select your Bluetooth phone. The wizard will provide tailored instructions for your phone.
Note: The screens below are for the Nokia 7650.
3.As directed in the next two screens, assign the phone a unique name and set the phone in Discoverable mode. Then tap Next>.
4.The mobile computer will begin to search for the phone. When the search is over, a list of the discovered Bluetooth phones will appear.
Choose the phone you wish to connect to, and tap Select. A service discovery phase will begin, about 5-10 seconds.
5. The next two screens describe procedures you can only complete outside of the wizard. Read through each screen but do not complete the described procedures until you exit the wizard. Directions for these procedures are provided in STEP 7: Dial-up to Your Network, starting on the next page. The two procedures are:
Bonding with your phone - This must be completed in order to complete the Bluetooth connection and involves dial-up networking.
Dolphin® 9500/9550 Mobile Computer User’s Guide |
5 - 43 |
Automatic Connections - This procedure is optional but will make future Bluetooth connections more convenient.
6. Continue to the last screen of the wizard and tap Finish. Now proceed to STEP 6 to complete the bonding process and, if desired, set up automatic connections.
Dial-up to Your Network
Complete the following steps to create a new Bluetooth connection. Before setting up dial-up networking, prepare yourself with dial-up information and other necessary settings for your office network or ISP.
1.Go to Start | Settings | Connections. Tap on the Connections icon. In the top field, select Internet Settings. Tap Modify… In the next screen, tap New…
5 - 44 |
Dolphin® 9500/9550 Mobile Computer User’s Guide |
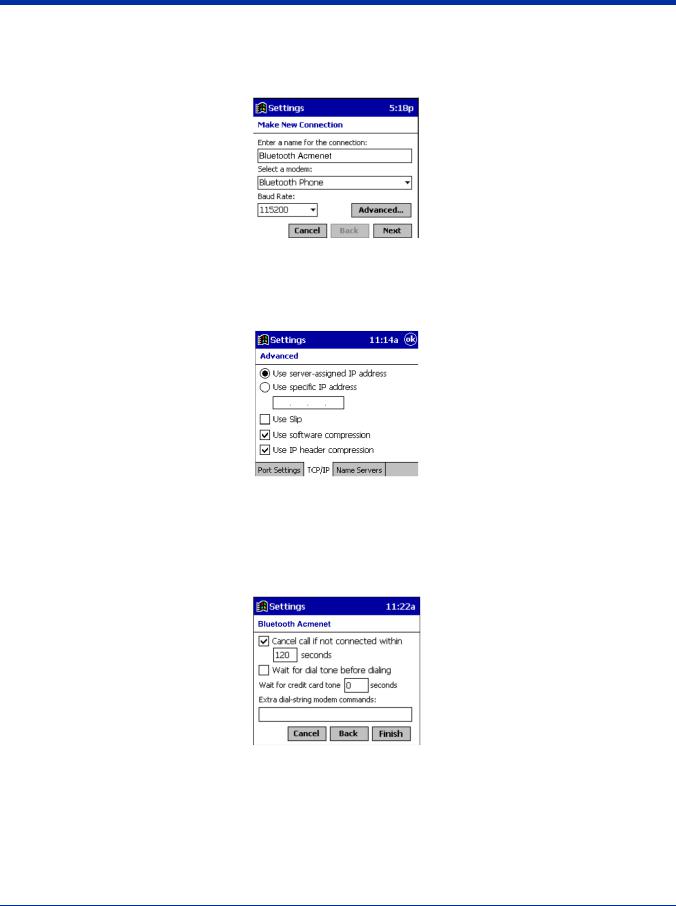
2. In the next screen, enter a name for the dial-up connection. For the modem, select Bluetooth Phone. For the Baud Rate, select 115200. Tap Advanced…
Note: Remember what you name the connection. You will need it when you start the connection.
3. The Port Settings screen will appear. If needed, tap on the TCP/IP and/or Name Servers screens to enter any necessary settings for your office network or ISP. Tap ok.
4.Tap Next.
5.In the Phone number field, enter the dial-up number. Tap Next.
6.Uncheck Wait for dial tone before dialing. Tap Finish.
7. Now you are ready to start the connection. In the Connections screen, under Internet Settings, tap Connect. In Network Log On, verify the dialing settings. Tap OK.
Dolphin® 9500/9550 Mobile Computer User’s Guide |
5 - 45 |
8. ONLY FOR MOTOROLA TIMEPORT 270C OR NOKIA 3650/6310/7650/8910/8910i:
a)After you tap Connect for the first time, the phone will display a message asking if you want to bond. On Motorola, enter GRANT; on Nokia, enter ACCEPT.
b)Make up a 4-16 digit passkey, enter it on the phone, then enter it on the Pocket PC.
Note: The Bluetooth icon on the Today screen will blink to indicate a connection.
c) After successfully bonding, you can set up the phone to automatically connect to your Dolphin 9500/9550 without requiring a passkey.
Automatic Connections for Motorola Timeport 270C:
•On the phone, press MENU.
•Scroll to Settings, then press SELECT.
•Scroll to Connection, then press ON.
•On Bluetooth Link, press SELECT.
•Scroll to Devices, then press SELECT.
•Choose your mobile computer, then press EDIT.
•Scroll to Access:Ask, then press CHANGE.
•Scroll to Automatic, then press SELECT. Press DONE.
Automatic Connections for Nokia 3650/7650:
•On the phone, press MENU.
•Scroll to Connectivity, then press Options.
•The Open option should be highlighted. Press Select.
•The Bluetooth option should be highlighted. Press Options.
•The Open option should be highlighted. Press Select.
•Scroll to the right tab to access the Paired devices list. Highlight your mobile computer, then press Options.
•Scroll to Set as authorized, then press Select.
•In the confirmation screen, press Yes.
Automatic Connections for Nokia 6310/8910/8910i:
• On the phone, press MENU.
5 - 46 |
Dolphin® 9500/9550 Mobile Computer User’s Guide |

•Scroll to 10 Bluetooth, then press SELECT.
•Scroll to 4 View Paired Devices, then press SELECT.
•Highlight the Pocket PC, then press OPTIONS.
•Scroll to 3 Request Connection Authorization, then press NO.
9. To use a different Bluetooth phone for dial-up networking, you can use the same connection setup, but you must make the new phone your favorite. Just run the Get Connected! Wizard again, select the new phone, and make it your new Favorite when prompted.
Alternatively, you can use the Bluetooth Devices folder to change your favorite phone. Refer to for instructions.
Dolphin® 9500/9550 Mobile Computer User’s Guide |
5 - 47 |

5 - 48 |
Dolphin® 9500/9550 Mobile Computer User’s Guide |

6
Customizing Your Dolphin 9500/9550
You can customize your Dolphin 9500/9550 mobile by adjusting device settings and installing additional software.
Adjusting Settings
You can adjust device settings to suit the way you work. To see available options, tap Start, Settings, then the Personal or System tab located at the bottom of the screen.
You might want to adjust the following:
•Clock, to change the time or to set alarms
•Menus, to customize what appears on the Start menu, and to enable a pop-up menu from the New button
•Owner Information, to enter your contact information
•Password, to limit access to your device
•Power, to maximize battery life
•Today, to customize the look and the information that is displayed on the Today screen
Adding Programs
Programs added to your device at the factory are stored in ROM (read-only memory). You cannot remove this software, and you’ll never accidentally lose ROM contents. ROM programs can be updated using special installation programs with a *.xip extension. All other programs and data files added to your device after factory installation are stored in RAM (random access memory).
You can install any program created for your device, as long as your device has enough memory. The most popular place to find software for your device is on the Pocket PC Web site (http://www.microsoft.com/mobile/pocketpc).
To add programs using ActiveSync
You’ll need to install the appropriate software for your device on your desktop computer before installing it on your device.
1.Determine your device and processor type so that you know which version of the software to install. Tap Start and then Settings. On the System tab, tap About. In the Version tab, make a note of the information in Processor.
2.Download the program to your desktop computer (or insert the CD or disk that contains the program into your desktop computer). You may see a single *.xip, *.exe, or *.zip file, a Setup.exe file, or several versions of files for different device types and processors. Be sure to select the program designed for the Pocket PC and your device processor type.
3.Read any installation instructions, Read Me files, or documentation that comes with the program. Many programs provide special installation instructions.
4.Connect your device and desktop computer.
5.Double-click the *.exe file.
If the file is an installer, the installation wizard will begin. Follow the directions on the screen. Once the software has been installed on your desktop computer, the installer will automatically transfer the software to your device.
If the file is not an installer, you will see an error message stating that the program is valid but it is designed for a different type of computer. You will need to move this file to your device. If you cannot find any installation instructions for the program in the Read Me file or documentation, use ActiveSync Explore to copy the program file to the Program Files folder on your device. For more information on copying files using ActiveSync, see ActiveSync Help.
Once installation is complete, tap Start, Programs, and then the program icon to switch to it.
To add a program directly from the Internet
1.Determine your device and processor type so that you know which version of the software to install. Tap Start and then Settings. On the System tab, tap About. In the Version tab, make a note of the information in Processor.
2.Download the program to your device straight from the Internet using Pocket Internet Explorer. You may see a single *.xip, *.exe or *.zip file, a Setup.exe file, or several versions of files for different device types and processors. Be sure to select the program designed for the Pocket PC and your device processor type.
3.Read any installation instructions, Read Me files, or documentation that comes with the program. Many programs provide special installation instructions.
Dolphin® 9500/9550 Mobile Computer User’s Guide |
6 - 1 |

4. Tap the file, such as a *.xip or *.exe file. The installation wizard will begin. Follow the directions on the screen.
Adding a Program to the Start Menu
Tap Start, Settings, Menus, the Start Menu tab, and then the check box for the program. If you do not see the program listed, you can either use File Explorer on the device to move the program to the Start Menu folder, or use ActiveSync on the desktop computer to create a shortcut to the program and place the shortcut in the Start Menu folder.
Using File Explorer on the Dolphin 9500/9550
1.Tap Start, Programs, File Explorer, and locate the program (tap the folder list, labeled My Documents by default, and then My Device to see a list of all folders on the device).
2.Tap and hold the program and tap Cut on the pop-up menu.
3.Open the Start Menu folder located in the Windows folder, tap and hold a blank area of the window, and tap Paste on the pop-up menu.
4.The program will now appear on the Start menu.
For more information on using File Explorer, see “Find and Organize Information,” on page.
Using ActiveSync on the desktop computer: Use the Explorer in ActiveSync to explore your device files and locate the program. Right-click the program, and then click Create Shortcut. Move the shortcut to the Start Menu folder in the Windows folder. The shortcut now appears on the Start menu. For more information, see ActiveSync Help.
Removing Programs
Tap Start and then Settings. On the System tab, tap Remove Programs.
If the program does not appear in the list of installed programs, use File Explorer on your device to locate the program, tap and hold the program, and then tap Delete on the pop-up menu.
6 - 2 |
Dolphin® 9500/9550 Mobile Computer User’s Guide |
7
Applications
Microsoft Pocket Outlook includes Calendar, Contacts, Tasks, Inbox, and Notes. You can use these programs individually or together. For example, e-mail addresses stored in Contacts can be used to address e-mail messages in Inbox.
Using ActiveSync , you can synchronize information in Microsoft Outlook or Microsoft Exchange on your desktop computer with your device. You can also synchronize this information directly with a Microsoft Exchange server. Each time you synchronize, ActiveSync compares the changes you made on your device and desktop computer or server and updates both computers with the latest information. For information on using ActiveSync, see ActiveSync Help on the desktop computer.
You can switch to any of these programs by tapping them on the Start menu.
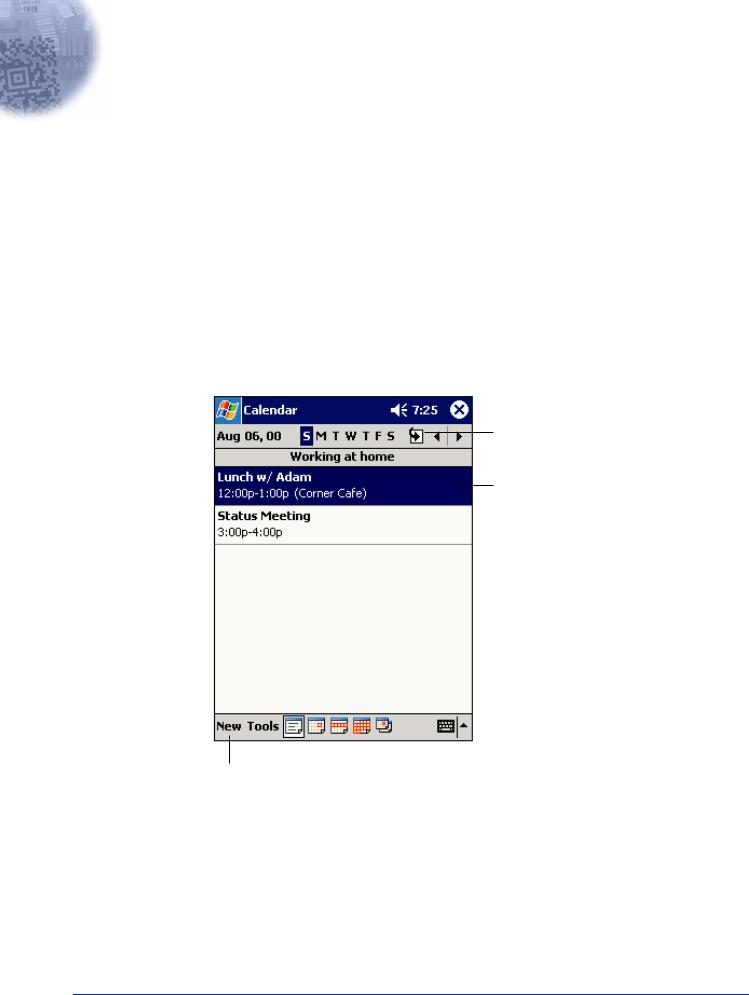
Calendar: Scheduling Appointments and Meetings
Use Calendar to schedule appointments, including meetings and other events. You can check your appointments in one of several views (Agenda, Day, Week, Month, and Year) and easily switch views by using the View menu.
Tap to go to today.
Tap to display or edit the appointment details.
Tap to create a new appointment.
Calendar Application
Note: You can customize the Calendar display, such as changing the first day of the week, by tapping Options on the Tools menu.
Dolphin® 9500/9550 Mobile Computer User’s Guide |
7 - 1 |
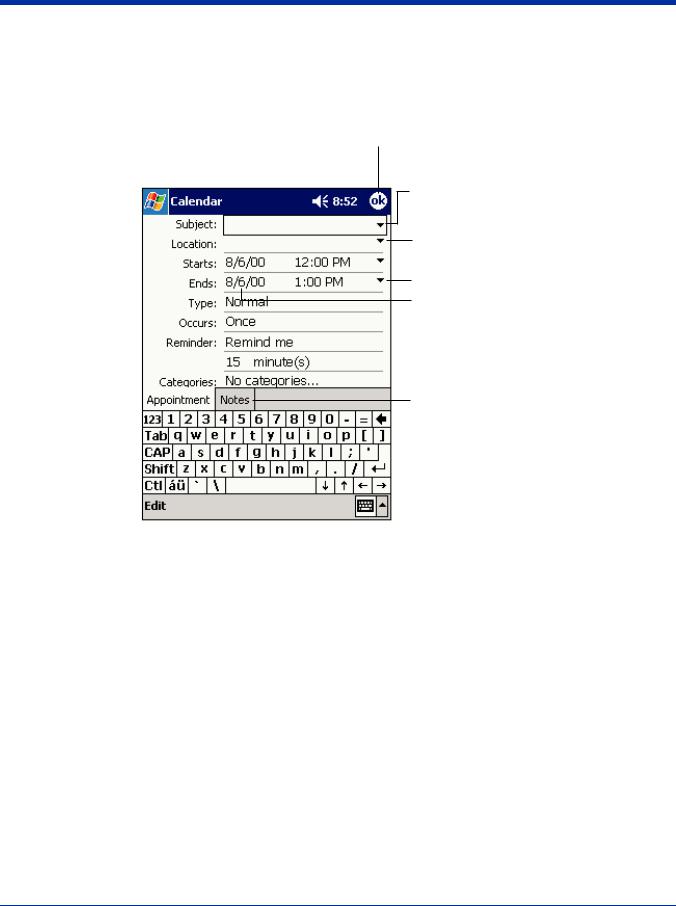
To create an appointment:
1.If you are in Day or Week view, tap the desired date and time for the appointment.
2.Tap New.
3.Using the input panel, enter a description and a location. Tap first to select the field.
Tap to return to the calendar (the appointment is saved automatically).
Tap to choose from predefined text.
Tap to choose from previously entered locations.
Tap to select a time.
Tap to select a date.
Notes is a good place for maps and directions.
Entering an Appointment
4.If needed, tap the date and time to change them.
5.Enter other desired information. You will need to hide the input panel to see all available fields.
6.To add notes, tap the Notes tab. You can enter text, draw, or create a recording. For more information on creating notes, refer to Notes on page 7-10.
7.When finished, tap OK to return to the calendar.
Note: If you select Remind me in an appointment, your device will remind you according to the options set in Start, Settings,
Personal tab, Sounds & Reminders.
7 - 2 |
Dolphin® 9500/9550 Mobile Computer User’s Guide |
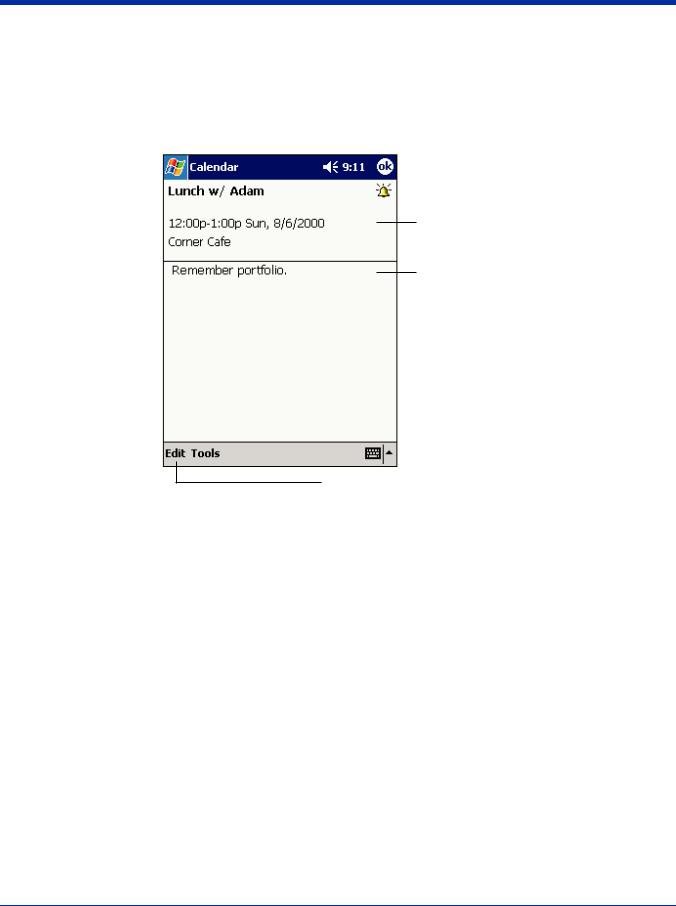
Using the Summary Screen
When you tap an appointment in Calendar, a summary screen is displayed. To change the appointment, tap Edit.
View appointment details.
View.
Tap to change appointment.
Appointment Summary Screen
Creating Meeting Requests
You can use Calendar to set up meetings with users of Outlook or Pocket Outlook. The meeting request will be created automatically and sent either when you synchronize Inbox or when you connect to your e-mail server. Indicate how you want meeting requests sent by tapping Tools and then Options. If you send and receive e-mail messages through ActiveSync, select
ActiveSync.
To schedule a meeting:
1.Create an appointment.
2.In the appointment details, hide the input panel, and then tap Attendees.
3.From the list of e-mail addresses you’ve entered in Contacts, select the meeting attendees.
The meeting notice is created automatically and placed in the Outbox folder.
For more information on sending and receiving meeting requests, see Calendar Help and Inbox Help on the device.
Dolphin® 9500/9550 Mobile Computer User’s Guide |
7 - 3 |
Contacts
Contacts maintains a list of your friends and colleagues so that you can easily find the information you’re looking for, whether you’re at home or on the road. Using the device infrared (IR) port, you can quickly share Contacts information with other device users.
Select the category of contacts you want displayed in the list.
Tap and enter part of a name to quickly find it in the list.
Tap to see additional phone numbers and e-mail addresses.
Tap to display or edit the contact details.
Tap and hold to display
a pop-up menu of actions.
Tap to create a new contact.
Contact Application
Note: To change the way information is displayed in the list, tap Tools and then Options.
7 - 4 |
Dolphin® 9500/9550 Mobile Computer User’s Guide |
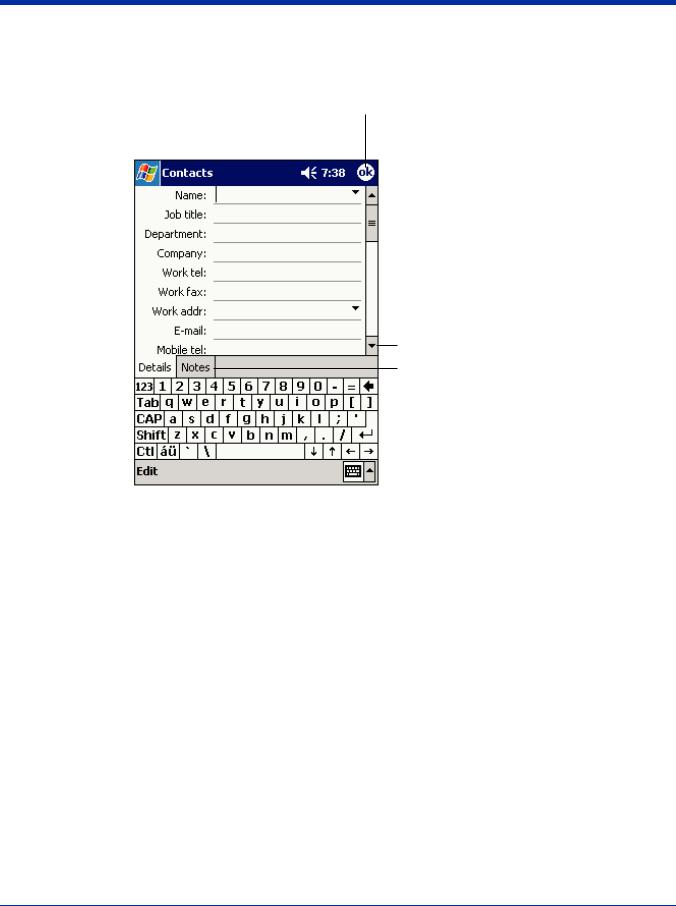
To create a contact:
1. Tap New.
Tap to return to the contact list (the contact is saved automatically).
Scroll to see more fields.
Notes is a good place for maps and directions.
Creating a Contact
2.Using the input panel, enter a name and other contact information. You will need to scroll down to see all available fields.
3.To assign the contact to a category, scroll to and tap Categories and select a category from the list. In the contact list, you can display contacts by category.
4.To add notes, tap the Notes tab. You can enter text, draw, or create a recording. For more information on creating notes, refer to Notes on page 7-10.
5.When finished, tap OK to return to the contact list.
There are four ways to find a contact:
•In the contact list, enter a contact name in the box under the navigation bar. To show all contacts again, clear text from the box or tap the button to the right of the box.
•In the contact list, tap the category list (labeled All Contacts by default) and select the type of contact that you want displayed. To show all contacts again, select All Contacts. To view a contact not assigned to a category, select None.
•To view the names of companies your contacts work for, in the contact list, tap View > By Company. The number of contacts that work for that company will be displayed to the right of the company name.
•Tap 
 , Find, enter the contact name, select Contacts for the type, and then tap Go.
Using the Summary Screen
When you tap a contact in the contact list, a summary screen is displayed. To change the contact information, tap Edit.
Dolphin® 9500/9550 Mobile Computer User’s Guide |
7 - 5 |
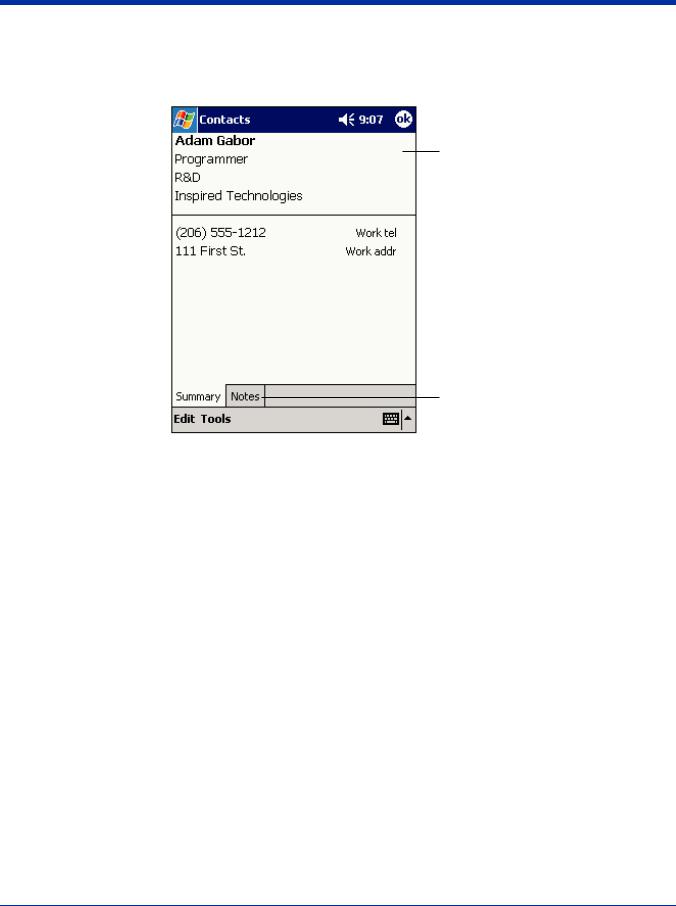
View contact details.
Tap to view notes.
 Tap to change contact information.
Contacts Summary Screen
7 - 6 |
Dolphin® 9500/9550 Mobile Computer User’s Guide |
Tasks
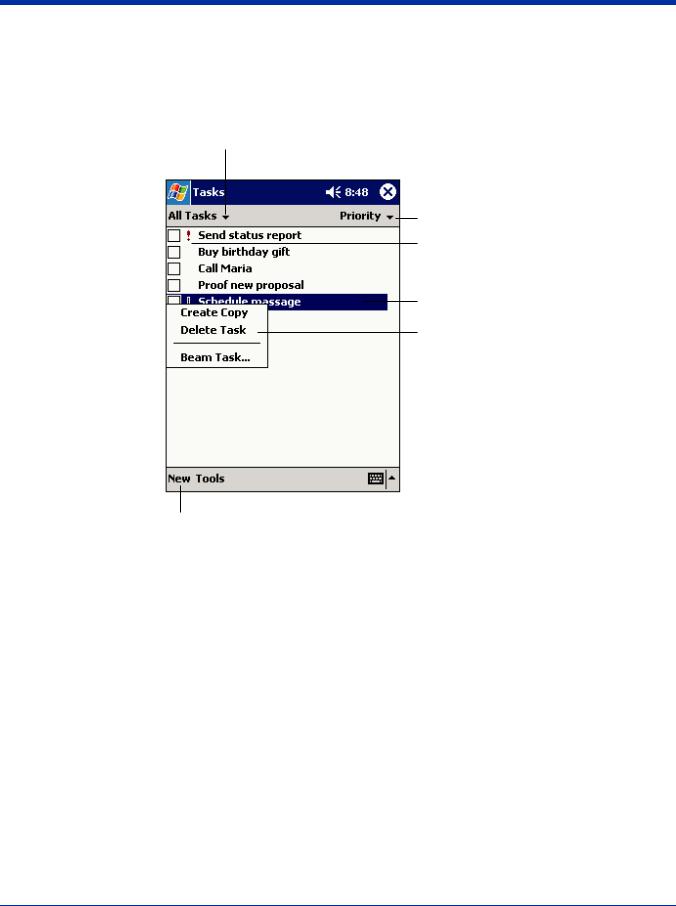
Use Tasks to keep track of what you have to do.
Select the category of tasks you want displayed in the list.
Select the sort order of the list.
Indicates high priority.
Tap to display or edit the task details.
Tap and hold to display
a pop-up menu of actions.
Tap to create a new task.
Task Application
Note: To change the way information is displayed in the list, tap Tools and then Options.
Dolphin® 9500/9550 Mobile Computer User’s Guide |
7 - 7 |
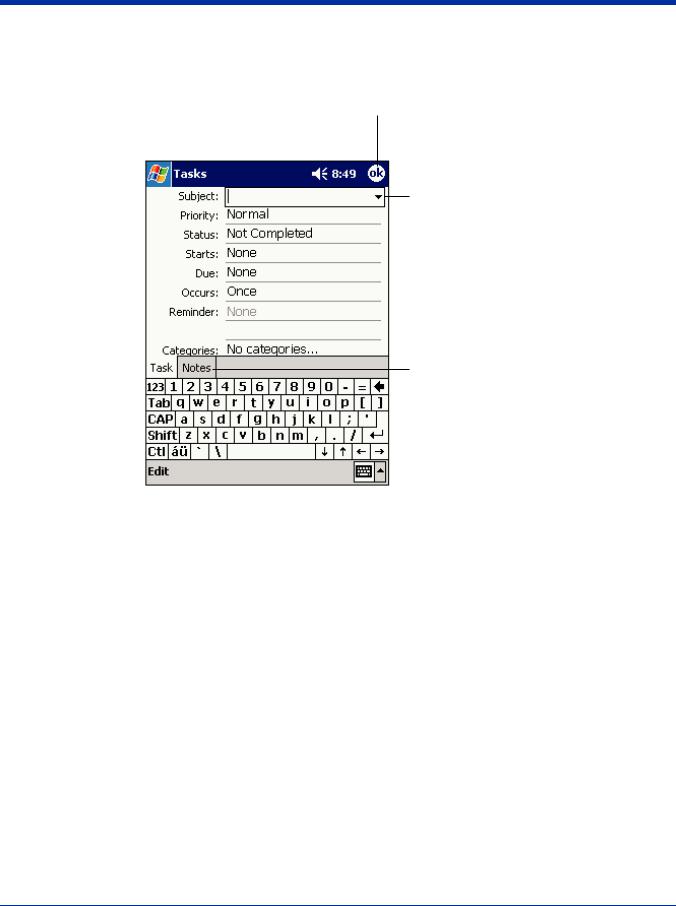
To create a task:
1. Tap New.
Tap to return to the task list (the task is saved automatically).
Tap to choose from predefined subjects.
Notes is a good place for maps and drawings.
Creating a Task
2.Using the input panel, enter a description.
3.You can enter a start date and due date or enter other information by first tapping the field. If the input panel is open, you will need to hide it to see all available fields.
4.To assign the task to a category, tap Categories and select a category from the list. In the task list, you can display tasks by category.
5.To add notes, tap the Notes tab. You can enter text, draw, or create a recording. For more information on creating notes, refer to Notes on page 7-10.
6.When finished, tap OK to return to the task list.
Note: To quickly create a task with only a subject, tap Entry Bar on the Tools menu. Then, tap Tap here to add a new task and enter your task information.
7 - 8 |
Dolphin® 9500/9550 Mobile Computer User’s Guide |
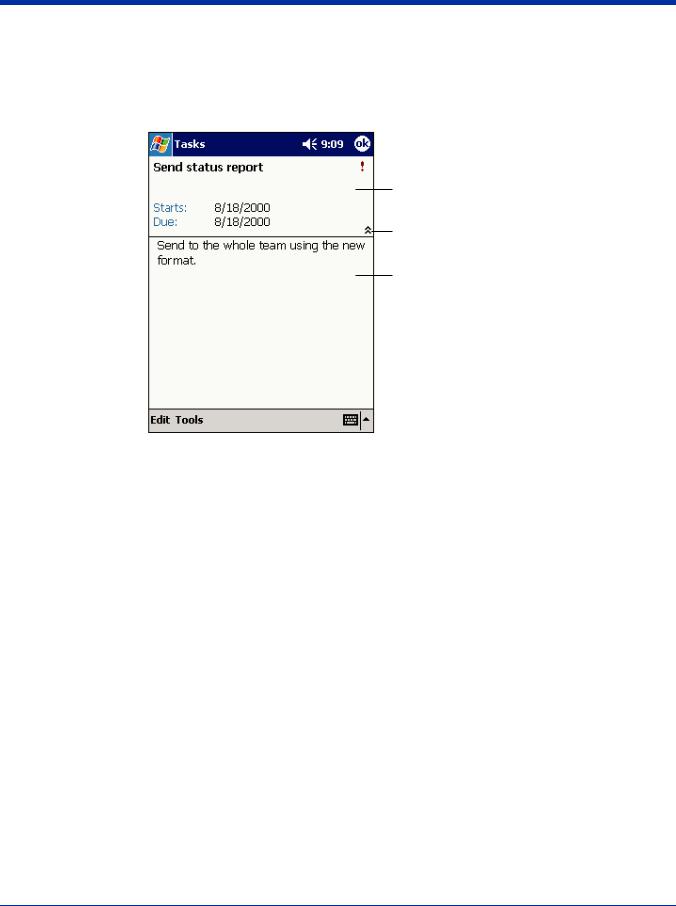
Using the Summary Screen
When you tap a task in the task list, a summary screen is displayed. To change the task, tap Edit.
View task details.
Tap to show and hide additional summary information.
View notes.
 Tap to change task.
Task Summary Screen
Dolphin® 9500/9550 Mobile Computer User’s Guide |
7 - 9 |
 Loading...