

Page 1

3820, 3820i, 4820, 4820i
Cordless Imaging Systems
Quick Start Guide
Page 2
Note: Refer to your user’s guide for information
about cleaning your device.
For localized language versions of this document,
go to www.honeywell.com/aidc.
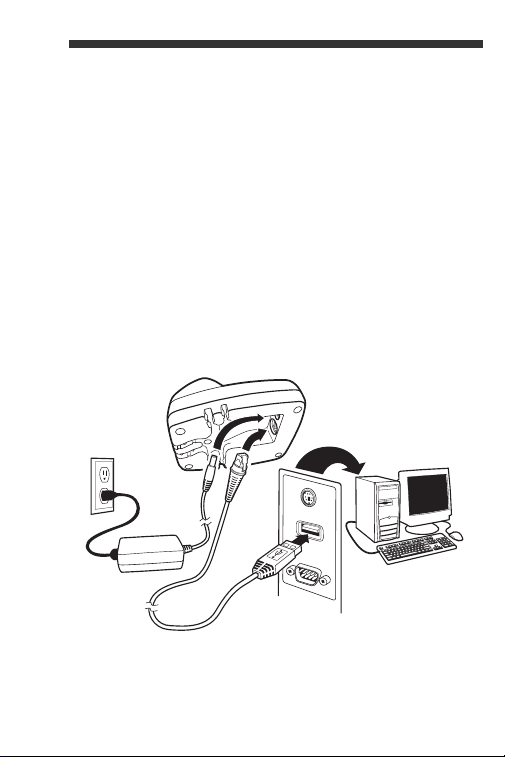
Getting Started
Turn off the computer’s power before connecting
the base, then power up the computer once the
base is fully connected. When the base is
connected and powered up, put the imager in the
base to establish a link. The green LED on the base
flashes to indicate the imager’s battery is charging.
USB Connection
1
Page 3
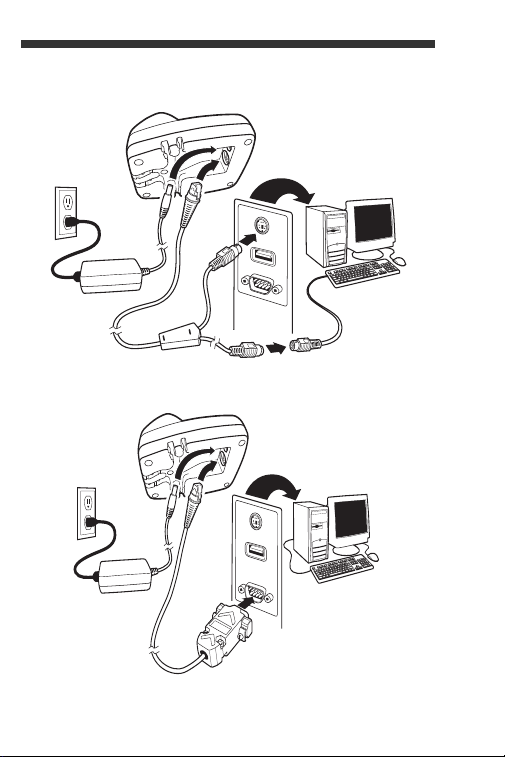
Keyboard Wedge Connection
Serial (RS-232) Connection
2
Page 4

Reading Techniques
4820/4820i
can read in
any direction
Center
beam over
barcode
The view finder
projects an aiming
beam that should
be centered over
the barcode. (The
4820/4820i can be
positioned in any
direction for a
good read.)
Hold the imager over the barcode, pull the trigger,
and center the aiming beam on the barcode.
The aiming beam is smaller when the imager is
closer to the code and larger when it is farther from
the code. Hold the imager close to smaller
barcodes, and farther away from large barcodes to
get a proper read.
If the barcode is highly reflective (e.g., laminated),
you may need to tilt the imager at an angle so the
barcode can be scanned.
Note: If the imager beeps 3 times when scanning a
barcode, the link has not been established.
If the imager beeps once, the link has been
established.
3
Page 5

Standard Product Defaults
Standard Product Defaults
RS-232
USB Keyboard (PC)
Japan DOS/V
USB Japanese Keyboard
(PC)
This barcode resets all standard product default
settings.
PC Interface
Scan the barcode that describes the PC or interface
you are using.
4
Page 6

PC Interface (continued)
Emulate External Keyboard
AT/PS2 Keyboard Wedge
(Default)
Program Keyboard Country
Keyboard Country
Scan the Program Keyboard Country barcode
below, then scan the numeric barcode(s) from
page 12, then the Save barcode to program the
keyboard for your country. As a general rule, the
following characters are not supported by the
imager for countries other than the United States:
@ | $ # { } [ ] = / ‘ \ < > ~.
Country Code Scan Country Code Scan
Belgium 1 Italy 5
Denmark 8 Norway 9
Finland 2 Spain 10
France 3 Switzerland 6
5
Page 7

Country Code Scan Country Code Scan
Save
Open Link
Germany/Austria 4 USA (Default) 0
Great Britain 7
Note: For complete list of country codes, see the
User’s Guide for your product at our website,
www.honeywell.com/aidc.
Open Link
Scan the Open Link barcode, then place the imager
into the base to establish a link. Placing a different
imager into the base establishes a new link and the
old imager is unlinked.
6
Page 8

Override Locked Imager
Override Locked Imager
Unlink Imager
If you need to replace a broken or lost imager that
is linked to a base, scan the Override Locked
Imager barcode with a new imager, and place that
imager in the base. The locked link will be
overridden; the broken or lost imager’s link with the
base will be removed, and the new imager will be
linked.
Unlinking the Imager
If the base has an imager linked to it, that imager
must be unlinked before a new imager can be
linked. Once the previous imager is unlinked, it will
no longer communicate with the base. Scan the
Unlink Imager barcode to unlink an imager.
7
Page 9

Trigger
Manual Trigger
(Default)
Presentation Mode
Streaming Presentation Mode
The following barcodes will allow you to use the
reader in Manual Trigger mode (need to press the
trigger to read) or Presentation mode (the reader is
activated when it “sees” a barcode).
Streaming Presentation™ (4820/4820i)
Note: Streaming presentation mode applies only to
units with advanced illumination. Units with
advanced illumination have a software
revision of 31205481-027 or higher.
When in Streaming Presentation mode, the imager
leaves the scan illumination on all the time and
continuously searches for barcodes.
8
Page 10

Reread Delay
Medium Reread Delay
Add CR Suffix
Remove Suffix
Add Tab Suffix
This sets the time period before the imager can
same
read the
barcode a second time. Setting a
reread delay protects against accidental rereads of
the same barcode.
Suffix
If you want a carriage return after the barcode, scan
the Add CR Suffix barcode. To add a tab after the
barcode, scan the Add Tab Suffix barcode.
Otherwise, scan the Remove Suffix barcode to
remove the suffixes.
9
Page 11

Add Code ID Prefix to all Symbologies
Add Code ID Prefix to all Symbologies
(Temporary)
Enable
(Default)
Disable
Scan the following barcode if you wish to add a
Code ID prefix to all symbologies at once.
Note: For complete list of Code IDs, see the User’s
Guide for your product at our website,
www.honeywell.com/aidc.
Function Code Transmit
When this selection is enabled and function codes
are contained within the scanned data, the imager
transmits the function code to the terminal. Charts
of these function codes are provided in your User’s
Guide. When the imager is in keyboard wedge
mode, the scan code is converted to a key code
before it is transmitted.
10
Page 12

Data Format Editor Instructions
Enter Data Format
Clear All Data Formats
Save
The following are abbreviated instructions for
entering a data format. For complete instructions
refer to your User’s Guide, available at our website,
www.honeywell.com/aidc.
1. Scan the Enter Data Format symbol.
2. Primary/Alternate Format: scan 0 for Primary
Format
3. Terminal Type: scan 099 for any terminal type
4. Code I.D.: scan 99 for any barcode type
5. Length: scan 9999 for any length barcode.
6. Editor commands: use the Programming Chart
that follows.
7. Scan Save to save your entries.
11
Page 13

Programming Chart
0
2
1
4
3
5
6
7
12
Page 14

A
B
C
D
E
F
9
8
Save
13
Page 15

Visual Xpress™
To obtain access to additional features for the
imager, use Visual Xpress, available from our
website at www.honeywell.com/aidc. For c om pl et e
download instructions and descriptions of Visual
Xpress features, refer to your User’s Guide.
Technical Assistance
If you need assistance installing or troubleshooting
your device, please call your distributor or the
nearest technical support office:
North America/Canada
Telephone: (800) 782-4263
Fax number: (315) 554-6705
E-mail: natechsupport@honeywell.com
Latin America
Telephone: (803) 835-8000
Telephone: (800) 782-4263
E-mail: latechsupport@honeywell.com
Brazil
Telephone: +55 (21) 3535-9100
Fax: +55 (21) 3535-9105
E-mail: brsuporte@honeywell.com
Mexico
Telephone: (803) 835-8000
E-mail: latechsupport@honeywell.com
Europe, Middle East, and Africa
Telephone: +31 (0) 40 7999 393
Fax: +31 (0) 40 2425 672
E-mail: eurosupport@honeywell.com
14
(8 a.m. to 6 p.m. EST)
Page 16

Asia Pacific
Telephone - Hong Kong: +852-3188-3485 or 2511-3050
Telephone - China: +86 21 6361 3818
E-mail: aptechsupport@honeywell.com
Japan
Telephone: +813 5770-6312
E-mail: aptechsupport@honeywell.com
Malaysia
Telephone: +603-6201-7020
E-mail: aptechsupport@honeywell.com
Online Technical Assistance
You can also access technical assistance online at
www.honeywell.com/aidc.
For Further Information
To download the full User’s Guide for these
products, visit our website at www.honeywell.com/
aidc.
Product Service and Repair
Honeywell provides service for all its products
through service centers throughout the world. To
obtain warranty or non-warranty service, contact
the appropriate location below to obtain a Return
Material Authorization number (RMA #) before
returning the product.
15
Page 17

North America
Telephone: (800) 782-4263
Fax: (803) 835-8012
E-mail: naservice@honeywell.com
Latin America
Telephone: (803) 835-8000
Telephone: (800) 782-4263
Fax: (239) 263-9689
E-mail: laservice@honeywell.com
Brazil
Telephone: +55 (21) 3535-9100
Fax: +55 (21) 3535-9105
E-mail: brservice@honeywell.com
Mexico
Telephone: +52 (55) 5203-2100
Fax: +52 (55) 5531-3672
E-mail: mxservice@honeywell.com
Europe, Middle East, and Africa
Telephone: +31 (0) 40 2901 633
Fax: +31 (0) 40 2901 631
E-mail: euservice@honeywell.com
Asia Pacific
Telephone: +852-2511-3050
Fax: +852-2511-3557
E-mail: apservice@honeywell.com
Japan
Telephone: +813-5770-6312
Fax: +813-5770-6313
E-mail: apservice@honeywell.com
16
Page 18

Online Product Service and Repair Assistance
You can also access product service and repair
assistance online at www.honeywell.com/aidc.
Limited Warranty
Honeywell International Inc. ("Honeywell") warrants its
products to be free from defects in materials and
workmanship and to conform to Honeywell’s published
specifications applicable to the products purchased at the
time of shipment. This warranty does not cover any
Honeywell product which is (i) improperly installed or
used; (ii) damaged by accident or negligence, including
failure to follow the proper maintenance, service, and
cleaning schedule; or (iii) damaged as a result of (A)
modification or alteration by the purchaser or other party,
(B) excessive voltage or current supplied to or drawn from
the interface connections, (C) static electricity or electrostatic discharge, (D) operation under conditions beyond
the specified operating parameters, or (E) repair or
service of the product by anyone other than Honeywell or
its authorized representatives.
17
Page 19

This warranty shall extend from the time of shipment for
the duration published by Honeywell for the product at the
time of purchase ("Warranty Period"). Any defective
product must be returned (at purchaser’s expense) during
the Warranty Period to Honeywell factory or authorized
service center for inspection. No product will be accepted
by Honeywell without a Return Materials Authorization,
which may be obtained by contacting Honeywell. In the
event that the product is returned to Honeywell or its
authorized service center within the Warranty Period and
Honeywell determines to its satisfaction that the product is
defective due to defects in materials or workmanship,
Honeywell, at its sole option, will either repair or replace
the product without charge, except for return shipping to
Honeywell.
EXCEPT AS MAY BE OTHERWISE PROVIDED BY
APPLICABLE LAW, THE FOREGOING WARRANTY IS
IN LIEU OF ALL OTHER COVENANTS OR
WARRANTIES, EITHER EXPRESSED OR IMPLIED,
ORAL OR WRITTEN, INCLUDING, WITHOUT
LIMITATION, ANY IMPLIED WARRANTIES OF
MERCHANTABILITY OR FITNESS FOR A PARTICULAR
PURPOSE.
18
Page 20

HONEYWELL’S RESPONSIBILITY AND PURCHASER’S
EXCLUSIVE REMEDY UNDER THIS WARRANTY IS
LIMITED TO THE REPAIR OR REPLACEMENT OF THE
DEFECTIVE PRODUCT WITH NEW OR REFURBISHED
PARTS. IN NO EVENT SHALL HONEYWELL BE LIABLE
FOR INDIRECT, INCIDENTAL, OR CONSEQUENTIAL
DAMAGES, AND, IN NO EVENT, SHALL ANY LIABILITY
OF HONEYWELL ARISING IN CONNECTION WITH
ANY PRODUCT SOLD HEREUNDER (WHETHER SUCH
LIABILITY ARISES FROM A CLAIM BASED ON
CONTRACT, WARRANTY, TORT, OR OTHERWISE)
EXCEED THE ACTUAL AMOUNT PAID TO
HONEYWELL FOR THE PRODUCT. THESE
LIMITATIONS ON LIABILITY SHALL REMAIN IN FULL
FORCE AND EFFECT EVEN WHEN HONEYWELL MAY
HAVE BEEN ADVISED OF THE POSSIBILITY OF SUCH
INJURIES, LOSSES, OR DAMAGES. SOME STATES,
PROVINCES, OR COUNTRIES DO NOT ALLOW THE
EXCLUSION OR LIMITATIONS OF INCIDENTAL OR
CONSEQUENTIAL DAMAGES, SO THE ABOVE
LIMITATION OR EXCLUSION MAY NOT APPLY TO
YOU.
All provisions of this Limited Warranty are separate and
severable, which means that if any provision is held invalid
and unenforceable, such determination shall not affect the
validity of enforceability of the other provisions hereof.
Use of any peripherals not provided by the manufacturer
may result in damage not covered by this warranty. This
includes but is not limited to: cables, power supplies,
cradles, and docking stations. Honeywell International Inc.
extends these warranties only to the first end-users of the
products. These warranties are non-transferable.
The duration of the limited warranty for the 2020-5B, the
4820, 4820i, 3820, and 3820i is three (3) years. The
duration of the limited warranty for the imager battery is
one (1) year.
19
Page 21

Disclaimer
Honeywell International Inc. (“Honeywell”) reserves the
right to make changes in specifications and other
information contained in this document without prior
notice, and the reader should in all cases consult
Honeywell to determine whether any such changes have
been made. The information in this publication does not
represent a commitment on the part of Honeywell.
Honeywell shall not be liable for technical or editorial
errors or omissions contained herein; nor for incidental or
consequential damages resulting from the furnishing,
performance, or use of this material.
This document contains proprietary information that is
protected by copyright. All rights are reserved. No part of
this document may be photocopied, reproduced, or
translated into another language without the prior written
consent of Honeywell.
©2008 Honeywell International Inc. All rights reserved.
Web Address: www.honeywell.com/aidc
20
Page 22

Honeywell
700 Visions Drive
P.O. Box 208
Skaneateles Falls, NY 13153-0208
Crdlss-02-QS Rev E
10/08
 Loading...