

Page 1

The Honeywell trademark is used under license from Honeywell
International inc. Honeywell International inc. makes no
representations or warranties with respect to this product.
La marque déposée Honeywell est utilisée avec autorisation
d'Honeywell International Inc. Honeywell international Inc. ne fait
aucune affirmation et n’offre aucune garantie au sujet de ce produit.
La marca Honeywell se usa bajo licencia otorgada por Honeywell
International Inc. Honeywell International Inc. no hace ningún tipo de
representación ni garantía con respecto a este producto.
Models / Modèles / Modelos
2111-2115
DIGITAL STEEL FIRE & SECURITY SAFE
COFFRE-FORT D'ACIER NUMÉRIQUE À
L'ÉPREUVE DU VOL ET DES INCENDIES
CAJA DE SEGURIDAD DIGITAL
DE ACERO CONTRA INCENDIO
Read this manual carefully and never store it inside the safe!
Lire attentivement ce manuel et ne jamais le garder à l’intérieur du coffre-fort !
¡Lea este manual cuidadosamente y nunca lo guarde dentro de la caja fuerte!
Page 2
Digital Steel Fire & Security Safe
PACKAGE CONTENTS
1 – Digital Steel Fire & Security Safe
1 – Operation Manual
2 – Entry Keys
4 – “AA” Batteries
1 – Silica Gel Pack
Models 2111-2115
DO NOT RETURN SAFE TO STORE!
If there are any missing parts or you have
difficulty setting up or operating your safe,
please contact our Consumer Assistance
Department by telephone:
1-877-354-5457
(USA & Canada)
Monday–Friday
7am - 5pm PST
SETUP & OPERATION
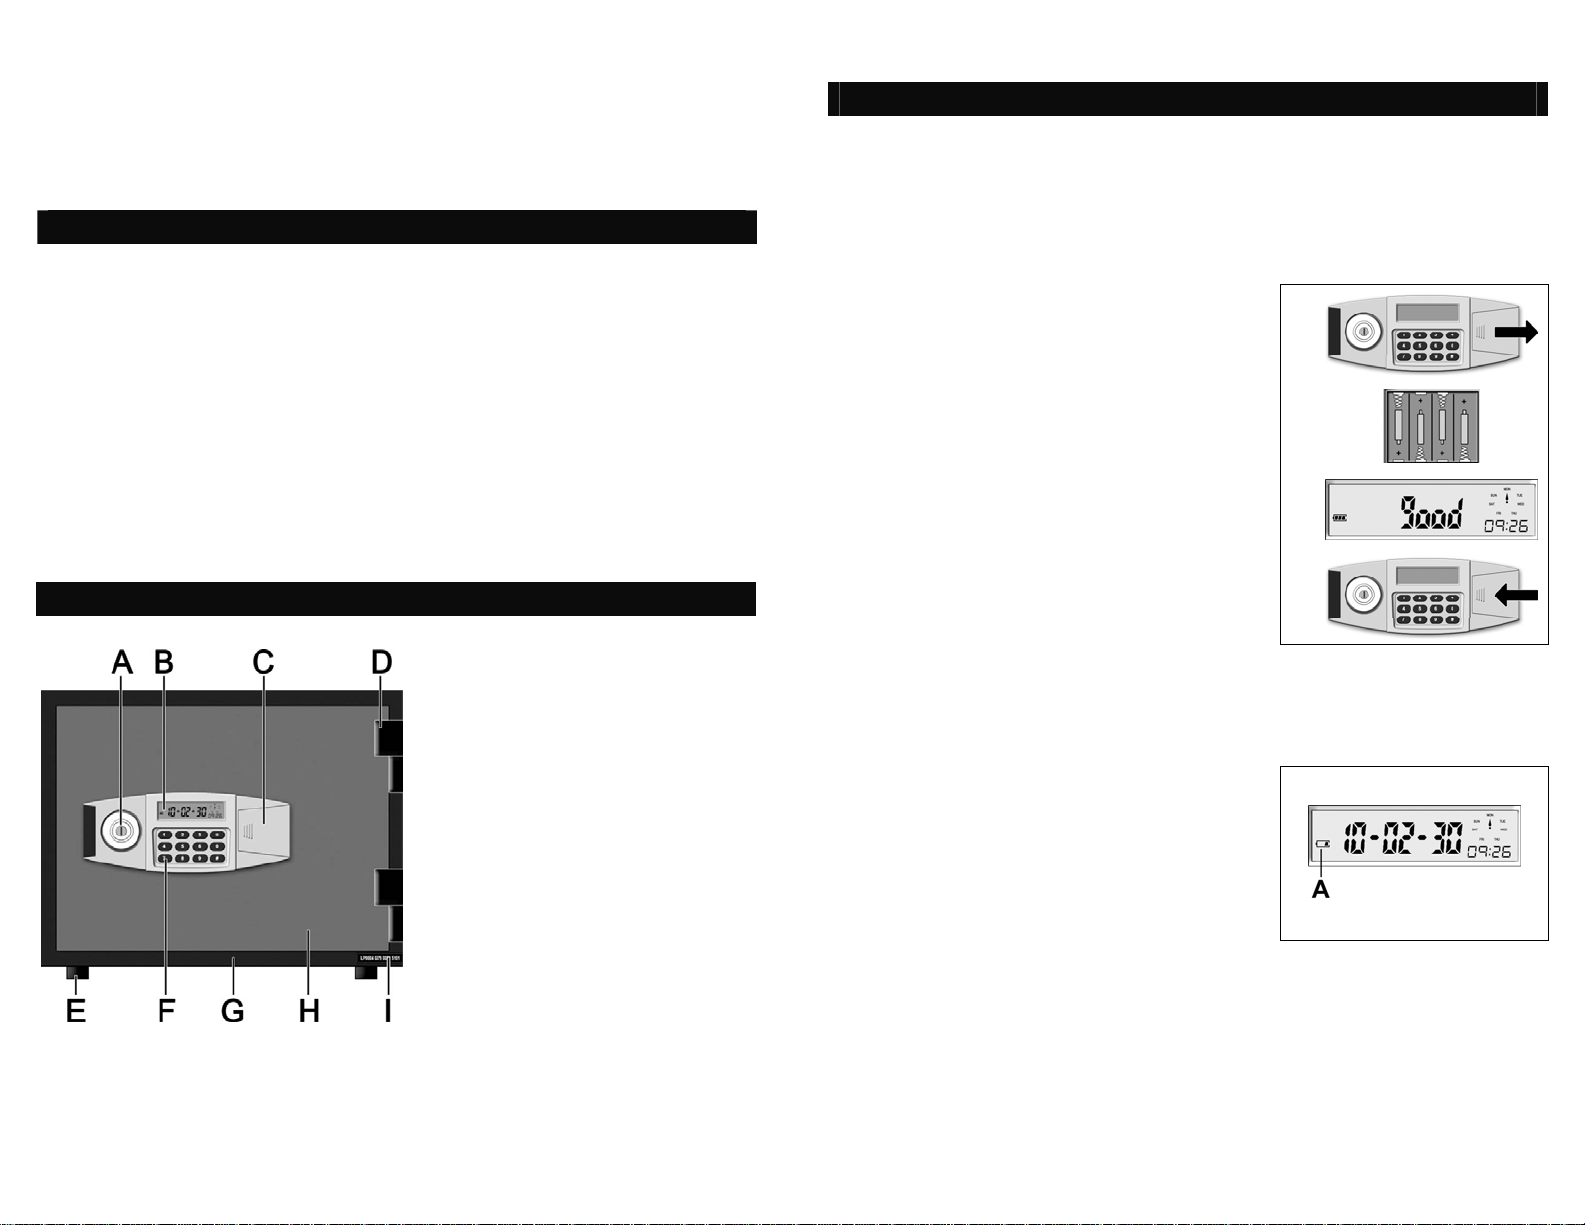
STEP 1: INSTALL BATTERIES
For your convenience, we have included 4 “AA” Batteries that provide the power
for the electronic controls. These must be installed before using your safe.
1. Remove the battery compartment cover
located on the right side of the control panel by
pushing in and to the right.
2. Install the 4 “AA” batteries in the battery
compartment as illustrated on the inside of the
compartment.
3. If the batteries are put in correctly, the safe will
beep and the LCD readout will flash, then it will
GOOD”
read “
1.
2.
3.
PRODUCT OVERVIEW
A - Entry Key Hole
B - LED Display panel
C - Battery Comp. Cover
D - Door Hinges
E - Rubber Feet
F - Electronic Digital Keypad
G - Safe Cabinet Body
H - Safe Door
I - Serial Number Label
4. Once the batteries are properly installed,
replace the battery compartment cover.
4.
REPLACE BATTERIES:
For best results, it is recommended to replace
the batteries when they become weak as
shown on the Battery Power Level Indicator
(A) or at least once a year.
NOTE: It is NOT RECOMMENDED to use
Non-alkaline or rechargeable batteries.
If the batteries are removed or fail, the keypad memory will NOT be erased
and the active programmed code will still work once power has been
restored.
Page 3

SETUP & OPERATION
SETUP & OPERATION
STEP 2: SET CALENDAR AND CLOCK
Once batteries are installed and the control pad is powered, the next step is to
begin by programming the clock and calendar. READ ENTIRE DIRECTIONS
AND WRITE DOWN DATE/DAY/TIME BEFORE PROGRAMMING. NOTE:
You must enter all information without delays. If the light goes off, you must
begin programming again.
1. With the safe door closed and locked, press
” key followed by the “9” key.
the “
The LCD readout will glow amber.
EXAMPLE
2. Enter the Year – 2 Digits
3. Enter the Month – 2 Digits
4. Enter the Date – 2 Digits
5. Enter the Day – 1 Digit (see chart below)
6. Enter the Hour – 2 Digits (see chart below)
7. Enter the Minutes – 2 Digits
DAY
Monday 1
Tuesday 2
Wednesday 3
Thursday 4
Friday 5
Saturday 6
Sunday 7
#
HOUR
##
1:00 am 01
2:00 am 02
3:00 am 03
4:00 am 04
5:00 am 05
6:00 am 06
7:00 am 07
8:00 am 08
When correctly entered, the LCD
readout will stop glowing and should
display the information you just
programmed.
2.
February =
3.
4.
Monday =
5.
9:26 am =
6.
1.
2010 =
th
30
=
9:26 am =
7.
HOUR
##
HOUR
##
9:00 am 09 5:00 pm 17
10:00 am 10 6:00 pm 18
11:00 am 11 7:00 pm 19
12:00 pm 12 8:00 pm 20
1:00 pm 13 9:00 pm 21
2:00 pm 14 10:00 pm 22
3:00 pm 15 11:00 pm 23
4:00 pm 16 12:00 am 00
STEP 3: UNLOCK AND OPEN THE SAFE
This safe is equipped with a dual digital/key lock system that requires entering
an active user code to unlock it and an entry key to open. It allows for two
separate reprogrammable active user codes.
The preset factory user codes are “
1 2 3 4” and “1 2 3 4 5 6”.
1. Begin by inserting the entry key into the
1.
cylindrical key hole on the left side of the
control panel.
2. On the keypad enter the
#” key, then the user code “1 2 3 4”,
“
followed by “
#” key again.
2.
3. If correct code is entered, OPEN will
3.
appear on the LCD panel, and you’ll hear a
chime tone indicating the safe is unlocked.
4. Within 5 seconds, turn the key to the right
4.
(clockwise) and pull the door open.
TO LOCK THE SAFE:
Carefully close the door, turn the key
counterclockwise to the left and remove.
The safe is now locked and an active user
code will need to be re-entered to open.
Page 4

SETUP & OPERATION
STEP 4: PROGRAM NEW USER CODES
SECURITY NOTE: To insure privacy, this procedure should be repeated for
both of the factory pre-set codes
1. Unlock the safe with the first factory pre-set (or
current active) code.
2. If correct code is entered, “OPEN” will appear
on the LCD panel, and you will hear a chime
tone indicating the safe is unlocked.
3. Immediately enter “” then a new 4-8 digit
code followed by the “
4. If entered correctly, “IN” will appear on blue
display followed by a chime and the new code
number will appear for 1 second.
Repeat this process to reprogram the second factory pre-set code.
#” key.
Your new code is now ready to use and the previous code is erased from
memory. If you wish to change your new code, simply repeat the process
with current active user code(s) and enter new code(s).
1.
2.
3.
4.
__ __ __ __
TO OPEN THE SAFE USING NEW USER CODE(S):
Repeat the process described in STEP 3: UNLOCK AND OPEN SAFE,
substituting the new user code(s) for the factory preset user code(s)
SECURITY FEATURES
PRIVACY MODE:
If you wish to prevent your personal code from
being read on the digital readout, it can be
hidden from view by inserting the “
Example: “
# 1 2 3 4 #”.
” after “#”.
INCORRECT CODE ENTRY:
If an incorrect code is entered, the word
ERROR” will appear on the digital readout
“
and an alert tone will sound. At this time, reenter the correct code.
SECURITY LOCKOUT PERIOD:
If an incorrect code is entered (3) times, the system will enter lockout mode
for 5 minutes.
The LCD will read “HOLD-05” showing the
minutes remaining. During the first minute the
security alarm will sound. During the entire 5minute period, the safe cannot be entered.
If incorrect codes continue to be entered once
the first five minute period has finished, a new
15-minute lockout period will begin and the
alarm will sound during the first minute.
SECURITY ALARM:
This safe is equipped with a security alarm.
To activate alarm, press “
Display will read “ALERT-ON”.
The alarm will sound whenever:
The wrong code is entered 3 or more times to gain entry
The safe is tilted more than 20° degrees
The safe is shaken or experiences forceful impact.
To de-activate alarm or turn off alarm siren, enter an active user code.
0” with door closed.
Page 5

SECURITY FEATURES
HISTORICAL ENTRY DATA RETRIEVAL
This safe has the ability to record into memory up to 50 entry records of those
gaining access to the safe. To retrieve this data, do the following:
Enter user code 1 or user code 2 and display
will read “OPEN”.
Immediately press “0” to view history beginning with the most recent event.
To view previous events, continue pressing “0” to view up to 50 entries.
EXAMPLE
EMERGENCY ACCESS
OPEN SAFE WITH EMERGENCY ACCESS KEY
If you have forgotten your personal access code or the electronic lock is not
functioning properly, you can use the Emergency Override Key to gain access.
1. The emergency override lock is
located behind the batteries under the
round digital keypad housing. To gain
access, lift the dust cover, rotate the
housing to the left (counterclockwise)
and carefully pull it forward and down.
2. Temporarily remove the batteries
and Insert the emergency override key
into the lock (K) and turn it clockwise
to the right.
1.
2.
Press
User Code 1 accessed on June 29th, 2010 at 4:17 pm
Press
Again
User Code 1 accessed on June 28th, 2010 at 10:49 am
Press
Again
User Code 1 accessed on June 27th, 2010 at 4:17 pm
Etc.
LOST ENTRY CODE
If you have lost or forgotten the active user code(s), you must contact consumer
assistance to receive authorization and instructions for reprogramming code(s).
3. Rotate the handle upwards and
3.
pull the door open.
4. Remove the key and replace the 4AA batteries. Reposition the digital
keypad housing into the locking holes
4.
and rotate the housing to the right
(clockwise).
5. Follow Step 3 (Setting New Personal Entry Code) to re-set your code and
test as instructed.
Page 6

ORDERING NEW KEYS
If a key is lost or you would like additional keys, you must first contact our
Consumer Assistance Department to verify ownership.
You need to provide the following: • Safe Serial Number
• Number of keys requested
• Name / Address / Telephone
• E-mail address if available
To order by telephone, call us toll-free at: 1-877-354-5457 (USA & Canada)
Monday - Friday / 7am - 5pm PST
After speaking with a representative you may order
keys via mail by sending the above information with a
check or money order for $12.00 (U.S. funds) to:
Consumer Assistance Dept.
LH Licensed Products, Inc.,
860 East Sandhill Avenue,
Carson, CA 90746 USA
We do accept Visa and MasterCard payments for orders received
by telephone. Express Delivery available for additional charge.
Subject to change without prior notification.
SAFE SERIAL NUMBER
Whenever contacting our Consumer
Assistance Department, you will need to
provide them with the serial number of your
safe. The serial number tag is located on the
lower right corner on the front of the safe.
IMPORTANT: Do Not Remove Tags! This is needed if your safe fails or
you lose your keys.
CONSUMER ASSISTANCE
Contact us by mail at the following
address:
Contact us by telephone (toll-free) at:
Consumer Assistance Dept.
LH Licensed Products, Inc.,
860 East Sandhill Avenue,
Carson, CA 90746 USA
1-877-354-5457
(USA & Canada)
Monday–Friday
7am - 5pm PST
LIMITED WARRANTY
LH Licensed Products, Inc., (“LHLP, Inc.”) warrants that for a period of seven (7) years from the date of
purchase, this product will be free from structural or mechanical defects resulting from materials or
workmanship. LHLP, Inc., at its sole option and as the purchaser’s sole remedy under this warranty, will
repair or replace this product or any component of the product found to be defective during the warranty
period. Replacement or repair will be made with a new or remanufactured product or component. If the
product is no longer available, replacement may be made with a similar product of equal or greater value.
THIS IS YOUR EXCLUSIVE WARRANTY.
This warranty is only valid for the original retail purchaser from the date of initial retail purchase and is not
transferable. You must keep the original sales receipt. Proof of purchase is required to obtain warranty
service.
LHLP, Inc. dealers, service centers, or retail stores selling this product do not have the right to alter, modify
or in any way change the terms and conditions of this warranty.
This warranty does not apply to the finish on the product. This warranty does not cover normal wear and
tear of parts or damage resulting from any of the following: negligent use or misuse of the product, use
contrary to the operating instructions, disassembly, repair or alteration by anyone other than LHLP, Inc. or
an authorized service center, improper installation, or exposure to extremes of heat or humidity. Further,
the warranty does not cover Acts of God, such as fire, flood, hurricanes and tornadoes.
LHLP, Inc. shall not be liable for any incidental or consequential damages caused by the breach of any
express or implied warranty or otherwise relating to the sale of this product. LHLP, Inc. is also not
responsible for: costs associated with removing or installing the product; damage or loss of the contents of
the product; nor for the unauthorized removal of the contents; or damages incurred during shipment.
THE ABOVE WARRANTY IS IN LIEU OF ALL OTHER WARRANTIES, EXPRESS OR IMPLIED,
INCLUDING ANY WARRANTIES OF MERCHANTABILITY OR FITNESS FOR A PARTICULAR
PURPOSE, AND LHLP, INC. DISCLAIMS ANY AND ALL OTHER COVENANTS AND WARRANTIES.
Except to the extent prohibited by applicable law, any implied warranty of merchantability or fitness for a
particular purpose is limited in duration to the duration of the above warranty period. Some states,
provinces or jurisdictions do not allow the exclusion or limitation of incidental or consequential damages or
limitations on how long an implied warranty lasts, so the above limitations or exclusion may not apply to
you. This warranty gives you specific legal rights, and you may also have other rights that vary from state
to state, or province to province, or jurisdiction to jurisdiction.
LIFETIME AFTER-FIRE REPLACEMENT GUARANTEE
If this Honeywell UL classified fire resistant product was purchased from LH Licensed Products, Inc.
(“LHLP”) and is damaged by fire at any time while still owned by you (the original owner), LHLP will ship a
free replacement if you send the following to Customer Service, LH Licensed Products, Inc., 860 E.
Sandhill Ave., Carson, CA 90746 USA:
1. Your name, mailing address, email address, and phone number with area code;
2. A description of the fire, the model number and a photo of the burned unit, and a copy of the report from
the fire department, insurance or police.
Freight on the replacement unit is not included in the guarantee and must be paid by the consumer. If an
identical product is no longer available, LHLP will provide a similar unit from its current product line. LHLP
is not responsible for any loss or damage to the contents of the safe.
Page 7

GARANTIE DE REMPLACEMENT À VIE APRÈS INCENDIE
Si ce produit Honeywell résistant au feu classifié UL a été acheté à LH Licensed Products, Inc
("LHLP") et est endommagé par un incendie à un quelconque moment et vous appartient
toujours (le propriétaire d'origine), LHLP expédiera gratuitement un remplacement si vous
envoyez ce qui suit au Service Client de LH Licensed Products, Inc., 860 E. Sandhill Ave.,
Carson, CA 90746 USA :
1. Votre nom, adresse postale, adresse courriel et numéro de téléphone avec l’indicatif
régional.
2. Une description de l’incendie, le numéro du modèle, une photo de l’unité brûlée et une
copie du rapport du service des pompiers, de l’assurance et de la police.
Le fret de l’unité de remplacement n’est pas compris dans la garantie et doit être payé par le
consommateur.
Si un produit identique n’est plus disponible, LHLP fournira une unité similaire de sa gamme
actuelle de produits.
LHLP n’est pas responsable de toute perte ou dommage du contenu du coffre-fort.
GARANTÍA DE REEMPLAZO DURANTE TODA LA VIDA DESPUÉS DE INCENDIO
Si se trata de un producto de Honeywell resistente al fuego, clasificado por los UL, comprado de
LH Licensed Products, Inc. (“LHLP”), y el fuego lo ha dañado en algún momento, mientras
todavía era de su propiedad (el propietario original), LHLP se lo remplazará sin ningún costo,
enviando la siguiente información a Customer Service, LH Licensed Products, Inc., 860 E.
Sandhill Ave., Carson, CA 90746 USA:
1. Su nombre, dirección postal, dirección e-mail y número de teléfono con el código de
área;
2. Descripción del incendio, número del modelo y fotografía de la unidad quemada, junto
con una copia del reporte del departamento de bomberos, o de la empresa de
seguros o de la policía.
No se incluye en la garantía el flete para reemplazar la unidad y lo debe pagar el consumidor.
En caso que ya no dispongamos de un producto igual, LHLP le enviará una unidad similar, de
nuestra línea de productos actuales.
LHLP no se responsabiliza por ninguna pérdida o daños ocurridos al contenido de la caja fuerte.
 Loading...