

Honda UMC425, UMC435 Owner's Manual

POWER HEAD
UMC425
UMC435
·
OWNER'S MANUAL
MANUEL DE L'UTILISATEUR
BEDIENUNGSANLEITUNG
MANUALE DELL'UTENTE
Read and understand this Owner’s Manual before operating the power head.
Lire et bien comprendre ce manuel avant d’utiliser le block moteur.
Lesen Sie diese Bedienungsanleitung gründlich bevor Sie den Motor trimmer in Betrieb nehmen.
Prima di azionare la testa motrice, leggere at tentamente il presente manuale.

Honda UMC425EUMC435E
UMC425U
OWNER’ S MANUAL
Original instructions
MANUEL DE L’UTILISATEUR
Notice originale
BEDIENUNGSANLEITUNG
Originalbetriebsanleitung
MANUALE DELL’UTENTE
Istruzioni originali
UMC435U
The ‘‘e-SPEC’’ mark symbolizes environmentally
responsible technologies applied to Honda power
equipment, which contains our wish to ‘‘preserve
nature for generations to come’’.

INTRODUCTION
Thank you for purchasing a Honda power head.
Honda power heads UMC425E, UMC435E, UMC425U, and UMC435U
can be used by attaching different kinds of Honda approved
attachments to enable various operations.
This manual covers the operation and maintenance of the Honda power
head UMC425EUMC435EUMC425UUMC435U.
Honda Motor Co., Ltd. reserves the right to make changes at any time
without notice and without incurring any obligation.
No part of this publication may be reproduced without written
permission.
This manual should be considered a permanent part of the power head
and should remain with it if it is resold.
Pay special attention to statements preceded by the following words;
Indicates a strong possibility of severe personal injury or
death if instructions are not followed.
CAUTION: Indicates a possibility of personal injury or equipment
damage if instructions are not followed.
NOTE: Gives helpful information.
If a problem should arise, or if you have any questions about the power
head, consult an authorized Honda dealer.
Honda power heads are designed to give safe and dependable service if
operated according to instructions.
Operating a power head requires special effort to ensure the safety of
the operator and the safety of others. Read and understand this
Owner’s Manual before operating the power head; failure to do so
could result in personal injury or equipment damage.
The illustrations herein are mainly based on: UMC435E
• The illustrations may vary according to the type.

Disposal
To protect the environment, do not dispose of this product, battery,
engine oil, etc. carelessly by leaving them in the waste. Observe
the local laws and regulations or consult your authorized Honda
dealer for disposal.
1

CONTENTS
1. SAFETY INSTRUCTIONS.........................................................3
2. SAFETY LABEL LOCATIONS ................................................. 11
3. COMPONENT IDENTIFICATION.............................................. 13
4. CONTROLS ......................................................................... 15
5. PRE-OPERATION CHECKS..................................................... 19
6. STARTING THE ENGINE........................................................ 34
7. OPERATION ........................................................................38
8. STOPPING THE ENGINE........................................................ 39
9. MAINTENANCE ................................................................... 40
10. TRANSPORTING .................................................................. 54
11. STORAGE ........................................................................... 55
12. TROUBLESHOOTING ............................................................ 57
13. SPECIFICATIONS ................................................................. 58
MAJOR Honda DISTRIBUTOR ADDRESSES ............. Inside back cover
‘‘EC Declaration of Conformity’’
CONTENT OUTLINE ........................................ Inside back cover
2
1. SAFETY INSTRUCTIONS
To ensure safe operation
For your safety and safety of others, pay special attention to these
precautions:
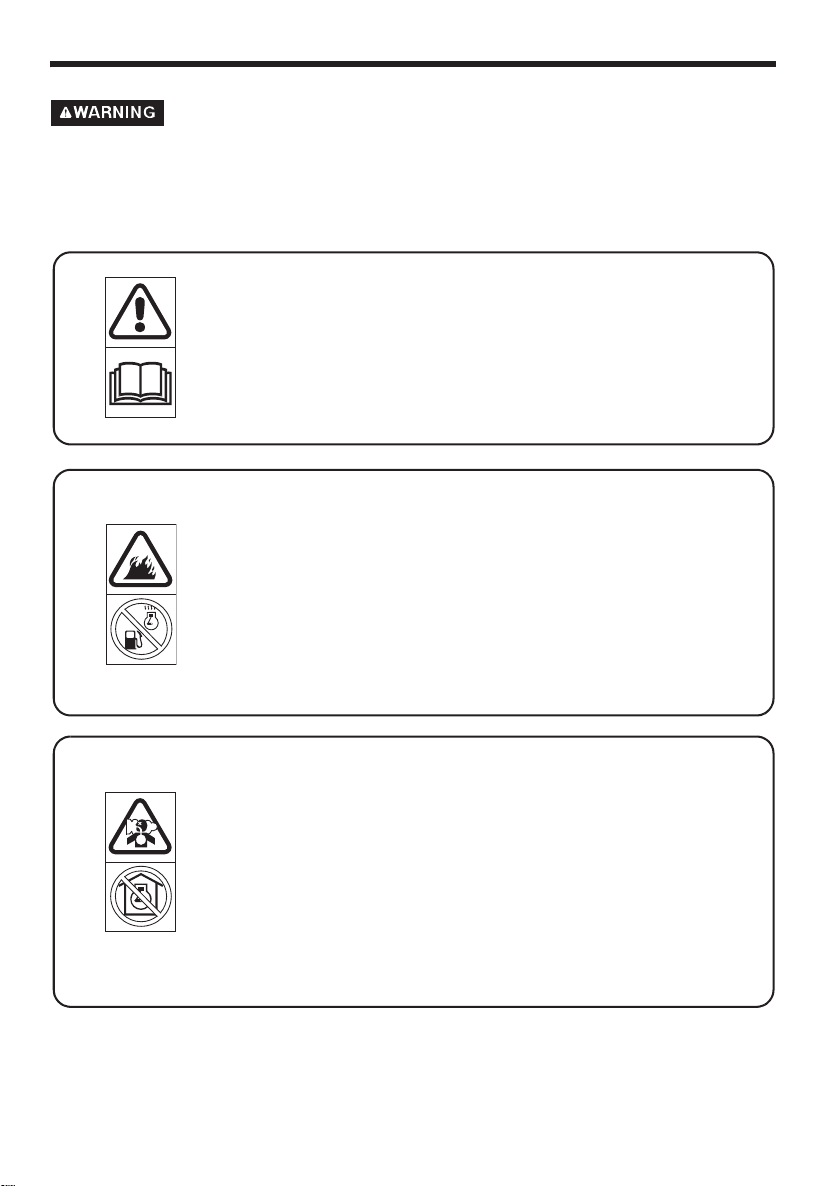
• Honda power head is designed to give safe and
dependable service if operated according to
instructions.
Read and understand the Owner’s Manual before
operating the power head. Failure to do so could
result in personal injury or equipment damage.
• Gasoline is extremely flammable and is explosive
under certain conditions.
• Do not smoke or allow flames or sparks in the
area where the power head is refueled or where
gasoline is stored.
• Do not overfill the fuel tank, and make sure the
fuel tank cap is closed securely after refueling.
• Refuel in a well-ventilated area with the engine
stopped.
• Exhaust contains poisonous carbon monoxide, a
colorless, odorless gas. Breathing carbon
monoxide can cause loss of consciousness and
may lead to death.
• If you run the power head in an area that is
confined, or even partially enclosed area, the air
you breathe could contain a dangerous amount of
exhaust gas.
• Never run your power head inside a garage, house
or near open windows or doors.
3

To ensure safe operation
Operator Responsibility
• Only equip Honda approved attachments. If not, injury or accident
may occur.
• Read and follow the instructions in the owner’s manual that came
with each attachments.
• Never operate the power head when tired, ill or under influence of
alcohol or other drugs.
• Any part from the machine is a potential source of danger if the
machine is used in abnormal conditions or if the maintenance is not
done correctly.
• Read the owner’s manual carefully. Be familiar with the controls and
their proper use of the power head. Know how to stop the engine
rapidly.
• Never allow children or people unfamiliar with this owner’s manual to
use the power head. Local regulations may restrict the age of the
operator.
• If you lend or resell your power head to a third person, instruct him or
her with how to handle the product and alert him or her to read the
Owner’s Manual carefully before operation.
• Never operate the power head while:
– people, especially children or pets are nearby.
– user is fatigued or under medication, or has swallowed substances
known to affect judgement or reactions.
• Each attachment have working area which people or animal shall not
approach. Follow to the instructions in the owner’s manual that
comes with each attachment.
• Keep in mind that the operator or user is responsible for accidents or
hazards occurring to other people or their property.
4

To ensure safe operation
Operator Responsibility
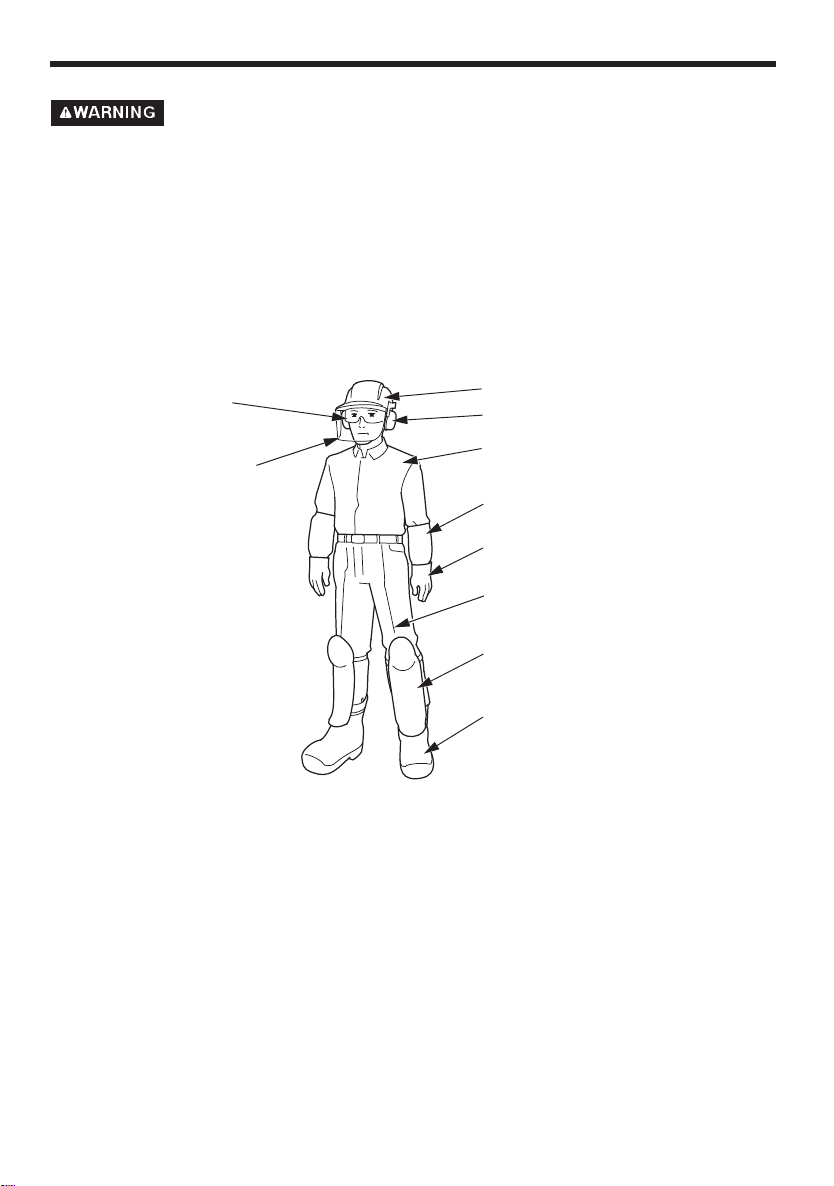
• While operating the power head, always wear protective clothing and
protective devices.
• For protective clothing and protective devices to be worn, follow to
the instructions in the owner’s manual that comes with each
attachment.
– Protective clothing
Wear adequate clothes with long sleeves and long pants.
The clothes must fit your body and button up or zip up the clothes
securely. Do not leave the sleeves and bottom of the shirt/jacket
loose.
Wear the arm covers, too.
Do not wear the clothes with the tapes, laces and/or ribbons, loose
clothes, necktie, necklace, etc. during operation. Bind your hair if it
is long, and do not let your hair below your shoulder.
– Protective devices
* Goggles
Wear the goggles or other eye protection to protect your eyes
from the debris.
*Helmet
Wear the helmet to protect your head from the overhead
branches and the falling foreign material.
* Face shield
Wear face shield to protect your face from the debris.
* Ear muffs/ear plugs
Wear the ear muff, ear plugs or other hearing protection to
protect your ears from the noise.
*Gloves
Wear the gloves to protect your hands.
* Safety boots
Wear the safety boots with the non-slip sole and toe protector to
protect your feet from the flying debris.
Do not operate the equipment when barefoot or wearing open
sandals.
Wear the leg protectors as well.
5
To ensure safe operation
Operator Responsibility
*Dust mask
We recommend that you wear the dust mask if you suffer from
the allergic rhinitis, e.g. pollinosis, etc. The dust mask is
available at a pharmacy and it is helpful for reducing the amount
of pollens you breathe.
GOGGLES
FACE SHIELD
HELMET
EAR MUFFS/EAR PLUGS
CLOTHES
(LONG SLEEVE)
ARM COVERS
GLOVES
CLOTHES
(LONG PANTS)
LEG PROTECTORS
SAFETY BOOTS
(WITH TOE PROTECTOR)
• Before each use, visually inspect the power head for any damage and
looseness of fastening part.
• Before each use, look around and underneath the engine for signs of
oil or gasoline leaks.
• Avoid operating the power head at night or in a bad weather of poor
visibility, because there is much possibility of accident.
• Walk, never run during operation.
• Avoid operating the power head on a steep slope.
The steep slope is very slippery, so you can slip down.
6

To ensure safe operation
Operator Responsibility
• Do not operate the power head with the labels, and other parts
removed.
• Do not mount any incorrect parts and do not tamper with the power
head as it can result in personal injury and/or equipment damage. Use
the parts that are designed for your model and application.
• Stop the engine with the engine switch to the OFF position in the
following cases:
– Before any operation around the power head.
– Before checking, cleaning or working on the power head.
– After striking a foreign object. Inspect the power head for damage
and make repairs before restarting and operating the power head
again.
– If power head starts to vibrate abnormally. Check immediately the
cause of the vibration and perform the necessary repair.
– Whenever you leave the power head unattended.
– Before refuelling.
– When any person or pet is approaching.
– Shut off the engine immediately when the power head shows
abnormal vibration suddenly. Sudden vibration can suggest the
damaged rotating parts or loose fasteners. Examine the cause of
the problem, and do not start the engine before repair is made.
• The power head is faulty when the engine is idling by returning the
throttle but the attachment keeps turning, and idle speed adjustment
must be made. Consult your authorized Honda dealer.
• Keep all nuts, bolts and screws tight to be sure the power head is in
safe working condition. Regular maintenance is an essential aid to
user’s safety and retaining a high level of performance.
• Do not use the power head with worn or damaged parts. Parts must
be replaced, or repaired. Replace worn or damaged parts with Honda
genuine parts. Non equivalent quality parts may damage the machine
and be prejudicial to your safety.
7

To ensure safe operation
Operator Responsibility
• Injury caused by vibration and cold:
You may feel the prickling or burning pain in your fingers, and the
fingers may lose color and feeling depending on your constitution. It
is believed that these symptoms are brought by vibration and/or
exposure to cold. The specific trigger point of these symptoms are
not identified yet, but observe the following instructions.
* Limit the amount of time you spend operating the power head in a
day.
A day’s work should consist of the work with the power head and
the other work without the hand-held equipment so you can limit
the amount of time when your hands are exposed to the machine
vibration.
* Keep your body warm, especially your hands, wrists and arms.
* Take your breaks at shorter intervals and arm exercises well to
maintain good blood circulation. Do not smoke while working.
* When you feel discomfort, redness and swelling of the fingers
followed by whitening and loss of feeling, consult your doctor
promptly.
• Injury caused by repeated operation:
Performing the repeated operation for a prolonged time may cause
injury. Observe the following instructions to reduce the causes of the
injury.
* Avoid the repeated operation by using your wrist(s) in bent,
stretched or twisted position.
* Take your breaks regularly to minimize the effect of the repeated
operation. Take your time when performing the repeated
operation. Do not rush to operate the power head.
* When your fingers, hands, wrists and/or arms are throbbing or
numbed, consult your doctor.
8

To ensure safe operation
Child Safety
• Keep children indoors and supervised at all times when any outdoor
power head is being used nearby. Young children move quickly and
are attracted especially to the power head activity.
• Never assume children will remain where you last saw them. Be alert
and turn the power head off if children enter the area.
• Children should never be allowed to operate the power head, even
under adult supervision.
Fire and Burn Hazard
Gasoline is extremely flammable, and gasoline vapor can explode.
Use extreme care when handling gasoline. Keep gasoline out of reach of
children.
• Store fuel in containers specifically designed for this purpose.
• Refuel outdoors only, and do not smoke while refuelling or handling
fuel.
• Add fuel before starting the engine. Never remove the cap of the fuel
tank or add petrol while the engine is running or when the engine is
hot.
• If gasoline is spilled, do not attempt to start the engine but move the
power head away from the area of spillage and avoid creating any
source of ignition until gasoline vapours have dissipated.
• Tighten all fuel tanks and container caps securely.
• When you start the engine after refueling, be sure to start the engine
at least 3 m (10 feet) away from the refueling spot.
• Never store the power head with gasoline in the tank inside a building
where fumes may reach an open flame, spark or high temperature
source.
• Allow the engine to cool before storing in any enclosure.
• To reduce the fire hazard, keep the power head, especially the engine,
muffler, the gasoline storage area as well, free of grass, leaves, or
excessive grease.
Do not leave containers of vegetable matters in or near a building.
• If the fuel tank has to be drained, this should be done outdoors, with
a cold engine.
9

To ensure safe operation
Carbon Monoxide Poisoning Hazard
Exhaust contains poisonous carbon monoxide, a colorless and odorless
gas. Breathing exhaust can cause loss of consciousness and may lead
to death.
• If you run the engine in an area that is confined or even partially
enclosed, the air you breathe could contain a dangerous amount of
exhaust gas. To keep exhaust gas from building up, provide adequate
ventilation.
• Replace faulty muffler.
• Do not operate the engine in a confined space where dangerous
carbon monoxide fumes can collect.
10
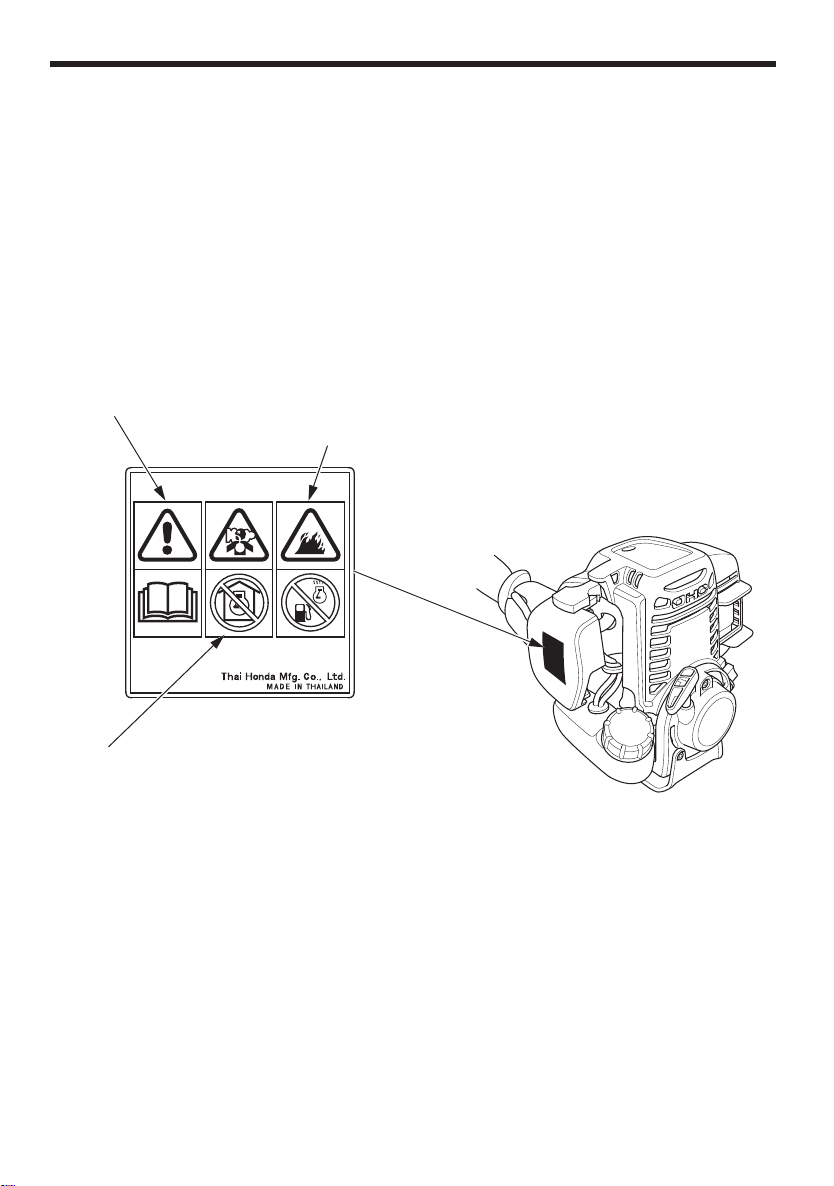
2. SAFETY LABEL LOCATIONS
Your power head must be used with care. Therefore, decals have been
placed on the machine, to remind you pictorially of main precautions to
take during use. Their meanings are explained on page 3.
These decals are considered as a part of the power head. Should one
become detached or unreadable, contact your Honda dealer for its
replacement.
For European model: UMC425E, UMC435E
READ OWNER’S MANUAL
FUEL CAUTION
EXHAUST CAUTION
11
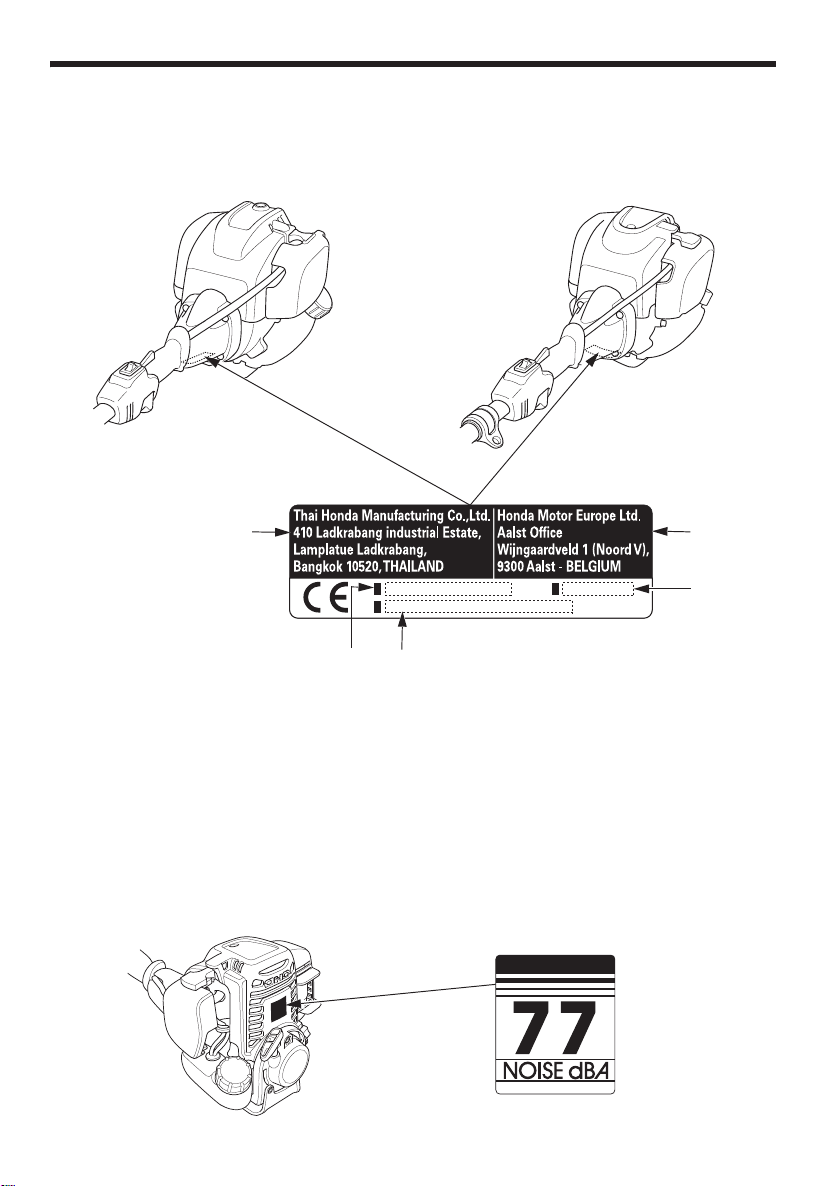
CE mark and noise label locations
1. Model and Type
2. Year of manufacture
3. Manufacturer and address
4. Frame serial number
5. Name and address of authorized representative
For European model:
UMC425E
CE MARK
UMC435E
3
1
4
5
2
*The noise label is affixed to the attachments.
For Australian model:
12
NOISE LABEL

Example: UMC435E
SET PIN KNOB
MAIN PIPE
LOOP HANDLE
ENGINE SWITCH
THROTTLE TRIGGER
INTERLOCK
THROTTLE TRIGGER
HANGER
PROTECTOR
JOINT KNOB
*The following attachments can be used with the power head.
• Brush cutter
• Grass trimmer
•Pruner
•Blower
•Hedge trimmer
• Edger
•Cultivator
3. COMPONENT IDENTIFICATION
13
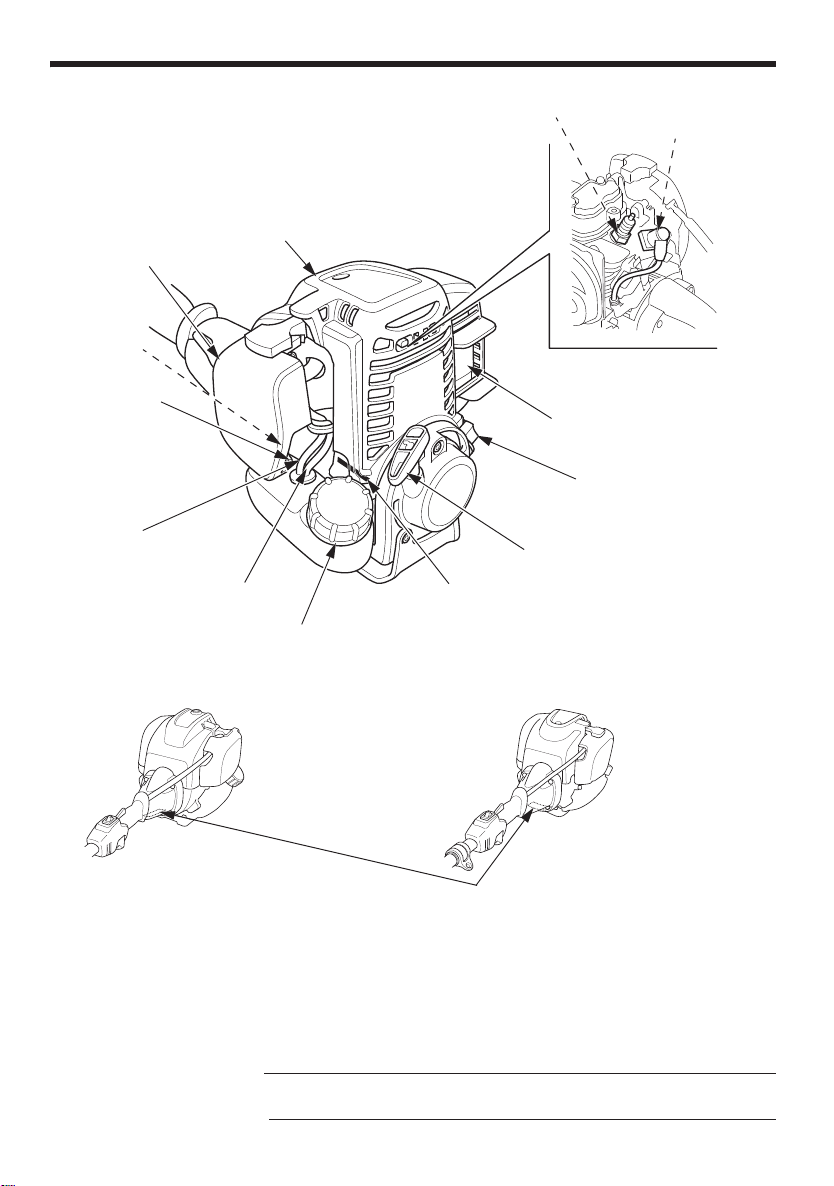
FUEL TUBE
(BLACK TUBE)
FUEL RETURN TUBE
(TRANSPARENT TUBE)
CHOKE
LEVER
PRIMING
PUMP
AIR CLEANER
TOP COVER
SPARK PLUG
SPARK PLUG CAP
(inside the top cover)
MUFFLER
ENGINE OIL
FILLER CAP
STARTER GRIP
ENGINE SERIAL
NUMBER
FUEL TANK CAP
UMC425U
UMC435U
FRAME SERIAL NUMBER
Record the frame serial number (see pages 12 and 14) and the engine
serial number in the space below. You will need these numbers when
ordering parts.
Frame serial number:
Engine serial number:
14
4. CONTROLS
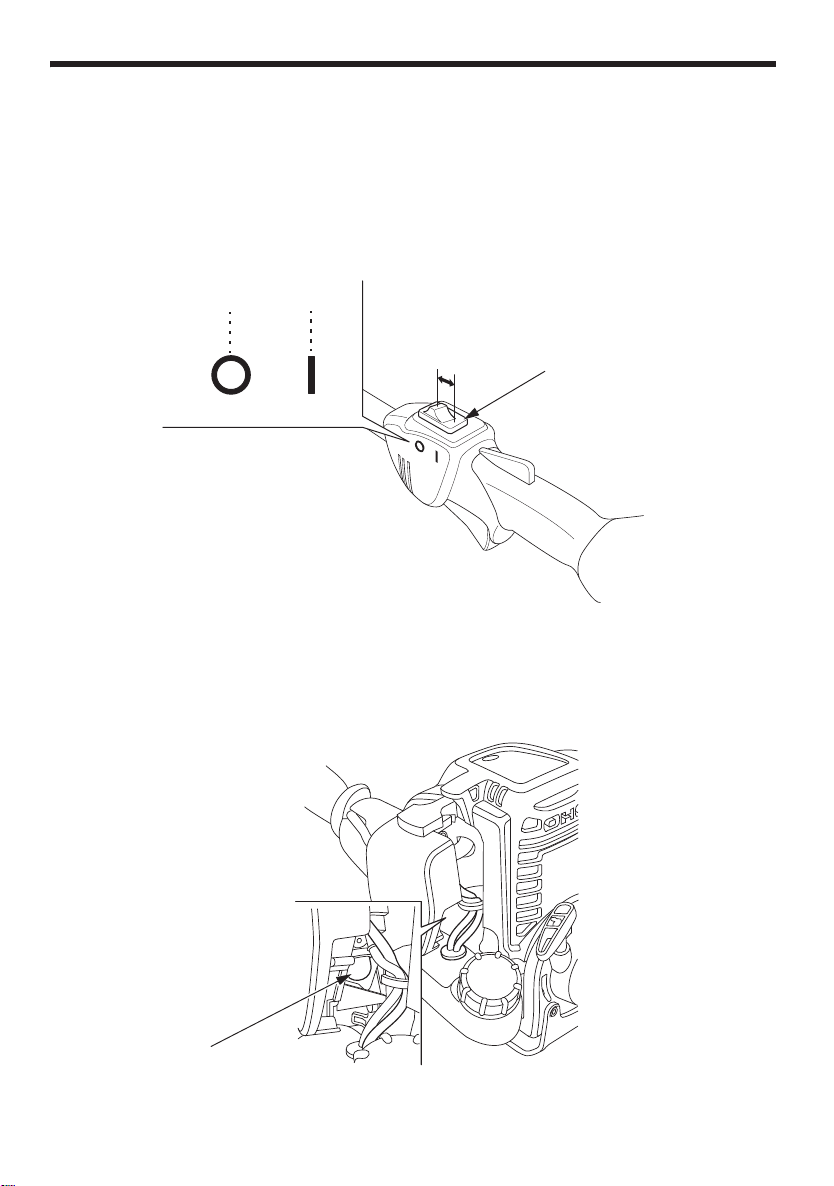
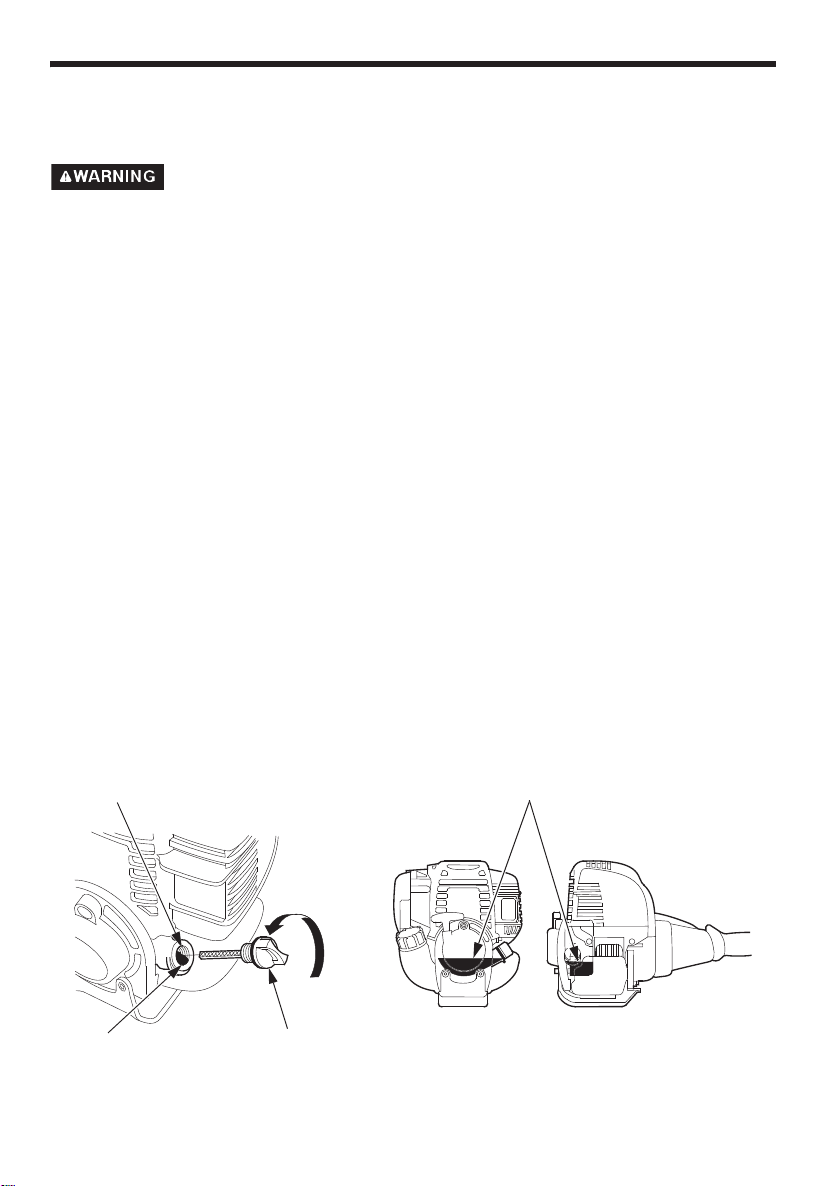
1.Engine switch
The engine switch enables and disables the ignition system.
The engine switch must be in the ON position for the engine to run.
Moving the engine switch to the OFF position stops the engine.
OFF
ON
OFF
ON
ENGINE SWITCH
2.Priming pump
Pressing the priming pump feeds the gasoline from the fuel tank to
the carburetor. This procedure is necessary for starting the engine.
PRIMING PUMP
15
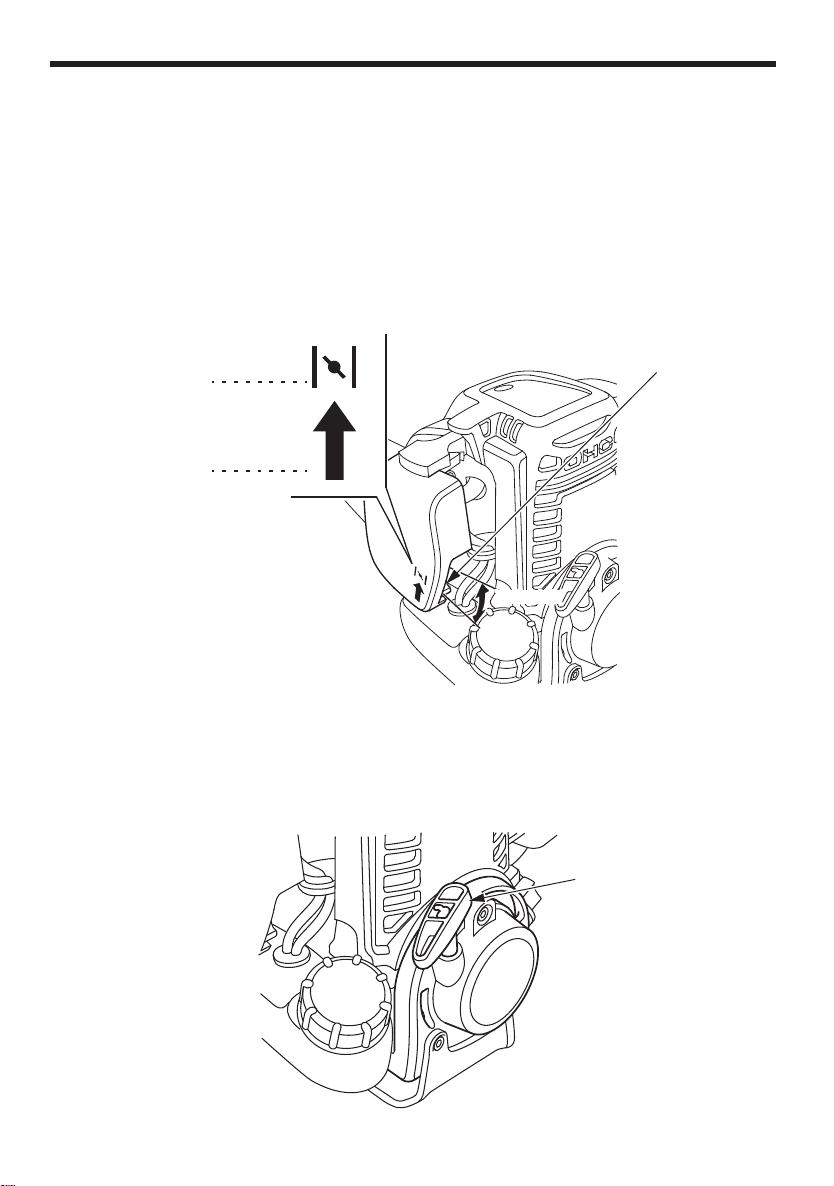
3.Choke lever
The choke lever opens and closes the choke valve in the carburetor.
The CLOSED position enriches the fuel mixture for starting a cold
engine.
The OPEN position provides the correct fuel mixture for operation
after starting, and for restarting a warm engine.
CLOSED
OPEN
CLOSED
OPEN
CHOKE LEVER
4.Starter grip
Pulling the starter grip operates the recoil starter to crank the engine
for starting.
STARTER GRIP
16
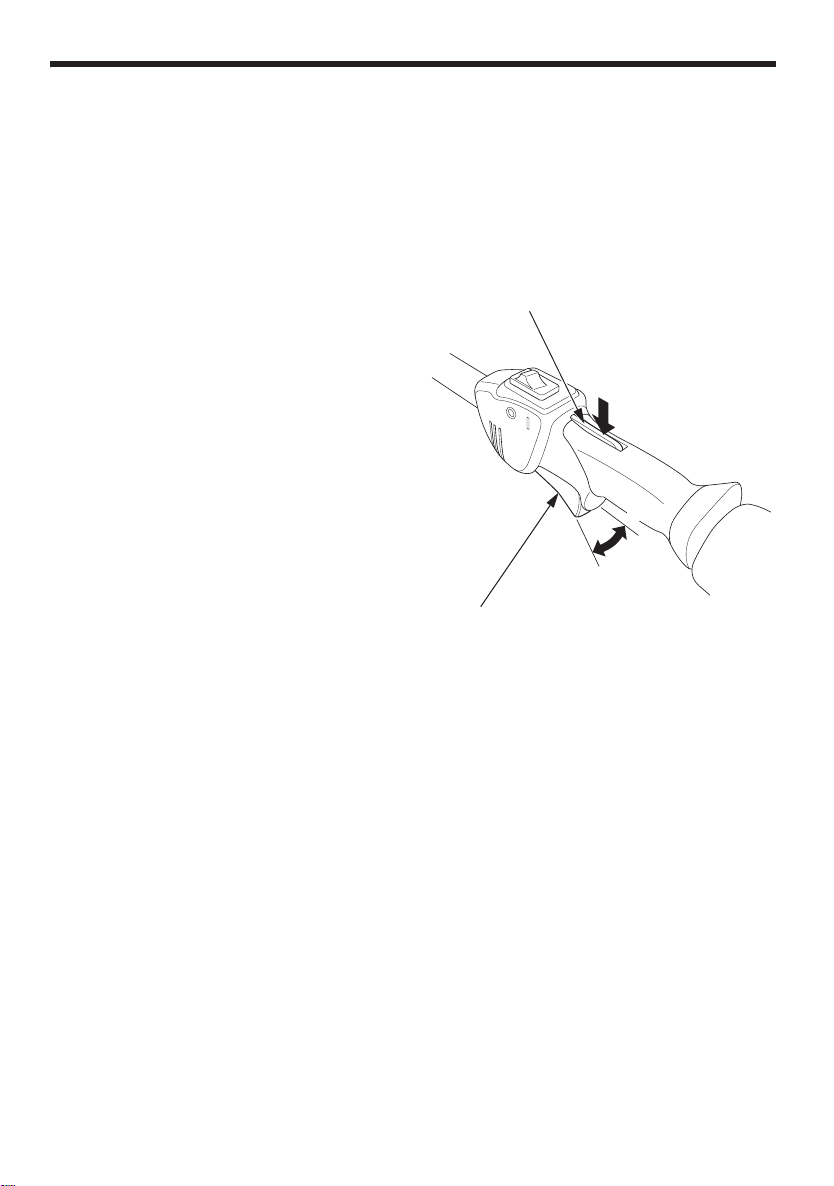
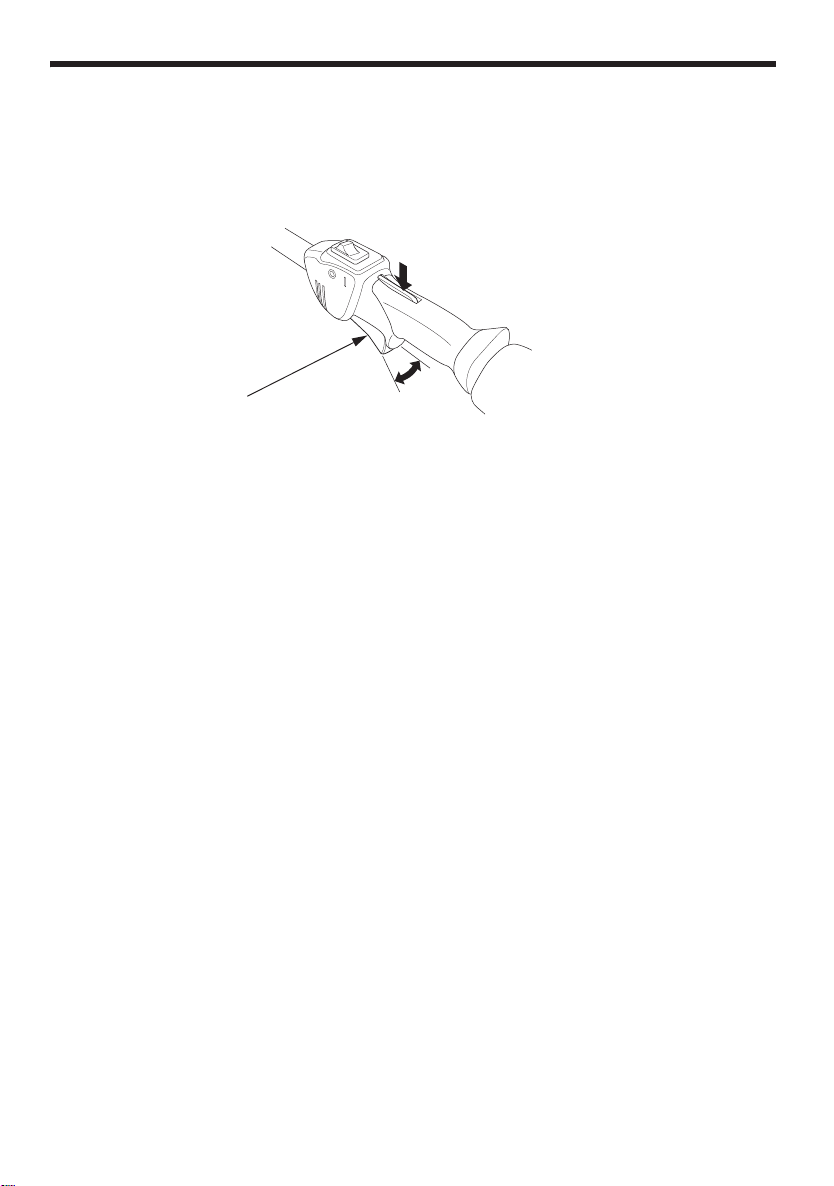
5.Throttle trigger
The throttle trigger controls engine speed.
Pulling and releasing the throttle trigger shown below makes the
engine run faster or slower.
NOTE:
The throttle trigger interlock
must be depressed before the
throttle trigger can be activated.
By pulling the throttle trigger
gradually, the engine speed
increases.
Pull the throttle trigger more to
accelerate the engine speed.
By releasing the throttle trigger,
the engine speed decreases.
Throttle trigger interlock:
The throttle trigger interlock
makes the throttle trigger
operable. The throttle trigger
cannot be pulled unless the
throttle trigger interlock has
been pushed beforehand.
THROTTLE TRIGGER
INTERLOCK
FAST
SLOW
THROTTLE TRIGGER
17
6.Joint
The joint is to attach Honda approved attachment to the power head.
Refer to Pages 30-32 for how to attach and detach the attachments.
JOINT
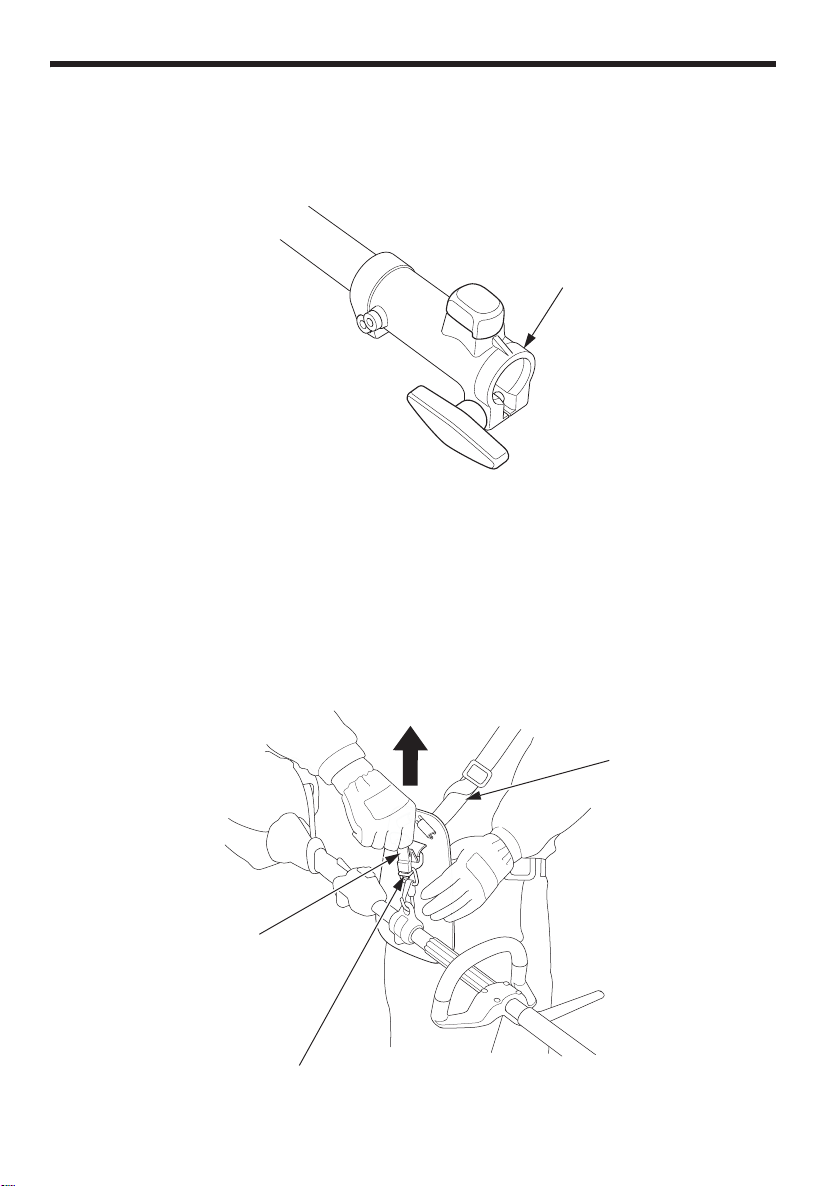
7.Quick-release latch
The quick-release latch tab is provided to detach the power head
from your body in an emergency.
Pull up the quick-release latch tab, and the power head is detached
from the carrying harness.
QUICK-RELEASE LATCH TAB
18
CARRYING
HARNESS
QUICK-RELEASE LATCH
5. PRE-OPERATION CHECKS
For safe and efficient operation, always make a pre-operation inspection
before operating:
Perform a pre-operation inspection on a firm, level surface with the
engine stopped and make sure that the engine switch is in the OFF
position.
1.Check the engine oil level
CAUTION:
Running the engine with low oil level will cause serious engine
damage.
Check the engine oil level before each use, or every 10 hours if operated
continuously.
1.Place the power head on a level surface and remove the oil filler cap.
2.Check the oil level. If it is below the upper limit, fill with the
recommended oil to the upper limit.
3.Reinstall the oil filler cap securely.
ENGINE OIL CAPACITY
UMC425E, UMC425U: 0.08 L (0.08 US qt, 0.07 lmp qt)
UMC435E, UMC435U: 0.10 L (0.11 US qt, 0.09 lmp qt)
OIL FILLER NECK
UPPER LIMIT
ENGINE OIL
FILLER CAP
UPPER LIMIT
19

Use 4-stroke motor oil that meets or exceeds
the requirements for API service
classification SE or later (or equivalent).
Always check the API service label on the oil
container to be sure it includes the letters SE
or later (or equivalent).
SAE 10W-30 is recommended for general
use. Other viscosities shown in the chart
may be used when the average temperature
in your area is within the indicated range.
CAUTION:
Using nondetergent oil or 2-stroke engine oil could shorten the engine’s
service life.
AMBIENT TEMPERATURE
20

2.Check the fuel level
Use automotive unleaded gasoline with a Research Octane Number of
91 or higher (a Pump Octane Number of 86 or higher).
Never use stale or contaminated gasoline or an oil/gasoline mixture.
Avoid getting dirt or water in the fuel tank.
• Gasoline is extremely flammable and is explosive under certain
conditions.
• Refuel in a well-ventilated area with the engine stopped. Do not
smoke or allow flames or sparks in the area where the engine is
refueled or where gasoline is stored.
• Do not overfill the fuel tank (there should be no fuel in the filler neck).
After refueling, make sure the tank cap is closed properly and
securely.
• Be careful not to spill fuel when refueling. Spilled fuel or fuel vapor
may ignite. If any fuel is spilled, make sure the area is dry before
starting the engine.
• Avoid repeated or prolonged contact with skin or breathing of vapor.
KEEP OUT OF REACH OF CHILDREN.
CAUTION:
Gasoline substitutes are not recommended; they may be harmful to
fuel system components.
21
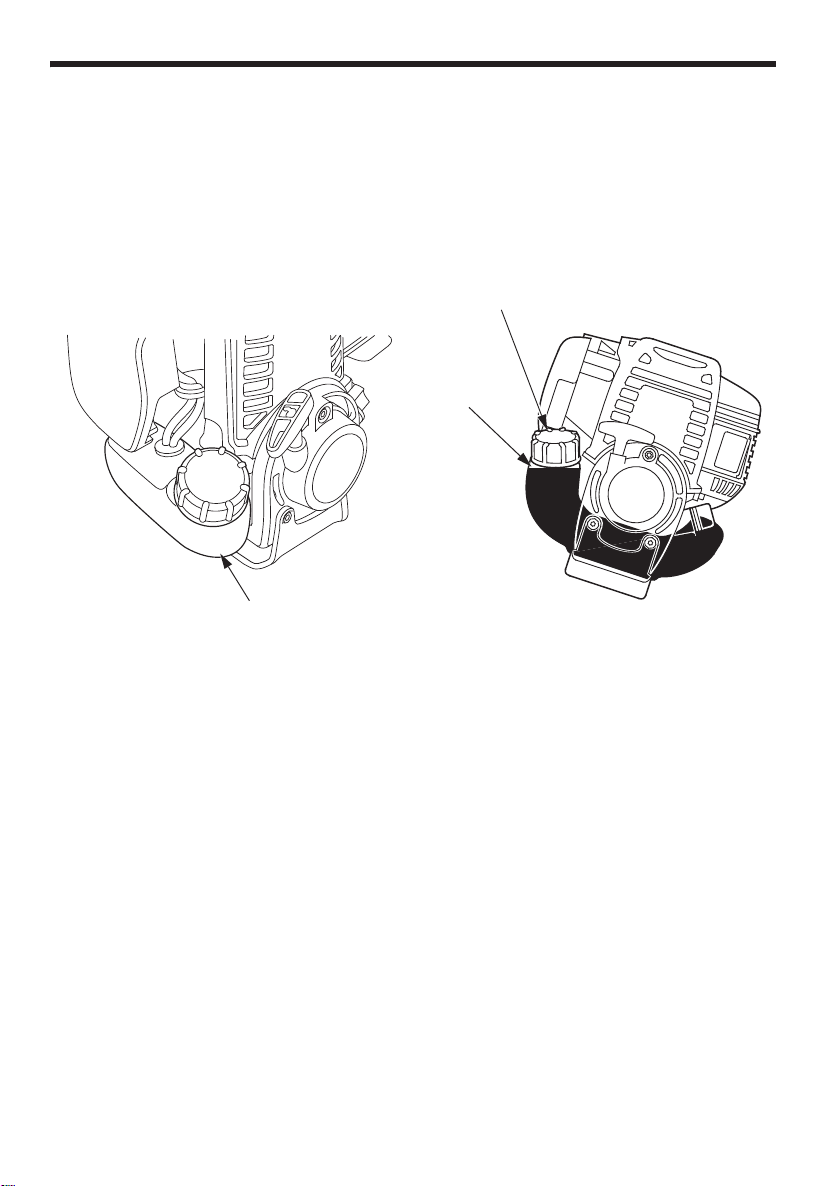
1.Check the fuel level visually from the outside of the fuel tank while
keeping the fuel filler neck upright.
2.If the fuel level is low, refuel the fuel tank until the level as specified.
Remove the fuel tank cap gradually to release a pressurized air in the
fuel tank. Fuel in the fuel tank may spout out, if the fuel tank cap is
removed quickly.
FUEL TANK CAP
UPPER FUEL
LIMIT LEVEL
FUEL TANK
22

NOTE:
Gasoline spoils very quickly depending on factors such as light
exposure, temperature and time.
In worst cases, gasoline can be contaminated within 30 days.
Using contaminated gasoline can seriously damage the engine
(carburetor clogged, valve stuck).
Such damage due to spoiled fuel is disallowed from coverage by the
warranty.
To avoid this please strictly follow these recommendations:
• Only use specified gasoline (see page 21).
• Use fresh and clean gasoline.
• To slow deterioration, keep gasoline in a certified fuel container.
• If long storage (more than 30 days) is foreseen, drain fuel tank and
carburetor (see pages 55 and 56).
Gasolines containing alcohol
If you decide to use a gasoline containing alcohol (gasohol), be sure its
octane rating is at least as high as that recommended by Honda.
There are two types of ‘‘gasohol’’: one containing ethanol, and the
other containing methanol.
Do not use gasohol that contains more than 10% ethanol.
Do not use gasoline containing more than 5% methanol (methyl or
wood alcohol) and that does not also contain co-solvents and corrosion
inhibitors for methanol.
NOTE:
• Fuel system damage or engine performance problems resulting from
the use of gasoline that contains more alcohol than recommended is
not covered under the warranty.
• Before buying gasoline from an unfamiliar station, first determine if
the gasoline contains alcohol, if it does, find out the type and
percentage of alcohol used.
If you notice any undesirable operating symptoms while using a
particular gasoline. Switch to a gasoline that you know contains less
than the recommended amount of alcohol.
23

3.Check the air cleaner
CAUTION:
Never run the engine without the air cleaner; rapid engine wear will
result.
1.Move the choke lever to the CLOSED (upwards) position.
2.Remove the air cleaner cover by unhooking the upper tab on the top
of the air cleaner cover and its two lower tabs.
3.Check the air cleaner element for dirt or obstruction.
Clean the air cleaner element, if it is dirty (see page 45).
4.Reinstall the air cleaner element.
5.Reinstall the air cleaner cover by inserting the lower tabs, then insert
the upper tab.
AIR CLEANER ELEMENT
24
UPPER TAB
AIR CLEANER COVER
LOWER TABS
CHOKE LEVER
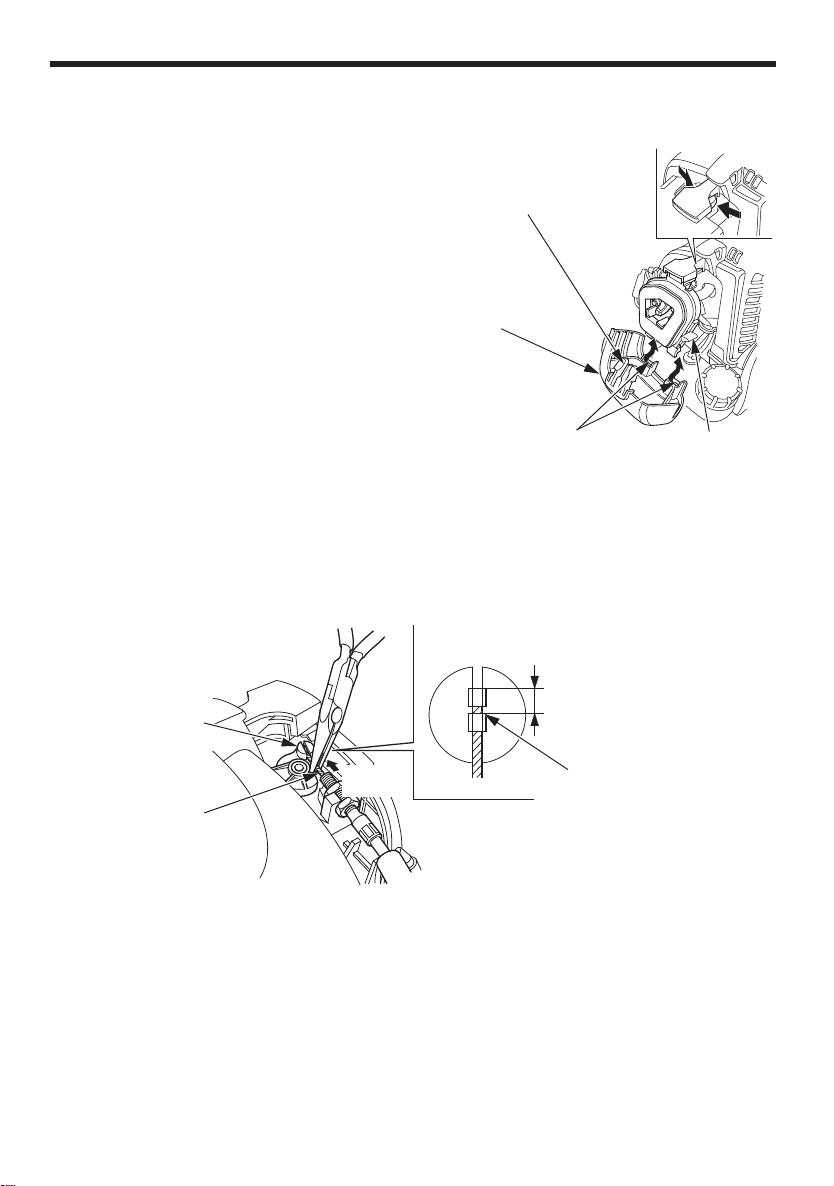
4.Check the throttle cable free play
UPPER TAB
AIR CLEANER
COVER
LOWER TABS
CHOKE LEVER
1.Move the choke lever to the
CLOSED (upwards) position.
2.Remove the air cleaner cover by
unhooking the upper tab on the
top of the air cleaner cover and
its two lower tabs.
3.Pull out the throttle cable lightly and check the extended length of
the throttle cable at the end of the cable. It should be 0.5–2.5 mm
(0.02–0.1 in). (Take care not to damage the throttle cable.) Adjust if
the measurement exceeds the specification (see page 49).
THROTTLE LEVER
THROTTLE CABLE
Pull out
lightly
FREE PLAY:
0.5 - 2.5mm (0.02 - 0.1 in)
TIP OF THE
THROTTLE CABLE
25
4.Operate the throttle system several times and check it has the free
play (i.e. throttle lever does not move while operating the throttle
trigger).
• Check the throttle trigger operates smoothly and always spring back
to the idle position.
THROTTLE TRIGGER
If there is any abnormality, the throttle system must be serviced.
Consult with your authorized Honda dealer.
26
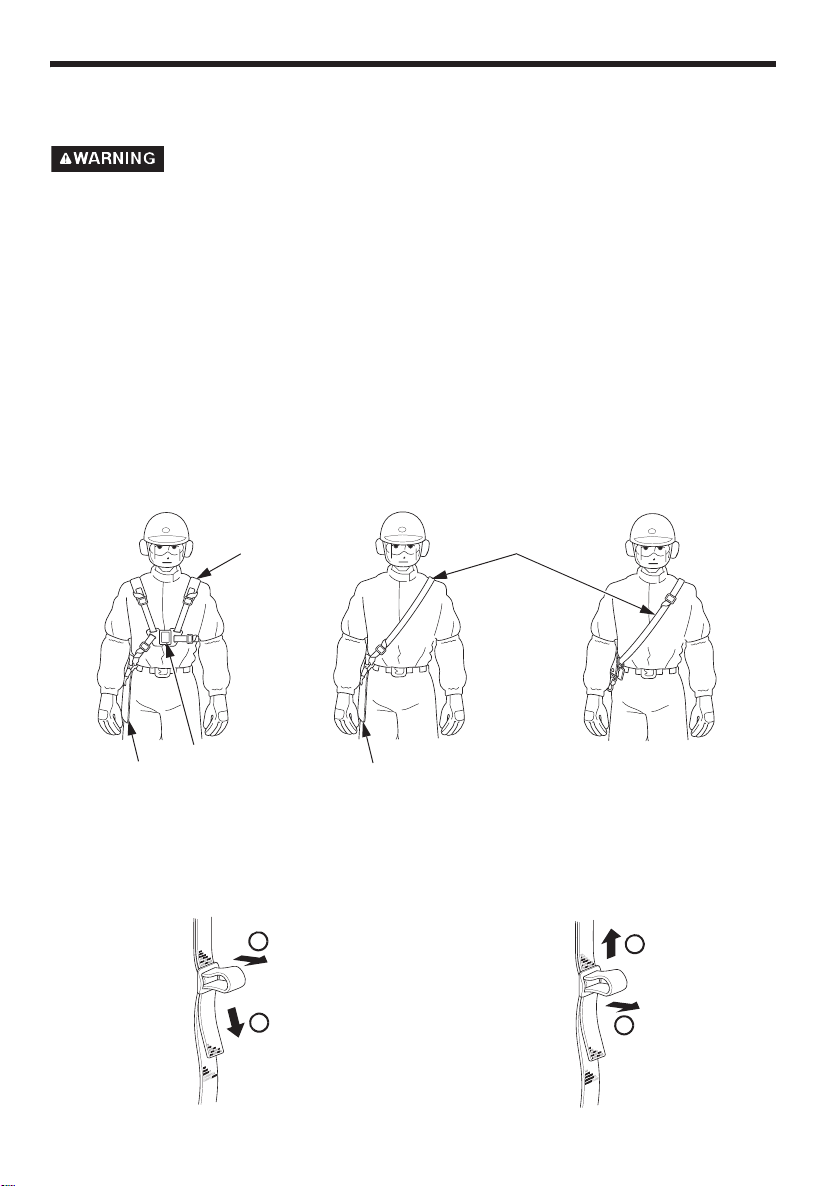
5.Adjustment of the carrying harness
HIP PAD
CARRYING
HARNESS
LATCH
For both shoulders
(UMC435E UMC435U)
CARRYING
HARNESS
CARRYING
HARNESS
For single shoulder
(UMC425E)
For single shoulder
(UMC425U)
HIP PAD
Be sure to wear the carrying harness before using the power head.
Otherwise, injuries might occur due to its instability.
1.Wear the carrying harness so that the hip pad is on the right side of
your body
• Make sure the harness does not twist.
• If the carrying harness is for both shoulders, firmly secure the
carrying harness latch on the front of your body until it clicks.
To unlock the carrying harness latch, pull the harness to the right
and to the left while pressing the latch.
2.Adjust the length of the harness as shown in the figures below.
To make it shorter
1
2
To make it longer
1
2
27
 Loading...