


2000
-
06 ACCESSORIES & EQUIPMENT
SRS components are located in this area. Review the SRS component locations (see
Reconnect the negative cable to the battery.
2006 Honda Insight
2006 Honda Insight
2000-06 ACCESSORIES & EQUIPMENT Dashboard - Insight
2000-06 ACCESSORIES & EQUIPMENT Dashboard - Insight
Dashboard - Insight
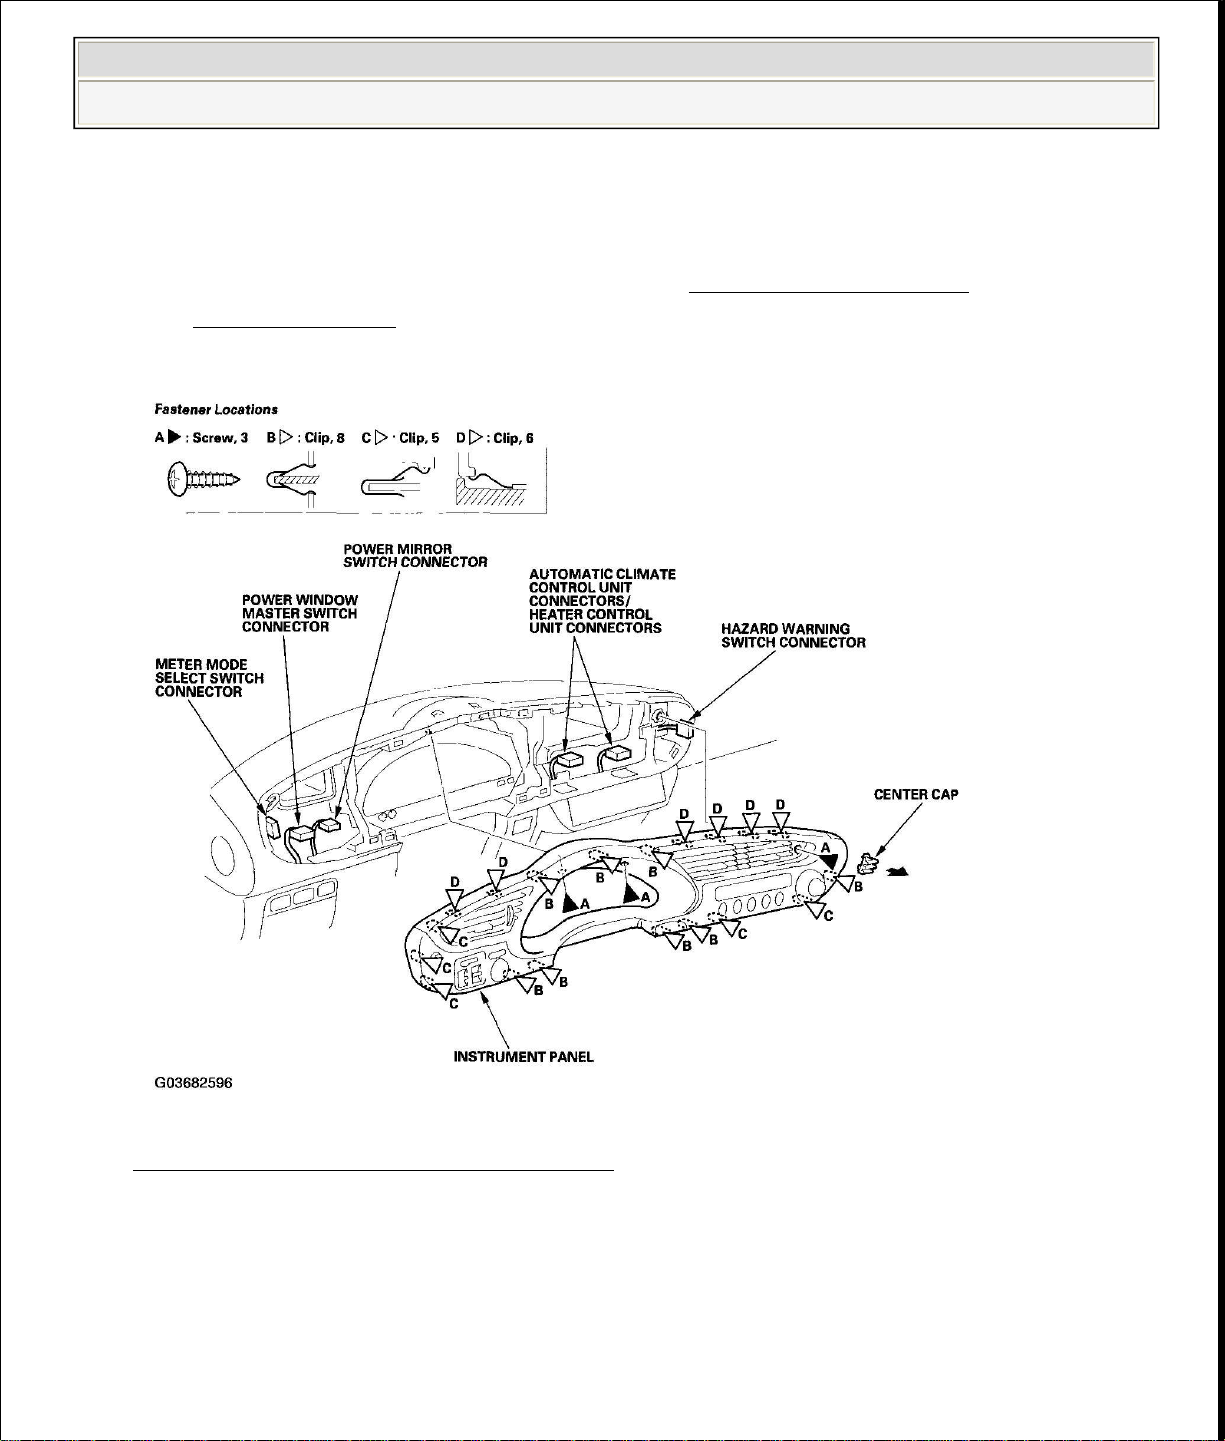
INSTRUMENT PANEL REMOVAL/INSTALLATION
Special Tools Required
KTC trim tool set SOJATP2014 *
* Available through the American Honda Tool and Equipment Program; call 888-
424-6857
COMPONENT LOCATION INDEX ) and the precautions and procedures (see
PRECAUTIONS AND PROCEDURES ) before performing repairs or service.
NOTE:
Use the appropriate tool from the KTC trim tool set to
avoid damage when prying components.
Take care not to scratch the dashboard and related
parts.
1. Make sure you have the anti-theft code for the radio, and then write down the
audio presets.
2. Disconnect the negative cable from the battery, and wait at least 3 minutes
before beginning work.
3. Remove driver's airbag, the steering wheel, and the steering column upper
cover (see STEERING COLUMN REMOVAL AND INSTALLATION ).
4. Remove the instrument panel as shown.
5. Install the instrument panel in the reverse order of removal, and note these
items:
Replace any damaged clips.
Make sure the connectors are plugged in properly.
Push the clips into place securely.
KTC trim tool set SOJATP2014 *
2006 Honda Insight
2000-06 ACCESSORIES & EQUIPMENT Dashboard - Insight
Enter the anti-theft code for the radio, then enter the audio presets.
Reset the clock.
Do the ECM idle learn procedure (see ECM IDLE LEARN
PROCEDURE ).
Fig. 1: Removing Instrument Panel
Courtesy of AMERICAN HONDA MOTOR CO., INC.
CENTER LOWER COVER REMOVAL/INSTALLATION
Special Tools Required

Push the clips into place securely.
2006 Honda Insight
2000-06 ACCESSORIES & EQUIPMENT Dashboard - Insight
* Available through the American Honda Tool and Equipment Program; call 888424-6857
NOTE:
Use the appropriate tool from the KTC trim tool set to
avoid damage when prying components.
Take care not to scratch the dashboard and related
parts.
1. Remove the glove box (see GLOVE BOX REMOVAL/INSTALLATION ).
2. Remove the center lower cover as shown.
3. Install the center lower cover in the reverse order of removal, and note these
items:
Replace any damaged clips.
Make sure the connector is plugged in properly.
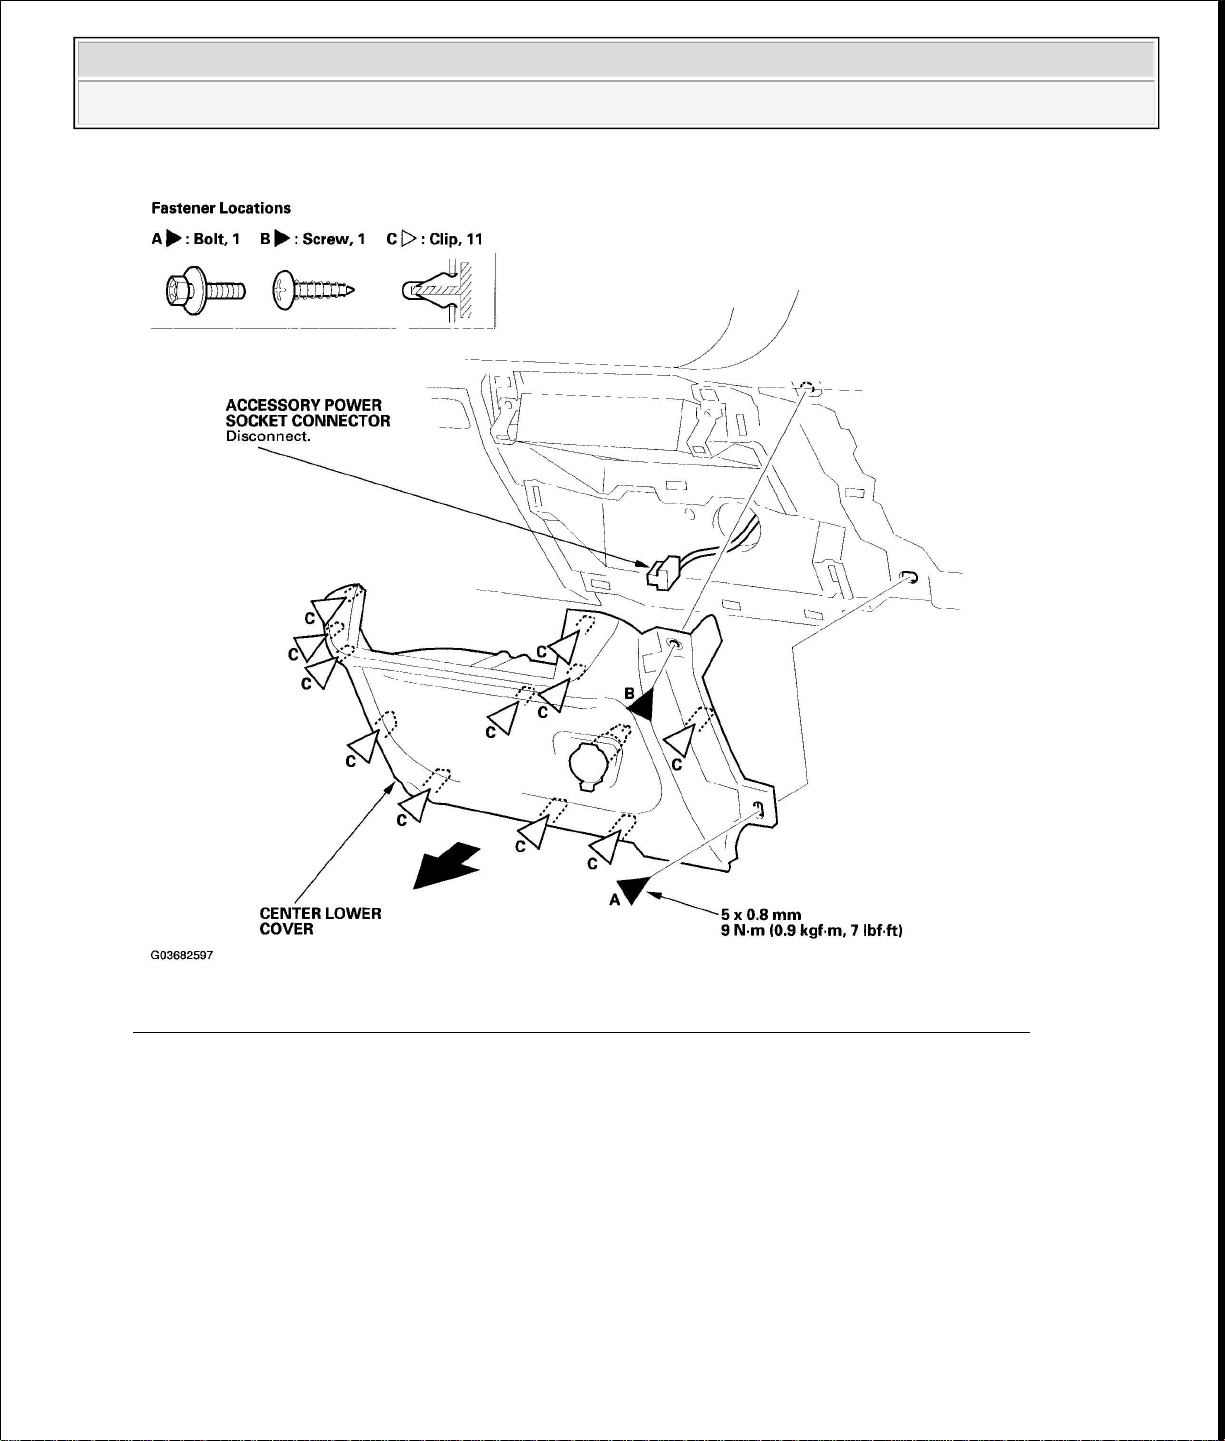
2.
Install the glove box in the reverse order of removal.
2006 Honda Insight
2000-06 ACCESSORIES & EQUIPMENT Dashboard - Insight
Fig. 2: Removing Center Lower Cover And Torque Specifications
Courtesy of AMERICAN HONDA MOTOR CO., INC.
GLOVE BOX REMOVAL/INSTALLATION
NOTE: Take care not to scratch the dashboard and related parts.
1. Remove the glove box as shown.

2006 Honda Insight
2000-06 ACCESSORIES & EQUIPMENT Dashboard - Insight
Fig. 3: Removing Glove Box And Torque Specifications
Courtesy of AMERICAN HONDA MOTOR CO., INC.

PASSENGER'S SIDE VENT REMOVAL/ INSTALLATION
related parts.
2006 Honda Insight
2000-06 ACCESSORIES & EQUIPMENT Dashboard - Insight
Special Tools Required
KTC trim tool set SOJATP2014 *
* Available through the American Honda Tool and Equipment Program; call 888-
424-6857
NOTE: Use the appropriate tool from the KTC trim tool set to avoid
damage when prying components.
1. Carefully insert a trim tool next to the clip (A), and detach the clips by prying
on the passenger's side vent (B). Take care not to scratch the dashboard and

DASHBOARD REMOVAL/INSTALLATION
2006 Honda Insight
2000-06 ACCESSORIES & EQUIPMENT Dashboard - Insight
Fig. 4: Removing Passenger's Side Vent
Courtesy of AMERICAN HONDA MOTOR CO., INC.
2. Remove the vent by releasing the hooks (C).
3. Reinstall the hook portions of the vent first, then push the clip portions into
place securely.

Special Tools Required
SRS components are located in this area. Review the SRS component locations (see
)
2006 Honda Insight
2000-06 ACCESSORIES & EQUIPMENT Dashboard - Insight
KTC trim tool set SOJATP2014 *
* Available through the American Honda Tool and Equipment Program; call 888-
424-6857
COMPONENT LOCATION INDEX ) and the precautions and procedures (see
PRECAUTIONS AND PROCEDURES ) before performing repairs or service.
NOTE:
Use the appropriate tool from the KTC trim tool set to
avoid damage when prying components.
Have an assistant help you remove and install the
dashboard.
Take care not to scratch the dashboard, body, and
other related parts.
Put on gloves to protect your hands.
1. Make sure you have the anti-theft code for the radio, and then write down the
audio presets.
2. Disconnect the negative cable from the battery, and wait at least 3 minutes
before beginning work.
3. Remove these items:
Front console (see FRONT CONSOLE
REMOVAL/INSTALLATION )
Center lower cover (see CENTER LOWER COVER
REMOVAL/INSTALLATION )
Audio unit (see AUDIO UNIT REMOVAL )
Steering column (see STEERING COLUMN REMOVAL AND
INSTALLATION )
Passenger's airbag (see PASSENGER'S AIRBAG REPLACEMENT )
A-pillar trim, both sides (see TRIM REMOVAL/INSTALLATION DOOR AREAS

the shift knob, seats, and interior parts.
2006 Honda Insight
2000-06 ACCESSORIES & EQUIPMENT Dashboard - Insight
4. Disconnect the steering beam wire harness connectors (A), main wire harness
connector (B), floor wire harness connector (C), water temperature sensor
connector (D), mode motor connector (E), and air hose (if equipped) (F).
Fig. 5: Disconnecting Wire Harness Connectors
Courtesy of AMERICAN HONDA MOTOR CO., INC.
5. Detach all of the harness and connector clips.
6. Remove the driver's pocket (G).
7. Remove the bolts (A) and screws (B), and lift up on the dashboard (C) to
release it from the dashboard holders (body side) (D). Take care not to scratch

Do the ECM idle learn procedure (see
ECM IDLE LEARN
2006 Honda Insight
2000-06 ACCESSORIES & EQUIPMENT Dashboard - Insight
Fig. 6: Removing Dashboard And Torque Specifications
Courtesy of AMERICAN HONDA MOTOR CO., INC.
8. Carefully remove the dashboard through the door opening.
9. Install the dashboard in the reverse order of removal, and note these items:
Make sure the dashboard fits onto the dashboard holders correctly.
Before tightening the bolts, make sure the dashboard wire harness and
steering beam wire harness are not pinched.
Make sure the connectors are plugged in properly.
Reconnect the negative cable to the battery.
Enter the anti-theft code for the radio, then enter the audio presets.
Reset the clock.

PROCEDURE
).
2006 Honda Insight
2000-06 ACCESSORIES & EQUIPMENT Dashboard - Insight
 Loading...