

Page 1
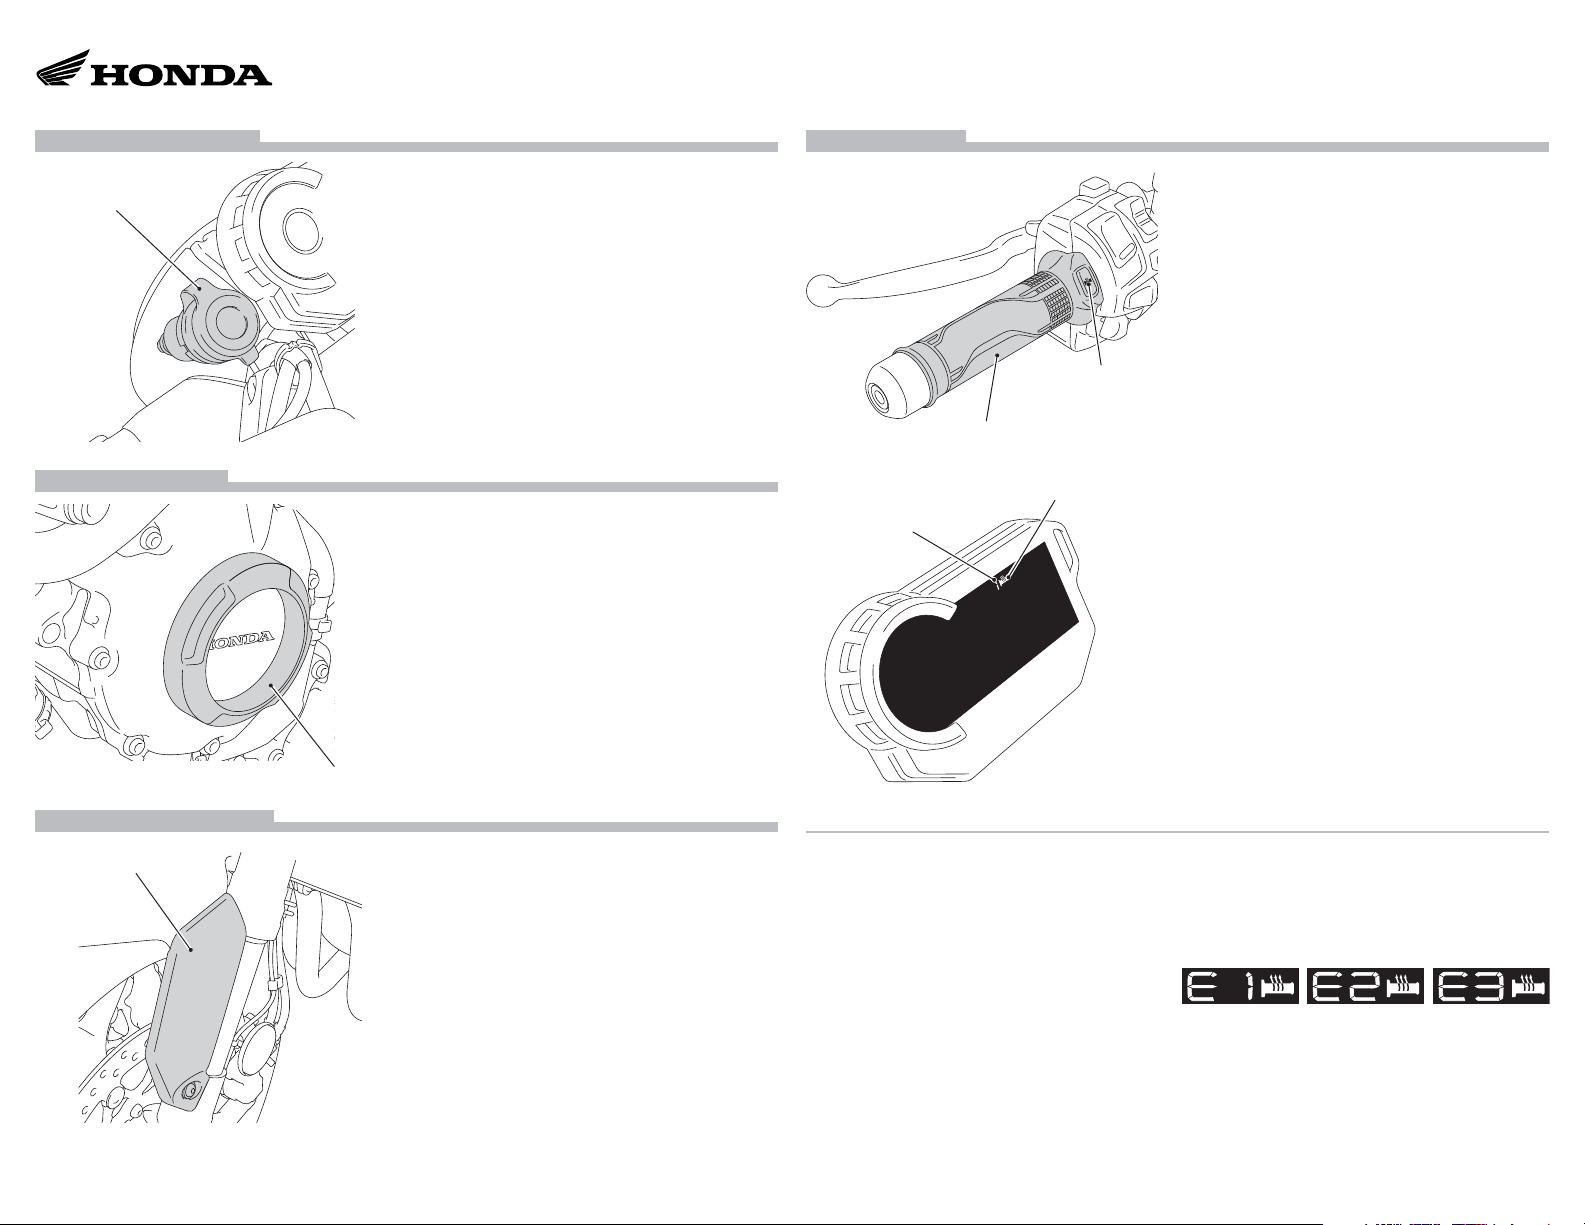
ACCESSORY SOCKET
ACCESSORY SOCKET
CRANKCASE RING
CRANKCASE RING
• The maximum power rating of connected
accessories is 12W (12V, 1A).
• Use accessories with engine running to avoid
discharging the battery.
• Do not use a cigarette lighter, as this can cause a
malfunction.
• Cover the socket with the cap when the
accessory socket is not used to prevent entry of
foreign objects.
• Carefully secure any connected devices, as
vibrations may cause them to shift unexpectedly.
• Make sure that the cable of device connected to
the accessory socket does not disturb the steering
operation or riding. Do not pinch the cable to
prevent from being damaged.
• When this accessory becomes dirty, rinse it
thoroughly with cool water to remove loose dirt,
then wipe with a clean cloth or sponge.
Do not use a brush to clean this accessory as it
may scratch the surface.
• Never use organic solvents such as gasoline,
thinner and benzine to clean this accessory. Also
do not use acid or alkaline cleaners to clean this
accessory.
Wipe up spilled brake or battery fluid at once as
they may damage the surface.
HEATED GRIPS
HEATED GRIP
HEATER LEVEL
CB1000RA
Genuine Accessory User’s Guide
• Wear gloves to protect your hands from the
heated grips.
• Do not use the heated grips with the engine at
idle for a long time. It may result in a low (or dead)
battery.
• The heated grip warms up the right and left grips
of the handlebar for comfortable riding on a cold
day.
• Adjust the temperature by repeatedly pressing
the switch.
INDICATOR
HEATED GRIP
STATUS ICON
The temperature can be adjusted to five levels.
• The heated grip maintains the selected level
when the ignition switch is turned off.
• The heater level is not saved if the ignition switch
is turned to the OFF position within 5 seconds of
changing the heater level.
• Do not leave the heated grip in the high position
for a long time on a warm day.
INDICATOR
• Displayed when the heated grips are on.
• The selected heater level is indicated by the
number of times the indicator blinks when
the heater is turned on and the heater level is
changed. For example, If you select heater level 5,
the indicator blinks 5 times and repeats it 7 times.
HEATER LEVEL
• The selected heater level is indicated for a few
seconds when the heater switch is operated.
FRONT FENDER PANEL
FRONT FENDER PANEL
© 2018 Honda Motor Co., Ltd. 71MKJ000
• When this accessory becomes dirty, rinse it
thoroughly with cool water to remove loose dirt,
then wipe with a clean cloth or sponge.
Do not use a brush to clean this accessory as it
may scratch the surface.
• Never use organic solvents such as gasoline,
thinner and benzine to clean this accessory. Also
do not use acid or alkaline cleaners to clean this
accessory.
Wipe up spilled brake or battery fluid at once as
they may damage the surface.
HE ATE D G R I P STATUS ICON
• Displayed when the heated grips are on.
• If the heated grips system has an error, the
heated grips status icon will blink. If the “E1”, “E2”
or “E3” blinking does not go off, see your Honda
dealer as soon as possible.
1 of 6
Page 2

CB1000RA
Genuine Accessory User’s Guide
HOW TO USE THE HEATED GRIPS
1. Start the engine.
2. Press the heater switch. The heated grips are
on.
3. Select the heater level by pressing the heater
switch.
• The clock on the display automatically
switches to indicate the heater level. The
indicator will return to the ordinary mode
after blinking for about 5 seconds.
4. To turn off the heater, press the heater switch
until the status icon on the display disappears.
• Also to turn off, press and hold the heater
switch.
OFF
LEVEL 5
Highest
temperature
LEVEL 4
LEVEL 3
LEVEL 2
LEVEL 1
Lowest
temperature
Press the heater switch.
Press and hold the
heater switch.
METER VISOR
METER VISOR
QUICK SHIFTER
QUICK SHIF TER
• When this accessory becomes dirty, rinse it
thoroughly with cool water to remove loose dirt,
then wipe with a clean cloth or sponge.
Do not use a brush to clean this accessory as it
may scratch the surface.
• Never use organic solvents such as gasoline,
thinner and benzine to clean this accessory. Also
do not use acid or alkaline cleaners to clean this
accessory.
Wipe up spilled brake or battery fluid at once as
they may damage the surface.
• Handle this accessory with care.
It can be damaged when it is bent excessively or
is subject to strong shock or impact.
• Do not disassemble the quick shifter.
• If the gear position display is not normal, the shift
feeling may change.
• When the shift change does not operate normally,
the shift change can be operated by clutch
operation.
• If the PGM-FI malfunction indicator lamp comes
on or the gear position indicator flashes “-” in the
current gear position, the Quick Shifter system
may not operate. If either of the above occurs,
contact your dealer as soon as possible.
HOW TO USE THE QUICK SHIFTER
•This accessory enables up and down gear
shifting without using the clutch during
acceleration/deceleration (Engine speed is
more than 1,350 rpm on upshifting or more
than the idle speed on downshifting).
•This system does not function when
upshifting with the throttle closed.
•This system does not function when the
clutch lever is being operated.
2 of 6
Page 3

REAR SEAT BAG
REAR SEAT BAG
• The weight of the cargo must not exceed the
following maximum weight capacity:
Rear seat bag 8.8 lb (4.0 kg)
• Be sure that the rear seat bag is installed
securely before riding.
• Before riding, close the rear seat bag.
• The rear seat bag is not perfectly water tight, and
water may enter when it rains, etc.
• Do not store valuables or fragile articles in the
rear seat bag.
• To prevent burns, allow the engine, exhaust
system, radiator, etc., to cool before installing and
removing the accessory.
• When washing the motorcycle and when leaving
the motorcycle, remove the rear seat bag.
• Do not let anybody ride on the rear seat bag.
• Never use organic solvents such as gasoline,
thinner and benzine to clean this accessory. Also
do not use acid or alkaline cleaners to clean this
accessory.
Wipe up spilled brake or battery fluid at once as
they may damage the surface.
REAR SEAT BAG
CB1000RA
Genuine Accessory User’s Guide
HOW TO INSTALL THE REAR SEAT BAG
1. Install the rear seat bag as shown.
• Repeat on the right side.
REAR
STRAP
FRONT STRAP
REAR SEAT BAG
FRONT STRAP
REAR
STRAP
2. Tighten the straps while adjusting the balance
between the right and left sides of the rear seat
bag as shown.
• Repeat on the right side.
• Secure well by pulling the straps tight.
3 of 6
Page 4

CB1000RA
Genuine Accessory User’s Guide
3. Wind the strap as shown.
4. Secure the strap end as shown.
STRAP
STRAP END
RAIN COVER
FAST EN ER
HOW TO USE THE RAIN COVER
1. Open the fastener as shown.
• Perform this step on the extended rear
seat bag.
REAR SEAT BAG
FRONT
STRAP
REAR STRAP
Not protrude.
TAI L L I GHT
5. Secure the other straps in the same manner.
6. Make sure that the rear seat bag does not
protrude to the rear of the tail light as shown.
• If the rear seat bag protrudes, adjust the
tensions of front strap and rear strap.
RAIN COVER
RAIN COVER
2. Temporarily release the buckles and pass them
through the rain cover holes as shown.
Pass.
BUCKLE
3. Cover the rain cover as shown.
4. Lock the buckles as shown.
RAIN COVER
BUCKLE
4 of 6
Page 5

REAR SEAT BAG
FAST EN ER
HOW TO EXTEND THE REAR
SEAT BAG
1. Open the fastener as shown.
SEAT COWL
SEAT COWL
CB1000RA
Genuine Accessory User’s Guide
• Do not allow passengers to ride on the seat cowl.
• Do not attach luggage to the seat cowl.
• When this accessory becomes dirty, rinse it
thoroughly with cool water to remove loose dirt,
then wipe with a clean cloth or sponge.
Do not use a brush to clean this accessory as it
may scratch the surface.
• Never use organic solvents such as gasoline,
thinner and benzine to clean this accessory. Also
do not use acid or alkaline cleaners to clean this
accessory.
Wipe up spilled brake or battery fluid at once as
they may damage the surface.
REAR SEAT BAG
Firmly pull to secure the belts.
2. Pull up the rear seat bag as shown.
TANK BAG
TAN K B AG
• The weight of the cargo must not exceed the
following maximum weight capacity:
Tank bag 2.2 lb (1.0 kg)
• Be sure that the tank bag is installed securely
before riding.
• Before riding, close the tank bag.
• The tank bag is not perfectly watertight, and
water may enter when it rains, etc.
• Do not store valuables or fragile articles in the
seat bag.
• When washing the motorcycle and when leaving
the motorcycle, remove the tank bag.
• Before installation, remove all dust, sand, etc.
from fuel tank and tank bag, as otherwise the fuel
tank may be damaged.
• Never use organic solvents such as gasoline,
thinner and benzine to clean this accessory. Also
do not use acid or alkaline cleaners to clean this
accessory.
Wipe up spilled brake or battery fluid at once as
they may damage the surface.
5 of 6
Page 6

TANK BAG STRAP
TAN K B AG
BUCKLE
TAN K B AG
HOW TO INSTALL THE TANK BAG
1. Lock the buckle as shown.
2. Install the tank bag as shown.
WHEEL STRIPE
WHEEL STRIPE
CB1000RA
Genuine Accessory User’s Guide
• When this accessory becomes dirty, rinse it
thoroughly with cool water to remove loose dirt,
then wipe with a clean cloth or sponge.
Do not use a brush to clean this accessory as it
may scratch the surface.
• Never use organic solvents such as gasoline,
thinner and benzine to clean this accessory. Also
do not use acid or alkaline cleaners to clean this
accessory.
Wipe up spilled brake or battery fluid at once as
they may damage the surface.
• Do not wash the motorcycle with a high-pressure
washer, as this may peel off the wheel stripes.
RAIN COVER
HOW TO USE THE RAIN COVER
1. Put the rain cover on the tank bag as shown.
6 of 6
 Loading...