

Page 1

HOLUX M1
M1
Digital Video Recorder
User Manual
Version: V1.0
Page 2

HOLUX M1
Important Notice
1. Do not drop, puncture or disassemble the device; otherwise the
warranty will be voided.
2. Avoid all contact with water, and dry hands before using.
3. Use the device with care. Avoid pressing hard on the device body.
4. For your own safety, avoid using the device when there is a storm
or lightning.
5. Use only the accessories supplied by the manufacturer.
6. Keep the device out of the reach of infants.
7. When you get off the car, do not leave the device on the dashboard
that is subject to direct sunlight.
8. For your own safety, do not operate the controls of the product
while driving. This product is intended to be used as a car
Camcorder aid only.
i
Page 3

HOLUX M1
FCC Compliance Statement
This device complies with Part 15 of the FCC
Rules. Operation is subjected to the following
two conditions: (1) this device may not cause
harmful interference, and (2) this device must
accept any interference received, including
interference that may cause undesired
operation.
This equipment has been tested and found to comply with limits for a
Class B digital device, pursuant to Part 15 of the FCC rules. These limits
are designed to provide reasonable protection against harmful
interference in residential installations. This equipment generates, uses,
and can radiate radio frequency energy, and if not installed and used in
accordance with the instructions, may cause harmful interference to
radio communications. However, there is no guarantee that interference
will not occur in a particular installation. If this equipment does cause
interference to radio or television equipment reception, which can be
determined by turning the equipment off and on, the user is encouraged
to try to correct the interference by one or more of the following
measures: -Reorient or relocate the receiving antenna. -Move the
equipment away from the receiver. -Plug the equipment into an outlet on
a circuit different from that to which the receiver is connected.
- Consult the dealer or an experienced radio/ television technician for
additional suggestions.
You are cautioned that any change or modifications to the equipment
ii
Page 4

HOLUX M1
not expressly approved by the party responsible for compliance could
void your authority to operate such equipment.
If the time arises to throw away your product, please recycle all the
components possible.
Batteries and rechargeable batteries are not to be disposed in your
domestic waste! Please recycle them at your local recycling point.
Together we can help to protect the environment.
iii
Page 5

HOLUX M1
Copyright Information
No part of this manual, including the products and software described in
it, may be reproduced, transmitted, transcribed, stored in a retrieval
system, or translated into any language in any form or by any mean,
without the express written permission of HOLUX Technology, Inc.
Copyright, All Rights Reserved.
iv
Page 6

HOLUX M1
Table of Contents
Product Introduction ............................................................................ 1
Product Features.................................................................................. 1
Package Content.................................................................................. 2
Product Overview................................................................................. 3
Using the In-Vehicle Bracket................................................................ 6
Installation suggestions..................................................................... 7
Charging the battery ............................................................................ 8
Using the car charger........................................................................ 8
Using Micro SD card (Optional) ........................................................... 9
Using the M1.........................................................................................11
Turn on/ off the device ........................................................................11
Recording Mode................................................................................. 12
Normal Recording ........................................................................... 12
Emergency Recording .................................................................... 12
Photo Mode........................................................................................ 13
Playback Mode................................................................................... 14
Playback on built-in LCD................................................................. 14
Playback on a TV ............................................................................ 14
Playback on a PC............................................................................ 15
Menu Settings .................................................................................... 16
Menu Options.................................................................................. 17
Specification........................................................................................ 23
v
Page 7

HOLUX M1
Product Introduction
Product Features
• Light-weighted and Compact DVR
• Records video in FULL HD 1080p at 30fps and HD 720p up to 60fps
• Advanced H.264 video compression technology
• 5.0 megapixels lens and aperture F 2.2 record the clearest video
and great quality photos
• The view angel is 140° wide angle-FOV
• Supports emergency recording function
• Real-time/ in-car playback
• Circling recording
• Support NTSC/ PAL system
• Built-in 2.0" TFT LCD
• Micro SD slot support SDHC up to 32 GB
• Ignition to start/ stop recording
• Easy mounting on windshield
1
Page 8

Package Content
HOLUX M1
DVR- M1 Bracket
Car Charger USB Cable Quick Guide
2
Page 9

Product Overview
Front View
2
○
3
○
4
○
1
○
HOLUX M1
Rear View
Bottom View
11
○
5
○
6
○
7
○
8
○
9
○
10
○
12
○
3
Page 10

Right View
13
○
HOLUX M1
15
○
Number Function
○1
Lens
Short press: Sound button
○2
Long press: Screen button (to saving power)
Short press: MENU button
○3
14
○
16
○
Long press: switch day and night mode
Short press: MODE button (Switch Recode mode- Photo
○4
mode- Playback mode)
Long press: SOS (Record mode only)
○5
Microphone
Short press: Display satellite signal information
○6
Long press: POWER ON/ OFF
4
Page 11

Up button
HOLUX M1
○7
○8
○9
○10
○11
○12
○13
Zoom in
Motion detection (in standby status)
Down button
Zoom out
OK button
RESET button
LCD display
Micro SD card slot
HD out port
○14
○15
○16
USB port
Speaker
GPS connector
5
Page 12

HOLUX M1
Using the In-Vehicle Bracket
The included in-vehicle bracket set can be securely suctioned on the
front windshield. Follow the procedures below to secure the bracket:
1. Follow the arrows and secure the unit into the in-vehicle bracket
fitting holes.
2. Suction the vehicle bracket securely to the windshield.
Bend the bracket support to a proper angle .
6
Page 13

HOLUX M1
Recommended installed location
Installation suggestions
1. Be sure to place the device in an appropriate place, so as not to
obstruct the driver's view or deployment of air bags.
2. Use the Top 1/5 of the windshield.
3. Be sure the interior rear view mirror/ viewing area mirror do not
block the camera.
7
Page 14
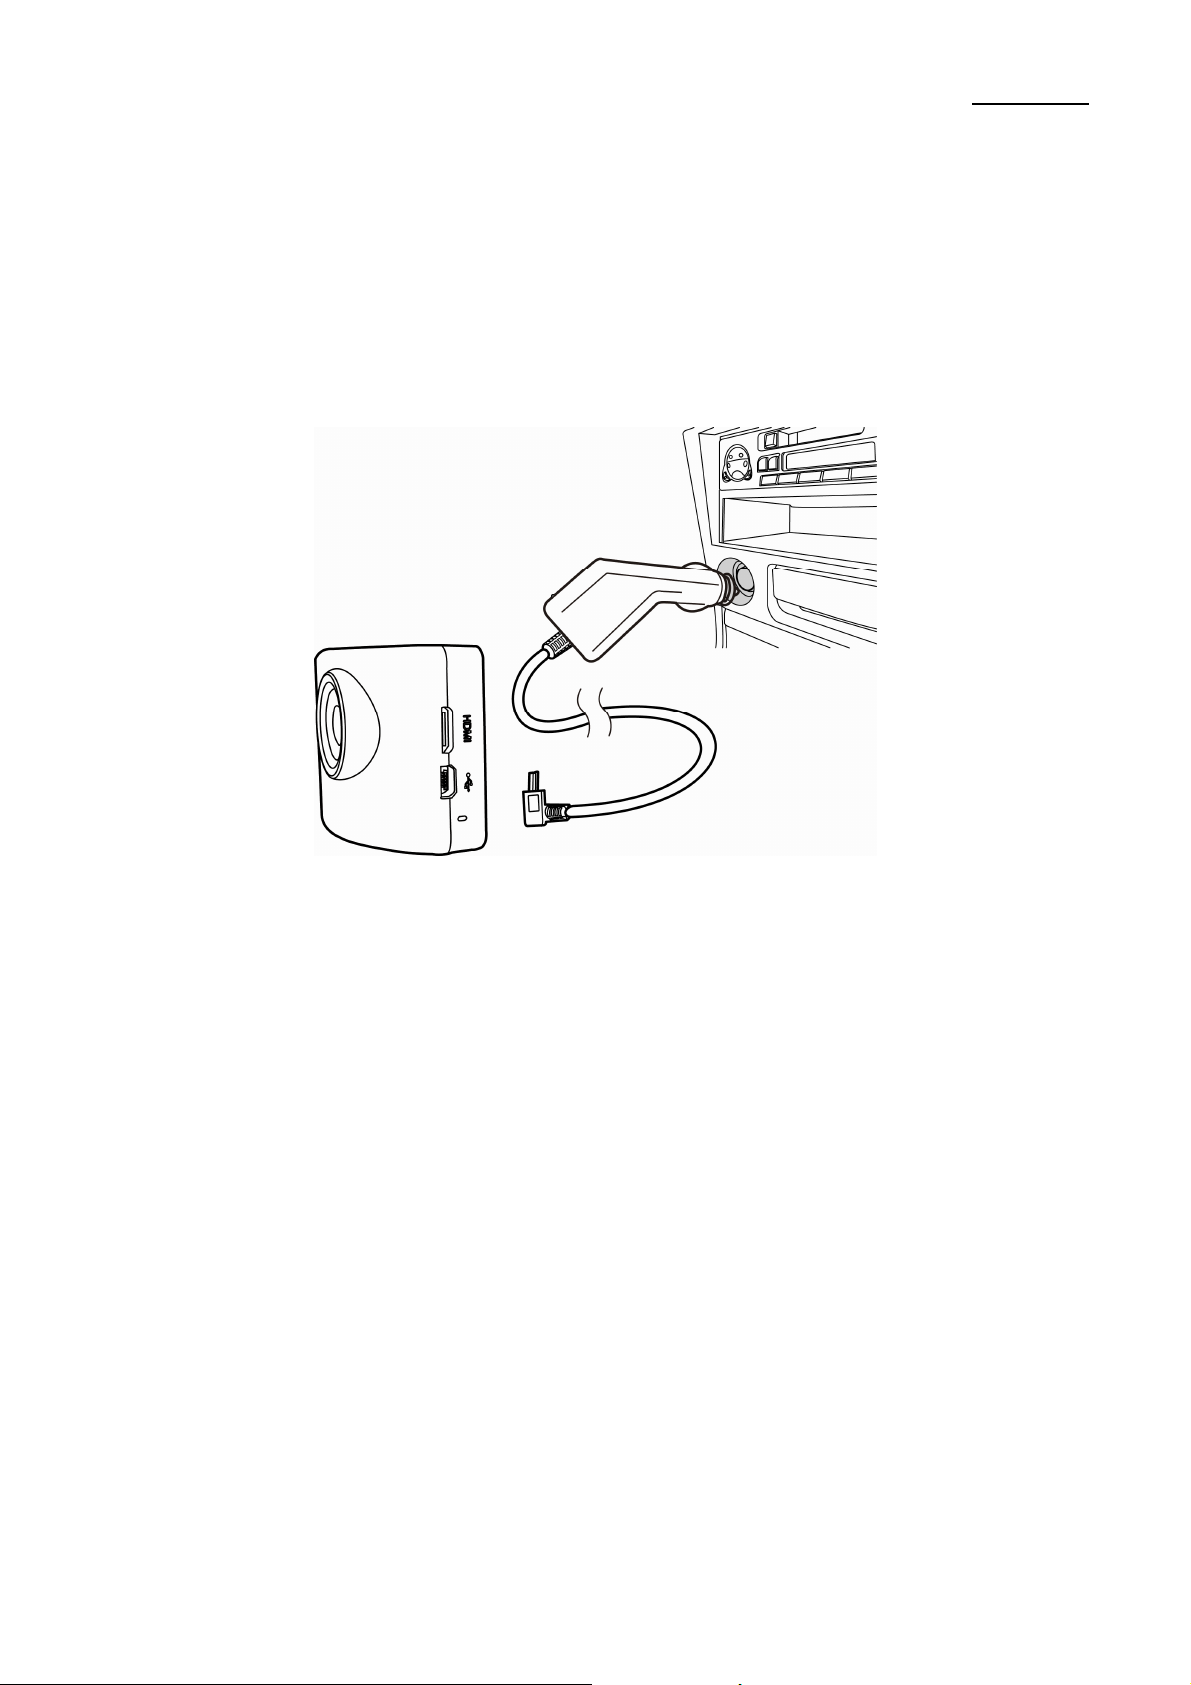
Charging the battery
Using the car charger
1. Connect the USB connector to unit.
2. Connect the other end to car’s internal charger.
HOLUX M1
8
Page 15

HOLUX M1
Using Micro SD card (Optional)
To insert the Micro SD card:
Insert Micro SD card with its chip facing up and flat into the SD slot.
Notice: the device supports class 6~10 micro SD card.
To remove the Micro SD card:
Gently press the top of the memory card, and the card will eject
automatically.
※ After inserting the Micro SD card the device will automatically
recognize it as default storage and all the data will be saved on this
card.
※ When the Micro SD card is out of memory, it will automatically erase
the oldest files and start recording from the beginning.
9
Page 16

HOLUX M1
Video Storage Capacity as below (Note: The actual value of capacity
may vary (up to ± 30%) depending on the color saturation and
complexity of your subject and surroundings.)
Memory Size
8GB 16GB 32GB
Resolution
1080p/30fps 100 200 400
720p/60fps 140 280 560
720p/30fps 180 360 720
Unit: minutes
※ We strongly recommend you that the memory card is strictly for the
car Camcorder use only. (Recommended specification: 4GB SDHC
Class 6 or above.)
※ Make sure the memory card is not in write protection
※ Must format the memory card before use by Car Camcorder or PC/
NB.
※ Never remove the memory card during the recording process, fatal
memory card damage could result.
※ Certain types of memory cards may not be recognized, take out the
card and inset again or just change to another card if this occurs.
※ Be sure to backup your data before overwriting the memory card.
10
Page 17

HOLUX M1
Using the M1
Turn on/ off the device
Position the device in the vehicle using the suction mount and press the
Power button to turn it on. To power off the device press the button
again.
You can also connect the device to the car charger. It will automatically
turn on and start recording when the car engine starts. When the engine
stops, the device will automatically save the last file and turn off.
Power button
11
Page 18

Recording Mode
HOLUX M1
Normal Recording
1. Setup up Car Camcorder properly before operation.
2. To start recording make sure the Video Mode is selected.
3. Press the [OK button] to start the recording.
4. Press the [OK button] again to stop the recording.
※ With car charger connected the device will automatically turn on and
start recording.
※ When M1 is in non-recording status, press the [Menu button] ( ) to
enter Menu Settings.
Emergency Recording
As emergency happens, press the [emergency recording button] ( )
to start recording the event immediately. Press the [emergency
recording button] ( ) to lock current file during recording and the
locked file won’t be replace until a manual unlock.
12
Page 19

HOLUX M1
Photo Mode
Taking pictures
1. When M1 is in non-recording status, press the [Mode button] ( ) to
enter Picture mode. To take a picture make sure the Picture Mode is
selected.
2. Press [Up / Down button] (▲/▼) to zoom in/out the lens.
3. Press the [OK button] to take a photo.
※ Press the [Menu button] ( ) to enter Menu Settings.
13
Page 20

HOLUX M1
Playback Mode
Playback on built-in LCD
1. Press the [Mode button] ( ) to enter playback mode.
2. Select the recording file you wanted by Up (▲) or Down button (▼)
and then press the [OK button] to start displaying.
※ The symbol means emergency file.
※ Press the [Menu button] ( ) to enter Menu Settings to set protect
or delete the file.
Playback on a TV
1. To play on a TV, connect the drive recorder to the HDTV, TV
(optional) or HDMI (optional) signal line on the TV.
2. The Recorded images will be displayed on the TV as thumbnails.
3. Select the normal recording file you wanted by Up (▲) or Down
button (▼) and then press the [OK button] to start displaying.
4. The Car Camcorder will play the all the movies continuously from
the chosen thumbnail image to the last one.
14
Page 21

HOLUX M1
Playback on a PC
1. Remove your memory card from the Car Camcorder and inset it into
a Memory card slot on your PC or a card adapter connected to your
PC.
2. Use your PC playback software for the H.264 AVI file type. For
example: Media Player Classic, Quick Time, Splash Lite, VLC Media
Player, etc.
3. Depending on your PC's effectiveness, video card characteristics,
memory size or Memory card transfer speed, your images may not
play smooth and/ or sound may cut in and out.
4. If you rename a file in your PC, it will not be recognized by Car
Camcorder
15
Page 22

HOLUX M1
Menu Settings
1. When M1 is in non-recording status, Press the [Menu button] ( )
to enter Menu Settings.
2. In Menu settings, press the [Mode button] ( ) to switch「Recording
Mode」, 「Picture Mode」, 「Playback Mode」, 「Media Tool」 and
「General Settings」 menu.
3. Press the [Up / Down button] (▲/▼) to select the option. Press the
[OK button] to enter submenu.
4. Press the [Up / Down button] (▲/▼) to set the value. When
completed, press the [OK button] to save the setting and return
previous page.
5. Press the [Menu button] ( ) again to return mode page.
16
Page 23

HOLUX M1
Menu Options
Mode Item Option Description
Movie
Mode
Recording
Mode
FHD 30fps (1080p)/
HD 30fps (720p)/
HD 60fps (720p)/
VGA 30fps
Select the video
image size.
※ The recording
resolutions will
affect viewing angle:
1080P-115°/
720P-130°/ VGA
(480P)-140°
Movie
Quality
Movie Clip
Time
Movie Off
Time
Sound
Super Fine/ Fine Select the video
quality.
Off/ 1 min/ 3 min/ 5
min/ 10 min
Select one of the
values to set the
video duration.
0 min/ 5 sec/ 1 min/
5 min/ 30 min/ 60
min
When removed from
power supply, the
device will delay
turn off depend on
the setting.
On/ Off Select video
Record
recording with audio
or not.
MIC Standard/ Low Select the sensitive
17
Page 24

Sensitivity of the Mic.
HOLUX M1
Scene Auto/ Sports/
Portrait/ Landscape/
Select mode for
various scenes.
Twilight/ Snow/
Beach/ Fireworks
Exposure -2, -1, 0, +1, +2 Select the exposure
compensation
White
Balance
ISO
Auto/ Fluoresc.1/
Daylight/ Fluoresc.2/
Cloudy/ Fluoresc.3/
incandescent lamp
Auto/ ISO100/
Select the correct
white balance
according to the
lighting conditions.
Select the ISO
Picture
Mode
Sensitivity
Still Image
Size
ISO200/ ISO400
14M/ 12M/ 8M/ 5M/
3M/ 2M/ 1.2M/ VGA
sensitivity.
Setup the image
size.
Still Quality Super Fine/ Fine Select the picture
quality.
Scene Auto/ Sports/
Portrait/ Landscape/
Select mode for
various scenes.
Twilight/ Snow/
Beach/ Fireworks
Exposure -2, -1, 0, +1, +2 Select the exposure
compensation
White Auto/ Fluoresc.1/ Select the correct
18
Page 25

HOLUX M1
Balance Daylight/ Fluoresc.2/
Cloudy/ Fluoresc.3/
incandescent lamp
ISO
Sensitivity
Auto/ ISO100/
ISO200/ ISO400
white balance
according to the
lighting conditions.
Select the ISO
sensitivity.
Color Natural/ Vivid/ Pale Select the special
color to apply to the
image.
Effect Normal/ Sepia/ B W/
Emboss/ Negative/
Sketch/ Oil/ Crayon
Select the special
effect to apply to the
image.
Playback
Mode
Volume
0~10
Delete Delete One/ Delete
All
Protect Protect One/
Unprotect One /
Protect All /
Unprotect All
Format SD
Yes/ No Select to format the
Card
Adjust the volume of
movie playback.
Delete video or
photos.
To protect or
unprotect files.
SD card.
Media Tool
※ Once you select
[YES] and press
[OK button] the card
will be formatted
19
Page 26

HOLUX M1
without warning. All
data on it will be
erased.
General
Settings
SD Card
INFO
Time Left/ Photo
Left
SD-Card storage
status.
Beep On/ Off Turn the beep
on/off.
Power Off Never/ 1 min/ 5 min
Set the
auto-shutdown time.
Clock
YY-MM-DD-HH-MM Setup time.
Settings
Date
Format
None/ YYYMMDD/
MMDDYYY/DDMM
Select the date
format.
YYYY
Language English/ Español/
Select language.
Português/ Pyccкий/
Chinese (TC/SC)/
Deutsch/ Italiano/
Latviski/ Polski/
Română/
slovenščina/
Yкраїнська/
Japanese
TV System NTSC/ PAL The format of TV
output.
20
Page 27

HOLUX M1
HDMI
Output
1080P/ 720P Select the signal of
HDMI.
Flicker 50Hz / 60Hz Setting light
frequency according
to electricity
frequency to cancel
the flash under the
lamp.
USB
Function
LCD
MSDC/ PCAM Select the function
of USB connection.
On/ Off The device can
Rotate
LCD
Power
record video in 2
different positions –
when the camera is
on the top and when
it is in upside down
position. To make
sure the video file is
not played upside
down, select LCD
Rotate – On.
Off/ 1 min/ 3 min Select the time for
LCD turn off
Save
automatically during
recording to save
power.
21
Page 28

HOLUX M1
Protect
Level
Reset
Setup
FW
Version
Off/ Level 0/ Level 1/
Level 2/ Level 3/
G-Sensor protects
sensitivity.
Level 4
Yes/ No Restore to factory
settings.
Version Displays the current
system version.
22
Page 29

Specification
Item Description
Lens 5 Mage pixel CMOS (Aperture F/2.2)
LCD display 2 inch color LCD
View Angle 140° Wide angle-FOV
HOLUX M1
Recording
1920x1080 @30fps
Resolution
1280x720 @60/30fps
640x480 @30fps
Video Format/
H.264 AVI
Codec
Photo
14M/ 12M/ 8M/ 5M/ 3M/ 2M/ 1.2M/ VGA
Resolution
Photo Format JPEG
Digital Zoom 8x Digital Zoom
Audio Speaker / Microphone
Recycle
Off/ 1 min/ 3 min/ 5 min/ 10 min
recording
Delay off 0 min/ 5 sec/ 1 min / 5 min / 30 min / 60 min
EV -2~+2
White Balance Auto/ Daylight/ Cloudy/ fluorescent lamp/
23
Page 30

incandescent lamp
TV Out HDMI/ AV OUT
TV System PAL/ NTSC
HOLUX M1
Light
50Hz/ 60Hz
Frequency
Power 5V/ 1.5A
Battery Rechargeable Li-polymer
Language Support multi-language
Connection USB 2.0
Storage Micro SDHC Slot support up to 32 GB
Function button SOS/ Switch Day & Night mode/ Turn sound
recording on/off
Note: Specifications are subject to change without notice.
24
 Loading...