


 GM-305 Personal Navigator
Explorer
User’s Guide
Version: 1.03 EI
Date: Mar. 07, 2001
Vertrieb Deutschland
o. j. imports, Sascha Schwalbe Alt-Gatow 33 b, 14089 Berlin
Telefon: 030-36 35 362 Fax: 030-364 00 722 E-Mail:info@holux-gps.de Web: www.holux-gps.de
All Right Reserved

Thank You!
Thank you for choosing HOLUX Explorer Handheld GPS as your personal navigator. We hope it will be useful to you for a long time.
Warranty
This Explorer is warranted to be free from defects in material and functions for one year from the date of purchase. Any failure of this product within this period under normal operation will be repaired at no charge to you. Please refer to the Warranty Card in the package.
HOLUX Technology, Inc. is a professional consumer GPS (Global Positioning System) products
provider. We started research and development of GPS and RF products in 1994. Our goal is continuously to provide people with items that make difficult tasks easier. We hope everyone in the world shares our achievement.
If you have questions about the operation, function or design of this unit, do please contact us at any time.
Holux Vertrieb Deutschland
E-Mail: info@holux-gps.de
Web: www.holux-gps.de
2

Table of Contents
Chapter 1 |
QUICK REFERENCE ……………………………………………… 4 |
|||
Chapter 2 |
BEFORE OPERATING …………………………………………….. 7 |
|||
I. NAME |
…………………………………………………………………………… 7 |
|||
II. ALL MODELS |
…………………………………………………………………… 7 |
|||
III. OPTIONAL ACCESSORIES |
…………………………………………………… 8 |
|||
IV. STANDARD PACKAGE ………………………………………………………… 9 |
||||
V. CAUTIONS |
……………………………………………………………………… 10 |
|||
VI. ACTIVE ANTENNA DISMANTLE & ASSEMBLE …………………………….. 11 |
||||
Chapter 3 |
OPERATING DETAIL ……………………………………………… 12 |
|||
I. ON/OFF & BACKLIGHT |
……………………………………………………….. 12 |
|||
II. SIMULATION |
…………………………………………………………………… 13 |
|||
III. MAJOR NAVIGATION FUNCTION KEYS |
…….……………………………. 13 |
|||
Chapter 4 |
FUNCTION DETAIL IN PAGES |
………………………………… 17 |
||
I. SATELLITES PAGE …………………………………………………………… 17 |
||||
II. MAP PAGE |
…………………………………………………………………….. 18 |
|||
III. STATUS PAGE |
………………………………………………………………….. 21 |
|||
IV. COMPASS PAGE ……………………………………………………………….. 21 |
||||
Chapter 5 |
SYSTEM MENU ……………………………………………………… 23 |
|||
I. WAYPOINT |
……………………………………………………………………… 23 |
|||
II. ROUTE |
………………………………………………………………………….. 25 |
|||
III. TRACK LOGS |
………………………………………………………………….. 28 |
|||
IV. POWER SAVING MODE ……………………………………………………… 30
V. UPLOAD ………………………………………………………………………….. 30 VI. DOWNLOAD ……………………………………………………………………… 32
VII SYSTEM UPGRADE …………………………………………………………….. 33
Chapter 6 SPECIFICATION …………………………………………………….. 35
Chapter 7 MANUFACTURING SETTING ……………….………………….. 37
I. BASIC SETTING ….……………………………………………………………… 23 II. SPECIAL ENGINEERING SETTING …………………………………………….. 25
Chapter 8 TROUBLE SHOOTING …………………………………………….. 38
Appendix A EARTH DATUMS …………………………………………… 40
3

Chapter 1 QUICK REFERENCE
I.CAUTIONS
A.Please select cold start mode under the following situations:
(i)Initial use.
(ii)Moving more than 500 km without performing satellite acquiring.
(iii)Unused for more than one month regardless of looking up map.
B.Environment and antenna position
(i)Outdoors without shade.
(ii)Have the built-in antenna paralleled the ground (i.e. the angle between Explorer
and ground is 30º) and faced up to the sky.
C.Battery
(i)Remove batteries from the cartridge when not use more than 30 days.
(ii)Use a certified charger to ensure batteries are full charged when using rechargeable batteries.
D.Program Waypoint and Routes
When complete, you must turn off Explorer. Then Waypoint and routes will be saved in the system.
II.ON/OFF
A.On: press “ “ for 2 seconds.
B.Off: press ” “ for 2 seconds.
C.Backlight: press ” “ once to turn on/off backlight when the unit is on.
III. SIMULATION
Satellite page, press “ ”, select Stop Navigation and press ”
 ” for power saving when looking up a map or setting up parameters without satellites acquiring. Be sure to return to Navigation after parameters set.
IV.COLD START
Satellite page, press “ ”, select Cold Start and press ”
 ” to erase obsolete or incorrect satellite data.
V. POWER SAVING MODE
Select Pw Saving On in Main Menu page and press ” ”. Turn on this function may make batteries last longer up to 30-70% longer but it may reduce the ability of acquiring satellites.
4

VI. MAJOR NAVIGATION FUNCTION KEYS
A.MENU “ ”
”
The gate key to operate all functions.
B.PAGE “ ”
”
(i)Switch among pages of satellite, map, status and compass.
(ii)Press for 2 seconds to change screen orientation, either horizontal or vertical.
C.ZOOM IN “ ” / ZOOM OUT “
 ”
”
(i)Enlarge/narrow down map scale.
(ii)In map page, press “ ” for 2 seconds to erase/redisplay the data in the right down corner.
(iii)Also in map page, press “ ” for 2 seconds to erase/redisplay road lines.
D.ESCAPE ” ”
”
(i)The same function as PAGE “ ”, only in reverse order.
(ii)To quit change of field’s data or return to previous page.
E.ENTER (CONFIRM) ” ”
”
(i)To confirm operation.
(ii)Press for 2 seconds to mark a waypoint in map page.
VII. FURTHER OPERATION
A. Search object
In map page, press “ ”,
”,
(i)GM-305-DT, GM-305-HT: Go to Search Object, Select Region, Select A Type and then Select A Name.
(ii)GM-305-WT: No back up map, you may search Waypoint and Route only.
B.Screen Search (For GM-305-D and GM-305-HT only) In map page, search in current screen page.
C.Show Map Information (For GM-305-D and GM-305-HT only)
In map page, select “Show MapInfo” to show details information when cursor touch a road or an interesting point.
D.Shortcut
After picking up a certain spot, select Shortcut On, and press ” ”. E. Display (For GM-305-DT, GM-305-HT only)
All icons in the map are displayed as requested. Activate Display and select all or some.
F. Moving Map
Hold direction key for 8 directions.
G. Measure distance
Show Dist On enables to measure distance between any two points in the map.
H. Map Orientation
In map page, press “ ”, you may select map orientation.
(i)North up
(ii)Track up
5

I. Adjust time
Go to Change Time from the status page for changing to daylight saving time or the real time in the area across more than one time zone.
J. Adjust contrast
Press “ ” or ”
 ” key in satellite page to adjust contrast.
K. Waypoints
Creating a waypoint: either go to Waypoints from Main Menu or press ” ” for 2 seconds in map page.
(i)GM-305-WT: Various icons available for Bank, Gas Station, School,……etc.
(ii)GM-305-DT, GM-305-HT: One icon only.
As long as a waypoint is edited into a route, it is undeletable.
L. Routes
The unit is able to memorize 20 routes, up to 30 waypoints each.
“*” will show at the right side of the route name once a route is set to navigation.
M. Track logs
Select Track Logs from Main Menu. You may set intervals by time or distance.
N. Optional Datum
In satellite page, 219 built-in datums for your options.
O. NMEA 0183 Output
In satellite page, you may use Explorer as a ordinary GPS receiver linking to other navigation system.
XIII. UPLOAD
Through serial cable, you may upload Waypoint & Route or Track logs to PC. Select Upload from Main Menu to transfer the Waypoint&Route or Track logs data from your Explorer to PC. The data communication baud rate is 57,600bps.
IX. DOWNLOAD
Select Download from Main Menu to store new Map, Waypoint&Route, Tracking Logs or Font in the system memory.
X. SYSTEM UPGRADING
When new HOLUX OS released, you may upgrade your unit by this function.
6
Chapter 2 BEFORE OPERATING
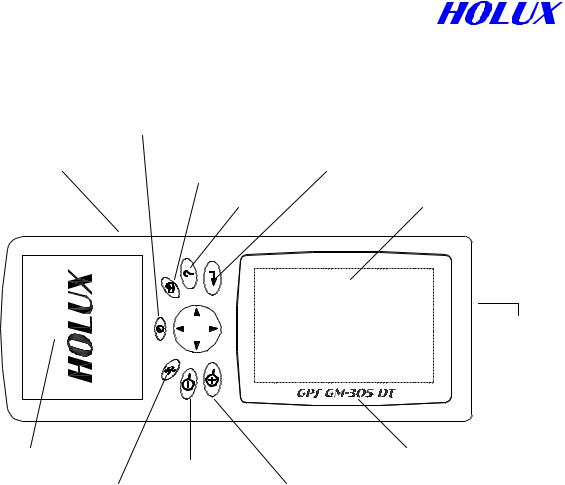
I. NAMES
A. Front
|
On-Off/ Blcklight |
|
|
Ext. Antenna Port |
Page |
Enter (Confirm) |
|
(At side) |
|
||
Menu |
Display |
||
|
(At side)
Battery
Cartridge
Built-in Antenna |
|
Zoom-Out |
Model No. |
|
|
Zoom-In |
|
|
Escape |
|
|
|
|
|
B. Back
Serial Port for data communication (Under rubber cover).
II.ALL MODELS
A.GM-305-WT
With track recording, waypoints and routes functions, special designed for outdoors use wherever in the open field, on the water or when exploring. You may preprogram your route, input waypoint or set track recouding ON to void getting lost. You may also upload your track logs to computer, e-mail it to your fellows for them to trace you or to share with you the interesting places you have been.
B. GM-305-DT
In additional to GM-305-WT, there is a 2-MB built-in memory for map of cities, inter-city roads or recreation area.
C. GM-305-HT
In additional to GM-305-WT, there is an 8-MB built-in memory for map downloading. You may download any interesting places available in the map CD supplied by your local distributor or HOLUX Web Site.
7

III.OPTIONAL ACCESSORIES
A.Single Item
(i)Explorer Holder (A-30501)
When using the unit in a car, stick the holder on the dashboard with enclosed 3M adhesive pad. you may have the unit held with the antenna facing up to the sky for better signal receiving and reading.
(ii)Data Cable (A-30502)
To up load / down load map, data or to upgrade system.
(iii)Active Antenna
When using Explorer in a RV car, truck or bus, connect an extensional active antenna to get better satellite signals. The windshields which are heavily tinted may interfere with signal reception. An active antenna then becomes essential. A-30503 w/2-M cable
A-30503 w/5-M cable A-30503S w/0.5-M cable
(iv)Extension Antenna Holder (A-30503-00)
Hold the active antenna to have it face up to the sky.
(v)Extension Cable
For extending the reach of active antenna.
A-30504-01: 1 M cable
A-30504-02: 2 M cable
A-30504-05: 5 M cable
(vi)Hanging Strip Set (A-30505)
150 and 450 mm each
(vii)Carrying Bag (A-30506)
With ring for hanging at waist or on neck.
(viii)Antenna Supporting Rod
For supporting extensional antenna when biking or mountaineering. A-30507-00: Universal connector for adjusting antenna facing up to the sky.
A-30507-01: 100 mm. A-30507-02: 200 mm. A-30507-05: 500 mm.
(ix) Clip Set (A-30508)
Use with A-30507 to grip something to support extensional antenna.
(x)Holding Strip (A-30509)
For holding Explorer on the frame of bike or motorcycle.
(xi)Holding Bracket (A-30510)
To hold Explorer standing on frame of bike or motorcycle.
8

(xii)Antenna Bracket (A-30511)
For holding antenna rod on bike or motorcycle.
(xiii)Travelling Bag (A-30512)
To receive all accessories and main unit for travelling or storage.
(xiv) Antenna Rod Supporting Strip (A-30513)
For holding antenna rod to support A-30503 when mountaineering or hiking.
(xv)Optional Map
Mountaineering map, sea map, recreation area map or street map.
(xvi)Battery Charger (A-100B99)
The battery charger is certified and packed with 4 AA batteries of 1,300 mAh nickelmetal hydride rechargeable.
A-100B99: 110V plug
A-100B99EU: 230V European plug A-100B99AU: Australian plug
(xvii) Rechargeable Battery
A-100B13: 2 AA rechargeable batteries with 1,300 mAH nickel-metal hydride. A-100B17: 2 AA rechargeable batteries with 1,700 mAH nickel-metal hydride.
B. ACCESSORY KIT (K-3051)
Special designed for mountaineering and biking. The kit includes:
(i)1 x A-30503 Active antenna with 2-m cable.
(ii)1 x A-30503-00 Active antenna holder.
(iii)1 x A-30505 Hanging strip.
(iv)1 x A-30506 Carrying bag.
(v)1 x A-30507-00 Universal connector.
1 x A-30507-01 Antenna supporting rod. 3 x A-30507-02 Antenna supporting rod.
(vi)1 x A-30508 Clip set.
(vii)1 x A-30509 Holding strip.
(viii)1 x A-30510 Holding bracket.
(ix)1 x A-30511 Antenna bracket
(x)1 x A-30512 Travelling bag.
(xi)1 x A-30513 Antenna rod supporter.
IV. STANDARD PACKAGE
A.Single Package
(i)Main Unit (GM-305)
Please remove the plastic covering on the display to get a clear screen.
(ii)Manual
Packed with a quick reference card and warranty card.
9

B.Full Package (GM-305-??) (?? for different language version) Details please refer above Optional Accessories or single package.
(i) Main Unit (GM-305)
(ii)Manual
Packed with a quick reference card and warranty card.
(iii)A-30501 Holder
(v)A-30502 Data Cable
(vi)M-305-?? Map CD (?? varies in different countries)
Your country map CD. You may download any or some areas to the unit.
(vii)4 AA NI-MH rechargeable batteries, 1300mAH (2 x A-100B13)
V.CAUTIONS
A.Cold Star
Please select Cold Start under the following situations:
(i)Initial use.
(ii)Moving more than 500 km without using in the way.
(iii)Unused for more than one month regardless of looking up map.
B. Antenna Position
Please keep in mind the following principles whenever you use the unit to receive satellite signals.
(i)The GPS navigator relies on the satellite signals, which are not amplified or transmitted by base stations on earth. Contrary to GSM on cellular phones, the signals is weak so please use the Explorer outdoors with a clear view to the sky.
(ii)The built-in antenna should be parallel to the ground and face to the sky. The best angle to the ground is 30º.as Fig. 2-4-1.
SMA Connector
Fig. 2-4-1
C.Battery
(i)Use 4 AA alkaline or rechargeable batteries.
10
(ii)Use a certified charger to ensure batteries are full charged.
(iii)Remove batteries from the cartridge when not use more than 30 days.
VI. EXTENSION ANTENNA ASSEMBLE & DISASSEMBLE
A.Remove rubber cover at right top side as Fig.2-4-1.
B.Connect active antenna with SMA connector to the unit.
11

Chapter 3 OPERATING DETAILS
The Explorer Handheld GPS is a miniature computer, composed of a CPU, memory IC and operation system (OS), called HOLUX OS. It is designed to receive the satellite signals once every 100 milli-second, i.e. 10 times per second, and to calculate all the retrieved data in the CPU. In that case, there will be some delay after you press a button. Also its processing speed is not as quick as a desktop computer for the sake of low power consumption.
I. ON/OFF & BACKLIGHT A. On
Press and hold “ “ for 2 seconds to turn on the unit as Fig. 3-1-1. It will switch to acquiring satellites page and search satellite signals automatically in 3 seconds as Fig. 3-1-2. Once a satellite is acquired, the signal bar will appear. If the satellite signal fixed, the bar will turn black. The stronger the signal is, the longer the bar is. After more than 3 satellites are acquired and fixed, your position is identified and the display goes to the map page as Fig. 3-1-3 for GM-305-DT and GM-305-HT or a “
 ” only in the map for GM-305-WT.
Model Name |
|
Software Version |
Satellite spread |
|
Back light |
status and its no. |
|
|
|
||
|
|
Battery status |
2 satellites unlocked |
Home Page |
|
Map Version |
|
|
|
||
|
|
& Map provider |
Coordinate |
|
|
5 satellites locked |
|
|
|
|
|
|
Fig. 3-1-1 |
Fig. 3-1-2 |
|
|
|
|
|
|
|
|
|
Backlight “ON” Backlight “OFF” |
|
|
||
|
Fig. 3-1-4 |
|
|
|
|
|
|
|
|
B. Off |
Fig. 3-1-3 |
|
||
|
|
|||
Press and hold ” |
|
“ for 2 seconds. |
|
|
|
|
|
||
|
|
|
||
C. Backlight
press ” “ to turn on/off backlight as Fig. 3-1-4 when the unit is on.
Note: The following message will show up when Explorer can not get position identified for 10 minutes continuously: This message may show in any page.
12
Poor GPS Signal
Select Cold Start
ˇ
In fact, You do not need to operate Cold Start. But you must improve satelliteacquiring environment unless incorrect satellite data stored in the system.
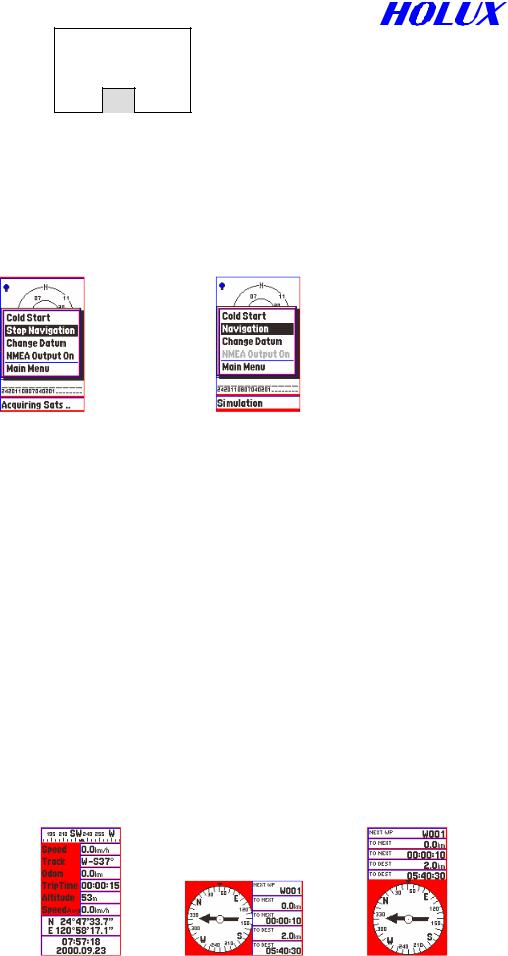
II. SIMULATION
This function is for looking up a map or setting up waypoints and routes regardless of acquiring satellite signals. It may save power and respond quicker.
Fig 3-2-1 |
Fig 3-2-2 |
A.Press “ ”.
”.
B.Select Stop Navigation as Fig. 3-2-1, and press ” ”.
”.
C.Be sure to switch to Navigation when you use navigation on the way. Otherwise, you will never get your position identified.
(i)Press “ ”
”
(ii)Select Navigation as Fig. 3-2-2, and press ” ”.
”.
III.MAJOR NAVIGATION FUNCTION KEYS
A.MENU “ ”
”
It is the initial key to all kinds of functions. Details will be described in later chapters.
B.PAGE “ ”
”
(i)Press to switch pages among satellite as Fig. 3-1-2, map as Fig. 3-1-3, status as Fig. 3-3-1 and compass as Fig. 3-3-3. There are a central mark “ ” and scale only in map page for GM-305-CT.
Fig. 3-3-1 |
Fig. 3-3-2 |
Fig. 3-3-3 |
13

(ii)Press and hold ” ” for 2 seconds to change screen orientation, horizontal or vertical as Fig. 3-3-2 and Fig. 3-3-3.
(iii) Satellite Page
In this page, you may see battery level, backlight and what & how many satellites are acquired. Once a satellite is acquired and fixed, the signal bar will turn dark. Moreover, strength of satellite signal will be told by length of signal bar as Fig. 3-1-2. Press direction key “ ” or ”
 ” to enter and adjust the contrast of screen as Fig. 3-3-4, “
 ” for lighter and ”
 ” for darker, Press ”
 ” to confirm or “
 ” to ignore.
Fig. 3-3-4 |
Fig. 3-3-5 |
Fig. 3-3-6 |
(iv)Map Page
(a)You may move map with direction keys, or ZOOM-IN / ZOOM-OUT the map.
(b)The cursor arrow is full when your position is identified, otherwise it will be hollow.
(v)Status Page
This page gives the following information: Speed, Track, Odom, Trip Time, Altitude, Average Speed, Latitude, Longitude, Time and Date as Fig. 3-3-7.
 Moving Direction
Fig. 3-3-7 |
Fig. 3-3-8 |
(vi) Compass Page
You may see your moving direction, next waypoint, distance & time to next waypoint and distance & time to destination. If you do not input route in the system, the arrow will not show and all value fields will be 0. The arrow in the compass points to the direction to next waypoint and your proceeding direction as Fig. 3-3-8.
C.ZOOM IN/OUT “ ” \ “
” \ “ ”
”
(i)Press “ ” \ “
” \ “ ” to switch map scale from 100m, 200m, 500m, 1km, 2km, 5km, 10km,
14

20km, 50km, 100km, 200km, 500km, 12 levels in total.
(ii)Press and hold “ ” for 2 seconds to display/clear scale, map mode and area size in right down corner.
(iii)Press and hold “ ” for 2 seconds to display/clear roads to check routes or track logs. (For GM-305-DT and GM-305-HT only)
(iv)When zooming in/out map, a black dot in the right down square changes size and related position accordingly as Fig. 3-3-9. The dot denotes the map displayed in the screen and the square denotes the whole map. (For GM-305-DT and GM-305-HT only)
Ratio & related position
of screen size to whole map
Fig. 3-3-9
D.ESCAPE “ ”
”
(i)The same function as “ ” in reverse order.
(ii)To ignore a selection in the menu.
E.ENTER ” ”
”
(i)Press and hold for 2 seconds to create a waypoint at the cursor position in map page. Detail describes in page 23 Method 2.
(ii)To change operating mode, either navigation “ ” or view map“
 ” in map page. The symbol at right down corner shows in navigation mode as Fig. 3-3-10, and in view map mode as Fig. 3-3-11.
Fig. 3-3-10 |
Fig. 3-3-11 |
F. Moving map
There are total 8 directions for direction function keys. Press “ ” to switch the symbols
“ ”
”
and “ ” at the right down corner.
(i)In view map mode, the screen shows a cursor ”Û”, an arrow “ ” and data about latitude and longitude appearing in right down corner. If position is fixed, “
 ” is your present
15
 Loading...