

Page 1

MIXER BOWL SCRAPER
ATTACHMENT
FOR MIXER MODELS A200, D300, D330, D340, H600, L800, M802 & V1401
701 S. RIDGE AVENUE
TROY, OHIO 45374-0001
937 332-3000
www.hobartcorp.com
FORM 33917 Rev. A (June 2001)
Page 2
Installation, Operation, Use and Care of
Mixer Bowl Scraper Attachment
For Mixer Models A200, D300, D330, D340, H600, L800, M802 & V1401
SAVE THESE INSTRUCTIONS
GENERAL
The mixer bowl scraper attachment continually scrapes the sides of the bowl as the agitator turns.
Material around the side and bottom of the bowl is constantly re-introduced into the mixture. Manual
scraping is not needed when using the bowl scraper. Bowl scraper is used when mixing batters or
creaming. Bowl scraper is not intended for mixing dough products. The bowl scraper is used
only with stainless steel bowls.
INSTALLATION
UNPACKING
Immediately after unpacking, check for possible shipping damage. If any parts are found to be
damaged, save the packaging material and contact the carrier within 15 days of delivery.
Contact your local Hobart Service office to perform installation if your maintenance technician cannot
perform the assembly described in the following section.
ASSEMBLY OF BOWL SCRAPER BRACKET
Model A200 (Fig. 1)
1. Remove Drip Cup from Planetary. Save Drip Cup.
2. Remove Acorn Nut, Jam Nut, Steel Washer and Fiber Washer
from center of planetary. Save Fiber Washer and discard other
items.
Caution: Planetary may come off with nuts removed. Support
or hold Planetary in place if necessary.
3. Place Fiber Washer and Bracket Assembly over center shaft.
Install first jam nut and tighten. Install second nut and tighten.
4. Place Hole Plug in bottom of Bracket Assembly. Line up hole
with side screw hole in Bracket. Insert Screw to retain Hole Plug.
5. Fill gaps around Scraper Bracket and Planetary with silicone
sealant (supplied).
FIBER WASHER
PL-53646
SCREW
JAM NUTS
HOLE PLUG
BRACKET ASSY
Fig. 1
6. Reassemble Drip Cup on Planetary.
© HOBART CORPORATION, 1990
– 2 –
Page 3
Models D300, D330, D340, H600 & L800 (Figs. 2 - 5)
1. Remove the bolt from under the planetary hub (Fig. 2). Use 9/16" hex head socket or wrench. Bolt
has standard right-hand threads. Do not remove the drip cup. The drip cup will hold planetary in place.
2. Flat washer and bolt removed in step 1 are not needed — discard them (Fig. 3). Lockwasher is
reused. A new bolt, shipped with the Bowl Scraper, is to be used in place of the bolt that was removed
in step 1.
PL-41560
Fig. 2 Fig. 3
3. Draw a bead of silicone sealant (supplied) around the recessed area and on top of the bracket
(Fig. 4).
4. Install bracket using the new bolt and the lockwasher removed in step 1, (Fig. 5). Remove excess
sealant by wiping around top of bracket with your finger. Tighten bolt to 228 to 285 in-lbs. torque.
D300, D330, D340 H600, L800
SILICONE
SEALANT
PL-50272
Fig. 4 Fig. 5
5. Fill any remaining gaps around Bracket Assembly and Planetary with silicone sealant (supplied).
– 3 –
Page 4

Hobart recommends the M802 and V1401 Bowl Scraper Brackets be
PL-51320
SCREW
BRACKET ASSY
MOUNTING PLATE
PLANETARY
COVER
BOLT
LOCKWASHER
LOCKWASHER
BOLT
V1401
installed by Hobart trained service technicians.
Model M802 (Fig. 6)
Caution: This procedure requires the installer to know how
to replace Planetary Oil. If you are not confident of how this
is done, contact Hobart service to perform this installation.
1. Drain oil from Planetary — refer to mixer instructions manual.
Remove existing Cap Seal with “O” Ring from center of Planetary
and discard. Planetary Oil will escape when Cap Seal is removed.
2. Put new “O” Ring in groove on new Cap Seal. Screw Cap Seal
into Planetary and tighten.
3. Attach Bracket Assembly to Mounting Plate with two 5/16"
Bolts and Lockwashers, provided.
4. Place a 3/8" bead of silicone sealant (supplied) around the bolt
hole in the Beveled Washer. Coat threads of 3/8" Bolt with sealant.
Caution: Proper application of sealant is necessary to prevent oil leakage.
Fig. 6
5. Place Bracket Assembly over Cap Seal. Place Beveled Washer under Cap Seal and Bracket, and hold
in place. Insert 3/8" Bolt and Lockwasher through hole in Beveled Washer and tighten.
6. Fill any gaps around Planetary and Bracket Assembly with silicone sealant.
Fill Planetary replacing any lost Planetary Oil with like amount and type. Refer to the instructions manual
for the M802 mixer.
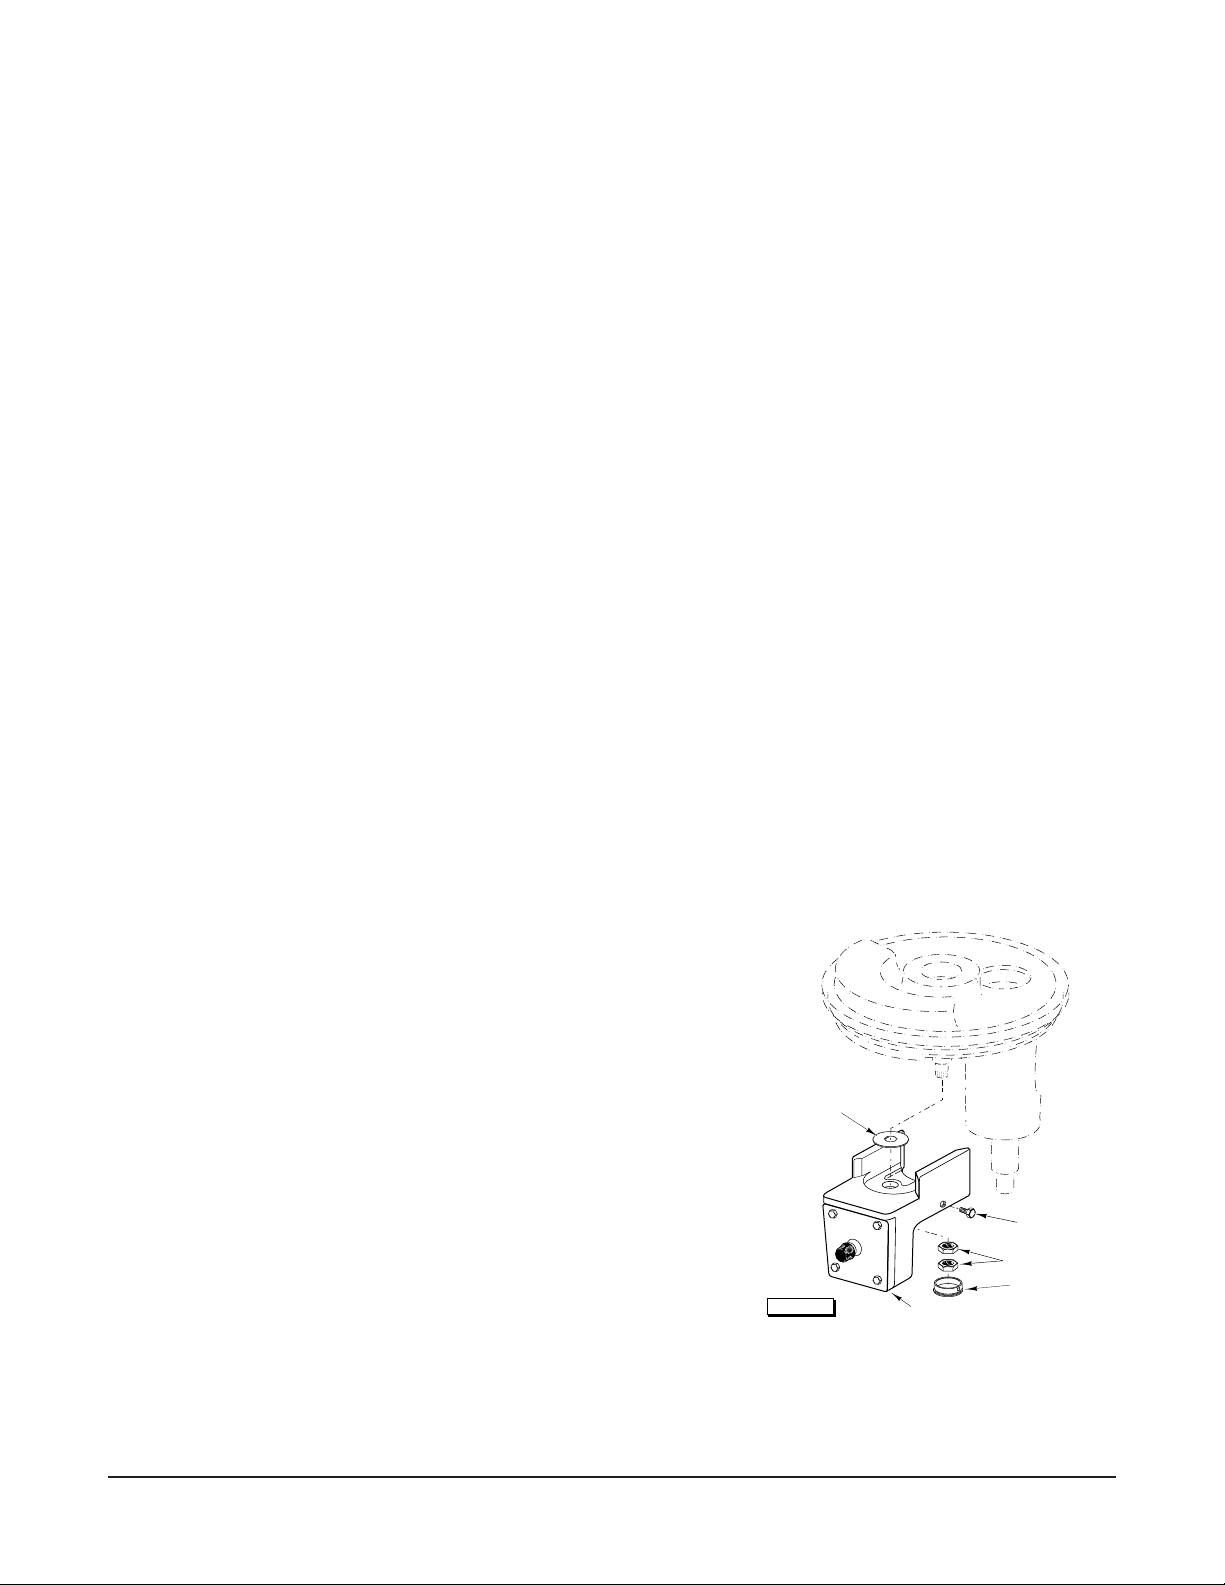
Model V1401 (Figs. 7, 8)
1. Remove Planetary Cover (and 2 Screws)
from machine. Discard these items.
2. Remove the two 1/2" Bolts and
Lockwashers which are opposite the
beater shaft (Fig. 7) on the underside of the
Planetary. Discard the Bolts and Lockwashers.
3. Place Mounting Plate through slot in
Planetary Cover and align with Bolt Holes.
Place supplied 1/2" Bolts through cover and
Mounting Plate from bottom. Place a
Lockwasher (supplied) on each Bolt. Align
Cover on Planetary. Tighten Bolts.
Fig. 7
4. Attach Bracket Assembly to Mounting Plate with 5/16" Bolts and
Lockwashers provided.
5. Fill all gaps around Planetary Cover and Mounting Plate with
silicone sealant, provided.
– 4 –
Fig. 8
Page 5

ASSEMBLY OF BOWL SCRAPER ONTO ARM — ALL MODELS (Figs. 9 – 11)
1. Slide urethane scraper onto arm; use a little water as a lubricant to make the scraper slide on easier.
Leading edge of scraper will turn clockwise as you look down into bowl (Fig. 9).
2. If necessary, tap the end of the urethane scraper on a flat surface to push scraper firmly onto the
arm (Fig. 10). Make sure sleeve is positioned on arm as shown in Fig. 11.
ARMS WITH GUSSETS
LOWER GUSSET
SLIDE TOP OF SLEEVE
TO LOWER GUSSET
END OF SLEEVE IS
APPROXIMATELY FLUSH
WITH METAL ARM
PL-41562
Fig. 10Fig. 9
ARMS WITHOUT GUSSETS
GUSSET
SLIDE TOP OF SLEEVE
TO START OF BEND
SLIDE SLEEVE UNTIL FLUSH
WITH END OF METAL ARM
PL-50520
Fig. 11
NOTE: Always use proper size sleeve with scraper arms. Be careful not to mix sleeves and arms if
you have multiple sizes of scrapers.
– 5 –
Page 6

INSTALL BOWL SCRAPER LABEL ON MIXER HEAD — ALL MODELS
NORMAL
ARM
HEAVY PRODUCT
BEHIND ARM CAN
BEND ARM
BENT ARM
PL-50521
Prepare a clean dry place on the mixer head
APPLY LABEL ON CLEAN FLAT SURFACE
where the Bowl Scraper label (included with
kit) can be seen by the operator. Peel off the
backing paper and apply the label (Fig. 12).
H600 SHOWN
PL-41563-1
Fig. 12
OPERATION
WARNING: MOVING BEATER AND SCRAPER IN BOWL. KEEP HANDS, CLOTHING AND
UTENSILS OUT WHILE IN OPERATION.
Lubricate bowl surface with vegetable oil or shortening,
especially in the area above the product where the sleeve
might rub against the bare surface of the bowl. The bowl
scraper rotates clockwise as you look down into the bowl. Use
speeds one and two only. Do not use bowl splash cover or bowl
extension ring.
Products which can be mixed while using the bowl scraper are:
Mashed Potatoes, Waffle/Hot Cake Batter, Cake Batter, Sugar
Cookies, Icing, Creaming Shortening/Sugar, Creaming Eggs/
Sugar, Mayonnaise.
Bowl Scraper should be used with wire whip or flat beater
agitators only. Stainless steel bowls must be used.
1. Lower empty bowl. Rotate Wire Cage Assembly on Bowl
Guard to rear (if equipped). Insert arm into bracket; lift arm up
until engaged (Fig. 13). Knob on mounting bracket will snap
into place while lifting arm. Attach beater to mixer shaft.
2. Raise bowl to operating position. Add ingredients. If mixer
is equipped with Bowl Guard, return Wire Cage Assembly to
front-center position. Run mixer normally.
NOTICE: Never raise a bowl of stiff product (i.e., cream
cheese, shortening, unmashed potatoes) with scraper arm
engaged in mounting bracket. The scraper arm can be
permanently bent and become damaged by rotating beaters
(Fig. 14).
Hold the start button to run the agitator while the bowl is being
raised; or, load the bowl after it is raised.
– 6 –
PL-41564
Fig. 13
Fig. 14
Page 7

3. To remove scraper arm after using: Lower the bowl. Open the Wire Cage Assembly on the Bowl
Guard (if equipped). Pull the black knob out. Lower the scraper arm (Fig. 15). If needed, remove the
bowl, contents, and beater.
PL-41565
Fig. 15 Fig. 16
Cleaning
To remove the scraper arm from the planetary bracket, lower the bowl, pull out on the knob and lower
the arm (Fig. 15). Remove the urethane sleeve from the arm. Tapping the sleeve against a table will
aid removal (Fig. 16). Clean both parts in a sink with warm water and detergent solution. Do not wash
urethane sleeve in a dishwasher or use water above 110°F. Rinse with clear water and air dry.
Do NOT use harsh chemicals (i.e., bleach) to clean the sleeve as this will degrade the urethane.
Slide sleeve onto arm so bevel is the leading edge; use a little water as a lubricant. Refer to Fig. 11
for proper sleeve position. Be sure top of arm is clean before reassembly into scraper mounting
bracket
.
Clean bracket as you would the exterior of the mixer. Wipe with a cloth moistened with warm water
and detergent solution. Dry with a clean dry cloth before installing scraper.
– 7 –
Page 8

MAINTENANCE
Lubricate top of scraper arm occasionally with a little Chevron Poly FM #2 (supplied). This will lubricate
the mechanism. Keep the end of the scraper arm clean when you insert it in the bracket slot.
The bracket cover can be removed (4 screws) for periodic cleaning and application of Chevron Poly
FM #2 grease.
TROUBLESHOOTING
Symptom Remedy
Scraper grabbing bowl. Lubricate bowl surface with vegetable oil or shortening.
Bevel edge not leading. Remove arm and reinstall urethane scraper.
Beater/Bowl clearance excessive. Hobart Service can adjust the Beater/Bowl clearance
so the scraper fits the side of the bowl.
Contact Hobart Service for any other problems.
FORM 33917 Rev. A (June 2001) PRINTED IN U.S.A.
– 8 –
 Loading...