

Hitachi VisionPlate User Manual for Embedded Linux and Microsoft Windows XP Embedded Operating Systems

User Manual for Embedded Linux and
Microsoft Windows XP Embedded
Operating Systems
Hitachi VisionPlate User Manual
i

Copyright
© 2003 Hitachi Data Systems. All rights reserved.
This publication contains information that is protected by copyright. No part of it may be
reproduced, transmitted, transcribed, stored in a retrieval system, or translated into any language
without permission from Hitachi Data Systems.
Trademarks
Crusoe is a trademark of Transmeta Corporation.
Microsoft, MS-DOS, and Windows are registered trademarks of Microsoft Corporation.
All trademarks, trade names, and service marks used herein are the rightful property of their
respective owners.
Chapter
ii

Hitachi VisionPlate User Manual
iii

Table of Contents
1 Safety Information...........................................................................................................................................1
1.1 Introduction ..................................................................................................................................................1
1.2 Tips for Safe Operation.............................................................................................................................1
1.3 Vision Risk Factors.......................................................................................................................................2
1.4 Hand and Wrist Motor Risk Factors .....................................................................................................2
1.5 Body Support Risk Factors .......................................................................................................................3
1.6 Product Safety Guidelines........................................................................................................................ 3
1.7 Main Battery Pack Guidelines ................................................................................................................4
1.8 Power Cord Guidelines..............................................................................................................................4
1.9 AC Adapter Guidelines..............................................................................................................................5
1.10 Restrictions for AC Adapters...................................................................................................................6
1.11 Liquid Crystal Display (LCD) Guidelines..............................................................................................6
1.12 Proper Treatment of Your Hitachi Product .......................................................................................7
1.13 Safety and Regulatory Compliance......................................................................................................8
1.14 General Safety Guidelines......................................................................................................................10
1.15 Battery Safety Guidelines.......................................................................................................................11
1.16 Operating Safety Guidelines.................................................................................................................11
2 Getting Started................................................................................................................................................12
2.1 Identifying Components.........................................................................................................................12
2.2 Setting up Your VisionPlate ..................................................................................................................16
2.3 Mobile Use...................................................................................................................................................20
2.4 Powering the VisionPlate On and Off ..............................................................................................22
2.5 Using the Stylus .........................................................................................................................................24
2.6 Battery Use and Maintenance..............................................................................................................26
3 Using Your VisionPlate with Embedded Linux............................................................................. 28
3.1 Touchscreen Calibration .........................................................................................................................28
3.2 Adjusting the Brightness of the LCD.................................................................................................29
3.3 Adjusting the Volume .............................................................................................................................30
3.4 Prolonging Battery Life and Instant on/off Functionality.........................................................31
3.5 Low Battery Notification Settings ......................................................................................................32
3.6 Installing and Removing PC Cards......................................................................................................32
3.7 Installing and Removing Compact Flash (CF) Cards ....................................................................34
3.8 Wireless LAN Configuration..................................................................................................................36
3.9 Screen Rotation..........................................................................................................................................37
Chapter
iv

3.10 Programmable Button ............................................................................................................................38
4 Using Your VisionPlate with Windows XP embedded............................................................. 40
4.1 Windows Toolbar Overview..................................................................................................................40
4.2 Touchscreen Calibration .........................................................................................................................41
4.3 Adjusting the Brightness of the LCD.................................................................................................43
4.4 Adjusting the Volume .............................................................................................................................43
4.5 Prolonging Battery Life and Instant on/off Functionality.........................................................44
4.6 Low Battery Notification Settings ......................................................................................................46
4.7 Installing and Removing PC Cards......................................................................................................47
4.8 Installing and Removing Compact Flash (CF) Cards ....................................................................49
4.9 Wireless LAN Configuration..................................................................................................................51
4.10 Programmable Button ............................................................................................................................51
4.11 EWF.................................................................................................................................................................52
5 VisionPlate Troubleshooting Tips......................................................................................................... 53
5.1 Troubleshooting the Display ................................................................................................................53
5.2 Troubleshooting the Stylus ...................................................................................................................53
5.3 Troubleshooting Power Connections ................................................................................................53
6 Specifications ................................................................................................................................................... 54
Hitachi VisionPlate User Manual
v

Disclaimer
Hitachi Data Systems has taken reasonable steps to provide complete and accurate information in
this document. However, due to continuous efforts being made to improve and update the
VisionPlate product, Hitachi Data Systems shall not be liable for any technical or editorial errors or
omissions contained in this document, or for any damage, direct or indirect, from discrepancies
between this document and the products it describes.
Information in this document is subject to change without notice and does not represent a
commitment on the part of Hitachi Data Systems.
Hitachi Data Systems strongly recommends that you keep separate, permanent written records of
all important data and perform periodic backups. Data can be lost or altered in virtually any
electronic memory product under certain circumstances. Hitachi Data Systems assumes no
responsibility for data loss or data otherwise rendered unusable, whether as a result of improper
use, repairs, defects, battery replacement, use after the specified battery life has expired, or any
other causes.
Hitachi Data Systems assumes no responsibility, directly or indirectly, for financial losses or claims
from third persons resulting from the use of this product and any of its functions, such as stolen
credit card numbers, the loss of, or alteration of, stored data, etc.
Chapter
vi

1 Safety Information
1.1 Introduction
This product is designed to operate safely when reasonable safety practices are followed.
The guidelines outlined in this document describe potential risks associated with product
operation and identify important safety practices designed to help you minimize these risks and
avoid injury to you and your product. If you have additional questions about your product and
how to operate it in a safe manner, please contact your Hitachi Customer Service or an authorized
Support Representative.
1.2 Tips for Safe Operation
The VisionPlate is designed for the mobile user’s needs. It is compact, lightweight, and extremely
portable. Because the VisionPlate is intended for frequent use in the field, it is conceivable that
the unit might be used in an environment where lighting conditions are poor, viewing angles and
distances from the screen are inconvenient, where seating conditions may adversely affect arm
and wrist positions, and where adequate neck and back support is lacking.
Some studies suggest that prolonged periods of tapping, typing, improper workstation setup,
incorrect work habits, personal health problems, and other factors might be linked to injuries such
as carpal tunnel syndrome, tendonitis, and eyestrain.
Warning signs of these conditions include:
• Aching, soreness, burning sensations, throbbing, tingling, or numbness in the hands, wrists,
arms, or neck.
• Blurred vision or persistant headaches.
1.2.1 Things to Keep in Mind
• If you are experiencing any of the above symptoms or similar pain, you should consult your
physician immediately.
• The information contained in this document is not meant to be construed as medical advice.
• While using this product, you should schedule regular medical and visual checkups with your
healthcare providers.
• If this product is your primary product at a fixed workplace, it might be more comfortable to
use an external mouse, external keyboard, and other such devices.
• To avoid eyestrain and physical discomfort, the following guidelines should always be
followed.
Hitachi VisionPlate User Manual
1

1.3 Vision Risk Factors
Sustained viewing of screens can lead to fatigue, blurred or double vision, and headaches.
Some researchers believe that users who look at their screens for long durations can even undergo
changes in how clearly and quickly they focus.
1.3.1 Things to Keep in Mind
• Maintain a desirable viewing angle of 20 to 35 degrees downward toward the center of the
LCD screen.
• Place the display at a comfortable viewing distance, usually about 20 to 24 inches away from
you.
• Periodically adjust the product during the work session to change the focal distance to the
LCD.
• Always locate the LCD directly in front of you.
• Always adjust the brightness and contrast controls to maximize the character and image
quality on the LCD.
• Take frequent, short stretching or exercise breaks.
• Frequently adjust your position in your chair.
• Select light sources that are located outside the peripheral field of vision in order to minimize
direct and reflected glare.
• Whenever possible, use indirect lighting to avoid reflective bright spots on the LCD.
1.4 Hand and Wrist Motor Risk Factors
Using the keyboard, using the mouse, using the touch panel, writing, and grasping and handling
paperwork might cause strain on the hand’s fine motor functions and could lead to pain, swelling,
and numbness that persists in the affected area, even when at rest.
1.4.1 Things to Keep in Mind
• Avoid sustained repetition of tasks without taking breaks. Take frequent breaks throughout
the operating session, and perform stretching exercises.
• Avoid sitting in one position for long periods of time.
• Be aware that working in an awkward position could cause discomfort or stress to the back,
neck, or shoulders.
• Periodically stretch, change your posture, and alternate between sitting and standing.
• When typing or tapping, ensure a neutral or straight wrist position by aligning the chair,
work surface, and the product.
Chapter
2
1

• Adjust your chair height so that your feet rest comfortably on the floor with your thighs
parallel to the floor.
1.5 Body Support Risk Factors
Prolonged sitting while using the product could lead to stress in the lower back and increased
pressure on vertebrae.
Chairs can also apply local pressure on the backs of legs, cutting off blood flow to muscles.
1.5.1 Things to Keep in Mind
• Ensure that your workspace allows for free movement.
• Change positions while performing tasks.
• Work in a chair that allows adjustment of both the seat height and the tilt. Chairs with
adjustable arm and back rests support the upper body and reduce pressure on the spine.
1.6 Product Safety Guidelines
If repair or adjustment for your Hitachi Data Systems product is necessary, contact an authorized
Hitachi Customer Service and Support Representative.
1.6.1 Things to Keep in Mind
• Never remove the cover or back panel of your Hitachi Data Systems product unless you have
been instructed to do so by a Hitachi Customer Service or an authorized Support
Representative.
• Removing the cover or back panel in an unauthorized manner could result in the risk of
electric shock.
• Never disassemble your Hitachi Data Systems product or its electrical components, as doing so
could possibly cause short-circuits that might damage the product.
Hitachi VisionPlate User Manual
3

1.7 Main Battery Pack Guidelines
• Use only the battery pack supplied with your Hitachi Data Systems product.
• Always turn off the power to the product before replacing a battery pack.
• Creating a short circuit in the main battery pack could cause a fire and could result in personal
injury.
• Causing the batteries to leak or disposing of them in an improper manner could pose a health
hazard.
• Always dispose of batteries in accordance with the laws of your local community.
1.7.1 Things to Keep in Mind
• Never accidentally or intentionally bring the battery terminals in contact with other metal
objects.
• Never disassemble the battery pack or subject the battery pack to heat.
• Never put the battery pack into a fire.
• When disposing of battery packs, follow all community regulations that pertain to battery
disposal.
• When disposing of the battery pack, cover the metal terminals with a non-conducting tape to
prevent accidental short-circuiting.
• Use the battery pack supplied with the Hitachi Data Systems product only, as other battery
packs could be incompatible with the Hitachi Data Systems product and could damage the
product.
• Charge the battery pack while it is installed in the product or use the external battery charger
that has been designated as an approved accessory.
1.8 Power Cord Guidelines
Never use damaged or worn power cords or plugs. Doing so could result in electric shock, burns,
or fire.
Chapter
4
1

1.8.1 Things to Keep in Mind
• When removing a plug from a socket, never bend or twist the power cord.
• Never place heavy objects on a power cord. Doing so could result in damage.
• To avoid damaging the power cord, always grasp the plug directly when unplugging the
power cord.
• To obtain suitable power cord replacements, contact your Hitachi Customer Service or an
authorized Support Representative.
WARNING: The power cord for this product contains lead, a chemical known to the State of
California to cause cancer, and birth defects or other reproductive harm.
1.9 AC Adapter Guidelines
Using any power source other than the Hitachi Data Systems AC adapter or power cord that comes
with your product could result in exposure to electric shock hazards.
1.9.1 Things to Keep in Mind
• Never attempt to disassemble or repair an AC adapter.
• Always use a surge protector to protect your product from possible damage caused by a
power surge.
• Always contact an authorized Hitachi Customer Service or an authorized Support
Representative if repair or replacement is required.
Hitachi VisionPlate User Manual
5

1.10 Restrictions for AC Adapters
• Use only the AC adapter and battery pack shipped with the VisionPlate.
• Product damage, personal injury, or fire could occur when using an unapproved AC adapter
or battery pack as they could have inappropriate voltage, or a different maximum output
current and polarity.
• When plugging in or unplugging the power supply cord, always hold the connector and not
the cord. Ensure that the connector in plugged all the way in.
• Connect only authorized Hitachi Data Systems products.
• Do not drop or apply excessive shock to the AC adapter and battery.
• Do not disassemble the AC adapter or the battery pack.
Note: It might not be appropriate to use your AC power adapter in certain mobile operating
situations, such as during an airplane flight. Please remember that each airline company has its
own safety policies, rules and regulations regarding the use of electronic devices during flights,
including these products. On flights that allow the use of these products, check with the Flight
Attendant to confirm the time periods when products are allowed to operate before using the in-
flight power adapter.
1.11 Liquid Crystal Display (LCD) Guidelines
If the VisionPlate’s LCD is damaged, the liquid contained within the display could leak.
Any ingestion of this liquid can result in serious bodily injury or illness.
1.11.1 Things to Keep in Mind
• Never apply force to the LCD and surrounding screen by pushing or squeezing it.
• If the LCD leaks, causing the liquid to come in contact with any part of your body, use large
amounts of water to immediately wash the liquid off.
• Wash any clothes that have come into contact with LCD leakage immediately, using a
synthetic detergent.
• For instructions on the safe disposal and replacement of a damaged LCD, contact an
authorized Hitachi Customer Service or an authorized Support Representative.
• WARNING: The LCD contains Mercury. Do not put the LCD into the trash. Recycle or dispose
of the LCD as Hazardous Waste.
Chapter
6
1

1.12 Proper Treatment of Your Hitachi Product
Allowing any metal objects, such as screws or paper clips, to fall into the VisionPlate could result in
a short circuit, fire, or other internal damage.
To avoid serious damage, never allow any liquids to spill into any part of your Hitachi product and
never expose the product to rain or other liquids when the peripheral covers are open.
1.12.1 Things to Keep in Mind
• Should any metal object fall into the VisionPlate, immediately turn off the power, unplug the
power cord, and contact Hitachi Customer Service or an authorized Support Representative
for assistance.
• Should the VisionPlate come into contact with rain or water when the peripheral covers are
open, turn the unit off immediately and contact Hitachi Customer Service or an authorized
Support Representative for assistance before attempting to use the product again.
• To avoid the potential of interfering with any airborne electronic navigation equipment,
never operate the Hitachi product in any aircraft, unless an authorized airline representative
has specifically granted permission.
• To prevent a potential malfunction or damage to the equipment, never place the product on
top of or near a heating device; never expose it to prolonged direct sunlight; and never store
it in an unventilated vehicle.
• During lightning storms, always unplug the power cord to protect the VisionPlate from
possible damage caused by a power surge.
• If the VisionPlate incurs damage from being dropped or sharply struck, or if it emits an
uncharacteristic odor or excessive heat, immediately unplug the power cord and shut off the
VisionPlate.
• Contact an authorized Hitachi Customer Service or an authorized Support Representative for
assistance.
• To prevent the possible occurrence of harmful internal condensation, always ensure that the
VisionPlate has been allowed to warm up to room temperature after it has been exposed to
cold temperatures.
• Although the VisionPlate has been designed for commercial environments, excessive dust,
dirt, or moisture can cause possible damage to its internal components.
Hitachi VisionPlate User Manual
7

1.13 Safety and Regulatory Compliance
1.13.1 FCC Part 15 Compliance Statement
Note: This equipment has been tested and found to comply with limits for a Class B digital device,
pursuant to Part 15 of the FCC Rules.
These limits are designed to provide reasonable protection against harmful interference in a
residential installation.
If an FCC label is not present, the unit is not approved.
This equipment generates, uses, and can radiate radio frequency energy and if not installed and
used in accordance with the instructions, can cause harmful interference to radio communications.
However, there is no guarantee that the interference will not occur in a particular installation.
If this equipment does cause harmful interference to radio or television reception, which can be
determined by turning the equipment off and on, try to correct the interference by doing one or
more of the following:
• Reorient or relocate the receiving antenna.
• Increase the separation between the equipment and receiver.
• Plug the equipment and the receiver into different power outlets.
• Consult your dealer or an experienced radio/TV technician for help.
Note: Changes or modifications not expressly approved by the party responsible for compliance
could void your authority to operate the equipment. If an FCC label is not present, the unit is not
approved.
Note: This device complies with Part 15 of the FCC Rules.
Operation is subject to the following two conditions:
1. This device should not cause harmful interference.
2. This device must accept any interference received, including interference that can cause
undesired operation.
Important: This product requires the use of shielded cables and connectors. The use of non-
shielded interfaced cables is prohibited.
1.13.2 Canadian EMI Compliance Statement
This Class B digital apparatus meets all requirements of the Canadian Interference-Causing
Equipment Regulations.
Cet appareil numérique de la class B respecte toutes les exigences du Règlement sur le matériel
brouilleur du Canada.
1.13.3 FCC Warning
WARNING: FCC regulations state that any unauthorized changes or modifications to this
equipment not expressly approved by the manufacturer could void the User’s authority to operate
this equipment.
Chapter
8
1

Properly shielded and grounded cables and connectors must be used for connection to the boot
computer and other peripherals in order to meet FCC emission limits.
This transmitter must not be co-located with any other transmitters or antennas.
1.13.4 UL1604 Compliance Statement
The VisionPlate has been investigated by Underwriters Laboratories for use in Class I, Division 2,
Group A, B, C and D Hazardous Locations. At the back of the VisionPlate, the following label
indicates that the unit is listed with UL.
If this label is not present, the unit is not approved for use in Hazardous Locations. The following
instructions apply when using the UL-listed model in Class I, Division 2, Group A, B, C and D
Hazardous Locations.
WARNING: Do not connect or disconnect all connectors unless the work area is known to be
nonhazardous.
• The AC adapter and Cradle for the VisionPlate are not listed for use in Class I, Division 2,
Group A, B, C and D Hazardous Locations.
• Use only Hitachi battery pack part numbers PC-AB5900 or PC-AB5910.
• Do not insert or remove the battery pack unless the work area is known to be nonhazardous.
• Do not disassemble the VisionPlate or modify it in any way.
LISTED
10HP
Data Processing Equipment
For use in
Hazardous Location:
Class 1 Division 2
Caution: Use only Batt. Pack (Li-ion)
Group A, B, C & D
Model: PC-AB5900 or PC-AB5910
by Hitachi Ltd.
INSTALLATION AND OPERATING INSTRUCTIONS:
1. THIS EQUIPMENT IS SUITABLE FOR USE IN CLASS I, DIVISION 2, GROUPS A, B, C AND D OR NON-
HAZARDOUS LOCATIONS ONLY.
2. WARNING - EXPLOSION HAZARD - SUBSTITUTION OF COMPONENTS MAY IMPAIR SUITABILITY
FOR CLASS I, DIVISION 2.
Hitachi VisionPlate User Manual
9

1.14 General Safety Guidelines
• Follow all cautions and instructions marked on the product.
• Ensure that the operating voltage of your product is the same as the voltage of your local
power supply. Otherwise, there is a risk of damage or electrical shock or fire. If voltage
adaptation is required, consult your place of purchase.
• Use only the specified batteries to prevent battery explosion, battery leaks, fire, and injury.
• Whenever you detect any abnormal heat, smoke, noise, or smell when using the machine,
stop operating the machine immediately, turn it off, and disconnect the power cord. If you
continue to operate the machine under such conditions, there is a danger of electrical shock
or fire.
• If lightning occurs while using the product, turn off the product. It is safe to use the product
on battery mode, as long as the product is properly grounded.
• Except as described otherwise in this document, refer all servicing to qualified personnel.
• Immediately shut off the product and refer the product for servicing under the following
conditions:
• When the power cord or plug is damaged or frayed.
• If liquid has been spilled into the product.
• If the product has been dropped or the cover has been damaged.
• Arrange the electrical cords so that you do not trip over them. Failure to do so can result in
personal injury and damage to the connected equipment.
• Never push objects of any kind into cabinet openings. They may touch dangerous voltage
points or short parts that could result in fire or electrical shock.
• Before cleaning the product, turn off the product and disconnect the AC adapter.
• Do not expose the product to direct sunlight.
• Keep the product away from any magnetic devices or TVs.
• Do not drop the product.
• Keep all liquids away from the product and its accessories, especially when peripheral covers
are open.
• Do not place containers with liquids or small metal objects, such as pins or paper clips, into
the product. If any liquid or object falls into the product, and you continue to use it, there is a
danger of electrical shock, fire, or malfunction.
• Do not use the product for any purpose other than for which it was intended. Such use can
cause a malfunction or personal injury.
• Use only the AC adapter supplied with the product. If you use a different adapter, there is a
danger of electrical shock, fire, or malfunction.
• Do not place any object on the power cord. Do not pull, press, bend, or rework the power
cord; otherwise, there is a danger of electrical shock, fire, or malfunction.
• To disconnect the power cord from the wall outlet, pull it out by the plug. Never pull on the
cord itself. Pulling on the cord can cause a line to break and could result in a fire.
Chapter
10
1

1.15 Battery Safety Guidelines
• Ensure that you replace the battery correctly. There is a risk of explosion if the battery is
replaced incorrectly.
• Replace the battery only with the same type or an equivalent type, as recommended by the
manufacturer.
• Always dispose of replaced batteries in accordance with the laws and regulations of your local
community. Incorrect handling of a battery can cause a fire or explosion when exposed to
heat.
• Never disassemble a battery.
• Keep batteries out of the reach of children.
• Never allow the batteries to heat up to 60 degrees Celsius (140 degrees Fahrenheit) or higher.
• Never burn the batteries or soak them in water.
Caution: Danger of explosion if battery is incorrectly replaced. Replace only with the same
battery type that is recommended by the manufacturer. Dispose of used batteries according to the
manufacturer’s instructions.
1.16 Operating Safety Guidelines
• Adjust the angle of the display so that you look down slightly at the display. The distance
between your eyes and the display should be 50 to 60 cm (20 to 24 inches).
• Adjust the brightness of your display and the room lighting to prevent any reflection or glare
on the display.
• Avoid exhaustion by taking frequent breaks.
Hitachi VisionPlate User Manual
11

2 Getting Started
2
Thank you and congratulations on the purchase of your Hitachi VisionPlate wireless tablet. This
section describes how to set up your VisionPlate and how to turn the VisionPlate on and off.
2.1 Identifying Components
The following illustration shows the front panel of your VisionPlate:
Speaker
Display
Microphone
Stylus holder
2.1.1 Buttons and Lamps
The following illustration shows the front panel buttons:
Cradle interface
Charge lamp
Power button/Power lamp
Programmable button
Chapter
12

The following table provides a description of the various states of the charge lamp indicators:
State Meaning
Charge Lamp Solid Orange Charging battery
Solid Green Charged battery
Blinking Red Low battery
Off Sufficient charge
Power Button/Power Lamp Solid Green In operation
2.1.2 Left Side Connectors
The following illustration shows the left side connectors:
Blinking Green Power saving mode
PC card slot
Hitachi VisionPlate User Manual
13

2.1.3 Right Side Connectors
2
The following illustration shows the right side connectors:
CF card slot
Headphone connector
Microphone connector
USB interface connectors (x2)
Power supply connector
Chapter
14

2.1.4 Cradle (optional)
The following illustration shows the optional Cradle:
USB interface connectors
Power supply connector
Stylus holder
Stand
Hitachi VisionPlate User Manual
15

2.2 Setting up Your VisionPlate
2
Your VisionPlate can be plugged directly into an outlet (see Direct-to-Outlet Connection), as a
desktop device operated through the optional cradle (see Desktop Use), or as a mobile unit
through battery operation and wireless connectivity (see Mobile Use).
2.2.1 Direct to Outlet Connection
Plug the AC adapter into the Power supply connector, which is located on the right side of the
VisionPlate, with the directional arrow facing down, as shown in the following illustration:
AC adapter
Chapter
16
Power supply connector

2.2.2 Desktop Use (with optional Cradle)
Your VisionPlate can be used with an optional Cradle.
The AC adapter, a USB keyboard, and a USB mouse can be connected directly to the Cradle.
To use your VisionPlate with the optional Cradle, do the following:
1. Plug the AC adapter into the Power supply connector of the Cradle adapter, with the
directional arrow facing away from you, as shown in the following illustration:
AC adapter
Cradle
2. Open the Cradle interface cover (located on the bottom of the VisionPlate), and verify that it
extends downward from the VisionPlate so as not to interfere with the docking connector.
Hitachi VisionPlate User Manual
17
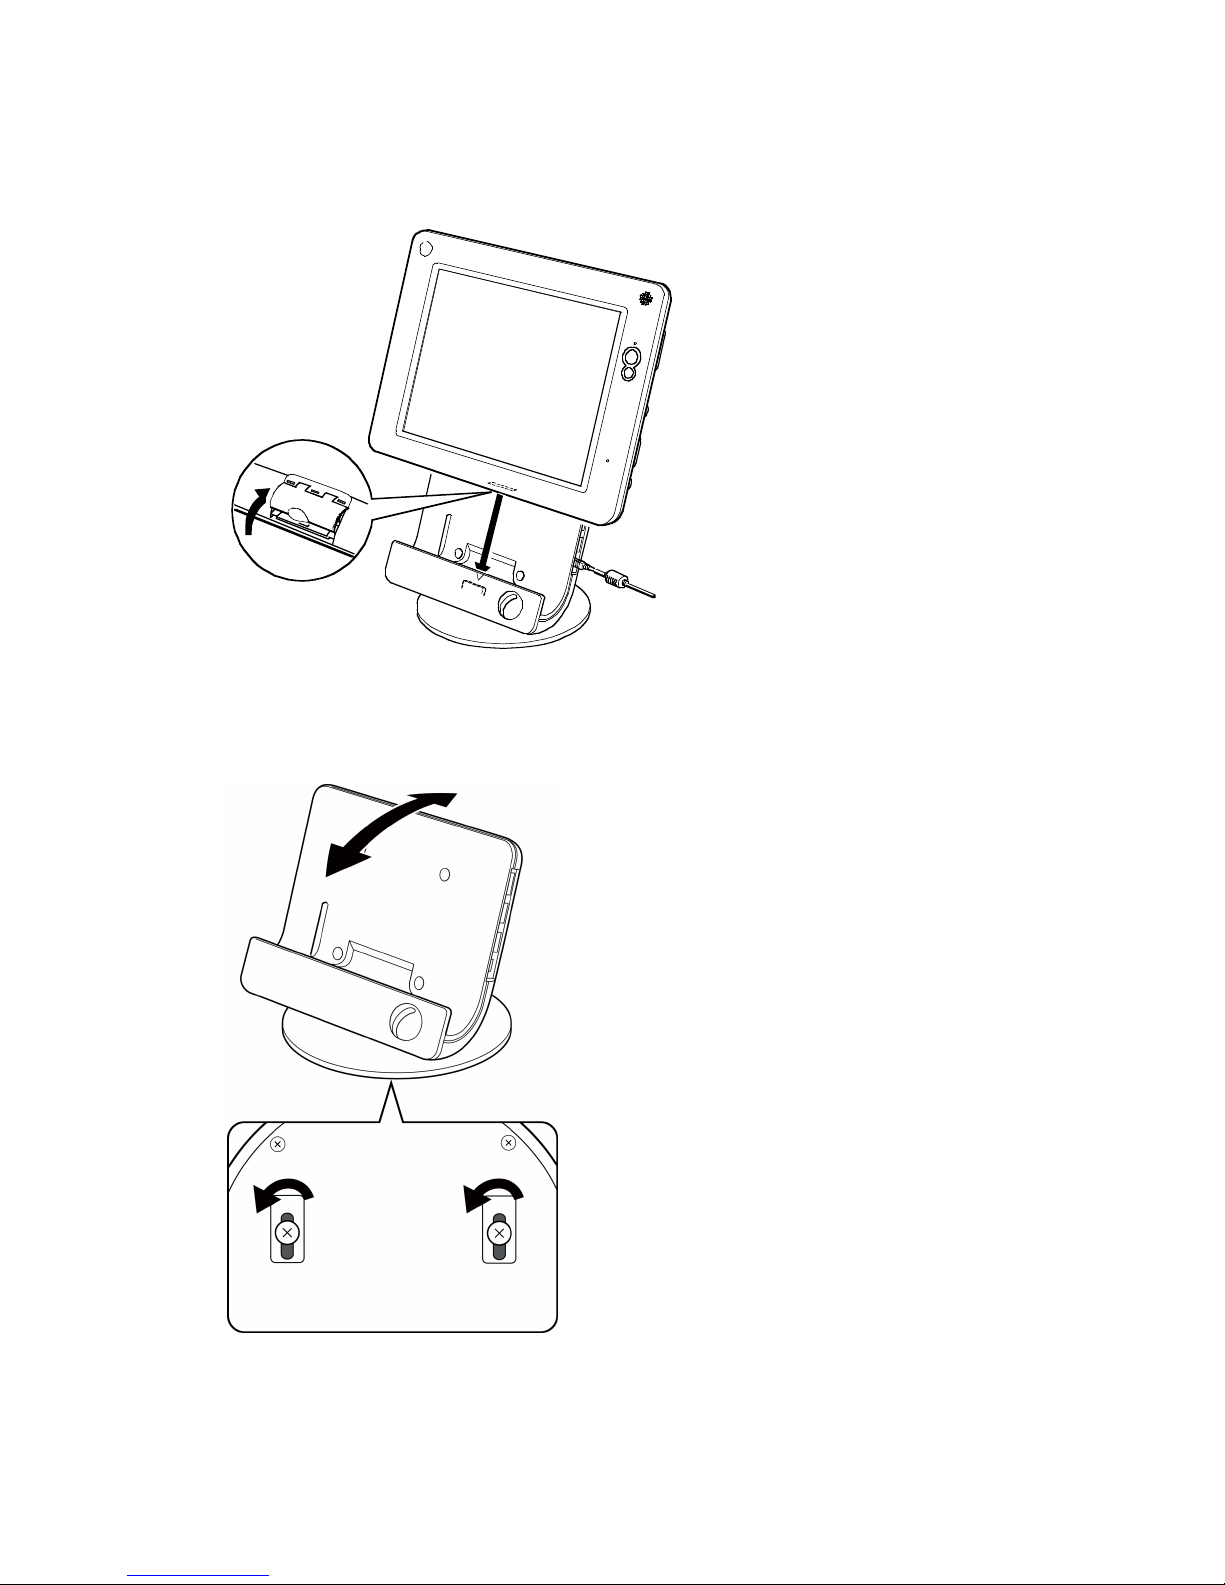
3. Slide your VisionPlate into the Cradle, as shown in the following illustration:
2
Note: The angle of the Cradle can be adjusted by loosening the two screws on the bottom of the
stand, as shown in the following illustration:
Chapter
18

2.2.3 Attaching the Cradle to a VESA Compliant Flat Panel Mounting Stand
The Cradle can be attached to a Flat Panel Mounting Stand that is VESA compliant.
1. Remove the base of the Cradle by removing the two screws, as shown in the following
illustration:
2. Fasten the top portion of the Cradle to the VESA compliant mounting stand as shown in the
following illustration:
Hitachi VisionPlate User Manual
19

2.3 Mobile Use
2
The VisionPlate comes with a lithium ion battery pack that can be used for mobile applications.
When your VisionPlate is powered on with the battery pack installed for the first time, an AC
adapter must be plugged in to fully charge the battery.
To install the battery in your VisionPlate, do the following:
1. Remove the two screws on the back side of the unit and then remove the battery cover, as
shown in the following illustration:
2. Insert the battery into the VisionPlate, as shown in the following illustration:
Note: When you remove the battery, slide the lock according to the directional arrow.
Chapter
20

3. Replace the battery cover, and then fasten the screws, as shown in the following illustration:
Hitachi VisionPlate User Manual
21

2.4 Powering the VisionPlate On and Off
2
This section describes how to turn the power to the VisionPlate on and off.
2.4.1 Powering the VisionPlate On
To turn the VisionPlate on, press the Power button, as shown in the following illustration:
Power button
2.4.2 Powering the VisionPlate Off
For Linux versions, tap the Menu icon, tap System, and then tap Shutdown, as shown in the
following illustration. To force a power off, press and hold the Power button for four seconds.
For Windows XP embedded versions, tap the Start Button, then tap Shutdown, as shown in the
following illustration. To force a power off, press and hold the Power button for four seconds.
Chapter
22

Important: Unplug the AC cord when your VisionPlate is not used for an extended period of
time.
Hitachi VisionPlate User Manual
23

1.5 Using the Stylus
2
The stylus is used to operate the VisionPlate. The stylus has three basic actions, which are
described in this section.
Single tap: Single tapping involves touching the screen softly with the stylus_This action is the
same as a single click of the left button of a mouse, and is used to select an item.
Double tap: Double tapping involves touching the screen softly twice in rapid succession with the
stylus. This action is the same as a double-click of the left button of a mouse and is used to open
an item.
Drag/Drag and Drop: Dragging involves touching the screen with the stylus, and moving the
stylus on the screen surface while the stylus is still touching the screen. Drag and Drop involves
selecting an object by touching the screen with the stylus and then lifting the stylus after moving
the object to another location.
Caution: The stylus supplied with your VisionPlate is designed for your LCD screen. Using any
other pointing device could damage your screen.
Chapter
24

Right click functionality: For embedded Windows environments, the VisionPlate provides a
right click tool. This tool provides right click functionality without the use of a mouse, enabling
use of right click functions in a mobile environment. The right click menu is displayed when the
stylus is held down on the touchscreen for approximately one second.
Right click settings can be adjusted by tapping the
The following menu will appear. The right click function can be disabled by checking Disable
Right Click Function.
icon in the task bar Quick Launch area.
Hitachi VisionPlate User Manual
25

2.6 Battery Use and Maintenance
2
2.6.1 Charging the Battery Pack
Your VisionPlate comes with a lithium ion battery pack, which is not fully charged. You must fully
charge the battery before you use your VisionPlate. The battery is charged by attaching a battery
pack to your VisionPlate, connecting the AC adapter to the VisionPlate, and then plugging the AC
adapter into an electrical outlet.
2.6.2 The Charge Lamp
The charge lamp has four modes that describe different states of the battery. They are as follows:
• Orange: The battery is being charged.
• Green: The battery has finished charging and is fully charged.
• Off: The battery is in use, and there is sufficient charge.
• Blinking red: The battery is in use and is low.
2.6.3 Battery Charging Time
Battery charging times are as follows:
• S size battery (1700mAh): approximately 2.5 to 3.5 hours.
• L size battery (3400mAh): approximately 4.5 to 5.5 hours.
Note: Battery charging times vary with the environment, number and type of peripheral
connections, and the age of the battery.
Important: Batteries that are fully discharged or that have not been used for a long period of
time will require a longer time to charge.
2.6.4 Battery Life
Battery life is approximately 3 hours with the S size battery and 6 hours with L size battery.
Battery life varies with the environment in which the VisionPlate is used and stored, the
peripheral connection state of the product, and the age of the battery. Battery life can be
extended by turning off the VisionPlate, by putting the product in suspend mode when not in use,
and by adjusting the screen to a lower brightness setting.
Under test conditions, the standard battery lasts approximately 2.5 hours when actively using
802.11b wireless connectivity and using an active application. The extended life battery will
double the battery charge life. Using Suspend mode and turning off applications or wireless
connections when not in use will result in a longer battery charge life between charges.
You can check the remaining battery life by tapping the Battery icon
and by double-tapping the Battery icon
XPe version.
for the Linux version,
in the Task Bar notification area for the Windows
Chapter
26

2.6.5 Battery Maintenance
To properly maintain your batteries, keep the following guidelines in mind:
• The battery will discharge slowly if it is attached to the VisionPlate without an AC adapter for
an extended period of time. A fully discharged battery will take a longer time to charge and
can have reduced capacity.
• The battery will slowly lose its charge even when the VisionPlate is turned off. Check the
remaining battery life by tapping the Battery icon
tapping the Battery icon
• Recharge the battery if it is less than 15 percent. Charge the battery periodically (at least once
per month) even if the unit is not being used during this time.
• The battery might have a shorter usable time when it is first charged, or after a long period of
non-use. Charging and discharging the battery several times should recover full battery
functionality.
• Store the battery in a cool dry place.
• Replace the battery when it no longer provides normal operating time.
• Allow your battery to discharge completely at least once a month in order to prolong the
battery life.
2.6.6 General Precautions
• Do not short-circuit the plus (+) and minus (–) terminals of the battery.
• Never allow the battery to heat up to more than 60 degrees Celsius (140 degrees Fahrenheit).
• Do not drop the battery.
• Avoid any shock to the battery.
• Do not wipe the metal parts of the battery with a wet cloth.
• Do not soak the battery in water or touch it with wet hands.
• Never disassemble a battery.
• Do not expose the batteries to direct sunlight.
• Replace the battery only with the same type of battery or an equivalent type that is
recommended by Hitachi Data Systems.
• Do not touch leaking batteries with bare hands. Wash your hands with running water if you
touch battery fluid.
• Dispose of batteries in accordance with applicable local laws, ordinances, and regulations.
for the Linux version and by double-
in the Task Bar notification area for the Windows XPe version.
Hitachi VisionPlate User Manual
27

3 Using Your VisionPlate with Embedded Linux
Your VisionPlate comes pre-installed with an embedded Linux operating system or an embedded
Microsoft Windows XP operating system. This section describes the basic functionality of pre-
installed Linux models.
3.1 Touchscreen Calibration
To calibrate the touchscreen, do the following:
1. Using the stylus, tap the Menu icon
following illustration. A + mark will appear on the screen.
, tap Settings, then tap Calibration, as shown in the
Chapter
28
3

2. Tap the center of the + mark, as shown in the following illustration. Repeat this step one or
more times after the + mark moves from the top left of the screen to the bottom right of the
screen.
Note: If the calibration tool cannot be accessed using the stylus, due to excessive calibration
offset, a USB mouse can be used instead of the stylus to access the calibration tool.
3.2 Adjusting the Brightness of the LCD
To adjust the brightness of the LCD screen, do the following:
Tap here
Using the stylus, tap the Menu icon
following illustration:
2. Move the slide bar to adjust the brightness.
, tap Settings, then tap Brightness, as shown in the
3. Tap OK.
Hitachi VisionPlate User Manual
29

3.3 Adjusting the Volume
To adjust the volume of your VisionPlate, do the following:
Using the stylus, tap the Menu icon
following illustration:
2. Move the slide bar to adjust the volume.
, tap Settings, then tap Volume, as shown in the
3. Tap OK.
Chapter
30
3

3.4 Prolonging Battery Life and Instant on/off Functionality
The VisionPlate provides the option of setting a Low Power Mode for prolonging battery life and
for instant on/off functionality. The Power button and Time-out function can be used to prolong
battery life.
3.4.1 Power Button
If the Power button is firmly pressed and released, your VisionPlate will enter one of three power
modes.
Enter Low Power Mode: Your VisionPlate will enter Low Power Mode.
When in Low Power Mode, the green lamp will blink.
Power OFF: Your VisionPlate will shut down.
Prompt User for Confirmation: Your VisionPlate will display a pop-up menu, providing you
with the option of entering Low Power Mode, Power OFF, or dismissing. This mode is the factory
default setting.
The power mode can be changed by following these steps:
1. Using the stylus, tap the tool icon.
2. Tap the Power Supply tab, and then press Modify.
3. In the Power Button Mode Action, select one of the three modes.
4. Tap OK. If Backlight Power Off is not selected, Low Power Mode is disabled.
3.4.2 Time-out
The VisionPlate is factory preset to enter Low Power mode after 20 minutes of non-use.
This time-out period can be changed by following these steps:
1. Tap the tool icon.
2. Tap the Power Supply tab, and then press Modify.
3. In the Power Saving Mode Action, select Backlight Power Off and define Timeout.
4. Tap OK. If Backlight Power Off is not selected, Low Power Mode is disabled.
3.4.3 Exiting Low Power Mode
To exit Low Power mode, tap the screen.
If the Power button is programmed to Power Off, the system will shut down.
Hitachi VisionPlate User Manual
31

3.5 Low Battery Notification Settings
Your VisionPlate will notify you when your battery level is low.
There are three user-selectable methods of notification, as follows:
Audible Warning: The VisionPlate will beep when the battery level is low, until the AC adapter is
connected.
Popup Message: The VisionPlate will display a popup message notifying you of the low battery
condition.
Power Off: No notification is provided. The VisionPlate will automatically shut down.
The notification method can be changed by doing the following:
1. Using the stylus, tap the tool icon.
2. Tap the Power Supply tab, and then tap Modify.
3. From the Low Battery menu, select one of the three notification methods.
4. Tap OK.
3.6 Installing and Removing PC Cards
The VisionPlate supports one Type I or Type II PC card.
3.6.1 Installing a PC Card
To install a PC card, do the following:
1. Open the cover of the PC card slot.
2. Insert the PC card into the slot.
Chapter
32
3

3.6.2 Removing a PC Card
You can remove a PC card only when the card is in Stop status.
To remove a PC card, do the following:
Caution: You can cause damage to the PC card if you remove the PC card while the VisionPlate is
in use.
Using the stylus, tap the Menu icon
following illustration:
2. Tap the Stop button for the PC card
, tap Utilities, then tap Card Tool, as shown in the
3. Tap OK.
4. Open the cover of the PC card slot.
Hitachi VisionPlate User Manual
33

5. Press the Eject button to remove the PC card, as shown in the following illustration:
Note: If it is difficult to remove the PC card, press the PC card back in and then press the Eject
button again.
3.7 Installing and Removing Compact Flash (CF) Cards
The VisionPlate supports one Type I or Type II CF card.
3.7.1 Installing a CF Card
To install a CF card, do the following:
1. Open the cover of the CF card slot.
2. Insert the CF card into the slot, as shown in the following illustration:
Chapter
34
3

3.7.2 Removing a CF Card
You can remove a CF card only when the card is in a Stop status.
To remove a CF card, do the following:
Caution: You can cause damage to the CF card if you remove CF card while the VisionPlate is in
use.
Using the stylus, tap the Menu icon
following illustration:
2. Tap the Stop button for the CF card.
, tap Utilities, then tap Card Tool, as shown in the
3. Tap Exit.
4. Open the cover of the CF card slot.
Hitachi VisionPlate User Manual
35

5. Press the Eject button to remove the CF card, as shown in the following illustration:
3.8 Wireless LAN Configuration
Your wireless LAN can be configured as follows:
2
1
3
Using the stylus tap on the tool icon
The Network tab should be selected as default. If it is not, tap the Network tab. Ensure that the
Wireless LAN radio button is selected.
on the control bar.
Chapter
36
3

Tap the Modify… button on the bottom right. The Modify Network Configuration window will
pop up as shown below and appropriate changes can be made to network settings.
3.9 Screen Rotation
The VisionPlate supports screen rotation for Linux environments. A screen rotation tool is
provided to enable you to select 90 degree or 270 degree states that can be directly accessed by
performing the following steps:
Tap the Menu icon
, then tap Utilities, then Screen Rotation.
Hitachi VisionPlate User Manual
37

The following window will appear.
Select the Landscape icon for Landscape mode, the Portrait #1 icon for 90-degree rotation,
and the Portrait #2 icon
Note: A change in screen rotation mode will automatically reboot the system. Calibration must
be reset after a change in screen rotation.
for 270-degree rotation.
3.10 Programmable Button
The VisionPlate includes a Programmable button that is located just under the Power button. In
embedded Linux systems this button can be programmed to launch applications or run custom
programs. The default setting is to launch the software keyboard. This setting can be changed
using the following method.
Using the stylus, tap the Tool icon
Tap the Quick Button tab. The following menu will appear:
.
Select the appropriate program from the pull down menu.
Chapter
38
3

Hitachi VisionPlate User Manual
39

4 Using Your VisionPlate with Windows XP embedded
Your VisionPlate comes pre-installed with an embedded Linux operating system or a Microsoft
Windows XP embedded operating system. This section describes basic functionality of pre-installed
Microsoft XP embedded models.
4.1 Windows Toolbar Overview
The Windows toolbar for Microsoft Windows XP embedded has four distinct areas: The Start
Menu area, the Quick Launch area, the Active window area, and the Notification area. These
areas are shown in the following illustration:
Chapter
40
4

4.2 Touchscreen Calibration
To calibrate the touchscreen, do the following:
1. Using the stylus, tap the
appear (the Calibration button will be grayed out).
Tap the center of the + mark that appears at the top left of the screen. The + mark will blink and
another + mark will appear at the top center of the screen. Tap the center of this second + mark.
Repeat this process for a total of 12 times as the + mark moves to the bottom right of the screen.
icon on the task bar Quick Launch area. The following screen will
Tap here
Hitachi VisionPlate User Manual
41

Tap the Calibration Button, which will be active as shown in the following illustration:
The Control page will appear, as shown in the following illustration. Tap the Save and Exit
button.
Note: If the calibration tool cannot be accessed using the stylus, due to excessive calibration
offset, a USB mouse can be used instead of the stylus to access the calibration tool.
Chapter
42

4.3 Adjusting the Brightness of the LCD
To adjust the brightness of the LCD screen, do the following:
1. Using the stylus, tap the brightness icon
window will appear:
2. Move the slide bar to adjust the brightness.
3. Tap OK.
4.4 Adjusting the Volume
To adjust the volume of your VisionPlate, do the following:
Using the stylus, double tap the volume icon
window will appear.
on the task bar Quick Launch area. The following
in the task bar Notification Area. The following
Use the slider control on the left to adjust the master volume level.
3. Close the volume control window by tapping on the mark on the top right of the window.
Hitachi VisionPlate User Manual
43

4.5 Prolonging Battery Life and Instant on/off Functionality
The VisionPlate provides the option of setting a Low Power Mode for prolonging battery life and
for Instant on/off functionality. The Power button and Time-out function can be used to prolong
battery life.
4.5.1 Power Button
If the Power button is pressed and released after one second, your VisionPlate will enter Standby
Mode. When in Standby Mode, the green lamp will blink.
The power mode can be changed by following these steps:
1. Using the stylus, tap the Start Menu, then tap Control Panel. The Control Panel window will
open.
2. Double tap the Power Option
3. Tap the Advanced tab and select one of four modes for the Power button, which are: Do
Nothing, Ask me what to do, Standby, and Shutdown. These modes can be set by selecting the
mode from the pull down menu under “When I press the power button on my computer.”
icon.
Note: The Sleep button modes under “When I press the sleep button on my computer” are
disabled.
Chapter
44
4

4.5.2 Time-out
The VisionPlate can be programmed to enter various low states of power by turning off any
combination of the monitor, the compact flash storage device, and the CPU.
This time-out period for each option can be changed by following these steps:
1. Using the stylus, tap the Start Menu then tap Control Panel. The control panel window will
open.
2. Double tap the Power Option
3. Change the values for Monitor, Hard disk (compact flash storage device), and Standby, as
needed.
icon.
Note: If a time-out value for Monitor is set without setting a value for Standby, only the
VisionPlate’s display will turn off after the time-out period.
4.5.3 Exiting Low Power Mode
Exiting from Standby Low Power mode (green lamp is blinking and screen is off): Press the Power
button firmly.
Exiting from Monitor Off Low Power mode (green lamp is solid and screen is off): Tap the screen.
Hitachi VisionPlate User Manual
45

4.6 Low Battery Notification Settings
Your VisionPlate will display a message to notify you when your battery level is low.
The notification method can be changed by doing the following:
1. Using the stylus, tap the Start menu then tap Control Panel. The Control Panel window will
open.
2. Double-tap the Power Option
3. Tap the Alarm tab. The following menu will appear:
4. There are four user-selectable methods of notification, as follows:
Sound Alarm: The VisionPlate will beep when the battery level is low. To enable this mode,
check the Sound alarm box.
Display Message: The VisionPlate will display a popup message notifying you of the low battery
condition. This is the default setting for the VisionPlate. To enable this mode, check the Display
message box.
icon.
Sound Alarm and Display Message: To enable this mode, check the Sound alarm and Display
message boxes.
Do nothing: Uncheck the Sound alarm and Display message boxes.
5. Tap OK.
Chapter
46
4

4.7 Installing and Removing PC Cards
The VisionPlate supports one Type I or Type II PC card.
4.7.1 Installing a PC Card
To install a PC card, do the following:
1. Open the cover of the PC card slot.
2. Insert the PC card into the slot.
4.7.2 Removing a PC Card
You can remove a PC card only when the card is in Stop status.
To remove a PC card, do the following:
Caution: You can cause damage to the PC card if you remove the PC card while the VisionPlate is
in use.
1. Using the stylus, tap the Card Removal icon
following window will appear.
Hitachi VisionPlate User Manual
on the task bar Notification area. The
47

2. Highlight the icon for the device you want to remove, then tap the Stop button.
3. Tap OK.
4. Open the cover of the PC card slot.
5. Press the Eject button to remove the PC card, as shown in the following illustration:
Note: If it is difficult to remove the PC card, press the PC card back in and then press the Eject
button again.
Chapter
48
4

4.8 Installing and Removing Compact Flash (CF) Cards
The VisionPlate supports one Type I or Type II CF card.
4.8.1 Installing a CF Card
To install a CF card, do the following:
1. Open the cover of the CF card slot.
2. Insert the CF card into the slot, as shown in the following illustration:
4.8.2 Removing a CF Card
You can remove a CF card only when the card is in a Stop status.
To remove a CF card, do the following:
Caution: You can cause damage to the CF card if you remove CF card while the VisionPlate is in
use.
1. Using the stylus, tap the Card Removal icon
following window will appear.
on the task bar Notification area. The
Hitachi VisionPlate User Manual
49

2. Highlight the icon for the device you want to remove, then tap the Stop button.
3. Tap OK.
4. Open the cover of the CF card slot.
5. Press the Eject button to remove the CF card, as shown in the following illustration:
2
1
3
Chapter
50
4

4.9 Wireless LAN Configuration
Your wireless LAN can be configured as follows:
Using the stylus, tap the Network icon
not connected to a wireless network, the Network icon should have a red X on it.
The following screen will appear (names of the available networks may differ). Highlight the
proper wireless network, input appropriate network key information and check the “Enable IEEE
802.1x authentification for this network” radio box
To further configure the wireless network, tap the Advanced button.
on the task bar Notification area. If the VisionPlate is
Note: When the wireless network is properly connected, the Network icon will change to reflect
the connected status.
4.10 Programmable Button
The VisionPlate includes a Programmable button, which is located just under the Power button.
This button can be programmed to launch applications or run custom programs. The Hitachi team
is available for programming and customization services as well as development support and
assistance. Please contact your Authorized Hitachi Representative for more information.
Hitachi VisionPlate User Manual
51

4.11 EWF
The Enhanced Write Filter (EWF) is a tool that protects the Compact Flash memory from
unnecessary writes and also extends the life of the Compact Flash by avoiding excessive writes to
non-volatile memory.
The EWF redirects data that is to be written to the Compact Flash to the RAM cache. This data
must then be written into the Compact Flash memory if it is to be available after a shut down or a
reboot. The EWF provides tools to write the data from the RAM cache into the Compact Flash
memory.
Programmable button
To save all data at shutdown, double-tap the EWF icon
Reference: The EWF can also be accessed through the following commands:
on the Windows desktop.
Command Meaning
ewfmgr c: Check status of EWF
ewfmgr c: -enable Enable EWF
ewfmgr c: -commit Save RAM cache data to Compact flash without
disabling EWF
ewfmgr c: -commitanddisable Save RAM cache data to Compact Flash and disable
EWF
Note: If the EWF is not executed before your VisionPlate is shut down, all changes and
modifications made to the VisionPlate, including application installs, network setting changes, and
bookmark modifications, will not be in effect upon rebooting.
Chapter
52
4

5 VisionPlate Troubleshooting Tips
5.1 Troubleshooting the Display
When troubleshooting the display, follow these guidelines.
If there is no display, do the following:
• Verify that the VisionPlate is not in Low Power or Standby mode. Touch the screen or press
the Power button for one second.
• Ensure that the AC cord and the AC adapter are plugged in correctly.
If the system hangs, do the following:
• Shut down the VisionPlate by pressing the Power button for at least four seconds, then
reconnect the AC adapter and battery pack, and then press the Power button again to restart
the VisionPlate.
5.2 Troubleshooting the Stylus
If a gap exists between the cursor position and the tapped point, adjust the touchscreen
calibration according to Sections 3.1 or 4.2.
5.3 Troubleshooting Power Connections
When troubleshooting power problems, follow these guidelines.
If the system does not boot up after pressing the Power button, do the following:
• Verify that the AC adapter and power cable are plugged in correctly.
• Ensure that there is power from the outlet.
• Check the battery connection.
• Check for short battery life.
Note: Repeat charging and discharging several times. If you still have the same results, the battery
could be at the end of its life.
Hitachi VisionPlate User Manual
53

6 Specifications
6
PC5NR3-J9xxxxxxxx PC5NR3-Z9xxxxxxxx
Operating System (embedded) Midori Linux Windows XPe
CPU
Cache Memory Primary 128kB CPU Embedded
Secondary 256kB CPU Embedded
Main Memory Capacity Standard 128MB, Max 256MB
Display LCD
VRAM 2MB (SVGA), 4MB (XGA)
Video Controller SMI SM712
Touch Panel Analog resistive type
File Compact Flash 128MB, 256MB, or 512MB
Clock Lithium battery backup (Five year life) Tolerance +/- 180s/month
Microphone Mono
Speaker Mono
Interface Headphone 1 port
Microphone 1 port
USB1.0
Wireless LAN IEEE 802.11b compliant
Expansion Interface 1 port for Cradle
PC Card Slot 1 Slot for Type I, II (PCMCIA 2.1)
CF Card Slot 1 Slot for Type I, II CFA compliant
Battery S size Battery Pack
Charge Time Approximately 2.5 to 3.5 hours
Battery Life *1 Up to 3.7 hours
L size Battery Pack
Charge Time Approximately 4.5 to 5.5 hours
Battery Life *1 Up to 7.5 hours
AC Adapter Frequency 50/60Hz
Input Voltage AC100V-240V
Consumption Maximum 45W
OS Idle Approximately 11W
Stand-by Approximately 4W
Weight 2.84lb(1.35kg) with S size Battery
Dimensions
Ambient
Temperature
Ambient
Humidity
Vibration Resistance Operating 4.9 m/s2 (0.5 G)
Shock Resistance Operating 98 m/s2 (10 G)
Operating 5 to 35°C (41 to 95°F)
Non-Operating -10 to 50°C (14 to 122 °F)
In transit/stock -10 to 60°C (14 to 140 °F)
Operating 20 to 80% (No Condensation)
Non-Operating 10 to 80% (No Condensation)
In transit/stock 10 to 80% (No Condensation)
*1 When the operating system is idle with the lowest intensity of LCD.
Transmeta Crusoe™
Processor TM5500 667MHz
Transmissive 10.4" TFT, 800x600 (SVGA), or 1024x768 (XGA), 262144
color, indoor viewable
2 ports
(Total maximum permissible current: 0.75A)
Lithium ion battery
11.1V 1700mAh
Lithium ion battery
11.1V 3400mAh
11.6"(W) x 8.8"(H) x 1.3"(D)
(294mm x 223mm x 34mm)
Chapter
54

VisionPlate User Manual
September 2003
Hitachi Data Systems
Ubiquitous Business Solutions
750 Central Expressway
Santa Clara, CA 95050
V2.0
Hitachi VisionPlate User Manual
55
 Loading...