

Page 1
ENGLISH
- 1 -
ENGLISH
–1–
ENGLISH
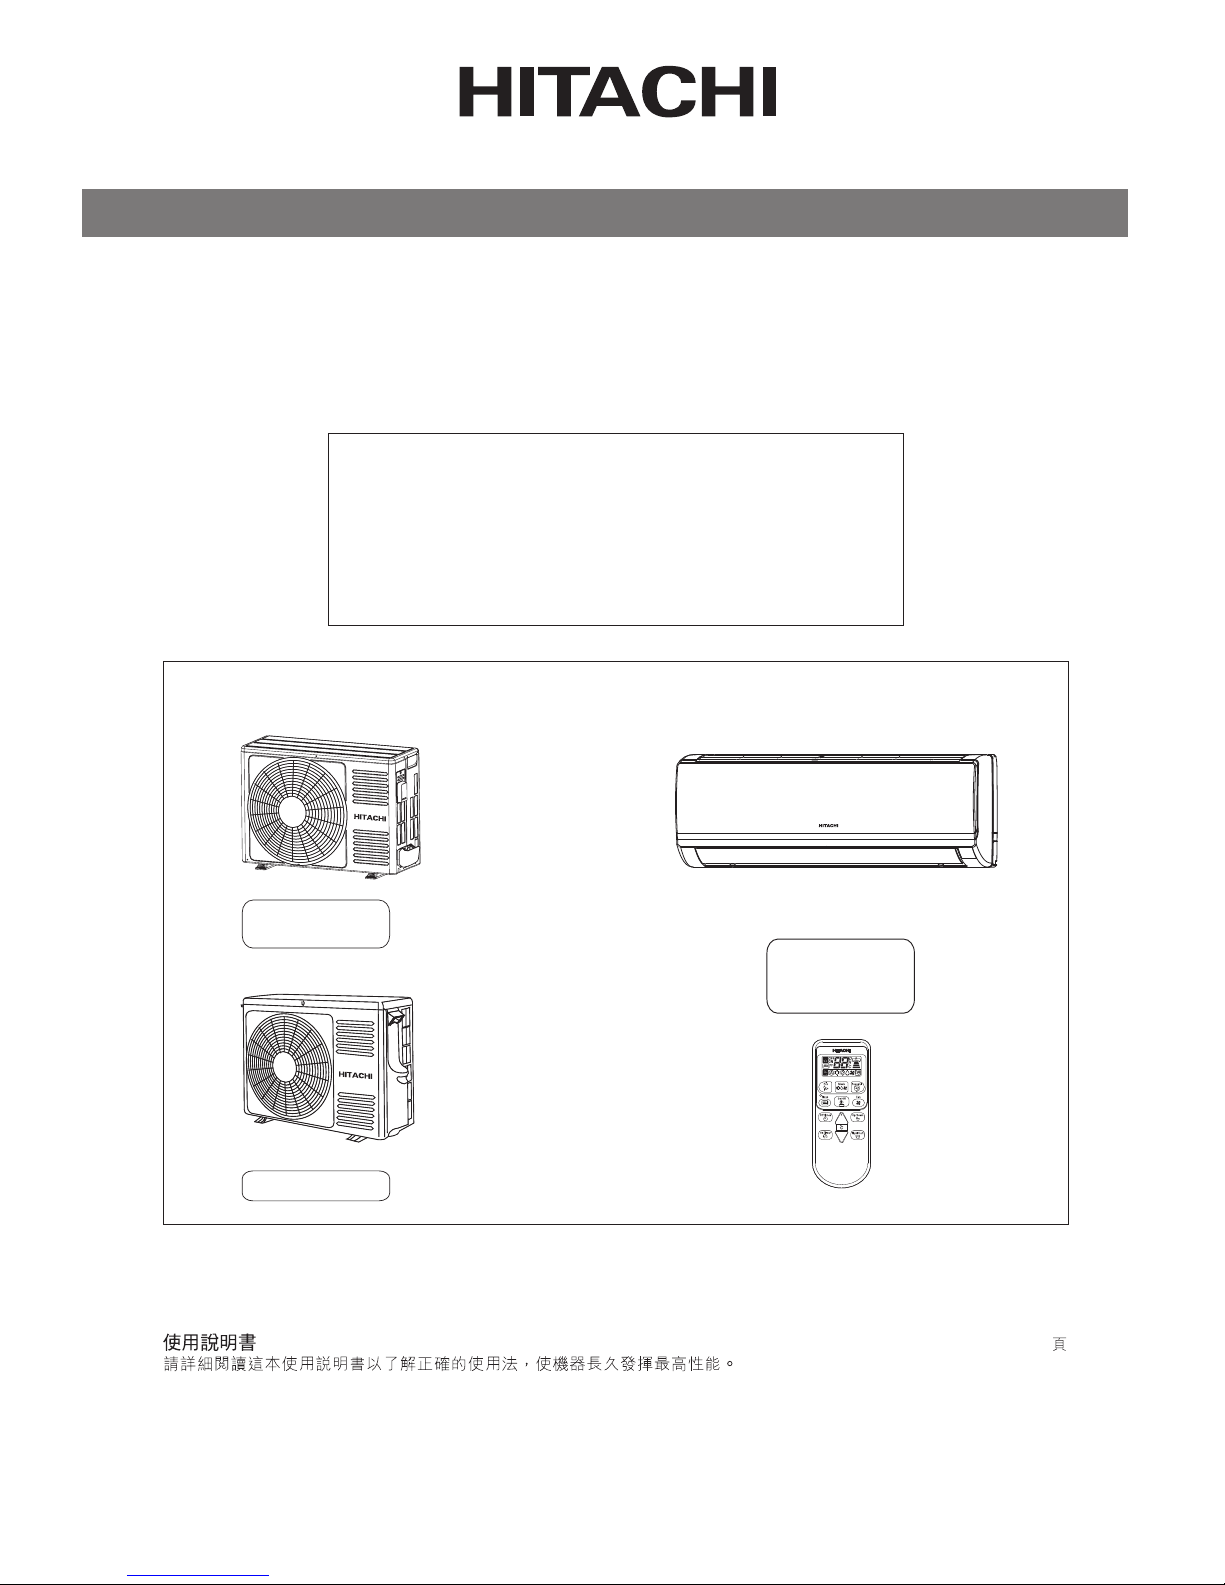
INDOOR UNIT/OUTDOOR UNIT
SPLIT TYPE AIR CONDITIONER
MODEL
RAS-X10CCK/RAC-X10CCK
RAS-X13CCK/RAC-X13CCK
RAS-X18CCK/RAC-X18CCK
RAC-X18CCK
Instruction manual
Page 1~20
To obtain the best performance and ensure years of trouble free use, please read this instruction manual completely.
21~40
RAC-X10CCK
RAC-X13CCK
OUTDOOR UNIT INDOOR UNIT
RAS-X10CCK
RAS-X13CCK
RAS-X18CCK
- 1 -
Page 2

- 2 -
- 5 -
Page 3
- 3 -
- 3 -
SAFETY PRECAUTION
Please read the “Safety Precaution” carefully before operating the unit to ensure correct usage of the unit.
Pay special attention to signs of“ Warning” and “ Caution”. The “Warning” section contains matters which,if
not observed strictly, may cause death or serious injury. The
“
Caution” section contains matters which may result in
serious consequences if not observed properly. Please observe all instructions strictly to ensure safety.
The signs indicate the following meanings.
Make sure to connect earth line.
The sign in the figure indicates prohibition.
Indicates the instructions that must be followed.
Please keep this manual after reading.
PRECAUTIONS DURING INSTALLATION
WARNING
Do not reconstruct the unit.
Water leakage, fault, short circuit or fire may occur if you reconstruct the unit
by yourself.
•
Please ask your sales agent or qualified technician for the installation of
your unit. Water leakage, short circuit or fi re may occur if you install the unit
by yourself.
•
Please use earth line.
Do not place the earth line near water or gas pipes, lightning-conductor, or
the earth line of telephone. Improper installation of earth line may cause
electric shock.
•
CAUTION
A circuit breaker should be installed depending on the mounting site of the
unit. Without a circuit breaker, the danger of electric shock exists.
•
Do not install near location where there is flammable gas. The outdoor unit
may catch fire if flammable gas leaks around it.
•
Please ensure smooth flow of water when installing the drain hose.•
PRECAUTIONS DURING SHIFTING OR MAINTENANCE
W
A
R
N
I
N
G
Should abnormal situation arises (like burning smell), please stop operating
the unit and turn off the circuit breaker. Contact your agent. Fault, short
circuit or fire may occur if you continue to operate the unit under abnormal
situation.
•
Please contact your agent for maintenance. Improper self maintenance may
cause electric shock and fire.
•
Please contact your agent if you need to remove and reinstall the unit.
Electric shock or fire may occur if you remove and reinstall the unit yourself
improperly.
•
If the supply cord is damaged, it must be replaced by the special cord
obtainable at authorized service/parts centers.
•
PRECAUTIONS DURING OPERATION
W
A
R
N
I
N
G
Avoid an extended period of direct air fl ow for your health.•
Do not put objects like thin rods into the panel of blower and suction side because
the high-speed fan inside may cause danger.
•
Do not use any conductor as fuse wire, this could cause fatal accident.•
During thunder storm, disconnect and turn off the circuit breaker.•
•
•
•
•
Page 4
- 4 -
ENGLISH
PRECAUTIONS DURING OPERATION
W
A
R
N
I
N
G
The product shall be operated under the manufacturer specification and not
for any other intended use.
•
Do not attempt to operate the unit with wet hands, this could cause fatal accident.•
When operating the unit with burning equipments, regularly ventilate the
room to avoid oxygen insufficiency.
•
Do not direct the cool air coming out from the air-conditioner panel to face
household heating apparatus as this may affect the working of apparatus such as
the electric kettle, oven etc.
•
Please ensure that outdoor mounting frame is always stable, fir m and
without defect. If not, the outdoor unit may collapse and cause danger.
•
Do not splash or direct water to the body of the unit when cleaning it as this may
cause short circuit.
•
Do not use any aerosol or hair sprays near the indoor unit. This chemical
can adhere on heat exchanger fin and blocked the evaporation water flow to
drain pan. The water will drop on tangential fan and cause water splashing
out from indoor unit.
•
Please switch off the unit and turn off the circuit breaker during cleaning, the highspeed fan inside the unit may cause danger.
•
Turn off the circuit breaker if the unit is not to be operated for a long period.•
Do not climb on the outdoor unit or put objects on it.•
Do not put water container (like vase) on the indoor unit to avoid water
dripping into the unit. Dripping water will damage the insulator inside the unit
and causes short-circuit.
•
Do not place plants directly under the air fl ow as it is bad for the plants.•
When operating the unit with the door and windows opened, (the room humidity is always above
80%) and with the air defl ector facing down or moving automatically for a long period of time,water
will condense on the air deflector and drips down occasionally. This will wet your furniture.Therefore,
do not operate under such c
ondition for a long time.
If the amount of heat in the room is above the cooling or heating capability of the unit (for example:
more people entering the room, using heating equipments and etc.), the preset room temperature
cannot be achieved.
•
•
This appliance is not intended for use by young children or infirm persons unless they have been
Young children should be supervised to ensure that they do not play with the appliance.
adequately supervised by a responsible person to ensure that they can use this appliance safely.
•
•
Page 5
- 5 -
ENGLISH
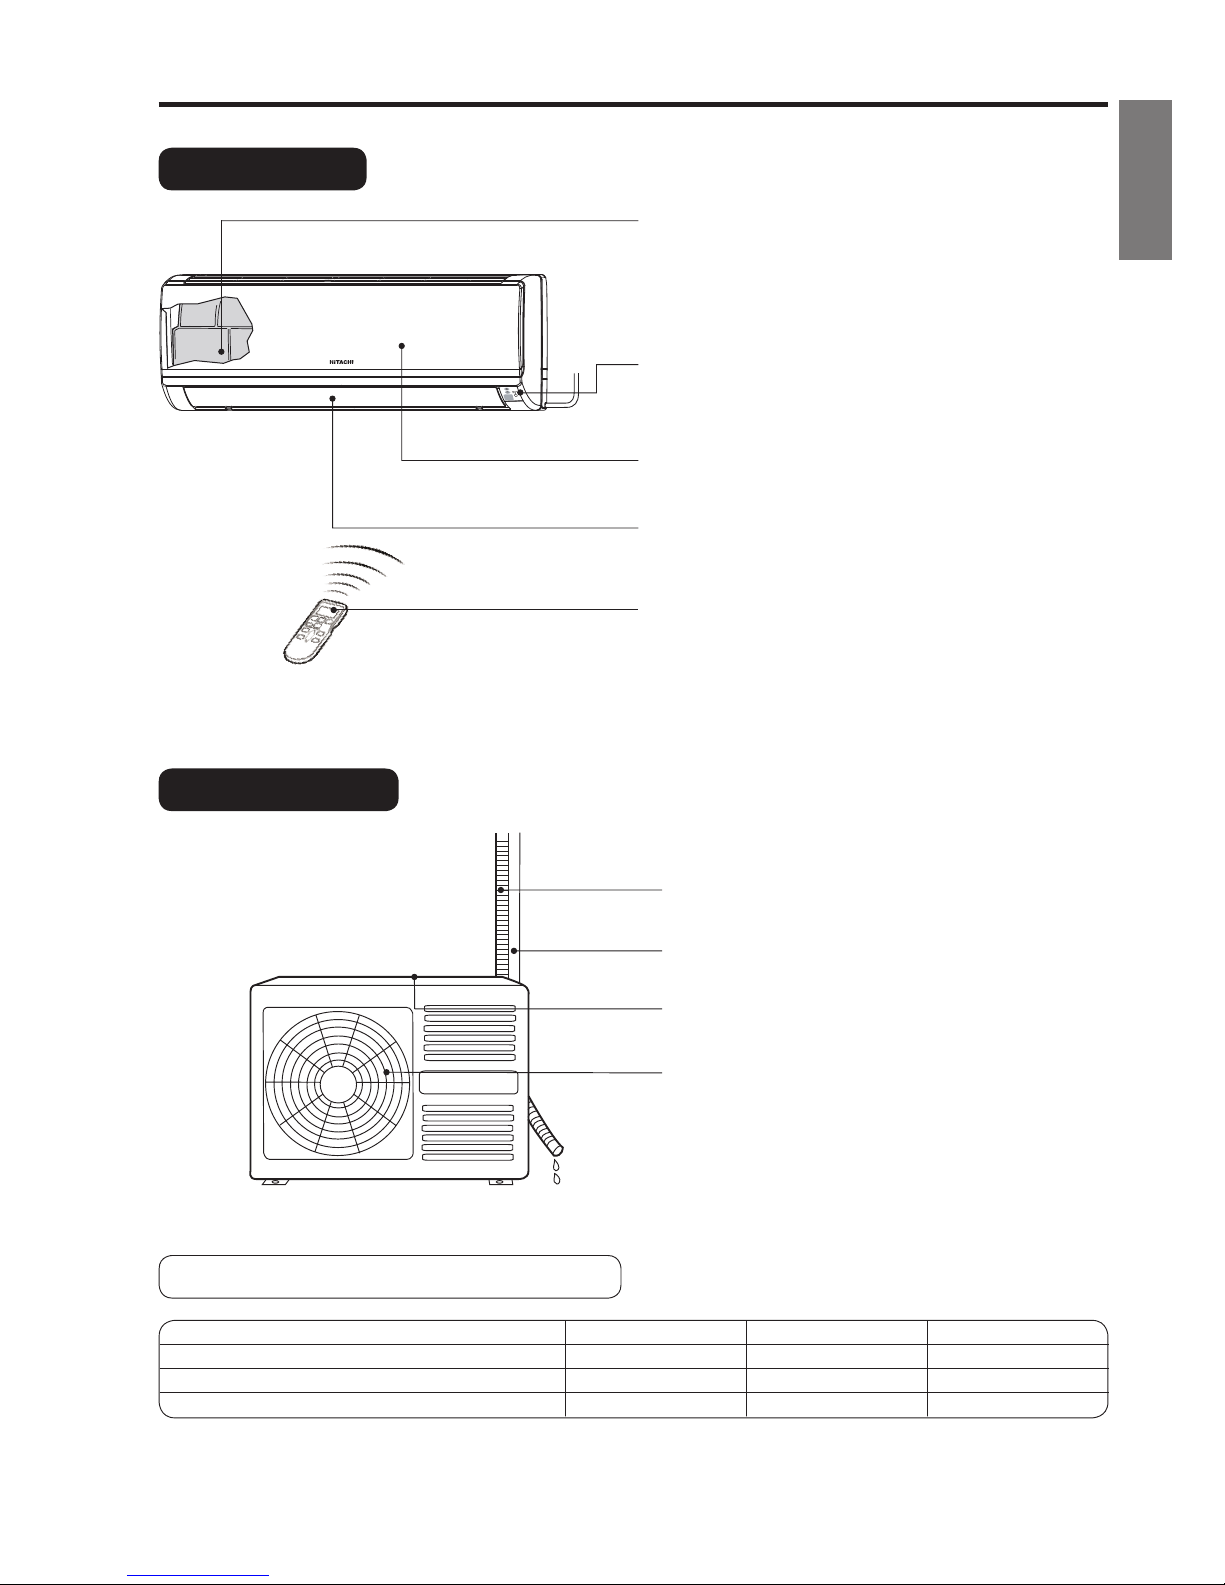
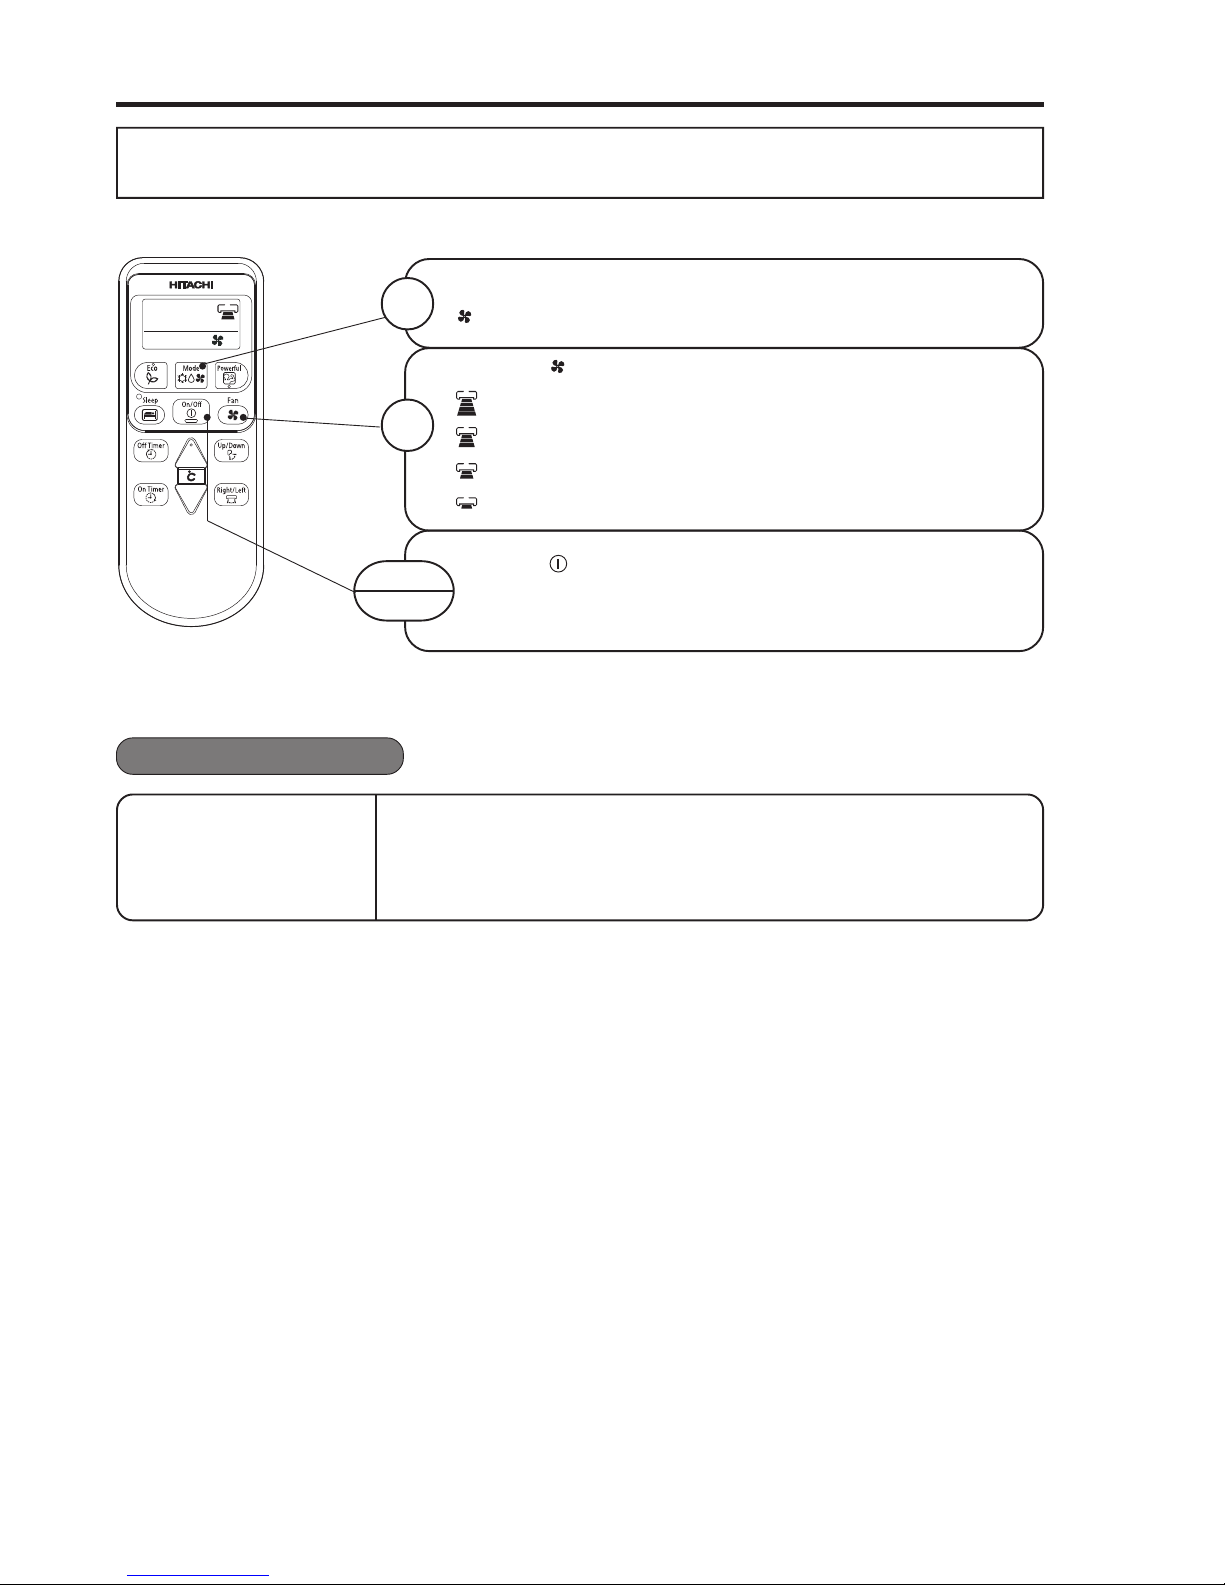
NAMES AND FUNCTIONS OF EACH PART
INDOOR UNIT
AIR FILTER
To prevent dust from coming into the door unit.
(Refer page 17)
INDOOR UNIT INDICATORS
Light indicator showing the operating condition.
(Refer page 6)
FRONT PANEL
HORIZONTAL DEFLECTOR • VERTICAL
DEFLECTOR (AIR OUTLET)
(Refer page 14)
REMOTE CONTROL
Send out operation signal to the indoor unit. So as to
operate the whole unit.
(Refer page 7)
OUTDOOR UNIT
DRAIN PIPE
Condensed water drain to outside.
CONNECTING CORD
AIR INLET (BACK, LEFT SIDE)
AIR OUTLET
MODEL NAME AND DIMENSIONS
MODEL WIDTH(mm) HEIGHT(mm) DEPTH(mm)
RAS-X10CCK, RAS-X13CCK、RAS-X18CCK 780 280 218
RAC-X10CCK、RAC X13CCK 700(+59) 505 258(+48)
RAC-X18CCK 750(+91) 548 288(+47)
-
(Refer page 6)
Page 6
- 6 -
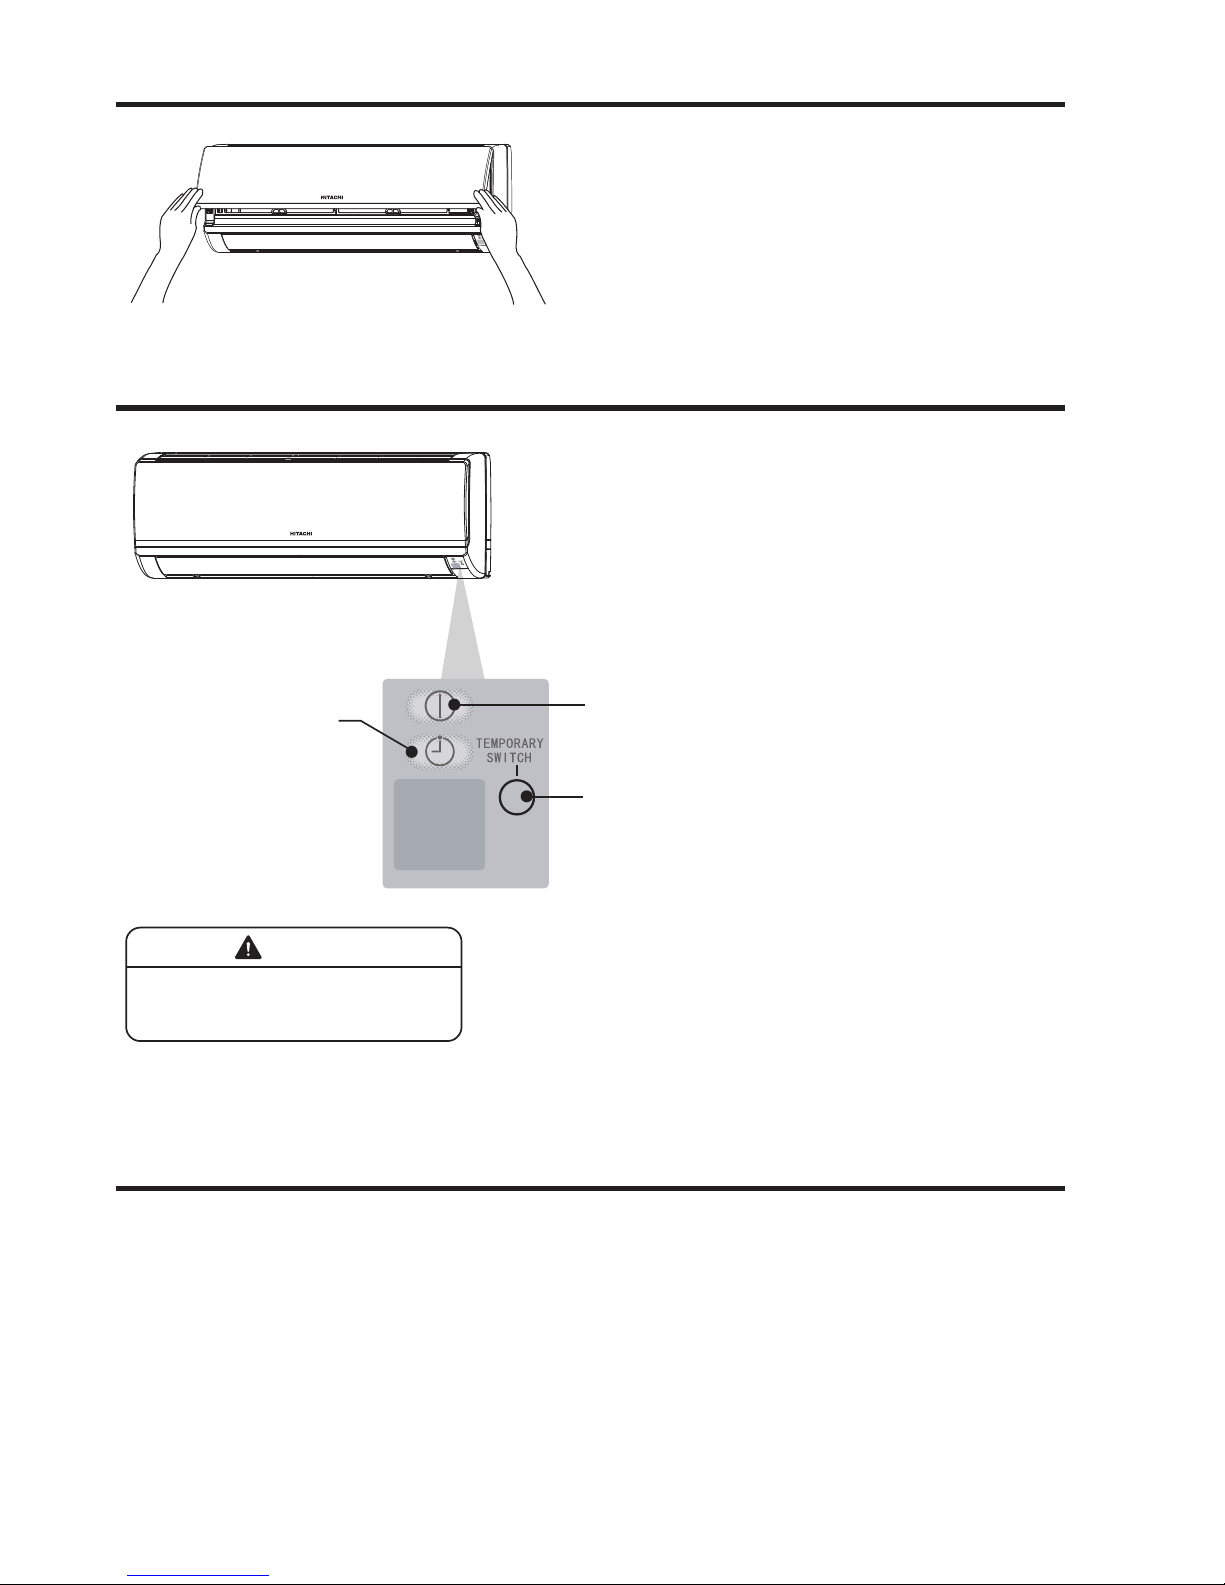
ATTACHING AND REMOVING FRONT PANEL
While gripping both the left and right hand edges
[recessed in the front housing] of the front panel,
lift up to open the front panel.
After completion of job, slightly lift up the fron t
panel and pull down to close the front panel. Ensure
that the 3 sets of left, centre and right clips are
fully secured.
•
•
RECEIVABLE INDICATOR FUNCTIONS
定时
应急
开关
运转
TIMER LAMP (Orange)
This lamp lights when the
timer is working.
OPERATION LAMP (Yellow)
This lamp lights during operation.
TEMPORARY SWITCH
CAUTION
Turn off the circuit breaker or pull out
the power plug if the unit is not be
operated for a long period.
OPERATION INDICATOR
TEMPORARY SWITCH
When the remote control device is not functioning, use the Temporary Switch mode
(1) When the Temporary Switch is pressed, the unit will operate as per the previous setting.
(2) Press the Temporary Switch a second time will stop the operations of the air conditioner unit.
AUTO RESTART FUNCTION
In the event of power failure, the air conditioner will restart automatically.
In the event of power failure during TIMER operation, the timer will be reset and the unit will begin or stop
operating under a new timer setting.
Page 7
- 7 -
ENGLISH
NAMES AND FUNCTIONS OF EACH PART
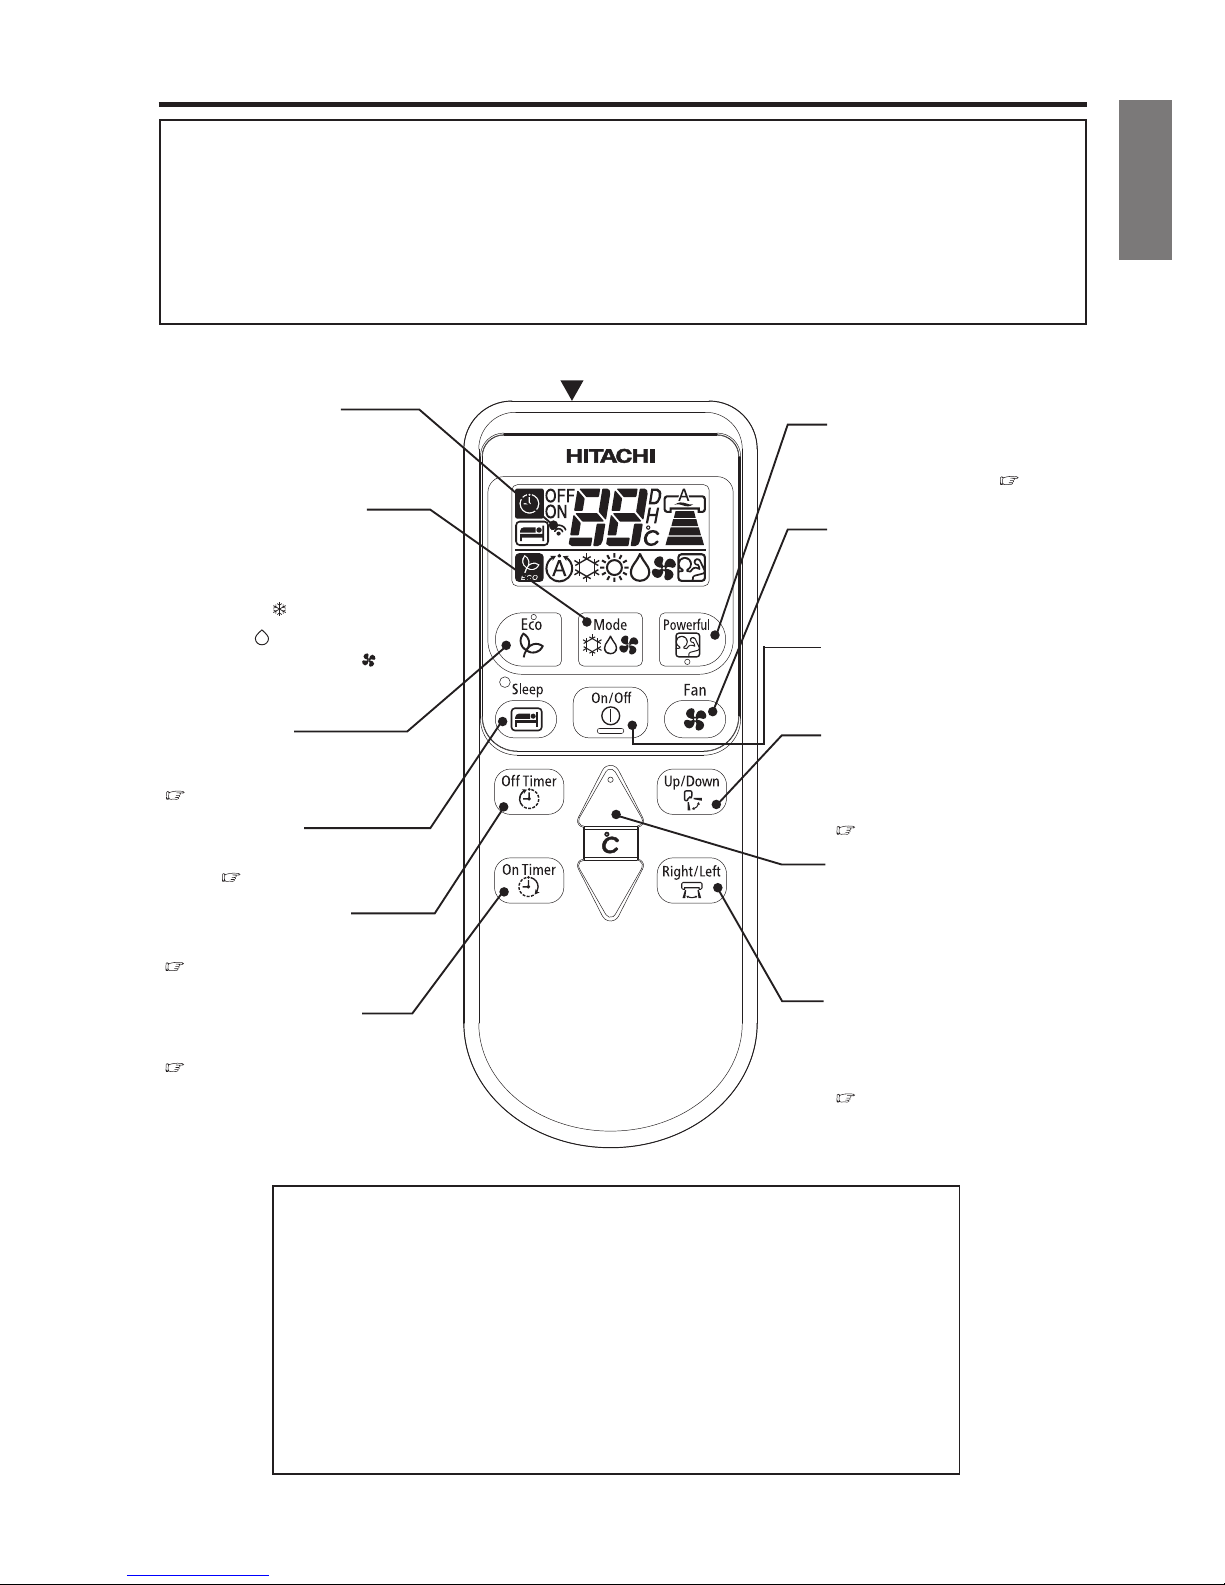
REMOTE CONTROLLER
• This controls the operation of the indoor unit.
The range of control is about 7 meters. If indoor lighting is controlled electronically, the range of
control may be shorter, in some cases, the control signal may not be received.
This unit can be fixed on a wall using the fixture provided. Before fixing it, make sure the indoor unit
can be controlled from the remote controller.
• Handle the remote controller with care.
Dropping it or getting it wet may compromise its signal transmission capability.
Precautions for Use
• Do not put the remote controller in the following places.
• In direct sunlight
• In the vicinity of a heater.
• Handle the remote controller carefully. Do not drop it on the floor, and
protect it from water.
• Once the outdoor unit stops, it will not restart for about 3 minutes (unless
you turn the power switch off and on or unplug the power cord and plug
it in again).
This is to protect the device and does not indicate a failure.
• If you press the FUNCTION selector button during operation, the device
may stop for about 3 minutes for protection.
Signal Transmission
Use this button to select the
operating mode. Every time
you press it, the mode will
change from
Transmission Sign
The transmission sign blinks
when a signal has been send.
POWERFUL Button
Press this button to start
powerful operation. (
Page 1 1)
TEMPERATURE Button
Room temperature setting.
Value will change quicker when
keep pressing.
FAN SPEED Button
Select the fan speed for each
mode.
AUTO SWING (Horizontal)
Button
Control the angle of the
horizontal air defl ector.
(
Page 1 4 )
AUTO SWING (Vertical)
Button
Control the angle of the
vertical air defl ector.
(Page 1 4 )
(COOL) to
(DEHUMIDIFY) and
FUNCTION selector
to
(FAN)
cyclically.
SLEEP button
Use this button to set the sleep
timer.
ECO Button
Use this button to set the ECO
mode.
(
Page 1 2)
OFF TIMER Button
Select the turn OFF time.
(
Page 1 1)
ON TIMER Button
Select the turn ON time.
(
Page 1 1)
START/STOP button
Press this button to start operation.
Press it again to stop operation.
(
Page 1 3)
Page 8
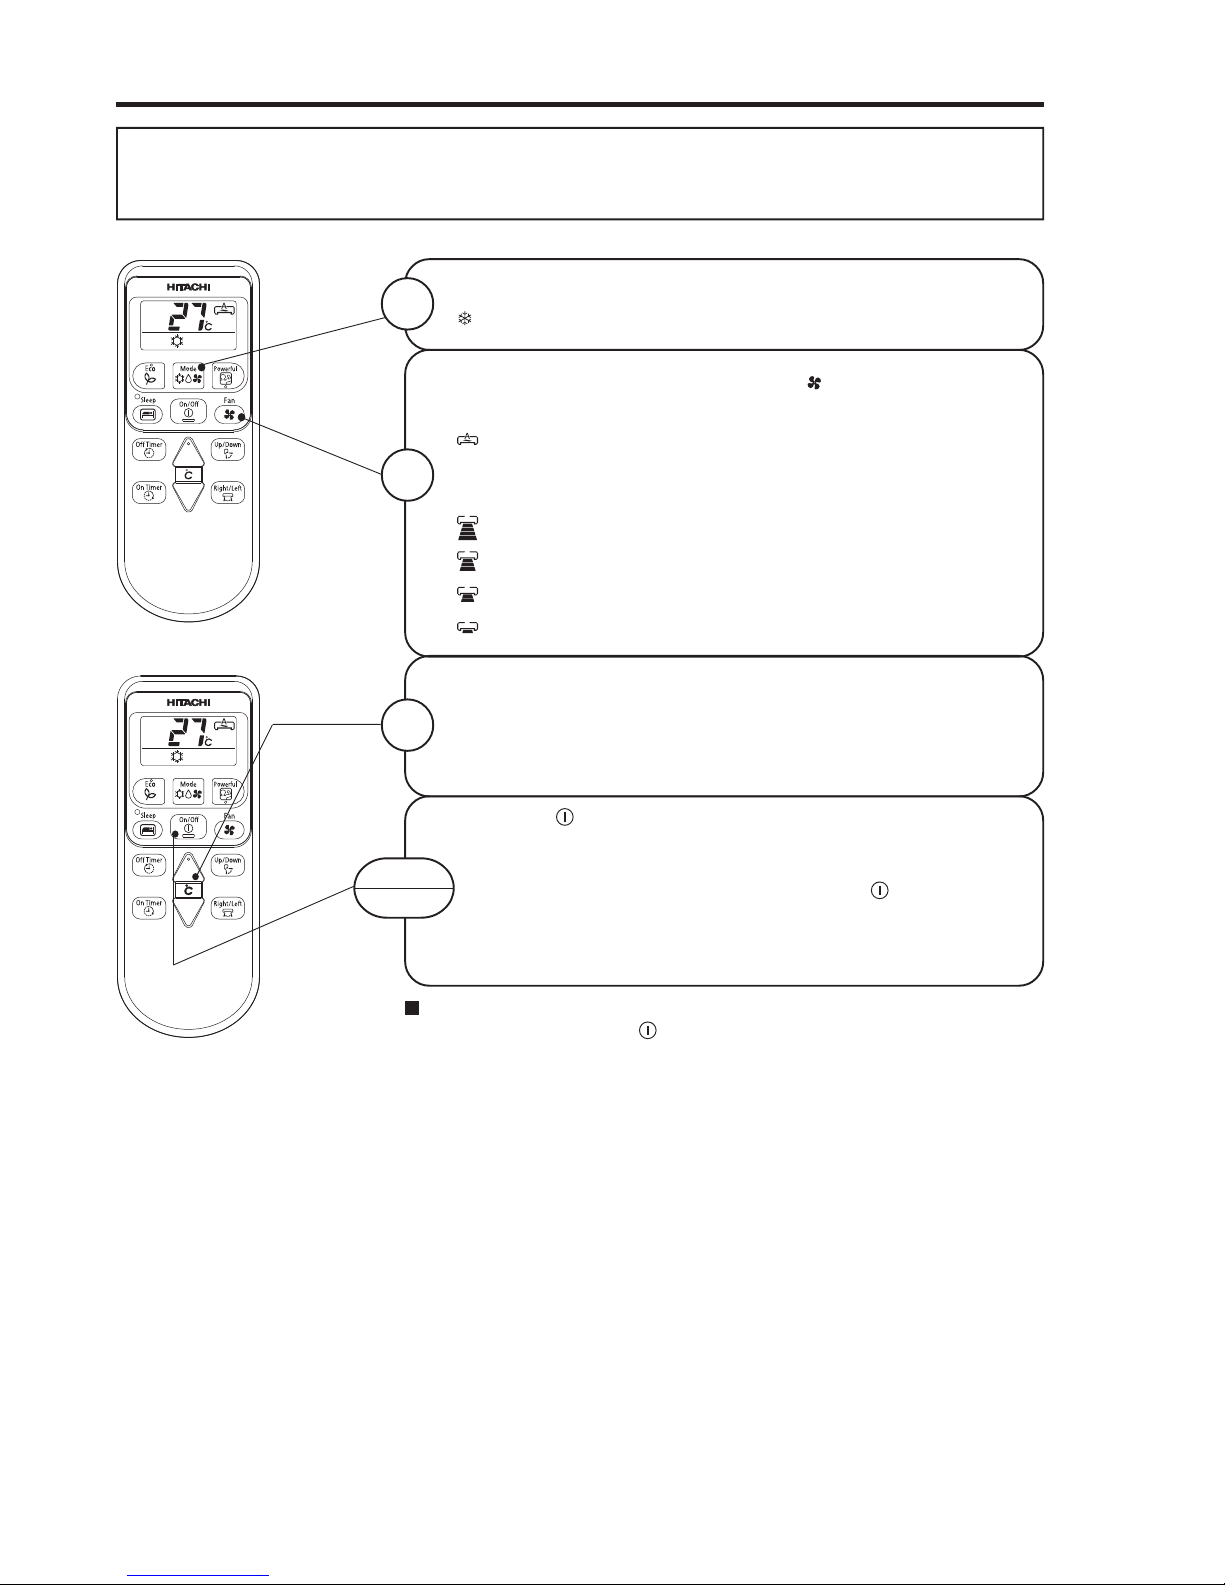
- 8 -
Press the (START/STOP) button. Cooling operation starts
with a beep. Press the button again to stop operation. The cooling
function does not start if the temperature setting is higher than
the current room temperature (even though the (OPERATION)
lamp lights).
The cooling function will start as soon as you set the temperature
below the current room temperature.
START
STOP
COOLING OPERATION
Use the device for cooling when the outdoor temperature is -10 to 43°C.
If humidity is very high (over 80%) indoors, some dew may form on the air outlet grille of the indoor
unit.
Press the FUNCTION selector so that the display indicates
(COOL).
1
Set the desired FAN SPEED with the (FAN SPEED) button
(the display indicates the setting).
(AUTO) : The FAN SPEED is HI at first and varies to MED
automatically when the preset temperature has
been reached.
(HI) : Economical as the room will become cool quickly.
(MED) : Quiet.
(LOW) : More quiet.
(SILENT) : Silent.
2
Set the desired room temperature with the TEMPERATURE
buttons (the display indicates the setting).
The temperature setting and the actual room temperature may
vary somewhat depending on conditions.
3
As the settings are stored in memory in the remote controller, you
only have to press the
(START/STOP) button next time.
Page 9
- 9 -
ENGLISH
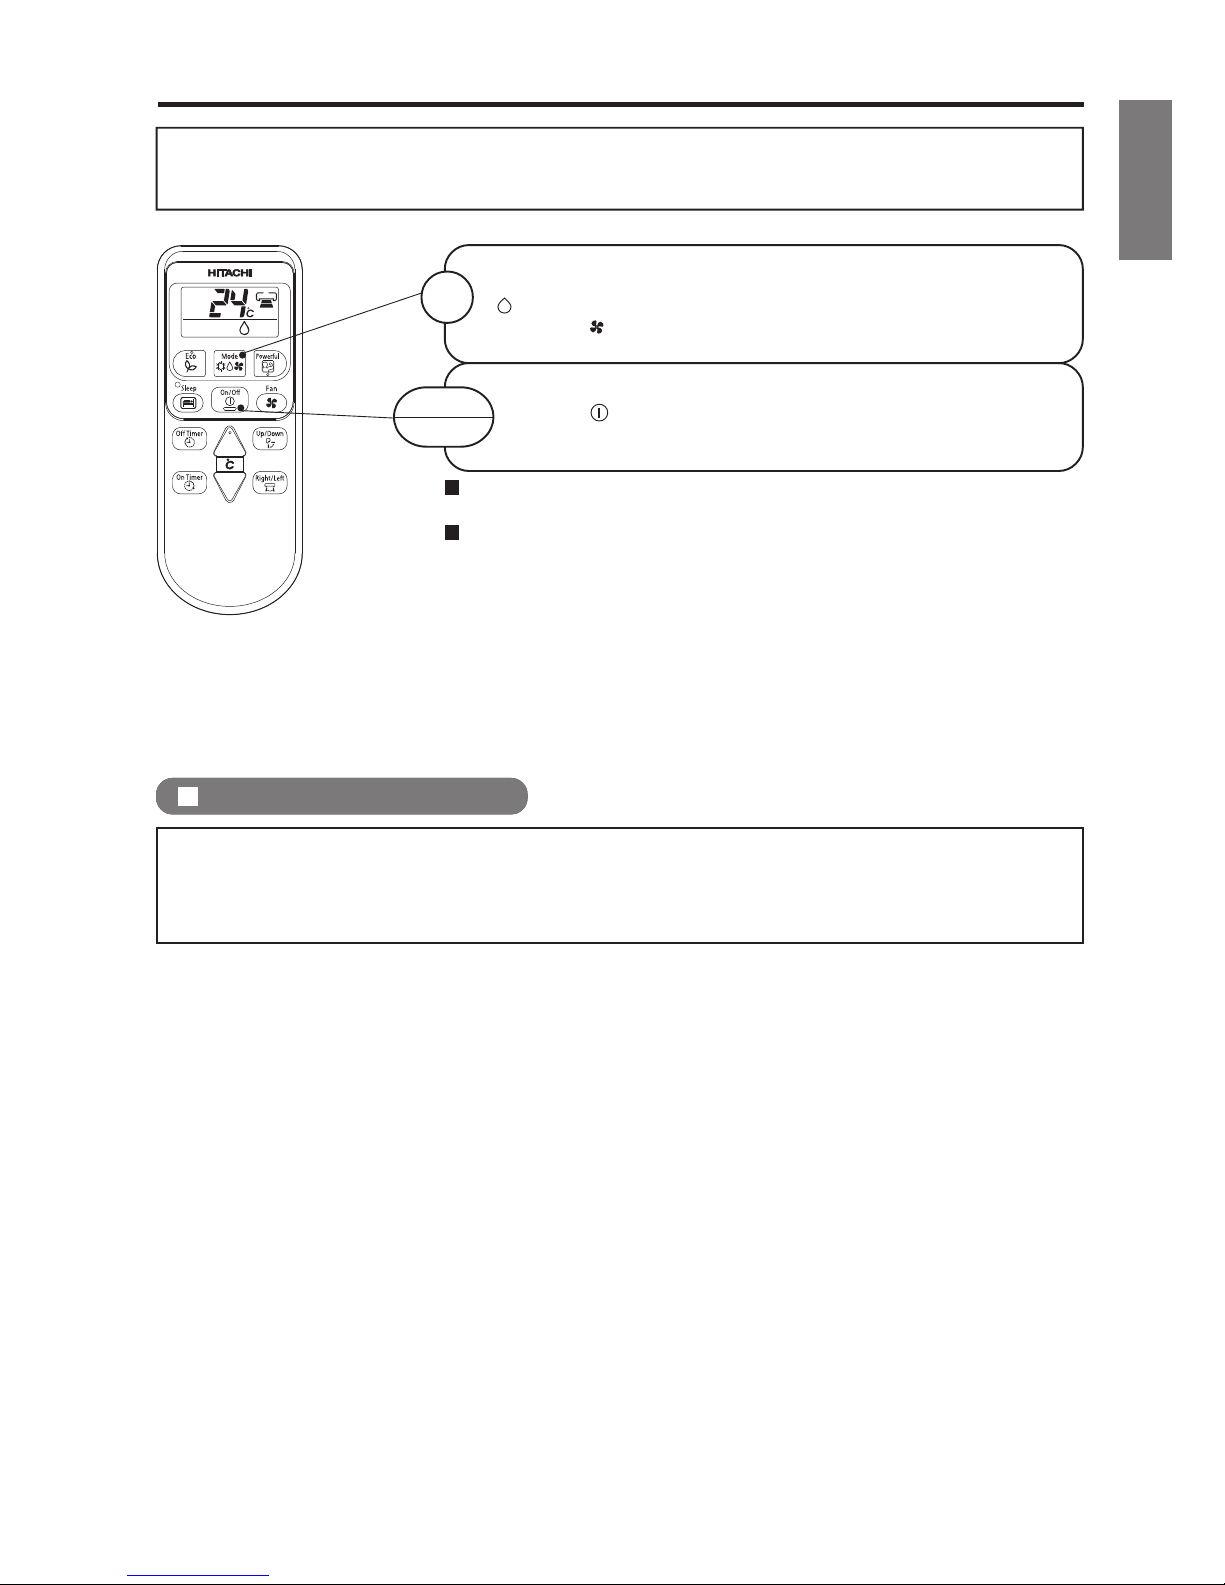
DEHUMIDIFYING OPERATION
Use the device for dehumidifying when the room temperature is over 16°C.
When it is under 15°C, the dehumidifying function will not work.
Press the (START/STOP) button.
START
STOP
Press the FUNCTION selector so that the display indicates
(DEHUMIDIFY).
Press the
(FAN SPEED) button to select LOW and SILENT.
1
When you want to change the operation mode, please use the
FUNCTION selector.
Set the desired temperature is available.
Dehumidifying Function
• Dehumidifying takes place with a target temperature which is slightly lower than the room
temperature setting.
If the room temperature becomes lower than the target value, operation stops. If the room
temperature becomes higher than the target value, operation restarts.
Page 10
- 10 -
Press the (START/STOP) button. Fan operation starts with a
beep.
Press the button again to stop operation.
START
STOP
FAN OPERATION
You can use the device simply as an air circulator. Use this function to dry the interior of the indoor unit
at the end of summer.
Press the FUNCTION selector so that the display indicates
(FAN).
1
Press the (FAN SPEED) button.
(HI) : The strongest air blow.
(MED) : Quiet.
(LOW) : More quiet.
(SILENT) : Silent.
2
FAN SPEED (AUTO)
… When the AUTO fan speed mode is set in the cooling operation:
• Operation starts in the “HI” mode to reach the preset temperature.
• As room temperature approaches the preset temperature, fan speed auto-
matically switches to “LOW”.
For the cooling operation
Page 11
- 11 -
ENGLISH
Operation stop at setting time
Timer Reservation
OFF TIME setting
• Select the OFF TIME by pressing the (OFF)
Button.
• Setting time will change according to the below
sequence when you press the button.
1 hour interval
TIMER RESERVATION
ON Timer and OFF Timer are available.
POWERFUL OPERATION
• During POWERFUL operation, cooler air will be blown out from indoor unit for COOLING or
respectively.
Press the (POWERFUL) button during operation.
• "
" is displayed on the LCD.
automatically operates with the previous settings used before
POWERFUL operation.
START
Press the
Press the (START/ STOP) button. or
(POWERFUL) button again.
• "
" disappears from the LCD.
CANCEL
• When ECO mode is selected, POWERFUL operation is cancelled.
• During POWERFUL operation, capacity of the air conditioner will not increase
–if the air conditioner is already running at maximum capacity.
• After auto restart, POWERFUL operation is cancelled and previous operation shall start.
2
1
ON TIME setting
• Select the ON TIME by pressing the (ON) Button.
• Setting time will change according to the below sequence
when you press the button.
Timer off
1 hour interval
Timer on
By pressing (POWERFUL) button during DEHUMIDIFYING, COOLING F ,
•
•
conditioner performs at maximum power.
, AN
NOTE
operation, the air
operation
POWERFUL operation ends in 60 minutes. Then the system
Page 12
- 12 -
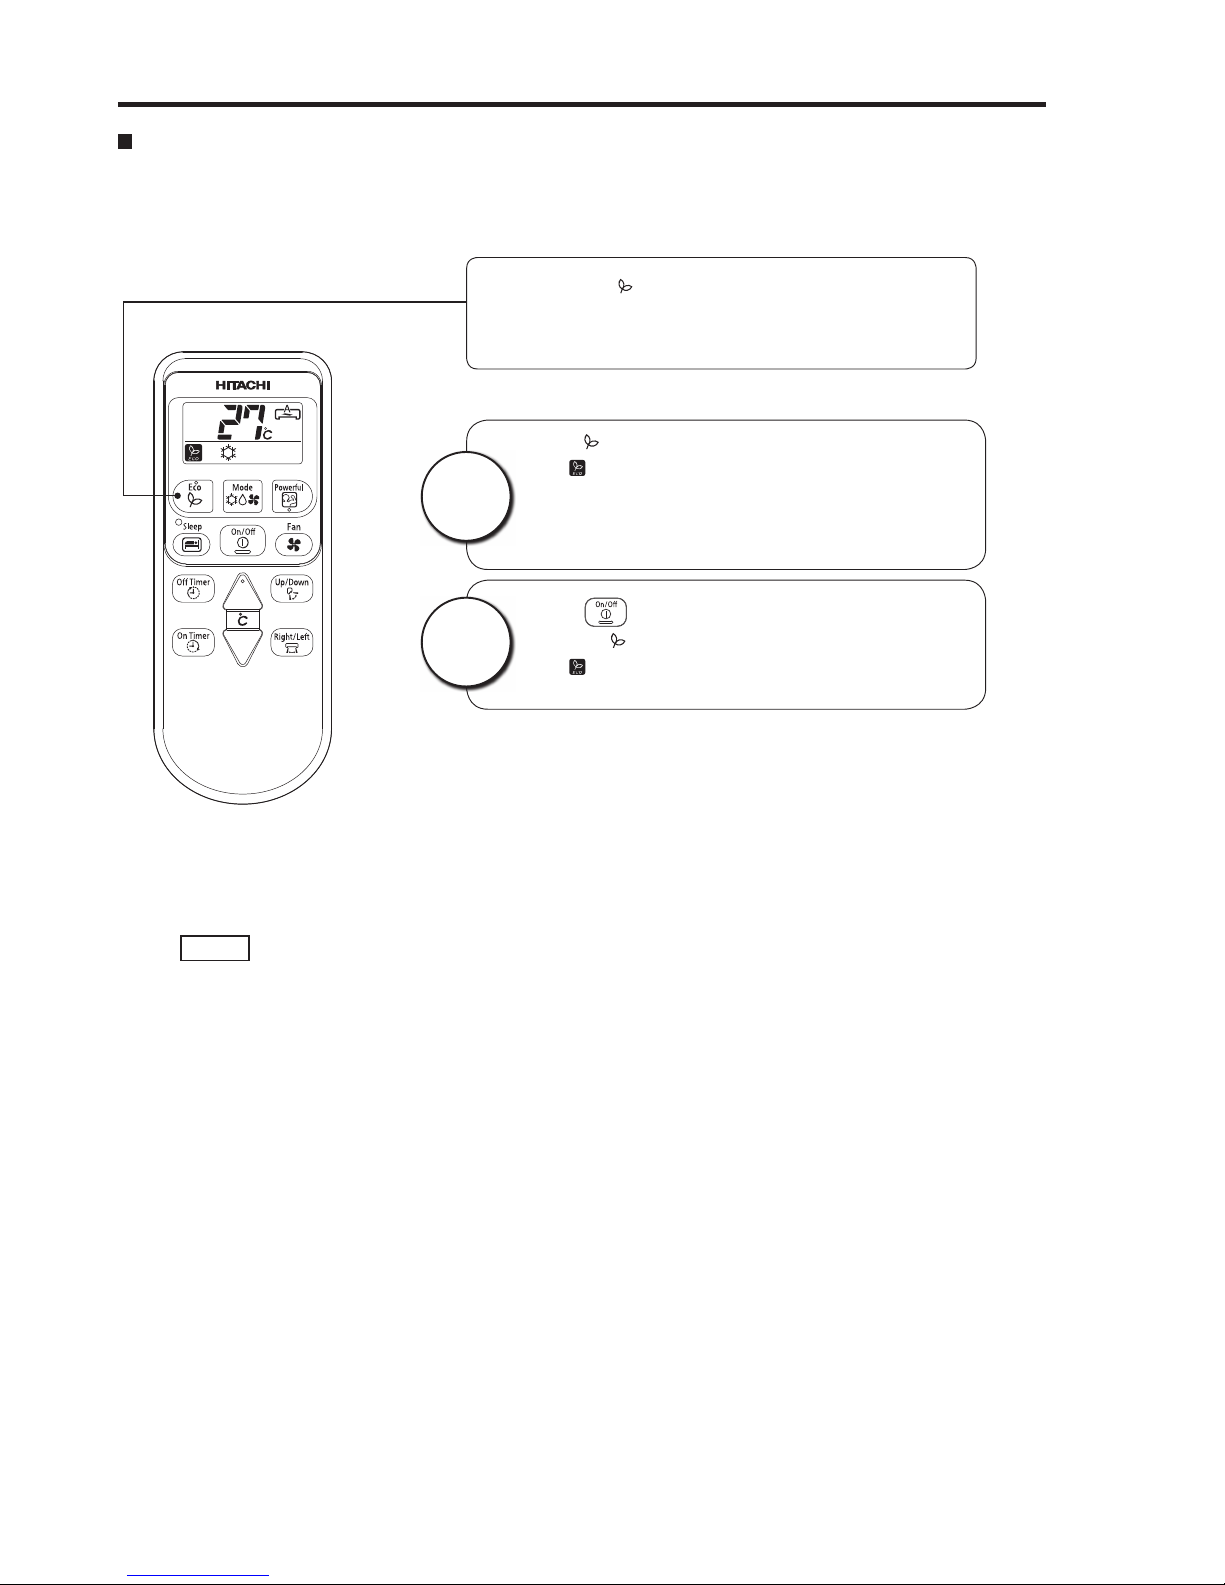
ECO OPERATION
Energy saving operation by changing set temperature and by limiting the maximum power consumption
value.
Press (ECO) button during operation.
• "
" is displayed on the LCD.
• Energy saving operation will start by changing
the set temperature higher or lower and saving
operation power consumption.
START
Press (START/STOP) button.
• Press
(ECO) button again.
• "
" disappears from the LCD.
CANCEL
NOTE
• In case the power consumption is already low,ECO operation will not reduce the power
consumption.
• By pressing (POWERFUL) button, ECO operation is cancelled.
• After auto restart, ECO operation is cancelled and previous operation mode shall start.
By pressing the (ECO) button during Dehumidifying or
Cooling operation, the air conditioner performs the “ECO”
operation.
Page 13

- 13 -
ENGLISH
HOW TO SET THE SLEEP TIMER
SLEEP
IndicationMode
Sleep Timer
1 hour 2 hours 3 hours 12 ho urs
Sleep timer off
Sleep Timer: The device will continue working for the desired number of
hours and then turn off.
Point the signal window of the remote controller toward the indoor unit, and
press the SLEEP button.
The timer information will be displayed on the remote controller. The TIMER
lamp lights with a beep from the indoor unit.
If you set the sleep timer when the off-time or on-timer has been set earlier, the sleep timer
becomes effective instead of the off - or on/off-timer set earlier.
...
Press (START/STOP) button.
● Room air conditioner will switch off.
Press (SLEEP) button again until
off time, “
” and
controller display.
● A beep sound emitted from indoor unit and the (TIMER) lamp
on the indoor unit turns off.
● SLEEP TIMER operation is cancelled.
number of hour disappear from the remote
By pressing (SLEEP) button during DEHUMIDIFYING, COOLING or FAN operation, the unit
shifts the room temperature and reduces the fan speed.
NOTE
Page 14

- 14 -
ADJUSTING THE AIR DEFLECTORS
1
Adjustment of the conditioned air in the upward and downward
directions.
The horizontal air deflector is automatically set to the proper angle
suitable for each operation. The deflector can be swung up and
down continuously and also set to the desired angle using the
“ (AUTO SWING
(HORIZONTAL )
)” button.
• In “Cooling” operation, do not keep the horizontal air
deflector swinging for a long time. Some dew may form on
the horizontal air deflector and dew may drop.
CAUTION
2
Adjustment of the conditioned air to the left and right.
HOW TO EXCHANGE THE BATTERIES IN THE REMOTE CONTROLLER
1
Remove the cover as shown in the figure and take out
the old batteries.
2
Install the new batteries.
The direction of the batteries should match the marks
in the case.
1. Do not use new and old batteries, or different kinds of
batteries together.
2. Take out the batteries when you do not use the remote
controller for 2 or 3 months.
CAUTION
about 15°
about 60
°
When cooling,
dehumidifying
•
If the “ (AUTO SWING(HORIZONTAL ))” button is pressed once,
the horizontal air deflector swings up and down. If the button is pressed
again, the deflector stops in its current position.
• Use the horizontal air deflector within the adjusting range
shown in the right.
• When the operation is stopped, the horizontal air deflector
moves and stops at the position where the air outlet closes.
•
If the “ (AUTO SWING(VERTICAL ))” button is pressed once,
the deflectors will start to swing right and left. If the button is pressed
again, the deflector will stop in the current position.
Push and pull to the
dirction of arrow
Horizontal
Page 15

- 15 -
ENGLISH
THE IDEAL WAYS OF OPERATION
Suitable Room Temperature
Warning
Freezing temperature
is bad for health and a
waste of electric power.
Install curtain or blinds
I t is po s s i b l e
to reduce heat
entering the room
through windows.
Ventilation
Caution
Do not close the room for a long period of
time. Occasionally open the door and windows
to allow the
entrance of
fresh air.
Effective Usage Of Timer
At night, please use the“sleep timer operation
mode”, together with your wake up time in
the morning. This will enable you to enjoy a
comfortable room temperature. Please use
the timer effectively.
Do Not Forget To Clean The Air Filter
Dusty air filter will reduce the air volume
and the cooling efficiency. To prevent from
wasting electric energy, please clean the
filter every 2 weeks.
Temperature
n
Please Adjust Suitable Temperature
For Baby And Children
Please pay attention to the room temperature
and air flow direction when operating the unit
for baby, children and old folks who have
difficulty in movement.
(The ideal temperature
difference between
outdoor and indoor
is about ±5°C).
Page 16

- 16 -
- 17 -
FOR USER’S INFORMATION
The Air Conditioner And The Heat Source In The Room
Caution
If the amount of heat in the room is above the
cooling capability of the air conditioner (for example:
more people entering the room, using heating
equipments and etc.), the preset room temperature
cannot be achieved.
Not Operating For A Long Time
When the indoor unit is not to be used for a long
period of time, please pull out the power plug. Or the
indoor unit still consumes about 1W in the operation
control circuit even if it is in “OFF” mode.
OFF
When Lightning Occurs
Warning
To protect the whole unit during lightning, please
stop operating the unit and remove the plug from the
socket.
Interference From Electrical Products
Caution
To avoid noise interference, please place the indoor
unit and its remote controller at least 1m away from
electrical products.
To prevent
interference,
place at least
1m away.
TV
Inverter-type
fluorescent
lamp.
Page 17

- 17 -
ENGLISH
MAINTENANCE OF THE UNITS
CAUTION
Ensure that the unit is not in operation and all power supply has been disconnected before cleaning the
units.
Dust Filter Screen
Dust filter screens are installed to remove the indoor dust particles hence they should be kept clean at all times.
They should be cleaned at each machine operation cycle of approximately 100 hours. Excessive dust collected at
the dust fi lter screen will block the air fl ow, reduce the cooling capability and could produce noise. Therefore the
dust filter screen should be cleaned as per instructions given below:
Cleaning Instructions
(1) Removing the dust filter screen
•
While holding both edges of the front panel, open up and lift the front panel and push in to park at the secured
position
Front panel
Front cabinet
•
Slightly lift up the dust filter screen, release the latch clips [2 places] located at the bottom of the front cabinet
and move the dust filter screen downwards to remove it from the unit
(2) Use a vacuum cleaner to vacuum clean the dust accumulated at the dust filter screen. If the accumulated dust
is too much to be removed by vacuum cleaning, apply mild detergent and fl ush the dust from the dust fi lter
screen with water. After thorough rinsing, leave the dust filter screen at a cool shaded place to dry.
(3) Re-install the dust filter screen to its original position (With “FRONT” marker facing front). Slightly lift up the
opened front panel and close it by returning it to its original position
(4) Each year before using the air conditioner unit, clean the heat exchanger (evaporator) with a fi ne soft brush or
a vacuum cleaner and take care to avoid damaging the evaporator fins
Front panel
Dust filter screen
Latch clip
CAUTION
•
Do not use hot water (40°C and above) to rinse the dust filter screen, otherwise the screen will warp and
get distorted. After rinsing, shake the dust fi lter screen to rid off all remaining water droplets and place it at a
cool shaded place to dry. Avoid placing the dust fi lter screen under direct sunlight, otherwise the screen will
warp and get distorted.
Do not operate the air conditioner unit without the dust filter screen installed, otherwise the ingress of dust
into the air conditioner unit will cause breakdowns.
Page 18

- 18 -
- 19 -
CLEANING THE FRONT PANEL
Front panel can easily get dirty. Use a soft cloth to wipe it.
If the front panel is excessively dirty, wipe the front panel with a soft
cloth either wet with warm water or containing a mild detergent after
which, wipe dry the front panel with a soft dry cloth.
Do not use hot water (50°C and above), volatile liquid, gasoline,acid,
diluting agents or brushes to clean the front panel as they could
damage the plastic fi nishing and paintwork of the front panel.
CAUTION
Please disconnect the power plug before cleaning the
front panel.
1.
2.
3.
Hot water (50°C)
Volatile liquid, acid and others
TROUBLE SHOOTING THE UNIT BEFORE CONTACTING SERVICE STAFF TO CHECK AND RECTIFY
The air conditioner unit is not operating.
•
Check whether the power supply plug is properly plugged in.
Abnormal air conditioning effects.
Is the dust fi lter screen clogged with dust and dirt?
Is the outdoor unit is located in direct sunlight?
Is there any blockage to the air fl ow of both the indoor and
outdoor units?
Are the doors and windows being left opened or is there any
heat source inside the room?
Is the temperature setting appropriate?
1.
2.
3.
4.
5.
Page 19

- 19 -
ENGLISH
AFTER SALE SETVICE AND WARRANTY
WHEN ASKING FOR SERVICE, CHECK THE FOLLOWING POINTS.
CONDITION CHECK THE FOLLOWING POINTS
When it does not operate
•
Is the fuse all right?
•
Is the voltage extremely high or low?
•
Is the circuit breaker “ON”?
When it does not cool well
•
Is the air fi lter blocked with dust?
•
Does sunlight fall directly on the outdoor unit?
•
Is the air fl ow of the outdoor unit obstructed?
•
Are the doors or windows opened, or is there any source of heat
in the room?
•
Is the set temperature suitable?
Notes
•
In quiet or stop operation, the following phenomena may occassionally occur,
but they are not abnormal for the operation.
(1) Slight fl owing noise of refrigerant in the refrigerating cycle.
(2) Sl i ght rubb i ng noise fro m the fan casi n g which is co oled and the n
gradually warmed as operation stops.
•
The odor will possibly be emitted from the room air conditioner because the
various odor, emitted by smoke, foodstuffs, cosmetics and so on, sticks to it.
So please clean the air fi lter and the evaporator regularly to reduce the odor.
•
Please contact your sales agent immediately if the air conditioner still fails to operate normally after the above
inspections. Inform your agent of the model of your unit, production number, date of installation. Please also
inform him regarding the fault.
•
Power supply shall be connected at the rated voltage, otherwise the unit will be broken or could not reach the
specified capacity.
Page 20

- 20 -
This product conforms with the protection requirements of council directives 89/336/EEC relating to
electromagnetic compatibility and 73/23/EEC relating to electrical equipment designed for use within
certain voltage limits.
Please note:
On switching on the equipment, particularly when the room light is dimmed, a slight brightness flsuctuation
may occur. This is of no consequence.
The conditions of the local Power Supply Companies are to be observed.
Note
•
Avoid to use the room air conditioner for co oling operation when the outside temperature is below
° °
The recom m e nded m a x im u m an d minimum op e r a ti ng tempe r a t ur es of th e ho t an d co l d si d e s
should be as below:
Minimum Maximum
Indoor
Dry bulb °C 21 32
Wet bulb °C 15 23
OutdoorD
Dry bulb °C 43
Wet bulb °C 26
MEMO
-10
-10 C (14 F).
-
Page 21

RAC-X10CCK
RAC-X13CCK
RAC-X18CCK
RAS-X10CCK
RAS-X13CCK
RAS-X18CCK
RAS-X10CCK/RAC-X10CCK
RAS-X13CCK/RAC-X13CCK
RAS-X18CCK/RAC-X18CCK
- 21-
Page 22

- 22 -
Page 23

- 23 -
Page 24

不要讓小孩單獨操作使用機器。除非在監督責任人的指導下,確保他們能安全正確的使用機器。
請確保小孩遠離機體,不要機體玩耍,以免發生危險。
灑
- 24 -
Page 25

隔塵網
吹
吹
RAS-X10CCK, RAS-X13CCK、RAS-X18CCK
RAC-X10CCK、RAC X13CCK
RAC-X18CCK
218
37
34
-
Page 26

定时
应急
开关
运转
提示
如長時間不使用冷氣機,請切斷
電源或拔下插頭。
檢查左右及中間位置是否已完全合上
應急開關
應急開關
應急開關
應急開關
應急開關
Page 27

信號傳送
當信號傳送時,
此信號將閃亮。
可以選擇機器運
轉模式,每次按
鍵,模式將循環
進入製冷 ,除
濕 ,送風 。
可以選擇進入節
能模式。
可以設定睡眠定
時器。
可以設定關閉機
器的時間。
可以設定開啟機
器的時間。
可以選擇進入強勁運
轉模式。
可以調節風速。
可以選擇開機或者停
止機器。
可以調節水平導風板
的角度。
可以提高或者降低設
定溫。
連續按住按鈕,溫度
會變化較快。
可以調節左右導風板
的角度。
遙控器不可放在下述地方
此遙控器用以控制室內機的運轉。控制範圍大約為7米,如果用電子方法控制室內照明的話,控制
範圍可能變小,特殊情況,可能導致遙控器信號無法到達。
此機器使用提供的安裝板固定在墻壁上,請在固定它之前,務必確認可以使用遙控器控制室內機。
請小心操作遙控器。避免跌落或者受潮。
(32页)
(33页)
(31页)
(31页)
(34页)
(34页)
(31页)
傳送信號
功能選擇按鍵
ECO按鍵
睡眠按鍵
POWERFUL按鍵
風速按鍵
開機/停止按鈕
上下搖擺按鈕
溫度調節按鈕
左右搖擺按鈕
關閉定時器按鍵
開啟定時器按鍵
直射的陽光下
加熱器附近
遙控器小心使用,不可跌落與地板,并避免受潮。
一旦室外機停止,它將停止大約3分鐘。(除非將電源開關關閉打開,
或者將電源插頭拔掉再插入。)
這是為了保護機器,且沒有故障提示。
如果通過功能選擇鍵調整運轉模式,同樣可能為了保護機器,停止運
轉約3分鐘。
遙控器各部分名稱和功能
遙控器
Page 28

- 28 -
1
2
3
-
(寧靜) : 非常安靜
(低) :較安靜
(中) :風速平穩
(高) :風速強勁
(風速)
(自動)
製冷運轉
製冷按壓功能選擇接鈕后顯示
在不同條件下,設定溫度與室溫有少許差異
設定將保存在遙控器內存中,下次可以直接按壓 (開始/停止)按鈕
按壓 (開始/停止)按鈕,發出提示音后製冷運轉開始。再次按壓
這個按鈕將停止運轉,另設定溫度高於當前室溫冷氣機也不啟動(運
轉指示燈始終點亮)。製冷運轉需要將設定溫度盡可能設定低於當前
房間溫度
開始
停止
製冷運轉
(高)
(中) (低)
(寧靜)
Page 29

- 29 -
1
開始
停止
除濕功能的目標溫度將略低於設定的室溫
按壓功能選擇鍵,遙控器液晶將顯示
按壓
需要設定運轉模式時,請使用功能選擇鍵
選擇適宜的溫度
(風速)按鈕選擇低速或者寧靜
按壓 (開始/停止)按鈕
Page 30

- 30 -
1
2
•
•
(寧靜) : 非常安靜
(低) :較安靜
(中) :風速平穩
(高) :風速強勁
按壓 (風速)按鈕。
按壓功能選擇按鍵后顯示 (送風)
可以使用此功能進行空氣循環,也可以在夏季結束后使用此功能乾燥室內機內部。
按壓 (開始/停止)按鈕,風扇開始運轉并發出提示音。
再次按壓此按鈕將停止運轉。
風扇速度(自動)
製冷運轉時風扇速度設定為自動
製冷運轉時
運轉開始,將以高風速使房間溫度達到與設定的溫度
房間溫度到達與設定溫度后,風扇將自動調整為低風速
送風運轉
開始
停止
Page 31

- 31 -
•
•
" "
" "
•
•
•
•
•
•
2
1
強勁運轉
按壓 (強勁)按鈕將調整除濕,製冷,送風運轉至最大功率。
在強勁運轉時,室內機吹出的空氣將較冷。
按壓 (強勁)按鍵在運轉時
將顯示在遙控器液晶上
運轉之前的設定狀態。
按壓 (開始/停止)按鈕。
或者再次按壓 (強勁)按鈕。
將從遙控器液晶上消失。
運轉
注 意
選擇節能模式后,強勁運轉將被取消。
在強勁運轉時,冷氣機的能力將不會增加
-如果冷氣機已經運轉在最大功率輸出狀態。
自動重啟之後,強勁運轉將被取消,以之前的設定開始運轉。
強勁運轉將運行60分鐘,之後將自動回復到強勁
Page 32

- 32 -
•
•
•
•
•
•
節能運轉
節能運轉是通過改變設定溫度和限制最大功率以實現。
在製冷或者除濕運轉時通過按壓 (節能)按鈕,
在運轉時按壓 (節能)按鈕。
從液晶上消失。
如果功率消耗已經是很小時,節能功能不再降低功率消耗。
開啟(強勁)功能后,節能運轉將取消。
自動重啟之後,節能運轉將被取消,以之前的設定進行運轉。
注意事項
節能運轉開始,通過改變設定溫度及限制運轉
功率。
將在遙控器液晶上顯示。
按壓 (開始/停止)按鈕。
再次按壓 (節能)按鈕。
運轉
冷氣機將進入“節能運轉”
Page 33

- 33 -
...
●
●
●
睡眠定時器的使用方法
在製冷,除濕,送風運轉時按壓 (睡眠)按鈕,冷氣機將調整房間溫度和重設風扇轉速。
模式 指令
按壓 (開始/停止)按鈕
如果開啟定時器或者關閉定時器已經設定,睡眠定時器設定時將代替開啟或關閉定時器的設定。
睡眠定時器:冷氣機將在設定時間到達后停止運轉
定時器信息將顯示在遙控器液晶上,室內機定時燈也將點亮
并有提示音。
睡眠定時器
12小時2小時 3小時1小時
定時器關閉
注 意
睡眠
冷氣機將停止運轉。
一直按壓 (睡眠)按鈕直到定時器關閉, 和
小時數字在遙控器液晶上消失。
睡眠定時器被取消。
室內機發出提示音並且室內機定時燈關閉。
取消睡眠運轉
Page 34

- 34 -
1
•
2
1
2
•
.
•
•
•
風向板的調節方法
水平導風板在各種運轉狀態時被自動設定在合適的角度,
導風板可以使用 (上下搖擺)按鍵調整上下擺動或者
需要的角度。
如果 按壓 (上下搖擺)按鈕一次,水平導風板將上
製冷運轉時,不要長時間搖擺水平導風板,可能造成導風板
如果按壓 (左右搖擺)按鈕一次, 導風板將左右
風向板的左右方向調整
警 告
注 意
風向板的上下方向調整
下擺動,如再次按壓這個按鈕,導風板將停止在當前位置。
水平導風板的調整角度可以參照右圖。
運轉停止的時候,水平導風板將搖擺至出風口關閉的位置。
結露。
擺動,如再次按壓這個按鈕,導風板將停止在當前位置。
遙控器
左右
Page 35

Page 36

1
Page 37

Page 38

Page 39

較低風速運轉時
Page 40

 Loading...