

Page 1
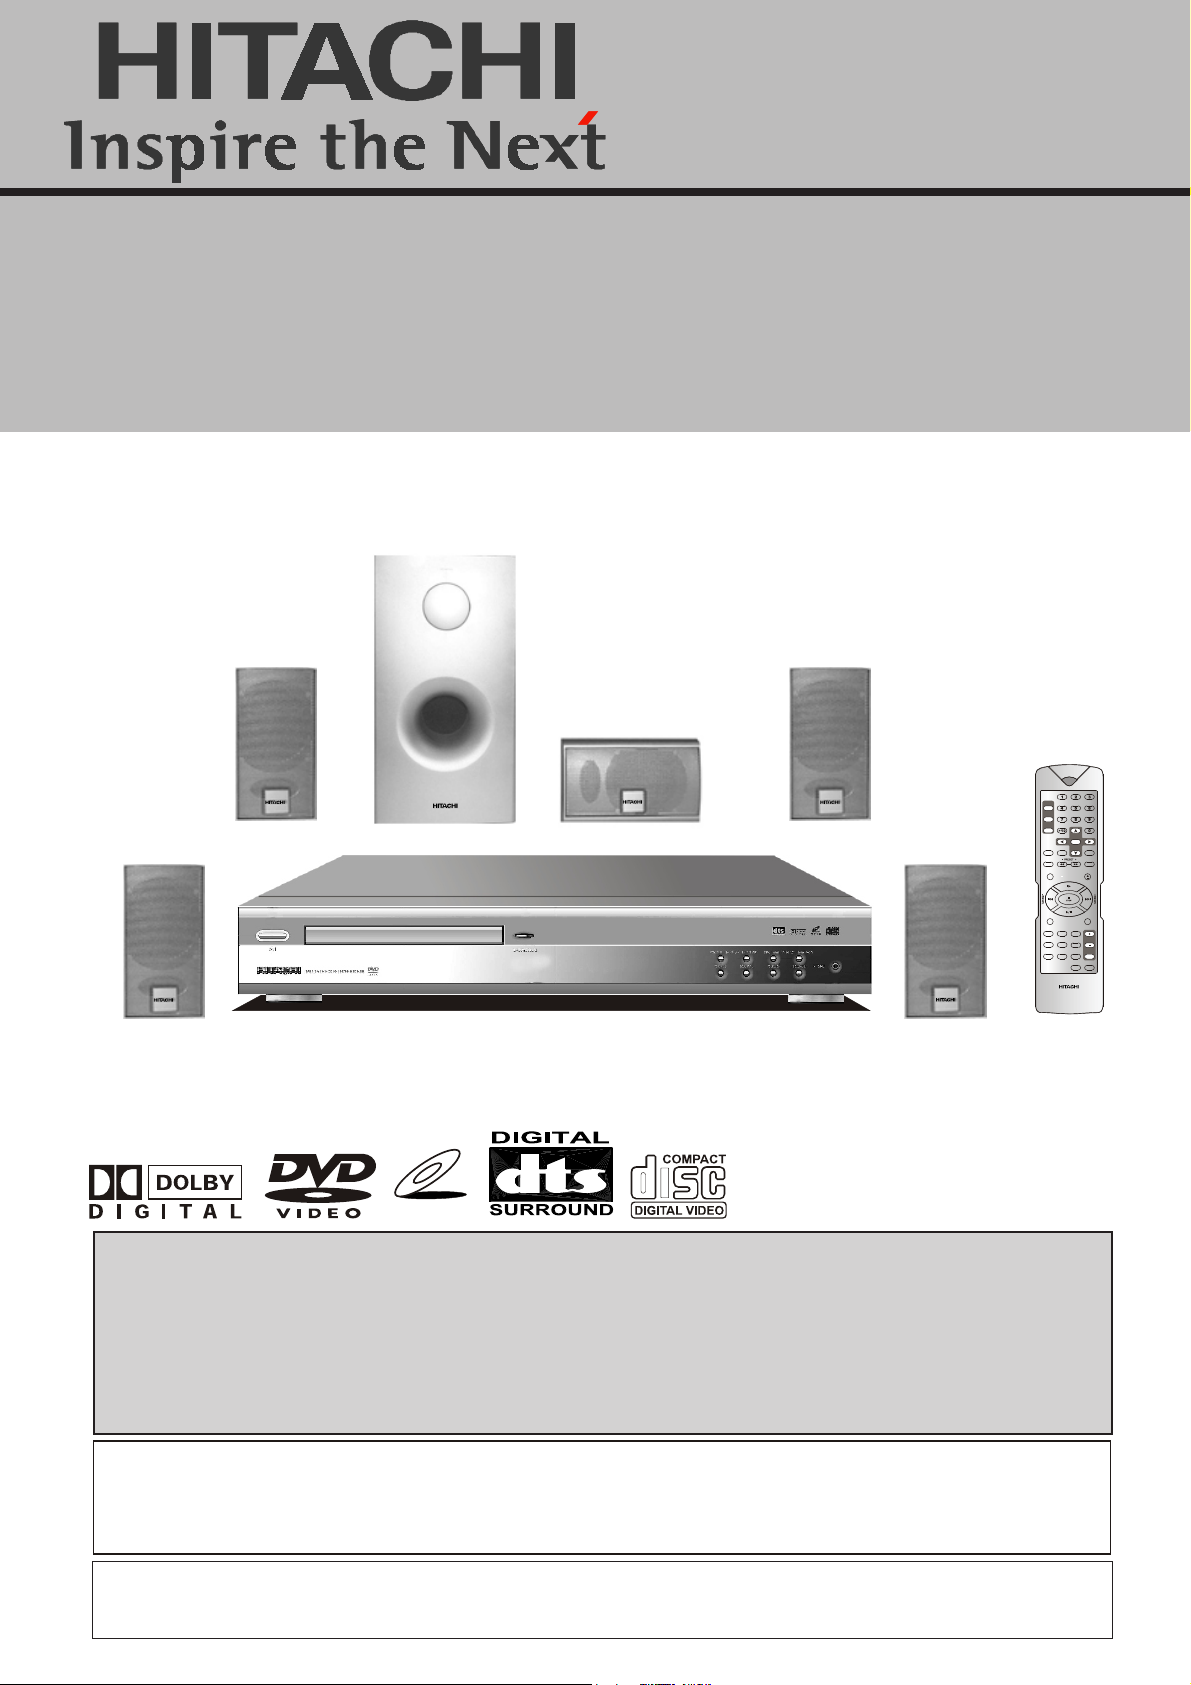
DVD DIGITAL THEATER SYSTEM
HTD-K160
DVD/VCD/CD PLAYER WITH
AV SURROUND RECEIVER
Instruction manual
Mode d’emploi
Bedienungsanleitung
Istruzioni per l’uso
Gebruiksaanwijzing
Guía de operación
Bruksanvisning
STANDBY
Betjeningsvejledning
STANDBY
DVD
TUNER
2
AUX
5
8
REPEATA-B
0
PROG
MENU/PBC
SLOW/MEMORY
TITLE
PLAY/PAUSE
Language
Title
Sub
ANGLE
AUDIO
Go
To Return DISPLAY
REMOTE CONTROLLER
RB-HTDK16
ENT
SLEEP
N/P
OPEN/CLOSE
SETUP
Zoom
EQ
ADJ/VOL
SELECT
LISTENING
MUTE
0
English.............................................page 02~46
Français...........................................page 47~92
Deutsch........................................
........
Seite
93~138
Italiano..........................................pag. 139~184
Nederlands....................................blz. 185~230
Español....................................página 231~276
Svenska.........................................sid. 277~322
VIDEO CD
Dansk............................................side 323~368
Before operating please read all these instructions thoroughly.
Veuiltez lire ces instructions dans le détail avant de mettre l’appareil en fonction.
Bitte lesen Sie diese Bedienungsanleitung vor der Inbetriebnahme sorgfältig durch.
Prima dell’uso, leggere attentamente le seguenti istruzioni.
Lees deze gebruiksaanwijzing aandachtig door alvorens dit toestel in gebruik te nemen.
Antes de ponerlo en funcionamiento lea la totalidad de estas instrucciones.
Läs dessa anvisningar noga, innan du börjar att använda apparaten.
Læs venligst instruktionerne igennem, før De tager apparatet i brug.
This product incorporates copyright protection technology that is protected by method claims of certain U.S.
Patents and other intellectual property rights owned by Macrovision Corporation and other rights owners. Use of
this copyright protection technology must be authorized by Macrovision Corporation, and is Intended for home and
other limited viewing uses only unless otherwise authorized by Macrovision Corporation. Reverse engineering or
disassembly is prohibited.
Manufactured under license from Dolby Laboratories. “Dolby” , “Pro Logic” and the double D symbol are trademarks of Dolby
Laboratories.
Confidential Unpublished Works. © 1992-1997 Dolby Laboratories, Inc. All rights reserved.
Page 2

DECLARATION OF CONFORMITY
We declare under our sole responsibility that this product, to which this declaration relates, is in conformity with the following standards:
EN60065, EN55013, EN55020, EN61000-3-2 and EN6100-3-3.
Following the provisions of 73/23/EEC, 89/336/EEC and 93/68/EEC directives.
IMPORIMPOR
IMPOR
IMPORIMPOR
The mains lead on this equipment may be supplied with a moulded plug incorporating a fuse, the value of which is indicated on
the pin face of the plug. Should the fuse need to be replaced, an ASTA or BSI approved BS1362 fuse must be used of the same
rating. If the fuse cover is detachable never use the plug with the cover omitted. If a replacement fuse cover is required, ensure
it is of the same colour as that visible on the pin face of the plug. Fuse covers are available from your dealer.
DO NOT cut off the mains plug from this equipment. If the plug fitted is not suitable for the power points in your home or the cable is too
short to reach a power point, then obtain an appropriate safety approved extension lead or consult your dealer.
Should it be necessary to change the mains plug, this must be carried out by a competent person, preferably a qualified electrician.
If there is no alternative to cutting off the mains plug, ensure that you dispose of it immediately, having first removed the fuse, to avoid
a possible shock hazard by inadvertent connection to the mains supply.
IMPORTANT
As these colour may not correspond to the coloured markings identifying the terminals in your plug, proceed as follows:
The wire coloured WHITE must be connected to the terminal marked with the letter FL. The wire coloured RED must be
connected to the terminal marked with the letter FR. The wire coloured GREEN must be connected to the terminal marked with
the letter C. The wire coloured BLUE must be connected to the terminal marked with the letter SL. The wire coloured GREY must
be connected to the terminal marked with the letter SR.
TT
ANTANT
T
ANT
TT
ANTANT
WARNING:
Mains supply:
This DVD player can be used with a power (mains) voltage of 230V.
The OPERATE button is indicated ” ”; this button allows you to select operate on or electrical power
standby.
Notice:
The OPERATE button is secondarily connected and does not separate the apparatus from the mains
supply in the switched-off position.
CONNECTION TO POWER (For the area of Great Britain)
Before Switching on make sure that the voltage of your electricity supply is the same as that indicated on the rating plate.
Mains Cord
This appliance may be fitted with a non-rewircable plug. If it is
necessary to change the fuse in a non-rewircable plug the
fuse cover must be refitted. If the fuse cover is lost or damaged,
the plug must not be used until replacement available from
the appliance manufacturer is obtained.
It is important that the colour of the replacement fuse cover
corresponds with the rating marking on the base of the plug.
It the plug has to be changed because it is not suitalble for
your socker, or becomes damaged, it should be cut off and
an appropriate plug fitted following the wiring instructions
below, The plug removed must be disposed of safely as insertion into a 13A socket is likely to cause an electrical hazard.
For your own safety read the following instructions carefully
before attempting to connect this unit to mains.
The wires in this mains lead are coloured in accordance with
the following code:
BLUE=NEUTRAL, BROWN=LIVE
Important
As the colours of the wires in the mains lead of the appliance
may not correspond with the coloured markings identifying
the terminals in your plug, proceed as follows: The wire which
is marked with the letter N or coloured black.
The wire which is coloured brown must be connected to the
terminal which is marked with the letter L or coloured red.
No connection is to be made to the earth terminal of the plug.
If a 13 Amp (BS 1363) Plug is used, a 3 Amp Fuse must be
fitted, of if any other type of Plug is used a 3 or 5 Amp Fuse
must be fitted, either in the Plug or Adaptor, or on the Distribution Board.
Mains Supply: 220 - 240 V-50 Hz - AC only
Do not make any connection to the larger pin marked with the
letter "E" or by the symbol or coloured green or green and
yellow.
2
Page 3
SOME DOSOME DO
SOME DO’
SOME DOSOME DO
EQUIPMENTEQUIPMENT
EQUIPMENT
EQUIPMENTEQUIPMENT
This equipment has been designed and manufactured to meet international safety standards but, like any electrical equipment,
care must be taken if you are to obtain the best results and safety is to be assured.
S S
AND DONAND DON
S
AND DON’
S S
AND DONAND DON
T ON T ON
T ON
T ON T ON
THE SAFE USE OF THE SAFE USE OF
THE SAFE USE OF
THE SAFE USE OF THE SAFE USE OF
YY
OUROUR
Y
OUR
YY
OUROUR
• DO read the operating instructions before you attempt to use the equipment.
• DO ensure that all electrical connections(including the mains plug, extension leads and interconnections between pieces of
equipment) are properly made and in accordance with the manufacturer`s instructions. Switch off and withdraw the mains
plug when making or changing connections.
• DO consult your dealer if you are ever in doubt about the installation, operation or safety of your equipment.
• DO be careful with glass panels or doors on the equipment.
• DON T continue to operate the equipment if you are in any doubt about it working normally, or if it is damaged in any way-switch
off, withdraw the mains plug and consult your dealer.
• DON T remove any fixed cover as this may expose dangerous voltages.
• DON T leave equipment switched on when it is unattended unless it is specifically stated that it is designed for unattended
operation or has a standby mode. Switch off using the switch on the equipment and make sure that your family knows how to
do this. Special arrangements may need to be made for infirm or handicapped people.
• DON T use equipment such as personal stereos or radios so that you are distracted from the requirements of traffic safety. It
is illegal to watch television whilst driving a vehicle.
• DON T listen to headphones at high volume, as such use can permanently damage your hearing.
• DON T obstruct the ventilation openings of the equipment, for example with curtains or soft furnishings. Overheating will cause
damage and shorten the life of the equipment.
• DON T use makeshift stands and NEVER fix legs with wood screws-to ensure complete safety always fit the manufacturer`s
approved stand or legs with the fixings provided according to the instructions.
• DON T allow electrical equipment to be exposed to rain or moisture.
ABOVE ALL
- NEVER let anyone especially children push anything into holes, slots or any other opening in the case-this could
result in a fatal electrical shock;
- NEVER guess or take chances with electrical equipment of any kind. It is better to be safe than sorry !
WARNINGWARNING
WARNING
WARNINGWARNING
English
Français
Deutsch
Italiano
To prevent fire or shock hazard, do not expose the
unit to rain or moisture.
To avoid electrical shock, do not open the cabinet.
Refer servicing to qualified personnel only.
Mains cord must only be changed at qualified service shop.
CLASS 1 LA SER PRODUCT
KLASSE 1 LASER PRODUKT
LUOKAN 1 LASER LAITE
KLASS 1 LASER APPARAT
• This appliance is classified as a CLASS 1 LASER product.
• The CLASS 1 LASER PRODUCT MARKING is located on
the rear panel.
• This product contains a low power laser device. To ensure
continued safety do not remove any cover or attempt to gain
access to the inside of the product. Refer all servicing to
qualified personnel only.
CAUTION
The use of optical instrument with this product will increase
eyes hazard. As the laser beam used in this CD/DVD player is
harmful to eyes, do not attempt to disassemble the cabinet.
Refer servicing to qualified personnel only.
The following marking is printed on the rear panel.
This symbol is intended to alert the user of the
presence of uninsulated “ dangerous
voltage”within the product’s encasement that
may be of sufficient magnitude to constitute a
risk of electric shock to persons.
This symbol is intended to alert the user of the
presence of important operating and maintenance (servicing) instructions in the literature
accompanying the appliance.
WW
elcome!elcome!
W
elcome!
WW
elcome!elcome!
Thank you for purchasing this DVD Compact AV system. Before operating the unit, please read this operation manual thoroughly and then keep it for future reference as it will be useful if
you have any operation problems in the future.
Español
Svenska
3
Page 4
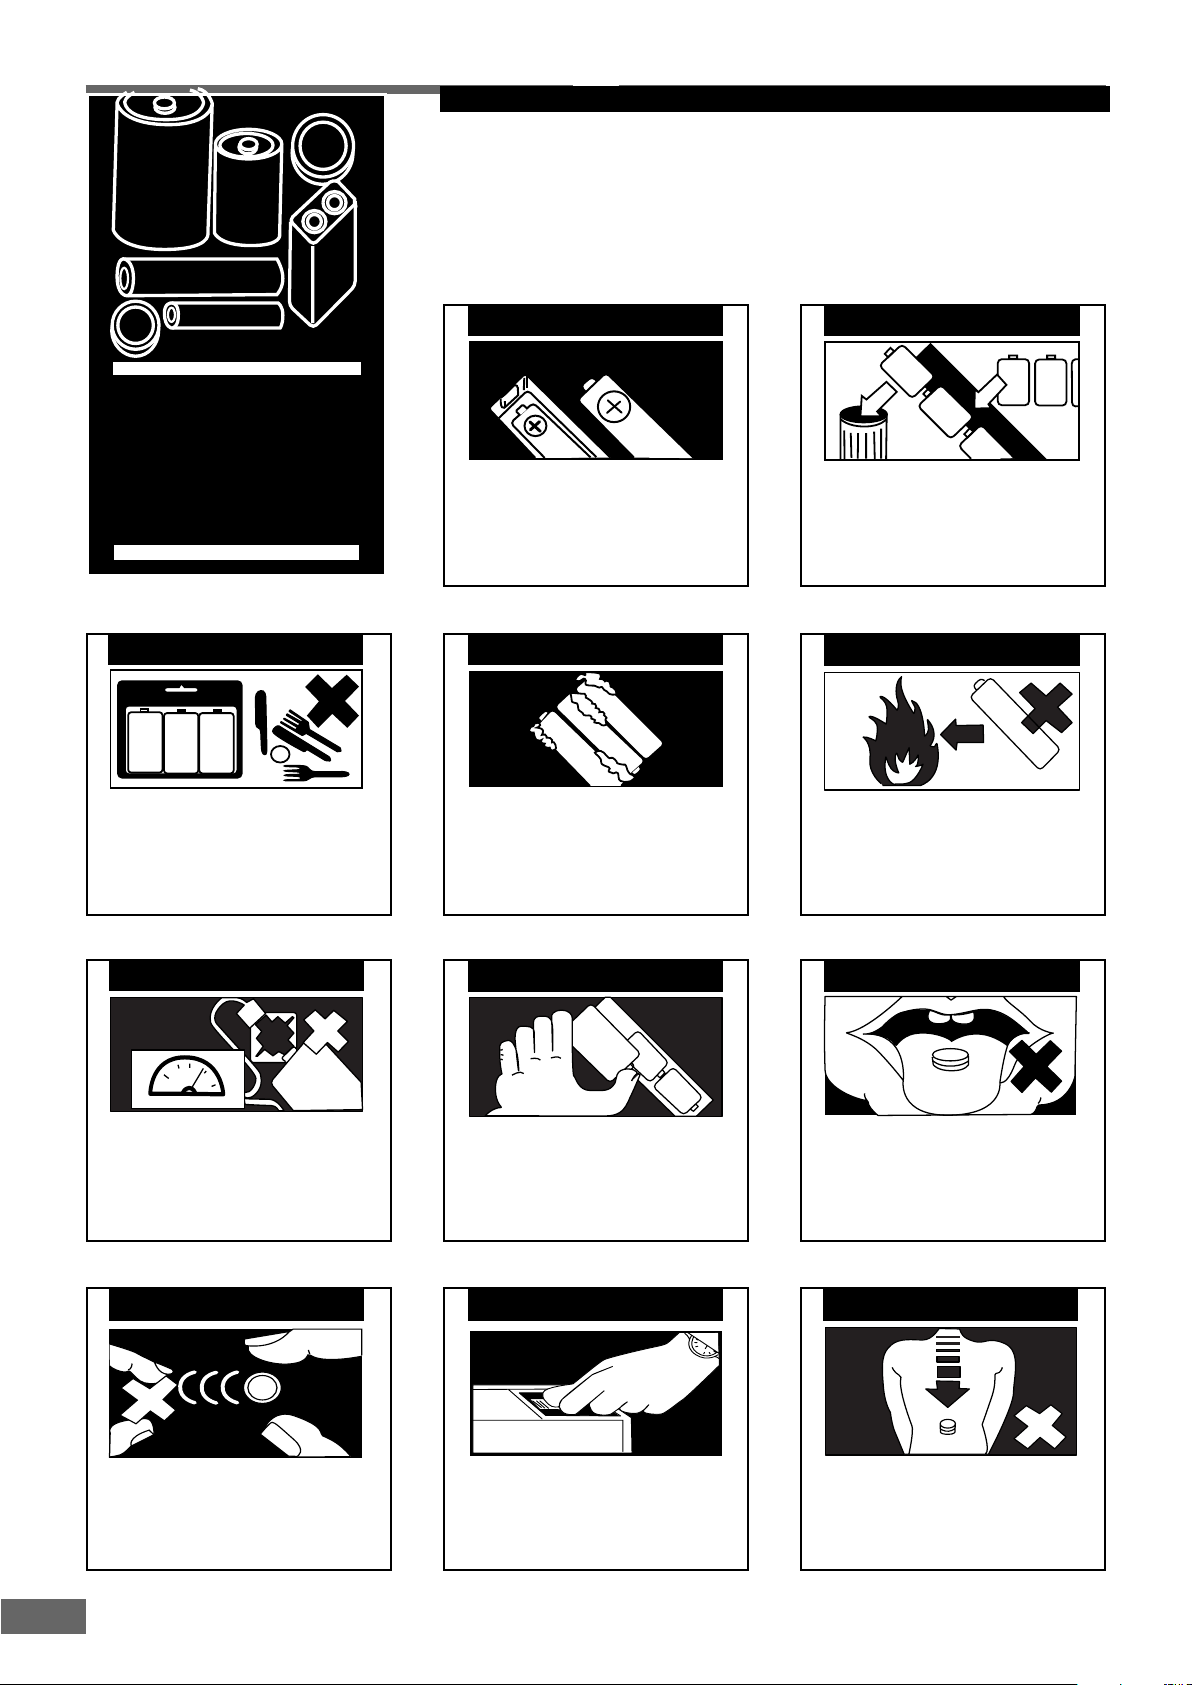
PLEASE PHOTOCOPY AND DISPLAY
Used correctly, domestic batteries are a safe and dependable source of
portable power. Problems can occur if they are misused or abused resulting in leakage or, in extreme cases, fire or explosion.
Here are some simple guidelines to safe battery use designed to eliminate
any such problems.
BATTERY
SAFETY
GUIDELINES
ALWAYS
Store unused batteries in their
packaging and away from metal
objects which may cause a shortcircuit resulting in leakage or, in
extreme cases, fire or even an
explosion.
ALWAYS
Take care to fit your batteries
correctly,observing the plus and
minus marks on the battery and
appliance. Incorrect fitting can cause
leakage or in extreme cases, fire or
even an explosion.
ALWAYS
Remove dead batteries from
equipment and all batteries from
equipment you know you are not
going to use for a long time.Otherwise
the batteries may leak and cause
damage.
ALWAYS
Replace the whole set of batteries at
one time,taking care not to mix old
and new batteries or batteries of
different types, since this can result in
leakage or in extreme cases, fire or
even an explosion.
NEVER
Never dispose of batteries in fire as
this can cause them to explode.
Please put dead batteries in with the
normal household waste.
NEVER
Never attempt to recharge ordinary
batteries, either in a charger or by
applying heat to them. They may leak
cause fire or even explode. There are
special rechargeable batteries which
are clearly marked as such.
ALWAYS
Keep loose button cells away from
young children.
ALWAYS
Supervise children if they are replacing
batteries themselves in order to ensure
these guidelines are followed.
ALWAYS
Make sure battery compartments are
secure.
NEVER
Remember that small button cell
batteries such as used in some
hearing aids, toys, games and other
appliances, are easily swallowed by
young children and this can be
dangerous.
ALWAYS
Seek medical advice if you believe a
cell has been swallowed.
4
Page 5

TT
T
TT
aa
a
aa
bb
b
bb
le ofle of
le of
le ofle of
Contents Contents
Contents
Contents Contents
English
Important Safeguards and Precautions ............................ 6~7
Features of This System ....................................................... 7
Conventions about This Manual ............................................7
Type of Disc That Can be Played on This System................. 8
Notes on Discs ..................................................................... 9
Selecting the Type of Disc for the Connected TV ................ 10
Functional OvFunctional Ov
Functional Ov
Functional OvFunctional Ov
Index to parts and control(Front Panel) ................................ 11
Index to parts and control(Rear Panel) ................................ 12
Index to parts and control(Remote Control) ......................... 13
InstallationsInstallations
Installations
InstallationsInstallations
Unpacking ........................................................................ 14
Inserting Batteries into the Remote Control .................... 14
Speaker System Hookup ................................................. 15
Antenna Hookups ............................................................. 16
TV and Optional Component Hookups ............................ 17
Connecting the AC Power Cord ....................................... 17
erer
vievie
vie
vievie
ww
w
........ 11~13
ww
er
erer
..................................... 14~17
SPEAKER SETUP
Center Delay Setting ........................................................... 31
Rear Delay Setting .............................................................. 31
Test Tone Setting .............................................................. 31
Best Position Setting .................................................. 31~32
AUDIO SETUP
Digital Out Setting ............................................................. 33
Dynamic Setting ............................................................... 33
PREFERENCE SETUP
Audio Setting ....................................................................... 33
Subtitle Setting .................................................................... 33
Disc Menu Setting ............................................................... 34
Parental Setting .................................................................. 34
Password Setting ............................................................... 34
Defaults Setting .................................................................. 44
EXIT SETUP
Exit Setting ..........................................................................34
Special FunctionsSpecial Functions
Special Functions
Special FunctionsSpecial Functions
Picture Zooming ..................................................................35
Angle Selection ................................................................... 36
Subtitle Language Selection ................................................ 36
Audio Language Selection ................................................... 36
Using Headphones ..............................................................37
................. 35~37
Français
Deutsch
Italiano
Basic FunctionalBasic Functional
Basic Functional
Basic FunctionalBasic Functional
Basic Play ..................................................................... 18~19
Slow-Motion Play ................................................................ 19
Locate a Point Quickly ...................................................... 19
Skip Next or Previous ....................................................... 19
Using the Menu for Each DVD ......................................... 20
Playing Video CDs with PBC ............................................ 21
Repeat Play ...................................................................... 2 2
A-B Repeat Play ................................................................ 22
Program Play .................................................................... 23
EQ Play ............................................................................. 23
Selecting a Start Point Using the Time Code .................. 24
Selecting a Track Using Number Buttons ....................... 24
Checking Information Using Display ............................... 25
Settings & AdjustmentsSettings & Adjustments
Settings & Adjustments..26~34
Settings & AdjustmentsSettings & Adjustments
Using the SETUP Menu ............................................. 26~27
SETUP Menu Item List ..................................................... 2 8
GENERAL SETUP
TV Display Setting ............................................................... 29
TV Type Setting................................................................... 29
Video Out Setting ................................................................ 29
Angle Mark Setting .............................................................. 30
OSD Language Setting ....................................................... 30
Screen Saver Setting .......................................................... 30
...................... 18~25
Other FunctionsOther Functions
Other Functions
Other FunctionsOther Functions
Listening to the Radio ................................................... 38~39
Presetting Radio Stations ................................................... 39
Listening to an External Source ........................................... 40
Selecting Listening Modes ................................................... 40
Using the Sleep Timer ......................................................... 41
AdAd
ditional Infditional Inf
Ad
ditional Inf
AdAd
ditional Infditional Inf
Troubleshooting ............................................................ 42~44
Glossary ....................................................................... 44~45
Specifications ..................................................................... 46
......................... 38~41
oror
mama
or
oror
tiontion
ma
tion 42~46
mama
tiontion
Español
Svenska
5
5
Page 6
ImporImpor
Impor
ImporImpor
tant Saftant Saf
tant Saf
tant Saftant Saf
ee
guarguar
e
guar
ee
guarguar
ds and Prds and Pr
ds and Pr
ds and Prds and Pr
ecautionsecautions
ecautions
ecautionsecautions
Safeguards
Electrical energy can perform many useful functions. This unit
has been engineered and manufactured to assure your personal
safety. Improper use can result in potential electrical shock or
fire hazards. In order not to defeat the safeguards, observe the
following instructions for its installation, use and servicing.
Power Cord Protection
To avoid any malfunctions of the unit, and to protect against electric shock, fire or personal injury, please observe the following:
• When an electric storm is present, unplug the power cord and
disconnect the antenna connections.
• Hold the plug firmly when connecting or disconnecting the AC
power cord.
• Keep the AC power cord away from the heating appliances.
• Never put any heavy object on the AC power cord.
• Do not attempt to repair or reconstruct the AC power cord in
any way.
• Check that all connections are proper and that there are no
problems with the connection cords. Always set the power to
OFF
connection cords.
• To prevent short circuits or damaged wires in the connection
cords, always unplug the power cord and disconnect the connection cords between all other components when moving the
unit.
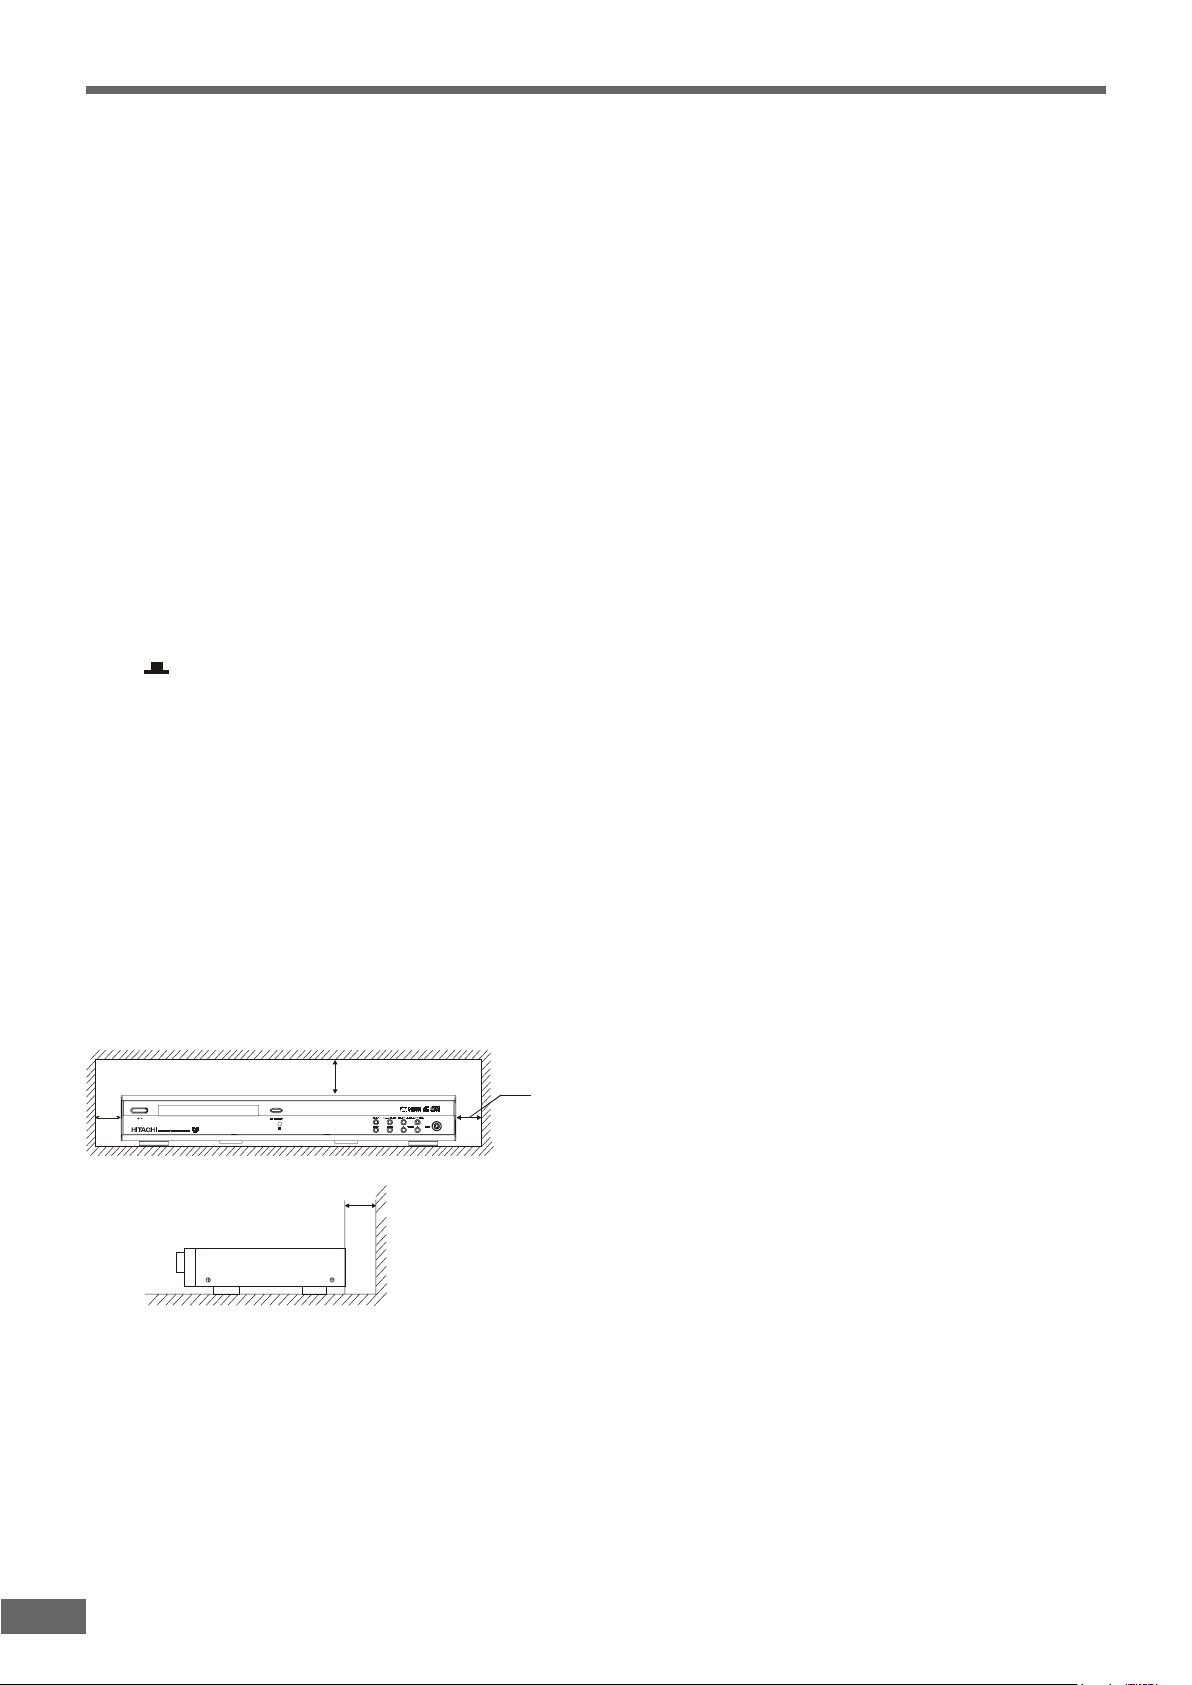
Location and Handing
• Do not install the system in a confined location; otherwise, heat
dissipation will be poor and malfunctions may occur.
• Always install this unit horizontally. For proper heat dissipation,
leave at least 10cm of space between the top, back and sides
of this unit and the wall or other components.
*
mode before connecting and disconnecting of the
10cm or more
IR
10cm or more
10cm or more
• Do not place any object containing water or other liquids on
this unit. In the event that liquid should enter the cabinet, unplug this unit immediately and contact the retailer or service
centre immediately.
• Do not remove the cabinet. Touching parts inside the cabinet
could result in electric shock and / or damage to the unit.
• Do not use the unit in a car. The operation can not guaranteed.
• Do not put subwoofer near TV as this might cause interference
to TV image.
Nonuse Periods
• When the unit is not being used, turn the unit off.
• When left unused for a long period of time, the unit should be
unplugged from the household AC outlet.
No Fingers or Other Objects Inside
Do not put any foreign object on the disc tray.
Stacking
Place the unit in a horizontal position, and do not place anything
heavy on it.
Condensation
Moisture may form on the pickup lens in the following conditions:
• Immediately after a heater has been turned on.
• In a steamy or very humid room.
• When the unit is suddenly moved from a cold environment to
a warm one.
If moisture forms inside this unit, it may not operate properly. In
this case, turn on the power and wait about one hour for the
moisture to evaporate.
On adjusting volume
Do not turn up the volume while listening to a portion with very
low level inputs or no audio signals. If you do, the speakers may
be damaged when a peak level portion is played.
If There is Noise Interference on the TV While a Broadcast
is being Received
Depending on the reception condition of the TV, interference may
appear on the TV monitor while you watch a TV broadcast with
the unit on. This is not a malfunction of the unit or the TV. To
watch a TV broadcast, turn off the unit.
• Air vents are provided in the cabinet to prevent excessive tem-
peratures inside the unit. Do not place this unit in closed spaces,
cover it, or otherwise block the vents.
• Do not place this unit in direct sunlight, or near heat sources.
• Keep this unit away from strong magnetic objects.
• Do not insert or drop anything into this unit through the air vents
as this could cause serious damage, possibly resulting in fire.
6
Service
• Do not attempt to service the unit yourself.
• Please refer any service to the nearest service centre.
Copyright
Audio-visual material may consist of copyrighted works which
must not be recorded without the authority of the owner of the
copyright. Please refer to relevant laws in your country.
Page 7

ImporImpor
Impor
ImporImpor
Copy protection
This DVD player supports Macrovision copy protection.
On DVD discs that include a copy protection code, if the contents of the DVD disc are copied using a VCR, the copy protection code
prevents the videotape copy from playing normally.
tant Saftant Saf
tant Saf
tant Saftant Saf
ee
guarguar
e
guar
ee
guarguar
ds and Prds and Pr
ds and Pr
ds and Prds and Pr
ecautionsecautions
ecautions
ecautionsecautions
English
Recommended Measures for Optimum Picture Excellence
This unit is a precision device that is constructed using extremely accurate technology.
Soiling or friction affecting the pickup lens or disc drive can impair the image quality. At the worst, neither video nor audio
back. To obtain optimum picture quality, the player should be checked (cleaning and replacement of some parts) every 1,000 hours.
Note that this period varies depending on the environment (temperature, humidity, dust, etc..) in which the player is used.
Do not attempt to clean the pickup lens yourself.
FF
eaea
turtur
F
ea
FF
eaea
• DVD player built-in DTS
• 5.1-channel amplifiers attached with active subwoofer.
• Tuner (AM/FM) receiver.
• Conforming DVD, DVD-R, SVCD, VCD1.1, VCD2.0, MP3, CD-DA, CD-R and CD-RW discs.
• DVD navigation and SVCD, VCD 2.0 PBC controlling functions.
• VFD front panel display and OSD menu display.
• Full function remote control.
*1
Manufactured under license from Digital Theater System, Inc. US Pat. No. 5,451,942 and other worldwide patents issued
and pending.
Systems, Inc. All rights reserved.
*2
Manufactured under license from Dolby Laboratories. “Dolby”, “AC-3”, “Pro Logic” and the double-D symbol are trade-
marks of Dolby Laboratories. Confidential Unpublished Works. © 1992-1997 Dolby Laboratories, Inc. All rights reserved.
tur
turtur
es ofes of
es of
es ofes of
“
DTS” and “DTS Digital Surround” are trademarks of Digital Theater Systems, Inc. © 1996 Digital Theater
TT
his Systemhis System
T
his System
TT
his Systemhis System
*1
and Dolby Digital*2 decoder, supporting Dolby Pro Logic and Virtual Surround.
will be played
Français
Deutsch
Italiano
ConCon
Con
ConCon
• Instructions in this manual describe the controls on the system. You can also use the controls on the remote control if they have
• The types of functions and operations that can be used for a particular disc vary depending on the features of that disc. In some
• For some operations, the icon may appear on the screen. This indicates that the operation described in this instruction
• The drawings about the TV screen and front panel display used in this instruction Manual are purely for the purposes of
vv
entions aentions a
v
entions a
vv
entions aentions a
the same or similar names as those on the system.
cases, these functions and operations may differ from the descriptions given in this instruction Manual. In this event, follow the
instructions given on the screen. This instruction Manual only covers basic disc operations.
Manual is not permitted for the current disc.
explanation. The actual displays may differ slightly from what are shown here.
bout bout
bout
bout bout
TT
his Manhis Man
T
his Man
TT
his Manhis Man
ualual
ual
ualual
Español
Svenska
7
Page 8
TT
ype ofype of
T
ype of
TT
ype ofype of
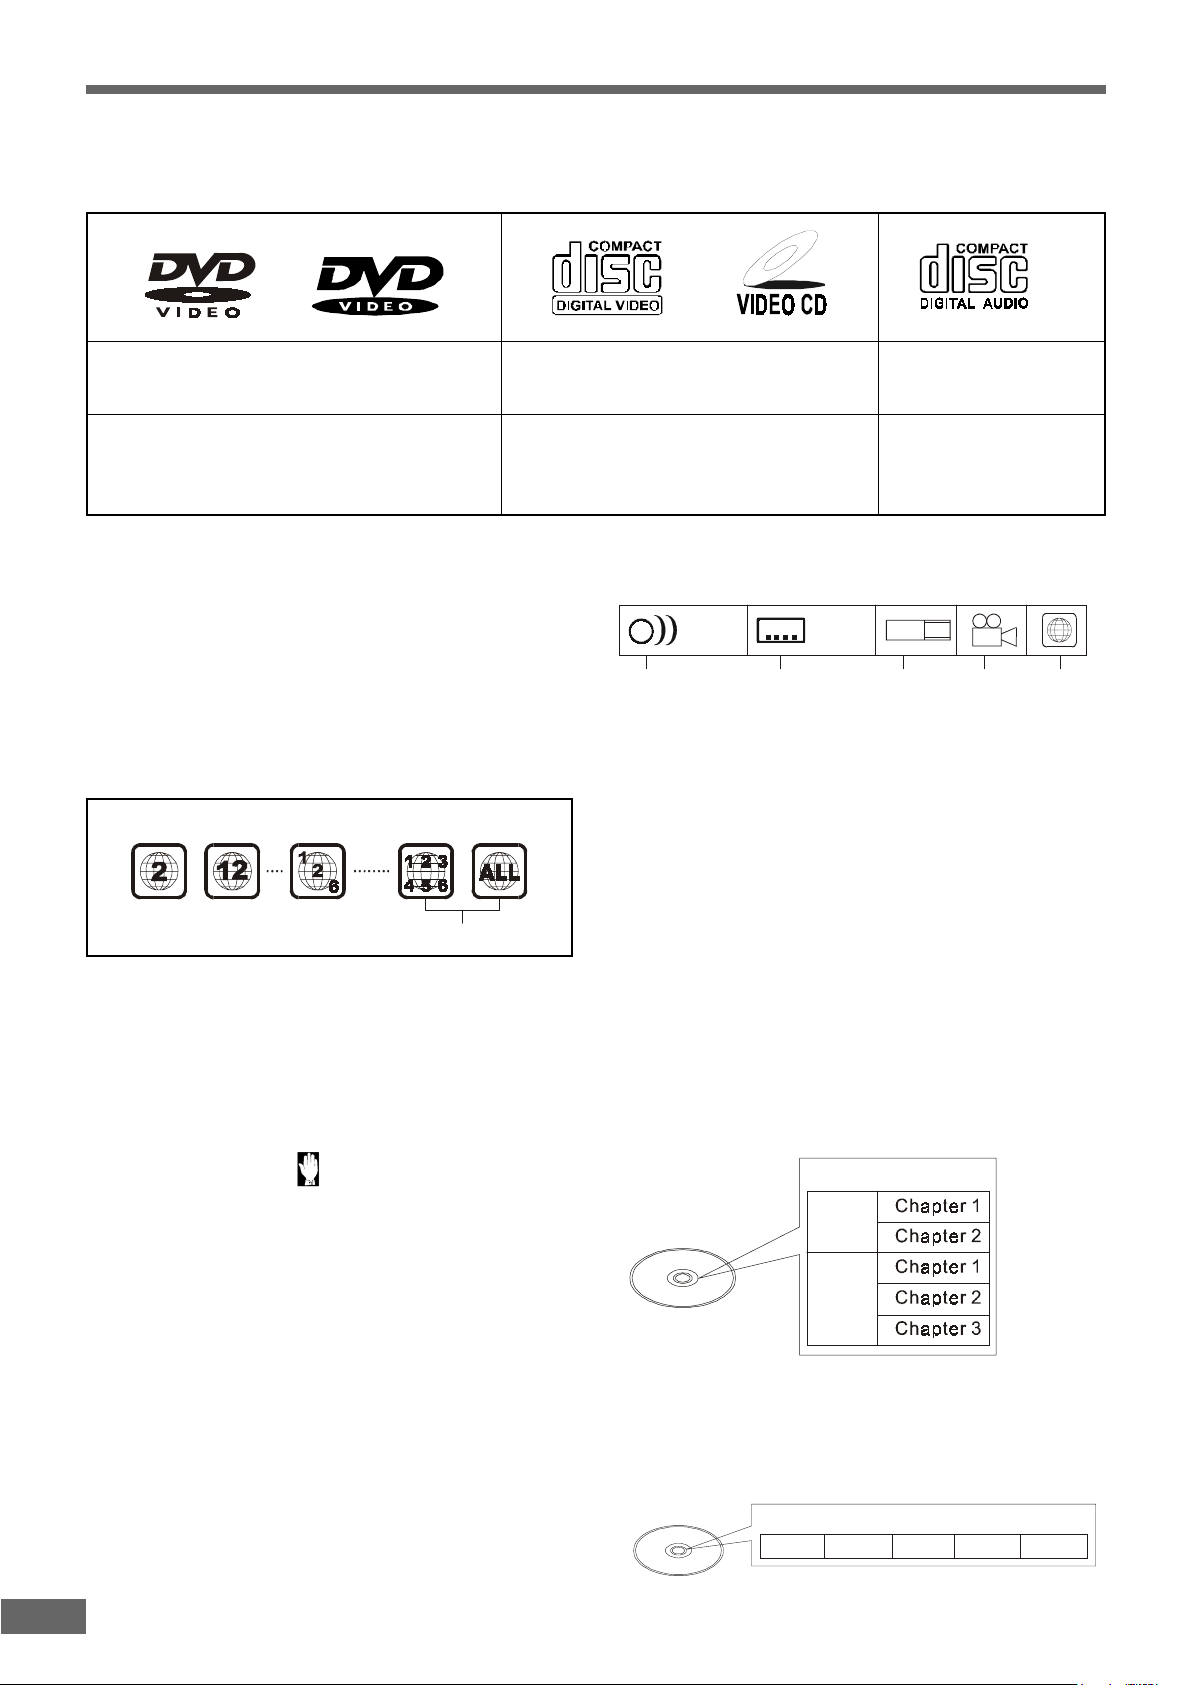
This player can playback discs bearing any of the following marks:
Disc Disc
Disc
Disc Disc
TT
T
TT
haha
t Can be Plat Can be Pla
ha
t Can be Pla
haha
t Can be Plat Can be Pla
yy
ed on ed on
y
ed on
yy
ed on ed on
TT
his Systemhis System
T
his System
TT
his Systemhis System
DVDs
12cm disc / 8cm disc
See Note-1
See Note-2
See Note-3
Note-1
• DVD players and discs are designed with region numbers which
dictate the regions in which a disc can be played. If the region
number on the disc you want to play does not match the region number in your DVD player, you will not be able to play the
disc. If you try to play the DVD, the message “WRONG REGION” will appear on OSD.
The region number for this DVD player is
On the rear panel of the unit has a region code printed.
Sample disc display:
2.
Disc playable in all regions
• Supports version until version 2.0
Video CDs
12cm disc / 8cm disc
See Note-2
Icons used on DVD discs
Sample Icons:
1. English
2
2. Chinese
Number of recorded
audio tracks
Note-4
• DVD door can be opened in DVD function only.
Glossary of Disc Terms
• Title (DVD)
The longest sections of a picture or a music piece on a DVD;
a movie, etc., for a picture piece on a video software; or an
album, etc., for a music piece on and audio software. Each
title is assigned a title number enabling you to locate the title
you want.
1. English
2
2. Chinese
Number of subtitles
recorded
16:9
Screen aspect
ratio recorded
Audio CDs
12cm disc / 8cm disc
• Supports MP3
LB
2
Disc with
Multiple
camera angles
1 2 3
4 5 6
Region code
indicator
Note-2
• The specific playback functionality for some DVD and video
CD discs is determined by the disc manufacturer. Because
this DVD player plays disc data in accordance with the disc
manufacturer’s guidelines, some functions may not be available on some discs. Be sure to read the instructions provided
with the disc.
The “Prohibited” icon displayed during DVD player operation indicates that such manufacturer imposed restrictions apply.
Note-3
• The audio on a DVD disc recorded in MPEG version 2.0 format
maybe cannot be played (image only).
Discs that Cannot be Played
• You cannot play CD-G and PHOTO CD discs.
• You cannot play illegally produced discs.
• You cannot play scratched discs.
• You cannot play disc that are dusty, soiled or marked with
fingerprints.
• Chapter (DVD)
Sections of a picture or a music piece that are smaller than
titles. A title is composed of several chapters. Each chapter is
assigned a chapter number enabling you to locate the chapter
you want. Depending on the disc, no chapters may be recorded.
For example
Title 1
Title 2
• Track (Video or audio CD)
Sections of a picture or a music piece on a VIDEO or a CD.
Each track is assigned a track number enabling you to locate
the track you want.
For example
Track 1 Track 2 Track 3 Track 4 Track 5
8
Page 9
Notes on DiscsNotes on Discs
Notes on Discs
Notes on DiscsNotes on Discs
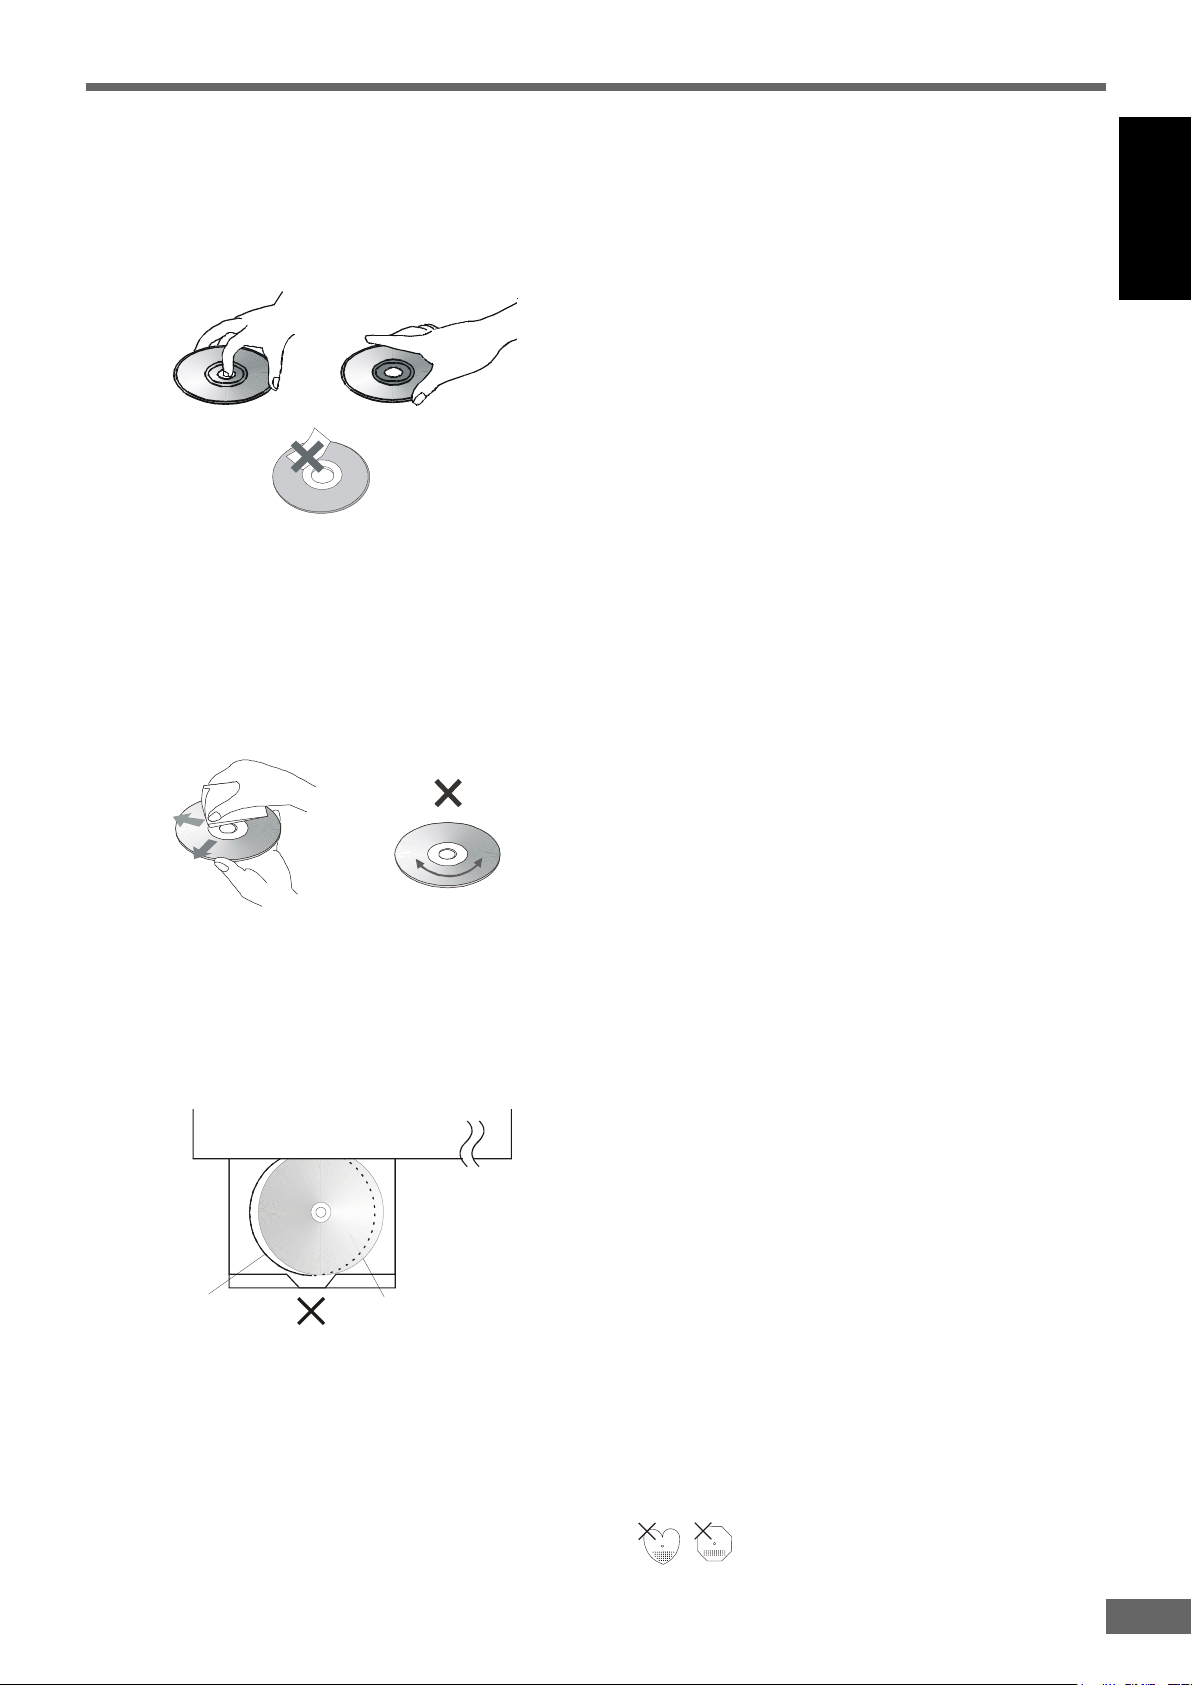
Disc handling precautions
• To keep the disc clean, handle the disc by its edge. Do not touch the surface.
• Do not stick paper or tape on the disc.
If there is glue (or a similar substance) on the disc, remove the glue completely before using the disc.
• Do not expose the disc to direct sunlight or sources such as hot air ducts, or leave it in a car parked in direct sunlight as there
can be considerable rise in temperature inside the car.
• After playing, store the disc in its case.
• Do not write on the label side with a ball-point pen or other writing utensils.
• Be careful not to drop or bend the disc.
Disc cleaning precautions
• Before playing, clean the disc with a cleaning cloth. Wipe the disc from the center out.
English
• Do not use solvents such as benzine, thinner, commercially available cleaners or anti-static spray intended for vinyl LPs.
Disc installing precautions
• Do not install more than 1 disc on disc tray.
• Do not place the disc on the tray up-side down.
• Do not try to close the disc tray when the disc is not installed properly.
Disc tray
• Do not store discs in high-temperature, high-humidity locations. The discs may develop warps and become unable to play. Also,
discs with moisture on them may be unplayable. Wipe any moisture off with a soft, dry cloth, and be sure discs are fully dry before
using.
• Do not leave a disc inside the CD player when it is not used for a long period.
• Please do not use compact discs with cellophane or with labels attached or those CD with peeled off stains, such as rental CD. If
such discs were used on a CD player, they may get trapped inside the unit and cause malfunction.
• CD with special shapes (heart-shaped CDs, octagonal CDs etc.) cannot be played on this set.
Disc
Attempting to do so may damage the set. Do not use such CDs.
9
Page 10
Selecting the Type of Disc for the Connected TVSelecting the Type of Disc for the Connected TV
Selecting the Type of Disc for the Connected TV
Selecting the Type of Disc for the Connected TVSelecting the Type of Disc for the Connected TV
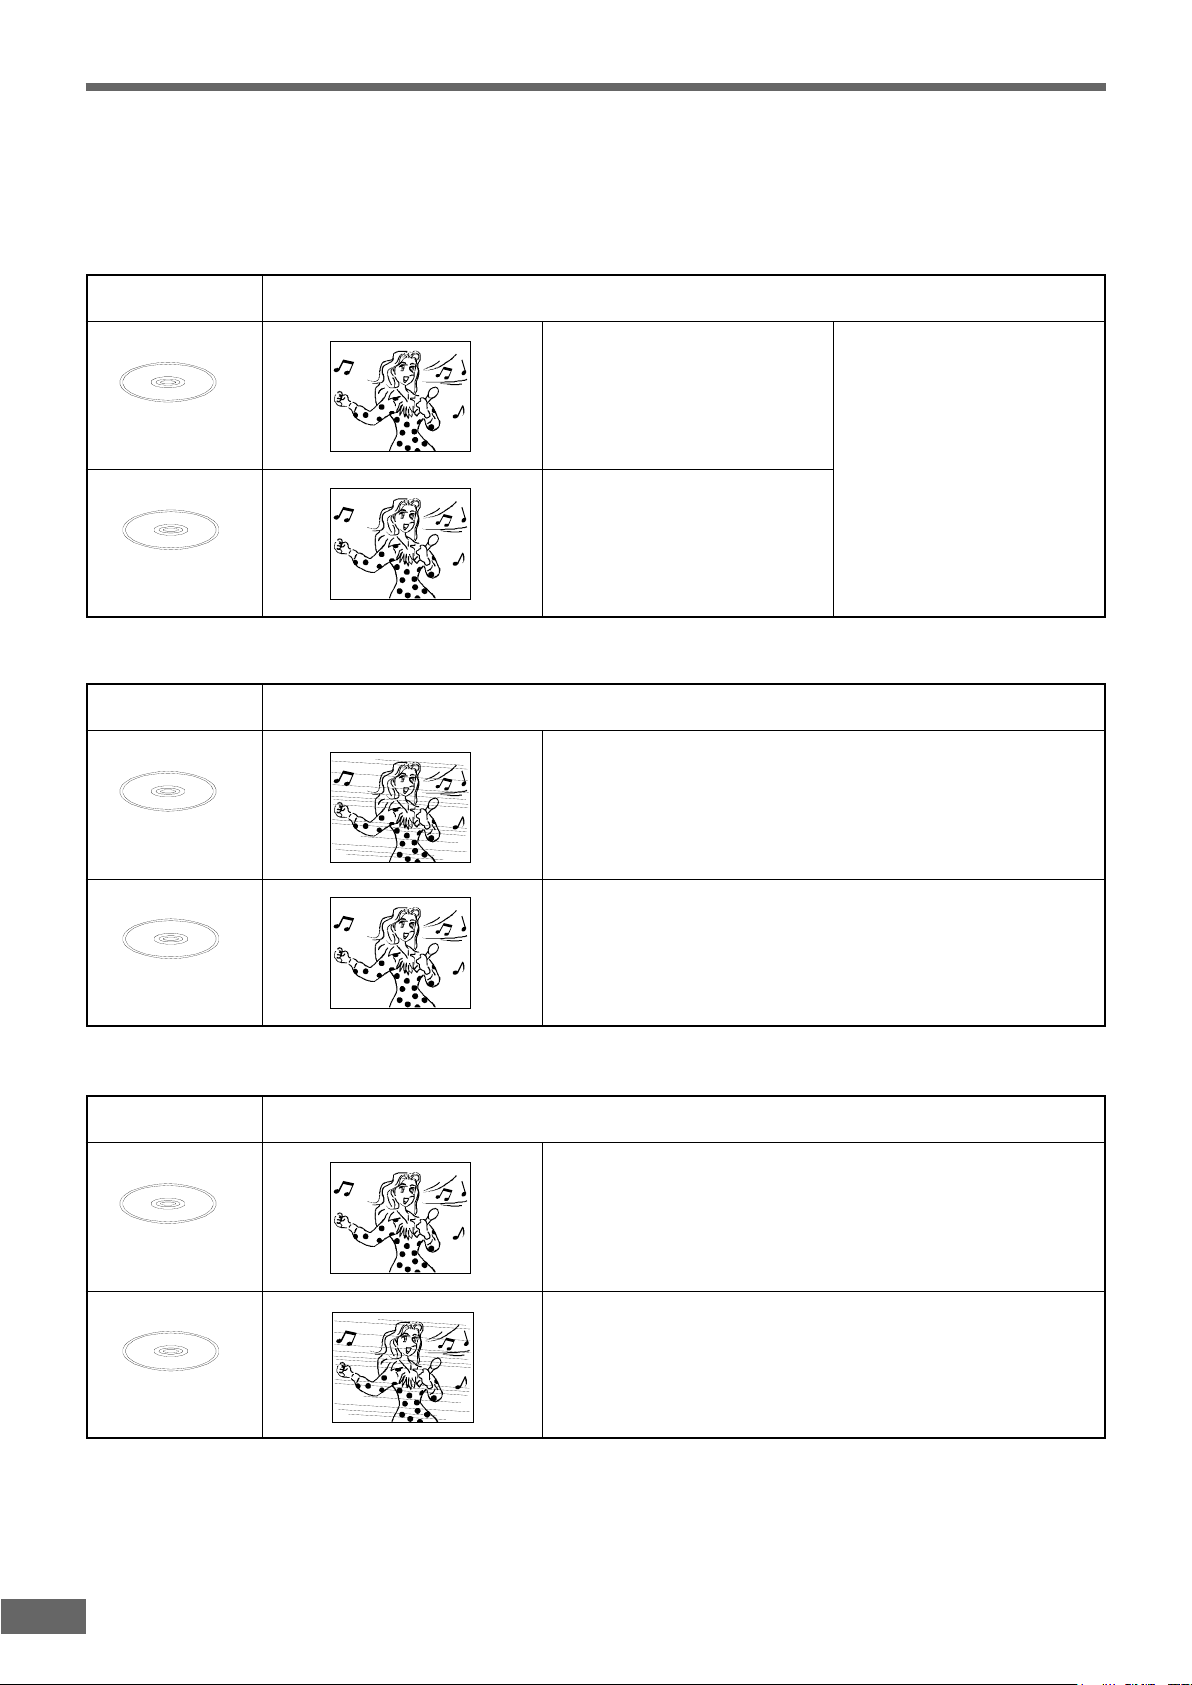
Both DVD discs and video CDs have the material recorded in the PAL and NTSC systems. Refer to the table below to select the
correct disc type for the type of connected TV.
Connecting to the Multi-system TV
Disc
PAL
NTSC
Connecting to NTSC TV
Disc
PAL
TV Monitor
Played in the PAL system.
The use of a multi-system TV
is recommended.
Played in the NTSC system.
TV Monitor
Can not be used.
Images playback in black and white. The images may also be distorted or may overlap at the bottom of the screen.
Played in the NTSC system.
Specify the settings for the type of TV connected (4:3, 16:9).
NTSC
Connecting to PAL TV
Disc
When viewed on a 4:3 TV, the images appear compressed horizontally.
PAL
Can not be used.
Images play back in black and white.
NTSC
Note
TV Monitor
• If the type of disc does not match the type of connected TV, you can also play the disc normally by setting the TV type in the SETUP
menu. For details, see page 29.
10
Page 11

IndeInde
Inde
IndeInde
Refer to the pages indicated in parentheses for details.
FF
rr
F
r
FF
rr
x to Px to P
x to P
x to Px to P
ont Pont P
ont P
ont Pont P
anelanel
anel
anelanel
arar
ts and Contrts and Contr
ar
ts and Contr
arar
ts and Contrts and Contr
olsols
ols
olsols
IR
English
/
-TUNING+
/
1
OPERATE Switch (page 18)
Turn on and off to switch the main power of the system.
Disc Tray (page 18)
Place a disc on the tray.
OPEN/CLOSE Button (page 18)
Open or close the disc tray.
REMOTE SENSOR (page 14)
Accept the remote control signals.
Front Panel Display (page 11)
Indicate the playing time, etc..
STOP Button (page 19)
Stop playing a disc.
SELECT Button (page 32)
Select the audio channel to view or adjust its level.
PLAY/II PAUSE Button (page 19)
Play or pause a disc.
FF
rr
ont Pont P
F
r
ont P
FF
rr
ont Pont P
anel Displaanel Displa
anel Displa
anel Displaanel Displa
1
yy
y
yy
2
4 83 962 5 7
SOURCE Button (page 18, 19, 39, 40)
Select the component you want to use.
In standby mode, press this button to turn on the power of
this system.
- VOLUME + Button (page 32)
Increase/decrease the master volume level or the selected
channel level.
/ -TUNING+ / Button (page 19, 39)
In Disc mode, press the button to jump to the previous/next
title, chapter or track.
Hold down to do fast reverse/forward.
In Tuner mode, press to change the tuning frequency.
Press and hold the button to search the tuning frequency
continuously.
PHONE Jack (page 37)
Connect the headphone to this jack.
3 4
5
6 7
10
11 12
Speakers Icons
Light according to the selected listening mode and the type
of playing Disc.
Dolby Digital Indicator
Illuminates when the playing disc is recorder with Dolby Digital
format.
Dolby Pro Logic Indicator
Illuminates when the playing disc is recorded with Dolby Pro
Logic format.
Stereo Indicator
Illuminates when the listening mode is selected.
9
DTS Indicator
Illuminates when the playing disc is recorded with DTS format.
Sleep Indicator
Illuminates when the sleep timer is set to on.
Program Indicator
Illuminates when the PROGRAM or MEMORY is set to on.
Frequency Unit Indicator
In AM mode, kHz lights up; In FM mode, MHz lights up.
Status Bar
Show type of playing disc, track,timing, etc. information.
8
11
Page 12
IndeInde
Inde
IndeInde
Refer to the pages indicated in parentheses for details.
x to Px to P
x to P
x to Px to P
arar
ts and Contrts and Contr
ar
ts and Contr
arar
ts and Contrts and Contr
olsols
ols
olsols
Main Unit RMain Unit R
Main Unit R
Main Unit RMain Unit R
AM
1 11
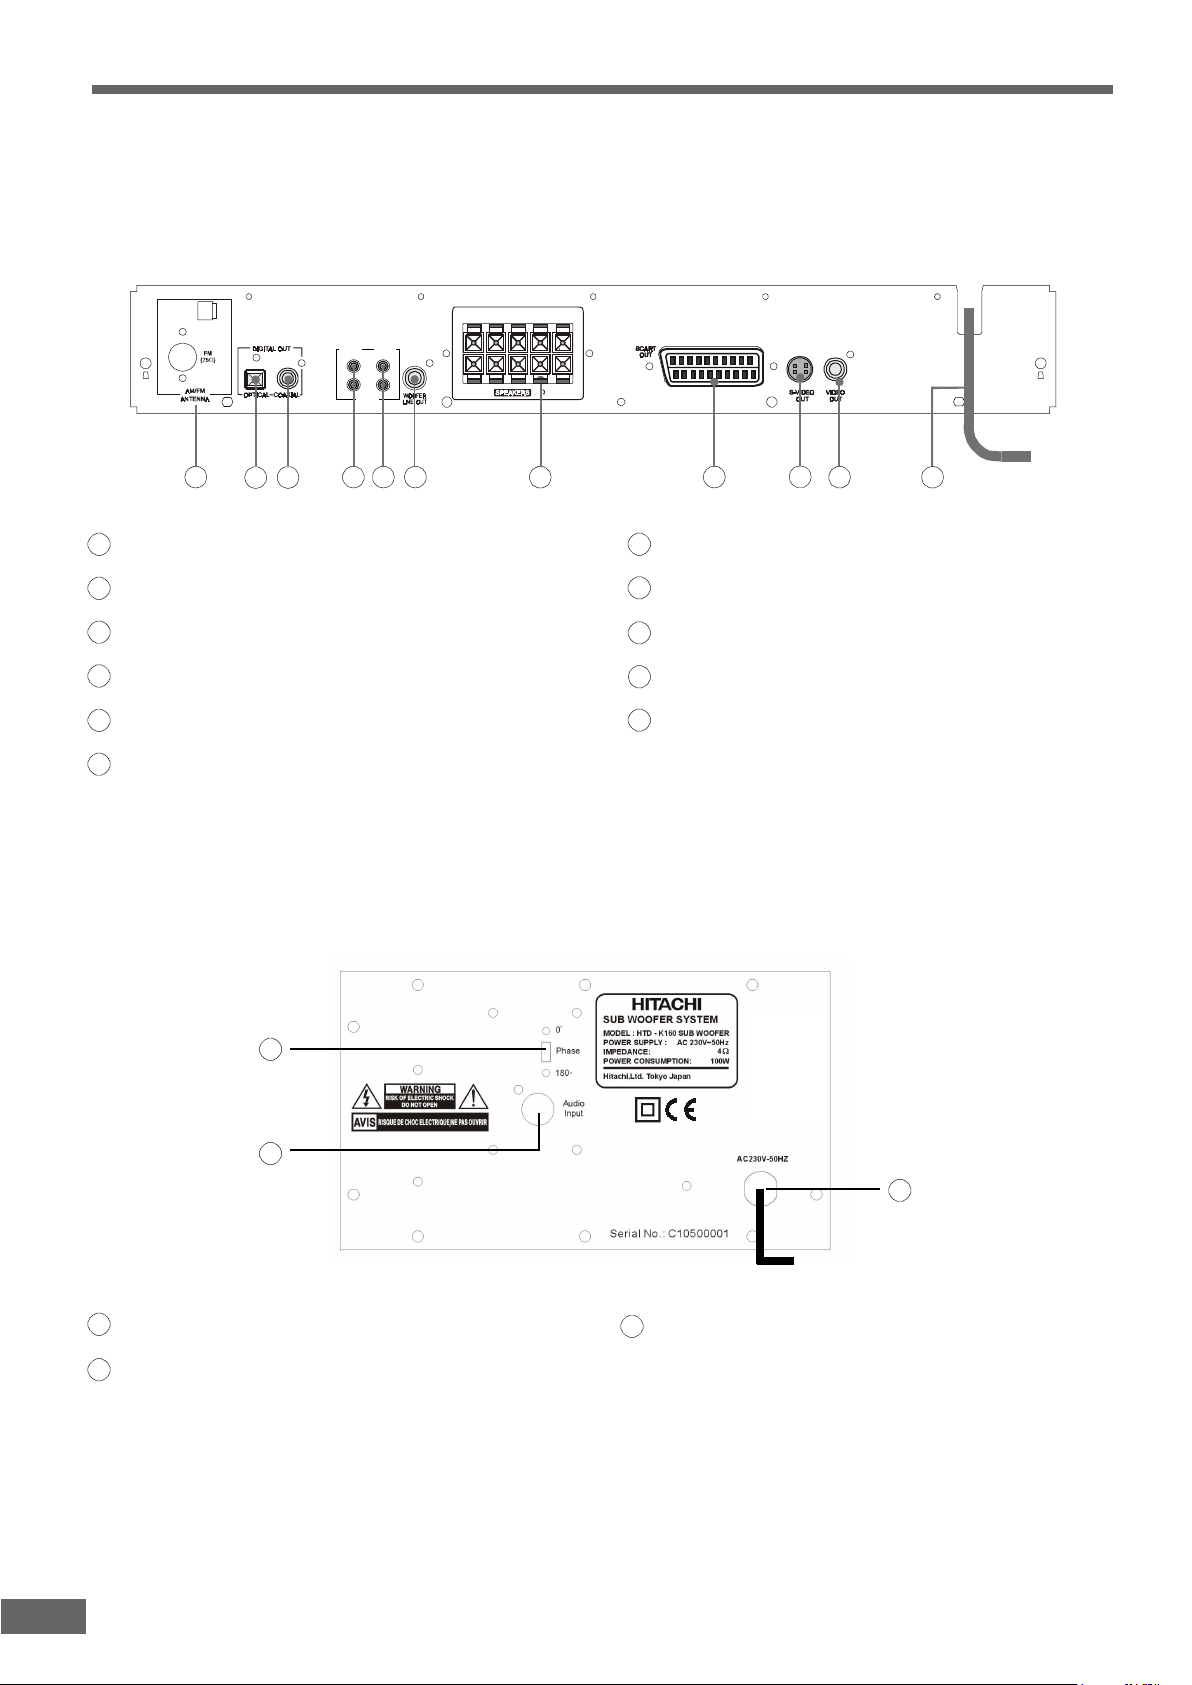
AM/FM ANTENNA Terminal (page 16)
1
Connect to the supplied AM/FM loop antenna.
OPTICAL Jack (page 17)
2
Connect to an optional receiver.
COAXIAL Jack (page 17)
3
Connect to an optional receiver.
AUX IN Jacks (page 17)
4
Connect to a TV set and a VCR, or other optional source.
AUDIO OUT Jacks (page 17)
5
Connect to a TV set, or other stereo receiver.
WOOFER LINE OUT Jack (page 15)
6
Connect to the supplied active subwoofer.
ear Pear P
ear P
ear Pear P
2
anelanel
anel
anelanel
AUDIO
IN
L
R
AUX IN
AUDIO
OUT
FL CFR SLSR
(8 )
98
76543
SPEAKERS Output Terminal (page 15)
7
Connect to the supplied speakers.
SCART OUT Connector (page 17)
8
Connect to the TV Scart input terminals.
S-VIDEO OUT Jack (page 17)
9
Connect to a TV S-Video input connector.
VIDEO OUT Jack (page 17)
10
Connect to a TV Video input connector.
AC Power Cord (page 15)
11
Connect to a wall outlet.
10
SubSub
ww
oofoof
Sub
w
SubSub
ww
1
AC cord
Connect to a 230V AC power outlet.
AUDIO INPUT
2
Connects the audio source such as amplifier.
Note
• After plug in, woofer go to STANDBY MODE, RED LED on.
• When sound sign come, woofer become ON, BLUE LED on.
• 10 mins after sound signal stop, woofer return to STANDBY MODE,
RED LED on.
oof
oofoof
er Rer R
er R
er Rer R
ear Pear P
ear P
ear Pear P
3
2
anelanel
anel
anelanel
1
PHASE (0O-180O)
3
The phase relationship between the subwoofer and main
speakers may vary depending on the crossover frequency
selected and the distance between the subwoofer and the
main speakers.
While listening to music with strong bass content, move the
phase switch between the 0
switch in the position that provides the strongest bass output.
O
and 180O position. Leave the
12
Page 13
IndeInde
Inde
IndeInde
RR
R
RR
x to Px to P
x to P
x to Px to P
emote Contremote Contr
emote Contr
emote Contremote Contr
arar
ts and Contrts and Contr
ar
ts and Contr
arar
ts and Contrts and Contr
olol
ol
olol
olsols
ols
olsols
English
PO WE R
STAN DBY
DVD
TUNER
2
AUX
5
ENT
PROG
MENU/PBC
Language
AUDIO
Go To
8
0
SLOW/MEMORY
PLAY/PAUSE
Sub Title
ANGLE
Return DISPLAY
Zoom
EQ
LISTENING
SLEEPREPEATA-B
N/P
OPEN/CLOSE
SETUPTITLE
ADJ/VOL
SELECT
MUTE
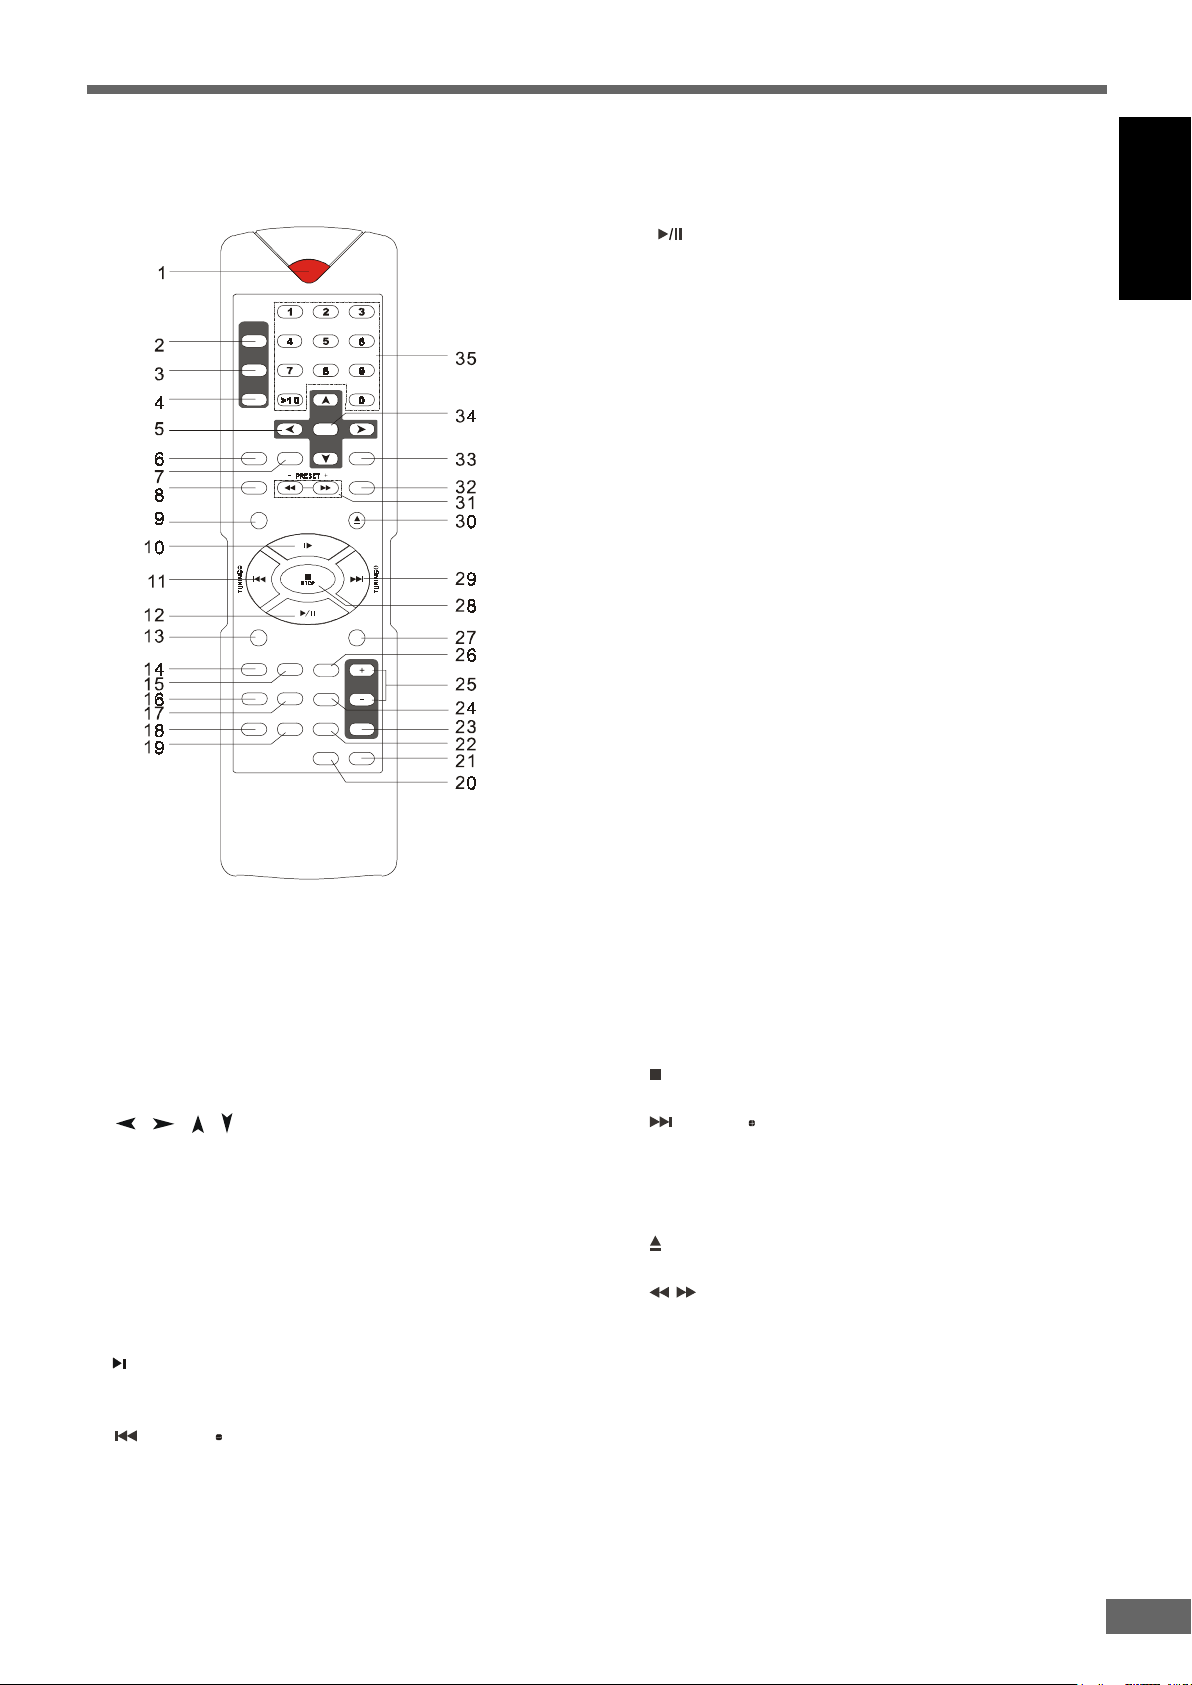
1. STANDBY Button (page 19)
Turn the system POWER ON or STANDBY.
2. DVD Button (page 20)
Select DVD mode directly.
3. TUNER Button (page 38, 39)
Select FM or AM mode directly.
4. AUX Button (page 40)
Select AUX mode directly.
5.
/ / / Button (page 19)
Select and move the screen cursor to a desired option.
6. A-B Button (page 22)
Specify a section and play it repeatedly.
7. REPEAT Button (page 22)
Press to do repeatedly.
8. PROGRAM Button (page 23)
Set a program play.
9. MENU/PBC Button (page 21)
Switch to set the PBC function on or off.
10.
SLOW/MEMORY Button (page 19, 38)
In Disc mode, do the slow-motion playing.
In tuning mode, press to save as memory.
11.
TUNING Button (page 19)
In DVD mode, press to select the previous title, chapter or
track.
In Tuner mode, press to drop down the tuning frequency.
Press and hold the button to search tuning frequency continuously in down sequence.
12.
PLAY/PAUSE button (page 19)
Start or pause the playing disc.
13. TITLE Button (page 20)
Back to the title menu when playing a DVD.
14. LANGUAGE Button (page 30, 36)
Select a desired language when playing a DVD.
15. SUB TITLE Button (page 33, 36)
Selects a desired language for the subtitles while playing a
DVD.
16. AUDIO Button (page 33, 37)
Select the audio channels for sound.
17. ANGLE Button (page 30, 36)
Select the angles cyclicity.
18. GO TO Button (page 24)
Select desired title/chapter or timing to start playback.
19. RETURN Button (page 21)
Back to the root menu when playing a DVD.
Back to the PBC menu when playing a CVD,VCD or SVCD.
20. LISTENING Button (page 40)
Select a listening mode you want.
21. MUTE Button (page 32)
Shut off all of the sound.
22. DISPLAY Button (page 25)
Switch the displayed item on the TV screen or/and on the
front panel display.
23. SELECT Button (page 32)
Select the audio channel to view or adjust its level.
24. EQ Button (page 20)
Cyclicity select the preset equalizer mode.
25. ADJ/VOL (+/-) Buttons (page 32)
Increase/decrease the master volume level.
26. ZOOM Button (page 35)
Zoom in the playing picture.
27. SETUP Button (page 26, 27)
Display or exit the SETUP menu.
28.
STOP Button (page 19)
Stop playing a disc and clear the stored program.
29.
TUNING Button (page 19, 39)
In DVD mode, press to select the next title, chapter or track.
In Tuner mode, press to move up the tuning frequency. Press
and hold the button to search tuning frequency continuously
in up sequence.
30.
OPEN/CLOSE Button (page 18)
Open or close the disc tray.
31.
/ - PRESET +Buttons (page 19)
Press to play a disc in fast forward / reverse mode.
In tuner mode, press to select the preset stations.
32. N/P Button (page 29)
Change the color system temporarily to match to your TV
standard.
33. SLEEP Button (page 41)
Activate the sleep timer.
34. ENTER Button
Confirm and execute the highlighted item.
35. Number Buttons
Select the items or settings directly.
13
Page 14
InstallaInstalla
Installa
InstallaInstalla
tionstions
tions
tionstions
UnpackingUnpacking
Unpacking
UnpackingUnpacking
This section describes how to hookup the system to the
speakers, a TV monitor with audio / video input jacks and
other video component. You cannot connect this system
to a TV monitor which does not have a video input
connector. Be sure to turn off the power of each component before making the connections.
Check that you have the following items:
• Main unit (1)
• Subwoofer (1)
• Speakers (5)
• Remote control (1)
• Audio & Video cable (1)
• Subwoofer cable (1)
• Scart cable(1)
• Speaker cords (5m x 3, 15m x 2)
• AM loop antenna (1)
• FM pigtail antenna (1)
• Instruction Manual (1)
InserInser
Inser
InserInser
the Rthe R
the R
the Rthe R
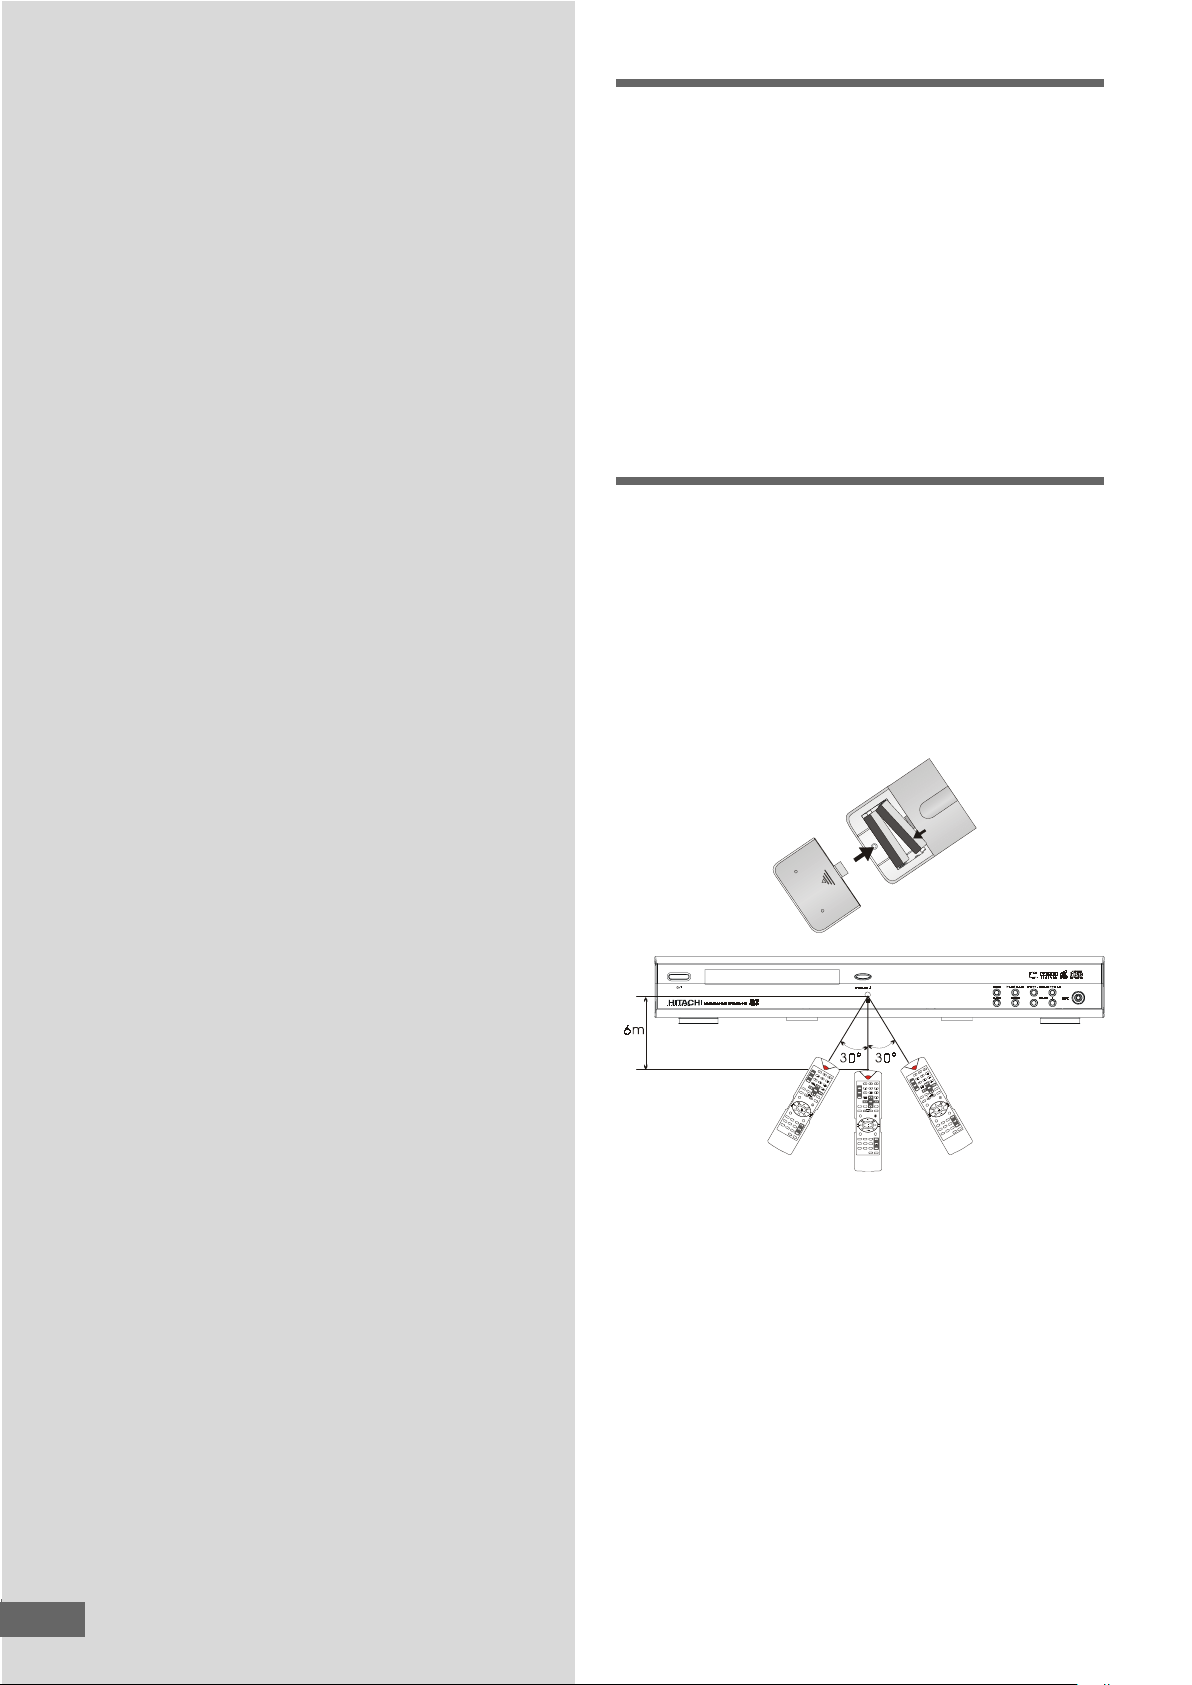
You can control the system using the supplied remote control.
Insert two batteries by matching the + and - on the batteries.
When using the remote control, point it at the remote sensor on
the front panel of this system.
3V [2X “AAA cell OR IEC R3 OR JIS R3P (JIS SUM-4)]
ting Bating Ba
ting Ba
ting Bating Ba
emote Contremote Contr
emote Contr
emote Contremote Contr
tteries intotteries into
tteries into
tteries intotteries into
olol
ol
olol
IR
P
O
W
S
T
E
A
R
N
D
B
Y
D
V
D
T
U
N
E
R
A
U
X
2
5
A
B
R
E
8
P
E
E
N
A
P
T
R
T
O
G
0
M
E
S
N
L
E
U
/
E
P
P
B
C
N
/
P
S
L
O
W
O
/
M
P
E
E
M
N
O
/
C
R
L
Y
O
S
E
T
I
T
L
E
L
a
P
n
L
g
A
u
Y
a
/
g
P
e
A
U
S
S
E
u
b
S
T
E
t
i
T
A
e
l
U
U
P
D
I
O
Z
o
o
m
A
N
G
L
E
G
o
T
o
E
Q
R
e
t
u
r
A
n
D
J
/
V
O
D
L
I
S
P
L
A
Y
S
E
L
E
C
L
I
T
S
T
E
N
I
N
G
M
U
T
E
R
E
W
Y
B
O
P
D
N
A
T
S
POWER
STANDBY
D
V
D
R
E
N
U
T
DVD
TUNER
AUX
PROG
MENU/PBC
AUDIO
Go To
2
P
E
X
E
L
T
U
S
A
N
E
5
P
/
N
T
A
8
E
P
E
R
E
S
O
2
5
ENT
8
SLEEPREPEATA-B
0
N/P
OPEN/CLOSE
SLOW/M EM O R Y
SETUPTITLE
PLAY/PA USE
Sub Title
ZoomEQLanguage
ADJ/VOL
ANGLE
SELECT
Return DISPLAY
MUTE
LISTENING
L
C
B
-
/
N
A
E
0
P
O
G
O
R
P
Y
R
O
M
E
C
B
M
/
P
/
W
U
N
O
E
L
S
M
P
U
T
E
S
E
S
U
A
P
/
Y
A
L
P
m
o
L
o
E
O
Z
L
V
T
/
I
J
T
D
A
le
t
i
T
b
u
S
Q
E
T
e
C
g
E
a
L
u
E
g
S
n
a
E
L
L
G
N
Y
A
A
L
P
S
I
O
E
D
I
T
D
U
U
M
A
n
r
u
t
G
e
N
R
I
N
E
T
S
I
o
L
T
o
G
Note
• Do not leave the remote control in an extermely hot or hu-
mid place.
• Do not use a new battery with an old one.
• Do not drop any foreign object into the remote casing. Par-
ticularly when replacing the batteries.
• Do not expose the remote sensor to direct sunlight or light-
ing apparatus. Doing so may cause a malfunction.
• If you are not using the remote control for an extended pe-
riod of time, remove the batteries to avoid possible damage from battery leakage and corrosion.
• The remote control may not be effective in the strong
daylight.
• During radio listening (AM), if you operate the remote con-
trol extremely close to the system, some noise may be produced.
14
14
Page 15
SpeakSpeak
g
Speak
SpeakSpeak
er System Hookuper System Hookup
er System Hookup
er System Hookuper System Hookup
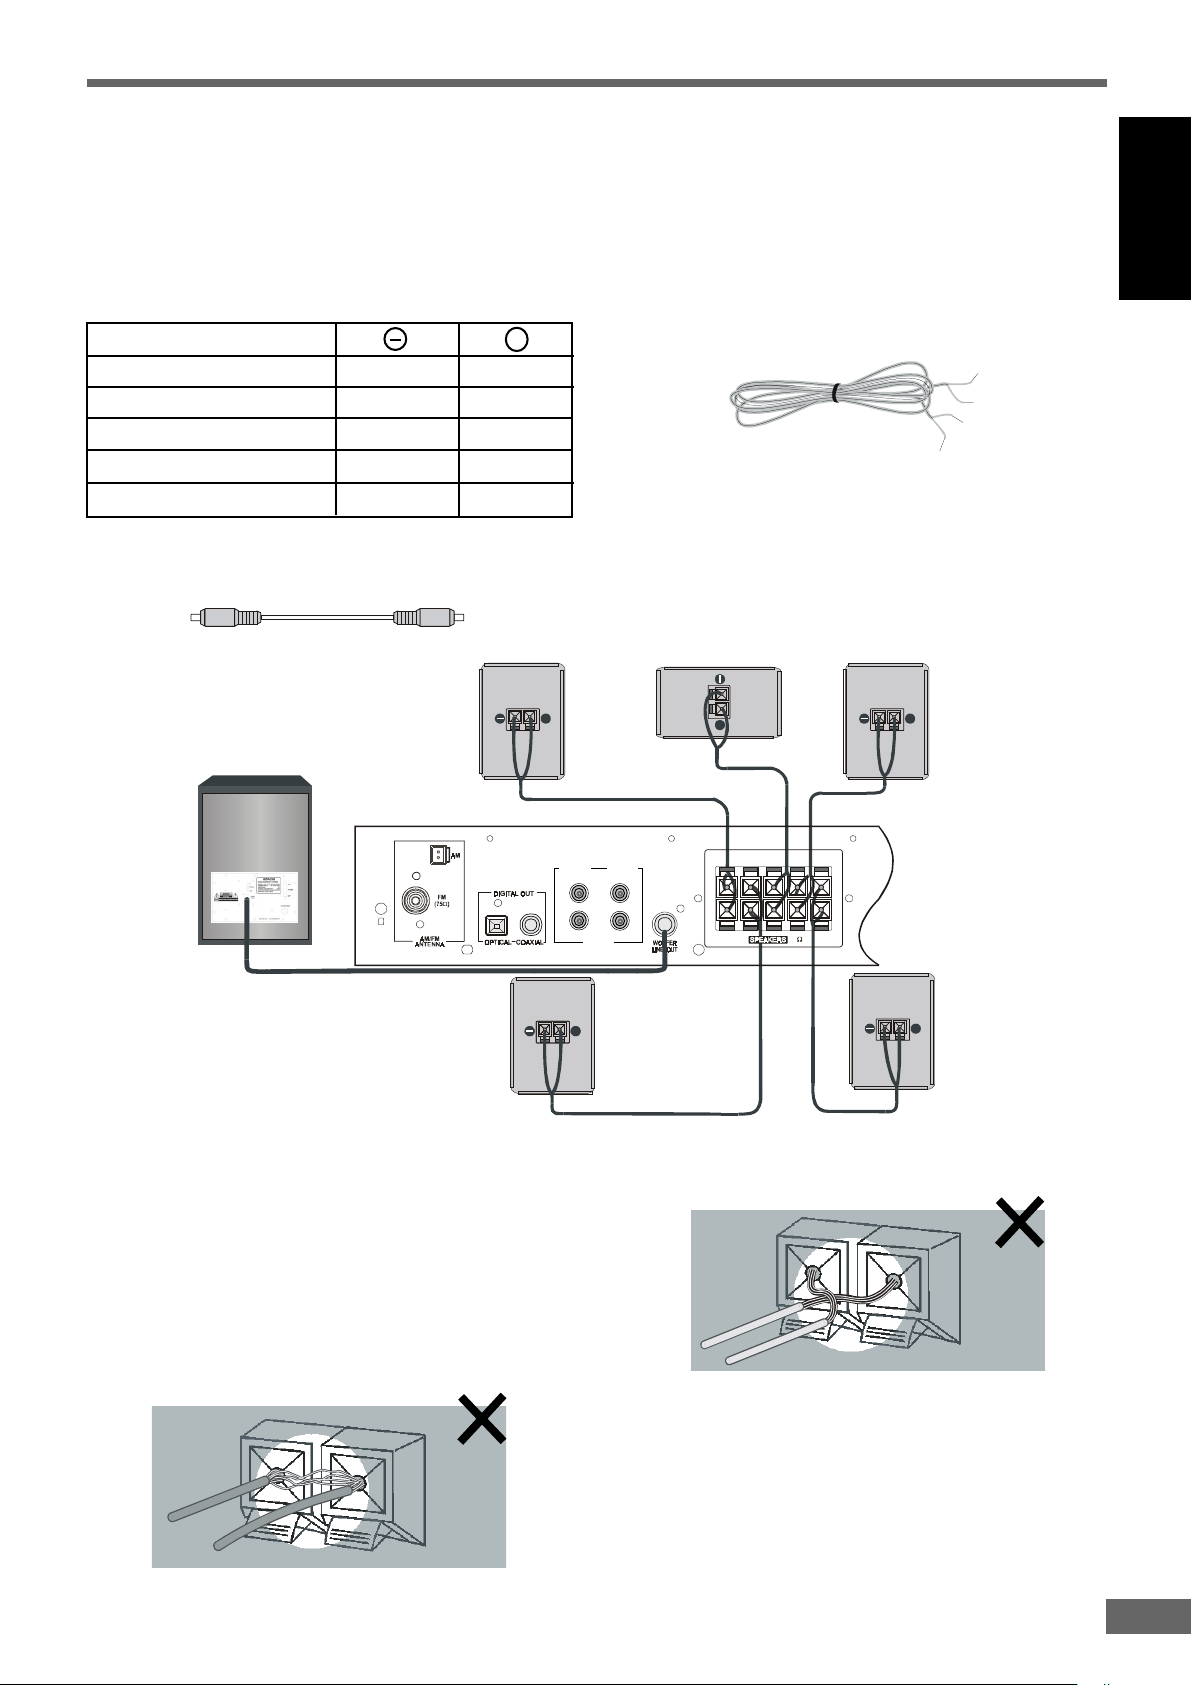
Connect the supplied speaker system using the supplied speaker
cords by matching the colors of the terminals and those of the
cords.
At the rear of each supplied speakers you will find two click fixation connectors, a black one is for (-) and a red / white / green
/ gray / blue one is for (+).
English
• Connect the Front Left speaker to the FL terminals.
• Connect the Front Right speaker to the FR terminals.
• Connect the Center speaker to the C terminals.
• Connect the Surround Left speaker to the SL terminals.
• Connect the Surround Right speaker to the SR terminals.
Required speaker cords (supplied):
Speakers
FRONT (R)
FRONT (L)
CENTER
SURROUND (R)
SURROUND (L)
BLACK
BLACK
BLACK
BLACK
BLACK
+
RED
WHITE
GREEN
GREY
BLUE
• Connect the active Subwoofer to the RCA jack of WOOFER
LINE OUT.
Required subwoofer cable (supplied):
Black Black
Front Right Speaker
+
Active Subwoofer
AUDIO
IN
L
R
AUX IN
AUDIO
OUT
Center Speaker
+
FL CFR SLSR
Rear Surr ound Ri
(8 )
ht Speaker
+
Rear Surround
Left Speaker
To avoid short-circuiting the speakers
• Short-circuiting of the speakers may damage the system. To
prevent this, make sure to take the following precautions when
connecting the speakers.
• Make sure the stripped end of each speaker cord does not
touch another speaker terminal or the stripped end of another
speaker cord.
Examples of poor conditions of the speaker cord
• Stripped speaker cord is touching another speaker terminal.
++
Front Left Speaker
+
• Stripped cords are touching each other due to excessive re-
moval of insulation.
Note
• Be sure to match the speaker cord to the appropriate terminal
on the components: + to + and - to -. If the cords are reversed,
the sound will be distorted and will lack of bass.
• If you use front speakers with low maximum input rating, adjust
the volume carefully to avoid excessive output on the speakers.
15
Page 16

Antenna HookupsAntenna Hookups
Antenna Hookups
Antenna HookupsAntenna Hookups
Connect the supplied AM / FM antennas for listening to the radio.
• Connect the AM loop antenna to the AM terminals.
• Connect the FM pigtail antenna to the FM 75-ohm coaxial terminal.
AUDIO
IN
L
R
AUX IN
AUDIO
OUT
FL CFR SLSR
(8 )
Note
• To prevent noise pickup, keep the AM loop antenna away from
the system and other components.
• Be sure to fully extend the FM pigtail antenna.
• After connecting the FM pigtail antenna, keep it as horizontal as
possible.
Skill of connecting speaker wires
Push and hold Speaker terminal tab down to insert wire. Release tab to lock wire in terminal. Make sure the insulation is
completely removed from the ends of speaker wires at all
connection points.
If you have poor FM reception
Use a 75-ohm coaxial cable (not supplied) to connect the system to an outdoor FM antenna as shown below.
Note
• If you connect the system to an outdoor antenna, ground it
against lightning.
• To prevent a gas explosion, do not connect the ground wire to a
gas pipe.
16
Page 17

TV and Optional Compo-TV and Optional Compo-
TV and Optional Compo-
TV and Optional Compo-TV and Optional Component Hookupsnent Hookups
nent Hookups
nent Hookupsnent Hookups
Connecting the Connecting the
Connecting the
Connecting the Connecting the
CorCor
Cor
CorCor
dd
d
dd
AA
A
AA
C PC P
C P
C PC P
oo
o
oo
ww
w
ww
erer
er
erer
English
Required cords
• Video cord for connecting a TV set (supplied).
Yellow Yellow
• Audio cords (supplied).
When connecting a cord, be sure to match the color-coded
pins to the appropriate jacks on the components.
Red
White White
Note
• When using the S-VIDEO OUT jack instead of the VIDEO
OUT jack for better picture clarity.
Your TV monitor must also be connected via an S-VIDEO INPUT jack. S-Video signals are on a separate bus from the video
signals and will not be output through the video jacks.
• When using the SCART OUT connector instead of the
VIDEO OUT jack.
Your TV monitor must also be connected via an Scart socket.
The Scart terminal contains separate video signals and stereo
audio signals.
• You can connect the OPTICAL or COAXIAL output to an-
other amplifier with DTS, Dolby Digital decoder.
Red
Note
• Power Requirements: AC 230 V, 50Hz.
• The power that differs from above value will damage the sys-
tem or cause the system to work abnormally.
Before connecting the AC power cord (main lead) of this system
to a wall outlet, connect the speakers to the system.
Connect the AC power cord of the active subwoofer.
Connect the AC power cords (main leads) of your TV, optional
components to a wall outlet.
AM
R
AUDIO
IN
L
AUX IN
AUDIO
OUT
FL CFR SLSR
(8 )
17
Page 18

Basic FunctionalBasic Functional
Basic Functional
Basic FunctionalBasic Functional
Basic PlayBasic Play
Basic Play
Basic PlayBasic Play
This chapter describes how to play a DVD / CVD / SVCD
/ VCD / CD / MP3 disc.
Depending on the DVD or Video CD discs, some operations may
be different or restricted. Refer to the instructions supplied with
your disc.
PLAY/PAUSE
IR
POWER
OPERATE
PLAY/PAUSE
OPEN/CLOSE SOURCE-TUNING+
POWER
STANDBY
DVD
TUNING-
STANDBY
DVD
TUNER
2
AUX
5
ENT
8
SLEEPREPEATA-B
0
PROG
N/P
MENU/PBC
OPEN/CLOSE
SLOW/MEMORY
OPEN/CLOSE
TUNING+
SETUPTITLE
STOP
PLAY/PAUSE
ZoomEQLanguage
Sub Title
ADJ/VOL
AUDIO
ANGLE
SELECT
Go To
Return DISPLAY
LISTENING
MUTE
1 Turn on the TV and select the video input so that you can view
the pictures from this system.
2 Press the OPERATE button on the front panel to turn on the
main power of this system. The front panel display lights up,
and the startup screen appears on TV screen.
3 If the system is not in the DVD player mode, press the DVD
button on the remote control to enter DVD player mode directly,
or press the SOURCE button on the front panel to select it.
4 Press the (OPEN/CLOSE) button, and place a disc on the
disc tray. Press
The player begin to loading disc. The operating message will
appear on the TV screen or/and on the front panel display, e.
g. as the following list:
On TV screen
DISC LOADING
OPEN
CLOSE
PLAY
NO DISC
BAD DISC
WRONG REGION (See page 8)
PARENTAL VIOLATION (See page 34)
again to close the tray.
On front panel display
WAITING
LOADING
OPEN
CLOSE
PLAY
NO DISC
BAD DISC
DVD/CVD/SVCD/VCD/CD/MP3
18
18
Page 19

Basic PlayBasic Play
Basic Play
Basic PlayBasic Play
LocaLoca
Loca
LocaLoca
te a Pte a P
te a P
te a Pte a P
oint Quicoint Quic
oint Quic
oint Quicoint Quic
klkl
kl
klkl
yy
y
yy
English
After following Step 4
• When playing a DVD
The menu screen may appear on the TV screen.
• When playing a CVD, SCVD, VCD or CD
The menu screen may appear on the TV screen depending on
the disc. You can play the disc interactively, following the instructions on the menu sceen. (About PBC playback, see page
21.)
• When playing a MP3
Begin to play the disc from the first track.
Note
• When DVD player is loading disc, the system may not respond
your any operations.
5 Press the /
stop mode. Press it again to pause.
(PLAY/PAUSE) button to begin playback in
6 Press the (STOP) button to stop playback.
In program playback status, press
playback, press it again to clear the memory of program. See
page 23.
Note
• If you leave the system in pause or stop mode for 1 minutes,
the screen saver image appears automatically. To make the
screen saver image go away, press /
button one time to stop
7 When the system is on, press the STANDBY button on the
remote control to turn the system off.
In standby mode, press this button to turn on the system.
Note
When the system is on, press STANDBY button on the
remote control to standby mode. If the power shutted off or
the power cord re-plug, the system will go to power on
mode.
Slow-Motion PlaySlow-Motion Play
Slow-Motion Play
Slow-Motion PlaySlow-Motion Play
Press the or remote control button while playing a disc.
The player will search the disc fast forward or reverse. When
you find the point you want, press the
the normal speed.
Change the searching speed
You can change the searching speed by pressing the
remote control button repeatedly.
• If the playing disc is DVD or MP3, you can select the following
types of searching speed: FF2, FF4, FF6, FF8, Normal
playback.
• If the playing disc is VCD or CD, you can select the following
types of searching speed: FF1, FF2, FF3, FF4, Normal playback
Note
• This function is useless in AUX mode.
• The larger the number is, the faster the searching speed.
• For VCD and CD, when the searching goes to the end of one
track, the player will begin to play the next track at normal speed.
Skip NeSkip Ne
Skip Ne
Skip NeSkip Ne
Press the or button while playing a disc.
The playback will go to the next or previous title, chapter or
track in continuous play mode.
Note
• Using the DISPLAY button on the remote control can view the
playing message about title, chapter, track and time from the
front panel display or/and TV screen.
• If the REPEAT-ONE function has been set, pressing the or
button will replay the same chapter (or track or title) from
its beginning.
• If the REPEAT-ALL function has been set, pressing the or
button repeatedly will skip to select all the chapters (or
tracks) in a title (or disc) cyclically.
• This function is useless in AUX mode.
xt or Prxt or Pr
xt or Pr
xt or Prxt or Pr
button to return to
ee
viousvious
e
vious
ee
viousvious
or
1 Press the SLOW remote control button to play a disc in slow
motion.
2 If the playing disc is DVD, press this button repeatedly to
select the following slow-motion type: SF2
SR2 SR4 SR8 normal play cyclicity.
SF4 SF8
3 If the playing disc is CVD, SVCD or VCD, press this button
repeatedly to select the following slow-motion type: SF1
SF2 SF3 normal play cyclicity.
Note
• SF: Slow Forward.
SR: Slow Reverse.
• The larger the number is, the lower the speed.
• This function is not available for CD and MP3.
• On some discs, the slow-motion playback function is disabled.
19
Page 20

Using the MenUsing the Men
Using the Men
Using the MenUsing the Men
u fu f
or Eacor Eac
u f
or Eac
u fu f
or Eacor Eac
h Dh D
h D
h Dh D
VDVD
VD
VDVD
Using the title menu
A DVD is divided into long sections of a picture or a music piece
called “title”. Normally, a title is composed of several chapters.
When you play a DVD which contains several titles, you can
select the title (or chapter) you want using the title menu.
POWE R
STANDBY
DVD
TUNER
2
AUX
5
ENT
8
SLEEPREPEATA-B
0
N/P
PROG
MENU/PBC
OPEN/CLOSE
SLOW/MEM OR Y
SETUPTITLE
PLAY/PAU SE
Zoom
Language
Sub Title
ADJ/VOL
EQ
AUDIO
ANGLE
SELECT
Go To
Return DISPLAY
MUTE
LISTENING
1 Press the TITLE button while playing a DVD disc.
The “TITLE MENU” will be shown on TV screen for a moment,
and then the title menu appears. The contents of the menu
vary from disc to disc.
Using the DVD menu
Some DVDs allow you to select the disc contents using the menu.
When you play these DVDs, you can select the language for the
subtitles, the language for the sound, etc., using the DVD menu.
1 Press the TITLE button while playing a DVD disc.
The DVD menu appears on the TV screen. The contents of
the menu vary from disc to disc.
2 Use the / / / buttons to select the item you want to
change.
Depending on the disc, you can use the number buttons (0~9
/ >10) to select the item.
3 To change other items, repeat Step 2.
4 Press the ENTER button.
Note
• you can set a preferred language for audio and subtitle in the
SETUP menu. For details, see page 33.
Using the root menu
A DVD may contain the root menu. Some titles or chapters are
recorded in the root menu.
2 Use the / / / buttons to select the title (or chapter) you
want to play.
Depending on the disc, you can use the number buttons (0~9
/ >10) to select the title (or chapter).
3 Press the ENTER button.
The player starts playing the selected title (or chapter).
Note
• Depending on the DVD disc, you may not be able to select the
title or chapter.
• Depending on the DVD disc, a “title menu” may simply be called
a “menu” or “title” in the instructions supplied with the disc.
• For some DVD disc, when you press the TITLE button, the
playback will restart from the beginning of the disc.
1 Press the RETURN button while playing a DVD disc.
The “ROOT MENU” will be shown on TV screen for a moment,
and then the root menu appears. The contents of the menu
vary from disc to disc.
2 Use the / / / buttons to select the title (or chapter) you
want to play.
Depending on the disc, you can use the number buttons (0~9
/ +10) to select the title (or chapter).
3 Press the ENTER button.
The player starts playing the selected title (or chapter).
Note
• Depending on the DVD disc, you may not be able to enter
the root menu.
• For some DVD disc, when you press the RETURN button, the
playback will restart from the beginning of the disc.
20
Page 21

Playing Video CDs withPlaying Video CDs with
Playing Video CDs with
Playing Video CDs withPlaying Video CDs with
PBCPBC
PBC
PBCPBC
When the DVD player has just read a CVD, SVCD or VCD2.0,
the system will set the PBC function to OFF automatically and
play the disc without showing PBC menu.
PBC playback allows you to play Video CDs interactively, following the menu on the TV screen.
POWE R
STANDBY
DVD
TUNER
2
AUX
5
ENT
8
SLEEPREPEATA-B
0
N/P
PROG
MENU/PBC
OPEN/CLOSE
SLOW/MEM OR Y
SETUPTITLE
PLAY/PAU SE
Zoom
Language
Sub Title
ADJ/VOL
EQ
AUDIO
ANGLE
SELECT
Go To
Return DISPLAY
MUTE
LISTENING
English
To go back to the menu screen
Press the RETURN button when playing a disc with PBC. The
“GO BACK TO MAIN PAGE” is shown on the TV screen, and
then the menu appears.
Note
• If the PBC function of this system is set to off, pressing the
RETURN button is useless.
To cancel PBC playback function and play a Video CD with
PBC functions in Continuous Play mode.
• Press the MENU/PBC button. “PBC OFF” will appear on the
TV screen. If a disc is playing, the playback will stop.
• Press the button to start (or restart) playing the disc in
Continuous Play mode.
1 Press MENU/PBC button to set PBC function is on.
2 Start playing a Video CD with PBC functions, the system will
enter PBC playback automatically. The menu appears on the
TV screen.
3 Use the / / / buttons to select the item you want.
For some discs, you can only select the items using the number buttons.
4 Press the ENTER button to execute your selection.
5 Follow the instructions on the menu screen for interactive
operations.
Refer to the instructions supplied with the disc, as the operating procedure may differ according to the Video CD.
Note
• While playing a disc with PBC functions, the number (0~9 /
>10) buttons are useless.
• Use MENU/PBC to switch MP3 menu ON or OFF.
• If playing MP3 disc with MENU/PBC, use / to select the
song or JPEG picture you want.
21
Page 22

RR
R
RR
ee
peapea
e
pea
ee
peapea
t Plat Pla
t Pla
t Plat Pla
yy
y
yy
A-B RA-B R
A-B R
A-B RA-B R
ee
peapea
e
pea
ee
peapea
t Plat Pla
t Pla
t Plat Pla
yy
y
yy
You can play all of chapters in a title or on a disc repeatedly.
You can play all of tracks on a disc repeatedly.
You can play a single title, chapter or track repeatedly.
In program play mode, the system repeats the chapters or tracks
in the programmed order.
POWE R
STANDBY
DVD
TUNER
2
AUX
5
ENT
8
SLEEPREPEATA-B
0
N/P
PROG
MENU/PBC
OPEN/CLOSE
SLOW/MEM OR Y
SETUPTITLE
PLAY/PAU SE
Zoom
Language
Sub Title
ADJ/VOL
EQ
AUDIO
ANGLE
SELECT
Go To
Return DISPLAY
MUTE
LISTENING
1 Press the REPEAT button while playing a disc.
2 If the playing disc is DVD, press REPEAT repeatedly to se-
lect the following repeat type cyclically: Chapter Repeat On
Title Repeat On Repeat Off.
You can play a specific portion in a chapter or track repeatedly.
This is useful when you want to memorize lyrics.
1 When playing a disc, press the A-B button one time to set the
starting point “A” of the specific portion you want to play
repeatedly.
The “[A-]” indicator appears on the front panel display.
2 When reaching the end point “B” you want, press the A-B
button a second time.
The “[A-B]” indicator appears on the front panel display.
The player starts to play the specific portion from point “A”,
and will continue playing this portion repeatedly unless you
cancel the A-B repeat function.
3 Press the A-B button again to cancel this setting and resume
playback in normal order.
Note
• The point “A” and “B” can be set only in the same chapter or
track.
• You can set A-B repeat on only one specific portion.
• A-B repeat is canceled when:
- you stop playback.
- you open the disc tray.
- you turn the power off.
• You may not be able to set A-B repeat, depending on the scene
of the DVD or the Video CD disc.
3 If the playing disc is CVD, SVCD, VCD, CD or MP3, press
REPEAT repeatedly to select the following repeat type
cyclically: Repeat One Track
peat Off.
The front panel display will show the following message:
• [R-1]: means Chapter Repeat On or Repeat One Track.
• [R-A]: means Title Repeat On or Repeat All Tracks.
Note
• You can not set repeat play during stop.
• The repeat function for CVD, SVCD and VCD2.0 are useless,
unless the PBC function set to OFF.
• This button is useless in Tuner and AUX mode.
Repeat All Tracks Re-
22
Page 23

Program PlayProgram Play
Program Play
Program PlayProgram Play
English
You can play the contents of the disc in the order you want by
arranging the order of the tracks on the disc and create your own
program. One program can be restored in the system and contain up to 99 tracks.
Note
• This function is not available for DVD and MP3 disc.
PLAY/PAUSE
IR
STOP
POWER
STAND BY
DVD
TUNER
2
AUX
5
ENT
8
SLEEPREPEATA-B
0
PROG
PROGRAM
PLAY/PAUSE
N/P
OPEN/CLOSE
MENU/PBC
SLOW/MEMORY
STOP
SETUPTITL E
PLAY/PAUS E
ZoomEQLanguage
Sub Title
ADJ/VOL
AUDIO
ANGLE
SELECT
Go To
Return DISPLAY
LISTENING
MUTE
Note
• If you press the button or other foreign buttons in the program
registration mode, the system will interrupt and exit the program setting.
4 In program play mode, press the button to stop program
play, but the program remains.
Note
• The program remains even after the program play ends. When
you press
, you can play the same program again.
• You can do repeat play of the programmed tracks.
During program play, press the REPEAT button.
5 To cancel program play, press the button a second time.
The “Program” indicator on the front panel display will
disappear.
Note
• The program is cancelled when:
- you open the disc tray.
- you turn the power off.
1 In stop mode, press the PROGRAM button to enter program
registration mode.
The programming display appears on the TV screen and the
front panel display.
Program play indicator lights
up on the front panel display
Programmed
numbers
Track
numbers
2 Use the number buttons (0~9 / +10) to key in the track num-
bers in the order you want. If the track number is more than
10, use +10 button.
If the programmed numbers have reached the maximum limit
(P99:--) and you key in track number again, the “FULL” indicator will appear on the TV screen and the front panel display.
3 If you have completed the above program registration as you
desire, press the
button to start the program play.
EQ Play
Press EQ button repeatedly to cyclicity select the preset equalizer mode: POP
......
Note
• When one equalizer mode is selected, the relevent item will
display VFD about 5 seconds, then disappear and system will
return to previous status.
ROCK JAZZ CLASSIC POP
23
Page 24

Selecting a StarSelecting a Star
Selecting a Star
Selecting a StarSelecting a Star
t Pt P
oint Using the oint Using the
t P
oint Using the
t Pt P
oint Using the oint Using the
Time CodeTime Code
Time Code
Time CodeTime Code
You can search by input the time code.
The time code corresponds to the approximate actual playing
time. For example, to search for a scene 2 hours 30 minutes 20
seconds past the beginning, key in 02:30:20.
Note
• This function is not available for CD and MP3.
POWE R
STANDBY
DVD
TUNER
2
AUX
5
ENT
8
SLEEPREPEATA- B
0
N/P
PROG
MENU/PBC
OPEN/CLOSE
SLOW/MEM ORY
SETUPTITLE
PLAY/PAUSE
Zoom
Language
Sub Tit l e
ADJ/VOL
EQ
AUDIO
ANGLE
SELECT
Go To
Return DISPLAY
MUTE
LISTENING
If the playing disc is DVD
1 Press the GOTO button, the following menu appears on the
TV screen.
Note
• If the title number, chapter number or time code you input is not
exist in the disc, the system will not execute your selection
and the selecting menu will exit.
• The selecting menu will time out for a few seconds if you do not
input valid number.
• For some DVDs, this function is ineffective.
If the playing disc is CVD, SVCD or VCD
1
Press the GOTO button.
The time menu appears on the TV screen.
GOTO: - - : - -
2 Use the number buttons (0~9 / >10) to input the time code
you want.
For example, key in 0, 1, 2, 3.
GOTO: 01 : 23
When the last digit is input and the time code is valid, the
system will begin to play (from the point of 01:23).
3 Follow Step 1, press the GOTO button again to exit.
TITLE 02 / 05 CHAPTER 001 / 006
2 Use the or button to select title number or chapter
number.
TITLE 02 / 05 CHAPTER 001 / 006
TITLE 02 / 05 CHAPTER 001 / 006
Use the number buttons (0~9 / >10) to input the title or chap-
ter number you want.
3 Press ENTER to play your selection.
4 Follow Step 1, press the GOTO button again to enter time
menu shown as below.
TITLE 02 / 05 TIME - - : - - : - -
5 Use the number buttons (0~9 / >10) to input the time code
you want.
For example, key in 0, 1, 2, 3, 4, 5.
TITLE 02 / 05 TIME 01 : 23 : 45
Selecting a Selecting a
Selecting a
Selecting a Selecting a
Number ButtonsNumber Buttons
Number Buttons
Number ButtonsNumber Buttons
You can select a track directly using the number (0~9 / >10)
buttons.
TT
T
TT
rr
r
rr
acac
k Usingk Using
ac
k Using
acac
k Usingk Using
• In AUX mode, this button is useless.
• In Tuner mode, use this button to enter station number directly.
• In DVD mode, use this button to enter tilte, chapter or track
number to select it directly, or key in password to unlock the
parental control function in setup menu.
Note
• If the PBC function is set to on, you cannot select the track on
the CVD, SVCD or VCD2.0 using number buttons directly. About
PBC, see page 21.
6 Press ENTER to start playing (from the point of 01:23:45).
7 Follow Step 4, press the GOTO button again to exit.
24
Page 25

ChecChec
Chec
ChecChec
king Infking Inf
king Inf
king Infking Inf
oror
or
oror
mama
tion Using Displation Using Displa
ma
tion Using Displa
mama
tion Using Displation Using Displa
yy
y
yy
English
You can check information about the disc, such as the total number of the titles or chapters or tracks or time, using the Display
function. The information you want appears on the TV screen or/
and on the front panel display.
When playing back a DVD
Press the DISPLAY button at remote control once, the infor-
1
mation about title number, chapter number and title elapsed
time appears on the TV screen as shown as below.
TITLE 01 / 03 CHAPTER 05 / 19
00 : 21 : 01
The display for title and chapter will disappear after a few seconds.
2 Press the DISPLAY button a second time to check the title
remaining time.
TITLE REMAIN
00 : 43 : 21
3 Press the DISPLAY button the third time to view the chapter
elapsed time.
3 Press the DISPLAY button the third time to view the total
elapsed time on the TV screen.
TOTAL ELAPSED
00 : 22 : 33
4 Press the DISPLAY button the fourth time to view the total
remaining time on the TV screen.
TOTAL REMAIN
00 : 33 : 22
5 Press the DISPLAY button the fifth time, the information dis-
play function is off.
OFF
00 : 33 : 25
Note
• For CD, the information about track and time appears sim-
ply on the front panel display, shown as below.
CHAPTER ELAPSED
00 : 03 : 01
4 Press the DISPLAY button the fourth time to view the chapter
remaining time
CHAPTER REMAIN
00 : 01 : 23
5 Press the DISPLAY button the fifth time, the information dis-
play function is off.
Note
• The above information will be displayed on VFD too.
• When stop the playback, the DISPLAY function will be set to
OFF automatically.
When playing back a CVD, AVCD,VCD or CD
1 Press the DISPLAY button once to view the single elapsed
time on the TV screen.
SINGLE ELAPSED
00 : 02 : 01
2 Press the DISPLAY button a second time to view the single
remaining time on the TV screen.
• When stop the playback, the DISPLAY function will be set to
OFF automatically.
When playing back a MP3
1 Press the DISPLAY button repeatedly to view the Chapter
elapsed
Chapter remain cyclically.
2 When the DISPLAY is set to ON, the information about the
track and elapsed time will shown on OSD.
Press DISPLAY
CHAPTER ELASPED
Press DISPLAY
CHAPTER REMAIN
Note
• When stop the playback, the DISPLAY function will be set to
OFF automatically.
SINGLE REMAIN
00 : 01 : 02
25
Page 26

Settings &Settings &
Settings &
Settings &Settings &
AdjustmentsAdjustments
Adjustments
AdjustmentsAdjustments
This chapter describes how to set and how to adjust using the SETUP menu. Most settings and adjustments are
required to be set when you first use the system.
Using the SETUP MenuUsing the SETUP Menu
Using the SETUP Menu
Using the SETUP MenuUsing the SETUP Menu
Using the SETUP menu, you can do the initial setup, adjusting
the picture, etc. you can also set a language for the subtitles and
the OSD, limit playback by children, etc.
Note
• All settings in the SETUP menu are useless for Tuner and AUX.
OTHERS
When power is ON, press to enter setup menu of this unit. Using
///
option(s).
When the unit is playing, the preferred items will be selected and
executed preferential.
• When a disc is playing, entering the setup menu will reset the
• After exiting the setup menu, the system will go back to its
• As a shortcut, pressing the SETUP again will complete and
• Use
and ENTER to select and preset a (or some) preferred
playback and all of audio output will be shut off.
previous status and resume playing according to the new
setting.
exit the setup expediently. Or use
menu to super-menu.
/
to turn over the page.
screen cursor to quite
FUNCTION DEFINITION
Press SETUP button to enter SETUP menu.
1.
Select the main setup you want using
ENTER button.
SETUP MENU--MAIN PAGE
/
and then press
26
26
Page 27

FUNCTION DEFINITION
2. Select the main item you want by using / .
Press
Select the setting item by using
confirm your selection.
button to go to the right option list.
/ , then press ENTER to
English
3. Use / / / and ENTER to select and set other items.
4. Use 0~9 buttons to key in numbers, such as the password
for parental control.
5. Select Main Page and press ENTER to go back to the main
page of setup menu .
6. Press the icon as below to exit SETUP menu entirely.
SETUP MENU--MAIN PAGE
27
Page 28

SETUP Menu Item ListSETUP Menu Item List
SETUP Menu Item List
SETUP Menu Item ListSETUP Menu Item List
The default settings are underlined.
SETUP MENU - - MAIN PAGE
GENERAL SETUP
SPEAKER SETUP
AUDIO SETUP
PREFERENCE SETUP
EXIT SETUP
GENERAL PAGE
-TV DISPLAY
...
PAN SCAN
...LETTER BOX
...WIDE 16:9
-TV TYPE
...
AUTO
...NTSC
...PAL
-VIDEO OUT
...
S-VIDEO
...RGB
-ANGLE MARK
...
ON
...OFF
-OSD LANGUAGE
...
ENGLISH
...FRENCH
...ITALIAN
...GERMAN
...SPANISH
-SCREEN SAVER
...ON
...
OFF
SPEAKER SETUP PAGE
-CENTER DELAY
...5MS
...
...3MS
...
...1MS
...
OFF
-REAR DELAY
...15MS
...
...9MS
...
...3MS
...
OFF
-TEST TONE
...OFF
...ON
AUDIO SETUP
-DIGITAL OUT
...SPDIF/RAW
...SPDIF/PCM
...OFF
-DYNAMIC
...FULL
...7/8
...
...5/8
...
...3/8
...
...1/8
...
OFF
PREFERENCE SETUP PAGE
-AUDIO
ENGLISH
...
...FRENCH
...ITALIAN
...GERMAN
...SPANISH
-SUBTITLE
...
ENGLISH
...FRENCH
...ITALIAN
...GERMAN
...SPANISH
...OFF
-DISC MENU
...
ENGLISH
...FRENCH
...ITALIAN
...GERMAN
...SPANISH
-PARENTAL
...1 G
...3 PG
...4 PG 13
...6 PG - R
...7 NC - 17
...
8 ADULT
...NO_PARENTAL
-PASSWORD
...CHANGE
-DEFAULTS
...RESET
-MAIN PAGE
28
-MAIN PAGE
-MAIN PAGE
Page 29

GENERAL SETUPGENERAL SETUP
GENERAL SETUP
GENERAL SETUPGENERAL SETUP
English
TV DISPLATV DISPLA
TV DISPLA
TV DISPLATV DISPLA
Path: Main Page General Page TV DISPLAY
Y SettingY Setting
Y Setting
Y SettingY Setting
Select the aspect ratio of the TV set connected.
The default setting is underlined.
• PAN SCAN: When a normal TV is connected. Display a wide
picture on the whole screen with a portion (right and left sides)
automatically cut off.
• LETTER BOX: When a normal TV is connected. Display a
wide picture with black bands appearing at the top and bottom
of the screen.
• WIDE 16:9:Select to play wide-screen video on a wide-screen
TV.
PAN SCAN
TV TYPE SettingTV TYPE Setting
TV TYPE Setting
TV TYPE SettingTV TYPE Setting
Path: Main Page General Page TV TYPE
Select the correct color TV system.
The default setting is underlined.
• AUTO: Select the output of the video signal either PAL or NTSC
in multi system.
• NTSC: Change the video signal of a PAL in NTSC system.
• PAL: Change the video signal of a NTSC in PAL system.
VIDEO OUT SettingVIDEO OUT Setting
VIDEO OUT Setting
VIDEO OUT SettingVIDEO OUT Setting
LETTER BOX
WIDE 16:9
Note
• Some wide-screen discs that do not permit Pan & Scan
mode playback are automatically played in Letterbox mode.
• You must set the screen mode on your wide-screen TV to
“FULL”.
• If WIDE is selected and a normal TV is connected, 16:9
content will appear distorted during playback (objects look
thin).
Path: Main Page General Page VIDEO OUTPUT
Select the video output terminals.
The default setting is underlined.
• S-VIDEO: Composite video output and S-video output are
available.
• RGB: Color separate signal output are available.
29
Page 30

ANGLE MARK SettingANGLE MARK Setting
ANGLE MARK Setting
ANGLE MARK SettingANGLE MARK Setting
SCREEN SASCREEN SA
SCREEN SA
SCREEN SASCREEN SA
VER SettingVER Setting
VER Setting
VER SettingVER Setting
Path: Main Page General Page ANGLE MARK
Selects the angle mark : whether appears on the TV screen
or not when a multi-angles scene is being played.
The default setting is ON.
• ON:
• OFF:
Angle mark is on Angle mark is off
Note
• You can change the angles using the ANGLE button. For the
:
appears on the TV screen.
:
does not appear.
details, see page 36.
Path: Main Page General Page SCREEN SAVER
Turn the screen saver ON or OFF.
The default setting setting is OFF.
If you turn on the screen saver, the screen saver image appears
when you leave the system in pause or stop mode for 5
minutes. The screen saver is useful to prevent your display
from becoming damaged.
• ON: Turns on the screen saver.
• OFF: Turns off the screen saver.
OSD LANGUOSD LANGU
OSD LANGU
OSD LANGUOSD LANGU
Path: Main Page General Page OSD LANGUAGE
AA
GE SettingGE Setting
A
GE Setting
AA
GE SettingGE Setting
ITALIAN
Switch the language for the On-Screen Display (OSD).
The default setting is underlined.
• English
• French
• Italian
• German
• Spanish
Note
• The combination language are for options to select a preferred
language.
• Automatically display menu consistent with the dics
guage setting.
’
s initial lan-
30
Page 31

SPEAKER SETUPSPEAKER SETUP
SPEAKER SETUP
SPEAKER SETUPSPEAKER SETUP
English
CENTER DELACENTER DELA
CENTER DELA
CENTER DELACENTER DELA
Path: Main Page Speaker Setup Page CENTER DELAY
CENTER DELAY SET TO 1MS
Select the center delay time from off, 1ms, 3ms, or 5ms. If the
listening position is closer to the center speaker than the front
speaker, you can set the center delay time to impove the sound
field effect. It
speaker settings, as Best Position Setting.
REAR DELAREAR DELA
REAR DELA
REAR DELAREAR DELA
Path: Main Page Speaker Setup Page REAR DELAY
’
s advisable to set this item together with other
Y SettingY Setting
Y Setting
Y SettingY Setting
Y SettingY Setting
Y Setting
Y SettingY Setting
Best PBest P
Best P
Best PBest P
PP
ositionosition
P
osition
PP
ositionosition
For the best possible surround sound all the speakers other than
the subwoofer should be the same distance from the listening
position.
However, this system allows you to place the center speaker up
to 1.6 meters closer (
closer ( C ) to the listening position.
The front speakers can be placed from 1.0 to 15.0 meters
) from the listening position.
(
A
• You can place the subwoofer at any position. If possible, place
the subwoofer near a corner to maximize the bass response.
• You can place the rear speakers either behind you or to the
side, depending on the shape of your room, etc.
When the rear speakers are placed to the side:
osition Settingosition Setting
osition Setting
osition Settingosition Setting
) and the rear speakers up to 4.6 meters
B
B
A A
o
45
REAR DELAY SET TO 9MS
Select the rear delay time from off, 3ms, 6ms, 9ms or 12ms. If
the listening position is closer to the rear speaker than the
front speaker, you can set the rear delay time to improve the
sound field effect. It s advisable to set this item together with
other speaker settings, as Best Position Setting.
TEST TEST
TEST
TEST TEST
Path: Main Page Speaker Page TEST TONE
TT
ONE SettingONE Setting
T
ONE Setting
TT
ONE SettingONE Setting
OFF
ON
C
o
90
o
20
When the rear speakers are placed behind you:
B
AA
o
45
C
o
90
C
C
Select ON or OFF to test the SPEAKER cyclicity.
Note
• If no disc, the test tone function can also test the speaker
cyclicity.
20
o
31
Page 32

Best PBest P
Best P
Best PBest P
Note
• Do not place the center and rear speakers far away from the
listening position than the front speakers.
• Avoid positioning the speakers in corners, as this will boost the
bass tones too much.
• Placing the speaker behind curtains, furniture etc. will reduce
the treble response, thus reducing the stereo effect
considerably. The listener should still be able to see the
speaker.
• Each room has different acoustic characteristics and position-
ing possibilities are often limited. You can find the best position
for your speakers by experimenting. In general, the speakers
should be arranged as symmetrically as possible.
HeightHeight
Height
HeightHeight
• The best height for front and center speaker is at the height of
your ears (while seated).
• The height of the rear speakers is not less than the height of
your ears (while seated).
See the following diagram. It’s advisable to place the rear
speakers in the
C
osition Settingosition Setting
osition Setting
osition Settingosition Setting
area. However you can place them in the
D
area, too.
TT
o specify the balance ofo specify the balance of
T
o specify the balance of
TT
o specify the balance ofo specify the balance of
ersers
ers
ersers
You can use the Test Tone function to check whether all the speakers are connected correctly, and to specify the balance of the
speakers.
the speak- the speak-
the speak-
the speak- the speak-
1. Press the ‘on’ in Speaker Setup page.
You will hear the test tone from Front-left speaker, Center
speaker, Front-right speaker, Surround-right speaker and
Surround-left speaker in sequence.
2. Sit at your listening position, use the VOLUME - or + buttons
to adjust the level of each speaker.
Adjust the volume level so that the volume of the test tone
from each speaker sounds the same.
The adjusted value will appear on the front panel display and
TV screen. If you do not operate the remote for a few seconds,
the value turns off and is stored in the system.
3. Press ‘OFF’ to turn off the test tone.
Note
• The playback will pause during test tone.
• The test tone only tests the valid speakers, depending the cur-
rent listening mode.
TT
o specify the leo specify the le
T
o specify the le
TT
o specify the leo specify the le
ersers
ers
ersers
You can vary the level of each speaker as follows. At the same
time, you can adjust the Treble of the front speakers.
vv
el ofel of
v
el of
vv
el ofel of
the speak- the speak-
the speak-
the speak- the speak-
1.Press the SELECT button to select a channel. The level of
C
D
60
C
o
D
o
30
the channel will appear on the front panel display and TV
screen.
TRE (Treble level) adjustable range: -10 dB to +10 dB, 2 dB/
step.
FL (Front-left level), CNT (Center level), FR (Front-right level),
SR (Surround-right level), SL (Surround-left level) and SUB
(Subwoofer level) adjustable range: -15 dB to +10 dB, 1
dB/step.
2. Use the VOLUME - and VOLUME + buttons to adjust the
selected channel’s level.
3. If you do not press the SELECT or VOLUME - / + buttons for
a few seconds, the values turns off and is stored in the system.
Note
• The optional items vary with the changing of listening mode.
To adjust the volume of all the speakers (Master Volume)
at one time
Use the VOLUME - and VOLUME + buttons in normal mode.
32
TT
o shut ofo shut of
T
o shut of
TT
o shut ofo shut of
Press the MUTE button. Shut off all of speakers' output.
Press it a second time to release muting and resume the
normal output.
ff
all of all of
f
all of
ff
all of all of
speak speak
speak
speak speak
erer
er
erer
s’s’
s’
s’s’
output output
output
output output
Page 33

AA
UDIO SETUPUDIO SETUP
A
UDIO SETUP
AA
UDIO SETUPUDIO SETUP
DIGITDIGIT
DIGIT
DIGITDIGIT
Path: Main Page Audio Setup Page DIGITAL OUT
Select the audio output format.
The default setting is underlined.
• SPDIF/RAW: The COAXIAL or OPTICAL output accept Dolby
Digital, MPEG or DTS SPDIF signal.
• SPDIF/PCM:The COAXIAL or OPTICAL output accept PCM
signal.
• OFF:The COAXIAL or OPTICAL output not signal but ANA-
LOG output has signal.
Note
• IF your speaker system does not match your DIGITAL OUT-
PUT setting, you will not be able to enjoy the true original
sound.
AL OUT SettingAL OUT Setting
AL OUT Setting
AL OUT SettingAL OUT Setting
DIGITAL OUT
PREFERENCE SETUPPREFERENCE SETUP
PREFERENCE SETUP
PREFERENCE SETUPPREFERENCE SETUP
Note
• You cannot enter the Preferences Page during playback.
You must stop playback before setting.
AA
UDIO SettingUDIO Setting
A
UDIO Setting
AA
UDIO SettingUDIO Setting
Path: Main Page Preference Setup Page AUDIO
FRENCH
ITALIAN
GERMAN
Select the preferred language for audio (dialog).
The default setting is ENGLISH.
Note
• When you select a preferred language that is not recorded on
the DVD, one of the recorded languages is automatically
selected.
• You can select any recorded language for audio by pressing
LANGUAGE button when playing a DVD disc
English
DD
YNYN
D
DD
Path: Main Page Audio Setup Page DYNAMIC
Select the dynamic range compression to fit the individual
listening situation of the audience.
The variable range is from FULL, 7/8~1/8 or OFF.
The default setting is OFF.
• FULL: Audio with fully compressed dynamic range.
• 7/8~1/8: Audio with partially compressed dynamic range.
•OFF: Audio with uncompressed dynamic range.
Note
• In many listening situations, it is objectionable to allow the
AMIC SettingAMIC Setting
YN
AMIC Setting
YNYN
AMIC SettingAMIC Setting
DIGITAL OUT
sound to become very loud, and thus the loudest sounds
must be compressed downwards in level. Likewise, the
very quiet sounds would be inaudible and must be brought
upwards in level to be heard. Dolby Digital satisfies these
needs through the dynamic range controlling.
SUBTITLE SettingSUBTITLE Setting
SUBTITLE Setting
SUBTITLE SettingSUBTITLE Setting
Path: Main Page Preference Setup Page SUBTITLE
FRENCH
ITALIAN
GERMAN
Select the preferred language for subtitle.
The default setting is ENGLISH.
Note
• When you select a preferred language that is not recorded on
the DVD, one of the recorded languages is automatically
selected.
• You can select any recorded language for audio by pressing
SUBTITLE button when playing a DVD disc
33
Page 34

DISC MENU SettingDISC MENU Setting
DISC MENU Setting
DISC MENU SettingDISC MENU Setting
PP
ASSWASSW
P
ASSW
PP
ASSWASSW
ORD SettingORD Setting
ORD Setting
ORD SettingORD Setting
Path: Main Page Preference Setup Page DISC MENU
FRENCH
ITALIAN
GERMAN
Select the preferred language for disc menu.
The default setting is ENGLISH.
Note
• When you select a preferred language that is not recorded on
the DVD, one of the recorded languages is automatically
selected.
PP
ARENTARENT
P
ARENT
PP
ARENTARENT
Path: Main Page Preference Setup Page PARENTAL
AL SettingAL Setting
AL Setting
AL SettingAL Setting
Path: Main Page Preference Setup Page PASSWORD
Depending on your personal like, you can set a new password
for the parental control to replace the old one.
The default password is “3308”.
Note
• This password is used to unlock the resetting function of pa-
rental control.
• The new password must be easy to memorise for you.
Don’t lose it!
DEFDEF
DEF
DEFDEF
AA
A
AA
ULUL
TS SettingTS Setting
UL
TS Setting
ULUL
TS SettingTS Setting
Playing some DVD discs can be limited depending on the age of
the users. The parental control function in this system allows
playback limitation level to be set by the parent. The default setting is “PG”.
Note
• The lower the level is set, the stricter the limitation is offerred.
• If the parental control level of the loading DVD disc is higher
than the setting level, the “PARENTAL VIOLATION” message
will be shown on the TV screen, and the system will refuse to
play the disc.
• To change the parental control level, a correct password is
needed to key in.
• To avoid locking forever, you must memory the password!
• A universal password is supplied as default, that is “3308”.
Path: Main Page Preference Setup Page DEFAULT
Resent all of the items in the SETUP menu as defaults.
Note
When running this item, all of the personal setting in the
SETUP menu will be updated as factory default.
EXIT SETUPEXIT SETUP
EXIT SETUP
EXIT SETUPEXIT SETUP
EXIT SettingEXIT Setting
EXIT Setting
EXIT SettingEXIT Setting
Path: Main Page Exit Setup Page EXIT
SETUP MENU--MAIN PAGE
34
Select this item to exit SETUP menu entirely.
Page 35

Special FunctionsSpecial Functions
Special Functions
Special FunctionsSpecial Functions
This chapter describes how to use some special functions,
such as subtitle selection and angle selection, etc.
Picture ZoomingPicture Zooming
Picture Zooming
Picture ZoomingPicture Zooming
1 Press the ZOOM button on the remote control during normal,
slow or still (pause) playback.
POWE R
STANDBY
DVD
TUNER
2
AUX
5
ENT
8
SLEEPREPEATA- B
0
N/P
PROG
MENU/PBC
OPEN/CLOSE
SLOW/MEM OR Y
SETUPTITLE
PLAY/PAU SE
Sub Title
Zoom
Language
ADJ/VOL
ANGLE
EQ
AUDIO
SELECT
Return DISPLAY
Go To
MUTE
LISTENING
2 If you further press the ZOOM button repeatedly, the magni-
fication level increases. Two magnification levels are
supported. On each press of ZOOM, the following message
will appear on the TV screen.
English
ZOOM1.5
ZOOM2
ZOOM4
ZOOM OFF
Note
• If you press the / / / buttons, the zoom point shifts,
allowing you to pan the zoomed picture.
• Some discs may not respond to the zoom feature.
• Zooming does not work on subtitles or menu screens included
on DVDs.
• The magnification level varies depending on the TV DISPLAY
selection in the SETUP menu.
35
Page 36

Angle SelectionAngle Selection
Angle Selection
Angle SelectionAngle Selection
Some DVD discs contain scenes which have been shot simultaneously from a number of different angles. For these discs,
the same scenes can viewed from each of the different angles.
(The recorded angles differ from disc to disc.)
1 While playing a title shot from different angles, the angle mark
:
appears on the TV screen. Of course, you can turn off it
by setting, for details, see page 30.
2 Press the ANGLE button to change the scenes from one
angle to other angle(s).
3 It is useless for single-angle type.
Number changes to show the
number of recorded angles (1/4
2/4 3/4 4/4, etc.)
Note
• The maximum number stipulated by the manufacturers is 9/9.
Example: Sequence of angles shot.
Subtitle Language Selec-Subtitle Language Selec-
Subtitle Language Selec-
Subtitle Language Selec-Subtitle Language Selec-
tiontion
tion
tiontion
Note
• This function can only be used for DVD discs on which sub-
titles have been recorded in multiple languages.
While playing a DVD disc, press the SUBTITLE button repeat-
edly to select a desire language for subtitle. The subtitle is displayed in new language immediately.
Note
• The first pressing shows the current selection. Subsequent
pressing toggles to the next subtitle setting.
• Some DVDs display subtitles automatically, and cannot be
turned off even if you set the subtitle function to off.
• During some scenes, the subtitles may not appear immedi-
ately after you turn them on.
• Some DVDs allow you to make subtitle selections and turn
subtitles on or off only via the disc menu. Use
and ENTER buttons.
• The maximum number of subtitle languages stipulated by the
manufacturers is 32/32.
• You can set a preferred language for subtitle in the SETUP
menu, see page 33.
/ / /
Audio Language SelectionAudio Language Selection
Audio Language Selection
Audio Language SelectionAudio Language Selection
Note
• This function can only be used for DVD discs on which audio
has been recorded in multiple languages.
While playing a DVD disc, press the LANGUAGE button repeat-
edly to select a desire language for audio, and playback then
continues in new language.
Note
• The first pressing shows the current selection. Subsequent
pressing toggles to the next audio setting.
• Some DVDs allow you to change audio selections only via the
disc menu. Use
• The maximum number of audio languages stipulated by the
manufacturers is 8/8.
• You can set a preferred audio language, see page 33.
Depending on some VCD and DVD discs, you may be able to
change the audio format (including audio coding type, number of
channels recorded and audio language) using LANGUAGE
button. The relevant message appears on the TV display.
/ / / and ENTER buttons.
36
Page 37

Using HeadphonesUsing Headphones
Using Headphones
Using HeadphonesUsing Headphones
Note
• Before connecting, reduce the volume level.
• Avoid listening for prolonged periods of time to prevent hear-
ing damage.
IR
PHONE
POWER
STAND BY
DVD
TUNER
2
AUX
5
ENT
8
SLEEP
REPE ATA-B
0
N/P
PROG
MENU/PBC
OPEN/CLOSE
SLOW/MEMO RY
SETUPTITL E
PLAY/P AU SE
Zoom
Language
Sub Title
ADJ/VOL
EQ
AUDIO
ANGLE
Go To
DISPLAY
Return
LISTENING
SELECT
VOLUME
MUTE
English
1 Plug your headphones to the HEADPHONE jack on the front
panel of the unit.
Plug type: 3.50 mm, stereo.
If the listening mode is not set to “Stereo”, the system will
switch to stereo mode automatically when the headphones
have been plugged.
2 Adjust the volume level using the VOLUME - or + button on
the front panel or on the remote control.
Note
• The system shuts off all of speakers’ outputs when you are
using headphone.
37
Page 38

Other FunctionsOther Functions
Other Functions
Other FunctionsOther Functions
Listening to the RadioListening to the Radio
Listening to the Radio
Listening to the RadioListening to the Radio
This chapter describes how to use some functions contained in the system, i.e. how to listen to the radio, how to
listen to an external source, how to select a listening mode
and how to use the sleep timer.
Preset radio stations to the system’s memory first (see “Preset-
ting Radio Stations” on page 39).
IR
SOURCE
POWER
STAND BY
DVD
TUNER
TUNING - TUNING +
TUNER
2
AUX
5
ENT
8
SLEEPREPE ATA-B
0
N/P
PROG
OPEN/CLOSE
MENU/PBC
SLOW/MEMO RY
SETUPTITLE
PLAY/P AU SE
ZoomEQLanguage
Sub Title
ADJ/VOL
AUDIO
ANGLE
Go To
Return DISPLAY
LISTENING
SELECT
MUTE
VOLUME
1 Press the SOURCE button repeatedly until “FM” or “AM” ap-
pears on the front panel display.
You can press the TUNER button to select FM or AM directly.
The last received station is tuned in.
2 Press the PRESET + or PRESET - button repeatedly to se-
lect the preset station you want.
Each time you press the button, the system tunes in one preset station at a time.
In Tuner mode, use the number buttons (0~9 / >10) to key in
a preset number (1~40), you can select the preset station
directly.
3 Adjust the volume level by pressing the VOLUME(- or +).
This system is built in Dolby Pro Logic decoder, so you
can enjoy the live sound in Dolby Surround. How to operate,
see “Selecting Listening Modes” on page 40.
38
38
Page 39

Listening to the RadioListening to the Radio
Listening to the Radio
Listening to the RadioListening to the Radio
To turn off the radio
Press the STANDBY button.
To listen to non-preset radio stations
Use manual or automatic tuning in step 2.
For manual tuning, press TUNING (
For automatic tuning, press and hold TUNING (
or ) repeatedly.
or ) until
the frequency indicator starts to change automatically, then release the button.
To improve reception
Reorient the supplied antennas.
Presetting Radio StationsPresetting Radio Stations
Presetting Radio Stations
Presetting Radio StationsPresetting Radio Stations
1 In DVD, AUX1 or TV/AV mode, press the TUNER on the
remote control to select Tuner function directly.
2 To select between FM or AM, press the TUNER button.
You can select FM or AM band using the SOURCE button
on the front panel.
3 Press and hold the TUNING ( or ) button until the
frequency indicator starts to change automatically, then
release the button.
Scanning stops when the system tunes in a station.
English
You can preset 40 stations for FM and AM randomly. Before
tuning, make sure that you have turned down the volume to the
minimum.
IR
SOURCE
POWER
STAND BY
DVD
TUNER
TUNER- TUNER+
TUNER
2
AUX
5
ENT
8
SLEEP
REPE ATA-B
0
N/P
PROG
OPEN/CLOSE
MENU/PBC
SLOW/MEMO RY
SETUPTITL E
PLAY/P AU SE
Zoom
Language
Sub Title
ADJ/VOL
EQ
AUDIO
ANGLE
Go To
DISPLAY
Return
LISTENING
SELECT
MUTE
VOLUME
-TUNING+
4 Press MEMORY(MEMO).
A preset number “P00” and “PROGRAM” indicator appear
on the front panel display.
5 Press the PRESET (+ or -) button on the remote control to
select a preset number you want.
You can use the number buttons (0~9 / >10) on the remote
control to key in a preset number directly.
6 Press the MEMO button again to store the station.
If you do not press this button in 5 seconds or you press
any other buttons, the station will not be stored in the system.
The preset number and “Program” indicator disappear.
7 Repeat Step 2 to 6 to store other stations.
To tune in a station with a weak signal
Press the TUNING ( or ) repeatedly in Step 3 to tune in
the station manually.
39
Page 40

Listening to an ExterListening to an Exter
Listening to an Exter
Listening to an ExterListening to an Exter
SourceSource
Source
SourceSource
nalnal
nal
nalnal
If other audio component(s) are connected to this system (see
page 17), you can enjoy external source.
IR
SOURCE
POWER
STANDBY
DVD
TUNER
2
AUX
5
ENT
8
SLEEP
REPEATA-B
0
PROG
N/P
MENU/PBC
OPEN/CLOSE
SLOW/MEMORY
SETUPTITLE
PLAY/PAUSE
Zoom
Language
Sub Title
ADJ/VOL
EQ
AUDIO
ANGLE
Go To
DISPLAY
Return
LISTENING
SELECT
MUTE
VOLUME
Selecting Listening ModesSelecting Listening Modes
Selecting Listening Modes
Selecting Listening ModesSelecting Listening Modes
This system is built in Dolby Pro Logic decoder. It can transform
the stereo or PCM signal to Dolby Surround signal so that you
can enjoy a live sound.
POWER
STANDBY
DVD
TUNER
2
AUX
5
ENT
8
SLEEPREPEATA-B
0
N/P
PROG
OPEN/CLOSE
MENU/ PBC
SLOW/MEMORY
SETUPTITLE
PLAY/PAUSE
Zoom
Language
Sub Titl e
ADJ/VOL
EQ
AUDIO
ANGLE
SELECT
Go To
Return DISPLAY
MUTE
LISTENING
1 Press LISTENING repeatedly to select Stereo DD cycli-
cally if DVD disc receive Dolby Digital signal; to select Stereo
select Stereo
2.1 CH or PCM.
DTS cyclically if DVD disc with DTS 5.1; and to
ProLogic cyclically if DVD disc with AC-3
1 Press the SOURCE button repeatedly until “AUX” or “TV/AV”
appears on the front panel display.
You can press the AUX button to select the desired external
source directly.
2 Operate the unit which is connected to this system.
3 Adjust the volume level by pressing the VOLUME (- or +).
This system is built in Dolby Pro Logic decoder, so you can
enjoy the live sound in Dolby Surround. How to operate, see
“Selecting Listening Modes” on the next page.
2 In playing a VCD/ CD/ MP3 disc, press this button repeat-
edly can select the listening mode, Stereo
Logic cyclically. The corresponding message will show
OSD and VFD.
Dolby Pro
3 This button also has functioned in TUNER or AUX mode.
Press this button repeatedly can select the listening mode
cyclically: MATRIX
recall its previous status.
Stereo MATRIX. The system will
40
Note
• When select MATRIX mode, VFD will show MATRIX 5 sec-
onds and then return back to original status.
Page 41

Using the Sleep TimerUsing the Sleep Timer
Using the Sleep Timer
Using the Sleep TimerUsing the Sleep Timer
English
You can set the system to turn off automatically at a specified
time.
POWE R
STANDBY
DVD
TUNER
2
AUX
5
ENT
8
SLEEPREPEATA-B
0
N/P
PROG
MENU/PBC
OPEN/CLOSE
SLOW/MEM OR Y
SETUPTITLE
PLAY/PAU SE
Zoom
Language
Sub Title
ADJ/VOL
EQ
AUDIO
ANGLE
SELECT
Go To
Return DISPLAY
MUTE
LISTENING
1 Press the SLEEP button while the power is on.
Each time you press SLEEP, the time changes as shown
below.
4 You can reset the time using SLEEP.
5 The system will enter Standby mode once the Sleep time
arrived.
note
If pressed the OPERATE or STANDBY button, the sleep timer
that has been set already will be cancelled.
120 (minutes) 110 100 90 80 70
60 50 40 30 20 10 00 (OFF)
120 ...
When you have specified the time, the “Sleep” indicator lights
on the front panel display.
2 If no button has been pressed in 5 seconds, the Sleep timer
setting will be completed and the system start to time.
3 You can check the time remaining before the system turns
off.
Press SLEEP, the remaining time appears on the front panel
display for a few seconds.
41
Page 42

AdditionalAdditional
Additional
AdditionalAdditional
TT
T
TT
rr
ouboub
r
oub
rr
ouboub
leshootingleshooting
leshooting
leshootingleshooting
InfInf
Inf
InfInf
oror
or
oror
mama
ma
mama
tiontion
tion
tiontion
If you experience any of the following difficulties while using the
system, use this troubleshooting guide to help you remedy the
problem. Should any problem persist, consult your nearest service center.
No power.
• Is the power cord firmly plugged into the power outlet?
• One of the safety mechanisms may be operating. In this
event, unplug the player from the power outlet briefly and
then plug it in again.
No picture.
• Check that the system is connected securely.
• The video connecting cord is damaged. Replace it with a
new one.
• Make sure you connect the system to video input connector
on the TV (see page 17).
• Make sure you turn on the TV.
• Make sure you select the video input on the TV so that you
can view the pictures from this system.
The picture noise appears.
• Clear the disc.
• If video from this system has to go through your VCR to get
to your TV, the copy-protection applied to some DVD programs could affect picture quality. If you still experience problems after checking your connections, please try connecting your DVD system directly to your TV’s S-Video input, if
your TV is equipped with this input (see page 17).
The aspect ratio of the screen cannot be changed even
though you set “TV DISPLAY” in the SETUP menu when
you play a wide picture.
• The aspect rate is fixed on your DVD disc.
• If you connect the system with the S-Video cable, connect
directly to the TV. Otherwise, you may not change the aspect rate.
• Depending on the TV, you may not change the aspect rate.
There is no sound or only a very low-level sound is
heard.
• Check that the speakers and components are connected
securely.
• Make sure that you have selected the correct source on the
system.
• Press MUTE button on the remote control if the red LED on
the front panel is blinking.
• The protective device on the system has been activated
because of a short circuit. Turn off the system, eliminate the
short-circuit problem and turn on the power again.
• The audio connecting cord is damaged. Replace it with a
new one.
• The system is in pause mode or in slow-motion play mode,
or fast forward or fast reverse is performed. Press
return to normal play mode.
• Check the speaker settings (see page 15~17, 31~32).
to
42
42
Page 43

TT
T
TT
rr
ouboub
r
oub
rr
ouboub
leshootingleshooting
leshooting
leshootingleshooting
English
The left and right sounds are unbalanced or reversed.
• Check that the speakers and components are connected cor-
rectly and securely.
• Adjust front balance parameter using SELECT and VOLUME
(- or +) buttons (see page 31~32).
Severe hum or noise is heard.
• Check that the speakers and components are connected
securely.
• Check that the connecting cords are away from a transformer
or motor, and at least 3 meters away from a TV set or fluorescent light.
• Move your TV away from the audio components.
• The plugs and jacks are dirty. Wipe them with a cloth slightly
moistened with alcohol.
• Clear the disc.
The sound loses stereo effect when you play a Video CD or
a CD.
• Set the Audio mode to “STEREO” in the SETUP menu (see
page 33).
• Make sure you connect the system appropriately.
The surround effect is difficult to hear when you are playing a Dolby Digital sound track.
• Set the Audio mode and the Dolby Surround to “OFF” in the
SETUP menu.
• Check the speaker connections.
• Depending on the DVD disc, the output signal may not be the
entire 5.1 channel but monaural or stereo even if the sound
track is recorded in Dolby Digital format.
The sound comes from the center speaker only.
• Depending on the disc, the sound may come from the center
speaker only.
No sound is heard from the center speaker.
• Make sure the Center is set to “ON” in SETUP menu (see page
31~32).
• You may set the listening mode to Dolby Pro Logic Phantom
(see page 40).
• Adjust the speaker volume (see page 31~32).
Radio stations cannot be tuned in.
• Check that the antennas are connected correctly. Adjust the
antennas and connect an external antenna if necessary.
• The signal strength of the stations is too weak (when tuning in
with automatic tuning). Use direct tuning.
• No stations have been preset.
The remote does not function.
• Remove any obstacles between the remote control and the
system.
• Use the remote control near the system.
• Point the remote control at the remote sensor on the front panel.
• Replace all the batteries in the remote control with new ones if
they are weak.
• Check that the batteries are loaded correctly.
The disc does not play.
• There is no disc inside. (“NO DISC” appears on the front panel
display and the TV screen.)
Insert a disc.
• Insert the disc correctly with the playback side facing down on
the disc tray.
• Clean the disc (see page 9).
• The system cannot play CD-ROMs, etc. (see page 8).
Insert a DVD, a Video CD, a CD , or a MP3 disc.
• Check the region code of the DVD disc (see page 8).
• Moisture has condensed inside the system.
Remove the disc and leave the system turned on for about an
hour (see page 7).
Playback stops automatically.
• Depending on the disc, the auto pause signal is recorded. While
playing such a disc, the system stops playback at the signal.
Stopping playback, Search, Slow-motion play, repeat play
or Program play, etc., cannot be done.
• Depending on the disc, you may not do some of the operations
above.
Messages do not appear on the TV screen in the language
you want.
• Select the language for OSD in SETUP menu (see page 30).
No sound or only a very low-level sound is heard from the
rear speakers.
• Make sure the Rear is set to “ON” in SETUP menu (see page
31~32).
• You may set the listening mode to 3-Stereo (see page 40).
• Adjust the speaker volume (see page 31~32).
Subwoofer sound deficient or no sound.
• Make sure connection / setup is correct.
• If it is still no good, change the subwoofer phase angle (0
or 180o-0o).
o
-180
The language for the sound cannot be changed when you
play a DVD.
• Multilingual sound is not recorded on the DVD.
• Changing the language for the sound is prohibited on the DVD.
o
43
Page 44

TT
T
TT
rr
ouboub
r
oub
rr
ouboub
leshootingleshooting
leshooting
leshootingleshooting
GlossarGlossar
Glossar
GlossarGlossar
yy
y
yy
The language for the subtitles cannot be changed when
you play a DVD.
• Multilingual subtitles are not recorded on the DVD.
• Changing the language for the subtitles is prohibited on the
DVD.
The subtitles cannot be turned off when you play a DVD.
• Depending on the DVD, you may not be able to turn the sub-
titles off.
The angles cannot be changed when you play a DVD.
• Multi-angles are not recorded on the DVD.
• Change the angles when the angle mark appears on the TV
screen (see page 36).
• Changing the angles is prohibited on the DVD.
The system does not operate properly.
• Static electricity, etc., may affect the system’s operation.
Press the OPERATE button to turn off, then press again to
turn on.
Bit rate
Value indicating the amount of video data compressed in a DVD
per second. The unit is Mbps (mega bit per second). 1 Mbps
indicates that the data per second is 1,000,000 bits. The higher
the bit rate is, the larger the amount of data. However, this does
not always mean that you can get higher quality pictures.
Chapter
Sections of a picture or a music piece on a DVD that are smaller
than titles. A title is composed of several chapters. Each chapter
is assigned a chapter number enabling you to locate the chapter
you want.
Dolby Digital
This sound format for movie theaters is more advanced that Dolby
Pro Logic Surround. In this format, the rear speakers output stereo sound with an expanded frequency range and a subwoofer
channel for deep bass is independently provided. This format is
also called “5.1” because the subwoofer channel is counted as
0.1 channel (since it functions only when a deep bass effect is
needed). All six channels in this format are recorded separately
to realize superior channel separation. Furtheremore, since all
the signals are processed digitally, less signal degradation occurs.
The name “AC-3” comes from the fact that it is the third audio
coding method to be developed by the Dolby Laboratories Licensing Corporation.
Dolby Pro Logic Surround
As one method of decoding Dolby Surround, Dolby Pro Logic
Surround produces four channels from two-channel sound. Compared with the former Dolby Surround system, Dolby Pro Logic
Surround reproduces left-to-right panning more naturally and localizes sounds more precisely. To take full advantage of Dolby
Pro Logic Surround, you should have one pair of rear speakers
and a center speaker. The rear speakers output monaural sound.
DTS
Digital audio compression technology that the Digital Theater
Systems, Inc. developed. This technology conforms to 5.1-channel surround. The rear channel is stereo and there is discrete
subwoofer channel in this format. DTS provides the same 5.1
discrete channels of high quality digital audio. The good channel
separation is realized because the all channel data is recorded
discrete and processed in digital.
MPEG AUDIO
International standard coding system to compress audio digital
signals authorized by ISO/IEC. MPEG 1 conforms to up to 2channel stereo. MPEG 2 used on DVDs conforms to up to 7.1channel surround.
44
Page 45

GlossarGlossar
Glossar
GlossarGlossar
yy
y
yy
English
DVD
A disc that contains up to 8 hours of moving pictures even though
its diameter is the same as a CD.
The data capacity of a single-layer and single-sided DVD, at 4.7
GB (Giga Byte), is 7 times that of a CD.
Furthermore, the data capacity of a dual-layer and single-sided
DVD is 8.5 GB, a single-layer and double-sided DVD 9.4 GB,
and a dual-layer and double-sided DVD 17 GB.
The picture data uses the MPEG 2 format, one of the worldwide
standards of digital compression technology.
The picture data is compressed to about 1/40 of its original size.
The DVD also uses the variable rate coding technology that
changes the data to be allocated according to the status of the
picture.
The audio data is recorded in Dolby Digital as well as in PCM,
allowing you to enjoy more real audio presence.
Furthermore, various advanced functions such as the multiangle, multilingual, and Parental Control functions are provided
with the DVD.
Multi-angle function
Various angles, or viewpoints of the video camera, for a scene
are recorded on some DVDs
Multilingual function
Several languages for the sound or subtitles in a picture are recorded on some DVDs.
Video CD
A compact disc that contains moving pictures.
The picture data uses the MPEG 1 format, one of the worldwide
standards of digital compression technology.
The picture data is compressed to about 1/140 of its original
size. Consequently, a 12 cm Video Disc can contain up to 74
minutes of moving pictures.
Video CDs also contain compact audio data. Sounds outside
the range of human hearing are compressed while the sounds
we can hear are not compressed. Video CDs can hold 6 times
the audio information of conventional audio CDs.
There are 2 versions of Video CDs.
• Version 1.1: You can play only moving pictures and sounds.
• Version 2.0: You can play high-resolution still pictures and en-
joy PBC functions.
This system conforms to both versions.
Parental Control
A function of the DVD to limit playback of the disc by the age of
the users according to the limitation level in each country. The
limitation varies from disc to disc; when it is activated, playback
is completely prohibited, violent scenes are skipped or replaced
with other scenes and so on.
Playback Control (PBC)
Signals encoded on Video CDs (Version 2.0) to control playback.
By using menu screens recorded on Video CDs with PBC functions, you can enjoy playing simple interactive programs, programs with search functions, and so on.
Title
The longest sections of a picture or a music piece on a DVD; a
movie, etc., for a picture piece on video software; or an album,
etc., for a music piece on an audio software. Each title is assigned a title number enabling you to locate the title you want.
Track
Sections of a picture or a music piece on a CD or Video CD.
Each track is assigned a track number enabling you to locate
the track you want.
45
Page 46

SpecificationsSpecifications
Specifications
SpecificationsSpecifications
DVD Player
• Pickup ...................................................................................... Semiconductor laser, Wavelength 650 mm
• Signal system ......................................................................... NTSC / PAL
• Video signal horizontal resolution .............................................. 480 lines (DVD)
• Video signal-to-noise ratio ..................................................... 50 dB (DVD)
• Audio frequency response (at 2 CH stereo mode) ................. DVD (PCM): 180 Hz ~ 20 kHz (+/- 1.0 dB)
................................................................................................... CD: 180 Hz ~ 20 kHz (+/- 1.0 dB)
• Audio signal-to-noise ratio ...................................................... 60 dB
• Total harmonic distortion ......................................................... 0.05%
• Dynamic range .......................................................................... DVD : 80 dB ; CD: 80 dB
FM Tuner
• System ...................................................................................... PLL quartz-locked digital synthesizer system
• Tuning range.............................................................................. 87.50 ~ 108.00 MHz (50 kHz step)
• Antenna ..................................................................................... FM pigtail antenna
• Antenna terminals ...................................................................... 75 ohms, unbalanced
• Intermediate frequency .............................................................. 10.7 MHz
AM Tuner
• System ...................................................................................... PLL quartz-locked digital synthesizer system
• Tuning range.............................................................................. 522~1620 kHz (9 kHz interval)
• Antenna ..................................................................................... AM Loop antenna
Video outputs
• CVBS Video .............................................................................. 1 Vp-p 75 ohms
• S-video ...................................................................................... Y: 1 Vp-p 75 ohms
................................................................................................... C: PAL 0.3 Vp-p 75 ohms / NTSC 0.286 Vp-p 75 ohms
• Scart out .................................................................................... 1 Vp-p 75 ohms
• Optical & Coaxial out ................................................................. 1 Vp-p 75 ohms
Audio line outputs
• Audio . L/R ................................................................................. 1 Vrms, 1k ohms
• Subwoofer ................................................................................. 1.2Vrms maximum (adjustable), 1k ohms
Audio power outputs
• Stereo mode ............................................................................ 50 W + 50 W (8 ohms at 1 kHz, THD 10%)
• Surround mode ........................................................................ Front: 50 W + 50 W (8 ohms at 1 kHz, THD 10%)
................................................................................................... Center: 50 W (8 ohms at 1 kHz, THD 10%)
................................................................................................... Rear: 50 W + 50 W (8 ohms at 1 kHz, THD 10%)
• Phones ...................................................................................... Headphones jack(stereo 3.54mm)
General (main unit)
• Power requirements .................................................................. AC 230 V, 50 Hz
• Power consumption ................................................................. 160 W
• Dimensions ............................................................................. W 435 x H 59 x D 345 mm
• Weight ...................................................................................... 4.8 kg
• Supplied accessories .............................................................. See page 14
Speakers
• Active Subwoofer ...................................................................... Output power : 100 W (4 ohms at 55Hz, THD 10%)
......................................................................................... Speaker system : Bass reflex
......................................................................................... Power reguirements : AC 230 V, 50 Hz
......................................................................................... Power consumption : 165 W
.................................................................................................... Speaker unit : 8 inches
.................................................................................................... Rated impedance : 4 ohms
.................................................................................................... Dimensions : W200x H360x D345 mm
.................................................................................................... Weight : 9.8 kg
• Front / Center / Rear speakers ................................................ Power: 50 W maximum
.................................................................................................... Speaker system: Bass reflex
.................................................................................................... Speaker unit: 3 inches,cone type : paper
.................................................................................................... Rated impedance: 8 ohms
.................................................................................................... Dimensions: W90x H150x D110 mm
.................................................................................................... Weight: 0.64 kg (rear speaker)
0.82 kg (front, center speaker)
Design and specifications are subjected to change without notice.
Weight and dimensions are approximate.
46
Page 47

Hitachi, Ltd. Tokyo, Japan
International Sales Division
THE HITACHI ATAGO BUILDING,
No. 15 -12 Nishi Shinbashi, 2 - Chome,
Minato - Ku, Tokyo 105-8430, Japan.
Tel: 03 35022111
HITACHI EUROPE LTD.
Dukes Meadow
Millboard Road
Bourne End
Buckinghamshire
SL8 5XF
UNITED KINGDOM
Tel: 01628 643000
Fax: 01628 643400
Email:
HITACHI EUROPE GmbH
Munich Office
Dornacher Strasse 3
D-85622 Feldkirchen bei München
GERMANY
Tel: +49 -89-991 80-0
Fax: +49 - 89 - 991 80 -224
Hotline: +49 - 180 - 551 25 51 (12ct/min.)
Email:
HITACHI EUROPE SRL
Via T. Gulli n.39
20147 MILAN
consumer-service@hitachi-eu.com
HSE-DUS.Service@Hitachi-eu.com
ITALY
Tel: 02 487861
Fax: 02 48786381
Servizio Clienti
Tel. 02 38073415
Email:
customerservice.italy@hitachi-eu.com
HITACHI EUROPE S.A.
364, Kifissias Ave. & 1, Delfon Str.
152 33 Chalandri
Athens
GREECE
Tel: 1-6837200
Fax: 1-6835694
service.hellas@hitachi-eu.com
Email:
HITACHI EUROPE S.A.
Gran Via Carlos III, 101 - 1
08028 Barcelona
SPAIN
Tel: 93 409 2550
Fax: 93 491 3513
Email:
HITACHI EUROPE AB
Box 77
S-164 94 KISTA
SWEDEN
Tel: 08 562 711 00
Fax: 08 562 711 11
Email:
rplan@hitachi-eu.com
csgswe@hitachi-eu.com
HITACHI EUROPE S.A.S
Lyon Office
B.P. 45, 69671 Bron Cedex
FRANCE
Tel: 04 72 14 29 70
Fax: 04 72 14 29 99
Email:
france.consommateur@hitachi-eu.com
HITACHI EUROPE LTD.
Norwegian Branch Office
Strandveien 18
1366 Dysaker
NORWAY
Tel: 02205 9060
Fax: 02205 9061
csgnor@hitachi-eu.com
Email
ELECTRONIC MATERIAL & MEDIA N.V./S.A)
UCO Tower – Bellevue, 17
B – 9050 GENT
BELGIUM (for BENELUX)
Tel: 09 230 48 01
Fax: 09 230 96 80
Email: hitachi.item@skynet.be
www.hitachidigitalmedia.com
Dansk
369
 Loading...