

DVD DIGITAL THEATER SYSTEM
HTDK150EBS
DVD/VCD/CD PLAYER WITH
AV SURROUND RECEIVER
Instruction manual
Manufactured under license from Dolby laboratories. Dolby , Pro Logic and the double D symbol
are trademarks of Dolby Laboratories.
Confidential Unpublished Words. 1992 - 1997 Dolby Laboratories, Inc. All right reserved.
C
" " " "

Table of Contents
Important Safeguards and Precautions ............................3~7
Features of This System ........................................................... 8
Conventions about This Manual ............................................. 8
Type of Disc That Can be Played on This System ............... 9
Notes on Discs .........................................................................10
Selecting the Type of Disc for the Connected TV ............... 11
Installations
Index to parts and control(Front Panel)................................12
Index to parts and control(Front Panel Display) .................13
Index to parts and control(Rear Panel) ................................14
Index to parts and control(Remote Control)..................15-16
Unpacking .................................................................................17
Inserting Batteries into the Remote Control .......................17
Speaker System Hookup........................................................18
Antenna Hookups ....................................................................19
TV and Optional Component Hookups ................................20
Connecting the AC Power Cord ............................................20
Basic Setup
Selecting the Language for OSD ..........................................21
Selecting the Color System ....................................................22
Selecting the Audio Output Mode ..........................................22
Selecting the Video Output Mode ..........................................23
Speakers Setup..................................................................23-25
Presetting Radio Stations ......................................................26
..........................................12~20
.............................................21~26
Dual Mono Setting....................................................................41
Dynamic Range Setting ..........................................................41
Setting the Language for Audio .............................................42
Setting the Language for Subtitle..........................................42
Setting the Language for Disc Menu ....................................42
Setting the Parental Control Level ........................................43
Setting a New Password ........................................................43
Resetting SETUP .....................................................................44
Special Functions
Picture Zooming .......................................................................45
Angle Selection.........................................................................46
Subtitle Language Selection..................................................46
Audio Language Selection .....................................................46
Using Headphones .................................................................47
Other Functions
Listening to the Radio .......................................................48-49
Listening to an External Source ............................................49
Selecting Listening Modes .....................................................50
Using the Sleep Timer ............................................................50
Additional Information
Troubleshooting .................................................................51-53
Glossary ...............................................................................53-54
Specifications .....................................................................55-56
....................45~48
............................48~50
.51~56
Playing Discs
Basic Play..................................................................................27
Slow-Motion Play......................................................................28
Single Stepping Play ...............................................................28
Locate a Point Quickly.............................................................28
Skip Next or Previous ..............................................................28
Using the Menu for Each DVD ...............................................29
Playing Video CDs with PBC .................................................30
Repeat Play...............................................................................31
A-B Repeat Play........................................................................31
Program Play ............................................................................32
Selecting a Start Point Using the Time Code .....................33
Selecting a Track Using Number Buttons ...........................33
Checking Information Using Display ...................................34
Settings & Adjustments
Using the SETUP Menu ....................................................35-36
SETUP Menu Item List............................................................37
TV Display Setting ....................................................................38
Angle Mark Setting ...................................................................38
Screen Saver Setting ...............................................................38
Center Delay Setting................................................................39
Rear Delay Setting ...................................................................39
Bass Mode Setting...................................................................40
Audio Mode Setting ..................................................................41
......................................27~34
..35~44
2
2

SOME DO’S AND DON’T ON THE SAFE USE OF YOUR
EQUIPMENT
This equipment has been designed and manufactured to meet international safety standards but, like
any electrical equipment, care must be taken if you are to obtain the best results and safety is to be
assured.
• DO read the operating instructions before you attempt to use the equipment.
• DO ensure that all electrical connections(including the mains plug, extension leads and interconnections between pieces of
equipment) are properly made and in accordance with the manufacturer`s instructions. Switch off and withdraw the mains
plug when making or changing connections.
• DO consult your dealer if you are ever in doubt about the installation, operation or safety of your equipment.
• DO be careful with glass panels or doors on the equipment.
’
• DON T continue to operate the equipment if you are in any doubt about it working normally, or if it is damaged in any way-switch
off, withdraw the mains plug and consult your dealer.
’
• DON T remove any fixed cover as this may expose dangerous voltages.
’
• DON T leave equipment switched on when it is unattended unless it is specifically stated that it is designed for unattended
operation or has a standby mode. Switch off using the switch on the equipment and make sure that your family knows how to
do this. Special arrangements may need to be made for infirm or handicapped people.
’
• DON T use equipment such as personal stereos or radios so that you are distracted from the requirements of traffic safety. It
is illegal to watch television whilst driving a vehicle.
’
• DON T listen to headphones at high volume, as such use can permanently damage your hearing.
’
• DON T obstruct the ventilation openings of the equipment, for example with curtains or soft furnishings. Overheating will cause
damage and shorten the life of the equipment.
’
• DON T use makeshift stands and NEVER fix legs with wood screws-to ensure complete safety always fit the manufacturer`s
approved stand or legs with the fixings provided according to the instructions.
’
• DON T allow electrical equipment to be exposed to rain or moisture.
ABOVE ALL
- NEVER let anyone especially children push anything into holes, slots or any other opening in the case-this could
result in a fatal electrical shock;
- NEVER guess or take chances with electrical equipment of any kind. It is better to be safe than sorry !
3
3

DECLARATION OF CONFORMITY
We declare under our sole responsibility that this product, to which this declaration relates, is in conformity with the following
standards:
EN60065, EN55013, EN55020, EN61000-3-2 and EN6100-3-3.
Following the provisions of 73/23/EEC, 89/336/EEC and 93/68/EEC directives.
IMPORTANT
The mains lead on this equipment may be supplied with a moulded plug incorporating a fuse, the value of which is indicated on
the pin face of the plug. Should the fuse need to be replaced, an ASTA or BSI approved BS1362 fuse must be used of the same
rating. If the fuse cover is detachable never use the plug with the cover omitted. If a replacement fuse cover is required, ensure
it is of the same colour as that visible on the pin face of the plug. Fuse covers are available from your dealer.
DO NOT cut off the mains plug from this equipment. If the plug fitted is not suitable for the power points in your home or the cable
is too short to reach a power point, then obtain an appropriate safety approved extension lead or consult your dealer.
Should it be necessary to change the mains plug, this must be carried out by a competent person, preferably a qualified
electrician.
If there is no alternative to cutting off the mains plug, ensure that you dispose of it immediately, having first removed the fuse, to
avoid a possible shock hazard by inadvertent connection to the mains supply.
IMPORTANT
The wires in this mains lead are coloured in accordance with the following code:
Blue : NEUTRAL
Brown : LIVE
As these colour may not correspond to the coloured markings identifying the terminals in your plug, proceed as follows:
The wire coloured BLUE must be connected to the terminal marked with the letter N or coloured BLUE or BLACK. The wire
coloured BROWN must be connected to the terminal marked with the letter L or coloured BROWN or RED.
On no account connect either of these wires to the terminal marked E or by the earth symbol or coloured green or green and
yellow.
Alternatively, this equipment may be supplied with a rewireable plug already fitted, which may be removed if not suitable and an
alternative fitted in accordance with the preceding instructions.
4
4
WARNING
Welcome!
To prevent fire or shock hazard, do not expose the unit to rain or moisture.
To avoid electrical shock, do not open the
cabinet.
Refer servicing to qualified personnel only.
Mains cord must only be changed at qualified service shop.
CLASS 1 LASER PRODUCT
KLASSE 1 LASER PRODUKT
LUOKAN 1 LASER LAITE
KLASS 1 LASER APPARAT
• This appliance is classified as a CLASS 1 LASER product.
• The CLASS 1 LASER PRODUCT MARKING is located on
the rear panel.
• This product contains a low power laser device. To ensure
continued safety do not remove any cover or attempt to gain
access to the inside of the product. Refer all servicing to
qualified personnel only.
Thank you for purchasing this DVD Compact AV system.
Before operating the unit, please read this operation manual
thoroughly and then keep it for future reference as it will be
useful if you have any operation problems in the future.
CAUTION
The use of optical instrument with this product will increase
eyes hazard. As the laser beam used in this CD/DVD player
is harmful to eyes, do not attempt to disassemble the cabinet.
Refer servicing to qualified personnel only.
The following marking is printed on the rear panel.
This symbol is intended to alert the user of
the presence of uninsulated “dangerous
voltage”within the product’s encasement that
may be of sufficient magnitude to constitute a
risk of electric shock to persons.
This symbol is intended to alert the user of
the presence of important operating and
maintenance (servicing) instructions in the
literature accompanying the appliance.
5
Important Safeguards and Precautions
Safeguards
Electrical energy can perform many useful functions. This
unit has been engineered and manufactured to assure your
personal safety. Improper use can result in potential electrical shock or fire hazards. In order not to defeat the safeguards,
observe the following instructions for its installation, use and
servicing.
Power Cord Protection
To avoid any malfunctions of the unit, and to protect against
electric shock, fire or personal injury, please observe the following:
• When an electric storm is present, unplug the power cord
and disconnect the antenna connections.
• Hold the plug firmly when connecting or disconnecting the
AC power cord.
• Keep the AC power cord away from the heating appliances.
• Never put any heavy object on the AC power cord.
• Do not attempt to repair or reconstruct the AC power cord in
any way.
• Check that all connections are proper and that there are no
problems with the connection cords. Always set the power
to OFF
mode before connecting and disconnecting of
the connection cords.
• To prevent short circuits or damaged wires in the connec-
tion cords, always unplug the power cord and disconnect
the connection cords between all other components when
moving the unit.
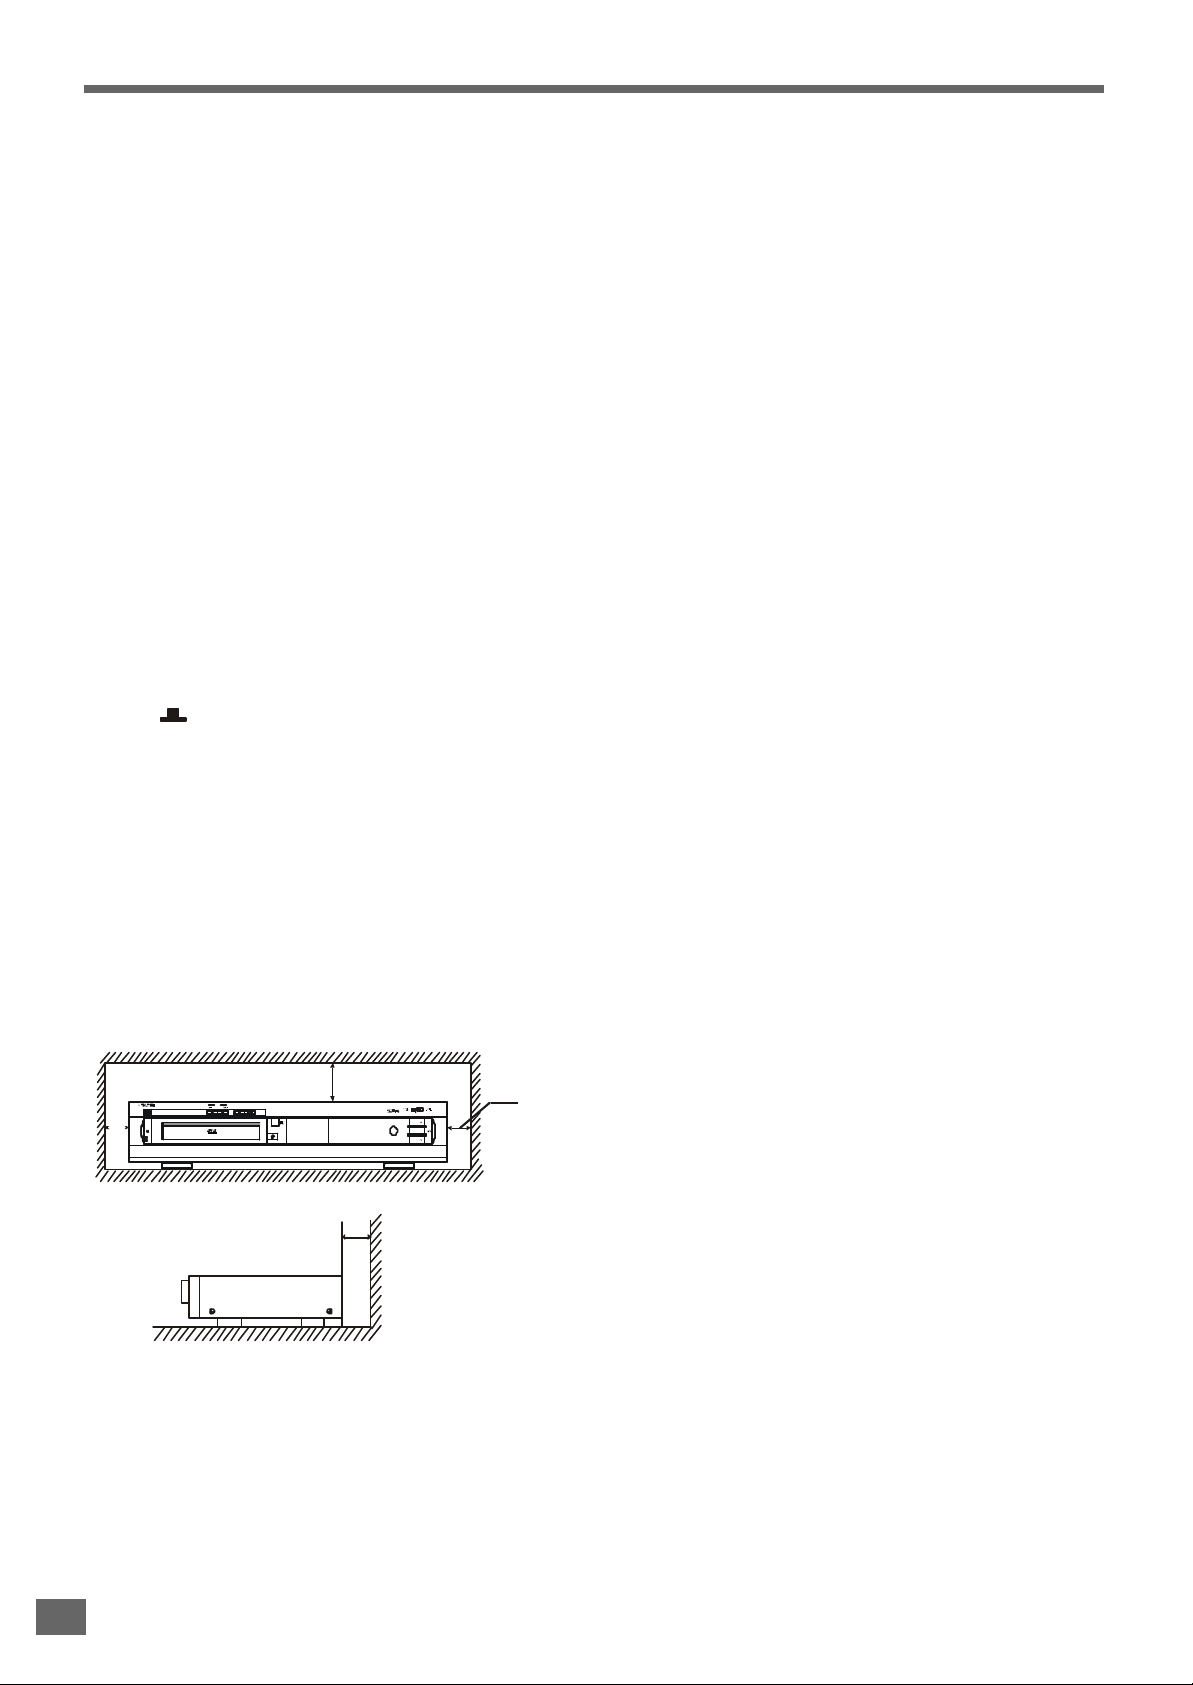
Location and Handing
• Do not install the system in a confined location; otherwise,
heat dissipation will be poor and malfunctions may occur.
• Always install this unit horizontally. For proper heat dissipa-
tion, leave at least 10cm of space between the top, back
and sides of this unit and the wall or other components.
• Do not place any object containing water or other liquids on
this unit. In the event that liquid should enter the cabinet,
unplug this unit immediately and contact the retailer or service centre immediately.
• Do not remove the cabinet. Touching parts inside the cabi-
net could result in electric shock and / or damage to the
unit.
• Do not use the unit in a car. The operation can not be guaran-
teed.
• Do not put subwoofer near TV as this might cause interfer-
ence to TV image.
Nonuse Periods
• When the unit is not being used, turn the unit off.
• When left unused for a long period of time, the unit should
be unplugged from the household AC outlet.
No Fingers or Other Objects Inside
Do not put any foreign object on the disc tray.
Stacking
Place the unit in a horizontal position, and do not place anything heavy on it.
Condensation
Moisture may form on the pickup lens in the following conditions:
• Immediately after a heater has been turned on.
• In a steamy or very humid room.
• When the unit is suddenly moved from a cold environment
to a warm one.
If moisture forms inside this unit, it may not operate properly.
In this case, turn on the power and wait about one hour for the
moisture to evaporate.
DVD/VCD/CD SURROUND RECEIVER HTD-K150
TUNING
STOP PLAY/PAUSE
STANDBY
POWER VOLUME
*
ON
NEXTPREV
OPEN/CLOSE
10cm or more
PHONES
10cm or more
SELECT
VOLUMEOFF
• Air vents are provided in the cabinet to prevent excessive
temperatures inside the unit. Do not place this unit in closed
spaces, cover it, or otherwise block the vents.
• Do not place this unit in direct sunlight, or near heat sources.
• Keep this unit away from strong magnetic objects.
• Do not insert or drop anything into this unit through the air
vents as this could cause serious damage, possibly resulting in fire.
6
10cm or more
On adjusting volume
Do not turn up the volume while listening to a portion with very
low level inputs or no audio signals. If you do, the speakers
may be damaged when a peak level portion is played.
If There is Noise Interference on the TV While a Broadcast
is being Received
Depending on the reception condition of the TV, interference
may appear on the TV monitor while you watch a TV broadcast with the unit on. This is not a malfunction of the unit or the
TV. To watch a TV broadcast, turn off the unit.
Service
• Do not attempt to service the unit yourself.
• Please refer any service to the nearest service centre.
Copyright
Audio-visual material may consist of copyrighted works which
must not be recorded without the authority of the owner of the
copyright. Please refer to relevant laws in your country.

Important Safeguards and Precautions
Copy protection
This DVD player supports Macrovision copy protection.
On DVD discs that include a copy protection code, if the contents of the DVD disc are copied using a VCR, the copy protection code prevents the videotape copy from playing normally.
Recommended Measures for Optimum Picture Excellence
This unit is a precision device that is constructed using extremely accurate technology.
Soiling or friction affecting the pickup lens or disc drive can
impair the image quality. At the worst, neither video nor audio
will be played back. To obtain optimum picture quality, the
player should be checked (cleaning and replacement of some
parts) every 1,000 hours. Note that this period varies depending on the environment (temperature, humidity, dust, etc..) in
which the player is used.
Do not attempt to clean the pickup lens yourself.
7

Features of This System
• DVD player built-in DTS
*1
and Dolby Digital*2 decoder, supporting Dolby Pro Logic and Virtual Surround.
• 5-channel amplifiers attached with active subwoofer.
• Tuner (AM/FM) receiver.
• Conforming DVD, SVCD, VCD1.1, VCD2.0, MP3, CDR, CDRW and CD-DA discs.
• DVD navigation and SVCD, VCD 2.0 PBC controlling functions.
• VFD front panel display and OSD menu display.
• Full function remote control.
*1
Manufactured under license from Digital Theater System, Inc. US Pat. No. 5,451,942 and other worldwide patents issued
and pending. “DTS” and “DTS Digital Surround” are trademarks of Digital Theater Systems, Inc. © 1996 Digital Theater
Systems, Inc. All rights reserved.
*2
Manufactured under license from Dolby Laboratories. “Dolby”, “AC-3”, “Pro Logic” and the double-D symbol are trade-
marks of Dolby Laboratories. Confidential Unpublished Works. © 1992-1997 Dolby Laboratories, Inc. All rights reserved.
Conventions about This Manual
• Instructions in this manual describe the controls on the system. You can also use the controls on the remote control if they have
the same or similar names as those on the system.
• The types of functions and operations that can be used for a particular disc vary depending on the features of that disc. In some
cases, these functions and operations may differ from the descriptions given in this instruction Manual. In this event, follow the
instructions given on the screen. This instruction Manual only covers basic disc operations.
• For some operations, the icon may appear on the screen. This indicates that the operation described in this instruction
Manual is not permitted for the current disc.
• The drawings about the TV screen and front panel display used in this instruction Manual are purely for the purposes of
explanation. The actual displays may differ slightly from what are shown here.
8

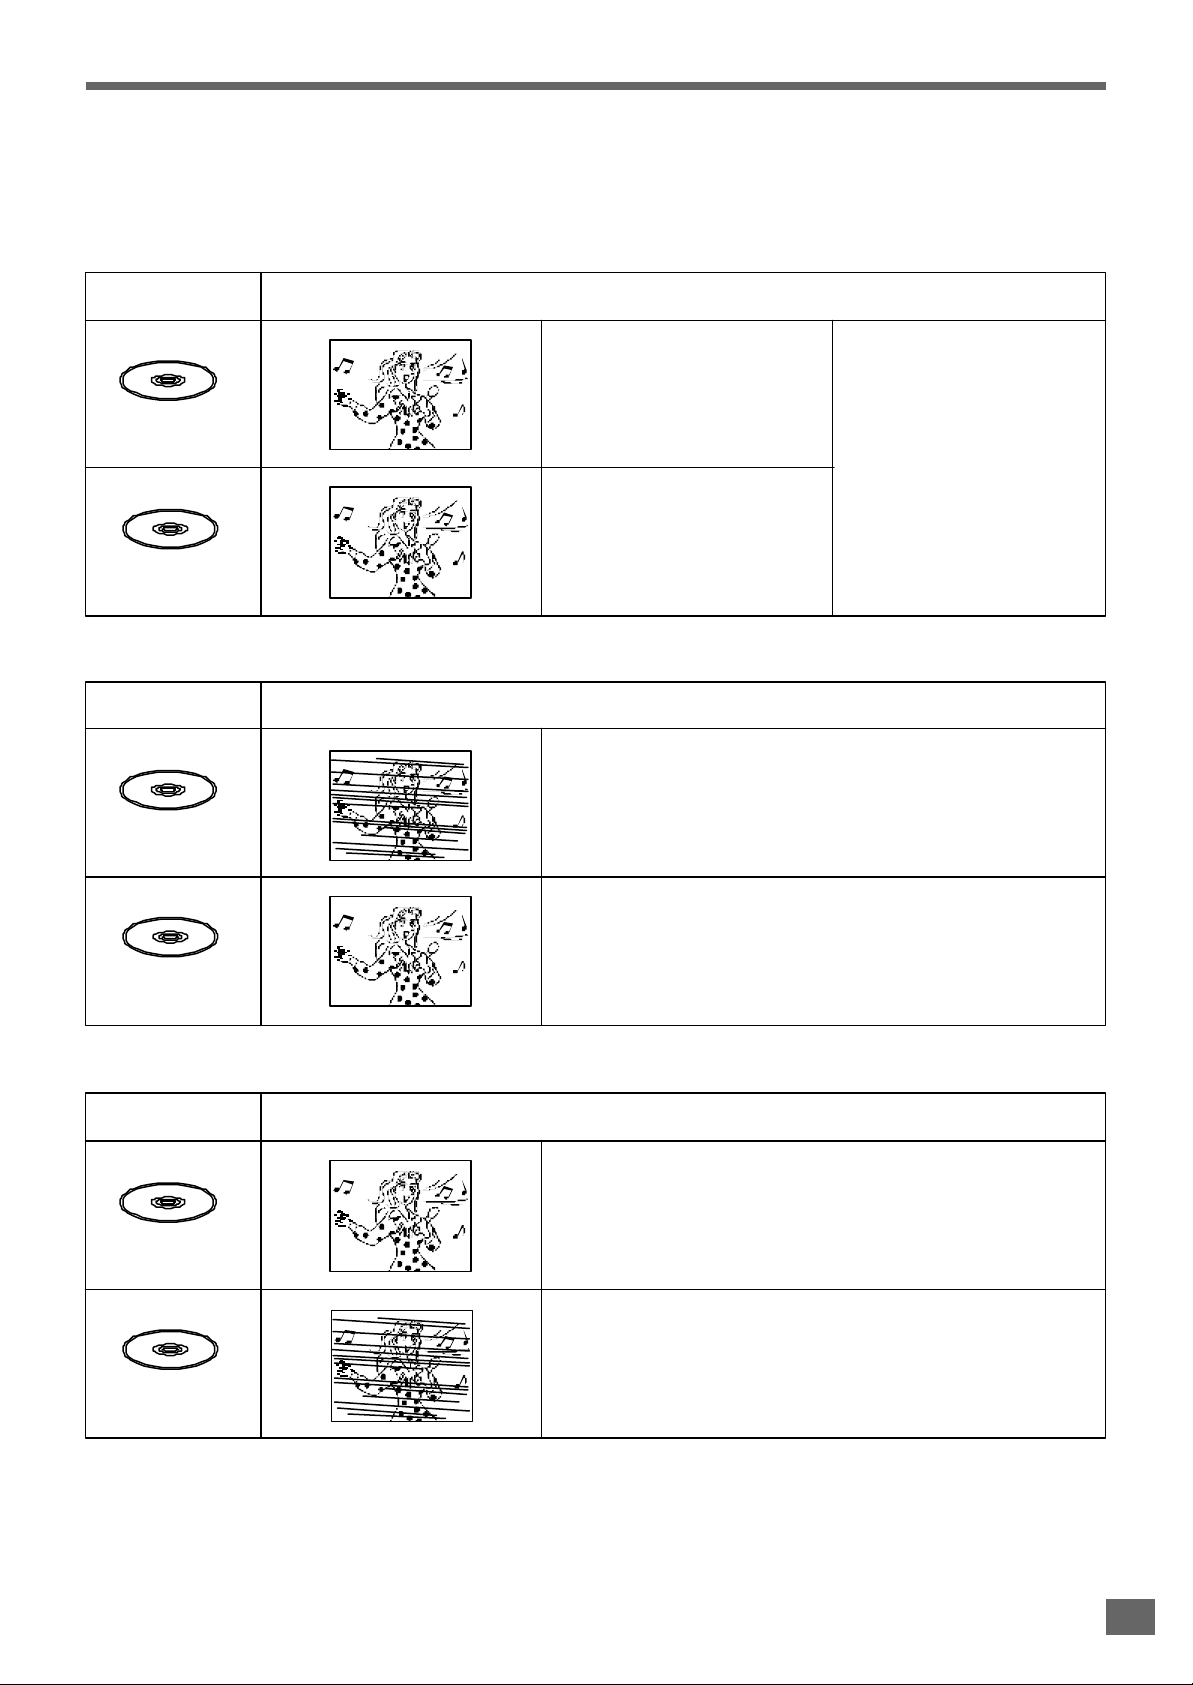
Type of Disc That Can be Played on This System
This player can playback discs bearing any of the following marks:
DVDs
12cm disc / 8cm disc
See Note-1
See Note-2
See Note-3
• Supports version until version 2.0
Note-1
• DVD players and discs are designed with region numbers
which dictate the regions in which a disc can be played. If
the region number on the disc you want to play does not
match the region number in your DVD player, you will not be
able to play the disc. If you try to play the DVD, the message
“WRONG REGION” will appear on OSD.
The region number for this DVD player is 2.
On the rear panel of the unit has a region code printed.
Sample disc display:
Disc playable in all regions
Video CDs
12cm disc / 8cm disc
See Note-2
Audio CDs
12cm disc / 8cm disc
• Supports MP3
Icons used on DVD discs
Sample Icons:
1. English
2
2. Chinese
Number of recorded
audio tracks
1. English
2
2. Chinese
Number of subtitles
recorded
LB
16:9
Screen aspect
ratio recorded
2
Disc with
Multiple
camera angles
Note-4
• DVD door can be opened in DVD function only.
Glossary of Disc Terms
• Title (DVD)
The longest sections of a picture or a music piece on a
DVD; a movie, etc., for a picture piece on a video software;
or an album, etc., for a music piece on and audio software.
Each title is assigned a title number enabling you to locate
the title you want.
1 2 3
4 5 6
Region code
indicator
Note-2
• The specific playback functionality for some DVD and video
CD discs is determined by the disc manufacturer. Because
this DVD player plays disc data in accordance with the disc
manufacturer’s guidelines, some functions may not be
available on some discs. Be sure to read the instructions
provided with the disc.
The “Prohibited” icon displayed during DVD player
operation indicates that such manufacturer imposed restrictions apply.
Note-3
• The audio on a DVD disc recorded in MPEG version 2.0
format maybe cannot be played (image only).
Discs that Cannot be Played
• You cannot play CD-G, PHOTO CD, CD-ROM and DVD-
ROM discs.
• You cannot play illegally produced discs.
• You cannot play scratched discs.
• You cannot play disc that are dusty, soiled or marked with
fingerprints.
• Chapter (DVD)
Sections of a picture or a music piece that are smaller than
titles. A title is composed of several chapters. Each chapter
is assigned a chapter number enabling you to locate the
chapter you want. Depending on the disc, no chapters may
be recorded.
For example
Title 1
Title 2
• Track (Video or audio CD)
Sections of a picture or a music piece on a VIDEO or a CD.
Each track is assigned a track number enabling you to locate the track you want.
For example
Track 1 Track 2 Track 3 Track 4 Track 5
9
Notes on Discs
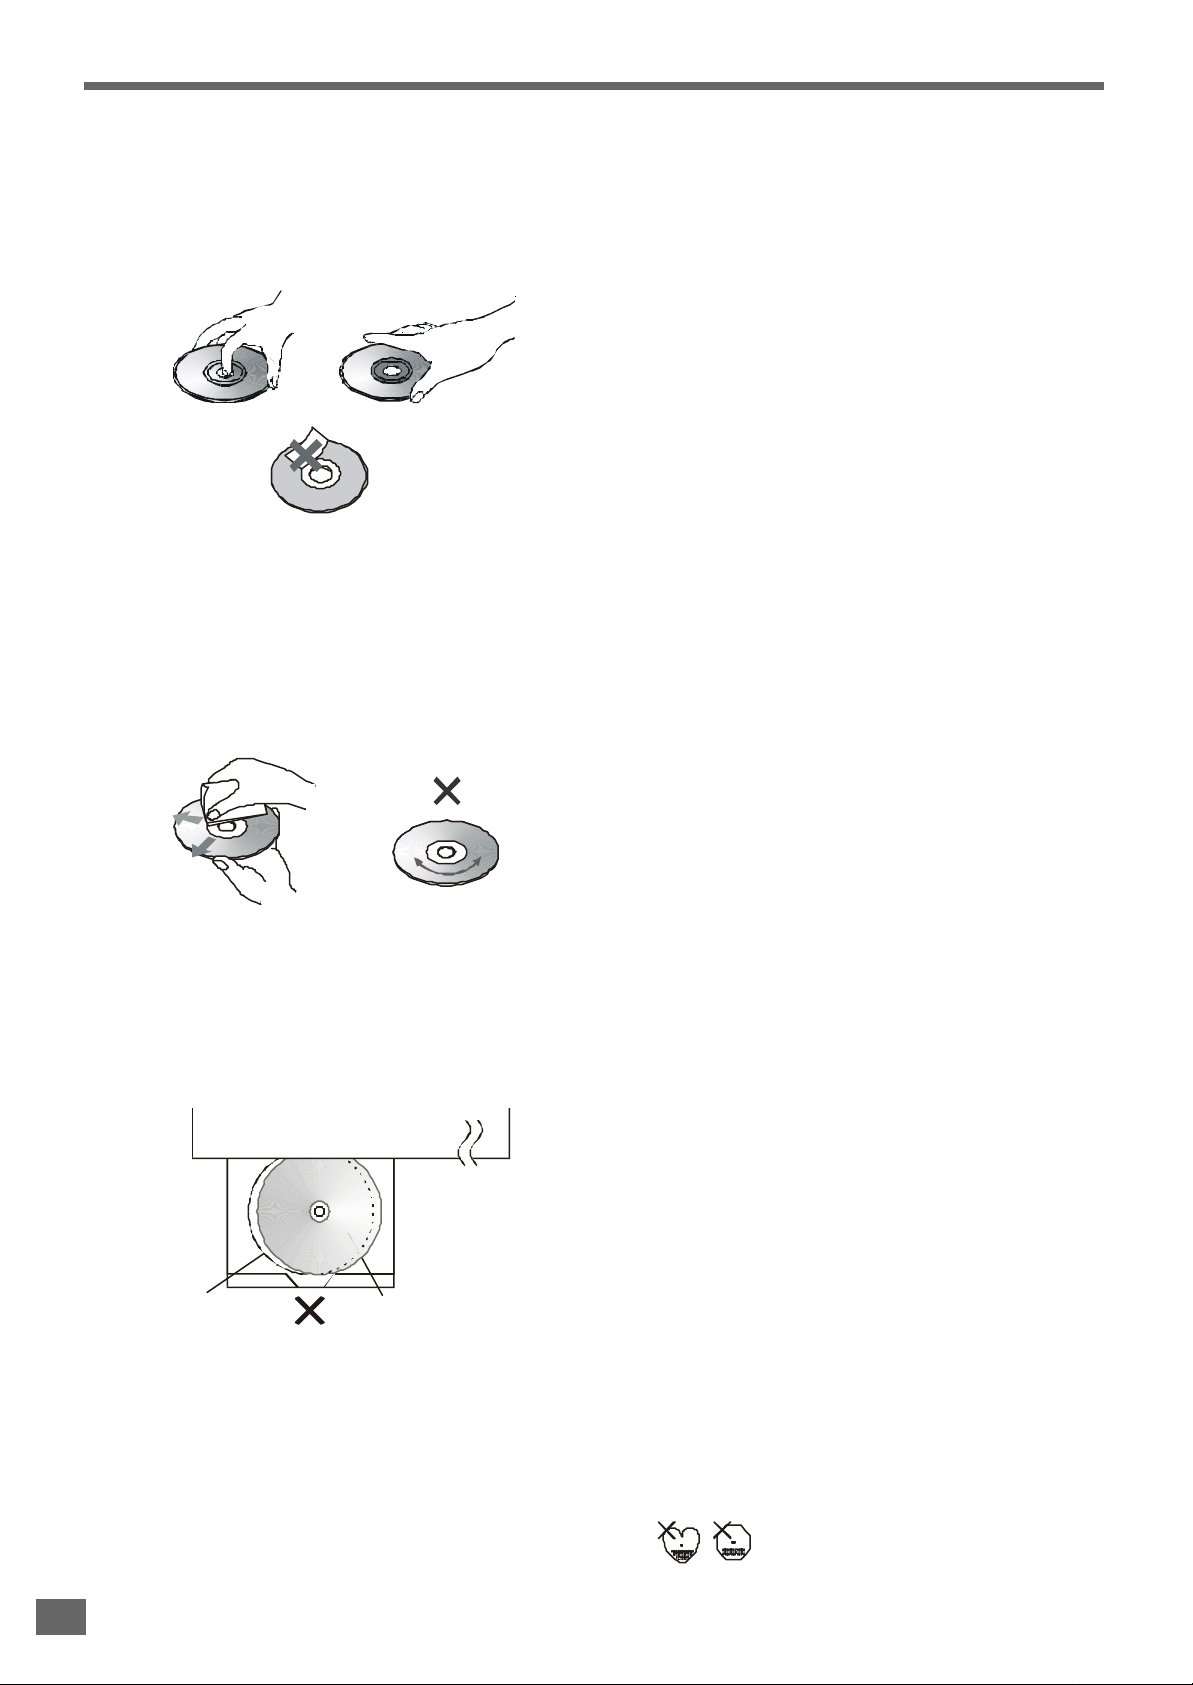
Disc handling precautions
• To keep the disc clean, handle the disc by its edge. Do not touch the surface.
• Do not stick paper or tape on the disc.
If there is glue (or a similar substance) on the disc, remove the glue completely before using the disc.
• Do not expose the disc to direct sunlight or sources such as hot air ducts, or leave it in a car parked in direct sunlight as there
can be considerable rise in temperature inside the car.
• After playing, store the disc in its case.
• Do not write on the label side with a ball-point pen or other writing utensils.
• Be careful not to drop or bend the disc.
Disc cleaning precautions
• Before playing, clean the disc with a cleaning cloth. Wipe the disc from the center out.
• Do not use solvents such as benzine, thinner, commercially available cleaners or anti-static spray intended for vinyl LPs.
Disc installing precautions
• Do not install more than 1 disc on disc tray.
• Do not place the disc on the tray up-side down.
• Do not try to close the disc tray when the disc is not installed properly.
Disc tray
Disc
• Do not store discs in high-temperature, high-humidity locations. The discs may develop warps and become unable to play.
Also, discs with moisture on them may be unplayable. Wipe any moisture off with a soft, dry cloth, and be sure discs are fully
dry before using.
• Do not leave a disc inside the CD player when it is not used for a long period.
• Please do not use compact discs with cellophane or with labels attached or those CD with peeled off labels, such as rental
CDs. If such discs are used on a CD player, they may get trapped inside the unit and cause malfunction.
• CD with special shapes (heart-shaped CDs, octagonal CDs etc.) cannot be played on this set.
10
Attempting to do so may damage the set. Do not use such CDs.
Selecting the Type of Disc for the Connected TV
Both DVD discs and video CDs have the material recorded in the PAL and NTSC systems. Refer to the table below to select the
correct disc type for the type of connected TV.
Connecting to the Multi-system TV
Disc
PAL
NTSC
Connecting to NTSC TV
Disc
PAL
TV Monitor
Played in the PAL system.
The use of a multi-system TV
is recommended.
Played in the NTSC system.
TV Monitor
Can not be used.
Images playback in black and white. The images may also be
distorted or may overlap at the bottom of the screen.
Played in the NTSC system.
Specify the settings for the type of TV connected (4:3, 16:9).
NTSC
Connecting to PAL TV
Disc
When viewed on a 4:3 TV, the images appear compressed horizontally.
PAL
Can not be used.
Images play back in black and white.
NTSC
Note
TV Monitor
• If the type of disc does not match the type of connected TV, you can also play the disc normally by setting the TV type in the
SETUP menu. For details, see page 21.
11
Index to Parts and Controls
Refer to the pages indicated in parentheses for details.
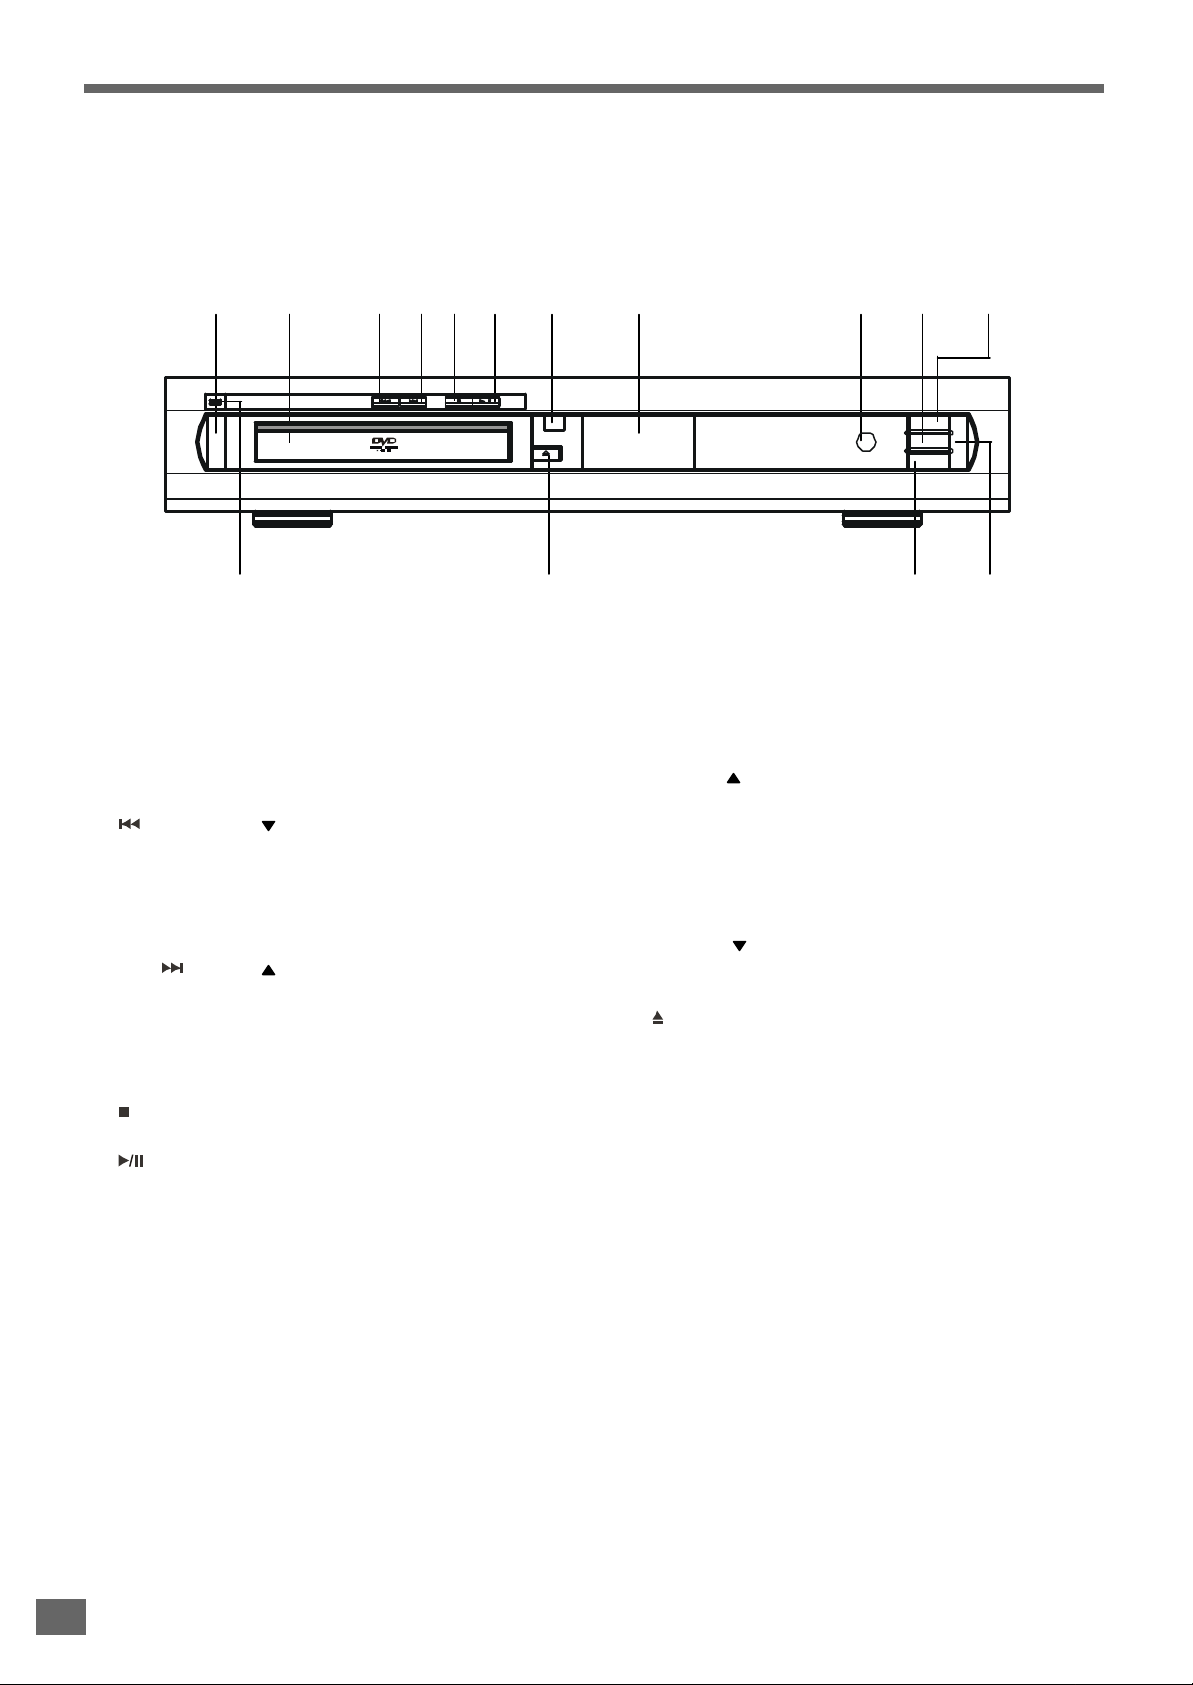
Front Panel
1 2 3 4 5 6 7 8 9 10 11
15 14 13 12
1. POWER switch (page 27)
Turns on and off the main power of the system.
2. Disc Tray (page 27)
Place a disc on the tray.
3. REV (TUNING ) button (page 28, 29, 49)
While playing a disc, press this button to select the previous title, chapter or track.
While listening to the radio, press this button to decrease
the frequency. For automatic tuning, press and hold it for
more than 1 second.
4. FWD (TUNING ) button (page 28, 29, 49)
While playing a disc, press this button to select the next
title, chapter or track.
While listening to the radio, press this button to increase
the frequency. For automatic tuning, press and hold it for
more than 1 second.
5. STOP button (page 28)
Stops playing a disc.
6. PLAY/PAUSE button (page 28)
Plays or pauses a disc.
7. REMOTE SENSOR (page 16)
Accepts the remote control signals.
8. Front Panel Display (page 13)
Indicates the playing time, etc..
9. PHONES jack (page 47)
Connects the headphone to this jack.
10. SELECT button (page 25)
Selects the audio channel to view or adjust its level.
11. VOLUME button (page 25)
Increase the master volume level or the selected channel level.
12. SOURCE button (page 26, 27, 28, 48, 49)
Selects the component you want to use.
In standby mode, press this button to turn on the power of
this system.
13. VOLUME button (page 25)
Decrease the master volume level or the selected channel level.
14. OPEN/CLOSE button (page 27)
Opens or closes the disc tray.
15. STANDBY LED (page 25, 28)
During standby, this red LED lights.
During mute, this red LED blinks.
12
Index to Parts and Controls
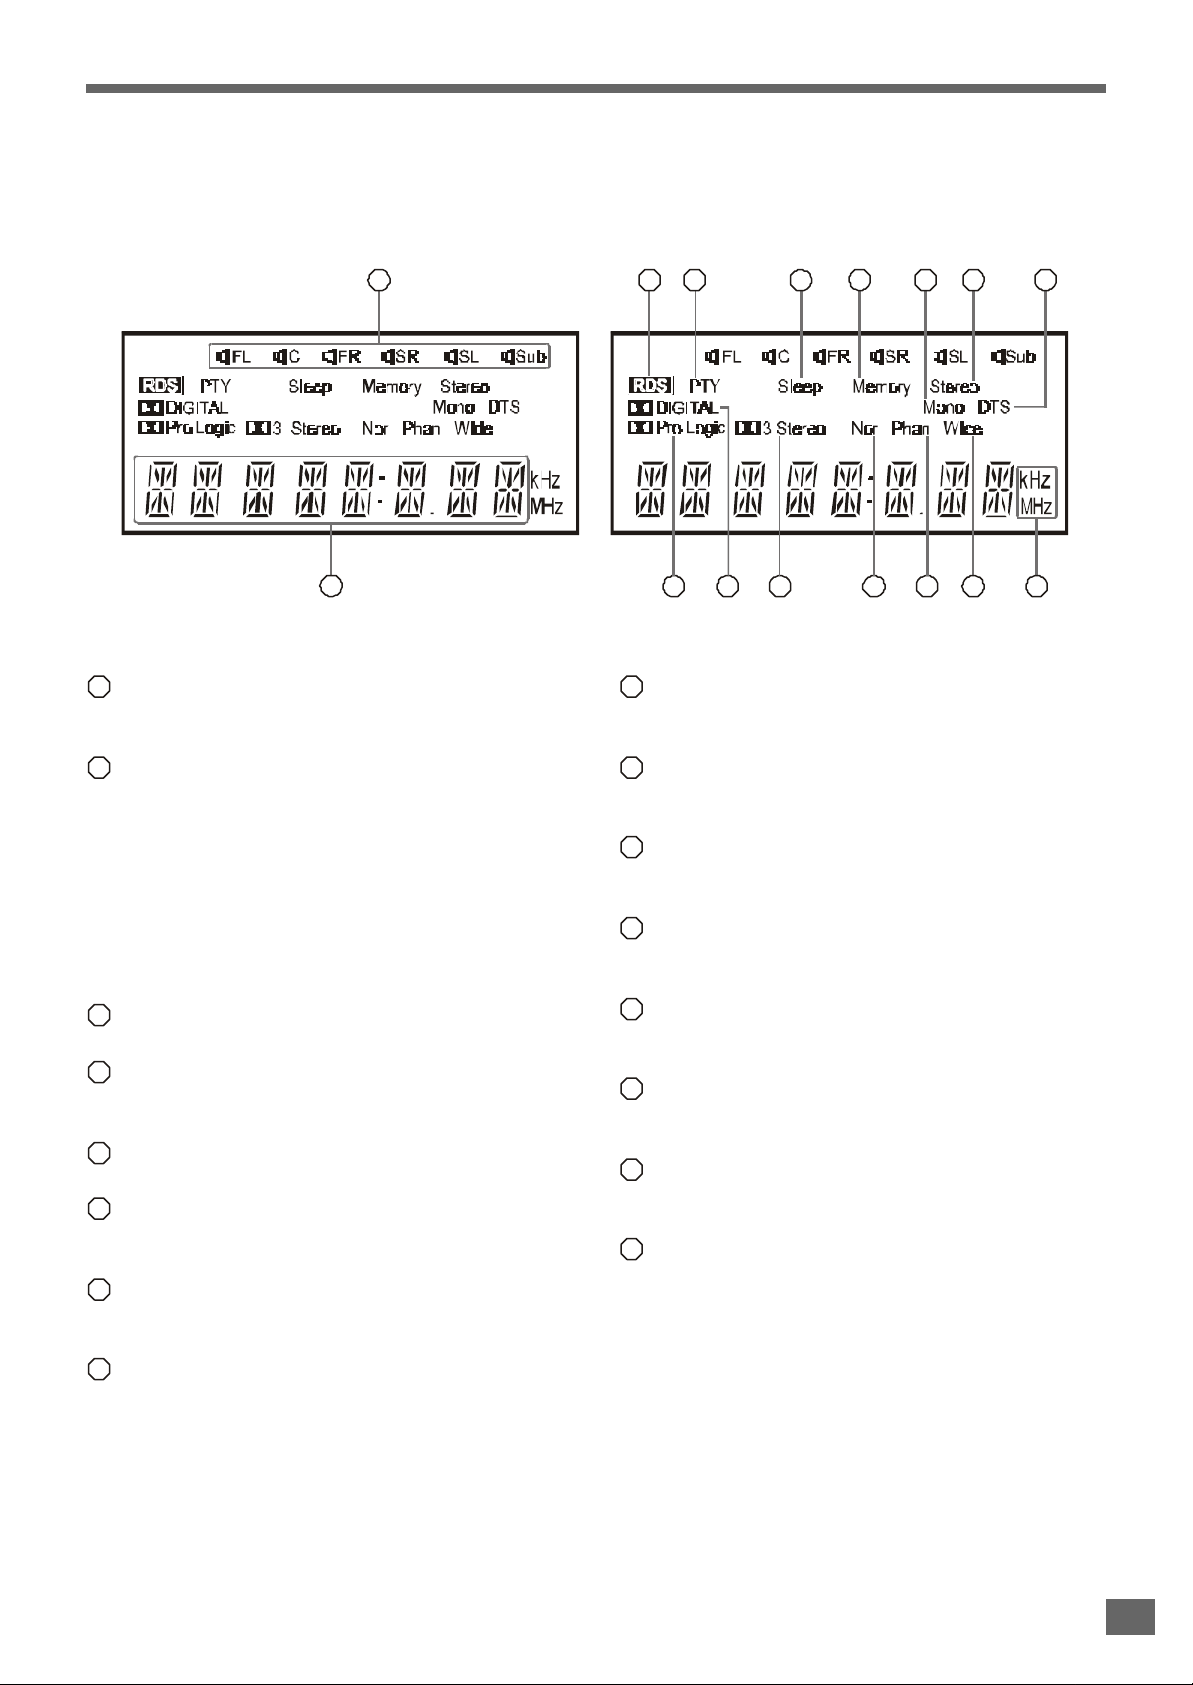
Front Panel Display
1
2
1
Speakers Icon (page 23, 38, 40, 50)
Light according to the selected listening mode and the
type of playing disc.
2
Status Bar (page 26, 30, 33, 48, 49)
It can show the operating information, such as “OPEN”,
“CLOSE”and “LOADING”, etc.
It can show the type of the playing disc, such as “DVD”,
“VCD”, “CD” and “MP3”, etc.
It can show the track and time information of the playing
CD and MP3 disc.
It can show the tuner band and frequency.
It can show the station name and program type when an
RDS station is received.
3
RDS indicator (page 49)
Illuminates when an RDS station is received.
4
PTY (Program Type) indicator (page 49)
Illuminates when an RDS station is received and its PTY
is decoded by the system.
5
Sleep indicator (page 50)
Illuminates when the sleep timer is set to on.
6
Memory indicator (page 25, 31)
Illuminates when the program play mode is set.
Illuminates when presetting radio stations.
7
Mono indicator (page 49)
Illuminates when setting to decode FM signal in mono
mode.
8
Stereo indicator (page 49)
Illuminates when a stereo FM station is received.
43
9
DTS indicator
Illuminates when the playing disc is recorded with DTS
format.
10
Frequency Unit indicator (page 48, 49)
In AM mode, the “kHz” lights up.
In FM mode, the “MHz” lights up.
11
Wide indicator (page 50)
Illuminates when the listening mode of “Pro Logic Wide”
or “3-Stereo Wide” is selected.
12
Phan indicator (page 50)
Illuminates when the listening mode of “Pro Logic Phantom” is selected.
13
Nor indicator (page 50)
Illuminates when the listening mode of “Pro Logic Normal” or “3-Stereo Normal” is selected.
14
Dolby 3-Stereo indicator (page 50)
Illuminates when the listening mode of “3-Stereo Normal” or “3-Stereo Wide” is selected.
15
Dolby Digital indicator
Illuminates when the playing disc is recorded with Dolby
Digital format.
Dolby Pro Logic (page 50)
16
Illuminates when the playing disc is recorded with Dolby
Pro Logic format.
Illuminates when the listening mode of “Pro Logic Normal”, “Pro Logic Phantom ” or “Pro Logic Wide” is selected.
5
1213141516 10
11
9876
13
Index to Parts and Controls
Refer to the pages indicated in parentheses for details.
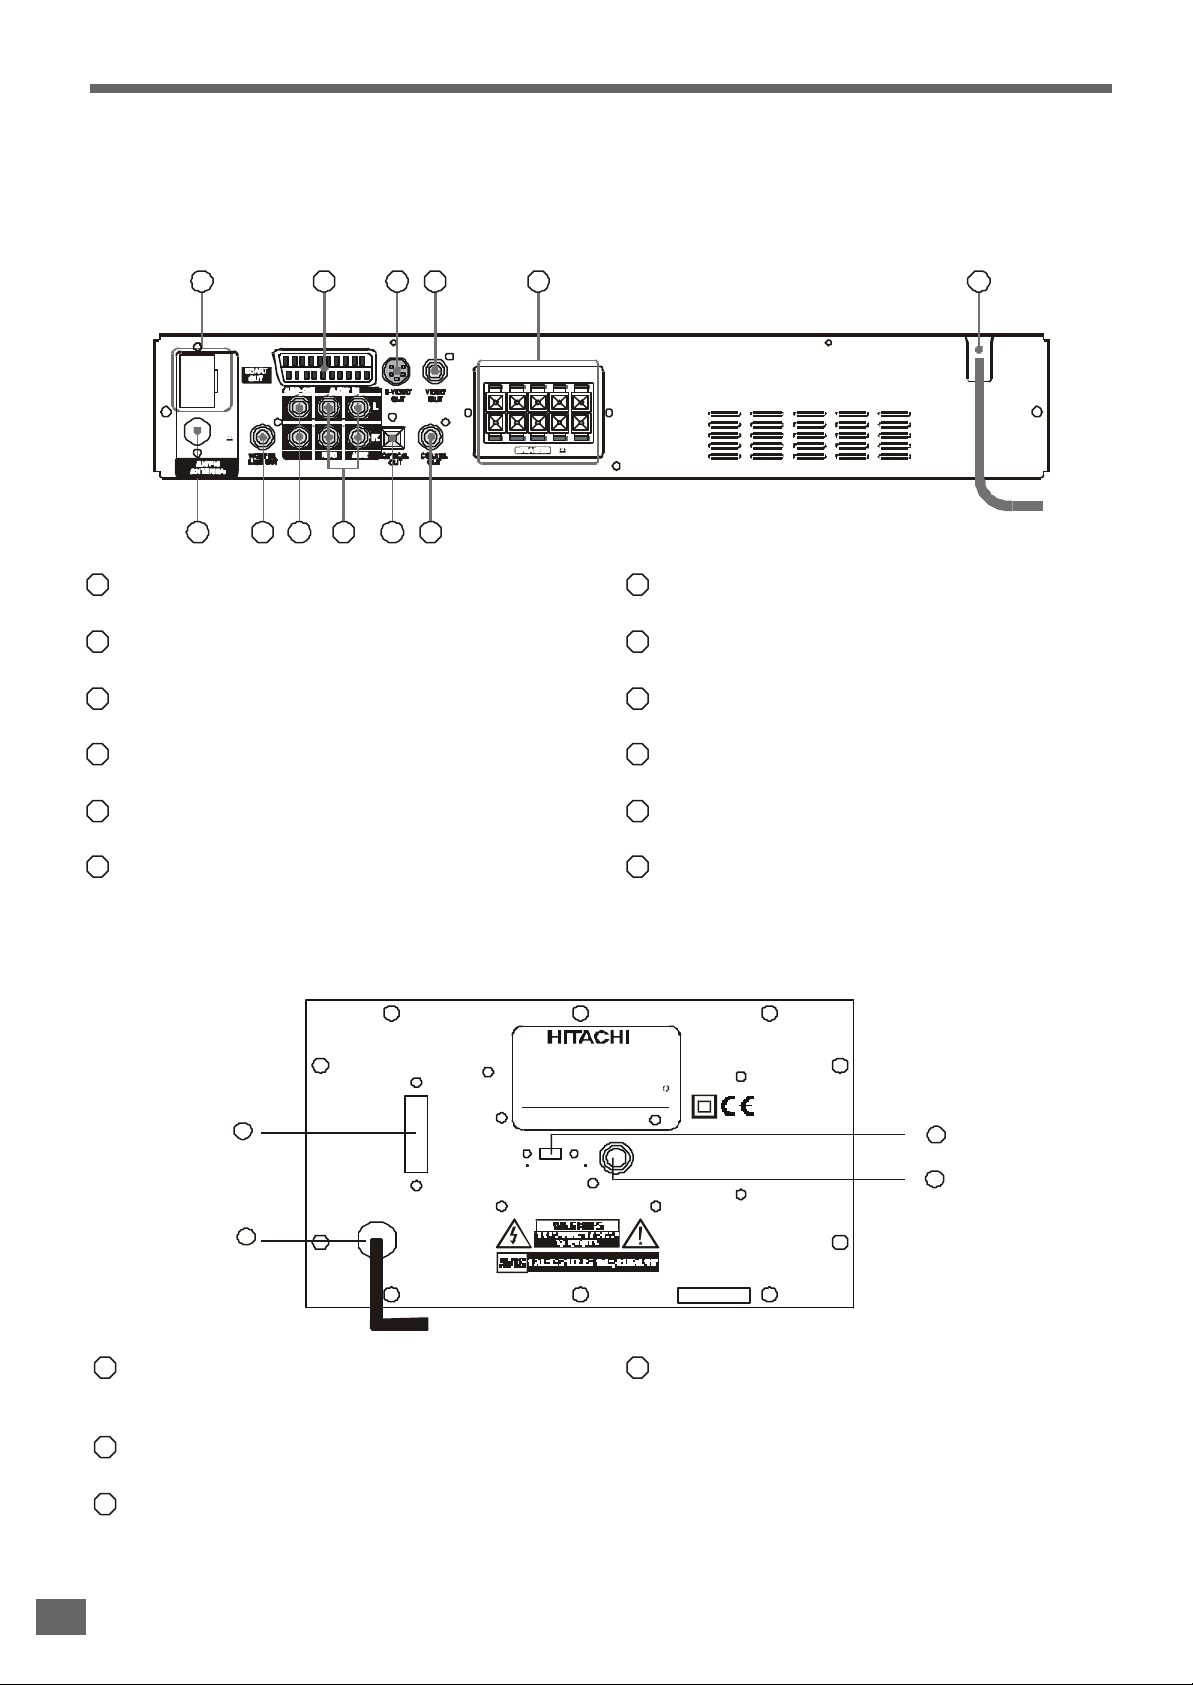
Main Unit Rear Panel
654321
AM
FM
(75 )
12 10 9 8 7
1
AM antenna terminal (page 19)
11
Connects to the supplied AM loop antenna.
2
SCART OUT connector (page 20)
Connects to the TV Scart input terminals.
3
S-VIDEO OUT jack (page 20)
Connects to a TV S-Video input connector.
VIDEO OUT jack (page 20)
4
Connects to a TV Video input connector.
SPEAKER output terminals (page 18)
5
Connects to the supplied speakers.
AC power cord (page 18)
6
Connects to a wall outlet.
FL CFR SLSR
(4 )
7
COAXIAL OUT jack (page 20)
Connects to an optional receiver.
8
OPTICAL OUT jack (page 20)
Connects to an optional receiver.
9
AUX1 and AUX2 audio line input jacks (page 20)
Connects to a TV set and a VCR, or other optional source.
AUDIO OUT jacks (page 20)
10
Connects to a TV set, or other stereo receiver.
WOOFER LINE OUT jack (page 18)
11
Connects to the supplied active subwoofer.
FM 75 ohm COAXIAL antenna terminal (page 19)
12
Connects to the supplied FM pigtail antenna.
Subwoofer Rear Panel
ON
1
2
1
POWER ON/OFF
Push this switch to ON position to switch on the system.
Push this switch to OFF position to switch off the system.
2
AC cord
Connect to a 230V AC power outlet.
3
AUDIO INPUT
Connects the audio source such as amplifier.
POWER
OFF
SUB WOOFER SYSTEM
MODEL : HTD - K150 SUB WOOFER
POWER SUPPLY : 230V~50Hz
IMPEDANCE:
POWER CONSUMPTION: 50W
Hitachi,Ltd. Tokyo Japan
180Phase 0
Serial No.:
4
4
Audio
Input
4
3
PHASE (0O-180O)
The phase relationship between the subwoofer and main
speakers may vary depending on the crossover frequency
selected and the distance between the subwoofer and
the main speakers.
While listening to music with strong bass content, move
the phase switch between the 0O and 180O position. Leave
the switch in the position that provides the strongest bass
output.
14
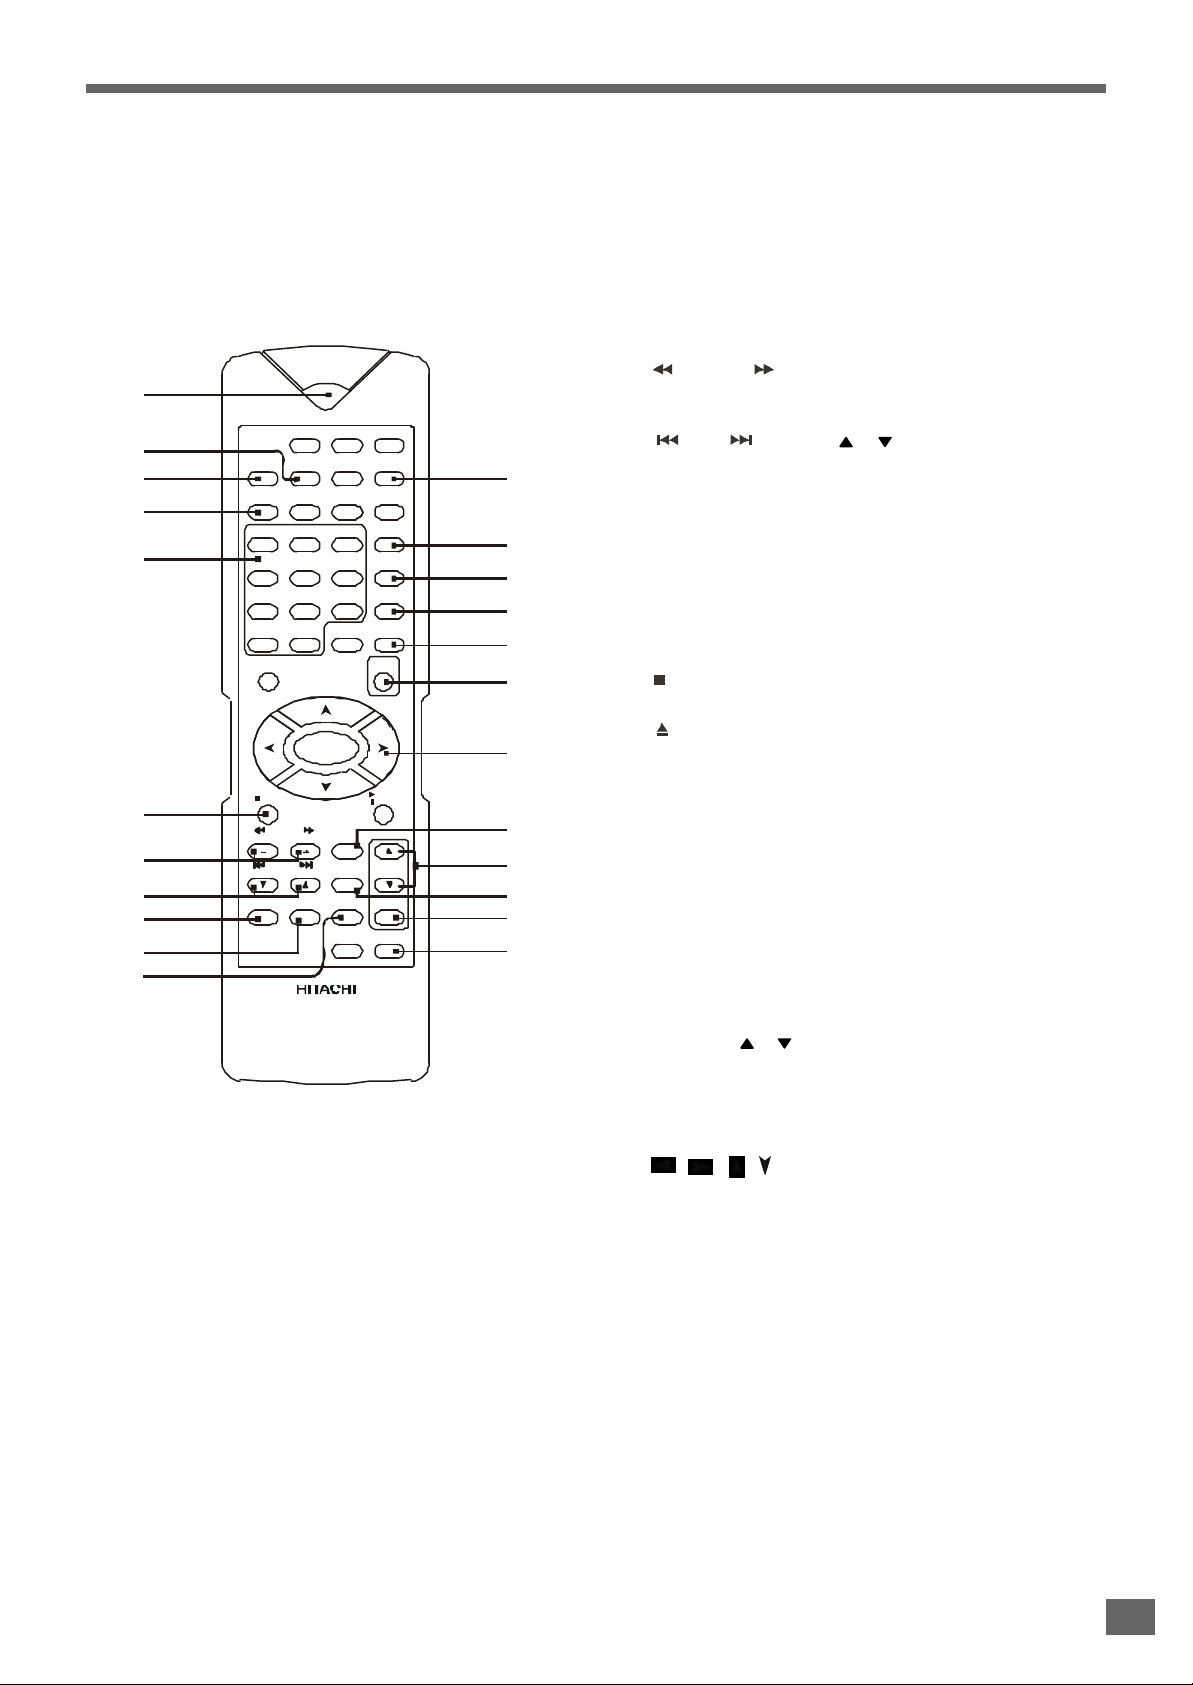
Index to Parts and Controls
Remote Control
STANDBY
1
DVD TUNER AUX
22
21
2
3
10
7
8
13
SUB
LANGUAGE TITLE RETURN
TITLE
ZOOM
1
2 3
4 5 6
7 8 9
+10 0
SETUP
ENTER
STOP
SEARCH
STATION
SKIP
TUNING
A-B REPEAT
MENU
/PBC
DISPLAY
SLEEP MUTE
OPEN/
CLOSE
PLAY/
PAUSE
STEP
ST/MO
VOLUME
SLOW
MEMO
PROG. SELECT
TEST
LISTENING
TONE
ANGLEGOTO
AUDIO
NTSC/
PAL
14
4
REMOTE CONTROLLER
RB - HTDK150
1. STANDBY button (page 28)
Turns on and off the system power.
2. GOTO button (page 33)
Selects a start point to play.
3. Number buttons
Select the items or settings.
4. PROGRAM button (page 32)
Sets a program play.
5. NTSC/PAL button (page 22)
Changes the color system temporarily to match the your
TV standard.
12
20
23
5
15
11
19
6
17
9
18
16
6. STEP(MONO/STEREO) button (page 28, 51)
Do the single stepping play while playing a DVD or VCD.
Switches between monaural or stereo of FM stereo reception.
7. SEARCH / STATION (+ or -) buttons (page 28, 49)
Press to play a disc in fast forward / reverse mode.
In tuner mode, press to select the preset stations.
8. SKIP / TUNING( or ) buttons (page 28, 49)
In DVD player mode, press to select the next / previous
title, chapter or track.
In Tuner mode, press to change the tuning frequency.
Press and hold the button for more than 1 second to
search the station automatically
9. SLOW(MEMORY) button (page 26, 28)
Do the slow-motion play while playing a DVD or VCD.
In tuning mode, press to save as memory preset station
for tuning frequency.
10. STOP button (page 28)
Stops playing a disc and clears the stored program.
11. OPEN/CLOSE button (page 27)
Opens or closes the disc tray.
12. RETURN button (page 30)
Displays the root menu when playing a DVD.
Goes back to the PBC menu when playing a VCD or SVCD.
13. REPEAT button (page 31)
Press to do a Repeat 1 or Repeat All playback.
14. A-B button (page 31)
Specifies a section and plays it repeatedly.
15. MUTE button (page 25)
Mutes the sound.
16. LISTENING button (page 51)
Selects a listening mode you want.
17. VOLUME ( or ) buttons (page 25)
Increase / decrease the master volume level or the selected channel level.
18. SELECT button (page 25)
Selects the audio channel to view or adjust its level.
19. / / / / ENTER button
Selects and executes the items or settings.
20. AUDIO button (page 47)
Selects the audio channels for sound.
21. SUBTITLE button (page 46)
Selects a desired language for the subtitles while playing a DVD.
22. LANGUAGE button (page 46)
Selects a desired language for the audio when playing a
DVD.
23. DISPLAY button (page 34)
Switches the item displayed on the TV screen or/and on
the front panel display.
15
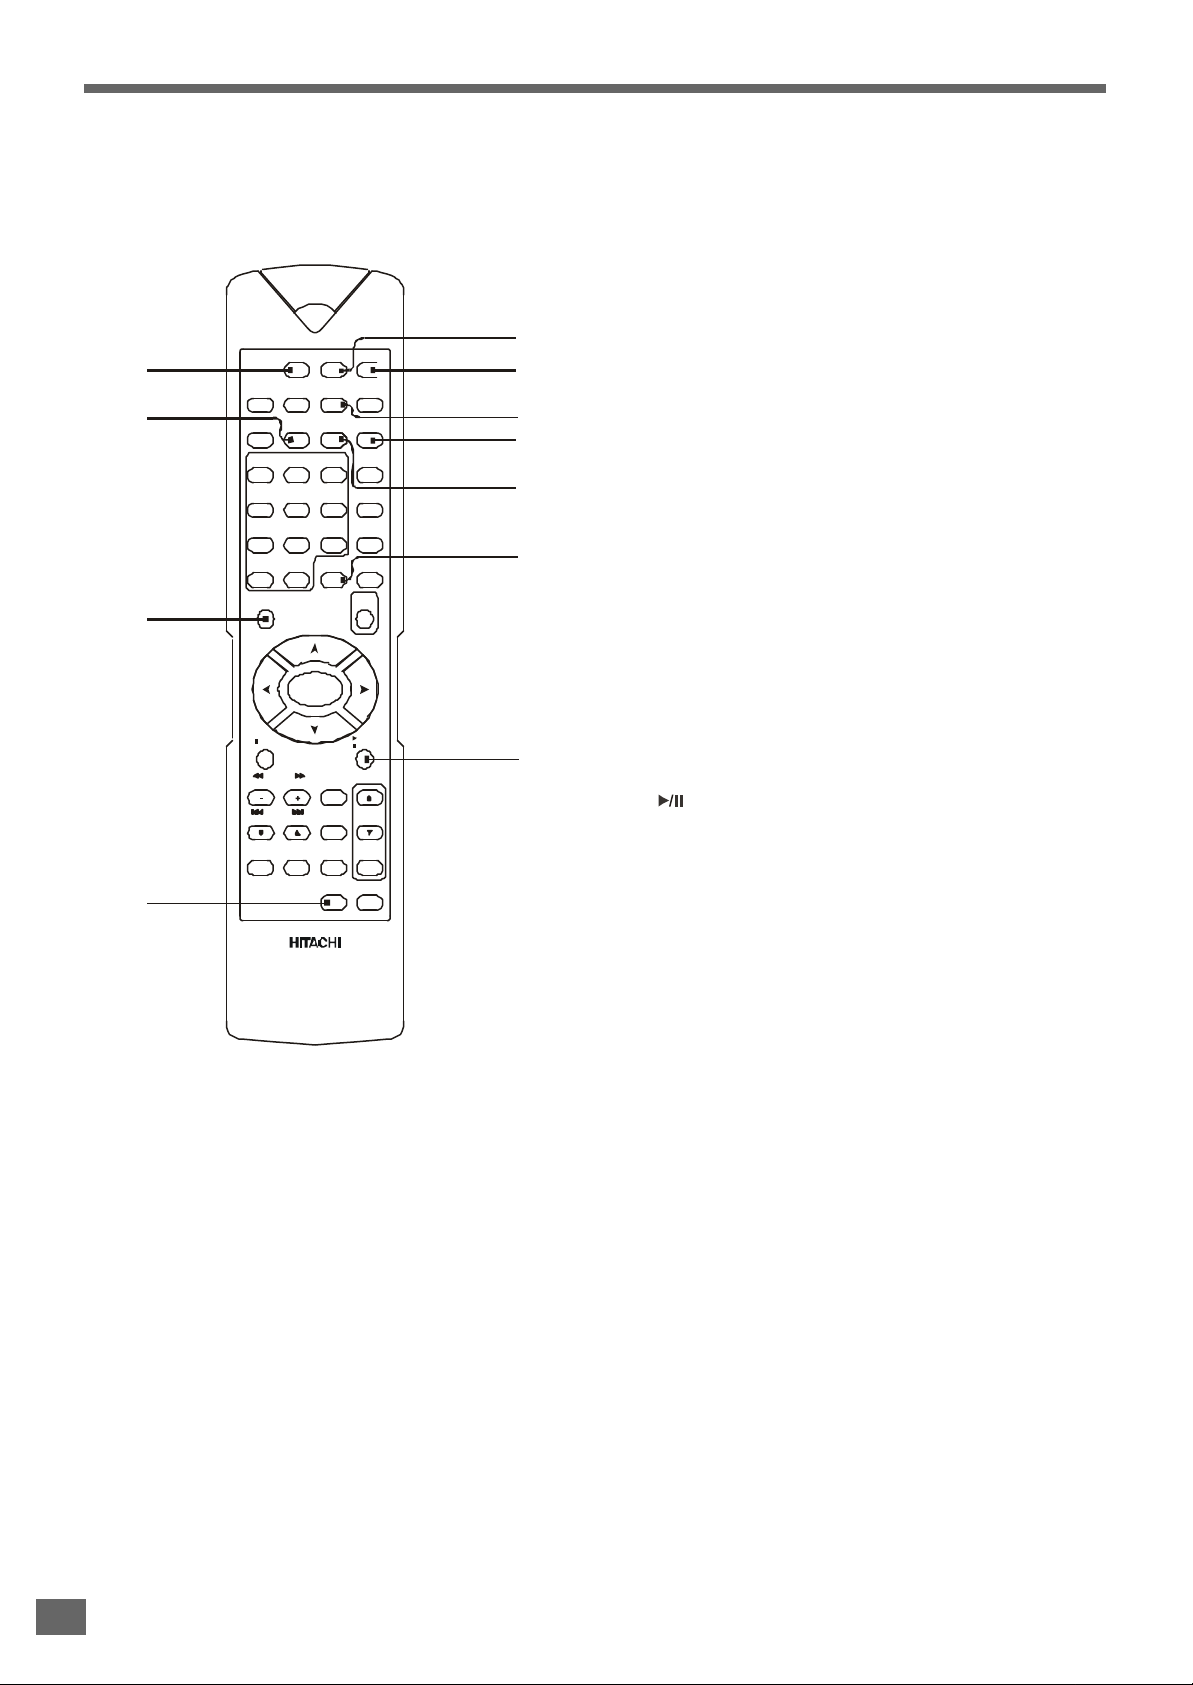
Index to Parts and Controls
Remote Control
STANDBY
DVD TUNER AUX
24
25
SUB
LANGUAGE TITLE RETURN
TITLE
MENU
ZOOM
/PBC
1
2 3
4 5 6
7 8 9
+10 0
SETUP
SLEEP MUTE
ANGLEGOTO
AUDIO
DISPLAY
NTSC/
PAL
OPEN/
CLOSE
26
ENTER
STOP
SEARCH
STATION
SKIP
TUNING
A-B REPEAT
PLAY/
PAUSE
STEP
ST/MO
VOLUME
SLOW
MEMO
PROG. SELECT
TEST
LISTENING
TONE
27
28
29
30
32
31
33
34
24. DVD button (page 28)
Selects the DVD player mode.
25. ZOOM button (page 45)
Zoom in the playing pictures.
26. SETUP button (page 21, 35)
Displays or exits the SETUP menu.
27. TEST TONE (page 25)
Turns test tone on and off.
28. TUNER button (page 26, 48)
Selects FM or AM mode.
29. AUX button (page 49)
Selects the AUX1 or AUX2 component (i.e. external
source).
30. TITLE button (page 29)
Displays the title menu when playing a DVD.
31. MENU/PBC button (page 30)
Switch the PBC functions to on or off when playing a VCD
(Ver. 2.0) or SVCD.
32. ANGLE button (page 46)
Changes the angles while playing a DVD.
33. SLEEP button (page 50)
Activates the sleep timer.
34. PLAY/PAUSE button (page 28)
Starts or pauses playing a disc.
REMOTE CONTROLLER
RB - HTDK150
16
Installations
Unpacking
This section describes how to hookup the system to
the speakers, a TV monitor with audio / video input
jacks and other video component. You cannot connect
this system to a TV monitor which does not have a
video input connector. Be sure to turn off the power of
each component before making the connections.
Check that you have the following items:
• Main unit (1)
• Subwoofer (1)
• Speakers (5)
• Remote control (1)
• Audio & Video cable (1)
• Subwoofer cable (1)
• Scart cable(1)
• Speaker cords (5m x 3, 15m x 2)
• AM loop antenna (1)
• FM pigtail antenna (1)
• Instruction Manual (1)
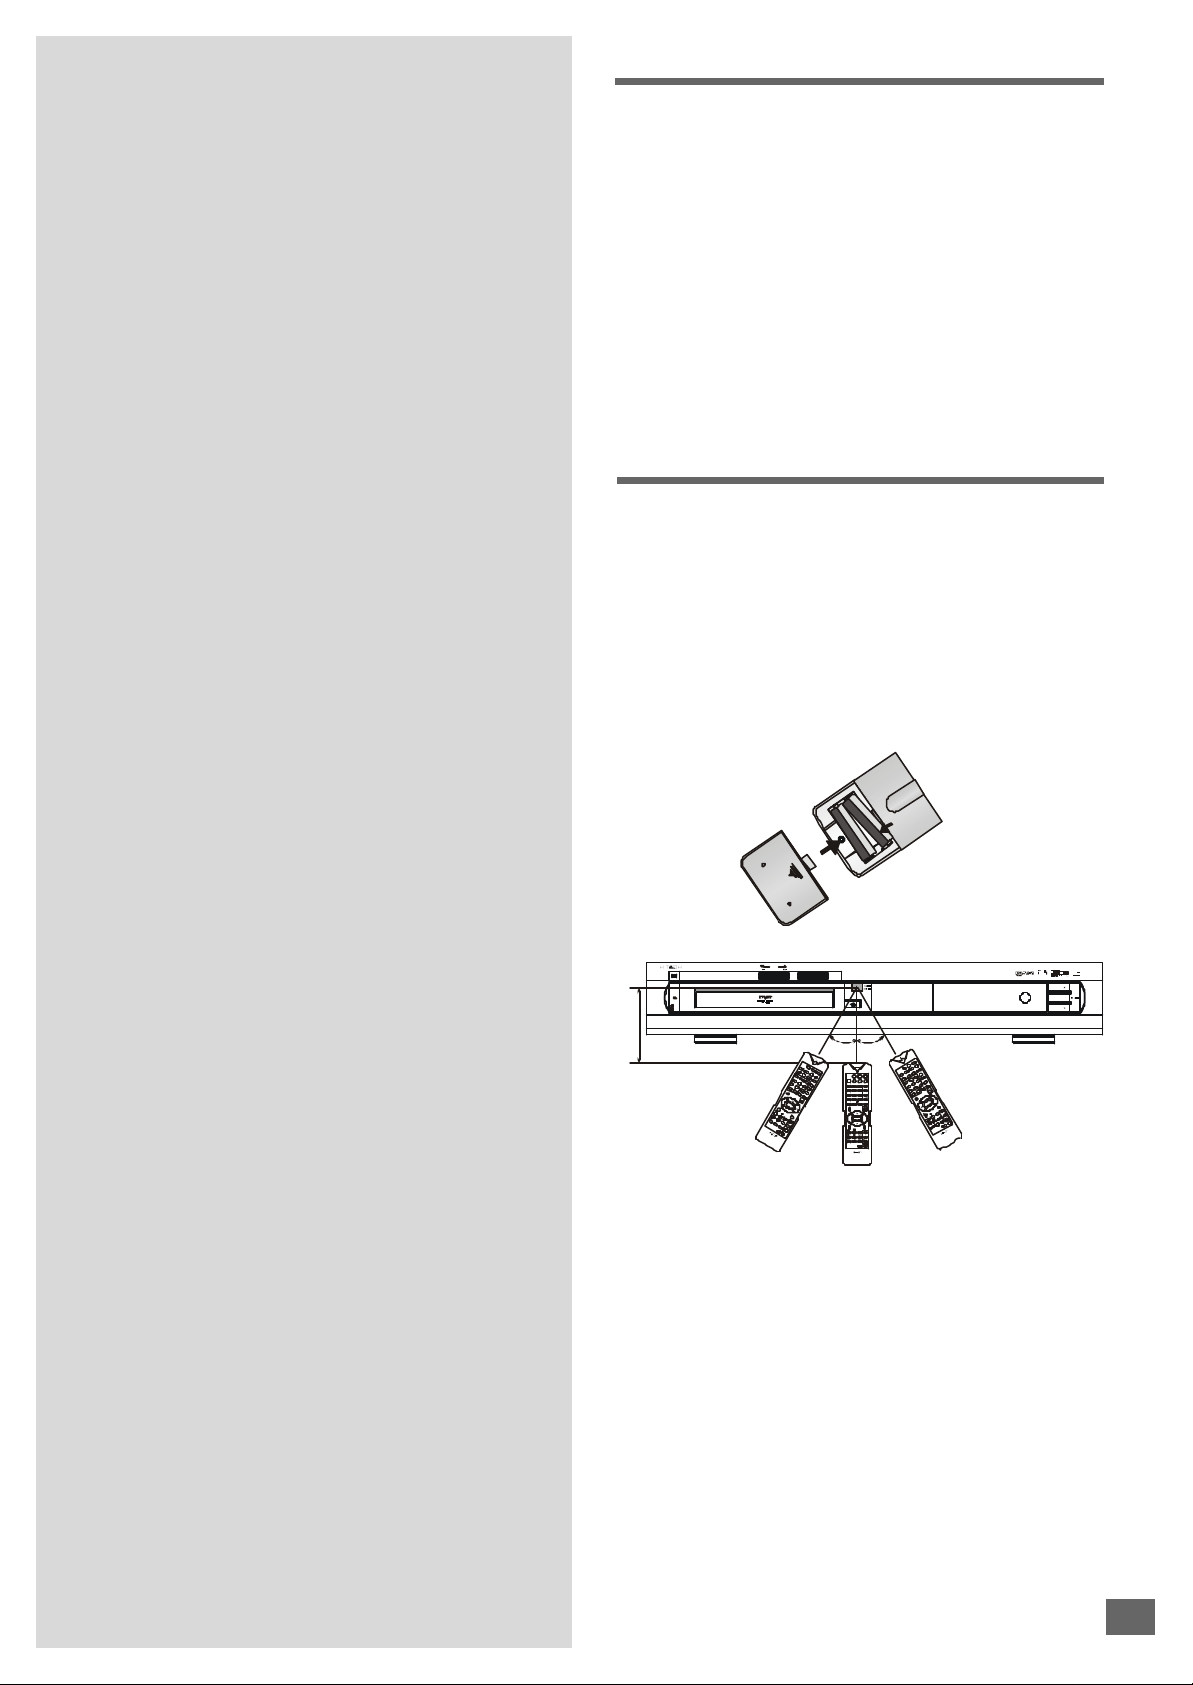
Inserting Batteries into
the Remote Control
You can control the system using the supplied remote control. Insert two batteries by matching the + and - on the batteries. When using the remote control, point it at the remote
sensor on the front panel of this system.
3V [2X “AAA cell OR IEC R3 OR JIS R3P (JIS SUM-4)]
DVD/VCD/CD SURROUND RECEIVER HTD-K150
STANDBY
POWER VOLUME
ON
OFF
6m
TUNING
STOP PLAY/PAUSE
NEXTPREV
OPEN/CLOSE
o30o
30
ST
A
N D
B
Y
D V
D
SUBTITL
TU
N E
LA
E
R
NGUA G
G
A UX
E
T
O
TO
ZO
ITL
E
OM
1
R E
MENU
/P
T
U RN
2
BC
4
A
N G
3
LE
5
A UD
IO
7
6
8
D I
S
+ 1
PL
9
A Y
0
0
N
T
SC/P
S
ET
SL
EEP
A
L
U
P
M
U T
E
O
PE
C
N
/
L
OSE
EN
TER
S
TO
P
SEAR
S
CH
T
A TIO
P
LAY
/
PA
N
SK
IP
U
SE
TU
S
N
ING
S
TEP
T/M
O
REPE
SLO
A T
V
W
A
-B
M
E
O
LUM
MO
E
PR
OG
.
S
TE
S
ELE
CT
TON
T
E
L
ISTE
N IN
G
R
E
M
O
TE C
ONT
R B
R
OL
H
TD
LER
K 1
5 0
SUBTITLE
LANGUAGE TITLE RETURN
4 5 6
7 8 9
+10 0
SETUP
STOP PLAY/PAUSE
SEARCH
STATION
SKIP
TUNING
REMOTE CONTROLLER
RB - HTDK150
D
BY
ST
A N
A
U X
R
R N
TUN
E
R
ETU
LE
D VD
STANDBY
T
IT
GL
E
U A
GE
A N
LA
N G
ME
N U
BC
/P
U D
IO
E
SU
B
A
TI
TL
DVD TUNER AUX
OM
O
3
LA
Y
Z
G
OTO
D IS
P
2
N
TSC
/PAL
6
1
ANGLEGOTO MENU /PBC
ZOOM
5
9
M
U TE
4
8
N
AUDIO1
2 3
DISPLAY
NTSC/
PAL
SLEEP MUTE
OPEN/
CLOSE
ENTER
STEP
ST/MO
VOLUME
SLOW
MEMO
A-B REPEAT
PROG. SELECT
TEST
LISTENING
TONE
/
SL
EEP
LO
SE
O
PE
7
C
0
0
+ 1
ETU
P
S
T
ER
LA
Y/
EN
P
PA
U SE
E
P
E
P
O
LUM
STO
O
ST
CH
V
ST
/M
L
OW
A R
SE
ION
T
S
EM
O
S
TAT
SEL
EC
.
M
IP
PRO
G
ING
SK
N IN
G
LIS
TEN
TU
A-B
T
EST
E
A
T
T
ON
RE
PE
LE
R
ROL
ON
T
1 5
0
TE
C
H T
D K
EM
O
B
-
R
R
PHONES
SELECT
VOLUME
Note
Do not leave the remote control in an extermely hot or humid
•
place.
• Do not use a new battery with an old one.
• Do not drop any foreign object into the remote casing. Par-
ticularly when replacing the batteries.
• Do not expose the remote sensor to direct sunlight or light-
ing apparatus. Doing so may cause a malfunction.
• If you are not using the remote control for an extended pe-
riod of time, remove the batteries to avoid possible damage from battery leakage and corrosion.
• The remote control may not be effective in strong day-
light.
• During radio listening (AM), if you operate the remote con-
trol extremely close to the system, some noise may be produced.
17

Speaker System Hookup
Front Right Speaker
Rear Surround Right Speaker
Connect the supplied speaker system using the supplied
speaker cords by matching the colors of the terminals and
those of the cords.
At the rear of each supplied speakers you will find two click
fixation connectors, a black one is for (-) and a red / blue / grey
one is for (+).
Speakers
FRONT (L&R)
CENTER
(REAR) SURROUND (L&R)
BLACK
BLACK
BLACK
+
RED
BLUE
GREY
• Connect the active Subwoofer to the RCA jack of WOOFER
LINE OUT.
Required subwoofer cable (supplied):
Black Black
Active Subwoofer
• Connect the Front Left speaker to the FL terminals.
• Connect the Front Right speaker to the FR terminals.
• Connect the Center speaker to the C terminals.
• Connect the Surround Left speaker to the SL terminals.
• Connect the Surround Right speaker to the SR terminals.
Required speaker cords (supplied):
Center Speaker
+
+
+
ON
POWER
Audio
Input
OFF
180
Phase 0
AC 120V~60Hz
FM
(75 )
AM
To avoid short-circuiting the speakers
• Short-circuiting of the speakers may damage the system.
To prevent this, make sure to take the following precautions
when connecting the speakers.
• Make sure the stripped end of each speaker cord does not
touch another speaker terminal or the stripped end of another speaker cord.
Examples of poor conditions of the speaker cord
• Stripped speaker cord is touching another speaker termi-
nal.
FR CFL SR SL
(4 )
++
Front Left Speaker
Rear Surround Left Speaker
+
• Stripped cords are touching each other due to excessive
removal of insulation.
Note
• Be sure to match the speaker cord to the appropriate termi-
nal on the components: + to + and - to -. If the cords are
reversed, the sound will be distorted and will lack bass.
• If you use front speakers with low maximum input rating,
adjust the volume carefully to avoid excessive output on the
speakers.
18

Antenna Hookups
Outdoor FM antenna
Connect the supplied AM / FM antennas for listening to the radio.
• Connect the AM loop antenna to the AM terminals.
• Connect the FM pigtail antenna to the FM 75-ohm coaxial terminal.
AM wire antenna
(supplied)
FM wire antenna
(supplied)
AM
FM
(75 )
Note
• To prevent noise pickup, keep the AM loop antenna away
from the system and other components.
• Be sure to fully extend the FM pigtail antenna.
• After connecting the FM pigtail antenna, keep it as horizontal
as possible.
Skill of connecting antenna and speaker wires
Push and hold Speaker terminal tab down to insert wire. Release tab to lock wire in terminal. Make sure the insulation is
completely removed from the ends of the Antenna and speaker
wires at all connection points.
FR CFL SR SL
(4 )
If you have poor FM reception
Use a 75-ohm coaxial cable (not supplied) to connect the
system to an outdoor FM antenna as shown below.
System
Ground wire
AM
(not supplied)
FM
(75 )
To ground
Note
• If you connect the system to an outdoor antenna, ground it
against lightning.
• To prevent a gas explosion, do not connect the ground wire
to a gas pipe.
19

TV and Optional Compo-
Connecting the AC Power
nent Hookups
Required cords
• Video cord for connecting a TV set (supplied).
Yellow Yellow
• Audio cords (supplied).
When connecting a cord, be sure to match the color-coded
pins to the appropriate jacks on the components.
Red
White White
Note
• When using the S-VIDEO OUT jack instead of the VIDEO
OUT jack for better picture clarity.
Your TV monitor must also be connected via an S-VIDEO
INPUT jack. S-Video signals are on a separate bus from
the video signals and will not be output through the video
jacks.
• When using the SCART OUT connector instead of the
VIDEO OUT jack.
Your TV monitor must also be connected via an Scart socket.
The Scart terminal contains separate video signals and
stereo audio signals.
• You can connect the OPTICAL or COAXIAL output to an-
other amplifier with DTS, Dolby Digital decoder.
Red
Cord
Note
• Power Requirements: AC 230 V, 50Hz.
• The power that differs from above value will damage the
system or cause the system to work abnormally.
Before connecting the AC power cord (main lead) of this system to a wall outlet, connect the speakers to the system.
Connect the AC power cord of the active subwoofer.
Connect the AC power cords (main leads) of your TV, optional
components to a wall outlet.
AM
FM
(75 )
FR CFL SR SL
(4 )
20

Basic Setup
You must do some basic setting when first using this
system. This chapter describes how to set the OSD
(On-Screen Display) language, colour system, audio
output mode and video output mode; how to position
and setup speakers; how to preset the radio stations,
etc.
Selecting the Language for
OSD
You can select the language for OSD (On-Screen Display).
This setting allows you to select a preferred language for the
OSD menu, operating messages and DVD disc menu. The
default language is ENGLISH
STANDBY
DVD TUNER AUX
SUB
LANGUAGE TITLE RETURN
TITLE
ZOOM
2 3
4 5 6
7 8 9
+10 0
SETUP
.
MENU
/PBC
SLEEP MUTE
ANGLEGOTO
AUDIO1
DISPLAY
NTSC/
PAL
OPEN/
CLOSE
NTSC/PAL
STOP
SEARCH
STATION
TUNING
REMOTE CONTROLLER
ENTER
PLAY/
PAUSE
STEP
ST/MO
SKIP
VOLUME
SLOW
MEMO
A-B REPEAT
PROG. SELECT
TEST
LISTENING
TONE
RB - HTDK150
/ / /
1 Press SETUP button to enter SETUP MENU. Use / to
select GENERAL SETUP, and then press ENTER button.
2 Highlight OSD LANG using / , then press button to go
to the right option list. Select ENGLISH or other languages
using / , then press ENTER to confirm your selection.
ENGLISH
FRENCH
ITALIAN
GERMAN
SPANISH
3 Press SETUP again to exit menu.
Note:
• Some DVDs may not support the selected language. In this
case, the player will display disc menu same as the initial
language of disc.
21

Selecting the Colour System
You can setup the colour system of this unit to match up your
connected TV set. If the colour system of this unit is different
from that of the TV set, the images can not be displayed normally on the screen. The default setting is MULTI.
1 Press SETUP button to enter SETUP MENU. Use / to
select GENERAL SETUP (see page 20), and then press
ENTER button.
2 Highlight TV TYPE using / , then press button to go to
the right option list. Select MULTI, NTSC or PAL using / ,
then press ENTER to confirm your selection.
MULTI
NTSC
PAL
Selecting the Audio Output
Mode
You must setup the audio output mode correctly, if not, you will
not get the audio outputs. The default setting is ANALOG.
• ANALOG: If the SPEAKERS outputs on the rear panel are
connected with speakers directly, or the AUDIO OUT (2 RCA
jacks) is connected to amplifier, select this item.
• SPDIF/RAW: If the COAXIAL or OPTICAL output on the rear
panel is connected to a receiver with built-in Dolby Digital,
DTS or/and MPEG decoder, select this item.
• SPDIF/PCM: If the COAXIAL or OPTICAL output is connected
with a receiver which accepts PCM audio signal, select this
item.
1 Press SETUP button to enter SETUP MENU. Use / to
select GENERAL SETUP (see page 13), and then press
ENTER button.
2 Highlight AUDIO OUT using / , then press button to go
to the right option list. Select ANALOG, SPDIF/RAW or
SPDIF/PCM using / , then press ENTER to confirm your
selection.
3 Press SETUP again to exit menu.
Note:
• You can change the colour system of the unit temporarily
using NTSC/PAL button on the remote control.
ANALOG
SPDIF/RAW
SPDIF/PCM
3 Press SETUP again to exit menu.
Note:
• If the SPDIF/RAW is selected and the audio source is LPCM
(DVD), the outputs in the COAXIAL and OPTICAL are PCM.
• If the SPDIF/RAW is selected and the audio source is audio
CD, the outputs in the COAXIAL and OPTICAL are PCM.
• If the ANALOG is selected, the COAXIAL and OPTICAL will
not have audio outputs.
• If your speaker system does not match your AUDIO OUT
setting, you will not be able to enjoy the true original sound.
22

Selecting the Video Output
Mode
You must setup the audio output mode correctly, if not, you will
not get the video outputs. The default setting is CVBS.
• CVBS: Composite video output and S-video output avail-
able. If the connected video output terminal is VIDEO OUTPUT or S-VIDEO OUTPUT on the rear panel, select this
item.
• RGB: Color separate signal (Red, Green and Blue) outputs
are available. If the connected video output terminals are
SCART or R, G, B on the rear panel, select this item.
• YUV: Video Chroma and Lum separate signal outputs are
available. If the connected video output terminals are Y, U, V
on the rear panel, select this item.
1 Press SETUP button to enter SETUP MENU. Use / to
select GENERAL SETUP (see page 22), and then press
ENTER button.
Speakers Setup
Position
For the best possible surround sound all the speakers other
than the subwoofer should be the same distance from the
listening position.
However, this system allows you to place the center speaker
up to 1.6 meters closer ( B ) and the rear speakers up to 4.6
meters closer ( C ) to the listening position.
The front speakers can be placed from 1.0 to 15.0 meters
( A ) from the listening position.
• You can place the subwoofer at any position. If possible,
place the subwoofer near a corner to maximize the bass
response.
• You can place the rear speakers either behind you or to the
side, depending on the shape of your room, etc.
When the rear speakers are placed to the side:
2 Highlight VIDEO OUTPUT using / , then press button
to go to the right option list. Select CVBS, RGB or YUV
using / , then press ENTER to confirm your selection.
CVBS
RGB
YUV
3 Press SETUP again to exit menu.
Note:
• Maybe there are not the terminals on your unit for Scart,
RGB and YUV outputs. These video output terminals are
used for options by manufacturer.
B
A A
o
45
C
o
90
o
20
When the rear speakers are placed behind you:
B
AA
o
45
C
C C
o
90
o
20
23

Speakers Setup
Note
• Do not place the center and rear speakers far away from the
listening position than the front speakers.
• Avoid positioning the speakers in corners, as this will boost
the bass tones too much.
• Placing the speaker behind curtains, furniture etc. will re-
duce the treble response, thus reducing the stereo effect
considerably. The listener should still be able to see the
speaker.
• Each room has different acoustic characteristics and posi-
tioning possibilities are often limited. You can find the best
position for your speakers by experimenting. In general, the
speakers should be arranged as symmetrically as possible.
Height
• The best height for front and center speaker is at the height
of your ears (while seated)
• The height of the rear speakers is not less than the height of
your ears (while seated).
See the following diagram. It s advisable to place the rear
speakers in the D area. However you can place them in
the C area, too.
’
2 Highlight CENTER using / , then press button to go to
the right option list. Select ON or OFF using / , then
press ENTER to confirm your selection.
ON
OFF
C
D
60
C
o
D
o
30
Size
When you do not connect center, rear speakers or subwoofer,
set the parameters for them in the SETUP MENU. Since the
front speakers setting are fixed, you cannot change them.
The default settings are underlined.
• ON: Normally select this.
• OFF: If you will not connect the relevant speaker(s), select
this.
3 Highlight REAR using / , then press button to go to
the right option list. Select ON or OFF using / , then
press ENTER to confirm your selection.
ON
OFF
4 Highlight SUBWOOFER using / , then press button
to go to the right option list. Select ON or OFF using / ,
then press ENTER to confirm your selection.
ON
OFF
Note
• When BASS MODE in the SETUP MENU is set to CONF 1,
see page 40, you cannot set the SUBWOOFER.
1 Press SETUP button to enter SETUP MENU. Use / to
select SPEAKER SETUP, and then press ENTER button.
24
5 Press SETUP again to exit menu.

Speakers Setup
To specify the balance and level of the speakers
You can use the Test Tone function to check whether all the
speakers are connected correctly, and to specify the balance
of the speakers.
VOLUME /
SELECT
STANDBY
DVD TUNER AUX
SUB
LANGUAGE TITLE RETURN
TITLE
MENU
ANGLEGOTO
ZOOM
/PBC
AUDIO1
2 3
DISPLAY
4 5 6
7 8 9
N/P
>10 0
SLEEP MUTE
SETUP
ENTER
STOP PLAY/PAUSE
STEP
STA- STA+ ST/MO
SLOW
N
T U TUN + MEMO
A-B REPEAT PROG. SELECT
TEST
TONE
ADJ/VOL
LISTENING
OPEN/
CLOSE
+
MUTE
VOLUME
SELECT
TEST TONE
1 Press the TEST TONE button on the remote control.
You will hear the test tone from Front-left speaker, Center
speaker, Front-right speaker, Surround-right speaker and
Surround-left speaker in sequence.
2 Sit at your listening position, use the VOLUME and VOL-
UME
buttons to adjust the level of each speaker..
Adjust the volume level so that the volume of the test tone
from each speaker sounds the same.
The adjusted value will appear on the front panel display
and TV screen. If you do not operate the remote for a few
seconds, the value turns off and is stored in the system.
You can vary the level of each speaker as follows. At the same
time, you can adjust the Treble of the front speakers.
1 Press the SELECT button to select a channel. The level of
the channel will appear on the front panel display and TV
screen.
TRE (Treble level) adjustable range: -10 dB to +10 dB, 2
dB/step.
FL (Front-left level), CNT (Center level), FR (Front-right
level), SR (Surround-right level), SL (Surround-left level)
and SUB (Subwoofer level) adjustable range: -15 dB to
+10 dB, 1 dB/step.
2 Use the VOLUME and VOLUME buttons to adjust the
selected channel’s level.
3 If you do not press the SELECT or VOLUME / buttons
for a few seconds, the values turns off and is stored in the
system.
Note
• The optional items vary with the changing of listening mode.
To adjust the volume of all the speakers (Master Volume) at
one time
Use the VOLUME
To shut off all of speakers’ output
Press the MUTE button. The red LED on the front panel starts
to blink.
Press it a second time to release muting and resume the
normal output. The blinking LED blacks out.
and VOLUME buttons in normal mode.
3 Press TEST TONE again to turn off the test tone.
Note
• The playback will pause during test tone.
• The test tone only tests the valid speakers, depending on the
current listening mode.
25

Presetting Radio Stations
You can preset 40 stations for FM and AM randomly. Before
tuning, make sure that you have turned down the volume to
the minimum.
TUNING( / )
Number
buttons
STATION +/-
TUNING /
DVD TUNER AUX
SUB
LANGUAGE TITLE RETURN
TITLE
ZOOM
1
4 5 6
7 8 9
+10 0
SETUP
STOP
SEARCH
STATION
SKIP
TUNING
A-B REPEAT
REMOTE CONTROLLER
RB - HTDK150
STANDBY
2 3
ENTER
MENU
/PBC
SLEEP MUTE
STEP
ST/MO
VOLUME
SLOW
MEMO
PROG. SELECT
TEST
LISTENING
TONE
ANGLEGOTO
AUDIO
DISPLAY
NTSC/
PAL
OPEN/
CLOSE
PLAY/
PAUSE
SOURCE
TUNER
5 Press the STATION (+ or -) button on the remote control to
select a preset number you want.
You can use the number buttons (0~9 / +10) on the remote
control to key in a preset number directly.
6 Press the MEMO button again to store the station.
If you do not press this button in 3 seconds or you press
any other buttons, the station will not be stored in the system.
The preset number and “Memory” indicator disappear.
7 Repeat Step 2 to 6 to store other stations.
To tune in a station with a weak signal
Press the TUNING ( or ) repeatedly in Step 3 to tune in the
station manually.
1 In DVD, AUX1 or AUX2 mode, press the TUNER on the
remote control to select Tuner function directly.
2 To select between FM or AM, press the TUNER button.
You can select FM or AM band using the SOURCE button
on the front panel.
3 Press and hold the TUNING ( or ) button until the fre-
quency indicator starts to change automatically, then release the button.
Scanning stops when the system tunes in a station.
4 Press MEMORY(MEMO).
A preset number “P00” and “Memory” indicator appear
on the front panel display.
26

Playing Discs
Basic Play
This chapter describes how to play a DVD / Video CD /
CD / MP3 disc.
Depending on the DVD or Video CD discs, some operations
may be different or restricted. Refer to the instructions supplied with your disc.
POWER TUNING( or )
STOP
SOURCE
OPEN/CLOSE
PLAY/PAUSE
DVD
STOP
SEARCH
STATION +/-
STANDBY
DVD TUNER AUX
SUB
LANGUAGE TITLE RETURN
TITLE
MENU
ZOOM
/PBC
2 3
4 5 6
7 8 9
>10 0
SLEEP MUTE
SETUP
ENTER
STOP PLAY/PAUSE
STEP
STA- STA+ ST/MO
SLOW
N
T U TUN + MEMO
A-B REPEAT PROG. SELECT
TEST
TONE
ANGLEGOTO
AUDIO1
DISPLAY
OPEN/
CLOSE
ADJ/VOL
LISTENING
N/P
+
STANDBY
OPEN/CLOSE
PLAY/
PAUSE
SKIP
TUNING /
1 Turn on the TV and select the video input so that you can
view the pictures from this system.
2 Press the POWER button on the front panel to turn on the
main power of this system. The front panel display lights
up, and the startup screen appears on TV screen.
3 If the system is not in the DVD player mode, press the DVD
button on the remote control to enter DVD player mode
directly, or press the SOURCE button on the front panel to
select it.
4 Press the (OPEN/CLOSE) button, and place a disc on the
disc tray. Press again to close the tray..
The player begin to loading disc. The operating message
will appear on the TV screen or/and on the front panel
display, e.g. as the following list:
On TV screen
DISC LOADING
OPEN
CLOSE
PLAY
NO DISC
BAD DISC
WRONG REGION (See page 9)
PARENTAL VIOLATION (See page 43)
On front panel display
WAITING
LOADING
OPEN
CLOSE
PLAY
NO DISC
BAD DISC
DVD/VCD/CD/MP3
27

Basic Play
Single Stepping Play
After following Step 4
• When playing a DVD
A DVD menu or title menu may appear on the TV screen
(see page 21).
• When playing a Video CD
The menu screen may appear on the TV screen depending
on the Video CD disc. You can play the disc interactively,
following the instructions on the menu sceen. (About PBC
playback, see page 30.)
• When playing a CD or MP3
Begin to play the disc from the first track.
Note
• When DVD player is loading disc, the system may not re-
spond your any operations.
5 Press the /
stop mode. Press it again to pause.
(PLAY/PAUSE ) button to begin playback in
6 Press the (STOP) button to stop playback.
In program playback status, press button one time to
stop playback, press it again to clear the memory of program. See page 32.
Note
• If you leave the system in pause or stop mode for 1 minutes,
the screen saver image appears automatically. To make
the screen saver image go away, press / . (You can set
the screen saver function to off, see page 28.)
`
7 When the system is on, press the STANDBY button on the
remote control to turn the system off. The red LED on the
front panel lights up.
In standby mode, press this button to turn on the system.
You can also turn on the system using the SOURCE.
Note
When the system is on, press STANDBY button on the
remote control to standby mode. If the power shutted off
or the power cord re-plug, the system will go to power on
mode.
9 Press the STEP button repeatedly to play the disc step by
step (one frame every step).
Note
• This function is not available for CD and MP3.
10 Press the button to resume normal playback.
Locate a Point Quickly
11 Press the or remote control button while playing a
disc.
The player will search the disc fast forward or reverse.
When you find the point you want, press the button to
return to the normal speed.
Change the searching speed
You can change the searching speed by pressing the or
remote control button repeatedly. .
• If the playing disc is DVD or Video CD, you can select the
following types of searching speed: FF1, FF2, FF3, FF4; or
FR1, FR2, FR3, FR4.
• If the playing disc is CD, you can select the following types
of searching speed: FF1, FF2; or FR1, FR2.
Note
• This function is not available for MP3.
• The larger the number is, the faster the searching speed.
• For Video CD and CD, when the searching goes to the end
of one track, the player will begin to play the next track at
normal speed.
Skip Next or Previous
12 Press the or button while playing a disc.
The playback will go to the next or previous title, chapter
or track in continuous play mode.
Slow-Motion Play
8 Press the SLOW remote control button to play a disc in
slow motion.
If the playing disc is DVD, press this button repeatedly to
select the following slow-motion type: SF1 SF2
SF3 SR1 SR2 SR3 normal play. .
If the playing disc is Video CD, press this button repeatedly to select the following slow-motion type: SF1 SF2
SF3 normal play. .
Note
• SF: Slow Forward.
SR: Slow Reverse.
• The larger the number is, the lower the speed.
• This function is not available for CD and MP3.
• On some discs, the slow-motion playback function is dis-
28
abled.
Note
• Using the DISPLAY button on the remote control can view
the playing message about title, chapter, track and time
from the front panel display or/and TV screen.
• If the REPEAT-ONE function has been set, pressing the
or button will replay the same chapter (or track or title)
from its beginning.
• If the REPEAT-ALL function has been set, pressing the
or button repeatedly will skip to select all the chapters
(or tracks) in a title (or disc) cyclically.

Using the Menu for Each DVD
Using the title menu
A DVD is divided into long sections of a picture or a music
piece called “title”. Normally, a title is composed of several
chapters. When you play a DVD which contains several titles,
you can select the title (or chapter) you want using the title
menu.
STANDBY
DVD TUNER AUX
SUB
LANGUAGE TITLE RETURN
TITLE
Number buttons
ENTER
TITLE
ZOOM
2 3
4 5 6
7 8 9
>10 0
SETUP
ENTER
STOP
STA- STA+ ST/MO
N
T U TUN + MEMO
A-B REPEAT PROG. SELECT
MENU
/PBC
SLEEP MUTE
PLAY/PAUSE
STEP
SLOW
TEST
TONE
ANGLEGOTO
AUDIO1
DISPLAY
OPEN/
CLOSE
ADJ/VOL
LISTENING
N/P
+
RETURN
/ / /
1 Press the TITLE button while playing a DVD disc.
The “TITLE MENU” will be shown on TV screen for a mo-
ment, and then the title menu appears. The contents of the
menu vary from disc to disc.
3 Press the ENTER button.
The player starts playing the selected title (or chapter).
Note
• Depending on the DVD disc, you may not be able to enter
the root menu.
• For some DVD disc, when you press the RETURN button,
the playback will restart from the beginning of the disc.
Using the DVD menu
Some DVDs allow you to select the disc contents using the
menu. When you play these DVDs, you can select the language for the subtitles, the language for the sound, etc., using the DVD menu.
1 Press the TITLE button while playing a DVD disc.
The DVD menu appears on the TV screen. The contents of
the menu vary from disc to disc.
2 Use the / / / buttons to select the item you want to
change.
Depending on the disc, you can use the number buttons
(0~9 / +10) to select the item.
3 To change other items, repeat Step 2.
4 Press the ENTER button.
2 Use the / / / buttons to select the title (or chapter)
you want to play.
Depending on the disc, you can use the number buttons
(0~9 / +10) to select the title (or chapter).
3 Press the ENTER button.
The player starts playing the selected title (or chapter).
Note
• Depending on the DVD disc, you may not be able to select
the title or chapter.
• Depending on the DVD disc, a “title menu” may simply be
called a “menu” or “title” in the instructions supplied with
the disc.
• For some DVD disc, when you press the TITLE button, the
playback will restart from the beginning of the disc.
Using the root menu
A DVD may contain the root menu. Some titles or chapters
are recorded in the root menu.
1 Press the RETURN button while playing a DVD disc.
The “ROOT MENU” will be shown on TV screen for a mo-
ment, and then the root menu appears. The contents of
the menu vary from disc to disc.
Note
• you can set a preferred language for audio and subtitle in
the SETUP menu. For details, see page 42.
2 Use the / / / buttons to select the title (or chapter)
you want to play.
Depending on the disc, you can use the number buttons
(0~9 / +10) to select the title (or chapter).
29

Playing Video CDs with PBC
When playing Video CDs (Version 2.0) with PBC functions,
you can enjoy simple interactive operations, operations with
search functions, etc.
PBC playback allows you to play Video CDs interactively, following the menu on the TV screen.
STANDBY
DVD TUNER AUX
SUB
LANGUAGE TITLE RETURN
Number buttons
ENTER
TITLE
ZOOM
2 3
4 5 6
7 8 9
>10 0
SETUP
ENTER
STOP
STA- STA+ ST/MO
N
T U TUN + MEMO
A-B REPEAT PROG. SELECT
MENU
/PBC
SLEEP MUTE
PLAY/PAUSE
STEP
SLOW
TEST
TONE
ANGLEGOTO
AUDIO1
DISPLAY
OPEN/
CLOSE
ADJ/VOL
LISTENING
N/P
+
RETURN
MENU/ PBC
/ / /
1 Press MENU/PBC button to set PBC function is on.
2 Start playing a Video CD with PBC functions, the system
will enter PBC playback automatically. The menu appears
on the TV screen.
To go back to the menu screen
Press the RETURN button when playing a disc with PBC. The
“GO BACK TO MAIN PAGE” is shown on the TV screen, and
then the menu appears.
Note
• If the PBC function of this system is set to off, pressing the
RETURN button is useless.
To cancel PBC playback function and play a Video CD with
PBC functions in Continuous Play mode.
• Press the MENU/PBC button. “PBC OFF” will appear on the
TV screen. If a disc is playing, the playback will stop.
• Press the button to start (or restart) playing the disc in
Continuous Play mode.
3 Use the / / / buttons to select the item you want.
For some discs, you can only select the items using the
number buttons.
4 Press the ENTER button to execute your selection.
5 Follow the instructions on the menu screen for interactive
operations.
Refer to the instructions supplied with the disc, as the
operating procedure may differ according to the Video CD.
Note
• While playing a disc with PBC functions, the GOTO, REPEAT
and number (0~9 / +10) buttons are useless.
30

Repeat Play
A-B Repeat Play
You can play all of chapters in a title or on a disc repeatedly.
You can play all of tracks on a disc repeatedly.
You can play a single title, chapter or track repeatedly.
In program play mode, the system repeats the chapters or
tracks in the programmed order.
STANDBY
DVD TUNER AUX
SUB
LANGUAGE TITLE RETURN
TITLE
MENU
ANGLEGOTO
ZOOM
/PBC
AUDIO1
2 3
DISPLAY
4 5 6
7 8 9
N/P
>10 0
SLEEP MUTE
OPEN/
SETUP
CLOSE
ENTER
PLAY/PAUSE
STOP
STEP
N
A-B REPEAT PROG. SELECT
+
ADJ/VOL
SLOW
TEST
LISTENING
TONE
REPEAT
STA- STA + ST/MO
T U TUN+ MEMO
A-B
1 Press the REPEAT button while playing a disc.
2 If the playing disc is DVD, press REPEAT repeatedly to
select the following repeat type cyclically: Chapter Repeat
On Title Repeat On Repeat Off.
3 If the playing disc is Video CD, CD or MP3, press REPEAT
repeatedly to select the following repeat type cyclically:
Repeat One Track Repeat All Tracks Repeat Off.
You can play a specific portion in a chapter or track repeatedly.
This is useful when you want to memorize lyrics.
1 When playing a disc, press the A-B button one time to set
the starting point “A” of the specific portion you want to
play repeatedly.
The “[A-]” indicator appears on the front panel display.
2 When reaching the end point “B” you want, press the A-B
button a second time.
The “[A-B]” indicator appears on the front panel display.
The player starts to play the specific portion from point “A”,
and will continue playing this portion repeatedly unless
you cancel the A-B repeat function.
3 Press the A-B button again to cancel this setting and re-
sume playback in normal order.
Note
• The point “A” and “B” can be set only in the same chapter
or track.
• You can set A-B repeat on only one specific portion.
• A-B repeat is canceled when:
- you stop playback.
- you open the disc tray.
- you turn the power off.
• You may not be able to set A-B repeat, depending on the
scene of the DVD or the Video CD disc.
The front panel display will show the following message:
• [R-1]: means Chapter Repeat On or Repeat One Track.
• [R-A]: means Title Repeat On or Repeat All Tracks.
Note
• You can not set repeat play during stop.
• You can not do repeat play during PBC playback (see page
30).
• You may not be able to do repeat play depending on the
DVD disc.
31

Program Play
You can play the contents of the disc in the order you want by
arranging the order of the tracks on the disc and create your
own program. One program can be restored in the system
and contain up to 99 tracks.
Note
• This function is not available for DVD and MP3 disc.
Number
buttons
STOP
STOP
SUB
TITLE
4 5 6
7 8 9
+10 0
SETUP
STOP
REMOTE CONTROLLER
STANDBY
DVD TUNER AUX
LANGUAGE TITLE RETURN
ZOOM
2 3
ENTER
SEARCH
STATION
ST/MO
SKIP
SLOW
TUNING
MEMO
A-B REPEAT
PROG. SELECT
RB - HTDK150
PLAY/PAUSE
MENU
ANGLEGOTO
/PBC
AUDIO1
DISPLAY
NTSC/
PAL
SLEEP MUTE
OPEN/
CLOSE
PLAY/
PAUSE
STEP
VOLUME
TEST
LISTENING
TONE
PLAY/PAUSE
PROGRAM
Note
• If you press the button or other foreign buttons in the
program registration mode, the system will interrupt and
exit the program setting.
4 In program play mode, press the button to stop program
play, but the program remains.
Note
• The program remains even after the program play ends.
When you press , you can play the same program again.
• You can do repeat play of the programmed tracks.
During program play, press the REPEAT button.
5 To cancel program play, press the button a second time.
The “Memory” indicator on the front panel display will dis-
appear.
Note
• The program is cancelled when:
- you open the disc tray.
- you turn the power off.
1 In stop mode, press the PROGRAM button to enter pro-
gram registration mode.
The programming display appears on the TV screen and
the front panel display.
2 Use the number buttons (0~9 / +10) to key in the track
numbers in the order you want. If the track number is more
than 10, use +10 button.
If the programmed numbers have reached the maximum
limit (P99:--) and you key in track number again, the “FULL”
indicator will appear on the TV screen and the front panel
display.
3 If you have completed the above program registration as
you desire, press the button to start the program play..
32

Selecting a Start Point Using the Time Code
You can search by inputting the time code.
The time code corresponds to the approximate actual playing
time. For example, to search for a scene 2 hours 30 minutes
20 seconds past the beginning, key in 02:30:20.
Note
• This function is not available for CD and MP3.
STANDBY
DVD TUNER AUX
SUB
LANGUAGE TITLE RETURN
TITLE
MENU
ANGLEGOTO
ZOOM
GOTO
Number
buttons
ENTER
If the playing disc is DVD
2 3
4 5 6
7 8 9
>10 0
SETUP
ENTER
STOP
STA- STA+ ST/MO
N
T U TUN + MEMO
A-B REPEAT PROG. SELECT
/PBC
SLEEP MUTE
PLAY/PAUSE
STEP
SLOW
TEST
TONE
AUDIO1
DISPLAY
OPEN/
CLOSE
ADJ/VOL
LISTENING
N/P
/ / /
+
Note
• If the title number, chapter number or time code you input is
not exist in the disc, the system will not execute your selection and the selecting menu will exit.
• The selecting menu will time out for a few seconds if you do
not input valid number.
If the playing disc is Video CD
1 Press the GOTO button.
The time menu appears on the TV screen.
GOTO: - - : - -
2 Use the number buttons (0~9 / +10) to input the time code
you want.
For example, key in 0, 1, 2, 3.
GOTO: 01 : 23
When the last digit is input and the time code is valid, the
system will begin to play (from the point of 01:23).
3 Follow Step 1, press the GOTO button again to exit.
1 Press the GOTO button, the following menu appears on
the TV screen.
TITLE 02 / 05 CHAPTER 001 / 006
2 Use the or button to select title number or chapter
number.
TITLE 02 / 05 CHAPTER 001 / 006
TITLE 02 / 05 CHAPTER 001 / 006
Use the number buttons (0~9 / +10) to input the title or
chapter number you want.
3 Press ENTER to play your selection.
4 Follow Step 1, press the GOTO button again to enter time
menu shown as below.
TITLE 02 / 05 TIME - - : - - : - -
5 Use the number buttons (0~9 / +10) to input the time code
you want.
For example, key in 0, 1, 2, 3, 4, 5.
Selecting a Track Using
Number Buttons
You can select a track directly using the number (0~9 / +10)
buttons
• In play or stop mode, press the number button to select a
track you want. The system will go to the beginning of the
selected track and start playing it.
• If the track number is more than 10, use the +10 button. The
number will increase 10 whenever you press +10 once.
For example, you want to select the track of 25. Press the
+10 button twice, then press 5 button.
Note
• This function is not available for DVD.
• If the PBC function is set to on, you cannot select the track
on the Video CD (Ver. 2.0) or SVCD using number buttons
directly. About PBC, see page 30.
TITLE 02 / 05 TIME 01 : 23 : 45
6 Press ENTER to start playing (from the point of 01:23:45).
7 Follow Step 4, press the GOTO button again to exit.
33

Checking Information Using Display
You can check information about the disc, such as the total
number of the titles or chapters or tracks or time, using the
Display function. The information you want appears on the TV
screen or/and on the front panel display.
When playing back a DVD
1 Press the DISPLAY button at remote control once, the infor-
mation about title number, chapter number and title elapsed
time appears on the TV screen as shown below.
TITLE 02 / 05 CHAPTER 001 / 006
00 : 34 : 56 TI : 02 / 05 CH : 001 / 006
The display for title and chapter will disappear after a few
seconds.
2 Press the DISPLAY button a second time to check the title
remaining time.
TITLE REMAIN
00 : 34 : 56 TI : 02 / 05 CH : 001 / 006
3 Press the DISPLAY button the third time to view the chapter
elapsed time
2 Press the DISPLAY button a second time to view the single
track remaining time on the TV screen.
SINGLE REMAIN
00 : 03 : 21 TRACK 01 / 06
3 Press the DISPLAY button the third time to view the total
tracks elapsed time on the TV screen.
TOTAL ELAPSED
00 : 12 : 34 TRACK 01 / 06
4 Press the DISPLAY button the fourth time to view the total
tracks remaining time on the TV screen.
TOTAL REMAIN
00 : 54 : 32 TRACK 01 / 06
5 Press the DISPLAY button the fifth time, the information
display function is off.
Note
• For CD, the information about track and time appears sim-
ply on the front panel display, shown as below.
CHAPTER ELAPSED
00 : 01 : 23 TI : 02 / 05 CH : 001 / 006
4 Press the DISPLAY button the fourth time to view the chap-
ter remaining time
CHAPTER REMAIN
00 : 03 : 21 TI : 02 / 05 CH : 001 / 006
5 Press the DISPLAY button the fifth time, the information
display function is off.
Note
• The above information does not appear on the front panel
display.
• Depending on the DVD, the title number or chapter number
or time may not appear or you may not be able to change
the display.
When playing back a Video CD or CD
1 Press the DISPLAY button once to view the single track
elapsed time on the TV screen.
SINGLE ELAPSED
00 : 01 : 23 TRACK 01 / 06
• Depending on the VCD, the time information may not ap-
pear on the TV screen or you may not be able to change the
display.
When playing back a MP3
1 Press the DISPLAY button to view the single track elapsed
time on the TV screen.
SINGLE ELAPSED
00 : 01 : 23 TRACK 001 / 160
2 Press the DISPLAY button again, the information display is
off.
Note
• The information about track and time appears simply on the
front panel display, shown as below.
34

Settings &
Using the SETUP Menu
Adjustments
This chapter describes how to set and how to adjust
using the SETUP menu. Most settings and adjustments are required to be set when you first use the
system.
Using the SETUP menu, you can do the initial setup, adjusting the picture, etc. you can also set a language for the subtitles and the OSD, limit playback by children, etc.
Note
• Some settings are in the chapter of Basic Setup, see the
relevant pages.
• All settings in the SETUP menu are useless for Tuner and
AUX.
STANDBY
DVD TUNER AUX
SUB
LANGUAGE TITLE RETURN
TITLE
MENU
ANGLEGOTO
ZOOM
/PBC
AUDIO1
2 3
DISPLAY
Number
buttons
SETUP
ENTER
4 5 6
7 8 9
>10 0
SETUP
ENTER
STOP
STA- STA+ ST/MO
N
T U TUN + MEMO
A-B REPEAT PROG. SELECT
SLEEP MUTE
PLAY/PAUSE
STEP
SLOW
TEST
TONE
OPEN/
CLOSE
ADJ/VOL
LISTENING
N/P
/ / /
+
1 Press SETUP button to enter SETUP menu.
Select the main item you want using / , and then press
ENTER button.
NORMAL / PS
NORMAL / LB
WIDE
35

Using the Setup Menu
2 Select the sub-item you want by using / .
Press button to go to the right option list.
Select the setting item by using / , then press ENTER to
confirm your selection.
NORMAL / PS
NORMAL / LB
WIDE
MULTI
NTSC
PAL
3 Use / / / and ENTER to select and set other items.
4 Use 0~9 buttons to key in numbers, such as the password
for parental control.
5 Press SETUP again to exit menu.
MULTI
NTSC
PAL
36

SETUP Menu Item List
The default settings are underlined.
SETUP MENU - - MAIN PAGE
GENERAL SETUP
SPEAKER SETUP
DOLBY DIGITAL SETUP
PREFERENCES
GENERAL PAGE
-TV DISPLAY
...NORMAL/PS
...NORMAL/LB
...WIDE
-TV TYPE
...MULTI
...NTSC
...PAL
-VIDEO OUT
...CVBS
...RGB
...YUV
-ANGLE MARK
...ON
...OFF
-OSD LANG
...ENGLISH
...FRENCH
...ITALIAN
...GERMAN
...SPANISH
-AUDIO OUT
...ANALOG
...SPDIF/RAW
...SPDIF/PCM
-SCR SAVER
...ON
...OFF
-MAIN PAGE
SPEAKER SETUP PAGE
-AUDIO MODE
...STEREO
...VSS
...PRO LOGIC
...5.1CH
...LT/RT
-CENTER
...ON
...OFF
-REAR
...ON
...OFF
-SUBWOOFER
...ON
...OFF
-CNTR DELAY
...5 MS
...
...3 MS
...
...1 MS
...OFF
-REAR DELAY
...15 MS
...
...9 MS
...
...3 MS
...OFF
-BASS MODE
...CONFIG 1
...CONFIG 2
-MAIN PAGE
DOLBY DIGITAL SETUP
-DUAL MONO
...STEREO
...L MONO
...R MONO
...MIX MONO
-DYNAMIC
...FULL
...
...6/8
...
...
...
...
...
...OFF
-MAIN PAGE
PREFERENCES PAGE
-AUDIO
...ENGLISH
...FRENCH
...SPANISH
...CHINESE
...JAPANESE
-SUBTITLE
...ENGLISH
...FRENCH
...SPANISH
...CHINESE
...JAPANESE
...OFF
-DISC MENU
...ENGLISH
...CHINESE
...FRENCH
...SPANISH
...JAPANESE
-PARENTAL
...1 G
...2
...3 PG
...4 PG13
...5
...6 PG-R
...7 NC-17
...8 ADULT
...NO PARENTAL
-PASSWORD
...CHANGE
-DEFAULTS
...RESET
-MAIN PAGE
37

TV Display Setting
Angle Mark Setting
Path: Main Page General Page TV Display. .
NORMAL / PS
NORMAL / LB
WIDE
Selects the aspect ratio of the TV set to be connected.
• NORMAL/PS (4:3 Pan & Scan mode): When you connect a
normal TV to the system. Displays a wide picture on the
whole TV screen with a portion (right and left sides of the
picture) automatically cut off.
• NORMAL/LB (4:3 Letterbox mode): When you connect a
normal TV to the system. Displays a wide picture with bands
displayed on the upper and lower portions of the screen.
• WIDE (16 : 9 Wide-screen mode): When you connect a
wide-screen TV to the system.
NORMAL/PS
Path: Main Page General Page Angle Mark.
ON
OFF
Selects that the angle mark : appears on the TV screen or
not when a multi-angles scene is being played.
• ON:
• OFF:
Angle mark is on Angle mark is off
Note
:
appears on the TV screen.
:
does not appear..
• You can change the angles using the ANGLE button. For the
details, see page 46.
NORMAL/LB
WIDE
Note
• Some wide-screen discs that do not permit Pan & Scan
mode playback are automatically played in Letterbox mode.
• Depending on the DVD, 4:3 Letterbox may be selected au-
tomatically instead of 4:3 Pan & Scan and vice versa.
• You must also set the screen mode on your wide-screen TV
to “FULL”.
• If WIDE is selected and a normal TV is connected, 16:9
content will appear distorted during playback (objects look
thin).
Screen Saver Setting
Path: Main Page General Page Screen Saver..
ON
OFF
Turns on or off the screen saver.
If you turn on the screen saver, the screen saver image appears when you leave the system in pause or stop mode for
1 minutes. The screen saver is useful to prevent your display
from becoming damaged.
• ON: Turns on the screen saver.
• OFF: Turns off the screen saver.
38

Center Delay Setting
Path: Main Page Speaker Setup Page CNTR Delay. .
5MS
3MS
1MS
OFF
Selects the center delay time from off, 1ms, 3ms, or 5ms. If
the listening position is closer to the center speaker than the
front speaker, you can set the center delay time to impove the
sound field effect. It s advisable to set this item together with
’
other other speaker settings, see page 23.
Rear Delay Setting
Path: Main Page Speaker Setup Page Rear Delay. .
B
A A
o
45
C
o
90
o
20
B
AA
o
45
C
15MS
9MS
3MS
OFF
If the listening position is closer to the rear speaker than to
the front speaker, you can set the rear delay time to improve
the sound field effect. It s advisable to set this item together
’
with other speaker settings, see page 23.
C
o
90
o
20
C
39

Bass Mode Setting
Front-left
Front-right
Path: Main Page Speaker Setup Page Bass Mode.
Selects the proper bass mode to fit your speaker system.
• CONFIG 1: The system sets all main channels to small
type and the subwoofer to on. If your speaker system contains 5 little satellite speakers and an active subwoofer (all
supplied), select this item.
• CONFIG 2: The system sets the Front-left and Front-right
channels to large type, the Center and Rear channels to
small type. If your speaker system contains 2 large main
CONFIG 1
CONFIG 2
Selects CONFIG 1 to match your connected speaker system shown as below.
(supplied)
Surround-left
(supplied)
Center (supplied)
Subwoofer
(supplied)
speakers (sold separately) for Front-left and Front-right
channels, 3 small satellite speakers (supplied) for Center
and Rear channels, and an active subwoofer (supplied),
select this item.
(supplied)
Surround-right
(supplied)
Selects CONFIG 2 to match your connected speaker system shown as below.
Surround-left
(supplied)
Front-left
(not supplied)
Center (supplied)
Subwoofer
(supplied)
40
Front-right
(not supplied)
Surround-right
(supplied)

Audio Mode Setting
Dual Mono Setting
Path: Main Page Speaker Setup Page Audio Mode.
STEREO
VSS
PRO LOGIC
5.1CH
LT / RT
Selects the Dual Mono reproduction mode to support dual
mono programs.
• STEREO: 2-channel stereo outputs, for stereo and head-
phone listening.
• VSS: 2-channel Virtual Surround outputs.
• PROLOGIC: Dolby Pro Logic decoding function is activated.
• 5.1CH: Depending on the audio encoding format of the
playing disc, Dolby Digital or DTS decoding function is activated automatically.
• LT / RT: 2-channel Tape outputs (for later decoding by Dolby
Pro Logic decoder).
Path: Main Page Dolby Digital Setup Dual Mono.
STEREO
L - MONO
R - MONO
MIX - MONO
Select the Dual Mono reproduction mode to support dual mono
programs.
• STEREO: Reproduces both channels as stereo.
• LEFT MONO: Only reproduces left mono signal to FL and
FR channels.
• RIGHT MONO: Only reproduces right mono signal to FL and
FR channels.
• MIXED MONO: Reproduces both channels mixed together.
Note
• If the loading disc is identified as VCD or CD format, the unit
will set the Audio Mode to PROLOGIC automatically.
• If the loading disc is identified as DVD format, the unit will
set the AUDIO Mode to 5.1CH automatically.
• If LT/RT, STEREO or VSS is selected, the outputs of Center,
Rear and Subwoofer are disabled.
• Depending on the disc, maybe there is no audio output if
LT/RT or STEREO is selected.
• Depending on the disc, the actual outputs may not match
you selection.
Dynamic Range Setting
Path: Main Page Dolby Digital Setup Dynamic RNG.
FULL
6/8
4/8
2/8
OFF
In many listening situations, it is objectionable to allow the
sound to become very loud, and thus the loudest sounds
must be compressed downwards in level. Likewise, the very
quiet sounds would be inaudible and must be brought upwards in level to be heard. Dolby Digital satisfies these needs
through the dynamic range controlling.
Selects the dynamic range compression to fit the individual
listening situation of the audience. The variable range is from
FULL, 7/8 to 1/8, or OFF.
• FULL: Audio with fully compressed dynamic range.
• 7/8~1/8: Audio with partially compressed dynamic range.
• OFF: Audio with uncompressed dynamic range.
Note
• The Dual Mono and Dynamic Range settings only support
Dolby Digital programs.
41

Setting the Language for Audio
Note
• You cannot enter the Preferences Page during playback. You must stop playback before setting.
Path: Main Page Preferences Page Audio.
Selects the preferred language for audio (i.e. dialog).
• ENGLISH
• FRENCH
• ITALIAN
ENGLISH
FRENCH
ITALIAN
GERMAN
SPANISH
• GERMAN
• SPANISH
Note
• When you select a preferred language that is not recorded on the DVD, one of the recorded languages is automatically
selected.
• You can select any recorded language for audio by pressing LANGUAGE button when playing a DVD disc (see page 46).
Setting the Language for Subtitle
Path: Main Page Preferences Page Subtitle.
Selects the preferred language for subtitle.
• ENGLISH
• FRENCH
• ITALIAN
• GERMAN
• SPANISH
• OFF
ENGLISH
FRENCH
ITALIAN
GERMAN
SPANISH
OFF
Note
• When you select a preferred language that is not recorded on the DVD, one of the recorded languages is automatically
selected.
• You can select any recorded language for subtitle using SUBTITLE button when playing a DVD disc. See page 46.
Setting the Language for Disc Menu
Path: Main Page Preferences Page Disc Menu.
Selects the preferred language for Disc Menu.
• ENGLISH
• FRENCH
• ITALIAN
• GERMAN
• SPANISH
Note
• When you select a preferred language that is not recorded on the disc, one of the recorded languages is automatically
selected.
ENGLISH
FRENCH
ITALIAN
GERMAN
SPANISH
42

Setting the Parental Control Level
Path: Main Page Preferences Page Parental.
1 G
2
3 PG
4 PG13
5
6 PG-R
7 NC-17
8 ADULT
NO-PARENTAL
Playing some DVD discs can be limited depending on the age of the users. The parental control function in this system allows
playback limitation level to be set by the parent. The default setting is “NO-PARENTAL”.
Note
• The lower the level is set, the stricter the limitation is offerred.
• If the parental control level of the loading DVD disc is higher than the setting level, the “PARENTAL VIOLATION” message will
be shown on the TV screen, and the system will refuse to play the disc.
• To change the parental control level, a correct password is needed to key in.
• To avoid locking forever, you must memory the password!
• A universal password is supplied as default, that is “3308”.
Setting a New Password
Path: Main Page Preferences Page Password.
Depending on your personal like, you can set a new
password for the parental control to replace the old one.
The default password is “3308”.
Note
• This password is used to unlock the resetting function
of parental control.
• The new password must be easy to memorise for
you.
Don’t lose it!
CHANGE
43

Resetting SETUP
Path: Main Page Preferences Page Defaults.
RESET
Selects “RESET” and press ENTER button.
All of the items in the SETUP menu will be reset as defaults.
Note
• All default settings are underlined in this manual.
• The parental control and its unlocking password will not be reset.
44

Special Functions
Picture Zooming
This chapter describes how to use some special functions, such as subtitle selection and angle selection, etc.
1 Press the ZOOM button on the remote control during nor-
mal, slow or still (pause) playback.
STANDBY
LANGUAGE
SUB TITLE
ZOOM
Number
buttons
SETUP
ENTER
DVD TUNER AUX
SUB
LANGUAGE TITLE RETURN
TITLE
ZOOM
2 3
4 5 6
7 8 9
>10 0
SETUP
ENTER
STOP
STA- STA + ST/MO
N
T U TUN+ MEMO
A-B REPEAT PROG. SELECT
MENU
/PBC
SLEEP MUTE
STEP
SLOW
TEST
TONE
PLAY/PAUSE
ADJ/VOL
LISTENING
ANGLEGOTO
AUDIO1
DISPLAY
N/P
OPEN/
CLOSE
ANGLE
/ / /
+
2 If you further press the ZOOM button repeatedly, the mag-
nification level increases. Two magnification levels are supported. On each press of ZOOM, the following message
will appear on the TV screen.
ZOOM 1
ZOOM 2
ZOOM OFF
Note
• If you press the / / / buttons, the zoom point shifts,
allowing you to pan the zoomed picture.
• Some discs may not respond to the zoom feature.
• Zooming does not work on subtitles or menu screens in-
cluded on DVDs.
• The magnification level varies depending on the TV DIS-
PLAY selection in the SETUP menu.
45

Angle Selection
Subtitle Language Selec-
Some DVD discs contain scenes which have been shot simultaneously from a number of different angles. For these
discs, the same scenes can viewed from each of the different
angles. (The recorded angles differ from disc to disc.)
1 While playing a title shot from different angles, the angle
mark : appears on the TV screen. Of course, you can
turn off it by setting, for details, see page 38.
2 Press the ANGLE button to change the scenes from one
angle to other angle(s).
Number changes to show the
number of recorded angles (1/
4 2/4 3/4 4/4, etc.)
Note
• The maximum number stipulated by the manufacturers is
9/9.
Example: Sequence of angles shot.
tion
Note
• This function can only be used for DVD discs on which
subtitles have been recorded in multiple languages.
While playing a DVD disc, press the SUBTITLE button repeat-
edly to select a desire language for subtitle. The subtitle is
displayed in new language immediately.
Note
• The first pressing shows the current selection. Subsequent
pressing toggles to the next subtitle setting.
• Some DVDs display subtitles automatically, and cannot be
turned off even if you set the subtitle function to off.
• During some scenes, the subtitles may not appear imme-
diately after you turn them on.
• Some DVDs allow you to make subtitle selections and turn
subtitles on or off only via the disc menu. Use / / /
and ENTER buttons.
• The maximum number of subtitle languages stipulated by
the manufacturers is 32/32.
• You can set a preferred language for subtitle in the SETUP
menu, see page 42.
Audio Language Selection
Note
• This function can only be used for DVD discs on which
audio has been recorded in multiple languages.
While playing a DVD disc, press the LANGUAGE button repeatedly to select a desire language for audio, and playback
then continues in new language.
Note
• The first pressing shows the current selection. Subsequent
pressing toggles to the next audio setting.
• Some DVDs allow you to change audio selections only via
the disc menu. Use / / / and ENTER buttons.
• The maximum number of audio languages stipulated by
the manufacturers is 8/8.
• You can set a preferred audio language, see page 42.
Depending on some VCD and DVD discs, you may be able to
change the audio format (including audio coding type, number of channels recorded and audio language) using LAN-
GUAGE button. The relevant message appears on the TV display as shown below.
46
AUDIO 2/8: AC-3 5.1CH ENGLISH

Using Headphones
Note
• Before connecting, reduce the volume level.
• Avoid listening for prolonged periods of time to prevent
hearing damage.
PHONES
(output)
STANDBY
DVD TUNER AUX
SUB
LANGUAGE TITLE RETURN
TITLE
MENU
ANGLEGOTO
ZOOM
/PBC
AUDIO1
2 3
DISPLAY
4 5 6
7 8 9
N/P
>10 0
SLEEP MUTE
OPEN/
SETUP
CLOSE
ENTER
STOP PLAY/PAUSE
STEP
+
STA- STA+ ST/MO
ADJ/VOL
N
T U TUN + MEMO
A-B REPEAT PROG. SELECT
SLOW
TEST
LISTENING
TONE
VOLUME
1 Plug your headphones to the HEADPHONE jack on the front
panel of the unit.
Plug type: 6.35mm, stereo.
If the listening mode is not set to “Stereo”, the system will
switch to stereo mode automatically when the headphones
have been plugged.
2 Adjust the volume level using the VOLUME or button
on the front panel or on the remote control.
Note
• The system shuts off all of speakers’ outputs when you are
using headphone.
47

Other Functions
Listening to the Radio
This chapter describes how to use some functions
contained in the system, i.e. how to listen to the radio,
how to listen to an external source, how to select a
listening mode and how to use the sleep timer.
Preset radio stations to the system’s memory first (see “Pre-
setting Radio Stations” on page 26).
TUNING( or )
Number
buttons
STATION +/-
TUNING /
STANDBY
DVD TUNER AUX
SUB
LANGUAGE TITLE RETURN
TITLE
ZOOM
2 3
4 5 6
7 8 9
>10 0
SETUP
ENTER
STOP
STA- STA+ ST/MO
N
T U TUN + MEMO
A-B REPEAT PROG. SELECT
MENU
/PBC
SLEEP MUTE
PLAY/PAUSE
STEP
SLOW
TEST
TONE
ANGLEGOTO
AUDIO1
DISPLAY
OPEN/
CLOSE
ADJ/VOL
LISTENING
N/P
+
SOURCE
TUNER
MONO
VOLUME
1 Press the SOURCE button repeatedly until “FM” or “AM”
appears on the front panel display.
You can press the TUNER button to select FM or AM directly.
The last received station is tuned in.
2 Press the STATION + or STATION - button repeatedly to
select the preset station you want.
Each time you press the button, the system tunes in one
preset station at a time.
In Tuner mode, use the number buttons (0~9 / +10) to key
in a preset number (1~40), you can select the preset station directly.
3 Adjust the volume level by pressing the VOLUME( or ).
This system is built in Dolby Pro Logic decoder, so you can
enjoy the live sound in Dolby Surround. How to operate,
see “Selecting Listening Modes” on page 50.
48
To turn off the radio
Press the STANDBY button.

Listening to the Radio
Listening to an External
To listen to non-preset radio stations
Use manual or automatic tuning in step 2.
For manual tuning, press TUNING ( or ) repeatedly..
For automatic tuning, press and hold TUNING ( or ) until the
frequency indicator starts to change automatically, then release the button.
If an FM program is noisy
Press (ST/MO) button on the remote control so that “MONO”
appears on the front panel display. There will be no stereo
effect, but the reception will improve. Press the button again
to restore the stereo effect.
To improve reception
Reorient the supplied antennas.
To display the RDS messages
When the received station is a RDS station, the “RDS” indicator will illuminate on the front panel display.
Source
If other audio component(s) are connected to this system
(see page 20), you can enjoy external source.
SOURCE
STANDBY
DVD TUNER AUX
SUB
LANGUAGE TITLE RETURN
TITLE
MENU
ZOOM
/PBC
2 3
4 5 6
7 8 9
>10 0
SLEEP MUTE
SETUP
ENTER
STOP PLAY/PAUSE
STEP
STA- STA+ ST/MO
SLOW
N
T U TUN + MEMO
A-B REPEAT PROG. SELECT
TEST
TONE
ANGLEGOTO
AUDIO1
DISPLAY
OPEN/
CLOSE
ADJ/VOL
LISTENING
N/P
+
AUX
VOLUME
At this time, you can use the DISPLAY button to view the fol-
lowing messages of the station on the front panel display,
usually with their abbreviation: station frequency station
name program type.
Note
If the station is not a RDS one, “NO RDS”will appear on the
front panel display when pressing the DISPLAY button.
If the RDS station has not got a station name, “NO NAME” will
appear on the front panel display when pressing the DISPLAY button.
If the RDS station has not got a program name, “NO PTY” will
appear on the front panel display when pressing the DISPLAY button.
If the signal of the station is weak, the above messages may
not be displayed, or the display may be incorrect.
1 Press the SOURCE button repeatedly until “AUX1” or
“AUX2” appears on the front panel display.
You can press the AUX button to select the desired exter-
nal source directly.
2 Operate the unit which is connected to this system.
3 Adjust the volume level by pressing the VOLUME ( or ).
This system is built in Dolby Pro Logic decoder, so you can
enjoy the live sound in Dolby Surround. How to operate,
see “Selecting Listening Modes” on the next page.
49

Selecting Listening Modes
Using the Sleep Timer
Note
• This function is only available for CD, Tuner and AUX (i.e.
external source).
This system is built in Dolby Pro Logic decoder. It can transform the stereo or PCM signal to Dolby Surround signal so
that you can enjoy a live sound.
STANDBY
DVD TUNER AUX
SUB
LANGUAGE TITLE RETURN
TITLE
MENU
ANGLEGOTO
ZOOM
/PBC
AUDIO1
2 3
DISPLAY
4 5 6
7 8 9
N/P
>10 0
SLEEP MUTE
OPEN/
SETUP
CLOSE
ENTER
PLAY/PAUSE
STOP
STEP
+
STA- STA+ ST/MO
ADJ/VOL
SLOW
N
T U TUN + MEMO
A-B REPEAT PROG. SELECT
TEST
LISTENING
TONE
When listening to the radio or external source, press the
LISTENING button repeatedly to select the following listening
modes cyclically.
LISTENING
You can set the system to turn off automatically at a specified
time.
STANDBY
DVD TUNER AUX
SUB
LANGUAGE TITLE RETURN
TITLE
MENU
ANGLEGOTO
ZOOM
/PBC
AUDIO1
2 3
DISPLAY
4 5 6
7 8 9
N/P
>10 0
SLEEP MUTE
OPEN/
SETUP
ENTER
STOP PLAY/PAUSE
STEP
STA- STA+ ST/MO
SLOW
N
T U TUN + MEMO
A-B REPEAT PROG. SELECT
TEST
TONE
CLOSE
ADJ/VOL
LISTENING
+
SLEEP
1 Press the SLEEP button while the power is on.
Each time you press SLEEP, the time changes as shown
below.
Pro Logic Normal Pro Logic Phantom Pro Logic Wide
3-Stereo Normal 3-Stereo Wide Stereo.
Surround modes and parameters
The following table show the presence or absence of signals
in the various modes, and wheather or not they can be controlled. Initial settings are indicated in parentheses.
OUTPUT CHANNEL
MODE FRONT/LR CENTER SURROUND SUBWOOFER
PROLOGIC NORMAL O O O O
PROGOGIC PHANTOM O X O O
PROLOGIC WIDE O O O O
3 STEREO NORMAL O O X O
3 STEREO WIDE O O X O
STEREO O X X O
: Signal preset.
X : No signal.
The relevant indicators appear on the front panel display.
Note
• Before pressing LISTENING, It`s advisable to lower the vol-
ume level.
• If the audio source is mono, It`s advisable to set the listen-
ing mode to “Stereo” then the others.
120 (minutes) 110 100 90 80 70
60 50 40 30 20 10 00 (OFF)
120 ...
When you have specified the time, the “Sleep” indicator
lights on the front panel display.
2 You can reset the time using SLEEP.
3 You can check the time remaining before the system turns
off.
Press SLEEP, the remaining time appears on the front panel
display for a few seconds.
50

Additional
Troubleshooting
Information
If you experience any of the following difficulties while using
the system, use this troubleshooting guide to help you remedy the problem. Should any problem persist, consult your
nearest service center.
No power.
• Is the power cord firmly plugged into the power outlet?
• One of the safety mechanisms may be operating. In this
event, unplug the player from the power outlet briefly and
then plug it in again.
No picture.
• Check that the system is connected securely.
• The video connecting cord is damaged. Replace it with a
new one.
• Make sure you connect the system to video input connector
on the TV (see page 20).
• Make sure you turn on the TV.
• Make sure you select the video input on the TV so that you
can view the pictures from this system.
The picture noise appears.
• Clear the disc.
• If video from this system has to go through your VCR to get
to your TV, the copy-protection applied to some DVD programs could affect picture quality. If you still experience problems after checking your connections, please try connecting your DVD system directly to your TV ’s S-Video input, if
your TV is equipped with this input (see page 20).
The aspect ratio of the screen cannot be changed even
though you set “TV DISPLAY” in the SETUP menu when you
play a wide picture.
• The aspect rate is fixed on your DVD disc.
• If you connect the system with the S-Video cable, connect
directly to the TV. Otherwise, you may not change the aspect
rate.
• Depending on the TV, you may not change the aspect rate.
There is no sound or only a very low-level sound is
heard.
• Check that the speakers and components are connected
securely.
• Make sure that you have selected the correct source on the
system.
• Press MUTE button on the remote control if the red LED on
the front panel is blinking.
• The protective device on the system has been activated
because of a short circuit. Turn off the system, eliminate the
short-circuit problem and turn on the power again.
• The audio connecting cord is damaged. Replace it with a
new one.
• The system is in pause mode or in slow-motion play mode,
or fast forward or fast reverse is performed. Press to
return to normal play mode.
• Check the speaker settings (see page 18~25).
51

Troubleshooting
The left and right sounds are unbalanced or reversed.
• Check that the speakers and components are connected
correctly and securely.
• Adjust front balance parameter using SELECT and VOL-
UME ( or ) buttons (see page 25).
Severe hum or noise is heard.
• Check that the speakers and components are connected
securely.
• Check that the connecting cords are away from a trans-
former or motor, and at least 3 meters away from a TV set or
fluorescent light.
• Move your TV away from the audio components.
• The plugs and jacks are dirty. Wipe them with a cloth slightly
moistened with alcohol.
• Clear the disc.
The sound loses stereo effect when you play a Video CD or
a CD.
• Set the Audio mode to “STEREO” in the SETUP menu (see
page 41).
• Make sure you connect the system appropriately.
The surround effect is difficult to hear when you are playing
a Dolby Digital sound track.
• Set the Audio mode and the Dolby Surround to “OFF” in the
SETUP menu.
• Check the speaker connections.
• Depending on the DVD disc, the output signal may not be
the entire 5.1 channel but monaural or stereo even if the
sound track is recorded in Dolby Digital format.
The sound comes from the center speaker only.
• Depending on the disc, the sound may come from the cen-
ter speaker only.
Radio stations cannot be tuned in.
• Check that the antennas are connected correctly. Adjust the
antennas and connect an external antenna if necessary.
• The signal strength of the stations is too weak (when tuning
in with automatic tuning). Use direct tuning.
• No stations have been preset.
The remote does not function.
• Remove any obstacles between the remote control and the
system.
• Use the remote control near the system.
• Point the remote control at the remote sensor on the front
panel.
• Replace all the batteries in the remote control with new
ones if they are weak.
• Check that the batteries are loaded correctly.
The disc does not play.
• There is no disc inside. (“NO DISC” appears on the front
panel display and the TV screen.)
Insert a disc.
• Insert the disc correctly with the playback side facing down
on the disc tray.
• Clean the disc (see page 10).
• The system cannot play CD-ROMs, etc. (see page 9).
Insert a DVD, a Video CD, a CD , or a MP3 disc.
• Check the region code of the DVD disc (see page 9).
• Moisture has condensed inside the system.
Remove the disc and leave the system turned on for about
an hour (see page 6).
Playback stops automatically.
• Depending on the disc, the auto pause signal is recorded.
While playing such a disc, the system stops playback at the
signal.
No sound is heard from the center speaker.
• Make sure the Center is set to “ON” in SETUP menu (see
page 24).
• You may set the listening mode to Dolby Pro Logic Phantom
(see page 50).
• Adjust the speaker volume (see page 25).
No sound or only a very low-level sound is heard from the
rear speakers.
• Make sure the Rear is set to “ON” in SETUP menu (see
page 24).
• You may set the listening mode to 3-Stereo (see page 50).
• Adjust the speaker volume (see page 25).
Subwoofer sound deficient or no sound.
• Make sure connection / setup is correct.
• If it is still no good, change the subwoofer phase angle (0
180o or 180o-0o).
52
Stopping playback, Search, Slow-motion play, repeat play
or Program play, etc., cannot be done.
• Depending on the disc, you may not do some of the opera-
tions above.
Messages do not appear on the TV screen in the language
you want.
• Select the language for OSD in SETUP menu (see page
21).
The language for the sound cannot be changed when you
play a DVD.
• Multilingual sound is not recorded on the DVD.
• Changing the language for the sound is prohibited on the
DVD.
o
-

Troubleshooting
Glossary
The language for the subtitles cannot be changed when
you play a DVD.
• Multilingual subtitles are not recorded on the DVD.
• Changing the language for the subtitles is prohibited on the
DVD.
The subtitles cannot be turned off when you play a DVD.
• Depending on the DVD, you may not be able to turn the
subtitles off.
The angles cannot be changed when you play a DVD.
• Multi-angles are not recorded on the DVD.
• Change the angles when the angle mark appears on the
TV screen (see page 46).
• Changing the angles is prohibited on the DVD.
The system does not operate properly.
• Static electricity, etc., may affect the system’s operation.
Press the POWER button to turn off, then press again to
turn on.
Bit rate
Value indicating the amount of video data compressed in a
DVD per second. The unit is Mbps (mega bit per second). 1
Mbps indicates that the data per second is 1,000,000 bits.
The higher the bit rate is, the larger the amount of data. However, this does not always mean that you can get higher quality pictures.
Chapter
Sections of a picture or a music piece on a DVD that are
smaller than titles. A title is composed of several chapters.
Each chapter is assigned a chapter number enabling you to
locate the chapter you want.
Dolby Digital
This sound format for movie theaters is more advanced that
Dolby Pro Logic Surround. In this format, the rear speakers
output stereo sound with an expanded frequency range and a
subwoofer channel for deep bass is independently provided.
This format is also called “5.1” because the subwoofer chan-
nel is counted as 0.1 channel (since it functions only when a
deep bass effect is needed). All six channels in this format
are recorded separately to realize superior channel separation. Furtheremore, since all the signals are processed digitally, less signal degradation occurs. The name “AC-3” comes
from the fact that it is the third audio coding method to be
developed by the Dolby Laboratories Licensing Corporation.
Dolby Pro Logic Surround
As one method of decoding Dolby Surround, Dolby Pro Logic
Surround produces four channels from two-channel sound.
Compared with the former Dolby Surround system, Dolby Pro
Logic Surround reproduces left-to-right panning more naturally and localizes sounds more precisely. To take full advantage of Dolby Pro Logic Surround, you should have one pair of
rear speakers and a center speaker. The rear speakers output monaural sound.
DTS
Digital audio compression technology that the Digital Theater Systems, Inc. developed. This technology conforms to
5.1-channel surround. The rear channel is stereo and there
is discrete subwoofer channel in this format. DTS provides
the same 5.1 discrete channels of high quality digital audio.
The good channel separation is realized because the all channel data is recorded discrete and processed in digital.
MPEG AUDIO
International standard coding system to compress audio digital signals authorized by ISO/IEC. MPEG 1 conforms to up to
2-channel stereo. MPEG 2 used on DVDs conforms to up to
7.1-channel surround.
53

Glossary
DVD
A disc that contains up to 8 hours of moving pictures even
though its diameter is the same as a CD.
The data capacity of a single-layer and single-sided DVD, at
4.7 GB (Giga Byte), is 7 times that of a CD.
Furthermore, the data capacity of a dual-layer and singlesided DVD is 8.5 GB, a single-layer and double-sided DVD
9.4 GB, and a dual-layer and double-sided DVD 17 GB.
The picture data uses the MPEG 2 format, one of the worldwide standards of digital compression technology.
The picture data is compressed to about 1/40 of its original
size. The DVD also uses the variable rate coding technology
that changes the data to be allocated according to the status
of the picture.
The audio data is recorded in Dolby Digital as well as in PCM,
allowing you to enjoy more real audio presence.
Furthermore, various advanced functions such as the multiangle, multilingual, and Parental Control functions are provided with the DVD.
Multi-angle function
Various angles, or viewpoints of the video camera, for a scene
are recorded on some DVDs
Multilingual function
Several languages for the sound or subtitles in a picture are
recorded on some DVDs.
Video CD
A compact disc that contains moving pictures.
The picture data uses the MPEG 1 format, one of the worldwide standards of digital compression technology.
The picture data is compressed to about 1/140 of its original
size. Consequently, a 12 cm Video Disc can contain up to 74
minutes of moving pictures.
Video CDs also contain compact audio data. Sounds outside
the range of human hearing are compressed while the
sounds we can hear are not compressed. Video CDs can
hold 6 times the audio information of conventional audio CDs.
There are 2 versions of Video CDs.
• Version 1.1: You can play only moving pictures and sounds.
• Version 2.0: You can play high-resolution still pictures and
enjoy PBC functions.
This system conforms to both versions.
Parental Control
A function of the DVD to limit playback of the disc by the age of
the users according to the limitation level in each country. The
limitation varies from disc to disc; when it is activated, playback is completely prohibited, violent scenes are skipped or
replaced with other scenes and so on.
Playback Control (PBC)
Signals encoded on Video CDs (Version 2.0) to control playback.
By using menu screens recorded on Video CDs with PBC
functions, you can enjoy playing simple interactive programs,
programs with search functions, and so on.
Title
The longest sections of a picture or a music piece on a DVD;
a movie, etc., for a picture piece on video software; or an
album, etc., for a music piece on an audio software. Each title
is assigned a title number enabling you to locate the title you
want.
Track
Sections of a picture or a music piece on a CD or Video CD.
Each track is assigned a track number enabling you to locate
the track you want.
54

Specifications
DVD Player
• Pickup ................................................................................................Semiconductor laser, Wavelength 650 nm
• Signal system ...................................................................................NTSC / PAL
• Video signal horizontal resolution ................................................480 lines (DVD)
• Video signal-to-noise ratio.............................................................60 dB (DVD)
• Audio frequency response (at 2 CH stereo mode) ...................DVD (PCM): 20 Hz ~ 20 kHz (+/- 1.0 dB)
CD: 20 Hz ~ 20 kHz (+/- 1.0 dB)
• Audio signal-to-noise ratio.............................................................90 dB
• Total harmonic distortion................................................................0.02%
• Dynamic range .................................................................................DVD : 90 dB
CD: 90 dB
FM Tuner
• System ...............................................................................................PLL quartz-locked digital synthesizer system
• Tuning range ....................................................................................87.50 ~ 108.00 MHz (50 kHz step)
• Antenna..............................................................................................FM pigtail antenna
• Antenna terminals ...........................................................................75 ohms, unbalanced
• Intermediate frequency...................................................................10.7 MHz
AM Tuner
• System ...............................................................................................PLL quartz-locked digital synthesizer system
• Tuning range ....................................................................................522~1620 kHz (9 kHz interval)
• Antenna..............................................................................................AM Loop antenna
Video outputs
• CVBS Video.......................................................................................1 Vp-p 75 ohms
• S-video ...............................................................................................Y: 1 Vp-p 75 ohms
C: PAL 0.3 Vp-p 75 ohms / NTSC 0.286 Vp-p 75 ohms
• Scart out.............................................................................................1 Vp-p 75 ohms
• Optical & Coaxial out.......................................................................1 Vp-p 75 ohms
Audio line outputs
• Audio L/R ...........................................................................................1 Vrms, 1k ohms
• Subwoofer .........................................................................................1.2Vrms maximum (adjustable), 1k ohms
Audio power outputs
• Stereo mode .....................................................................................25 W + 25 W (4 ohms at 1 kHz, THD 10%)
• Surround mode ................................................................................Front: 25 W + 25 W (4 ohms at 1 kHz, THD 10%)
Center: 25 W (4 ohms at 1 kHz, THD 10%)
Rear: 25 W + 25 W (4 ohms at 1 kHz, THD 10%)
• Phones ..............................................................................................Headphones jack(stereo 6.35mm)
General (main unit)
• Power requirements .......................................................................AC 230 V, 50 Hz
• Power consumption ........................................................................110 W
• Dimensions ......................................................................................W 430x H78x D378 mm
• Weight................................................................................................8.5 kg
• Supplied accessories .....................................................................See page 17
55

Specifications
Speakers
• Active Subwoofer.............................................................................. Output power : 75 W (4 ohms at 80Hz, THD 10%)
Speaker system : Bass reflex
Power reguirements : AC 230 V, 50 Hz
Power consumption : 50 W
Speaker unit : 8 inches, dia, cone type
Rated impedance : 4 ohms
Dimensions : W200x H333x D328 mm
Weight : 7.1 kg
• Front / Center / Rear speakers ...................................................... Power: 25 W maximum
Speaker system: Bass reflex
Speaker unit: 2 7/8 inches,dia,cone type
Rated impedance: 4 ohms
Dimensions: W90x H150x D110 mm
Weight: 0.5 kg
Design and specifications are subjected to change without notice.
Weight and dimensions are approximate.
56

Hitachi, Ltd. Tokyo, Japan
International Sales Division
THE HITACHI ATAGO BUILDING,
No. 15 –12 Nishi Shinbashi, 2 – Chome,
Minato – Ku, Tokyo 105-8430, Japan.
Tel: 03 35022111
HITACHI EUROPE LTD,
Whitebrook Park
Lower Cookham Road
Maidenhead
Berkshire
SL6 8YA
UNITED KINGDOM
Tel: 01628 643000
Fax: 01628 643400
Email: consumer-service@hitachi-eu.com
HITACHI EUROPE GmbH
Munich Office
Dornacher Strasse 3
D-85622 Feldkirchen bei München
GERMANY
Tel: +49-89-991 80-0
Fax: +49- 89-991 80-224
Hotline: +49-180-551 25 51 (12ct/min)
Email: HSE-DUS.service@hitachi-eu.com
HITACHI EUROPE srl
Via Tommaso Gulli N.39, 20147
Milano, Italia
ITALY
Tel: +39 02 487861
Tel: +39 02 38073415 Servizio Clienti
Fax: +39 02 48786381/2
Email: customerservice.italy@hitachi-eu.com
HITACHI EUROPE S.A.S
Lyon Office
B.P. 45, 69671 BRON CEDEX
FRANCE
Tel: 04 72 14 29 70
Fax: 04 72 14 29 99
Email: france.consommateur@hitachi-eu.com
HITACH EUROPE AB
Egebækgård
Egebækvej 98
DK-2850 Nærum
DENMARK
Tel: +45 43 43 6050
Fax: +45 43 60 51
Email: csgnor@hitachi-eu.com
Hitachi Europe Ltd
Bergensesteenweg 421
1600 Sint- Pieters-Leeuw
BELGIUM
Tel: +32 2 363 99 01
Fax: +32 2 363 99 00
Email: sofie.van.bom@hitachi-eu.com
www.hitachidigitalmedia.com
HITACHI EUROPE S.A.
364 Kifissias Ave. & 1, Delfon Str.
152 33 Chalandri
Athens
GREECE
Tel: 1-6837200
Fax: 1-6835964
Email: service.hellas@hitachi-eu.com
HITACHI EUROPE S.A.
Gran Via Carlos III, 101- 1
08028 Barcelona
SPAIN
Tel: 93 409 2550
Fax: 93 491 3513
Email: atencion.cliente@hitachi-eu.com
HITACHI Europe AB
Box 77 S-164 94 Kista
SWEDEN
Tel: +46 (0) 8 562 711 00
Fax: +46 (0) 8 562 711 13
Email: csgswe@hitachi-eu.com
HITACHI EUROPE LTD (Norway) AB
STRANDVEIEN 18
1366 Lysaker
NORWAY
Tel: 67 5190 30
Fax: 67 5190 32
Email: csgnor@hitachi-eu.com
HITACHI EUROPE AB
Neopoli / Niemenkatu 73
FIN-15140 Lahti
FINLAND
Tel : +358 3 8858 271
Fax: +358 3 8858 272
Email: csgnor@hitachi-eu.com
HITACHI EUROPE LTD
Na Sychrove 975/8
101 27 Praha 10 – Bohdalec
CZECH REPUBLIC
Tel: +420 267 212 383
Fax: +420 267 212 385
Email: csgnor@hitachi-eu.com
 Loading...