

Hitachi HDT721010SLA360, HDT721075SLA360, HDT721064SLA360, HDT721050SLA360, HDT721032SLA360 Quick installation guide
...
Quick Installation Guide
Hitachi Deskstar 7K1000.B
and Deskstar E7K1000.B
Models: HDT721010SLA360
HDT721075SLA360
HDT721064SLA360
HDT721050SLA360
HDT721032SLA360
HDT721025SLA380
HDT721016SLA380
HDE721010SLA330
HDE721075SLA330
HDE721050SLA330
System Requirements for Serial ATA
The following are needed to install a Serial ATA
(SATA) drive to a system:
• SATA capable motherboard or controller card
• SATA hard drive
• SATA cable (1 meter or less in length)
Handling precautions
Set the drive down gently to prevent damage
from impact or vibration.
Do not open the ESD bag containing the drive
until needed.
Handle the drive carefully by the edges. Do not
touch the exposed printed circuit board or any
electronic components.
Do not press on the top or bottom of the drive.
Before handling the drive, discharge any static
electricity from yourself and your clothing. With
one hand, touch an unpainted metal surface on
your computer chassis, then touch the ESD bag
with the other hand. Remain in contact with the
chassis and the bag for a minimum of two
seconds.
Quick installation procedure
Note: Back up all data before installing drive.
1. Turn off the computer.
2. Unplug the computer.
3. Remove the computer cover as instructed by
the computer system manual.
4. Discharge static electricity (see Handling
precautions).
5. Note the mounting position of existing drives
and cables. If you are replacing a drive or any
cable, remove it now.
6. Remove the drive from the ESD bag.
7. Record the model, the part number, and the
serial number of the drive for future reference.
8. Attach the Serial ATA cable to the drive. Match
key on cable to connector on drive
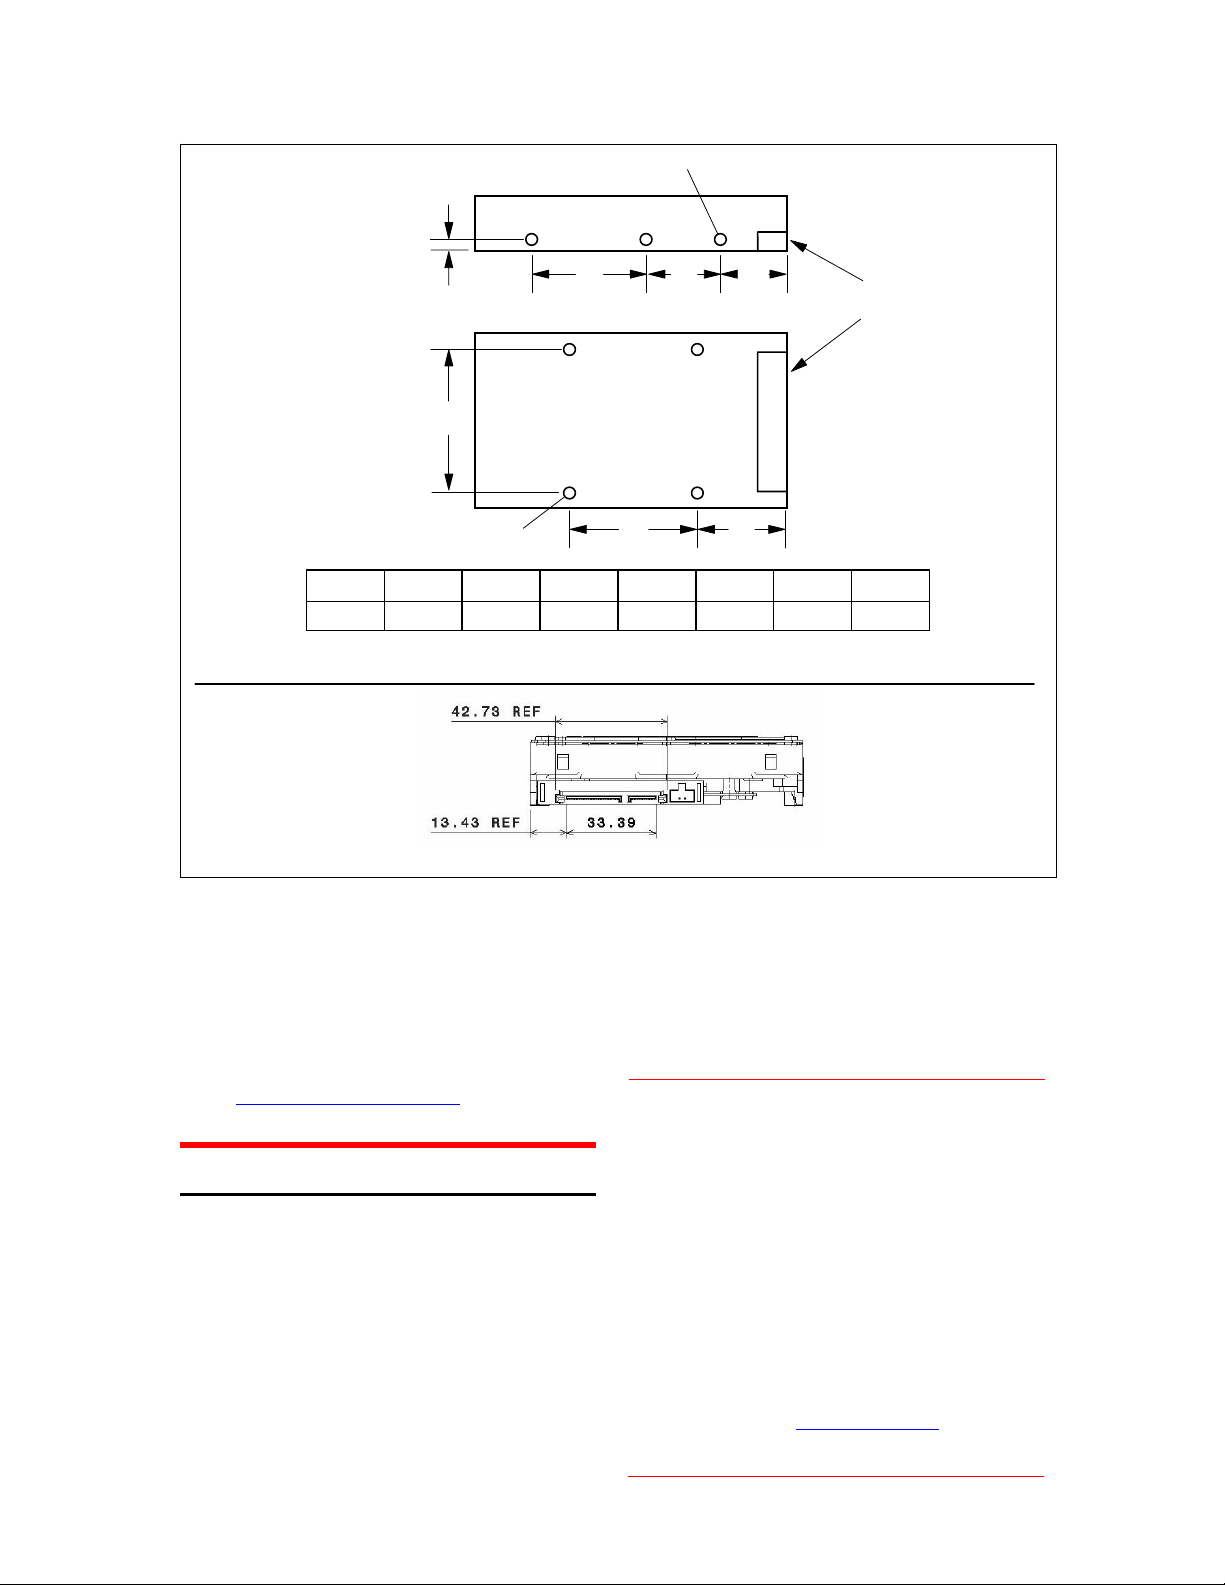
Mounting instructions
Note: The mounting hole and connector locations are
shown in figures 1 and 2.
1. Mount the drive securely.
2. Verify all attachments.
3. Replace the computer cover.
4. Plug in the computer.
5. Turn on the computer.
6. Verify that the hard disk is recognized by the
BIOS and is reporting the full capacity of the
drive. Instructions for accessing your BIOS can
be found in the computer system manual or in
the motherboard manufacturer documentation.
If the drive is
not recognized in the BIOS, set
Page 1 version 1.0
Hitachi Global Storage Technologies
(6X) Max. penetration 4.5 mm
(4)
Side View
Bottom View
(3)
(5)(6) (7)
I/F Connector
(4X) Max. penetration 4.0 mm
Thread (1) (2) (3) (4) (5) (6) (7)
6-32UNC 41.28±0.5 44.45±0.2 95.25±0.2 6.35±0.2 28.5±0.5 60.0±0.2 41.6±0.2
Figure 1: Mounting holes locations (all dimensions are in mm)
Figure 2: Connector location (all dimensions are in mm)
the BIOS options of your computer system to
Auto Detection and LBA mode if available.
Once the drive is recognized correctly in the
BIOS, it is ready to be partitioned and
formatted.
7. Your operating system setup utility will provide
instructions on how to partition and format your
drive before it installs the operating system.
For additional information see:
www.hitachigst.com/support
Mounting Recommendations
The drive will operate in all axes (6 directions).
Performance and error rate will stay within
specification limits if the drive is operated in the other
orientations from which it was formatted.
For reliable operation, the drive must be mounted in
the system securely enough to prevent excessive
motion or vibration of the drive during seek operation
or spindle rotation, using appropriate screws or
equivalent mounting hardware.
The recommended mounting screw torque is 0.6 - 1.0
Nm (6-10 Kgf.cm).
The recommended mounting screw depth is 4 mm
maximum for bottom and 4.5 mm maximum for
horizontal mounting.
Drive level vibration test and shock test are to be
conducted with the drive mounted to the table using
the bottom four screws.
© 2008 Hitachi Global Storage Technologies
Hitachi Global Storage Technologies
3403 Yerba Buena Road
San Jose, CA 95135
Produced in the United States, 7/08. All rights reserved.
Deskstar™ is a trademark of Hitachi Global Storage Technologies.
Hitachi GST trademarks are authorized for use in countries and jurisdictions in
which Hitachi has the right to use, market and advertise the brands. Hitachi GST
shall not be liable to third parties for unauthorized use of its trademarks.
References in this publication to Hitachi products, programs or services do not
imply that Hitachi intends to make these available in all countries in which it
operates. Some countries have laws that may affect encryption-enabled devices.
Hitachi GST assumes no responsibility for compliance with laws that apply to our
products after they are sold or outside of our control. Accordingly, we suggest
that you review all laws of the countries where you conduct business.
Product specifications provided are sample specifications and do not constitute a
warranty. Information is true as of the date of publication and is subject to
change. Actual specifications for unique part numbers may vary. Please visit the
Support section of our website, www.hitachigst.com/suport
information on product specifications. Photographs may show design models.
9 July 2008
(1)(2)
, for additional
Page 2 version 1.0
 Loading...