

Page 1

Hit achi America, Lt d.
y
Dynamic Braking Unit
HBU-2015/2030/4015/4030/4045/4220
Instruction Manual
NOTE: REFER ALSO TO APPLICABLE INVERTER INSTRUCTION MANUAL
Manual Number: HAL7201C
Februar
2008
Hitachi America, Ltd.
After reading this manual,
keep it handy for future reference.
Page 2

Hitachi America, Ltd.
Tarrytown, NY
Revision History
Rev B, December 2007 – Changed depth dimension on page 11 for
2015/2030/4015/4030/4045/4220
Rev C, February 2008 – Added missing ratings in tables, pages 8-10; improved descriptions on
pages 4, 14, 15 and 19; added index
2
Page 3
Hitachi America, Ltd.
Tarrytown, NY
Safety Precautions
Please read through this user’s manual before you use our product. Keep this manual handy for future reference.
Definitions used in this manual:
CAUTION! – This indicates a potentially hazardous situation that, if not avoided, can result in minor
to moderate injury, or serious damage to the product.
WARNING! – This indicates a potentially hazardous situation that, if not avoided, can result in serious
injury or death.
I. General Information
The function of the HBU braking unit is to divert into a braking resistor the regenerative energy produced in the
process of decelerating the motor, converting that energy into heat. Regenerative energy flows from the motor into the
inverter DC Bus, manifested as increased bus voltage. The advantage gained using the HBU is improved braking
performance and shorter deceleration time of the load.
Before you use the HBU braking unit, please read through this manual and please contact your distributor if you
have any questions. This manual will provide you the necessary information for installation, operation,
troubleshooting and repair of the HBU braking unit.
A. Inspection
Please check that the model number is the same as what you ordered BEFORE opening the box. Then, check the
contents for any sign of defect or damage during transport. If there is any problem, please contact your Hitachi
distributor immediately.
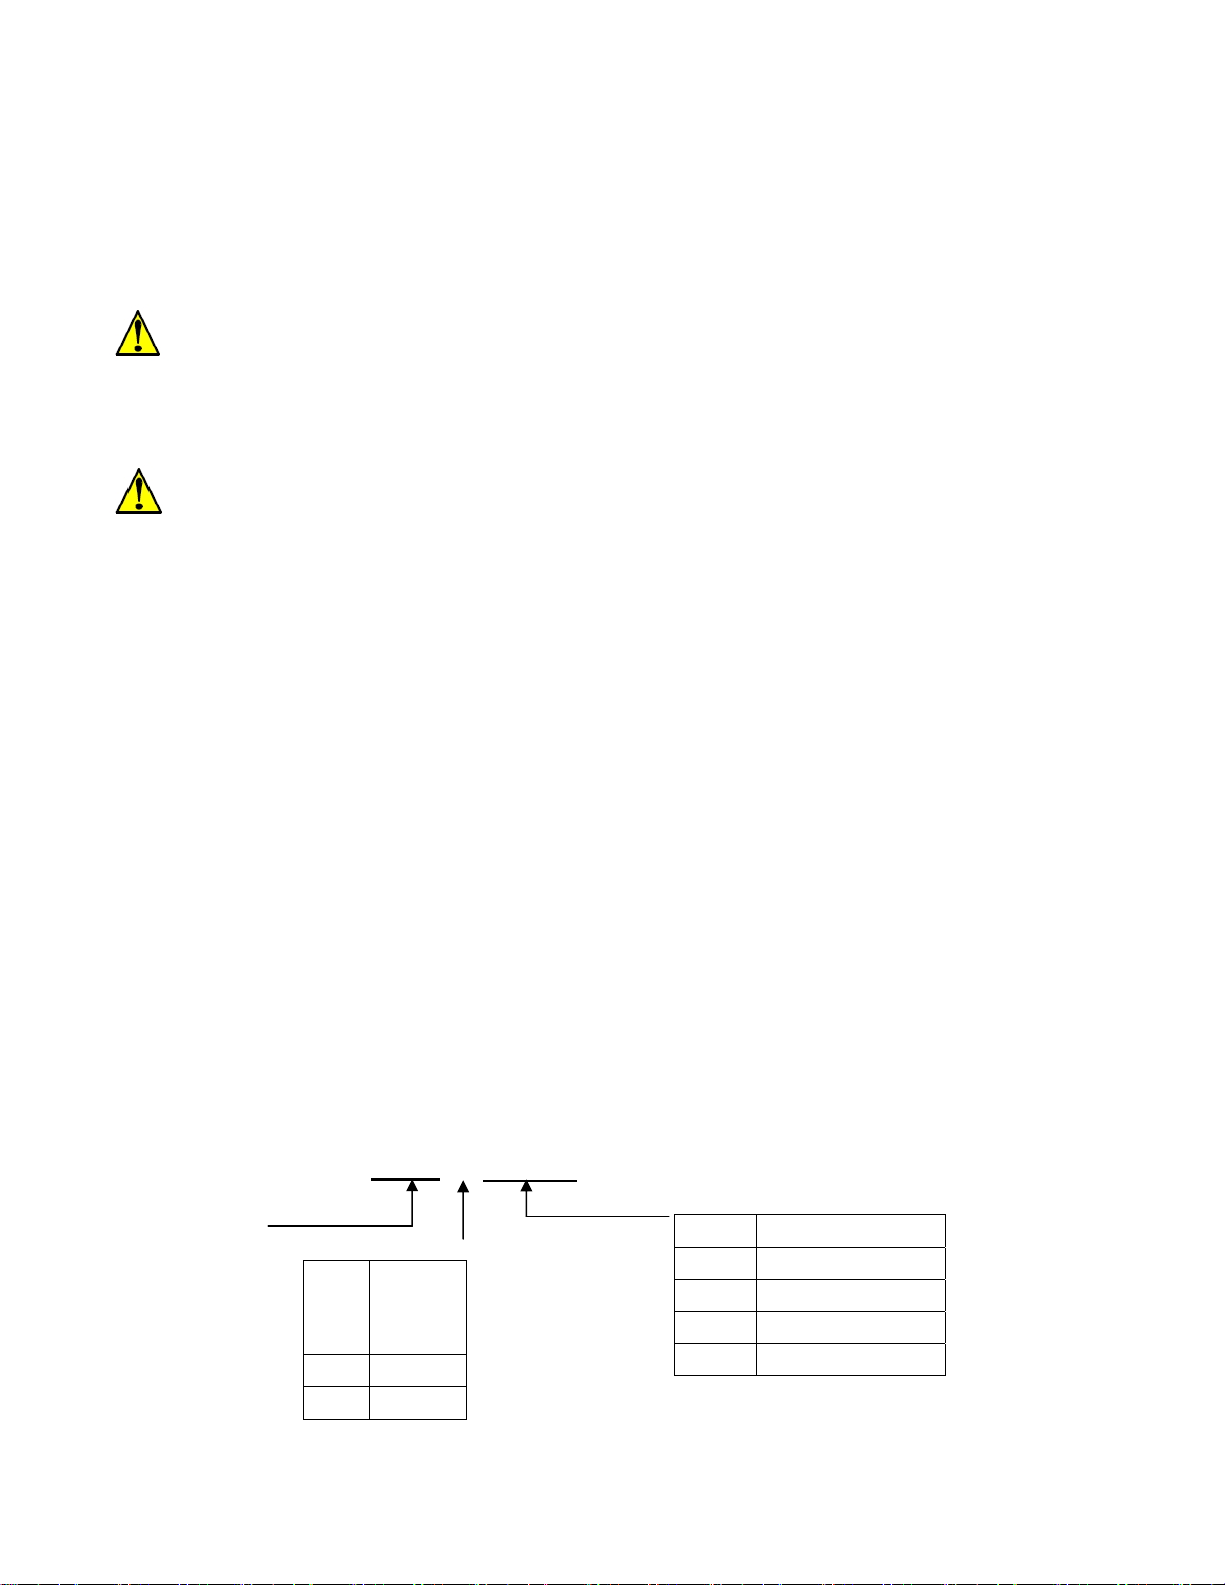
B. Braking Unit model numbering convention
HBU-□□□□
Braking Unit (@ 10% ED)
Inverter
Code
2 200 VAC
4 400 VAC
Input
Voltage
Code Inverter Power
015 15 kW
030 30 kW
045 45 kW
220 220 kW
3
Page 4

C. HBU Series Technical Specifications
200 V SERIES
Model HBU-2015 HBU-2030
Peak current (A) * 50 90
Input and output
specifications
Power supply DC Bus Voltage Range 230-380V
Continuous current (A) 15 30
Braking Activation Voltage 380 ±10 VDC (not selectable)
Maximum hysteresis ~10 VDC
Multiple units Maximum: 10 HBUs parallel connected
Hitachi America, Ltd.
Tarrytown, NY
Indication
functions
Physical data
400 V SERIES
Input and output
specifications
Power supply DC Bus Voltage Range 460-800V
Power ON
Braking ON
Ambient temperature Minus 10˚C to 40˚C (no frost)
Ambient humidity 90% RH (no dew)
Vibration 10-20hz: 1g, 20-50hz: 0.2g
Protection IP20
Weight 2.3 kg/5.1 lbs
Model HBU-4015 HBU-4030 HBU-4045 HBU-4220
Peak current (A) * 25 50 75 250
Continuous current (A) 8 15 25 80
Braking Activation Voltage 630/660/690/730/760V+-16V (jumper selectable)
Maximum hysteresis About 16V
Multiple units Maximum: 10 HBUs parallel connected
The red "power" LED will be on whenever the
inverter DC Bus voltage is above ~35VDC
The green "braking" LED will be on during
braking unit conduction
Indication
functions
Physical data
* Peak current is defined as capacity for 10 seconds maximum, and 10% ED
4
Power ON
Braking ON
Ambient temperature Minus 10˚C to 40˚C (no frost)
Ambient humidity 90% RH (no dew)
Vibration 10-20hz: 1g, 20-50hz: 0.2g
Protection IP20
Weight 2.3 kg/5.1 lbs
The red "power" LED will be on whenever the
inverter DC Bus voltage is above ~35VDC
The green "braking" LED will be on during braking
unit conduction
11.6 kg/
25.5 lbs
Page 5

Hitachi America, Ltd.
D. Braking Resistor Selection Table for HBU braking unit
200 V SERIES
ED = 10%,braking activation voltage = 380 VDC
Tarrytown, NY
Quantity
Power of
Inverter
0.4 HBU-2015 1 70W 200Ω 1 220
0.75 HBU-2015 1 70W 200Ω 1 125
1.5 HBU-2015 1 260W 100Ω 1 125
2.2 HBU-2015 1 260W 70Ω 1 120
3.7 HBU-2015 1 390W 40Ω 1 125
5.5 HBU-2015 1 520W 30Ω 1 115
7.5 HBU-2015 1 780W 20Ω 1 125
11 HBU-2015 1 2400W 13.6Ω 1 125
15 HBU-2015 1 3000W 10Ω 1 125
18.5 HBU-2015 2 2400W 16Ω 2 125
22 HBU-2015 2 2400W 13.6Ω 2 125
30 HBU-2015 2 3000W 10Ω 2 125
37 HBU-2015 2 3000W 10Ω 2 100
45 HBU-2015 3 3000W 10Ω 3 120
55 HBU-2030 2 4800W 6.8Ω 2 100
75 HBU-2030 3 4800W 6.8Ω 3 110
90 HBU-2030 4 4800W 6.8Ω 4 120
Model of braking
unit
of
braking
unit
Resistors
Quantity of
resistors
Braking
torque
(10%ED)
%
110 HBU-2030 5 4800W 6.8Ω 5 100
5
Page 6

200 V SERIES
ED = 20%,braking activation voltage = 380 VDC
Hitachi America, Ltd.
Tarrytown, NY
Quantity
Power of
Inverter
0.4 HBU-2015 1 140W 200Ω 1 220
0.75 HBU-2015 1 140W 200Ω 1 125
1.5 HBU-2015 1 520W 100Ω 1 125
2.2 HBU-2015 1 520W 70Ω 1 120
3.7 HBU-2015 1 780W 40Ω 1 125
5.5 HBU-2015 1 1KW 30Ω 1 115
7.5 HBU-2015 1 1.5KW 20Ω 1 125
11 HBU-2015 1 4.8KW 13.6Ω 1 125
15 HBU-2015 2 3KW 20Ω 2 125
18.5 HBU-2030 1 9.6KW 8Ω 1 125
22 HBU-2030 1 9.6KW 6.8Ω 1 125
30 HBU-2030 3 4KW 15Ω 3 125
37 HBU-2030 2 6KW 10Ω 2 100
45 HBU-2030 2 9.6KW 6.8Ω 2 120
55 HBU-2030 3 6.4KW 10.2Ω 3 100
75 HBU-2030 4 7.2KW 9Ω 4 110
90 HBU-2030 4 9.6KW 6.8Ω 4 120
Model of braking
unit
of
braking
unit
Resistors
Quantity of
resistors
Braking
torque
(20%ED)
%
110 HBU-2030 5 9.6KW 6.8Ω 5 100
6
Page 7

200 V SERIES
ED = 40%,braking activation voltage = 380 VDC
Hitachi America, Ltd.
Tarrytown, NY
Quantity
Power of
Inverter
0.4 HBU-2015 1 240W 200Ω 1 220
0.75 HBU-2015 1 450W 200Ω 1 125
1.5 HBU-2015 1 900W 100Ω 1 125
2.2 HBU-2015 1 1.3KW 70Ω 1 120
3.7 HBU-2015 1 2.2KW 40Ω 1 125
5.5 HBU-2015 1 3.3KW 30Ω 1 115
7.5 HBU-2015 1 4.5KW 20Ω 1 125
11 HBU-2015 2 3.3KW 27.2Ω 2 125
15 HBU-2030 1 9KW 10Ω 1 125
18.5 HBU-2030 2 6KW 16Ω 2 125
22 HBU-2030 2 6.6KW 13.6Ω 2 125
30 HBU-2030 2 9KW 10Ω 2 125
37 HBU-2030 3 7.5KW 15Ω 3 100
45 HBU-2030 3 9KW 10.2Ω 3 120
55 HBU-2030 4 8.5KW 13.2Ω 4 100
75 HBU-2030 4 12KW 9Ω 4 110
90 HBU-2030 6 9KW 10.2Ω 6 120
Model of braking
unit
of
braking
unit
Resistors
Quantity of
resistors
Braking
torque
(40%ED)
%
110 HBU-2030 8 8.5KW 10.8Ω 8 100
7
Page 8

400 V SERIES
ED = 10%,braking activation voltage = 760 VDC
Hitachi America, Ltd.
Tarrytown, NY
Quantity
Power of
Inverter
0.4 HBU-4015 1 70W 750Ω 1 230
0.75 HBU-4015 1 70W 750Ω 1 130
1.5 HBU-4015 1 260W 400Ω 1 125
2.2 HBU-4015 1 260W 250Ω 1 135
3.7 HBU-4015 1 390W 150Ω 1 135
5.5 HBU-4015 1 520W 100Ω 1 135
7.5 HBU-4015 1 780W 75Ω 1 130
11 HBU-4015 1 1040W 50Ω 1 135
15 HBU-4015 1 1560W 40Ω 1 125
18.5 HBU-4030 1 4800W 32Ω 1 125
22 HBU-4030 1 4800W 27.2Ω 1 125
30 HBU-4030 1 6000W 20Ω 1 125
37 HBU-4045 1 9600W 16Ω 1 125
45 HBU-4045 1 9600W 13.6Ω 1 125
55 HBU-4045 2 6000W 20Ω 2 135
75 HBU-4045 2 9600W 13.6Ω 2 145
90 HBU-4045 2 9600W 13.6 Ω 2 100
Model of braking
unit
of
braking
unit
Resistors
Quantity of
resistors
Braking
torque
(10%ED)
%
110 HBU-4045 3 9600W 13.6Ω 3 100
132 HBU-4220 1 16KW 3.6Ω 1 120
160 HBU-4220 1 40KW 3Ω 1 140
220 HBU-4220 1 60KW 2.5Ω 1 110
300 HBU-4220 2 40KW 3Ω 2 110
600 HBU-4220 4 40KW 3Ω 4 110
8
Page 9

400 V SERIES
Hitachi America, Ltd.
Tarrytown, NY
ED = 20%,braking activation voltage = 760 VDC
Quantity
Power of
Inverter
0.4 HBU-4015 1 140W 750Ω 1 230
0.75 HBU-4015 1 140W 750Ω 1 130
1.5 HBU-4015 1 520W 400Ω 1 125
2.2 HBU-4015 1 520W 250Ω 1 135
3.7 HBU-4015 1 780W 150Ω 1 135
5.5 HBU-4015 1 1040W 100Ω 1 135
7.5 HBU-4015 1 1560W 75Ω 1 130
11 HBU-4015 1 2KW 50Ω 1 135
15 HBU-4030 1 3KW 40Ω 1 125
18.5 HBU-4030 1 9600W 32Ω 1 125
22 HBU-4030 1 9600W 27.2Ω 1 125
30 HBU-4045 1 12KW 20Ω 1 125
37 HBU-4045 1 20KW 16Ω 1 125
45 HBU-4030 2 10KW 27.2Ω 2 125
55 HBU-4045 2 12KW 20Ω 2 135
75 HBU-4045 3 18KW 20.4Ω 3 145
90 HBU-4045 4 12KW 21.2Ω 4 120
Model of braking
unit
of
braking
unit
Resistors
Braking
Quantity
of resistors
torque
(20%ED)
%
110 HBU-4045 4 15KW 18Ω 4 100
132 HBU-4220 1 48KW 3.6Ω 1 120
160 HBU-4220 1 80KW 3Ω 1 140
220 HBU-4220 2 60KW 5Ω 2 110
300 HBU-4220 2 80KW 3Ω 2 110
600 HBU-4220 4 80KW 3Ω 4 110
9
Page 10

400 V SERIES
Hitachi America, Ltd.
Tarrytown, NY
ED = 40%,braking activation voltage = 760 VDC
Quantity
Power of
Inverter
0.4 HBU-4015 1 240W 750Ω 1 230
0.75 HBU-4015 1 450W 750Ω 1 130
1.5 HBU-4015 1 800W 400Ω 1 125
2.2 HBU-4015 1 1.32KW 250Ω 1 135
3.7 HBU-4015 1 2.2KW 150Ω 1 135
5.5 HBU-4015 1 3.3KW 100Ω 1 135
7.5 HBU-4015 1 4.5KW 75Ω 1 130
11 HBU-4030 1 6.6KW 50Ω 1 135
15 HBU-4030 1 9KW 40Ω 1 125
18.5 HBU-4045 1 11KW 32Ω 1 125
22 HBU-4045 1 13.2KW 27.2Ω 1 125
30 HBU-4030 2 10KW 40Ω 2 125
37 HBU-4045 2 11KW 32Ω 2 125
45 HBU-4045 2 13.5KW 27.2Ω 2 125
55 HBU-4045 3 12KW 30Ω 3 135
75 HBU-4045 4 11KW 27.2Ω 4 145
90 HBU-4220 1 54KW 5.3Ω 1 120
110 HBU-4220 1 66KW 4.4Ω 1 100
132 HBU-4220 2 40KW 10Ω 2 130
160 HBU-4220 2 48KW 6Ω 2 140
220 HBU-4220 2 66KW 5Ω 2 110
300 HBU-4220 3 60KW 4.5Ω 3 110
600 HBU-4220 6 60KW 4.5Ω 6 110
Model of braking
unit
of
braking
unit
Resistors
Quantity
of
resistors
Braking
torque
(40%ED)
%
10
Page 11

Hitachi America, Ltd.
II. Mounting
A. External dimensions of HBU-2015/2030/4015/4030/4045/4220
Tarrytown, NY
2015/2030/4015/4030/4045
4220
158
Figure 1
Mounting Hole Size (mm) Terminal Screw Size Wire Size (mm2)
2015/2030/4015/4030/4045 6 M4 4-6
4220 8 M8 16-36
11
Page 12
Hitachi America, Ltd.
Tarrytown, NY
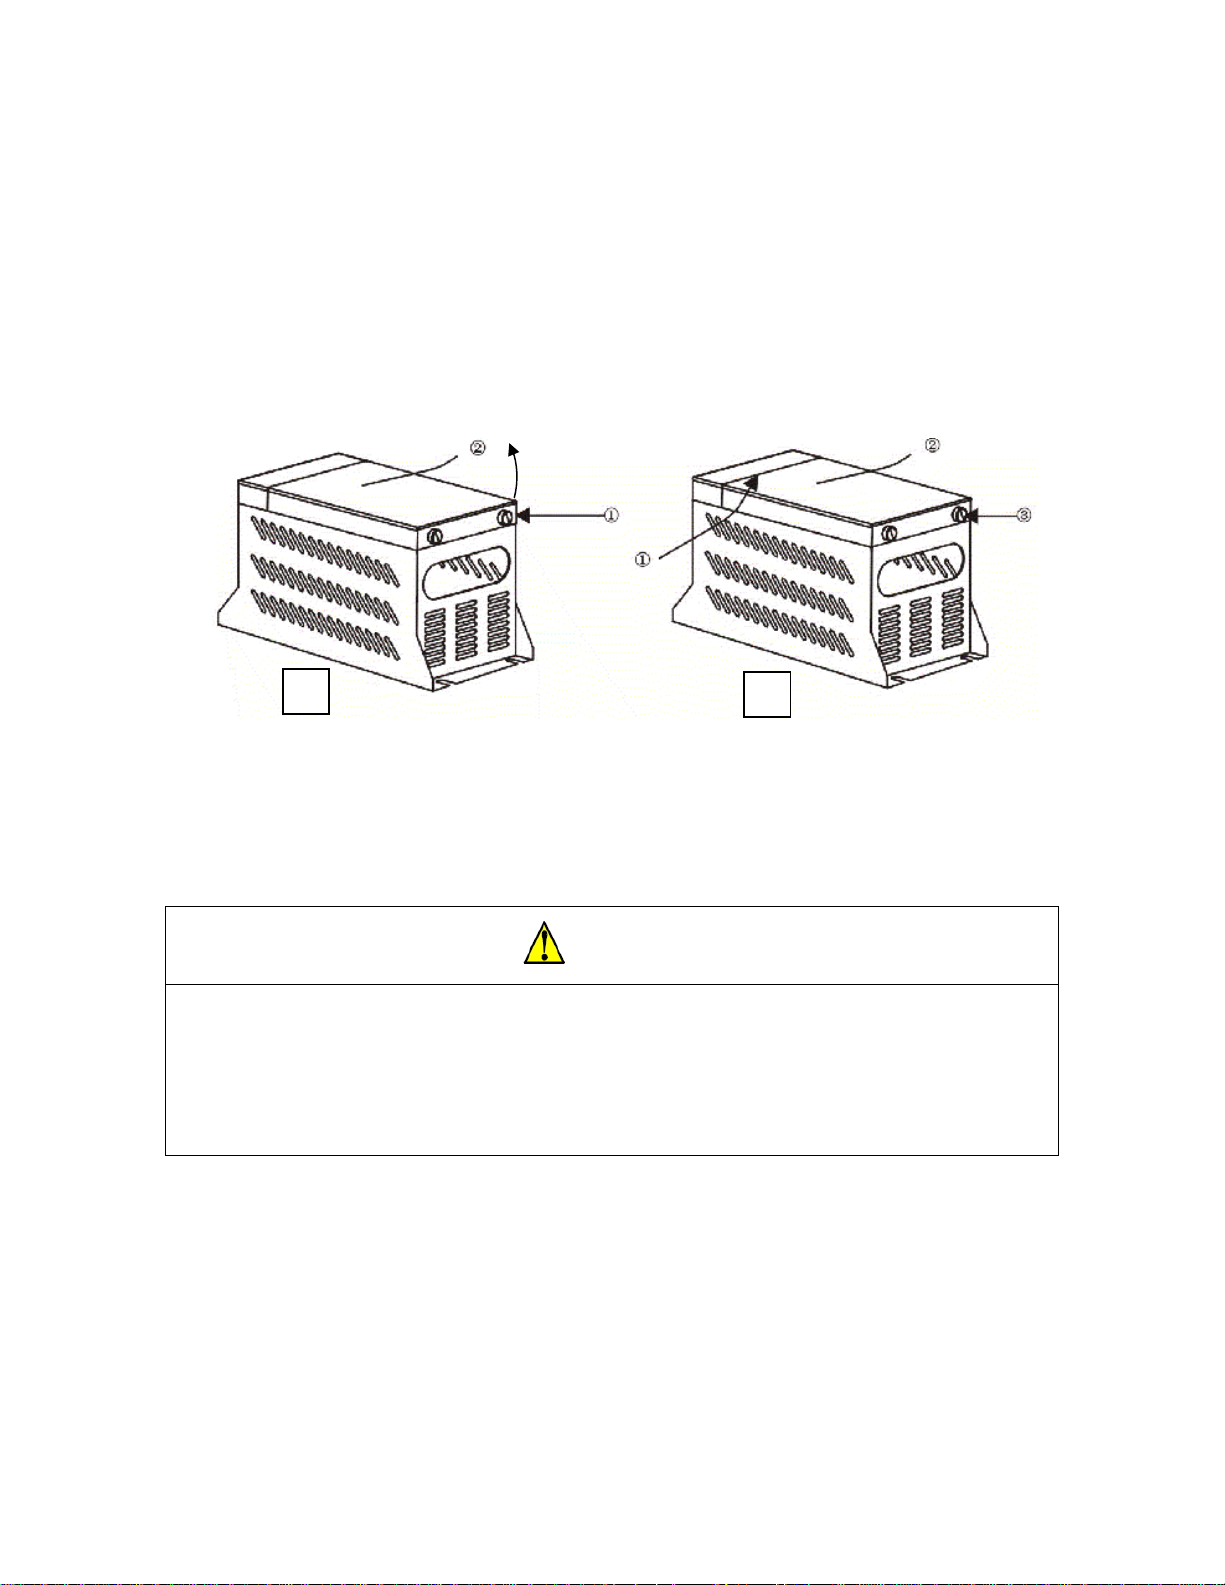
B. Braking Unit Front Panel
1. Front Cover Removal
Grasp the two sides of the front panel firmly. Remove the two attachment screws at the bottom of the cover by
turning counterclockwise. Remove the cover by lifting it upward from the bottom. (Figure 2 A)
2. Front Cover Re-attachment
Insert the top tongue of the front cover under the coping. Push the front cover down until it is fully seated.
Reinstall the attachment screws at the bottom of the front cover. (3-5N.M) (Figure 2B)
e
A
B
Figure 2 - Front cover removal and reinstallation of HBU braking unit.
C. Cautions for Installation
CAUTION!
1. Please install the braking unit on a non-flammable wall or panel. Otherwise there is risk of fire.
2. If you install braking units in an enclosure, be sure to size the panel properly and provide adequate
cooling/ventilation as necessary to ensure the internal temperature remains lower than +40˚C.
3. It is normal for this braking unit to become hot during operation. Therefore be sure nothing
flammable or explosive comes in contact with it while it is in use. Otherwise there is risk of fire.
1. Installation considerations:
o If installed in a cabinet, the cabinet should be adequately ventilated.
o Ambient temperature should be between -10˚C and +40˚C, or if NOT in a cabinet, between -10˚C
and +50˚C (no frost)
o Humidity < 90% RH, non-condensing.
o Do not install the braking unit on wooden board or any flammable surface.
o Do not install where the unit will be exposed to direct sunlight.
o Do not install near flammable, explosive or caustic gases or liquids
o Protect from dust and strong electromagnetic fields.
12
Page 13
Hitachi America, Ltd.
Tarrytown, NY
2. Ambient temperature:
In order to improve the life and reliability of the braking unit, please install it in a well-ventilated area. If
you install braking units in an enclosure, be sure to size the panel properly and provide adequate
cooling/ventilation as necessary to ensure the internal temperature remains lower than +40˚C.
3. Other precautions for installation:
Before installation, cover the ventilation grills on the braking unit with tape to keep out dust and metal
fragments. After installation is completed, be sure to remove any tape or other coverings from the ventilation
grills.
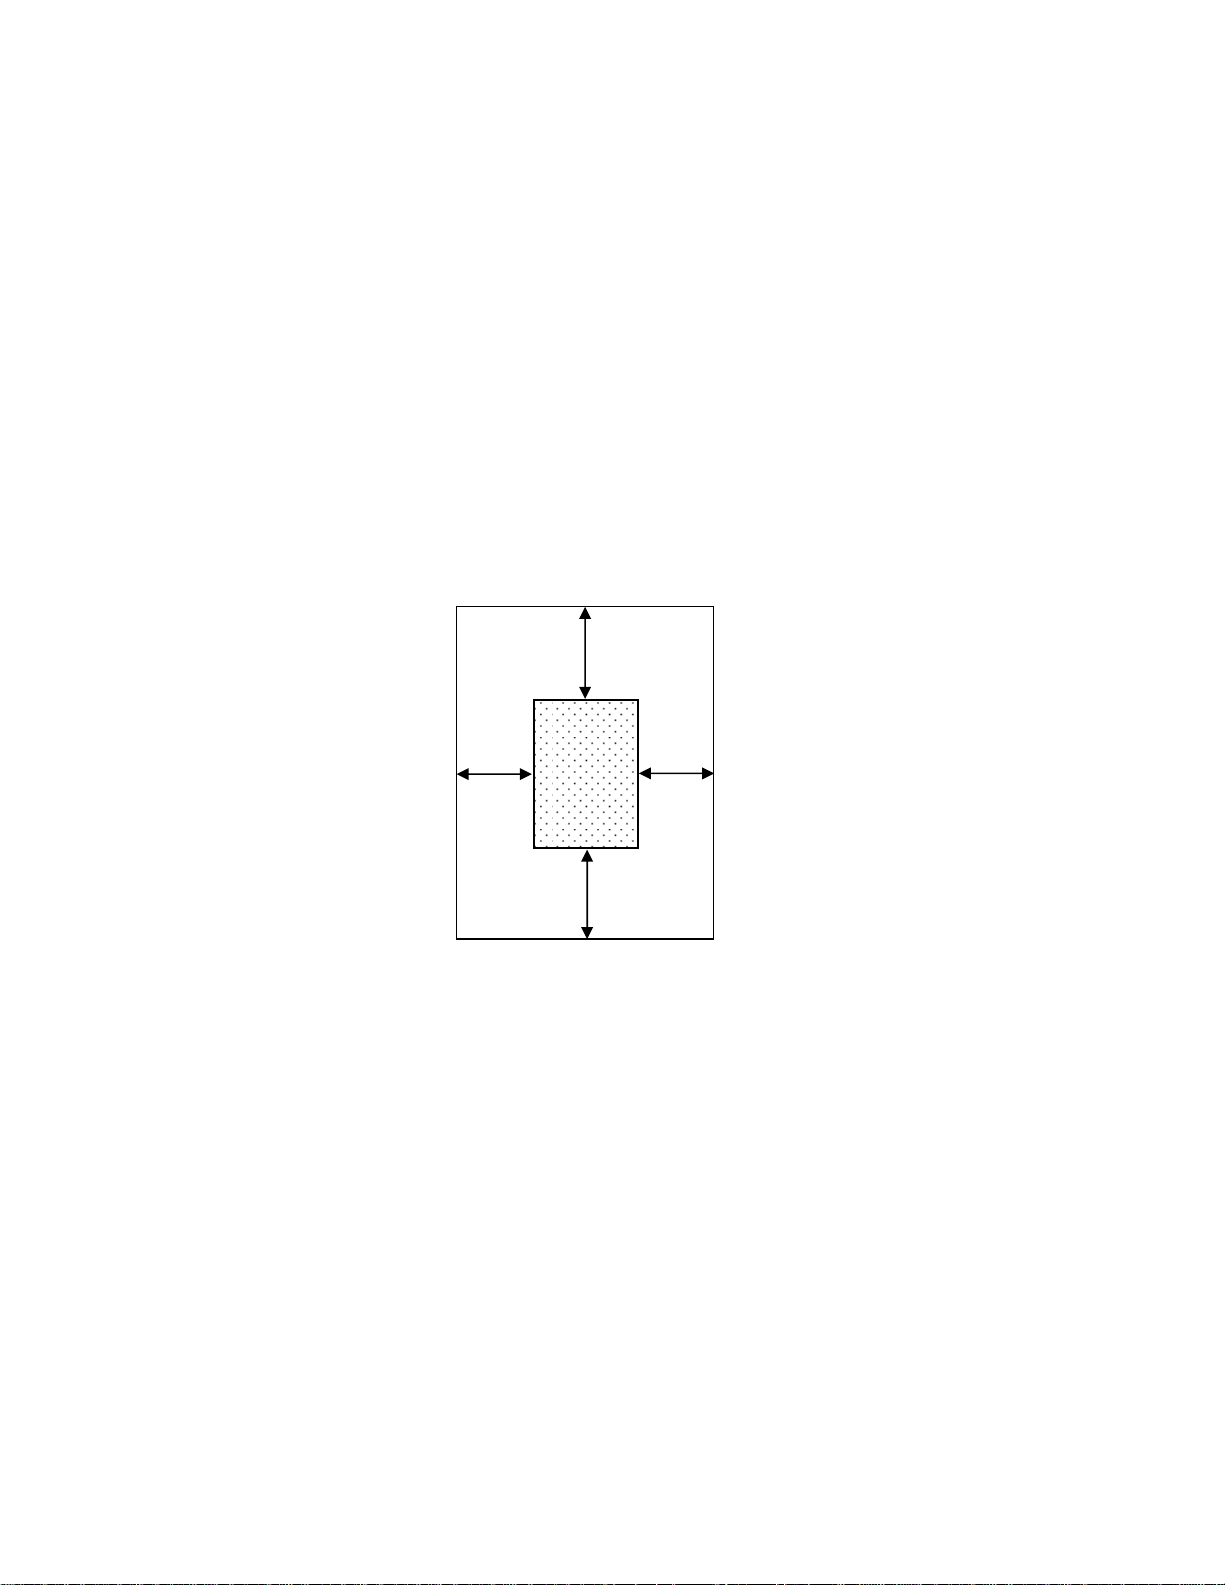
4. Mounting clearance:
Provide adequate top, bottom and side clearance around the HBU according to the following diagram:
>10 cm
>5 cm >5 cm
HBU
Figure 3
>10 cm
13
Page 14

III. Installation and Operation
1. The inverter DC Bus can hold a dangerous electrical charge for some time after AC power
had been removed. Make sure that the inverter input power has been turned off for at least
10 minutes before you attempt to make any wiring connections to the HBU..
2. Wiring should be done by a licensed electrician following applicable codes and generally
accepted wiring practices.
3. Do not touch the terminals or internal components of the braking unit while the DC bus is
charged.
4. Make sure that no wire strands contact the metal case of the HBU, or cause a short circuit
between the terminals.
Hitachi America, Ltd.
Tarrytown, NY
WARNING!
CAUTION!
1. Be sure to connect the braking resistors, braking unit and inverter according to the
connection diagram.
2. Tighten the terminal screws according the specified torque.
A. General instructions
1. Use wire gauge > 4 mm
2. Check that the connections are correct before you connect to the power supply. Refer to the wiring diagram in
Figure 4 for the necessary connections for P and N, and recommended use of fault alarm functions. The terminal
arrangement is shown in Figure 7.
3. The HBU incorporates internal fault detection which can be monitored externally through the relay alarm output
terminals marked Tb and Tc. Should the HBU detect an internal fault, the relay will energize and the state of the
Tb/Tc output will change. These terminals should be wired to a safety circuit as appropriate. In the factory default
configuration, the Tb/Tc output will CLOSE when the HBU detects a high internal temperature, and will be
OPEN otherwise. An HBU fault will cause an external trip fault in the inverter. Note: Jumper J8 will change the
logic sense of the Tb/Tc output from NO to NC (Figure 5) should your system so require. However, it is
recommended to use the factory default setting as described. Refer to the Inverter Instruction Manual for more
specific details about how to wire and set up an external trip input.
4. The resistor(s) must incorporate an internal thermal switch (usually open-on-fault type), and this must be wired
with a safety circuit that will remove power to the inverter. A typical configuration is shown in Figure 4. In this
way, a resistor over-temperature condition, or a break in the alarm wiring, will cause power to be removed from
the inverter.
5. On 400 V models only, there are five voltage settings (630V, 660V, 690V, 730V, and 760V) for unit activation.
The braking voltage should be set to meet the needs of the application. Set the voltage by moving the jumper on
inside the HBU to the pair of pins that correspond to the activation voltage desired. Note: On 200 V models, the
2
on power supply connection and resistor connection.
14
Page 15

Hitachi America, Ltd.
Tarrytown, NY
activation voltage is fixed at 380 VDC.
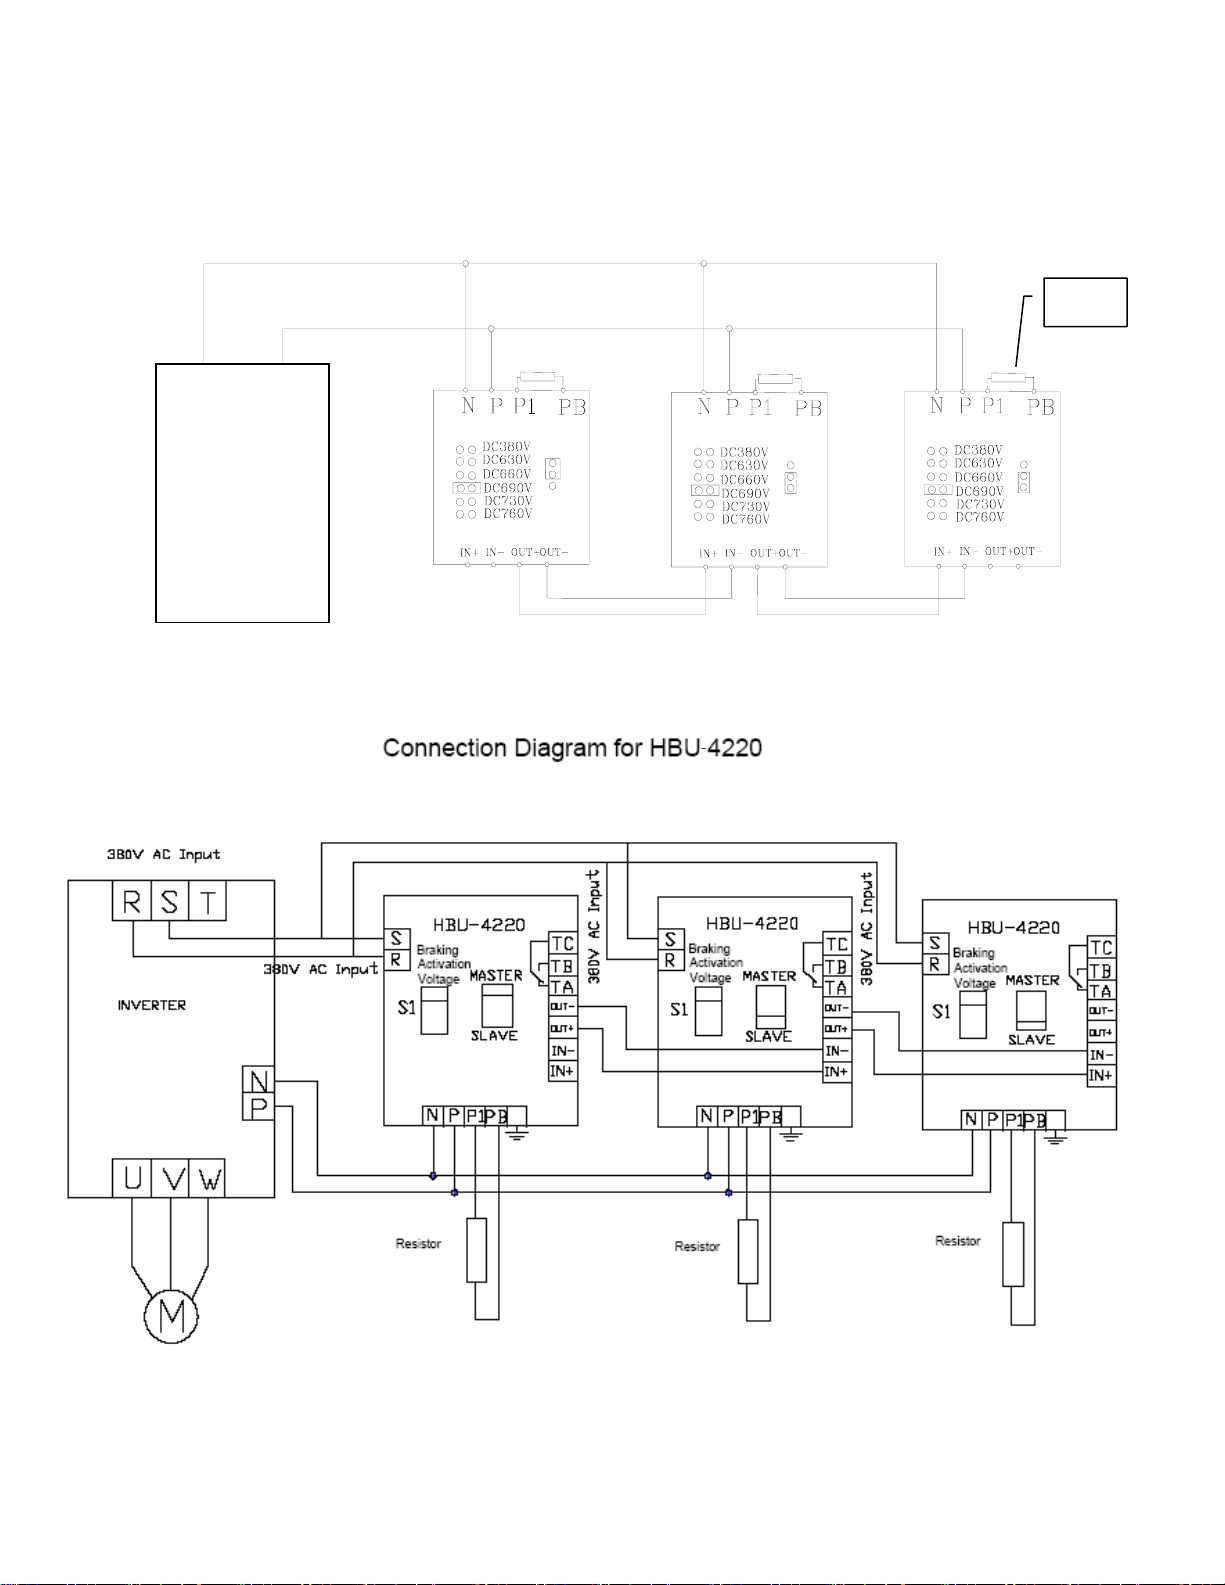
6. When using multiple HBU units, please refer to section III, B on page 16. The first braking unit should have its
jumper set to the MASTER position, and braking units number 2 through N should have their jumpers in the
SLAVE position.
7. Ensure that the case of braking unit is well grounded.
8. All units except the HBU-4220 are completely powered from the DC bus (P and N terminals) of the inverter. The
HBU-4220 also requires single phase AC power to operate. The HBU-4220 also includes terminals marked R and
S, which must be connected to the corresponding terminals on the AC input side of the inverter, as shown below.
HBU-4220 Only
R
S
REQUIRED
FOR SAFETY
Fault relay
energizes when
HBU internal
temperature is
too high
Figure 4
Typical Alarm and Safety
Circuit
WARNING! Be sure to utilize a power disconnection method as shown in Figure 4
above, which removes power from the inverter should the braking resistor overheat.
Failure to do so may result in risk of fire, injury or death.
15
Page 16

Jumper
block
Hitachi America, Ltd.
Tarrytown, NY
Factory Default Position for Normally
Open (N.O.) Operation (recommended)
Position for Normally Closed (N.C.)
Operation (not recommended)
Jumper J8 Setting
Figure 5
16
Page 17
B. Connecting Multiple HBU Units
Connection Diagram for HBU-2015/2030/4015/4030/4045
N P
INVERTER
MASTER
SLAVE
Hitachi America, Ltd.
Tarrytown, NY
Resistor
MASTER
SLAVE
MASTER
SLAVE
Figure 6
17
Page 18

Hitachi America, Ltd.
Tarrytown, NY
Ta
Tb
IN-
IN+
R
OUT+ OUT-
S
N
HBU-4220
4220
Ta Tb Tc
P
P1
PB
Tc
HBU-2015/2030/4015/4030/4045
Figure 7
C. Simplified circuit diagram of the braking unit
Tb
IN+
IN-
N
OUT+ OUT-
P
P1
PB
Tc
2015/2030/4030/4045
D. Wiring
1. The wiring to the HBU should be passed through the wiring hole provided on the bottom of the unit.
2. The wires from the HBU to the inverter and to the resistor carry high current with significant harmonic content.
To minimize the chance for interference, lay out signal wire as far away as possible from these high current
wires. Use shielded signal wires as necessary to eliminate interference.
3. The wiring distance between braking unit and braking resistor and between braking unit and inverter should
meet the requirements as followed pictures. Please do make sure that the connections between those units are
in a bundle and they should be shielded or twisted pair.
Braking
Resistor
10 meters 5 meters
Braking
Unit
Inverter
18
Page 19

Hitachi America, Ltd.
Tarrytown, NY
E. Operation
1. Recheck all wiring and connections before applying power to the inverter.
2. Operation of the HBU is automatic once installed. It will turn on when the voltage of the inverter DC Bus
exceeds the activation voltage setting. When activated, the HBU draws current off the DC Bus and passes it to
the braking resistor(s). In so doing, it will dissipate the regenerative energy from the motor load as heat.
3. Do not touch the braking resistor while the inverter is operating. The resistor may become very hot during
normal operation.
4. Inside the HBU front metal cover, on the internal printed circuit board, there are two LED indicators. The red
LED – “POWER” – will be ON when the voltage between the DC Bus P and N of inverter is higher than 35V;
and the green LED – “BRAKING” – will be ON when the DC bus level is above the activation voltage and the
braking unit is therefore passing current to the resistor(s).
WARNING!
Do not disassemble the HBU when it is connected to an inverter and the power is applied!
CAUTION!
Do not touch the braking resistor while the inverter is energized. Its surface may be very hot during
normal operation, and there is risk of injury.
19
Page 20

Hitachi America, Ltd.
Tarrytown, NY
IV. Troubleshooting
The internal protection circuit of the braking unit will cause it to shut down in the case of any internal malfunction.
Should this occur, it would likely result in an over voltage trip on the inverter.
In case of difficulty, use the table below to try to find possible solutions. Should this not resolve the problem, please
contact your Hitachi distributor for further assistance.
Item Symptom Possible Cause Solution
The “POWER” light of the braking
1
2
3 “Over voltage” trip on inverter.
4
unit is not illuminated when the
inverter is energized
The “BRAKING” light is on all the
time.
The braking unit trips because the
temperature of resistor is too high.
Short circuit on Braking unit
The capacity of braking unit
Braking usage rate (%ED) is
The ambient temperature is
Wiring error Check the wiring
HBU set for “SLAVE”
IGBT
Wrong connection of the
braking resistor.
AC Input to the inverter is
high
Wiring error Recheck connections
and braking resistor is not
enough.
too high
over 40˚C
Confirm that the jumper is
set for “MASTER”
Change the braking unit
Examine the braking
resistance and its connection.
Check that AC supply is
within spec
Examine the design and
recalculate it.
Examine the design and
recalculate it.
Reduce the ambient
temperature where the HBU
is installed.
20
Page 21

INDEX
Hitachi America, Ltd.
Tarrytown, NY
A
Alarm relay · 14
Ambient temperature · 13
C
Cover installation · 12
Cover removal · 12
D
Dimensions · 11
Distance, wiring · 18
F
Fault detection · 14
M
Model numbering · 3
Mounting · 11
Mounting Clearance · 13
Multiple unit connection · 17
O
Operation · 19
P
Power requirements · 15
R
Resistor Selection · 5, 6, 7, 8, 9, 10
Revision History · 2
G
Grounding · 15
I
Internal circuit · 18
J
Jumper, activation voltage · 15
Jumper, alarm contact · 16
L
LED indicators · 19
S
Safety Circuit · 15
Safety Precautions · 3
Specifications · 4
T
Terminal arrangement · 18
Themal protection, resistor · 14
Troubleshooting · 20
W
Wire gauge · 14
Wiring · 18
Wiring schematic · 15
21
Page 22

Hitachi America, Ltd.
Tarrytown, NY
Hitachi America, Ltd.
50 Prospect Avenue
Tarrytown, NY 10591
For Technical Support, contact your Hitachi
Distributor,
Or visit:
www.hitachi.us/inverters
© Hitachi America, Ltd.
Manual Number: HAL7201C – December 2008
22
 Loading...