

ASK
ME!
0335E2new.fm Page 1 Tuesday, April 25, 2000 4:10 PM
SOLID STATE COLOR TV
27GX01B
OPERATING GUIDE
IMPORTANT SAFEGUARDS 2-3
FIRST TIME USE 4-9
REMOTE CONTROL 10-14
MENU SELECTION 15-23
USEFUL INFORMATION 24-25
Printed in the United States TQB2AA0335
0335E2new.fm Page 2 Tuesday, April 25, 2000 4:10 PM
IMPORTANT
Important
Follow all warnings and instructions marked on this television receiver.
CAUTION
RISK OF ELECTRIC SHOCK
DO NOT OPEN
CAUTION: TO REDUCE THE RISK OF ELECTRIC SHOCK,
DO NOT REMOVE COVER (OR BACK).
NO USER SERVICEABLE PARTS INSIDE.
REFER SERVICING TO QUALIFIED SERVICE PERSONNEL.
CAUTION: Never remove the back cover of the set as this can expose you to very high voltages and other hazards. If
NOTE: This television receiver will display closed captioning, ( or ), in accordance with paragraph 15.119 of the FCC rules.
Model and serial numbers are indicated on back side of the set.
Modifications
The FCC requires the user to be notifi ed that any changes or modif ications m ade to this device t hat are not e xpressly approved by
Hitachi Home Electronics (America), Inc. may void the user’s authority to operate the equipment.
POWER SOURCE
• This solid state color TV is designed to operate on 120 volts 60Hz, AC household current.
• Insert power cord into a 120 volt 60Hz outlet.
• To prevent electric shock, do not use the television’s plug with an extension cord, receptacle, or other outlet unless the blade s and
ground terminal can be fully inserted to prevent blade exposure.
• Never connect the TV to 50Hz, direct current, or anything other than the specified voltage.
the set does not operate properly, unplug the set and call your authorized dealer or service shop. To prevent
fire or shock hazard, do not expose this television system to rain or moisture.
CC
The lightning flash with arrowhead symbol, within an equilateral
triangle, is intended to alert the user to the presence of uninsulated
“dangerous voltage” within the product’s enclosure that may be of a
sufficient magnitude to constitute a risk of electric shock to persons.
The exclamation point within an equilateral triangle, is intended to
alert the user to the presence of important operating and
maintenance (servicing) instructions in the literature accompanying
the appliance.
IMPORTANT SAFEGUAR DS
CAUTION: • Read all of these instructions.
SAFETY POINTS YOU SHOULD KNOW ABOUT
YOUR HITACHI TELEVISION RECEIVER
• Save these instructions for later use.
• Follow all warnings and instructions marked on the
television receiver.
Our reputation has been built on the quality, performance, and ease of service of HITACHI television receivers.
Safety is also foremost in our minds in the design of these units. To help you operate these products properly, this section illustrates safety tips which will be of benefit to you.
Please read it carefully and apply the knowledge you obtain from it to the proper operation of your HITACHI television receiver.
Please fill out your warranty card and mail it at once to HITACHI. This will enable HITACHI to notify you promptly in the improbable event that a safety problem should be
discovered in your product model.
FOR YOUR PERSONAL SAFETY
1. This television set is equipped with
a polarized alternating-cur rent line
plug (a plug havin g one blade wider
than the other). This plug will fit into
the power outlet only one way. This
is a safety feature. If you are
unable to insert the plug fully into
the outlet, try reversing the plug. If
the plug should still fail to fit,
contact your electrician to replace
your obsolete outlet. Do not defeat
the safety purpose of the polarized
plug.
2. When the power cord or plug is
damaged or frayed, unplug the
television set from the wall outlet
and refer servicing to qualified
service personn el .
3. Do not overload wall outlets and
extension cords as this can result in
fire or electric shock.
4. Do not allow anything to rest on or
roll over the power cord, and do not
place the T V whe re t h e pow er co rd
is subject to traffic or abuse. This
may result in a shock or fire hazard.
NO!
5. Do not attempt to service the
television set yourself as
opening or removing cover s may
expose you to dangerous
voltage or other hazards. Refer
all servicing to qualified service
personnel.
6. Never push objects of any kind
into the television’s cabinet slots
as they may touch dangerous
voltage points or short out parts
that could result in a fire or
electric shock. Never spill liquid
of any kind on the television set.
7. If the television set has been
dropped or the cabinet has been
damaged, unp lug the television
set from the wall outlet and refer
servicing to qualified service
personnel.
8. If liquid has been spilled into the
television set, unplug it from the
wall outlet and refer service to
qualified service personnel.
9. Do not subject your television
set to impact of any kind. Be
careful not to da ma ge the pi ct u r e
tube surface.
NO!
10. Unplug the televisio n set from the
wall outlet before cleaning. Use
a damp cloth f or c l ea ni ng . Do n ot
use liquid or aerosol cleaners.
11-1.Do not place the t elevi sion set on
an unstable cart, stand, or table.
Coins
The television set may fall,
causing serious injury to a child
or an adult, and seri ous dama ge
to the appliance. Use only with a
cart or stand recommended by
the manufacturer, or sol d wi th th e
television set. Wall or shelf
mounting should follow the
manufacturer’s instructions, and
should use a mounting kit
approved by the manufacturer.
11-2.An appliance and cart combination
should be moved with care.
Quick stops, excessive force,
and uneven surfaces may cause
the appliance and cart
combination to overturn.
!
HELP
- 2 -

O
0335E2new.fm Page 3 Tuesday, April 25, 2000 4:10 PM
PROTECTION AND LOCATION OF YOUR TELEVISION SET
12. Do not use the television set
near water, for example, near a
bathtub, washbowl, kitchen sink,
or laundry tub, in a wet
basement, or near a swimming
pool, etc.
• Never expose the set to rain or
water. If the set has been
exposed to rain or water,
unplug set from wall ou tlet and
refer to qualified service
personnel.
13. Choose a place where light
(artificial or sunlight) does not
shine directly on the screen.
PROTECTION AND LOCATION OF YOUR TELEVISION SET
6-1. If an outside anten na is
connected t o the television set ,
be sure the antenna system is
grounded so as to provide some
protection against voltage
surges and built-up static
charges. Section 810 of the
National Electrical Code, NFPA
No. 70-1975, provides
information with respect to
proper grounding of the mast
and supporting structure,
grounding of the lead-in wire to
an antenna discharge unit, size
of grounding conductors,
location of antenna discharge
unit connection to grounding
electrode, and requirements for
the grounding electrod e.
6-2. Note to CATV system installer:
(Only for television sets with
CATV reception). This reminder
is provided to call CATV system
installer’s attention to Article
820-40 of the NEC that provides
guidelines for proper grounding
and, in particular, specifies that
the cable ground shall be
connected to the grounding
system of the building, as close
to the point of cable entry as
practical.
NO!
Important
14. Avoid dusty places, since
accumulated dust inside the
chassis may cause failure of the
set when high humidity persists.
15. The set has slots or openings in
the cabinet for ventilation
purposes whi ch provide reliabl e
operation of the receiver and
protect th e TV fr om ov erhe atin g.
These openings must not be
blocked or covered.
• Never cover the slots or
openings with cloth or other
material.
ANTENNA
LEAD IN
WIRE
GROUND
CLAMP
ANTENNA
DISCHARGE UNIT
(NEC SECTION 810-20)
ELECTRIC
SERVICE
EQUIPMENT
NEC NATIONAL ELECTRICAL CODE
EXAMPLE OF ANTENNA GROUNDING AS P ER NATIONAL ELECTRICAL
CODE INSTRUCTIONS.
GROUNDING CONDUCTORS
(NEC SECTION 810-21)
GROUNDING CONDUCTORS
POWER SERVICE GROUNDING
ELECTRODE SYSTEM
(NEC ART 250 PART H)
• Never block the bottom
ventilation slots of the set by
placing it on a bed, sofa, rug,
etc.
• Never place the set near or
over a radiator or heat register.
• Never place the set in a "builtin" enclosure, unless proper
ventilation is provided.
17. An outside antenna system
should not be located in the
vicinity of overhead power lines
or other electrical lights or power
circuits, or where it can fall into
such power lines or circuits.
When installing an outside
antenna system, extreme care
should be taken to keep from
touching such power lines or
circuits as contact with them
might be fatal.
18. For added protection for the
television set during a lightning
storm, or w hen it is unus ed for
long periods of time, unplug it
from the wall outlet and
disconnect antenna. This will
prevent damage due to lightning
and power-line surges.
No !
TO
HOT!
OPERATION OF YOUR TELEVISION SET
19. This television set should be
operated only from the type of
power source indicated on the
marking label. If you are not sure
of the type of power supply at
your home, consult your
television dealer or local pow er
company. For television sets
designed to operate from battery
power, refer to the operating
instructions.
Use
Proper
Voltage
IF THE TELEVISION SET DOES NOT OPERATE PROPERLY
2. If you are unable to restore
normal operation by following
the detailed procedure in your
operating instructions, do not
attempt any further
adjustments. Unplug the set
and call your dealer or service
technician.
Service
FOR SERVICING AND MODIFICATION
25. Do not use attachments not
recommended by the television
set manufacturer as they may
cause hazards.
20. If the television set does not
operate normal ly b y fo l low in g the
operating instructions, unplug
the television set from the wall
outlet and refer servicing to
qualified service personnel.
Adjust only those controls that
are covered in the instructions
as improper adjustment of other
controls may result in damage
and will often require extensive
work by a qualified service
technician to restore the
television set to normal
operation.
23. Whenever the television set is
damaged or fails, or i f ther e is a
distinct change in performance
that indicates a need for service,
unplug the set and have it
checked by a qualified service
technician.
26. When replacement parts are
required, be sure the service
technician has used
replacement parts specified by
the manufacturer that have the
same characteristics as the
original part. Unauthorized
substitutions may result in fire,
electric shock, or other hazards.
- 3 -
21. If your television set is to remain
unused for a period of time,
(such as when going on a
holiday), turn the television set
?
OFF and unplug it from the wall
outlet.
24. It is normal for some television
sets to make occasional
snapping or popping sounds,
particularly when being turned on
or off. If the snapping or popping
is continu ous or fr equent , unp lug
the set and consult you r de aler or
service technician.
27. Upon completion of any service
or repairs to the television set,
ask the service technician to
perform routine safety checks to
determine that the television is in
safe operating condition.
Snap
Pop
Pop
Snap
ASK
ME!

0335E2new.fm Page 4 Tuesday, April 25, 2000 4:10 PM
Introduction
INTRODUCTION
Congratulations On Your New Purchase
Your new television features all solid state components. It is designed to give you many years of enjoyment. It was
thoroughly tested and adjusted at the factory for best performance.
In order for you to take full advantage of your new television, please read and follow the installation and operating
instructions contained in this manual.
Customer’s Record
The model and serial number of this product may be found on its back cover. You should note the model and serial
numbers in the space provided and retain this book as a permanent record of your purchase to aid in identification in the
event of theft or loss.
Care and Cleaning
Picture Tube (Turn TV off)
Use a mild soap solution or window cleaner and a clean cloth. DO NOT USE ABRASIVE CLEANERS. Avoid excessive
moisture and wipe dry.
Plastic Cabinets
Wipe the cabinet with a soft cloth dampened with water or mild detergent solution and wipe dry with a soft clean cloth.
Avoid excessive moisture. Do not use benze ne, thinners or other petroleum-based cleaners.
Remote Control
To clean, wipe with a soft cloth slightly mois tened with a mild detergent then wipe dry with a soft clean cloth. Do not use
benzene, thinners or other petroleum-based c leaners to clean the remote control.
- 4 -

0335E2new.fm Page 5 Tuesday, April 25, 2000 4:10 PM
Installation
INSTALLATION
Television Location
This unit is intended to be used with an optional stand or entertainment center. Consult your dealer for available options.
Locate for comfortable viewing. Avoid p lacing where sunlight or other bright light (including reflections) will fall on the
screen. Use of some types of fluorescent lighting may reduce remote control transmitter range.
Adequate ventilation is essential to prevent internal component failure. Keep away from areas of excessive heat or
moisture. To insure optimum color purity, do not position magnetic equipment (motors, fans, othe r speakers, etc.) nearby.
Optional External Equipment Connections
Audio/Video connections between components can be made with shielded video and audio cables. For best performance,
video cables should utilize 75 ohm coaxial shielded wire. Cables are available from your dealer or electronic supply house.
Use appropriate input and output connectors that match your component connectors, and avoid long cables to minimize
interference.
AC Power Supply Cord
CAUTION: TO PREVENT ELECTRIC SHOCK, MATCH WIDE BLADE OF PLUG TO WIDE SLOT OF
AC OUTLET AND FULLY INSERT. DO NOT USE A PLUG WITH A RECEPTACLE OR OTHER
OUTLET UNLESS THE BLADE CAN BE FULLY INSERTED TO PREVENT BLADE EXPOSURE.
Remote Control Battery Installation
Batteries: Use two “AA” batteries.
1. Remove t he batte ry comp artment co ver on b ack of th e
remote.
2. Install the batteries in the battery compartment.
(Polarity (+ ) or (-) must be correct.)
3. Reattach the battery cover.
Battery Compartment
Polarized Plug
NOTE
:
For frequent remote control users, replace old
batteries with alkaline batteries for longer life.
Precaution on Battery Use
Incorrect installation can cause battery leakage and
corrosion that will damage the remote control.
Observe the Followi ng Precautions:
1. Batteries must be replaced in pairs.
2. Do not combine a used battery with a new one.
3. Do not mix batte ry types (Example: “zinc carb on” with
“alkaline”).
4. Do not attempt to charge, short-circuit, disassemble,
heat or burn used batteries.
5. Battery repla cement is nece ssary when rem ote control
reacts sporadically or stops operating the television.
INSTALLATION (CONT.)
-
+
Battery
Battery
-
+
To Remove Cover Push In And Up
On Catch With A Narrow Object
- 5 -
0335E2new.fm Page 6 Tuesday, April 25, 2000 4:10 PM
Installation (cont.)
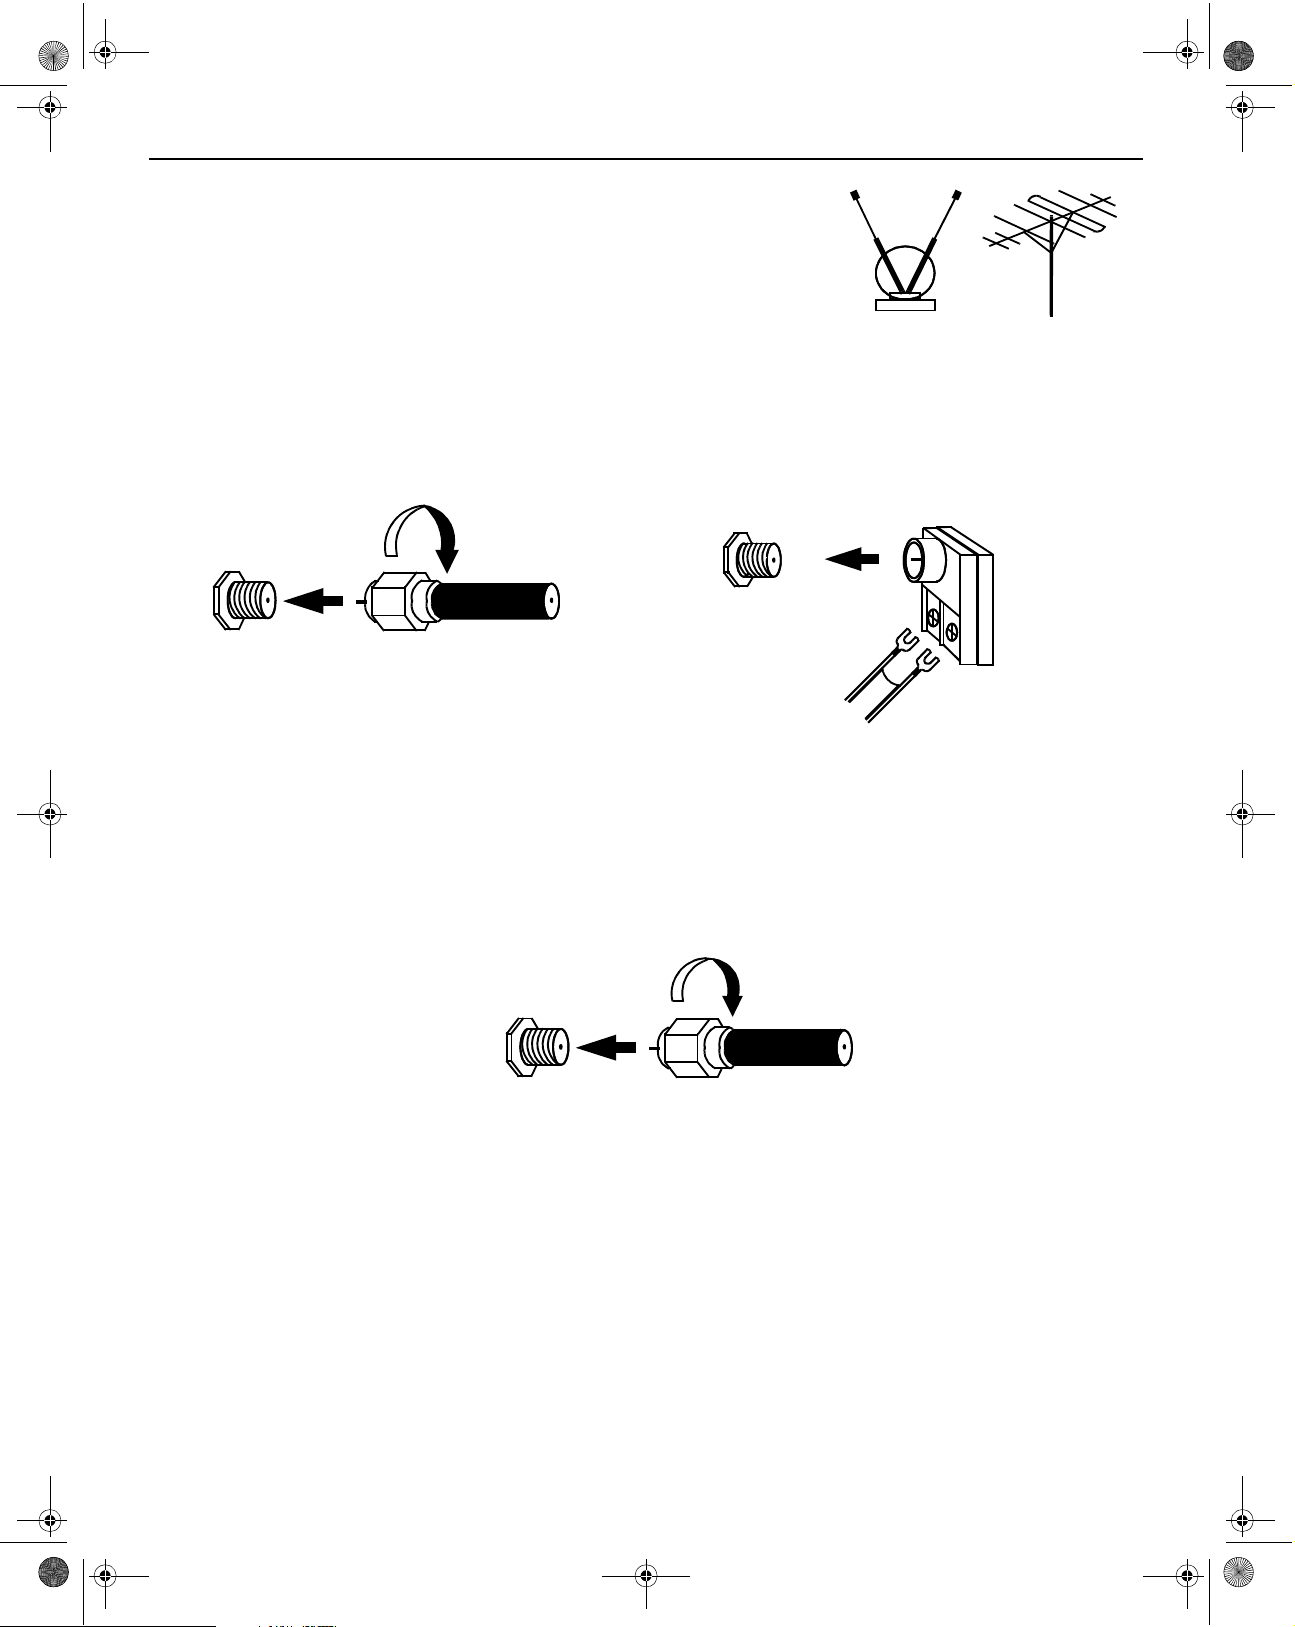
Antenna/Cable Connections
Antenna Connection - For proper reception of VHF/UHF channels, an external
antenna is required. For best reception an outdoor antenna is recommended.
Antenna must be selected as your signal source. (Refer to the Sign al Source
section loca ted in the Set-Up menu).
Incoming Cable from Home Antenna
OutdoorIndoor
Typical VHF/UHF Antenna
75 Ohm
VHF/UHF
on Back of Television
VHF/UHF
on Back of Television
300 Ohm
or
300 to 75 ohm Matching
Transformer (Not Included)
Cable Connection - For re ce pti on of ca bl e chann el s, c onn ect t he ca ble s upp li ed by y ou r loc al cab l e co mp a ny. CA T V must
be selected as your signal source. (Refer to the Signal Source section located in the Set-Up menu).
Incoming Cable from Cable Company
75 Ohm
VHF/UHF
on Back of Television
NOTE: Certain cable systems offset some channels to reduce interference or have premium (scrambled) channels. A
cable converter box is required for proper reception. Check with your local cable company for compatibility
requirements.
Other Video Equipment
VCRs, video disc players, computers, video game equipment, and SAT equipment can also be connected to the antenna
input connec tion.
- 6 -

0335E2new.fm Page 7 Tuesday, April 25, 2000 4:10 PM
Installation (cont.)
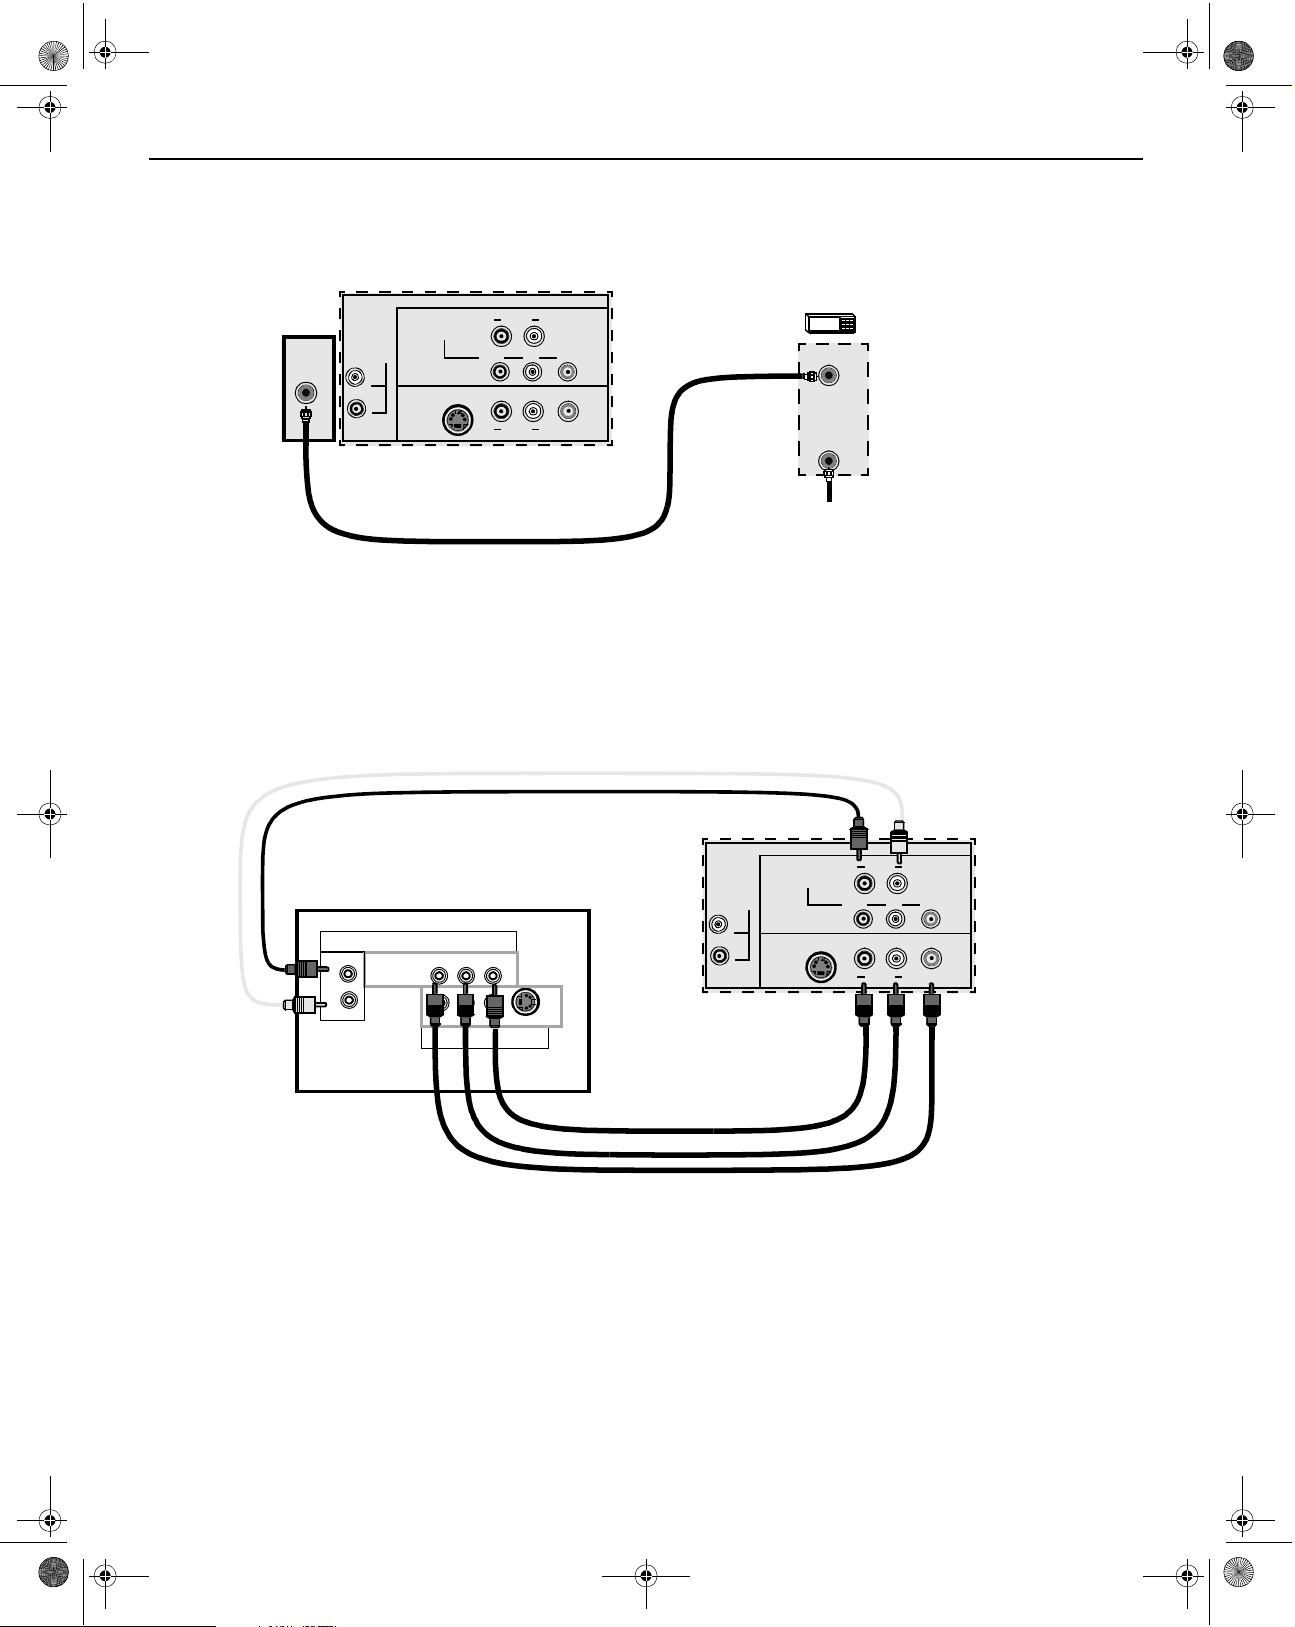
Optional Equipment Connection and Operation
To Audio AMP Connection (Stereo)
TERMINALS ON BACK OF TV
AUDIO AMP
R
L
AUDIO
P
P
AUDIO
Y/VIDEO
B
VIDEO
L
R
R
AMP
L
R
COMPONENT
VIDEO INPUT
INPUT 1
INPUT 2
S-VIDEO
L
AUDIO OUT
R
TO AUDIO
CABLES NOT SUPPLIED
• To Audio AM P
Connect to an external audio amp auxiliary input for monitoring sound through a stereo system.
NOTE: “TO AUDIO AMP” terminals cannot be used for external speakers.
Operation - When an audio amp is connected to “TO AUDIO AMP” terminals as shown:
1. Select SPEAKERS ON located in the onscreen AUDIO menu.
2. Set amplifier volume to minimum.
3. Adjust TV volume to desired level.
4. Adjust amplifier volume to match the TV.
5. Select SPEAKERS OFF & VAO (Variable Audio Out) from AUDIO menu.
6. Volume and mute are now controlled us ing the TV controls.
Audio/Video Connection
TERMINALS ON BACK OF TV
R
L
TO AUDIO
AMP
L
R
COMPONENT
VIDEO INPUT
INPUT 1
INPUT 2
S-VIDEO
AUDIO
P
P
AUDIO
Y/VIDEO
B
VIDEO
L
R
R
CABLES NOT SUPPLIED
Jack used for 1/8”
headphone plug
Operation
1. Connect equipme nt as shown to front or rear Audio/Video input jacks.
2. Select the Video mode by pressing the INPUT button.
3. Operate optional equipment (VCR-VDP) foll owing their respective equipment manual.
NOTE: The S-VIDEO connec ti on i s opt i onal an d over ri d es ot he r V IDEO c on nec ti on . Use IN PUT 2, AU DIO R and L w ith
S-VIDEO connection.
VCR
S-VIDEO OUT
VIDEO OUT
AUDIO OUT
ANT INPUT
L
OUTPUT
R
HPJ
VIDEO 3
TERMINALS ON FRONT OF TV
L AUDIO IN R
- 7 -
0335E2new.fm Page 8 Tuesday, April 25, 2000 4:10 PM
Installation (cont.)
Cable Box Connection
TERMINALS ON BACK OF TV
R
L
AUDIO
P
P
AUDIO
Y/VIDEO
B
VIDEO
L
R
R
CABLES NOT SUPPLIED
AMP
L
R
COMPONENT
VIDEO INPUT
INPUT 1
INPUT 2
S-VIDEO
TO AUDIO
ANT
Operation
1. Connect incoming cable to cable box ANT INPUT.
2. Connect a cabl e from cable box ANT OUTPUT to TV ANT.
CABLE BOX
ANT OUTPUT
ANT INPUT
Incoming cable
Digital TV - Set-Top Box (DTV-STB) Connection
Use this diagram to connect the DTV-STB (Digital TV-Set-Top Box) to the back of your TV.
DTV TERMINALS ON BACK OF TV
R
AUDIO
P
R
R
AUDIO
Note:
TERMINALS ON BACK OF DTV- ST B
DIGITAL TV OUTPUT
MAIN
VIDEO
L-AUDIO-R
R-AUDIO-L
PRPBY
-VIDEO
S-VIDEO
TO AUDIO
AMP
L
R
COMPONENT
VIDEO INPUT
INPUT 1
INPUT 2
S-VIDEO
NTSC OUTPUT
There are three video inputs, Y, PB, and PR. Separate component color inputs provide luminance and color separation. Use the
L (left) and R (right) audio inputs.
L
P
Y/VIDEO
B
VIDEO
L
- 8 -
12345
0335E2new.fm Page 9 Tuesday, April 25, 2000 4:10 PM
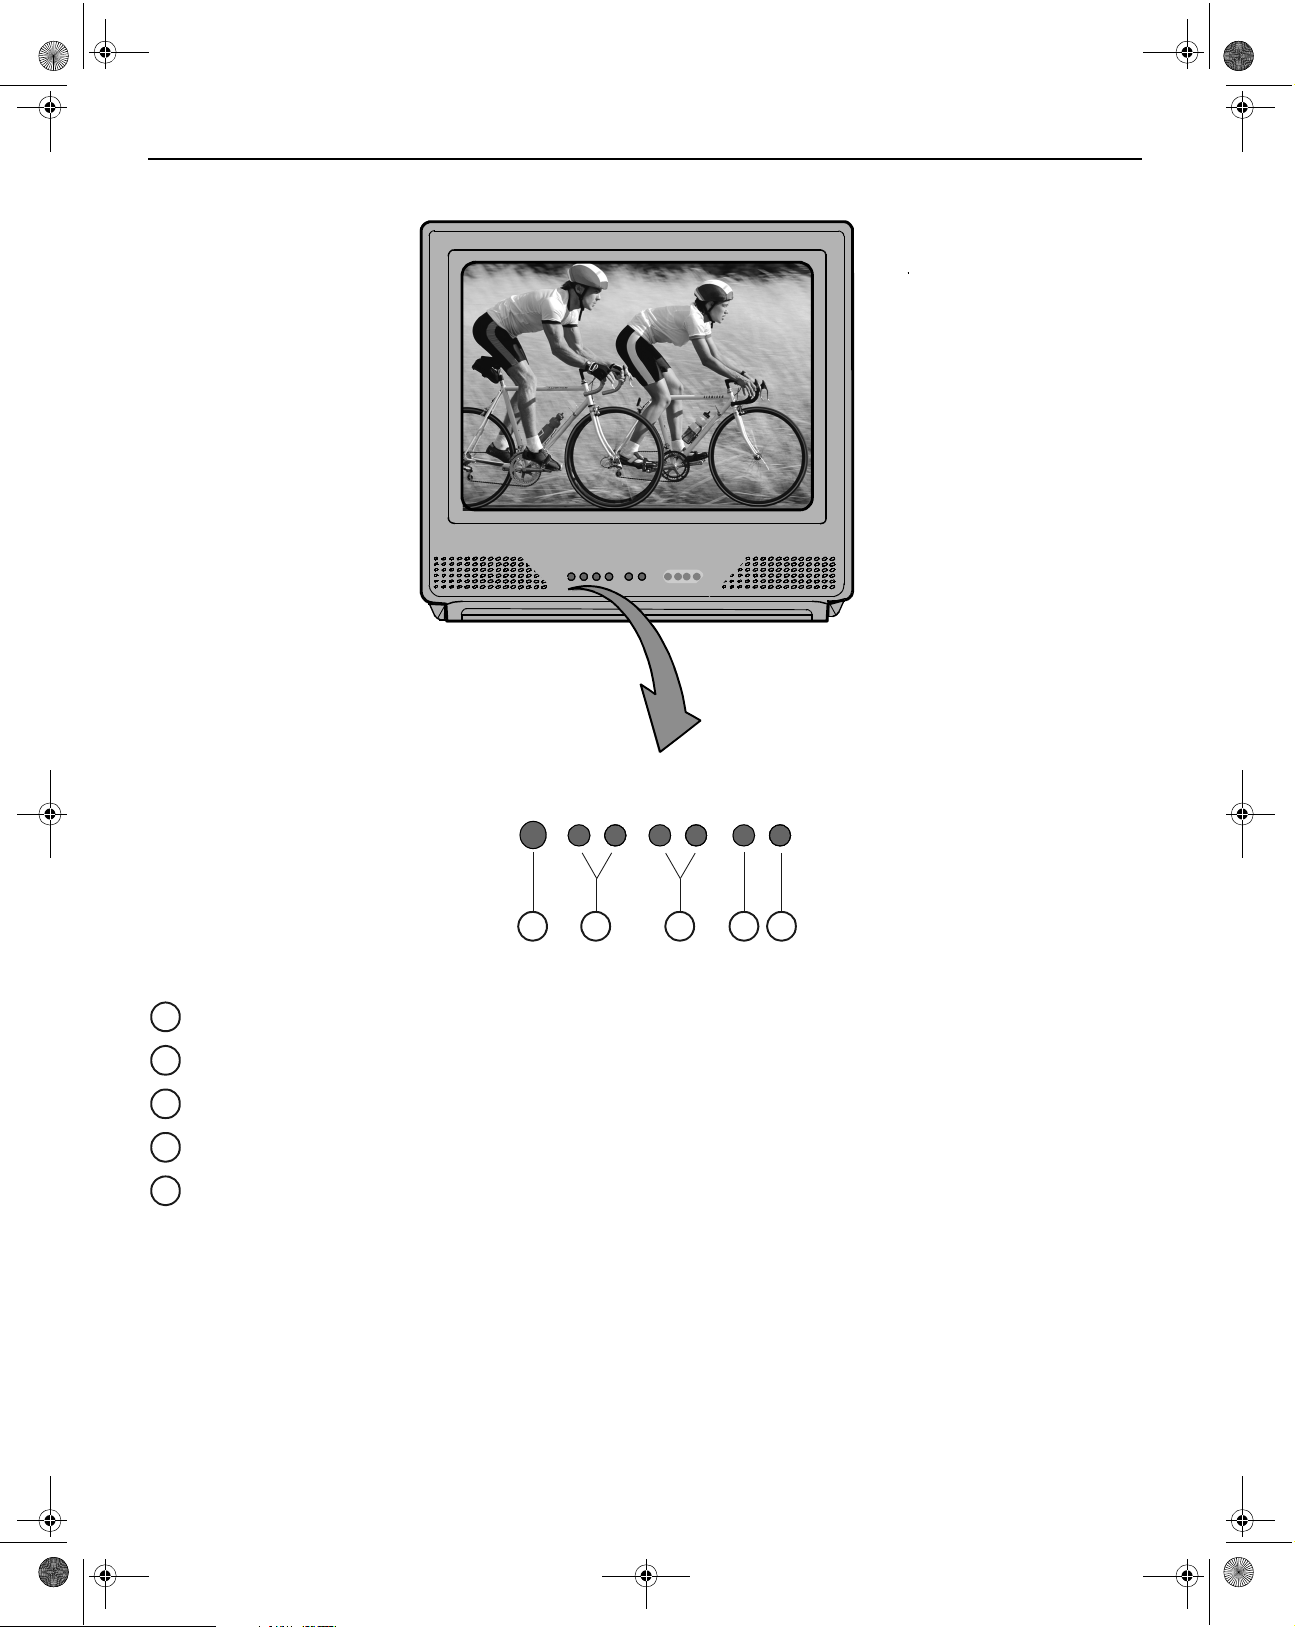
LOCATION OF TELEVISION CONTROLS
Location of Television Controls
HITACHI
Front Control Panel
POWER
VOL
VOL+
-
CH
MENU INPUT
CH+
-
1 2 3 4 5
Power Button - Press to turn ON or OFF.
VOL (Volume) Buttons - Press to adjust soun d level.
CH (Channel) - Press to select programmed channels.
Menu Button - Press to display main menu and access onscreen features or Adjustment menus.
Input Button - Press to select TV or video input.
- 9 -

0335E2new.fm Page 10 Tuesday, April 25, 2000 4:10 PM
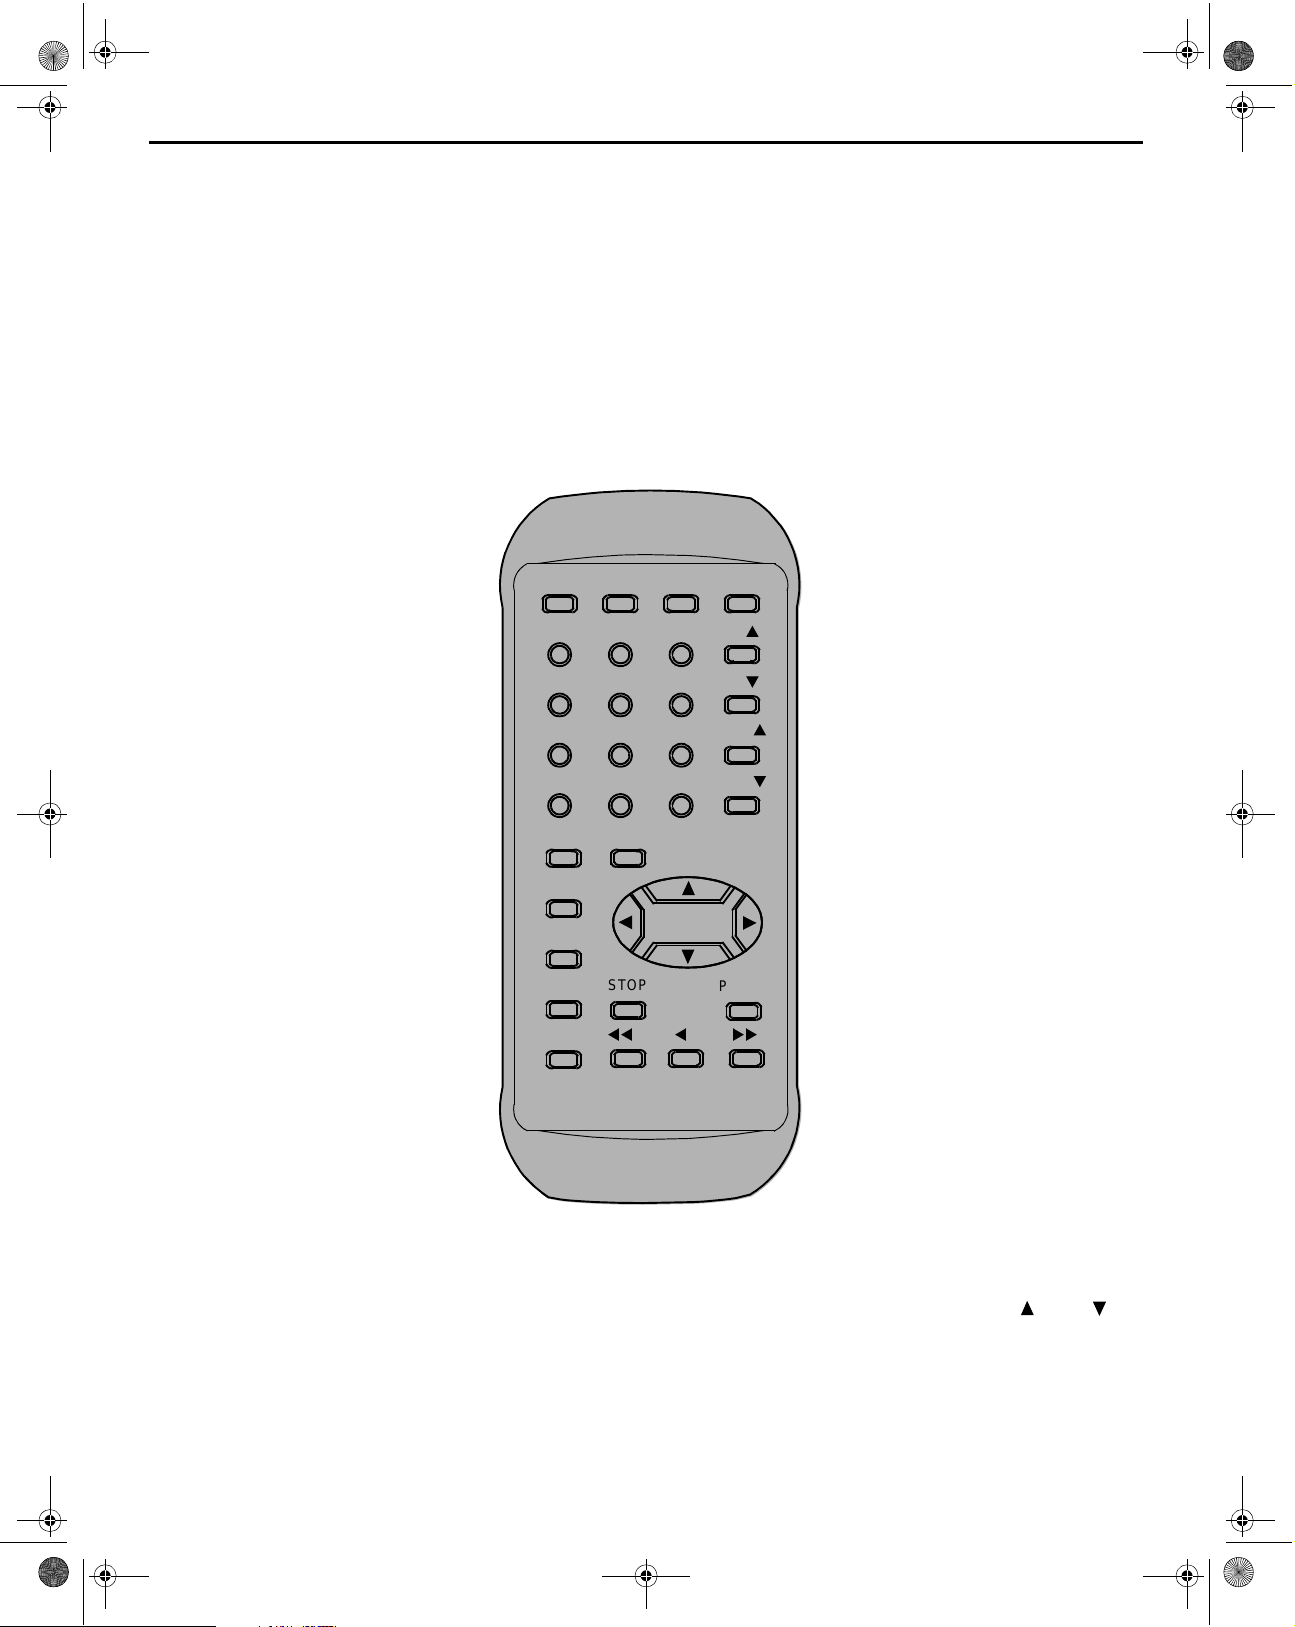
Remote Control
REMOTE CONTROL
Power Button
Press to turn On or Off.
Mute Button
Press to mute sound. A second press
resumes sound. Press also to toggle
Closed Captioning.
Input Button
Press to select TV or video input.
Menu Button
Press to display main menu and
access or exit onscreen features or
Adjustment menus.
Recall Button
Press to display Time status of sleep
timer, channel, video mode, channel
I.D. and audio mode.
Precoded VCR Buttons
These buttons transmit the chosen
precoded VCR codes.
POWER TV CABLE VCR
1
4
789
MUTE
MENU
RECALL
REC
TV/VCR
23
LTS-CH
0
SLEEPINPUT
STOP
tt t uu
65
CURSOR
CONTROL
CH
CH
VOL
VOL
PAUSE
HITACHI
CLU-351U
REMOTE CONTROL
Mode Buttons
These buttons allow the remote to
control your TV, VCR, or cable box
depending on which mode button is
selected.
Channel Buttons
Press to select channels.
Keypad Buttons
Press desired channel number to
access channel.
Volume Buttons
Press to adjust TV sound level.
LST-CH (Last Channel) Button
Press to swi t ch t o th e p re vi o usl y t uned
channel.
Sleep Button
Press to turn TV Off in 30, 60, or 90
minutes.
Cursor Button
Press to adjust Audio menus, Video
menus, and select operating features
when menus are dis played.
- 10 -

0
98
6
321
45
7
0335E2new.fm Page 11 Tuesday, April 25, 2000 4:10 PM
Remote Control Quick Reference Functional Key Chart
REMOTE CONTROL QUICK REFERENCE F UNCTIONAL KEY CHART
Key Operates
POWER
INPUT
MENU
TV
CABLE
VCR
TV Selects the TV Input Mode
TV Activates and Exits TV Menus
TV
VCR
CABLE
Turns TV On and Off
Turns Cable Box On and Off
Turns VCR On and Off
Selects Channel
Selects code in Video Lock Menu
Selects Channel in Channel I.D. Menu
Selects Channel in Timer Menu
Selects Precoded VCR codes when programming
remote
Selects Precoded CABLE co des when programming
remote
RECALL
TV Display Channel, Time, Channel I.D. and Audio Mode
TV Menu Navigation
CH
CH
VOL
TV
CABLE
p
Channel Up/Down
Channel Up/Down
VOL
q
TV Volume Up/Down
- 11 -
0335E2new.fm Page 12 Tuesday, April 25, 2000 4:10 PM
Remote Control Quick Reference Functional Key Chart
Key Operates
SLEEP
MUTE
LST-CH
Mode Selection Buttons
TV
CABLE
VCR
Standard VCR Control Buttons
REC
TV
TV
TV Select previously tuned channel
TV
CABLE
VCR
VCR
Selects 30, 60 or 90 minutes for Automatic Turn Off.
Also use to turn Sleep Timer off by selecting NO
Mutes TV Audio
Access and exit Closed Captioning
Selects TV Mode for the remote control
Selects Cable Mode for the remote control
Selects VCR Mode for the remote control
Record
STOP
PAUSE
TV/VCR
VCR
VCR
VCR
VCR
VCR
VCR
CABLE
Rewind
Fast Forward
Play
Stop
Pause
Selects TV or VCR Mode
Selects A/B Mode
- 12 -
0335E2new.fm Page 13 Tuesday, April 25, 2000 4:10 PM
Using the Remote to Control VCR and Cable Box Functions
USING THE REMOTE TO CONTROL VCR AND CABLE BOX FUNCTIONS
Operating the Precoded F unction
for Your VCR
This remote is designed to operate
different types of VCRs. You must first
program the remote to match the
remote system in your VCR. (Refer to
the VCR Code Index section.)
1. Turn on your VCR.
2. Aim the remote control at the front
of your VCR.
3. Press the VCR button to switch to
VCR precoded mode.
4. While holding down the VCR
button, enter the 2-digit preset
code that matches your VCR*. The
remote will turn on your VCR wh e n
the correct 2-digit preset code is
entered. When this occurs, the
remote control is programmed for
your VCR. If your VCR does not
turn off after 5 seconds, try a
different 2-digit preset code.
5. The remote will now control your
VCR.
NOTES:
• If your VCR cannot be operated
after performing the above
procedures, this means that your
VCR codes have not been
precoded into the remote.
• I n the un likel y even t that yo ur VCR
cannot be operated after
performing the above procedures,
consult your VCR operating guide.
• The remote control will remember
the codes you have programmed
in until the batt eries are removed.
After replacing the batteries repeat
the entire programming procedure
stated above.
• If your VCR does not have a power
function, the remot e will issue the
CHANNEL UP function.
POWER TV CABLE VCR
1
4
789
MUTE
MENU
RECALL
REC
TV/VCR
23
LTS-CH
0
SLEEPINPUT
STOP
tt t uu
65
CURSOR
CONTROL
PAUSE
CH
CH
VOL
VOL
HITACHI
CLU-351U
* (Codes are listed on page 14)
Operating the Precod ed Functio n
for Your Cable Box
1. Turn on your cable box.
2. Aim the remo te control a t the front
of your cable box.
3. Press the cable box button to
switch to cable box precoded
mode.
4. While holding down the CABLE
button, enter the 2-digit preset
code that matches your cable bo x*.
The remote will turn on your ca ble
box when the correct 2-digit preset
code is entered. W hen this oc curs,
the remote control is programmed
for your cable box. If your cable
box does not turn off after 5
seconds, try a different 2-digit
preset code.
5. The remote will now control your
cable box.
NOTES:
• If your cable box cannot be
operated after performing the
above procedures, this means that
your cable box codes have not
been precoded into the remote.
• In the unlikely event that your
cable box cannot be operated after
performing the above procedures,
consult your cable box operating
guide.
• The remote control will remember
the codes you have programmed
in until the batteries are removed.
After replacing the ba tteries repe at
the entire prog ramming procedure
stated above.
• If your cable box does not have a
power function, the remote will
issue the CHANNEL UP function.
• For some models, the remote
control’s channel and will
control the cable bo x channel. The
number buttons will control your
television channel although you
are in cable mode.
- 13 -

0335E2new.fm Page 14 Tuesday, April 25, 2000 4:10 PM
VCR and Cable Box Codes Index
VCR AND CABLE BOX CODES INDEX
The remote is capable of operating many brands of VCRs and cable boxes. You must first program the remote control to
match the remote system in your VCR or cable box.
NOTE:
The remote control memory is limited. Some models of VCRs or cable boxes may not operate. The remote control is not
designed to control all features that are available in all models.
Code Index For VCRs
VCR Brand Code (s)
Emerson
Funai
GE
Hitachi
JVC
Magnavox
Mitsubishi
Panasonic
RCA
Sony
Toshiba
Zenith
00,01,10,16,23,33,
37,40, 43
00
09,22
00,14,15
14,26
09,12,28
16,23,26,45
09,35,46
15,22
06,07,08,09
16,17,42
07,08,12
Code Index for Cable Boxes
Cable Box
Brand
G.I.
Jerrold
Magnavox
Philips
Pioneer
Samsung
Scientific Atlantic
Zenith
Code(s)
09
03, 09, 10, 12, 13,
51
40
40
39
39
04, 06, 14, 52, 56
00
- 14 -
Press Button
Press Button Again
CHANNEL
PREVIOUSLY VIEWED
CHANNEL NOW
BEING VIEWED
123
4
5
0335E2new.fm Page 15 Tuesday, April 25, 2000 4:10 PM
Menu Selections
SPECIAL FUNCTIONS
LST-CH
LST-CH - Pressing switches between the last two
channels selected from numeric keypad.
NOTE: When scanning channels with the CHANNEL
or button, pressing the LST-CH button
switches betw een the last two chan nels scanned.
RECALL
Recall - Press to review:
Audio Mode Status
CH Number or Video Input Selected
Channel I.D. (Station Identifier)
Clock Time
Sleep Timer Status
1
STEREO
SAP
MONO
5
2
CH 3
KXYZ
5:2529
3
4
MENU
Display and Exit Menus
Cursor Button
or
Highlight Desired Feature
when Menu is Displ ayed
Cursor Button
or
Selects or Adjusts Features
Cursor Buttons
Located on remote control
MENU
when Menu is Displ ayed
1. Press .
2. Press CURSOR or and or to select the
desired icon.
MENU
3. Press after selecting the desired icon to access
sub menus.
MENU
4. Press twice to exit sub menus.
Menu Language Selection
The menu language is factory set to ENGLISH. Follow
the instructions to change the menu language to
SPANISH, FRENCH and back to ENGLISH.
MENU
1. Press .
2. Press CURSO R or and or to highlig ht the
Set-Up icon.
MENU
3. Press to display the Set-Up menu.
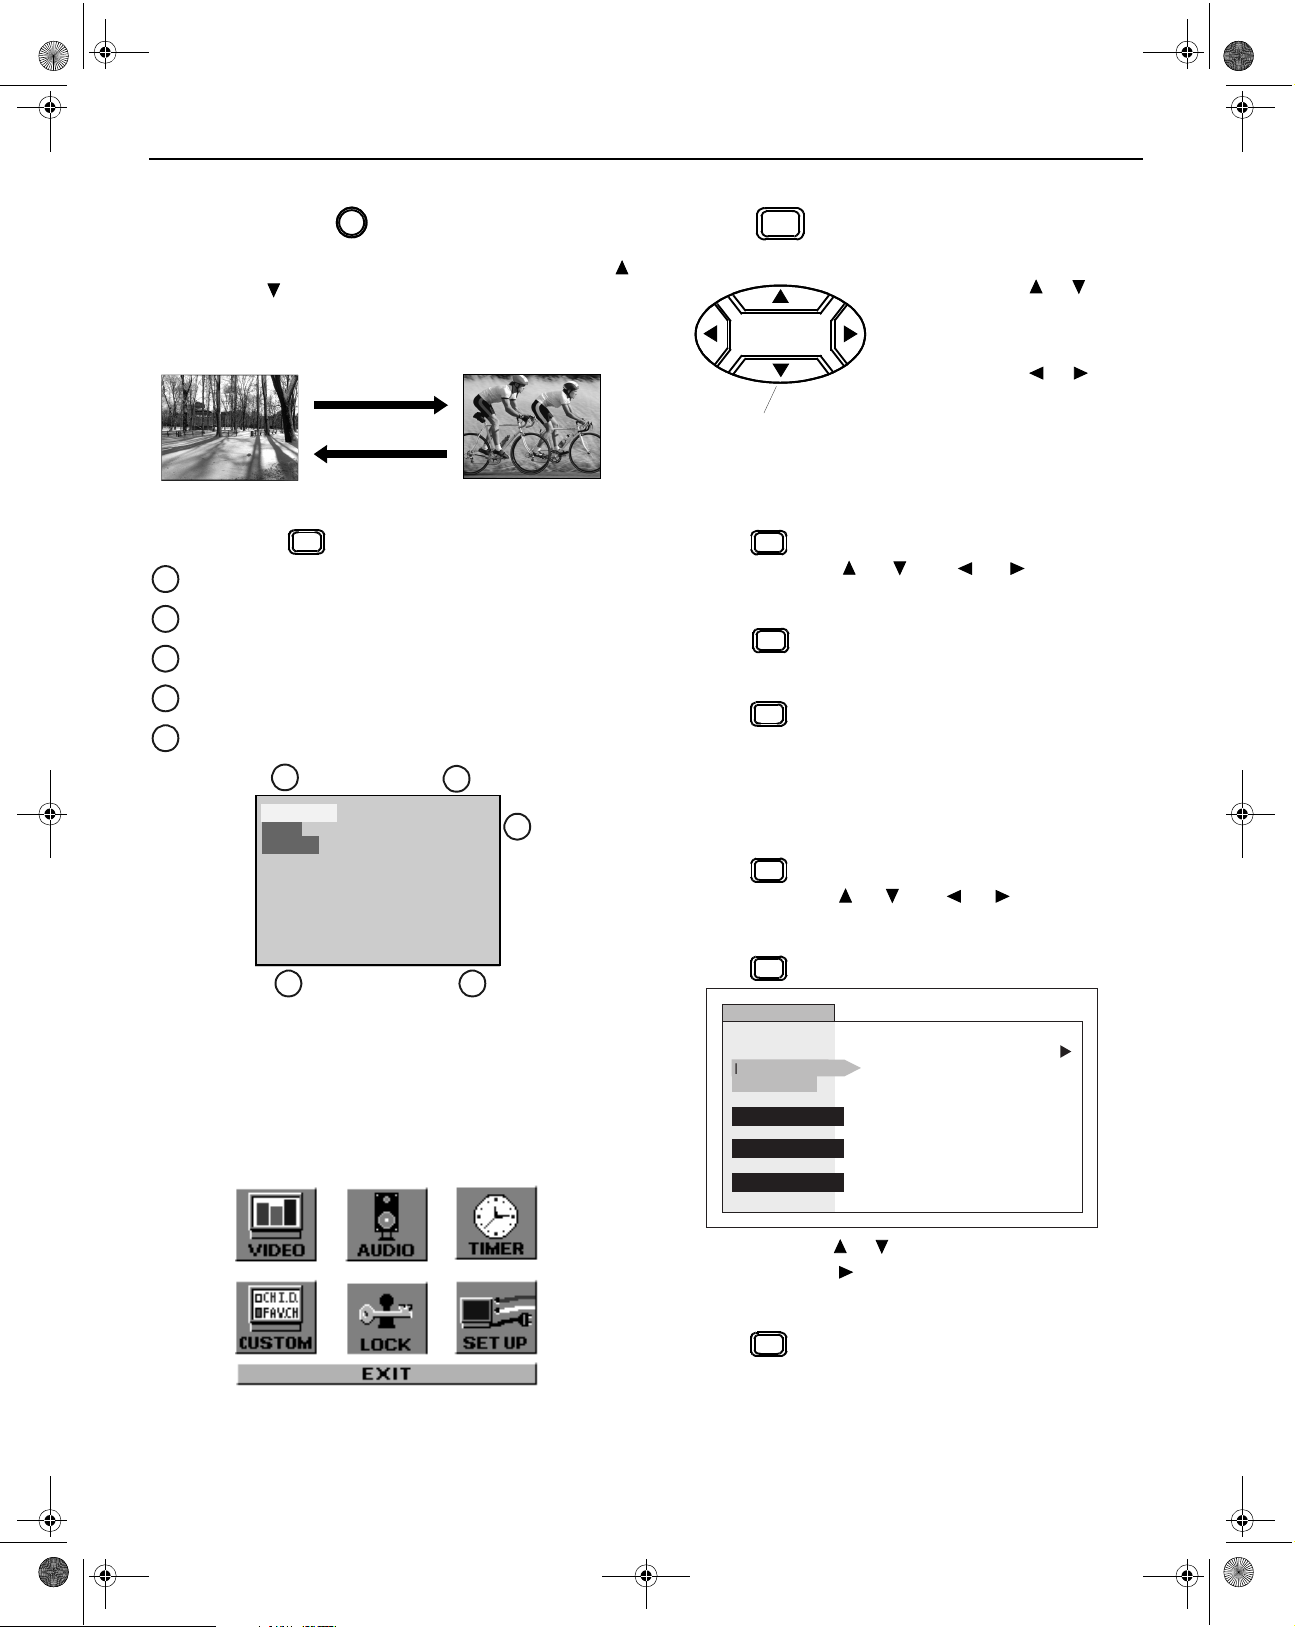
SET UP
Main Menu
IDIOMA/
LANGUE
PROG CHAN
CC
OTHER ADJ.
MODE ENGLISH
4. Press CURSOR or to highlight IDIOMA LANGUE.
5. Press CURSOR to select ENGLISH, ESPAÑOL or
FRANÇAIS.
MENU
6. Press twice to exit menus.
- 15 -
u

0335E2new.fm Page 16 Tuesday, April 25, 2000 4:10 PM
Menu Selections
Video Adjustments
Reset
Use to reset Color, Tint, Brightness, Contrast and
Sharpness adjustments back to a factory preset level.
MENU
1. Press .
2. Press CURSOR or and or to highlight the
Video icon.
MENU
3. Press to display the Video Adjustment menu.
VIDEO
VIDEO ADJ.
OTHER ADJ.
4. Press CURSOR or to highlight RESET.
5. Press CURSOR or to select “SET” to normalize
Color, Tint, Brightness, Contrast, and Sharpness.
MENU
6. Press twice to exit menus.
Color, Tint, Brightness, Contrast and
Sharpness Adjustments
MENU
1. Press .
2. Press CURSOR or and or to highlight the
Video icon.
MENU
3. Press to display the Video Adjustment menu.
VIDEO
VIDEO ADJ.
OTHER ADJ.
COLOR
TINT
BRIGHTNESS
CONTRAST
SHARPNESS
RESET
COLOR
TINT
BRIGHTNESS
CONTRAST
SHARPNESS
RESET
NO
NO
u
u
7. Repeat steps 5 and 6 for the remaining Picture
Adjustments.
MENU
8. Press twice to exit menus.
Note:
COLOR -Adjust for desired color intensity.
TINT - Adjust for natural flesh tones.
BRIGHTNESS - Adjust so dark areas of picture slightly
become black for a crisp details.
CONTRAST - Adjust the white areas of the picture as
desired.
SHARPNESS - Adjust for best clarity of outline detail.
Color Temp
Use to increase and decrease WARM (red) and COOL
(blue) colors to suit personal preferences.
MENU
1. Press .
2. Press CURSO R or and or to highlig ht the
Video icon.
MENU
3. Press to display the Video Adjustment menu.
VIDEO
VIDEO ADJ.
OTHER ADJ.
COLOR TEMP
4. Press CURSOR to highlight OTHER ADJ.
5. Press CURSOR to select Normal, Warm or Cool.
MENU
6. Press twice to exit menus.
NORMAL
u
4. Press CURSOR to highlight COLOR.
5. Press CURSOR or to select the desired Video
Adjustment (Color, Tint, Brightness, Contrast or
Sharpness).
6. Press CURSOR or to adjust your selection.
(The Selected Video Adjustment will be displayed.)
- 16 -

0335E2new.fm Page 17 Tuesday, April 25, 2000 4:10 PM
Menu Selections
Audio Adjustm ents
Mode
When Audio is broadcast in Stereo or SAP, an On-Screen
display will appear on initial “Turn On”. The available
choices will be highlighted.
MENU
1. Press .
2. Press CURSOR or and or to highlight the
Audio icon.
MENU
3. Press to display the Audio Adjustment menu.
AUDIO
MODE
AUDIO ADJ.
OTHER ADJ.
SURROUND
SPEAKERS
4. Press CURSOR to highlight MODE.
5. Press CURSOR or
(second audio program), or MONO. The selected
mode will be highlighted.
MENU
6. Press twice to exit menus.
Note:
STEREO - Two channel audio reception.
SAP - Second Audio Programming (such as bilingual
audio, weather reports, etc.).
MONO - Used when stereo signal is wea k.
PERFECT VOL - Automatically adjusts th e volume so
each channel has the same average volume.
STEREO SAP MONO
BASS
TREBLE
BALANCE
RESET
to select STEREO, SAP
FIXED
FIXED
FIXED
SET
Bass, Treble, and Balance
• BASS - To increase or decrease bass response.
• TREBLE - To increase or decrease treble response.
• BALANCE - To emphasize LEFT / RIGHT speaker volume.
MENU
1. Press .
2. Press CURSO R or and or to highlig ht the
Audio icon.
MENU
3.
Press to display the Audio Adjustment menu.
AUDIO
MODE
AUDIO ADJ.
OTHER ADJ.
SURROUND
SPEAKERS
STEREO SAP MONO
BASS
TREBLE
BALANCE
RESET
NO
u
4. Press CURSOR .
5. Press CURSOR or to select the desired Audio
Adjustment (Bass,Treble or Balance).
6. Press CURSOR or to adjust your selection.
(The Selected Audio Adjustment will be displayed.)
MENU
Press twice to exit menus.
Reset
This feature is used to reset BASS, TREBLE, and
BALANCE back to a factory preset level .
NOTE: Bass and Treble is automatically set when
PERFECT VOL. (VOLUME) is ON.
MENU
1.
Press
2. Press CURSO R or and or to highlig ht the
Audio icon.
3.
Press to display the Audio Adjustment menu
.
MENU
AUDIO
MODE
AUDIO ADJ.
OTHER ADJ.
SURROUND
SPEAKERS
STEREO SAP MONO
BASS
TREBLE
BALANCE
RESET
4. Press CURSOR .
5. Press CURSOR or to highlight RESET.
6. Press CURSOR or to select NO or SET.
MENU
7. Press twice to exit menus.
- 17 -
NO
u

0335E2new.fm Page 18 Tuesday, April 25, 2000 4:10 PM
Menu Selections
Perfect Vol. (Volume)
This feature automatically adjusts the volume to maintain a
comfortable listening level.
MENU
1. Press .
2. Press CURSOR or and or to highlight the
Audio icon.
MENU
3. Press to display the Audio Adjustment menu.
.
AUDIO
AUDIO ADJ.
OTHER ADJ.
SURROUND
SPEAKERS
PERFECT VOL.
ON
u
4. Press CURSOR .
5. Press CURSOR or to select ON or OFF.
MENU
6. Press twice to exit menus.
Surround
Use Surround to enhance audio response when listening to
stereo broadcasts.
MENU
1. Press .
2. Press CURSOR or and or to highlight the
Audio icon.
MENU
3. Press to display the Audio Adjustment menu.
Internal Speakers
This feature is used to turn the internal speakers “ON” or
“OFF”. It is used when the TV is connected to an external
audio amplifier. (Refer to “To Audio Amp Connection
section for further information.)
MENU
1. Press .
2. Press CURSO R or and or to highlig ht the
Audio icon.
MENU
3. Press to display the Audio Adjustment menu.
AUDIO
AUDIO ADJ.
OTHER ADJ.
SURROUND
SPEAKERS
4. Press CURSOR or
ON
to select SPEAKERS.
5. Press CURSOR or to select ON, OFF&VAO or
OFF&FAO.
• ON - TV SPEAKERS operate normally.
• OFF&VAO (Variable Audio Output) - TV SPEAKERS off, the
sound output varies according to the TV volume. Use the TV
remote to control the volume, muting, bass, treble and
balance of the External Amplifier System.
• OFF&FAO (Fixed Audio Output) - TV SPEAKERS off, sound
output is not adjustable. The audio is controlled by the
External Amplifier System volume control.
MENU
6. Press twice to exit menus.
u
AUDIO
AUDIO ADJ.
OTHER ADJ.
SURROUND
SURROUND
SPEAKERS
OFF
4. Press CURSOR .
5. Press CURSOR or to select ON or OFF.
MENU
6. Press twice to exit menus.
u
- 18 -

0335E2new.fm Page 19 Tuesday, April 25, 2000 4:10 PM
Menu Selections
Timer Features
Clock Set
Clock (when set) will disp lay onscreen at initial “ Turn On”,
after a channel change and when pressing the RECALL
button. The tim e must be set first in o rder to operate the
Event Program Timer.
MENU
1. Press .
2. Press CURSOR or and or
Set-Up icon.
MENU
3. Press to display the Set-Up menu.
CLOCK
CLOCK SET
SLEEP
TIMER1
TIMER2
4. Press CURSOR or
TIME - - : - DAY
to set hours (Set AM/PM
accordingly).
5. Press CURSOR to select minutes position.
6. Press CURSOR or repeatedly to set minutes.
MENU
7. Press
twice to exit menus.
Sleep Timer
This feature is used for automa tic turn off in 30, 60 or 90
minutes. Display will flash 3, 2 and 1 to indicate the last
three remaining minute s prior to turn o ff. The recall displa y
will also appear.
MENU
1. Press .
2. Press CURSOR or and or
Timer icon.
MENU
3. Press to display the CLOCK menu.
CLOCK
CLOCK SET
SLEEP
TIMER1
TIMER2
4. Press CURSOR to highlight to SLEEP.
HOW LONG?
to highlight the
- - -
to highlight the
NO
u
5. Press CURSO R , to select NO, 30, 60 or 90 m inute s
(Sleep timer will be activated).
MENU
6. Press
twice to exit menus.
NOTE: To deactivate Sleep TImer repeat steps 1 through
5. In step 5 select “NO” instead of minutes.
Note:
Press the RECALL button to display the remaining minutes for
Sleep Timer, the status will display in the bottom left corner.
Timer 1 and Timer 2
In TIMER menu, select one or both timers to turn the
television on and off at selected times, on selected
channels, and on selected days.
Note:
1. Press .
2. Press CURSOR or and or
3. Press to display the CLOCK menu.
4. Press CURSOR to highlight TIMER 1 or TIMER 2.
5. Press CURSOR to set day or days.
6. Press CURSOR to highlight ON (time).
7. Press CURSOR or
8. Press CURSOR to highlight the minutes position.
9. Press CURSOR or repeatedly t o set minutes.
10. Press CURSOR to highlight OFF (time).
11. Repeat steps 7 through 9 for sett ing OFF (time).
12. Press CURSOR to highlight ENTER CHANNEL.
13. Press CURSOR or or use the remote control
14. Press CURSOR to highlight SET.
15. Press CURSOR to select:
• NO - not activated
• YES- activated
16. Press
TIME must be entered in CLOCK SET to operate
TIMER features
MENU
to highlight the
Timer icon.
MENU
CLOCK
CLOCK SET
SLEEP
TIMER1
TIMER2
DAY MON-FRI
ON - - : - -
OFF - - : - -
ENTER CHANNEL - - -
SET
SET TIME FIRST
NO
repeatedly to set hours (Set
u
u
AM or PM accordingly).
Keypad to enter the channel number desired when the
set turns “ON”.
MENU
twice to exit menus.
- 19 -

0335E2new.fm Page 20 Tuesday, April 25, 2000 4:10 PM
Menu Selections
Timer 1 and Timer 2 (cont.)
NOTE: To deactivate Program Timer select NO in step 15.
Special Feature:
Automatic turn “OFF” after 90 minutes. The TV has
a special feature that will shut itself OFF after 90
minutes when turned ON by the program Timer unless
a function key is pressed during the 90 minutes.
This feature is useful so t hat the TV will not remain
ON unattended for an extended period of time.
Programming the OFF timer will cancel t he automatic
OFF special feature.
Note:
If the Timer Program “ON” functions while the set is
operating, the set will automatically tune to the channel
designated in the Timer Menu.
Custom Favorites
In CHANNELS menu under FAVORITES select:
• CHANNEL SCAN FAV to enter up to 16
favorite channels.
• CHANNEL SCAN ALL to scan all channels
when using the CH up/down buttons.
1. Press
2. Press cursor p or q and t or u to highlight
3. Press to display the CUSTOM menu.
4. Press cursor
5. Press cursor
6. Press to exit menu.
MENU
.
CUSTOM icon.
MENU
CUSTOM
FAVORITES
CAPTION
EXIT
11
15
ALL
u
3
3
4
7
8
12
16
CHANNEL SCAN
ENTER CHANNEL
FAVORITE CHANNELS
1
2
5
6
9
10
13
14
u
TO ADD
u
TO DELETE
p or q to highlight CHANNEL SCAN.
t or u to
select ALL or FAVORITES.
- 20 -

0335E2new.fm Page 21 Tuesday, April 25, 2000 4:10 PM
Menu Selections
Custom
Manual Caption
This feature allows you to enter the call names of up to 30
stations into memory (using up to 4 characters for each
station). The I.D. name will then display along with the
channel number when changing channels or pressing
RECALL.
CH 03
KXYZ
MENU
1. Press
.
2. Press CURSOR or and or to highlight the
Custom icon.
MENU
3. Press to display the CUSTOM menu.
Channel I.D.
11. Press CURSOR or to highlight ENTER
CHANNEL.
12. Repeat steps 7 through 11 to continue adding Station
Identifiers.
MENU
13. Press twice to exit menu.
CUSTOM
MANUAL CAPTION
ENTER CHANNEL
ENTER ID.
10
FULL
Note:
• To delete a Manual Caption Channel I.D. (Station
Identifier) from memory all four characters positions
in the “ENTER I.D.” area must display a dash mark
(-).
• When the maximum amount of channel identifiers
are entered, “FULL” will display in the caption
character
position.
CUSTOM
FAVORITES
CAPTION
4. Press CURSOR
to highlight CAPTION.
MANUAL CAPTION
INPUT LABEL
u
u
5. Press CURSOR to highlight Manual Caption.
6. Press CURSOR to display Manual Caption sub
menu.
CUSTOM
MANUAL CAPTION
ENTER CHANNEL
ENTER ID.
p
t
7. Press CURSOR
TO MOVE CURSOR
TO SELECT CHANNEL
or to enter channel number.
3
- - - -
q
u
8. Press CURSOR to highlight ENTER I.D.
9. Press CURSOR to highlight first character.
10. Press CURSOR
or t o e nt er ch ar acte r, t he n r epeat
until all characters ar e en te r.
- 21 -

0335E2new.fm Page 22 Tuesday, April 25, 2000 4:10 PM
Menu Selections
Input Label
This feature is used to label video connections for onscreen
display of optional equipment.
MENU
1. Press .
2. Press CURSOR or and or
Custom icon.
MENU
3. Press to display the Custom menu
.
CUSTOM
FAVORITES
CAPTION
4. Press CURSOR
5. Press CURSOR
MANUAL CAPTION
INPUT LABEL
to highlight CAPTION.
.
6. Press CURSOR to highlight Input Label.
7. Press CURSOR
to display Input Label sub menu.
to highlight the
u
u
Lock
Lock Set
Prevents video games and other video sources from being
viewed. Channel 3, 4 and video inputs are locked out for
12, 24, 48 hours or ALWAYS.
NOTE: Be sure to understand this feature before
attempting it s use. Use a c ode t hat you will easi ly
remember or write the code on a piece of paper.
MENU
1. Press .
2. Press CURSOR or and or
Lock icon.
MENU
3. Press to display the Lock menu.
LOCK
MODE
HOW LONG?
LOCK SET
BLOCK PROGRAMS:
U.S. MOVIE RATINGS
STATUS
ENTER SECRET
CODE
to highlight the
OFF
OFF
- - - -
CUSTOM
INPUT LABEL
VIDEO1
VIDEO2
VIDEO3
p
TO MOVE CURSOR
t
TO SELECT CHARACTER
8. Press CURSOR or
- - - - - - - -
- - - - - - - -
- - - - - - - -
q
u
to highligh t V ide o 1, Vi de o 2 or
Video 3 for labeling.
9. Press CURSOR or
10. Press CURSOR
to select first character.
to highlight next character.
11. Repeat steps 9 and 10 to continue adding characters.
MENU
12. Press to display the Lock menu.
4. “ENTER SECRET CODE” should already be
highlighted. Use the numeric keypad to enter a
four-digit code.
5. Press to select OFF or ON for Lock Set Setting.
MENU
6. Press
to highlight MODE.
7. Press CURSOR to highlight HOW LO NG? .
8. Press CURSOR to select the desired amount of time
(12, 24, 48 hours or ALWAYS) for Lock Set to be
activated.
MENU
9. Press twice to exit menus.
To unlock LOCK SET follow steps 1 through 6, and on step
6 select NO.
Note:
If you do not rememb er y our cod e, L OCK w il l u nloc k in 12, 24,
or 48 hours, depending on the current setup. Be cautious when
selecting ALWAYS. If ALWAYS is selected and you forget your
secret code, the TV must be serv iced by a qua lified te chnici an
to clear the LOCK setup.
NOTE: If LOCK SET is selected, and if a blo cked channel
or video input is selected, the message LOCK
SET displays in the upper right corner of the TV
screen.
For more information about Block Programs and U.S.
Movie Rating, see Hitachi Child Lock reference guide.
- 22 -

0335E2new.fm Page 23 Tuesday, April 25, 2000 4:10 PM
Menu Selections
Set-Up Features
Signal Source
The proper input mode must be selected for the type of
signal at the antenna input.
• Antenna mode is used when the television is not
connected to a cable TV system, for example when
using a VHF/UHF antenna (channels 02 - 69).
• CATV mode is used when the television is connected
to a Cable TV system and you are not using a cable
company converter box (channels 01 - 125).
MENU
1. Press .
2. Press CURSOR or and or
Set-Up icon.
MENU
3. Press to display the Set-Up menu.
to highlight the
6. Press CURSOR to highlight AUTO CHANNEL.
7. Press CURSOR or to start Auto Programming.
Channels will automat ically advance until all channels
have been scanned.
NOTE: These feature is disabled when Lock Set is
activated.
MENU
8. Press twice after completion of Auto
Programming to exit me nu s.
Channel Memory
This feature all o ws y ou t o s el ect w hi ch c h ann el s ar e p l ac ed
into Channel Scan Memory.
MENU
1. Press .
2. Press CURSOR or and or
Set-Up icon.
MENU
3. Press to display the Set-Up menu.
to highlight the
SET UP
IDIOMA/
LANGUE
PROG CHAN
CC
OTHER ADJ.
SOURCE CATV
AUTO CHANNEL
CHANNEL MEMORY
u
u
u
4. Press CURSOR to highlight PROG CHAN.
5. Press CURSOR
MENU
6. Press
to select ANT (TV) or CATV.
twice to exit menus.
Auto Channel
These feature allows you to place all channels with a video
signal into Channel Scan Memory.
MENU
1. Press .
2. Press CURSOR or and or
Set-Up icon.
MENU
3. Press to display the Set-Up menu.
SET UP
IDIOMA/
LANGUE
PROG CHAN
CC
OTHER ADJ.
SOURCE CATV
AUTO CHANNEL
CHANNEL MEMORY
to highlight the
u
u
u
SET UP
IDIOMA/
LANGUE
PROG CHAN
CC
OTHER ADJ.
4. Press CURSOR
SOURCE CATV
AUTO CHANNEL
CHANNEL MEMORY
.
u
u
u
5. Press CURSOR to highlight CHANNEL MEMORY.
6. Press CURSOR or to display the Channel
Memory menu.
SET UP
CHANNEL MEMORY
ENTER CHANNEL 3
TO ADD
u
u
TO DELETE
NOTE: These feature is disabled when Lock Set is
activated.
7. Use the CURSOR or or use the keypad “0
through 9" buttons to select channels.
8. Press CURSOR to add channel(s) to memory
(Cyan). Press CURSOR to delete channels from
memory (Yellow).
9. Repeat steps 7 and 9 to continue adding or deleting
channels.
MENU
10. Press twice to exit menus.
4. Press CURSOR to highlight PROG CHAN.
5. Press CURSOR
.
- 23 -

MUTE
0335E2new.fm Page 24 Tuesday, April 25, 2000 4:10 PM
Menu Selections
CC on Mute
Activate C1-C2 for Closed Caption in g disp la y when th e
remote MUTE button is pressed.
MENU
1. Press .
2. Press CURSOR or and or
to highlight the
Set-Up icon.
MENU
3. Press to display the Set-Up menu.
SET UP
IDIOMA/
LANGUE
PROG CHAN
CC
OTHER ADJ.
CC ON MUTE
CC MODE
NO
OFF
u
u
4. Press CURSOR to highlight CC.
5. Press CURSOR
MENU
to select NO, C1 or C2.
6. Press twice to exit menus.
Closed Caption
This television has a built-in decoder that provides a visual
depiction of the audio portion of a television program, in the
form of written words across the screen (White or colored
letters on a black background). It allows the viewer to read
the dialogue of a television program or other i nformation.
When Closed Caption is in the OFF mo de:
The viewer may display closed caption by pressing
5. Press CURSOR
.
6. Press CURSOR to highlight CC MODE .
7. Press CURSOR
MENU
to select OFF, C1 o r C2.
8. Press twice to exit menus.
Auto Power On
This feature allows the user to power up the TV at the
same time as the cab le box (or other components). Of
course, the TV must be plugged into the cable box.
Note:
1. Press .
2. Press CURSOR or and or
3. Press to display the Set-Up menu.
4. Press CURSOR to highlight OTHER ADJ.
5. Press CURSOR to select AUTO POWER ON
6. Press twice to exit menus.
When this feature is activated (on), Timer
features will be disabled.
MENU
to highlight the
Set-Up icon.
MENU
SET UP
IDIOMA/
LANGUE
PROG CHAN
CC
AUTO POWER ON
OTHER ADJ.
OFF
feature OFF or SET.
MENU
u
on the remote control. Press again to delete.
MENU
1. Press .
2. Press CURSOR or and or
Set-Up icon.
MENU
3. Press to display the Set-Up menu.
SET UP
IDIOMA/
LANGUE
PROG CHAN
CC
OTHER ADJ.
CC ON MUTE
CC MODE
4. Press CURSOR to highlight CC.
to highlight the
NO
u
OFF
u
- 24 -

0335E2new.fm Page 25 Tuesday, April 25, 2000 4:10 PM
Before you call for service, determine the symptoms and make a few simple checks shown below.
Symptoms
Picture Sound
Useful Information
TROUBLESHOOTING CHART
Check
- ANTENNA LOCATION AND/OR CONNECTION
SNOWY PICTURE
MULTIPLE IMAGE
INTERFERENCE
NORMAL PICTURE
NO VIDEO
NOISY SOUND
NOISY SOUND
NOISY SOUND
NO SOUND
NOISY SOUND
?
NO PICTURE
NO COLOR NORMAL SOUND
VIDEO
NO SOUND
- ANTENNA DIRECTION AND/OR LOCATION
- ANTENNA LEAD-IN WIRE
- ELECTRICAL APPLIANCES, LIGHTS, CARS, AND TRUCKS
- DIATHERMY AND OTHER MEDICAL EQUIPMENT
- VOLUME CONTROL SETTING
- MUTE CONTROL (IF APPLICABLE)
- TRY ANOTHER CHANNEL
- TV SPEAKERS OFF
- TV OR CABLE TUNING MODE SET TO PROPER SETTING
- ANTENNA INPUT CORRECT (IF APPLICABLE)
- CHECK THAT AC POWER CORD IS PLUGGED INTO AC
OUTLET
- BRIGHTNESS AND AUDIO CONTROLS SET PROPERLY
- TRY ANOTHER CHANNEL
- COLOR CONTROL SETTINGS
- TRY ANOTHER CHANNEL
- RECEIVER IN VIDEO MODE WITH NO SIGNAL
BLACK PICTURE
NO SOUND
Specifications
Power Source: 120V CA, 60Hz,
Channel Capability: 181 channels (See chart)
VHF 2~13, UH F 14 ~ 6 9 ,
Cable 125 channels
Video Input Jacks: 1V p-p, 75 ohm, p ho no jac k typ e
Audio Input Jacks: 500mV rms 47K ohm
To Audio AMP Jacks: 0~2.0V rms 4.7K ohm
Stereo Sound
Closed Caption Display
Specificati ons are subject to change withou t notice or obligation.
- 25 -
Channel Capability Chart
BAND CHANNELS
VHF
UHF
CABLE (Mid - Band)
CABLE (Super Band)
CABLE (Hyper Band)
CABLE (Ultra Band)
TOTAL CHANNELS 181
12
56
15
14
28
56

e
800 HITACHI
0335E2new.fm Page 26 Tuesday, April 25, 2000 4:10 PM
servic
service
Useful Information
To locate an authorized HITACHI
service facility in the continental
U.S.A. and Canada,
DIAL TOLL FREE
7 days a week, 24 hours a day
(1-800-448-2244)
HITA CHI AMERICA, LTD.
HOME ELECTRONICS DIVISION
Hitachi has made every effort to assure you hours of trouble free op eration from your unit, however, s hould your television
require service, a network o f Hitachi Autho rized S ervice Facilitie s has bee n establishe d in all 50 states and Puerto Rico .
Each facility will provide convenient a nd expedient as sistance. Our servic e hotline opera tor will direct you to the Hitachi
Authorized Service Fa cility ne arest you. Just pr esen t proo f of purch ase and/or deliv ery rec eipts to th e Hitachi Author ized
Service Facility, and service will be rendered in accordance with the terms of the limited warranty as stated on your
warranty card or operating guide.
Should you have any questions regarding warranty service, operation or technical assistance, please contact:
Hitachi Home Electronics (America), Inc.
1855 Dornoch Court
San Diego, CA 92154-3225
In Canada, please contact : 1- 800 - HITACHI
(1- 800 - 448-2244)
Hitachi (HSC) C a na da Inc.
6740 Campobello Road
Mississauga, Ont. L5N 2L8
- 26 -

0335E2new.fm Page 27 Tuesday, April 25, 2000 4:10 PM
Notes
- 27 -

0335E2new.fm Page 28 Tuesday, April 25, 2000 4:10 PM
QR41172
 Loading...