

Hitachi DZ-MV580E (SW), DZ-MV580E (UK), DZ-MV550E (SWH), DZ-MV550E (UK), DZ-MV550E (SW) Instruction Manual
...
DZ-MV580E (SW) DZ-MV580E (AU)
DZ-MV550E (SW) DZ-MV550E (AU)
DZ-MV580E (SWH) DZ-MV580E (UK)
DZ-MV550E (SWH) DZ-MV550E (UK)
English
Pyccкий
DZ-MV550E DZ-MV580E
Instruction manual
To obtain the best performance and ensure years of
trouble-free use, please read this instruction
manual completely.
DVDCAM PC Software Support Center
URL http://dvdcam-pc.support.hitachi.ca/
This manual was printed
with soy based ink.
Printed on recycled paper
English
Important Information
For Your Safety
The power switch turns the DVD video camera/recorder on and off, leaving the date/time feature unaffected. If the
camera/recorder is to be left unattended for a long period of time, turn it off.
WARNING :TO PREVENT FIRE OR SHOCK HAZARD, DO NOT
EXPOSE THIS UNIT TO RAIN OR MOISTURE.
WARNING :TO PREVENT FIRE OR SHOCK HAZARD, USE THE
RECOMMENDED ACCESSORIES ONLY.
The D VD video camera/recorder and AC adapter/
charger have the following caution marks.
CAUTION
RISK OF ELECTRIC SHOCK
DO NOT OPEN
CAUTION: TO REDUCE THE RISK OF
ELECTRIC SHOCK, DO NOT OPEN.
NO USER-SERVICEABLE PARTS INSIDE.
REFER SERVICING TO QUALIFIED
SERVICE PERSONNEL.
Precautions
WARNING: Many television programmes and
films are copyrighted. In certain circumstances,
copy-right law may apply to private in-home
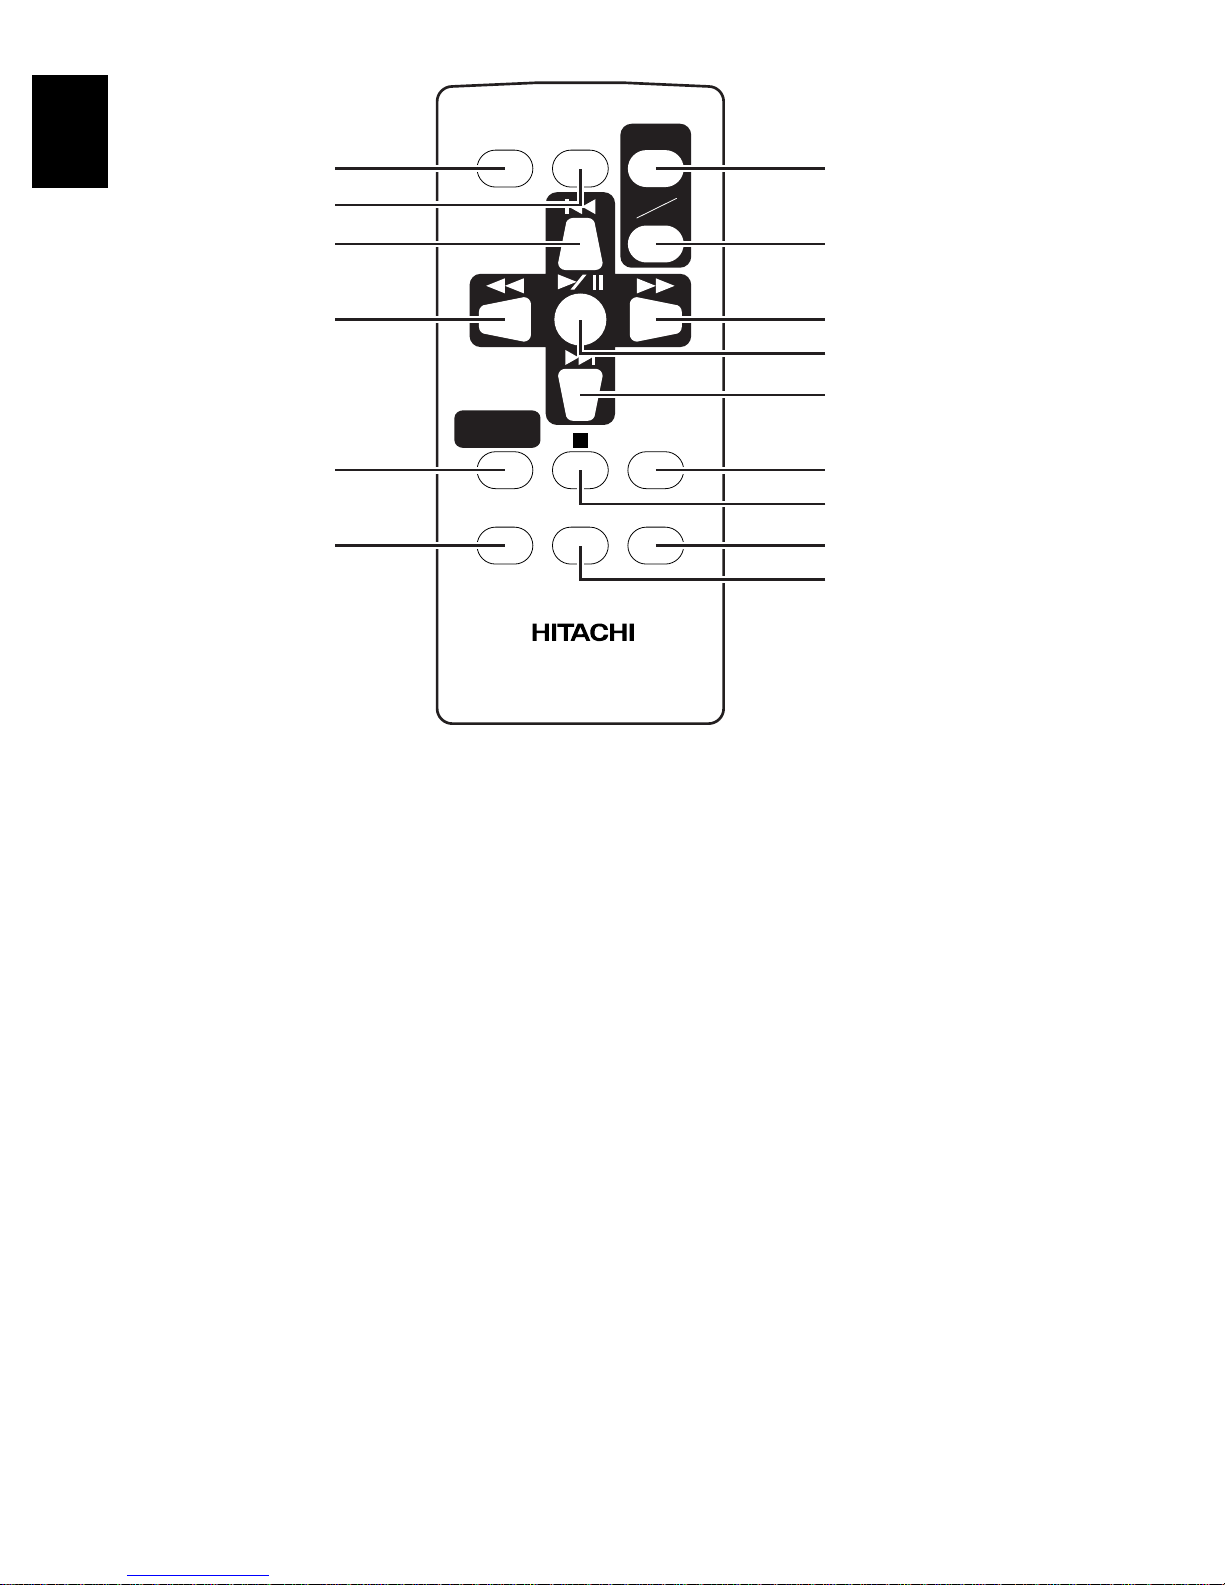
videotaping of copyrighted materials.
The liquid crystal display (LCD) panel is made
by highly precise technology. More than 99.99%
of its picture elements (pixels) are effective, but
some (less than 0.01%) may appear as coloured
bright dots. This does not indicate a fault as the
LCD panel stretches the limits of current
technology.
Identifications of caution marks
This symbol warns the user that
uninsulated voltage within the unit
may have sufficient magnitude to
cause electric shock. Therefore, it is
dangerous to make any kind of contact
with any inside part of this unit.
This symbol alerts the user that
important literature concerning the
operation and maintenance of this unit
has been included. Therefore, it should
be read carefully to avoid any
problems.
WARNING: T o pr event risk of injury or damage to
your DVD video camera/recorder and the AC
adapter/charger, use only the DZ-BP14S/DZBP14SW battery and DZ-ACS1 AC adapter/
charger.
CLASS 1
LASER PRODUCT
CAUTION
This product contains a laser diode of higher
class than 1. To ensure continued safety, do
not remove any covers or attempt to gain
access to the inside of the product. Refer all
servicing to qualified personnel.
2

Important for United Kingdom (for DZ-MV580E (UK)/DZ-MV550E (UK))
The mains lead on this equipment is supplied with a moulded plug incorporating a fuse, the value of
which is indicated on the pin face of the plug.
Should the fuse need to be replaced, an ASTA or BSI approved BS 1362 fuse must be used of the same
rating. If the fuse cover is detachable never use the plug with th e cover omitted. If a repl acement fuse
cover is required, ensur e it is of the same colour as that visible on the pin face of the plug. Fuse covers
are available from your dealer.
DO NOT cut off the mains plug fr om this equipment. If the plug fitted is not suitable for the power points
in your home or the cable is too short to r each a power point, then obtain an appropriate safety approved
extension lead or consult your dealer.
If there is no alternati ve to cutting off the mains plug, ensur e that you dispose of it immediately, having
first removed the fuse, to avoid a possible shock hazard by inadvertent conne ction to the mains supply .
IMPORTANT
The wires in the mains lead are coloured in accordance with the following code:
Blue= Neutral, Brown=Live
As these colours may not correspond with the coloured markings identifying the terminals in your
plug, proceed as follows:
The wire coloured BLUE must be connected to the terminal m arked with the letter N or coloured BLUE
or BLACK.
The wire coloured BROWN must be connected to the terminal marked with the letter L or coloured
BROWN or RED. On no account connect either of these wir es to the terminal marked E or by the earth
symbol or coloured green or green and yellow.
English
3
English
ИНФОРМАЦИЯ
О СЕРТИФИКАЦИИ ПРОДУКЦИИ
ME28
сертифицированы органом по сертификации электрооборудования <<MEHTECT>>
Сертификат соответствия №: POCC JP.ME28.B00613
Сертификат соответствия выдан: 16-ro января 2003 года
Сертификат соответствия действителен до: 16-ro января 2005 года
Модель DZ-ACS1 соответствует требованиям
нормативных документов:
Срок службы 7 (семь) лет
УСТРОЙСТВО ЗАРЯДНОЕ (Блок питания) МОДЕЛЬ DZ-ACS1
Менделеевского ЦСМС
(Регистрационный номер в Госреестре – POCC RU.0001.11ME28)
ГОСТ P МЭК 60065-2002,
ГОСТ Р 51318.14.1-99
INFORMAT IO N ON PRODUCT CERTIFICATION
AC ADAPTER / BATTERY CHARGER MODEL DZ-ACS1
certified by “MENTEST” of Mendeleevsky CSMS
(Registration number in State Register - POCC RU.0001.11ME28)
Certificate of conformity No.: POCC JP.ME28.B00613
Certificate of conformity issued: The 16th of January 2003
Certificate of conformity valid till: The 16th of January 2005
Model DZ-ACS1 complies with requirements of
normative documents:
Life cycle 7 (seven) years
GOST R IEC 60065-2002,
GOST R 51318.14.1-99
ИНФОРМАЦИЯ
О СЕРТИФИКАЦИИ ПРОДУКЦИИ
AE68
Сертификат соответствия №: POCC JP.АE68.B10147
Сертификат соответствия выдан: 19-го января 2004 года
Сертификат соответствия действителен до: 18-го января 2006 года
Модель DZ-ACS1 соответствует требованиям
нормативных документов:
Cрок службы 7 (семь) лет
УСТРОЙСТВО ЗАРЯДНОЕ (Блок питания) МОДЕЛЬ DZ-ACS1
сертифицированы органом по сертификации электрооборудования
<<КОРПОРАЦИЯ СТАНДАРТ>>
(Регистрационный номер в Госреестре – РОСС RU.0001.11АЕ68)
ГОСТ Р МЭК 60065-2002,
ГОСТ Р 51318.14.1-99.
INFORMAT IO N ON PRODUCT CERTIFICATION
AC ADAPTER / BATTERY CHARGER MODEL DZ-ACS1
certified by “CORPORATION STANDARD”
(Registration number in State Register – POCC RU.0001.11AE68)
Certificate of conformity No.: POCC JP.AE68.B10147
Certificate of conformity issued: The 19th of January 2004
Certificate of conformity valid till: The 18th of January 2006
Model DZ-ACS1 complies with requirements of
normative documents:
Life cycle 7 (seven) years
GOST R IEC 60065-2002,
GOST R 51318.14.1-99.
4

IMPORTANT SAFEGUARDS
In addition to the careful attention d evoted to quality standards in the man ufacture of your video product, saf ety is a major
factor in the design of every instrument. But, safety is your responsibility too.
This page lists important information that will help to assure your enjoyment and proper use of DVD video camera/
recorder and accessory equipment. Please read it carefully bef ore operating your video product and keep it in a handy
place for future reference.
English
INSTALLATION
1 Read and Follow Instructions — All the safety and
operating instructions should be read before the
video product is operated. Follow all operating and
use instructions.
2 Retain Instructions — The safety and operating
instructions should be retained for future reference.
3 Heed Warnings — Comply with all w arnings on the
video product and in the operating instructions.
4 Power Sources — This video product should be
operated only from the type of power source indicated
on the marking label. If you are not sure of the type of
mains supply to your home , consult your video dealer
or local power company . F or video products intended
to operate from battery power , or other sources , refer
to the operating instructions.
5 Overloading — Do not overload wall outlets and
extension cords as this can result in a risk of fire or
electric shock. Overloaded A C outlets and extension
cords are dangerous, and so are f rayed mains leads ,
damaged or cracked wire insulation and broken
plugs. They may result in a shock or fire hazard.
Periodically e xamine the cord and have it replaced b y
your service technician if appearance indicates
damage or deteriorated insulation.
7 Ventilation — Slots and openings in the cabinet are
provided for v entilation to ensure reliable operation of
the video product and to protect it from over heating.
These openings must not be bloc ked or covered. The
openings should never be blocked by placing the
video product on a bed, sofa, rug, or other similar
surface. This video pr oduct should n ever be placed
near or over a radiator or heat register. This video
product should not be placed in a b uilt-in installation
such as a bookcase or rack unless proper v entilation
is provided or the video product manufacturer’s
instructions have been followed.
8 Attachments — Do not use attachments unless
recommended by the video produ ct manufacturer as
they may cause hazards.
Caution: Maintain electrical safety. Powerline operated
equipment or accessories connected to this unit should
bear the UL listing mark or CSA certification mark on the
accessory itself and should not hav e been modified so as
to defeat the safety features. This will help avoid any
potential hazard from electric shock or fire. If in doubt,
contact qualified service personnel.
9 Water and Moisture — Do not use this video product
near water — for example, near a bath, wash bowl,
kitchen basin, or laundry tub, i n a w et basement, o r
near a swimming pool, and the like.
6 Mains Lead Protection — Mains leads should be
routed so that they are not likely to be walked on or
pinched by items placed upon or against them,
paying particular attention to leads at plugs,
convenience receptacles, and the point where they
exit from the appliance.
10 Accessories — Do not place this video product on an
unstable cart, stand, tripod, bracket, or table. The
video product may fall, causing serious injury to a
child or adult, and serious damage to the appliance.
Use only with a cart, stand, tripod, bracket, or table
recommended by the manuf actu rer , or sold with the
video product. Any mounting of the product should
follow the manufacturer’s inst ructions, and should
use a mounting accessory recommended by the
manufacturer.
11 An appliance and cart combination
should be moved with care . Quic k
stops, excessiv e force, and uneven
surfaces may cause the appliance
and cart combination to overturn.
5

12 Po wer Lines — An outside ante nna system should
English
not be located in the vicinity of ov erhead power lines
or other electric light or power circuit s, or where it can
fall into such pow er lines or circu its. When installing
an outside antenna system, extreme care shoul d be
taken to keep from touching or approaching such
power lines or circuits as contact with them might be
fatal. Installing an outdoor aerial can be hazardous
and should be left to a professional aerial installer.
USE
13 Cleaning — Unplug this video product from the w all
outlet before cleaning. Do not use liq uid cleaners or
aerosol cleaners. Use a damp cloth for cleaning.
14 Object and Liquid Entry — Never push objects of
any kind into this video product through openings as
they may touch d angerous voltage points or short-out
parts that could result in a fire or electric shoc k. Never
spill liquid of any kind on the video product.
15 Lightning — For added protection for this video
product during a lightning storm, or when it is left
unattended and unused for long periods of time,
unplug it from the wall outlet and disconn ect the aerial
or cable-system. This will prevent damage to the
video product due to lightning and power-line surges.
SERVICE
16 Servicing — Do not attempt to service this video
product yourself as opening or remo ving covers may
expose you to dangerous voltage or other hazards.
Refer all servicing to qualified service personnel.
17 Conditions Requiring Service — Unplug this video
product from the wall outlet and refer servicing to
qualified service personnel under the following
conditions.
a. When the mains lead or plug i s damaged.
b. If liquid has b een spilled, or objects have fallen
into the video product.
c. If the video product has been e xposed to rain or
water.
d. If the vi deo product does not operate normally by
following the oper ating instructions. Adjust only
those controls that are cov ered by the operating
instructions. Improper adjustment of other
controls may result in damage and will often
require extensiv e work by a qualified technician
to restore the video product to its normal
operation.
e. If the video product has been dropped or the
cabinet has been damaged.
f. When the video product exhibits a dist inct
change in performance — this indicates a need
for service.
18 Replacement P arts — When replacement parts are
required, have t he service technician v e rify that the
replacements he uses have the same safety
characteristics as the original parts. Use of
replacements specified by the video product
manufacturer can pre vent fire, electric shock or othe r
hazards.
19 Safety Check — Upon completion of an y service or
repairs to this video product, ask the service
technician to perform safety checks recommended
by the manufacturer to determine that the video
product is in safe operating condition.
20 Heat — The product should be situated away from
heat sources such as radiators, heat registers,
stoves, or other products (including amplifiers) that
produce heat.
6

Cautions When Using
Handle the liquid crystal display (LCD) with care:
• The LCD is a very delicate display device: Do not press its surface with force, hi t it or prick it with a
sharp object.
• If you push the LCD surface, unevenness in display may occur . If unevenness does not disappear soon,
turn the DVD video camera/recorder off, wait for a few moments, and then t urn it on again.
• Do not place the DVD video camera/recorder with th e op en LCD screen down.
• Close the LCD monitor when not using the DVD video camera/recorder.
Liquid crystal display (LCD) and viewfinder:
• The LCD screen and viewfinder ar e the products of highly precise technology . Among the total numb er
of pixels (approx. 120,000 pix els for LCD monitor and approx. 1 10,000 pixels for viewfi nder), 0.01% or
less pixels may be missing (black dots) or may remain li t as coloured dots (red, blue, green). This shows
the limitations of the current te chnology , and does not indicate a fault that will interfere with r ecording.
• The LCD screen and viewfinder will be slightly dimmer than usual when the DVD video camera/
recorder is at low temperature, as in cold areas, or immediately after power is turned on. Normal
brightness will be restor ed when the temperature inside the DVD video camera/recorder rises.
Hold the DVD video camera/recorder correctly:
• Do not hold the viewfinder or LCD monitor when lifting the DVD video camera/recorder: The
viewfinder or LCD monitor could detach and the DVD video camera/recorder may fall.
English
Do not subject the DVD video camera/recorder to impact:
• This DVD video camera/recorder is a precision machine. Take great care that you do not strike it
against a hard object or let it fall.
• Do not use the DVD video camera/recorder on a tripod in a place where it is subject to severe vibrations
or impact.
No sand or dust!
• Fine sand or dust entering the DVD video camera/recorder or AC adapter/charger could cause
malfunctions or defects.
No water or oil!
• Water or oil entering the DVD video camera/recorder or AC adapter/charger co uld cause electric
shock, malfunctions or defects.
7

Heat on surface of product:
English
• The surface of the DVD video camera/r ecorder will be slightly warm, but this does not indicate a fault.
Screen on connected TV:
• Never leave the disc navigation screen, still image or camera image displayed on your TV to which the
DVD video camera/recorder is connected: Doing so could result in displayed image retention or
phosphor degradation of TV screen.
Be careful of ambient temperature:
• Using the DVD video camera/recor der in a place where the temperature is over 40°C or under 0°C will
result in abnormal recording/playback.
• Take care that the temperatur e of this DVD video camera/ r ecor der, when connected to PC does not
rise excessively (reference for usage: approx. 30 minutes at about 30ºC).
• Do not leave the DVD video camera/recorder on beach sand or in a closed vehicle where the
temperature is very high for a long time: This could caus e malfunctions.
Do not point directly at the sun:
• If direct sunlight strikes the lens or viewfinder , the DVD video camera/recor der could malfunction or
a fire could occur .
• Do not leave the DVD video camera/recorder with the LCD screen exposed to direct sunlight: This
could cause malfunctions.
Do not use the DVD video camera/recorder near TV or radio:
• This could cause noise to appear on the TV screen or in radio bro adcasts.
Do not use the DVD video camera/recorder near strong radio waves or magnetism:
• If the DVD video camera/recor der is used near strong radio waves or magnetism, such as near a radio
wave tower or electric appliances, noise could enter video and audio that are being r ecorded. During
playback of normally recorded video and audio, noise may also be present in picture and sound.
At worst the DVD video camera/recorder could malfunction.
Do not expose the DVD video camera/recorder to soot or steam:
• Thick soot or steam could damage the DVD video camera/recorder case or cause malfunctions.
Do not use the DVD video camera/recorder near corrosive gas:
• If the DVD video camera/recorder is used in a place whe re ther e is dense ex haust gas generate d by
petrol or diesel engines, o r corrosive gas s uch as hydrogen sulfide, the external or internal terminals
could corrode, disabling normal oper ation, or the battery connecting terminals could cor rode, so that
power will not turn on.
Do not use the DVD video camera/recorder near ultrasonic humidifier:
• With some water in humidifier , calcium and other chem icals dissolved in water could scatter in the air,
and white particles could adhere to the optical head of the DVD video camera/r ecorder , which could
cause it to operate abnormally.
Do not expose the DVD video camera/recorder to insecticide:
• Insecticide entering the DVD video camera/recor der could dirty the lens in laser pickup block, and
in such a case the DVD video camera/recorder might not operate normally. Turn the DVD video
camera/recorder off and cover it with vinyl sheet, etc. befor e using insecticide.
Do not use a generally available 8 cm CD lens cleaner:
• Cleaning the lens is not necessary when using this DVD video camera/recorder in the usual way.
• Using 8 cm CD lens cleaner could cause this DVD video camera/recorder to be faulty.
8

Be careful of moisture condensation:
• When you move the DVD video camera/recorder between places where the difference in
temperatures is great - such as entering a lodge fr om a ski slope or going out of a cooled room or vehicl e
- condensation (vapour in air warmed or cooled to water droplets) could occur on the lens an d/or
inside the DVD video camera/r ecorder. If condensation occurs, do not open the cover of disc or car d
insertion block if possible. If condensation occurs on the lens, wipe it of f wi th a soft , dry cloth. Even
if the external surface of DVD video camera/recorder has dried, condensation may remain inside:
T urn the DVD video camera/r ecorder off and leave it in a dry place for at least 1-2 hours befor e using
it again.
Do not use the DVD video camera/recorder fo r a lo ng un in terrupted period of time:
• This DVD video camera/recorder cannot be used for a long time continuously as a surveillance
camera/monitor . If you use the DVD video camera/recorder for a long conti nuous period of time, the
temperature of DVD video camera/recorder could exceed a limit and the recording/playback
operation could be slowed down: In this case, turn it off and wait for a while before using it again.
Do not turn the DVD video camera/recorder off while the ACCESS/PC indicator or
CARD ACCESS indicator is lit or blinking:
• The ACCESS/PC or CARD ACCESS indicator is lit or
blinking to show that data is being written to disc or card, or
being read from it. At this time, do not do any of the
following, so as not to damage the data:
− Remove battery
− Disconnect AC adapter/charger
− Plug or unplug PC connection ca ble
− Remove disc or card
− Subject DVD video camera/r ecorder to severe vibrations
or impact.
− Violently open or close the LCD monitor
CARD
ACCESS
indicator
ACCESS/PC
indicator
English
If you turn the DVD video camera/recor der off whil e the ACCESS/PC or CARD ACCESS indicator i s
lit or blinking, turn it on again with the disc or card loaded in it: Repair of the disc or card will be executed
automatically (see page 168).
Do not wipe the DVD video camera/recorder case with benzene or thinner:
• The coating of case could peel off or the case surface could deteriorate.
• When using a chemical cleaning cloth, follow the instructions.
Also read the instructions attached with optional accessories:
• For optional accessories, observe the cautions and follow instruction manuals attached.
9

English
Cautions When Storing
Do not leave the DVD video camera/recorder in a place where the temperature is very
high for a long period of time.
• The temperature inside a closed vehicle or boot can become very high in a hot season. If you leave the
DVD video camera/recorder in s uch a place, it could malfunction or the case could be dam aged. Also,
do not expose the DVD video camera/recorder to direct sunlight or place it near a heater.
Do not store the DVD video camera/recor der in a place where the humidity is high or
in a dusty place:
• Dust entering the DVD video camera/recor der could cause malfunctions. If the humidity is high, the
lens could be mouldy, and the DVD video camera/recorder could become inoperable. It is
recommended that you put the DVD video camera/r ecor der with desiccant in a box when stor ing it
in a closet, etc.
Do not store the DVD video camera/recor der in a place subject to str ong ma gnetism
or intense vibrations:
• This could cause malfunctions.
Detach the battery from the DVD video camera/recorder and store it in a cool place:
• Leaving the battery attached or storing it at high temperatur e could shorten its life.
10

Suggestions and Restrictions
Make a trial recording:
• Always make a trial recording before doing actual recording to make sure that recording is normal. The
data that have not been stored normally becaus e of a defect in the DVD video camera/recorde r cannot
be restored.
It is recommended that you use DVD-RAM disc from which recorded contents can be deleted for trial
recording.
Do not use the DVD video camera/recorder for professional applications:
• This DVD video camera/recorder is design ed and pr oduced fo r home-use r ecor di ng and playback.
The recorded contents cannot be compensated for:
• Hitachi cannot compensate for any damages caused when recording is not made normally or recor ded
contents cannot be played back because of a defect in the DVD vi deo camer a/r ecor der, disc or card.
Also, Hitachi cannot be responsi ble for your recorded video and audio.
• If you or a third party make a mistake when handling this DVD video cam era/recorder , disc, card, etc.,
the recorded contents may be lost. W e cannot be respon sible for compensation for damage due to loss
of recorded contents.
Copyright:
• Data recorded on the disc or card in this DVD video camera/recorder using other di gital/a nalogue
media or devices are protected by the copyright act and cannot be used without permission of the
owner of copyright, except for pers onal enjoyment. Be aware that recording is restricted for some
demonstrations, performances and exhibitions, even for personal enjoyment.
English
11

English
Read This First
To guide you, we've included following six chapters.
• The section on “Setups” explains how to set up
the DVD video camera/recorder, battery, and
set the date/time.
• The section on “Basic Techniques” explains the
basic operation of this DVD video camera/
recorder - reco rding of movies, still images,
external input*, and playback of recorded
images.
• The section on “Advanced Techniques” explains
settings on this DVD video camera/recorder for
more advanced usage.
• The section on “Disc Navigation” explains
editing with Disc Navigation: Refer to this
section when finalising DVD-R disc and
initialising DVD-RAM disc.
• The section on “Connecting to PC” explains the
contents of provided CD-ROM and how to
install the software included.
• “Subsidiary Information” includes an
introduction to pr oducts sold separately , proper
cleaning, and troubleshooting.
* Unavailable on DZ-MV550E (UK) or DZ-MV580E (UK).
We want this manual to be as help ful as possible,
so it includes two easy ways to find the information
you need:
• A quick index for the information you use most
• A detailed table of contents directing you to
Get to know your DVD video camera/recorder by
using this manual, and get to know Hitachi. We
appreciate your business.
Quick Index
Available Discs.................................................28
Recording Movie..............................................53
Playing Back....................................................62
Connecting to a TV..........................................81
Functions Available with Disc Navigation.......112
Connecting to PC...........................................143
often (this page).
specific information quickly (see page 15-17).
With this DVD video camera/recorder you can view the picture being recorded or the playback picture
whether on the LCD monitor or in the viewfinder. Openin g or closing the LCD monitor switches the picture
to appear on the LCD monitor or in the viewfinder. Th e following text describes the operation assuming that
the viewfinder is used as a major monitor device.
It is possible to switch the language in the on-screen display of this DVD video camera/ recorder (see
page 106).
Microsoft
Professional, and Windows
Intel
IBM
Manufactured under licence from Dolby Laboratories.
“Dolby” and the double-D symbol ar e trademarks of Dolby Laboratories.
Other company names and product names listed are trademarks or brand names belonging to each
individual company.
SD logo is a trademark.
®
, Windows®, Wind ows® 98, Windows® 98 Second Edition, W indo ws® Me, Windows® 2000
®
, Pentium® Processor, and Celeron® Processor are registered trademarks of Intel Corporation.
®
and PC/AT® are registered trademarks of International Business Machines Corporation.
®
XP are registered trademarks of Microsoft Corporati on.
12
Introduction
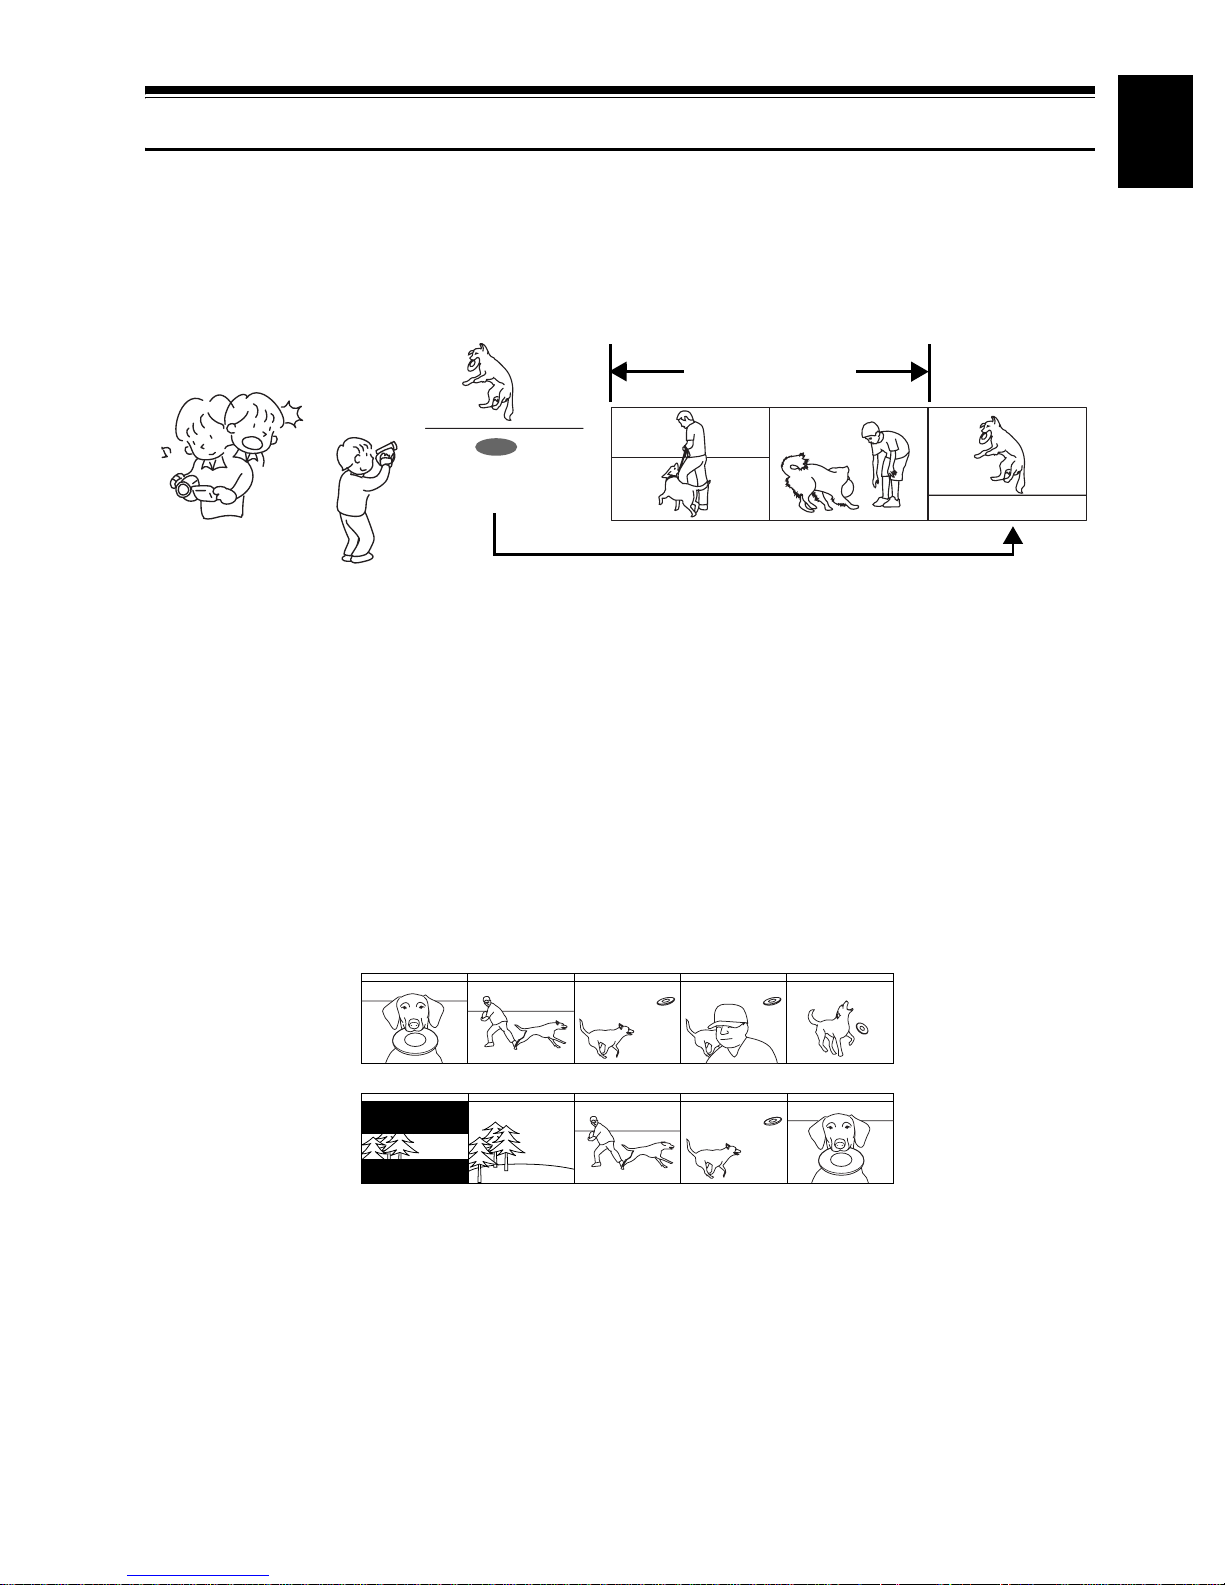
●You can start recording immediately after stopping playback (P.53, 62)
Unlike tape devices, you do not need to search for the recording start position or locate the beginning
of blank portion.
You can stop playback and immediately start recording: New recording will not overwrite any
previously recorded data.
Recorded scenes
If you stop playbac k midway and start recording, overwrite will not occur .
●You can immediately play back desired recorded scenes (P.110)
You do not need to rewind, unlike recorders using tape.
You can select any scene you want and immediately play it back (using Disc Navigation function).
English
●You can easily print without PC (P.123)
Use DPOF to set the photos to be printed and the print number among the photos recorded on SD
memory card or MultiMediaCard: This is useful whe n print ing phot os on a pri nter con formi ng t o SD
memory card or when asking a photo lab to print them.
●Use Disc Navigation to create your original movie (P.129)
You can delete unnecessary scenes, move any scenes, etc., and create your original movie work (Play
List).
Before editing
After editing
13
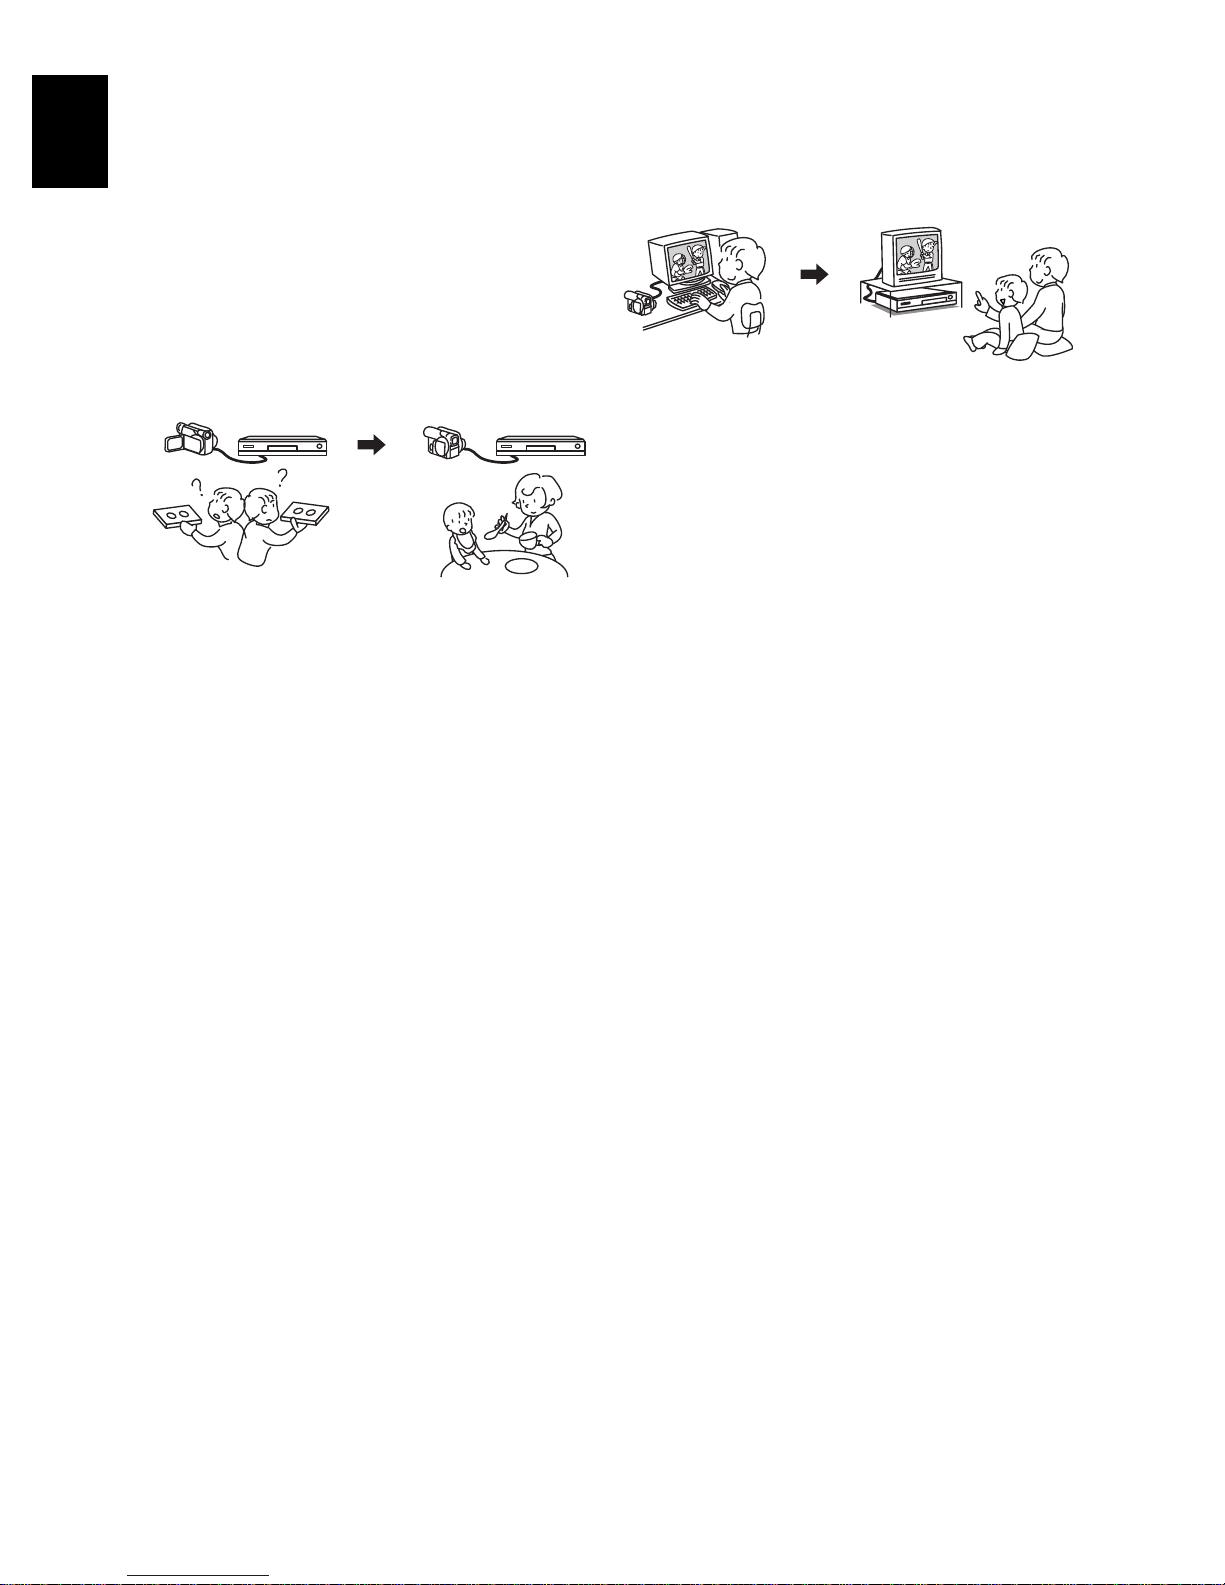
●You can easily edit scenes, which is
English
quite difficult with tape (P.90)
Using this DVD video camera/recorder, you can
collect scenes of your child, for example, on play
list of Disc Navigation function and create an
original movie: Then simply play back the play list
and dub it on VCR. It is also easy to make any
number of identical tapes.
●Create original DVDs on PC (P.155)
You can use a DVD-R disc to create an original
DVD, using the provided software CD-ROM.
The created DVD disc can be played back on DVD
player, DVD-ROM drive, etc.
Up to now , y ou had t o
repeatedly press
buttons
With DVD, you can sim p ly
play back this DVD video
camera/recorder, and
press the record button on
VCR.
Original DVD bein g
created
Playbac k of DVD
14

Table of Contents
English
Important Information ........................................2
For Your Safety .................................................2
Precautions .......................................................2
IMPORTANT SAFEGUARDS ...........................5
Cautions When Using ........................................7
Cautions When Storing....................................10
Suggestions and Restrictions...........................11
Read This First.................................................12
Introduction ......................................................13
Table of Contents.............................................15
Checking Provided Accessories.......................18
Names of Parts ................................................19
About This Manual...........................................23
Try to Record and Play Back using Disc
(Video and Photo)..........................................24
Try to Record and Play Back using Card
(Photo)...........................................................26
Discs and Cards...............................................28
AVAILABLE DISCS .............................................28
INFORMATION ON DVD-R DISC ............... ... .. ... 29
EXAMPLES OF DISCS THAT CANNOT
BE USED ON THIS DVD VIDEO
CAMERA/RECORDER:....................................29
HANDLING DISCS .............................................. 30
AVAILABLE CARDS............................................31
Storage Capacity on Disc or Card....................32
RECORDABLE TIME OF MOVIE (VIDEO) ...... ... 32
RECORDABLE STILLS (PHOTOS) ON DISC ....32
RECORDABLE STILLS (PHOTOS) ON CARD...33
SIZE AND QUALITY OF PHOTOS......................33
Setups
Setting Up the DVD Video Camera/
Recorder........................................................34
HOLDING DVD VIDEO CAMERA/
RECORDER .....................................................34
ATTACHING SHOULDER STRAP......................35
ATTACHING LENS CAP .....................................35
INSERTING BATTERY INTO REMOTE
CONTROL ........................................................36
REMOVING BATTERY FROM REMOTE
CONTROL ........................................................36
CHANGING LENS COVER FOR
REPLACEMENT...............................................37
VIEWING SUBJECT THROUGH
VIEWFINDER ...................................................39
VIEWING IMAGE ON LCD MONITOR
SCREEN...........................................................39
CLOSING LCD MONITOR .................................. 40
SETTING DATE AND TIME ................................41
CHANGING DISPLAY FORMAT OF DATE
AND TIME.................... .. ... ... .......................... .. .42
Setting Up the Battery..................................... 43
CHARGING BATTERY........................................43
ATTACHING BATTERY TO DVD VIDEO
CAMERA/RECORDER.....................................44
REMOVING BATTERY.................. ......................44
BATTERY REMAINING LEVEL INDICATOR......46
EFFICIENT USE OF BATTERY ..........................46
USING DVD VIDEO CAMERA/RECORDER
WITH AC ADAPTER/CHARGER......................47
Inserting and Removing Disc .......................... 48
INSERTING DISC............................................. .. .48
REMOVING DISC................... .. ... .. ... ...................50
Inserting and Removing Card.......................... 51
Basic Techniques
Basic Handling of DVD Video Camera/
Recorder....................................................... 52
TURNING DVD VIDEO CAMERA/
RECORDER ON AND OFF ..............................52
Recording Movie ............................................. 53
Recording Stills ............................................... 54
Compensating for Backlight ............................ 55
On-Screen Information.................................... 56
INFORMATION DISPLAY DURING
RECORDING....................................................56
Zooming .......................................................... 60
MACRO RECORDING ........................ .. ..............61
RECORDING SUBJECTS FOR STRONGER
WIDE-ANGLE OR TELEPHOTO EFF ECT.......61
Playing Back.................................................... 62
PLAYING BACK ..................................................62
PLAYBACK FROM START OF DISC OR
CARD................................................................63
SEARCH PLAYBACK OF MOVIE .......................63
FRAME ADVANCE/FRAME BACK/SLOW
PLAYBACK OF MOVIE ...................... ..............63
SKIP PLAYBACK OF MOVIE..............................64
PLAYING BACK STILLS .....................................64
JUMPING TO SPECIFIED POINT (GO TO)........65
On-Screen Information Display....................... 66
INFORMATION DISPLAY DURING
PLAYBACK.......................................................66
Checking Flow of Quick Mode......................... 67
Camera Functions
FLOW OF QUICK MODE WHEN RECORDING
MOVIE: .............................................................68
FLOW OF QUICK MODE WHEN RECORDING
PHOTO (DISC): ................................................69
FLOW OF QUICK MODE WHEN RECORDING
PHOTO (CARD):...............................................70
15

Disc Navigation Functions
English
FLOW OF QUICK MODE
(WITH DVD-RAM DISC):............. ... .................. 72
FLOW OF QUICK MODE
(WITH DVD-R DISC): ..................... .................. 73
FLOW OF QUICK MODE (WITH CARD): ...........74
Manually Focusing Subject..............................75
FOCUSING DURING RECORDING ...................75
Adjusting Brightness of Image to be recorded
(Exposure)..................................................... 77
Using Full Auto Function..................................78
Setting Video Flash (for DZ-MV580E).............79
USING EXTERNAL MICROPHONE .............. ... .. 80
Viewing on TV Screen.....................................81
CONNECTING TO A TV .....................................81
VIEWING ON TV SCREEN.......................... .. ... .. 82
Playback on DVD Video Recorder/Player .......83
PLAYING BACK DVD-RAM DISC.......................83
PLAYING BACK DVD-R DISC............................84
Removing and Replacing from/in Round DVD
Holder............................................................85
HOW TO REMOVE DISC..................... .. ... ... .. .....85
REPLACING DISC IN ROUND DVD HOLDER...86
WHEN THE HINGE OF ROUND DVD HOLDER
COMES OFF .................................................... 86
DISC CLEANING................................................. 86
Recording (Dubbing) Images...........................87
RECORDING (DUBBING) IMAGES FROM
OTHER VIDEO DEVICE...................................87
RECORDING (DUBBING) IMAGES FROM
OTHER VIDEO CAMERAS ..............................89
RECORDING (DUBBING) IMAGES ON
OTHER VIDEO DEVICES ................................ 90
Advanced Techniques
Checking Flow of Normal Mode.......................91
Camera Functions
Setting Up Camera Functions..........................94
SELECTING SHOOTING MODE TO MATCH
THE SUBJECT
(SWITCHING PROGRAMME AE MO DE ) ...... .. 94
ADJUSTING COLOUR (WHITE BALANCE).......95
USING THE ELECTRONIC IMAGE
STABILISER (EIS)........ ....................................97
REDUCING WIND NOISE DURING
RECORDING (MIC.FILTER) ............................97
SWITCHING TO 16:9 MODE .............................. 98
Setting Up Record Functions...........................99
SWITCHING MOVIE QUALITY
(VIDEO MODE) ......................... .. ... ... .. .............99
SWITCHING QUALITY OF STILL IMAGE
(QUALITY)......................................................100
RECEIVING IMAGE FROM ANOTHER DEVICE
(INPUT SOURCE)..........................................101
SWITCHING EXTERNAL INPUT RECORDING
METHOD (PHOTO INPUT) ............................ 101
SELF-TIMER .....................................................102
SETTING ON-SCREEN DISPLAY OUTPUT
ON OR OFF (OSD OUTPUT).........................103
LCD Setup ................................................. ....104
SETTING BRIGHTNESS OF LCD SCREEN
(BRIGHTNESS)..............................................104
SETTING COLOUR DENSITY OF LCD
SCREEN (COLOUR LEVEL)..........................104
Initial Settings ................................................105
SWITCHING OPERATING SOUND ON OR
OFF (BEEP)....................................................105
TURNING DVD VIDEO CAMERA/RECORDER
OFF AUTOMATICALLY (POWER SAVE)......105
TURNING RECORD LED ON OR OFF
(RECORD LED). .. ... ... .......................... .. ... ... .. .106
CHANGING DISPLAY LANGUAGE
(LANGUAGE) .................................................106
RESETTING MENU SETTINGS TO
DEFAULTS (RESET)........... ... .. ... ...................107
Disc Navigation
Using Disc Navigation....................................108
STARTING OR TERMINATING DISC
NAVIGATION..................................................108
PLAYING BACK FROM DISC NAVIGATION
SCREEN.........................................................110
SELECTING MULTIPLE SCENES....................111
SELECTING CONSECUTIVE SCENES
TOGETHER....................................................111
FUNCTIONS AVAILABLE WITH DISC
NAVIGATION..................................................112
UNDERSTANDING FLOW OF DISC
NAVIGATION MENU ................... ...................113
Scene.............................................................114
DELETING SCENES (DELETE)........................114
CHANGING IMAGES FOR THUMBNAILS
(EDIT - THUMBNAIL) .....................................116
PLAYING BACK BY SKIPPING SCENES
(EDIT - SKIP)..................................................117
ARRANGING ORDER OF SCENES
(EDIT - MOVE) ...............................................117
DIRECTING SCENES EFFECTIVELY
(EDIT - FADE) ................................................118
COMBINING MULTIPLE SC ENE S
(EDIT - COMBINE) .........................................119
DIVIDING MOVIES (EDIT - DIVIDE).................120
COPYING STILLS ON DVD-RAM DISC TO
CARD (COPY)................................................121
LOCKING SCENES ON CARD (LOCK)............122
DESIGNATING SCENES TO BE PRINTED
(DPOF) ...........................................................123
SELECTING SCENES USING MENU SCREEN
(SELECT) .......................................................124
DISPLAYING INFORMATION USING MENU
SCREEN (DETAIL)................................ .........125
Programme....................................................126
WHAT IS “PROGRAMME ”? ................... .. .........126
SWITCHING TO THUMBNAIL DISPLAY OF
SPECIFIC DATE (SWITCH) ................ .. ... ... ...126
PLAYING BACK PROGRAMME (PLAY)...........127
CHANGING TITLE OF PROGRAMME
(TITLE)............................................................127
16

Play List..........................................................129
WHAT IS “PLAY LIST”?..................... .. ..............129
CREATING NEW PLAY LIST (CREATE)..........129
SWITCHING TO DISPLAY OF EACH PLAY
LIST (SWITCH)............................ ... .. ... ... ........130
PLAYING BACK A PLAY LIST (PLAY)..............130
ADDING SCENES TO PLAY LIST
(EDITING PLAY LIST)....................................131
DELETING SCENES FROM PLAY LIST
(EDITING PLAY LIST)....................................132
ADDING SCENES USING SUBMENU FOR
EDITING (EDITING PLAY LIST) ....................132
DELETING SCENES USING SUBMENU FOR
EDITING (EDITING PLAY LIST) ....................133
SELECTING SCENES USING SUBMENU
FOR EDITING (EDITING PLAY LIST )............133
ARRANGING ORDER OF SCENES (MOVE)...134
CHANGING TITLE OF PLAY LIST (TITLE).......135
DELETING PLAY LIST (DELETE).....................135
Go To.............................................................136
TOP (END) ........ ... ... .. ... .......................... ... .. ... ...1 3 6
Disc or Card Management .............................137
VERIFYING REMAINING FREE SPACE ON
DISC OR CARD (CAPACITY)............... .........137
PROTECTING DISC FROM WRITING
(PROTECT DISC)...........................................137
INITIALISING DVD-RAM DISC OR CARD
(FORMAT DISC. FORMAT CARD)................138
UPDATING CONTROL INFORMATION OF
DVD-RAM DISC
(UPDATE CONTROL INFO.)..........................139
FINALISING DVD-R DISC (FINALIZE DISC)....140
Others ............................................................141
DISPLAYING MOVIES OR STILLS
INDEPENDENTLY (CATEGORY) ..................141
PLAYING BACK SCENES REPEATEDLY
(REPEAT PLAY)........ .. ........................ ... .. ......141
SLIDE SHOW (CONTINUOUS PLAYBACK OF
STILLS)...........................................................142
Subsidiary Information
Introduction to Optional Accessories............. 160
CAMERA ACCESSORIES ................................160
POWER SUPPLY ..............................................160
INFORMATION ON SQUARE ADAPTER .........1 60
Cleaning........................................................ 161
Changing Setting of Demonstration .............. 162
Terminology................................................... 163
No DVD Video Camera/Recorder Operation -
Check the Following: .................................. 166
Trouble Messages......................................... 168
Troubleshooting............................................. 175
System Reset................................................ 183
Major Specifications...................................... 184
Index.............................................................. 186
Be sure to read the following before opening
the package of CD-ROM ............................ 188
English
Connecting to PC
THE FOLLOWING ARE AVAILABLE WHEN
CONNECTING TO PC. ... ... .. .......................... .143
Contents on Provided CD-ROM.....................145
Installing Software..........................................147
DISPLAYING INSTALLER SCREEN.................147
INSTALLING USB DRIVER...............................148
INSTALLING UDF DRIVER
(DVD-RAM DRIVER)......................................149
INSTALLING DVD-MovieAlbumSE ...................151
INSTALLING MyDVD ........................................153
Creating DVD Video on PC from DVD-RAM
Disc Recorded on DVD Video Camera/
Recorder......................................................155
Uninstalling Software .....................................157
UNINSTALLING USB DRIVER..........................157
DELETING OTHER APPLICATIONS................158
Cautions When Using DVD Video Camera/
Recorder by Connecting It to PC.................159
17
English
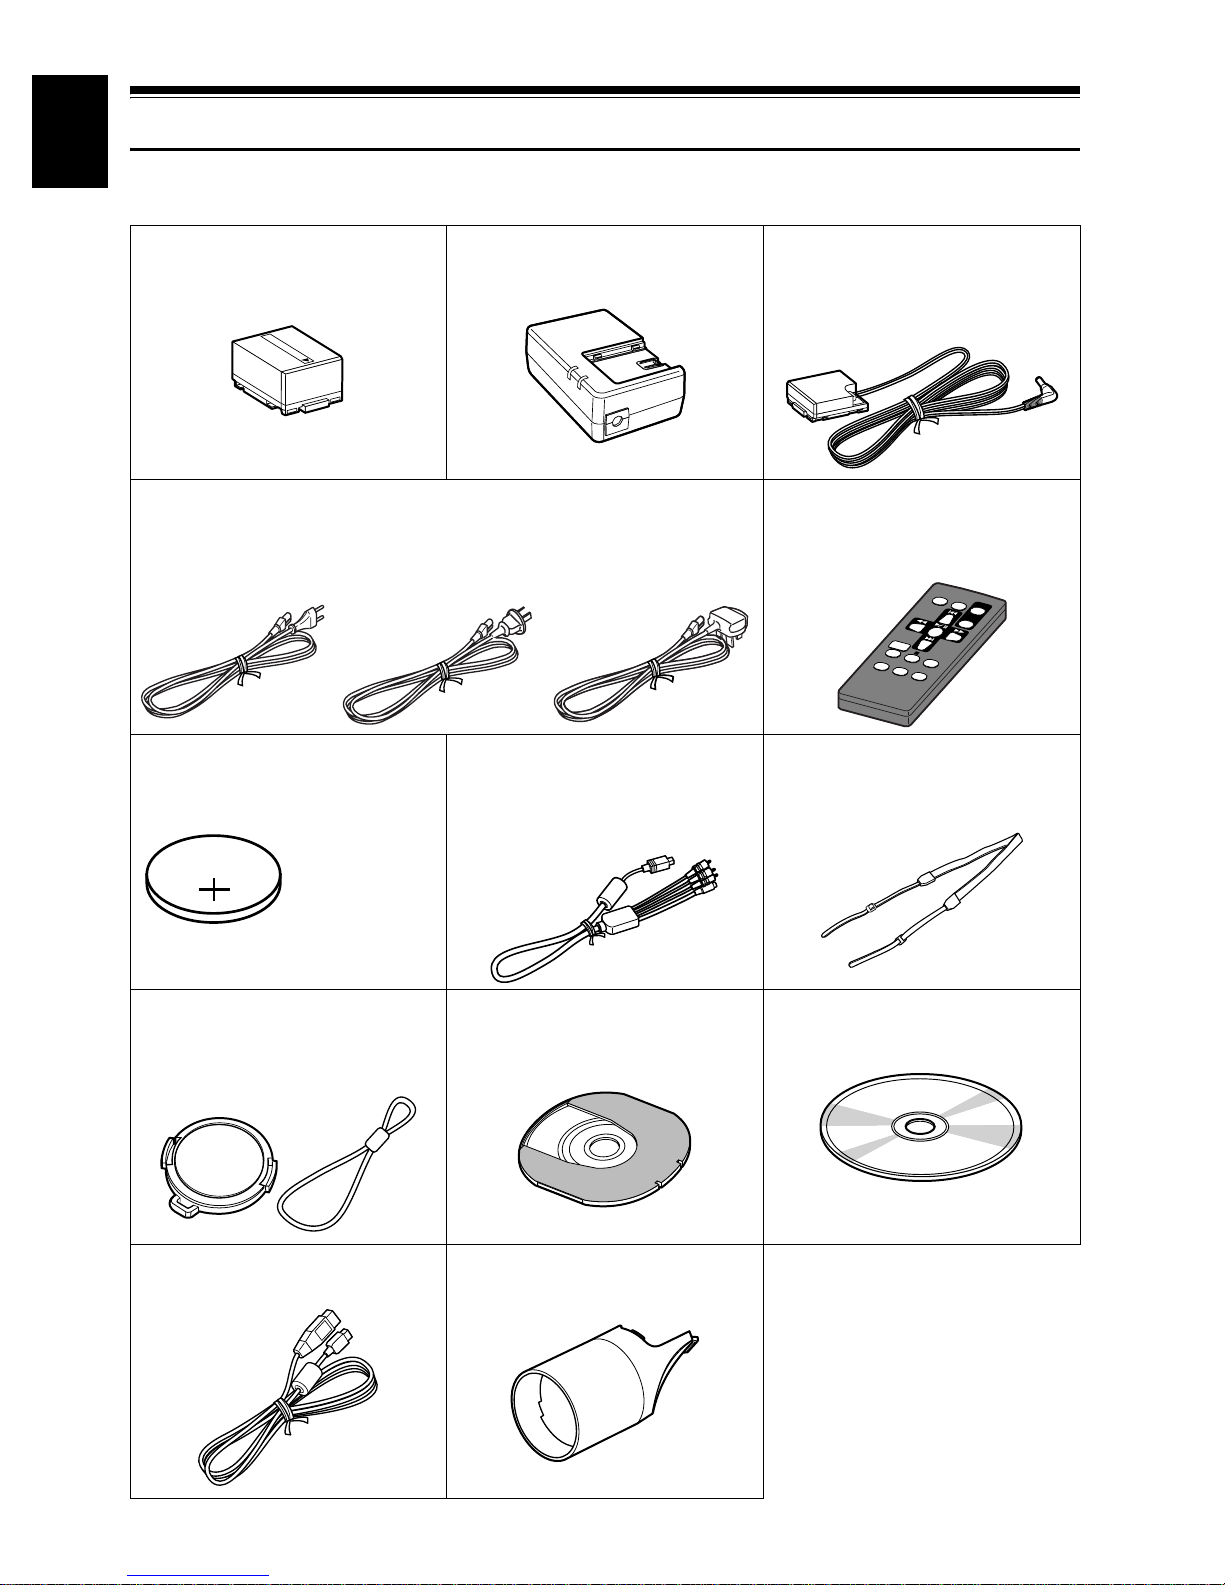
Checking Provided Accessories
Make sure that you have all the following accessories in package:
Battery (model DZ-BP14S):
Portable power supply for this DVD video
camera/recorder. Charge it before use.
Mains lead:
Connect between household AC outlet and AC adapter/charger.
for DZ-MV580E (SW)
and DZ-MV550E (SW)
Lithium battery (model CR2025):
To power the remote control.
WARNING: Keep
this battery away
from children. If
swallowed, consult
a physician
immediately for
emergency
treatment.
for DZ-MV580E (AU)
and DZ-MV550E (AU)
AC adapter/charger (model DZ-ACS1):
Used to power the DVD video camera/
recorder from AC outlet, or charge battery.
and DZ-MV550E (SWH)
AV/S input/output cable:*
Used when viewing th e picture pla y ed bac k
on the DVD video camera/recorder on TV
screen, or input or output video from/to
another video device.*
for DZ-MV580E (UK),
DZ-MV550E (UK),
DZ-MV580E (SWH),
DC power cord:
When powering the DVD video camera/
recorder from household A C out let, use thi s
cord to connect the DV D video camera/
recorder and AC adapter/charger.
Infrared remote control
(model DZ-RM3W):
Use to control the DVD video camera/
recorder from a distance.
Shoulder strap:
Attach to the D VD video camer a/recorder to
hang it from shoulder.
Lens cap and lens cap string:
Attach the lens cap when not recording, to
protect the lens.
PC connection cable:
Use this cable when connecting the DVD
video camera/recorder to PC.
18
Single-sided 8 cm DVD-RAM disc (in
Round DVD Holder):
T o record videos (movies) and photos (stills)
on this DVD video camera/recorder.
2 lens covers for replacement
Use to replace the attached lens cover (see
P. 3 7)
Software CD-ROM:
Use this CD-ROM when connecting the DVD
video camera/recorder to PC.
Note:
The provided single-sided DVD-RAM
disc is not generally av ailable in shops:
When purchasing a disc, order a 60minute double-sided disc (2.8GB, in
Round DVD Holder).
ex. Maxell DRMH60
*AV/S output cable for DZ-MV550E
(UK) and DZ-MV580E (UK): External
input is not availab le on these models.
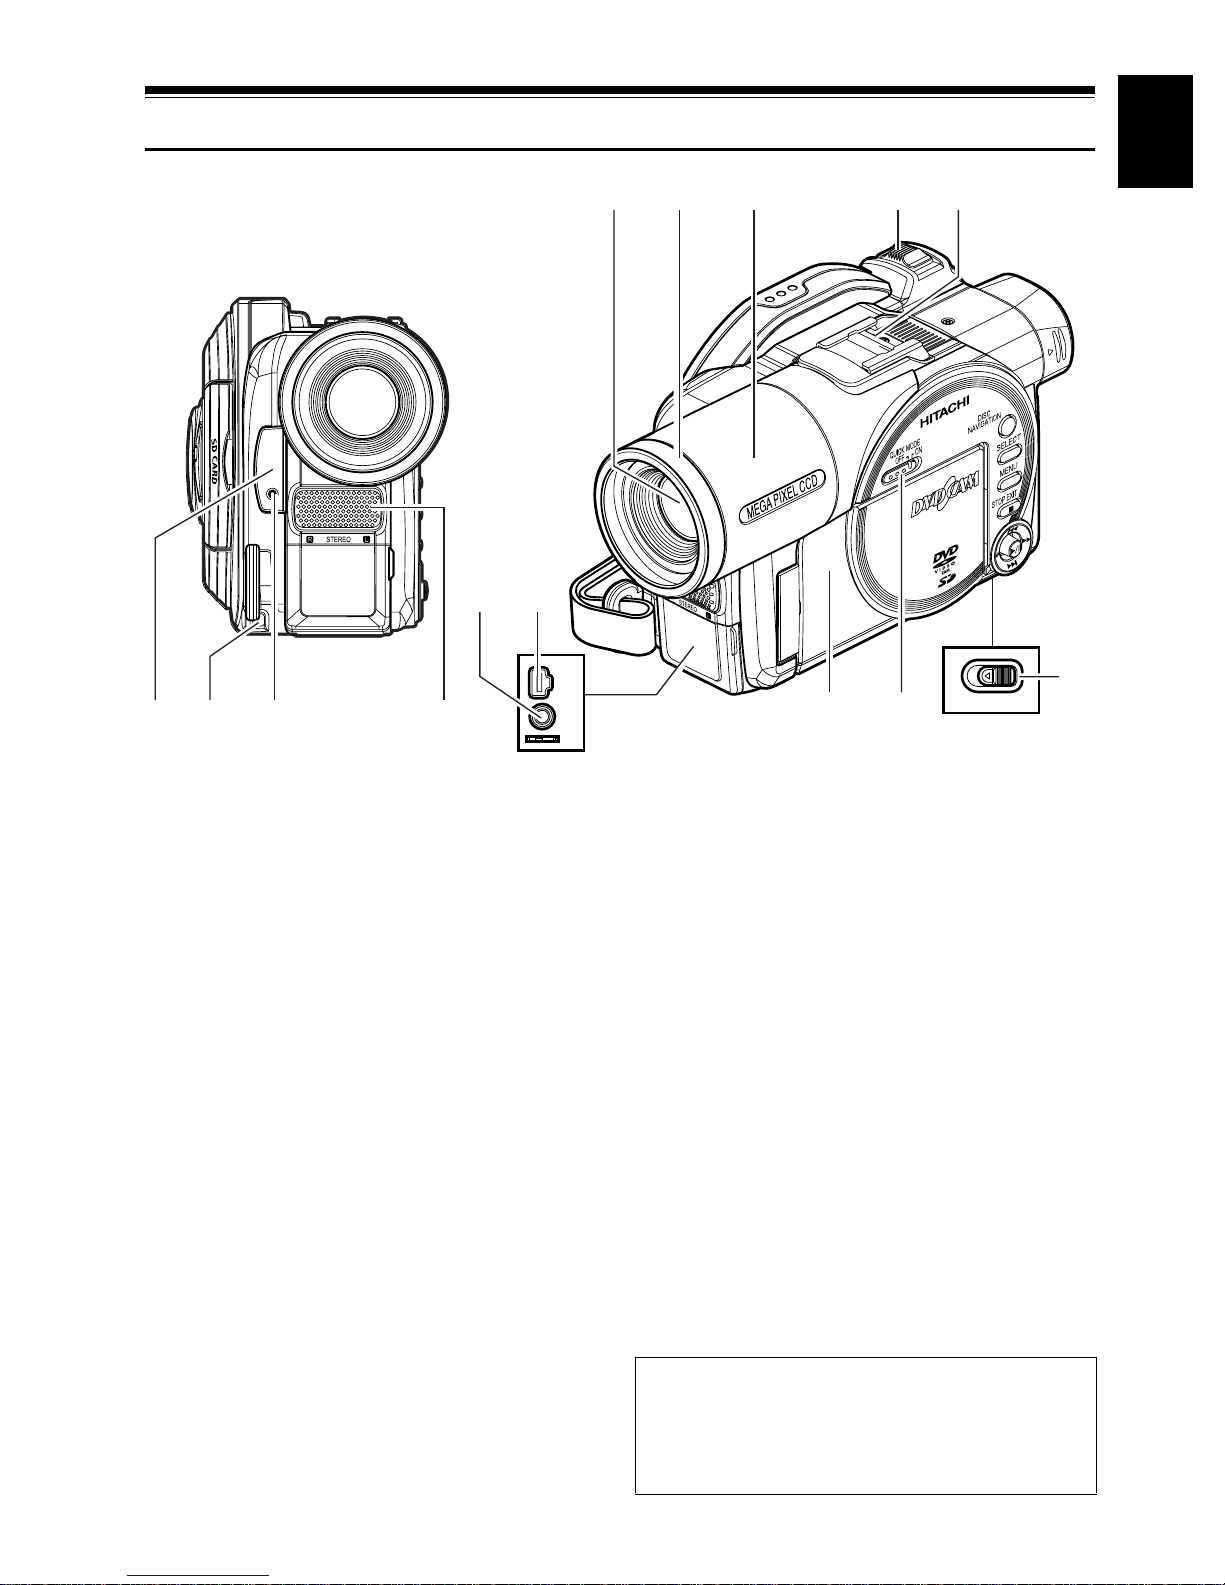
Names of Parts
10 11
56 89
7
English
123 4
(Inside the cover)
1 Infrared receiver (P. 37)
When the remote control i s used to operate the
DVD video camera/recorder , this receiver will
receive the infrared signal.
2 Lens cap string attachment hole (P. 35)
3 Recording indicator (P. 106)
The red indicator will light during recording.
4 Stereo microphone (P. 80)
5 Optical 18× zoom lens (DZ-MV550E)
Optical 10x zoom lens (DZ-MV580E)
(P. 60)
6 Lens hood (P. 61)
Always remove this lens hood when using
generally available tele-conversion or wideconversion lens.
7 Lens cover (P. 37)
Y ou can replace the lens cover with eithe r of the
two covers provided.
8 Zoom lever (P. 60)
Push the lever to the T side for telephoto, or to
the W side for wide-angle.
A/V
MIC
12 13
BATTERY EJECT
(Bottom)
9 Accessory shoe
Only for DZ-MV580E:
The optional video flash, etc. can be attached
here. (See the instruction manual of device to be
attached for details.)
10 External microphone jack (P. 80)
11 AV input/output jack (P. 81, 87)
AV output jack on DZ-MV550E (UK) and DZMV580E (UK).
12 2.5" type liquid crystal display (inside)
(P. 39)
13 QUICK MODE switch (P. 67)
T o switch the menu display on screen between
Normal mode and Quick mode.
14 BATTERY EJECT switch (P. 44)
The BA TTERY EJECT switch is located on the
bottom of this DVD video camera/recorder:
Slide it when removing the battery.
Although the external appearance s of DZMV550E and DZ-MV580E are different, the
method of operating both models is identical.
DZ-MV580E illustrations are used in this
manual.
14
19
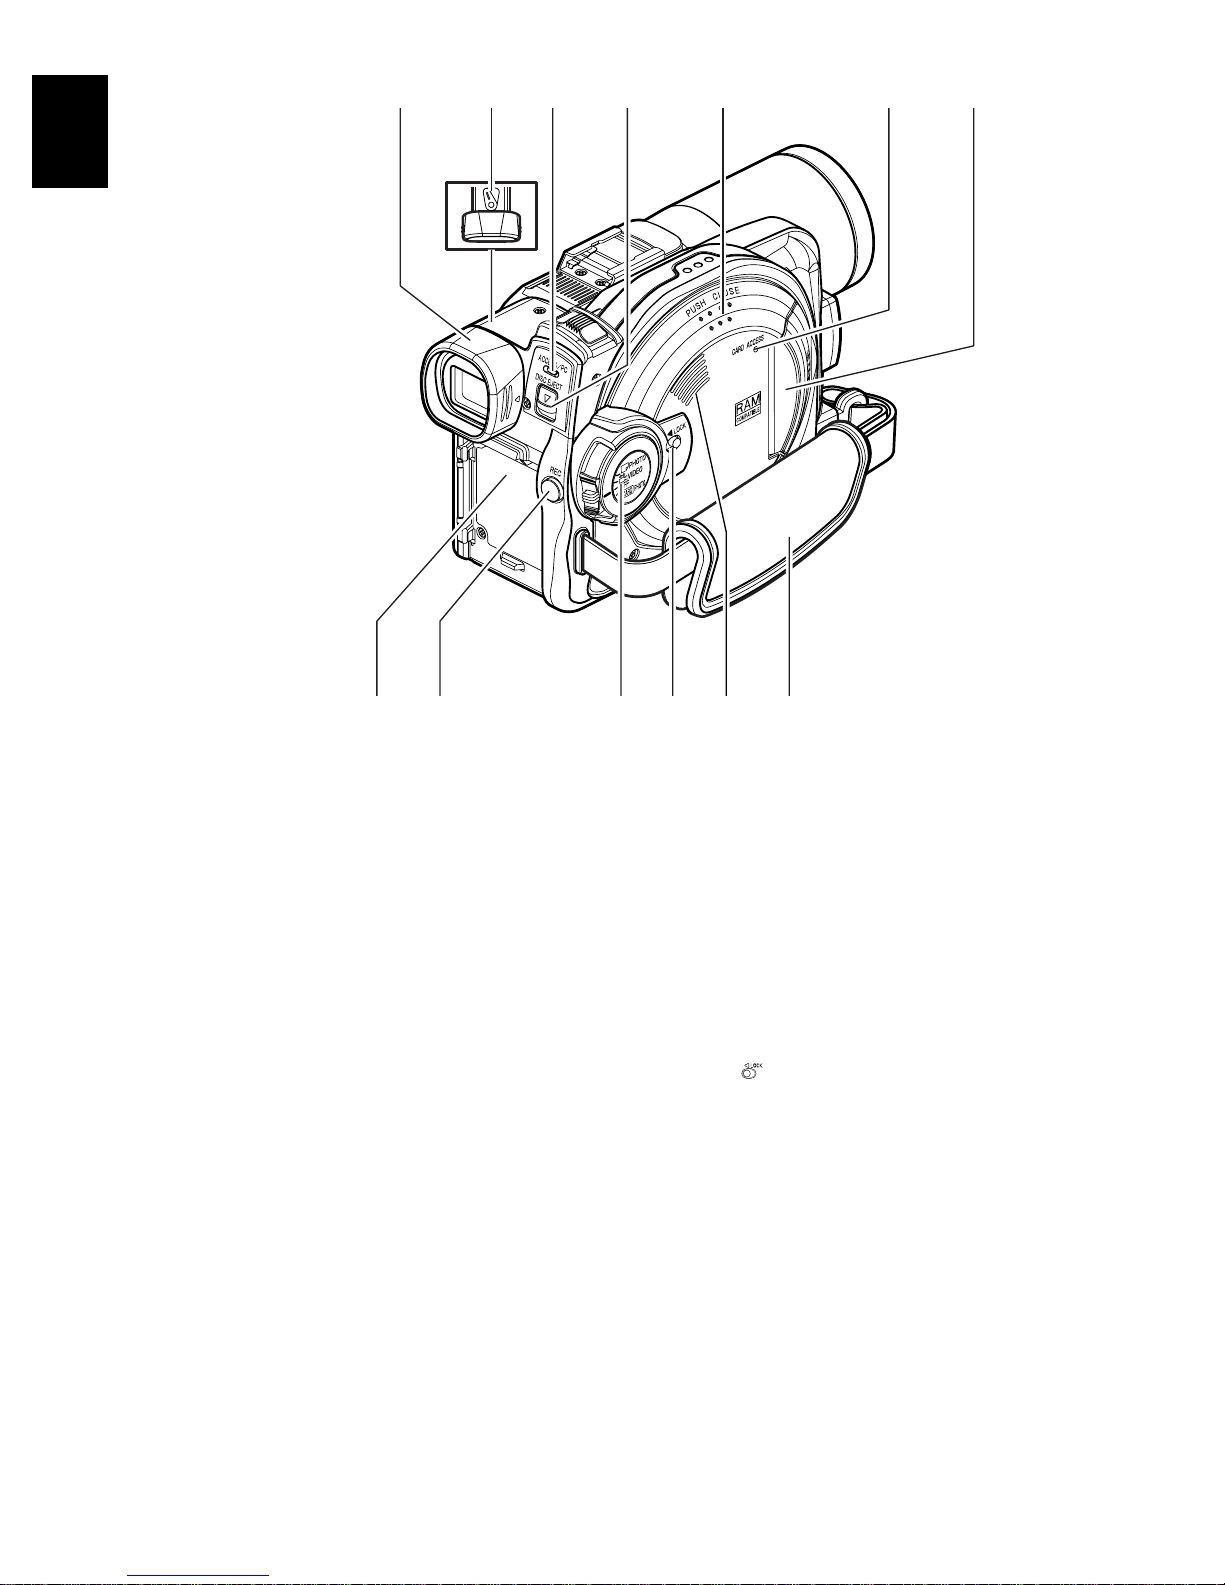
English
15 16 17 2118
19
20
22 23 25 2726
15 Viewfinder (P. 39)
16 Dioptre control (P. 39)
To adjust the focus of image app e ar i ng in the
viewfinder. (Pull out the viewfinder.)
17 ACCESS/PC indicator (P. 9, 53, 54)
Will blink or light when the disc in DVD video
camera/recorder is accessed (write or read is
executed) or the DVD video camera/recorder
is connected to PC.
18 DISC EJECT button (P. 48)
Press down and releas e this button to open the
disc guide.
19 Disc insertion block (P. 48)
24
20 CARD ACCESS indicator (P. 9, 54)
21 Card insertion block (P. 51)
22 Battery attachment platform (P. 44)
23 Record button (REC) (P. 53)
24 Power switch (P. 52, 53, 54)
25 LOCK switch (P. 54)
It is recommended that yo u set the LOCK
switch to (to the left) to prevent the power
switch in the “O VIDEO” position from
accidentally moving to “N PHOTO”.
26 Speaker (P. 62)
27 Hand strap (P. 34)
20
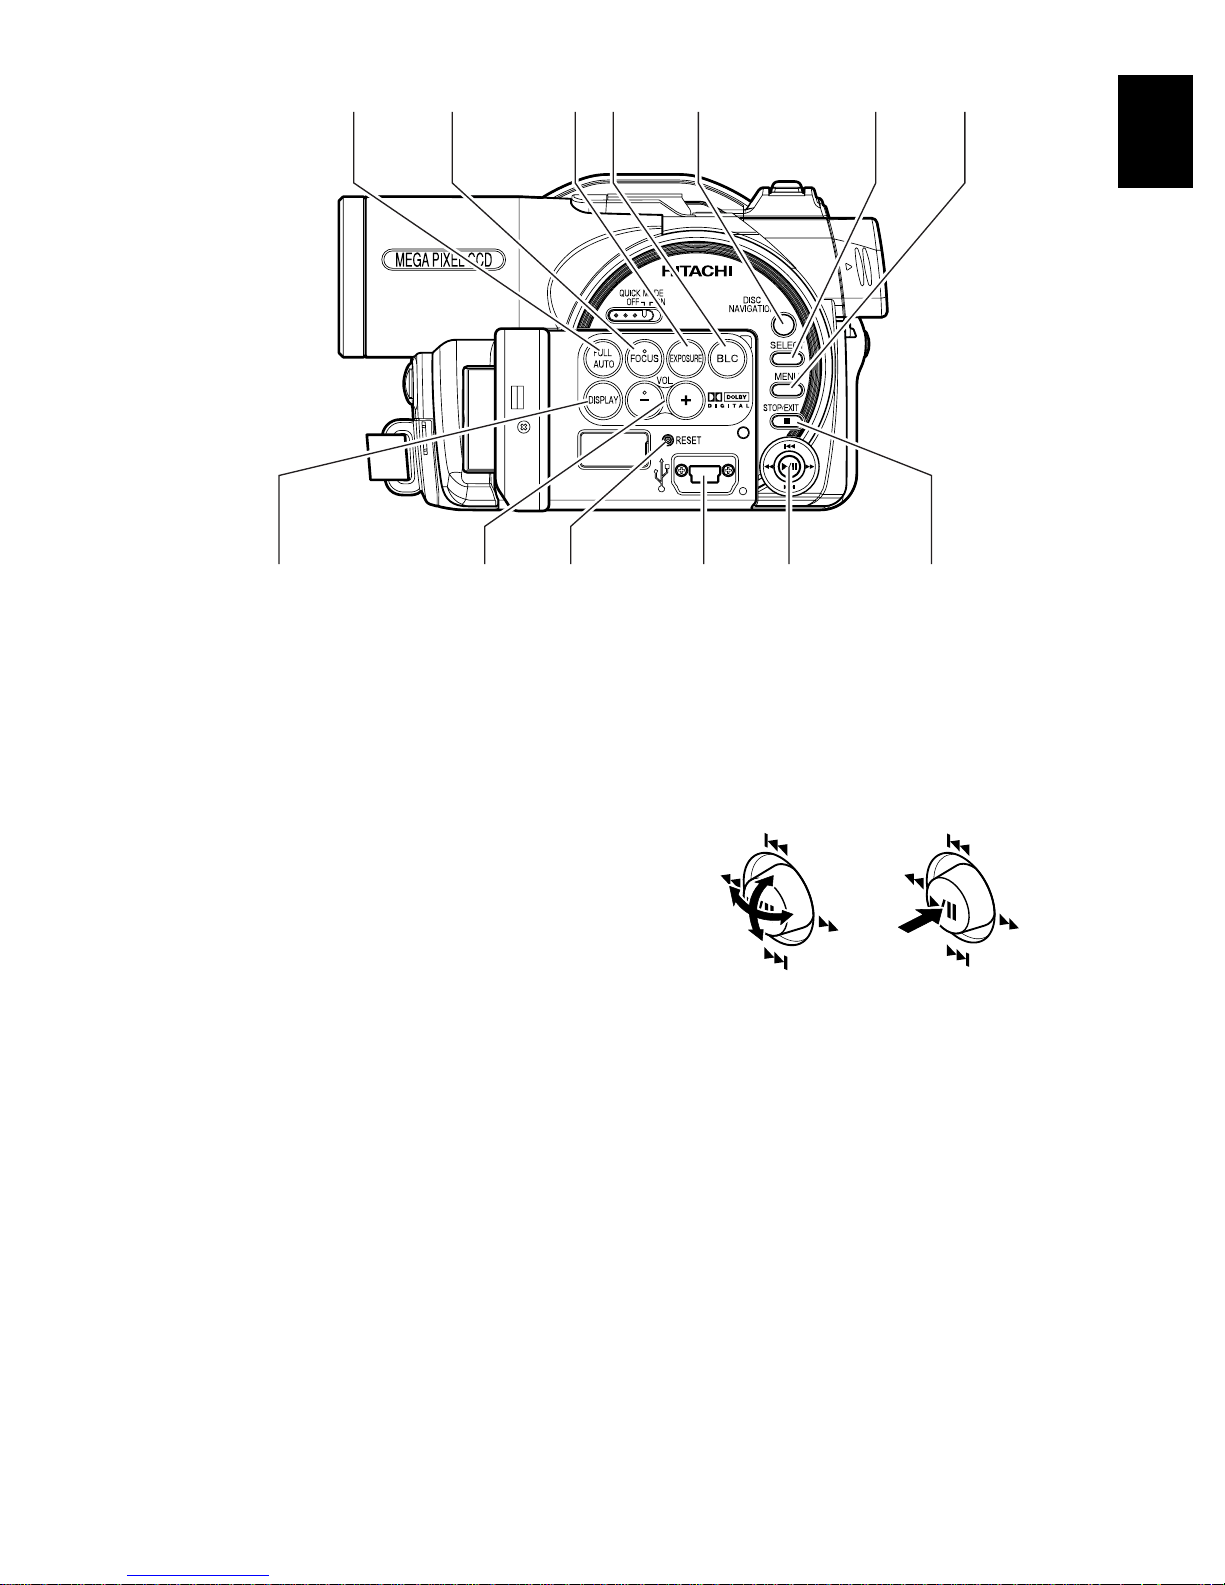
28 29 30 31 32 33 34
4036 37 38 3935
English
28 FULL AUTO button (P. 78)
To switch the DVD video camera/recorder to
full automatic.
29 FOCUS button (P. 75)
To switch between manual focus and autofocus.
30 EXPOSURE button (P. 77)
Press this button to adjust the exposure.
31 BLC (backlight compensation) button
(P. 55)
Press this button when subject is being lighted
from rear.
32 DISC NAVIGATION button (P. 108)
33 SELECT button (P. 111)
34 MENU button (P. 41, 91, 114)
Press this button to display the menu for setting
camera functions and Disc Navigation.
37 RESET button (P. 183)
T o reset all sett ings to defaults (status wh en the
DVD video camera/recorder was shipped
from the factory)
38 PC connection terminal (TO PC)
39 Joystick (P. 41, 62, 91, 93)
Move the joystick to select a scene or menu
item, and then press the centre (A) to play
back the scene, pause it, or designate an option
of the menu.
40 Stop/cancel button (P. 23, 62, 108)
To end playback or cancel setting of menu.
35 DISPLAY (Screen display) button (P. 66)
Press this button to display the details of image
being played back or camera setting status, or
switch the display off.
36 Volume contr ol buttons (VOL)/ S R buttons
(P. 62, 75, 77)
To adjust the volume of sound from speaker,
etc.
21
English
41
REC
DIGITAL
ZOOM
ZOOM
47
42
43
44
45
46
DISC
NAVIGATION
MENU
DZ-RM3W
T
W
DISPLA Y
DELETESELECT
48
49
50
51
52
53
54
55
41 REC button (P. 53, 54)
42 DIGITAL ZOOM button (P. 60)
43 Reverse skip button (P. 64)
44 Reverse search button (P. 63)
45 DISC NAVIGATION button (P. 108)
46 MENU button (P. 41, 94, 115)
47 ZOOM T button (P. 60)
48 ZOOM W button (P. 60)
49 Forward search button (P. 63)
50 Play/pause button (P. 62)
51 Forward skip button (P. 64)
52 DISPLAY button (P. 66)
53 Stop button (P. 23, 62, 110)
54 DELETE button (P. 114)
55 SELECT button (P. 111)
* The buttons on remote control will function the same as those on DVD video camera/recorder.
22

About This Manual
●Displays in this manual
Understand that the displays are dif fer ent fr om tho se you will actua lly see in the viewfinder or on the
LCD screen.
●Notation of cancel button
Press the stop/cancel button to stop your operation midway , or r eturn the menu screen to the preceding
one. The expression “press the C button” will be used in this text.
●1, 2 and 3 marks beside headings
Some functions of this DVD video camera/r ecorder are una vailable with disc or card us ed. Refer to the
marks at right above each function to identify whether the disc or card is compatible with the function.
Refer to these marks and identify the functions and operation to match the disc or card you use.
●Illustrations in this manual
Although the external appearances of DZ-MV550E and DZ-MV580E are different, the method of
operating both models is identical.
The illustrations of DZ-MV580E are used for the explanation in this text.
●This instruction manual is for eight DVD video camera/recorder models - DZ-MV580E (SW), DZ-
MV580E (SWH), DZ-MV580E (AU), DZ-MV580E (UK), DZ-MV5 50E (SW), DZ-MV550E (SWH), DZMV550E (AU), and DZ-MV550E (UK).
The functions and specifications for four of these models - DZ-MV580E (SW), DZ-MV580E (SWH),
DZ-MV580E (AU), and DZ-MV580E (UK) - are identified as “DZ-MV580E” for purposes of
explanation; while for the other four models - DZ-MV550E (SW), DZ-MV550E (SWH), DZ-MV550E
(AU), and DZ-MV550E (UK) - are identified as “DZ-MV550E”.
No model names are mentione d for the functions and specifications common to all models. However ,
where there are any differences between models, the model names are specified.
English
23
English
12
Try to Record and Play Back using Disc
(Video and Photo)
Before You Begin
You can record both videos and photos on DVD-RAM disc; only videos on DVD-R disc.
• It is recommended that you use a D VD-RAM disc f or trial recording, since
you can delete the recorded contents (P. 28).
1Connect a power supply (P. 47).
Mains lead
1
2
4
3
AC adapter/charger
DC power cord
To AC outlet
* The shape of plug
varies depending on
the model.
2Insert a disc (P. 48).
1Press down the DISC EJECT button once and
release it.
DISC EJECT
2Gently open the cover until it stops.
3Insert the disc, in Round DVD Holder, into
the disc guide properly until it stops, and then
close the cover of disc insertion block.
DISC EJECT button
Disc cover
PUSH CLOSE
portion
24
3Start recording (P. 53).
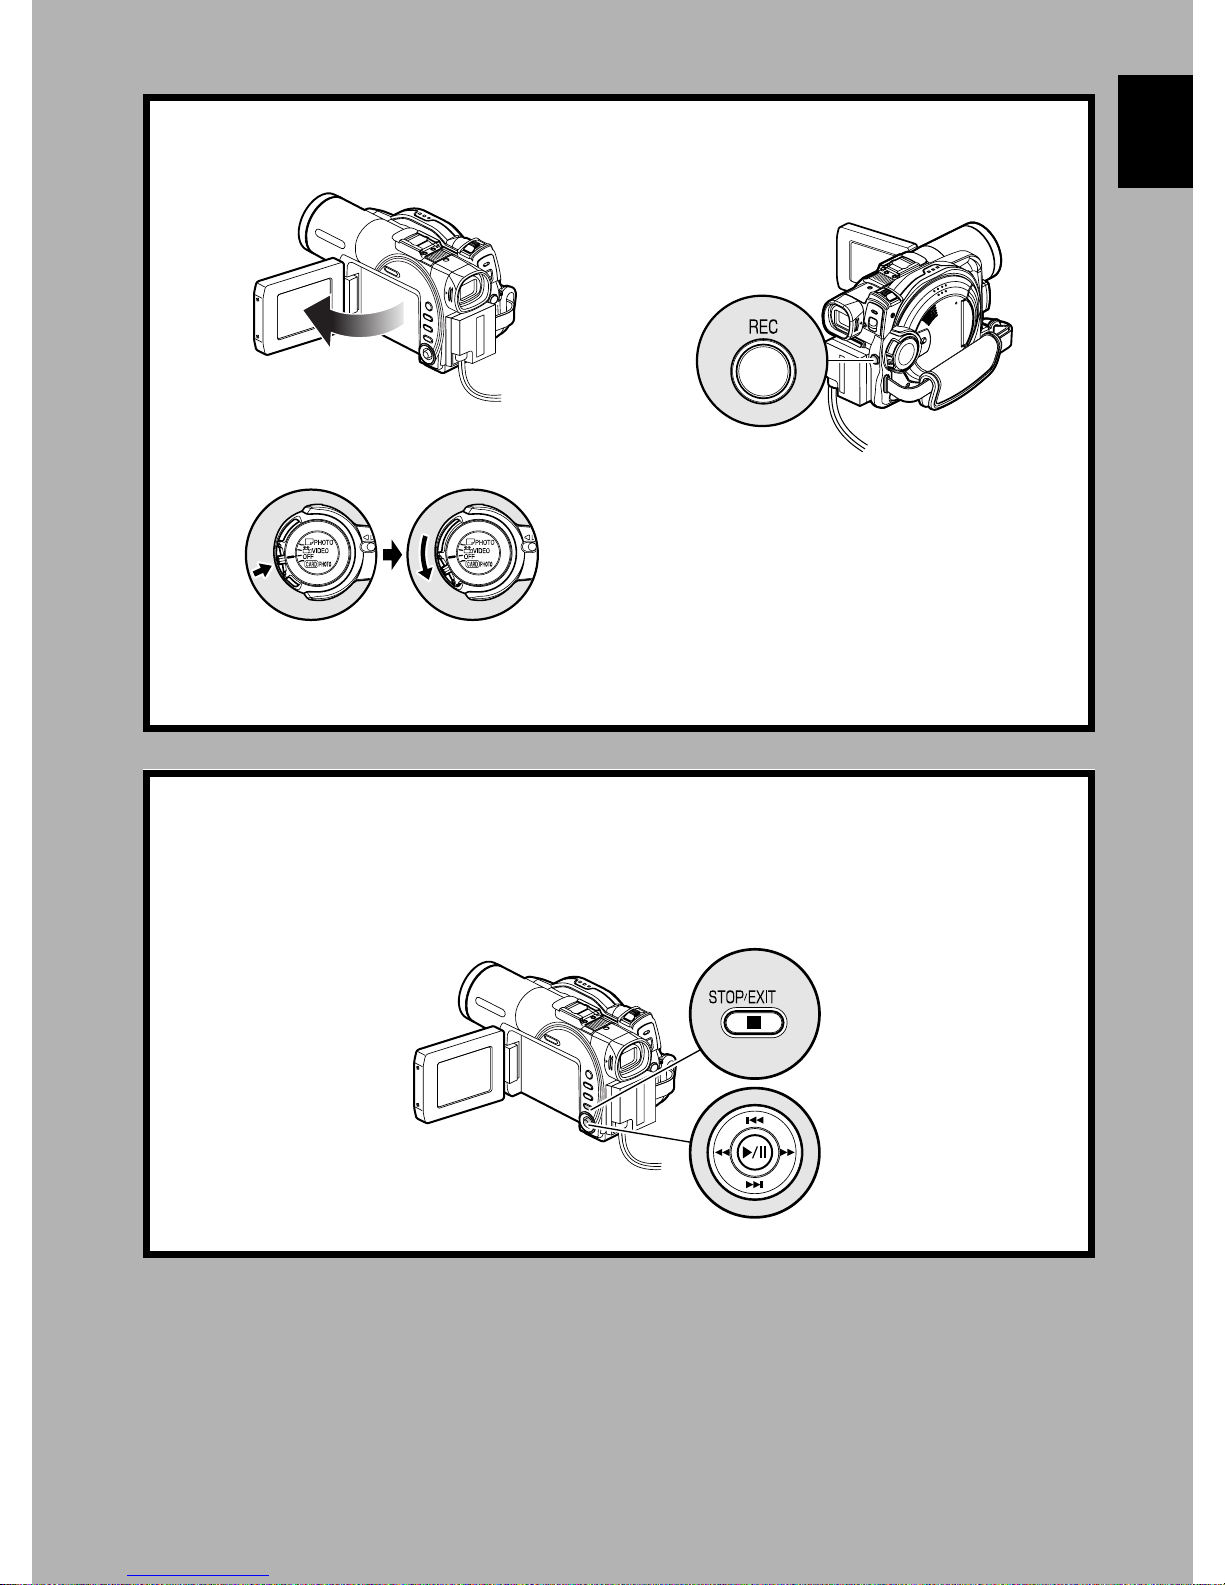
1Open the LCD monitor (P. 39).
2While holding the grey switch at the centre of
power switch, set the switch to “O VIDEO” or
“N PHOTO”. (“O VIDEO” only for DVD-R
disc)
Note:
• When using an unformatted disc, format (initialise) it on this DVD video camera/recorder.
If unformatted disc is inserted into this DVD video camera/recorder, a message will appear: Format the disc
following the instructions on screen (P. 49, 138). Initialising the DVD-RAM disc will erase all the recorded
contents: Make sure the contents on disc are not valuable before initialising the disc.
• See Check 1 on P. 166 if recording is not possible with “O VIDEO”.
• See Check 2 on P. 166 if recording is not possible with “N PHOTO”.
3Press the REC button.
Recording will start.
Pressing the REC button again will stop
recording (O VIDEO).
Pressing REC will enable you to record one
photo (N PHOTO).
English
4View the playback of recorded content on LCD monitor screen (P. 39).
1After recording is finished, press the A
button.
The recorded scene will be played back.
2Press the C button to stop playback.
25
English
3
Try to Record and Play Back using Card (Photo)
Only photos can be recorded on card.
1Connect a power supply (P. 47).
Mains lead
1
2
4
3
AC adapter/charger
DC power cord
To AC outlet
* The shape of plug
varies depending on
the model.
2Insert a card (P. 51).
1Open the cover of card insertion block with
power turned off.
2Put in a card.
3Insert the card all the way until it locks, and
then close the cover of card insertion block.
26
3Start recording (P. 54).
1Open the LCD monitor (P. 39).
2While holding the grey switch at the centre of
power switch, set the switch to “PPHOTO”.
Note:
See Check 2 on P. 166 if recording is not possible with “N PHOTO”.
3Press the REC button.
Pressing REC once will record one photo.
English
4View the playback of recorded content on LCD monitor screen (P. 39).
1Press the A button in recording pause
status: The recorded scene will be played
back.
2Press the C button to stop playback.
27
English
Discs and Cards
The following tab le lists the storage media (discs and cards) that can be used on this DVD video camera/
recorder and the functions which are available with them:
Media
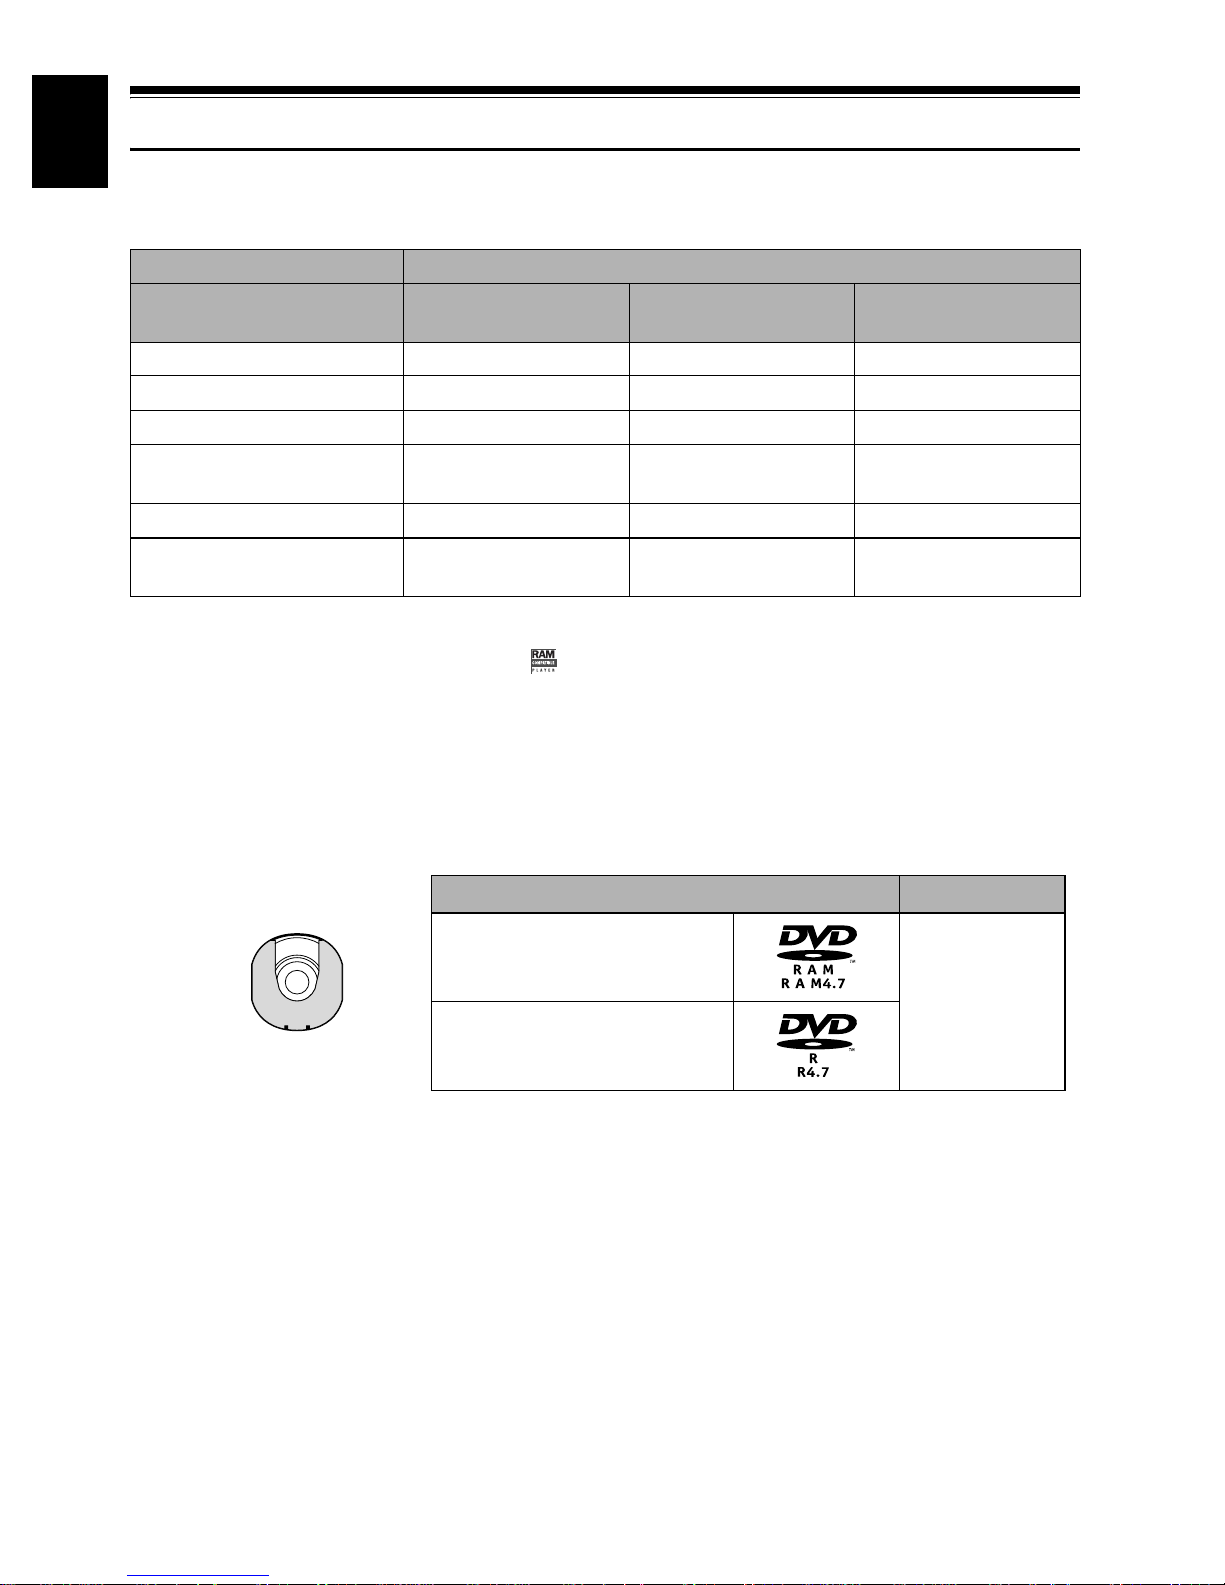
Function DVD-RAM disc DVD-R disc
Recording movie ∴∴ ×
Recording still ∴
Deleting recorded image ∴
Editing on this DVD video
camera/recorder
Playback on DVD player
Playback on DVD video
recorder
*1: Can be played back on DVD players with the
*2: Must be finalised (see “T erminolog y”, P. 163) on this D VD video camera/recorder bef ore D VD-R disc can be play ed
back on D VD player or D VD video recorder (see page 140). Ma y not be play able on some D VD players or D VD video
recorders.
*3: Cannot be played back on a DVD video recorder that does not conform to 8 cm DVD-RAM disc.
*4: There are DVD video recorders that are compatible with SD memory card or MultiMediaCard.
∴
*1
×
*3
∴
mark.
×
×
×
*2
∴
*2
∴
∴: Functions available; ×: Not available
SD memory card/
MultiMediaCard
∴
∴
∴
×
*4
×
AVAILABLE DISCS
Usable discs and logos Shape
DVD-RAM Ver. 2.1 (8 cm)
DV D-R
[for General Ver. 2.0 (8 cm)]
This DVD video camera/recorder uses 8 cm DVDRAM discs and 8 cm DVD-R discs for camcor der
use.
Discs removed from Round DVD Holder cannot
be used on this DVD video camera/recorder : Use
them only in the holder. Do not insert a bare disc
removed from the holder into the DVD video
camera/recorder: It will not be removable.
Note:
• It is recommended that you use Hitachi Maxell discs,
since their compatibility with this DVD video camera/
recorder has been confirmed. Using a disc other than
those made by Hitachi Maxell may not allow the DVD
video camera/recorder to deliv er optimum performance.
In Round DVD
Holder
• The Round D VD Holder cannot be used on the follo wing
DVD video camera/recorders:
- DZ-MV100A/E
- DZ-MV200E
- DZ-MV208E
- DZ-MV230E
- DZ-MV238E
- DZ-MV270E
- Other DVD video camera/recorders that use square
type adapters.
• See page 29 for information on DVD-R disc.
28

INFORMATION ON DVD-R DISC
Y ou cannot re cord a still on DVD-R disc, or delete
any recorded images or data.
For optimum recording on DVD-R disc, this DVD
video camera/recorde r writes contr ol da ta to th e
disc in order to automatically make adjustments
when it is inserted and ejected accompanying
recording. If the disc has no a rea to be written for
adjustment, recording may not be possible. To
prevent this, do not insert or eject a DVD-R disc
accompanying recording more than 100 times.
●Finalising DVD-R disc
Before using the 8 cm DVD-R disc provided on this
DVD video camera/recorder on a DVD player or
DVD video recorder that is compatible with 8 cm
DVD-R disc, the disc must be finalised on this
DVD video camera/recorder. For the finalising
procedure of 8 cm DVD-R disc, refer to “Fin alising
DVD-R Disc (finalize disc)” (P. 140).
Note:
• When using an unf ormatted DVD-R disc, it is necessary
to format it on this DVD video camera/recorder (see
page 49).
• Do not insert a D VD-R disc record ed on this D VD video
camera/recorder but not finalised, into a recordable
device, such as a DVD video recor der: The recorded
data may be damaged.
• DVD-R discs edited and finalised on PC or those
finalised on another DVD video recorder may not be
playab le on this DVD video camera/recorder , depending
on the editing software used or record ed status of D VDR disc.
EXAMPLES OF DISCS THAT CANNOT BE USED ON THIS DVD VIDEO
CAMERA/RECORDER:
English
• DVD-RAM (2.6 GB) Ver. 1.0 • DVD-ROM • MO
• DVD-R (3.9 GB) Ver. 1.0 • DVD-Video • MD
• DVD-R (4.7 GB) for Authoring V er. 2.0 • CD-R • iD
• DVD-RW • CD-RW • Floppy disk
• DVD+RW • CD • Discs other than those with diameter of 8 cm
• DVD+R • LD • CD-ROM
Note:
Discs recorded on PC or D VD video recorder may not be pla yab le on this D VD video camera/recorder: If so, message
“This disc cannot be used.” will appear. Also, blue thumbnails will appe ar (Fig. 1* on page 30), or normal playback will
not be possible.
29

HANDLING DISCS
English
●Using disc s
DVD-RAM and DVD-R discs are very delicate
recording med ia. C arefully read the fo llowing
cautions and observe them:
• When using disc on this DVD video camera/
recorder, be sure to keep it in Round DVD
Holder.
• Always use a brand new disc when recording
important material.
• Be sure not to touch the disc
exposed portion, and be
careful that no dirt adher es to
it.
• If there is dust, scratch, dirt
on disc or if it is warped, the
following phenomena may occur:
− Block noise in playback
image
− Momentary stop of playback
image
− Sound interrupted during
playback, or abnormal
sound
− Blue thum bnail
display* (Fig.1)
− Di sc cannot correctly
be recognised
− Di sc cannot be
initialised
− Delay between video
and audio
Even if disc is normal, the above phenomena
may occasionally occur . While the ACCESS/PC
indicator is lit, do not subject disc to vibrations or
impact, and avoid using DVD video camera/
recorder at extremely high or low temperatures,
or in environment wher e condensation is likely
to occur .
• When recording images,
the DVD video camera/
recorder may avoid the
portions of disc where
recording is not possible,
due to dust, scratches, etc.
[It will pause m at such a
portion and
automatically r e start
(Recording one scene
may produce multiple
thumbnails.)
recordin g (n).]
This will cause recording to be interrupted for
several seconds to several minutes, and multiple
thumbnails will be created by one recording
session as shown above. In this case, the
recordable time on disc will decrease.
Do not touch
Block noise
PLAY
Fig. 1
*
PLAY
001/ 00 6All Programs
RAM
001 / 002All Programs
RAM
• Be careful when removing the disc since the
metal of removal slot of DVD video camera/
recorder, and disc itself, may be hot.
●Storing discs
• When storing disc, insert it in Round DVD
Holder into plastic case.
• Be careful that no condensation occurs on disc.
• Do not place disc in following places:
− Direct sunlight for a long time
− Where humidity is high or in dusty place
− Whi le there is heat from a heater, etc.
Note:
• See page 86 when cleaning the removed disc.
• See page 85 f or how to handle disc removed from Round
DVD Holder.
• See page 85 f or how to set the disc removed f rom Round
DVD Holder or another disc correctly in Round DVD
Holder.
30
 Loading...