

Page 1
DZ-MV350A
DZ-MV380A
Instruction Manual
HITACHI AMERICA, LTD.
HOME ELECTRONICS DIVISION
1855 Dornoch Court
San Diego, CA 92154-722 5
Tel. 1-800-HITACHI
(1-800-448-2244)
Thank you for buying a Hitachi product. Please take timetobecomefamiliarwiththemanualandhow it
is set up. Keep it handy for future reference.
QR34962 ©Hitachi, Ltd. 2003 Printed in Japan OM-M(I)
HITACHI CANADA LTD.
DIGITAL MEDIA DIVISION
6740 Campobello Road
Mississauga, Ontario L5N 2L8
CANADA
Tel. 1-800-HIT ACHI
(1-800-448-2244)
English
1
Page 2
Important Information
For Your Safety
Thepowerswitch turnstheDVD videocamera/recorderonandoff,leaving thedate/timefeatureunaffected.Ifthe camera/
recorderis to be leftunattended fora long periodoftime, turn itoff .
WARNING :TO PREVENT FIRE OR SHOCK HAZARD, DO NOT
EXPOSE THIS UNIT TO RAIN OR MOISTURE.
WARNING :TO PREVENT FIRE OR SHOCK HAZARD, USE THE
The DVD video camera/recorder and AC adapter/
charger have the following caution marks.
CAUTION
RISK OFELECTRICSHOCK
DO NOTOPEN
RECOMMENDED ACCESSORIES ONLY.
WARNING:TOP REVENT FIRE ORSHOCK HAZARD, BE
SURETOUS E THESPECIFIEDACADAPTER/CHARGER
(DZ-ACS1).
CAUTION: TO REDUCE THE RISK OF
ELECTRIC SHOCK, DO NOT OPEN.
NO USER-SERVICEABLE PARTS INSIDE.
REFER SERVICING TO QUALIFIED SERVICE
PERSONNEL.
Precautions
WARNING: Many television programs and films
are copyrighted. In certain circumstances, copyright law may apply to private in-home
videotaping of copyr ig h t ed materials.
This Class B digital ap p aratus complies wi th
Canadian ICES-003.
The liquid crystal display (L C D) panel is made
by highly precise technology. More than 99.99%
of its picture elements (pixels) ar e effective, but
English
some (less than 0.01%) may appear as colored
bright dots. This does not indicate a fault as the
LCD panel st retc hes the limits of cu rrent
technology.
Identifications of caution marks
This symbol warns the user that
uninsulated voltage within the unit
may have sufficient magnitude to cau se
electric shock. Therefore, it is dangerous
to make any kind of contact with any
inside part of this unit.
This symbol alerts the user that
important literature concerning the
operation and maintenance of this unit
has been included. Therefore, it shoul d
be read carefully to avoid any problems.
CLASS 1
LASERPRODUCT
CAUTION
This product contains a laser diode of higher
class than 1. To ensure continued safety, do
not remove any covers or attempt to gain
access to the inside of the product. Refer all
servicing to qualified personnel.
2
Page 3

Warning: This device complies with Part 15 of the FCC Rules. Operation is subject to the following two
conditions: (1) This dev ic e ma y not cause harmful interference, and (2) t h is d e vice must accept any
interference received, including interference that may cause undesired operation.
Note: This equipment has been tes ted and found to comply with t he lim its for a Class B di gital d evice,
pursuant to Part 15 of the FCC Rules. These limits ar e designed to pr ovide reasonable protection against
harmful interference in a residential installation. This equipment generates, uses, and can radiate radio
frequency energy and, if not i nstalled and used in acco rdance with th e instructions, may cause har mful
interference to radio communications. How ever , there is no guarantee t hat interference w ill not occur in
a particular installation. If this equipment does cause harmful interference to radio or television
reception, which can be determined by turning the eq uipment off and on, th e user is encouraged to try
to correct by one or more of the following measures:
• Reorient or relocate the receiving antenna.
• Increase the separation between the equipment and receiver.
• Connect the equipment into an o utlet on a circuit different fr om that to which the receiver is conne cted.
• Consult the dealer or an experienced radio/TV technician for help.
Caution to the user: Changes or modifi ca ti on s no t ex pressly approved by the manufacturer void the
user's authority to operate the equipment.
Microsoft®, Windows®, Windows® 98, Windows® 98 Second Edition, Windows® Me, Windows® 2000
Professional, and Windows
®
, Pentium® Processor, and Celeron® Processor are registered trademarks of Intel Corporation.
Intel
®
and PC/AT® are registered trademarks of International Business Machines Corporation.
IBM
®
XP are registered trademarks of Micro s oft Cor pora tion.
Manufactured under licen se from Dolby Laboratories.
“Dolby” and the double- D sym b ol are trademarks of Dolby Laboratories.
Other company names and produc t nam e s li st ed are trad e m arks or brand names belonging to eac h
individual company.
SD logo is a trad e m ark.
English
3
Page 4

IMPORTANT SAFEGUARDS
Inadditiontothecarefulattention devotedtoqualitystandards inthe manufactureof yourvideo product,safetyis amajor
factor in the design of every instrument. But, safetyisyour responsibility too.
Thispagelistsimportantinformation thatwillhelpto assureyour enjoymentand properuseofDVD videocamera/recorde r
and accessory equipment. Please readitcarefully before operating yourvideoproduct andkeepit in a handy placefor
future reference.
1 Read and Follow Instructions — Allthe safetyand
operatinginstructionsshouldberead beforethevideo
product is operated. Follow all operating and use
instructions.
2 Retain Instructions — The safety and operating
INSTALLATION
instructions should be retained for future reference.
3 Heed Warnings — Comply withallwarnings on the
video product and in the operating instructions.
4 Power Sources — This video product should be
operated onlyfromthetype ofpower sourceindicated
on themarking label. Ifyou are notsure of thetype of
powersupplyto yourhome, consultyour videodealer
or localpower company.For video productsintended
to operatefrom battery power,or othersources, refer
to the operating instructions.
5 Overloading —Do notoverload
wall outletsand extension cords
asthis canresult inariskoffireor
electric shock. Overloaded AC
outlets and extension cords are
dangerous, and so are frayed
power cables, damaged or
cracked wire insulation and
brokenplugs.Theymayresultin
a shockorfire hazard. Periodically examine the cord
and have it replaced by your service technician if
appearance indicates damage or deteriorated
insulation.
English
6 Power-Cord Protection — Power-supply cords
should be routed so that they are not likely to be
walked onorpinchedbyitems placeduponor against
them, paying particular attention to cords at plugs,
convenience receptacles, and the point where they
exit from the appliance.
7 Ventilation — Slots andopenings inthe cabinetare
provided forventilation toensurereliable operationof
the video product and to protect it from overheating.
These openingsmust notbe blocked orcovered. The
openings should never be blocked by placing the
video product on a bed, sofa, rug, or other similar
surface. This video product should never be placed
near or over a radiator or heat register. This video
product should not be placed in a built-in installation
such asa bookcase or rackunless proper ventilation
is provided or the video product manufacturer's
instructions have been followed.
kawaii koneko
mekoalbum
key to chise
cat book
MOMO
momogatoiredemizubitashi
yohsinarish yohsinarishashin
namemekogaikiteita
nurie
mito
mito
1
mitoniikikata
album
abcdfevcdsz
kabushiki
Zoo Docter
Zoo Docter
tadashiigenkou
mitono
Part 1
Part 2
yakamashii
Why?
tadashiigenkou
auto moter
mother
sasaki akemi
hirayamo akiko
horie youji setuko kimio
igarashi
kuro
kusano
kakurai
oomori matuda
diet
a
g
n
u
f
a
g
n
u
f
a
a
g
g
n
n
u
u
f
f
a
a
g
g
n
n
u
u
f
f
a
g
n
u
f
i
r
h
e
c
h
t
mame
metsuki
nyanko1midori3okubyo
junkaikun2momo3momo2momo1ebisu2ebisu1key5key4key3key2key1chise5chise4chise3chise2chise
a
o
d
m
o
m
o
t
t2
r
1
123
2
a
P
3
8 Attachments — Do notuseattachments unless
recommended by thevideo product manufacturer as
they may cause hazards.
Caution: Maintain electrical safety.Pow erline operated
equipment or accessories connected to this unit should
bear the UL listing mark or CSA certification markonthe
accessory itself andshould not have beenmodified soas
to defeat the safety features. This will help avoid any
potential hazard from electric shock or fire. If in doubt,
contact qualified service personnel.
9 WaterandMoisture— Donot usethisvideoproduct
nearwater —forexample, nearabath tub,washbowl,
kitchensink,orlaundrytub, inawetbasement,or near
a swimming pool, and the like.
10 Accessories— Donot placethisvideoproductonan
unstable cart, stand, tripod, bracket, or table. The
videoproductmay fall,causing seriousinjurytoa child
or adult, and serious damage to the appliance. Use
only with a cart,stand, tripod, bracket, ortable
recommended by the manufacturer, or sold with the
video product. Any mounting of the product should
followthe manufacturer'sinstructions,and shoulduse
a mounting accessory recommended by the
manufacturer.
4
Page 5
11 An applianceandcart combination
should be moved with care. Quick
stops,excessive force,and uneven
surfaces may cause the appliance
and cart combination to overturn.
12 Power Lines — An outside antenna system should
not belocated inthe vicinity of overheadpower lines
or otherelectric lightorpower circuits,or where itcan
fallintosuchpowerlinesorcircuits. Wheninstalling an
outside antenna system, extreme care should be
taken to keep from touching or approaching such
power lines or circuits ascontactwith them might be
fatal.Installing anoutdoor antennacan behazardous
and should be leftto a professional antenna installer.
USE
13 Cleaning — Unplug this video product from the wall
outlet before cleaning. Do not use liquid cleaners or
aerosol cleaners. Use a damp cloth for cleaning.
14 Object and Liquid Entry — Never push objects of
any kind into this videoproductthrough openings as
theymaytouch dangerousvoltage pointsor short-out
partsthatcouldresultin afire orelectricshock.Never
spill liquid of any kind on the video product.
15 Lightning — For added protection for this video
product during a lightning storm, or when it is left
unattended and unused for long periods of time,
unplug it from the wall outlet and disconnect the
antennaor cable-system.This willpreventdamageto
the videoproduct due tolightning andpower-line
surges.
16 Servicing — Do not attempt to service this video
SERVICE
productyourselfas openingor removingcovers may
expose you to dangerous voltage or other hazards.
Refer all servicing to qualified service personnel.
17 Conditions Requiring Service —Unplug this video
product from the wall outlet and refer servicing to
qualified service personnel under the following
conditions.
a. When the power-supply cord or plug is damaged.
b. If liquidhas beenspilled, orobjectshavefallen into
the video product.
c. If the video product has been exposed to rain or
water.
d. If the video product does not operate normally by
following the operating instructions. Adjust only
those controls that are covered by the operating
instructions. Improperadjustment ofother controls
may result in damage and willoften require
extensive workby a qualifiedtechnician torestore
the video product to its normal operation.
e. If the video product has been dropped or the
cabinet has been damaged.
f. When the video productexhibitsa distinct change
inperformance— thisindicatesa needforservice.
18 ReplacementParts —When replacement parts are
required, have the service technician verify that the
replacements he uses have the same safety
characteristics asthe originalparts.Use of
replacements specified bythe video product
manufacturer canpreventfire, electric shockor other
hazards.
19 Safety Check— Upon completionofany serviceor
repairs to this video product, ask the service
technician toperformsafety checksrecommended by
the manufacturer todetermine thatthe video product
is in safe operating condition.
20 Heat — The product should be situated away from
heatsources suchasradiators, heatregisters,stoves,
or otherproducts (including amplifiers)that produce
heat.
This product may contain lead and mercury.
Disposal of these materials be regulated due to
environmental considerations. For the disposal
or recycling information, please con tact your
local authoritie s or t he Electronics Indust rie s
Alliance : “www.eia.org
.”
English
5
Page 6

Cautions When Using
Handle the liquid crystal display (LCD) with care:
• The LCD is a very delicate display device: Do not press its surface with force, hit it or prick it with a sharp
object.
• If you push the LCD surface, unevenness in display may occur. If unevenness does not disappear soon,
turn the DVD video cam e ra/recorder off, wait for a few moment s, a nd th e n turn it on again.
• Do not place the DVD video camera/recorder with the open LCD screen down.
• Close the LCD monitor when not using the DVD video camera/recorder.
Liquid crystal display and viewfinder:
• The LCD screen and viewfinder a re the products of highl y precise technology. Among the total number
of pixels (approx. 120,000 pixels for LCD monitor and approx. 1 10,000 pixels for viewfinder), 0.01% or
less pixels may be missing (black dots) or may remain lit as colored dots (red, blue, green). This shows
the limitations of th e current technol ogy , and does not indicate a fault that will inter fere with r ecording.
• The LCD screen and viewfinder will be slightly dimmer than usual when the DVD video camera/
recorder is at low temperature, as in cold areas, or im mediately after power is turne d on. Normal
brightness will be restored when the temperature inside the DVD video camera/recorder rises.
Hold the DVD video camera/recorder correctly:
• Do not hold the viewfinder or LCD monitor when lifting the DVD video camera/recorder: The
viewfinder or LCD monitor could detach and the DVD video camera/recorder may fall.
Do not subject the DVD video camera/recorder to impact:
• This DVD video camera/rec order is a precision machine. T ake great care t hat you do not strike it agains t
a hard object or let it fa ll.
• Do not use the DVD video camer a/recorder on a tripod in a place wher e it is subject to severe vibratio ns
or impact.
No sand or dust!
• Fine sand or dust ente rin g t he DVD video camera/recorde r or AC adapter/cha rger co uld cause
malfunctions or defects.
Nowateroroil!
• Wa ter or oil entering the DVD video camera/recor der or AC adapter/charger could cause electr ic shock,
malfunctions or defects.
English
6
Page 7

Heat on surface of product:
• The surface of the DVD video camer a/recorder wi ll be slightly warm, but thi s does not indicate a fault.
Screen on connected TV:
• Never leave the disc navigat ion screen, still image o r camera image di splayed on your TV to which the
DVD video came ra/recorder is connect e d: Doing so could result in displayed im ag e ret en t ion or
phosphor degradat ion of TV screen.
Be careful of ambient temperature:
• Using the DVD video camera/rec order in a place wher e the temperature i s over 140ºF (4 0°C) or under
32ºF (0°C) will result in abnormal recording/playback.
• T ake care that the temperat ure of this DVD video camera/r ecorder , when connected to PC does not rise
excessively (reference for usage: ap prox. 30 minut e s at ab out 86ºF (30ºC).
• Do not lea ve the DVD v i deo camera / r ecorder on bea ch sand or i n a closed vehicle where the
temperature is very high for a long time: This could cause malfunctions.
Do not point directly at the sun:
• If direct sunlight strikes the lens or vi ewfinder, the DVD video camera/record er could malf unction or
7
English
Page 8

Be careful of moisture condensation:
• When you move the DVD video camera/rec order between places wher e the differen ce in temperatures
is great - such as entering a lodge from a ski slope or going out of a cooled room or vehicle - condensation
(vapor in air warmed or cooled to water droplets) could occur on the lens and/or inside the DVD video
camera/recorder. If condensation occurs, do not open the cover of disc or card insertion block if possible.
If condensation occurs on the lens, wipe it off wit h a soft, dry cloth. Even if the external surface of DVD
video camera/recorder has dried, condensation may remain inside: Turn the DVD video camera/
recorder off and leave it in a dry place for at least 1- 2 ho urs b efore us in g it ag ain .
Do not use the DVD video camera/recorder for a long uninterrupted period of time:
• This DVD video camera/recorder cannot be used for a long time continuously as a surveillance camera/
monitor. If you use the DVD video camera/recorder for a long continuous period of time, the
temperature of DVD video camera/r ecorder could exceed a limit and the r ecording/playback operation
could be slowed down: In this case, turn it off and wait for a while before using it again.
DonotturntheDVDvideocamera/recorderoffwhile theACCESS/PCindicatororCARD
ACCESS indicator is lit or blinking:
• The ACCESS/PC or CARD ACCESS indicator is lit or blinking
to show that data is being written to disc or card, or being read
from it. At this time, do not do any of the following, so as not
to damage the data:
− Remove battery
− Disconnect AC adapter/charger
− Plug or unplug PC connection cable
− Remove disc or card
− Subject DVD video camera/recorder to severe vibrations or
impact.
− Violently open or close the LCD monitor
If you turn the DVD video camera/recorder off while the ACCESS/PC or CARD ACCESS indicator is lit
or blinking, turn it on agai n with th e dis c or c ard loaded in i t: Repair o f t he disc or car d wi ll be ex ecuted
automatically (see page 149).
CARD
ACCESS
indicator
ACCESS/PC
indicator
Do not wipe the DVD video camera/recorder case with benzene or thinner:
• The coating of case could peel off or the case surface could deteriorate.
• When using a chemical cleaning cloth, follow the instructions.
Also read the instructions attached with optional accessories:
• For optional accessories, observe the cautions and follow instruction manua ls at t ac h ed .
English
8
Page 9

Cautions When Storing
Do not leave the DVD video camera/recorder in a place where the temperature is very
high for a long period of time:
• The temperature inside a clo sed vehicle or t runk can become very h igh in a hot seaso n. If you leave the
DVD video camera/r ecor der in such a pla ce, it co uld malfuncti on or the cas e could be da maged. Also ,
do not expose the DVD video camera/recorder to direct sunlight or place it near a heater.
Do notstorethe DVD videocamera/recorderinaplace where the humidityis high or in
a dusty place:
• Dust entering the DVD video camera/recor der could cause malfunctions. I f the humidity i s high, the
lens could be moldy , and the DVD video camera/recorder could become inoperable. It is recommended
that you put the DVD video camera/recorder with desiccant in a box when storing it in a closet, etc.
Do notstorethe DVD videocamera/recorderinaplace subject tostrongmagnetism or
intense vibrations:
• This could cause malfunctions.
Detach the battery from the DVD video camera/recorder and store it in a cool place:
• Leaving the battery attached or storing it at high temperature could shorten its life.
Suggestions and Restrictions
Make a trial recording:
• Always make a trial recording before doing actual recording to make sure that recording is normal. The
data that have not been stor ed normally b ecause of a defec t in the DVD video camera /recor der cannot
be restored.
It is recommended that you use DVD-RAM disc from which recorded contents can be deleted for trial
recording.
Do not use the DVD video camera/recorder for professional applications:
• This DVD video camera/recorder is designed and produced for home-use recording and playback.
The recorded contents cannot be compensated for:
• Hitachi cannot compensate for any damages caused when recording is not made normally or recorded
contents cannot be played back because of a defect in the DVD video camera/r ecorder , disc or card. Also,
Hita c hi cannot be responsible for your recorded video and a udio.
• If you or a third party make a mistake when handling this DVD video camera/recorder, disc, card, etc.,
the recorded contents may be lost. We cannot be responsible for compensation for damage due to loss
of recorded contents.
Copyright:
• Data recorded on the disc or card in this DVD video camera/recorder using other digital/analog media
or devices are protected by the copyright a ct a nd canno t be used witho ut permissi on of the owner of
copyright, except for personal enjo yment. Be aware that recording i s restricted for some demonstrations,
performances and exhibitions, even for personal enjoyment.
English
9
Page 10

Read This First
To guide you, we've included following six chapters.
•
The section on “Setups” explains how to set up
the DVD video camera/rec order , battery , and set
the date/time.
• The section on “Basic Techniques” explains the
basic operation of this DVD video came ra/
record er - recording of movies, still images,
external input, and playback of recorded images.
• The section on “Advanced Techniques” explains
settings on this DVD video camera/recorder for
more advanced usage.
• The section on “Disc Nav iga ti on ” e xplains
editing with Disc Navigation: Refer to this
section when finalizing DVD-R disc and
initializing DVD-RAM disc.
• The section on “Installing Software” explains the
con tent s o f pro vi de d C D-R OM an d h ow to i ns ta ll
the software included.
• “Subsidiary Information” in c lud e s an
introduction to products sol d separately, proper
cleaning, and troubleshooting.
With this DVD video camera/recorder you can view the picture being recorded or the playback picture
whether on the LCD monitor or in the viewfinder . Opening or closing the LCD monitor switches the pic ture
to appear on the LCD monitor or in the viewfinder . The following text describes the operation assuming th at
the viewfinder is used as a major monitor device.
Wewantthis manualtobe as helpfulas possible,
soit includestwo easywaystofind the information
you need:
A quick index for the information you use most
•
often (this page).
• A detailed table of contents directing you to
specific informatio n qu ic kly (se e p age 13-15).
Get to know your DVD video camera/recorder by
using this manual, and get to know Hitachi. We
appreciate your business.
Quick Index
Available Discs................................................22
Recording Movie..............................................50
Immediately Checking Recorded Scene .........67
Connecting to a TV..........................................72
Functions Available with Disc Navigation........ 99
Installing Software.........................................132
English
10
Page 11
Introduction
●You can record even during playback
Unlike tape devices, you do not need to sear ch for the recor ding star t position or loca te the beginning of
blank portion.
You can start recording during playback: New recording will not overwrite any previously recorded data.
Recorded scenes
Ifyou stopplayback midwayand startrecording, overwritewill notoccur.
●You can immediately play back desired recorded scenes
You do not n eed to rewind , unlike recorders using tape.
Yo u can select any scene you want and immediately play it back (using Disc Navigation function).
●Use Disc Navigation to create your original movie
Y ou can delete unnecessary scenes, move any scenes, etc., and crea te your original movie work (Play List).
11
English
Page 12

●Youcaneasilyeditscenes,whichis
quite difficult with tape
Using this DVD video camera/recorder, you can
collect scenes of your child, for example, o n play list
of Disc Navigation function and create an original
movie: Then simply play back the play list and dub
it on VCR. It is also easy to make any number of
identical tape s.
●Create original DVDs on PC
You can use a DVD-R disc to c reate an original
DVD, using the provided software CD-ROM.
The created DVD di sc can b e played back on DVD
player, DVD-ROM drive, etc.
English
12
Page 13

Table of Contents
Important Information .........................................2
For Your Safety ..................................................2
Precautions ........................................................ 2
IMPORTANT SAFEGUARDS ............................4
Cautions When Using.........................................6
Cautions When Storing.......................................9
Suggestions and Restrictions............................. 9
Read This First .................................................10
Introduction.......................................................11
Table of Contents.............................................13
Checking Provided Accessories.......................16
Names of Parts.................................................17
About This Manual............................................21
Discs and Cards ...............................................22
AVAILABLE DISCS...............................................22
INFORMATION ON DVD-R DISC.........................23
EXAMPLES OF DISCS THATCANNOT
BE USED ON THIS DVDVIDEO CAMERA/
RECORDER:......................................................23
HANDLING DISCS................................................24
AVAILABLE CARDS..............................................25
Storage Capacity on Disc or Card ....................26
RECORDABLE TIME OF MOVIE (VIDEO)...........26
RECORDABLE STILLS (PHOTOS) ON DISC ......27
RECORDABLE STILLS (PHOTOS) ON CARD.....27
Features of DVD Video Camera/Recorder.......28
VERSATILE FUNCTIONS AVAILABLE ................28
RECORDING ON DISC.........................................30
RECORDING MOVIE AND STILL.........................30
IMMEDIATE REVIEWINGOF
RECORDED IMAGE...........................................31
EDITING IN VARIOUS WAYS ON DVD VIDEO
CAMERA/RECORDER ALONE..........................31
USING WITH VARIOUS DEVICES.......................31
Setups
Setting Up the DVD Video Camera/Recorder... 32
HOLDING DVD VIDEO CAMERA/ RECORDER ..32
ATTACHING LENS CAP.......................................32
ATTACHING SHOULDER STRAP........................33
INSERTING BATTERY INTO
REMOTE CONTROL..........................................34
REMOVING BATTERY FROM
REMOTE CONTROL..........................................34
Setting Up the Battery.......................................36
CHARGING BATTERY..........................................36
ATTACHING BATTERY TO DVD VIDEOCAMERA/
RECORDER.......................................................37
REMOVING BATTERY .........................................37
BATTERY REMAINING LEVEL INDICATOR........39
EFFICIENT USE OF BATTERY............................39
USING DVD VIDEO CAMERA/RECORDER
WITH AC ADAPTER/CHARGER........................40
Inserting and Removing Disc............................ 41
INSERTING DISC.................................................41
REMOVING DISC.................................................43
Inserting and Removing Card........................... 44
Basic Techniques
Basic Handling of DVD Video Camera/
Recorder........................................................ 45
TURNING DVD VIDEO CAMERA/RECORDER
ON AND OFF.....................................................45
VIEWING SUBJECT THROUGH VIEWFINDER...46
VIEWING IMAGE ON LCD MONITOR SCREEN..46
CLOSING LCD MONITOR....................................47
Setting Date and Time...................................... 48
CHANGING DISPLAY FORMAT OF
DATE AND TIME................................................49
Recording Movie............................................... 50
USING EXTERNAL MICROPHONE .....................52
Recording Stills................................................. 53
Zooming............................................................55
MACRO RECORDING..........................................56
RECORDING SUBJECTS FOR STRONGER
WIDE-ANGLE OR TELEPHOTO EFFECT ........56
Manually Focusing Subject............................... 57
FOCUSING DURING RECORDING.....................57
Adjusting Exposure Manually ........................... 59
Compensating for Backlight.............................. 60
Using Full Auto Function .................................. 61
On-Screen Information..................................... 62
INFORMATION DISPLAY DURING
RECORDING .....................................................62
Recording Image from Other AV Devices ........ 65
CONNECTING TO OTHER AV DEVICE ..............65
RECORDING IMAGE FROM AV DEVICE............66
Playing Back.....................................................67
IMMEDIATELY CHECKING RECORDED
SCENE...............................................................67
PLAYBACK FROM START OFDISC OR CARD..68
SEARCH PLAYBACK OF MOVIE.........................68
FRAME ADVANCE/FRAME BACK/SLOW
PLAYBACK OF MOVIE......................................68
SKIP PLAYBACK OF MOVIE................................69
PLAYING BACK STILLS.......................................69
JUMPING TO SPECIFIED POINT (GO TO) .........70
On-Screen Information Display........................ 71
INFORMATION DISPLAY DURING PLAYBACK..71
Playback on Other Devices..............................72
CONNECTING TO A TV.......................................72
VIEWING ON TV SCREEN...................................73
PLAYBACK ON DVD PLAYER.............................74
REMOVING AND REPLACING FROM/IN
ROUND DVD HOLDER......................................75
HOW TO REMOVE DISC .....................................75
English
13
Page 14

REPLACING DISC IN ROUND DVD HOLDER.....76
WHEN THE HINGE OF ROUND DVD HOLDER
COMES OFF ......................................................76
DISC CLEANING...................................................76
Playback on DVD Video Recorder/Player ........ 77
Advanced Techniques
Understanding Flow of Menu............................ 78
Setting Up Camera Functions...........................80
SELECTING SHOOTING MODETOMATCH
THE SUBJECT
(SWITCHING PROGRAM AE MODE)................80
ADJUSTING COLOR (WHITE BALANCE)............81
USING THE ELECTRONIC IMAGE STABILIZER
(EIS)....................................................................83
MAGNIFYING SUBJECT IMAGE (DIG. ZOOM) ...84
REDUCING WIND NOISE DURING
RECORDING (MIC.FILTER) ..............................85
Setting Up Record Functions............................86
SWITCHING MOVIE QUALITY (VIDEO MODE)...86
SWITCHING QUALITY OF STILL IMAGE
(QUALITY)..........................................................87
RECEIVING IMAGE FROM ANOTHER DEVICE
(INPUT SOURCE)..............................................88
SWITCHING EXTERNAL INPUT RECORDING
METHOD (PHOTO INPUT) ................................88
SELF-TIMER .........................................................89
SETTING ON-SCREEN DISPLAY OUTPUT
ON OR OFF (OSD OUTPUT).............................90
LCD Setup........................................................91
SETTING BRIGHTNESS OFLCD SCREEN
(BRIGHTNESS)..................................................91
SETTING COLOR DENSITYOF LCD SCREEN
(COLOR LEVEL) ................................................91
Initial Settings...................................................92
SWITCHING OPERATING SOUND ON OR OFF
(BEEP)................................................................92
TURNING DVDVIDEO CAMERA/RECORDEROFF
AUTOMATICALLY (POWER SAVE)..................92
TURNING RECORD LED ON OR OFF
(RECORD LED)..................................................93
CHANGING DISPLAY LANGUAGE
(LANGUAGE) .....................................................93
RESETTING MENU SETTINGSTO DEFAULTS
(RESET) .............................................................94
Disc Navigation
Using Disc Navigation.......................................95
STARTING DISC NAVIGATION............................95
English
TERMINATING DISC NAVIGATION .....................97
PLAYING BACK FROM DISCNAVIGATION
SCREEN.............................................................97
SELECTING MULTIPLE SCENES........................98
SELECTING CONSECUTIVE SCENES
TOGETHER........................................................98
Disc Navigation Menu.......................................99
FUNCTIONS AVAILABLE WITH
DISC NAVIGATION............................................99
UNDERSTANDING FLOW OF
DISC NAVIGATION MENU ..............................100
Scene ............................................................. 101
DELETING SCENES (DELETE) .........................101
CHANGING IMAGES FOR THUMBNAILS
(EDIT - THUMBNAIL).......................................103
PLAYING BACK BY SKIPPINGSCENES
(EDIT - SKIP) ...................................................104
ADDING SPECIAL EFFECTS (EDIT - FADE)....105
ARRANGING ORDER OF SCENES
(EDIT - MOVE).................................................106
COMBINING MULTIPLE SCENES
(EDIT - COMBINE)...........................................107
DIVIDING MOVIES (EDIT - DIVIDE)...................108
COPYING STILLS ON DVD-RAM DISC
TO CARD (COPY)............................................109
LOCKING SCENES ON CARD (LOCK)..............110
DESIGNATING SCENES TO BE PRINTED
(DPOF).............................................................111
SELECTING SCENES USING MENUSCREEN
(SELECT).........................................................112
DISPLAYING INFORMATION USING MENU
SCREEN (DETAIL) ..........................................113
Program.......................................................... 114
WHAT IS “PROGRAM”? .....................................114
SWITCHING TO THUMBNAIL DISPLAY OF
SPECIFIC DATE (SWITCH).............................114
PLAYING BACK PROGRAM (PLAY)..................115
CHANGING TITLE OF PROGRAM (TITLE) .......115
Play List.......................................................... 117
WHAT IS “PLAY LIST”? ......................................117
CREATING NEW PLAY LIST (CREATE)............117
SWITCHING TO DISPLAY OFEACHPLAY LIST
(SWITCH).........................................................118
PLAYING BACK A PLAY LIST (PLAY) ...............119
ADDING SCENES TO PLAY LIST
(EDITING PLAY LIST)......................................120
DELETING SCENES FROMPLAY LIST
(EDITNG PLAY LIST).......................................121
ADDING SCENES USING SUBMENU FOR
EDITING (EDITING PLAY LIST)......................121
DELETING SCENES USING SUBMENU FOR
EDITING (EDITING PLAY LIST)......................122
SELECTING SCENES USINGSUBMENU FOR
EDITING (EDITING PLAY LIST)......................122
ARRANGING ORDER OF SCENES (MOVE).....123
CHANGING TITLE OF PLAY LIST (TITLE) ........124
DELETING PLAY LIST (DELETE) ......................124
Go To.............................................................. 125
TOP (END)..........................................................125
Disc or Card Management.............................. 126
VERIFYING REMAINING FREE SPACEON
DISC OR CARD (CAPACITY)..........................126
PROTECTING DISC FROM WRITING
(PROTECT DISC) ............................................126
INITIALIZING DVD-RAM DISC OR CARD
(FORMAT DISC. FORMAT CARD)..................127
UPDATING CONTROL INFORMATION OF
DVD-RAM DISC...............................................128
FINALIZING DVD-R DISC...................................129
14
Page 15

Others .............................................................130
DISPLAYING MOVIES ORSTILLS
INDEPENDENTLY (CATEGORY)....................130
PLAYING BACK SCENES REPEATEDLY
(REPEAT PLAY)...............................................130
SLIDE SHOW (CONTINUOUS PLAYBACKOF
STILLS).............................................................131
Installing Software
Contents on Provided CD-ROM .....................133
INSTALLING USB DRIVER.................................135
INSTALLING UDF DRIVER
(DVD-RAM DRIVER)........................................137
INSTALLING DVD-MovieAlbumSE .....................139
INSTALLING MyDVD ..........................................141
Creating DVD Video on PC from
DVD-RAM Disc Recorded on
DVD Video Camera/Recorder...................... 143
Subsidiary Information
Cleaning..........................................................145
Changing Setting of Demonstration................ 146
No DVD Video Camera/Recorder Operation -
Check the Following:....................................147
Trouble Messages .......................................... 149
Troubleshooting..............................................156
System Reset .................................................163
Major Specifications........................................1 64
Introduction to Optional Accessories..............1 6 6
CAMERA ACCESSORIES..................................166
POWER SUPPLY................................................166
INFORMATION ON SQUARE ADAPTER...........166
To Order in the United States.........................1 67
BY PHONE..........................................................167
Index............................................................... 168
Be sure to read the following before opening
the package of CD-ROM.............................. 170
15
English
Page 16
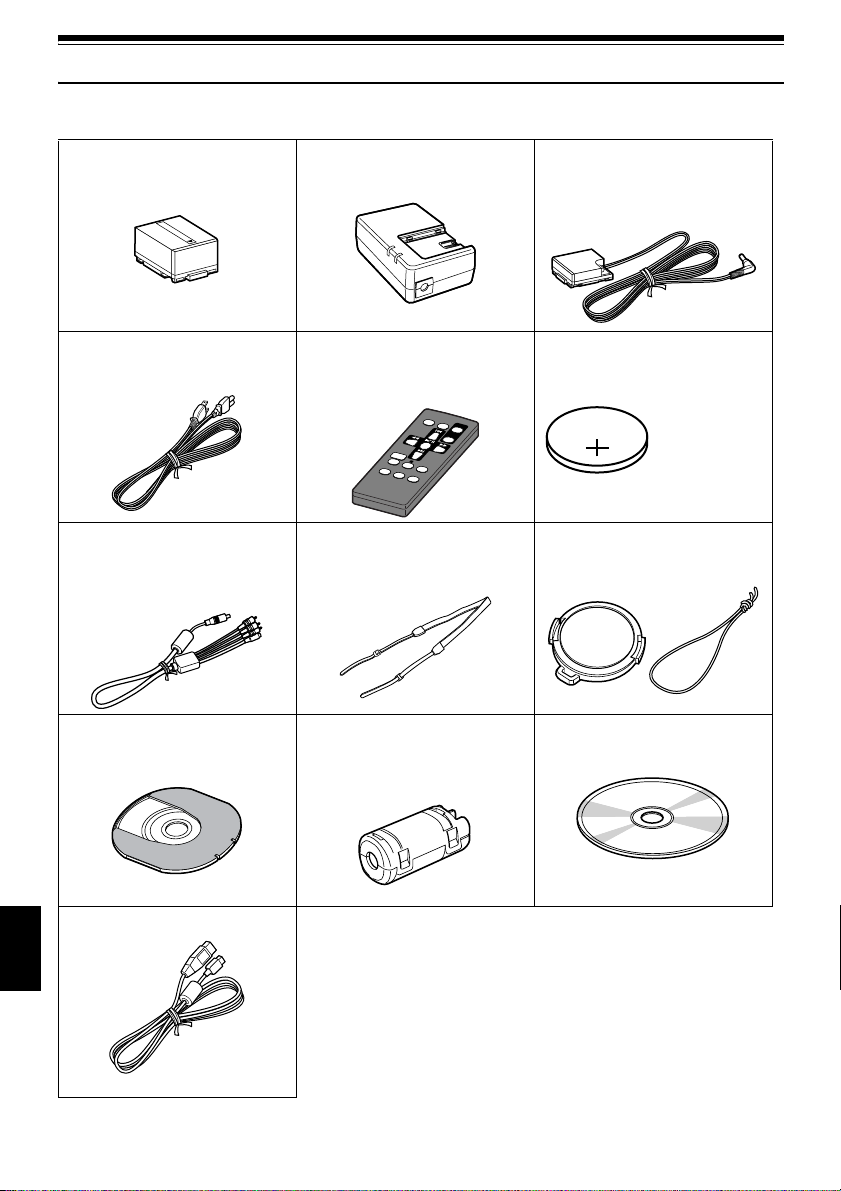
Checking Provided Accessories
Make sure that you have all the following accessories in package:
Battery (model DZ-BP14S):
Portable power supply for this DVD video
camera/recorder. Charge it before use.
Power cable:
Connect between household A C outlet and
AC adapter/charger.
AV/S input/output cable:
Used when viewingthe pictureplayed back
on theDVD video camera/recorder on TV
screen, orinput or output videofrom/to
another videodevice.
8 cm DVD-Rdisc (inRound DVD Holder):
To recordvideo (movie) on thisDVD video
camera/recorder
AC adapter/charger(model DZ-ACS1):
Used topower the DVDvideo camera/
recorder from ACoutlet, or chargebattery.
Infrared remote control
(model DZ-RM3W):
Use tocontrol the DVD videocamera/
recorder from adistance.
Shoulder strap:
Attachto theDVDvideo camera/recorderto
hang itfrom shoulder.
Ferrite core:
In orderto control radio noise emission,
attach thisto external microphone cable if
you areusing the external microphone.
DC power cord:
When powering theDVD video camera/
recorderfrom householdAC outlet, usethis
cord toconnect the DVDvideo camera/
recorder and ACadapter/charger.
Lithium battery (model CR2025):
Topower the remote control.
WARNING: Keep
this batteryaway
from children. If
swallowed,consult
a physician
immediately for
emergency
treatment.
Lens cap andlens cap string:
Attach thelens cap when not recording,to
protect thelens.
Software CD-ROM:
UsethisCD-ROMwhenconnectingtheDVD
video camera/recorder toPC.
PC connection cable:
English
16
Page 17
Names of Parts
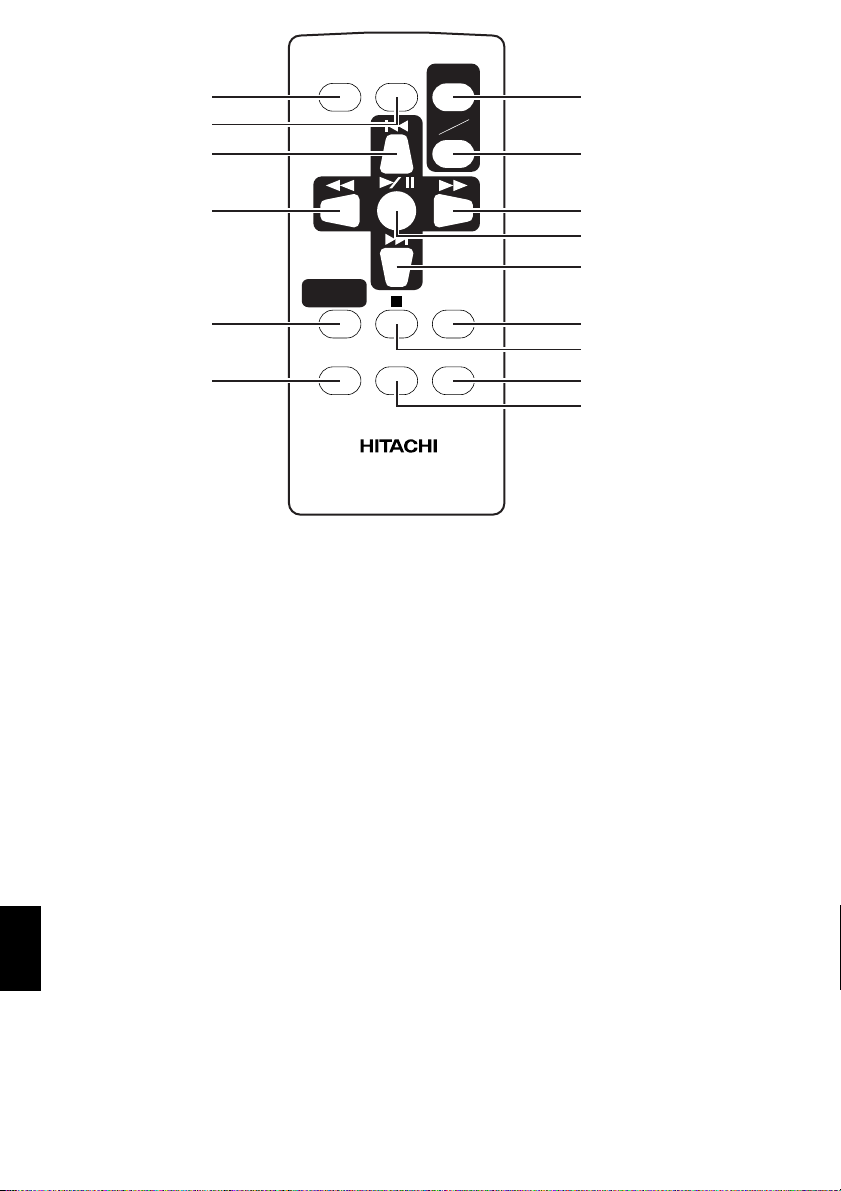
1 Recording indicator (P. 93)
The red indi cator will light durin g recording.
2 Optical 10× zoom lens (P. 55)
3 Lens hood (P. 56)
Always remove this lens hood when u sin g
generally available tele-conversion or wideconversion lens.
4 Infrared receiver (P. 35)
When the remote control is used to oper ate the
DVD video camera/recorder, this receiver will
receive the infrared signal.
5 Zoom lever (P. 55)
Push the lever to the T side for telephoto, or to
the W side for wide-angle.
6 Accessory shoe
Only for DZ-MV380A:
Slide the cover to r emove it, and then attach the
optional video flash, etc., here. (See the
instruction manual of device to be attached for
details.)
7 External microphone jack(P. 52)
8 AV input/output jack (P. 65, 72)
9 Stereo microphone(P. 52)
10 2.5” typeliquid crystaldisplay(inside) (P.46)
11 BATTERY EJECT switch (P.37)
The BATTERY EJECT switch is located on the
bottom of this DVD video camera/recorder:
Slide it when removing the battery.
English
17
Page 18
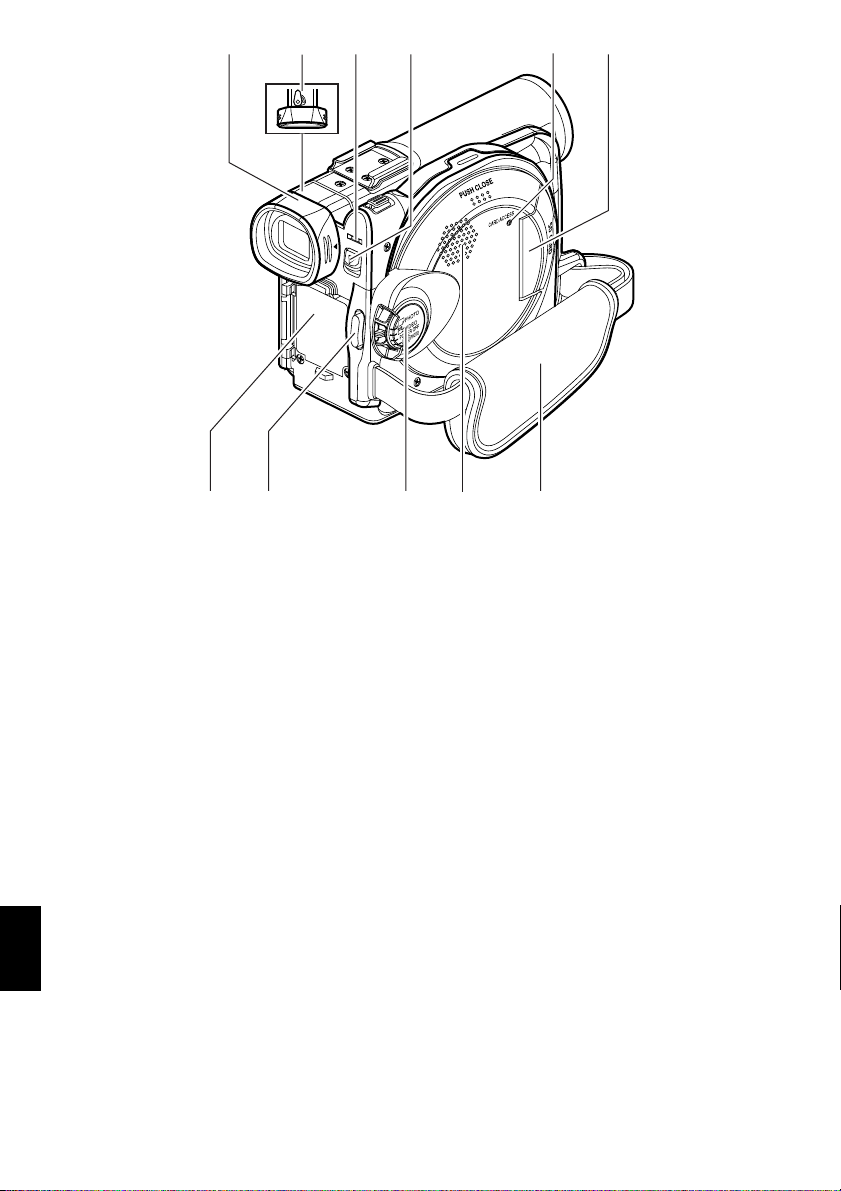
12 13 14 1715
ACCESS/PC
DISC EJECT
R
E
C
18 19 20 2221
16
12 Viewfinder (P. 46)
13 Diopter co ntrol (P. 46)
To adjust the focus of im ag e ap pe aring in the
viewfinder. (Pull out the viewfinder.)
14 ACCES S/ PC indicator (P. 8, 50, 53)
Will blink or light while the DVD video camera/
recorder is operating.
15 DISC EJECT button (P. 41)
Press down and release this button to open the
disc guide.
English
16 CARD ACCES S indicator (P. 8, 53)
17 Card insertion block (P. 4 4)
18 Battery attachment platform (P. 37)
19 Record button (REC) (P. 50)
20 Power switch (P. 45, 50, 53)
21 Speaker (P. 67)
22 Hand strap (P. 32)
18
Page 19
23 24 25 26 27 28 29
3531 32 33 3430
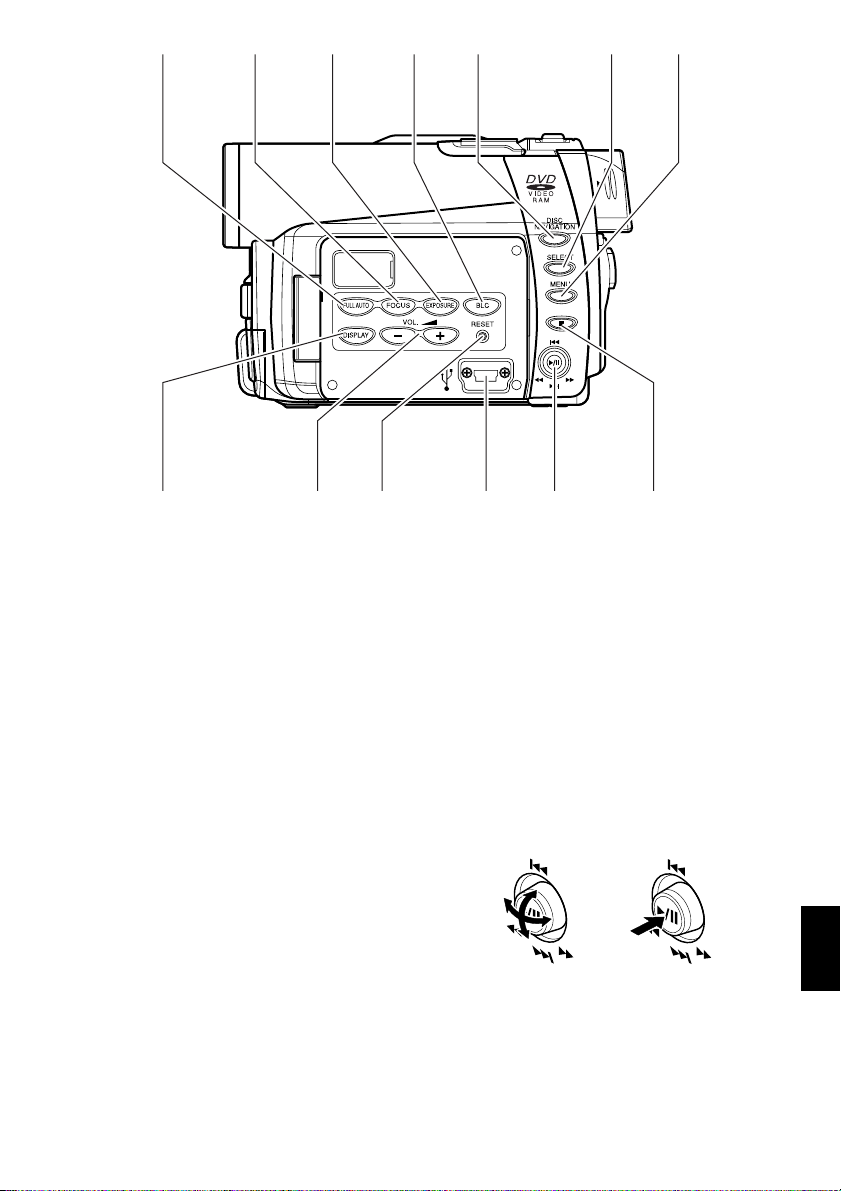
23 FULL AUTO button (P. 61)
To switch the DVD video camera/recorder to
full automatic
24 FOCUS button (P. 57)
To switch between manual focus and autofocus.
25 EXPO SURE button (P. 59)
Press this button to adjust the exposure.
26 BLC (backlight compensation) button
(P. 60)
Press this button when subject is being li ghted
from rear.
27 DISC NAVIGATION button (P. 95)
28 SELE CT button (P. 98)
29 MENU button (P. 48, 79, 101)
Press this button to displa y the menu for setting
camera functions and Disc Navigation.
The camera menu will appear even if disc is not
loaded.
30 DISPLAY (Screen display) button (P. 71)
Press this button to displa y the details of image
being played back or camera setting status, or
switch the display off.
31 Volume control buttons (VOL)/ buttons
(P. 57, 59, 67)
T o adjust the volume of sound from speaker, etc.
32 RESET button (P. 163)
T o reset all setti ngs to defaults (status when the
DVD video camera/recorder was shipped from
the facto r y )
33 PC connection terminal (TO PC)
34 Joystick (P. 48, 67, 79)
Move the joystick to select a scene or menu item;
then play back the scene or pause it.
35 Stop/cancel button (P. 21, 67, 97)
To end playback or cancel setting of menu.
English
19
Page 20
36
37
38
REC
DIGIT AL
ZOOM
ZOOM
T
W
42
43
39
NAVIGATION
40
41
36 REC button (P. 50, 53)
37 DIGITAL ZOOM button (P. 84)
38 Reverse skip button (P.69)
39 Reverse search button (P. 68)
40 DISC NAVIGATION button (P. 95)
41 MENU button (P. 48, 80, 102)
DISC
MENU
DZ-RM3W
44
45
46
DISPLA Y
47
DELETESELECT
48
49
50
42 ZOOM T button (P. 55)
43 ZOOM W button (P. 55)
44 Forward search button (P. 68)
45 Play/pause button (P. 67)
46 Forward skip button (P. 69)
47 DISPLAY button (P. 71)
48 Stop button (P. 21, 67, 97)
49 DELETE button (P. 101)
50 SELECT button (P. 98)
* The buttons on remote control will function the same as those on DVD video camera/recorder.
English
20
Page 21

About This Manual
●Displays in this manual
Understand that the di splays are differ ent from those you wil l actually see in the v iewfinder or on the LCD
screen.
●Notation of cancel button
Press the stop/cancel button to stop your operation midway, or return the menu screen to the preceding
one. The expression “press the button” will be used in this text.
●, and marks beside headings
Some functions of this DVD video camer a/r ecor der are una vaila ble with di sc or ca r d used. Ref er to the
marks at right above each function to identify whether the disc or ca rd is compatible with the function.
Refer to these marks and identify the functions and operation t o match the di sc or card you use.
●Illustrations in this manual
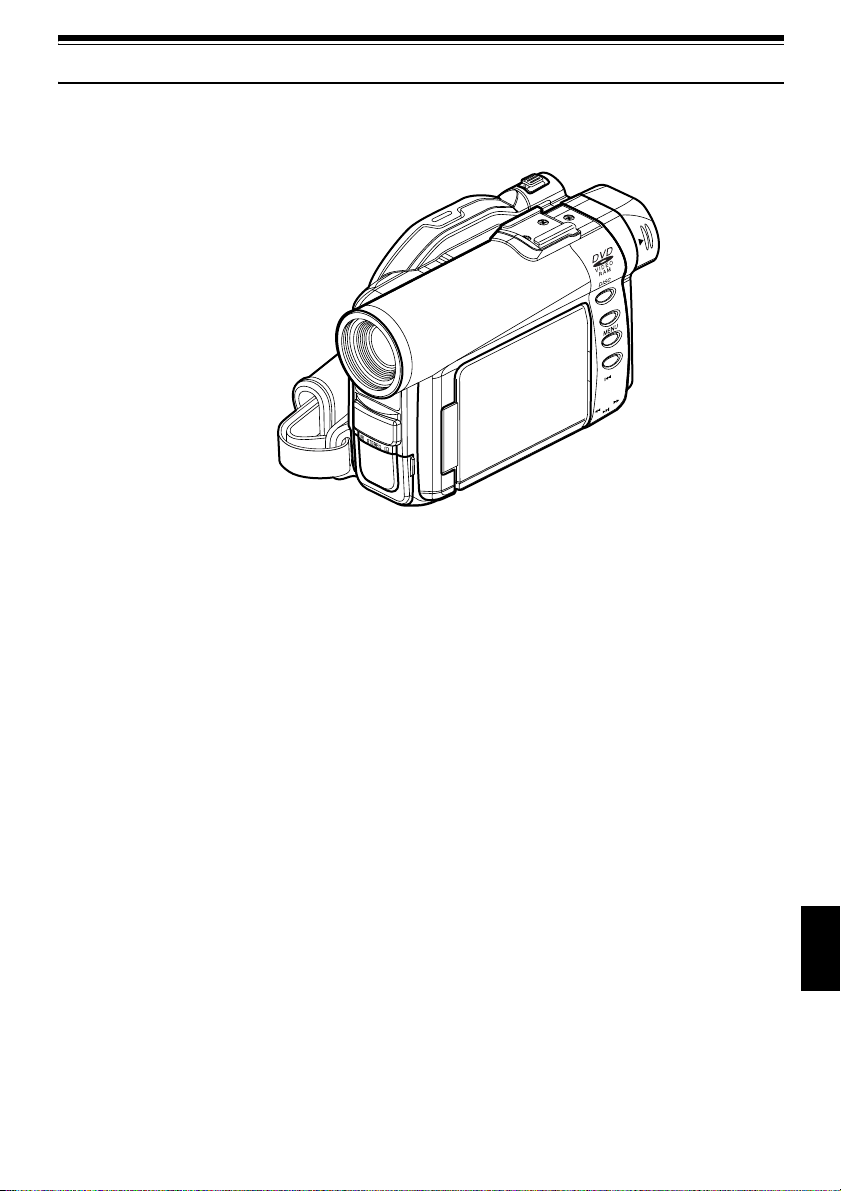
Although the external appe arances of DZ-MV350A and DZ-M V380A are different, the method of
operating both models is identical.
The illustrations of DZ-MV350A are used for the explanation in this text.
21
English
Page 22

Discs and Cards
The followingtablelists the storagemedia(discsand cards) that can beusedon this DVD video camera/
recorder and the functions which are available with them:
Media
Function DVD-RAM disc DVD-R disc
Recording movie ∴∴×
Recording still ∴
Deleting recordedimage ∴
Editing onthisDVDvideo
camera/recorder
Playback onDVDplayer
Playback on DVD-RAM
recorder
*1: CanbeplayedbackonsomeDVDplayers.
*2: Must befinalized onthis DVD videocamera/recorder beforeDVD-Rdisc can beplayed back onDVD player orDVD
recorder (See P.74). May not be playable on some DVD players.
*3: CanbeplayedbackonsomeDVD-RAMrecorders.
∴
*1
×
∴∴
×
×
××
*2
∴
*2
AVAILABLE DISCS
Usable discs and logos Shape
SD memory card/
Multimedia card
∴
∴
×
*3
×
∴: Functions available; ×: Not available
DVD-RAM Ver. 2.1 (8 cm)
DVD-R
[for General Ver.2.0 (8 cm)]
This DVD video camera/recorder uses 8 cm DVDRAM discs and 8 cm DVD- R d isc s for camcorder
use.
Discs remo ved from Round DVD H older cannot be
used on this DVD video camera/recorder: Use
them only in the holder.
English
Note:
• It is recommended that you use Hitachi Maxell discs,
since their compatibility with this DVDvideo camera/
recorder has been confirmed. Using a disc other than
those made by Hitachi Maxell may not allowthe DVD
video camera/recorder todeliveroptimum performance.
• Itisnecessaryto initializean unformatteddisc. Whenan
unformatteddiscis insertedinto theDVD videocamera/
recorder, a messagewillappear: Initialize the disc
following the instructions on screen (P. 127).
22
In Round DVD
Holder
• The RoundDVD Holdercannot beused onthe following
DVD video camera/recorders:
- DZ-MV100A
- DZ-MV230A/200A
- DZ-MV270A
- Other DVD video camera/recorders that use square
type adapters.
• Imagedataeditedon PCand certaintypes ofimagedata
may not be visible on this DVD video camera/recorder.
• The imagedatarecorded on another devicemay not be
playable on this DVD video camera/recorder.
Page 23

INFORMATION ON DVD-R DISC
Y ou ca nnot record a still on DVD-R disc, or delet e
any recorded images or data.
For optimum r e cording on DVD-R disc, th is D VD
video camera/recorder writes control data to the
disc in order to automati cally make adjustments
when it is inserted and ejected accompanying
recording. If the disc has no area to be written for
adjustment, record ing may not be possible. To
prevent this, do not insert or eject a DVD-R disc
accompanying recording more than 50 times. The
DVD video camera/recorder will not perform
“write adjustment” when the DVD video camera/
recorder is turned on again, from off, for recording
with the disc in it, or when no reco rding is made,
even if the disc is removed and then reinserted.
●Finalizing DVD-R disc
Before using the 8 cm DVD-R disc provided on this
DVD video camera/recorder on a DVD playe r or
DVD video recorder that is c o m p at ib le with 8 cm
DVD-R disc, the disc must b e finalized on this DVD
video camera/recorde r. For the finalizing
procedure of 8 cm DVD-R disc, refer to “Finalizing
DVD-R Disc” (P. 129).
Note:
• Do notinsert a DVD-Rdiscrecorded on thisDVD video
camera/recorder but not finalized, into a recordable
device,suchasaDVDvideorecorder:Therecorded data
may be damaged.
• DVD-RdiscseditedandfinalizedonPC orthosefinalized
on another DVDvideo recorder maynot beplayable on
this DVD video camera/recorder, depending on the
editing software used orrecorded statusofDVD-R disc.
EXAMPLESOFDISCSTHATCANNOTBEUSED ONTHI S DVDVIDEOCAMERA/
RECORDER:
• DVD-RAM (2.6 GB) Ver. 1.0 • DVD-ROM • MO
• DVD-R (3.9 GB) Ver. 1.0 • DVD-Video • MD
• DVD-R (4.7 GB) f or Authoring V er . 2 .0 • CD-R • iD
• DVD-RW • CD-RW • Floppy disk
• DVD+RW • CD • Discs other than those with diamet er
• DVD+R • LD • CD-ROM
of 8 cm
Note:
Discs recorded on PC orDVD video recorder may not be playable on thisDVD video camera/recorder: If so, message
“This disc cannotbeused.” will appear. Also,blue thumbnails willappear (Fig. 1*onpage 24), or normal playbackwill
not be possible.
23
English
Page 24
HANDLING DISCS
●Using discs
DVD-RAM and DVD-R discs are very del icate
recording media. Carefully read the following
cautions and observe them:
• When using disc on this DVD video camera/
recorder , be sure to keep it in Round DV D Holder.
• Always use a brand new disc when recording
important material.
• Be sure not to touch th e disc
exposed portion, and be
careful that no dirt adheres to
it.
• If there is dust, scrat ch, dirt on
disc or if it is warped, the
following phenomena may occur:
− Block noise in playback
image
− Momentary stop of playback
image
− Sound interrupted duri ng
playback, or abnormal sound
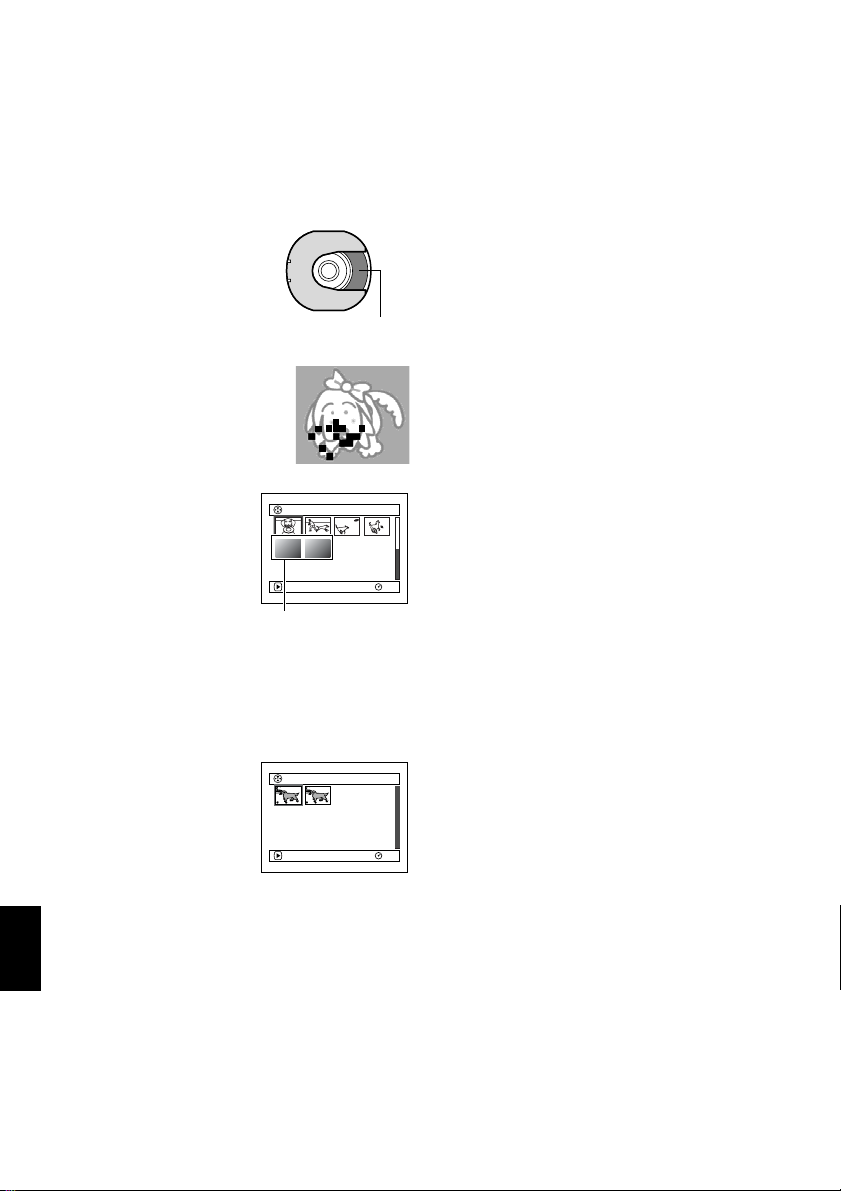
− Blue thumbnail
display* (Fig.1)
− Disc cannot correctly be
recognized
− Delay between video
and audio
Even if disc is nor mal, the
above phenomena may
occasionally occur. While the ACCESS/PC
indicator is lit, do n ot subject disc to vibrations or
impact, and avoid using DVD video camera/
recorder at extremely high or low temperatur es,
or in environment where condensation is likely
to occur.
• When recording im ages,
the DVD video camera/
record er may avoid the
portions of disc where
recording is not possible ,
due to dust, scratches, etc.
[It will pause / at such a
portion and automatically
English
restart recording (0 ).]
This will cause recording
to be interrupted for sev e ral seconds to several
minutes, and multiple thumbnails will be created
by one recording session as shown above. In this
case, the recordable time on disc will decrease.
• Be careful when removing the disc since the
metal of removal slot of DVD video camera/
recorder, and disc itself, may be hot.
PLAY
*
PLAY
(Recording one scene
may produce multiple
thumbnails.)
Do not touch
Block noise
001/ 006All Programs
Fig. 1
001 / 0 02All Programs
●Storing discs
• When storing di sc, in se rt it in Round DVD
Holder into pla st ic case.
• Be careful that no condensatio n oc curs on di sc .
• Do not place disc in following places:
− Direct sunlight for a long time
− Where humidity is high or in dusty place
− While there is heat from a heater, etc.
Note:
• See page 76 when cleaning the removed disc.
• Seepage 75forhowtohandle discremoved fromRound
DVD Holder.
• Seepage 75for howto setthediscremovedfromRound
DVD Holder or another disc correctly in Round DVD
Holder.
RAM
RAM
24
Page 25
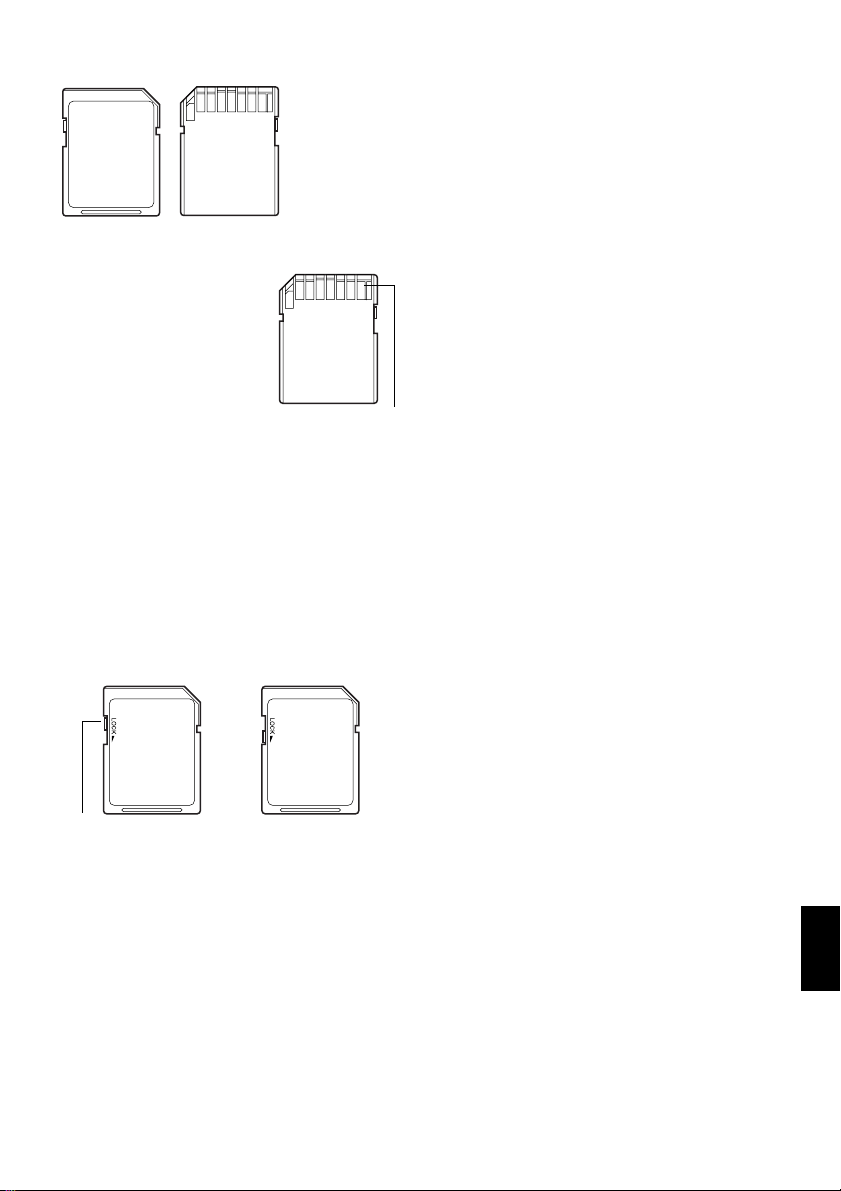
AVAILABLE CARDS
SD memorycard
and multimedia
card canbe used
onthisDVDvideo
camera/recorder.
●Handling card
• Do not use cards other than
the designated ones.
• Be sure to use a brand new
Card when rec ordin g vita l
images.
• Do not touch the card
terminal or allow it to touch
metal.
• Do not paste anything other
than exclusive lab e l on label pasting po rt ion.
• Do not subject card to impact, bend or dro p it.
• Do not disassemble card or modify it.
• Do not expose card to water.
• Do not use or store card in the following places:
− Where the temperature is high, such as in
vehicle at high temperatures, under burning
sun or near a heater.
− Where humidity is high, or in dusty place
• When the erasure prevention switch on SD
memory card is locked, no recording, deletion or
editing will be p ossible on the card.
Terminal
• It is recommended that you create a backup file
for valuable data on hard disk of PC.
• Do not do the following, or the da ta on card may
be damaged or lost:
− Do not remove the card or turn DVD video
camera/recorder off during reading or writing
of data
− Do not use DVD video camera/recorder in a
place subject to static electricity or electrical
noise
Note:
• This DVD video camera/recorder can play back image
datarecordedon otherdigital camerasconforming tothe
DCF(Designrule forCamera Filesystem)standard.The
range ofimage dataplayable onthis DVDvideo camera/
recorderisthatwith pixelsfrom 80horizontal×60 vertical
to 4000 horizontal × 3000 vertical.
• DCFis anintegrated imagefile formatofdigitalcameras:
Image filescan beused onall digitaldevices conforming
to DCF.
• Imagedataeditedon PCand certaintypes ofimagedata
may not be visible on this DVD video camera/recorder.
• The imagedatarecorded on another devicemay not be
playable on this DVD video camera/recorder.
Erasure prevention
switch
Locked status
English
25
Page 26

Storage Capacity on Disc or Card
RECORDABLE TIME OF MOVIE (VIDEO)
The recordable time wil l vary depen ding o n the
recording quality: See page 86 for the setting of
recording quality.
Movie recordable time on one disc (on single side)
(when recording only movies)
Recording
quality
XTRA Approx. 18 min*1No recording
FINE Approx. 30 min
STD Approx.60min*3Approx. 60 min
LPCM No recording
*1:Variable bit recording (recording of more than 18
minutesmay be possiblebecause the transfer rate
variesautomatically between approx. 3-10 Mbps)
*2:Transfer rate: Approx. 6 Mbps
*3:Transfer rate: Approx. 3 Mbps
*4:Linear PCM recording (If your DVD player does not
conform toMPEG audio player2, record in LPCM
mode)
DVD-RAM DVD-R
possible
Disc used
possible
*2
Approx. 30 min
Approx. 30 min
*2
*3
*4
:
Note
• Audio in XTRA, FINE or STD mode is recorded in the
MPEG audiolayer 2format, whichis theoption standard
of DVD video standard.
• No movie canberecorded on SD memory cardor
multimedia card.
• Themoviequality modecan bechanged forrecordings
on DVD-RAM disc, but not on DVD-R disc.
• IfyourecordinXTRAmodeathightemperaturesfora
long time, theDVD video camera/recorder will get hot
andthe maximumtransferrate willbe limitedto approx.
6Mbps.
• If a disc recorded in XTRAmode is used at high
temperatures,normalplaybackmaybeimpossible:Turn
the DVDvideo camera/recorderoff once, waituntil the
ambienttemperature becomeslower,and thenoperate
it again.
English
26
Page 27

RECORDABLESTILLS(PHOTOS)ON
DISC
●Number of recordable stills on one
side of disc: Up to 999
If the disc still has free space after recor d ing 999
stills on it, movies can also be recorded on it.
RECORDABLESTILLS(PHOTOS)ON
CARD
The number of recordable st ills will vary
depending on the recording quality: See page 87 for
the setting of recording quality.
For DZ-MV350A
Capacity
8MB
16 MB
32 MB
64 MB
128MB
256 MB
512 MB
Approx. 45 Approx. 95 Approx. 190
Approx. 100 Approx. 200 Approx. 400
Approx. 220 Approx. 440 Approx. 880
Approx. 440 Approx. 880 Approx. 1,760
Approx. 880 Approx. 1,760 Approx. 3,520
Approx. 1,760 Approx.3,520 Appro x.7,040
Approx. 3,520 Approx.7,040 Appro x.14,080
Recording quality
FINE NORM ECO
:
Note
• Cards used on other devices can be used on this DVD
video camera/recorder.
• No movie or music data recorded on card can be
checked, viewed or heard on this DVD video camera/
recorder.Inaddition,no suchadatafilecanbedisplayed
on this DVD video camera/recorder.
• Use the remaining display function to check the
remaining freespace ondiscbeforeuse. See “Verifying
Remaining Free Space on Disc or Card (Capacity)” on
page 126.
• Some still data recorded on this DVD video camera/
recorder may not be playable on another device.
●Still recording quality
The pixel size of JPEG stills that can be recorded on
this DVD video cam e ra/recorder is as follows:
Model
DZ-MV350A 640×480pixels 640 × 480 pixels
DZ-MV380A 1,280× 960pixels 640 × 480 pixels
Camera input External input
Although still images are recorded on DVD-RAM
dis c onl y i n t he FI NE mo de, t he qu alit y m od e can be
chosen when recordin g st ills on card.
The following table shows the file size and qualit y
of one JPEG still recorde d on card:
Setting
For DZ-MV380A
Capacity
8MB
16 MB
32 MB
64 MB
128MB
256 MB
512 MB
(The numbers of recordable stills aboveareonly for
reference)
Approx. 8 Approx. 14 Approx. 20
Approx. 22 Approx. 35 Approx. 50
Approx. 50 Approx. 80 Approx. 110
Approx. 100 Approx. 160 Approx. 220
Approx. 200 Approx. 320 Approx. 440
Approx. 400 Approx. 640 Approx. 880
Approx. 800 Approx. 1,280 Approx. 1,760
Recording quality
FINE NORM ECO
Quality
FINE Approx.
NORM Approx.
ECO Approx.
File size
DZ-MV350 DZ-MV380
128 KB
64 KB
32 KB
Approx.
512 KB
Approx.
384 KB
Approx.
256 KB
Application
When image
quality is
prioritized
Standard
When number of
stills is prioritized
(quality will be
slightly inferior)
* See page 164 for the number of recordable stills.
Note:
No still can be recorded on DVD-Rdisc.
27
English
Page 28

Features of DVD Video Camera/Recorder
VERSATILE FUNCTIONS AVAILABLE
This DVD video camera/recor der has numerous useful functions. However , the functions that can be used
will vary depending on whether DVD-RAM disc, DVD-R disc or card is used.
Use the functions, following the table below:
Camera Functions:
Function
Camera Functions Setup
Record Functions Setup
Date Setup
LCD Setup
Initial Setup
Program AE
White Bal.
EIS
Dig.Zoom
MIC.Filter
VIDEO Mode
Quality
Input Source
PHOTO Input
Self Timer
OSD Output
Date Mode
Date Set
Brightness
Color Level
Beep
Power Save
Record LED
Language
Demo Mode
Reset
Disc/Card used
DVD-RAM DVD-R CARD
∴∴∴
∴∴∴
∴∴×
∴∴∴
∴∴×
*1
∴
*2
∴
×
××∴
∴∴∴
∴ × ∴
∴ × ∴
∴∴∴
∴∴∴
∴∴∴
∴∴∴
∴∴∴
∴∴∴
∴∴∴
∴∴∴
∴∴∴
∴∴∴
∴∴∴
∴: Available; ×: Unavailable
(*1 Except for LPCM mode)
(*2 Except for XTRA mode)
Reference
page
80
81
83
84
85
86
87
88
88
89
90
49
48
91
91
92
92
93
93
146
94
English
28
Page 29

Disc Navigation Functions:
Function
Scene Delete
Edit Thumbnail
Copy
Select Start →Current
Detail
PlayList Switch
Play
Create
Edit
Title
Delete
Program Switch
Play
Title
Go To Top
End
Disc Capacity
Protect Disc
Format Disc
Update Control Info.
Finalize Disc
Others Category All
Repeat Play On
Skip
Fade
Combine
Divide
Move
Current → End
All
VIDEO
PHOTO
Off
Disc used
DVD-RAM DVD-R
∴ ×
∴ ×
∴ ×
∴ ×
∴ ×
∴ ×
∴ ×
∴ ×
∴∴
∴∴
∴∴
∴∴
∴ ×
∴ ×
∴ ×
∴ ×
∴ ×
∴ ×
∴∴
∴∴
∴ ×
∴∴
∴∴
∴ ×
∴ ×
∴ ×
∴ ×
× ∴
∴ ×
∴ ×
∴ ×
∴∴
∴∴
∴: Available; ×: Unavailable
Reference
page
101
103
104
105
107
108
106, 123
109
112
112
112
113
118
119
117
120 - 123
124
124
114
115
115
125
125
126
126
127
128
129
130
130
130
130
130
29
English
Page 30

Card Navigation Functions:
Function Reference page
Delete 101
Lock 110
Scene
Go To
Card
Slide Show
DPOF 111
Select Start → Current 112
Current → End 112
All 112
Detail 113
Top 125
End 125
Capacity 126
Format Card 127
All 131
DPOF 131
RECORDING ON DISC
Y ou can use both 8 cm DVD-RAM and DVD-R discs
on this DVD vide o camera/r ecord er for rec ording.
The recorded v ideo and audio will be stor ed on an
8 cm DVD-RAM disc or 8 cm DVD-R disc.
Using disc allows you to record without
overwriting previo us reco rding s, and also to store
your valuable recordings for as long as need be
while retaining clarity.
With disc you can immediately access recording
and playback, in contrast to videotape, which must
be fast-forwarded or rewound.
In addition, simply loading a DVD-RAM disc into
a PC equipped with DVD-RAM drive and DVD
vide o recording softwa re comp atibl e with 8 cm
DVD-RAM allows you to easily view the r ecorded
disc.
You can finalize a recorded DVD-R disc on this
DVD video camera/recorder so that you can play it
back on a DVD player or DVD video recorder that
is compatible with 8 cm DVD-R disc (however, the
finalized DVD-R disc may not be usable on some
DVD players).
RECORDING MOVIE AND STILL
The DVD video camera/recorder can record
movies of events and sports, in the same way as
with conventional camcorders.
It can also record stills on a DVD-RAM disc or card,
as with a digital still camera. With CCD of 680
pixels (DZ-MV350A), 1
‚020‚000 pixels (DZ-
MV380A), high-quality movies and stills (on DVDRAM disc only) can be recorded. When recording
movies, subject images can be zoomed up to 240
English
30
times; when re cord ing stil ls, subj ect image s can be
zoomed up to 40 times. Movies and stills can be
recorded on the same disc, by simply switching the
recording mode (power switch). However, if you
use a DVD-R disc, a still image cannot be recorded.
‚000
(If the DVD video camera/recorder is connected to
PC, the DVD video camera/recorder can capture
still images, suc h as JPEG data.)
Page 31

IMMEDIATE REVIEWING OF RECORDED IMAGE
You can check the recorded movie or still in the
viewfinder or on the LCD screen.
EDITING IN VARIOUS WAYS ON DVD VIDEO CAMERA/RECORDER ALONE
This DVD video camera/recorder is provided with
a useful editing/playback tool. Disc Navigation
allows you to easily attach a title or special video
effect to the recorded movie or still. With Disc
Navigation, you can arrange the playback order
and edit multiple images to play them back
continuously . You can create an entire movie on this
DVD video camera/recorder alone, without
inputting video to a PC for editing.
USING WITH VARIOUS DEVICES
Connect this DVD video camera/ recor der to yo ur
TV and you can enjoy the playbac k pi ct ure with
your family and friends o n the l ar ge TV scr een; or
connect it to a video printer (generally available) to
print the recorded image. You can also transfer
recorded movies and stills (for DVD-RAM disc or
card) to PC.
31
English
Page 32

Setups
This section explainspreparations for recording-setting up the DVD videocamera/recorderand
battery.
Setting Up the DVD Video Camera/Recorder
HOLDING DVD VIDEO CAMERA/ RECORDER
Insert your right hand from the bottom of DVD
video camera/recorder up t o the b ase of y our
thumb.
Put your hand in a
position where you can
easily operate the REC
button and the Zoom
lever.
Adjust the length of
hand strap so that the
DVD video camera/
record er is stable when
you press the REC button with your thumb.
Note:
Do notadjust the handstrap while holdingthe DVDvideo
camera/recorder: Doing this could cause the DVD video
camera/recorder to fall and be damaged.
ATTACHING LENS CAP
Pass the provided string through the hole in the len s cap and atta ch it to the hand strap of DVD video
camera/recorder.
Caution:
Do not lift the DVD video camera/recorder by
holding the viewfinder or LCD monitor: If the
viewfinderorLCDmonitorcomesoff,theDVDvideo
camera/recorder will fall.
1Use the string to attach the c ap to the DVD video
camera/recorder.
English
Note:
• Always keep the lens cap on when not using the DVD
video camera/recorder, to protect the lens.
• When recording,attach thelens capto thehand strapby
hooking thetab insidethe caponto strapforcomfortable
shooting.
32
2Push the both sides of cap inward and attach it
over the lens.
Push and fit
Page 33

ATTACHING SHOULDER STRAP
Besuretopassthroughthe2slots.
Pass the shoulder strap through
the shoulder strapattachments.
33
English
Page 34

INSERTING BATTERY INTO RE MOTE CONTROL
Insert the provided lithium battery into remote control.
1Slide the cover to remove it .
2Insert the lithium battery with the positive
terminal facing up.
Batterystopper
3Slide the cover to close it.
Note:
The lifeof lithium battery isapproximately oneyear. If the
batteryisdischarged,nooperationispossiblewith remote
control: Replace the battery.
REMOVING BATTERY FROM REMOTE CONTROL
1While pushing the battery stopper, slide the
battery out.
While pushing
batterystopper
Batterystopper
Warning:
• KEEP THE BATTERY AWAY FROM CHILDREN AND
PETS.
• IF SWALLOWEDCONSULTAPHYSICIAN
IMMEDIATELY FOR EMERGENCY TREATMENT.
• BATTERYMAY EXPLODE IF NOTHANDL ED
PROPERLY.DONOTRECHARGE,DISASSEMBLEOR
DISPOSE OF IN FIRE.
English
34
:
Note
• Replace the battery with a Hitachi Maxell, Sony,
Panasonic, Sanyo, Toshiba CR2025, or Duracell
DL2025.Use ofanother batterymay presentarisk offire
or explosion.
• Dispose of batterysafelyin accordancewith local laws.
Do not dispose of in fire.
• Do not short circuit thebattery.
• Do not hold the battery withthemetallic tweezers.
• Keep the battery in a dark, cool, dry place.
Page 35

●Using Remote Control
Point the remote control to the infrared receiver on
the DVD video camera/recorder. The remote
controllable distance is up to 16 feet (5 m).
10˚
15˚
10˚
15˚
5
(
t
e
e
f
6
1
.
x
o
r
p
p
A
Infrared
receiver
)
m
Note:
• When using the remote control, make sure that the
infrared receiver on DVD video camera/recorder is not
exposed to directsunlight or anyintense light.If the
infrared receiver is subject to light stronger than the
infraredlightfromremotecontrol, theDVD videocamera/
recorder cannot be operated by remote control.
• If thereis an obstaclebetween the remote control and
infraredreceiveronDVD videocamera/recorder,remote
control may not be possible.
• The DVD video camera/recorder uses the “VCR2”
remote controlcode ofHitachiVCRs.Ifyou usea Hitachi
VCR,etc. withremotecontrol codesetto “VCR2”,aVCR
placed nearthe DVDvideo camera/recorderwill alsobe
operated by theremote control: To preventthis, change
the remote control code of the VCR.
35
English
Page 36

Setting Up the Battery
TheDZ-BP14Sbattery provided withthis DVD videocamera/recorderhasnot been chargedat purchase
time: Charge it before using the DVD video camera/recorder.
Note:
• Besureto usethe DZ-BP14SWbatteryfortheDVDvideocamera/recorder: Usingother batteriescould causethe DVD
video camera/recorder to malfunction, or result in fire.
• Besure touse theDZ-ACS1 ACadapter/chargerto chargethe battery:Using otherchargers couldcause electricshock
or fire.
• Charge the battery at temperatures of 50 - 86ºF (10-30°C).
CHARGING BATTERY
Use the provided AC adapter/charger to charge
the battery.
1Connect th e p o wer cable to AC ad ap ter/
charger.
3Attach the battery to AC adapter/charger.
Note:
When charging abattery, unplug the DC powercord from
the DC output jack on AC adapter/charger.
2Plug the power cable into AC outlet.
The CHARGE indicator on AC ad apter/charger
will light.
Battery
POWER and
CHARGEindicators
AC adapter/charger
Power cable
●Battery charged status
Y ou can find out the charged s tatus of battery b y checking the CHARGE indicator on A C adapter/char ger:
Charge status CHARGE indicator
During charge Lit
Charge complete Goes out
Note:
English
See “Troubleshooting” on page 156 when the CHARGE
indicator blinks.
36
Page 37

ATTACHING BATTERY TO DVD VIDEO CAMERA/RECORDER
1Fit the battery to the battery attachment
platform on this DVD v ideo camera/recorder
and slide it upward un t il a c lick is heard.
Note:
• Make sure that the battery is in the correct orientation.
• Make sure that the battery is securely attached:
Incomplete attachment could cause the battery to fall,
resulting in damage.
REMOVING BATTERY
After using the DVD video camera/recorder, remove the battery from it.
1Slide the BAT TERY EJECT switch on the bottom
of DVD video camer a/recorde r: The battery can
be removed.
Note:
• For safety, be sure to turn the DVD video camera/
recorder off before attaching or removing the battery.
• Be careful not to drop the removed battery.
• If thebattery remainsattached, minutelevel current will
floweven ifthe DVDvideocamera/recorderisoff, andthe
battery will discharge.
37
English
Page 38

●Recordable time with fully charged
battery (with no zoom operation,
etc.)
The reference for DVD video camer a/ recorder
recordable time with fully charged battery is
between 40 and 60 mi nutes.
For DZ-MV350A
For DZ-MV380A
Withoutanyextraordinaryoperation,such
as zooming:
The continuou s ly rec ordab le time of DVD video
camera/recorder in the above table shows the time
available when the DVD video camer a/recorder i s
in the recording mode without using any other
function after recording is started. In act ual
recording, the battery will discharge 2-3 times
faster than this referenc e, since the REC button and
zoom are being operated, and playbac k is
performed. Assume that the reco rdable time with a
fully charged battery is between 40 and 60 minutes,
and prepare the number of batter ies to allow for the
time you are planning to r ecord on the DVD vid eo
camera/recorder.
Note that the battery discharges faster in cold
places.
●The time taken for charging the
batteryis165 minutesat77ºF(25ºC).
Note:
• See page 156 when charging is not possible.
• The charge time will vary depending on thebattery
remaininglevel.
• During and aftercharging, the battery willbe warm, but
this does not indicate a fault.
• If the folloa1 Tc[0.12026-0.1(phe5.7(f)-n[(zo(s)-en5.7(f)-a.2(h)0.2a[0.1p5.7(f)-pea5.7(f)-(wa3.7(m).3(ging)-26-0.1(ba(f)-260.( bazo(s)-6(r)62)-12.7(5)24.50)-12.2(80.0007(f)-eth a)8.3( )]T TD-0.5.1(n))1.272.55.5.1(n))1:(m).38(e-(t)-6.6(n))1p55.l.55.c2.9(h)-15.t.(u)-12.7(t)]TJ9TD-0.-n)-98a292bazo(s1.8.2(a(n2026-0.4.6o9(f)-r)7.8(i)-oes)-296.4)-89( )-15a9(f)-retimem17(6)-0.2(au)1(l)856.2(6ttery-64.6(e))0.2(s)-6tte06(e)c61.4(r(c)9-on.6(61.4d)1(i)-5.9(F)-o(s1.)1(l)856eth a)iy
English
*1 TheXT RA modecan beset onlywhena DVD-RAMdisc
is used. The time is only forreference: It will vary
depending on recording contents.
*2 LPCM modecan beset onlywhenDVD-Rdisc isused.
38
Page 39

BATTERY REMAINING LEVEL INDICATOR
When the battery is used to power the DVD video camera/r ecorder, the battery remaining level appears
in the viewfinder or on the LCD screen as follows:
Fully charged Nearly empty
(Blinks)
White portion shows remaining level
Note:
The remaining levelindicator “*” maybe displayed for anextended period, and “+”or“,”maybedisplayedfor
a shorter period.
EFFICIENT USE OF BATTERY
Charge battery immediately before using DVD
video camera/recorder:
The battery will slig htly discharge even if it is
detached from the DVD video camera/r ecorder . If
the battery is left attached to DVD video camera/
recorder, it will consume a slight amount of power.
Therefore, it is recommended that you charge the
battery shortly before using the DVD video
camera/recorder, usually on the day before you
plan to use it.
However , since the battery used for this DVD video
camera/recorder is free from the memory effect,
you do not need to completely discharge the
battery before charging it.
Whennot usingtheDVD video camera/ recorder
for an extended period:
It is recommended that you fully charge the batter y
once a year, attach it to DVD video camera/
recorder and use it up; th en remove the battery and
store it in a cool place aga in .
Store in cool, dark place:
When you a r e not using t h e DVD vide o camera/
recorder, remove the battery and store it in a cool,
dark place. If you store it in a place where the
temperature is high, the battery life will be
shortened. Be especially sure not to store the
battery in an environment (in a clos ed vehicle) over
140°F (60°C): Neglecting this could damage the
battery.
Battery life:
The battery life varies greatly depending on the
ambient environment and how often the DVD
video camera/recor der is used. If the usable time of
DVD video camera/recorder with a fully charged
battery is noticeabl y s ho r t, the battery is pr o ba bly
dead: Purchase a new one.
Power save and di scharge of battery:
It is recommended that you turn the DVD video
camera/recorder off in status other than recording,
since even during recor ding pause battery power is
consumed at the same level as during recording.
If, when you specify Power Save On, the recording
pause status continues for approximately 5
minutes, the DVD video camera/recorder will
automatically turn off.
To set or release power save, see “Turning DVD
Video Camera/Recorder Off Automatically
(Power Save)” on page 92.
39
English
Page 40

USING DVD VIDEO CAMERA/RECORDER WITH AC ADAPTER/CHARGER
It is recommended that you use the AC adapter/char ger to power the DVD video camera/rec order from
household AC outlet when you perform settings on it, play back or edit images, or use it indoors.
Note:
Be sure touse the specified AC adapter/charger (DZ-ACS1) to powerthe DVD video camera/recorder. Using otherAC
adapter/chargers could cause electric shock or result in fire.
1Connect th e p o wer cable to AC ad ap ter/
charger.
2Plug the power cable into AC outlet.
3Plug one end of DC power cord into the DC
output jack on AC adapter/charger.
4Attach the other end of DC power cord to the
battery attachment platform on DVD video
camera/recorder.
English
Note:
• The AC adapter/charger canbe used around the world.
AnACplugadapteris requiredinsome foreigncountries.
Ifyouneed one,purchaseitfrom yourHitachi distributor.
• If the CHARGE indicator does not lightwhentheAC
adapter/charger isplugged intoAC outlet,unplugitfrom
the AC outlet, waita few moments, and then plugit into
the AC outlet again. If the CHARGE indicator still does
notlight,theAC adapter/charger maybefaulty.Unplug it
from the AC outlet and consult your dealer.
40
Page 41

Inserting and Removing Disc
INSERTING DISC
1Press down the DISC EJECT button once and
release it.
A few moments after th e ACCESS/PC indicator
blinks, the cover of disc insertion block will open
slightly.
2Gently open the cover by hand until it stops.
3Insert the disc, in Round DVD Holder, into the
disc guide until it stops.
Note that the recording/playback surface of
disc must face the inside of DVD video camera/
recorder. The orientation for inserting the disc
into the disc guide is also predetermined : Load
the disc correctly, referring to the figure below.
DISC EJECT
button
Disc cover
PUSH CLOSE
portion
• The disc exposed portion must face in the same
direction as the lens, as showninfigure.
• The recording/playback side must face the inside
(DVD video camera/recorder).
Disc
guide
Correct
orientation
Incorrectorientation
Incorrect
orientation
4Push the section marked “PU S H CLOSE” on
the cover of disc insertion block, to close the
cover.
5Turn the DVD video camera/recorder on
( VIDEO or PHOTO).
When “DISC ACCESS” disappears, the DVD
video camera/recorder is ready for recording.
●Identifying recording/playback
sides of disc:
Single sided disc:
The recording/playback side
is opposite to the printed label.
Double-sided disc:
The recording/playback side
of “SIDE A” is opposite to the
“SIDE A” marked side .
The recording/playback side
of “SIDE B” is the “SIDE A”
marked side.
“SIDE A”mark
The opposite sideis
the “SIDE A”
recording/playback
side.
41
English
Page 42

Note:
• Disccannotbeinsertedor removedunlessthe batteryor
ACadapter/chargeris connectedtoDVD videocamera/
recorder.
• See page 76 for how to set disc in Round DVD Holder.
• If there is some delay before recording starts, refer to
page 147.
• The discinsertion orientationis predetermined: Forcibly
inserting a disc in wrong orientation could damage the
DVD video camera/recorder or Round DVD Holder of
disc.
• Ifthediscisnotcorrectly inserted,thecoverwillnotclose.
Never try to forcibly close the cover: This could cause
damage. Reinsert the disc properly.
• Ifasingle-sideddiscisinsertedintoDVDvideocamera/
recorder withthe printedlabel facingthe inside,anerror
messagewill appear.Remove thediscandreinsertitwith
its recording/playback side facing the inside. See
“Trouble Messages” on page 149.
●When using brand-new DVD-R disc
Recognition of the disc will
start.
The messages on the right
will appear in sequence by
pressing the button
between messages.
Whenrecordingonthis
DVD video camera/
recorder:
When final message
“Format the disc now? ”
appears, choose “YES ” an d
then press the button.
The disc will be
automatically formatted.
When formatting is
complete, “DVD-R disc,
Video mode cannot be
changed” will appear (See
page 152): Press the
button to erase the message.
Once formatted, a DVD-R
disc can no longer be
changed to a disc for PC, even if it has not been
record ed on t his DVD vide o camera/re corder.
Note:
Seepage86formoviequalitymode.
For
m
at Disc
Disc is not formatted.
If it formats, it becomes
possible to use for camera.
NEXT
CANCEL
Format Disc
Howeve r, when you r ecord
f rom PC connect i on
terminal,
please do not format.
NEXT
CANCEL
m
at Disc
For
Format the disc now?
YES NO
ENTER
When recording data from PC:
While the above messages are being displayed,
press the button, or when message “Format the
disc now?” appears, choose “NO” and then press
the button.
However, if data from PC has not yet been
recorded, the disc can be made usable on this DVD
video camera/recorder. When inserting the disc
into this DVD video camera/recorder, the same
message will appear: If you wish to use it on this
DVD video camera/recorder, choose “YES”.
Note:
Do not initialize a disc onwhich you wish to record data
English
created using the application (MyDVD) of PC.
42
Page 43

REMOVING DISC
1Set the power switch to
“POWER OFF” to turn the
DVD video came ra/
recorder off.
2Press down the DISC
EJECT butto n once and
release it.
In a moment, the cover of
disc insertion bloc k will
open slightly.
3Gently open the cover until
it stops.
When the cover is f ully
open, the disc wi ll slightly
come out from the disc
guide, and stop.
4Remove the
disc.
Note:
• It isrecommendedthat youturn theDVD videocamera/
recorder off wheninserting orremoving disc, inorder to
prevent faulty operation.
• Evenaftert he DVDvideocamera/recorderis turnedon,
the disc canbe removed unless it isin recording status.
Hold down theDISCEJECT button forapproximately 2
seconds, and then release it to remove the disc. (The
DISCEJECTindicatoronthe LCDscr een willblink.) Itis
recommended that you turn the DVD video camera/
recorder offbefore insertingor removing disc toprevent
misoperation.
• Donot detachthe batteryorACadapter/charger untilthe
DVD video camera/recorder is completely turned off.
• Do notinsert anything otherthan the 8cm DVD-RAM or
DVD-R discinto thedisc insertion block:Doing socould
cause malfunctions.
• Set thepowerswitch to “POWER OFF”toturn the DVD
video camera/recorder off.
• When inserting or removing the disc, be careful not to
touch the inside of DVD video camera/recorder
(especially, the lens of laser pickup).
• When insertingorremoving thedisc, connect acharged
battery orAC adapter/charger tothe DVDvideocamera/
recorder: The disc cover will not openunless the DVD
video camera/recorder ispowered.
Hold the top
of Round
DVD
Holder as
shown in the
illustration an d g e ntly pull it out.
Note:
Be careful notto touch the disc exposed portionwhen
removing the disc.
5Gently push the section
indicated “PUSH CLOSE”
on the cover of disc insertion
block, to close the cover.
English
43
Page 44

Inserting and Removing Card
Beforeinsertingorremoving card,setthe powerswitchto “POWEROFF”toturn theDVDvideocamera/recorder
off.
1Open the cover of card
insertion block with power
turned off .
2Insert card with its
terminal inw a rd u ntil it
locks.
Removing Card
Push the center of card
edge: The card will come
out so that it can be held
by fingers.
3Close the cover of card
insertion block.
English
44
Page 45

Basic Techniques
This sectionexplains about recordingof movies and stillimages, and also basicsettings on DVD video
camera/recorder.
Basic Handling of DVD Video Camera/Recorder
TURNING DVD VIDEO CAMERA/RECORDER ON AND OFF
While holding down the red button at the center of
power switch, s e t the switch accordin g to each
record ing fu nctio n:
Set to “ PHOTO”:
To record still on DVDRAM disc
Set to “ VIDEO”:
To record movie on DVDRAM or DVD-R disc
Set to “POWER OFF”:
The DVD video camera/
record er wil l turn off.
Set to “ PHOTO”:
To record still on SD
memory card or
multimedia card
Note:
• OnceyouturntheDVDvideocamera/recorderontolet
it recognizethe disc,you canimmediately recordor play
back byturning the DVDvideo camera/recorder on
again.However,ifyouremovethe disc,replaceit,orifthe
date changes afterpower is turned on, itwill take some
timeforthe DVDvideo camera/recorderto startbecause
it must recognize the disc again (See page 147).
• Itwill takesome timeforthe DVDvideo camera/recorder
to display the Disc navigation screen after power is
turned on.
• If youturn theDVD video camera/recorder on, the
ACCESS indicatorwill lightor blinkto showthat theDVD
video camera/recorder is recognizing the disc or card:
During thistime, nooperation, suchas recording,can be
performed.
After several seconds, the ACCESS indicator will go
out, andoperating theDVD videocamera/recorder will
be possible.
Power ON status
During playback, set the power switch to “
VIDEO” or “ PHOTO” when us ing disc , or set it
to “ PHOTO” when using card.
T urn the switch while holding down the red button
at the center of switch.
Power switch
• When the DVDvideo camera/recorder is turned on,the
self-diagnosis function will work and a message may
appear. In this case, refer to “Trouble Messages” on
page 149 and take corrective action.
• Whilethe ACCESS/PCorCARDACCESS indicatorislit
or blinking, do not violently open or close the LCD
monitor.
English
45
Page 46

VIEWING SUBJECT THROUGH VIEWFINDER
1Pull out the viewfinder.
2Turn the diopter control knob to adjust the focus
to suit your eyesight.
Note:
• If the LCD monitor is open approximately 90°, the
viewfinder will be off.
• Focusing will not be correct unless the viewfinderis
pulled out.
VIEWING IMAGE ON LCD MONITOR SCREEN
If you open the LCD monitor, you can monitor subject image on the LCD screen.
1Open the LCD monitor.
The LCD monitor has a po rtion where you can
hook your finger . Hook the finger there to open
the monitor.
●Range where the LCD monitor can
be moved
The LCD monitor can be opened up to
approximately 90º.
If the LCD monitor is open 90°, it can be tilted with
the screen down as much as 90°, and can also be
tilted with screen up an d tur ned up to 180° so the
screen faces in the same direction as the lens.
If the LCD monitor is turned 180° so the scr een faces
in the same direction as the lens during recording,
subject image will also appear in the vi ewfinder as
an mirror image (left/right rever se d).
Tilt the LCD monitor to adjust its vertical angle so
that you can see the screen easily.
Note:
• Be sure to open the LCD monitor approximately 90º
before changing its vertical angle.
• Do notrecord for aprolonged time withthe LCD monitor
turned approximately180
video camera/recorderbody: Doingthis couldcause the
DVDvideo camera/recorderand LCDmonitortobecome
English
hot.
ºin closecontact withtheDVD
46
Page 47

CLOSING LCD MONITOR
Before closing the LCD monitor, be sure to reset it at
right angles to the DVD video camera/recorder.
Replace the LCD monitor on the DVD video
camera/recorder with the LCD screen facing
inward until a click is heard.
Note:
• Be sure to returntheLCD monitor at right angles to the
DVDvideo camera/recorderbefore closingitorreplacing
it on the DVD video camera/recorder with its screen
facing outside. If the LCD monitor is tilted, it cannot be
closed to the DVD video camera/recorder.
• IftheLCD monitorisnot securelylocked totheDVD video
camera/recorder, noimagewill appear intheviewfinder.
47
English
Page 48

Setting Date and Time
Set the current date and time so that the date and time you make a recording can be recorded correctly.
The following procedure can also be used to correct the date and time you have already s et.
1Turn the DVD video camera/recorder on.
2Press the MENU button.
The menu screen will
appear.
3Use the joystick to choose
“Date Setup” and then
“Date Set”.
4Tilt the joystick to right.
The figure for the month
will be selected .
[The digit that is
highlighted first depends
on the date display format
(set up in Date Mode): The digit on the left end
of the date display will be first highlighted.]
Note:
After setting thefigure for the month, tiltthe joystick to
right to select the digit to be set. Ifyoupress the
button after selecting the figure for the month, the
English
screen for verifying theset date will appear instead of
screen for setting day, year or time.
5Tilt the joystick to left or
right to select the digit
you want to set in
sequence.
Tilt the joystick up or
down to select the
number for current date/time, and then repea t
step 5 to set the current date and time.
Note:
To stop date/time setting midway, press the button.
6After setting the current
date and time, press the
button.
The screen for verifying
the set date will appear.
7If the displayed date and time are corr ect, use the
joystick to choose “YES”, and then press the
button.
The date and time wil l be set, and the DVD video
camera/recorder will enter the r ecording pause
status.
Choosing “NO” will restore the men u sc reen.
Note:
This DVD video camera/recorder incorporates a
rechargeable batteryto storethedateandtimein memory.
Ifthis built-inbatteryisexhausted,the dateandtime willbe
reset. To prevent this, connect the AC adapter/charger to
DVD video camera/recorder every 3 months, and leave
them for at least 24 hours with the DVD video camera/
recorder turned off: The built-in battery will be charged.
48
Page 49

CHANGING DISPLAY FORMAT OF DATE AND TIME
Y ou can select one of three date display formats: month/day/year , day/month/year or year/month/day .
Associated with the sel e ct e d date di splay, the time display format will also c ha nge as follows:
Display format Example of display
M/D/Y
D/M/Y
Y/M/D
5:00PM
9/30/2003
17:00
30/9/2003
PM5:00
2003/9/30
1Press the MENU button.
The menu screen will appear.
2Use the joystick to choose
“Date Mode” on the
“Date Setup” menu
screen, and then press the
buttom.
The options will appear
on the right of “Date Mode”: The mark will be
attached to the currently selected option.
Da t e Se t up
Da te Mode
Da t e Se t
ENTER RETURN
M/D/ Y
D/M/ Y
Y/M/D
3Use the joystick to select
the desired date display
Da t e Se t up
format, and then pres s the
button.
The menu screen for
ENTER RETURN
setting date will be
restored, and the “Date Mode” has been
RAM
changed as you designated.
4Press the MENU button to switch off the menu
screen.
Note:
If the date display format has been changed, the display
formatduring playbackaswell asduring recordingwillalso
be changed (See page 62).
Da te Mode
Da t e Se t
D/M/ Y
RAM
49
English
Page 50

Recording Movie
Insert a recordable D VD-RAM or DVD-R disc into this DVD video camera/recorder.
ACCESS/PC
indicator
Pressing REC
once will start
recording;
pressing it
onceagain will
temporarily
stop recording.
Power switch
1Turn the DVD camera/recorder on.
Set the power switch to “ VIDEO” to turn the
DVD video camera/recorder on.
After the ACCESS/PC indicator goes out,
perform the subsequent operation:
2Check the subject on the screen (viewfinder or
LCD).
If using the viewfinder, pull it out.
3Press the REC button.
The “/” mark in the viewfinder or on the LCD
screen will change to the “0” mark, and
recording will start.
During recording, the recording indicator on the
front of DVD video camera/recorder will light.
Pressing REC again during recording will set the
DVD video camera/recorder to the recording
pause status.
Note:
• See page 147 when recording movie is not possible.
• See page 147 if it takes some time before recording is
possible.
• See page 62 for on-screen information display.
• It is recommended that you use DVD-RAM disc from
which recorded contents can be deleted.
• Sound is recorded from the stereo microphone on the
front of DVDvideo camera/recorder: Take care that this
microphone is not blocked.
• Youcanpress theRECbutton immediatelyaftertheDVD
video camera/recorder enters the recording pause
status,but nofurther recordingcanbemadewhile “DISC
ACCESS” is being displayed
Recording will restart after themessage disappears.
• Take care that power is not interrupted while the
ACCESS/PC indicator is blinking.
• The minimumrecordable time ofmovie isapproximately
3 seconds.
• See page 93 for setting of Record LED (recording
indicator) On/Off.
• For various functions available during recording, see
“Setting Up Camera Functions” on page 80.
• Hitachi cannot be responsible for video and audio that
cannot berecorded or edited because ofany defect.
• The power switch can be changed over even during
recording, but the operation will notbe changed.
• Each time the DVD video camera/recorder enters the
recording pausestatus, thecounter display willbereset
to “0:00:00”.
• WhenusingDVD-Rdisc,donotperformthe following,or
data on the disc may not be read:
- Using another device, doing additional recording on
DVD-R disc recorded on this DVDvideocamera/
recorder
- Using this DVD video camera/recorder, doing
additional recording on DVD-R disc recorded on
anotherdevice
4When recording is finished, t urn the DVD video
camera/recorder off.
English
50
Page 51

●Powersaveand dischargeofbattery
If, when “Power Save: On” is specified, the DVD
video camera/recorde r is left in the recording
pause status for approximately 5 minutes, it will
automatically turn off.
To restart re cording, set the power s witch t o
“POWER OFF”, and then set it to “ VIDEO”.
To set or release power save, see “Turning DVD
Video C amera/Recorder Off Automatically
(Power Save)” on page 92.
It is recommended that you specify “Power Save:
On”, since even during recording pause battery
power is consumed at the same level as during
recording. Especially when power save ha s be e n
released, turn the DVD video camera/r ecorder off
when not in use.
51
English
Page 52

USING EXTERNAL MICROPHONE
Connect external microphone (generally available) to the external microphone jack of this DVD video
camera/recorder. Clearer sound can be recorded. Turn on the switch on microphone and start recording.
For details on microphone, see “Major Specifications” on page 164.
To external
microphone jack
A/V
MC
Note:
• If the AV/S input/output cable is plugged in, youcannot use external microphone: Unplug the AV/S input/output cable
to use the external microphone.
• This DVD video camera/recorder cannot use a plug-in power type microphone (power supplied from camcorder).
●Attaching Ferrite Core
Although no ferrite core is attached in the il lustrations of the cables in text, be sure to attach the provided
core to the external microphone cable using the following procedure:
1Open the cover of ferrite core.
2Attach the core to ext ernal micr ophon e cable at
a position approximately 1-15/16” (5 cm) from
its end.
3Close the cover of core, taking care that it does
not catch the external microphone cabl e.
1-15/16”
(5cm)
English
52
Page 53

Recording Stills
Note:
Recordingofstill imagesis possibleon DVD-RAMdisc and
card.
ACCESS/PC
indicator
Power switch
CARD
ACCESS
indicator
1Turn the DVD camera/recorder on.
When using DV D- RAM disc:
Set the power switch to “ PHOTO”.
When using card:
Set the power switch to “ PHOTO”.
After the ACCESS indicator goes out, perform
the subsequent operation:
Still recording mode
Number of recordable stills
(When usingDVD-RAMdisc)
REM
999
8:00AM
9/30/2003
2Check the subject on the screen (viewfinder or
LCD).
3Press the REC button.
The DVD video camera/rec order automatically
focuses on the subject at the center of screen
(when auto focus is selected ).
The screen will be bl ack, and t hen the r ec ord ed
still will be displayed. When the “/” mark
appears, you can proceed with the next
recording; while “DISC ACCESS” or “CARD
ACCESS” is bein g displayed, you c annot
proceed with the next recording.
4Set the power switch to “POWER OFF” to turn
the DVD video camera/recorder off.
Note:
• See“Still recordingquality” onpage 27fordetailsof stills
on card.
• Donotoperatethepower switchorremove thecard while
the ACCCSS/PC or CARD ACCESSindicator is lit or
blinking: Doing so may damage the card orthe data on
card.
• With DZ-MV380A,therange of screen inwhich recording
is possible will be differentfor movie and still.
REM
FINE
(When using card)
8:00AM
9/30/2003
999
English
53
Page 54

●Setting Video Flash* (see
“Introduction to Optional
Accessories” on page 166)
When recording still s in a dark place, or the subject
is lit from rear, it is recommended that you use the
optional DZ-FLH3 Video Flash: Refe r to the
instruction manual of Video Flash for use.
Setting of
Video Flash
AUTO No display Automaticallyemits
ON Always emits light
OFF No light emission
* Unusable on DZ-MV350A.
On-screen
information
Manner of
emitting light
lightindarkplaceor
in a place lit from
rear.
regardless of
brightness
Note:
• The DVD video camera/recorder automatically sets the
shutterspeedbetween1/800and 1/30second (between
1/800 and 1/10 second if Program AE has been set to
Low Light) depending on the subject brightness.
• During recordingof stills, theelectronic imagestabilizer
will not function.
• See “Switching Quality of Still Image (Quality)” on
page 87 if you want to change the still quality mode.
• However,darksubjects maynot bein clearfocuseven if
theV ideoFlash isused.Itisrecommended thatyou light
a subject when recording in a dark place.
English
54
Page 55

Zooming
This DVD video camera/rec order allows you to record using optical 10-power zoom and digital zoom.
Move the zoom leve r t o “T ” control side, and the
subject image will gradually become telescopic:
Move the zoom lever to “W” control side, and the
image will wide n.
If Dig. Zoom 40× or 240× is specified, moving the
zoom lever to “T” control side will engage the
digital zoom midway (See page 84).
Recordinginwide
area
Note:
• The settingof digitalzoom 240× iseffectiveonly during
movie recording.
• If you set zoom to 240× when recording still,the digital
zoom will be up to 40×.
• When asubject is zoomed,it may bemomentarily out of
focus.
• When digitalzoom is engaged,the image qualitywill be
rougher.
• Ifthezoom ratiois frequently changedat short intervals,
the recorded image will be unclear.
Zoom Out
In case of still recording
In caseof movie recording
1 × 10 × 40 × 240 ×
Zooming
Digital zoom range
Recording
enlargedimage
FINE
9/3 0/2003
Zoom In
0:00:00
REM
3 0 MIN
8:00AM
English
55
Page 56
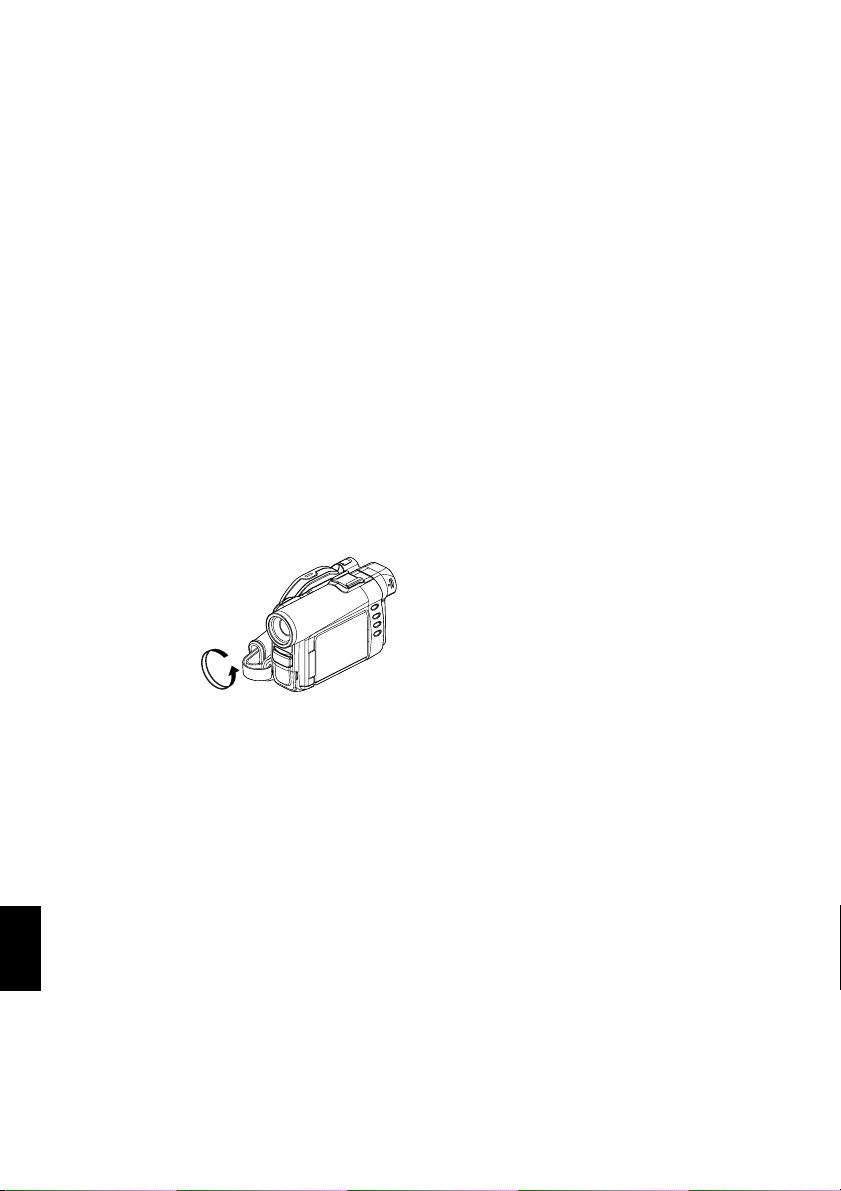
MACRO RECORDING
Use the macro function when r ecor ding a small obj ect fr om c lose-up posit ion: You can shoot the subject
as close as approximately 13/16” (2 cm) from the lens surface, magnifying the image to fill the screen.
1Aim the DVD video camera/recorder at the
subject, and press down the zoom lever to “W”
control side.
Note:
• Zoom canbe used,but thesubject maynot be focused,
depending on the distance to the subject. In this case,
movethezoomto“W”controlsidetofocus.
• The amountof lighttends to beinsufficient duringmacro
recording:If the subjectimage istoo dark,useadditional
lighting.
RECORDING SUBJECTS FOR STRONGER WIDE-ANGLE OR TELEPHOTO
EFFECT
Use tele-conversion lens or wide-conversion lens to record subjects for stronger telephoto or wide-angle
effect.
Use conversion lenses with the following filter diameters:
DZ-MV350A: 30.5 m m
DZ-MV380A: 37 mm
1Remove the lens hood fro m DVD video camera/
recorder.
2Remove the cap of conversion lens, and screw
the lens into the filter thread of DVD video
camera/recorder until it stops.
* With DZ-MV380A, you can use the optional conversion lenses:
• Tele-conversion lens (DZ-TL1): For stronger telephoto effect
• Wide-conversion lens (DZ-WL1): For stronger wide-angle effect
Note:
• Be careful not to lose the removed lens hood.
• With DZ-TL1tele-conversion lens,the focusingrange at
“T” (telephoto) control side is between approx. 5m and
infinite.
• Whenaconversionlensisattached,note thatif youzoom
English
in on a subject, vignetting willslightly occur on the “W”
(wide-angle) controlside (thefour cornersof screen will
be dim).
56
Page 57

Manually Focusing Subject
The DVD video camera/recorder measures the distance toasubjectviewed at the centerofscreenand
automatically focuses on it. If it is difficult to automatically focus the subject, adjust the focus manually.
FOCUSING DURING RECORDING
This DVD video cam era/recorder automatically focuses a subject at the cent e r of screen (auto-focus).
When the DVD video camera/recorder is turned on, auto-focus will always be set.
Focusing range
You can switch the display mode of on-sc ree n in formation:
• On T (tele) side: appro ximately 3.6 feet (1 m) from lens surface to infinity
• On W (wide) side: approximate ly 13 /16” (2 cm) from lens surface to infinity
1Press the FOCUS button during recording.
“MF” will appear on the screen.
0:00:00
REM
Manual Focus icon
3 0 MIN
FINE
8:00AM
9/30/2003
2Press the zoom lever down to “T” control side to
zoom in on subject.
3Use the buttons to adjust the focus, while
viewing the image in the viewfinder or on the
LCD screen.
Note:
• Pressing FOCUS will alternate between manualfocus
andauto focus.With autofocus,no indicationwillappear
on the screen.
• Be sure to zoom in on your subject before manually
focusingon it.Ifyou bringthesubject intofocusat the“W”
control side,focus willbefaulty whenyou turn thezoom
lever to the “T” control side to zoom in on the subject.
• Manual focus is released when the DVD video camera/
recorder is turned off. When you turn the DVD video
camera/recorder on next time, auto focus will be
restored.
English
57
Page 58

Manually focus the following ob je cts, which may n ot be au t omatically focu sed (See page 57):
Objects not in
the center of
screen
Objects
moving rapidly
Object behind
glass with
waterdroplets,
dirt onit
Objects with
little variation
in brightness,
such as white
wall
Objects lit by
neon sign,
spotlight, etc.
whichglaresor
emits strong
light
Nightview
Objects that
are farand
near at the
same time
Dark objects
English
58
Page 59

Adjusting Exposure Manually
This DVD video camera/recorder measures the subject brightness and automatically adjusts th e
exposure. You can also adjust the exposure manually.
1Press the EXPOSURE button during recording.
The exposure indicator will appear on the
screen.
0:00:00
REM
Exposure indicator
3 0 MIN
Adjust with and buttons
FINE
8:00AM
9/3 0/2003
2Use the buttons to adjust the exposure,
while viewing the image in the viewfinder or on
the LCD screen.
Note:
• Pressing EXPOSURE will alternatebetween manual
adjustment andauto exposure.With autoexposure,no
indication will appear on the screen.
• The exposure setting will return to AutowhentheDVD
video camera/recorder is turned off.
English
59
Page 60

Compensating for Backlight
Whensubjectislightedfromrear,thisfu nction willcompensateforlightingsothatthesubject isnottoodark.
1Press the BLC button during recording.
0:00:00
REM
Backlight correction icon
3 0 MIN
FINE
The backlight correction icon will appear.
Note:
• PressingtheBLC buttonwill alternatebetween backlight
setting between on and off.
• The backlight setting will automatically return to “off”
when the DVD video camera/recorder is turned off.
English
8:00AM
9/30/2003
60
Page 61

Using Full Auto Function
Pressing the FULL AUTO button will fully automate the camera functions.
1Press the FULL AUTO button.
The following settings will reset to defaults:
Function When setting full auto
Program AE Auto
White balance Auto
Exposure Auto
Backlight compensation Off
Focus Auto
EIS On
MIC.Filter Off
English
61
Page 62

On-Screen Information
Various types of information will appear in the viewfinder or on the LCD screen during recording.
INFORMATION DISPLAY DURING RECORDING
*1
1234
7
8
9
10
11
FINE
12
The abovescreen is anexample for explanation:It is
different fromthe actual display.
DISC ACCESS
5
LIN
10
0:00:00
REM
3 0 MIN
8:00AM
9/30/2003
1. Recording mode
:Movie
:Still
: External input still (field)
: External input still (frame)
2. 0 Program AE (only in movie recording mode)
No display: Auto
- :Sports
. :Portrait
/ : Spotlight
0 :Sand & Snow
1 :Low Light
6 White bal ance
No display: Auto
English
3 :Set
4 : Outdoor
5 :Indoor1
6 :Indoor2
8 Backlight compensati on
No display: Backlight compensation OFF
8 : Backlight compensation ON
: Manual focus
No display: Autofocus
: : Manu al f oc us
REC
External flash
separately) is attached] (only in still recording
mode)
6
13
14
15
No display: Emits light automatically
3. Microphone filter (only in movie recording
16
17
mode)
No display: Microphone filter OFF
; : Microphone filter ON
4. Self-timer (only in still recording mode)
No display: Self-timer OFF
< : Self-timer ON (count is from 10
5. External Input
LIN :AV input
*1
SIN
6. Recording status
0 :During recording
/ : During recording pause
No display
7. Electronic image stabilizer (EIS) (only in movie
recording mode)
No display: EIS OFF
9 :EIS ON
8. Zoom
!
9. Exposure correction
10.Warning message
[when Video Flash (sold
: Always emits ligh t
: No light emission
seconds)
:S-VIDEO input
*2
(Digital Zoom: Off)
(Digital Zoom: 40×)
(Digital Zoom: 240×, only in movie
recording mod e)
62
Page 63

11.
Disc/Card type
:DVD-RAM
:DVD-R
: DVD-RAM (write-protected)
: DVD-R disc already finalized on this
: DVD-R disc f inali zed on a d evic e
DVD video camera/recorder
other than this DVD video came r a /
recorder
: SD memory card or multimedia card
: Locked SD memory card
No display
*3
12.Movie recording quality (only when using disc)
XTRA : Highest quality (only when using
LPCM : Highest audio quality (only when
FINE : High quality
STD : Standard
Still recording quality (only when using card)
FINE : High quality
NORM : Standard
ECO : Number of recordable stills is
*1 No t displayed on DZ-MV350A.
*2 When no disc or card is in the DVD video camera/recorder, or disc has not yet been initialized, a write-protected
disc or locked card, or a disc or card with no remaining space, has been inserted.
*3 When a disc or card that cannot be used in this DVD video camera/recorder is inserted
*4 No remaining time or number will be displayed with a protected disc or lockedcard, or finalized DVD-R disc.
*5 In XTRA mode,possible recordingtime may be longer thanthe displayedtime.
*6 The displayed numberof recordable stills isforreference: The decreasing number maynot be correct, depending
on recording conditions (not displayed with aDVD-R disc).
DVD-RAM disc)
using DVD-R disc)
prioritized
13.Movie recording time (only in movie recording
mode)
14.Remaining space on disc/card
REM XX MIN*5: Remaining recordable minutes
*6
REM XX
during movie recording
:Number of remaining
recordable still images during
still recording
*4
15.Rema ining batt ery level
B(full charge)
C
D
E
(low remaining charge)
16.Brightness/Color density of LCD screen or
Volume
:
The volume can be adjusted during external
input and playback.
17.Current date/time
63
English
Page 64

●Switching the information display mode
You can switch the display mode of on-sc ree n in formation:
Press the DISPLAY button.
The full and minimum display modes will altern a t e.
• Full display mode: All types of in formation will appear.
• Minimum display mode: The recordi ng mod e (see 1 on
page 62) and recording status (see 6 on page 62) will appear. If
the DVD video came ra/recorder has warning information, a
warning message will appear.
Note:
The DVDvideo camera/recorder doesnot recordthe dateand time asa part ofimage.However,this information during
recording will be recorded withimage as data whichcan be checked onDiscNavigation screen during playback (See
“Information Display During Playback” on page 71).
●Display when recording an image of yourself
When recording with t he LCD screen facin g the same directio n as the lens, the
operating status will appear, and in addition, the battery remaining level will
blink when the battery has almost no remaining charge.
The following ope rating status indicat or will light or blink to giv e warning
message to user . The message can be checked when returning th e LCD monitor
180° to the original status from the status in which the LCD screen was facing
the same direction as the lens.
- :The disc has almost no free space.
:Write-protected disc or locked card is loaded.
:You are attempting to record a still on DVD-R
No display :Disc or card that cannot be used has been loaded.
. :The disc or card is full, or you are attempting to
disc.
record a copy-guarded im age.
Note:
• If theLCD screenis set facingthe samedirectionas thelens, the LCDscreen willdisplay amirror image(left and right
reversed).
• If the LCD screen is set facing the same direction as the lens, you can also view subject image in the viewfinder.
• Although youcan switch tothe manual focus,exposure and on-screendisplay modeseven during recordingwithLCD
screen facing the same direction as lens, they willnotappear on the screen.
English
64
Page 65

Recording Image from Other AV Devices
You can record images from other AV devices to disc or card in this DVD video cam e ra/recorder.
CONNECTING TO OTHER AV DEVICE
Use the A V/S input/output cable (provided) to connect the DVD video camera/ recorder to the other A V
device as follows:
Attachferritecoretocontrol
radio noise emission
To AVinput/output jack
AV/S input/output cable
(provided)
* If you areusing DZ-MV380A andthe connectedAV devicehasanS-VIDEO outputjack,
you can connect the S-VIDEO jack of AV/S input/output cable.
Note:
• If you operate the DVD video camera/recorder
connected toanother device, alwayspower the camera/
recorder from AC outlet using the AC adapter/charger.
• Ifyou usea HitachiVCR,it willbe operatedbythe remote
controlprovided with theDVD video camera/recorder.
When recording an image from a Hitachi VCR, change
theremotecontrol code oftheVCR tootherthan“VCR2”.
To S-VIDEO
outputjack of
VCR, etc.
Yellow
White
To video/
audio output
jacks
Red
• With DZ-MV380A, using S-VIDEO will enable youto
record clearer images.
• The DZ-MV350A cannot record S-VIDEO input.
• Reduce the volume of external input sound heard from
thebuilt-inspeaker: Theloudvolumemaycause noiseto
enter therecorded image.
English
65
Page 66

RECORDING IMAGE FROM AV DEVICE
1Set the input source on the
DVD video came ra/
L IN
recorder to “LINE (L IN)”.
Switch the input referring
to “Input Source” on
FINE
9/30/2003
page 88.
Choose “S LINE” to input S-VIDEO signal.
(Only for DZ-MV380A)
2Turn on the connected device, and start
playback.
The picture will appear on the LCD screen or
viewfinder of this DVD video ca mera/recor der .
3Press the REC button.
Recording will start on this DVD video camera/
recorder.
The operation of this line-input recording is the
same as for recording movie.
0:00:00
REM
3 0 MIN
8:00AM
Note:
• The recorded contents can beplayed back in thesame
manner aswhen playingback cameraimagesrecorded
on this DVD video camera/recorder.
• Stillimages canalso be recorded onDVD-RAM discor
card. See “Switching External Input Recording Method
(PHOTO Input)” on page 88for details, and“Recording
Stills” on page 53 for how to record still images.
• The “Input Source” setting will return to “CAMERA”
whenever DVD video camera/recorder is turned off.
• Recording of most images is prohibited by the copy-
guard signal to protectthe copyright, except forimages
recordedon camcordersforpersonalenjoyment.“COPY
PROTECTED”appearsintheseimages:Theycannotbe
recorded on this DVD video camera/recorder.
Typicalcopyright protectedimages includethoseof DVD
video, LD, recorded videotapes, some parts ofdigital
satellite broadcasts, etc.
• If a video signal that cannot be read by this DVD video
camera/recorder ispresent-even inimagesrecordedon
camcorder for personal enjoyment without copy-guard
signal - the input image may not be recorded normally.
• If theinput signal isinterrupted by switchingthe channel
onTVorswitchingthesignalusingvideoselector,normal
recordingcannot be performed.
English
66
Page 67

Playing Back
IMMEDIATELY CHECKING RECORDED SCENE
You can check your recording immediately on the spot.
Note:
• If the LCD monitor is open during playback of movie,
playbacksoundwillbeheardfromthespeaker.Adjustthe
sound volume using thevolume control buttons (
• To temporarily stop playback, press the button.
Press the
• Even ifyoustopplayback midwayand immediatelystart
recordingagain, thenewimag e willbere cordedafter the
lastscene ondiscorcard(theprevious imageswill notbe
overwritten).
• Depending on the amount of data to be played back, it
may take some time for the playback image to appear.
• Donotoperatethepower switchorremove thecard while
the ACCCSS/PC or CARD ACCESSindicator is lit or
blinking: Doing so may damage the card orthe data on
card.
1Press button in the recording pause status.
The DVD video camera/r ecor der will enter the
playback mode, and the scene you have
recorded last will be played back.
When playback is finished, th e DVD video
camera/recorder will enter the pause status at
the last image o n d isc.
If the pl ayback pause status continu es for as long
as 5 minutes, the DVD video camera/recorder
will automatically ret urn to the recording pause
status.
Notes when playing back stills on card:
•
This DVD video camera/recorder can play back image
data recorded on SD memory card in other digital
cameras conformingtotheDCF(Designrule forCamera
Filesystem) standard.The rangeofimagedatanormally
playable onthis DVDvideo camera/recorder isthat with
pixels from80 horizontalx 60 vertical to4000 horizontal
x3000 vertical.If thepixel dataisoutside thisrange, blue
thumbnails will appear (thumbnails* in thefigure),
meaning the imageis unplayable.
, ).
buttonagain to restart playback.
2Press the button.
Playback will stop, and recor d ing pause status
will be restored.
• Even when the number of pixels is within the above
range, playback maynot bepossible, depending onthe
recording status of the digital cameras used.
• When playing backa still, “Playback.” will appear:Stills
with a large number of pixels willtake some time to
appear.
English
67
Page 68

PLAYBACK FROM START OF DISC OR CARD
Use the Go To function (P. 70) or Disc Navigation
function (P . 95) to play back from the start of disc or
card.
SEARCH PLAYBACK OF MOVIE
During playback, tilt the j oystick to right or left and
hold it: Search playback will start.
Tilt and hold: Scenes will be visually scanned
forward
Tilt and hold: Scenes will be visually scanned
backward
Release the joystick when you find the desired
image: Normal playback will start from that point.
Note:
• When you skip or search scenes from playback or
playback pause, the screen will be darkbriefly.
• See page 147 if search playback does not operate
normally.
FRAME ADVANCE/FRAME BACK/SLOW PLAYBACK OF MOVIE
During playback pause, tilt the joystick: Frame
advance, frame back or slow playback will start.
Tilt once : Picture will advance one frame.
Tilt once : Picture will go back one frame.
Tilt and hold : Forward slow playback
Tilt and hold : Reverse slow playback
After frame advance, frame back or slow playba ck,
the DVD video camera/recorder will enter the
playback pause status.
Note:
• In forward slow,a rapidly moving subject imagemay be
distorted.
• The intervals for playing backframesin frame advance/
frame back/slow playback are as follows:
Frameadvanceand forwardslow: Approx.0.03 second
Frame backand reverse slow: Approx.0.5 second
• No sound will behear d during search playback or slow
playback.
English
68
Page 69

SKIP PLAYBACK OF MOVIE
During playback, tilt the joystick up or down to
locate the start of desi red sce ne.
Tilt once : To skip to the first image of the
Tilt once : To return to the first image of
Tilt and hold : To continuously locate the
Tilt and hold : To continuously locate the
scene following the one being
played back, and start
playback.
the scene being played back,
and start playback.
beginnings of scenes, starting
from the scene following the
scene being played back. When
the desired image appears,
release the joystick: Playback
will start from that point.
beginnings of scenes
backward, starting from the
scene preceding the scene
currently being played back.
When the desired image
appears, release the joystick:
Playback will start from that
point.
PLAYING BA CK STILLS
Tilt the joystic k up or down during playback to
quickly play back stills in sequence.
Tilt once: To display stills one by one forward
Tilt once: To display stills one by one backward
Portion being played back
Tilt uptwice Tilt uponce Tilt down once Tilt down twice
Scene 1 Scene2 Scene 3
Portion being played back
Tilt up once
Scene 1 Scene 2 Scene 3
Tiltingupthejoystick ataportionseveralseconds from
the startof scene being playedback will return tothe
start of the scene preceding that being played back.
Note:
• If youperform skipplaybackduring playback pause,the
DVD video camera/recorder will enter the playback
pause status at the beginning of the located scene.
• Tilting down in thelastscene on disc will setthe DVD
video camera/recorder to the playback pause status at
the lastimage.
• Seepage 147if skipplayback doesnot operatenormally.
Tilt down once
Tilt down twice
[When using disc]
Releasing the joystick will start continuous
playback.
[When using card]
When the joystick is released, the photo at that
point will be displayed, and then the DVD vi deo
camera/recorder will enter the playback pause
status.
Set the slide show function for continuous display
(P. 131).
69
English
Page 70

JUMPING TO SPECIFIED POINT (GO TO)
1Press the MENU button
during play back.
2Choose the option (point
you want to go to), and
then press the button.
Go To
Top
End
Spec i f y
ENTER RETURN
●Specifying the point to view
1Choose “Specify” in step 2 above, and then press
the button.
The screen for specifying the point to go to will
appear.
Positionofcurrently
played back image
Go to
TOP ENDCURRENT
Cursor
0:00:00 0:24:240:03:26
TOP END
Totalrecordingtimeof
all selected scenes
0:03:26
GO TO
Cursor position
ENTER
CANCEL
2Use the joystick to select the desired time of
chosen point.
:To select the start.
:To select the end.
:·Press once: To move the cursor in 10-
·Hold down: To move the cursor in 1-
English
(When thestart ofscene isselected)
Cursor at current image position.
Cursor at (GO TO) position.
second units (1-still uni t s
for card)
minute units (10-still units
for card)
Go to
TOP
0:00:00 0:24:240:03:26
GO TO
TOP END
0:00:00
ENTER
ENDCURRENT
CANCEL
Top : To go to the start, and ente r playb a ck
pause.
End :To go to the end of last scene, and enter
playback pause.
RAM
Specify :To go to a specified point and enter
playback pause. See the following for
details.
3Press the button to enter the selection.
The DVD video camera/r eco r der wil l go t o the
specified point and enter the playback pause
status.
T o cancel the “Go T o” procedure midway , pr ess the
button before going to the specified point.
Note:
• Ifmultiple scenesareselectedusing theDiscNavigation
function or SELECTbutton, choosing “Top” will jumpto
the beginning of selected scenes (P. 125).
• When multiple scenes are selected, the total time of
selected scenes willappear in the“total recordingtime”
display.
• When card is loaded, the number ofstills will appear.
• The cursor may not move at same-pitch intervals.
70
Page 71

On-Screen Information Display
INFORMATION DISPLAY DURING PLAYBACK
Various types of inform ation on recording will be super im p ose d on playback image you are viewing.
No display Playback information
●Switching the information display
mode
Press the DISPLAY button: Yo u can switch the
display mode of on-screen information.
When using disc:
Recording mode
ProgramorPlayList
When using card:
Scene No. File name Lock
Recording mode
*1
Scene No.
RAM
00606 0:00:16
Disc type
ProgramNo. or Play ListNo.
*2
003 100—0003
*1
Playback operation
Repeat play
Playback
operation
Counter
*4
*5
DPOF
Slide Show
*5
*6
*3
*5
display
*1
(VIDEO) or (PHOTO); Only (PHOTO)
with card.
*2
Program or Play List
*3
Number of program or play list being played
Recording date/time
back (not displayed when all programs are being
played back)
*4
Refer to “Disc/Card type” on page 63.
*5
:Will appear when each function is specified
“On”
*6
# :Standard playback
$ :Playback pause
% :Forw ard search p layback
& :Reverse search playback
' :Forward skip playback
( :Reverse skip playback
) :Forw ard fra me ad vance
* :Reverse frame back
Refer to “Playing Back” beginning on page 67 for
how to operate.
The “,” mark will appear on the first image on
disc.
The “+” mark will appear on the last image on
disc.
• Recording date/time display: Shows the date/
*5
time when recording was star ted . Even when
playback starts, the date/time display wil l not
advance.
• No display: No information will appear.
However , when the mode of playback operatio n
*6
is switched, the symbol will appear for approx. 3
seconds.
English
Note:
See “Using Disc Navigation” onpage 95 and later for
explanation on program and play list.
71
Page 72

Playback on Other Devices
VIDEOAUDIO
LR
VIDEOAUDIO
This section explains about playback on another AV device, such as TV.
CONNECTING TO A TV
Use the provided AV/S input/output cable to connect the DVD video camera/recorder to a TV as
follows:
To S-video
To AVinput/output jack
AV/Sinput/output cable
(provided)
* If your TV has an S-VIDEO input jack, you can connect the S-VIDEO plug to it.
input jack*
Yellow
White
To video/
audio input
jacks
Red
Note:
• Using S-VIDEO will deliver clearer playback status.
• Before connecting, make sure that thevolumeon TV is
turneddown:Forgettingthismaycause howlingfrom the
TV speakers.
Stereo Type with
S-VIDEO Jack
S-VIDEO VIDEOAUDIO
Red White
LR
English
72
Red
• Insert the AV/S input/output cable plugs into jacks
straight: Obliquely inserting them could damage the
jacks.
StereoType
Yellow
White
Monaural Type
YellowWhite
Page 73

VIEWING ON TV SCREEN
1Turn the TV on and set the input selector to
“VCR” whichever applicable Video input.
Refer to the TV instruction manual for how to
switch the TV input.
2Turn the DVD video camera/recorder on.
The image that the DVD video camera/record er
is seeing will appear on the TV screen.
You can also monitor the image on the LCD
screen or viewfi nder of t he DVD video camer a/
recorder.
3Perform playback , recording o r editing.
Y ou can perform playback, editing or editing on
Disc Navigation while checking on TV screen.
Note:
• Adjust the volume of sound on TV.
• The infraredremotecontrol isuseful whenoperating the
DVD video camera/recorder while viewing animage on
TVscreen.However,ifyouuse aHitachiVCR,theremote
controlmayinadvertentlyoperatetheVCR ifitis nearthe
DVD video camera/recorder. T oprevent this, set the
remote control code ofthe VCR to apositionother than
“VCR2”.
• Information that the DVD video camera/recorder is
recording will appear on the TV screen: You can also
displayonly partof information or switchoff thedisplay.
Refer to“Setting On-Screen Display Output Onor Off
(OSD Output)” on page 90, and press the DISPLAY
buttontoswitchthedisplaystatus.
• When copy-guarded disc is played back, noimage will
appear on TV screen.
• If youuse TVwith wide mode(aspect ratio 16:9)and set
the TV to the wide mode,theentire Disc Navigation
display may not be displayed on the TV screen. If this
happens, release thewide mode settingon TV (see the
TV instruction manual for releasing the wide mode).
English
73
Page 74

PLAYBACK ON DVD PLAYER
Y ou can play back finalized DVD-R discs on DVD players or other devices that conform to 8 cm DVD-R
disc. However, DVD-R discs may not be usable on all those devices.
1Finalize a recorded DVD-R disc.
You n ee d to finali ze a di sc to play it b ack on DVD
player: See page 129.
No further data can be recorded on finalized
disc.
Note:
Use this DVD video camera/recorder to finalize the
DVD-R disc recorded on the DVD video camera/
recorder.
2Remove the disc from Round DVD Holder.
See “Removing and Replacing from/in Round
DVD Holder” on page 75.
3Insert the disc into th e DVD player and play it
back.
See the instruction manual for DVD player .
Note:
DVD-Rdiscsrecordedon thisDVDvideocamera/recorder
canbe playedbackon otherDVD players,but playbackon
all DVD players is not guaranteed.
Playback may notbe possible onsome DVDplayers, orit
may depend on the recorded status of DVD-R discs: In
such cases, playback the DVD-R disc onthis DVD video
camera/recorder.
English
74
Page 75

REMOVING AND REPLACING FROM/IN ROUND DVD HOLDER
Y ou can remove DVD-RAM or DVD-R disc used on this DVD video camera/recorder from Round DVD
Holder and use the uncovered disc on DVD player , DVD-RAM recor der, drive for PC, etc., which conforms
to 8 cm DVD-RAM or 8 cm DVD-R. Removing disc from Round DVD Holder may vary with the disc
maker: See the disc instruction sheet. The following explains the disc in Round DVD Holder made by
Hitachi Maxell.
It is recommended that you do not remove the disc from Round DVD Holder until camera recording is
finished, in order to avoid getting dirt on disc.
Note:
Using discs removed fromholders on variousdevices may notalways bepossible.
HOW TO REMOVE DISC
1Hold the Round DVD
Holder with SIDE A
facing up. While pushing
the two release levers in
the direction of arrows (1)
marked on holder , slowly
open SIDE A of the holder
in the direction of arrows
(2), taking care not to dro p
the disc.
Release
levers
1
SIDE A mark
2
2
Do not open
more than90°.
1
recording/playback
surface, hold the disc edge
and center hole to remove
it.
2Without touching the
75
English
Page 76

REPLACING DISC IN ROUND DVD HOLDER
1Open SIDE A of the Round DVD Holder, and
replace the disc in the holder with the SIDE A
mark or label surface facing up, taking car e not
to touch th e disc surf ace.
3
OPEN marks
SIDEAmarksideor
Label surface
SIDE A
mark
3
2Close SIDE A of the Round DVD Holder, and
push it to lock the release levers at positions (3).
WHEN THE HINGE OF ROUND DVD HOLDER COMES OFF
1Push the hinged portion of the holder piece
marked SIDE A with thumb and middle finger ,
and warp it in the direction of arrows (4).
SIDEAmarkside
Hinged portions
4
Approx.90°
2Fit the hinged portion of the other holder piece
into the warped hinge portion.
Note:
• Handle the disc carefully so that no scratch, dirt,
fingerprint or dust adheres to the recording/playback
surface.
• When notusing theRound DVD Holder,store it incase:
Do notleave abare holder asis.
• Be carefulof drop orimpact: If youdrop theRoundDVD
Holder, the disc maypop out.
• Do not subject the Round DVD Holder to force.
DISC CLEANING
Use a soft, dry cloth to lightly wipe off any dust,
dirt, etc. adhering to disc, as shown in the figure.
Never use solvent. Do not use thinner , water , antistatic spray, etc. to clean disc.
Use softcloth toclean
from inner to outer
circumference in axial
English
direction.
76
Page 77

Playback on DVD Video Recor der/Player
Youcanuse aDVD videorecorderorDVD playerthatconformsto DVD-RAMtoplaybackDVD-RAMdiscs
recorded on this DVD video camera/recorder
1Remove the disc from Round DVD Holder.
2Insert the disc into the DVD video recorder/
player and play it back.
See the instruction manual for DVD video
recorder/player.
Note:
• DonotinsertaDVD-R discthathasnotbeenfinalizedinto
aDVDvideo recorder:Therecordedimage datamay be
damaged.
• When playing back disc on another device, the Disc
Navigation display will bedifferent from theone on this
DVD video camera/recorder.
English
77
Page 78

Advanced Techniques
This sectionexplains aboutvarious settings to furtherextend the usefulness ofthis DVD videocamera/
recorder.
Understanding Flow of Menu
Press the MENU button during reco rding pause: The “Camera Functions Setup” menu screen will a ppear.
Tilt the j oystick up, do wn, to l eft o r right to se lect a men u ite m, and then press the button to choose
the option.
The screens used here t o explain are disp layed when DVD-RAM disc is used. Some ite ms will not appear
when a DVD-R disc or card is used, or when no disc or card is inserted.
<Interpreting screen for setting>
Displayof selected
setup item
Selectionofsetupitems
: Camera
FunctionsSetup
: Record Functions
Setup
: Date Setup
:LCDSetup
: Initial Setup
Functions settable
Camera Funct ions Setup
Program AE
W
hi te Bal.
EIS
Dig. Zoo
MIC.Fi l ter
ENTER RETURN
Guide display
m
Auto
Spo r ts
Portrait
Spo t l i ght
Sand&Snow
Low Li ght
RAM
Options settable
Display of disc or card
being used (P. 62)
English
78
Page 79

●Flow of Menu
Refer to page indicated for details of each functio n.
Camera Functions Setup
Camer a Func t ions Setup
Program AE :
W
hi te Ba l. :
EIS :
Dig. Zoom :
MIC.Fi l ter :
ENTER RETURN
Program AE (P. 80)
White balance (P. 81)
Au t o
Au t o
EIS (P. 83)
On
40x
Digital zoom (P. 84)
Of f
Microphone filter
RAM
*Not displayed when us ing
*
(P. 85)
Date Setup
Dat e Setup
Da t e Mode : M/ D/Y
Da t e Se t
ENTER RETURN
Display format (P. 49)
Date setting (P. 48)
RAM
card.
LCD Setup
Recording Functions Setup
Record Funct ions Setup
V IDEO Mode : F I NE
Inpu t Source : CAMERA
PHOTO I npu t : F i e ld
Sel f T imer : Of f
OSD Ou t pu t : On
ENTER RETURN
Movie quality (P. 86)
[The quality m ode will
appear when using card
(P. 87)]
Input selection (P. 88)
RAM
External still input (P. 88 )
Self-timer (P. 89)
On-screen inform at ion
display output (P. 90)
LCD Setup
Brightness
Col or L evel
ENTER RETURN
Initial Setup
Initial Setup
Beep : O n
w
er Save : Of f
Po
Record LED : On
Language : Engl ish
Demo Mode : Auto
Reset
ENTER RETURN
Brightness (P. 91)
Color density (P. 91)
RAM
Beep (P. 92)
Power save (P. 92)
Recording LED (P. 93)
Language selection (P. 93)
Demo mode (P. 146)
RAM
Reset (P. 94)
Yo u can use the joystick on DVD video camera/recorder to select various setting options in menu and
designate them.
Press the MENU button.
Camer a Func t ions Setup
Program AE :
W
hi te Ba l. :
EIS :
Dig. Zoom :
MIC.Fi l ter :
ENTER RETURN
Auto
Auto
On
40x
Of f
or
RAM
Camer a Func tions Setup
Program AE
W
hi te Ba l.
EIS
Di g . Zoom
MIC.Fi l ter
ENTER RETURN
Auto
Spo r ts
Por t r a i t
Spo t l i gh t
Sand&Snow
Low L ight
RAM
or
Record Funct ions Setup
V IDEO Mode : F I NE
Inpu t Source : CAMERA
PHOTO I npu t : F i e ld
Sel f T imer : Of f
OSD Ou t pu t : On
ENTER RETURN
RAM
Press the button directly to choose an option from menu.
Toreturn to the screen one before, press the
Pressing the MENU button again will cause themenu screen to
disappear.
button.
Note:
• Pressing the MENU button during recording will not work.
• The menu screen will disappear when it is left for approx. one minute without any operation.
• With DZ-MV380A, the range of screen in whichrecordingstills is possible will be different for disc and card.
English
79
Page 80

Setting Up Camera Functions
SELECTING SHOOTING MODE TO MAT CH THE SUBJECT
(SWITCHING PROGRAM AE MODE)
This DVD video camera/recorder automatically sets the shutter speed and aperture according to the
subject brightness for optimum recording: You can also specify one of six modes depending on the subject
conditions, recording environment or purpose of filming.
1Press the MENU button, use the joystick to
choose “Program AE” on the “Camera
Functions Setup” screen, and then press the
button.
The options will appear on the right of “Program
AE”.
2Use the joystick to
choose the des ired
option, and then press
the button: The
selected option will be
set.
Selected AE mode
Camer a Func tions Setup
Program AE
W
hi te Ba l.
EIS
Dig .Zoo
MIC.Fi l ter
ENTER RETURN
FINE
3Press the MENU button to end the setting.
The menu screen will disappear.
Note:
• Youcan check the selected AE mode by the on-screen
information display. However, nothingwill appear in the
Auto mode.
• Theshootingmodesetasabovewillbestored inmemory
even if the DVD video camera/recorder is turned off.
English
m
Auto
Spo r ts
Portrait
Spo t l i gh t
Sand&Snow
Low L ight
RAM
0:00:00
REM
3 0 MIN
8:00AM
9/30/2003
Tilt up/down and to left/
right to select, and then
press
to designate.
, Auto : The camera/recorder automatically
judges the subject and surrounding environment
for optimum recording.
Sports : Reduces blurring when recording
rapidly moving subjects such as in golf or tennis.
If the Sports mode is used under a fluorescent light,
the image may flicker: In this case, use the Auto
mode for rec ording .
Portrait : Makes a subject, such as a person or a
creature, stand out from a blurred background.
Spotlight : Prevents overexpos ur e of subj ect
portrait face, etc. when strong light strikes the
subject, as in a wedding or on stage.
Sand & Snow : Prevents underexposure of
subject portrait face, etc. in a place where reflect ion
of light is intense, such as at the seaside in
midsummer or on a ski slop e .
LowLight: Allows user to record in a dark place
even with decreased lighting: However, an afterimage will app e ar with a moving subject.
Note that the Low Light mode cannot be us ed when
the recording quality mode is STD.
If there is difficulty in automatica lly focusing
subject image, adjust t h e focus manually.
80
Page 81

ADJUSTING COLOR (WHITE BALANCE)
This DVD video camera/recorder automatically
adjusts the tint to ma tc h the conditions of subject.
However, it may not allow user to deliver natural
tint, depending on the weather or status of light
source. In this case, change the white balance
setting according to the situation.
Note:
• The whitebalance modecan be confirmedusing theon-
screen information.
• Thewhitebalance settingwill bestored inmemory even
when the DVD video camera/recorder is turned off.
• Do not block the infrared sensor with hand, etc.
Mode Setting content
Auto White balance always
Set Youcan manuallyadjust
automatically adjusted
white balance to match
the light source or
situation
Outdoor Torecord in fineweather
Indoor 1 To record under
Indoor 2 To record under
1Press the MENU button,
choose “White Bal.” on
incandescent light,
halogen light or bulbcolor type fluorescent
light
fluorescent light
Camer a Func tions Setup
the “Camera Functions
Setup” menu screen, and
then press the
button.
2Choose the desired
option, and then press the
button.
FINE
On-screen
display
Program AE
W
hi te Ba l.
EIS
Di g . Zoo
m
MIC.Fi l ter
ENTER RETURN
None
!
"
#
$
Aut o
Set
Ou tdoor
Indoor 1
Indoor 2
0:00:00
REM
8:00AM
9/30/2003
• If a tele orwide-conversion lens is used, the auto white
balance may not operate depending on the recording
conditions. Ifthishappens, set tothe modetomatch the
recording conditions, or manually setthe white balance.
• Be sure toremove the lens capbefore turning the DVD
video camera/recorder on: If the DVD video camera/
recorder is turned on with the lens capped, the white
balance will not work normally.
RAM
3 0 MIN
White balance mode
3Press the MENU button to end the setting.
English
81
Page 82

●Setting white balance manually
1Point the DVD video
camera/r ecorder at a
white object so that it
fills the screen. Use
an object that is not
transparent.
White shirt or thick paper
2Press the MENU
button, choose “White
Bal.”, “Set”, and then
press the button.
Camer a Func tions Setup
Program AE
W
hi te Ba l.
EIS
Di g .Zoo
m
MIC.Fi l ter
ENTER RETURN
3Press the button: The
“!“ indicator wil l
change from blinking to a
steady light: The steady
light indicat es that the
white balance se tting is
Set EXIT
complete.
4Press the button to end
the setti ng.
Aut o
Set
Ou tdoor
Indoor 1
Indoor 2
RAM
RAM
0:00:00
REM
3 0 MIN
FINE
Note:
• Thewhitebalance setusingthe“Set”optionwillbesto red
in memory until it is reset.
• Do not use a colored object when setting the white
balance: The appropriate tint cannot be set.
• If “Input Source: LINE” has been specified, you cannot
use the“Set” mode of white balance (P. 88).
English
82
8:00AM
9/30/2003
Page 83

USING THE ELECTRONIC IMAGE STABILIZER (EIS)
This DVD video camera/recor der is equipped with an electronic image stabi lizer function: When you use
zoom to record a magnified subject image, it will correct fuzziness in the recorded image.
1Press the MENU button,
choose “EIS” on the
“Camera Functions
Setup” menu screen, and
then press the
button.
Camera Func t i ons Setup
m
AE
Progra
W
hi te Ba l.
EIS
Dig .Z
oom
MIC.Fi l ter
ENTER RETURN
On
Of f
RAM
2Choose the “On” or “Off”, and then press the
button.
3Press the MENU button to end the setting.
●Checking EIS On or Off
You can check EIS On or Off by the on-screen
information display .
0:00:00
REM
EIS
FINE
After recording with EIS set to “Off”, it is
recommended that you retur n the setti ng to “ On”
and then turn the DVD video camer a/recorder o ff,
unless you norm ally record with “Off” settin g .
This function is e ffec ti ve on ly during movie
recording: It will not work during still recording.
Note:
• The EISsetting will bestored inmemory evenwhen the
DVD video camera/recorder is turned off.
• Although you canswitch EISbetweenon and off during
still recording, the setting will be effective onlyduring
movie recording.
• Itisrecommended thatyou specify“EIS Off”when using
the DVD video camera/recorder on a desk or tripod.
• When “EIS On” is specified, there will be aslight
difference between the actual movement and the
movement on screen.
• Gross camerashake maynot beentirelycorrected even
if “EIS On” is specified.
• EIS may not operate correctly when the tele or wide-
conversion lens (generally available) is used.
3 0 MIN
8:00AM
9/30/2003
83
English
Page 84

MAGNIFYING SUBJECT IMAGE (DIG. ZOOM)
When the zoom lever is moved down to “T” control side with Dig. Zoom 40× or 240× specified, digital
zoom will automatically kick in when optical 10× zoo m range is exceeded. You can set the digital zoom
to 40× or 240× for movie recording, or 40× for still recording.
1Press the MENU button,
choose “Dig. Zoom” on
the “Camera Functions
Setup” menu screen, and
then press the
button.
Camera Func t i ons Setup
m
AE
Progra
W
hi te Ba l.
EIS
Dig .Z
oom
MIC.Fi l ter
ENTER RETURN
240x
40x
Of f
2Choose the desired magnification, and then
press the button.
3Press the MENU button to end the setting.
Moving the zoom lever will display the digital
zoom bar.
FINE
RAM
When Dig. Zoom is "Off"
W
When Dig. Zoom is "On"(40x)
When Dig. Zoom is "On"(240x)
(only in movie recording)
W
Digital zoom range
Digital zoom range
T
TW
Dig. Zoom “240×”, “40×” or “Off” setting will be
stored in memory even if the D VD vi deo ca mer a /
record er is turned off.
Note:
• You can check whether Dig. Zoom is “240×”, “40×” or
“Off” bypressing the DISPLAY buttonand reviewing the
on-screeninformation.
• Youcan also use theDIGITALZOOM button on remote
control to switch the digital zoom setting: Pressing the
button during movie recording will switch the setting
between “Off”, “40×” and “240×”: Pressing the button
during stillrecording willswitch between “Off”and “40×”.
• When using card, zooming only up to 40× is possible,
even when “240×” or “40×” has been chosen.
• Ifthe powerswitch isset to“ PHOTO”with DVD-RAM
disc loaded, zooming only up to 40x is possible, even
when “240×” has been chosen.
0:00:00
REM
3 0 MIN
8:00AM
9/30/2003
T
English
84
Page 85

REDUCING WIND NOISE DURING RECORDING (MIC.FILTER)
When recording sound from the microphone built into this DVD video camera/recorder, you can reduce
wind noise in recor ding.
If “MIC.Filter: ON” is specified, the low-frequency components in the sound picked up by microphone
will be cut off during recording: Thi s makes it easier to hear the target voice or sound during playback.
1Press the MENU button,
choose “MIC.Filte r” on
the “Camera Functions
Setup” menu screen, and
then press the
button.
Camer a Func tions Setup
Program AE
W
hi te Ba l.
EIS
Dig. Zoo
m
MIC.Fi l ter
ENTER RETURN
On
RAM
2Choose the desired option, and then press the
button.
3Press the MENU button
to end the setting.
FINE
Microphone filter icon
0:00:00
REM
3 0 MIN
8:00AM
9/30/2003
Note:
• Youcan alsouse theon-screendisplay toconfirmthatthe
MIC.Filter has been set.
• The MIC.Filter setting will be stored in memory even
when the DVD video camera/recorder is turned off.
• The MIC.Filter function will work only during movie
recording.
• The microphone filter function works only with the built-
inmicrophone: Itwill notfunctionwhenusing anexternal
microphone (P. 52).
85
English
Page 86

Setting Up Record Functions
SWITCHING MOVIE QUALITY (VIDEO MODE)
Choose the movie quality from “XTRA” (only with DVD-RAM disc), “FINE”, “STD” and “LPCM” (only
with DVD-R disc).
It is recommended that you record critical subjects in the “XTRA” or “FINE” when you are using a DVDRAM disc, or in the “FINE” with a DVD-R disc.
1Press the MENU button,
choose “VIDEO Mode”
on the “Record Functions
Setup” menu screen, and
then press the
button.
Record Funct ions Setup
V IDEO Mode
Input Source
PHOTO Input
Se l f Ti mer
OSD Ou t p u t
ENTER RETURN
XTRA
FINE
STD
2Choose the desired quality mode, and then press
the button.
3Press the MENU button to end the setting.
0:00:00
REM
Movie quality
FINE
8:00AM
9/30/2003
Note:
• The moviequality setting willbe stored inmemory even
when the DVD video camera/recorder is turned off.
• The “VIDEO Mode” setting will notcha nge even if the
DVD-RAM disc is replaced with aDVD-R disc, or vice
RAM
versa. However, if “XTRA”has beenset withDVD-RAM
disc,or“LPCM”has beensetwith DVD-Rdisc,“FINE”will
be set when the disc is changed.
• When using DVD-R disc, you cannot switch the movie
quality while recording on the disc:The DVD video
camera/recorder will be automatically set to the movie
quality first used with the disc for recording.
• The movie quality setting is effective only during movie
recording: Switching the movie quality willnotwork
during still recording.
3 0 MIN
English
86
Page 87

Block-like noise may appear in recorded image, or the outline of subject image is distored under the
recordi ng conditions list ed below: Pan the DVD v ideo camera/r ecorder as slowly as possible. (Bl ock noise
is likely to appear in the “STD”):
• If there is a complic at e d pattern in backg r ound (as in following fig u re on le ft)
• If the DVD video camera/recorde r is moved excess iv ely or quickly
• If subject is moving rapidly even when the DVD video camera/recorder is not moving
(Imagewhenblock-likenoiseoccurs) (Imagewithout block-likenoise)
SWITCHING QUALITY O F STILL IMAGE (QUALITY)
You can switch the st ill recording quality on ly when using card.
It is recommended that you use “FINE” when recording vital images.
1Press the MENU button,
choose “Quality ” on the
“Record Functions
Setup” menu screen, and
then press the
button.
Record Funct ions Setup
Quality
Input Source
PHOTO Input
Se l f Ti mer
OSD Ou t p u t
ENTER RETURN
FINE
NORM
ECO
3Press the MENU button
to end the s etting.
2Choose the option you want, and then press the
button.
Note:
Thestill qualitysetting willbe storedin memoryevenwhen
the DVD video camera/recorder is turned off.
REM
999
8:00AM
NORM
Still recording quality
9/30/2003
English
87
Page 88

RECEIVING IMAGE FROM ANOTHER DEVICE (INPUT SOURCE)
If you wish to input an im ag e from an ot h e r de vice to this DVD video camera/recorder, you must first
switch the setting on the DVD video camera/recorder.
Refer to th e explanation starting fro m page 65 on how to connect the DVD video ca mera/recorder to other
devices or record images input from them.
Setting Content On-screen display
CAMERA
LINE
SLINE
* Displ aye d on DZ-MV380A only.
Usually select this option. No display
To input image from another device L IN
*
To input S-VIDEO signal from another device S IN
1Press the MENU button,
choose “Input Source” on
the “Recor d Function s
Setup” menu screen, and
then press the
button.
Record Funct ions Setup
V IDEO Mode
Input Source
PHOTO Input
Se l f Ti mer
OSD Ou t p u t
ENTER RETURN
CAMERA
LINE
SLINE
2Choose “LINE”, and then press the button.
3Press the MENU button
to end the s etting.
Note:
The “Input Source” setting will
RAM
returnto“CAMERA” whenever
theDVDvideocamera/recorder
is turned off.
FINE
External input icon
SWITCHING EXTERNAL INPUT RECORDING METHOD (PHOTO INPUT)
Y ou can r ecor d stills of externally input images on a DVD-RAM disc or car d in the Frame o r Field mode.
The DVD video camera/recorder can record an external image with little movement by specifying
“Frame”, but “Field” is recom mended for recording image with movement.
Recording
format
Frame
Field
1Press the MENU button,
choose “PHOTO Input”
Doesnot suitrecordingof frequentlymoving video s ubjects, despitehigh
image quality. Frame suits recording of less moving video.
Suitable for recordingof frequently moving video subjects.
Record Funct ions Setup
on the “Record Functions
Setup” menu screen, and
then press the
button.
English
2Select the desired option and then press the
button.
3Press the MENU button to end the setting.
Details of setting On-screen display
V IDEO Mode
Input Source
PHOTO Input
Se l f Ti mer
OSD Ou t p u t
ENTER RETURN
F r ame
Field
RAM
Still externalinputmode
Note:
• ThePHOTOInput settingcan beconfirmedusing theon-
screen information.
• The PHOTOInput settingwill bestored inmemoryeven
when the DVD video camera/recorder is turned off.
• Refer to “Recording Image from Other AV Devices” on
page 65 to see how to connect the DVD video camera/
recorderto another device.
L IN
0:00:00
REM
3 0 MIN
8:00AM
9/30/2003
L IN
REM
999
8:00AM
9/30/2003
88
Page 89

SELF-TIMER
Y ou can record stills of yourself alone or with your family, friends, etc., using the self-timer function, as
with ordinary cameras. A still will be recorded approximately 10 seconds after the REC button is pressed.
1Press the MENU button,
choose “Self Timer” on
the “Recor d Function s
Setup” menu screen, and
then press the
button.
Record Funct ions Setup
V IDEO Mode
Input Source
PHOTO Input
Se l f Ti mer
OSD Ou t p u t
ENTER RETURN
On
Of f
2Select “On”, and then press the button.
The self-timer will be set.
3Press the MENU button to end the setting.
10
Self-timerrecording
REM
8:00AM
9/30/2003
4Press the REC button.
The recording ind i cator at the front o f DVD
video camera/recorder will blink.
RAM
999
The self-timer indicator will start to count down,
and recording will commence approximately 10
seconds later.
Note:
• You can also check that self-timer has been set by
reviewing the on-screen information.
• Torelease theself-timermode, choose“Off”on themenu
screen or turn DVD video camera/recorder off.
• Tosuspendself-timer,presstheRECbuttonagainbefore
recordingstarts, or press the
button.
• When theREC button ispressed, the markon LCD
screen will be pink. Itwill also change inthesame way
when recording with the LCD screen facing the same
direction as the lens.
89
English
Page 90

SETTING ON-SCREEN DISPLAY OUTPUT ON OR OFF (OSD OUTPUT)
If you connect this DVD video camera/r ecorder to a TV to view ima ges on TV screen, you can switch o ff
the on-screen information (displayed in the viewfinder or on the LCD screen) from the TV screen.
1Press the MENU button,
choose “OS D out put” on
the “Recor d Function s
Setup” menu screen, and
then press the
button.
Record Funct ions Setup
V IDEO Mode
Input Source
PHOTO Input
Se l f Ti mer
OSD Ou t p u t
ENTER RETURN
On
Of f
RAM
2Choose “On” or “Off”, and pres s the button.
LCD screen or viewfinder
“On” setting
0:00:00
REM
3 0 MIN
FINE
8:00AM
9/30/2003
TV screen TV screen
FINE
3Press the MENU button to end the setting.
Note:
• The“OSDOutput” settingwill bestored inmemory even
when the DVD video camera/recorder is turned off.
• Even if “Off” ischosen, theon-screen information will
appear during playback. See page 71 for playback onscreen information display.
• Evenafter theon-screeninformationisremovedfromthe
TV screen, it will stillappear in the viewfinder oron the
LCD screen.
0:00:00
REM
3 0 MIN
8:00AM
9/30/2003
“Off” setting
English
90
Page 91

Page 92
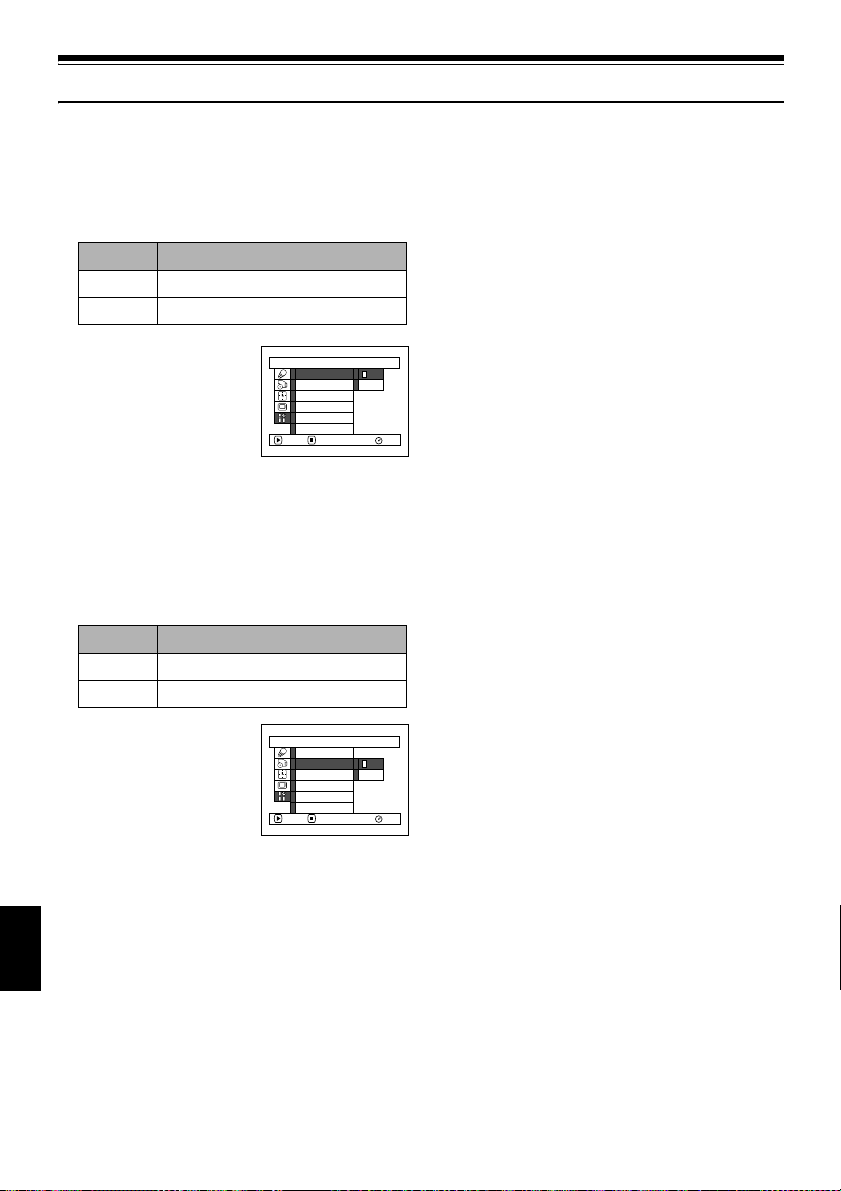
Initial Settings
SWITCHING OPERATING SOUND ON OR OFF (BEEP)
This DVD video camera/recorder will emit a sound when the power switch i s changed over, the REC
button is pressed to rec ord a movie, or other operations are engaged. If you do not need operating sound,
you can switch it off.
2Select “On” or “Off”, and the n p ress the
Setting Content
On Beep is heard
Off No beep is heard
1Press the MENU button,
choose “Beep” on the
“Initial Setup” me nu
screen, and then press the
button.
Ini t ial Setup
Beep
Power Save
Record LED
Language
Demo Mode
Reset
ENTER RETURN
On
Of f
RAM
TURNING DVD VIDEO CAMERA/RE CORDER OFF AU TOMATICALLY
(POWER SAVE)
This DVD video camera/rec order is equipped with power save fu nction. Specify “Power Save: On”: If the
DVD video camera/recorder is left in the recor ding pause sta tus without being operated for 5 minutes,
it will automatically turn off to prevent the battery from discharging needlessly.
Setting Content
On Toengage power save
Off To cancel power save
1Press the MENU button,
choose “Power Save” on
the “Initial Setup” menu
screen, and then press the
button.
Ini t ial Setup
Beep
Power Save
Record LED
Language
Demo Mode
Reset
ENTER RETURN
On
Of f
RAM
button.
3Press the MENU button to end the setting.
Note:
The“Beep” settingwillbe storedinmemoryeven whenthe
DVD video camera/recorder is turned off.
Note:
• To turn the DVD video camera/recorder on again from
automatic off activated by the power save function, set
the powerswitch to“POWER OFF”,and thensetitto “
VIDEO”, “ PHOTO” or “ PHOTO”
• The PowerSave settingwill notappear intheon-screen
information display.
• The Power Save settingwillbe stored in memory even
when the DVD video camera/recorder is turned off.
2Select “On” or “Off”, and
then press the button.
3Press the MENU button to end the setting.
English
92
Page 93

TURNING RECORD LED ON OR OFF (RECORD LED)
You can switch off the recording indicator on the front of DVD video camera/recorder even d u ri ng
recording.
Setting Content
On
Off
Therecordingindicatorwill lightred toshowthatthe DVDvideo camera/recorderis recording.
The recording indicator will not lightevenduring recording.
2Select “On” or “Off”, and the n p ress the
button.
Recording indicator
3Press the MENU button to end the setting.
Note:
• TheRecordLED settingwill notappear inthe on-screen
information display.
• The Record LED settingwill be stored in memory even
1Press the MENU button,
choose “Record LED” on
the “Initial Setup” me n u
screen, and then press the
button.
Ini t ial Setup
Beep
Power Save
Record LED
Language
Demo Mode
Reset
ENTER RETURN
On
Of f
RAM
when the DVD video camera/recorder is turned off.
• Specify “Record LED: Off”whenrecording a subject
behind a glass or water tank that reflects light: The
reflected light of the recording indicator will not be
recorded.
• When using the self-timer function, the recording
indicator will blink when the REC buttonispressed
regardless of whether Record LED is On or Off.
CHANGING DISPLAY LANGUAGE (LANGUAGE)
You can change t he language used to display the men u and information.
The following shows that English is changed to French.
1Press the MENU button,
choose “Language” on
the “Initial Setup” me n u
screen, and then press the
button.
“English” has been set.
2Select “França is”, an d
then press the
button.
In itial Setup
Beep
Power Save
Engl i sh
Record LED
Fr ança i s
Language
Español
Demo Mode
Deu t sh
Reset
ENTER RETURN
Configuration Ini tiale
Beep
Power Save
LED Enrg.
Langue
Fr ança i s
Mode Démo
Régl Défaut
ENTRER RETOUR
Italiano
3Press the MENU button to end the setting.
Note:
The languagesetting willbe stored inmemory evenwhen
the DVD video camera/recorder is turned off.
RAM
RAM
93
English
Page 94

RESETTING MENU SETTINGS TO DEFAULTS (RESET)
Y ou can restore menu settings to defaults (initial settings at the factory (P. 163) ). (Note, however, that the
date/time, brightness and color density of LCD monitor will not be reset.)
1Press the MENU button,
choose “Reset” on the
“Initial Setup” me nu
screen, and then press the
button.
The screen for verifying
reset will appear.
2If you are sure that you
wish to reset, use the
joystick to choose “YES”,
and then press the
button.
The setting items have
now been reset to defaults.
Ini t ial Setup
Beep
Power Save
Record LED
Language
Demo Mode
Reset
ENTER RETURN
Reset
Reset?
YES NO
ENTER
3Press the MENU button to end the setting.
Note:
Tocancel resettingmidway,choose“NO”on thescreen for
verification in step 2 or press the
RAM
RAM
button.
English
94
Page 95

Disc Navigation
Using Disc Navigation
STARTING DISC NAVIGATION
Disc Navigation is a tool for editing scenes recorded on this DVD video camera/recorder.
Here is an explanation on “sce n e ” an d “p rogram ”, so that you will be able to make most use of Disc
Navigation function.
The screens in this instruction manual are ba sically those that will appear when DVD-RAM disc is used:
Some items will not appear when DVD-R disc or card is used, but the operation is the same.
1Press the DISC
NAVIGATION
button.
The Disc
Navigation screen
(shown on page 96)
will appear.
Note:
Do not proceed with a followingstep while the disc is
being recognized or the ACCESS/PC indicator is
blinking.
●Thumbnail:
This refers to a reduced image that helps to distinguish recorded scenes quickly . Immediately recording
is finished, the first image of the rec orded scene wil l be used as a thumbnail of the scene: The thumbnail
can be changed later on this DVD video camera/recorde r.
●Scene:
Movie (video): One scene refers to images recor ded fr om one pr ess of the REC butt on until r ecord ing is
Still (photo): One scene refers to a photo recorded by pressing the REC button.
temporarily stopped by pressing RE C agai n .
English
95
Page 96

The following screen will appear when DVD-RAM dis c is used: Some display components will not appear
when DVD-R disc or card is used.
Thumbnail
*1
001 / 014All Programs
Cursor
Stillimage icon
Operationguide
*1 The displayed thumbnail willbe the first image that you recorded.
*2 Scene number refers to display number on thumbnail display screen.
*3 No stilliconwill appear for card.
*4 The operation guide will vary depending on the operation status of DVD video camera/recorder.
*5 Appears when 13scenes or more have been recorded.
*6 “ R” appears for DVD-R disc. “ ” will appear for card.
:
Note
*3
*4
PLAY
RAM
Selected scene number*2/
Number of all scenes
Current page position
Bar graph
Disc type icon
*6
• The background color of screen allows you to identify
whether disc or card is in DVD video camera/recorder.
- Purple: When disc is inserted
- Green: When card is inserted
• Pressing the DISPLAY buttonwilldisplay the recording
date/timeof thesceneonwhichthecursoris placedinthe
space foroperating guide.Pressing DISPLAYagain will
displaythe operating guide.
• Ifnodisc orcard isinserted,the Discnavigationscreen
cannot be displayed even by pressing the DISC
NAVIGATION button.
• Each time Disc Navigation isstarted withaDVD-R disc
inserted, message “Creating Thumbnail...” will appear.
After themessage appears, theDisc Navigation screen
will appear.
• If the following disc or card is inserted, the Disc
Navigation screen willappear or some messagewill be
displayed:
- Write-protecteddisc
- Locked card
- Finalized DVD-R disc
• Do notleave thedisc navigation screendisplayedon TV
to whichthe DVD video camera/recorder isconnected:
Doing so could damage the TV screen, possibly by
burning.
*5
English
96
Page 97

TERMINATING DISC NAVIGATION
1Press the DISC NAVIGATION button.
Disc Navigation will be terminated and the
DVD video camera/recorder will enter the
recording pause status.
You can also press the button to end Disc
Navigation.
PLAYING BACK FROM DISC NAVIGATION SCREEN
1Press the DISC NAVIGATION button.
2Use the joystick to select the desired scene.
The selected scene will be framed: This is called
a “cursor”.
●When playback ends:
The DVD video camera/
recorder will enter the
playback pause status at the
last image of last scene.
Pressing the or DISC
NAVIGATION button will
restore the Disc Navigation
screen.
When the playback pause status continues for as
long as 5 minutes, the D isc Navi gation sc r een will
automatically be restored.
●Playing back stills
A still will be displayed for approx. 3 seconds.
When playing back stills on card, playback will
stop after each still playback.
PLAY
3Press the button .
Playback will start from the selected scene.
Note:
Tiltingthe joystick toleft orright willmove thecursor to
the preceding or following scene.
Tiltingit upordown willmove topreceding orfollowing
page.
Note:
• Press the button to temporarily stop playback.
• If you press the button after playback of the last
• Pressing the button will always restore the Disc
• Withplayback onDisc Navigation,youcan selectdesired
• Whenplayingback astill withalarge numberof pixelson
again will start from thatpoint.
Pressing
sceneondisc finishes,playback willstart againfrom the
beginning of disc.
Navigation screen.
scenes for playback and skip unnecessary scenes.
card,“Playback.”will appear, anditwilltakesometimefor
the still to appear.
001/014All Programs
RAM
97
English
Page 98

SELECTING MULTIPLE SCENES
1Press the DISC NAVIGATION button.
2Use the joystick to select the desired scene.
3Press the SELECT button once:
The selected scene will be framed in red and
yellow.
Repeat steps 2 and 3 to randomly select multiple
scenes.
T o cancel a selected scene, select the scene to be
canceled, and then press the SELECT button.
T o cancel all selected scenes, pr ess the button.
Note:
Although scenescan be randomlyselected, playbackwill
always start from the lowest scene number.
SELECTING CONSECUTIVE SCENES TOGETHER
1Press the DISC NAVIGATION button.
2Use the joystick to select
the desired scene.
3Hold down the SELECT
button for at least one
second:
The selected scene will be
doubly framed in yellow
and blue.
4
English
98
Page 99

Disc Navigation Menu
FUNCTIONS AVAILABLE WITH DISC NAVIGATION
Disc Navigation allows you to do the following:
Availablefunction Disc or card used Contents
Deletion of scenes
Editing of scenes
Scene information
display
Setting of title
Creation of play list
Disc orCard initialization
Copy from disc to card
Disc finalization
Repeat play
Slide show
Remaining display
(Capacity)
Disc protection
Scene lock
DPOF setting
You can delete unnecessarys cenes. 101
Youcan attach fade andskip toa scene,
combine scenes, or divide onescene.
You can display information on one
sceneor multiplescenes,such asimage
quality, recording time, etc.
Youcan setdesiredtitles toplaylists and
programs.
You can create an originalmovieby
changing the combinationofscenes.
You can initialize a DVD-RAM disc or
card so that it can be used on this DVD
video camera/recorder.
You can copy photos recordedonDVDRAM disc to card.
You can use this DVD videocamera/
recorder to finalize any DVD-R disc
recorded on it so thatthedisc can be
viewed on DVD player, etc.
You canrepeatedly playback programs
and scenes.
You can play back stills continuously. 131
The remainingrecordable movietime or
number of recordable stills is displayed.
You can protect the DVD-RAM disc to
prevent deletion oreditingby mistake.
You canlock any sceneso that itwill not
bedeletedbymistake:Essentialscenes
are thereby protected,andrecording
another still ispossible.
Youcan setthenumberof printsforeach
scene.
Reference
page
103 - 108
113
115,124
117
127
109
129
130
126
126
110
111
99
English
Page 100

UNDERSTANDING FLOW OF DISC NAVIGATION MENU
Press the MENU button on the Disc Navigation scr een: The menu scr eens for Disc Navi gation and menu
screens for disc and card will appear.
See pages 78-79 and 96 for how to interp ret t he sc reen .
Refer to pages indicated for details of settings.
●When using DVD-RAM disc
Scene
Play list Top (P.125)
Program
Delete (P.101)
Edit (P.103)
Copy (P.109)
Select (P.112)
Detail (P.113)
Switch (P.118)
Play (P.119)
Create (P.117)
Edit (P.120- 123)
Title (P.124)
Delete (P.124)
Switch (P.114)
Play (P.115)
Title (P.115)
Thumbnail (P.103)
Skip (P.104)
Fade (P.105)
Combine (P.107)
Divide (P.108)
Move (P.106)
Start → Current (P.112)
Current → End (P.112)
All (P .112)
Go To
Disc
Others
ETC
End (P.125)
Capacity (P.126)
Protect Disc (P.126)
Format Disc (P.127)
Update Control Info. (P.128)
Category (P.130)
Repeat Play (P.130)
●When using DVD-R disc
Scene
Select (P.112)
Detail (P.113)
Start → Current (P.112)
Current → End (P.112)
All (P .112)
Program
Go To
●When using card
Scene
English
Go To
Card
100
Switch (P.114)
Play (P.115)
Top (P.125)
End (P.125)
Delete (P.101)
Lock (P.110)
DPOF (P.111)
Select (P.112)
Detail (P.113)
Top (P.125)
End (P.125)
Capacity (P.126)
Format Card (P.127)
Disc
Others
ETC
Start → Current (P.112)
Current → End (P.112)
All (P .112)
Slide Show
Capacity (P.126)
Finalize Disc (P.129)
Repeat Play (P.130)
All (P.131)
DPOF (P.131)
 Loading...