

Page 1
Rotary Hammer
MODEL DH 45MR
HANDLING INSTRUCTIONS
Note:
Before using this Power Tool, carefully read through these HANDLING
INSTRUCTIONS to ensure efficient, safe operation. It is recommended that
these INSTRUCTIONS be kept readily available as an important reference
when using this power tool.
Page 2

GENERAL POWER TOOL SAFETY WARNINGS
WARNING
Read all safety warnings and all instructions.
Failure to follow the warnings and instructions may result in
electric shock, fire and/or serious injury.
Save all warnings and instructions for future reference.
The term “power tool” in the warnings refers to your mainsoperated (corded) power tool or battery-operated (cordless)
power tool.
1) Work area safety
a) Keep work area clean and well lit.
Cluttered or dark areas invite accidents.
b) Do not operate power tools in explosive atmospheres,
such as in the presence of flammable liquids, gases
or dust.
Power tools create sparks which may ignite the dust
or fumes.
c) Keep children and bystanders away while operating
a power tool.
Distractions can cause you to lose control.
2) Electrical safety
a) Power tool plugs must match the outlet.
Never modify the plug in any way.
Do not use any adapter plugs with earthed (grounded)
power tools.
Unmodified plugs and matching outlets will reduce
risk of electric shock.
b) Avoid body contact with earthed or grounded surfaces,
such as pipes, radiators, ranges and refrigerators.
There is an increased risk of electric shock if your
body is earthed or grounded.
c) Do not expose power tools to rain or wet conditions.
Water entering a power tool will increase the risk of
electric shock.
d) Do not abuse the cord. Never use the cord for carrying,
pulling or unplugging the power tool.
Keep cord away from heat, oil, sharp edges or moving
parts.
Damaged or entangled cords increase the risk of
electric shock.
e) When operating a power tool outdoors, use an
extension cord suitable for outdoor use.
Use of a cord suitable for outdoor use reduces the
risk of electric shock.
f) If operating a power tool in a damp location is
unavoidable, use a residual current device (RCD)
protected supply.
Use of an RCD reduces the risk of electric shock.
3) Personal safety
a) Stay alert, watch what you are doing and use common
sense when operating a power tool.
Do not use a power tool while you are tired or under
the influence of drugs, alcohol or medication.
A moment of inattention while operating power tools
may result in serious personal injury.
b) Use personal protective equipment. Always wear eye
protection.
Protective equipment such as dust mask, non-skid
safety shoes, hard hat, or hearing protection used for
appropriate conditions will reduce personal injuries.
c) Prevent unintentional starting. Ensure the switch is
in the off-position before connecting to power source
and/or battery pack, picking up or carrying the tool.
1
4) Power tool use and care
5) Service
PRECAUTION
Keep children and infirm persons away.
When not in use, tools should be stored out of reach of children and
infirm persons.
Carrying power tools with your finger on the switch
or energising power tools that have the switch on
invites accidents.
d) Remove any adjusting key or wrench before turning
the power tool on.
A wrench or a key left attached to a rotating part of
the power tool may result in personal injury.
e) Do not overreach. Keep proper footing and balance
at all times.
This enables better control of the power tool in
unexpected situations.
f) Dress properly. Do not wear loose clothing or
jewellery. Keep your hair, clothing and gloves away
from moving parts.
Loose clothes, jewellery or long hair can be caught
in moving parts.
g) If devices are provided for the connection of dust
extraction and collection facilities, ensure these are
connected and properly used.
Use of dust collection can reduce dust related hazards.
a) Do not force the power tool. Use the correct power
tool for your application.
The correct power tool will do the job better and safer
at the rate for which it was designed.
b) Do not use the power tool if the switch does not
turn it on and off.
Any power tool that cannot be controlled with the
switch is dangerous and must be repaired.
c) Disconnect the plug from the power source and/or
the battery pack from the power tool before making
any adjustments, changing accessories, or storing
power tools.
Such preventive safety measures reduce the risk of
starting the power tool accidentally.
d) Store idle power tools out of the reach of children
and do not allow persons unfamiliar with the power
tool or these instructions to operate the power tool.
Power tools are dangerous in the hands of untrained
users.
e) Maintain power tools. Check for misalignment or
binding of moving parts, breakage of parts and any
other condition that may affect the power tool's
operation.
If damaged, have the power tool repaired before use.
Many accidents are caused by poorly maintained
power tools.
f) Keep cutting tools sharp and clean.
Properly maintained cutting tools with sharp cutting
edges are less likely to bind and are easier to control.
g) Use the power tool, accessories and tool bits etc. in
accordance with these instructions, taking into
account the working conditions and the work to be
performed.
Use of the power tool for operations different from
those intended could result in a hazardous situation.
a) Have your power tool serviced by a qualified repair
person using only identical replacement parts.
This will ensure that the safety of the power tool is
maintained.
Page 3
ROTARY HAMMER SAFETY WARNINGS
1. Wear ear protectors.
Exposure to noise can cause hearing loss.
2. Use auciliary handle(s), if supplied with the tool.
Loss of control can cause personal injury.
3. Hold power tool by insulated gripping surfaces,
when performing an operation where the cutting
accessory may contact hidden wiring or its own
cord.
Cutting accessory contacting a "live" wire may make
exposed metal parts of the power tool "live" and
could give the operator an electric shock.
4. Do not touch the bit during or immediately after
operation. The bit becomes very hot during
operation and could cause serious burns.
5. Before starting to break, chip or drill into a wall,
floor or ceiling, thoroughly confirm that such items
as electric cables or conduits are not buried inside.
6. Always hold the body handle and side handle of
the power tool firmly. Otherwise the counterforce
produced may result in inaccurate and even
dangerous operation.
7. Wear a dust mask
Do not inhale the harmful dusts generated in
drilling or chiseling operation. The dust can
endanger the health of yourself and bystanders.
SPECIFICATIONS
Voltage (by areas)* (110V, 115V, 120V, 127V, 220V, 230V, 240V)
Power input 1200 W*
Capacity Drill bit: 45 mm
No load speed 120 – 240 min
Full-load impact rate 1250 – 2500 min
Weight (without cord, side handle) 8.0 kg
*Be sure to check the nameplate on product as it is subject to change by areas.
STANDARD ACCESSORIES
(1) Case ............................................................................. 1
(2) Side Handle ................................................................ 1
2. Anchor hole drilling (Rotation + Hammering)
(3) Stopper ........................................................................ 1
(4) Hammer Grease A .................................................... 1
Standard accessories are subject to change without
notice.
Core bit: 125 mm
-1
-1
Drill bit (Taper shank)
(3) Cotter
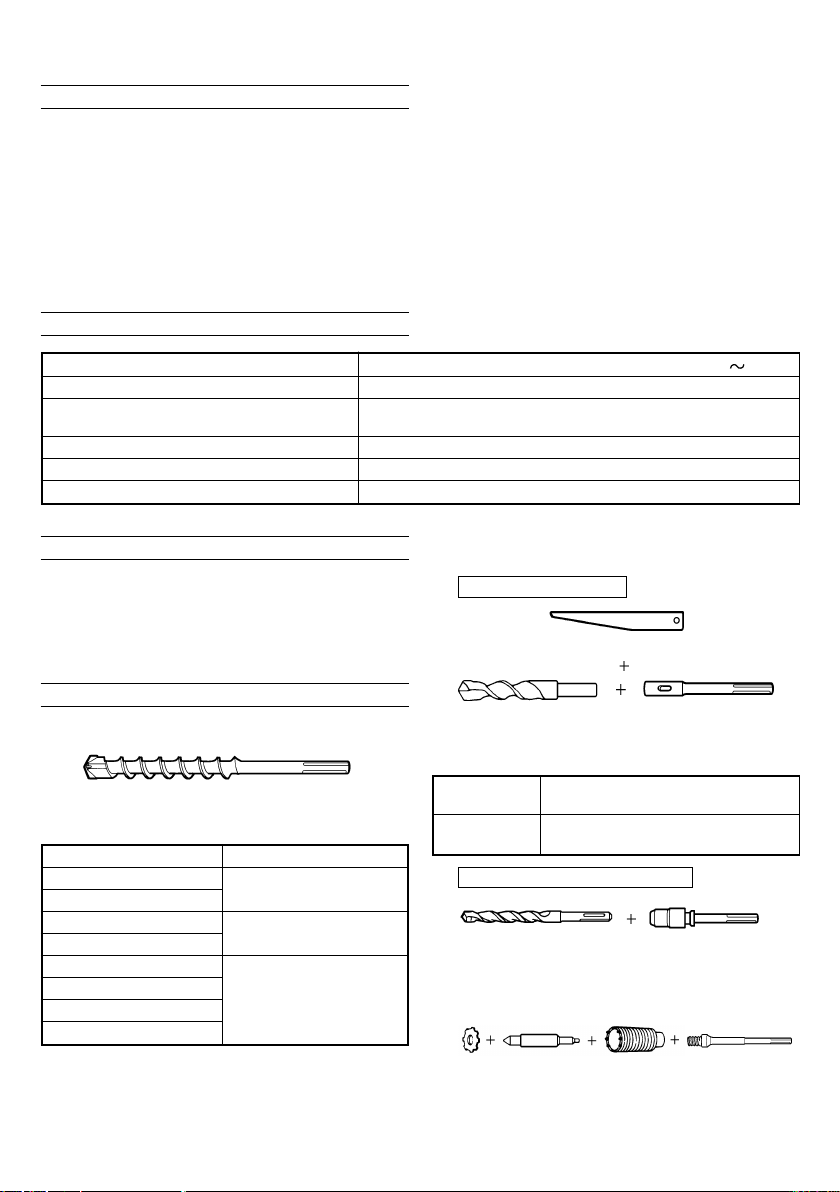
OPTIONAL ACCESSORIES (sold separately)
1. Through-hole drilling (Rotation + Hammering)
(1) Drill bit (SDS max shank)
Outer diameter (mm) Overall length (mm)
16
19
22
25
28
32
38
40
340, 540
320, 520
370, 570
(1) Drill bit (taper shank)
External dia.: 11, 12.3, 12.7,
14.3, 14.5,
(2) Taper shank
adapter
(SDS max shank)
17.5 mm
Taper shank
adapter
Application drill bit
Morse taper Drill bit (taper shank)
(No. 1) 11, 12.3, 12.7, 14.3, 14.5, 17.5 mm
Adapter for SDS-plus shank bit
(1) Drill bit
(SDS-plus shank)
(2) Adapter for SDS-plus
shank bit
(SDS max shank)
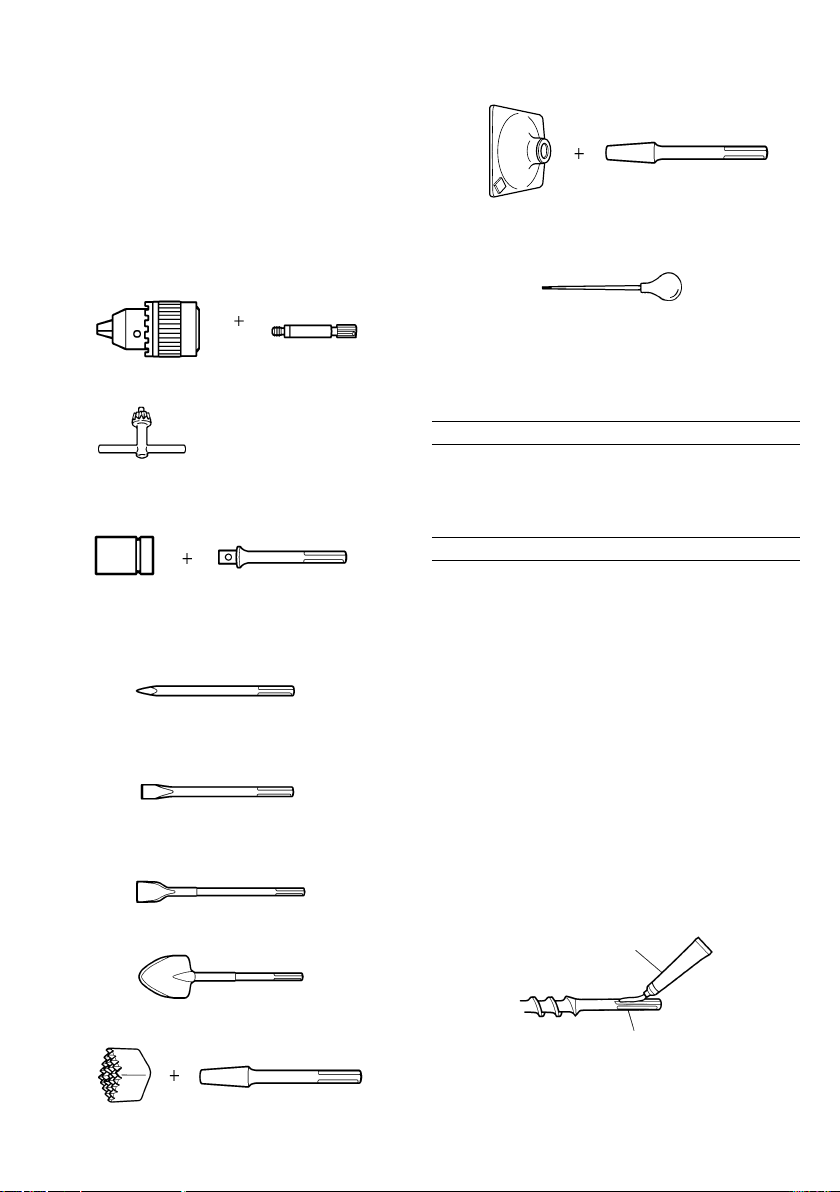
3. Large dia. hole boring (Rotation + Hammering)
(Guide
plate)
(1) Center
pin
(2) Core
bit
(3) Core bit
shank
(1) Center pin
䢇 Applied to core bits from 38 mm to 125 mm
䢇 Applied to core bits 32 mm and 35 mm
2
Page 4
NOTE:
Do not use core bits 25 mm or 29 mm.
(2) Core bit
䢇 External dia. 25, 29, 32, 35, 38, 45, 54, 64, 79, 94,
105, 120, 125 mm
(with guide plate, not applicable to cores 25 mm
or 29 mm)
(3) Core bit shank
䢇 Applied to core bits above 38 mm
䢇 Applied to core bits below 35 mm
4. Drilling holes .... For drilling metal and wooden
13 mm drill chuck
(13VLA)
Chuck wrench
5. Bolt placing operation with Chemical Anchor
(Rotation + Hammering)
(Standard socket
on the market)
6. Crushing (Hammering)
7. Groove digging and edging (Hammering)
8. Asphalt cutting (Hammering)
9. Scooping Work (Hammering)
materials
Chuck adapter
(SDS max shank)
(SDS max shank)
12.7 mm Chemical
Anchor Adaptor
19 mm Chemical
Anchor Adaptor
(1) Bull point
Overall length: 280, 400 mm
(1) Cold chisel
Overall length: 280, 400 mm
(1) Cutter
11. Tamping (Hammering)
(1) Rammer
150 × 150 mm
12. Syringe (for chip removal)
䡬 Hammer grease A
500 g (in a can)
70 g (in a green tube)
30 g (in a green tube)
Optional accessories are subject to change without
notice.
(2) Shank
APPLICATIONS
䡬 Drilling holes in concrete
䡬 Drilling anchor holes
䡬 Crushing concrete, chipping, digging, and squaring
(by applying optional accessories)
PRIOR TO OPERATION
1. Power source
Ensure that the power source to be utilized conforms
to the power requirements specified on the product
nameplate.
2. Power switch
Ensure that the power switch is in the OFF position.
If the plug is connected to a power receptacle while
the power switch is in the ON position, the power
tool will start operating immediately, which could
cause a serious accident.
3. Extension cord
When the work area is removed from the power
source, use an extension cord of sufficient thickness
and rated capacity. The extension cord should be
kept as short as practicable.
4. How to install tool
NOTE:
For tools such as a bull point and a cold chisel,
use only Hitachi genuine parts.
(1) Clean, then smear the tool shank with the grease
provided in the green tube (Fig. 1).
Grease
(1) Scoop
10. Surface Roughing (Hammering)
(1) Bushing Tool
3
(2) Shank
Tool shank
Fig. 1
Page 5

(2) To attach the tool (SDS max shank), insert it into
the hole until it contacts the innermost end of the
hole as illustrated in Fig. 2.
Front cap
HOW TO USE THE ROTARY HAMMER
1. How to drill holes (Fig. 4)
(1) Pull the switch trigger after applying the drill bit
tip to the drilling position.
(2) It is unnecessary to forcibly press the rotary hammer
main body. It is sufficient to slightly press the rotary
hammer to an extent that shavings are freely
discharged.
Fig. 2
Fig. 3
Grip
Dial
Part of
Tool
SDS max shank
If you continue to turn the tool with slight pressure,
you can feel a spot where there is a hitch. At that
spot, pull the grip to the direction of an arrow mark
and insert the tool all the way until it hits the
innermost end.
Releasing the grip reverts the grip and secures the
tool in place.
(3) Pull the tool to make sure it is locked completely.
(4) To remove the tool, fully pull the grip in the direction
of the arrow and pull out the tool.
5. Regulating the number of rotations and hammering
(Fig. 3)
This Rotary Hammer is equipped with a built-in
electronic control circuit that can adjust and regulate
the number of rotations and times of hammering.
This Rotary Hammer can be used by adjusting the
dial, depending upon the contents of operation,
such as boring holes into fragile materials, chipping,
centering, etc.
The scale ‘1’ of the dial is designed for a minimum
speed with the number of 120 rotations per minute
and 1250 times of blow per minute. The scale ‘6’
is designed for a maximum speed with the number
of 240 rotations per minute and 2500 times of blow
per minute.
CAUTION:
Do not adjust the dial during operation. Doing so
can result in injury because the Rotary Hammer
must be held by only one hand, disabling the steady
control of the Rotary Hammer.
6. RCD
The use of a residual current device with a rated
residual current of 30 mA or less at all times is
recommended.
Fig. 4
CAUTION:
Although this machine is equipped with a safety
clutch, if the drill bit becomes bound in concrete
or other material, the resultant stoppage of the drill
bit could cause the machine body to turn in reaction.
Ensure that the main handle and side handle are
gripped firmly during operation.
2. How to chisel or crush (Fig. 5)
By applying the drill bit tip to the chiseling or
crushing position, operate the rotary hammer by
utilizing its empty weight.
Forcible pressing or thrusting is unnecessary.
Fig. 5
3. When drilling at “rotation + hammering”:
CAUTION:
If you switch the selector lever during motor rotation,
the tool can start to rotate abruptly, resulting in
unexpected accidents. Be sure to switch the selector
lever when the motor is at a complete stop.
(1) Switching to “rotation + hammering”
(a) Push the button, release lock and turn the selector
lever clockwise.
(b) Align ▲ of the selector lever and
holder as illustrated in Fig. 6.
of the lever
4
Page 6

Lever holder
Selector lever
(c) Release the button to lock the selector lever.
NOTE:
Turn the selector lever (do not push the button) to
check if it is completely locked and make sure that
it does not turn.
4. When chipping and chiseling at “hammering”:
CAUTION:
䡬 If the selector lever is switched during motor rotation,
the tool can start to rotate abruptly, resulting in
unexpected accidents. Make sure to switch the
selector lever when the motor is at a complete stop.
䡬 If the bull point or cold chisel is used at the position
of ”rotation + hammering”, the tool can start to
rotate, resulting in unexpected accidents. Make
sure that they are used at the position of
”hammering”.
(1) Switching to ”hammering”
(a) Push the button, release lock and turn the selector
lever counterclockwise.
(b) Align ▲ of the selector lever and
holder as illustrated in Fig. 7.
Lever holder
Button
Fig. 6
of the lever
Lever holder
Selector lever
(b) Release the button to lock the selector lever.
(c) Turn the grip as illustrated in Fig. 9 and fix the
tool to the desired working direction.
(d) Switch the selector lever to “hammering”
according to the procedures mentioned in the
above item (1) and secure the position of the tool.
5. Install the stopper (Fig. 10)
(1) Loosen the side handle and insert the straight portion
of the stopper into the handle bolt hole.
(2) Move the stopper to the specified position and
rotate the grip of the side handle clockwise to fix
the stopper.
Stopper
Button
Fig. 8
Grip
Fig. 9
Button
(c) Release the button to lock the selector lever.
NOTE:
Turn the selector lever (do not push the button) to
check if it is completely locked and make sure that
it does not turn.
(2) When fixing working positions of tools such as cold
chisel, etc.,
(a) Push the button, release lock and turn the selector
lever.
Align ▲ of the selector lever and
holder as illustrated in Fig. 8.
5
Selector lever
Fig. 7
of the lever
Side handle
Fig. 10
6. Warming up (Fig. 11)
The grease lubrication system in this unit may
require warming up in cold regions.
Position the end of the bit so makes contact with
the concrete, turn on the switch and perform the
warming up operation. Make sure that a hitting
sound is produced and then use the unit.
Fig. 11
Page 7

English
CAUTION:
When the warming up operation is performed, hold
the side handle and the main body securely with
both hands to maintain a secure grip and be careful
not to twist your body by the jammed drill bit.
DRILLING AND DRIVING-IN OPERATIONS FOR
ANCHORS
1. When a taper shank adapter is used. (Fig. 12)
Taper shank adapter
Drill bit (taper shank)
Fig. 12
(1) Install drill bit with taper shank in the taper shank
adapter.
(2) Turn the power on and drill a base hole to the depth
sounded by indicating groove on the drill bit.
(3) After cleaning out dust with a syringe, attach the
plug to the anchor tip and drive in the anchor with
a manual hammer.
(4) To remove the drill bit (taper shank), insert the
cotter into the slot of the taper shank adapter and
strike the head of the cotter with a manual hammer
supporting on a rest. (Fig. 13)
Cotter
Indicating
groove shows
standard
depth
matching the
outside
diameter of
the anchor
for drilling.
Taper shank adapter
(a) Attach the chuck adapter to the drill chuck.
(b) The SDS max shank of the chuck adapter is
equivalent to the drill bit. Therefore, follow the
same procedure as [How to install tool] for
attaching and detaching.
Front cap
Drill chuck
Chuck adapter
(3) Drilling
(a) Even if you apply more-than-required pressure to
the machine body, drilling can never be performed
as quickly as you expect. Applying more force or
pressure to the machine body than what is needed,
on the contrary, damages the drill tip, resulting in
the declined working efficiency and shortened life
of this machine.
(b) A drill can snap sometimes when drilling is almost
finished. It is important to relax your thrusting
pressure when drilling is nearing the end.
Part of SDS
max shank
Fig. 14
Grip
HOW TO HANDLE A CORE BIT
When a core bit is used, large diameter holes and blind
holes can be drilled. In this case, use optional
accessories for core bits (such as a center pin and core
bit shank) for more efficient operation.
1. Mounting
CAUTION:
Prior to mounting a core bit, always disconnect the
plug from the power supply receptacle.
(1) Mount the core bit on the core bit shank. (Fig. 15)
Before that, feed oil to the screw portion of core
bit shank for easy dismounting.
Rest
Fig. 13
USING DRILL CHUCK, CHUCK ADAPTER
Note that this machine can be used at “rotation only”
if separately sold parts such as drill chuck and chuck
adapter are attached. Use it with the selector lever
positioned at “rotation + hammering”.
CAUTION:
During operation, be sure to grip the handle and
the side handle firmly to prevent your body from
swaying.
(1) Switching to “rotation + hammering”
For switching to “rotation + hammering”, follow the
same procedures mentioned in [3. When drilling at
“rotation + hammering”].
(2) Attaching chuck adapter to drill chuck (Fig. 14)
Core bit
Core bit shank
Fig. 15
(2) Mount the core bit shank on the main body in the
same manner as in mounting the drill bit and the
bull point. (Fig. 16)
6
Page 8

Fig. 16
(3) Insert the center pin into the guide plate until it
reaches the extremity.
(4) Fit in the guide plate by aligning its concaved
portion with the core bit tip. When the position of
the concave is shifted by turning the guide plate
right or left, the guide plate never slips off even
when the drill is used in a downward direction.
(Fig. 17)
3. How to dismount the core bit
䡬 By holding the rotary hammer (with the core bit
inserted) in an upward position, drive the rotary
hammer to repeat impact operation two or three
times, whereby the screw is loosened and the rotary
hammer becomes ready for disassembly. (Fig. 19)
Core bit
Core bit shank
Remove the core bit shank from the rotary hammer
hold the core bit with one hand, and strongly strik
the head of the SDS max shank portion of the core
bit shank with a manual hammer two or three
times, whereby the round head screw is loosened
and the rotary hammer is ready for disassembly.
(Fig. 20)
Fig. 19
Center pin
Core bit
2. Drilling holes
(1) Insert the plug into a receptacle.
(2) A spring is built in the center pin. By straightly and
gently pressing it to the wall or floor surface, the
entire surface of the core bit tip attains contact to
start the hole drilling job. (Fig. 18)
(3) When the hole depth reaches approximately 5 mm,
the hole position can be determined. Then remove
the center pin and guide plate from the core bit
and continue the hole drilling job.
CAUTION:
When removing the center pin and guide plate,
always disconnect the plug from the receptacle.
7
Guide plate
Core bit tip
Fig. 17
Fig. 18
Core bit shank
Core bit
Fig. 20
HOW TO REPLACE GREASE
This machine is of full air-tight construction to protect
against dust and to prevent lubricant leakage. Therefore,
the machine can be used without lubrication for long
periods. Replace the grease as described below.
1. Grease replacement period
After purchase, replace grease after every 6 months
of usage. Ask for grease replacement at the nearest
Hitachi Authorized Service Center. Proceed for
replacement of grease.
2. Grease replenishment
CAUTION:
Before replenishing the grease, turn the power off
and pull out the power plug.
(1) Remove the crank cover and wipe off the grease
inside. (Fig. 21)
Page 9

Crank cover
Fig. 21
(2) Supply 30 g of Hitachi Electric Hammer Grease A
(Standard accessory, contained in tube) to the crank
case.
(3) After replenishing the grease, install the crank cover
securely.
NOTE:
The Hitachi Electric Hammer Grease A is of the low
viscosity type. If necessary purchase from an Hitachi
Authorized Service Center.
MAINTENANCE AND INSPECTION
1. Inspecting the tool
Since use of a dull tool will degrade efficiency and
cause possible motor malfunction, sharpen or
replace the tool as soon as abrasion is noted.
2. Inspecting the mounting screws
Regularly inspect all mounting screws and ensure
that they are properly tightened. Should any of the
screws be loose, retighten them immediately. Failure
to do so could result in serious hazard.
3. Maintenance of the motor
The motor unit winding is the very “heart” of the
power tool. Exercise due care to ensure the winding
does not become damaged and/or wet with oil or
water.
4. Inspecting the carbon brushes
For your continued safety and electrical shock
protection, carbon brush inspection and replacement
on this tool should ONLY be performed by a HITACHI
Authorized Service Center.
5. Replacing supply cord
If the supply cord of Tool is damaged, the Tool
must be returned to Hitachi Authorized Service
Center for the cord to be replaced.
6. Service parts list
A: Item No.
B: Code No.
C: No. Used
D: Remarks
CAUTION
Repair, modification and inspection of Hitachi Power
Tools must be carried out by a Hitachi Authorized
Service Center.
This Parts List will be helpful if presented with the
tool to the Hitachi Authorized Service Center when
requesting repair or other maintenance.
In the operation and maintenance of power tools,
the safety regulations and standards prescribed in
each country must be observed.
MODIFICATION
Hitachi Power Tools are constantly being improved
and modified to incorporate the latest technological
advancements.
Accordingly, some parts (i.e. code numbers and/or
design) may be changed without prior notice.
NOTE:
Due HITACHI’s continuing program of research and
development, the specifications herein are subject to
change without prior notice.
8
Page 10

9
Page 11

ABCD
1 321-306 1
2 321-305 1
3 318-590 1
4 321-304 1
5 321-303 1
6 321-302 1
7 981-942 4 M6×25
8 321-300 1
9 956-996 3 1AS-60
10 321-301 1
11 325-229 1
12 315-868 1
13 948-131 1
14 600-7DD 1 6007DDUAV2S
15 321-297 1
16 313-421 2 D8×20
17 324-919 1
18 324-921 1
19 324-920 1
20 324-922 1
21 324-923 1
22 324-924 1
23 313-057 4 D6×6
24 324-925 1
25 324-930 1
26 324-931 1
27 324-927 1
28 324-928 1
29 324-926 1
30 325-297 2 I.D 27.2
31 324-929 1
32 324-917 1
33 324-915 1
34 324-916 1
35 324-932 1
36 991-712 4 M6×25
37 324-933 1
38 321-867 1
39 983-162 1 M4×12
40 321-309 1
41 324-935 1
42 311-229 1
43 324-934 1
44 873-095 1 P-16
45 321-310 1
46 321-311 1
47 321-312 1
48 939-540 1
49 324-909 1
50 971-750 1 3X3×20
51 948-391 1
52 620-3DD 1 6203DDCMPS2L
53 996-363 1 S-40
54 971-745 1
55 986-940 4 M6×45
56 994-192 8 M5×16
57 324-937 1
58 324-912 1 “59-61, 63-71”
59 944-109 1 3×3×8
60 324-913 1
61 321-279 1
62 313-050 1
63 600-2DD 1 6002DDCMPS2L
64 313-058 1
65 313-053 1
66 321-281 1
67 321-282 10
68 320-343 10
69 324-914 1
70 321-283 1
71 629-VVM 1 629VVC2PS2L
72 944-525 1
ABCD
73 325-230 1
74 324-944 1
75 324-947 1
76 ––––––– 1
77 324-938 1
78 313-078 1
79 313-079 1
80 980-673 2 M5×40
81 313-093 1
82 938-307 1
83 324-948 1
84 301-653 2 D4×20
85 981-373 2
86-1 980-063 1
86-2 930-804 1 “ GBR (110V),”
87-1 960-266 1
87-2 981-987Z 1 “SUI”
88 984-750 2 D4×16
89-1 953-327 1 D8.8
89-2 938-051 1 D10.1
90 ––––––– 1
91 313-080 1
92 971-786 1
93 998-471 1 M5×12
94 324-936 1
95 ––––––– 1
96 324-908 1
97 324-910 1
98 324-911 1
98 939-299 1 M661
100 961-501 2 D5×60
101-1 340-646C 1 110V “111”
101-2 340-646E 1 230V “111”
101-3 340-646F 1 240V “111”
102 ––––––– 1
103 324-943 1 “106, 107”
104 945-161 2
105 999-071 2
106 962-777 2
107 938-477 2 M5×8
108 324-946 1
109 984-508 2 M5×20
110 321-313 2 M6×22
111 937-623 2
112 321-322 1
113 985-436 1
114 620-0VV 1 6200VVCMPS2L
115 318-721 1
116 620-2DD 1 6202DDCMPS2L
117 980-700 1
118 318-918 1
119-1 360-737C 1 110V “118”
119-2 360-737E 1 230V “118”
119-3 360-737F 1 240V “118”
120 324-945 1
121 324-942 1
122-1 324-940 1 110V
122-2 324-941 1 120V
122-3 324-939 1 230V-240V
123 317-113 1
501 324-820 1
502 981-840 1 30G
10
Page 12

Hitachi Koki Co., Ltd.
Shinagawa Intercity Tower A, 15-1, Konan 2-chome,
Minato-ku, Tokyo, Japan
Code No. C99144811 N
101
Printed in Japan
 Loading...