

Page 1

Projector
CP-X4021N/CP-X5021N
CP-WX4021N
User's Manual (detailed)
Instant Stack Guide
Thank you for purchasing this product.
This manual is intended to explain only Instant Stack feature. Other than what is
mentioned in this manual, please see other manuals of this product.
Features
This projector can be used with one more same type projector to make one image
on one screen with Instant Stack feature.
The two projectors can work simultaneously to make the image brighter.
Moreover, if you connect two projectors with RS-232C cross-over cable, it turns to
a kind of intellectual stacking system. The two projectors can work alternately by
themselves, and once one projector has an accident the other voluntarily starts to
work to keep your presentation going.
These features, generically called Instant Stack, provide you with the broad use.
WARNING ►Before using this product, be sure to read all manuals for this
product. After reading them, store them in a safe place for future reference.
►Follow all the instructions in the manuals or on the product. The manufacturer
assumes no responsibility for any damage caused by mishandling that is beyond
normal usage dened in the manuals.
NOTE • The information in this manual is subject to change without notice.
• The manufacturer assumes no responsibility for any errors that may appear in
this manual.
• The reproduction, transfer or copy of all or any part of this document is not
permitted without express written consent.
Trademark acknowledgment
All the trademarks in this manual are the properties of their respective owners.
1
Page 2

Contents
1. Introduction ........................3
1.1 Entries and graphical
symbols explanation ........................ 3
1.2 Important safety instruction ..........3
For Instant Stack feature ..................... 3
For general installation ........................ 5
1.3 Basic information
and preparation ............................... 6
Instant Stack ........................................ 6
Intellectual Stack and Simple Stack ..... 6
Remote control for Intellectual Stack
and Simple Stack ............................ 6
Installation styles ................................. 6
Tentative naming of two projectors ...... 6
2. Installation ..........................7
2.1 Preparation with powered up ........ 7
2.2 Installation of
the rst projector (Set A) ................ 8
Removing pocket caps ........................ 8
Preparing of elevator feet .................... 8
Deciding installation position ............... 8
Setting up Set A ................................... 9
2.3 Installation of
the second projector (Set B) ........ 11
Piling up projectors ............................ 11
Connecting projectors ........................ 11
Setting up Set B ................................. 12
2.4 Conrmation of Main
& Sub setting ................................. 14
2.5 Fine adjustment
of image position ........................... 15
For Intellectual Stack users ............... 15
For Simple Stack users ...................... 16
3. Setting on STACK menu ..17
3.1 Displaying STACK menu ............ 17
3.2 Selecting Main, Sub or off ..........18
3.3 Selecting lamp working mode..... 19
3.4 Selecting lamp switching mode .. 21
3.5 Selecting input source to Sub ..... 22
3.6 Exiting STACK menu .................. 23
In STACK menu ................................. 23
In a dialog from STACK menu ........... 23
3.7 Important information
for Intellectual Stack ...................... 24
4. Connecting cables ...........27
4.1 Connecting RS-232C cable ........ 27
4.2 Connecting signal cables............ 28
Inputting image to Sub from Main ...... 28
Inputting image
to Sub and Main individually ........... 28
5. Setting for input port
on menu ..............................29
5.1 Preparing menu operation .......... 29
5.2 Checking Main projector’s
operating status ............................. 29
5.3 Starting Main projector ...............30
5.4 Setting on menu .........................31
Inputting image to Sub from Main
- Computer signal ...........................31
Inputting image to Sub from Main
- Video signal
(either COMPONENT or VIDEO) ...32
Inputting image of
Sub and Main individually ............... 31
6. Restriction
on Schedule function ........34
7. Troubleshooting ...............36
2
Page 3
1. Introduction
1.1 Entries and graphical symbols explanation
The following entries and graphical symbols are used for the manuals and the
product as follows, for safety purpose. Please know their meanings beforehand,
and heed them.
WARNING This entry warns of a risk of serious personal injury or even
death.
CAUTION This entry warns of a risk of personal injury or physical
damage.
NOTICE This entry notices of fear of causing trouble.
1.2 Important safety instruction
The followings are important instructions for safely using the product in Instant
Stack. First of all, read the following instructions and be sure to follow them al-
ways when using the Instant Stack of this product.
For Instant Stack feature
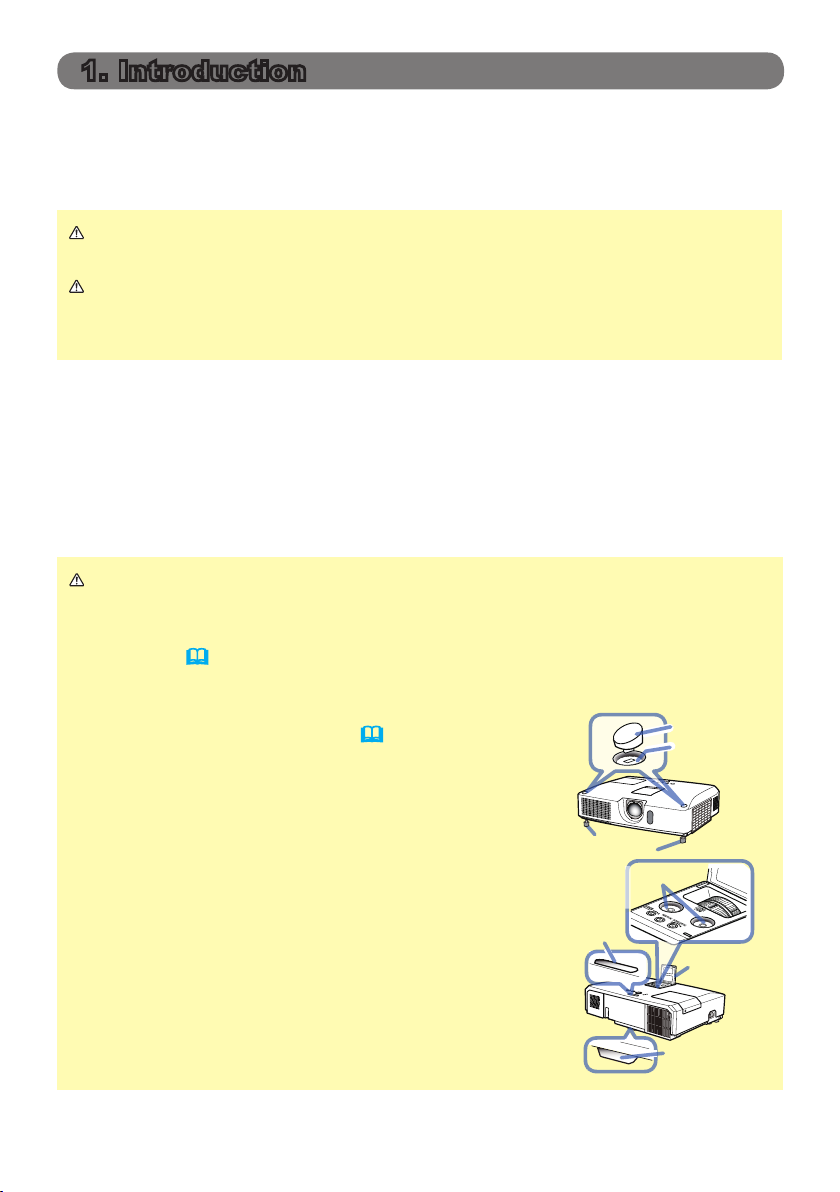
WARNING ► Take a special care not to fall the stacked projectors.
• When stacking two projectors, make sure the elevator feet and heel of the
upper projector are inserted into the corresponding pockets of the lower
projectors. (
• When using the Instant Stack by piling up two projectors, you can change the
projection angle by adjusting the elevator feet of the
unit that is placed underneath. (
to prevent the stacked projector from falling off or
tipping over while adjusting the elevator feet.
• Pile up two projectors as maximum and do not pile
up three projectors or more.
• Do not install the projectors that are piled up with
using the stack pockets, elevator feet and heel of
the projectors at a place higher than man.
• Do not install the projectors that are piled up with
using the stack pockets, elevator feet and heel of
the projectors on a ceiling.
• Do not touch the stacked projectors except when
instructions are given in this manual. Do not hit the
projectors with any type of object.
11
)
8
) Exercise care
Elevator feet
Cap storage
pocket
Stack
pocket
Pocket cap
Stack pocket
LOCK
Lens
adjuster
door
Heel
(continued on next page)
3
Page 4

1.2 Important safety instruction - For Instant Stack feature (continued)
Introduction
WARNING ► Be sure to storage the pocket caps reliably and safely inside
of the lens adjuster door to prevent children and pets from swallowing the caps,
when taking the caps from the in stack pockets. (
3
) If they swallow the caps,
consult a physician immediately for emergency treatment.
CAUTION ► Be careful not to injure your nail and nger to remove the
pocket caps. (
3
)
NOTICE ► Instant Stack is a feature that brings you a very convenient way to
pile up or line up two projectors. The images projected from the two projectors
may not be able to be nely superimposed on screen depending on the position
or environmental of the projectors. Especially, if the screen is curved or
distorted or unlevel, the images will not be nely superimposed.
• Just after turning on, the projected images will not be so stable since the
temperature inside of the projectors is rising. Wait 20 minutes or more after
turning on, before you start to adjust images to superimpose.
• The images may be shifted by temperature change, vibration and shock of
being hit by something. When you use Instant Stack, install them in stable
environment. If the images are shifted, adjust them again. (
9, 12, 15
)
• The images may be shifted with time by the tension or weight of connected
cables. Pay attention to arrangement of cables not to place burden to the
projectors.
• It may be happened to make a mechanical noise and degrade image quality
by sympathetic vibration with the piled up projectors if the volume of built-in
speakers is set much higher. In this case, check the volume setting on both
projectors, and lower the volume to remove such phenomena or place the
projectors side by side.
• With RS-232C connection between two projectors, a projector as Main can
control the other as Sub, which is a feature called as Intellectual Stack. (
If you use the feature, you cannot use RS-232C communication to control
projectors, since RS-232C function is occupied with Intellectual Stack. If you
wish to control projectors, use LAN connection that can be connected with
one of the projectors.
• When you use Intellectual Stack, the operations or setting of some functions
are restricted. Refer to this manual for detail. (
34
)
11
)
4
Page 5

Introduction
For general installation
WARNING ► Install the projector where you can access the power outlet
easily.
► Do not subject the projector to unstable conditions. Install the projector in a
stable horizontal position.
• Do not use any mounting accessories except the accessories specied by the
manufacturer. Read and keep the manuals of the accessories used.
• For special installation such as ceiling mounting, be sure to consult your
dealer beforehand. Specic mounting accessories and services may be
required.
► Do not install the projector near thermally conductive or ammable things.
► Do not place the projector where any oils, such as cooking or machine oil,
are used.
► Do not place the projector in a place where it may get wet.
CAUTION ► Place the projector in a cool place with sufcient ventilation.
• Keep a space of 30 cm or more between a side of the projector and other
objects such as a wall. If you install two projectors in Style 2 (
6
), keep a
space of 30 cm or more between the two projectors.
• Do not stop up, block nor cover the projector’s vent holes.
• Do not place the projector at places that are exposed to magnetic elds, doing
so can cause the cooling fans inside the projector to malfunction.
► Avoid placing the projector in smoky, humid or dusty place.
• Do not place the projector near humidiers. Especially for an ultrasonic
humidier, chlorine and minerals contained in tap water are atomized and
could be deposited in the projector causing image degradation or other
problems.
NOTICE ► Position the projector to prevent light from directly hitting the
projector’s remote sensor.
• Do not place the product in a place where radio interference may be caused.
5
Page 6

Introduction
1.3 Basic information and preparation
Instant Stack
Instant Stack is the feature that brings you very convenient way to superimpose
the images projected by two projectors. The projector is specially designed to
support the feature, and has some functions to support you to install two projec-
tors and superimpose the images.
Intellectual Stack and Simple stack
Instant Stack covers both of the following two features.
If you link two projectors with an RS-232C cable and make necessary setting on
the projectors, the projectors will automatically collaborate to work under the set-
ting. This use is called as Intellectual Stack in this manual.
If you do not connect an RS-232C cable, the projectors will work individually. This
use is called as Simple Stack in this manual.
Remote control for Intellectual Stack and Simple Stack
In Intellectual Stack use, one projector is set as Main and the other is set as Sub.
(
18) If you use Intellectual Stack, only the projector as Main can receive the
remote control signal. Even if you want to operate the other as Sub , you need to
point at the Main with the remote control.
If you use Simple Stack, both projectors can receive the remote control signal. To
avoid the operation by the remote control to being mixed up, it is recommended to
operate one projector by the remote control and to operate the other by the control panel on the projector or wired remote. In this case the other projector should
disable the remote control by KEY LOCK. (Operating Guide → OPTION menu)
Installation styles
There are following two styles to install two projectors. Instant Stack can support
both of them.
Style 1 : Piling them up vertically
Style 2 : Lining them up horizontally
This manual is mainly explained the installation of Style 1. If you wish to install
two projectors in Style 2, refer to the articles you need in this manual.
Tentative naming of two projectors
To be easy to follow the explanation, the following
Set
B
names are used in the manual for piling up installation.
Set A : A projector placed underneath
Set B : A projector placed over Set A
6
Set
A
Page 7
2. Installation
Before installation, read carefully Important safety instruction (
reason. And note the followings for proper use of the Instant Stack.
● When you use Intellectual Stack, until you set STACK MODE to SUB on one
projector, both projectors can react to the remote control signal.
For installation, it is recommended to operate one projector by the remote
control and to operate the other by the control panel on the projector or wired
remote. In this case the other projector should disable the remote control by
KEY LOCK. (
● Even if the images of Set A and Set B are fully superimposed once, it may shift
over time.
Adjust the images again to superimpose the image.
● It may be happened to make a mechanical noise and degrade image quality by
sympathetic vibration with the two projectors if the volume of built-in speakers is
set to much higher.
In this case, check the volume setting on both projectors, and lower the volume
to remove such phenomena. In case the image position is shifted, adjust it
again.
Operating Guide → OPTION menu)
3~5
) for safety
2.1 Preparation with powered up
If you wish to use Intellectual Stack with RS-232C cable connection, the following
setting must be conrmed on both of projectors. Otherwise, menus for Intellectual
Stack on the projectors cannot be operated.
● STANDBY MODE in SETUP menu: NORMAL
(
Operating Guide → SETUP menu)
● COMMUNICATION TYPE in COMMUNICATION in SERVICE menu: OFF
(
Operating Guide → OPTION menu)
● STACK LOCK in SECURITY menu: OFF
If STACK LOCK is set on, any menu related to Instant Stack cannot be
operated. So, it is required to set to off for installation and setting on menu.
(1) Using the ▲/▼/◄/► buttons, go down the menu tree as below;
ADVANCED MENU > SECURITY
> STACK LOCK
STACK LOCK dialog will appear on screen. (
Guide → SECURITY menu)
(2) Use the ▲/▼ buttons to point at OFF, and press the ► button to complete
the setting.
Operating
7
Page 8
2.2 Installation of the rst projector (Set A)
Installation
Removing pocket caps
When you pile up two projectors, remove pocket caps
on Set A.
CAUTION ►It is recommended to use a pin or
something similar to remove the caps. If you use
your nger, be careful not to injure your nail and n-
ger.
NOTE • Cap storage pockets for the pocket caps
are provided inside of the lens adjuster door. Be
sure to keep the caps in the storage pockets, when
taking the caps from the stack pockets.
To store the cap to the pocket, put thin side of the
cap to the pocket rst, and then rmly push down
the other side of the cap to the bottom end of the
pocket. Be aware that keeping the caps solidly is
extremely important to prevent children and pets
from swallowing the caps.
Preparing of elevator feet
When you pile up two projectors, set the elevator feet
length minimum with using the elevator buttons on Set
A and B.
Pocket caps
Thin side
LOCK
Cap storage
pocket
CAUTION ►Be careful that when you pile up
two projectors, a projector set over the other may
slide down.
Deciding installation position
Decide the position of Set A and its projection angle. (
User’s Manual (concise)
→ Arrangement and Adjusting the projector’s elevator.)
• The angle of gradient of Set A to the horizontal line should be within
NOTE
12 degrees.
• Keep in mind the followings when you consider the installation position.
VERTICAL adjuster should be set to upper limit position.
-
- ZOOM ring should not be set to fully wide position.
- HORIZONTAL adjuster is recommended to be set around center position.
8
Page 9
Installation
Setting up Set A
1. Turn on Set A.
2. Set the lens position to upper limit with VERTICAL adjuster.
NOTE • If it is not set to upper limit, the image of Set B may not be able to
fully overlap to the image of Set A.
• If necessary, set MIRROR rst, since the setting change may shift the image
position. (
• HORIZONTAL adjuster is recommended to be set around center position.
Operating Guide → SETUP menu)
3. Adjust the image of Set A to match your screen with using VERTICAL adjust-
er, HORIZONTAL adjuster, ZOOM ring and FOCUS ring. (User’s Manual
(concise) → Displaying the picture)
If necessary, also use KEYSTONE and PERFECT FIT to set the image position. (Operating Guide → EASY MENU or SETUP menu).
NOTE • ZOOM ring should not be set to fully wide position, otherwise the
image of Set B may not be able to fully overlap to the image of Set A. Be
aware that the image size of Set B must be set a little wider than the one of
Set A using ZOOM ring, since electrical ne tuning of image position of Set B
never widen the image size of Set B.
• When you use PERFECT FIT, KEYSTONE cannot be operated. If you
require to adjust the image with KEYSTONE and PERFECT FIT, adjust it with
KEYSTONE rst.
• If you use Simple Stack, go to Installation of the second projector (Set B).
(
11
)
4. Display a menu with MENU button. (Operating Guide → Using the menu
function)
5. Using the ▲/▼/◄/► buttons, go down the menu tree as below.
ADVANCED MENU > OPTION
> SERVICE > COMMUNICATION
> STACK
STACK menu will appear on screen.
(
Operating Guide → OPTION menu).
(continued on next page)
9
Page 10

Installation of the rst projector (Set A) - Setting up Set A (continued)
Installation
6. Use the ▲/▼ buttons to point at STACK
MODE, and press the ► button to display
STACK MODE dialog.
Point at SUB pressing the ▲/▼ buttons, and
press the ► button.
7. After pressing the ► button, a dialog to
conrm whether or not the setting is saved is
displayed.
Press the ► button to complete the setting. (23)
8. Disable the remote control by KEY LOCK if you use Intellectual Stack.
(Operating Guide → OPTION menu)
• During the installation, Set A will not be operated by the remote
NOTE
control after that. So, it is recommended to disable the remote control by KEY
LOCK, to avoid the operation by the remote control to being mixed up.
• After STACK MODE setting is completed, Set A (Sub) cannot receive the
remote control signal. When you set STACK MODE to OFF, enable the
remote control by KEY LOCK if necessary.
10
Page 11

Installation
2.3 Installation of the second projector (Set B)
Piling up projectors
1. Put Set B onto Set A, if you want to pile up two projectors. Make sure that the
heel on the bottom of Set B is right into the heel pocket on the top of Set A.
2.
Keeping Set B on Set A, without
holding Set B up, push the elevator buttons of Set B to draw the
elevator feet. Make sure that the
feet are reached to the bottom of
the stack pockets on Set A.
CAUTION ►Be careful that
when you pile up two projectors,
a projector set over the other may
slide down.
3. Make the feet of Set B rotate two
revolutions counterclockwise to keep about 1 mm space between a protrusion
at the bottom of Set B and the top case of Set A as shown in the right.
NOTE • Keeping Set B slightly away from Set A except the heel part is
required to avoid sympathetic vibration with the two projectors caused by
sound out from built-in speakers.
• Be careful that if Set B is tilted more, the image of Set B may not be able to
be superimposed to the image of Set A.
• If you have already used the elevator feet of Set A, make sure that the angle
to the horizontal line of both sets should be within 12 degrees.
Connecting projectors
If you wish to use Intellectual Stack, connect each CONTROL port on Set A and
Set B with an RS-232C cross cable.
11
Page 12
Installation
Setting up Set B
1. Turn on Set B.
NOTE • After turning on Set B, make sure that the image of Set B is not
remarkably inclined compared with the image of Set A. If it is inclined too
much, rotate the elevator feet of Set B to adjust the angle roughly. Check
again that there is about 1 mm space between a protrusion at the bottom of
Set B and the top case of Set A.
2. Reset the adjustment by KEYSTONE and PERFECT FIT on Set B.
(Operating Guide → EASY MENU or SETUP menu)
NOTE • When you use PERFECT FIT, KEYSTONE cannot be operated. If it
is required to reset both functions, reset PERFECT FIT function rst.
3. Adjust image size and position of Set B with ZOOM ring, VERTICAL adjuster,
HORIZONTAL adjuster and FOCUS ring to fully overlap the image of Set A.
NOTE • Fine adjustment of image size and position later by electrical
function, such as KEYSTONE and PERFECT FIT, cannot widen the
image size, so it is important to fully overlap the image of Set A by optical
adjustment.
• If you try to operate Set B with the remote control, Set A may react as well.
It is recommended to operate Set B with the control panel on Set B.
• If you install two projectors side by side, also adjust image size and position
of Set B to fully overlap the image of Set A.
• If you use Simple Stack, it is recommended to disable the remote control
on Set B by KEY LOCK and operate it by the control panel, or to operate
it by a wired remote control, since Set A will react to the remote control.
(
Operating Guide → OPTION menu)
• If you use Simple Stack, go to For Simple Stack users. (
16
)
4. Display a menu with MENU button. (Operating Guide → Using the menu
function)
5. Using the ▲/▼/◄/► buttons, go down the menu tree as below.
ADVANCED MENU > OPTION
> SERVICE > COMMUNICATION
> STACK
STACK menu will appear on screen.
Operating Guide → OPTION menu).
(
(continued on next page)
12
Page 13

Installation of the second projector (Set B) - Setting up Set B (continued)
6. Use the ▲/▼ buttons to point at STACK
MODE, and press the ► button to display
STACK MODE dialog.
Point at MAIN with the ▲/▼ buttons, and
press the ◄ button to return to the previous menu.
7. Use the ▲/▼ buttons to point at LAMP
MODE, and press the ► button to display
LAMP MODE dialog.
Point at DUAL with the ▲/▼ buttons, and press the ► button.
8. After pressing the ► button above, a dia-
log to conrm whether or not the setting is
saved is displayed.
Press the ► button to complete the setting.
(23)
Installation
13
Page 14

2.4 Conrmation of Main & Sub setting
1. Press MENU button on the remote control to Main (Set B).
NOTE • In use of Intellectual Stack, the remote control signal can be
received by the Main only, and the Sub ignores the remote control signal.
2. The MENU dialogs appear on the lower right of screen.
Installation
Main (Set B)
Sub (Set A)
3. If you press the ► button, the dialog is closed and a menu on Main (Set B)
will appear when MAIN is pointed at.
If you press the ◄ button, the dialog is closed and a menu will disappear.
NOTE • If these dialogs are not displayed on screen, check RS-232C cable
11
connection (
) and Main/Sub setting on STACK MODE dialog. (
18
)
14
Page 15

Installation
2.5 Fine adjustment of image position
To superimpose the image of Main (Set B) to the one of Sub (Set A), the image
size and position of Main (Set B) is nely adjusted with PERFECT FIT.
For Intellectual Stack users
1. Press MENU button on the remote control or control
panel on Main (Set B) to display MENU dialog.
Point at MAIN with the ▲/▼/◄/► buttons, and press
the ► button.
Main (Set B)
Then, a menu on Main (Set B) will appear.
2. Using the ▲/▼/◄/► buttons on the remote
control or Main (Set B) control panel, select
PERFECT FIT that is existed in EASY MENU
and OPTION menu of ADVANCED MENU.
(Operating Guide → EASY MENU or OP-
TION menu)
The image especially arranged for Intellectual
Image from Main (Set B)
Stack appears on screen. It consists of one
TEMPLATE screen with the PERFECT FIT
dialog from Main (Set B) and another TEM-
PLATE screen from Sub (Set A).
3. Using PERFECT FIT on Main (Set B), adjust
the image size and position of Main (Set B) to
fully superimpose to the image of Sub (Set A).
(Operating Guide → EASY MENU or OP-
TION menu)
It is recommended to adjust it by the following
way.
(1) Adjust four corners roughly in turn as be-
low.
Top left → Top right
→ Bottom right → Bottom left.
(2) Adjust four corners nely in turn as same
as above.
Image from Sub (Set A)
Superimposed image
NOTE • Refer to NOTE for all users. (
15
16
)
Page 16

Installation
For Simple Stack users
1. Press MENU button on the remote control to open a menu on Set A.
2. Use the ▲/▼/◄/► buttons to open
TEMPLATE dialog, then select STACK on
the dialog. (Operating Guide → SCREEN
menu)
3. Press MENU button on the control panel of Set
B to open a menu.
4. Use the ▲/▼/◄/► buttons to select
PERFECT FIT that is existed in EASY MENU
and OPTION menu of ADVANCED MENU.
(Operating Guide → EASY MENU or OP-
TION menu).
PERFECT FIT dialog appears on screen.
STACK of TEMPLATE
5. Using PERFECT FIT on Set B, adjust the im-
age size and position of Set B to fully superim-
pose to the image of Set A.
It is recommended to adjust it by the following
way.
(1) Adjust four corners roughly in turn as below.
Top left → Top right → Bottom right → Bottom left.
(2) Adjust four corners nely in turn as same as above.
for all users • Refer to PERFECT FIT of EASY MENU or OPTION
NOTE
menu in the Operating Guide for the detail of PERFECT FIT.
• Even if you place two projectors side by side (Style 2), adjust the image
position of one projector to the other's with the same way as explained above.
• It is strongly recommended to use a at screen. If you use a curved or
distorted screen, it is very difcult to adjust two images to be superimposed,
even if you use pin/barrel adjustment on PERFECT FIT.
• Even though you try to nely adjust the images from two projectors, it may
not be possible to superimpose the images depending on input signals. In this
case, try to resolve it with the following measures.
- Press AUTO button of the remote control or execute AUTO ADJUST
EXECUTE (
- Adjust H POSITION and V POSITION (Operating Guide → IMAGE menu)
on each of the projectors.
- Check RESOLUTION setting on INPUT menu, and if it is different between
the two projectors, change the setting to the same. (Operating Guide →
INPUT menu)
Operating Guide → IMAGE menu) on each of the projectors.
PERFECT FIT dialog
on STACK of TEMPLATE
16
Page 17

3. Setting on STACK menu
Using STACK menu, set the Intellectual Stack operation.
NOTE • If you use Simple Stack without RS-232C cable connection, skip this
chapter.
• If you do not need to change the setting that is set during the installation
explained prior to this chapter, jump to 3.3 Selecting lamp working mode. (
• Read carefully 3.7 Important information for Intellectual Stack. (
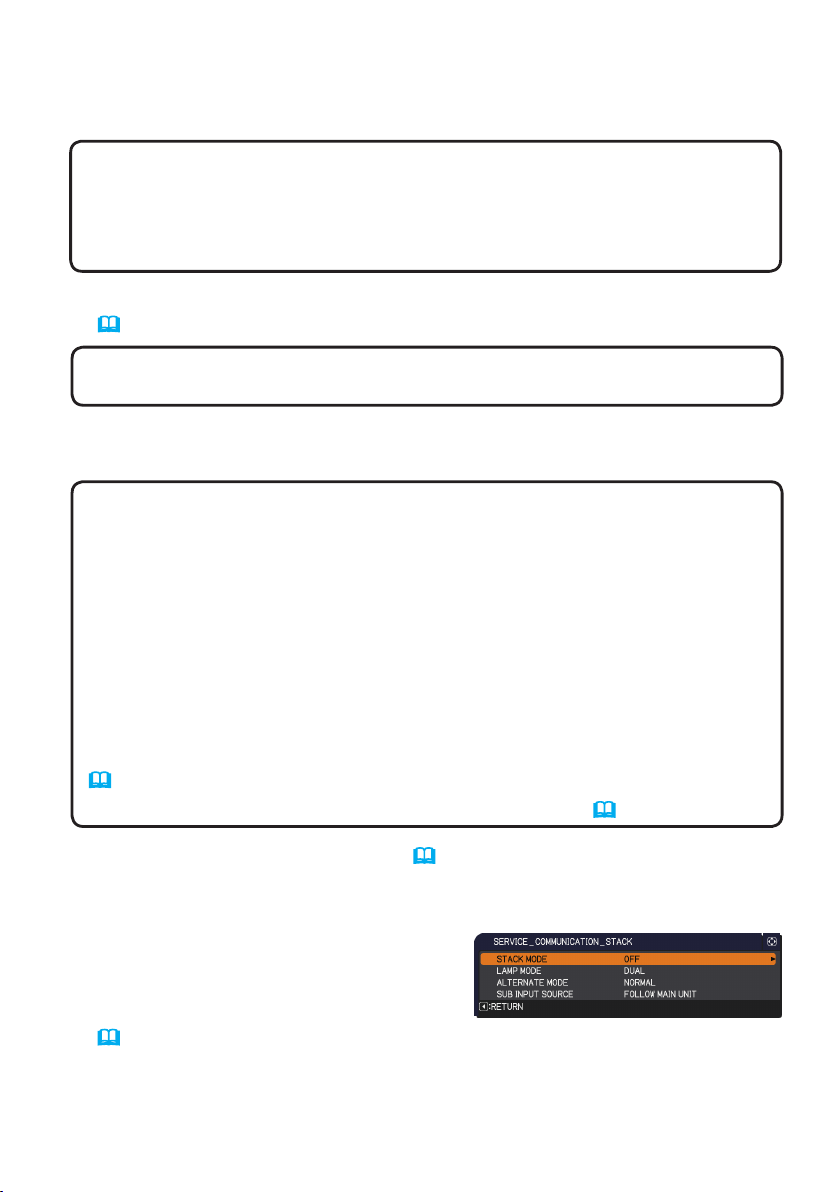
3.1 Displaying STACK menu
Using the ▲/▼/◄/► buttons, go down the menu tree as below.
ADVANCED MENU > OPTION
> SERVICE > COMMUNICATION > STACK
STACK menu will appear on screen.
(
Operating Guide → OPTION menu). The
setting for Intellectual Stack operation is started from the menu.
NOTE • The following setting must be conrmed on both of projectors.
Otherwise, STACK menu on the projectors cannot be operated. (
- STANDBY MODE in SETUP menu: NORMAL
(
Operating Guide → SETUP menu)
- COMMUNICATION TYPE in COMMUNICATION in SERVICE menu: OFF
(
Operating Guide → OPTION menu)
- STACK LOCK in SECURITY menu: OFF (
7
)
7
24
)
)
19
)
17
Page 18

Setting on Stack menu
3.2 Selecting Main, Sub or off
If you wish to turn on Intellectual Stack, select either MAIN or SUB. When a
projector is set to MAIN and the other is set to SUB in STACK MODE dialog, Intel-
lectual Stack is started. If you wish to turn off Intellectual Stack, select OFF.
1. Point at STACK MODE with the ▲/▼ buttons in
STACK menu, then press the ► button to display
STACK MODE dialog.
2. Use the ▲/▼ buttons in the dialog to point at MAIN, SUB or OFF.
OFF : for disabling Intellectual Stack
MAIN : for assigning the projector to Main that is works as a control tower.
SUB : for assigning the projector to Sub that works as a follower.
3. Press the ◄ button to turn back to previous menu, or the ► button to com-
plete the setting. (23)
NOTE
information can be monitored on Web Control.
(
Projector Status on the main menu of web
control. Stack Mode item shows whether your
projector is set to Main or Sub, even though
STACK MODE is set to OFF.
• After setting Main or Sub, the setting
Network Guide → Web Control) Select
18
Page 19

Setting on Stack menu
3.3 Selecting lamp working mode
Select one of lamp working mode, DUAL use or ALTERNATE use.
1. Point at LAMP MODE with the ▲/▼ buttons in
STACK menu, then press the ► button to display
LAMP MODE dialog.
2. Use the ▲/▼ buttons in the dialog to point at DUAL or ALTERNATE.
DUAL : for turning on the projectors at the same time.
ALTERNATE : for turning on the projectors alternately.
3. Press the ◄ button to turn back to previous menu, or the ► button to com-
plete the setting. (23)
NOTE • If DUAL is selected for the LAMP MODE, a menu to select MAIN or
SUB may be displayed on screen rst when a button on the control panel of the
projector or remote control is pressed. If displayed, select one of them which
you want to operate. Refer to some example below.
- When MENU button is pressed, a menu to select MAIN or SUB is displayed.
Then, if MAIN is selected, a menu either EASU MENU or ADVANCED MENU
on Main projector is displayed.
- When KEYSTONE button is pressed, a menu to select MAIN or SUB is
displayed. Then, if MAIN is selected, the KEYSTONE menu on Main projector
is displayed.
• When DUAL is selected for LAMP MODE, operating restrictions are as follows.
- AUTO POWER OFF and
FREEZE functions on both
projectors is disabled.
- The test patterns arranged
for CUSTOM of GAMMA and
COLOR TEMP are not displayed.
- It takes a little longer than
on other mode to turn on
the projectors, which is not
malfunction.
A menu to select
MAIN or SUB
A menu on Main
A menu to select
MAIN or SUB
A menu on Main
(continued on next page)
19
Page 20

Selecting lamp working mode (continued)
Setting on Stack menu
NOTE • When DUAL is selected for LAMP MODE, the following settings
are recommended because Main and Sub projectors may display different
images on screen.
- Set the same image on TEMPLATE and START UP functions on Main and
Sub projectors.
- Capture the same image on MyScreen on Main and Sub projectors.
- Save the same image on MY IMAGE on Main and Sub projectors.
- Set the same content of message for Messenger function (
Network Guide
→ Messenger Function) on Main and Sub projectors.
• When DUAL is selected for LAMP MODE, the image shift causes degradation
of image quality on screen. Set MIRROR setting in advance of image position
adjustment. When MIRROR setting (
Operating Guide → SETUP menu) is
changed, the image position is shifted.
• When ALTERNATE is selected, if an error is occurred and the lamp is turned
off on a working projector, the other automatically starts to work. In a case an
RS-232C cable is disconnected or AC power is not supplied, the other will not
work.
• Even when ALTERNATE is selected, if one or both of PIN LOCK and
TRANSITION DETECTOR are set to ON (
Operating Guide → SECURITY
menu), the both projectors will turn on. Then, after inputting security code for
each one, one of projector will turn off.
• In the Intellectual Stack use, POWER indicator on the control panel of
projector operates in different way from normal use. (
Operating Guide →
Troubleshooting) When Main and Sub projectors are in standby mode, if
STANDBY/ON button on the remote control or control panel of Main projector
is pressed, Main projector will decide projectors to turn on in accordance with
STACK MODE setting.
- While Main projector is selecting projectors to turn on, POWER indicator on
Main projector is blinking in green.
- If Main projector is required to turn on, POWER indicator on Main projector
turns to steady green after the lamp is on, as same as usual.
- If only Sub projector is required to turn on, POWER indicator on Main
projector turns to steady orange after Sub projector turns on.
- If an error is occurred on Main projector, Sub projector turns on and POWER
indicator on Main projector is lighting or blinking in red.
20
Page 21

Setting on Stack menu
3.4 Selecting lamp switching mode
The setting is required only when ALTERNATE is selected at LAMP MODE dialog.
(19) Select one of lamp switching mode, AUTO or NORMAL, in the ALTER-
NATE use.
1. Point at ALTERNATE MODE with the ▲/▼ but-
tons in STACK menu, then press the ► button to
display ALTERNATE MODE dialog.
2. Use the ▲/▼ buttons in the dialog to point at AUTO or NORMAL.
AUTO : for turning on one projector that has the lamp which usage time is
shorter than the other’s one.
NORMAL : for turning on one projector that was not used last time.
3. Press the ◄ button to turn back to previous menu, or the ► button to com-
plete the setting. (23)
NOTE • ALTERNATE MODE dialog can be operated on Main projector, when
ALTERNATE is selected on LAMP MODE dialog.
• To maintain quality and reliability of two projectors, it sometimes happens to
turn on a projector that has a lamp being used longer time than the one of the
other projector even if AUTO is selected.
21
Page 22

Setting on Stack menu
3.5 Selecting input source to Sub
Point at SUB INPUT SOURCE with the ▲/▼ but-
1.
tons in STACK menu, then press the ► button to
display SUB INPUT SOURCE dialog.
2. Use the ▲/▼ buttons in the dialog to point at FOLLOW MAIN UNIT or FIXED
(COMPUTER IN 1).
FOLLOW MAIN UNIT : for setting the input source on Sub projector as same
as the one on Main projector.
FIXED (COMPUTER IN 1) : for setting the input source on Sub projector to
COMPUTER IN1 port which is connected to MONITOR OUT port on Main
projector.
3. Press the ◄ button to turn back to previous menu, or the ► button to com-
plete the setting. (23)
NOTE • If FIXED (COMPUTER IN 1) is selected, either COMPUTER IN
1 or IN 2 port can be selected as an input source on Main projector. When
COMPUTER or VIDEO button on the remote control or INPUT button on the
projector is pressed, MAIN INPUT SOURCE dialog will be displayed on screen.
Select COMPUTER IN 1 or IN 2 with the ▲/▼ buttons.
• If FIXED (COMPUTER IN 1) is selected, COMPUTER IN1 port on Sub
projector should be connected to MONITOR OUT port on Main projector with a
computer cable. The image that is input from the selected port is output from
MONITOR OUT port on Main projector and input to COMPUTER IN1 port on
Sub projector. The setting for MONITOR OUT on Main projector is invalid when
FIXED (COMPUTER IN 1) is selected. (
• If FIXED (COMPUTER IN 1) is selected, video signals can be input to
COMPUTER IN1 and IN 2 ports on Main projector. Set the port which a video
signal is input to with COMPUTER IN, and set the video format on VIDEO
FORMAT. Refer to Inputting image to Sub from Main (
image to Sub from Main - Video signal (either COMPONENT or VIDEO) (
Operating Guide → SETUP menu)
28
) and Inputting
32
)
22
Page 23

Setting on Stack menu
3.6 Exiting STACK menu
Before exiting from menu operation for Intellectual Stack, checking all the setting
on STACK menu is recommended. In a dialog from the STACK menu, press the
◄ button to return to the STACK menu.
Refer to the following to exit from menu opereation for Intellectual Stack.
In the STACK menu
When you press the ◄ button (as RETURN)
with any setting change, the conrmation
dialog will appear.
● Pressing the ► button (as YES) in the dialog
saves the setting, and closes the dialog. The
screen is turned to black while the setting is
activating, so wait for a while.
● Pressing the ◄ button (as NO) in the dialog returns to the COMMUNICATION
menu without saving the setting. (
SERVICE)
In a dialog from the STACK menu
When you press the ► button (as EXIT) with any setting change, the conrmation dialog will appear.
● Pressing the ► button (as YES) in the dialog
saves the setting, and closes the dialog. The
screen is turned to black while the setting is
activating, so wait for a while.
● Pressing the ◄ button (as NO) in the dialog closes the dialog without saving the
setting.
Operating Guide → OPTION menu →
23
Page 24

Setting on Stack menu
3.7 Important information for Intellectual Stack
This section does not explain the menu operation, but gives you some important
information for setting Main/Sub projectors. Read all carefully.
● If you use Intellectual Stack, one projector must be set to Main and the other to
Sub.
● If you pile up two projectors, the control panel of the projector laid underneath
cannot be operated, so that it is strongly recommended to set the projector laid
underneath to Sub and the other to Main.
● Any keys except STANDBY/ON button on the control panel of Sub projector are
disabled. Operate the projectors with the control panel of Main projector or the
remote control.
● Even if pressing STANDBY/ON button of Sub projector, it is not possible to turn
off Sub projector only. If you press the button for more than 3 seconds, Main
and Sub projectors are turned off. Even if you press the button, you can turn on
neither Main nor Sub projector.
● Main projector can receive the signal from the remote control but Sub projector
cannot, so the remote control should be pointed at Main projector.
● If you use a wired remote control, connect the plug to Main projector, not to Sub.
● If you use a simple PC mouse function, connect both of Main and Sub projectors
to your computer with USB cables.
● AUTO SEARCH function is disabled while the projector is used in Intellectual
stack.
● Sub projector cannot be turned on through network communication to Sub
and by Web control on Sub. Sub projector should be controlled though Main
projector.
● Remote Control function on Web Control of Sub projector is disabled.
(
Network Guide → 3.11 Remote Control)
● If the projectors are tried to turn on with using Power on & Display on feature on
Messenger function, the projectors will exit from Intellectual stack and display
the message accordingly. If you wish to start Intellectual stack again, select
MAIN/SUB again on both projectors in STACK MODE dialog, or turn off and on
again for both projectors.
● Main and Sub projectors have common setting for the following.
- Muting feature (
- Magnifying feature (Operating Guide → Using the magnify feature)
- ASPECT and OVER SCAN (Operating Guide → IMAGE menu)
- COMPUTER IN (Operating Guide → INPUT menu)
- MESSEAGE (Operating Guide → SCREEN menu)
- MY BUTTON (Operating Guide → OPTION menu)
- TEMPLATE (Operating Guide → SCREEN menu)
Operating Guide → Temporarily muting the sound)
(continued on next page)
24
Page 25

Important information for Intellectual Stack (continued)
Setting on Stack menu
● The following functions are disabled.
- Executing of AUTO KEYSTONE (
Operating Guide → SETUP menu)
- STANDBY MODE (Operating Guide → SETUP menu)
- AUTO SEARCH (
Operating Guide → OPTION menu)
- Turning on/off AUTO KEYSTONE (Operating Guide → OPTION menu)
- DIRECT POWER ON (Operating Guide → OPTION menu)
- MY SOURCE (Operating Guide → OPTION menu)
- COMMUNICATION TYPE (Operating Guide → OPTION menu → SERVICE
→ COMMUNICATION)
● The input source from the following ports cannot be selected.
- USB TYPE A, USB TYPE B, LAN
● An error message will be displayed if an error is occurred on projectors while
operating on Intellectual stack.
When an error is occurred, a full dialog will be
displayed on screen. After around 20 seconds
without any key input, the full dialog will be turned
Full dialog
to a small dialog. When a small dialog is displayed,
pressing the ◄ button displays a full dialog again.
A number on projector icon means that “1” indicates Main projector
Small dialog
and “2” does Sub.
Refer to a message on screen as shown below and take a necessary action to
solve the problem.
Example:
Cover Error: Lamp cover is opened.
Lamp Error: Lamp does not light up.
Fan Error: Cooling fan has a problem.
Temp Error: Temperature in projector is too
high.
Air Flow Error: Check exhaust vent that may
be blocked, since temperature in projectore is
too high.
Filter Error: Filter timer counts hours more than
the setting hours on Filter Message menu.
(
Operating Guide → OPTION menu →
SERVICE)
Cold Error: Air temperature around projector is
too low.
(continued on next page)
25
Page 26

Important information for Intellectual Stack (continued)
Setting on Stack menu
● If it is necessary to turn off one of projectors for error handling or anything else,
turn off both projectors to start Intellectual Stack correctly when turning on.
● If PIN LOCK or TRANSITION DETECTOR of security function on both projectors
are set to ON, the both projectors will turn on once. Input security code for Main
rst and Sub next. If ALTERNATE mode is selected, one of the projectors will
be turned off automatically. (
Operating Guide → SECURITY menu)
● If SECURITY function on one of projectors are set to on, it is required to input
security code as below, when turning on.
- In DUAL mode, both projectors will turn on. Input the security code for the
projector that is locked by the SECURITY function.
- In ALTERNATE mode, if a projector locked by the SECURITY function is due
to turn on by ALTERNATE mode setting only the projector will turn on, and if
not both projectors will turn on. Input the security cord for the projector locked
by SECURITY function. After the security lock is released, if two projectors
turned on, one of the projectors will turn off.
26
Page 27

4. Connecting cables
To superimpose two images to one screen, the same image is required to input
to Main and Sub projectors. There are some options to input image to the
projectors. This chapter shows you such option for connection of cables. Read
this chapter to nd one that matches to your demand.
NOTE • If you use Simple Stack without an RS-232C connection, Main and
Sub projectors mentioned below do not exist. So, be aware that Main read as
a projector and Sub does as the other in this chapter.
• For detail of input port, specs, connections and so on, refer to Connecting
with your devices (←
Operating Guide - Technical)
4.1 Connecting RS-232C cable
If you use Intellectual Stack, connect RS-232C port on Main and Sub projectors
with an RS-232C cross cable. (
NOTE • If the cable that connects two projectors working in Intellectual Stack
is disconnected, the projectors exit from Intellectual Stack and start to work
individually. Even if the cable is just connected again, Intellectual Stack will not
restart. Go through the following procedure to restart Intellectual Stack.
(1) Leave the both projectors unattended for 10 seconds or more after the cable
is disconnected, to let projectors recognize that.
(2) Turn off the both projectors, and allow them to cool sufciently.
(3) Reconnect the two projectors with the RS-232C cable, and turn them on
again. Then Intellectual Stack will restart.
Operating Guide) and Connection to the ports (←
11
) If you use Simple stack, it is not required.
27
Page 28

Connecting cables
4.2 Connecting signal cables
There are two options to input image to Sub projector. (
- Inputting image to Sub from the MONITOR OUT port on Main.
- Inputting image to Sub and Main individually.
Inputting image to Sub from Main
Connect the MONITOR OUT port on Main
1.
to COMPUTER IN1 port on Sub with a
computer cable.
Connect your image device to one of input
2.
port on Main.
NOTE for Intellectual Stack • As an
input port on Main projector in Intellectual
Stack, COMPUTER IN1 and IN2 are
available. Do not use other ports for image
input.
- If you wish to input a component signal,
input it to COMPUTER IN1 and IN2.
- If you wish to input a video signal, input it to
Y pin of component signal on COMPUTER
IN1 and IN2.
22, 23
)
Main
NOTE for Simple Stack • As an input
port on the projector that is connected a
computer cable to the ports MONITOR OUT,
COMPUTER IN1 and IN2 that can be output
from MONITOR OUT port are available.
(
Operating Guide → SETUP menu) If you
wish to use other input port, input the image
to Sub and Main individually.
Connection example
in Intellectual stack
Inputting image to Sub and Main individually
Split output signal from your image device to two with a signal splitter or
1.
something similar.
Connect your image device to the same input port on Main and Sub
2.
projectors.
NOTE for Intellectual Stack • As an input port on Main projector in
Intellectual Stack, LAN, USB TYPE A and USB TYPE B cannot be used.
NOTE for Simple Stack • As an input port on the projectors, any input
ports which signal can be split to two are available.
28
Sub
Page 29

5. Setting for input port on menu
5.1 Preparing menu operation
If you use Simple Stack without RS-232C cable connection, select the input port
that you connect the cables to, pressing COMPUTER or VIDEO button on the
remote control or INPUT button on the control panel on both projectors. For
setting of the MONITOR OUT, refer to SETUP menu in the Operating Guide.
Then, the setting is nished.
If you use Intellectual Stack with RS-232C cable connection, the setting or
changing anything related to menu operation for Intellectual Stack requires to be
done on Main projector. So Main projector should be working for input source
setting on Intellectual Stack.
5.2 Checking Main projector’s operating status
On Intellectual Stack, setting or changing related to menu operation requires to
be done on Main projector. Before starting menu operation for Intellectual Stack,
check whether or not Main projector is working as below.
Press MENU button on the remote control.
1.
If MENU dialog as right appears on screen, it is
2.
conrmed that the two projectors are working in DUAL
mode and Main projector is surely working.
Go to 5.4 Setting on menu. (
If the dialog does not appear, LAMP MODE is set to ALTERNATE and either
Main or Sub projector is working. Go to next.
Using the ▲/▼/◄/► buttons, go down the menu tree as below.
3.
ADVANCED MENU > OPTION
> SERVICE > COMMUNICATION
> STACK
STACK menu will appear on screen.
(
Operating Guide → OPTION menu).
Check STACK MODE setting in STACK menu.
4.
- If MAIN is shown, it is conrmed that Main projector is working. Go to 5.4
Setting on menu. (
- If SUB is shown, it is conrmed that Main projector is turned off and Sub is
working. Go to 5.3 Starting Main projector. (
31
31
)
)
30
)
29
Page 30

Setting for input port on menu
5.3 Starting Main projector
After performing Checking Main projector’s operating status section, it is
conrmed that the two projectors are set to ALTERNATE MODE and Sub projector
is working at the moment. Since the setting for Intellectual Stack can be changed
while Main projector is working, this section shows you how you can switch from
Sub projector to Main.
Using the ▲/▼/◄/► buttons, go down the menu tree as below.
1.
ADVANCED MENU > OPTION
> SERVICE > COMMUNICATION > STACK
STACK menu will appear on screen.
(
Operating Guide → OPTION menu)
Check ALTERNATE MODE setting in the menu.
2.
If NORMAL is shown, two projectors are powered on in turn. So, if the stacked
projectors are restarted, Main projector will turn on.
(1) Press STANDBY/ON button on the remote control or control panel of Main
projector, and then Sub projector will turn off.
(2) After cooling down of the projector turn on again with pressing STANDBY/ON
button. Main projector will turn on this time.
If AUTO is shown, one of projector having a lamp that is shorter usage time is
powered on. So, even though the stacked projectors are restarted, Main projector
may not turn on. Take the following process to turn on Main projector.
(1) Use the ▲/▼ button to point at STACK MODE, and press the ► button to
display STACK MODE dialog.
(2) Use the ▲/▼ button to point at OFF, and then press the ► button to complete
the setting. (
(3) Display STACK MODE dialog again with the same process above.
(4) Use the ▲/▼ button to point at SUB, and then press the ► button to complete
the setting. (
(5) After exiting, wait for 10 seconds or more.
(6) Press STANDBY/ON button on the remote control or control panel of Main
projector, and then Sub projector will turn off.
(7) After cooling down of the projector turn on again with pressing STANDBY/
ON button. Main projector will surely turn on this time, even if AUTO is set on
LAMP MODE.
23
23
)
)
Now, Main projector is working, so you can set or change the setting for
3.
Intellectual Stack. Proceed to 5.4 Setting on menu. (
NOTE • If Main projector cannot turn on with an error or something wrong on
Main, Sub projector will turn on even if you take the procedure as mentioned
above. Take necessary action for Main projector to recover rst, and then
change the setting for Intellectual Stack.
30
31
)
Page 31

Setting for input port on menu
5.4 Setting on menu
If you use Intellectual Stack with RS-232C cable connection, follow the instruction
as below. In the case of inputting image from Main to Sub, note that the operation
is different if you use computer signal, or video signal such as COMPONENT and
VIDEO.
Inputting image to Sub from Main - Computer signal
If STACK menu is already on screen, proceed to 3 below. Otherwise press
1.
MENU button on the remote control.
If MENU dialog is displayed, use the ▲/▼ buttons to
point at MAIN, and press the ► button. Then, a menu
appears on screen.
If not, a menu directly appears on screen.
Using the ▲/▼/◄/► buttons, go down the menu tree as below.
2.
ADVANCED MENU > OPTION
> SERVICE > COMMUNICATION > STACK
STACK menu will appear on screen.
(
Operating Guide → OPTION menu)
Use the ▲/▼ buttons to point at SUB INPUT
3.
SOURCE, and press the ► button to display SUB
INPUT SOURCE dialog.
Use the ▲/▼ buttons to point at FIXED (COMPUTER IN 1) , and press the ►
4.
button to complete the setting. (
Press COMPUTER or VIDEO button on the
5.
remote control or INPUT button on the control
panel on Main projector, MAIN INPUT SOURCE
dialog is displayed on screen. Use the ▲/▼
buttons to point at the source you connected a
cable to, and press the ► button to complete the
setting.
NOTE • When FIXED (COMPUTER IN 1) is selected, the MONITOR OUT
setting is invalid. (
• When FIXED (COMPUTER IN 1) is selected, only COMPUTER IN1 and
COMPUTER IN2 can be selected, and other input cannot.
• When FIXED (COMPUTER IN 1) is selected, if any buttons related to input
port setting, such as COMPUTER, VIDEO, MY SOURCE/DOC.CAMERA and
MY BUTTON (if any function related to input source is assigned) buttons on
the remote control, and INPUT button on the projector is pressed, the dialog to
select input source is displayed.
Operating Guide → SETUP menu)
23
)
31
Page 32

Setting for input port on menu
Inputting image to Sub from Main
- Video signal (either COMPONENT or VIDEO)
If STACK menu is already on screen, proceed to 3 below. Otherwise press
1.
MENU button on the remote control.
If MENU dialog is displayed, use the ▲/▼ buttons to point at MAIN, and press
the ► button. Then, a menu appears on screen.
If not, a menu directly appears on screen.
Press MENU button on the remote control or
2.
control panel on Main projector. Then, using
the ▲/▼/◄/► buttons, open COMPUTER IN
dialog. (
If you input component signal on either COMPUTER IN 1 or IN 2 port, set
3.
AUTO at the port. Then, use the ▲/▼/◄/► buttons to point at EXIT and
press the ► button to complete the setting.
If you input video signal on either COMPUTER IN 1 or IN 2 port, set VIDEO
at the port. If it is necessary to select a video format, use the ▲/▼/◄/►
buttons to point at RETUEN and press the ◄ button to display INPUT menu,
otherwise use the ▲/▼/◄/► buttons to point at EXIT and press the ► button
to complete the setting.
Select VIDEO FORMAT in INPUT menu to
4.
display VIDEO FORMAT dialog.
Select AUTO or appropriate format for the
port that you input video signal.
Then, use the ▲/▼/◄/► buttons to point at EXIT and press the ► button to
complete the setting.
Operating Guide → INPUT menu)
Inputting image of Sub and Main individually
If STACK menu is already on screen, proceed to 3 below. Otherwise press
1.
MENU button on the remote control.
If MENU dialog is displayed, use the ▲/▼ buttons to point at MAIN, and press
the ► button. Then, a menu appears on screen.
If not, a menu directly appears on screen.
Using the ▲/▼/◄/► buttons, go down the menu tree as below.
2.
ADVANCED MENU > OPTION
> SERVICE > COMMUNICATION > STACK
STACK menu will appear on screen.
(
Operating Guide → OPTION menu)
(continued on next page)
32
Page 33

Setting on menu - Inputting image of Sub and Main individually (continued)
Use the ▲/▼ buttons to point at SUB INPUT SOURCE, and press the ►
3.
button to display SUB INPUT SOURCE dialog.
Use the ▲/▼ buttons to point at FOLLOW MAIN
4.
UNIT, and press the ► button to complete the
setting. (
Press COMPUTER or VIDEO button on the
5.
remote control or INPUT button on the control
panel on Main projector, MAIN INPUT SOURCE
dialog is displayed on screen. Use the ▲/▼
buttons to point at the source you connected a
cable to, and press the ► button to complete the
setting.
NOTE • When FOLLOW MAIN UNIT is selected, if you set input source on
whichever Main or Sub projector, the same input port is automatically set on
other projector.
• When FOLLOW MAIN UNIT is selected, LAN, USB TYPE A and USB TYPE
B cannot be selected.
• When FOLLOW MAIN UNIT is selected, if any buttons related to input port
setting, such as COMPUTER, VIDEO, MY SOURCE/DOC.CAMERA and MY
BUTTON (if any function related to input source is assigned) buttons on the
remote control, and INPUT button on the projector is pressed, the dialog to
select input source is displayed.
23
)
Setting for input port on menu
33
Page 34

6. Restriction on Schedule function
This model supports schedule function on Web Control feature. (
Guide → 3. Web Control → 3.7 Schedule Settings) If you use Intellectual Stack
with RS-232C cable connection, there are some restriction on the function. If you
use Simple Stack without RS-232C cable connection, there is no restriction on the
function.
Whichever you use Intellectual Stack or Simple Stack, be careful about the schedule settings that you have set before you start to use them, which may cause
unexpected change of setting while using them.
See the following for the restriction on Intellectual Stack. When you use Simple
Stack, skip this chapter.
Restriction on Main projector
LAMP MODE
Functions
Projector
power
Power On
Power Off
Input port change
My Image
Messenger
Slide Show X *3) X *3) X *3) X *3)
Restriction on Sub projector
Main ON ON OFF OFF
Sub ON OFF ON OFF
DUAL ALTERNATE
*1)
*1)
*1)
X *2) X *2)
X *2) X *2)
Network
DUAL/
ALTERNATE
*1)
LAMP MODE
Functions
Projector
power
Power On X *3 X *3 X *3 X *3
Power Off
Input port change
My Image
Messenger
Slide Show X *3) X *3) X *3) X *3)
: The schedule can put into Web Control even if the projector is working in Intel-
lectual stack, and the schedule will be executed.
*1): The schedule setting can put into Web Control while the projector is working
(continued on next page)
Main ON ON OFF OFF
Sub ON OFF ON OFF
DUAL ALTERNATE
*1)
34
*1)
X *2)
X *2)
*1)
DUAL/
ALTERNATE
*1)
X *2)
X *2)
Page 35

Restriction on Schedule function (continued)
Restriction on Schedule function
in Intellectual Stack. If input port is tried to change to any port that is allowed to
use on Intellectual Stack by schedule function the schedule will be executed, but if
not the schedule will not be done.
X *2): The schedule can put into Web Control even if the projector is working in
Intellectual Stack, but the schedule will not be executed.
X *3): The schedule setting cannot put into Web Control while the projector is
working in Intellectual Stack. The schedule will not be executed.
NOTE
• If the schedule is not executed, an alert message will be sent out in
any case in accordance with Schedule Execution Error setting on Web Control.
(
Network Guide → 3. Web Control → 3.6 Alert Settings).
• If the schedule function is set to turn off the power, Main and Sub projectors
will be turned off when the projectors are working in Intellectual Stack.
• If the schedule function on Main projector is set to turn on the power, the
projectors will start to work in accordance with LAMP MODE setting.
• When two projectors are working in DUAL mode, while a projector is
displaying some menu on screen the schedule function for My Image and
Messenger on the other projector will not be executed.
• Power Off in the chart means that the projector is turned off by settings on
Intellectual Stack or by STANDBY/ON button on the remote control or control
panel of Main projector, and is in standby mode.
• The projectors cannot be turned on by the schedule function on Sub projector.
Set it on Main projector if necessary.
• When Sub projector is turned off in ALTERNATE mode, the schedule function
on Sub projector to turn off Sub will be executed without an error.
35
Page 36

7. Troubleshooting
About the phenomenon confused with a machine defect, check and cope with it
according to the following table.
Phenomena that may be easy to be mistaken for machine defects
Phenomenon Cases not involving a machine defect
The electrical power cords are not plugged
in Main and Sub.
To use Intellectual Stack feature, supply Main
and Sub projectors with AC power. If one
of the projector is not supplied, Intellectual
Stack becomes invalid on the other even if it
is supplied with AC power.
RS-232C cable is not connected to Main
and Sub projector correctly.
To use Intellectual Stack, connect Main and
Sub projectors with RS-232C cross cable. If
Intellectual Stack
does not work.
Main and Sub
do not work
collaboratively.
not connected, Main projector cannot control
Sub.
The setting for Intellectual Stack on menu
is not done properly.
Check the setting on STACK menu on Main
and Sub projectors. To use Intellectual stack,
STACK MODE must be set to MAIN on one
projector and to SUB on the other.
Signal cables are not connected correctly.
Check the connection of cables. Also conrm
that the cable connection and the port setting
on menu are matched.
RS-232C cable is not connected to Main
and Sub projector correctly.
Connect RS-232C cable properly and restart
Main projector.
Reference
page
8
in User’s
Manual
(concise)
11
18
28
10 - 14
in Operating
Guide
11
(continued on next page)
36
Page 37

Troubleshooting (continued)
Troubleshooting
Phenomenon Cases not involving a machine defect
The settings on projectors are not set for
Intellectual Stack feature.
Check the following settings on Main and Sub
STACK menu
cannot be
operated.
projectors.
- STANDBY MODE in SETUP menu:
NORMAL
- COMMUNICATION TYPE in
COMMUNICATION in SERVICE menu:
OFF
- STACK LOCK in SECURITY menu: OFF
The remote control points at Sub projector.
Projector does
not react the
remote control.
When the projector is working on Intellectual
Stack, only Main projector can receive the
remote control signal. So, point at Main
projector when you use the remote control.
Two images are not superimposed
Images are
not overlapped
properly or
defocused.
correctly.
Adjust ZOOM ring, VERTICAL adjuster,
HORISONTAL adjuster and FOCUS ring to
superimpose them.
If necessary, also adjust PERFECT FIT and
KEYSTONE.
There is something different on adjustment
between two images.
Try to resolve it with the following measures.
Though you try a
ne adjustment,
the images from
two projectors
are not
superimposed.
- Press AUTO button of the remote control or
execute AUTO ADJUST EXECUTE on each
of the projectors.
- Adjust H POSITION and V POSITION on
each of the projectors.
- Check RESOLUTION setting on INPUT
menu, and if it is different between the two
projectors, make it same.
Reference
page
7
6
8
15
24
in Operating
Guide
38
in Operating
Guide
42
in Operating
Guide
37
 Loading...