

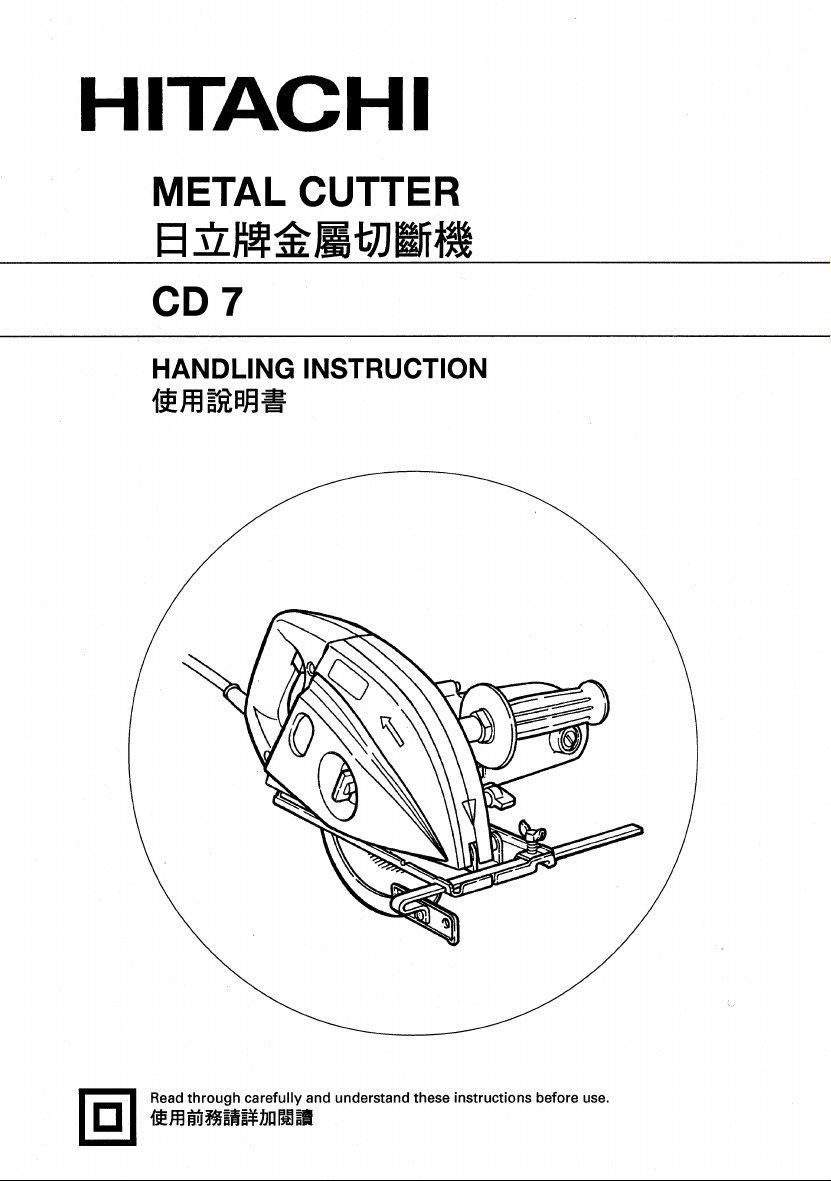
Page 1
Page 2
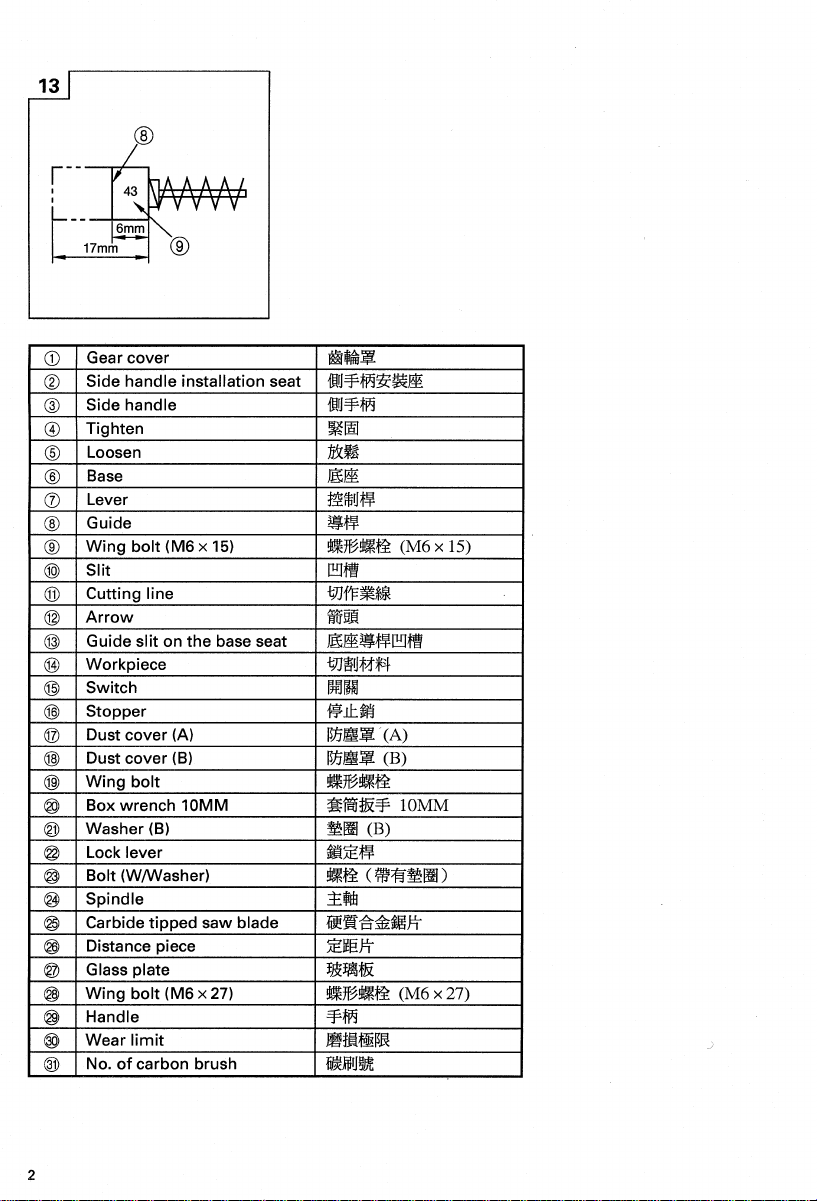
1 2 3
1
2
3
4
5
6
7
4 5 6
=
A
9
D
9
8
6
F
E
7
10
G
H
B
C
A
8 9
J
I9
4
K
M
K
O
φ19
4
5
φ20
N
P
L
B
11 12
H
R
Q
G
G
S
H
1
Page 3
Page 4

GENERAL OPERATIONAL PRECAUTIONS
WARNING! When using electric tools, basic safety
precautions should always be followed to reduce the risk
of fire, electric shock and personal injury, including the
following.
Read all these instructions before operating this product
and save these instructions.
For safe operations:
1. Keep work area clean. Cluttered areas and benches
invite injuries.
2. Consider work area environment. Do not expose
power tools to rain. Do not use power tools in
damp or wet locations. Keep work area well lit.
Do not use power tools where there is risk to
cause fire or explosion.
3. Guard against electric shock. Avoid body contact
with earthed or grounded surfaces. (e.g. pipes,
radiators, ranges, refrigerators).
4. Keep children away. Do not let visitors touch the
tool or extension cord. All visitors should be kept
away from work area.
5. Store idle tools. When not in use, tools should
be stored in a dry, high or locked up place, out
of reach of children.
6. Do not force the tool. It will do the job better and
safer at the rate for which it was intended.
7. Use the right tool. Do not force small tools or
attachments to do the job of a heavy duty tool.
Do not use tools for purposes not intended; for
example, do not use circular saw to cut tree limbs
or logs.
8. Dress properly. Do not wear loose clothing or
jewelry, they can be caught in moving parts.
Rubber gloves and non-skid footwears are
recommended when working outdoors. Wear
protecting hair covering to contain long hair.
9. Use eye protection. Also use face or dust mask
if the cutting operation is dusty.
10. Connect dust extraction equipment.
If devices are provided for the connection of dust
extraction and collection facilities ensure these are
connected and properly used.
11. Do not abuse the cord. Never carry the tool by
the cord or yank it to disconnect it from the
receptacle. Keep the cord away from heat, oil and
sharp edges.
12. Secure work. Use clamps or a vise to hold the
work. It is safer than using your hand and it frees
both hands to operate tool.
13. Do not overreach. Keep proper footing and balance
at all times.
14. Maintain tools with care. Keep cutting tools sharp
and clean for better and safer performance. Follow
instructions for lubrication and changing
accessories. Inspect tool cords periodically and if
damaged, have it repaired by authorized service
center. Inspect extension cords periodically and
replace, if damaged. Keep handles dry, clean, and
free from oil and grease.
15. Disconnect tools. When not in use, before servicing,
and when changing accessories such as blades,
bits and cutters.
16. Remove adjusting keys and wrenches. Form the
habit of checking to see that keys and adjusting
wrenches are removed from the tool before turning
it on.
17. Avoid unintentional starting. Do not carry a
plugged-in tool with a finger on the switch. Ensure
switch is off when plugging in.
18. Use outdoor extension leads. When tool is used
outdoors, use only extension cords intended for
outdoor use.
19. Stay alert. Watch what you are doing. Use common
sense. Do not operate tool when you are tired.
20. Check damaged parts. Before further use of the
tool, a guard or other part that is damaged should
be carefully checked to determine that it will
operate properly and perform its intended function.
Check for alignment of moving parts, free running
of moving parts, breakage of parts, mounting and
any other conditions that may affect its operation.
A guard or other part that is damaged should be
properly repaired or replaced by an authorized
service center unless otherwise indicated in this
handling instructions. Have defective switches
replaced by an authorized service center. Do not
use the tool if the switch does not turn it on and
off.
21. Warning
The use of any accessory or attachment, other
than those recommended in this handling
instructions, may present a risk of personal injury.
22. Have your tool repaired by a qualified person.
This electric tool is in accordance with the relevant
safety requirements. Repairs should only be carried
out by qualified persons using original spare parts.
Otherwise this may result in considerable danger
to the user.
PRECAUTIONS ON USING METAL CUTTER
1. Always use the correct electric power source
voltage which is indicated on the name plate on
the metal cutter.
2. Do not fix the protective cover permanently in
place so that it does not move. Check to see that
it moves smoothly.
3. Use the tipped saw by following the use limitations
indicated on the name plate.
Do not use a tipped saw with bottom blade
diameter of 165 mm or less.
4. Place the materials to be cut on a stable table or
bench.
5. Just before and after the piece has been cut all
the way through, be sure the tipped saw blade
does not get caught between the two pieces
because of the weight of the cut off portion of
the material. Prevent this by supporting the piece
being cut off by placing it on a table or bench.
6. If the piece being cut off is large, support it by
using a stable table or bench. If the cut is to be
made on a work piece lying on a flat surface, keep
the tipped saw blade from touching the surface
below and causing the saw to move by making
sure that the height of the work piece is elevated
above the surface under the work piece at least
three times the distance that tipped saw blade
projects from the saw.
3
Page 5
7. When cutting, hold the body of the metal cutter
firmly.
8. While using the metal cutter, keep the tipped saw
blade, rotating parts and the saw dust exit aperture
away from the hands and face.
9. When making a cut, do not try to pull the metal
cutter out of the cut while it is running. Turn off
the power switch first and wait until the blade
completely stops rotating before taking the metal
cutter out of the cut.
10. If the tipped saw does not seem to operate
normally or makes abnormal sounds, stop using
the tipped saw immediately and contact an
and repair.
11. If the metal cutter is accidentally dropped or
bumped, carefully examine the frame, tipped saw,
etc. to see that there are no cracks, deformation
or any other damage.
12. Make sure that material to be cut is firmly fixed
in place.
13. Keep flaminable and easily damaged objects away
when cutting metal.
14. Do not use the metal cutter to cut hard metal
materials for long continuous periods of time.
15. Do not use cutting oil when cutting materials with
the metal cutter.
Authorized Hitachi Service Center for inspection
SPECIFICATIONS
Voltage 110V
Power input 1140W
No-load speed 4300/min
Max. cutting depth 62.5 mm
Saw blade 185 mm (external dia.) × 1.6 mm (thickness) × 20 mm (hole dia.)
Weight (without cord) 4.4 kg
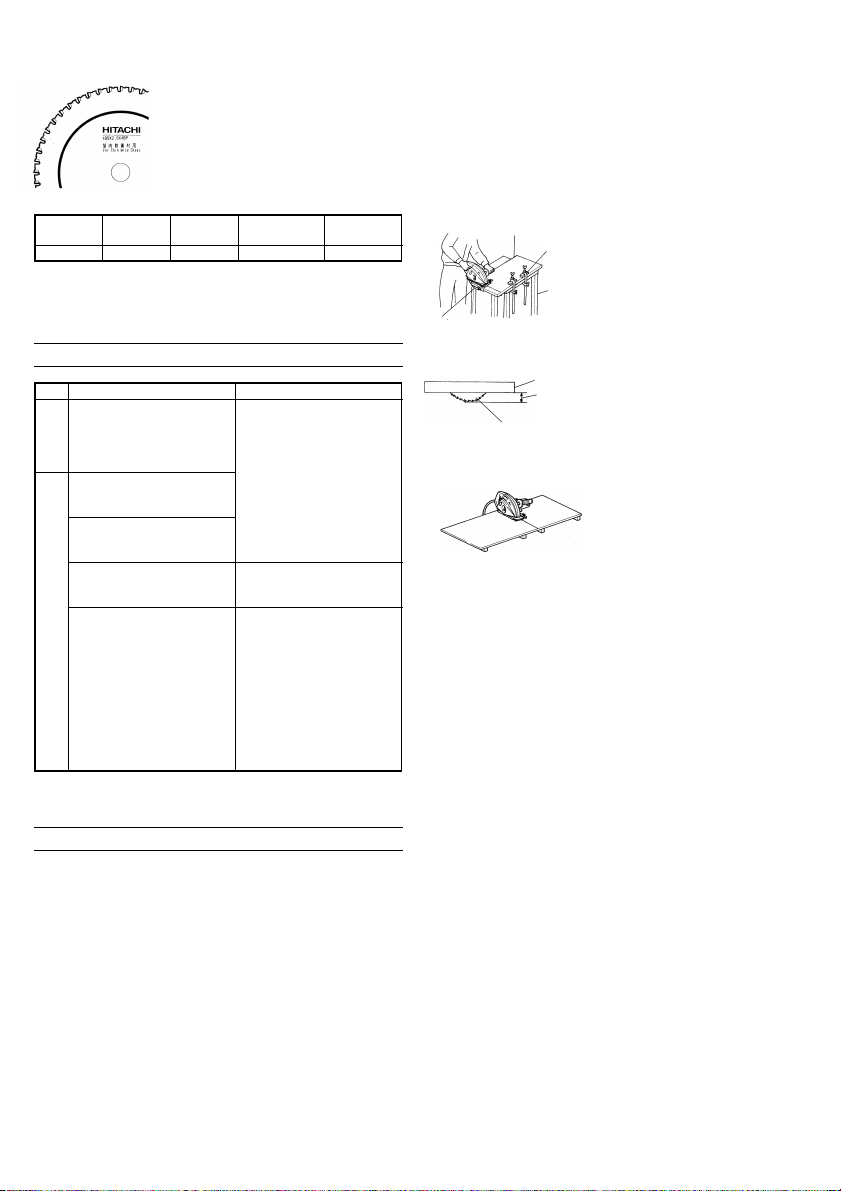
STANDARD ACCESSORIES
1 Carbide Tipped Saw Blade .................................... 1
(Mounted on the unit)
2 Box Wrench .............................................................. 1
3 Side Handle ............................................................... 1
4 Guide .......................................................................... 1
5 Eye Protection ........................................................... 1
1
The 1 tipped saw blade may not be included depending
on the prodact type and must be purchased separately.
Standard accessories are subject to change without notice.
2
3
4
5
OPTIONAL ACCESSORIES (sold separately)
1. Carbide tipped saw blade: Thin,
soft steel material cutting
Use: For cutting soft steel
materials.
Dimensions:
Outer Hole Tip
diameter diameter width
185 mm 20 mm 2 mm 1.6 mm 48 teeth
2. Carbide tipped saw blade: Thin,
soft steel material cutting (Low
noise type)
Use: For cutting soft steel
materials.
Dimensions:
Outer Hole Tip
diameter diameter width
185 mm 20 mm 2 mm 1.6 mm 48 teeth
3. Carbide tipped saw blade:
Aluminum sash material cutting.
Use: For cutting aluminum sash
materials.
Dimensions:
Outer Hole Tip
diameter diameter width
185 mm 20 mm 2 mm 1.5 mm 60 teeth
Thickness of
saw blade
Thickness of
saw blade
Thickness of
saw blade
Number
of teeth
Number
of teeth
Number
of teeth
4
Page 6
4. Carbide tipped saw blade:
Stainless steel, soft steel
material cutting use.
Uses: For cutting stainless steel/
soft steel materials
Dimensions:
Outer Hol e Tip
diameter diameter width
180 mm 20 mm 2 mm 1.6 mm 48 teeth
Thickness of
saw blade
Number
of teeth
Optional accessories are subject to change without
notice.
APPLICATIONS
Blades
Soft steel use blade
Standard
accessories
Tipped saw blades:
Thin, soft steel material
cutting use
Tipped saw blades:
Thin, soft steel material
cutting use (Low noise type)
Tipped saw blades:
Aluminum sash material
cutting use
Tipped saw blades:
Stainless steel/soft steel
materials cutting use.
Optional accessories
嘷
¡
嘷
嘷
¡
嘷
嘷 Refer to Page 6: “Selecting the proper tipped saw
blade for different materials”
Uses
For cutting various types
of soft steel materials
such as flat steel strips,
pipe, steel channels (“C”
channels, “L” angles,
etc.).
Caution: Cannot be used
for cutting tempered
steel materials.
For cutting aluminum
sash materials only.
For cutting various types
of soft steel materials
such as flat steel sheets,
pipe, steel channels, etc.
(“C” channels, “L”
angles, etc.)
Caution: Cannot be used
for cutting tempered
steel materials.
For cutting stainless
steel materials.
PRIOR TO OPERATION
1. This product has double insulation. However, to
avoid electric shocks, be sure to use a power
source that is equipped with a circuit breaker to
cope with power leakage and sudden surges.
2. Power source
Ensure that the power source to be utilized
conforms to the power requirements specified on
the product nameplate.
3. Power switch
Ensure that the power switch is in the OFF position.
If the plug is connected to a receptacle while the
power switch is in the ON position, the power tool
will start operating immediately, inviting serious
accident.
4. Extension cord
When the work area is removed from the power
source, use an extension cord of sufficient thickness
and rated capacity. The extension cord should be
kept as short as practicable.
5. Preparing a wooden work bench
The outer edge of the
tipped saw blade projects
Work piece to be cut
Work
bench
Tipped saw blade
from the bottom of the
work piece being cut.
Vise
Therefore, the material
should be placed on a work
bench when cutting.
In addition, care should be
taken to see that the tipped
saw blade and protective
cover do not come into
Work piece
Tipped saw
blade
Projection
distance of
the tipped
saw blade
contact with the surface
below the work piece (e.g.,
the surface of the work
bench or the ground, floor,
etc.). To make sure that this
does not happen, the work
piece (material to be cut)
should be at a height above
the surface below the work
piece that is equal to at
least three times the
distance (width) that the
blade projects below the
bottom of the work piece.
In situations like this, it is safer to make sure that
the material is firmly secured in place using a vise
so that both hands can be used to operate the
metal cutter.
If the piece to be cut off is large in size, care must
be taken to see that the weight of the piece being
cut off does not press on the saw blade. To
prevent the saw blade from being caught between
the two pieces, the piece being cut off should be
supported using a stable bench or braced in place
using wooden supports.
If separate wooden supports are to be used to
support the piece being cut off, when cutting at
a work bench, they should be positioned on a flat
surface and fixed in place. It is dangerous to allow
the work bench to wobble or shift position while
cutting materials with the metal cutter.
6. Checking to see that the tipped saw blade is
attached firmly in position
Always check to see that the tipped saw blade
is attached firmly in position. For details, see Page
7: “Attached and removing the tipped saw blade”.
7. Check the lever to see that is properly tightened.
Insufficient tightening of the cutting adjustment
lever may cause personal injury (See Fig. 2).
Be sure to check that it is firmly tightened.
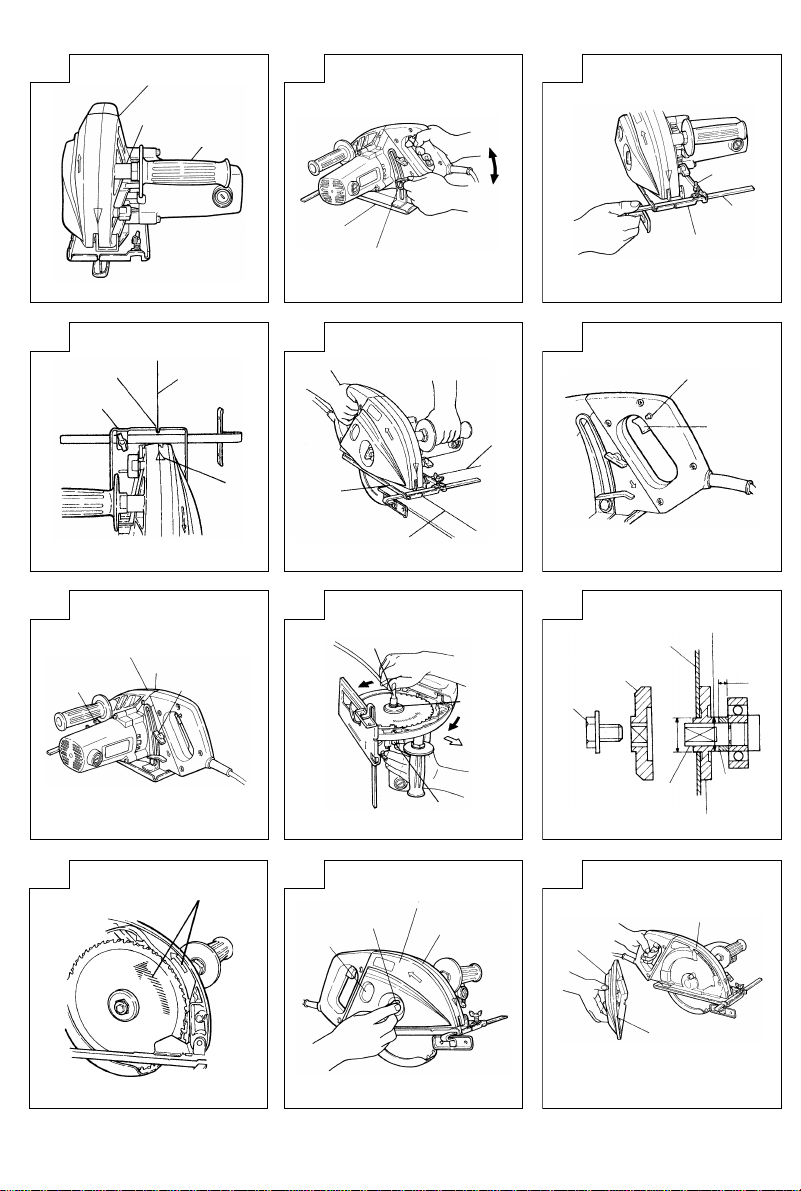
8. Attaching the side handle
Attach the side handle by screwing it in place in
the socket located on the gear cover. (See
Fig. 1)
5
Page 7

9. Check to see whether the protective cover moves.
CAUTION
Do not fasten the protective cover permanently
in one position. Make sure that it can move
smoothly. Leaving the tipped saw blade
exposed can result in accidents.
The protective cover is used to prevent the body
of the user from coming into contact with tipped
saw blade. Be sure that the protective cover can
be moved into place and is covering the blade.
~~~~~~~~~~~~~~~~~~~~~~~~
If for any reason, the protective cover will not
~~~~~~~~~~~~~~~~~~~~~~~~
move into position to cover the blade, discontinue
~~~~~~~~~~~~~~~~~~~~~~~~
the use of the metal cutter. Please contact an
~~~~~~~~~~~~~~
Authorized Hitachi Service Center for repair.
10. Making adjustments before using the metal cutter
(1) Adjusting the cutting depth (Fig. 2)
~~~~~~~~~~~~~~~~~~
CAUTION
If the cutting depth lever is not firmly tightened,
accidents may result. After adjusting the
cutting depth, make sure to tighten the cutting
depth lever firmly.
Loosen the lever and move the base, then you
(2) Attaching and adjusting the guide (Fig. 3)
Loosen the wing bolt and slide the guide into the
slot at the base. Move the guide left or right to
adjust the location of the cut to be made. After
adjusting the quide, fix it firmly in place by
tightening the wing bolt.
11. Check to see that the brake is functioning properly
This metal cutter is designed so that when the
switch is turned off, the brake automatically
functions. If for any reason the brake fails to
operate, please contact an Authorized Hitachi
Service Center for repair.
CAUTION
The metal cutter will recoil when the brake
operates.
This can cause the operator to drop the metal
cutter, resulting in accidents.
12. Check the power plug
If the power plug is loose or pulls out easily from
the socket, call your local electric repair service
and have the connection repaired.
can adjust the depth of cutting.
SELECTING THE CORRECT TIPPED SAW BLADE FOR DIFFERENT MATERIALS
In order to get the best performance from your metal cutter, it is important to select the correct type
of tipped saw blade for the type of material to cut.
Please use the blades best suited for cutting different thickness of different materials as shown below.
Selecting the best blade by type of material to be cut
Tipped saw
blade type
Blades for cutting
soft steel materials
Blades for cutting
thin, soft steel
materials
Blade for cutting
aluminum sash
materials.
¡• Most suitable
¡‡ Suitable
Blades for cutting
stainless steel/ soft
steel materials
Material T (mm)
Lip channels
T
Light U channels
T
Steel base support
forms
T
Angle forms
T
Steel plate
T
Square pipe
T
Round pipe
Structural use, wiring
()
conduit use, pressure use
T
Aluminum
sashes
Stainless
plate
Stainless
pipe (round)
1.6
1.6 ∼ 2.3 ¡‡ ¡• ¡X ¡•
0.5 ∼ 0.8 ¡• ¡• ¡X ¡•
1.2 ∼ 2.3 ¡• ¡• ¡X ¡•
3.2 ∼ 3.5 ¡‡ ¡‡ ¡X ¡‡
1.2 ∼ 2.8 ¡‡ ¡• ¡X ¡•
3.2 ∼ 3.5 ¡• ¡‡ ¡X ¡‡
T
T
Outer diameter 185mm Outer diameter: 185mm Outer diameter: 185mm Outer diameter: 180mm
Number of teeth: 38 Number of teeth: 48 Number of teeth: 60 Number of teeth: 48
∼ 3.2 ¡‡ ¡• ¡X ¡•
3.2 ¡• ¡• ¡X ¡•
3 ¡‡ ¡• ¡X ¡•
4 ∼ 6 ¡• ¡X ¡X ¡•
4 ∼ 6 ¡‡ ¡X ¡X ¡•
¡X ¡X ¡• ¡X
2 ¡X ¡X ¡X ¡‡
2 ¡X ¡X ¡X ¡‡
6
Page 8

HOW TO USE
CAUTION:
䡬 If the tipped saw blade stops suddenly, makes an
abnormal sound, etc., immediately turn off the
switch.
䡬 Do not use cutting oil on the blade.
Such substances as cutting oil, polishing oils and
waxes can catch fire from sparks when cutting.
䡬 When using the metal cutter, always wear eye
protection.
䡬 Be sure that the materials are secured firmly in
position. If the materials are not properly secured
in position, they may fly about causing damage to
the tipped saw blade.
䡬 When cutting is finished, immediately turn off the
power and unplug the metal cutter.
䡬 Be careful as not to cut the unit cord with the
rotating tipped saw blade.
䡬 Discard cutting dust before the dust cover becomes
completely full.
If the metal cutter is used when the cutting dust
is pressed against the dust cover, the performance
of the dust collector will drop and the temperature
of the dust cover (B) will rise. This may cause dust
cover (C) to warp or melt.
䡬 Wear ear plugs to protect ears from effects of the
sound.
䡬 If the cutting depth adjustment is too shallow, the
cut may tend to open lowering the performance of
the cutting dust collector.
䡬 When cutting the surface of a wall, the rate of
accumulation of cutting dust inside the dust cover
may change and may lower the performance of the
cutting dust collector.
䡬 Use a tipped saw blade that is suitable for the
material being cut.
䡬 When cutting, push the blade straight and forward
without letting the blade curve to the left and right.
䡬 Push the blade forward slowly, especially when
beginning to cut and when coming to the end of
the cut.
䡬 Do not turn on the metal cutter with the blade
pressed against the cutting material. Do not turn
off the metal cutter in the midst of cutting a piece
of material. In a case where it is absolutely necessary
to turn the metal cutter off in the middle of cutting
a work piece, pull the chip saw back with the blade
still turning and after it is no longer in contact with
the work piece material, then turn the power switch
off.
䡬 Do not to try to cut the same work piece two times
in the same location.
1. Place the main body (base) on the surface of the
work piece and align the slit on the forward edge
of the base with the sighting line. The arrow mark
on the gear cover and the slit in the base will be
aligned and can be used for positioning the metal
cutter. (See Fig. 4)
2. Without allowing the blade to touch the material,
~~~~~~~~~~~~~~~~~~~~~~~~~
turn on the power switch. When the blade has
~~~~~~~~~~~~~~
attained its maximum speed, push the metal cutter
slowly forward and maintain the same speed until
the cut is completed.
To keep the cut clean, push the saw forward at the
same speed.
3. The slit in the base indicats the position of the edge
of the blade at further end of the cut. This is useful
when cutting the work piece to a mid-way point.
(See Fig. 5)
4. The power switch is turned on by pulling the trigger.
When the “Stopper” switch is pushed (See Fig. 6),
the saw will remain running even if the finger is
removed from the trigger. This is a convenient
feature when using the saw for continuous work.
When the trigger is pulled a second time, the
“Stopper” switch is turned off and the saw is
stopped.
ATTACHING AND REMOVING BLADES
CAUTION:
䡬 Always turn the power switch off first and remove
the plug from the socket.
䡬 Use the spanner and box wrench that are supplied
with the metal cutter. Do not use other tools as this
may result in over-tightening or in sufficient
tightening of the wing bolt that holds the blade in
place causing accidents.
1. Removing the blade
(1) Loosen the two wing bolts and remove dust covers
(A) and (B). (See Fig. 7).
(2) Adjust the cutting depth of the blade to the minimum
position and place the tipped saw cutter on a flat,
stable surface. (See Fig. 8).
(3) While pushing in the lock lever, slowly unscrew the
bolt using the box wrench provided.
(4) Holding the spindle in position, turn the box wrench
counter-clockwise and remove the bolt and the
washer (B).
(5) Remove the tipped saw blade in direction (A).
2. Attaching the blade
CAUTION:
䡬 After using the tipped saw blade, dust covers (A)
and (B) may become hot. Take caution when
handling.
䡬 Do not forget to use the distance piece.
䡬 Before plugging in the metal cutter, be sure to
check to see whether the lock lever has been returned
to its original position and that the tipped saw blade
can rotate smoothly.
(1) Follow the blade removal routine in reverse.
(2) Remove any cutting dust that may have adhered
to the spindle or the washers.
(3) When a chip saw blade with a 20mm diameter is
to be attached, place washer (A) with the shallow
recessed portion turned toward the blade side.
When the hole diameter is 19mm, place the side
of washer (A) with the more deeply recessed portion
toward the blade.
For both cases, the (B) washer is used with its
recessed portion facing toward the blade. (See
Fig. 9)
(4) Make sure that the arrow mark on the side of the
blade is aiming the direction as the direction of
arrow on the gear cover. (See Fig. 10)
(5) Be sure to tighten the bolt sufficiently.
7
Page 9

THROWING AWAY THE CUTTING DUST
CAUTION:
䡬 To prevent possible accidents, always turn the metal
cutter off and unplug before attempting to empty
out the cutting dust.
䡬 Cutting dust from metal materials may be very hot.
Do not touch the cutting dust or dust covers (A)
or (B) with bare hands.
䡬 Be careful when handling dust covers (A) and (B)
as not to bend them. If they become bent, cutting
dust may spill out.
1. Throwing away the cutting dust
If too much cutting dust accumulates inside dust
covers (A) and (B), the performance of dust collector
may decrease. Be sure to empty out the cutting dust
before the dust receptacle becomes full.
(1) Screw off the dust wing bolts by turning them to
the counterclockwise. (See Fig. 11).
(2) Use the handle to remove dust cover (B) and throw
out the cutting dust (See Fig. 12).
(3) Remove any cutting dust that has adhered to dust
covers (A) and (B) and wipe them with a rag, etc..
Then, replace dust cover (B) and fasten with the
wing bolt.
MAINTENANCE AND INSPECTION
1. Inspecting the carbide tipped saw blade
Since use of a dull saw blade will cause motor
malfunctioning and degraded efficiently, replace with
a new one without delay when abrasion is noted.
2. Inspecting the mounting screws
Regularly inspect all mounting screws and ensure
that they are properly tightened. Should any of the
screws be loose, retighten them immediately. Failure
to do so could result in serious hazard.
3. Maintenance of the motor
The motor unit winding is the very “heart” of the
power tool. Exercise due care to ensure the winding
does not become damaged and/or wet with oil or
water.
4. Inspecting the carbon brushes (Fig. 13)
The motor employs carbon brushes which are
consumable parts. Since an excessively worn carbon
brush can result in motor trouble, replace the carbon
brushes with new ones having the same carbon
brush No. shown in the figure when they become
worn to or near the “wear limit”. In addition, always
keep carbon brushes clean and ensure that they
slide freely within the brush holders.
5. Replacing carbon brushes
Disassemble the brush caps with a slotted-head
screwdriver. The carbon brushes can then be easily
removed.
NOTE
Due to HITACHI’s continuing program of research and
development, the specifications herein are subject to
change without prior notice.
8
Page 10

Page 11

Page 12

Page 13

Page 14

Page 15

Page 16

15
Page 17

005
Code No. C99053131 N
Printed in Japan
 Loading...