

Page 1
Dry Cut Metal Saw
Metall Kreissäge
Tronçonneuse lame carbure
Troncatrice
Metaal afkort machine
Tronzadora
CD 12F
Read through carefully and understand these instructions before use.
Diese Anleitung vor Benutzung des Werkzeugs sorgfältig durchlesen und verstehen.
Lire soigneusement et bien assimiler ces instructions avant usage.
Prima dell’uso leggere attentamente e comprendere queste istruzioni.
Deze gebruiksaanwijzing s.v.p. voor gebruik zorgvuldig doorlezen.
Leer cuidadosamente y comprender estas instrucciones antes del uso.
Handling instructions
Bedienungsanleitung
Mode d’emploi
Istruzioni per l’uso
Gebruiksaanwijzing
Instrucciones de manejo
Page 2
1
1
2
8
3
2
9
0
A
4
B
C
D
5
6
7
E
F
34
G A B H
G A B H
5
5
I
J
D
5
D
6
A
K
A
1
7
6
Page 3
78
3
O
9
11
B
R
S
L M 4 N O P
A
N
Q
10
12
B
T
U
V
A
G
G
2
Page 4

1
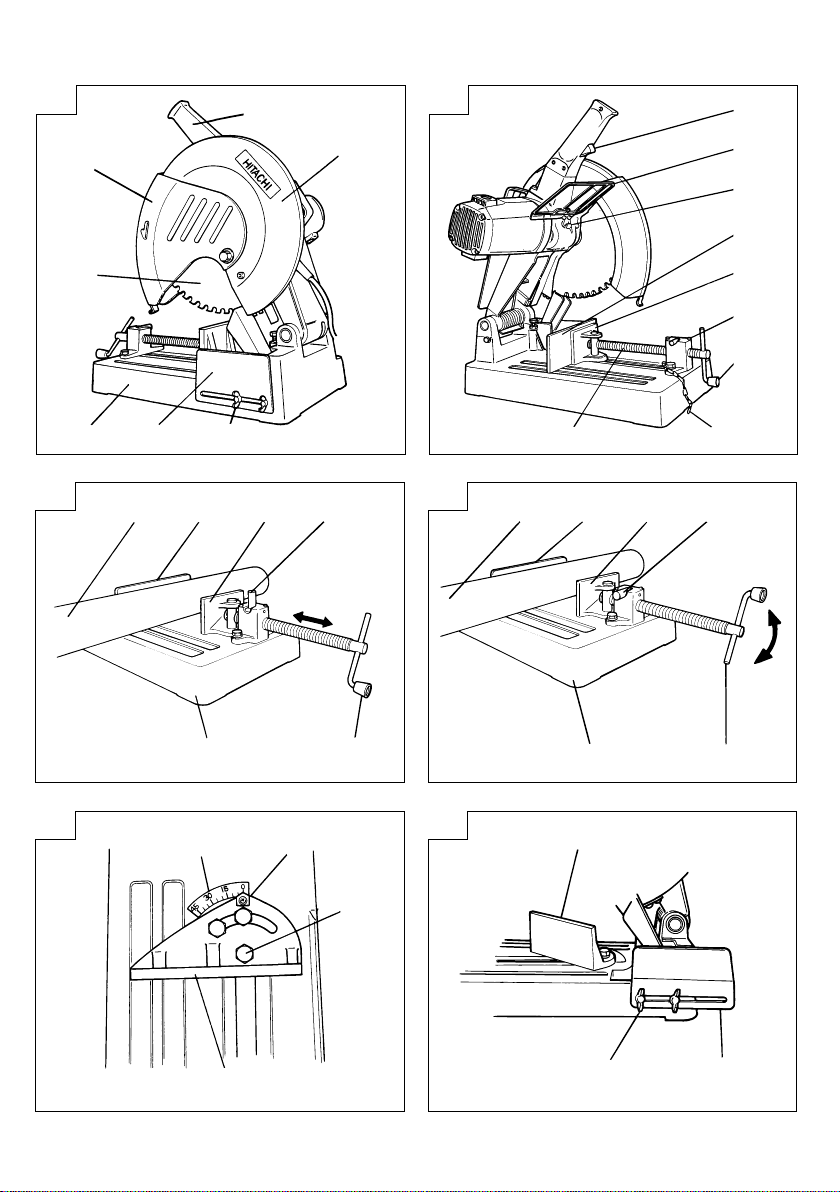
Handle
2
Saw Cover
3
Safety Cover
4
Carbide Tipped Saw Blade
5
Base
6
Side Cover
7
Wing Bolt
8
Trigger Switch
9
Eye Shield
0
Chain Hook
A
Vise (B)
B
Vise (A)
C
One-Touch Vice
D
Screw handle
E
Screw
F
Chain
G
Workpiece
H
Grip
I
Angle Scale
J
Indicator
K
10mm Bolt
L
Sleeve
M
Washer (A)
N
Washer (B)
O
Bolt
P
Wrench
Q
Hexagon Socket Head Bolt
R
Tighten
S
Loosen
T
Spindle Lock
U
Wear Limit Line
V
No. of carbon brush
English
Deutsch
Griff
Sägeabdeckung
Sicherheitsabdeckung
Hartmetallbestücktes Sägeblatt
Basis
Seitenabdeckung
Flügelschraube
Auslöseschalter
Augenschutz
Kettenhaken
Schraubstock (B)
Schraubstock (A)
One-Touch-Schraubstock
Schraubgriff
Schraube
Kette
Werkstück
Griff
Winkelskala
Zeiger
10mm Schraube
Ärmel
Beilegscheibe (A)
Beilegscheibe (B)
Bolzen
Schraubenschlüssel
Innensechskant schrauben
Anziehen
Lockern
Spindelhebel
Verschleißgrenze
Nr. der Kohlebürste
Français
Poignée
Couvercle de la scie
Capot de sécurité
Lame de la scie à pointe de carbure
Base
Cauvercle latéral
Boulon à oreilles
Commutateur de déclenchement
Protecteur des yeux
Crochet de chaîne
Etau (B)
Etau (A)
Etau à touche simple
Poignée à vis
Vis
Chaîne
Piéce á travailler
Poignée
Echelle d’angle
Indicateur
Boulon de 10mm
Manchon
Rondelle (A)
Rondelle (B)
Boulon
Clef
Tête de boulon à cavité hexagonale
Serrer
Desserrer
Verrou en fuseau
Ligne de limite d’usure
No. de balai en carbone
3
Page 5

Italiano
1
Impugnatura
2
Copertura della sega
3
Coperchio di sicurezza
4
Lama della sega a punta di carburo
5
Base
6
Copertura laterale
7
Dado ad alette
8
Interruttore di disinserimento
9
Protettore degli occhi
0
Gancio di catena
A
Morsa (B)
B
Morsa (A)
C
Morsetto a tocco semplice
D
Manopola della vite
E
Vite
F
Catena
G
Materiale di lavoro
H
Impugnatura
I
Scala graduata angolare
J
Indicatore
K
Bullone da 10mm
L
Manicotto
M
Rondella (A)
N
Rondella (B)
O
Bullone
P
Chiave
Q
Bullone a testa cava esagonale
R
Serrare
S
Allentare
T
Fermo dell' alberino
U
Linea di usura massima
V
N. della spazzola di carbone
Nederlands Español
Hendel
Zaagblad-veiligheidskap
Veiligheidskap
Carboon-getipt zaagblad
Basis
Zijkap
Sleutelmoer
Hoofdschakelaar
Oogbescherming
Kettinghaak
Klem (B)
Klem (A)
Klemhulpstuk
Schroefhendel
Schroef
Ketting
Werkstuk
Klem
Hoekschaal
Indikator
10mm bout
Kous
Ring (A)
Ring (B)
Bout
Sleutel
Zeskante inbusbout
Aandraaien
Losdraaien
Vergrendelknop
Slijtage limiet
Nr. van de koolborstel
Asa
Cubierta de la sega
Cubierta de seguridad
Hoja de la sega de punta de carburo
Base
Cubierta lateral
Tuerca de aletas
Interruptor de disparo
Protector de los ojos
Gancho de cadena
Tornillo de banco (B)
Tornillo de banco (A)
Torno de banco de "toque sencillo"
Empuñadura roscada
Tornillo
Cadena
Madera a ser cortada
Asidero
Escala de ángulos
Indicador
Perno de 10mm
Manguito
Arandela (A)
Arandela (B)
Perno
Llave
Perno de cabeza hexagonal
Apretar
Soltar
Seguro del eje
Línea limite de desgaste
No. de escobilla de carbón
4
Page 6
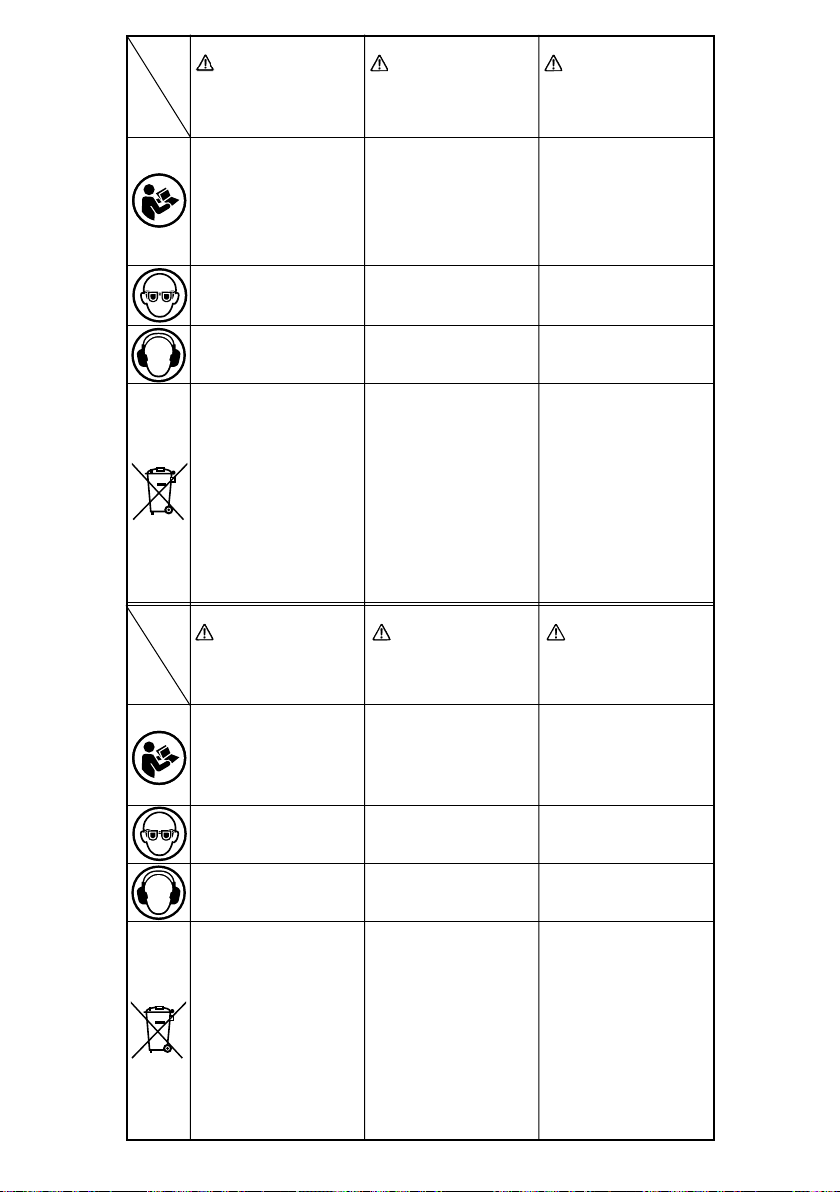
Symbols
WARNING
The following show symbols used
for the machine. Be sure that you
understand their meaning before
use.
Read all safety warnings and all
instructions.
Failure to follow the warnings and
instructions may result in electric
shock, fire and/or serious injury.
Always wear eye
protection.
Symbole
WARNUNG
Die folgenden Symbole werden für
diese Maschine verwendet. Achten
Sie darauf, diese vor der
Verwendung zu verstehen.
Lesen Sie sämtliche
Sicherheitshinweise und
Anweisungen durch.
Wenn die Warnungen und
Anweisungen nicht befolgt
werden, kann es zu Stromschlag,
Brand und/oder ernsthaften
Verletzungen kommen.
Tragen Sie immer einen
Augenschutz.
Symboles
AVERTISSEMENT
Les symboles suivants sont utilisés
pour l’outil. Bien se familiariser
avec leur signification avant
d’utiliser l’outil.
Lire tous les avertissements de
sécurité et toutes les instructions.
Tout manquement à observer ces
avertissements et instructions peut
engendrer des chocs électriques,
des incendies et/ou des blessures
graves.
Toujours porter des
verres de protection.
Always wear hearing
protection.
Only for EU countries
Do not dispose of electric tools
together with household waste
material!
In observance of European
Directive 2002/96/EC on waste
electrical and electronic equipment
and its implementation in
accordance with national law,
electric tools that have reached the
end of their life must be collected
separately and returned to an
environmentally compatible
recycling facility.
Simboli
AVVERTENZA
Di seguito mostriamo i simboli
usati per la macchina. Assicurarsi
di comprenderne il significato
prima dell’uso.
Leggere tutti gli avvertimenti di
sicurezza e tutte le istruzioni.
La mancata osservanza degli
avvertimenti e delle istruzioni
potrebbe essere causa di scosse
elettriche, incendi e/o gravi lesioni.
Indossate sempre le
protezioni oculari.
Indossare sempre i
dispositivi di protezione
acustica.
Solo per Paesi UE
Non gettare le apparecchiature
elettriche tra i rifiuti domestici.
Secondo la Direttiva Europea
2002/96/CE sui rifiuti di
apparecchiature elettriche ed
elettroniche e la sua attuazione in
conformità alle norme nazionali, le
apparecchiature elettriche esauste
devono essere raccolte
separatamente, al fine di essere
reimpiegate in modo ecocompatibile.
5
Stets Gehörschutz
tragen.
Nur für EU-Länder
Werfen Sie Elektrowerkzeuge nicht
in den Hausmüll!
Gemäss Europäischer Richtlinie
2002/96/EG über Elektro- und
Elektronik- Altgeräte und
Umsetzung in nationales Recht
müssen verbrauchte
Elektrowerkzeuge getrennt
gesammelt und einer
umweltgerechten
Wiederververtung zugeführt
werden.
Symbolen
WAARSCHUWING
Hieronder staan symbolen
afgebeeld die van toepassing zijn op
deze machine. U moet de betekenis
hiervan begrijpen voor gebruik.
Lees alle waarschuwingen en
instructies aandachtig door.
Nalating om de waarschuwingen
en instructies op te volgen kan in
een elektrische schok, brand en/of
ernstig letsel resulteren.
Draag altijd
oogbescherming.
Draag altijd
gehoorbescherming.
Alleen voor EU-landen
Geef elektrisch gereedschap niet
met het huisvuil mee!
Volgens de Europese richtlijn 2002/
96/EG inzake oude elektrische en
elektronische apparaten en de
toepassing daarvan binnen de
nationale wetgeving, dient
gebruikt elektrisch gereedschap
gescheiden te worden ingezameld
en te worden afgevoerd naar een
recycle bedrijf dat voldoet aan de
geldende milieu-eisen.
Porter des protections
anti-bruit en permanence.
Pour les pays européens
uniquement
Ne pas jeter les appareils électriques
dans les ordures ménagères!
Conformément à la directive
européenne 2002/96/EG relative aux
déchets d’équipements électriques
ou électroniques (DEEE), et à sa
transposition dans la législation
nationale, les appareils électriques
doivent être collectés à part et être
soumis à un recyclage respectueux
de l’environnement.
Símbolos
ADVERTENCIA
A continuación se muestran los
símbolos usados para la máquina.
Asegúrese de comprender su
significado antes del uso.
Lea todas las instrucciones y
advertencias de seguridad.
Si no se siguen las advertencias e
instrucciones, podría producirse
una descarga eléctrica, un
incendio y/o daños graves.
Utilice siempre una
protección ocular.
Utilice siempre
protecciones auriculares.
Sólo para países de la Unión
Europea
¡No deseche los aparatos eléctricos
junto con los residuos domésticos!
De conformidad con la Directiva
Europea 2002/96/CE sobre residuos
de aparatos eléctricos y electrónicos
y su aplicación de acuerdo con la
legislación nacional, las
herramientas eléctricas cuya vida
útil haya llegado a su fin se deberán
recoger por separado y trasladar a
una planta de reciclaje que cumpla
con las exigencias ecológicas.
Page 7

English
GENERAL OPERATIONAL PRECAUTIONS
WARNING! When using electric tools, basic safety
precautions should always be followed to reduce the
risk of fire, electric shock and personal injury, including
the following.
Read all these instructions before operating this product
and save these instructions.
For safe operations:
1. Keep work area clean. Cluttered areas and benches
invite injuries.
2. Consider work area environment. Do not expose
power tools to rain. Do not use power tools in
damp or wet locations. Keep work area well lit.
Do not use power tools where there is risk to
cause fire or explosion.
3. Guard against electric shock. Avoid body contact
with earthed or grounded surfaces (e.g. pipes,
radiators, ranges, refrigerators).
4. Keep children and infirm persons away. Do not
let visitors touch the tool or extension cord. All
visitors should be kept away from work area.
5. Store idle tools. When not in use, tools should
be stored in a dry, high or locked up place, out
of reach of children and infirm persons.
6. Do not force the tool. It will do the job better and
safer at the rate for which it was intended.
7. Use the right tool. Do not force small tools or
attachments to do the job of a heavy duty tool.
Do not use tools for purposes not intended; for
example, do not use circular saw to cut tree limbs
or logs.
8. Dress properly. Do not wear loose clothing or
jewelry, they can be caught in moving parts.
Rubber gloves and non-skid footwear are
recommended when working outdoors. Wear
protecting hair covering to contain long hair.
9. Use eye protection. Also use face or dust mask
if the cutting operation is dusty.
10. Connect dust extraction equipment.
Cutting operation by this compound saw may
produce considerable amount of dust from
extraction duct on fixed guard.
(Dust material: Wood or Aluminium)
If devices are provided for the connection of dust
extraction and collection facilities ensure these are
connected and properly used.
11. Do not abuse the cord. Never carry the tool by
the cord or yank it to disconnect it from the
receptacle. Keep the cord away from heat, oil and
sharp edges.
12. Secure work. Use clamps or a vise to hold the
work. It is safer than using your hand and it frees
both hands to operate tool.
13. Do not overreach. Keep proper footing and balance
at all times.
14. Maintain tools with care. Keep cutting tools sharp
and clean for better and safer performance. Follow
instructions for lubrication and changing
accessories. Inspect tool cords periodically and if
damaged, have it repaired by authorized service
center. Inspect extension cords periodically and
replace, if damaged. Keep handles dry, clean, and
free from oil and grease.
15. Disconnect tools. When not in use, before servicing,
and when changing accessories such as blades,
bits and cutters.
16. Remove adjusting keys and wrenches. Form the
habit of checking to see that keys and adjusting
wrenches are removed from the tool before turning
it on.
17. Avoid unintentional starting. Do not carry a
plugged-in tool with a finger on the switch. Ensure
switch is off when plugging in.
18. Use outdoor extension leads. When tool is used
outdoors, use only extension cords intended for
outdoor use.
19. Stay alert. Watch what you are doing. Use common
sense. Do not operate tool when you are tired.
20. Check damaged parts. Before further use of the
tool, a guard or other part that is damaged should
be carefully checked to determine that it will
operate properly and perform its intended function.
Check for alignment of moving parts, free running
of moving parts, breakage of parts, mounting and
any other conditions that may affect its operation.
A guard or other part that is damaged should be
properly repaired or replaced by an authorized
service center unless otherwise indicated in this
handling instructions. Have defective switches
replaced by an authorized service center. Do not
use the tool if the switch does not turn it on and
off.
21. Warning
The use of any accessory or attachment, other
than those recommended in this handling
instructions, may present a risk of personal injury.
22. Have your tool repaired by a qualified person.
This electric tool is in accordance with the relevant
safety requirements. Repairs should only be carried
out by qualified persons using original spare parts.
Otherwise this may result in considerable danger
to the user.
PRECAUTION FOR DRY CUT METAL SAW
1. Never use the dry cut metal saw with its safety
cover fixed in the open position.
2. Ensure that the safety cover moves smoothly.
3. Always keep the saw blade sharp.
4. Never operate the dry cut metal saw with the saw
blade turned upward or to the side.
5. Ensure that the workpiece is free of foreign matter.
6. When carrying the tool, grasp the handle instead.
7. Start cutting only after motor revolution reaches
full speed.
8. Promptly turn off the trigger switch when
abnormality observed.
9. Shut off power and wait for saw blade to stop
before servicing or adjusting tool.
10. Use only original Hitachi TCT saw blades for metal
cutting. Do not use blades made for wood saws,
metal saws, or cut-off wheels.
6
Page 8

English
SPECIFICATIONS
Steel Pipe ø115mm
Max. Cutting Capacity
Height × Width
Cutting Angle 0° – 45°
Input 1450W*
No-Load Speed 1350/min
Weight 19kg
*Be sure to check the nameplate on product as it is subject to change by areas.
Rectangular Pipe 100mm × 100mm
Shaped Steel 75mm × 125mm
Round Bar ø32mm
STANDARD ACCESSORIES
(1) TCT saw blade (305mm, NT50) ............................. 1
(mounted on tool)
(2) Wrench ........................................................................ 1
(3) Protective goggles ..................................................... 1
Standard accessories are subject to change without
notice.
OPTIONAL ACCESSORIES
(sold separately)
(1) TCT saw blade (305mm, NT60)
Optional accessories are subject to change without notice.
APPLICATION
䡬 Cutting various types of metallic materials such as
Steel pipes, Rectangular pipes, Shaped Steel and
Round bars.
PRIOR TO OPERATION
1. Power source
Ensure that the power source to be utilized conforms
to the power requirements specified on the product
nameplate.
2. Power switch
Ensure that the power switch is in the OFF position.
If the plug is connected to a receptacle while the
trigger switch is in the ON position, the power tool
will start operating immediately, inviting serious
accident.
3. Extension cord
When the work area is removed from the power
source, use an extension cord of sufficient thickness
and rated capacity. The extension cord should be
kept as short as practicable.
4. Since movable portions are secured by tension of
a chain while in transit, remove the chain from the
chain hook by slightly depressing the handle.
ADJUSTING THE POWER TOOL PRIOR TO
USE
CAUTION
Make all necessary adjustments before inserting the plug
in the power source.
1. Check to see that the safety cover operates smoothly.
(1) Make sure the safety cover moves smoothly
when the handle is in the down position.
(2) Next, check that the safety cover returns to the
original position when the handle is raised.
2. Make sure the spindle lock used for mounting and
dismounting the saw blade is removed.
3. Make sure the saw blade is fixed firmly in place.
4. Check facial deflection by rotating the saw blade.
If there is too much facial deflection, the lifespan
of the blade will be shortened and cutting precision
will deteriorate.
PRACTICAL APPLICATIONS
WARNING
䡬 It is dangerous to remove or install the workpiece
while the saw blade is turning.
1. Switch operation.
After pushing the lock-of button with the thumb,
the saw blade rotate when the trigger switch is
pulled, and stop when the trigger switch is released.
2. lnstructions for one-touch vice (Figs. 3 and 4).
(1) When the grip is in the upright position (Fig.
3), if the screw handle is pushed and pulled, vice
(A) moves forward quickly.
(2) When the grip is in the down position (Fig. 4),
if the screw handle is turned, vice (A) can be
moved.
NOTICE
䡬 If the grip cannot be put in the down position, turn
the screw handle slightly.
3. Fix workpiece.
(1) Place the workpiece in vice (B) and push the
screw handle so that the grip is in an upright
position (Fig. 3); then push vise (A) slightly
against the workpiece. Next, push down on the
grip and turn the screw handle so that the
workpiece is fixed tightly. (Fig. 4)
(2) All workpiece must, of course, be fixed in the
vise as securely as possible.
7
Page 9

English
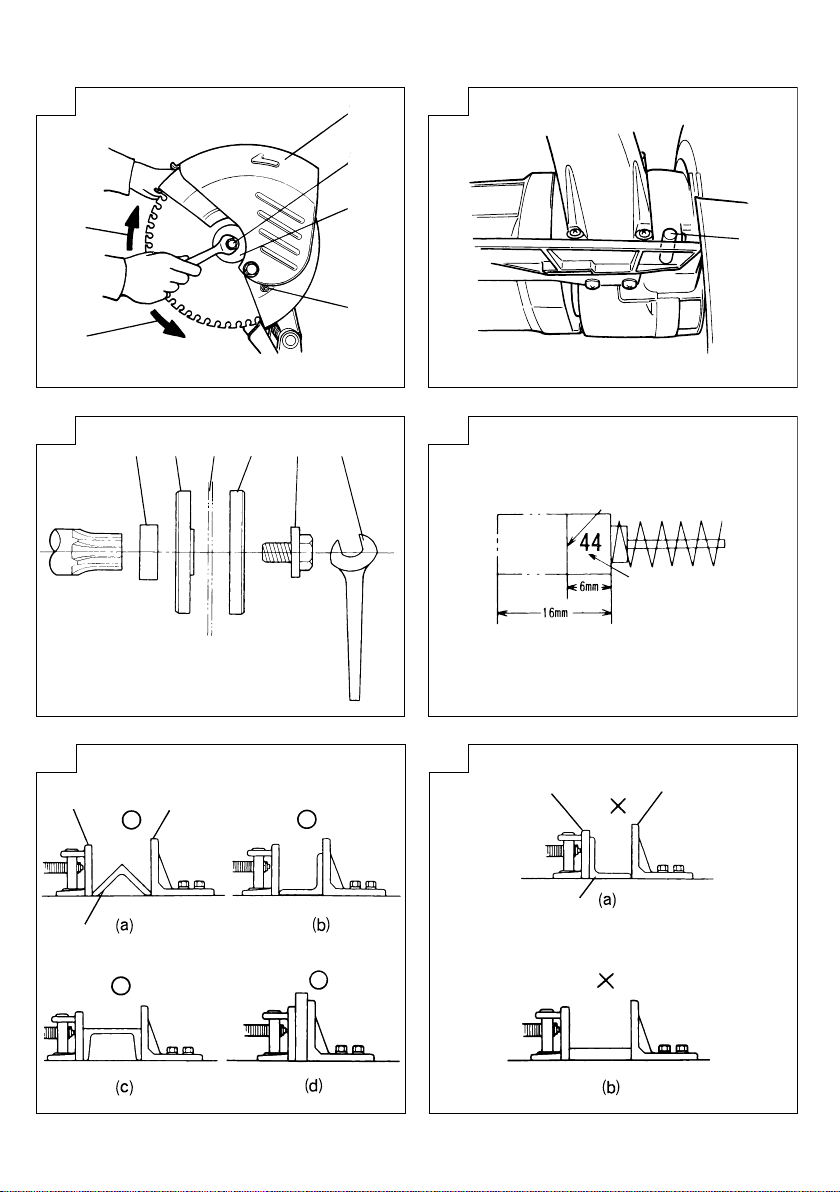
Fix shaped steel as shown in Fig. 11-(a), (b), (c).
Do not fix shaped steel as shown in Fig. 12-(a).
If it is, the workpiece will move and cutting
accuracy will deteriorate.
(3) Fix flat-bar steel as shown in Fig. 11-(d). but,
hight of workpiece is less than 100mm. (Figs.
11 and 12).
CAUTION
䡬 Ensure that the workpiece is securely fastened with
the vise. If it not, a serious accident could be caused
if the workpiece comes loose or the saw blade
breaks during operation.
䡬 Do not fix flat-bar steel as shown in Fig. 12-(b).
Improper fixing of the workpiece material may cause
the carbide tipped to abrade and make a crack
during cutting, causing damage to the blade.
4. Cutting.
(1) After turning on the trigger switch and checking
that the saw blade is rotating at full speed,
slowly push down the handle while holding
down the lever and bring the equipment in the
vicinity of the workpiece.
(2) When the saw blade contacts the workpiece,
push the handle down gradually to produce
cutting.
(3) When the cutting (or desired cutting-in) has been
completed, raise the handle up to the retract
position.
(4) Turn off the trigger switch after each cutting
operation is completed, and allow the saw blade
to come to a complete stop before preparing for
the next operation.
CAUTION
䡬 Be sure to wear protective goggles-while cutting.
䡬 Slowly bring the saw blade into contact with the
workpiece. Do not move the blade suddenly.
䡬 Increased pressure on the handle does not
necessarily mean faster cutting of the work-piece.
On the contrary, too much force may result in
overload of the motor and/or decreased cutting
efficiency.
䡬 While cutting, the tip will wear down slightly, but
this will not adversely affect cutting ability. Continue
to use as is. However, when cracks appear on the
metallic block immediately stop using the saw blade.
䡬 When the saw blade ceases to work during cutting,
immediately turn off the trigger switch and remove
the saw blade from workpiece. Afterwards, check
for problems by no load test operation without any
workpiece.
䡬 When the material that is to be cut off and discarded
is thin or narrow, if after cutting the handle is lifted
while the saw blade continues to rotate, this scrap
may fly out when it comes into contact with the
rotating saw blade and cause injury. Return the
handle to its original position after the saw blade
has completely stopped moving.
䡬 When the cutting is stopped in the middle of a job,
lift the handle as the saw blade continues to rotate.
䡬 Ensure the trigger switch is turned OFF and the plug
is removed from the power outlet when work has
been completed.
WARNING
䡬 Do not touch the material around the region where
it has been cut with unprotected hands. It is very
hot.
5. Cutting at angles
(1) It is possible to cut at angles up to 45 degrees.
Untighten the three M10 bolts with the wrench
that comes with the saw blade and set the angle
of vice (B) in alignment with the angle on the
indicator. (Fig. 5)
(2) Make sure to tighten the three M10 bolts securely
after setting the angle.
(3) Untighten the two wing bolts and move the side
cover so that it is in alignment with the angle
set. (Figs. 1 and 6)
MOUNTING AND DISMOUNTING SAW
BLADE
CAUTION
First, disconnect plug from receptacle.
1. Dismounting Saw Blade. (Figs. 7, 8 and 9)
(1) Lift the safety cover until it touches the hexagonal
socket head bolt.
(2) Press in spindle lock, and loosen bolt with
wrench.
If the spindle lock cannot be easily pressed in
to fix the saw blade spindle, turn the bolt by
wrench while applying pressure on the spindle
lock.
The saw blade spindle is fixed when the spindle
lock is pressed inward.
(3) Removing the bolt, washer (B) and the saw
blade.
WARNING
䡬 Be very careful when removing the saw blade after
it has been used for cutting several materials in
succession, since the blade may be very hot.
2. Mounting Saw Blade.
(1) Attach the saw blade.
WARNING
When mounting the saw blade, make sure the
rotation indicator mark on the saw blade and the
rotation direction are properly matched.
(2) Thoroughly clean washer (B) and the bolt, and
install them onto the saw blade mounting shaft.
(3) Press the spindle lock and tighten the bolt with
a wrench.
CAUTION
䡬 Make sure the spindle lock has returned to the
retract position after installing or removing the saw
blade.
䡬 Tighten the bolt so it doesn't come loose during
operation.
䡬 Check that the bolt is properly tightened before the
Power tool is started.
MAINTENANCE AND INSPECTION
CAUTION
Prior to inspecting the dry cut metal saw be sure to
disconnect the power plug.
1. Inspecting the saw blade.
Since use of a dull saw blade will degrade efficiency
and cause possible motor malfunction, sharpen or
replace the saw blade as soon as abrasion is noted.
8
Page 10

English
2. Inspecting the mounting screws
Regularly inspect all mounting screws and ensure
that they are properly tightened. Should any of the
screws be loose, retighten them immediately. Failure
to do so could result in serious hazard.
3. Inspecting the carbon brushes (Fig. 10).
The motor employs carbon brushes which are
consumable parts. Since an excessively worn carbon
brush could result in motor trouble, replace a carbon
brush with a new one when it becomes worn to
or near the "wear limit". In addition, always keep
carbon brushes clean and ensure that they slide
freely within the brush holders.
4. Replacing a carbon brush.
Disassemble the brush cap with a minus-head
screwdriver. The carbon brush can then be easily
removed.
5. Maintenance of the motor.
The motor unit winding is the very "heart" of the
power tool. Exercise due care to ensure the winding
does not become damaged and/or wet with oil or
water.
6. Lubrication (Figs. 1 and 2)
Feed oil at the oiling points once a month for
extending machine service life (machine oil is
suitable for the machine).
Oiling point
䡬 Rotary part of shaft
䡬 Rotary part of vise
䡬 Slide way of vise (A)
䡬 Screw
䡬 Spring
7. Service parts list
A:Item No.
B:Code No.
C:No. Used
D:Remarks
CAUTION
Repair, modification and inspection of Hitachi Power
Tools must be carried out by a Hitachi Authorized
Service Center.
Especially laser device should be maintained by the
authorised agent by laser manufacturer.
Always assign the repair of laser device to Hitachi
Authorised Service Center.
This Parts List will be helpful if presented with the
tool to the Hitachi Authorized Service Center when
requesting repair or other maintenance.
In the operation and maintenance of power tools,
the safety regulations and standards prescribed in
each country must be observed.
MODIFICATIONS
Hitachi Power Tools are constantly being improved
and modified to incorporate the latest technological
advancements.
Accordingly, some parts (i.e. code numbers and/or
design) may be changed without prior notice.
GUARANTEE
We guarantee Hitachi Power Tools in accordance with
statutory/country specific regulation. This guarantee does
not cover defects or damage due to misuse, abuse, or
normal wear and tear. In case of complaint, please send
the Power Tool, undismantled, with the GUARANTEE
CERTIFICATE found at the end of this Handling
instruction, to a Hitachi Authorized Service Center.
NOTE
Due to HITACHI’s continuing program of research and
development the specifications herein are subject to
change without prior notice.
IMPORTANT
Correct connection of the plug
The wires of the main lead are coloured in accordance
with the following code:
Blue: -Neutral
Brown: -Live
As the colours of the wires in the main lead of this tool
may not correspond with the coloured markings
identifying the terminals in your plug proceed as follows:
The wire coloured blue must be connected to the terminal
marked with the letter N or coloured black. The wire
coloured brown must be connected to the terminal
marked with the letter L or coloured red. Neither code
must be connected to the earth terminal.
NOTE
This requirement is provided according to BRITISH
STANDARD 2769: 1984.
Therefore, the letter code and colour code may not
be applicable to other markets except The United
Kingdom.
Information concerning airborne noise and vibration
The measured values were determined according to
EN61029.
The typical A-weighted sound pressure level: 90 dB(A)
The typical A-weighted sound power level: 103 dB (A)
Wear ear protection.
The typical weighted root mean square acceleration value
does not exceed 2.5 m/s2.
9
Page 11

Deutsch
ALLGEMEINE VORSICHTSMASSNAHMEN
WARNUNG! Bei der Verwendung von Elektrowerkzeugen
müssen immer die grundlegenden Vorsichtsmaßnahmen
befolgt werden, um das Risiko von Feuer, elektrischem
Schlag und persönlicher Verletzung und den
nachfolgenden Punkten zu vermeiden.
Lesen Sie diese Anweisungen völlig, bevor Sie dieses
Erzeugnis verwenden, und bewahren Sie diese
Anweisungen auf.
Für sicheren Betrieb:
1. Der Arbeitsplatz sollte sauber gehalten werden.
Unaufgeräumte Arbeitsplätze und Werkbänke
erhöhen die Unfallgefahr.
2. Die Betriebsbedingungen beachten. Elektrowerkzeuge
sollten nicht dem Regen ausgesetzt werden.
Ebenfalls sollten Sie nicht an feuchten oder nassen
Plätzen gebraucht werden. Der Arbeitsplatz sollte
gut beleuchtet sein.
Verwenden Sie Elektrowerkzeuge nicht an Orten,
an denen die Gefahr von Feuer oder Explosion
besteht.
3. Schutzmaß nahmen gegen elektrische Schläge
treffen. Darauf achten, daß das Gehäuse nicht in
Kontakt mit geerdeten Flachen kommt (z.B. Rohre,
Radiatoren, Elektroherde, Kühlschränke).
4. Kinder und gebrechliche Personen sollten vom
Gerät ferngehalten werden. Andere Personen nicht
mit dem Werkzeug oder dem Verlängerungskabel
in Kontakt kommen lassen. Besucher sollten vom
Arbeitsbereich ferngehalten werden.
5. Nicht benutzte Werkzeuge sollten sicher aufbewahrt
werden. Sie sollten an einem trockenen und
hochgelegenen oder verschließbaren Ort
aufbewahrt werden, außerhalb der Reichweite von
Kindern und gebrechlichen Personen.
6. Werkzeuge sollten nicht mit übermäßiger Gewalt
verwendet werden. Ihre Leistung ist besser und
sicherer, wenn sie mit der vorgeschriebenen
Geschwindigkeit verwendet werden.
7. Nur die korrekten Werkzeuge verwenden. Niemals
ein kleineres Werkzeug oder Zusatzgerat für
Arbeiten verwenden, die Hochleistungsgerate
erfordern. Nur Werkzeuge verwenden, die dem
Verwendungszweck entsprechen, d.h. niemals eine
Kreissäge zum Sägen von Ästen oder Baumstämmen verwenden.
8. Die richtige Kleidung tragen. Keine lose Kleidung
oder Schmuck tragen, da sich lose Kleidungsstücke
in den bewegenden Teilen verfangen können. Bei
Arbeiten im Freien sollten Gummihandschuhe und
rutschfeste Schuhe getragen werden. Tragen Sie
eine schützende Haarabdeckung, um langes Haar
zurückzuhalten.
9. Es sollte eine Sicherheitsbrille getragen werden.
Bei Arbeiten mit Staubentwicklung sollte eine
Gesichtsoder Staubmaske getragen werden.
10. Schließen Sie eine Staubabsaugvorrichtung an.
Sägen mit dieser Verbundsäge kann eine
beträchtliche Menge Staub aus dem Auslass am
fixierten Schutz verursachen.
(Staubmaterial: Holz oder Aluminium)
Wenn Vorrichtungen für den Anschluß von
Staubabsaug- und -sammelvorrichtungen
vorhanden sind, so stellen Sie sicher, daß diese
angeschlossen sind und richtig verwendet werden.
11. Niemals das Kabel mißbrauchen. Ein Werkzeug
niemals am Kabel tragen oder bei Abtrennung
von der Steckdose das Kabel harausreißen. Das
Kabel sollte gegen Hitze, Öl und scharfe Kanten
geschützt werden.
12. Den Arbeitsplatz gut absichern. Zwingen oder einen
Schraubstock zur Befestigung des Werkstücks
verwenden. Das ist sicherer als die Benutzung der
Hände und macht beide Hände zur Bedienung des
Werkzeugs frei.
13. Sich niemals weit überbeugen. Immer einen festen
Stand und ein sicheres Gleichgewicht bewahren.
14. Die Werkzeuge sollten sorgfältig behandelt werden.
Für einen einwandfreien und sicheren Betrieb sollten
sie stets scharf sein und saubergehalten werden.
Die Anleitungen für schmierung und Austausch
des Zuehörs unbedingt einhalten. Die Kabel der
Geräte regelmäßig überprüfen und bei
Beschädigung durch eine autorisierte
Kundendienststelle reparieren lassen. Ebenfalls die
Verlägerungskabel regelmäßig überprüfen und bei
Beschadigung auswechseln. Die Handgriffe sollten
stets trocken und sauber sein, sowie keine Öl- oder
Schmierfett stellen aufweisen.
15. Werkzeuge vom Netz trennen, wenn sie nicht
benutzt werden, vor Wartungsarbeiten und beim
Austausch von Zubehörteilen wie z.B. Blätter,
Bohrer und Messer.
16. Alle Stellkeile und Schraubenschlüssel entfernen.
Vor Einschaltung des Gerätes darauf achten, daß
alle Stellkeile und Schraubenschlüssel entfernt
worden sind.
17. Ein unbeabsichtigtes Einschalten sollte vermieden
werden. Niemals ein angeschlossenes Werkzeug
mit dem Finger am Schalter tragen. Vor Anschluß
überprüfen, ob das Gerät ausgeschaltet ist.
18. Im Freien ein Verlängerungskabel verwenden. Nur
ein Verlängerungskabel verwenden, das für die
Verwendung im Freien markiert ist.
19. Den Arbeitsvorgang immer unter Kontrolle haben.
Das Gerät niemals in einem abgespannten Zustand
verwenden.
20. Beschädigte Teile überprüfen. Vor Benutzung des
Werkzeugs sollten beschädigte Teile oder
Schutzvorrichtungen sorgfältig überprüft werden,
um festzustellen, ob sie einwandfrei funktionieren
und die vorgesehene Funktion erfüllen,
Ausrichtung, Verbindungen sowie Anbringung sich
bewegender Teile überprüfen. Ebenfalls
uberprufen, ob Teile gebrochen sind. Teile oder
Schutzvorrichtungen, die beschädigt sind, sollten,
wenn in dieser Bedienungsanleitung nichts anderes
erwähnt ist, durch eine autorisierte
Kundendienststelle ausge wechselt oder repariert
werden. Dasselbe gilt für defekte Schalter. Wenn
sich das Werkzeug nicht mit dem Schalter einoder
ausschalten läßt, sollte das Werkzeug nicht
verwendet werden.
21. Warnung
Die Verwendung von anderem Zubehör oder
anderen Zusätzen als in dieser Bedienungsanleitung empfohlen kann das Risiko einer
Körperverletzung einschließen.
22. Lassen Sie Ihr Werkzeug durch qualifiziertes Personal
reparieren.
Dieses Elektrowerkzeug entspricht den zutreffenden
Sicherheitsanforderungen. Reparaturen sollten nur von
qualifiziertem Personal unter Verwendung von
Originalersatzteilen durchgeführt werden, da sonst
beträchtliche Gefahr für den Benutzer auftreten kann.
10
Page 12

Deutsch
VORSICHTSMASSREGELN FÜR BENUTZUNG
DES METALL KRElSSÄGE
1. Niemals die Schiebe-Kappsäge verwenden, wenn
die Schutzabdeckung offen ist.
2. Immer sicherstellen, daß sich die Schutzabdeckung
glatt bewegt.
3. Immer das Sägeblatt scharf halten.
4. Niemals metall kreissäge mit dem Sägeblatt nach
oben oder zur Seite weisend verwenden.
5. Immer sicherstellen, daß das Werkstück von
Fremdkörpern, wie etwa Nägeln, frei ist.
6. Beim Tragen des Werkzeugs immer am Halter
anfassen.
7. Erst mit dem Sägen beginnen, wenn die richtige
Motordrehzahl erreicht ist.
8. Wenn Betriebsstörungen auftreten, sofort
ausschalten.
9. Vor der Wartung oder Einstellung immer
ausschalten, und warten bis das Sägeblatt ganz
gestoppt ist.
10. Für das Schneiden von reinem Metall nur Hitachi
Kohlentipped Sägeblätter verwenden. Keinesfalls
Sägeblätter verwenden, die für Holzsägen,
Metallsägen oder Abschneiaerad hergestellt
worden sind.
TECHNISCHE DATEN
Rohre, Stahlrohre ø115mm
Maximale Schneidleistung
Größe × Breite
Winkelschneiden 0° – 45°
Leistung saufnahme 1450W*
Leerlaufdrehzahl 1350/min
Gewicht 19kg
*Vergessen Sie nicht, die Produktangaben auf dem Typenschild zu überprüfen, da sich diese je nach
Verkaufsgebiet ändern.
STANDARDZUBEHÖR
(1) Hartmetallbestücktes Sägeblatte (ø305 × 50P)
(am Werkzeug befestigt) .......................................... 1
(2) Schraubenschlüssel ................................................... 1
(3) Sicherheitsglas ........................................................... 1
Das Standardzubehör kann ohne vorherige
Bekanntmachung jederzeit geändert werden.
SONDERZUBEHÖR
(separat zu beziehen)
(1) Hartmetallbestücktes sägeblatt (ø305 × 60P)
Das Sonderzubehör kann ohne vorgerige
Bekanntmachung jederzeit geändert werden.
ANWENDUNG
䡬 Schneiden vershiedener Metallgegenstände wie
Rohre, Quadratisches Stahlrohr, Geformter Stahl
und Runde Stangen.
VOR INBETRIEBNAHME
1. Netzspannung
Prüfen, daß die zu verwendende Netzspannung der
Angabe auf dem Typenschild entspricht.
2. Netzschalter
Prüfen, daß der Nezschalter auf „AUS” steht. Wenn
der Stecker in eine Steckdose gesteckt wird, während
der Auslöseschalter auf ON steht, beginnt das
Elektrowerkzeug sofort zu laufen, wodurch es zu
einem schweren Unfall kommen kann.
11
Quadratisches Stahlrohr 100mm × 100mm
Geformter Stahl 75mm × 125mm
Runde Stangen ø32mm
3. Verlängerungskabel
Wenn der Arbeitsbereich nicht in der Nähe des
Netzanschlusses liegt, ist ein Verlängerungskabel
ausreichenden Querschnitts und ausreichender
Nennleistung zu verwenden. Das Verlängerungskabel
sollte so kurz wie möglich gehalten werden.
4. Da die beweglichen Teile beim Transport durch die
Spannung einer Kette gesichert sind, muss zuerst
die Kette vom Haken gelöst werden, indem man
den Griff etwas nieder drückt.
EINSTELLUNGEN DER WERKZEUGMASCHINE
VOR DER VERWENDUNG
ACHTUNG
Sicherstelen, daß alle erforderlichen Einstellungen vor
dem Einstecken des Steckers in die Steckdose
durchgeführt sind.
1. Prüfen, ob die Schutzabdeckung richtig arbeitet.
(1) Darauf achten, daß sich die Sicherheitsabdeckung
gleichmäßig bewegt, wenn sich der Griff in der
unteren Position befindet.
(2) Dann prüfen, ob die Schutzabdeckung in
Ausgangsstellung zurükkehrt, wenn der Handgriff
angehoben wird.
2. Darauf achten, daß die Spindel-Verriegelung für
Anbringen und Entfernen des sägeblattes verwendet
wird.
3. Darauf achten, daß das sägeblatt sicher festgestellt
wird.
4. Die Oberflächenvibration durch Rotieren des
sägeblattes überprüfen. Falls die Unregelmäßigkeit
zu stark ist, wird die Lebensdauer des Blattes verkürzt
und die Schneidegenauigkeit leidet.
Page 13

Deutsch
PRAKTISCHE ANWENDUNGEN
WARNUNG
䡬 Es ist gefährlich, das Werkstück zu entfernen oder
anzubringen, wenn sich das Sägeblatt dreht.
1. Bedienung des Schalters
Nach Drücken des Sicherungsknopfs mit dem
Daumen wird die Werkzeugmaschine angeschaltet
(ON), wenn der Auslösehebel gedrückt wird, und
wieder ausgeschaltet (OFF), wenn der Auslösehabel
wieder losgelassen wird.
2. Bedienungshinweise für den One-TouchSchraubstock (Diagramme 3 und 4).
(1) Wenn sich der Griff in oberen Position befindet
(Diagramm 3), und der Schraubgriff gedrückt
und gezogen wird, so bewegt sich der
Schraubstock (A) schnell vorwärts.
(2) Wenn sich der Griff in der unteren Position
befindet (Diagramm 4), und der Schraubgriff
gedreht wird, so kann der Schraubstock (A)
bewegt werden.
HINWEIS
䡬 Wenn sich der Griff nicht in die untere Position
bewegen lässt, den Schraubgriff leicht drehen.
3. Fixieren des Werkstücks
(1) Spannen Sie das Werkstück in den Schraubstock
(B) ein und schieben Sie den Schraubgriff in
eine aufrechte Stellung (Abb. 3). Drücken Sie
den Schraubstock (A) leicht gegen das Werkstück.
Als nächstes drücken Sie den Griff nach unten
und drehen den Schraubgriff so, dass das
Werkstück fest fixiert ist. (Abb. 4)
(2) Alle Werkstücke müssen natürlich im
Schraubstock so fest wie möglich fixiert sein.
Fixieren Sie Formstahl wie in Abb. 11-(a), (b),
(c) gezeigt. Formstahl darf nicht wie in Abb. 12(a) gezeigt fixiert werden. Wenn man dies tut,
wird sich das Werkstück bewegen und die
Schnittgenauigkeit wird dadurch geringer.
(3) Fixieren Sie flache Stahlleisten wie in Abb. 11-
(d) gezeigt, aber die Höhe des Werkstücks darf
nicht mehr als 100 mm betragen (Abb. 11 und
12).
ACHTUNG
䡬 Vergewissern Sie sich, dass das Werkstück im
Schraubstock sicher befestigt ist. Wenn es das nicht
ist, könnte ein schwerer Unfall verursacht werden,
wenn sich das Werkstück lockert, oder das Sägeblatt
beim Schneiden bricht.
䡬 Fixieren Sie flache Stahlleisten nicht wie in Abb. 12-
(b) gezeigt.
Eine unsachgemäße Fixierung des Werkstück könnte
zum Abreiben der Karbidspitzen führen und einen
Riss beim Schneiden verursachen, wodurch das
Sägeblatt beschädigt wird.
4. Schneiden.
(1) Nachdem der Schalter eingeschaltet wurde und
überprüft worden ist, daß das Sägeblatt sich mit
voller Geschwindigkeit dreht, langsam den
Handgriff nach unten drücken und das Gerät in
die Nähe des zu schneidenden Materials bringen.
(2) Sobald das Sägeblatt mit dem Werkstück in
Berührung gekommen ist, den griff langsam
weiter niederdücken, um mit dem Schneiden zu
betinnen.
(3) Wenn der Schneidevorgang beendet ist (oder
der gewünschte Einschnitt vorgenommen worde),
den Griff in sein Ausgangsposition zurückführen.
(4) Nach dem Beenden jedes Schneidevorgangs die
Werkzeugmaschine auf OFF (aus) stellen und
warten, bis das Sägeblatt vollständig zum
Stillstand gekommen ist, ehe mit dem nächsten
Schneidevorgang begonnen wird.
ACHTUNG
䡬 Während des Schneidens grundsätzlich einen
Augenschutz tragen.
䡬 Das Spitzsägeblatt langsam mit dem Material in
Berührung bringen. Das Sägeblatt nicht ruckartig
bewegen.
䡬 Erhöhter Druck auf den griff bedeutet nicht unbedingt
schneleres Schneiden. Ganz im Gegenteil kann zuviel
Druck zu einer Überlastung des Motors und/oder
einer virringerten Schneideleistung führen.
䡬 Während des Schneidens wird sich das Sägeblatt
geringfugig abnutzen, dies hat jedoch keinen Einfluß
auf die Schneidefähigkeit. Weiter so verwenden,
wie es ist. Sollten jedoch Risse im Metallblock
auftreten, den Gebrauch der Säge sofort beenden.
䡬 Sollte das sägeblatt während des Schneiden
aussetzen, sofort den Hauptschalter ausschalten und
das sägeblatt vom Material entfernen, Danach, auf
Störungen überprüfen, durch Leerlaufdrehzahl, ohne
Materialeinsatz.
䡬 Wenn das zu schneidende und wegzuwerfende
Material dünn oder eng ist, und nach dem Schneiden
der Griff angehoben wird, während das Sägeblatt
weiterhin rotiert, so kann es geschehen, daß dieses
Material, wenn es mit dem rotierenden Sägeblatt
in Berührung kommt, weggeschleudert wird und
dann zu Verletzungen führt. Nachdem das Sägeblatt
vollständig zum stehen gekommen ist, den Griff
wieder in seine Ausgangsposition bewegen.
䡬 Wenn inmitten eines Arbeitsganges das schneiden
beendet wird, den Griff anheben, während das
sägeblatt weiterhin rotiert.
䡬 Sich stets vergewissern, daß der Schalter auf OFF
steht und der Stecker aus der Steckdose gezogen
ist, wenn die Arbeit beendet ist.
WARNUNG
䡬 Das Material in der direkten Umgebung der
Schneidfläche keinesfalls mit ungeschützen Händen
anfassen, diese ist sehr heiß.
5. Winkelschneiden
(1) Es ist möglich in Winkeln mit bis zu 45 Grad
zu schneiden.
Die drei M10 Schrauben mittels des mit der
Säge mitgelieferten Schraubenschlüssels losen,
und den Winkel des Schraubstocks (B)
übereinstimmend mit dem Winkel auf der
Anzeige einstellen. (Abb. 5)
(2) Darauf achten, daß nach der Winkeleinstellung
die drei M10 Schrauben wieder sicher angezogen
werden.
(3) Die beiden Flügelschrauben lösen und die
Seitenabdeckung in eine Stellung bewegen, die
mit der Winkeleinstellung übereinstimmt. (Abb.
1, 6)
12
Page 14

Deutsch
ANBRINGEN UND ENTFERNEN DES
SÄGEBLATT
ACHTUNG
Zuerst den Stecker aus der Steckdose ziehen.
1. Ausbauen des Sägebiattes (Abb. 7, 8, 9)
(1) Die Sicherheitsabdeckung, so weit anheben, bis
es die lnnensechskantschrauben berührt.
(2) Den Sperrhebel eindrücken und die Schraube
mit einem Schrauben schlüssel Iösen.
Wenn der Sperrhebel nicht leicht eingedrückt
werden kann, um die Sägeblattspindel zu
befestigen, die Schraube mit dem Schrauben
schlüssel drehen, und gleichzeitig auf Sperrhebel
drücken.
Die Sägeblattspindel wird befestigt, wenn der
Sperrhebel nach innen gedrückt wird.
(3) Die Schraube, Beilegscheibe (B) und sägeblatt.
WARNUNG
䡬 Beim Abnehmen des Spitzsägeblattes, nachdem dies
zum Scheiden mehrerer Materialien eingesetzt
wurde, sehr vorsichtig sein, da das Sägeblatt sehr
heiß sein kann.
2. Sägeblatt anbringen.
(1) Das sägeblatt anbringen.
WARNUNG
Beim Anbringen des Sägeblatts immer sicherstellen,
daß die Drehungsanzeige am Sägeblatt und die
Drehrichtung der Säge übereinstimmen.
(2) Die Beilegscheibe (B) und die Schraube gründlich
säubern, und dann auf der Sägeblatt-Haltewelle
anbringen.
(3) Die Spindelverriegelung andrücken und die
Schrauben mit einem Schraubenschlüssel
anziehen.
VORSICHT
䡬 Immer sicherstellen, daß der Sperrhebel in
Einzugstellung zurückgekehrt ist, nachdem das
Sägeblatt aus-óder eingebaut worden ist.
䡬 Die Schraube so festziehen, daß sie sich beim Betrieb
nicht lockern kann.
䡬 Prüfen, daß die Schraube richtig festgezogen ist,
befor das Werkzeug eingeschaltet wird.
WARTUNG UND ÜBERPRÜFUNG
VORSICHT
Vor einer Überprüfung der Abschneidemaschine den
Netzstecker unbedingt herausziehen.
1. Überprüfen der Sägeblätter.
Da die Verwendung stumpfer Sägeblätter zu
geringeren Schnittleistungen führt und
möglicherweise Funktionsstörungen des Motors
verursacht, die Sägeblätter schärfen oder
austauschen, sobald eine Abnutzung festzustellen
ist.
2. Inspektion der Befestigungsschrauben
Alle Befestigungsschrauben werden regelmäßig
inspiziert und geprüft, ob sie gut angezogen sind.
Wenn sich eine der Schrauben lockert, muß sie
sofort wieder angezogen werden. Geschieht das
nicht, kann das zu erheblichen Gefahren führen.
3. Überprüfen der Kohlebürsten (Abb. 10).
Der Motor verwendet Kohlebürsten. Bei diesen
handelt es sich um Verschleißteile. Da eine
übermäßig abgenutzte Kohlebürste zu
Motorproblemen führen kann, eine Kohlebürste, die
bis zur Abnutzungsgrenze (oder nahe daran)
abgenutzt ist, durch eine neue ersetzen. Außerdem
sollten Kohlebürsten stets saubergehalten werden,
und es muß darauf geachtet werden, daß sie sich
in den Bürstenhaltern frei bewegen können.
4. Austausch der Kohlebürsten.
Die Bürstendappe mit einem Schraubenzieher
auseinandernehmen. Die Kohlebürste kann dann
leicht herausgenommen werden.
5. Wartung des Motors.
Die Wicklung des Motors ist sozusagen des Herzstück
dieser Werkzeugmaschine. Achten Sie daher bitte
stets darauf, daß die Wicklung nicht beschädigt
und/oder durch Wasser und Öl feucht wird.
6. Schmieren (Abb. 1 und 2)
Einmal im Monat die angegebenen
Schmierstellenölen, um eine längere Lebensdauer
der Maschine zu gewährleisten. Am geeignetsten ist
Maschinenöl.
Schmierstellen:
䡬 Drehteile der Welle
䡬 Drehteile des schraubstocks
䡬 Schiebeweg des Schraubstocks (A)
䡬 Schraube
䡬 Feder
7. Liste der Wartungsteile
A:Punkt Nr.
B:Code Nr.
C:Verwendete Anzahl
D:Bemerkungen
ACHTUNG
Reparatur, Modifikation und Inspektion von HitachiElektrowerkzeugen müssen durch ein Autorisiertes
Hitachi-Wartungszentrum durchgeführt werden.
Besonders die Laservorrichtung sollte von
autorisierten Agenten des Laserherstellers gewartet
werden.
Wenden Sie sich für Reparatur der Laservorrichtung
immer an ein von Autorisierten Hitachi
Wartungszentrum.
Diese Teileliste ist hilfreich, wenn sie dem
Autorisierte Hitachi-Wartungszentrum zusammen mit
dem Werkzeug für Reparatur oder Wartung
ausgehändigt wird.
Bei Betrieb und Wartung von Elektrowerkzeugen
müssen die Sicherheitsvorschriften und Normen
beachtet werden.
MODIFIKATIONEN
Hitachi-Elektrowerkzeuge werden fortwährend
verbessert und modifiziert, um die neuesten
technischen Fortschritte einzubauen.
Dementsprechend ist es möglich, daß einige Teile
(z.B. Codenummern bzw. Entwurf) ohne vorherige
Benachrichtigung geändert werden.
13
Page 15

GARANTIE
Auf Hitachi-Elektrowerkzeuge gewähren wir eine Garantie
unter Zugrundelegung der jeweils geltenden gesetzlichen
und landesspezifischen Bedingungen. Dieses Garantie
erstreckt sich nicht auf Gehäusedefekte und nicht auf
Schäden, die auf Missbrauch, bestimmungswidrigen
Einsatz oder normalen Verschleiß zurückzuführen sind.
Im Schadensfall senden Sie das nicht zerlegte
Elektrowerkzeug zusammen mit dem GARANTIESCHEIN,
den Sie am Ende der Bedienungsanleitung finden, an
ein von Hitachi autorisiertes Servicecenter.
HINWEIS
Aufgrund des ständigen Forschungs- und Entwicklungsprogramms von HITACHI bleiben Änderungen der hierin
gemachten technischen Angaben vorbehalten.
Information über Betriebslärem und Vibration
Die Meßwerte wunden entspreched EN61029 bestimmt.
Der typische A-gewichtete Schalldruckt ist 90 dB (A)
Der typische A-gewichtete Schalleistungspegel ist 103 dB
(A)
Bei der Arbeit immer Ohrenschutz tragen.
Der typische gewichtete Effektiv-Beschleuningungswert
überschreitet nicht 2,5 m/s2.
Deutsch
14
Page 16

Français
PRECAUTIONS GENERALES DE TRAVAIL
AVERTISSEMENT ! Lors de l’utilisation d’un outillage
électrique, les précautions de base doivent être respectées
de manière à réduire les risques d’incendie, de secousse
électrique et de blessure corporelle, y compris les
précautions suivantes.
Lire ces instructions avant d’utiliser le produit et conserver
ces instructions pour référence.
Pour assurer un fonctionnement sûr :
1. Maintenir l’aire de travail propre. Des ateliers ou
des établis en désordre risquent de provoquer des
accidents.
2. Tenir compte de l’environnement de l’aire de tra
vail. Ne pas exposer les outils électriques à la
pluie. Ne pas les utiliser dans des endroits humides.
Travailler dans un endroit bien éclairé.
Ne pas utiliser d’outillage électrique s’il existe un
risque d’incendie ou d’explosion.
3. Protection contre une décharge électrique. Eviter
tout contact corporel avec des surfaces de mise
à la terre telles que les tuyaux, radiateurs,
cuisinières et réfrigérateurs.
4. Tenir les enfants et les personnes infirmes éloignés.
Ne pas laisser les visiteurs toucher l’outil ni son
cordon d’alimentation. Il est préférable de tenir les
visiteurs et les personnes infirmes à l’écart de
l’aire de travail.
5. Ranger les outils non utilisés. Quand on ne les
utilise pas, il est recommandé de ranger les outils
dans un endroit sec, verrouillé ou hors de portée
des enfants et des personnes infirmes.
6. Ne pas forcer l’outil. Il fonctionnera mieux et plus
sûrement à la vitesse pour laquelle il a été con
cu.
7. Utiliser l’outil approprié. Ne pas essayer de faire
avec un petit outil le travail prevu pour un outil
plus important. Toujours utiliser l’outil adéquat;
par exemple, ne pas se servir d’une scie circulaire
pour couper des branches d’arbres ou des billots
de bois.
8. Porter des vêtements appropriés. Ne pas mettre
de vêtements flottants ou de bijoux qui risquent
d’être pris dans les pièces mobiles. Si l’on travaille
à l’extérieur, il est recommandé de porter des
gants de caoutchouc et des chaussures à semelles
antidérapantes. Veiller à s’attacher les cheveux ou
à mettre un bonnet si on a les cheveux longs.
9. Porter des lunettes protectrices. Mettre un masque
si l’opération de coupe crée de la poussière.
10. Relier l’équipement d’extraction de poussière.
L'opération de coupe avec cette scie à coupe
mixte peut produire une quantité considérable de
poussière par le conduit d'évacuation de la
protection fixe.
(Matériau des poussières : bois ou aluminium)
Si des dispositifs sont prévus pour le raccordement
d’installations d’extraction et de collection de
poussière, s’assurer qu’ils sont correctement
raccordés et utilisés.
11. Prendre soin du fil. Ne jamais transporter l’outil
en le tenant par le fil et ne pas le débrancher en
tirant sur le fil d’un coup sec. Tenir le fil à l’abri
de la chaleur, l’éloigner de l’huile ou de bords
tranchants.
12. Fixer fermement la piêce à travailler. Utiliser des
agrafes ou un étau pour la maintenir. C’est plus
sûr que d’utiliser ses mains et cela les libêre pour
faire fonctionner l’outil.
13. Ne pas présumer de ses forces. Essayer de garder
son équilibre en toute circonstance.
14. Entretenir les outils avec soin. Les conserver bien
aiguisés et les nettoyer afin d’en obtenir les
meilleures performances et de pouvoir les utiliser
sans danger. Suivre les instructions pour le
graissage et le changement des accessoires.
Vérifier régulièrement les fils et cordons et s’ils
sont endommagés, les faire réparer par une
personne compétente. Vérifier régulièrement les
rallonges et les remplacer si elles sont
endommagées. Veiller à ce que les poignées soient
toujours sèches et propres, sans huile ni graisse.
15. Debrancher les outils lorsqu’on ne les utilise pas,
avant toute opération d’entretien et lors du
changement d’accessoire; comme par exemple
quand on change les lames, les forets, le fraises,
etc.
16. Retirer les clés de réglage. Prendre l’habitude de
toujours vérifier que les clés de réglage sont bien
retirées de l’appareil avant de le mettre en marche.
17. Eviter toute mise en marche accidentelle. Ne pas
transporter l’outil branché avec un doigt sur
l’interrupteur. S’assurer que l’interrupteur est sur
la position d’arrêt quand on branche l’outil.
18. Utilisation de rallonges à l’extérieur. Quand on
utilise l’outil à l’extérieur, ne se servir que des
rallonges prévues pour l’extérieur et portant une
marque distinctive.
19. Soyez vigilant. Regardez bien ce que vous faites.
Faites appel à votre bon sens. N’utilisez pas l’outil
quand vous êtes fatigué.
20. Vérifier les pièces endommagées. Avant d’utiliser
davantage l’outil, vérifier attentivement toute pièce
endommagée afin de déterminer si l’outil peut
fonctionner correctement et effectuer le travail
pour lequel il est prévu. Vérifier l’alignement et
la flexion des piêces mobiles, la cassure des pièces,
le montage et toute autre condition risquant
d’affecter le bon fonctionnement de l’outil. Un
protecteur ou toute autre pièce endommagée devra
être correctement réparé ou remplacé par un
service d’entretien autorisé, sauf autre indication
dans ce mode d’emploi. Faire remplacer les
interrupteurs défectueux par un service d’entretien
autorisé. Ne pas utiliser l’outil si l’interrupteur ne
permet pas de le mettre en marche ou de l’arrêter.
21. Précaution
L’utilisation d’un accessoire ou dispositif annexe
autre que ceux conseillés dans ce mode d’emploi
peut entraîner un risque de blessure corporelle.
22. Confier la réparation d’un outil à un technicien
qualifié.
Cet outil électrique a été conçu conformément aux
règles de sécurité en usage. Les réparations doivent
être effectuées par du personnel qualifié utilisant
des pièces d’origine. Dans le cas contraire,
l’utilisateur s’expose à des risques graves.
15
Page 17

Français
PRECAUTIONS SUR LA TRONÇONNEUSE
LAME CARBURE
1. Ne jamais utiliser la TRONÇONNEUSE LAME
CARBURE quand son capot de sécurité ouvert.
2. S'assurer que le capot de sécurité se meut sans
àcoups.
3. La lame de la scie doit toujours être aiguisée.
4. Ne jamais utiliser la TRONÇONNEUSE LAME
CARBURE avec la lame de la scie coupe tournée
vers le haut ou latéralement.
5. S'assurer que le pièce à couper est débarrassée
de tout corps étranger, comme des cous, par
exemple.
6. Lors du transport de l'outil, ne pas le saisir par
le support, mais plutot par la poignée.
7. Commencer à couper uniquement après que le
moteur a atteint la rotation maximum.
8. Quand une anomalie est décelée, commuter
immédiatement l'interrupteur d'alimentation sur
OFF.
9. Couper l'alimentation et attendre que la lame de
coupe se soit arrêtée avant de procéder à l'entretien
ou au réglage de scie.
10. Utiliser seulement les lames de scie avec pointe
carbide Hitachi pour couper le métal pur. Ne pas
utiliser les lames prévues pour les scies pour bois,
les scies métalliques ou le disque coupant.
CARACTERISTIQUES
Capacité de coupe
maximales
Hauteur × Largeur
Angle de coupe 0° – 45°
Entree 1450W*
Vitesse sans charge 1350/min
Poids 19Kg
*Assurez-vous de vérifier la plaque signalétique se trouvant sur le produit, car elle peut changer suivant
les régions.
ACCESSOIRES STANDARDS
(1) Lame de la scie á pointe de carbure
(ø305 × 50P) .............................................................. 1
(2) Clef ............................................................................... 1
(3) Verre de sécurité ...................................................... 1
Les accessoires standards sont sujets à changement
sans préavis.
ACCESSOIRES SUR OPTION
(Vendus séparément)
(1) Lame de la scie á pointe de carbure (ø305 × 60P)
Les accessoires à option sont sujets à changement sans
préavis
UTILISATION
䡬 Coupe de divers types se matériaux métalliques,
tels que des tuyaux. tuyaux carrés en acier, acier
profilé et barres rondes.
AVANT LA MISE EN MARCHE
1. Source de puissance
S’assurer que la source de puissance à utiliser
correspond à la puissance indiquée sur la plaque
signalétique du produit.
Tuyaux en acier ø115mm
Tuyaux carrés en acier 100mm × 100mm
Acier profilé 75mm × 125mm
Barres rondes ø32mm
2. Interrupteur de puissance
S’assurer que l’interrupteur de puissance est en
position ARRET. Si la fiche est branchée alors que
la gachette est sur MARCHE, l'outil démarre
automatiquement, risquant de provoquer un grave
accident.
3. Fil de rallonge
Lorsque la zone de travail est éloignée de la source
de puissance, utiliser un fil de rallonge d’une
épaisseur suffisante et d’une capacité nominale
suffisante. Le fil de rallonge doit être aussi court
que possible.
4. Etant donné que les parties mobiles sont maintenues
en place par une chaîne pendant le transport, enlever
la chaîne du crochet en appuyant légèrement sur
la poignée.
REGLAGE DE LA PUISSANCE DE L'OUTIL
AVANT L'UTILISATION
REMARQUE
Exécuter tous les réglages nécessaires avant de brancher
la fiche du cordon d'alimentation dans une prise
électrique.
1. Vérifier le fonctionnement de la protection.
(1) S'assurer que le couvercle de sécurité se déplace
aisément lorsque la poignée est en position vers
le bas.
(2) Vérifier si la protection revient bien sur sa position
d'origine en relevant la poignée.
2. S'assurer que le verrou de la broche utilisé pour
monter et démonter la lame de la scie soit bien
retiré.
16
Page 18

Français
3. S'assurer que la lame de la scie soit fixée fermement
en position.
4. Vérifier la vibration de surface en tournant la lame
de la scie. S'il y a également beaucoup de jeu de
la rotation, la durée de service de la lame de la
scie sera raccourcie et la précision de coupe sera
détériorée.
APPLICATIONS PRATIQUES
ATTENTION
䡬 Il est très dangereux de placer ou d'ôter une pièce
à travailler pendant que la scie fonctionne.
1. Utilisation de l'interrupteur
Après avoir enfoncé la touche de verrouillage avec
le pouce, l'outil est sous tension dès que l'
interrupteur à gâchette est à la position ON et hors
tension quand cet interrupteur est relâché.
2. Instructions pour I'étau à "touche simple" (Fig. 3
et 4).
(1) Lorsque les mâchoires sont en position verticale
(Fig. 3), et si la poignée à vis est poussée et
tirée, l'étau (A) se déplacera en avant rapidement.
(2) Lorsque les mâchoires sont en position vers le
bas (Fig. 4) et si la poignée à vis est tournée,
l'étau (A) pourra êtra déplacé.
REMARQUE
䡬 Si les mâchoires ne peuvent pas être installées en
position vers le bas, tourner la poignée de la vis
légèrement.
3. Fixer la pièce à découper.
(1) Placer la pièce dans l’étau (B) et pousser la
poignée de la vis de telle manière que les
mâchoires soient en position verticale (Fig. 3) ;
puis poussez l’étau (A) légèrement contre la
pièce à découper. Ensuite, pousser les mâchoires
vers le bas et tourner la poignée de la vis de
telle manière que la pièce à découper soit fixée
fermement (Fig. 4).
(2) L’ensemble de la pièce doit bien sûr être fixée
aussi fermement que possible dans l’étau.
Fixer l’acier profilé comme indiqué sur la Fig. 11(a), (b), (c).
Ne pas fixer l’acier profilé comme indiqué sur la
Fig. 12 (a). Sinon, la pièce à découper va bouger
et la précision de la découpe sera moindre.
(3) Fixer la barre en acier comme indiqué sur la Fig.
11(d) en s’assurant que la hauteur de la pièce à
découper soit inférieure à 100 mm (Fig. 11 et 12).
PRECAUTION
䡬 Vérifier que la pièce à découper est bien fixée dans
l’étau. Vous risquez de provoquer un accident grave
si la pièce se desserre ou si la lame de scie se casse
pendant la découpe.
䡬 Ne pas fixer la barre en acier comme indiqué sur
la Fig. 12-(b). Une fixation incorrecte de la pièce
à découper peut entraîner une abrasion et une
fissure de la pointe en carbure pendant la découpe.
La lame s'en trouverait endommagée.
4. Coupe.
(1) Après avoir actionné le contacteur (gâchette) et
vérifié si la lame de la scie tourne bien à plein
régime, abaisser lentement la poignée en
exerçant une pression continue sur le levier et
approcher la scie de la pièce à découper.
(2) Lorsque la lame de la scie entre en contact avec
la pièce, abaisser petit à petit la poignée pour
procéder à la coupe.
(3) Lorsque l'opération de coupe (ou de découpe
in térieure) est terminée, relever la poignée à
sa position originale.
(4) Mettre l'outil hors tension (OFF) à la fine de
chaque opération de coupe et attendre que la
lame de scie s'arrête complètement de tourner.
PRECAUTION
䡬 Veiller à porter des lunettes de protection pendant
que la coupe est exécutée.
䡬 Mettre la lame de la scie lentement en contact avec
le matériau. Ne pas déplacer la lame brùsquement.
䡬 Une pression excessive sur la poignée n'entraîne
pas une opération de coupe plus rapide. Au contraire,
cette force peut provoquer une surcharge du moteur
et/ou une réduction de sa capacité.
䡬 Durant la coupe, la pointe s'usera un peu, mais ceci
n'influencera pas négativement la capacité de coupe.
Continuer à utiliser de la même manière. Cependant,
lorsque des fissures apparaissent sur le pièce
métallique, interrompre immédiatement l'utilisation
de la scie.
䡬 Lorsque la lame de scie cesse de travailler durant
la coupe, desactiver le commutateur de l'alimentation
immédiatement et enlever la lame de la scie du
matériau, Puis vérifier s'il y a des problèmes pour
exécuter l'opération d'essai à la vitesse sans charge
sans matériau.
䡬 Lorsque le matériau devant être coupé et jeté est
mince ou étroit, et si après la coupe, la poignée
est soulevée pendant que la lame de la scie continue
à tourner, des fragments pourraient voler en l'air
lorsqu' il vient en contact avec la lame de la scie
en tournant et ceci risque de blesser l'opérateur.
Remettre la poignée à sa position d'origine après
que la lame de la scie ait cessé de se déplacer
complètement.
䡬 Lorsque la coupe est interrompue pendant un travail,
soulever la poignée pendant que la lame de la scie
continue à tourner.
䡬 S'assurer que l'interrupteur est à la position OFF
et que la fiche est débranchée de la prise secteur
lorsque les opérations de coupe sont complètement
terminées.
ATTENTION
䡬 Ne pas toucher le matériau autour de la surface où
il a été coupé avec les mains sans protection, car
il est très chaud.
5. Découpes à angles
(1) Il est possible de couper selon des angles allant
jusqu'à 45 degrés. Desserrer les trois boulons
M10 au moyen de la clef fournie avec la scie
et régler l'angle de l'étau (B) aligné avec l'angle
de l'indicateur (Fig. 5).
(2) S'assurer de serrer correctement les trois boulons
M10 après avoir réglé l'angle.
(3) Desserrer les deux boulons à ailettes et déplacer
le couvercle de côté de telle manière qu'il soit
aligné avec l'angle réglé (Fig. 1, 6).
17
Page 19

Français
MONTAGE ET, DEMONTAGE DE LA LAME
DE SCIE A POINTE DE CARBURE
ATTENTION
Débrancher la fiche de réceptacle.
1. Démontage de la lame de la scie. (Fig. 7, 8, 9)
(1) Soulever le couvercle de sécurité jusqu'à ce qu'il
touche le boulon à cavité hexagonale.
(2) appuyer sur le verrou d'arbre et desserrer le
boulon à l'aide de la clé plate.
Si le verrou de l'arbre ne se fixe pas facilement
dans l'arbre de la lame, tourner le boulon avec
la clé plate, tout en poussant sur le verrou est
poussé vers l'intérieur.
(3) Déposér le boulon et sa rondelle (B) et lame
dela scie.
ATTENTION
䡬 Faire très attention lorsque la lame de scie à pointe
est retirée après qu'elle ait été utilisée pour la coupe
successive de plusieurs matériaux, car la lame
pourrait être trés chaude.
2. Mise en place de la lame la scie.
(1) Fixer la lame de scie à pointe.
ATTENTION
Lors de la mise en place de la lame de la scie, veiller
à ce que le repère de rotation sur la lame
corresponde au sens de la rotation.
(2) Nettoyer à fond la rondelle (B) et le boulon, puis
les installer sur l'axe de montage de la lame de
la scie.
(3) Presser le verrou de la broche et serrer le boulon
avec une clef.
PRECAUTIONS
䡬 Veiller à ce que le verrou de l'arbre se replace à
la position rétractée après avoir installé ou déposé
la lame de la scie.
䡬 Serrer le boulon de façon qu'il ne puisse se desserrer
pendant le fonctionnement.
䡬 Vérifier que le boulon est correctement serré avant
de démarrer l'outil.
ENTRETIEN ET VERIFICATION
ATTENTION
Avant de procéder à toute vérification de la tronçonneuse,
s'assurer de débrancher la prise d' alimentation.
1. Vérification de la lame de la scie.
L'utilisation d'une lame émoussée réduira l'efficacité
et provoquera peut-être un mauvais fonctionnement
du moteur. Par conséquent, aiguiser la lame ou la
remplacer dès que des signes d'usure apparaissent.
2. Contrôle des vis de montage
Vérifier régulièrement les vis de montage et s’assurer
qu’elles sont correctement serrées. Resserrer
immédiatement toute vis desserrée. Sinon, il y a
danger sérieux.
3. Vérification des balais en carbone (Fig. 10).
Le moteur est muni de balais en carbone, qui sont
des pièces qui s'usent. Etant donné qu'un balai
carbone trop usé peut être la cause d'un mauvais
fonctionnement du moteur, remplacer ce balai en
carbone par un neuf lorsqu'il commence à s'user
ou que l'usure a atteint la "limite d'usure". De plus,
toujours conserver les balais en carbone propres
et s'assurer qu'ils bougent librement dans leur
support.
4. Remplacement d'un balai en carbone.
Démonter le capot du balai à l'aide d'un tournevis.
Le balai en carbone peut être alors enlevé facilement.
5. Entretien du moteur.
Le bobinage du moteur est véritablement le "coeur"
de cet outil. Dès lors, l'entretenir régulièrement
pour s'assurer que le bobinage ne subit pas de
dommages et/ou est mouillé par de l'huile ou de
l'eau.
6. Lubrification (Fig. 1 et 2).
Lubrifier les pièces désignées une fois par mois
pour prolonger la durée de vie de la machine (de
l'huile de machine est tout à fait recommandable
pour la lubrification de la découpeuse).
Pièces à lubrifier:
䡬 la partie mobile de l'axe,
䡬 la partie mobile de l'étau,
䡬 la coulisse de l'étau (A),
䡬 Vis,
䡬 Ressort
7. Liste des pièces de rechange
A:No. élément
B:No. code
C:No. utilisé
D:Remarques
ATTENTION
Les réparations, modifications et inspections des
outils électriques Hitachi doivent être confiées à un
service après-vente Hitachi agréé.
Les appareils utilisant un laser en particulier doivent
être entretenus par un agent agréé par le fabricant
du laser.
Toujours confier les réparations d'un appareil
utilisant un laser au service après-vente HITACHI
agréé.
Il sera utile de présenter cette liste de pièces au
service après-vente Hitachi agréé lorsqu’on apporte
un outil nécessitant des réparations ou tout autre
entretien.
Lors de l’utilisation et de l’entretien d’un outil
électrique, respecter les règlements et les normes
de sécurité en vigueur dans le pays en question.
MODIFICATIONS
Les outils électriques Hitachi sont constamment
améliorés et modifiés afin d’incorporer les tous
derniers progrès technologiques.
En conséquence, il est possible que certaines pièces
(c.-à-d. no. de code et/ou dessin) soient modifiées
sans avis préalable.
GARANTIE
Nous garantissons que l’ensemble des Outils électriques
Hitachi sont conformes aux réglementations spécifiques
statutaires/nationales. Cette garantie ne couvre pas les
défauts ni les dommages inhérents à une mauvaise
utilisation, une utilisation abusive ou l'usure et les
dommages normaux. En cas de réclamation, veuillez
envoyer l'Outil électrique, en l’état, accompagné du
CERTIFICAT DE GARANTIE qui se trouve à la fin du
Mode d’emploi, dans un service d’entretien autorisé.
18
Page 20

Français
REMARQUE
En raison du programme de recherche et de
développment permanent de HITACHI, les spécifications
de ce mode d’emploi sont sujettes à modifications sans
préavis.
Au sujet du bruit et des vibrations
Les valeurs mesurèes ont été déterminées en fonction
de la norme EN61029.
Le niveau de pression acoustique pondéré A type est de
90 dB (A)
Le niveau de puissance sonore pondéré A type est de
103 dB (A)
Porter un casque de protection.
L’accélération quadratique pondérée typique n’excède
pas 2,5 m/s2.
19
Page 21

Italiano
PPRECAUZIONI GENERALI
AVVERTIMENTO! Quando si usano elettroutensili,
bisogna sempre seguire le precauzioni basilari di
sicurezza per ridurre il rischio di incendi, scosse elettriche
e lesioni alle persone, tra cui quanto segue.
Leggere tutte queste istruzioni prima di usare questo
prodotto e conservare le istruzioni.
Per un funzionamento sicuro:
1. Mantenere sempre pulita l’area dove si lavora.
Un’area di lavoro sempre pulita aiuta ad evitare
incidenti.
2. Tenere nella dovuta considerazione le condizioni
dell’ ambiente di lavoro. Non esporre gli
elettroutensili alla pioggia. Non usare gli
elettroutensili in luoghi molto umidi o bagnati.
Mantenere ben illuminata l’area di lavoro.
Non usare elettroutentsili dove ci sia il rischio di
causare incendi o esplosioni.
3. Fare attenzione alle scosse elettriche. Evitare il
contatto del corpo con superfici collegate a terra
(p.es. tubi, caloriferi, fornelli, frigoriferi).
4. Tenere lontani i bambini e gli infermi. Non
permettere che persone estranee ai lavori tocchino
gli elettroutensili o i cavi della corrente elettrica.
Le persone non addette al lavoro non dovrebbero
nemmeno avvicinarvisi.
5. Riporre gli elettroutensili in un luogo adatto.
Quando non utilizzati, gli elettroutensili vanno
tenuti in un luogo asciutto, chiuso a chiave o in
alto, al di fuori della portata di bambini.
6. Non forzare mai gli elettroutensili. Qualsiasi lavoro
viene eseguito meglio e più velocemente alla
velocità per la quale l’elettroutensile è stato
formulato.
7. Scegliere sempre l’utensile elettrico adatto. Non
forzare un piccolo elettroutensile o un accessorio
a fare un lavoro di un utensile o accessorio più
grande. Non usare gli elettroutensili per dei lavori
per i quali non sono stati formulati (non usare,
per esempio, una sega circolare per tagliare grossi
tronchi).
8. Vestirsi in modo adatto. Non portare abiti larghi
o gioielli, che potrebbero impigliarsi nelle parti in
movimento degli elettroutensili. Lavorando all'ester-no, si raccomanda l’uso di guanti di gomma
e di scarpe antisdrucciolo. Chi porta capelli lunghi
dovrebbe utilizzare un’apposita cuffia protettiva.
9. Usare occhiali protettivi. Esegundo dei lavori di
taglio che producono molta polvere, usare anche
una mascherina antipolvere.
10. Collegare apparecchiature di rimozione della
polvere.
Le operazioni di taglio con questa sega possono
produrre grandi quantità di polvere dal dotto di
estrazione sulla protezione fissa.
(Materiale polvere: legno o alluminio)
Se sono forniti dispositivi per il collegamento di
apparecchiature di rimozione e raccolta della
polvere, assicurarsi che siano collegati e usati
correttamente.
11. Non maltrattare il cavo della corrente elettrica.
Non trasportare gli elettroutensili prendendoli per
il cavo della corrente e non scollegarli dalla presa
in tal modo. Tenere il cavo della corrente lontano
dal calore, olio ed oggetti taglienti.
12. Lavorare su oggetti fermi. Fissare saldamente
l’oggetto in una morsa. Èpiù sicuro che non
tenendolo fermo con le mani, che restano libere
per maneggiare l’elettroutensile.
13. Non squilibrare il corpo durante l’esecuzione di
un lavoro. Stare sempre su due piedi, in equilibrio
stabile.
14. Trattare gli utensili elettrici con cura. Tenerli sempre
puliti ed affilati per un funzionamento migliore e
più sicuro. Seguire le istruzioni date per la
lubrificazione e la sostituzione degli accessori.
Controllare periodicamente le condizioni del cavo
della corrente. Se dovesse essere rovinato, farlo
sostituire presso un Centro Assistenza. Non usare
cavi di prolungamento rovinati. Mantenere le
impugnature sempre pulite, libere soprattutto da
olio e grasso.
15. Quando non si usa, prima di eseguire una qualsiasi
operazione di manutenzione e prima di
intraprendere qualsiasi sostituzione di accessori
(lama, punte, ecc.), scollegare sempre
l’elettroutensile.
16. Togliere sempre le chiavi di regolazione
dall’attrezzo. E’buona abitudine controllare siste
maticamente che nessuna chiave di regolazione
sia più attaccata all’elettroutensile, prima di
metterlo in funzione.
17. Evitare che l’elettroutensile possa inavvertitamente
essere messo in funzione. Non trasportare gli elet
troutensili mantenendo il dito sull’interruttore,
mentre sono collegati alla rete. Prima di collegarli,
controllare che l’interruttore sia in posizione di
spento.
18. Fare uso di cavi di prolungamento per esterni. In
questo caso, controllare che il cavo sia adatto per
l’uso all’esterno.
19. Stare sempre attenti. Guardare sempre nel punto
in cui si esegue il lavoro. Non usare utensili
elettrici se si è stanchi.
20. Controllare qualsiasi parte che sembra
danneggiata. Prima di riprendere l’uso degli
elettroutensili, controllare attentamente che la parte
apparentemente danneggiata possa ancora essere
usata in modo da assolvere la sua funzione.
Controllare che le parti mobili siano nella loro
posizione corretta, che nessun pezzo sia rotto, che
tutti i pezzi siano montati correttamente, e
controllare altri punti importanti per il
funzionamento dell’ utensile elettrico. Qualsiasi
pezzo danneggiato deve essere ripa rato o sostituito
da un Centro Assistenza autorizzato, a meno che
dettagliate istruzioni in proposito siano date nel
presente manuale. Fare sostituire gli interruttori
difettosi presso un Centro Assistenza autorizzato.
Non usare l’elettroutensile se non può e acceso
o spento per mezzo del suo interruttore.
21. Attenzione
L’uso di qualsiasi accessorio o attacco diverso da
quelli citati nel presente manuale di istruzioni può
presentare il rischio di lesioni alle persone.
22. Far riparare l’elettroutensile da personale
qualificato.
Questo elettroutensile è in conformità con le
relative norme di sicurezza. Le riparazioni devono
essere eseguite solo da personale qualificato
usando ricambi originali, altrimenti ne possono
derivare considerevoli rischi per l’utilizzatore.
20
Page 22

Italiano
PRECAUZIONI PER LA TRONCATRICE
1. Non usara mai la troncatrice con il coperchio di
sicurezza in posizione aperta.
2. Assicurarsi che il coperchio di sicurezza si muova
liberamente.
3. Tenere sempre la lama della sega affilata.
4. Non utilizzare l'utensile con la lama della sega,
rivolta verso l'alto o a lato.
5. Assicurarsi che la superficie da lavorare sia libera
da materiali estranei come chiodi.
6. Quando si transporta l'utensile, non tenerlo per
il supporto, bensi per la maniglia.
7. Iniziare a tagliare solo dopo che il motore ha
raggiunto la velocità massima.
8. Se si notano delle anormalità, disattivare
immediatamente l'interruttore (OFF).
9. Disattivare l'alimentazione e aspettare che la lama
della sega sia ferma, prima di intervenire
sull'utensile o regolarlo.
10. Utilizzare soltanto le lame della sega o punta di
carburo Hitachi per tagliare il metallo puro. Non
utilizzare le lame per seghe per legno, seghe di
metallo oppure la lama di taglio.
CARATTERISTICHE
Tubi in acciaio ø115mm
Capacità massima di taglio
Altezza × Larghezza
Angolo di taglio angolare 0° – 45°
Potenza assorbita 1450W*
Velocità senza carico 1350/min
Peso 19kg
*Accertatevi di aver controllato bene la piastrina perché essa varia da zona a zona.
ACCESSORI STANDARD
(1) Lama della sega a punta di carburo
(ø305 × 50P) (montata sull'untensile) .................. 1
(2) Chiave ......................................................................... 1
(3) Barre rotonde ............................................................ 1
Gli accessori standard possono essere cambiamento
senza preavviso.
Tubi quadrati in acciaio 100mm × 100mm
Acciaio profilato 75mm × 125mm
Barre rotonde ø32mm
3. Prolunga del cavo
Quando l’ambiente di lavoro è lontano da una
presa di corrente, usare una prolunga del cavo
di sufficiente spessore e di prestazione adeguata.
La prolunga deve essere più corta possibile.
4. Le parti mobili sono fissate con una catena durante
il trasporto. Premere leggermente l’impugnatura
per sfilare la catena dal suo gancio.
ACCESSORI DISPONIBILI A RICHIESTA
(Venduti separatamente)
(1) Lama della sega a punta di carburo (ø305 × 60P)
Gli accessori dispónibili a richiesta possono essere
cambiamento senza preavviso.
APPLICAZIONE
䡬 Taglio di vari tipi di metallo vari, tubi quadrati in
acciaio, acciaio profilato e barre rotonde.
PRIMA DI INIZIARE LE OPERAZIONI
1. Alimentazione
Assicurarsi che la rete di alimentazione che si
vuole usare sia compatibile con le caratteristiche
relative all’alimentazione di corrente specificate
nella piastrina dell’apparecchio.
2. Interruttore di corrente
Mettere l’interruttore in posizione SPENTO. Se la
spina è infilata in una presa mentre l’interruttore
di azionamento è acceso, l’utensile elettrico si
mette immediatamente in moto, facilitando il
verificarsi di incidenti gravi.
21
REGOLAZIONE DELLA MACCHINA PRIMA
DELL'USO
ATTENZIONE
Eseguire tutte le regolazioni necessarie prima di inserire
la spina nella presa di corrente.
1. Controllare che la copertura di sicurezza funzioni
bene.
(1) Assicurarsi che la copertura di sicurezza sia
spostata lentamente quando la maniglia si trova
nella posizione in basso.
(2) Poi controllare che lá copertura di sicurezza ritorni
alla posizione originale quando si solleva
l'impugnatura.
2. Assicurarsi che il blocco del mandrino utilizzato per
installare e rimuovere la lama della sega sia rimosso.
3. Assicurarsi che la lama della sega sia fissata
fermamente in posizione.
4. Controllare la vibrazione della superficie girando la
lama sella sega, Se c'é molta deformazione
superficie, la durata di servizio della lama sarà
accorciata e la precisione del taglio sarà deteriorata.
Page 23

Italiano
APPLICAZIONI PRATICHE
AVVERTENZA
䡬 E'pericoloso rimuovere o installare il pezzo da lavoro
mentre la lama della sega è in funzione.
1. Funzionamento dell'interruttore
Dopo avere spinto con il pollice il tasto di sblocco
dell'interruttore, tirare il grilletto dell'interruttore per
accendere la macchina (ON) e rilasciarlo per
spegnerla (OFF).
2. Istruzioni per il morsetto a "tocco semplice" (Fig.
3 e 4).
(1) Quando l'impugnatura si trova nella posizione
verticale (Fig. 3), e se la maniglia a vite viene
spinta e tirata, il morsetto (A) si sposta in avanti
rapidamente.
(2) Quando l'impugnatura si trova nella posizione
in basso (Fig. 4) e se la maniglia a vite viene
girata, il morsetto (A) potrà essere spostato.
NOTA
䡬 Se l'impugnatura non può essere installata nella
posizione in basso, girare la maniglia a vite
leggermente.
3. Fissare i materiali che devono essere tagliati.
(1) Mettere i materiali da tagliare nel morsetto (B)
e spingere la maniglia a vite di modo che
l'impugnatura sia in una posizione verticale (Fig.
3); quindi spingere il morsetto (A) leggermente
contro il materiale da tagliare. Poi, spingere in
basso sull'impugnatura e girare la maniglia a
vite di modo che il materiale da tagliare sia
fissato con fermezza. (Fig. 4)
(2) Tutti i materiali da tagliare devono, ovviamente,
essere fissati nel morsetto il più saldamente
possibile.
Fissare l’acciaio sagomato come indicato in Fig.
11-(a), (b), (c).
Non fissare l’acciaio sagomato come indicato in
Fig. 12-(a). In tal caso, il materiale si muoverà
e la precisione di taglio diminuirà.
(3) Fissare l’acciaio a barra piatta come indicato in
Fig. 11-(d), assicurandosi che l’altezza del
materiale da tagliare sia inferiore a 100mm (Fig.
11 e 12).
ATTENZIONE
䡬 Assicurarsi che il materiale da tagliare sia ben fissato
con la morsa per evitare il pericolo di gravi incidenti
nel caso il materiale si liberasse durante il lavoro
o la lama della sega si rompesse.
䡬 Non fissure l’acciaio a barra piatta come indicato
in Fig. 12-(b).
Un fissaggio scorretto del materiale da tagliare
potrebbe causare l’abrasione o la rottura della punta
di carburo durante il taglio, causando danni alla
lama.
4. Taglio.
(1) Dopo aver acceso l'unità e aver controllato che
la lama della sega giri a massima velocità,
spingere in basso l'impugnatura lentamente
tenendo premuta la leva e avvicinare l'unità al
materiale da tagliare.
(2) Quando la lama della sega è a contatto con il
materiale da tagliare, spingere gradualmente
verso il basso l'impugnatura per iniziare a
tagliare.
(3) Dopo aver completato l'operazione di taglio (o
d'intaglio), sollevare l'impugnatura nella
posizione di riposo.
(4) Portare l'nterruttore su OFF alla fine di ogni
operazione di taglio e aspettare che la lama della
sege sia completamente ferma prima di iniziare
l'operazione di taglio successiva.
ATTENZIONE
䡬 Assicurarsi di portare degli occhiali di protezione
mentre il taglio viene eseguito.
䡬 Spostare lentamente la lama della sega per metterla
in contatto con il materiale. Non spostare la lama
improvvisamente.
䡬 Una maggiore pressione sull'impugnatura non
significa necessariamente una maggiore velocità di
taglio. AI contrario, una eccessiva pressione può
provocare il sovraccarico del motore e/o un
funzionamento meno efficiente.
䡬 Durante il taglio, la punta verrà portata in basso
leggermente, per ciò non influirà la capacità del
taglio in modo sfavorevole.
Continuare a utilizzare nello stesso modo.
Comunque, quando le fessure appaiono sul blocco
metallico, interrompere immediatamente l'uso della
sega.
䡬 Quando la lama della sega a punta smette di operare
durante il taglio, disattivare il commutatore dell
alimentazione immediatamente e rimuovere la lama
della sega dal materiale. Poi, controllare se ci sono
problemi eseguendo l'operazione di prova a velocità
senza carico, senza materiale.
䡬 Quando il materiale da tagliare e da buttare via è
sottile oppure stretto, e se dopo il taglio, la maniglia
viene sollevata mentre la lama della sega continua
a girare, dei frammenti possono volare in aria
quando vengono in contatto con la lama della sega
rotante e possono ferire l'operatore.
Rimettere la maniglia nella sua posizione originale
dopo che la lama della sega si sia fermata
completamente.
䡬 Quando il taglio è interrotto durante un lavoro,
sollevare la maniglia mentre la lama della sega
continua a girare.
䡬 Alla fine del lavoro assicurarsi di portare l'interruttore
su OFF e di scollegare la spina dalla presa di
corrente.
AVVERTENZA
Non toccare il materiale intorno all'area dove è
stato tagliato, con le mani non protette, poichè è
molto caldo.
5. Per esequire tagli angolari
(1) Si può tagliare secondo degli angoli fino a 45
gradi. Allentare i tre bulloni M10 con la chiave
fornita con la sega e regolare l'angolo del
morsetto (B) allineandolo con l'angolo sull'
indicatore (Fig. 5).
(2) Assicurarsi di stringere i tre bulloni M10
sicuramente dopo avere regolato l'angolo.
(3) Allentare i due bulloni ad alette e spostare la
copertura del lato di modo che sia allineata con
l'angolo regolato (Fig. 1, 6).
22
Page 24

Italiano
INSTALLAZIONE E RIMOZIONE DELLA LAMA
DELLA SEGA
ATTENZIONE
lnnanzitutto, scollegare la spina dalla presa.
1. Pre smontare la lama della sega. (Fig. 7, 8, 9).
(1) Sollevare la copertura di sicurezza fino a che
entri in contatto con il bullone a testa cava
esagonale.
(2) Premere la leva di blocco e allentare il bullone
con la chiave.
Se la leva di blocco non può essere facilmente
premuta per fissare la leva della lama della sega,
girare il bullone con la chiave mentre si effettua
pressione sulla leva di blocco.
La leva della lama della sega è fissata quando
la leve di blocco è premuta all'interno.
(3) Rimuovere il bullone e la rondella (B) e lama
della sega.
2. Montaggio della lama della sega.
(1) Pissare la lama della sega.
AVVERTENZA
Quando si monta la lama della sega, assicurarsi che
il segno indicatore di rotazione sulla lama della
sega e la direzione di rotazione corrispondano
appropriatamente.
(2) Pulire completamente la rondella (B) e il bullone
e installarli nell' asta di montaggio della lama
della sega.
(3) Premere i blocco del mandrino e stringere il
bullone con una chiave.
AVVERTENZA
䡬 Assicurarsi che la leva di blocco sia ritornata alla
posizione ritratta dopo l'installazione o rimozione
della lama della sega.
䡬 Fissare il bullone in modo che non si allenti durante
l'operazione.
䡬 Controllare che il bullone sia fissato adeguatamente
prima di azionare l'utensile.
MANUTENZIONE E CONTROLLI
ATTENZIONE
Prima di controllare la macchina assicurarsi di scollegare
il cavo di alimentazione.
1. Controllo lama della sega.
L'uso di una lama della sega consumata riduce
l'efficienza della macchina causando eventuali danni
anche al motore. Sostituire perciò la lama non
appena essa presenti segni di logoramento.
2. Controllo delle viti di tenuta
Controllare regolarmente tutte le viti di tenuta e
assicurarsi che siano esclusìvamente serrate. Nel
caso che una di queste viti dovesse allentarsi
riserrarla immediatamente. Se si non ottiene di
farlo, si può causare un grave incidente.
3. Controllo delle spazzole di carbone (Fig. 10).
lI motore usa delle spazzole di carbone che tendono
a consumarsi. Poiché spazzole di carbone
eccessivamente logore potrebbero impedire il
corretto funzionameto del motore, sostituirle non
appena cominciano a dare segni di usura. Tenere
inoltre le spazzole sempre pulite controllando che
si muovano senza impedimenti all'interno dei loro
supporti.
23
4. Sostituzione di una spazzola di carbone.
Rimuovere il cappuccio della spazzola con un
cacciavite con punta piatta. In tal modo si potrà
rimuovere facilmente anche la spazzola.
5. Manutenzione del motore.
L'avvolgimento del motore è la parte più importante
della macchina. Fare sempre attenzione a che
l'avvolgimento non si attorcigli e/o non si bagni con
olio o acqua.
6. Lubrificazione (Fig. 1 e 2)
Lubrificare una volta al mese le parti sottoposte a
frizione per garantire una lunga durata della
macchina (del normale olio per macchine è adatto
a questa macchina).
Punti da lubrificare
䡬 Parte rotante dell' albero
䡬 Parte rotante della morsa
䡬 Parte scorrevole della morsa
䡬 Vite
䡬 Molla
7. Lista dei pezzi di ricambio
A: N. voce
B: N. codice
C: N. uso
D: Note
ATTENZIONE
Riparazioni, modifiche e ispezioni di utensili elettrici
Hitachi devono essere eseguite da un centro
assistenza Hitachi autorizzato.
In particolare il dispositivo laser deve essere
mantenuto da un agente autorizzato del produttore
del laser.
Per riparazioni del dispositivo laser, rivolgersi sempre
al centro assistenza autorizzato Hitachi.
Questa lista dei pezzi torna utile se viene presentata
con l’utensile al centro assistenza Hitachi autorizzato
quando si richiedono riparazioni o altri interventi
di manutenzione.
Nell’uso e nella manutenzione degli utensili elettrici
devono essere osservate le normative di sicurezza
e i criteri prescritti in ciascun paese.
MODIFICHE
Gli utensili elettrici Hitachi vengono continuamente
migliorati e modificati per includere le più recenti
innovazioni tecnologiche.
Di conseguenza, alcuni pezzi (p.es. numero di codice
e/o design) possono essere modificati senza
preavviso.
GARANZIA
Garantiamo gli Utensili Elettrici Hitachi in conformità
alle specifiche normative imposte dalla legge e dai paesi.
Questa garanzia non copre difetti o danni dovuti a uso
erroneo, abuso o normale usura. In caso di lamentele, si
prega di inviare l’Utensile Elettrico, non smontato,
insieme al CERTIFICATO DI GARANZIA che si trova al
termine di queste Istruzioni per l’uso, ad un Centro di
Assistenza Autorizzato Hitachi.
NOTA
A causa del programma HITACHI di continua ricerca e
miglioramento, le specifiche qui riportate sono sosggette
a modifiche senza preavviso.
Page 25

Informazioni riguardanti i rumori trasmessi dall'aria e
le vibrazioni
I valori misurati sono stati determinati in conformità a
EN61029.
Il livello di pressione sonora pesato A tipico è di 90 dB
(A)
Il livello di potenza sonora pesato A tipico è di 103 dB (A)
Indossare protezioni per le orecchie.
Il valore tipico di accelerazione quandrata media a radice
pesata non supera 2,5 m/s2.
Italiano
24
Page 26

Nederlands
ALGEMENE VOORZORGMAATREGELEN
WAARSCHUWING! Bij gebruik van elektrisch
gereedschap moet u altijd de normale basisvoorzorgen
voor de veiligheid in acht nemen om de kans op brand,
elektrische schokken en letsel te verminderen. Let tevens
op de volgende punten.
Lees al de aanwijzingen door alvorens het gereedschap
in gebruik te nemen. Bewaar deze aanwijzingen.
Voor een veilige werking:
1. Houd de plaats waar gewerkt wordt schoon. Niet
opgeruimde werkplaatsen en werkbanken
verhogen het gevaar van ongelukken.
2. Kies een geschikte omgeving om te werken. Stel
electrisch gereedschap niet aan regen bloot.
Gebruik electrisch gereedschap niet op vochtige
of natte plaatsen. Zorg dat de werkplaats goed
verlicht is.
Gebruik elektrisch gereedschap niet op plaatsen
waar brand- of explosiegevaar is.
3. Vermijd een electrische schok. Let er daarom op
dat er geen contact is met geaarde oppervlakken
zoals pijpen, radiators, keukenfornuis of ijskast.
4. Houd kinderen en onbevoegden uit de buurt. Laat
bezoekers het gereedschap of snoer niet aanraken.
Alle bezoekers moeten een veilige afstand tot de
werkplaats aanhouden.
5. Ruim overbodig gereedschap op. Gereedschap dat
niet gebruikt wordt moet op een droge,
hooggelegen of af te sluiten plaats buiten bereik
van kinderen en onbevoegden opgeborgen
worden.
6. Forceer het gereedschap niet. Het levert een betere
en veiligere prestatie op de snelheid waarvoor zij
werd ontworpen.
7. Gebruik het juiste gereedschap. Gebruik een klein
gereedschap of hulpstuk niet voor werkzaamheden
waarvoor een apparaat met groot vermogen vereist
is. Gebruik het gereedschap niet voor doeleinden
waarvoor dit niet bestemd is (bijvoorbeeld gebruik
van de cirkelzaag voor het zagen van bomen).
8. Draag de juiste kleding. Draag geen loszittende
kleren of armbanden e.d. daar deze in de
bewegende delen verstrikt kunnen raken. Bij het
werken buitenshuis wordt het gebruik van rubber
handschoenen en stevige, niet glijdende schoenen
aanbevolen. Draag een haarnetje wanneer u lang
haar hebt.
9. Draag een veiligheidsbril. Ontstaat er veel stof
tijdens het werken, draag dan eveneens een
gezichtsbeschermer en/of stofmasker.
10. Sluit apparatuur voor het verzamelen van stof
aan.
Bij het zagen met deze machine kunnen aanzienlijke
hoeveelheden stof geproduceerd worden, hetgeen
wordt afgevoerd via de afvoer bevestigd aan de
vaste afscherming.
(Materiaal stof: hout of aluminium)
Indien apparatuur voor het verzamelen van stof
is bijgeleverd, moet u deze apparatuur op de
vereiste wijze verbinden en gebruiken zoals wordt
beschreven.
11. Behandel het snoer voorzichtig. Draag het gereed
schap nooit door dit bij het snoer vast te houden.
Bescherm het snoer tegen hitte, olie en scherpe
hoeken.
25
12. Neem de uiterste veiligheid in acht. Gebruik
klemmen of een bankschroef om het werkstuk
vast te zetten. Hierdoor heeft u uw handen vrij
om het gereedschap te bedienen.
13. Buig u nooit te ver naar voren. Kies een goede
plaats en behoud altijd uw evenwicht.
14. Behandel het gereedschap voorzichtig. Zorg ervoor
dat het gereedschap scherp en schoon is zodat
een goed en veilig prestatievermogen wordt
verkregen. Volg de gebruiksaanwijzing voor het
smeren en het verwisselen van toebehoren.
Inspecteer de snoeren regelmatig op beschadiging
en laat deze zonodig door een erkend servicecenter
repareren. Controleer de verlengsnoeren ook
regelmatig en vervang deze bij beschadiging. Houd
alle handgrepen droog en schoon en vrij van olie
en vet.
15. Trek de stekker uit het stopcontact als het gereed
schap niet wordt gebruikt en ook bij
onderhoudsbeurten, het verwisselen van
toebehoren zoals bladen, boren, messen e.d.
16. Verwijder sleutels en moersleutels. Maak er een
gewoonte van voor het inschakelen te controleren
of alle sleutels en moersleutels verwijderd zijn.
17. Schakel het gereedschap niet onverwacht in. Draag
geen aangesloten gereedschap met de vinger op
de schakelaar. Controleer altijd of het gereedschap
uitgeschakeld staat alvorens dit aan te sluiten.
18. Bij het werken buitenshuis dient een verlengsnoer
te worden gebruikt. Gebruik dan alleen
verlengsnoeren die geschikt zijn voor het werken
buitenshuis en desbetreffend gemerkt zijn.
19. Let altijd goed op tijdens het werken. Kijk uit wat
u doet en gebruik het gereedschap niet als u moe
bent.
20. Bij beschadiging van een van de onderdelen dient
dit nauwkeurig te worden nagekeken en gerepa
reerd alvorens het gereedschap opnieuw in gebruik
wordt genomen. Let erop dat het betreffende on
derdeel zijn functie goed vervult. Controleer of de
bewegende delen goed zijn gemonteerd en vrij
kunnen bewegen. Dit om een foutief functioneren
van het gereedschap te voorkomen. Bij de
beschadiging van een onderdeel dient de reparatie
altijd te worden overgelaten aan een erkend ser
vice-center, tenzij in deze gebruiksaanwijzing an
ders wordt voorgeschreven. Laat ook defekte
schakelaars vervangen door een erkend servicecenter. Gebruik het gereedschap niet als de aan/
uit-schakelaar niet werkt.
21. Waarschuwing
Het gebruik van toebehoren of verlengstukken
waarvan het gebruik niet in deze
gebruiksaanwijzing is aangegeven, veroorzaakt
mogelijk letsel.
22. Laat het elektrisch gereedschap door een vakman
repararen.
Dit elektrisch gereedschap voldoet aan de vereiste
eisen voor de veiligheid. Voorkom mogelijk zeer
ernstige ongelukken en laat derhalve reparatie
over aan een erkend vakman die de originele
reserve-onderdelen gebruikt.
Page 27

Nederlands
VOORZORGSMAATREGELEN BIJ GEBRUIK
VAN DE METAAL AFKORT MACHINE
1. Gebruik de metaal afkort machine met de
veiligheidskap in de open positie vergrendeld.
2. Verzeker u ervan dat de veiligheidskap soepelloopt.
3. Zorg dat het zaagblad altijd scherp is.
4. Gebruik de zaag nooit met het zaagblad naar
boven of op zij gericht.
5. Verzeker u ervan dat er in het werkstuk geen
harde voorwerpen, zoals spijkers, zitten.
6. Draag de zaag altijd aan het handvat en niet aan
de houder.
7. Begin niet met zagen voordat de motor het
maximale toerental heeft bereikt.
8. Laat, zodra u iets abnormaals merkt of hoort, de
schakelaar los.
9. Trek de stekker uit het stopcontact en wacht totdat
het blad niet meer draait alvorens enige afstelling
te maken.
10. Gebruik, voor het snijden van metaal, uitsluitend
Hitachi carboon-getipte zaagbladen. Gebruik geen
zaagbladen die zijn bestemd voor houtzagen,
metaalzagen of ander snijwiel.
TECHNISCHE GEGEVENS
Pijpen ø115mm
Maximale zaaghoek
Hoogte × Breedte
Verstekzaagnoek 0° – 45°
Ingang 1450W*
Onbelaste snelheid 1350/min
Gewicht 19kg
*Kontroleer het naamplaatje op het toestel omdat spanning van gebied tot gebied kan verschillen.
STANDAARD TOEBEHOREN
(1) Carboon-getipt zaagblad (ø305 × 50P) .................. 1
(bevestigd aan het gereedschap)
(2) Sleutel ......................................................................... 1
(3) Veiligheidsglas ........................................................... 1
De standaard toebehoren kunnen zonder aankondiging
op ieder moment worden veranderd.
EXTRA TOEBEHOREN
(Los te verkrijgen)
(1) Carboon-getipt zaagblad (ø305 × 60P)
De extra toebehoren kunnen zonder aankondiging op
ieder moment worden veranderd.
TOEPASSINGSGEBIEDEN
䡬 Zagen van verschillende metalen zoals pijpen,
vierkante stalen profielen. Staal profiel en ronde
stangen.
VOOR HET GEBRUIK
1. Netspanning
Controleren of de netspanning overeenkomt met
de opgave op het naamplaatje.
2. Netschakelaar
Controleren of de netschakelaar op „UIT” staat.
Wanneer de stekker op het net wordt aangesloten
terwijl de aan/uit-schakelaar op "AAN" staat, begint
het gereedschap onmiddellijk te draaien, wat
ernstig gevaar betekent.
Vierkante stalen profielen 100mm × 100mm
Staalprofiel 75mm × 125mm
Ronde stangen ø32mm
3. Verlengsnoer
Wanneer het werkterrein niet in de buurt van een
stopcontact ligt, dan moet men gebruik maken
van een verlengsnoer, dat voldoende dwarsprofiel
en voldoende nominaal vermogen heeft. Het
verlengsnoer moet zo kort mogelijk gehouden
worden.
4. Omdat beweegbare onderdelen voor transport
vastgezet zijn d.m.v. de spanning van een ketting,
dient de ketting losgemaakt te worden van de
kettinghaak door licht op de hendel te drukken.
INSTELLEN VAN HET APPARAAT GEBRUIK
VOORZICHTIG
Maak alle noodzakelijke intellingen alvorens u de stekker
in het stopcontact.
1. Kontroleer de bevestiging en de werking van de
beschermkap.
(1) Kontroleer of de veiligheidskap soepel beweegt
als de hendel in de onderste stand staat.
(2) Kontroleer vervolgens of de beschermkap in de
uitgangsstand terugkeert bij loslaten of opheffen
van de hendel.
2. Vergewis u ervan dat u de as-vergrendeling gebruikt
voor het monteren en demonteren van carboongetipte zaagbladen.
3. Zorg dat het zaagblad stevig wordt vastgezet.
4. Roteer het snijwiel om het oppervlak grondig te
inspecteren. Als het zaagblad bij het ronddraaien
een slingering vertoont, zal de levensduur ervan
aanmerkelijk verkort worden en de zaagpreciesie
neemt af.
26
Page 28

Nederlands
PRAKTISCHE TOEPASSINGEN
VOORZICHTIG
䡬 Het is uiterst gevarlijk een werkstuk te installeren of
te verwijderen tewijl de zaagblad in beweging is.
1. Schakelaarbediening
Druk eerst met de duim op de vergrendelknop; trek
vervolgens aan de trekker om het apparaat in te
schakelen (ON), en laat de trekker los om uit te
schakelen (OFF).
2. Aanwijzingen voor de klembeugel (afb. 3 en 4).
(1) Als de greep zich in de staande stand bevindt
(afb. 3) en het schroefhandvat wordt uitgetrokken
of ingeduwd, zal de klem (A) snel vooruit
bewegen.
(2) Als de greep zich in de onderste stand bevindt
(afb. 4) en het schroefhandvat wordt uitgetrokken
of ingeduwd, kan klem (A) bewogen worden.
LET OP
䡬 Als u het schroefhandvat niet in de onderste stand
kunt zetten, draain dan lichtjes aan het schroefhandvat.
3. Klem het werkstuk vast.
(1) Plaats het werkstuk in de klem (B) en duw het
schroefhandvat aan, zodat de greep zich rechtop
bevindt (afb. 3); duw de klem (A) vervolgens
lichtjes tegen het werkstuk aan. Daarna drukt u
de greep omlaag en draait u het schroefhandvat
aan zodat het werkstuk stevig vastzit. (afb. 4)
(2) Alle werkstukken moeten zo stevig mogelijk in
de klem worden vastgezet. Maak profielstaal
vast zoals getoond in afb. 11-(a), (b), (c).
Maak profielstaal niet vast zoals getoond in afb.
12-(a).
Als dit wel wordt gedaan, zal het werkstuk
bewegen en neemt de zaagnauwkeurigheid af.
(3) Maak plat staal vast zoals getoond in afb. 11-
(d), maar zorg dat de hoogte van het werkstuk
minder is dan 100 mm. (afb. 11 en 12)
VOORZICHTIG
䡬 Zorg ervoor dat het werkstuk stevig in de klem is
vastgeklemd. Als dit niet het geval is, kan er een
gevaarlijk ongeluk gebeuren wanneer het werkstuk
losraakt of als het zaagblad tijdens het gebruik breekt.
䡬 Maak plat staal niet vast zoals getoond in afb. 12-
(b).
Als het werkstuk niet goed vastzit, kan het hardmetaal
afgeschuurd worden en barsten tijdens het snijden,
waardoor het blad wordt beschadigd.
4. Zagen.
(1) Schakel het apparaat in en kontroleer eerst of
het zaagblad op volle snelheid draait. Druk
vervolgens de hendel langzaam omlaag terwijl
u de vergrendelknop ingedrukt houdt, en breng
het apparaat dichtbij het te snijden materiaal.
(2) Maak hardmetaal opgelegde kontakt met het
werkstuk en druk de hendel lichtelijk door om
het werkstuk door te zagen.
(3) Na het zagen (of inzagen), de hendel naar boven
brengen tot de hoogste stand.
(4) Schakel het apparaat elke keer uit (OFF) nadat
een werkstuk doorgezaagd is, en laat het zaagblad
volledig tot stilstand komen alvorens met een
nieuw werkstuk te beginnen.
VOORZICHTIG
䡬 Draag, tijdens zagen of slijpen altijd een
veiligheidsbril.
27
䡬 Breng het zaagblad altijd voorzichtig in aanraking
met het werkstuk. Maak geen ruwe of plotsèlinge
bewegingen.
䡬 Het gebruiken van grote druk op de hendel zal het
doorzagen van hout niet bespoedigen. In tegendeel,
teveel druk resulteert in overbelasting van de motor
en/of verminderde zaagefficientie.
䡬 Tijdens het zagen of slijpen zal de rand het blad
slijten. Dit heeft echter geen nadelige invloed op
het zagen. U kunt het blad blijven gebruiken. Zodra
er echter scheurtjes in metalen blok verschijnen
dient u dit te vervangen.
䡬 Als het zaagblad tijdens het werk plotseling stopt,
schakel het apparaat dan onmiddellijk uit en trek
het blad uit het werkstuk. Kontroleer vervolgens de
zaag zelf, door deze te laten ronddraaien zonder dat
het blad in onbelaste shelheid komt met het
materiaal.
䡬 Als het gedeelte van het materiaal dat afgezaagd
wordt zeer klein of dun is, kan het gebeuren dat
dit, nadat de zaagsnede voltooid is, door het
draaiende zaagblad wordt weggeslingerd. Dit is
bijzonder gevaarlijk en kan leiden tot ernstige
verwondingen. Zorg dat het zaagblad geheel tot
stilstand is gekomen alvorens het werkstuk los van
de klem te maken.
䡬 Als u halverwege de zaagsnede stopt met zagen,
duw de hendel dan naar boven terwijl het zaagblad
nog draait.
䡬 Kontroleren of de schakelaar op „OFF” is gezet en
vervolgens de stekker uit het stopcontact verwijderen
als het werk voltooid is.
WAARSCHUWING
䡬 Raak het materiaal na het zagen niet met blote
handen aan. Het materiaal zal rondom de zaagsnede
bijzonder heet zijn.
5. Snijden met een hoek
(1) Het is mogelijk om onder een hoek (van maximaal
45°) te zagen. Draai de drie M10 bouten los met
de bijgelverde sleutel en stel de hoek van het
klemhulpstuk (B) in aan de hand van de
schaalverdeling op de indikator (afb. 5).
(2) Vergeet niet om de drie M10 bouten na het
instellen van de hoek weer stevig aan te draaien.
(3) Draai de twee vleugelmoeren los en plaats het
zijdeksel in de juiste stand voor de ingestelde
hoek (afb. 1 en 6).
MONTEREN EN DEMONTEREN VAN HET
CARBOON-GETIPT ZAAGBLAD
VOORZICHTIG
Trek eerst de stekker uit het stopcontact.
1. Demonteren van het zaagblad (afb. 7, 8, 9).
(1) Breng de veiligheidskap omhoog, totdat deze in
aanraking komt met de zeskantskop bout.
(2) Druk de vergrendelknop in en draai de bout los
met een sleutel.
Als u de vergrendelknop niet makkelijk kunt
indrukken om de zaagblad-as klem te zetten,
verdraai de bout dan met een sleutel terwijl u
druk op de vergrendelknop uitoefent.
Als de vergrendelknop ingedrukt is, zal het
zaagblad vergrendeld zijn.
(3) Verwijder de bout, de ring (B) en zaagblad.
Page 29

Nederlands
WAARSCHUWING
䡬 Laat het carboon-getipte zaagblad, alvorens dit na
het werk te werwijderen, altijd even afkoelen,
aangezien dit bijzonder heet kan zijn.
2. Aanbrengen van het zaagblad.
(1) Bevestig het zaagblad.
WAARSCHUWING
Als u het zaagblad monteert, let dan goed op dat
de pijl die de draairichting van het blad aangeeft
in de juiste richting wijst.
(2) Reining de ring (B) en de bout en breng deze
weer aan op de zaagblad-as.
(3) Druk de as-vergrendeling aan en draai de bout
aan met een sleutel.
VOORZICHTIG
䡬 Kontroleer, nadat u een zaagblad heeft vervangen,
of de vergrendelknop terug is gesprongen.
䡬 Draai de bout goed aan zodat deze tijdens het zagen
niet los komt.
䡬 Kontroleer altijd even of de bout vast aangedraaid
is alvorens met zagen te beginnen.
ONDERHOUD EN INSPECTIE
VOORZICHTIG
Alvorens de inspectie van het apparaat uit te voeren
de stekker uit het stopcontact verwijderen.
1. Inspectie van het zaagblad.
Omdat gebruik van een stomp zaagblad de efficientie
van het zagen sterk zal verminderen en zelfs
storingen in de motor kan veroorzaken, het zaagblad
slijpen of vervangen zodra dit bot wordt.
2. Inspectie van de bevestigingsschroef
Alle bevestigingsschroeven moten regelmatig
geïnspecteerd en gecontroleerd worden of zij juist
aangedraaid zijn. Wanneer één van de schroeven
losraakt, dan moet deze onmiddellijk opnieuw
aangedraaid worden. Gebeurt dat niet, dan kan dat
tot aanzienlijke gevaren leiden.
3. Inspectie van de koolborstels (Afb. 10).
De motor maakt gebruik van koolborstels die na
verloop van tijd verslijten. Omdat overmatig
versleten koolborstels motorstoringen kunnen
veroorzaken, dienen deze zodra de slijtagelimiet
bereikt is, vervangen te worden. Verder de
koolborstels altijd schoonhouden en ervoor zorgen
dat deze vrij in de houders kunnen bewegen.
4. Vervangen van de koolborstels.
Demonteer de koolborstelkap met een
minschroevedraaier. Nu kunnen de koolborstels
gemakkelijk verwijderd worden.
5. Onderhoud van de motor.
De motoreenheid is het "hart" van het apparaat.
Wees uiterst voorzichtig dat de spoelwikkel niet
wordt beschadigt en/of in aanraking komt met water
of olie.
6. Smering (Afb. 1 en 2)
In het belang van de levensduur van het apparaat
is het aanbevolen eens per maand de smeerpunten
van olie te voorzien (u kunt hiervoor gewone
machineolie gebruiken).
Smeerpunten:
Smeren van onderdelen
䡬 Draaiende delen van de as
䡬 Bewegende delen van de klem
䡬 Bewegende delen van de spanklem (A)
䡬 Schroef
䡬 Veer
7. Lijst vervangingsonderdelen
A:Ond.nr.
B:Codenr.
C:Gebr.nr.
D:Opm.
LET OP
Reparatie, modificatie en inspectie van Hitachi
elektrisch gereedschap dient te worden uitgevoerd
door een erkend Hitachi Service-centrum.
De laserinrichting in het bijzonder dient uitsluitend
te worden nagezien en onderhouden door een
erkende vertegenwoordiger van de fabrikant.
Laat reparatie van de laserinrichting te allen tijde
over aan uw erkende Hitachi Service-centrum.
Deze Onderdelenlijst komt van pas wanneer u deze
samen met het gereedschap aanbiedt bij het erkende
Hitachi Service-centrum wanneer u om reparatie of
ander onderhoud verzoekt.
Bij gebruik en onderhoud van elektrisch gereedschap
dienen de in het land waar u zich bevindt geldende
veiligheidsregelgeving en veiligheidsstandaarden
stipt te worden opgevolgd.
MODIFICATIES
Hitachi elektrisch gereedschap wordt voortdurend
verbeterd en gewijzigd teneinde gebruik te kunnen
maken van de nieuwste technische ontwikkelingen.
Daarom is mogelijk dat sommige onderdelen (zoals
codenummers en/of ontwerp) zonder voorafgaande
kennisgeving gewijzigd worden.
GARANTIE
De garantie op het elektrisch gereedschap van Hitachi is
in overeenstemming met de wettelijke/landspecifieke
richtlijnen. Deze garantie dekt geen defecten of schade
als gevolg van foutief gebruik, misbruik of normale
slijtage. In geval van klachten verzoeken wij u het
elektrisch gereedschap samen met het
GARANTIECERTIFICAAT dat u achterin deze handleiding
aantreft naar een erkend servicecentrum van Hitachi te
sturen. Indien door de gebruiker de machine wordt
gedemonteerd vervalt de aanspraak op garantie.
OPMERKING
HITACHI volgt continu een research-en
ontwikkelingsprogramma. De hier gegeven specificaties
zijn derhalve zonder voorafgaande kennisgeving
wijzigbaar.
Informatie betreffende luchtgeluid en trillingen
De gemeten waarden zijn verkregen overeenkomstig
EN61029.
Het doorsnee A-gewogen geluiddruknivo is 90 dB (A)
Het standaard A-gewogen geluiddruknivo: 103 dB (A)
Draag gehoorbescherming.
De doorsnee gewogen effektieve acceleratiewaarde is
gelijk aan of minder dan 2,5 m/s2.
28
Page 30

Español
PRECAUCIONES GENERALES PARA OPERACIÓN
¡ADVERTENCIA! Cuando utilice herramientas eléctricas,
tome las medidas de ˙seguridad básicas para reducir el
riesgo de incendios, descargas eléctricas, y lesiones,
incluyendo lo siguiente.
Lea todas todas estas instrucciones antes de utilizar este
producto y guárdelas.
Para realiza roperaciones seguras:
1. Mantener el área de trabajo limpia, áreas y bancos
de trabajo desordenados son causa de da ños
personales.
2. Considerar el medio ambiente del área de trabajo.
No exponer las herramientas eléctricas a la lluvia.
No usar herramientas eléctricas en lugares
mojados o húmedos. Mantener el área de trabajo
bien iluminada.
No utilice herramientas eléctricas cuando exista
el riesgo de incendios o de explosión.
3. Protegerse contra descargas eléctricas. Evitar el
contacto del cuerpo con las superficies puestas
a tierra (p. ej., tubos, radiadores, hornos de
microondas, o refrigeradores).
4. Mantener a los ni ños alejados. No dejar que los
visitantes toquen las herramientas ni los cables
de extensión. Todos los visitantes deberán
mantenerse alejados del área de trabajo.
5. Guardar las herramientas que no se usen y
ponerlos en lugares secos, altos o cerrados, fuera
del alcance de los ni ños.
6. No forzar las herramientas, éstas trabajarán más
y con mayor seguridad cuando cumplan con las
especificaciones para las cuales fueron diseñadas.
7. Usar las herramientas apropiadas. No forzar
pequeñas herramientas o accesorios a realizar el
trabajo de herramientas de mayor potencia. No
utilizar herramientas para otros propósitos para
los cuales no fueron dise ñadas, por ejemplo, no
utilizar sierras circulares para cortar ramas de
árboles o troncos.
8. Vestir apropiadamente. No ponerse ropas que
queden flojas ni tampoco joyas. Estas podrian
quedar atrapadas en las partes móviles de las
herramientas. Cuando se trabaje en exteriores, se
recomienda el uso de guantes de goma y calzado
que no resbale.
9. Usar gafas de protección. Usar también mascarillas
contra el polvo si las condiciones de corte fuesen
polvorientas.
10. Conecte un equipo colector de polvo.
La operación de corte de esta sierra compuesta
puede producir una cantidad considerable de polvo
procedente del conducto de extracción que hay
en la cubierta fija.
(Material del polvo: madera o aluminio)
Si existen dispositivos para la conexión de equipos
de extracción y recolección de polvo, cerciórese
de queéstos estén conectados adecuadamente, y
de utilizarlos en la forma correcta.
11. Cuidar del cable. Nunca lleve las herramientas
colgando del cable, tampoco tire del cable para
efectuar la desconexión de las herramientas.
Mantener el cable alejado del calor, aceite y bordes
agudos.
12. Asegurar la pieza de trabajo usando para ello
abrazaderas o un tornillo. Esto es más seguro que
usar las manos, ademas, ambas manos quedan
libres para operar la herramienta.
13. No extenderse excesivamente para efectuar un
trabajo. Mantener en todo momento un buen
balance y base de apoyo.
14. Mantener cuidadosamente las herramientas. Tener
las siempre limpias y afiladas para obtener un
mejor rendimiento y un funcionamiento más
seguro. Seguir siempre las instrucciones para la
lubricación y el cambio de accesorios. Inspeccionar
periódicamente los cables de las herramientas y
si estuviesen da nãdos, hacer que los reparen
técnicos ó expertos. Inspeccionar periodicamente
los cables de extensión y cambiarlos si estuviesen
da ñados. Mantener los mangos secos, limpios,
y libres de aceite y grasa.
15. Desconectar las herramientas cuando no se usen,
antes de repararlas, y cuando se cambien
accesorios como por ejemplo, cuchillas, brocas,
cortadores, etc.
16. Quitar las cuñas y las llaves de tuercas.
Acostumbrarse a comprobar si se han quitado las
cu ñas y las llaves de tuercas antes de poner las
harramientas en funcionamiento.
17. Evitar puestas en funcionamiento sin fin alguno.
No llevar las herramientas con los dedos en los
inerruptores mientras que éstas cstán conectadas.
Cuando se conecten las herramientas, cerciorarse
de que los interruptores esten en la posición de
desconectados.
18. Para usos en exteriores usar cables de extensión.
Cuando las herramientas vayan a ser usadas en
exteriores, usar solamente cables de extensión
diseñados para tal propósito.
19. Estar siempre alerta y poner atención a lo que
se está haciendo, usar el sentido común y no
operar con la herramienta cuando se esté cansado.
20. Comprobar las piezas dañadas. Antes de seguir
con el funcionamiento de las herramientas, las
piezas que estén dañadas deberán comprobarse
cuidadosamente para determinar si pueden
funcionar apropiadamente y cumplir con la función
para las que fueron dise ñadas. Comprobar el
alineamiento y agarrotamiento de piezas móviles,
rotura de piezas, montura, y cualiquier otra
anomalia que pudiese afectar al rendimiento de
la herramienta. Cualquier pieza que estuviese da
ñada deberá repararse apropiadamente o
cambiarse en un centro de reparaciones autorizado,
al menos que se indique, lo contrario en este
manual de instrucciones. Procurar que los
interruptores defectuosos los cambie un centro de
reparaciones autorizado. No usar las herramientas
si sus interruptores no funcionasen
apropiadamente.
21. Advertencia
La utilización de cualquier accesorio o aditivo no
recomendado en este manual de instrucciones
puede conducir al riesgo de lesiones.
22. En caso de avería, haga que su herramienta sea
reparada por un técnico cualificado.
Esta herramienta eléctrica está de acuerfdo con
los requisitos de seguridad pertinentes. Las
reparaciones solamente deberán realizarlas
técnicos cualificadosutilizando piezas de repuesto
originales. De lo contrario, el usuario podría
lesionarse.
29
Page 31

Español
PRECAUCIONES PARA LA TRONZADORA
1. No emplee nunca la tronzadora con su cubierta
de seguridad fijada en posición de abierta.
2. Asegúrese de que la cubierta de seguridad se
mueva suavemente.
3. Mantenga siempre la hoja de sierra afilada.
4. No emplee nunca la tronzadora radial abatible con
la hoja de sierra girada hacia arriba o el lado.
5. Asegúrese de que la pieza de trabajo esté libre
de materias extrañas, como clavos.
6. Para transportar la herramienta, no la sujete por
el soporte. Emplee el asa.
7. Comience a cortar solamente después de que el
motor alcance la plena velocidad.
8. Si observa alguna anormalidad, ponga
inmediatamente en OFF el interruptor.
9. Antes de realizar el trabajo de mantenimiento o
de ajustar la herramienta, desconecte la
alimentación y espere hasta que la hoja de sierra
se haya parado.
10. Usar sólo hojas de sierra con punta de carburo
Hitachi para cortar el metal puro. No usar hojas
para sierras para madera, sierras de metal o rueda
cortadora.
ESPECIFICACIONES
Tubos de acero ø115mm
Capacidad máxima de
corte
Altura × Anchura
Angulo de corte de ingletes 0° – 45°
Entrada 1450W*
Velocidad sin carga 1350/min
Peso 19kg
*Asegúrese de comprobar la placa de características del producto, ya que pueden variar de acuerdo con
el lugar de destino.
ACCESORIOS ESTANDAR
(1) Hoja de sierra de punta de carburo
(ø305 × 50P) (montada en la herramienta) ......... 1
(2) Llave ............................................................................ 1
(3) Vidrio di seguridad ..................................................1
Accesorios estándar están sujetos a cambio sin previo
aviso.
ACCESORIOS FACULTATIVOS
(de venta por separado)
(1) Hoja de sierra de punta de carburo (ø305 × 60P)
Accesorios facultativos están sujetos a cambio sin previo
aviso.
APLICACION
䡬 Corte de varios tipos de materiales metálicos, como
tubos de acero, tubos cuadrados de acero, acero
perfilado y barra redonda.
ANTES DE LA PUESTA EN MARCHA
1. Alimentación
Asegurarse de que la alimentación de red que ha
de ser utilizada responda a las exigencias de
corriente especificadas en la placa de características
del producto.
Tubos cuadrados de acero 100mm × 100mm
Acero perfilado 75mm × 125mm
Barra redonda ø32mm
2. Conmutador de alimentación
Asegurarse de que el conmutador de alimentación
esté en la posición OFF (desconectado). Si la clavija
está conectada a un receptáculo cuando el
interruptor de accionamiento está en la posición
ON, la herramienta eléctrica comenzará a funcionar
inmediatamente, pudiendo causar un accidente
grave.
3. Cable de prolongación
Cuando está alejada el área de trabajo de la red
de alimentación, usar un cable de prolongación de
un grosor y potencia nominal suficiente. El cable
de prolongación debe ser mantenido lo más corto
posible.
4. Como las piezas extraíbles están fijadas mediante
tensión de una cadena durante el tránsito, retire la
cadena del gancho de cadena presionando
ligeramente el mango.
AJUSTE DE LA HERRAMIENTA ELECTRICA
ANTES DE SU UTILIZACION
PRECAUCION
Realice todos los ajustes necesarios antes de conectar el
enchufe a una toma de la red.
1. Compruebe si la cubierta de seguridad se mueva
suavemente.
(1) Asegurarse de que la cubierta de seguridad se
mueva suavemente cuando la manija está en
posición hacia abajo.
(2) A continuación, compruebe si la cubierta de
seguridad vuelva a su posición original cuando
levante el asa.
30
Page 32

Español
2. Asegurarse de que sea removido el reten del eje
usado para montar y desmontar la hoja de sierra.
3. Asegurarse de que la hoja de sierra sea fijada
firmementé en posición.
4. Verificar la vibración de superficie girando la hoja
de sierra. Se hay también mucha deflexión facial,
la duración de servicio de la hoja de sierra se
acortará y la precisión de corte se deteriorerá.
APLICACIONES PRACTICAS
PRECAUCION
䡬 Es muy peligrosos extraer o colocar maderas
mientras la hoja de sierra esté girando.
1. Operación del interruptor
Después de empujar el botón de seguro con el
pulgar, la alimentación de la herramienta se
conectará (ON) cuando accione el gatillo, y se
desconectará (OFF) cuando lo suelte.
2. Instrucciones para el torno de banco de "toque
sencillo" (Fig. 3 y 4).
(1) Cuando los asideros están en posición vertical
(Fig. 3), y si la manija de tornillos está empujada
y tirada, el torno de banco (A) se mueve
rápidamente adelante.
(2) Cuando los asideros están en posición hacia
abajo (Fig. 4) y si se gira la manija de tornillos,
el torno de banco (A) puede moverse.
NOTA
䡬 Si los asideros no pueden ser instalados en posición
hacia abajo, girar la manija del tornillo levemente.
3. Fije la pieza de trabajo.
(1) Coloque la pieza de trabajo en el torno de banco
(B) y empuje la manija de tornillos de tal manera
que el asidero quede en la posición vertical (Fig.
3) y, a continuación, empuje el tornillo de banco
(A) ligeramente contra la pieza de trabajo. Luego,
presione el asidero y gire la manija de tornillos
de tal manera que la pieza de trabajo se fije
firmemente. (Fig. 4)
(2) Naturalmente, se debe fijar todas las piezas de
trabajo en el tornillo de banco lo más firmemente
posible.
Fije el acero forjado como se muestra en la Fig.
11-(a), (b), (c).
No fije el acero forjado como se muestra en la
Fig. 12-(a).
Si lo fija así, la pieza de trabajo se desplazará
y se deteriorará la precisión de corte.
(3) Fije el acero plano como se muestra en la Fig.
11-(d), pero la altura de la pieza de trabajo debe
ser inferior a 100 mm. (Figs. 11 y 12).
PRECAUCION
䡬 Asegúrese de que la pieza de trabajo esté firmemente
apretada con el tornillo de banco. Si no está, podría
ocurrir un serio accidente si la pieza de trabajo se
afloja o si la hoja de sierra se rompe durante la
operación.
䡬 No fije el acero plano como se muestra en la Fig.
12-(b).
Una fijación inadecuada de la pieza de trabajo puede
abradir la punta de carburo y causar una grieta
durante el corte, causando daños a la hoja.
4. Corte.
(1) Después de cerrar el interruptor y comprobar
que la hoja de sierra gire a plena velocidad,
empuje lentamente hacia abajo el asa sujetando
hacia abajo la palanca, y aproxime la herramienta
al material que desee cortar.
(2) Cuando la hoja de sierra entre en contacto con
la madera, empuje gradualmente hacia abajo el
asa para iniciar el corte.
(3) Cuando haya finalizado la operación de corte,
levante el asa hasta la posición retraída.
(4) Al finalizar cada operación de corte, ponga el
interruptor de la herramienta en OFF, y deje que
la hoja de sierra se pare completamente antes
de iniciar la siguiente operación de corte.
PRECAUCION
䡬 Asegurarse de usar anteojos de protección mientras
se ejecuta la corte.
䡬 Colocar la hoja de sierra despacio de modo que
toque el material. No mover la hoja de repente.
䡬 El aumento de la presión sobre el asa no significará
necesariamente mayor velocidad de corte. Por el
contrario, demasiada presión puede resultar en
sobrecarga del motor y/o disminución de la eficacia
de corte.
䡬 Durante la corte, la punta se desgasta un poco, pero
no afectará gravemente la capacidad de corte de
la sierra. Continuar operando de la misma manera.
Sin embargo, cuando aparecen grietas en el bloque
metálico, interrumpir inmediatamente el uso de la
sierra.
䡬 Cuando la hoja de sierra se detiene a operar durante
la corte, desactivar el conmutador de alimentación
inmediatamente y remover la hoja de sierra del
material. Luego verificar se hay problemas
ejecutando la operación de prueba de velocidad sin
carga, sin material.
䡬 Cuando el material que se debe cortar y descartar
es delgado o estrecho, y si después de la corte,
la manija está levantada mientras la hoja de sierra
continua girando, fragmentos del material pueden
volar cuando entran en contacto con la hoja de
sierra en rotación y pueden herir el operador. Colocar
nuevamente la manija en su posición de origen
después de que la hoja de sierra de punta se
interrumpe moviendo completamente.
䡬 Cuando la corte es detenida durante un trabajo,
levantar la manija mientras la hoja de sierra continua
girando.
䡬 Una vez finalizado el trabajo de corte, asegúrese
de poner el interruptor de alimentación de la
herramienta en OFF y de desenchufar el cable de
la red.
ADVERTENCIA
䡬 No tocar el material alrededor de la superficie donde
ha sido cortado con las manos sin proteccion, porque
es muy caliente.
5. Corte en ángulo
(1) Se puede cortar según los ángulos hasta 45
grados. Aflojar los tres pernos M10 mediante la
llave suministrada con la sierra y ajustar el
ángulo del torno de banco (B) alineado con el
ángulo del indicador (Fig. 5).
(2) Asegurarse de apretar correctamente los tres
pernos M10 después de ajustar el ángulo.
31
Page 33

Español
(3) Desapretar los dos pernos de aletas y mover la
cubierta al lado de manera que sea alineada con
el ángulo ajustado (Fig. 1, 6).
MONTAJE Y DESMONTAJE DE LA HOJA DE
SIERRA DE PUNTA DE CARBURO
ADVERTENCIA
En primer lugar, desenchufe el cable de la toma.
1. Desmontaje de la hoja de sierra. (Fig. 7, 8, 9)
(1) Levantar la cubierta de seguridad hasta que
toque el perno de cabeza hexagonal.
(2) Presione el seguro del eje, y afloje el perno con
una llave.
Si el seguro del eje no puede presionarse
fácilmente para fijar el eje la hoja de sierra, gire
el perno con la llave aplicando presión sobre
el seguro del eje.
El eje de la hoja de sierra se fija cuando el
seguro del eje se presiona hacia adentro.
(3) Extracción del perno, la arandela (B) y hoja de
sierra.
ADVERTENCIA
䡬 Tenga cuidado cuando la hoja de sierra de punta
se remueve después de que esté usada para una
corte eccesiva de varios materiales, debido a que
la hoja puede ser muy caliente.
2. Montaje de la hoja de sierra.
(1) Fijar la hoja de sierra.
ADVERTENCIA
Cuando monte la hoja de sierra, cerciórese de que
la marca del indicador de rotación de la hoja de
sierra y el sentido de rotación coincidan
adecuadamente.
(2) Limpie a fondo la arandela (B) y el perno, e
instálelos sobre el eje de montaje de la hoja de
sierra.
(3) Presionar el retén del eje y apretar el perno por
medio de una llave.
PRECAUCION
䡬 Cerciórese de que el seguro del eje haya vuelto a
la posición de retraído después de instalar o extraer
la hoja de sierra.
䡬 Apriete el perno de forma que no se afloje durante
la operación.
䡬 Compruebe que el perno haya quedado
adecuadamente apretado antes de poner en
funcionamiento la herramienta.
MANTENIMIENTO E INSPECCION
PRECAUCION
Antes de inspeccionar la máquina cortadora, asegúrese
de desconectar el enchufe del cable de alimentación.
1. Inspección de la hoja de sierra.
Como la utilización de una hoja de sierra sin filo
reducirá la eficacia de corte y puede hacer que el
motor funcione mal, afile o reemplace dicha hoja
cuando observe que está gastada.
2. Inspeccionar los tornillos de montaje
Regularmente inspeccionar todos los tornillos de
montaje y asegurarse de que estén apretados
firmemente. Si cualquier tornillo estuviera suelto,
volver a apretarlo inmediatamente. El no hacer esto
provocaría un riesgo serio.
3. Inspección de las escobillas (Fig. 10).
El motor emplea escobillas de carbón que son
piezas consumibies. Como unas escobillas
excesivamente gastadas pueden averiar el motor,
reemplácelas cuando lleguen al "límite de desgaste".
Además, manténgaias siempre limpias y asegúrese
de que se deslicen libremente dentro de sus
portaéscobillas.
4. Reemplazamiento de las eacobillu de carbón.
Extraiga las tapas de las escobillas con un
destornillador de punta plana. Después de ello, las
escobillas podrán extraerse fácilmente.
5. Mantenimiento del motor.
El bobinado del motor es el "corazón" de las
herramientas eléctricas. Tenga cuidado para que
dicho bobinado no se dañe y/o humedezca con
agua o aceite.
6. Engrase (Fig. 1 y 2)
Aplique aceite a los puntos de engrase una vez al
mes a fin de prolongar la duración útil de la máquina
(el mejor aceite será el de máquina).
Puntos de engrase
䡬 Parte giratoria del eje
䡬 Parte giratoria del tornillo de banco
䡬 Parte deslizante del tornillo de banco (A)
䡬 Tornillo
䡬 Resorte
7. Lista de repuestos
A:N°. ítem
B:N°. código
C:N°. usado
D:Observaciones
PRECAUCION
La reparación, modificación e inspección de las
herramientas eléctricas Hitachi deben ser realizadas
por un Centro de Servicio Autorizado de Hitachi.
Especialmente el dispositivo láser debería ser
revisado por el agente autorizado por el fabricante
del dispositivo láser.
Encargue siempre la reparación del dispositivo láser
a un centro de servicio autorizado de Hitachi.
Esta lista de repuestos será de utilidad si es
presentada junto con la herramienta al Centro de
Servicio Autorizado de Hitachi, para solicitar la
reparación o cualquier otro tipo de mantenimiento.
En el manejo y el mantenimiento de las herramientas
eléctricas, se deberán observar las normas y
reglamentos vigentes en cada país.
MODIFICACIONES
Hitachi Power Tools introduce constantemente
mejoras y modificaciones para incorporar los últimos
avances tecnológicos.
Por consiguiente, algunas partes (por ejemplo,
números de códigos y/o diseño) pueden ser
modificadas sin previo aviso.
GARANTÍA
Las herramientas motorizadas de Hitachi incluye una
garantía conforme al reglamento específico legal/
nacional. Esta garantía no cubre los defectos o daños
debidos al uso incorrecto, el abuso o el desgaste normal.
En caso de reclamación, envíe la herramienta motorizada,
sin desmontar y con el CERTIFICADO DE GARANTÍA que
aparece al final de estas instrucciones de uso, al Centro
de Servicio Autorizado de Hitachi.
32
Page 34

Español
NOTA
Debido al programa de investigación y desarrollo
continuos de HITACHI, las especificaciones indicadas
aquí pueden estar sometidas a cambios sin previo aviso.
Información sobre el ruido propagado por el aire y
vibración
Los valores medidos fueron determinados de acuerdo
con EN61029.
El nivel de presión acústica de ponderación A típica es
de 90 dB (A)
Nivel de potencia acústica de ponderu A típico: 103 dB
(A)
Utilica protectores para los oídos.
El valor de aceleración de ponderación media cuadrática
tipico no sobrepasa 2,5 m/s2.
33
Page 35

ABCD
37 306005 1
38 6205DD 1 6205DDCMPS2L
2 307563 1
1 305726 4 D5×30
ABCD
HOLE-NT50
40 300196 3 M6×45
41 978956 1
42 949455 1 M6
43 949830 1 M6×10
44 305994 1
45 305995 1
47 305996 1
48 305997 1 M10×16
49 306471 1
50 995046 2 M5×12
39A 306009 1
5 999044 2
6 978445 2
3A 977089 2 M4×8
4A 980487 2
46A 308088 1 305MM-D25.4
7 ——— 1
8 ——— 1 FOR FRA
10 951878 1
11 306001 1
9A 951867 1 INCLUD.3A,4A,10
12 998744 2
51 306011 1
"GBR (110V)"
"FRA, HOL, GBR
13 974613C 1 110V-115V "12"
13A 340198H 1 220V-230V "12"
55 307571 1
56 302311 1
53 995046 2 M5×12
54 ——— 1 ID12×T1.5×10
52B 306010 1
(230V), AUT"
17 951872 1
18 6300VV 1 6300VVCMPS2L
16A 320210 2 D5×75
19-1 360313C 1 110V "18, 20, 22"
57 306013 1 M8×12
701 879055 1 17MM
702A 875769 1
"GBR (110V)"
"FRA, HOL, GBR
(230V), AUT"
20 947622 1
19-2 360313E 1 230V "18, 20, 22"
21 946362 1
22 6002DD 1 6002DDCMPS2L
24 6000VV 1 6000VVCMPS2L
25 939545 1
26 306004 1
23A 931554 1 D5×50
27 948015 1 5X5×10
28 306003 1
29 6200VV 1 6200VVCMPS2L
30 974577 1
31 306007 1
32 303426 1
34 306008 3 D5×105
35 6201VV 1 D5×105
36 946362 1
33A 306006 1
34
Page 36

AB CD
102 307384 4 M6×25
103 968523 1
104 977133 2 D4×10
105 949429 1 M4
106 955835 1
107 976825 1
108A 951524 1
113 305993 1
114 305126 3 M10×35
115 995046 1 M5×12
110 306000 1
111 306065 1
112 966292 1 M5×12
116 305990 1
117 305989 1
118 949558 1
119 949759 1 M8×30
120 988872 1 M10×40
121A 949572 1 M10
701 879055 1 17MM
122 305992 1
124 949394 2 M6×10
123B 305991 1
702A 875769 1
ABCD
58 995046 2 M5×12
HOL, AUT"
60 306015 1
61 990541 2 M5×16
62 981373 2
59A 305998 1
64 937631 1
63-1 952804Z 1 "62" "GBR"
63-2 952806Z 1 "62" "FRA,
65 949219 2 M4×16
INCLUD.72,73,81-87
68 305988 1
69 305982 1
66A 938051 1 D10.1
67A 307351 2 M10×35
INCLUD.74-76,78,79
70 955479 1
71 971563 1
72 305983 1 INCLUD.70,71
73 305984 1
74 ——— 1
75 978946 1
76 978947 1
78 978949 1
79 935196 2 M4×12
81 949433 2 M8
82 949537 1 D3×15
83 949681 1 D5×25
84 955818 1 M16
85 305987 1 T0.5
86 305986 1
87 305985 1
88 949339 4 M6×14
89 305981 1
91 964851 3
92 949431 3 M5
90B 305980 1
97 ——— 1 ID12×T1×200
93 949241 3 M5×20
94A 320266 1
95A 307028 3 D4×25
35
Page 37

English
Italiano
GUARANTEE CERTIFICATE
1 Model No.
2 Serial No.
3 Date of Purchase
4 Customer Name and Address
5 Dealer Name and Address
(Please stamp dealer name and address)
Deutsch
GARANTIESCHEIN
1 Modell-Nr.
2 Serien-Nr.
3 Kaufdaturn
4 Name und Anschrift des Kunden
5 Name und Anschrift des Händlers
(Bitte mit Namen und Anschrift des
Handlers abstempeln)
Français
CERTIFICAT DE GARANTIE
1 No. de modèle
2 No. de série
3 Date d'achat
4 Nom et adresse du client
5 Nom et adresse du revendeur
(Cachet portant le nom et l'adresse du
revendeur)
CERTIFICATO DI GARANZIA
1 Modello
2 N° di serie
3 Data di acquisto
4 Nome e indirizzo dell'acquirente
5 Nome e indirizzo del rivenditore
(Si prega di apporre il timbro con questi
dati)
Nederlands
GARANTIEBEWIJS
1 Modelnummer
2 Serienummer
3 Datum van aankoop
4 Naam en adres van de gebruiker
5 Naam en adres van de handelaar
(Stempel a.u.b. naam en adres vande de
handelaar)
Español
CERTIFICADO DE GARANTIA
1 Número de modelo
2 Número de serie
3 Fecha de adquisición
4 Nombre y dirección del cliente
5 Nombre y dirección del distribudor
(Se ruega poner el sellú del distribudor
con su nombre y dirección)
✄
36
Page 38

1
2
3
4
5
✄
37
Page 39

Hitachi Power Tools Europe GmbH
Siemensring 34, 47877 willich 1, F. R. Germany
Tel: +49 2154 49930
Fax: +49 2154 499350
URL: http://www.hitachi-powertools.de
Hitachi Power Tools Netherlands B. V.
Brabanthaven 11, 3433 PJ Nieuwegein, The Netherlands
Tel: +31 30 6084040
Fax: +31 30 6067266
URL: http://www.hitachi-powertools.nl
Hitachi Power Tools (U. K.) Ltd.
Precedent Drive, Rooksley, Milton Keynes, MK 13, 8PJ, United Kingdom
Tel: +44 1908 660663
Fax: +44 1908 606642
URL: http://www.hitachi-powertools.co.uk
Hitachi Power Tools France S. A. S.
Prac del’ Eglantier 22, rue des Crerisiers Lisses, C. E. 1541,
91015 EVRY CEDEX, France
Tel: +33 1 69474949
Fax: +33 1 60861416
URL: http://www.hitachi-powertools.fr
Hitachi Power Tools Belgium N.V. / S.A.
Koningin Astridlaan 51, 1780 Wemmel, Belgium
Tel: +32 2 460 1720
Fax: +32 2 460 2542
URL http://www.hitachi-powertools.be
Hitachi Fercad Power Tools Italia S.p.A
Via Retrone 49-36077, Altavilla Vicentina (VI), Italy
Tel: +39 0444 548111
Fax: +39 0444 548110
URL: http://www.hitachi-powertools.it
Hitachi Power Tools lberica, S.A.
C / Migjorn, s/n, Poligono Norte, 08226 Terrassa, Barcelona, Spain
Tel: +34 93 735 6722
Fax: +34 93 735 7442
URL: http://www.hitachi-powertools.es
Hitachi Power Tools Österreich GmbH
Str. 7, Objekt 58/A6, Industriezentrum NÖ –Süd 2355
Wiener Neudorf, Austria
Tel: +43 2236 64673/5
Fax: +43 2236 63373
38
Page 40

English
EC DECLARATION OF CONFORMITY
We declare under our sole responsibility that this
product is in conformity with standards or standardized
documents EN61029, EN55014 and EN61000 in
accordance with Council Directives 2004/108/EC, and
98/37/EC.
This declaration is applicable to the product affixed CE
marking.
Deutsch
ERKLÄRUNG ZUR KONFORMITÄT MIT CE-REGELN
Wir erklären mit alleiniger Verantwortung, daß dieses
Produkt den Standards oder standardisierten
Dokumenten EN61029, EN55014 und EN61000 in
Übereinstimmung mit den Direktiven des Europarats
2004/108/CE und 98/37/CE entspricht.
Diese Erklärung gilt für Produkte, die die CE-Markierung
tragen.
Français
DECLARATION DE CONFORMITE CE
Nous déclarons sous notre seule et entière responsabilité
que ce produit est conforme aux normes ou documents
normalisés EN61029, EN55014 et EN61000 en accord
avec les Directives 2004/108/CE et 98/37/CE du Conseil.
Cette déclaration s’applique aux produits désignés CE.
Representative office in Europe
Hitachi Power Tools Europe GmbH
Siemensring 34, 47877 Willich 1, F. R. Germany
Italiano
DICHIARAZIONE DI CONFORMITÀ CE
Si dichiara sotto nostra responsabilità che questo
prodotto è conforme agli standard o ai documenti
standardizzati EN61029, EN55014 e EN61000 conforme
alle direttive 2004/108/CE e 98/37/CE del concilio.
Questa dichiarazione è applicabile ai prodotti cui sono
applicati i marchi CE.
Nederlands
EC VERKLARING VAN CONFORMITEIT
Wij verklaren onder eigen verantwoordelijkheid dat dit
produkt conform de richtlijnen of gestandardiseerde
documenten EN61029, EN55014 en EN61000 voldoet
aan de eisen van EEG Bepalingen 2004/108/EC, en 98/
37/EC.
Deze verklaring is van toepassing op produkten
voorzien van de CE-markeringen.
Español
DECLARACIÓN DE CONFORMIDAD DE LA CE
Declaramos bajo nuestra única responsabilidad que
este producto está de acuerdo con las normas o con
los documentos de normalización EN61029, EN55014
y EN61000, según indican las Directrices del Consejo
2004/108/CE y 98/37/CE.
Esta declaración se aplica a los productos con marcas
de la CE.
30. 1. 2009
Head office in Japan
Hitachi Koki Co., Ltd.
Shinagawa Intercity Tower A, 15-1, Konan 2-chome,
Minato-ku, Tokyo, Japan
Hitachi Koki Co., Ltd.
K. Kato
Board Director
901
Code No. H99304285 N
Printed in Japan
 Loading...