

Page 1
Circular Saw
Sierra circular
Serra circular
C 9SA3
Read through carefully and understand these instructions before use.
Leer cuidadosamente y comprender estas instrucciones antes del uso.
Antes de usar, leia com cuidado para assimilar estas instruções.
Handling instructions
Instrucciones de manejo
Instruções de uso
Page 2
1
3
4
2
$
#
!
@
^
%
1
(
5
6
7
8
9
0
$
&
*
2 3
4
w
0
e
6
7A
%
)
q
0
4
5
*
&
#
0
0
1
Page 3
7B
8
@
r
(
9
11A
t
9
i
0
u
y
y
y
i
9
4
10
11B
8
9
o
a
p
y
u
12
s
5
d
13
5
6
4
f
g
2
Page 4
14
17 mm
6 mm
h
j
15
k
C9SA3
38
j
0
l
3
Page 5

English Español Português
1
Switch trigger Interruptor de activación Interruptor de gatilho
2
Saw cover Cubierta de la sierra Cobertura da serra
3
Lower guard lever Palanca de la protección inferior Alavanca do protetor inferior
4
Saw blade Cuchilla de sierra Lâmina de serra
5
Left-hand bolt Perno de la izquierda Parafuso do lado esquerdo
6
Washer (B) Arandela (B) Arruela (B)
7
Lower guard Protección inferior Protetor inferior
8
Guide Guía Guia
9
Guide piece Pieza guía Peça da guia
0
Base Base Base
!
Inclined gauge Indicador inclinado Medidor de inclinação
@
Wing-bolt Perno de mariposa Parafuso-borboleta
#
Wing-nut Perno de mariposa Porca-borboleta
$
Brush cap Tapa del cepillo Tampa da escova
%
Handle Mango Cabo
^
Nameplate Placa de identificación Placa de identificação
&
Knob Perilla Botão
*
Cord holder Soporte para cables Suporte do cabo
(
Wing-bolt Perno de mariposa Parafuso-borboleta
)
Lumber Madera útil Madeira
q
Workbench Banco de trabajo Bancada de trabalho
w
Side Handle Asidero lateral Cabo lateral
e
Screw (M6 × 20) Tornillo (M6 × 20) Parafuso (M6 × 20)
r
Lock spring Bloqueo del muelle Mola de bloqueio
t
M4 Screw Tornillo M4 Parafuso M4
y
Premarked line Línea de trazado Linha pré-marcada
u
Front scale at 45˚ incline Escala frontal con 45° de inclinación Escala frontal com 45° de inclinação
i
Front scale when not inclined Escala frontal sin inclinación Escala frontal sem inclinação
o
Dust collector Colector de polvo Coletor de pó
p
Lever (short type) Palanca (tipo corto) Alavanca (tipo curta)
a
M4 Screw Tornillo M4 Parafuso M4
s
Lock lever Palanca de cierre Alavanca de bloqueio
d
Hex. bar wrench Llave de barra hexagonal Chave de barra sextavada
f
Washer (A) Arandela (A) Arruela (A)
g
Spindle Husilio Eixo
h
Wear limit Límite de uso Limite de desgaste
j
No. of carbon brush No. de carbón de contacto No da escova de carvão
k
Square Escuadra Esquadro
l
Slotted set screw Vástago Parafuso de cabeça ranhurada
4
Page 6

English
GENERAL POWER TOOL SAFETY WARNINGS
WARNING
Read all safety warnings, instructions, illustrations and
specifications provided with this power tool.
Failure to follow all instructions listed below may result in
electric shock, fire and/or serious injury.
Save all warnings and instructions for future reference.
The term “power tool” in the warnings refers to your mainsoperated (corded) power tool or battery-operated (cordless)
power tool.
1) Work area safety
a) Keep work area clean and well lit.
Cluttered or dark areas invite accidents.
b) Do not operate power tools in explosive
atmospheres, such as in the presence of
flammable liquids, gases or dust.
Power tools create sparks which may ignite the dust
or fumes.
c) Keep children and bystanders away while
operating a power tool.
Distractions can cause you to lose control.
2) Electrical safety
a) Power tool plugs must match the outlet. Never
modify the plug in any way. Do not use any
adapter plugs with earthed (grounded) power
tools.
Unmodified plugs and matching outlets will reduce
risk of electric shock.
b) Avoid body contact with earthed or grounded
surfaces, such as pipes, radiators, ranges and
refrigerators.
There is an increased risk of electric shock if your
body is earthed or grounded.
c) Do not expose power tools to rain or wet
conditions.
Water entering a power tool will increase the risk of
electric shock.
d) Do not abuse the cord. Never use the cord for
carrying, pulling or unplugging the power tool.
Keep cord away from heat, oil, sharp edges or
moving parts.
Damaged or entangled cords increase the risk of
electric shock.
e) When operating a power tool outdoors, use an
extension cord suitable for outdoor use.
Use of a cord suitable for outdoor use reduces the
risk of electric shock.
f) If operating a power tool in a damp location
is unavoidable, use a residual current device
(RCD) protected supply.
Use of an RCD reduces the risk of electric shock.
3) Personal safety
a) Stay alert, watch what you are doing and use
common sense when operating a power tool.
Do not use a power tool while you are tired
or under the influence of drugs, alcohol or
medication.
A moment of inattention while operating power tools
may result in serious personal injury.
b) Use personal protective equipment. Always
wear eye protection.
Protective equipment such as a dust mask, non-skid
safety shoes, hard hat or hearing protection used for
appropriate conditions will reduce personal injuries.
c) Prevent unintentional starting. Ensure the
switch is in the off-position before connecting to
power source and/or battery pack, picking up or
carrying the tool.
Carrying power tools with your finger on the switch or
energising power tools that have the switch on invites
accidents.
d) Remove any adjusting key or wrench before
turning the power tool on.
A wrench or a key left attached to a rotating part of the
power tool may result in personal injury.
e) Do not overreach. Keep proper footing and
balance at all times.
This enables better control of the power tool in
unexpected situations.
f) Dress properly. Do not wear loose clothing or
jewellery. Keep your hair and clothing away from
moving parts.
Loose clothes, jewellery or long hair can be caught in
moving parts.
g) If devices are provided for the connection of
dust extraction and collection facilities, ensure
these are connected and properly used.
Use of dust collection can reduce dust-related
hazards.
h) Do not let familiarity gained from frequent use
of tools allow you to become complacent and
ignore tool safety principles.
A careless action can cause severe injury within a
fraction of a second.
4) Power tool use and care
a) Do not force the power tool. Use the correct
power tool for your application.
The correct power tool will do the job better and safer
at the rate for which it was designed.
b) Do not use the power tool if the switch does not
turn it on and off.
Any power tool that cannot be controlled with the
switch is dangerous and must be repaired.
c) Disconnect the plug from the power source and/
or remove the battery pack, if detachable, from
the power tool before making any adjustments,
changing accessories, or storing power tools.
Such preventive safety measures reduce the risk of
starting the power tool accidentally.
d) Store idle power tools out of the reach of children
and do not allow persons unfamiliar with the
power tool or these instructions to operate the
power tool.
Power tools are dangerous in the hands of untrained
users.
e) Maintain power tools and accessories. Check
for misalignment or binding of moving parts,
breakage of parts and any other condition
that may affect the power toolʼs operation. If
damaged, have the power tool repaired before
use.
Many accidents are caused by poorly maintained
power tools.
f) Keep cutting tools sharp and clean.
Properly maintained cutting tools with sharp cutting
edges are less likely to bind and are easier to control.
g) Use the power tool, accessories and tool bits
etc. in accordance with these instructions,
taking into account the working conditions and
the work to be performed.
Use of the power tool for operations different from
those intended could result in a hazardous situation.
5
Page 7

English
h) Keep handles and grasping surfaces dry, clean
and free from oil and grease.
Slippery handles and grasping surfaces do not allow
for safe handling and control of the tool in unexpected
situations.
5) Service
a)
Have your power tool serviced by a qualified repair
person using only identical replacement parts.
This will ensure that the safety of the power tool is
maintained.
PRECAUTION
Keep children and infirm persons away.
When not in use, tools should be stored out of reach of
children and infirm persons.
SAFETY INSTRUCTIONS FOR ALL SAWS
Cutting procedures
a)
DANGER: Keep hands away from cutting area
and the blade. Keep your second hand on auxiliary
handle, or motor housing.
If both hands are holding the saw, they cannot be cut by
the blade.
b) Do not reach underneath the workpiece.
The guard cannot protect you from the blade below the
workpiece.
c) Adjust the cutting depth to the thickness of the
workpiece.
Less than a full tooth of the blade teeth should be visible
below the workpiece.
d) Never hold the workpiece in your hands or across
your leg while cutting. Secure the workpiece to a
stable platform.
It is important to support the work properly to minimize
body exposure, blade binding, or loss of control.
e) Hold the power tool by insulated gripping surfaces,
when performing an operation where the cutting
tool may contact hidden wiring or its own cord.
Contact with a “live” wire will also make exposed metal
parts of the power tool “live” and could give the operator
an electric shock.
f) When ripping, always use a rip fence or straight
edge guide.
This improves the accuracy of cut and reduces the
chance of blade binding.
g) Always use blades with correct size and shape
(diamond versus round) of arbour holes.
Blades that do not match the mounting hardware of the
saw will run off-centre, causing loss of control.
h) Never use damaged or incorrect blade washers or
bolt.
The blade washers and bolt were specially designed for
your saw, for optimum performance and safety of operation.
Kickback causes and related warnings
- kickback is a sudden reaction to a pinched, jammed or
misaligned saw blade, causing an uncontrolled saw to lift
up and out of the workpiece toward the operator;
- when the blade is pinched or jammed tightly by the kerf
closing down, the blade stalls and the motor reaction
drives the unit rapidly back toward the operator;
- if the blade becomes twisted or misaligned in the cut, the
teeth at the back edge of the blade can dig into the top
surface of the wood causing the blade to climb out of the
kerf and jump back toward the operator.
Kickback is the result of saw misuse and/or incorrect
operating procedures or conditions and can be avoided by
taking proper precautions as given below.
a) Maintain a firm grip with both hands on the saw
and position your arms to resist kickback forces.
Position your body to either side of the blade, but
not in line with the blade.
Kickback could cause the saw to jump backwards, but
kickback forces can be controlled by the operator, if
proper precautions are taken.
b) When blade is binding, or when interrupting a cut
for any reason, release the trigger and hold the saw
motionless in the material until the blade comes to a
complete stop.
Never attempt to remove the saw from the work or
pull the saw backward while the blade is in motion
or kickback may occur.
Investigate and take corrective actions to eliminate the
cause of blade binding.
c) When restarting a saw in the workpiece, centre the
saw blade in the kerf so that the saw teeth are not
engaged into the material.
If a saw blade binds, it may walk up or kickback from the
workpiece as the saw is restarted.
d) Support large panels to minimise the risk of blade
pinching and kickback.
Large panels tend to sag under their own weight.
Supports must be placed under the panel on both sides,
near the line of cut and near the edge of the panel.
e) Do not use dull or damaged blades.
Unsharpened or improperly set blades produce narrow
kerf causing excessive friction, blade binding and
kickback.
f) Blade depth and bevel adjusting locking levers
must be tight and secure before making the cut.
If blade adjustment shifts while cutting, it may cause
binding and kickback.
g) Use extra caution when sawing into existing walls or
other blind areas.
The protruding blade may cut objects that can cause
kickback.
Lower guard function
a) Check the lower guard for proper closing before
each use. Do not operate the saw if the lower guard
does not move freely and close instantly. Never
clamp or tie the lower guard into the open position.
If the saw is accidentally dropped, the lower guard may
be bent. Raise the lower guard with the retracting handle
and make sure it moves freely and does not touch the
blade or any other part, in all angles and depths of cut.
b) Check the operation of the lower guard spring. If
the guard and the spring are not operating properly,
they must be serviced before use.
Lower guard may operate sluggishly due to damaged
parts, gummy deposits, or a build-up of debris.
c) The lower guard may be retracted manually only for
special cuts such as “plunge cuts” and “compound
cuts”. Raise the lower guard by the retracting
handle and as soon as the blade enters the material,
the lower guard must be released.
For all other sawing, the lower guard should operate
automatically.
d) Always observe that the lower guard is covering
the blade before placing the saw down on bench or
floor.
An unprotected, coasting blade will cause the saw to
walk backwards, cutting whatever is in its path. Be aware
of the time it takes for the blade to stop after switch is
released.
6
Page 8

English
PRECAUTIONS ON USING CIRCULAR SAW
1. Use only blade diameter specified on the machine.
2. Do not use any abrasive wheel.
3. Do not use saw blades which are deformed or cracked.
4. Do not use saw blades made of high speed steel.
5. Do not use saw blades which do not comply with the
characteristics specified in these instructions.
6. Do not stop the saw blades by lateral pressure on the
disc.
7. Always keep the saw blades sharp.
8. Ensure that the lower guard smoothly and freely.
9. Never use the circular saw with its lower guard fixed in
the open position.
10. Ensure that the retraction mechanism of the guard
system operates correctly.
11. Never operate the circular saw with the saw blade turned
upward or to the side.
12. Ensure that the material is free of foreign matters such as
nails.
13. For model C9SA3, the saw blades should be 235 mm.
14. Disconnect the plug from the receptacle before carrying
out any adjustment, servicing or maintenance.
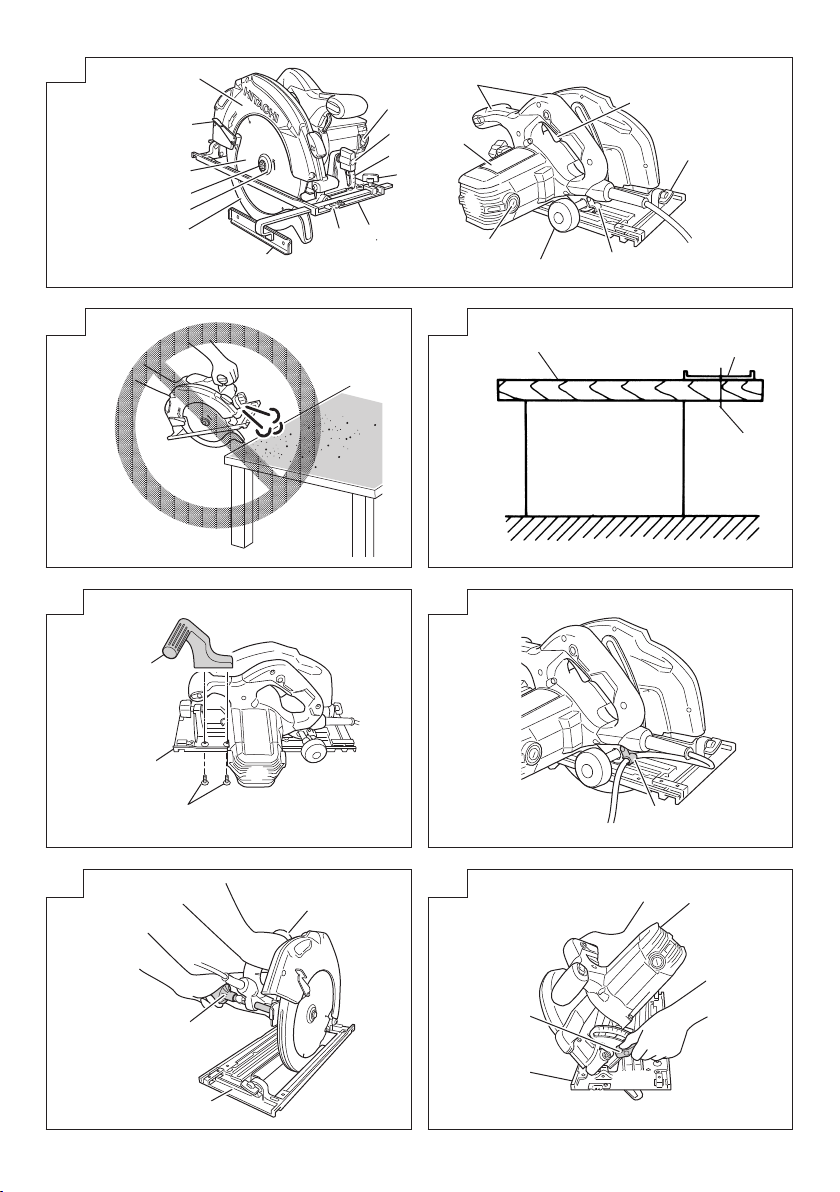
15. Do not use the tool with only the blower function. (Fig. 2)
SPECIFICATIONS
Model C9SA3
Voltage (by areas)*
Cutting Depth
Power Input* 1800 W (127 V), 2000 W (220 V)
No-load speed 5200 min
Weight (without cord) 7.0 kg
* Be sure to check the nameplate on product as it is subject to change by areas.
STANDARD ACCESSORIES
(1) Saw Blade (Dia. 235 mm) ............................................1
(2) Hex. bar wrench ............................................................1
(3) Guide ..........................................................................1
(4) Wing-bolt ......................................................................1
(5) Lock spring ...................................................................1
(6) Lever (short type) ..........................................................1
(7) Dust collector ................................................................1
(8) Side handle ...................................................................1
(9) Screw (M6 × 20)............................................................2
Standard accessories are subject to change without notice.
APPLICATION
Cutting various types of wood.
PRIOR TO OPERATION
1. Power source
Ensure that the power source to be utilized conforms
to the power requirements specified on the product
nameplate.
2. Power switch
Before the tool is plugged in to the receptacle, ensure
that the power switch is in the OFF position. If the plug
is connected to a receptacle while the power switch is
in the ON position, the power tool will start operating
immediately, which could cause a serious accident.
3. Extension cord
When the work area is removed from the power source,
use an extension cord of sufficient thickness and rated
capacity. The extension cord should be kept as short as
practicable.
4. Prepare a wooden workbench (Fig. 3)
Since the saw blade will extend beyond the lower surface
of the lumber, place the lumber on a workbench when
cutting. If a square block is utilized as a workbench,
select level ground to ensure it is properly stabilized. An
unstable workbench will result in hazardous operation.
90° 86 mm
45° 65 mm
5. When using the side handle (Fig. 4)
Securely attach the side handle to the base with the two
screws (M6 × 20) when using the side handle.
CAUTION
To avoid possible accident, always ensure that the
portion of lumber remaining after cutting is securely
anchored or held in position.
6. Using the cord holder (Fig. 5)
Using the cord holder, the cord can be guided toward the
rear of the product, as shown in the figure.
If the cord is interfering during operation, hook it into the
cord holder and change its angle.
ADJUSTING THE SAW PRIOR TO USE
1. Adjusting the cutting depth
As shown in Fig. 6, hold the handle with one hand while
loosening the knob with the other.
The cutting depth can be adjusted by moving the base
to the desired position. In such manner adjust the cutting
depth and then securely retighten the knob.
2. Adjusting the angle of inclination
As shown in Fig. 7 (A), Fig. 7 (B) by loosening the wing-
nut on the incline gauge and the wing-bolt on the base,
the saw blade may be inclined to a maximum angle of
45° in relation to the base. After having completed the
adjustment, reconfirm that the wing-nut and the wing-bolt
are firmly tightened.
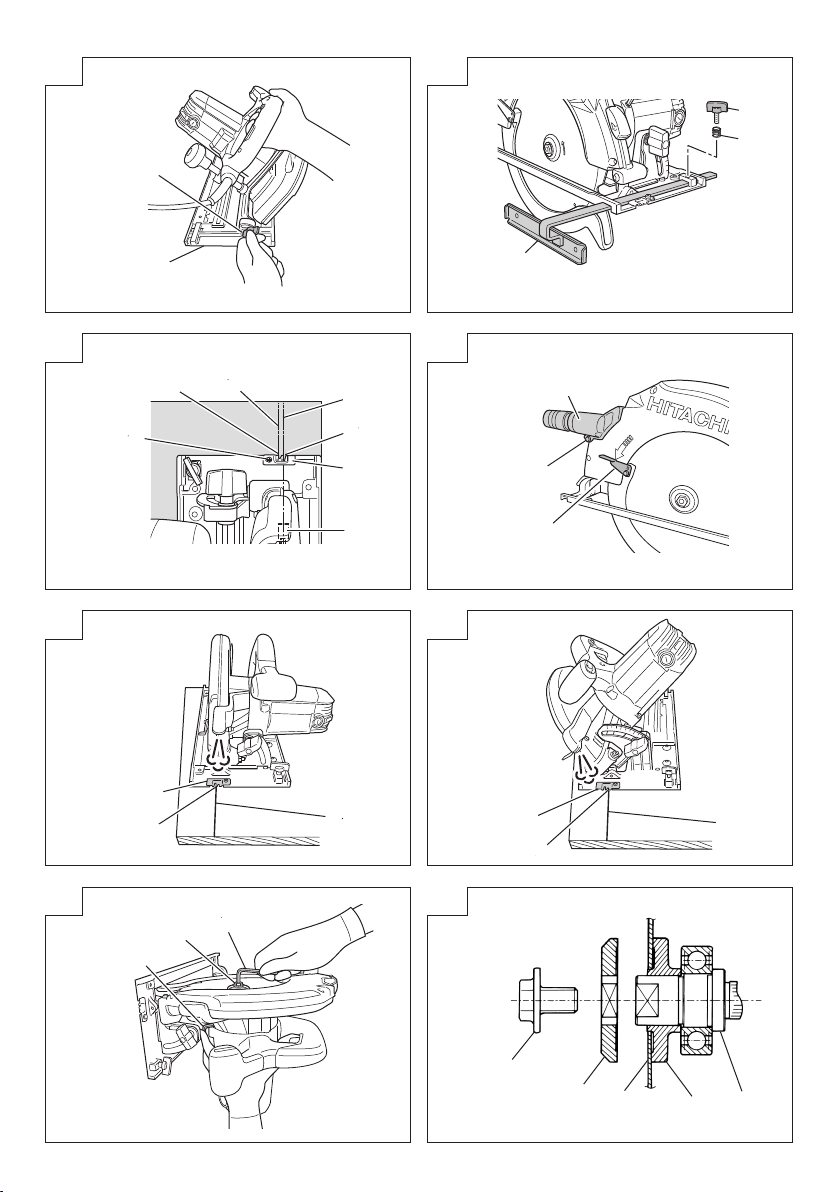
3. Regulating the guide (Fig. 8)
The cutting position can be regulated by moving the
guide to the left or right after loosening its wingbolt. The
guide may be mounted on either the right or left side of
the tool.
4. Adjusting the guide piece
On the circular saw, it is possible to make fine adjustment
of the fixing position of the guide piece, where the saw
blade and the premarked line are to be aligned.
When the saw is shipped from the factory, the linear
portion of a front scale on the guide piece is aligned with
the central position of the saw blade (Fig. 9).
(127 V, 220 V)
-1
(/min)
7
Page 9

English
Loosen the fixed M4 screw on the guide piece, should
the fixing position be wrong, and make necessary
adjustment of the position.
5. Using the dust collector
To use the vacuum cleaner to gather up saw dust, attach
the suction hose to the dust collector which is attached
to the main unit by M4 screw. When attaching the dust
collector always be sure to change the lever to the short
type at this same time (Fig. 10).
CAUTION
Continuing to use the lever that was attached to the main
unit prior to shipping from the factory will cause it to bind
on the dust collector and will interfere with the lower
guard operation.
CUTTING PROCEDURES
1. Place the base on the material, then align the premarked
line and the sawblade with the guide piece front scale
section at the front of the base (Fig. 9).
When the base is not slanted, use the large cutout as the
guide (Fig. 9, Fig. 11 (A)).
If the base is slanted (45 degrees), use the small front
scale as the guide (Fig. 9, Fig. 11 (B)).
2. Ensure that the switch is turned to the ON position before
the saw blade comes in contact with the lumber. The
switch is turned ON when the trigger is squeezed; and
OFF when the trigger is released.
3. Moving the saw straight at a constant speed will produce
optimum cutting.
CAUTIONS
Prior to cutting operation, make sure the material you
are going to cut. If the material to be cut is expected to
generate harmful / toxic dusts, make sure the dust bag
or appropriate dust extraction system is connected with
dust outlet tightly.
Wear the dust mask additionally, if available.
○ Before starting to saw, ensure that the saw blade has
reached full speed revolution.
○ Should the saw blade stop or make an abnormal noise
while operating, promptly turn OFF the switch.
○ Always take care in preventing the power cord from
coming near the revolving saw blade.
○ Using the circular saw with the saw blade facing upwards
or sideways is very hazardous. Such uncommon
applications should be avoided.
○ When cutting materials, always wear protective glasses.
○ When finished with a job, pull out the plug from the
receptacle.
MOUNTING AND DISMOUNTING THE SAW
BLADE
CAUTION
To avoid serious accident, ensure the switch is in the
OFF position, and the power source is disconnected.
1. Dismounting the saw blade
(1) Set the cutting volume at maximum, and place the
Circular Saw as shown in Fig. 12.
(2) Depress the lock lever, lock the spindle, and remove the
hexagonal-socket bolt with the Hex. bar wrench.
(3) While holding the lower guard lever to keep the lower
guard fully retracted into the saw cover, remove the saw
blade.
2. Mounting the Saw Blade
(1) Thoroughly remove any sawdust which has accumulated
on the spindle, bolt and washers.
(2) As shown in Fig. 13, the side of Washer (A) with a
projected center the same diameter as the inner diameter
of the saw blade and the concave side of Washer (B)
must be fitted to the saw blade sides.
(3) To assure proper rotation direction of the saw blade, the
arrow direction on the saw blade must coincide with the
arrow direction on the saw cover.
(4) Using the fingers, tighten the hexagonal-socket bolt
retaining the saw blade as much as possible. Then
depress the lock lever, lock the spindle, and thoroughly
tighten the bolt.
CAUTION
After having attached the saw blade, reconfirm that the
lock lever is firmly secured in the prescribed position.
MAINTENANCE AND INSPECTION
1. Inspecting the saw blade
Since use of a dull saw blade will degrade efficiency and
cause possible motor malfunction, sharpen or replace
the saw blade as soon as abrasion is noted.
2. Inspecting the mounting screws
Regularly inspect all mounting screws and ensure that
they are properly tightened. Should any of the screws be
loose, retighten them immediately. Failure to do so could
result in serious hazard.
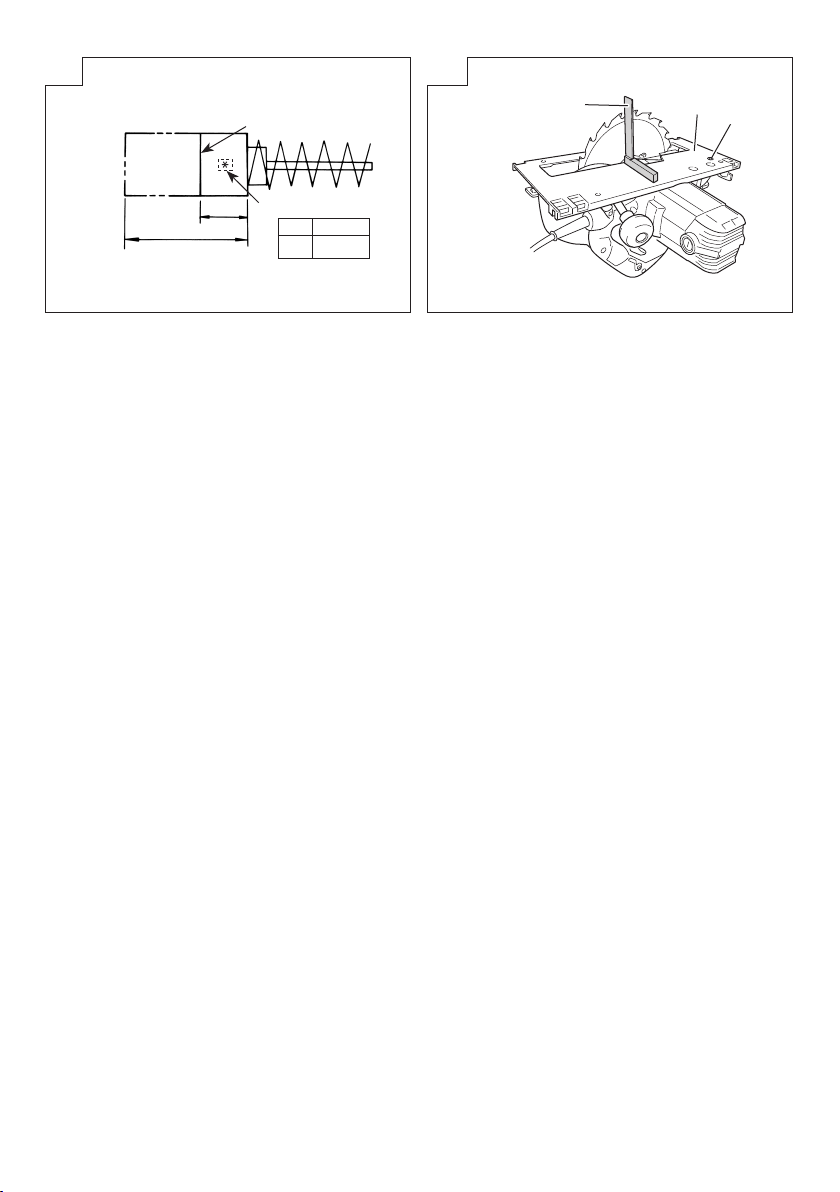
3. Inspecting the carbon brushes (Fig. 14)
The motor employs carbon brushes which are
consumable parts. Since an excessively worn carbon
brush can result in motor trouble, replace the carbon
brushes with new ones having the same carbon brush
No. shown in the figure when it becomes worn to or near
the “wear limit”. In addition, always keep carbon brushes
clean and ensue that they slide freely within the brush
holders.
CAUTION
When replacing the new carbon brushes, always
use genuine Hitachi carbon brushes with the number
specified in the drawing.
4. Replacing carbon brushes
Disassemble the brush caps with a slotted-head
screwdriver. The carbon brushes can then be easily
removed.
5. Motor unit maintenance
The motor winding is an important part of this tool. Avoid
damaging and be careful to avoid contact with cleaning
oil or water.
After 50 hours of use, clean the motor by blowing into the
ventilation holes of the motor housing with dry air from an
air gun or other tool (Fig. 16).
Dust or particle accumulation in the motor can result in
damage.
6. Inspecting and maintaining the lower guard
Always make sure that the lower guard moves smoothly.
In the event of any malfunction, immediately repair the
lower guard.
For cleaning and maintenance, use an air gun or other
tool to blow clean the space between the lower guard and
gear cover as well as the rotation part of the lower guard
with dry air (Fig. 16).
Doing so is effective for the emission of chips or other
particles.
Accumulation of chips or other particles around the lower
guard may result in malfunction or damage.
WARNING
To prevent dust inhalation or eye irritation, wear
protective safety goggles and a dust mask when
using an air gun or other tool to clean the lower
guard, ventilation holes or other parts of the
product.
8
Page 10

English
Ensure smooth
movement of lower guard
Space between lower
guard and gear cover
Housing vent
Fig. 16
7. Adjusting the base and saw blade to maintain
perpendicularity
The angle between the base and the saw blade has been
adjusted to 90°, however should this perpendicularity be
lost for some reason, adjust in the following manner:
(1) Turn the base face up (Fig. 15) and loosen the wing-nut
and wing-bolt (Fig. 7 (A), Fig. 7 (B)).
(2) Apply a square to the base and the saw blade and turning
the slotted set screw with a slotted-head screwdriver,
shift the position of the base to produce the desired right
angle.
8. Service parts list
A: Item No.
B: Code No.
C: No. Used
D: Remarks
CAUTION
Repair, modification and inspection of Hitachi Power
Tools must be carried out by a Hitachi Authorized Service
Center.
This Parts List will be helpful if presented with the tool to
the Hitachi Authorized Service Center when requesting
repair or other maintenance.
In the operation and maintenance of power tools, the
safety regulations and standards prescribed in each
country must be observed.
MODIFICATION
Hitachi Power Tools are constantly being improved
and modified to incorporate the latest technological
advancements.
Accordingly, some parts (i.e. code numbers and/or
design) may be changed without prior notice.
Rotation part of
the lower guard
Air gun
NOTE
Due to HITACHI’s continuing program of research and
development, the specifications herein are subject to
change without prior notice.
9
Page 11

Español
ADVERTENCIAS DE SEGURIDAD GENERAL DE
LA HERRAMIENTA ELÉCTRICA
ADVERTENCIA
Lea todas las advertencias de seguridad, instrucciones,
ilustraciones y especificaciones incluidas con esta
herramienta.
Si no se siguen las instrucciones indicadas a continuación
podría producirse una descarga eléctrica, un incendio o
daños graves.
Guarde todas las advertencias e instrucciones para
futura referencia.
El término “herramienta eléctrica” en las advertencias hace
referencia a la herramienta eléctrica que funciona con la red
de suministro (con cable) o a la herramienta eléctrica que
funciona con pilas (sin cable).
1) Seguridad del área de trabajo
a) Mantenga la zona de trabajo limpia y bien
iluminada.
Las zonas desordenadas u oscuras pueden provocar
accidentes.
b) No utilice las herramientas eléctricas en
entornos explosivos como, por ejemplo, en
presencia de líquidos inflamables, gases o
polvo.
Las herramientas eléctricas crean chispas que
pueden inflamar el polvo o los gases.
c) Mantenga a los niños y transeúntes alejados
cuando utilice una herramienta eléctrica.
Las distracciones pueden hacer que pierda el control.
2) Seguridad eléctrica
a) Los enchufes de las herramientas eléctricas
tienen que ser adecuados a la toma de corriente.
No modifique el enchufe. No utilice enchufes
adaptadores con herramientas eléctricas
conectadas a tierra.
Si no se modifican los enchufes y se utilizan tomas
de corriente adecuadas se reducirá el riesgo de
descarga eléctrica.
b) Evite el contacto corporal con superficies
conectadas a tierra como tuberías, radiadores y
frigoríficos.
Hay mayor riesgo de descarga eléctrica si su cuerpo
está en contacto con el suelo.
c) No exponga las herramientas eléctricas a la
lluvia o a la humedad.
La entrada de agua en una herramienta eléctrica
aumentará el riesgo de descarga eléctrica.
d) No utilice el cable incorrectamente. No utilice el
cable para transportar, tirar de la herramienta
eléctrica o desenchufarla.
Mantenga el cable alejado del calor, del aceite,
de bordes afilados o piezas móviles.
Los cables dañados o enredados aumentan el riesgo
de descarga eléctrica.
e) Cuando utilice una herramienta eléctrica al aire
libre, utilice un cable prolongador adecuado
para utilizarse al aire libre.
La utilización de un cable adecuado para usarse al
aire libre reduce el riesgo de descarga eléctrica.
f) Si no se puede evitar el uso de una herramienta
eléctrica en un lugar húmedo, utilice un
suministro protegido mediante un dispositivo
de corriente residual (RCD).
El uso de un RCD reduce el riesgo de descarga
eléctrica.
3) Seguridad personal
a) Esté atento, preste atención a lo que hace y
utilice el sentido común cuando utilice una
herramienta eléctrica.
No utilice una herramienta eléctrica cuando esté
cansado o esté bajo la influencia de drogas,
alcohol o medicación.
Una distracción momentánea mientras utiliza
herramientas eléctricas puede dar lugar a lesiones
personales graves.
b) Utilice un equipo de protección personal. Utilice
siempre una protección ocular.
El equipo de protección como máscara para el
polvo, zapatos de seguridad antideslizantes, casco
o protección auditiva utilizado en las situaciones
adecuadas reducirá las lesiones personales.
c) Evite un inicio involuntario. Asegúrese de que
el interruptor esté en “off” antes de conectar
la herramienta a una fuente de alimentación o
batería, cogerla o transportarla.
El transporte de herramientas eléctricas con el dedo
en el interruptor o el encendido de herramientas
eléctricas con el interruptor encendido puede
provocar accidentes.
d) Retire las llaves de ajuste antes de encender la
herramienta eléctrica.
Si se deja una llave en una pieza giratoria de la
herramienta eléctrica podrían producirse lesiones
personales.
e) No se extralimite. Mantenga un equilibrio
adecuado en todo momento.
Esto permite un mayor control de la herramienta
eléctrica en situaciones inesperadas.
f) Vístase adecuadamente. No lleve prendas
sueltas o joyas. Mantenga el cabello y la ropa
alejados de las partes móviles.
La ropa suelta, las joyas y el pelo largo pueden
quedar atrapados en las piezas móviles.
g) Si se proporcionan dispositivos para la conexión
de extracción de polvo e instalaciones de
recogida, asegúrese de que estén conectados y
se utilicen adecuadamente.
La utilización de un sistema de recogida de polvo
puede reducir los riesgos relacionados con el polvo.
h) No deje que la familiaridad adquirida con el
uso frecuente de herramientas le permitan caer
en la complacencia e ignorar los principios de
seguridad de la herramienta.
Una acción descuidada puede causar lesiones
graves en una fracción de segundo.
4) Utilización y mantenimiento de las herramientas
eléctricas
a) No fuerce la herramienta eléctrica. Utilice
la herramienta eléctrica correcta para su
aplicación.
La herramienta eléctrica correcta trabajará mejor y
de forma más segura si se utiliza a la velocidad para
la que fue diseñada.
b) No utilice la herramienta eléctrica si el interruptor
no la enciende y apaga.
Las herramientas eléctricas que no pueden
controlarse con el interruptor son peligrosas y deben
repararse.
c) Desconecte el enchufe de la fuente eléctrica y/o
retire la batería, si es extraíble, de la herramienta
eléctrica antes de hacer ajustes, cambiar
accesorios o almacenar herramientas eléctricas.
Estas medidas de seguridad preventivas reducen el
riesgo de que la herramienta eléctrica se ponga en
marcha accidentalmente.
10
Page 12

Español
d) Guarde las herramientas eléctricas que no se
utilicen fuera del alcance de los niños, y no
permita que utilicen las herramientas eléctricas
personas no familiarizadas con las mismas o
con estas instrucciones.
Las herramientas eléctricas son peligrosas si son
utilizadas por usuarios sin formación.
e) Realice el mantenimiento de las herramientas
eléctricas y accesorios. Compruebe si las piezas
móviles están mal alineadas o unidas, si hay
alguna pieza rota u otra condición que pudiera
afectar al funcionamiento de las herramientas
eléctricas. Si la herramienta eléctrica está
dañada, llévela a reparar antes de utilizarla.
Se producen muchos accidentes por no realizar
un mantenimiento correcto de las herramientas
eléctricas.
f) Mantenga las herramientas de corte afiladas y
limpias.
Las herramientas de corte correctamente mantenidas
con los bordes de corte afilados son más fáciles de
controlar, y existe menor riesgo de que se atasquen.
g) Utilice la herramienta eléctrica, los accesorios
y las brocas de la herramienta, etc. de acuerdo
con estas instrucciones, teniendo en cuenta las
condiciones de trabajo y el trabajo que se va a
realizar.
La utilización de la herramienta eléctrica para
operaciones diferentes a las previstas podría dar
lugar a una situación peligrosa.
h) Mantenga los mangos y las superficies de
agarre secas, limpias y libres de aceite y grasa.
Los mangos resbaladizos y las superficies de agarre
no permiten el manejo seguro y el control de la
herramienta en situaciones inesperadas.
5) Revisión
a) Solicite a un experto cualificado que revise la
herramienta eléctrica y que utilice solo piezas
de repuesto idénticas.
Esto garantizará el mantenimiento de la seguridad de
la herramienta eléctrica.
PRECAUCIÓN
Mantenga a los niños y a las personas enfermas
alejadas.
Cuando no se utilicen, las herramientas deben
almacenarse fuera del alcance de los niños y de las
personas enfermas.
INSTRUCCIONES DE SEGURIDAD PARA TODAS
LAS SIERRAS
Procedimientos de corte
a)
PELIGRO: Mantenga las manos alejadas de
la zona de corte y de la cuchilla. Mantenga la otra
mano en el mango auxiliar o la carcasa del motor.
Si sujeta la sierra con las dos manos, evitará cortarse
con la cuchilla.
b) No se coloque debajo de la pieza de trabajo.
El protector no puede protegerle de la cuchilla si se sitúa
debajo de la pieza de trabajo.
c) Ajuste la profundidad de corte al grosor de la pieza
de trabajo.
Debajo de la pieza de trabajo solo debe quedar visible
menos de un diente completo de la cuchilla.
d) Nunca sujete la pieza en las manos o sobre una
pierna mientras corta. Fije la pieza de trabajo a una
plataforma estable.
11
Es importante que apoye la pieza de trabajo de forma
adecuada para evitar que su cuerpo quede expuesto a la
sierra, que la cuchilla se quede atascada o que se pierda
el control.
e) Sostenga la herramienta eléctrica por las
superficies de agarre aisladas cuando realice una
operación en la que el accesorio de corte pueda
entrar en contacto con el cableado oculto o con su
propio cable.
El contacto con un cable con corriente hará que las
partes metálicas expuestas de la herramienta eléctrica
puedan transmitir esa corriente y provocar una descarga
eléctrica al operador.
f) Cuando realice un corte al hilo, utilice siempre un
tope-guía o una guía de borde recto.
De esta forma mejora la precisión del corte y se reducen
las posibilidades de que la cuchilla se atasque.
g) Utilice siempre cuchillas con orificios de árbol que
tengan el tamaño y la forma correctos (rombo frente
a círculo).
Las cuchillas que no coincidan con los componentes
de montaje de la sierra funcionarán descentradas y
provocarán la pérdida de control.
h) No utilice nunca arandelas o pernos de cuchilla
dañados o incorrectos.
Las arandelas y el perno están diseñados
específicamente para su cuchilla, con el fin de alcanzar
un rendimiento óptimo y la máxima seguridad de
funcionamiento.
Causas de retroceso y advertencias relacionadas
- El retroceso es una reacción repentina de la cuchilla
de la sierra cuando se engancha, se atasca o está mal
alineada, lo cual provoca que la sierra sin control se
eleve, se salga de la pieza de trabajo, y se dirija hacia el
operador;
- cuando la cuchilla se engancha o se atasca por el cierre
de la vía, la cuchilla queda bloqueada y la reacción del
motor hace que la unidad retroceda rápidamente hacia
el operador;
- Si la cuchilla se tuerce o pierde la alineación durante el
corte, los dientes del borde trasero de la cuchilla pueden
clavarse en la superficie superior de la madera, hacer
que la cuchilla se salga de la vía de corte y salte en
dirección al operador.
El retroceso es el resultado de un uso inadecuado de la
sierra o de procedimientos o condiciones de funcionamiento
incorrectos, y puede evitarse adoptando las precauciones
correctas indicadas a continuación.
a) Sujete la sierra con firmeza con ambas manos
y coloque los brazos de forma que resistan las
fuerzas de retroceso. Coloque el cuerpo a uno de
los lados de la cuchilla, pero no en línea con ella.
El retroceso puede provocar que la sierra salte hacia
atrás, pero el operador puede controlar las fuerzas de
retroceso si se adoptan las medidas necesarias.
b) Cuando se atasque la cuchilla o se interrumpa el
corte por cualquier motivo, libere el interruptor de
activación y mantenga la sierra sin moverla en el
material hasta que se detenga por completo.
No intente extraer la sierra de la pieza de trabajo ni
tire de ella hacia atrás mientras la cuchilla está en
movimiento, ya que puede producirse un retroceso.
Investigue y tome las medidas correctivas necesarias
para eliminar la causa del atascamiento de la cuchilla.
c) Cuando vuelva a poner en marcha la sierra en la
pieza de trabajo, centre la cuchilla de la sierra en la
vía de forma que los dientes no estén enganchados
en el material.
Page 13

Español
Si la cuchilla de la sierra se atasca, puede saltar o
retroceder desde la pieza de trabajo al poner la sierra en
marcha de nuevo.
d) Apoye los paneles de gran tamaño para minimizar el
riesgo de que la cuchilla se enganche y se produzca
retroceso.
Los paneles grandes tienden a combarse por su propio
peso. Se deben colocar apoyos bajo ambos lados del
panel, cerca de la línea de corte y cerca del borde del
panel.
e) No utilice cuchillas melladas o dañadas.
Las cuchillas no afiladas o mal ajustadas hacen que
una vía estrecha provoque una fricción excesiva, que se
atasque la cuchilla y que se produzca un retroceso.
f) La profundidad de la cuchilla y las palancas de
bloqueo del ajuste del bisel deben estar bien fijadas
antes de realizar el corte.
Si el ajuste de la cuchilla cambia durante el corte, se
puede producir un atasco de la cuchilla o un retroceso.
g) Adopte medidas de precaución adicionales al
utilizar la sierra sobre muros existentes u otros
puntos ciegos.
La cuchilla que sobresale puede cortar objetos que
podrían producir retroceso.
Función de la protección inferior
a) Compruebe que la protección inferior se cierra
adecuadamente antes de cada uso. No utilice la
sierra si el protector inferior no se mueve con
libertad y se cierra de forma instantánea. No sujete
ni fije el protector inferior en la posición de apertura.
Si la sierra se cae de forma accidental, el protector
inferior se puede doblar.
Levante el protector inferior con el mango retráctil, y
asegúrese de que se mueva libremente y no toque la
cuchilla ni ninguna otra pieza, en todos los ángulos y
profundidades de corte.
b) Compruebe el funcionamiento del resorte del
protector inferior. Si el protector y el resorte no
funcionan correctamente, deben repararse antes de
usar la sierra.
El protector inferior puede funcionar lentamente porque
hay alguna pieza dañada, hay restos de pegamento o
existe una acumulación de residuos.
c) La protección inferior puede replegarse
manualmente solo para cortes especiales tales como
“cortes por penetración” y “cortes compuestos”.
Levante el protector inferior retrayendo el mango
y libere el protector inferior en cuanto la cuchilla
entre en contacto con el material.
Para el resto de cortes, el protector debería funcionar
automáticamente.
d) Compruebe siempre que el protector inferior cubre
la cuchilla antes de colocar la sierra sobre un banco
o sobre el suelo.
El deslizamiento de la cuchilla sin protección puede
hacer que la sierra se desplace hacia atrás y corte lo
que encuentre a su paso. Tenga en cuenta el tiempo que
tarda la cuchilla en detenerse después de accionar el
interruptor.
PRECAUCIONES AL UTILIZAR LA SIERRA
CIRCULAR
1. Utilice en la máquina únicamente cuchillas del diámetro
especificado.
2. No utilice nunca discos abrasivos.
3. No utilice cuchillas deformadas o rajadas.
4. No emplee cuchillas de acero de alta velocidad.
5. No emplee cuchillas que no estén de acuerdo con las
caracteristicas especificadas en estas instrucciones.
6. No pare las cuchillas de sierra mediante presión lateral
sobre el disco.
7. Mantener siempre las cuchillas afiladas.
8. Asegúrese de que la protección inferior se mueve de una
forma ligera y libre.
9. No utilice nunca la sierra circular con su protección
inferior fijada en la posición abierta.
10. Cerciórese de que todos los mecanismos de retracción
del sistema de protección funcionen correctamente.
11. Nunca accionar la sierra circular con la cuchilla vuelta
hacia arriba o hacia un lado.
12. Asegurarse de que la pieza de trabajo esté libre de
cuerpos extraãos tales como clavos.
13. Para el modelo C9SA3, las cuchillas de sierra deben ser
de 235 mm.
14. Antes de realizar cualquier ajuste, operación de
mantenimiento, o reparación, desconecte el enchufe del
tomacorriente.
15. No utilice la herramienta con sólo la función del soplador.
(Fig. 2)
ESPECIFICACIONES
Modelo C9SA3
Voltaje (por áreas)*
Profundidad de corte
Acometida* 1800 W (127 V), 2000 W (220 V)
Velocidad de marcha en vacío 5200 min
Peso (sin cable) 7,0 kg
* Verificar indefectiblemente los datos de la placa de características de la máquina, pues varían de acuerdo al país de
destino.
90° 86 mm
45° 65 mm
(127 V, 220 V)
-1
(/min)
12
Page 14

Español
ACCESORIOS NORMALES
(1) Cuchilla de sierra (Diá. 235 mm) ...................................1
(2) Llave de barra hexagonal ..............................................1
(3) Guía ..........................................................................1
(4) Perno de mariposa ........................................................1
(5) Bloqueo del muelle .......................................................1
(6) Palanca (tipo corto) .......................................................1
(7) Colector de polvo ..........................................................1
(8) Asidero lateral ...............................................................1
(9) Tornillo (M6 × 20) ..........................................................2
Los accesorios normales están sujetos a cambio sin previo
aviso.
APLICACIONES
Cortar diversos tipos de madera.
ANTES DE LA PUESTA EN MARCHA
1. Alimentación
Asegurarse de que la alimentación de red que ha de
ser utilizada responda a las exigencias de corriente
especificadas en la placa de características del producto.
2. Conmutador de alimentación
Antes de que la herramienta esté enchufada a una toma
de corriente, asegúrese de que el interruptor principal
se encuentra en la posición OFF. Si la clavija está
conectada en la caja del enchufe mientras el conmutador
de alimentación esté en pocisión ON (conectado)
las herramientas eléctricas empezarán a trabajar
inmediatamente, provocando un serio accidente.
3. Cable de prolongación
Cuando está alejada el área de trabajo de la red de
alimentación, usar un cable de prolongación de un grosor
y potencia nominal suficiente. El cable de prolongación
debe ser mantenido lo más corto posible.
4. Preparar un banco de trabajo de madera (Fig. 3)
Como la cuchilla sobresale debajo de la superficie inferior
de la madera útil, situar la madera útil encima de un
banco de trabajo al cortar. Si se usa un bloque cuadrado
como banco de trabajo, seleccionar un fondo liso para
asegurar que sea estable. Un banco de trabajo inestable
tendrá como resultado una operación peligrosa.
5. Cuando emplee el asidero lateral (Fig. 4)
Cuando emplee el asidero lateral, instálelo con seguridad
en la base con los dos tornillos (M6 × 20).
PRECAUCIÓN
Para evitar posibles accidentes, asegurarse siempre
de que la parte de la madera útil restante después de
haberla cortado, quede sujetado firmemente y mantenido
en su posición.
6. Uso del soporte para cables (Fig. 5)
Utilizando el soporte para cables, el cable puede guiarse
por la parte posterior del producto, como se muestra en
la figura.
Si el cable interfiere durante la operación, engánchelo en
el soporte para cable y cambie su ángulo.
AJUSTE ANTES DE CORTAR
1. Ajuste de la propundidad de corte
Aflojar la perilla con una mano al mismo tiempo que
sujeta el mango con la otra, de la forma mostrada en
la Fig. 6. La profundidad de corte podrá ajustarse
moviendo la base hasta la posición deseada. Ajustar la
profundidad de corte y apretar firmemente la perilla.
2. Ajuste del ángulo de inclinación
Tal y como se muestra en la Fig. 7 (A), Fig. 7 (B) al
aflojar el tornillo de mariposa en el calibre de inclinación
y el perno de mariposa en la base, la cuchilla de la sierra
puede inclinarse hasta un ángulo máximo de 45° en
relación con la base. Una vez realizado el ajuste, vuelva
a confirmar que el tornillo de mariposa y el perno de
mariposa están bien ajustados.
3. Para regular la guía (Fig. 8)
La posición de corte puede ser regulada moviendo la
guía a la izquierda o a la derecha después de afojar su
pasador de palomilla. La guía puede ser montada en el
lado derecho o izquierdo del aparato.
4. Ajuste de la pieza guía
En la sierra circular usted podrá ajustar con precisión
la posición de fijación de la pieza guía, donde haya
que alinear la cuchilla de sierra y la línea previamente
marcada.
Cuando la sierra sale de fábrica, la parte lineal de una
escala frontal de la pieza guía está alineada con la
posición central de la cuchilla de sierra. (Fig. 9)
Si la posición de fijación está errada, afloje el tornillo
M4 fijado y, a continuación, ajuste la posición como sea
necesario.
5. Utilización del colector de polvo
Para usar la aspiradora para recopilar las astillas, acople
la manguera de succión al colector de polvo conectado
a la unidad principal con un tornillo M4. Cuando conecte
el colector de polvo asegúrese siempre de cambiar la
palanca al tipo corto en este mismo momento (Fig. 10).
PRECAUCIÓN
Seguir usando la palanca conectada a la unidad principal
antes del envío de fábrica causará que se atasque en
el colector de polvo e interferirá con la operación de la
protección inferior.
PROCEDIMIENTO DE CORTE
1. Coloque la base sobre el material, y después alinee la
línea previamente marcada y la cuchilla de sierra con la
sección de la escala frontal de la pieza guía de la parte
frontal de la base (Fig. 9).
Cuando la base no esté inclinada, utilice un corte larga
como guía (Fig. 9, Fig. 11 (A)).
Si la base está inclinada (45 grados), utilice la escala
frontal pequeño como guía (Fig. 9. Fig. 11 (B)).
2. Asegurarse de que el conmutador esté girado a la
posición ON (conectado) antes de que la cuchilla entre
en contacto con la madera útil. Cuando el conmutador
se apreta está puesto en ON (conectado) y cuando
se vuelve a apretar queda en OFF (desconectado) el
pulsador está soltado.
3. Cuando la sierra se mueva todo a la derecha con una
velocidad constante producirá un corte efectivo.
PRECAUCIONES
Antes de proceder a la operación de corte, verifique
el material que va a cortar. Si el material que se va a
cortar puede general polvo tóxico o dañino, asegúrese
de que la bolsa del polvo o el sistema de extracción de
polvo apropiado está conectado a la salida de polvo
correctamente.
Póngase la máscara para el polvo.
○ Antes de empezar a serrar, asegurarse de que la cuchilla
haya alcanzado la plena velocidad de giro.
○ Si la cuchilla de la sierra se detiene o emite ruidos
anormales durante su funcionamiento, coloque el
interruptor rápidamente en la posición OFF.
○ Siempre prestar atención para evitar que el cable se
acerque a la cuchilla que gira.
13
Page 15

Español
○ Es muy peligroso utilizar la sierra circular con la hoja
apuntando hacia arriba o de lado. Evite estas posiciones
en la medida de lo posible.
○ Al cortar material, utilice siempre gafas protectoras.
○ Cuando termine de trabajar, desenchufe el cable de la
toma de pared.
MONTAR Y DESMONTAR LA CUCHILLA
PRECAUCIÓN
Para evitar accidentes graves asegurarse de que el
conmutador está la posición OFF (desconectado) y la
acometida de red también esté desconectada.
1. Desmontaje de la cuchilla
(1) Poner el volumen de corte al máximo y situar la cierra
circular como se muestra en Fig. 12.
(2) Suelte la palanca de bloqueo, bloquee el husillo y
extraiga el perno de cabeza hexagonal con la llave de
barra hexagonal.
(3) Mientras sujeta la palanca de protección inferior
para mantener la protección inferior completamente
retractada en la tapa de la sierra, extraiga la cuchilla de
la sierra.
2. Colocación de la cuchilla
(1) Limpiar el polvo del husillo, perno y aandelas.
(2) Como muestra la Fig. 13, el lado de la arandela (A)
con un control sobresaliente del mismo diámetro que el
diámetro interior de la cuchilla de sierra y el lado cóncavo
de arandela (B), tienen que ser montados a los lados de
la cuchilla de sierra.
(3) Montar la cuchilla de forma que la flecha marcada quede
alineada con la flecha de la cubierta.
(4) Con los dedos, apriete el perno de cabeza hexagonal
que sujeta la cuchilla de la sierra lo máximo posible.
Suelte la palanca de bloqueo, bloquee el husillo y apriete
el perno completamente.
PRECAUCIÓN
Después de haber instalado la cuchilla de sierra, vuelva
a confirmar que la palanca de cierre esté firmemente
asegurada en la posición indicada.
MANTENIMIENTO E INSPECCIÓN
1. Inspeccionar la cuchilla
Como el uso de una cuchilla desgastada disminuye la
eficiencia y origina posible funcionamiento defectuoso
del motor, afilar o reemplazar la cuchilla tan pronto como
se note el desgaste.
2. Inspeccionar los tornillos de montaje
Regularmente inspeccionar todos los tornillos de montaje
y asegurarse de que estén apretados firmemente. Si
cualquier tornillo estuviera suelto, volver a apretarlo
inmediatamente. El no hacer esto provocaría un riesgo
serio.
3. Inspección de escobillas de carbón (Fig. 14)
El motor emplea carbones de contacto que son
partes consumibles. Como un carbón de contacto
excesivamente desgastado podría dar problemas al
motor, reemplazar el carbón de contacto por uno nuevo,
que tenga el mismo número mostrado en la figura,
cuando se haya desgastado o esté cerca del límite de
uso. Adicionalmente, mantener siempre los carbones de
contacto limpios y asegurarse de que corran libremente
dentro de los sujetadores de carbón.
PRECAUCIÓN
Para reemplazar las escobillas, utilice siempre otras
genvinas de Hitachi con el número (56) especificado en
el dibujo.
4. Reemplazar el carbón de contacto
Quitar la cápsula de carbón con un destornillador con
cabeza pequeña. El carbón de contacto se deja luego se
quiat facilmente.
5. Mantenimiento de la unidad del motor
El bobinado del motor es una parte importante de esta
herramienta. Evite dañarlo y tenga cuidado de evitar el
contacto con el aceite o el agua de limpieza.
Luego de 50 horas de uso, limpie el motor soplando
en los orificios de ventilación de la carcasa del motor
con aire seco de una pistola de aire u otra herramienta
(Fig. 16).
La acumulación de polvo o partículas en el motor puede
resultar en daños.
6. Inspección y mantenimiento de la protección
inferior
Asegúrese siempre de que la protección inferior se
mueva suavemente.
En el caso de detectar algún fallo, repare inmediatamente
la protección inferior.
Para la limpieza y el mantenimiento, utilice una pistola
de aire u otra herramienta para limpiar el espacio situado
entre el protector inferior y la cubierta del engranaje, así
como la pieza de rotación de la protección inferior con
aire seco (Fig. 16).
Hacerlo es efectivo para la emisión de las virutas u otras
partículas.
La acumulación de virutas o cualquier otra partícula
alrededor de la protección inferior podría provocar un
mal funcionamiento o daños.
ADVERTENCIA
Para evitar la inhalación de polvo o la irritación en
los ojos, utilice gafas de seguridad de protección
y una máscara contra el polvo cuando utilice una
pistola de aire u otra herramienta para limpiar la
protección inferior, los orificios de ventilación u
otras piezas del producto.
Asegúrese de que exista
un movimiento suave de
la protección inferior
Espacio entre la
protección inferior y la
cubierta del engranaje
Rejilla de ventilación
de la carcasa
7. Ajuste de la perpendicularidad entre la base y la
cuchilla
El ángulo entre la cuchilla y cuchilla y la base, está
ajustadooriginalmente de forma que se mantenga a
90°, pero si se pierde tal ajuste, ajustarlo de la forma
siguiente:
(1) Gire la base hacia arriba (Fig. 15) y afloje el tornillo de
mariposa y el perno de mariposa (Fig. 7 (A), Fig. 7 (B)).
(2) Cuando aplique una escuadra a la base y apoyándola
sobre la cuchilla, girar el tornillo sin cabeza con un
destornillador (–) para despazar la base, y ajustar la base
y la cuchilla de forma que queden en ángulo recto entre
sí.
Fig. 16
Pieza de rotación de
la cubierta inferior
Pistola de aire
14
Page 16

Español
8. Lista de repuestos
A: N° ítem
B: N° código
C: N° usado
D: Observaciones
PRECAUCIÓN
La reparación, modificación e inspección de las
herramientas eléctricas Hitachi deben ser realizadas por
un Centro de Servicio Autorizado de Hitachi.
Esta lista de repuestos será de utilidad si es presentada
junto con la herramienta al Centro de Servicio Autorizado
de Hitachi, para solicitar la reparación o cualquier otro
tipo de mantenimiento.
En el manejo y el mantenimiento de las herramientas
eléctricas, se deberán observar las normas y
reglamentos vigentes en cada país.
MODIFICACIONES
Hitachi Power Tools introduce constantemente mejoras
y modificaciones para incorporar los últimos avances
tecnológicos.
Por consiguiente, algunas partes (por ejemplo, números
de códigos y/o diseño) pueden ser modificadas sin
previo aviso.
NOTA
Debido al programa continuo de investigación y desarrollo
de HITACHI estas especificaciones están sujetas a cambio
sin previo aviso.
15
Page 17

Português
ADVERTÊNCIAS GERAIS DE SEGURANÇA
PARA A FERRAMENTA ELÉTRICA
ADVERTÊNCIA
Leia todas as advertências de segurança, instruções,
ilustrações e especificações fornecidas com esta
ferramenta elétrica.
Deixar de seguir todas as instruções descritas a seguir
pode provocar um choque elétrico, incêndio e/ou ferimentos
graves.
Guarde todas as advertências e instruções para futuras
consultas.
O termo “ferramenta elétrica” em todas as advertências
refere-se à sua ferramenta conectada à corrente (com um
cabo de alimentação) ou à ferramenta elétrica alimentada
por bateria (sem um cabo de alimentação).
1) Segurança da área de trabalho
a) Mantenha a área de trabalho limpa e bem
iluminada.
As áreas escuras ou cheias de material são propícias
a acidentes.
b) Não trabalhe com ferramentas elétricas em
ambientes explosivos, tais como na presença
de líquidos inflamáveis, gases ou pó.
As ferramentas elétricas criam faíscas que podem
inflamar os gases ou pó.
c) Mantenha as crianças e outras pessoas
afastadas quando trabalhar com uma ferramenta
elétrica.
As distrações podem fazer com que perca controle.
2) Segurança elétrica
a) Os plugues da ferramenta elétrica devem
corresponder às tomadas. Nunca modifique
o plugue. Não use plugues de adaptação com
ferramentas elétricas conectadas à terra.
Os plugues inalterados e tomadas correspondentes
reduzirão o risco de choques elétricos.
b) Evite o contato corporal com superfícies
conectadas à terra, tais como canos, radiadores,
fogões e geladeiras.
Existe um risco maior de choque elétrico se o seu
corpo estiver conectado à terra.
c) Não exponha ferramentas elétricas à chuva ou
condições de umidade.
A entrada de água numa ferramenta elétrica
aumentará o risco de choques elétricos.
d) Não abuse do cabo de alimentação. Nunca use
o cabo para transportar, puxar ou desligar a
ferramenta elétrica.
Mantenha o cabo afastado do calor, óleo, bordas
agudas ou peças móveis.
Fios danificados ou entrelaçados podem aumentar o
risco de choques elétricos.
e) Quando trabalhar com uma ferramenta elétrica
ao ar livre, use uma extensão adequada para
uso em exteriores.
O uso de um cabo adequado para uso ao ar livre
reduz o risco de choques elétricos.
f) Se não for possível evitar o uso de uma máquina
elétrica num local úmido, use uma fonte de
alimentação protegida por um dispositivo de
corrente residual (RCD).
O uso de um RCD reduz o risco de choques elétricos.
3) Segurança pessoal
a) Mantenha-se alerta, esteja atento ao que estiver
fazendo e use o bom senso ao trabalhar com
uma ferramenta elétrica.
Não use uma ferramenta elétrica quando estiver
cansado ou sob a influência de drogas, álcool
ou medicamentos.
Um momento de desatenção enquanto trabalha com
ferramentas elétricas pode resultar em ferimentos
pessoais graves.
b) Use o equipamento de proteção pessoal. Use
sempre protetores para os olhos.
O equipamento de proteção, tal como uma máscara de
pó, sapatos de segurança antiderrapantes, capacete
ou protetores auditivos usados para condições
adequadas reduzirá os ferimentos pessoais.
c) Evite ligar a ferramenta acidentalmente.
Certifique-se de que o interruptor esteja na
posição de desligado antes de conectar a
fonte de alimentação e/ou bateria, levantar ou
transportar a ferramenta.
Transportar ferramentas elétricas com o dedo
no interruptor ou ativar ferramentas que estão
com o interruptor ligado é perigoso e aumenta a
probabilidade de acidentes.
d) Remova qualquer chave de parafusos ou chave
de aperto antes de ligar a ferramenta.
Uma chave de aperto ou de parafusos instalada
na parte rotativa da ferramenta pode provocar
ferimentos pessoais.
e) Não se estique. Mantenha sempre o controle e
equilíbrio adequados.
Isso lhe permite obter um melhor controle da
ferramenta em situações inesperadas.
f) Vista-se adequadamente. Não use roupas largas
ou jóias. Mantenha o cabelo e roupa afastados
das peças móveis.
As roupas largas, jóias ou cabelo comprido podem
ser apanhados em peças móveis.
g) Se forem fornecidos componentes para a
conexão de dispositivos de extração e coleta
de pó, certifique-se de que os mesmos sejam
conectados e usados adequadamente.
O uso de um coletor de pó pode reduzir os perigos
relacionados com o pó.
h) Não permita que a familiaridade adquirida
com o uso frequente de ferramentas o torne
descuidado a ponto de ignorar os princípios de
segurança da ferramenta.
Uma ação descuidada pode causar ferimentos
graves numa fração de segundo.
4) Uso da ferramenta e manutenção
a) Não force a ferramenta elétrica. Use a ferramenta
correta para a sua aplicação.
A ferramenta correta fará o trabalho melhor e com mais
segurança à velocidade para a qual foi concebida.
b) Não use a ferramenta elétrica se o interruptor
não a ligar ou desligar.
Qualquer ferramenta que não possa ser controlada
pelo interruptor é perigosa e deve ser reparada.
c) Desconecte o cabo de alimentação da tomada
elétrica e/ou retire a bateria, se removível, da
ferramenta elétrica antes de realizar quaisquer
ajustes, mudar os acessórios ou guardar a
ferramenta elétrica.
Tais medidas preventivas de segurança reduzem o
risco de ligar a ferramenta elétrica acidentalmente.
d) Guarde as ferramentas elétricas fora do alcance
de crianças e não permita que pessoas não
habituadas à ferramenta elétrica ou estas
instruções trabalhem com a ferramenta.
As ferramentas elétricas são perigosas nas mãos de
usuários inexperientes.
16
Page 18

Português
e) Realize a manutenção de ferramentas elétricas
e acessórios. Verifique a existência de
desalinhamentos ou curvaturas das peças
móveis, rupturas de peças e quaisquer outras
condições que possam afetar o funcionamento
das ferramentas elétricas.
Se encontrar qualquer dano, solicite o conserto
da ferramenta antes de usá-la.
Muitos acidentes são causados por ferramentas com
manutenção inadequada.
f) Mantenha as ferramentas de corte afiadas e
limpas.
As ferramentas de corte com uma manutenção
adequada e extremidades afiadas são menos
propensas a curvar-se e mais fáceis de controlar.
g) Use a ferramenta elétrica, acessórios e brocas
de ferramentas, etc., de acordo com estas
instruções, levando em consideração as
condições de trabalho e o trabalho a ser efetuado.
O uso de uma ferramenta elétrica para operações
diferentes das concebidas pode resultar num mau
funcionamento.
h) Mantenha os cabos e superfícies de empunhadura
secos, limpos e livres de óleo e graxa.
Cabos e superfícies de empunhadura escorregadios
não permitem um manuseio e controle seguro da
ferramenta em situações inesperadas.
5) Manutenção
a) A manutenção da sua ferramenta elétrica deve
ser realizada por pessoal técnico qualificado e
somente peças idênticas devem ser usadas para
substituição de peças defeituosas.
Isso garantirá que a segurança da ferramenta elétrica
seja mantida.
PRECAUÇÃO
Mantenha afastadas das crianças e pessoas
debilitadas.
Quando não estiverem sendo usadas, as ferramentas
devem ser guardadas fora do alcance de crianças e
pessoas debilitadas.
INSTRUÇÕES DE SEGURANÇA PARA TODAS
AS SERRAS
Procedimentos de corte
a)
PERIGO: Mantenha as mãos afastadas da área
de corte e da lâmina. Mantenha a outra mão no cabo
auxiliar ou caixa do motor.
Segure a serra com ambas as mãos para não sofrer
cortes das mãos pela lâmina.
b) Não coloque as mãos debaixo da peça de trabalho.
O protetor não pode proteger da lâmina se as mãos
estiverem debaixo da peça de trabalho.
c) Ajuste a profundidade de corte para a espessura da
peça de trabalho.
Deve ser visível menos de um dente total dos dentes da
lâmina abaixo da peça de trabalho.
d) Nunca segure a peça de trabalho com as mãos nem
entre as pernas ao cortar. Fixe a peça de trabalho a
uma plataforma estável.
É importante suportar corretamente a peça de trabalho
para minimizar a exposição do corpo, dobragem da
lâmina ou perda de controle.
e) Segure a ferramenta elétrica pelas superfícies de
empunhadura isoladas ao realizar uma operação na
qual a ferramenta de corte possa entrar em contato
com uma fiação elétrica oculta ou seu próprio cabo
elétrico.
17
O contato com um fio elétrico “vivo” deixará “vivas”
(carregadas eletricamente) as partes metálicas expostas
da ferramenta elétrica e poderá causar um choque
elétrico no operador.
f) Quando serrar no sentido longitudinal, sempre use
uma guia de alinhamento ou um guia de borda reta.
Isso melhora a precisão do corte e reduz a possibilidade
de dobragem da lâmina.
g) Use sempre lâminas com a dimensão e formato
corretos (diamante ou redondo) dos orifícios de
fixação.
As lâminas que não são compatíveis com as peças de
montagem da serra funcionarão de forma descentrada,
provocando a perda de controle.
h) Nunca use arruelas ou parafuso de lâmina
incorretos ou danificados.
As arruelas e o parafuso da lâmina foram concebidos
especialmente para a sua serra, para um excelente
desempenho e funcionamento seguro.
Causas e advertências relacionadas com o contragolpe
- o contragolpe é uma reação brusca de uma lâmina de
serra emperrada, agarrada ou desalinhada, fazendo
com que a serra descontrolada se levante ou abaixe da
peça de trabalho na direção do operador;
- quando a lâmina fica emperrada ou agarrada fortemente
no entalhe do corte, a lâmina para de mover-se e a
reação do motor impulsiona a ferramenta fortemente
para trás na direção do operador.
– Se a lâmina ficar torcida ou desalinhada no corte, os
dentes da borda traseira da lâmina podem enterrar-se
na superfície superior da madeira, fazendo com que a
lâmina saia do entalhe e salte na direção do operador.
O contra-golpe é o resultado de uso e/ou procedimento
inadequado ou condições de operação incorretos da serra
e pode ser evitado tomando-se as devidas precauções, tal
como indicado em baixo.
a) Segure a serra bem com ambas as mãos e posicione
os braços para resistir às forças de contra-golpe.
Coloque o corpo num dos lados da lâmina, mas não
alinhado com a lâmina.
O resultado pode fazer com que a lâmina salte para trás,
mas as forças de contra-golpe podem ser controladas
pelo operador, se forem tomadas as devidas precauções.
b) Quando a lâmina estiver dobrando ou quando o
corte for interrompido por alguma razão, solte o
gatilho e segure a serra sem mexer até que lâmina
pare completamente.
Nunca tente remover a serra da peça de trabalho
nem puxe a serra para trás enquanto a lâmina
estiver em movimento; caso contrário, isso pode
ocorrer um contra-golpe.
Investigue e tome medidas de correção para eliminar a
causa da dobragem da lâmina.
c) Ao reiniciar a serragem na peça de trabalho, centre
a lâmina da serra no entalhe do corte de forma que
os dentes da serra não se engrenem no material.
Se a lâmina da serra dobrar-se, ela pode sair do entalhe
ou causar um contragolpe da peça de trabalho ao
reiniciar a serragem.
d)
Coloque painéis de apoio de grandes dimensões para
minimizar o risco da lâmina ficar atracada ou ressaltar.
Os painéis grandes tendem dobrar sob o seu próprio
peso. Portanto, devem ser colocados apoios debaixo do
painel em ambos os lados, perto da linha de corte e perto
da extremidade do painel.
e) Não use lâminas rombas ou danificadas.
As lâminas não afiadas ou incorretamente instaladas
criam um entalhe estreito, causando uma fricção
excessiva, dobragem da lâmina e contra-golpe.
Page 19

Português
f) As alavancas de bloqueio do ajuste da profundidade
e chanfradura da lâmina devem estar apertadas e
fixadas antes de fazer o corte.
Se o ajuste da lâmina mudar durante o corte, isso pode
provocar a dobragem e contra-golpes.
g) Tome especial cuidado ao serrar em paredes
existentes ou outras áreas cegas.
A lâmina protuberante pode cortar objetos que podem
provocar contra-golpes.
Função do protetor inferior
a) Confirme o fechamento adequado do protetor
inferior antes de cada uso. Não opere a serra se
o protetor inferior não se mover livremente e não
se fechar instantaneamente. Nunca prenda nem
amarre o protetor inferior na posição aberta.
Se a serra for derrubada acidentalmente, o protetor
inferior pode dobrar-se.
Levante o protetor inferior com o cabo retrátil e certifique-
se de que o protetor se mova livremente e não toque na
lâmina ou em qualquer outra parte, em todos os ângulos
e profundidades de corte.
b) Verifique o funcionamento da mola do protetor
inferior. Se o protetor e a mola não estiverem
funcionando corretamente, os mesmos devem ser
reparados antes do uso.
O protetor inferior pode funcionar incorretamente
devido a peças danificadas, depósitos acumulados ou
acumulação de detritos.
c) O protetor inferior pode ser retraído manualmente
apenas para cortes especiais como “corte de
mergulho” e “cortes compostos”. Levante o
protetor inferior com o cabo retrátil e assim que a
lâmina entrar no material, o protetor inferior deve
ser solto.
Para outras serragens, o protetor inferior deve funcionar
de forma automática.
ESPECIFICAÇÕES
d) Certifique-se sempre de que o protetor inferior
esteja cobrindo a lâmina antes de colocar a serra na
bancada de trabalho ou no chão.
Uma lâmina de corte longitudinal desprotegida fará que
a serra ande para trás, cortando o que estiver no seu
caminho.
Verifique o tempo que demora para que lâmina pare
após a liberação do gatilho.
PRECAUÇÕES RELATIVAS AO USO DA SERRA
CIRCULAR
1. Use apenas o diâmetro de lâmina especificado na
máquina.
2. Não use rodas abrasivas.
3. Não use as lâminas de serra que estejam deformadas ou
quebradas.
4. Não use lâminas de serra feitas de aço rápido.
5. Não use lâminas de serra que não estejam de acordo
com as características especificadas nestas instruções.
6. Não pare as lâminas de serra usando pressão lateral
sobre o disco.
7. Mantenha as lâminas sempre bem afiadas.
8. Certifique-se de que o protetor inferior se mova com
suavidade e livremente.
9. Nunca use a serra circular com o protetor inferior fixado
na posição de aberta.
10. Certifique-se que o mecanismo de retração do sistema
de guia funcione corretamente.
11. Nunca opere a serra circular com a lâmina de serra
virada para cima ou para o lado.
12. Certifique-se de que o material esteja livre de materiais
estranhos como pregos.
13. Para o modelo C9SA3, as lâminas de serra devem ser de
235 mm.
14. Desconecte o plugue da tomada antes de realizar
qualquer ajuste, conserto ou manutenção.
15. Não use a ferramenta apenas com a função de sopro.
(Fig. 2)
Modelo C9SA3
Voltagem (por áreas)*
Profundidade do corte
Potência de entrada* 1800 W (127 V), 2000 W (220 V)
Rotação sem carga 5200 min
Peso (sem fio) 7,0 kg
* Não deixe de verificar a voltagem na placa identificadora constante do produto, pois ela está sujeita a mudanças conforme
a área.
ACESSÓRIOS PADRÕES
(1) Lâmina de serra (Diâmetro 235 mm).............................1
(2) Chave de barra sextavada ............................................1
(3) Guia ..............................................................................1
(4) Parafuso-borboleta .......................................................1
(5) Mola de bloqueio ..........................................................1
(6) Alavanca (tipo curta) .....................................................1
(7) Coletor de pó ................................................................1
(8) Cabo lateral...................................................................1
(9) Parafuso (M6 × 20) .......................................................2
Os acessórios padrões estão sujeitos a modificações sem
aviso prévio.
90° 86 mm
45° 65 mm
APLICAÇÕES
Corte vários tipos de madeira
ANTES DA OPERAÇÃO
1. Fonte de energia
Certifique-se de que a fonte de energia que será usada
satisfaça as exigências especificadas na placa de
identificação do produto.
(127 V, 220 V)
-1
(/min)
18
Page 20

Português
2. Interruptor de alimentação
Antes de conectar a ferramenta a uma tomada elétrica,
certifique-se de que o interruptor de alimentação esteja
na posição OFF (desligado). Se o plugue for conectado
a uma tomada elétrica com o interruptor na posição de
ligado (ON), a ferramenta elétrica começará a funcionar
imediatamente, podendo provocar um grave acidente.
3. Cabo de extensão
Quando o local de trabalho não possuir uma fonte de
energia, use um cabo de extensão de espessura e de
potência nominal suficientes. A extensão deve ser
mantida o mais curta possível.
4. Prepare uma bancada de trabalho de madeira
(Fig. 3)
Como a lâmina de serra se estende além da superfície
mais baixa da madeira, coloque a madeira numa
bancada de trabalho ao cortá-la. Se for usado um bloco
quadrado como bancada de trabalho, selecione um piso
nivelado para garantir que ela fique adequadamente
estável. Uma bancada instável pode tornar a operação
arriscada.
5. Uso do cabo lateral (Fig. 4)
Ao usar o cabo lateral, prenda-a firmemente na base
com os dois parafusos (M6 x 20).
PRECAUÇÃO
Para evitar um possível acidente, certifique-se sempre
de que a porção de madeira que sobrar depois do corte
esteja ancorada firmemente ou fixada na posição.
6. Uso do suporte do cabo (Fig. 5)
Você pode usar o suporte do cabo para direcionar o
cabo para trás da ferramenta, como mostrado na figura.
Se o cabo estiver causando alguma interferência durante
o trabalho, enganche-o no suporte do cabo e mude seu
ângulo.
AJUSTE DA SERRA ANTES DO USO
1. Ajuste da profundidade do corte
Como mostrado na Fig. 6, segure o cabo com uma mão
enquanto afrouxa o botão com a outra. A profundidade
de corte pode ser ajustada movendo-se a base para a
posição desejada. Dessa maneira, ajuste a profundidade
do corte e, em seguida, reaperte o botão firmemente.
2. Ajuste o ângulo de inclinação
Como mostrado na Fig. 7 (A) e Fig. 7 (B), ao soltar
o parafuso-borboleta do medidor de inclinação e o
parafuso-borboleta da base, a lâmina da serra poderá
estar inclinada para um ângulo máximo de 45° em
relação à base. Após o ajuste, certifique-se de que
a porca-borboleta e o parafuso-borboleta estejam
apertados.
3. Ajuste da guia (Fig. 8)
A posição de corte pode ser ajustada mediante o
deslocamento da guia para a esquerda ou para a direita
depois de afrouxar seu parafuso-borboleta. A guia pode
ser montada do lado direito ou esquerdo da ferramenta.
4. Ajuste da peça da guia
Na serra circular, é possível fazer ajustes finos da
posição de fixação da guia, onde a lâmina de serra e a
linha pré-marcada devem ser alinhadas.
Quando a serra sai da fábrica, a porção linear da escala
frontal na guia é alinhada na posição central da lâmina
de serra (Fig. 9).
Afrouxe o parafuso M4 fixado na peça da guia, caso a
posição de fixação esteja incorreta, e ajuste a posição
conforme seja necessário.
5. Uso do coletor de pó
Para usar o aspirador de pó para coletar o pó de serra,
instale a mangueira de sucção no coletor de pó que
se encontra instalado na unidade principal com um
parafuso M4. Ao instalar o coletor de pó, certifique-se
sempre de mudar a alavanca para o tipo curta ao mesmo
tempo (Fig. 10).
PRECAUÇÃO
Continuar a usar a alavanca que foi instalada na unidade
principal antes da ferramenta sair da fábrica dobrará a
mesma no coletor de pó e interferirá com a operação do
protetor inferior.
PROCEDIMENTOS DE CORTE
1. Coloque a base sobre o material e, em seguida, ajuste
a linha pré-marcada e a lâmina de serra com a seção da
escala frontal da guia na parte frontal da base (Fig. 9).
Quando a base não estiver inclinada, use o recorte como
guia (Fig. 9, Fig. 11 (A)).
Se a base estiver inclinada (45 graus), use a escala
frontal pequena como guia (Fig. 9, Fig. 11 (B)).
2. Certifique-se de ligar (ON) o interruptor de alimentação
antes de colocar a lâmina de serra em contato com a
madeira. O interruptor é ligado (ON) quando o gatilho
é pressionado; e é desligado (OFF) quando o gatilho é
solto.
3. Mover a serra reta em velocidade constante produz
cortes perfeitos.
PRECAUÇÃO
Antes de efetuar uma operação de corte, verifique o
material que cortará. Se o material a ser cortado puder
gerar pós tóxicos e perigosos, certifique-se de que o
saco do pó ou o sistema de extração esteja conectado
adequadamente à saída de pó.
Além disso, use a máscara de pó, se disponível.
○ Antes de começar a serrar, certifique-se de que a lâmina
de serra tenha atingido a velocidade de rotação total.
○ Se a lâmina de serra parar ou gerar um ruído anormal
durante o funcionamento, desligue (OFF) o interruptor de
alimentação imediatamente.
○ Sempre tome cuidado para que o cabo de alimentação
não se aproxime da serra circular em funcionamento.
○ Usar a serra circular com a lâmina da serra virada para
cima ou de lado é muito perigoso. Esse tipo de uso
pouco comum deve ser evitado.
○ Quando cortar materiais, sempre use óculos de
proteção.
○ Quando terminar o trabalho, retire o plugue da tomada
elétrica.
MONTAGEM E DESMONTAGEM DA LÂMINA DE
SERRA
PRECAUÇÃO
Para evitar acidentes graves, certifique-se de que o
interruptor esteja desligado (OFF), e de que a fonte de
energia esteja desconectada.
1. Desmontagem da lâmina de serra
(1) Ajuste o volume de corte ao máximo e, em seguida,
posicione a serra circular como mostrado na Fig. 12.
(2) Pressione a alavanca de bloqueio, bloqueie o eixo e, em
seguida, retire o parafuso de cabeça sextavada com a
chave de barra sextavada.
(3) Enquanto segura a alavanca do protetor inferior para
manter o protetor inferior totalmente retraído para dentro
da tampa da serra, retire a lâmina da serra.
19
Page 21

Português
2. Montagem da lâmina de serra
(1) Remova completamente qualquer serragem que tenha
se acumulado no eixo, parafuso e arruelas.
(2) Como mostrado na Fig. 13, o lado da arruela (A) com
um centro saliente do mesmo diâmetro que o diâmetro
interno da lâmina de serra e o lado côncavo da arruela
(B) devem ajustar-se nos lados da lâmina de serra.
(3) Para garantir o sentido de rotação correto da lâmina de
serra, a direção da seta na lâmina de serra deve coincidir
com a direção da seta na tampa da serra.
(4) Aperte o máximo possível o parafuso de cabeça
sextavada que fixa a lâmina da serra com a mão. Logo,
pressione a alavanca de bloqueio, tranque o eixo e
aperte bem o parafuso.
PRECAUÇÃO
Depois de fixar a lâmina de serra, verifique novamente
se a alavanca de bloqueio está bem presa na posição
prescrita.
MANUTENÇÃO E INSPEÇÃO
1. Inspeção da lâmina de serra
Como o uso de uma lâmina de serra cega diminui a
eficácia e pode causar um mau funcionamento do motor,
afie ou substitua a lâmina de serra assim que perceber o
desgaste da mesma.
2. Inspeção dos parafusos de montagem
Inspecione regularmente todos os parafusos de
montagem e certifique-se de que estejam corretamente
apertados. Se algum deles estiver frouxo, reaperte-o
imediatamente. Deixar de fazer isso pode resultar em
graves perigos.
3. Inspeção das escovas de carvão (Fig. 14)
O motor emprega escovas de carvão que são peças de
consumo. Como uma escova de carvão excessivamente
desgastada pode provocar problemas no motor, troque-a
por uma nova que tenha o mesmo número mostrado na
ilustração. Além disso, mantenha as escovas de carvão
sempre limpas e certifique-se de que elas deslizem
livremente nos suportes de escova.
PRECAUÇÃO
Ao substituir escovas de carvão por novas, sempre use
peças genuínas Hitachi com o número (56) especificado
no desenho.
4. Troca de escovas de carvão
Desmonte o protetor da escova com uma chave de
fenda. Assim, as escovas de carvão poderão ser
removidas facilmente.
5. Manutenção do motor
O enrolamento do motor é uma parte importante desta
ferramenta. Evite danificar o mesmo e tome cuidado
para evitar seu contato com óleo ou água de limpeza.
Após 50 horas de uso, limpe o motor soprando nos
orifícios de ventilação da caixa do motor com ar
seco usando uma pistola de ar ou outra ferramenta
semelhante (Fig. 16).
A acumulação de poeira ou partículas no motor pode
resultar em danos.
6. Inspeção e manutenção do protetor inferior
Certifique-se sempre de que o protetor inferior possa se
mover com suavidade.
No caso de qualquer mau funcionamento, repare o
protetor inferior imediatamente.
Para a limpeza e manutenção, use uma pistola de ar
ou outra ferramenta semelhante para soprar e limpar
o espaço entre o protetor inferior e a cobertura da
engrenagem, bem como a parte de rotação do protetor
inferior com ar seco (Fig. 16).
Fazer isso é eficaz para a remoção de aparas ou outras
partículas.
A acumulação de aparas ou outras partículas ao redor do
protetor inferior pode resultar em defeitos ou danos.
ADVERTÊNCIA
Para prevenir a inalação de pó ou irritação dos
olhos, use luvas de proteção e uma máscara de
proteção contra poeira ao usar uma pistola de ar ou
outra ferramenta semelhante para limpar o protetor
inferior, orifícios de ventilação ou outras partes do
produto.
Assegure o movimento
suave do protetor inferior
Espaço entre o protetor
inferior e cobertura da
engrenagem
Ventilação da caixa
Fig. 16
7. Ajuste da base e da lâmina de serra para manter a
perpendicularidade
O ângulo entre a base e a lâmina de serra vem ajustado
para 90°, mas se a perpendicularidade for perdida por
alguma razão, ajuste novamente da seguinte maneira:
(1) Vire a base para cima (Fig. 15) e afrouxe a porca-
borboleta e o parafuso-borboleta (Fig. 7 (A), Fig. 7 (B)).
(2) Instale um esquadro na base e na lâmina de serra, gire o
parafuso com uma chave de fenda e, em seguida, altere
a posição da base para obter o ângulo reto desejado.
8. Lista de peças para conserto
A: N° do item
B: N° do código
C: N° da peça usada
D: Observações
PRECAUÇÃO
Os consertos, modificações e inspeções das
Ferramentas Elétricas da Hitachi devem ser realizados
por uma Oficina Autorizada da Hitachi.
Esta lista de peças pode ser útil se for apresentada com
a ferramenta na Oficina Autorizada da Hitachi ao solicitar
conserto ou manutenção.
Na operação e na manutenção das ferramentas
elétricas, devem-se observar as normas de segurança e
os padrões estabelecidos por cada país.
MODIFICAÇÕES
As Ferramentas Elétricas da Hitachi estão sempre sendo
aperfeiçoadas e modificadas para incorporar os mais
recentes avanços tecnológicos.
Dessa forma, algumas peças (isto é, números de código
e/ou design) podem sofrer modificações sem aviso
prévio.
NOTA
Devido ao contínuo programa de pesquisa e desenvolvimento
da HITACHI, as especificações aqui contidas estão sujeitas
a modificações sem aviso prévio.
Parte de rotação
do protetor inferior
Pistola de ar
20
Page 22

ABCD
44 370278 1 M4X6
45 370268 1
1 370540 1
2 370541 1
ABCD
13
12
11
10
501
46 331003 1 M4
3 6202VV 2
47 324659 1
48 319541 1 M5X6
49 308481 1
50 320163 1 D6X13
51 308480 1 D6X17
52 949425 1 M6
53 322959 1 M6X22
54 997841 3 M5X50
55 938477 2 M5X8
56 983362 2
57 999038 2
58 961781 2
59 301653 6 D4X20
60 370269 1
61 953327 1 D8.8
62 –––––– 1
63 –––––– 1
64 370289 1
67 –––––– 1
68 325355 1
69 6000VV 1 6000VVCMPS2L
70 931701 1
71 370260 1
73 937631 1
74 984750 2 D4X16
75 370261 1
76 959141 1 50092
78 370290 1
501 303888 1
502 872422 1 6MM
503 303811 1
504 323208 2 M6X20
505 370264 1
4 370543 1
5 370284 1
6 370277 1
7 992013 2 M5X14
8 370273 1
9 326829 1 235MM-D25
10 370280 1
11 951039 3 M4X12
12 997247 1
13 935196 3 M4X12
14 370542 1
15 370279 1
16 324662 1 M8X15.5
17 937623 2
19 370292 1
21 370282 1
22 370281 1
24 370544 1
25 337080 1
26 949794 1 M6X20
27 370276 1
28 370275 1
29 303797 2 M6X14
30 370266 1 M8
31 370291 1
32 303792 1
33 301806 1 M6X15
34 947859 1
35 324658 1
36 949433 1 M8
37 302457 1 M8X30
38 302469 1 M6X6
39 370294 1 "51"
40 324660 1
41 949433 1 M8
42 676531 1 P-7
18-1 340942D 1 127V "17"
18-2 340942G 1 220V-230V "17"
20-1 361033D 1 127V
20-2 361033E 1 220V-230V
78
30
29
28
26
16
15
9
8
7
6
505
504
503
502
5
27
25
24
23
13
22
14
21
4
3
2
1
B
32
A
13
20
19
71
70
63
3
31
18
17
76
75
74
69
73
68
67
64
59
62
61
60
59
58
57
53
56
52
55
B
54
51
50
48
49
47
46
36
35
33
34
39
38
37
A
43 370267 1
45
44
43
42
41
40
21
Page 23

22
Page 24

Issued by
Shinagawa Intercity Tower A, 15-1, Konan 2-chome,
Minato-ku, Tokyo 108-6020, Japan
Distributed by
Avenida Isaac Newton No.286, Piso 2, Colonia Polanco Sección V,
Delegación Miguel Hidalgo, C. P. 11560
México, D. F.
Code No. C99223841 F
Printed in China
602
 Loading...