

Page 1

Users Guide
C1422R
C1422RS
C1422T
C1422TS
C1432TB
C1432TY
C2122T
Page 2

CONTENTS
Safety Information Page 1 Features Menu Page 5
Installation Procedure Page 2 Local Control Keys Page 5
Getting Started using the Menus Page 2 Remote Control Key Functions Page 5
Tuning Your Television Page 3 Your Guarantee Page 6
Manual Tuning Page 4 Technical Specifications Page 7
Move Stored Channels Page 4 Connecting Other Appliances Page 7
Picture Controls Menu Page 4
Safety Information
Do’s and Don’ts
This television has been designed and manufactured to meet international safety standards but, like any electrical equipment, care
must be taken if you are to obtain the best results and safety is to be assured.
DO’S
DO
read the operating instructions before you attempt to use the equipment.
DO
consult your dealer if you are in any doubt about installation, operation or safety of your equipment.
DO
be careful with glass panels or doors on equipment.
This TV is supplied with a fitted mains plug. This plug must not be cut off as it may contain a special radio interference filter, the
removal of which could lead to impaired performance. If you wish to extend the lead, obtain an appropriate safety approved
extension lead or consult your dealer.
Observe the manufacturer’s instructions when connecting extension leads to the TV. Check the fuse rating on the new plug, it
should be fitted with a 5 Amp fuse which conforms to either ASTA or BSI (BS1362) approvals. These are easily identifiable by
either the or symbols. If you are in any doubt about the installation of an extension lead, please consult a competent
electrician.
DON’TS
DON’T
switch off, withdraw the mains plug and consult your dealer.
ASTA
continue to operate the equipment if you are in any doubt about it working normally, or if it is damaged in any way -
S
DON’T
DON’T
DON’T
or has a standby mode (see Remote Control Key Functions,
equipment and make sure your family know how to do this. Special arrangements may need to be made for infirm or handicapped
people.
DON’T
illegal to watch television whilst driving.
DON’T
and shorten the life of the equipment. . There should be a minimum gap of 10cm all round your TV.
DON’T
complete safety always use the manufacturer’s approved stand with the fixings provided.
DON’T
place water filled vessels on top of TV cabinets.
remove any fixed cover as this may expose dangerous voltages.
leave equipment switched on when it is unattended unless it specifically states that it is designed for unattended operation
Standby Key
use equipment such as personal stereos or radios so that you are distracted from the requirements of traffic safety. It is
obstruct the ventilation of the equipment, for example, with curtains or soft furnishings. Overheating will cause damage
use makeshift stands and
allow electrical equipment to be exposed to rain or moisture.
NEVER
fix legs or stands to the TV with any screws other than those provided - to ensure
on page 5). Switch off using the switch on the
ABOVE ALL
NEVER let anyone, especially children, push anything into holes, slots or any other opening in the case - this could
result in a fatal electric shock.
NEVER guess or take chances with electrical equipment of any kind - it is better to be safe than sorry.
Page 1
Page 3
Installation Procedure
1. Connect your aerial to the TV at the rear of the cabinet. (On portable TV’s an indoor aerial is supplied and in certain
reception conditions may not provide the best picture. Adjust the aerial position for the best result or use an external aerial).
2. The proximity of mountains or high buildings may be responsible for ghost pictures, echoes or shadows. If this is the case,
change the orientation of the aerial.
3. Plug the moulded 13 amp mains plug into a 220-240V/50Hz mains supply socket.
4. Install the two AA type batteries supplied into the hand unit according to the diagram inside the battery compartment.
Secure the battery cover.
5. Switch on your TV with the button marked on the front panel.
Note: Standby –To save energy and preserve optimum picture quality (by de-magnetizing the tube), you are advised to switch
off your television at the on/off switch when not in use.
Getting started using the Menus
Note: The blue page inserted in this booklet is a Quick Set-up Guide to enable you set up your TV easily and quickly. Once
you have set up your TV the guide can be ignored, however, retain the complete Instruction Booklet for future reference.
• Green - Selects the PICTURE controls menu.
Yellow - Selects the MANUAL/TUNING menu.
Blue - Selects the FEATURES menu.
The coloured keys select the Menus as listed above. See pages 3, 4 and 5 for
full details of their functions.
In Teletext mode they enable quick access to topical subjects related to the
magazine you have selected. Just press the key with the same colour as the
topic at the foot of the page.
‚ Up/Down - Moves the cursor (coloured bar) when using Menus.
When viewing television these keys will select next/previous TV station.
When using Teletext these keys will select next/previous pages.
ƒ Left/Right - Moves the cursor (coloured bar), or makes adjustments
when using Menus.
In TV and Teletext mode they will adjust the volume down and up.
Page 2
Page 4

Tuning Your Television
1
3
2
5
Note: If you have a VCR, play a tape or select the Test pattern. (See your VCR handbook for information about the test pattern).
If you have a satellite switch on Sky News or Sky One.
PROGRAMME
Press the YELLOW
key on your remote
control.
PROGRAMME
Press the YELLOW
key again.
SETUP
PROGRAMME
The
Note: The four arrows and the TV symbol indicate the
cursor movement and the key for leaving menu mode.
SETUP
The
Note: The four coloured boxes at the bottom of the
display, NAME, MANUAL, SKIP, AUTO, correspond
to the coloured keys on the hand unit.
menu will appear on your screen.
menu will appear on your screen.
00_ _ _ _ 10_ _ _ _ 20_ _ _ _
01_ _ _ _ 11_ _ _ _ 21_ _ _ _
08_ _ _ _ 18_ _ _ _ 28_ _ _ _
09_ _ _ _ 19_ _ _ _ 29_ _ _ _
Select ∨ ∧ < >
SET UP
00_ _ _ _ 10_ _ _ _ 20_ _ _ _
08_ _ _ _ 18_ _ _ _ 28_ _ _ _
09_ _ _ _ 19_ _ _ _ 29_ _ _ _
NAME MANUAL SKIP
Select ∨ ∧ <
>
SETUP
AUTO
4
Press the BLUE key
AUTO
AUTO
stations, satellite and VCR. This takes a few minutes.
Note: The white graph shows the tuning progress.
You can stop tuning by pressing the blue key again.
This time the blue key is the
All available TV channels, satellite and VCR will be
stored and displayed on your screen as illustrated.
Unnamed TV channels will be numbered 07 upwards,
and indicated by the four red dashes changing to white.
Press to see channels 30 - 59. Press to return.
The TV key cancels the menu and your TV is ready to use.
tune now tunes and stores all your local TV
CANCEL
key.
SET UP
00_ _ _ _ 10_ _ _ _ 20_ _ _ _
08_ _ _ _ 18_ _ _ _ 28_ _ _ _
09_ _ _ _ 19_ _ _ _ 29_ _ _ _
AUTO
UHF ››››››
CANCEL
SET UP
00 - - - - 10 - - - - 20 - - - 01 B B C 1 11 - - - - 21 - - - 02 B B C 2 12 - - - - 22 - - - 03 I T V 13 - - - - 23 - - - 04 C H 4 14 - - - - 24 - - - 05 C H 5 15 - - - - 25 - - - 06 S A T 16 - - - - 26 - - - 07 - - - - 17 - - - - 27 - - - -
01 B B C 1
NAME MANUAL SKIP AUTO
Select ∨ ∧ <
>
All stored channels (white dashes after the channel numbers) can be named to suit your own requirements.
The four dashes will be high-lighted in the edit box
with a small white cursor on the first position.
Press the RED key.
NAME
a) Press until the character you want appears.
b) Press to move the cursor to the next position.
Repeat steps a and b until all four digits are entered.
Press the RED key (OK) and the name you have entered
will replace the four white dashes.
The BLUE key (
Press the TV key to return to television viewing.
CANCEL
) will terminate the entry.
SET UP
00 - - - - 10 - - - - 20 - - - 01 B B C 1 11 - - - - 21 - - - 02 B B C 2 12 - - - - 22 - - - 03 I T V 13 - - - - 23 - - - 04 C H 4 14 - - - - 24 - - - 05 C H 5 15 - - - - 25 - - - 06 S A T 16 - - - - 26 - - - 07 - - - - 17 - - - - 27 - - - -
11 - - - -
OK CANCEL
Select <
>
Adjust ∨
∧
Page 3
Page 5

Manual Tuning
1
1
1
2
Manual tuning need only be used for a) Tuning and storing other equipment connected in the aerial system
b) Moving Auto-tuned channels, (see Move Stored Channels below).
c) To reduce unwanted interference.
2
Press the YELLOW key twice. The
Tuning Your Television.
The TUNING menu will appear on the screen.
a) Press or to enter the VCR channel
b) Press to move the cursor to
Press the GREEN key. c) Press to start manual tuning. Each time a
TUNING d) Press again until the channel you want is found.
e) Press to move the cursor to
f) Press to store the settings.
g) Press the TV key to return to television viewing .
SETUP
number 00.
channel is found the search will stop.
menu will appear on your screen. See illustration in step 4 of
MANUAL
STORE.
.
TUNING
PROG 00
BAND UHF
MANUAL ››››
FINE ›››››››
STORE
SETUP
Select ∨ ∧ Adjust <
>
Move Stored Channels
Note: Make sure you are in television mode by pressing the TV key before continuing.
Press the YELLOW key twice. The
Tuning Your Television.
Using the
Note: Moving a stored channel will copy your choice into its new location erasing any channel already stored there.
Press the GREEN key.
MANUAL
Note: To clear the old channel location, select the SETUP menu, (Green key), move the blue bar with the Arrow keys to the old
channel number, press and hold the Yellow key (SKIP) until the SKIP prompt disappears.
Arrow
keys , , , , on your remote control, move the cursor onto the channel you want to move.
The manual
a) Use the
b) Use the
c) Press or to store the new number.
SETUP
number.
menu will appear on your screen. See illustration in step 4 of
TUNING
Arrow
Arrow
menu will appear on your screen.
keys to change the programme
key to move the blue bar to
STORE
TUNING
PROG 00
BAND UHF
MANUAL ››››
.
FINE ›››››››
STORE
Select ∨ ∧ Adjust <
SETUP
>
Press the GREEN
key.
PICTURE
Picture Controls Menu
The PICTURE menu will appear on your screen.
a) Press or to move the cursor onto the picture
control you want to adjust, (e.g. Brightness).
b) Press or to adjust the brightness setting.
Repeat steps a and b until you complete your adjustments.
c) Press to move the cursor to STORE.
d) Press or to store the settings.
e) Press the TV key to return to television viewing.
Page 4
PICTURE
BRI ›››
CON ›››››
COL ››››
SHARP ››
STORE
Select ∨ ∧ Adjust <
>
Page 6

Features Menu
1
60
Use the FEATURES menu to select and set/cancel the features on your television.
The FEATURES menu will appear on your screen.
Press the BLUE key.
FEATURES
Source: Toggles between TV, AV1 (Euroconnector), AV2 (Phonos) and RGB.
Child Lock: On or Off - when on, it allows operation of your TV from the remote control only.
Sleep Timer: Toggles between Off, 15, 30, 45, 60, 90 and 120 minutes. Your TV will switch to standby when the timer runs out.
Press the TV key to return to television viewing.
Volume Lock: See
Local Control Keys
a) Press or to move the cursor onto the feature
you want to set/cancel.
b) Press or to select one of the available
options.
below
SLEEP TIMER OFF
Select ∨ ∧ Adjust <
FEATURES
SOURCE TV
CHILD LOCK OFF
Local Control Keys
These keys at the front of your TV can be used for selecting programmes and adjusting sound and picture settings.
1. Press – and + keys to select previous or next programme.
2. Press Select key once for volume, twice for brightness and three times for contrast.
3. Use – and + to adjust each one.
>
Volume Lock:
adjustment bar is still on the screen press the
adjustment bar. The lock is now set.
To cancel press Select once, and whilst the adjustment bar is on the screen press the
volume symbol disappears.
To operate this feature press Select once, make your volume adjustment with the
MUTE key on the remote control until the volume symbol appears to the right of the
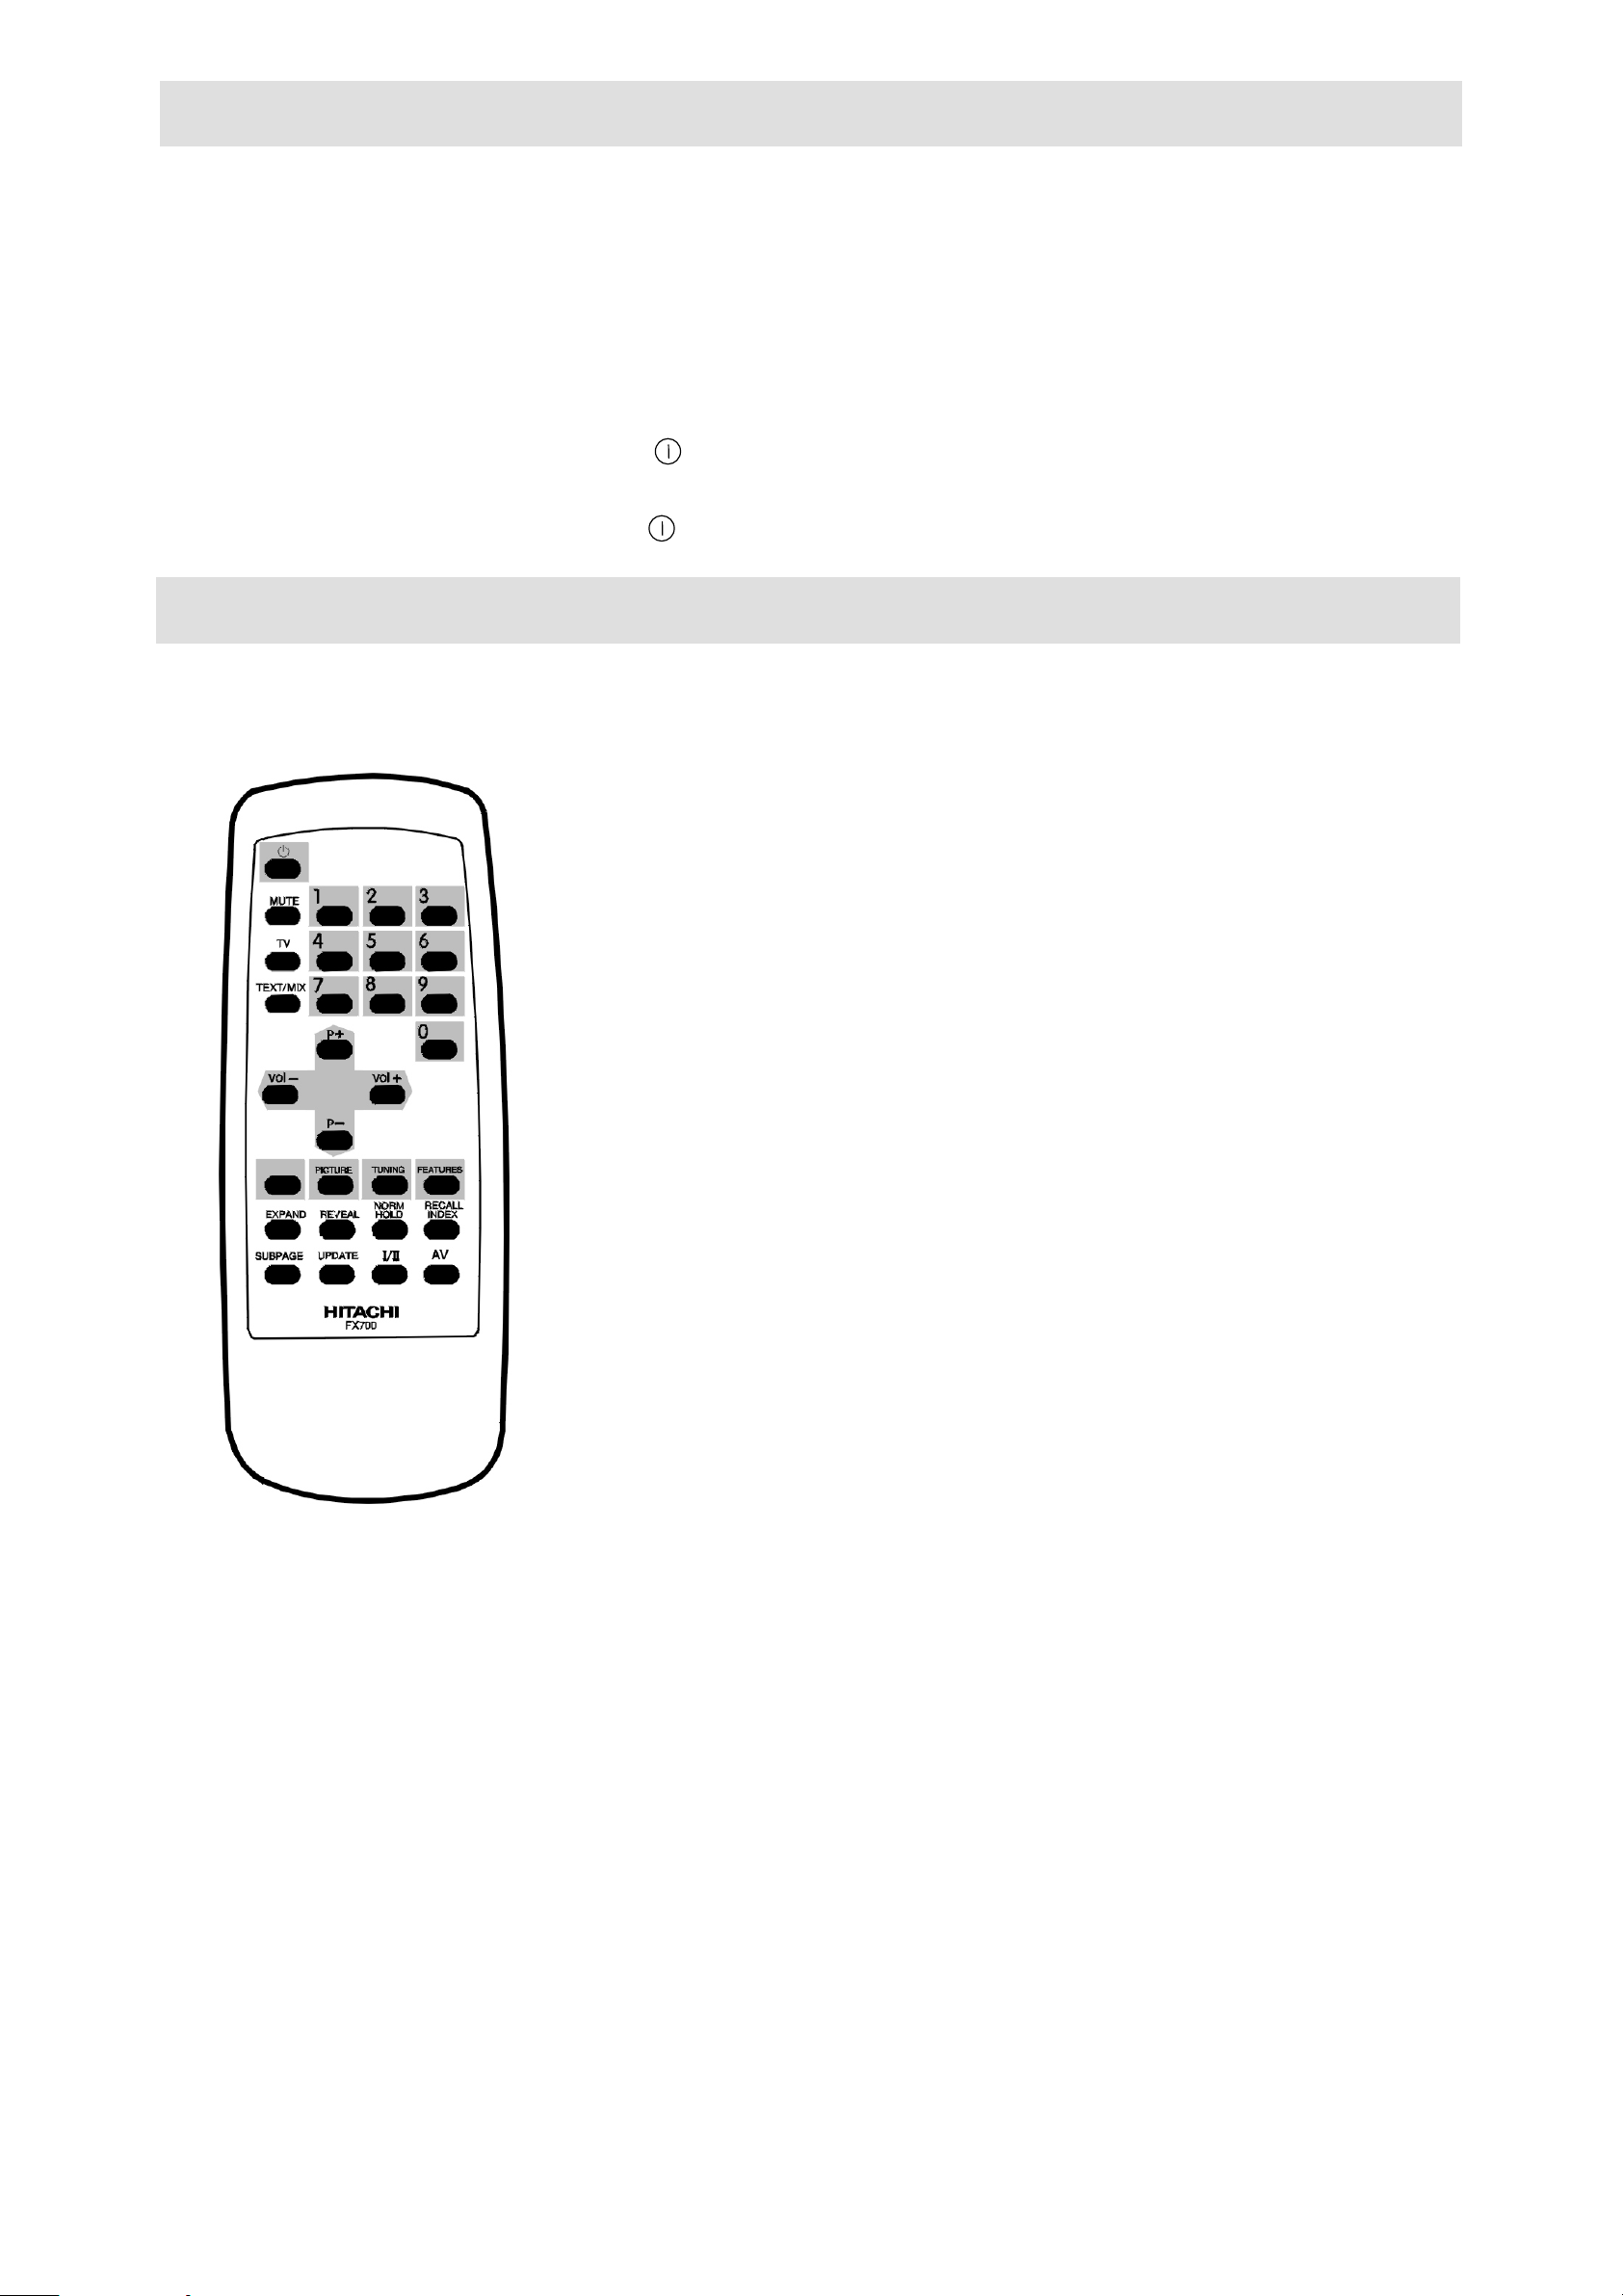
Remote Control Key Functions
Standby Key
Press a number key or
MUTE Switches the sound off or on.
TV Will return you to TV viewing from either
TEXT/MIX Press once to select the Teletext service for the channel you are watching. Press again to show the
TV picture and Teletext page together.
EXPAND Press to enlarge the top half of the Teletext page. Press again to enlarge the bottom half. Press
again to return to normal.
REVEAL Press to reveal hidden text (answers to quizzes etc.). Press again to hide text .
NORM/
Normalize
HOLD Menu Picture mode. Press and hold for three seconds to restore adjustments to factory pre-set
levels OSD symbol).
RECALL/
Hold
(TV Mode) press to recall and display on your screen the features being used, e.g. Channel
Recall
INDEX number 2 and name BBC2 , sound muted , child lock activated , volume lock
activated or sleep timer minutes remaining .
(Teletext Mode) returns you to the index page of the Teletext magazine you are viewing.
Index
- Switches your TV partly off. The power-on LED becomes brighter.
TV to restore.
restores picture controls to user stored values, (green OSD symbol) in TV mode and
stops or starts the automatic sequence of sub-pages in Teletext mode.
– or + key. Whilst the volume
MUTE key on the remote control until the right hand
Teletext
or
Menu
modes.
SUB-PAGE In TV mode it displays the Teletext digital clock at the top right hand corner of your television.
In Teletext some subjects have multiple pages. The Sub-page key allows you to access any of these
pages directly by keying in its own number. Press the Sub-page key and enter four digits for the
page you want, e.g. page 2 would be 0002. When the sub-page has been found it will be displayed.
Press the sub-page key twice to return to normal page quence.
UPDATE Press to allow you to watch TV while waiting for a Teletext page to be found. When the page is
found, its number appears on the screen. Press to display the page.
I/II This key has no function. It operates only on models with stereo capability.
AV Toggles your television between TV, AV1 (Euroconnector), AV2 (Phonos) and RGB inputs.
Page 5
Page 7

Technical Specification
TV Standard 625 lines single standard (PAL)
Channel Coverage UHF channels
Aerial Impedance 75Ω unbalanced
Picture Tube 35.5cm and 51cm types
Mains Voltage 230V AC ±10%, 50Hz
Internal Speaker 35.5cm models 25Ω, 2W, 75mm round
51cm models 25Ω, 2W, 126mm x 58mm”
Power Consumption 35.5cm models <40W approx. (Stand-by <4W)
51cm models <52W approx. (Stand-by <4W)
Net Weight 35.5cm models 9.25kg approx.
51cm models 20kg
Dimensions (W x H x D) 35.5cm models 355 x 355 x 390mm
51cm models 505 x 491 x 480mm
Remote Control Batteries 2 x HITACHI SUM-3/IEC R6
or equivalent AA
Specifications are subject to change without notice. Weight and dimensions shown are approximate.
Connecting Other Appliances
EUROCONNECTOR (AV1)
20
21
Pin Signal
1 Audio Output - Right
2 Audio Input - Right
3 Audio Output - Left
4 Audio earth
5 Blue earth
6 Audio input - Left
7 RGB blue input
8 Switching voltage
9 Green earth
10 No connection
11 RGB green input
12 No Connection
13 Red earth/SVHS earth
14 RGB switching voltage earth
15 RGB red input/SVHS chroma input
16 RGB switching voltage
17 Video output earth
18 Video input earth
19 Video output
20 Video input/SVHS luma input
21 Shield/earth
2
1
Video Audio (mono)
AV2 - 35.5cm (14”) models
AV2 - 51cm (21”) models
Video
Audio
Page 6
Page 8

Your Guarantee
of excellence
Thank you for purchasing this Hitachi te levision
In the unlikely event that this product should develop a fault, we undertake to
replace or repair any part of the product which fails due to a manufacturing
defect within 12 months of the d ate of purchase provided that:
i) The product has been installed and used only in accordance
with the instructions supplied with the product.
ii) The product has not been repaired, maintained, or modified by any
person other than an Hitachi authorised engineer.
iii) The product serial number has not been removed or altered.
This guarantee does not apply to product acquired secondhand or for
commercial or communal use.
This guarantee does not cover the replacement of exhau sted batteries, the
adjustment of user controls, or aerial alignmen t.
Any parts replaced under this guarantee shall become the property of
Hitachi Home Electronics (Europe) Ltd.
Please note that evidence of the date of purchase will be required before any
service under this guarantee is carried out.
THIS GUARANTEE DOES NOT AFFECT YOUR STATUTORY RIGHTS.
IN ALL CASES OF DIFFICULTY PLEASE CONSULT YOUR HITACHI DEALER.
Page 7
Page 9

Hitachi, Ltd. Tokyo, Japan
International Sales Division
THE HITACHI ATAGO BUILDING,
No. 15 –12 Nishi Shinbashi, 2 – Chome,
Minato – Ku, Tokyo 105-8430, Japan.
Tel: 03 35022111
HITACHI EUROPE LTD,
Whitebrook Park
Lower Cookham Road
Maidenhead
Berkshire
SL6 8YA
UNITED KINGDOM
Tel: 01628 643000
Fax: 01628 643400
Email: consumer-service@hitachi-eu.com
HITACHI EUROPE GmbH
Munich Office
Dornacher Strasse 3
D-85622 Feldkirchen bei München
GERMANY
Tel: +49-89-991 80-0
Fax: +49-89-991 80-224
Hotline: +49-180-551 25 51 (12ct/min)
Email: HSE-DUS.service@hitachi-eu.com
HITACHI EUROPE srl
Via Tommaso Gulli N.39, 20147
Milano, Italia
ITALY
Tel: +39 02 487861
Tel: +39 02 38073415 Servizio Clienti
Fax: +39 02 48786381/2
Email: customerservice.italy@hitachi-eu.com
HITACHI EUROPE S.A.S
Lyon Office
B.P. 45, 69671 BRON CEDEX
FRANCE
Tel: 04 72 14 29 70
Fax: 04 72 14 29 99
Email: france.consommateur@hitachi-eu.com
HITACH EUROPE AB
Egebækgård
Egebækvej 98
DK-2850 Nærum
DENMARK
Tel: +45 43 43 6050
Fax: +45 43 60 51
Email: csgnor@hitachi-eu.com
Hitachi Europe Ltd
Bergensesteenweg 421
1600 Sint-Pieters-Leeuw
BELGIUM
Tel: +32 2 363 99 01
Fax: +32 2 363 99 00
Email: sofie.van.bom@hitachi-eu.com
www.hitachidigitalmedia.com
HITACHI EUROPE S.A.
364 Kifissias Ave. & 1, Delfon Str.
152 33 Chalandri
Athens
GREECE
Tel: 1-6837200
Fax: 1-6835964
Email: service.hellas@hitachi-eu.com
HITACHI EUROPE S.A.
Gran Via Carlos III, 101-1
08028 Barcelona
SPAIN
Tel: 93 409 2550
Fax: 93 491 3513
Email: atencion.cliente@hitachi-eu.com
HITACHI Europe AB
Box 77 S-164 94 Kista
SWEDEN
Tel: +46 (0) 8 562 711 00
Fax: +46 (0) 8 562 711 13
Email: csgswe@hitachi-eu.com
HITACHI EUROPE LTD (Norway) AB
STRANDVEIEN 18
1366 Lysaker
NORWAY
Tel: 67 5190 30
Fax: 67 5190 32
Email: csgnor@hitachi-eu.com
HITACHI EUROPE AB
Neopoli / Niemenkatu 73
FIN-15140 Lahti
FINLAND
Tel : +358 3 8858 271
Fax: +358 3 8858 272
Email: csgnor@hitachi-eu.com
HITACHI EUROPE LTD
Na Sychrove 975/8
101 27 Pr aha 10 – Bohdalec
CZECH REPUBLIC
Tel: +420 267 212 383
Fax: +420 267 212 385
Email: csgnor@hitachi-eu.com
 Loading...