

Page 1

Operating Instructions
ãĚŅĂĘĎàēĄĠéņæēú
Front Loading Washer Dryer
ĝãĄĘĥĎæêĒàýņē ĎûýņēþēČúņē
Model
ĄęŅú
ãĐãĐýåěöúĘħğĈĚĐâìĚĨĐğåĆĚħĐèìĔâÿňĕ ĐýÿňĕĀĕĎüňĕđėøĕëė
ğüĄõĎŅēúãĚŅĂĘĎúĖĦğõăĆđĝĎĖăõ ĝÿĘĥĎĠČņĞúŅĠçĈŅēĠéņæēúĝãĄĘĥĎæġõņĎăŅēæĝČĂēđċĂ
ġþĆ÷ğâĦýýĔøĆĆĔýþĆēâĔü åĜŇĄĚĐâĕĆĢëňèĕüãĔĨüāĚĨüòĕü åĬĕĠüēüĬĕĢüâĕĆøė÷øĔĨè ĠĈē
ĆĕąâĕĆâĕĆøĆĊéčĐýâĕĆøė÷øĔĨè (ğĐâčĕĆâĕĆąĚüąĔüâĕĆøė÷øĔĨè) ģĊňĐňĕèĐėèĢü
Đüĕåø
Please read the “Safety Precautions” carefully to ensure
proper use of the machine.
(P. 10 to 14)
ġþĆ÷ĐŇĕü
“ãňĐåĊĆĆēĊĔèğāĚħĐåĊĕĄþĈĐ÷ăĔą”
ġ÷ąĈēğĐĘą÷
ğāĚħĐĢĎňĠüŇĢéĊŇĕĢëňğåĆĚħĐè
ģ÷ňĐąŇĕèğĎĄĕēčĄ
(Čúņē
108
÷ėæ
112
)
Thank you for purchasing the Hitachi Front Loading
Washer Dryer.
Please read this manual carefully to ensure proper
operation of the machine.
Be sure to keep this manual along with the Warranty
Card, the Basic Operation Guide, the Installation
Instructions, and the Installation Check Sheet for Front
Loading Washer Dryer (Installation Confirmation Sheet)
for future reference.
Operating Instructions
ãĚŅĂĘĎàēĄĠéņæēú
Front Loading Washer Dryer
ĝãĄĘĥĎæêĒàýņē ĎûýņēþēČúņē
Model
ĄęŅú
BD-W3500
Thank you for purchasing the Hitachi Front Loading
Washer Dryer.
Please read this manual carefully to ensure proper
operation of the machine.
Be sure to keep this manual along with the Warranty
Card, the Basic Operation Guide, the Installation
Instructions, and the Installation Check Sheet for Front
Loading Washer Dryer (Installation Confirmation Sheet)
for future reference.
ãĐãĐýåěöúĘħğĈĚĐâìĚĨĐğåĆĚħĐèìĔâÿňĕ ĐýÿňĕĀĕĎüňĕđėøĕëė
ğüĄõĎŅēúãĚŅĂĘĎúĖĦğõăĆđĝĎĖăõ ĝÿĘĥĎĠČņĞúŅĠçĈŅēĠéņæēúĝãĄĘĥĎæġõņĎăŅēæĝČĂēđċĂ
ġþĆ÷ğâĦýýĔøĆĆĔýþĆēâĔü åĜŇĄĚĐâĕĆĢëňèĕüãĔĨüāĚĨüòĕü åĬĕĠüēüĬĕĢüâĕĆøė÷øĔĨè ĠĈē
ĆĕąâĕĆâĕĆøĆĊéčĐýâĕĆøė÷øĔĨè (ğĐâčĕĆâĕĆąĚüąĔüâĕĆøė÷øĔĨè) ģĊňĐňĕèĐėèĢü
Đüĕåø
Please read the “Safety Precautions” carefully to ensure
proper use of the machine.
ġþĆ÷ĐŇĕü
ģ÷ňĐąŇĕèğĎĄĕēčĄ
“ãňĐåĊĆĆēĊĔèğāĚħĐåĊĕĄþĈĐ÷ăĔą”
(Čúņē
108
(P. 10 to 14)
÷ėæ
112
ġ÷ąĈēğĐĘą÷
)
ğāĚħĐĢĎňĠüŇĢéĊŇĕĢëňğåĆĚħĐè
Heat Recycle Wind Iron
ระบบการใชความรอนแบบหมุนเวียน
ระบบรีดดวยลมรอน
Hitachi Front Loading
Washer Dryer
เครื่องซักผา อบผาฝาหนา
English ġøă
Page 2

CONTENTS
Before Use
z Features ...................................................................................................................... ................................................................ 4
z Preparation ................................................................................................................................................................................. 5
· Checking the installation ............................................................................................................................................................5
z Parts and Accessories ..............................................................................................................................................................6
z Control Panel Functions ............................................................................................................................................................ 8
z Safety Precautions .................................................................................................................................................................. 10
z Usage Precautions .................................................................................................................................................................. 15
z Before You Start Washing ....................................................................................................................................................... 16
z Washing and Drying Programs ............................................................................................................................................... 17
z Tips for Good Washing Results ..............................................................................................................................................18
· Preparing your laundry · Helpful hints · How to load the laundry into the drum .................................................................. 18, 19
· To ensure smooth spinning operation · Guides for laundry loads · Average weights for laundry
· Notes for using mesh laundr y bags .................................................................................................................................... 20, 21
z Tips for Good Drying Results.................................................................................................................................................. 22
· Selecting the right drying program for your laundry · Helpful hints · To reduce pills and static electricity ..................................22
· To reduce wrinkles · To reduce uneven drying · To prevent shrinking ....................................................................................... 23
z About the Wind Iron Operation ............................................................................................................................................... 24
· To reduce wrinkles · Examples of finished laundry ............................................................................................................. 24, 25
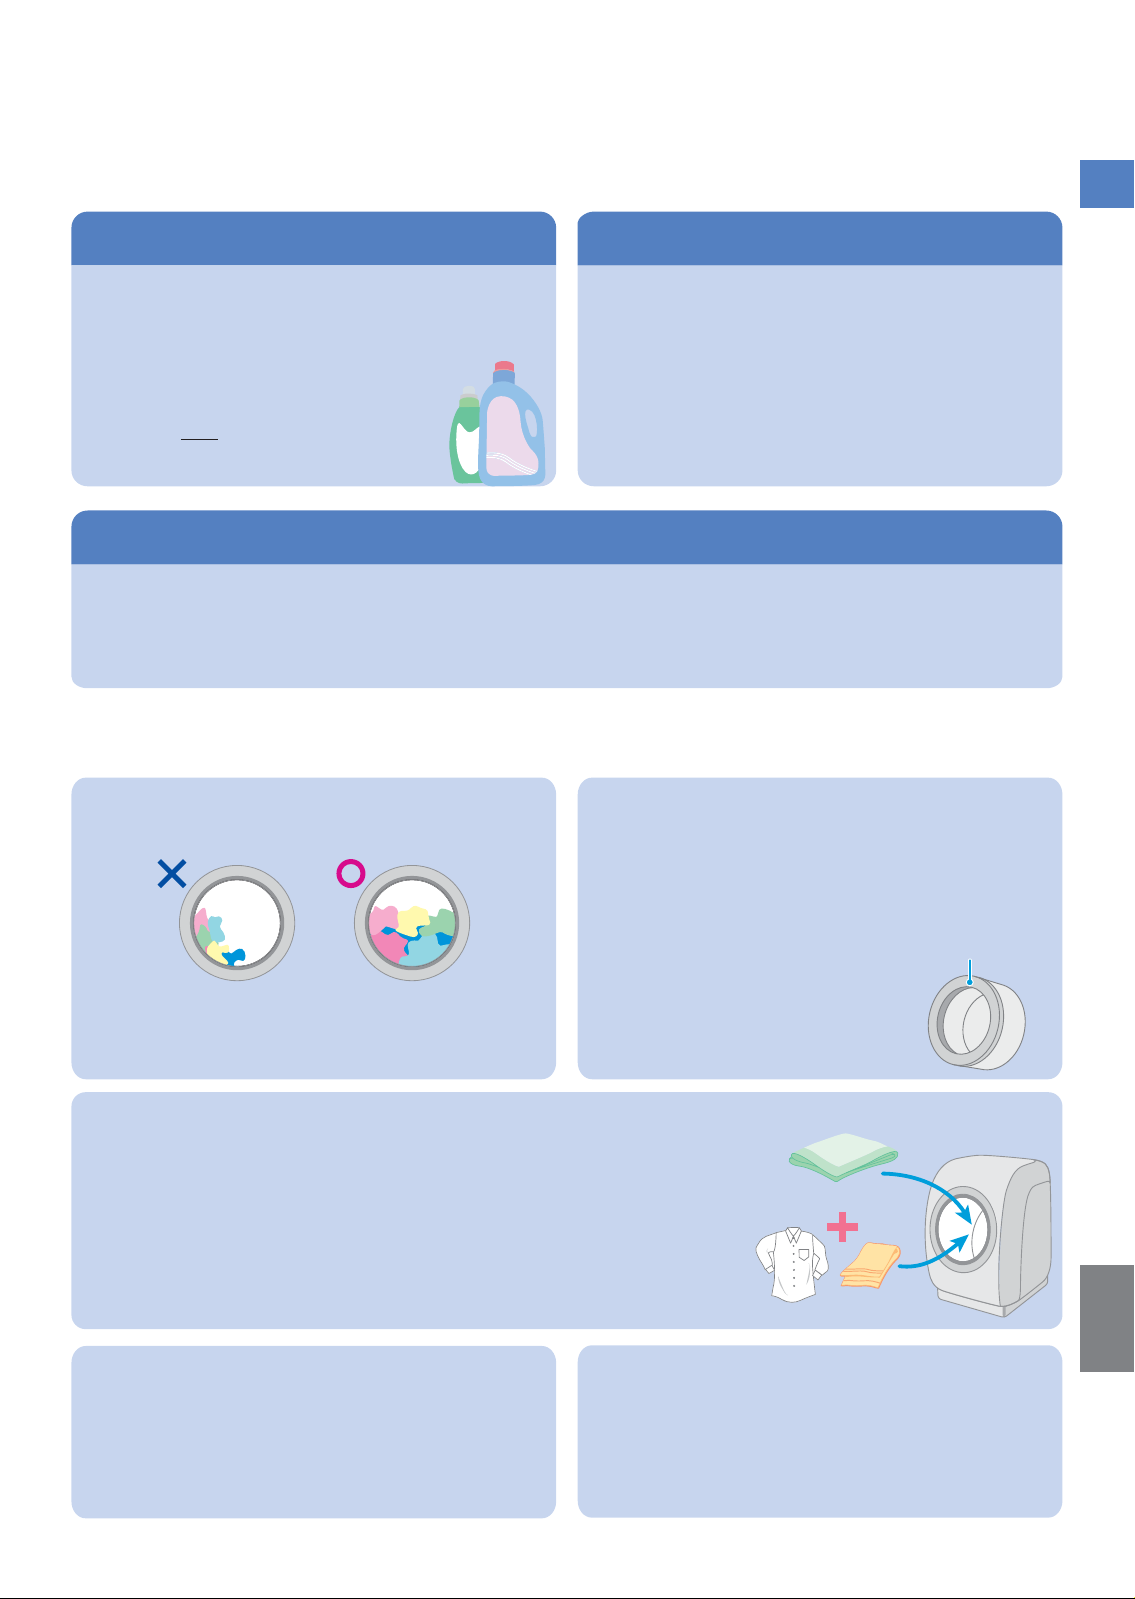
z Adding Detergent and Softener .............................................................................................................................................. 26
· Wash load detection and detergent indicators · Recommended amounts of detergent, softener, and bleach ...................26, 27
· How to add detergent, bleach, and softener ............................................................................................................................ 28
· Using laundr y starch ................................................................................................................................................................ 30
z Opening and Closing the Door ............................................................................................................................................... 31
· How to open and close the door · Opening the door during operation ...............................................................................31, 31
· Releasing the door lock ........................................................................................................................................................... 32
· Using the DOOR LOCK · Preventing the door from being closed .............................................................................................33
How to Use the Machine
z Washing .................................................................................................................................................................................... 34
· FUZZY · SPEEDY · HEAVY · FAVORITE · BLANKET · DELICATE · SOFT · Selecting the right program · How to star t
z Washing & Dr ying .................................................................................................................................................................... 36
· FUZZY · SPEEDY WASH & DRY · HEAVY · FAVORITE · SILENT · BLANKET · Selecting the right program · How to start
z Drying ....................................................................................................................................................................................... 38
· FUZZY · HEAVY · SILENT · BLANKET · STATIC DRY · Selecting the right program · How to start
z BLANKET Program (WASH, WASH DRY, DRY) .....................................................................................................................40
· Preparation · How to install or remove the washing cap · How to start ............................................................................. 40~35
z DELICATE Program (WASH) .................................................................................................................................................... 44
· Preparation · Notes on laundry · How to start · After washing is finished ...........................................................................44~47
z STATIC DRY Program (DRY) ...................................................................................................................................................48
· How to start · Items that can be dried · After drying is finished ......................................................................................... 48, 49
z Using the CLEAN Function - DEODORANT ...........................................................................................................................50
· Items that can be cleaned in the [DEODORANT] program · How to start ........................................................................... 50, 51
z Using the CLEAN Function – TUB CLEAN / TUB DRY ..........................................................................................................52
· Selecting the right program · About the [TUB CLEAN] program · About the [TUB DRY] program · How to start ...............52, 53
z Creating Your Own Program ...................................................................................................................................................54
· How to start · Selecting the right program · How to change the program settings .............................................................54, 55
z Partial Operation of the FUZZY Program ............................................................................................................................... 56
·
WASHJRINSEJSPIN · WASH only · WASHJRINSE · WASHJSPIN · RINSE only · RINSEJSPIN · DRAIN only, SPIN only
· How to start .............................................................................................................................................................................56
z Using the DELAY START Function ..........................................................................................................................................58
· How to change the delay time · How to start .....................................................................................................................58, 59
z Full Auto Operation and Changeable Settings ......................................................................................................................60
z Other Settings .......................................................................................................................................................................... 64
· Changing or disabling the operation start/finish sounds · Disabling the 10-minute warning sound ....................................64, 64
· Using the [HOT WASH] function to remove stubborn stains .....................................................................................................65
· Reducing uneven or over-dry drying results
· Settings that can be changed via the [DELAY START] button
· Washing thoroughly in low-temperature environments (temperature sensor control) ................................................................ 67
· Reducing vibration and noise during [WASH DRY] operations .................................................................................................68
· Reducing vibration and noise during spin or speeding up startup ............................................................................................ 68
· Disabling the Tangle-Free Finish function after spin operations ................................................................................................69
.................................................................................................................................
............................................................................................................
66
66
2
Page 3

· Maintaining softness after drying operations (Soft Guard) ........................................................................................................ 69
· Changing the dehumidification mode ....................................................................................................................................... 70
Maintenance
· Lint filter ................................................................................................................................................................................... 71
· Dry filter · Dry filter port ...................................................................................................................................................... 73, 74
· Detergent dispenser · Detergent dispenser port · Main body and drum ............................................................................. 75, 76
· Water supply inlet ..................................................................................................................................................................... 77
· Water tap, one-touch joint, and water supply hose · Drain outlet ............................................................................................. 78
Troubleshooting
z Troubleshootin g .......................................................................................................................................................................79
· Error codes in the remaining time indicator .............................................................................................................................. 79
· Frequently encountered problems ............................................................................................................................................ 81
· Unusual sounds .......................................................................................................................................................................82
· Problems with particular parts of the machine .........................................................................................................................82
· Sounds and vibrations ....................................................................................................................................................................... 82, 83
· Water supply inlet · Drain outlet · Door · Drum ...................................................................................................................................83~85
· Power · [START] button · Detergent dispenser · Dry filter · Sound guides and warnings ...................................................................85~86
· Main body ................................................................................................................................................................................................ 87
· Problems during operations .....................................................................................................................................................88
· Operations .........................................................................................................................................................................................88, 89
· Operation times .................................................................................................................................................................................89, 90
· Problems in the control panel ................................................................................................................................................... 91
· Detergent indicator · Operation indicators · Remaining time indicator ............................................................................................... 91, 92
· Problems with washing results ................................................................................................................................................. 93
· Leftover detergent · Excessive lint · Insufficient cleaning · Darkening and yellowing · Color bleeding and discoloration.................... 93, 94
· Coarse textures · Odors · Uneven or insuf ficient drying ..................................................................................................................... 94, 95
· Wrinkles after drying ................................................................................................................................................................................96
z Miscellaneous .......................................................................................................................................................................... 97
· Draining the water before a move (or to prevent freezing) · If the machine freezes .................................................................... 97
z Optional Accessories ..............................................................................................................................................................98
z Specifications ..........................................................................................................................................................................99
Frequently encountered problems (P.81)
English
3
Page 4
The main features of your front loading washer dryer and
Features
tips for good washing and drying results are described
below. Please read them before using your machine.
Wind Iron
z High-speed airflow smoothes out wrinkles. Clothes are dried at lower
temperatures than with previous models, resulting in less shrinking of
delicate clothes.
z Clothes move freely inside the big drum while drying.
z A Jet Fan Motor generates the high-speed airflow, which blows through the
clothes to smooth out wrinkles.
Cleaning power
High-speed airflow
3D Sensor Control Wash
z The 3D vibration sensor maximizes
the beat washing effect by
controlling the drum rotation speed
using a revolution sensor.
(This function is used during the
[FUZZY], [SPEEDY WASH & DRY],
[SPEEDY], [HEAVY], [FAVORITE],
and [SOFT] programs.)
Energy saving
Heat Recycle Drying
1
Main motor
Heavy laundry
Jeans,
sweatpants,
etc.
Light laundry
Shirts, aprons,
etc.
3
Eco Vent
2
Jet Fan
Increased
drum rotation
speed
Laundry does not lift. Improved beat washing
effect.
Decreased
drum rotation
speed
Laundry does not drop.
1
Recycled heat from the main motor
Heat generated from the main motor is
transferred into the drum to raise the
temperature.
2
Recycled heat from the Jet Fan
In addition to heat from the heater,
compressed heat from the Jet Fan, which
generates high-speed airflow, and heat from
the Jet Fan Motor are used as hot air during
drying.
3
Recycled heat via the Eco Vent
Air warmed by the main motor and heater
enters the Eco Vent (open-close type inlet),
which is set along the drying pipeline, and is
reused as warm air during drying.
(This function is not used during the
[SILENT], [DRY (10 MIN)], and [DEODORANT]
programs.)
Improved beat washing
effect.
4
Page 5

Preparation
If problems occur during use,
see (P.79 to 96).
Checking the installation
If you have any problems with the installation, contact your dealer or the service technician that
performed installation.
Reasons for water leakage
z Are you using Hitachi’s new one-touch joint
(supplied) for the connection to the tap? (P.6)
z Is the connection to the tap loose?
z Is the union nut firmly connected to the
machine? (Installation Instructions)
Reasons for abnormal drainage
z Is the drain hose elevated more than 10 cm
above the ground?
z Is the drain hose firmly attached to the drain
outlet? (Installation Instructions)
The drain hose must not be elevated more than
10 cm when going over a threshold, for example,
and its total length must be 2 m or less.
Features / Preparation
Reasons for stops and abnormal sounds
and vibration during the spin cycle
z Is the machine installation level?
z Is the air bubble in the spirit level inside the
circle? (Installation Instructions)
Circle
Air
bubble
Ú View the spirit level
from directly above.
10 cm or less
2 m or less
English
5
Page 6
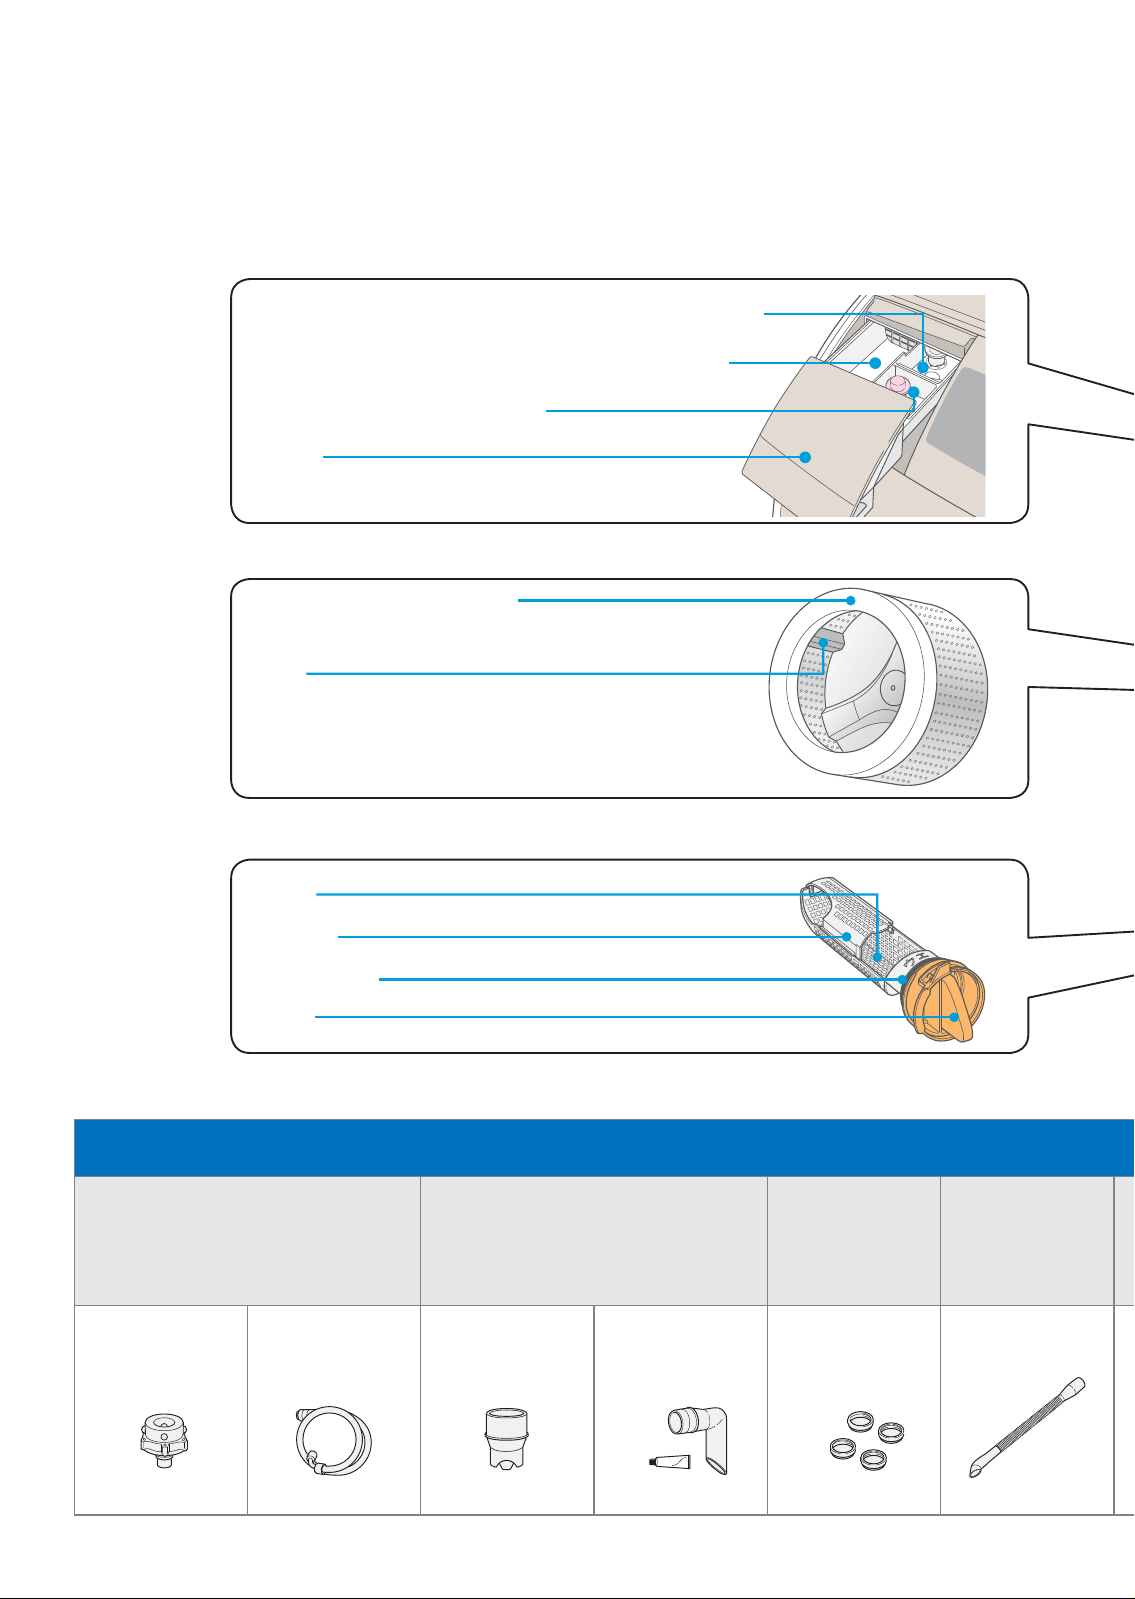
Parts and Accessories
The numbers in parentheses indicate pages for reference. (P. XX)
Detergent dispenser (P.28, 75)
Liquid detergent / liquid bleach inlet (right back side)
Powder detergent / powder bleach inlet (left side)
Softener inlet (right front side)
Handle
Drum
5-Ply Liquid Load Balancer
Lifter
Ú Moving liquid can be heard when the drum is rotated.
This is the liquid inside the 5-Ply Liquid Load Balancer
that acts as a balance during the spin cycle. This is
not residual water that has been left in the drum.
Lint filter (P.71, 72)
Filter
Filter lid
Rubber seal
Knob
Supplied accessories (refer to the Installation Instructions)
Used when the drain
Used when connecting to the tap
One-touch joint Water supply
hose
(approx. 1.5 m)
outlet hole is too small
(outlet diameter:
48 mm or less)
Hose piece
(Installation
Instructions)
L-Pipe and
adhesive
(Installation
Instructions)
Used for leveling
the machine
Foot caps
(for adjusting height)
6mm
3mm
Used when cleaning
the dry filter port
Suction nozzle
(P.74)
(1 piece) (1 piece) (1 piece) (1 piece)(4 pieces)
(1 each)
6
Page 7
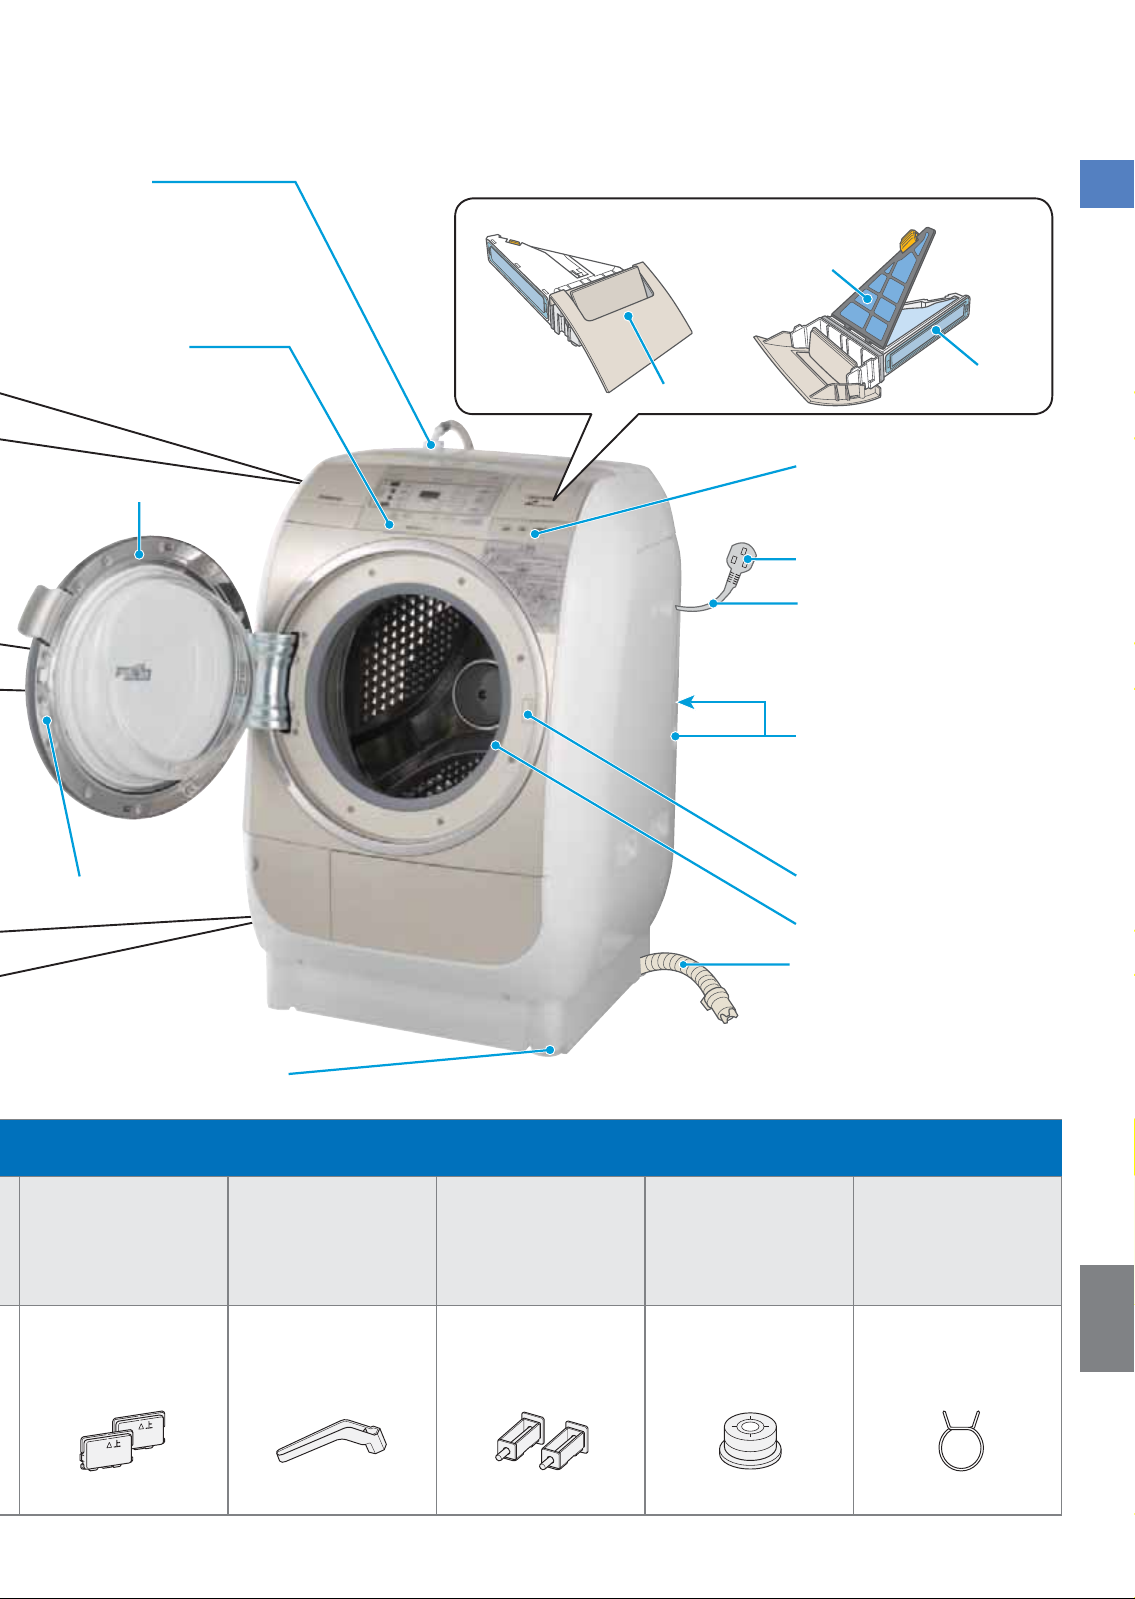
Water
supply inlet
(P.77)
Control
panel
Door
Dry filter (P.73, 74)
Top
Handle
Bottom
Filter B
POWER buttons
Power plug
Power cord
Drain hose supports
(holes)
(on left and right sides)
Parts and Accessories
Filter A
Door stopper
Adjustable feet
(Installation Instructions)
(You can adjust the height of the right front foot.)
Used to cover the holes
after the transport bolts
are removed
Cover caps
(Installation Instructions)
Used when installing or
removing transport bolts
Spanner for
transport bolts
(Installation Instructions)
Used to secure the
drum during transport
or installation
Transport bolts
(Installation Instructions)
Door lock
Door bellows
Drain hose
(Installation Instructions)
Used for determining
whether the machine
is level
Spirit level
(Installation Instructions)
Used before securing the
drain hose connector
English
Hose clip
(Installation Instructions)
(2 pieces) (1 piece) (2 pieces) (1 piece) (1 piece)
7
Page 8
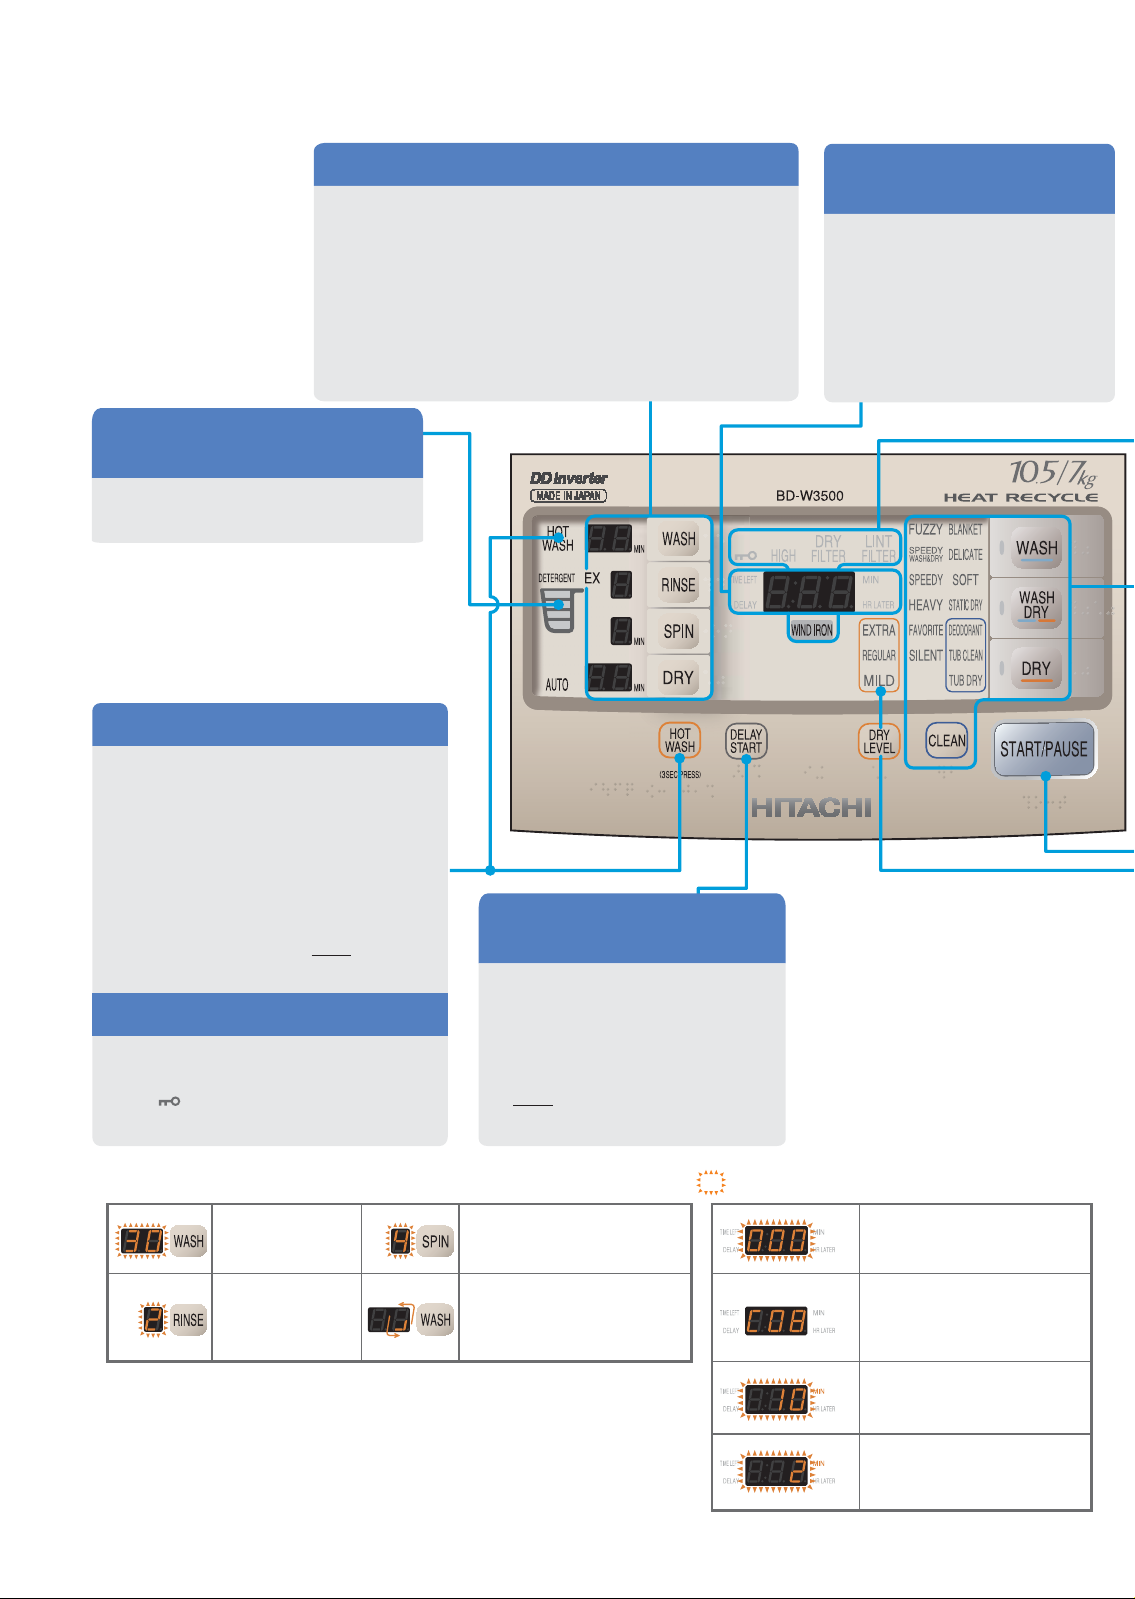
Control Panel Functions
Change the cycle settings (P.55, 60, 61)
Combine and change [WASH], [RINSE], [SPIN],
and [DRY] cycle settings.
z Press [PAUSE] after the machine starts to change
the settings. Settings cannot be changed after the
[WASH] cycle finishes.
Ú The settings cannot be changed when only the
[WASH] cycle is used.
z The settings cannot be changed for some programs.
Detergent indicator
(P.26)
Indicates the suggested amount
of detergent to use.
Use the HOT WASH function (P.65)
Blow hot air onto laundry to
activate the detergent for more
complete cleaning.
z The [HOT WASH] indicator lights
when set, and blinks during
operation.
z This function cannot be used during
the [BLANKET] and [DELICATE]
programs and during [DRY] and
[CLEAN] operations.
Set the DOOR LOCK (P.33)
Prevent children from opening the
door.
z The indicator lights when this is
set.
Remaining time and delay
indicators (P.26, 58)
Indicates the remaining time
after operation starts, or
displays the delay time with
each press of the [DELAY
START] button.
After starting, only the [DELAY]
indicator is lit.
DOOR LOCK
Use the DELAY START
function (P.58, 59)
Set the machine to finish
operation 3 to 12 hours later
in 1-hour increments.
z Delay times cannot be set for
some programs.
z [DRY] operations and [CLEAN]
programs cannot be delayed.
Examples of indicator displays during operation ( indicates blinking)
[WASH (30 MIN)]
in progress
[RINSE (2 times)]
in progress
Ú During the defoaming operation, water for defoaming is injected
from the front side of the drum after first draining the water (for
up to 15 minutes).
[SPIN (4 MIN)] in progress
Defoaming in progress
(display rotates during
[WASH] cycle) (P.91)
8
Soft Guard operation in
progress
An error has occurred
(e.g., [C08])
Drying operation on standby
(P.92)
Tangle-Free Finish operation
in progress (P.92)
Page 9
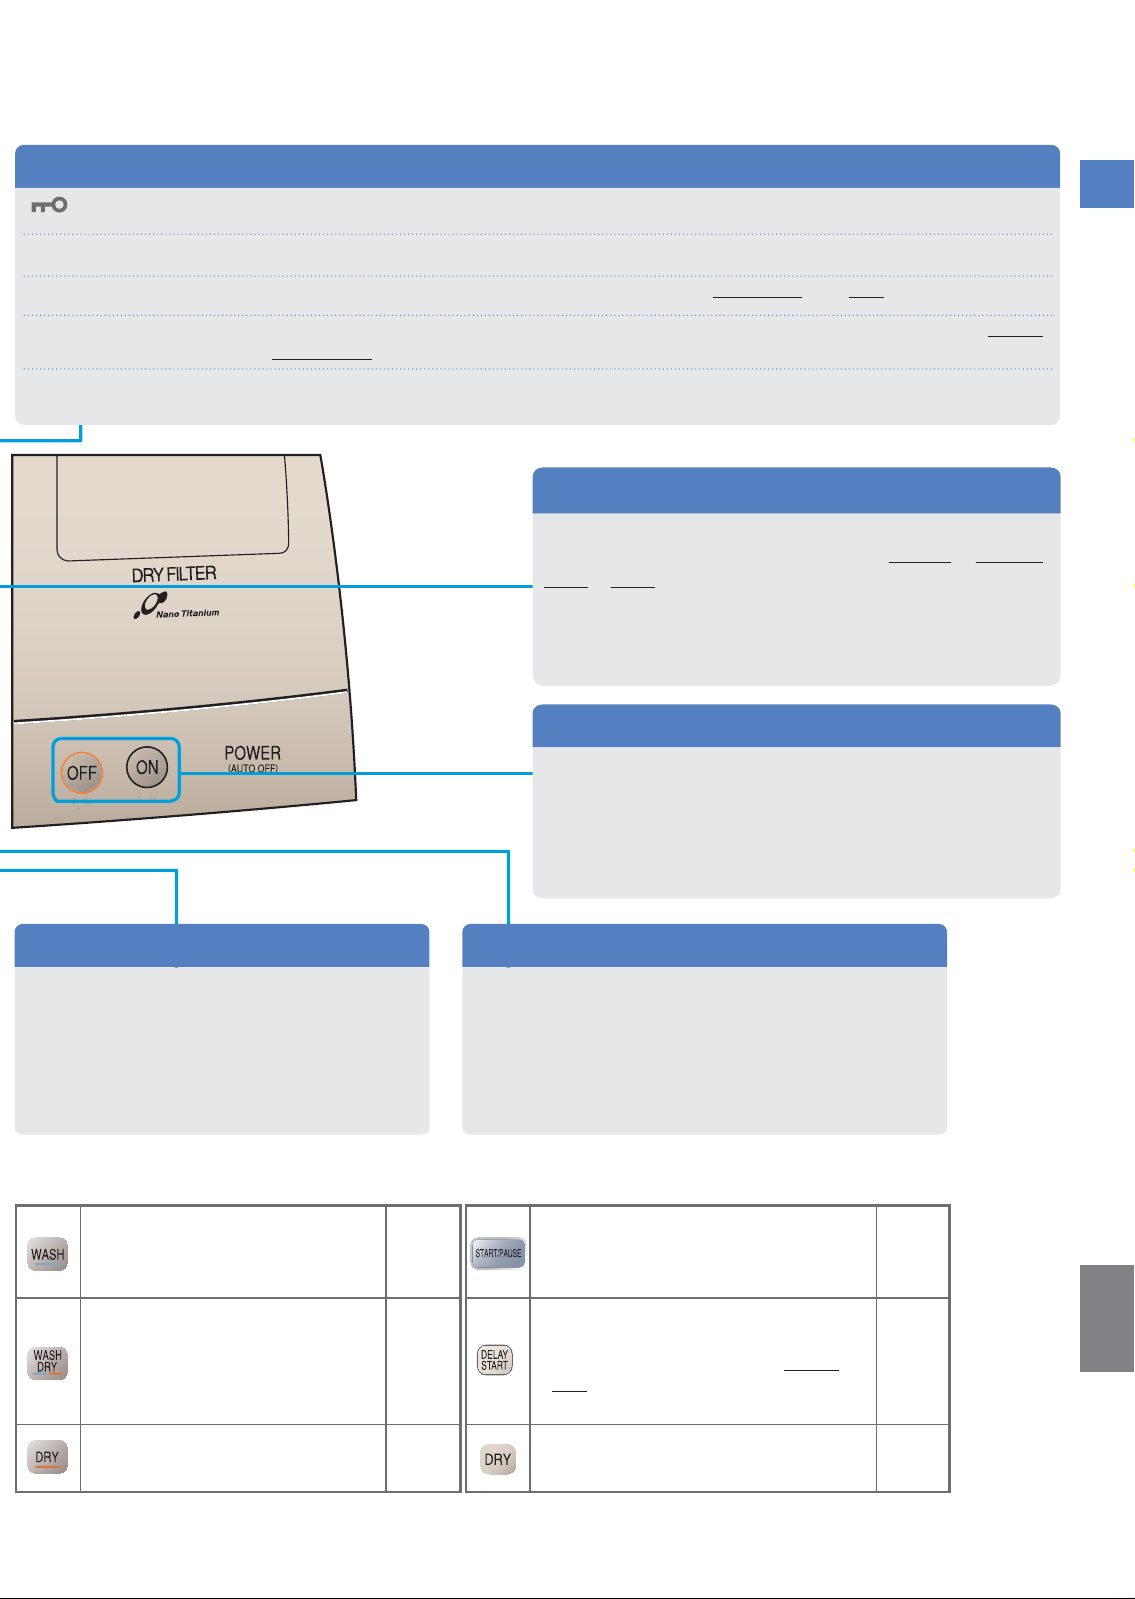
Status indicators (P.31, 32, 71 to 74)
z Lights or blinks when the door is locked.(door lock)
z Lights or blinks when the inside of the drum is hot.HIGH (temperature)
Control Panel Functions
DRY FILTER
LINT FILTER
WIND IRON
z Blinks when the dry filter is clogged or after every 25 times the [WASH DRY] and [DRY] operations are used.
z Blinks when the lint filter is not attached properly or clogged, or after every 30 times the [WASH]
and [WASH DRY] operations are used.
z Lights when a program that uses the Wind Iron function is selected. Blinks during Wind Iron
operation.
Select a program (P.34 to 55)
Cycle through (i.e., light) the selectable programs
for each operation by pressing the [WASH], [WASH
DRY], [DRY], or [CLEAN] button.
z The selectable programs differ for each operation.
Power buttons (P.79)
Turn the power on or off.
z If you turn the power on and do not start an operation
within 10 minutes, the power will turn off automatically
(Auto Power Off).
z The power turns off automatically after an operation
finishes.
START/PAUSE button (P.31, 32)Adjust the level of drying (P.66)
Adjust the level of drying to one of three
levels: [EXTRA], [REGULAR], or [MILD].
z The factory default setting is [REGULAR].
Start or pause an operation.
z Even if you press [PAUSE] during a drying
operation, you cannot open the door until the inside
of the drum has cooled.
z Make sure that the door is closed before
pressing the button. Failure to do so may result in
malfunction of the machine.
Buttons that function differently when held for 3 to 5 seconds after turning on the power
Turn the Tangle-Free Finish function
on or off.
Change the operation start/finish
sound.
Turn the Soft Guard function on or
off.
(P.69) Turn the pre-finish sound on or off. (P.64)
x Turn the temperature sensor control on
(P.64)
(P.69)
or off.
x Adjust the spin speed during [WASH
DRY] operations.
x Adjust the spin startup conditions.
Change the dehumidification mode (Air /
Water Cooling).
(P.67,
68)
(P.70)
English
9
Page 10
Safety Precautions
To prevent injuries to yourself and others or damage to property, please read the following
precautions thoroughly. In addition, read the notes in this manual carefully to ensure proper use of the
machine.
Meanings of listed precautions
The following symbols indicate the severity of injury or damage in cases where the machine is
used improperly.
Symbol examples
WARNING
Indicates that death or serious
injury may occur.
Indicates WARNING or CAUTION
information.
Indicates a prohibited action.
CAUTION
Indicates that minor injuries or
damage to property may occur.
WARNING
Power plug and power cord
z Use a dedicated 220-240VAC outlet with a capacity of 10 A or higher.
Sharing an outlet with other appliances may cause the outlet to overheat and result in fire.
z Wipe off any dust that accumulates on the blades of the power plug or the contact
surfaces.
Failure to do so may result in fire.
z Hold the body of the power plug firmly when disconnecting the plug.
Failure to do so may cause electrical shock or short circuits and result in fire.
z If the power cord is damaged, it must only be replaced by the authorized service agent
or repairing shops appointed by the manufacturer in order to avoid a hazard.
z If the machine does not operate, emits smoke or unusual odors, or otherwise
operates abnormally, disconnect the power cord immediately and consult a service
representative to request inspection or repair.
Failure to do so may cause electrical shock, electrical leakage, or short circuits, and result in fire.
z Disconnect the power plug when performing maintenance on the machine or when not
using the machine for prolonged periods.
Failure to do so may result in electrical shock or injuries.
z Do not connect or disconnect the power plug with wet hands.
Doing so may result in electrical shock.
z Do not use power cords or power plugs that are damaged or loose power outlets.
Doing so may result in electrical shock, short circuits, or fire.
z Do not scratch, modify, forcibly bend, pull, twist, place heavy objects on, pinch, or
otherwise damage the power cord.
A damaged power cord may result in fire.
z Do not overload the power outlet by using a splitter, for example.
Doing so may result in fire.
z Do not use an extension cord.
Doing so may cause overheating and result in fire.
Indicates an action that must be
performed.
10
Page 11

Installation
z Do not install the machine in damp locations, such as a bathroom, or in locations
exposed to rain.
Doing so may cause electrical shock or electrical leakage and result in fire.
z Do not install the machine on a wheeled platform or other unstable surface.
Doing so may cause the machine to move or fall over by vibration during operations.
z Carpet does not obstruct the openings for washing machines with ventilation openings
in the base.
Laundry and detergent
z Do not dry clothes to which vegetable oil, animal oil, machine oil, dry-cleaning oil,
cosmetic oil (massage oil, beauty treatment oil, etc.), benzene, thinner, gasoline,
or resin (cellulose) has adhered, or clothes made of polypropylene fiber, even after
washing. In addition, do not dry items that contain sponge-like materials.
Doing so may cause natural combustion of the oil and materials.
z Do not add excessive amount of detergent.
Use the recommended amounts of detergent, referring to the detergent indicator. Failure to do so may
cause excessive foaming and malfunction of the machine, and result in leakage of water and foam
from the machine or drain outlet and electrical shock.
WARNING
Safety Precautions
During and after operation
z Do not insert your hand into the laundry until the drum stops spinning completely.
Your hand may get caught in the laundry and injuries may result, even during gentle spinning. In
particular, keep children away during operation.
z Never stop a tumble dryer before the end of the drying cycle unless all items are
quickly removed and spread out so that the heat is dissipated.
When near the machine
z Keep flammable materials away from the drum.
(Flammable materials include kerosene, gasoline, benzene, thinner, alcohol, and
laundry on which such substances have adhered.)
Failure to do so may result in fire.
z Keep candles, incense, cigarettes, and other sources of fire away from the machine.
Failure to do so may result in fire.
z Children should be supervised to ensure that they do not play with the appliance.
z Do not allow children to enter the drum. Do not allow children to operate the machine.
Children may get trapped inside the drum and asphyxiate, or get burned, shocked, or otherwise
injured.
English
11
Page 12

Safety Precautions (continued)
WARNING
Miscellaneous
z Remove the door before disposing the machine.
Children may get trapped in the machine. Loosen the screws and remove the door.
z Keep the supplied spirit level and plastic packaging away from children.
Children may accidentally swallow the spirit level or place the packaging on their head and asphyxiate.
z The appliance is not to be used by persons (including children) with reduced physical,
sensory or mental capabilities, or lack of experience and knowledge, unless they have
been given supervision or instruction.
z Do not dismantle, repair, or modify the machine.
Doing so may result in electrical shock, fire, or injuries. (Consult a service representative.)
z Do not splash water directly onto the machine when performing maintenance.
Doing so may result in electrical shock or short circuits.
z Do not wash laundry on which volatile solvents (gasoline, benzene, thinner, kerosene,
etc.) or sodium hydroxide have adhered.
Doing so may result in fire.
z Keep your hands away from the door hinge when closing the door.
Fingers may get caught between the machine and door and result in injuries.
CAUTION
Laundry
z Do not wash, rinse, spin, or dry waterproof mats, sheets or clothes, bath mats, hard
and thick items such as doormats, carpets or fabrics that do not allow water to pass
through.
The laundry may be damaged, or the machine may malfunction during the spin cycle and cause
injuries.
Examples
Fishing wear, ski wear, raincoats, sleeping bags, sauna suits, wetsuits, windbreakers, disposable diapers, bicycle,
motorcycle, or car covers, carpets, waterproof mats or sheets, bath mats, and other hard and thick items.
12
Page 13

CAUTION
Before, after, and during operation
z Turn on the tap and make sure there is no leakage before washing and drying.
Loose screws may result in water leakage and unexpected damage. The metal fixtures and gasket of
the tap can deteriorate and rust over long periods of use, resulting in leaks.
z Turn off the tap when not in use.
This can prevent unexpected water leakage.
z Check for leaks after tap connection whenever the machine is installed or moved.
This can prevent unexpected water leakage.
z Open and close the door gently.
Failure to do so may result in injuries, damage to surrounding walls, or malfunction of the machine.
z Check and ensure that lint and other particles are not attached to the surface of the
door bellows before operating the machine.
Such particles may interfere with the sealing of the door and result in water leakage.
z Do not attempt to open the door by force when it is locked. (P.31 to 33)
Doing so may damage the door and lock, or result in injuries or malfunction of the machine.
z Make sure the lint filter is properly attached before operation, and do not remove it
during operation.
Improper attachment or removal will result in water leakage.
z Do not apply excessive pressure to the door bellows when loading or unloading
laundry.
Doing so may warp the door bellows and result in water leakage.
z Do not pull out the detergent dispenser during operation.
Doing so may result in steam or water leakage.
z Do not remove the dry filter during drying operations.
Doing so may result in steam or water leakage or burns.
z Do not place your hands and feet under the machine during operation.
Doing so may result in injuries.
z Do not touch the metallic parts of the drum or door, the top right portion of the
machine, or the laundry (zippers, metallic buttons, etc.) during or after drying
operations.
Doing so may result in burns.
Safety Precautions
13
English
Page 14

Safety Precautions (continued)
CAUTION
Miscellaneous
z Close fasteners (e.g., zippers) on laundry before operation.
Failure to do so may result in malfunction of the machine or water leakage.
z If any liquid detergent, bleach, or softener remains on the metal parts of the detergent
dispenser, the metal parts of the back side of the door, or any plastic parts on the
exterior of the machine, wipe it off immediately with a soft, damp cloth.
Failure to do so may cause rust and deterioration of the machine parts and result in injuries.
z After a water outage occurs or after you disconnect and reconnect the water supply
hose, turn off the tap, press the <START> button, and ensure that the detergent
indicator lights before turning on the tap slowly.
(Do this after long periods of disuse as well.)
Air may have accumulated in the water supply hose or plumbing fixtures, and the pressurized air may
cause malfunction of the machine, water leakage, or injuries when released.
z Install the machine in the way that you can access the drain outlet for cleaning.
Clogged drain outlets will result in improper drainage and water leakage. If you remove the drain hose
from the drain outlet hole, make sure that it is reinserted securely into the drainage pipe.
z Clean the lint filter and drain outlet regularly (i.e., once a month).
Washing laundry that produces a lot of lint or laundry on which hair or pet fur is attached will clog the
lint filter and drain outlet quickly, and result in improper draining and water leakage.
z Remove the detergent case and clean the case regularly (i.e., once a week).
Accumulation of liquid detergent, softener, or bleach may cause malfunction of the machine and result
in injuries.
z Do not use hot water from a water heater.
Doing so may result in malfunction of the machine, water leakage, or improper drying operation.
z Do not jam laundry when closing the door.
Doing so may result in malfunction of the machine, water leakage, or improper drying operation.
z Do not climb on top of the machine or place heavy objects on it.
Doing so may result in malfunction of the machine or water leakage.
z Do not apply excessive pressure to the door or its hinges.
Doing so may result in malfunction of the machine or water leakage.
z Do not use water that is 50°C (122°F) or higher in temperature.
Doing so may result in malfunction of the machine, water leakage, or improper drying operation.
z Do not use the washing cap (optional) during the [WASH DRY] and [DRY] operations
and the [CLEAN] and [SOFT] programs.
The heat may cause the washing cap to warp and fly out of the drum, resulting in injuries or
malfunction of the machine.
z Do not hang a rag on the door bellows.
Doing so may deform the door bellows, resulting in water leakage.
14
Page 15

Usage Precautions
Do not disconnect the power plug during
operation.
z Doing so may result in malfunction. Pause
the operation or turn the power off before
disconnecting the power plug.
Do not use the machine near televisions or
radios.
z Doing so may result in interference in the
television screen and television and radio
noise.
Do not overload the machine with laundry.
z Overflowing laundry may result in damage to
the laundry, door bellows, and plastic parts.
z Doing so may prolong washing times or
produce uneven washing and drying results.
When washing larger loads, separate
underwear, handkerchiefs, and smaller
items into a commercially available mesh
laundry bag.
z Smaller items may collect near the door
bellows during operation, resulting in
insufficient washing and drying.
z We recommend using the optional washing
cap (MO-F102). (P.98)
Do not use the washing cap during the [WASH
DRY] and [DRY] operations and the [CLEAN]
and [SOFT] programs.
Do not use commercially available washing
accessories.
z Commercially available accessories, such as
washing balls and filters, may warp and be
damaged by heat, which may result in damage
to the laundry and malfunction of the machine.
Ensure sufficient ventilation during drying
operations.
z Doing so ensures efficient drying of the
laundry.
z Insufficient ventilation during winter or low
room temperatures may result in condensation
on windows and walls.
Usage Precautions
Mesh laundry
bag
Washing cap
Do not overfill commercially available mesh
laundry bags.
z Full bags may cause increased noise and
vibration.
z Full bags may not dry sufficiently in the spin
cycle.
z Put only lightweight items in the bag (e.g.,
lingerie and small items).
English
15
Page 16
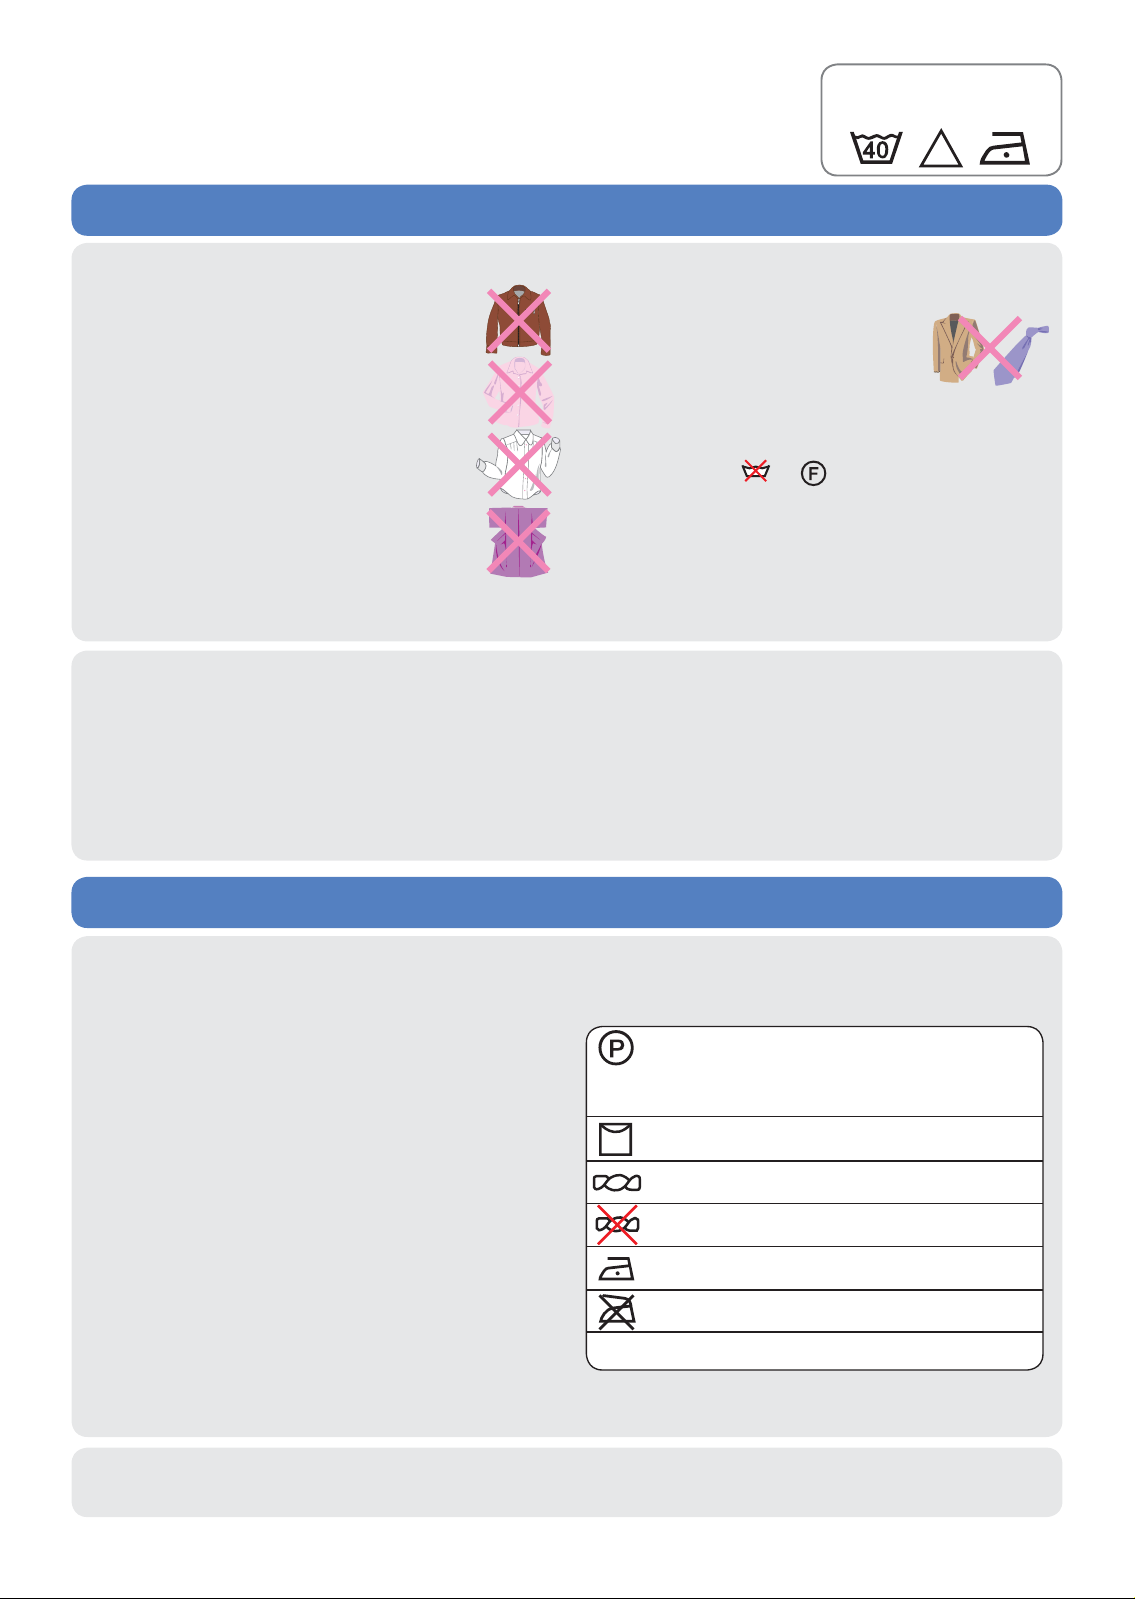
Before You Start Washing
Do not wash or dry the following items
To prevent shrinking, deformation, discoloration, changes in texture, etc.
z
Be sure to check the washing
instructions and guides.
z Leather, fur, feathers, and items that
include these
z Rayon, cuprammonium, and their
mixtures
x Such items may shrink, deform, or discolor.
z Silk items
x Such items may shrink, deform, or discolor.
z Velvet and other pile fabrics
z Neckties, suits, and coats
x Such items may shrink or deform.
Ú The [DEODORANT] program can be
used. (P.50)
z Shoes
Ú The [STATIC DRY] program can be used. (P.48)
z Items labeled or , items without washing
instructions, and items without material labels
z Kimonos and their accessories
z Blankets and rugs made with 100% wool or pile
of 10 mm or more
z Items that use highly twisted threads (hard-
z Items with coating, resin finishing, or
twist yarn) (wool, crape, etc.)
embossing
To prevent injuries and malfunctions from abnormal spinning vibration
z Waterproof items (P.12)
x
Such items tend to gravitate to one side, resulting in
malfunction of the machine and damage to the laundry.
z Mats with rubber lining underneath or long piles
(doormats, carpets, rugs, etc.)
x Such items tend to gravitate to one side, resulting in
malfunction of the machine.
z Items that are covered in pet fur
Ú Such items may clog the drain outlet.
z Commercially available washing accessories
(washing balls, filters, etc.)
z Pillows, cushions, etc.
Do not dry the following items
To prevent shrinking, wrinkling, discoloration, changes in texture, etc.
z Items made of rubber, polyurethane plastic, etc.
x Follow the cleaning instructions on the product.
z Toys, dolls, and items that include polyurethane
sponge material
z Items that shrink easily
z Items with cotton stuffing, such as futons,
comforters, etc.
z Tights and items that are decorated with lace or
embroidery (synthetic fibers, micro fibers, etc.)
z Wool, other animal hair, and their mixtures
Ú Certain materials can be dried using the [STATIC
DRY] program. (P.48)
z Deep colored prints
z
Do not dry clothes, hats, and other items on
which animal oil, vegetable oil, machine oil,
dry-cleaning oils, benzene, thinner, gasoline,
cosmetic oil, ointments, and similar substances
have adhered, even after washing. In addition, do
not dry items that contain sponge-like materials.
x
Doing so may cause natural combustion of the oil and materials.
To prevent dry filter clogging and other malfunctions
z Starched clothes
Do not wash items with the following washing
instructions:
Dry cleaning is possible
Ú Certain materials can be dried using the [STATIC
DRY] program. (P.48)
Hang drying is recommended
Light wringing is recommended
Do not wring
Low-temperature ironing is recommended
Do not iron
Labels that prohibit tumble drying, etc.
16
Page 17
Washing and Drying Programs
Desired operation
Normal laundry
x Underwear, pajamas, etc.
Fast washing and drying
x Shirts, pajamas, etc.
Fast washing of lightly soiled laundry
x Handkerchiefs, aprons, etc.
Heavily soiled or thick laundry
x Sweatshirts, socks, etc.
Customized operation
x Shirts, etc.
Silent operation
x Underwear, pajamas, etc.
Recommended program
FUZZY
(P.34, 36, 38)
SPEEDY
WASH&DRY
(P.36)
SPEEDY
(P.34)
HEAVY
(P.34, 36, 38)
FAVORITE
(P.54)
SILENT
(P.36, 38)
Washing and Drying Programs
Washing and drying blankets, etc.
x
Acrylic blankets, comforters, bed pads, curtains, etc.
Washing clothes with “hand wash only” labels
x Skirts, sweaters, etc.
Maintaining soft textures after wash
x Hand towels, bath towels, etc.
Drying clothes with dry-clean labels, shoes, etc.
x Sweaters, shoes, etc.
Removing odors and smells
x Suits, stuffed toys, etc.
BLANKET
(P.40 to 43)
DELICATE
(P.44 to 47)
SOFT
(P.34)
STATIC DRY
(P.48)
DEODORANT
(P.50, 51)
English
17
Page 18

Tips for Good Washing Results
Preparing your laundry
Separate items for which lint is a concern,
or place them into a mesh laundry bag
z Place corduroy (or other long pile material) or dark
colored clothes, stockings, and other clothes on
which lint may be noticeable in a commercially
available mesh laundry bag with lint protection.
z When washing with other laundry, use the Water-
Injection Rinse function and the [RINSE (3 times)] or
[RINSE (4 times)] operation.
Separate items that are likely to
bleed color
z Separate items that bleed
color easily, and wash items
of similar color 2 to 3 pieces
at a time.
Place small and delicate items
into a mesh laundry bag
z Place brassieres with wires into commercially
available mesh laundry bags made for brassieres.
z Place socks, handkerchiefs, and other small items into
commercially available mesh laundry bags made for
general purposes. This is to prevent the items from
getting caught between the inside of the door and the
door bellows during operation.
Remove debris, dirt, sand, hair,
and pet fur
z Debris and foreign particles
may clog the drainage pipeline
and drying pipeline, resulting in
malfunction.
(Single pieces of laundry tend to gravitate to one side during the
spin cycle and may not dry sufficiently. Wash them together with
other items for which color transfer is not a concern.)
Remove all coins, hairpins, and objects
(including from pockets)
z These objects
may damage the
laundry or cause
malfunctions.
Remove
matches,
hairpins,
coins, etc.
Treat stains as soon as possible
z Stains become harder to
remove as time passes. Partial
cleaning of the stained area
before wash may help remove
them.
Tie all strings and close all
fasteners
z This is to prevent the
fasteners from damaging
the laundry and causing
malfunctions in the
machine.
Separate items for which pilling or lint is
a concern, or turn them inside out
z Turn sweaters and other items for
which pilling is a concern inside
out.
z Separate such items from towels,
bath towels, etc.
18
Page 19
Helpful hints
Tips for Good Washing Results
To prevent coarse textures
Items such as towels can feel coarse after
washing due to flattened piles.
z Use a fabric softener.
z Wash using the [SOFT] program.
(P.34)
z For items that feel coarse after drying,
run the [DRY] > [FUZZY] program for an
additional 30 minutes. (P.39)
z Increase the number of rinse cycles. (P.55)
z Use the Water-Injection Rinse function. (P.55)
z Decrease the amount of detergent. (P.26, 27)
To rinse thoroughly
To prevent color bleeding and darkening (P.94)
z Separate items that are likely to bleed color when washing.
z Use the recommended amounts of detergent and softener.
Ú Insufficient amounts of detergent or excessive amounts softener may result in darkening.
Ú Using liquid detergent can result in darkening. Try using a powder detergent.
How to load the laundry into the drum
Distribute the laundry evenly and avoid
concentration on one side.
Place the laundry behind the 5-Ply Liquid
Load Balancer.
z Failure to do so may cause the laundry to get
caught between the door and the door bellows,
resulting in damage to the laundry and the door
bellows.
Place smaller items into the back
of the drum first, and then load the
remaining laundry.
z We recommend using the
optional washing cap.
5-Ply Liquid
Load Balancer
Large items (sheets, cotton blankets, etc.), thick items (jeans,
sweatshirts, etc.), small loads, and mats of various types should
be washed together with other laundry.
z Such items tend to gravitate to one side when washed alone, resulting in
excessive vibration and insufficient drying during the spin cycle. (P.79)
When drying a small load of laundry (about
1kg or less), place a dry towel together with
the laundry.
z Small loads of laundry may result in insufficient
drying. Placing a dry towel or similar item together
with the laundry will reduce unevenness in drying.
Do not overload the machine with laundry.
z Overflowing laundry may result in damage to the
laundry, door bellows, and plastic parts.
z It may also prolong drying times or produce uneven
washing and drying results.
Cotton blanket, etc.
English
19
Page 20
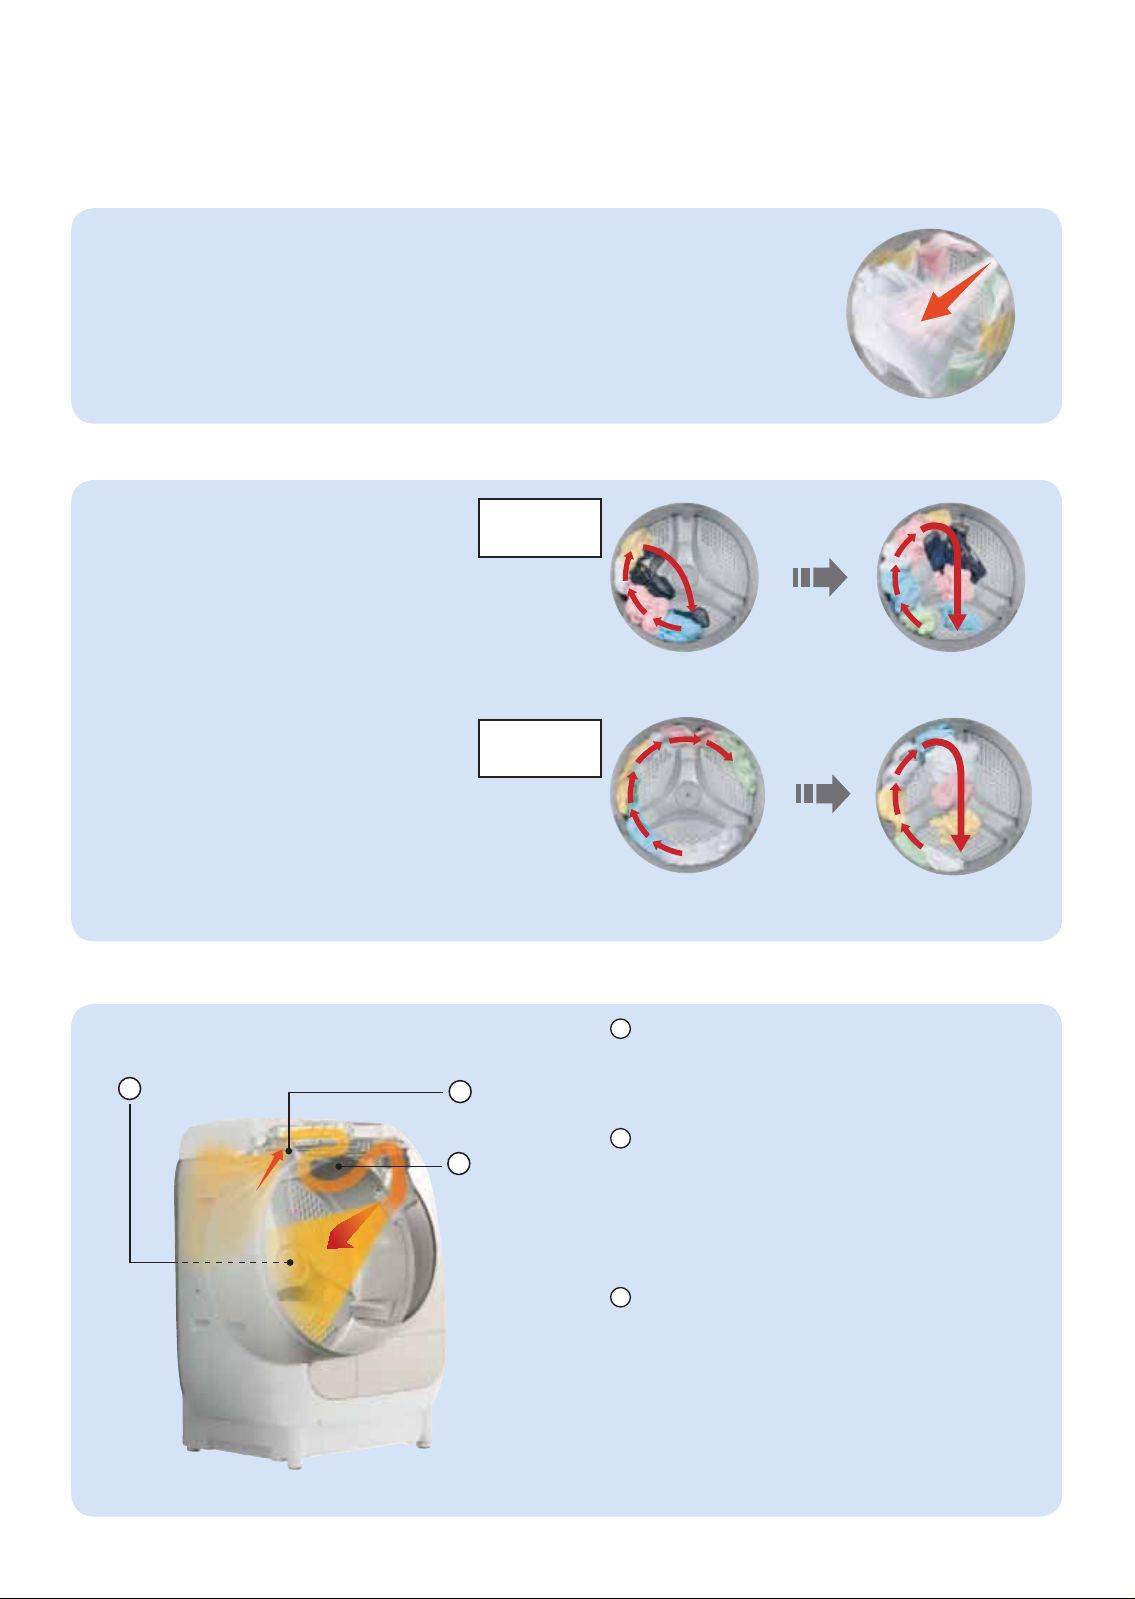
Tips for Good Washing Results (continued)
To ensure smooth spinning operation
If laundry concentrates on one side, the machine will automatically even it out, prolonging the
operation time and consuming more water in the process. In addition, excessive vibration may occur
during the spin cycle, forcing the machine to stop during operation. Take note of the following to
prevent this.
z Do not wash thick items (cotton blankets,
jeans, etc.) or items in mesh laundry bags
alone.
z
Wash 2 to 3 thick items or mesh laundry bags at a time, or wash them together with other laundry.
z Place only delicate items (lingerie, brassieres,
stockings, etc.) and small items (socks,
handkerchiefs, etc.) into the mesh laundry bags.
(P.18, 21)
Overstuffed bags may prevent smooth
spinning operation.
z Set the startup operation for spinning to
Smooth Mode. (P.68)
Guides for laundry loads
z A rough guide for a 10.5 kg load of laundry is the top of the door bellows.
z A rough guide for an 8 kg load of laundry is halfway between the top of the door bellows and the
screw shown below.
Guide for about 10.5 kg
Guide for about 8 kg
Screw
20
Door bellows
Page 21

Average weights for laundry
Tips for Good Washing Results
Briefs
(100% cotton;
about50g)
Socks
(100% cotton;
about50g)
Tow e ls
(100% cotton;
about70g)
Long-sleeve T-shirts
(100% cotton;
about150 g)
Blouses
(blend; about200g)
Shirts
(blend;
about200g)
Bath towels
(100% cotton;
about300g)
Pajamas
(top and bottom)
(100% cotton;
about500g)
Sheets
(100% cotton;
about500g)
Notes for using mesh laundry bags
z Do not overstuff
the bag.
z Do not wash a single bag alone. Wash it together
with other laundry.
z Be sure to close
the fastener
(e.g.,zipper).
z Do not use mesh laundry bags that are longer
than 40 cm on any side.
40 cm or more
40 cm or more
English
21
Page 22

Tips for Good Drying Results
z Use a program that includes the [WIND IRON] function. (P.24)
Selecting the right drying program for your laundry
Normal laundry that is unlikely to wrinkle
z Sweatshirts
z Tracksu i ts
z Towels
z Briefs, etc.
Laundry that is likely to wrinkle
z Elongated items such as cotton shirts
(especially thin cotton shirts)
z Large items such as sheets
z Pajamas, handkerchiefs, T-shirts
z Hard and thick items such as jeans
z Cotton trousers
z Blouses, etc.
Recommended program
[WASH DRY] /
[DRY] > [FUZZY]
[WASH DRY] /
[DRY] > [FUZZY]
(dry cycle timer:
30minutes)
Thick laundry that is harder to dry
z Thick sweatshirts
z Bath towels, etc.
Helpful hints
z If you are washing and drying laundry that is likely to wrinkle together with laundry that
is not, select the [WASH DRY] > [FUZZY] program and select 30 minutes for the dry
cycle. When the dry cycle finishes, remove the laundry that is likely to wrinkle and hang
it immediately. Dry the remaining laundry using the [DRY] > [FUZZY] program.
z Laundry that is left in the drum for long periods after drying may wrinkle or lose
softness. Therefore, remove laundry immediately after drying or use the Soft Guard
operation. (P.69)
To reduce pills and static electricity
z If you are worried about pilling on a particular item of laundry, turn the item inside out.
z Use a liquid fabric softener when using the [WASH DRY] operation.
Use an anti-static sheet when using the [DRY] operation.
[WASH DRY] /
[DRY] > [HEAVY]
22
Page 23

To reduce wrinkles
z Certain laundry items are more
likely to wrinkle after drying.
This is true regardless of the
dryer used, and some wrinkling
cannot be avoided. Depending
on the type and shape of the
item dried, this machine may
cause more wrinkling than with
other existing dryers.
z In particular, elongated items
such as cotton shirts may
wrinkle more after [AUTO]
drying in the [WASH DRY] >
[FUZZY] program.
Tips for Good Drying Results
[WASH DRY] >
[FUZZY]program
(dry cycle timer:
30minutes)
Dry laundry for about
30 minutes after
washing to remove
wrinkles caused by
the spin cycle. After
drying, remove and
hang the laundry
immediately.
Result after [AUTO] drying in the
[WASH DRY] > [FUZZY] program.
z You can reduce wrinkles by
removing the laundry after the
spin cycle, and smoothing out
wrinkles before putting it back
in to dry.
[DRY] > [FUZZY]program
(wash load: 3kg or less)
Reducing the wash
load will reduce
wrinkles.
To reduce uneven drying
z Select [EXTRA] using the [DRY LEVEL] button. (P.66)
z Use the [HEAVY] program of the [WASH DRY] or [DRY] operation.
z Reduce the wash load (4 kg or less).
z Dry thick laundry and thin laundry separately.
z Thick laundry may dry unevenly.
In such cases, dry again using the [DRY] > [FUZZY] program.
To prevent shrinking
English
z Use the [STATIC DRY] program for items with dry-clean labels (wool sweaters, skirts, etc.). (P.48)
z Dry laundry in sunshine beforehand.
(You can finish drying using the dryer.)
23
Page 24

About the Wind Iron Operation
Low-temperature high-speed airflow blows over laundry during the dry cycle to smooth out wrinkles.
z When you select the [FUZZY], [SPEEDY WASH & DRY], [HEAVY], or [FAVORITE] program of the
[WASH DRY] operation, or the [FUZZY] or [HEAVY] program of the [DRY] operation, the Wind Iron
operation functions automatically.
z This operation cannot remove wrinkles from laundry that is half-dry or fully dry before starting the
[DRY] operation.
[WASH DRY] operation (P.36)
Press [WASH DRY],
and select a program
that includes Wind
Iron operation.
(Lit) (Lit) (Lit)
[DRY] operation (P. 38)
Press [DRY], and select
a program that includes
Wind Iron operation.
Washing
operation
High-speed warm
airflow
Spin cycle
High-speed
warm air
Low-speed
reverse
rotation
Highspeed
spin or
highspeed
warm
air spin
High-speed
warm airflow
High-speed
warm air
Lowspeed
reverse
rotation
(Blinking)
High-speed warm air blows
while this blinks.
High-speed airflow
High-speed
air
Low-speed
reverse
rotation
High-speed airflow
High-speed air
Low-speed
reverse
rotation
(Blinking)
(Lit)
High-speed warm air blows
while this blinks.
(Blinking)
(Blinking)
z If the dry filter is clogged and pressure builds up inside the machine, the [WIND IRON] indicator may
remain lit instead of blinking (i.e., low-speed warm airflow operation).
z If you select the [CLEAN] > [DEODORANT] program, the [WIND IRON] indicator will blink.
To reduce wrinkles
z Reduce the drying load. However, for extremely small loads that consist mostly of items made of
cotton, add 1 or 2 more items for drying. (This will prevent the laundry from sticking to the walls of
the drum while drying.)
z We recommend drying clothes that are wrinkle-resistant.
z Dry thick laundry and thin laundry separately.
z Tie any strings before drying. In addition, reduce the number of shirts, pajamas, and similar items.
(This prevents tangling during operation.)
z Remove laundry after the spin cycle, and smooth out wrinkles caused by the spin cycle before
putting it back in to dry.
z Remove laundry immediately after the drying operation finishes. (If laundry is left in the drum, the
weight of other laundry may cause wrinkles.) Otherwise, use the Soft Guard operation. (P.69)
z Wrinkle reduction may not be as effective on wrinkle prone items such as thin cotton shirts. In such
cases, select the [WASH DRY] > [FUZZY] program, select 30 minutes for the dry cycle, and hang dry
the items.
24
Page 25
Examples of finished laundry
About the Wind Iron Operation
1 kg
3 kg
Wash load
Ú Illustrations and tables are rough examples.
Shirt
Longsleeve
T-s hir t
Dad Mom
Shirt, undershirt,
socks, briefs,
handkerchief,
pajamas, bath towel
Blouse, shorts,
undershirt,
handkerchief, socks
Casual
shirt
Undershirt
Girl Boy
Handkerchiefs
Long-sleeve T-shirt,
shorts, handkerchief,
pajamas
Casual shirt, shorts,
briefs, handkerchief,
socks
Blouse
(school uniform)
(x 4)
Wrinkle-resistant shirt
(55% cotton, 45% polyester)
Casual shirt
(100% cotton)
Dad Mom
6 kg
Shirt, chino pants,
undershirt, socks,
briefs, handkerchief,
pajamas, bath towel
Girl Boy
Blouse, shorts,
undershirt, skirt,
handkerchief, socks,
pajamas, bath towel
Double-size sheet (x 1)
Long-sleeve T-shirt,
shorts, handkerchief,
pajamas, bath towel
Casual shirt, shorts,
briefs, handkerchief,
socks, pajamas,
bath towel
z The Wind Iron operation can dramatically reduce wrinkles, but results will vary depending on the wash
load, the material of the items, and the types of items that are dried together.
z Wrinkles cannot be eliminated completely.
25
English
Page 26
Adding Detergent and Softener
Wash load detection and detergent indicators
Load the laundry, select a program, and press
[START].
The drum rotates, and detects the size of the
wash load.
Display during load
detection
Ú If there is more than 3 L of water in the drum or the
[BLANKET], [DELICATE], [TUB CLEAN], or [TUB DRY]
program is selected, the wash load will not be detected and
the detergent indicator (guide) will not appear.
The detergent indicator (guide) appears.
The approximate operation time appears about 6 seconds
after the amount of detergent appears.
(The detergent cup indicator will not change.)
Display example:
1hour30minutes
Display example:
30minutes
Open the detergent dispenser, and refer to the
table to the right to add the detergent, bleach,
and softener.
Water will be supplied about 1 minute after the detergent
indicator appears. If you press the blinking program button
or ), water supply will start immediately.
(
Display examples:
DOOR LOCK
Wash load
(approx.)
6 to
10.5kg
4 to 6 kg
1 to 4 kg
1 kg or
less
Detergent
indicator
(1.0 cup)
(0.8 cup)
(0.6 cup)
(0.3 cup)
Detergent
Bleach
Softener
26
If you cannot add the detergent before water supply starts, press
the [PAUSE] button to prevent it from starting. After adding the
detergent, press [PAUSE] again to resume the operation.
Notes on detergent, bleach, and softener
z Do not use detergents that foam excessively. The foaming of some detergents may
result in malfunctions (water leakage, electrical shock).
z Do not use powder soap made from natural fats and oils. Such soaps may clog the
machine pipeline, resulting in malfunction or water leakage.
z When using detergents that foam easily, use slightly less than the recommended
amount.
z Do not use chlorine-based bleach in programs other than [TUB CLEAN].
Doing so may result in malfunction of the machine.
z Do not dilute concentrated softeners.
Doing so may result in caking and stains.
Page 27

Recommended amounts of detergent, softener, and bleach
Determine the amount of detergent to add based on the detergent indicator.
z The packaging of some detergents may include recommendations such as “XX g per 30 L of water.” In
such cases, use the following table as a guide for determining the appropriate amount of detergent.
Adding Detergent and Softener
Synthetic detergent
Powder Liquid
(per 30L of water) (per 30L of water)
20 g 25 g
44 g 55 g
36 g 45 g
28 g 35 g
16 g 20 g
10 mL 20 mL 25 mL 40 mL 40 mL 7 mL 10 mL 20 mL 40 mL
22 mL 44 mL 55 mL 40 mL 40 mL 15 mL 22 mL 44 mL 40 mL
18 mL 36 mL 45 mL 30 mL 30 mL 13 mL 18 mL 36 mL 30 mL
14 mL 28 mL 35 mL 25 mL 25 mL 11 mL 14 mL 28 mL 25 mL
8 mL 16 mL 20 mL 20 mL 20 mL 8 mL 8 mL 16 mL 20 mL
Neutral
liquid
(per 30L
of water)
Soap
(natural fat/oil)
Softener
Liquid Concentrated
(per 30L
of water)
(per 30L of water)
Bleach
Normal
(per 30L
of water)
The recommended amount of detergent (XX g per 30 L of water) may not be indicated by some manufacturers. In
addition, the volume for “1 cup” differs depending on the detergent, so be sure to check the instructions for front
loading washers on the detergent’s packaging.
The recommended amounts for top loading washers and front loading washers differ.
Notes on wash loads
z The amount of laundry that can be washed varies depending on the type, size, and thickness of items.
To improve washing results, we recommend loads of 6 kg or less.
z The rated capacity for [WASH DRY] and [DRY] operations is 7 kg.
English
27
Page 28

Adding Detergent and Softener (continued)
How to add detergent, bleach, and softener
Liquid detergent / liquid bleach inlet
(right back side)
Softener inlet
(right front side)
Powder detergent / powder bleach inlet
(left side)
Detergent dispenser
Handle
Cover
Powder and liquid detergent
Pull out the detergent
dispenser.
Pull out the dispenser by its
handle.
z Water may remain in the
After the detergent indicator appears
dispenser, so pull it out slowly
Add the detergent.
z Determine the amount of detergent
to add based on the detergent
indicator. (P.26, 27)
z Do not use powder soap made from natural fats and
oils.
Such soaps may clog the machine pipeline, resulting
in malfunction or water leakage.
z Do not add excessive amounts of detergent.
Doing so may prolong operation time, reduce the
effectiveness of rinsing and stain removal, darken
laundry, or result in malfunction, water leakage, or
electric shock.
z Do not add clumps of detergent into the detergent
dispenser. Break up the clumps before adding.
Adding clumps of detergent may result in water
leakage.
z If the detergent dispenser is wet, be sure to wipe it
with a dry cloth to prevent the detergent from caking.
z If the detergent is not added before the water is
supplied, the detergent may remain in the dispenser.
z When using liquid detergent and liquid bleach at
the same time, do not add excessive amounts. The
detergent and bleach may drain due to a siphon
effect.
z As liquid detergent and softener are added by injecting
water and creating a siphon effect, water may remain
in the detergent dispenser in some cases. Depending
on the amount of condensation in the machine and
the amount of caked softener, the remaining water
may increase. If this is a concern, empty the water or
wipe it off, or clean the dispenser. (P.75)
z If you are using a tablet, sheet, or cube type
detergent, dissolve it completely before adding it
directly into the drum. To add it into the drum, press
[PAUSE] after the detergent indicator appears, and
open the door.
28
Page 29

Bleach
Adding Detergent and Softener
z Add the bleach after adding
the detergent.
Use the left inlet when using powder
bleach, and the right back inlet
when using liquid bleach
Do not use chlorine-based bleach in programs other than
[TUB CLEAN].
Doing so may result in malfunction of the machine.
z For details on the amount of bleach and how to use it,
refer to the instructions of the oxidizing bleach.
z Do not pour the bleach directly on the laundry.
Doing so may result in discoloration or damage to the
laundry.
Softener
Add the softener into the
right front inlet.
After the detergent indicator appears
Close the detergent
dispenser.
z Do not add detergent into the softener inlet.
Doing so may result in malfunction.
z Do not add the softener and allow it to sit for long
periods (12 hours or more).
Doing so will result in caking.
z The softener may cake in the softener inlet. In such
cases, remove the dispenser and clean it.
z Do not add excessive amounts of softener
(max.60mL).
The softener may drain and come in direct contact
with laundry, resulting in discoloration and darkening.
z Using detergents or softeners that are excessively
fragrant or thick or made from natural fats and oils
may result in excessive fragrance after wash. In such
cases, reduce the amount of detergent, or run the
[TUB CLEAN] program. (P.52)
z If liquid detergent or softener comes into contact with
the top caps in the dispenser, it may cake and remain
there. Avoid the caps when pouring.
z Open and close the detergent dispenser gently.
If the dispenser is opened too quickly, the water,
detergent, bleach, or softener inside the dispenser
may spill out. In addition, if liquid detergent spills into
the softener inlet, the siphon effect may not occur and
the softener may remain in the dispenser.
z Remove the detergent dispenser and clean the
dispenser connection port regularly (i.e., once per
week).
Accumulation of liquid detergent, softener, or bleach
may cause malfunction of the machine and result in
injuries. (P.75)
z If any liquid detergent, bleach, or softener remains on
the metal parts of the back side of the door or any
plastic parts on the exterior of the machine, wipe it off
immediately with a soft, damp cloth.
Failure to do so may cause rust and deterioration of
the machine parts and result in injuries.
English
29
Page 30

Adding Detergent and Softener (continued)
Using laundry starch
About laundry starch
Use only laundry starches that are labeled as synthetic starch (e.g., vinyl acetate, PVAc).
z Laundry starches other than those above may result in malfunction, so be sure to check the ingredients label.
Ú Do not use PVA (polyvinyl alcohol).
Such starches may not adhere sufficiently or may result in malfunction of the machine.
Laundry starch amounts
Refer to the indications on the laundry starch’s packaging.
The resulting laundry may be stiff, as front loading washers use less water.
If this is a concern, reduce the amount of starch.
Wash load size for starching
1.5 kg or less (“Average weights for laundry” (P.21))
Starching operation
z Do not use the [HOT WASH] function.
z Do not dry starched laundry.
Doing so may clog the dry filter and result in malfunction.
Dilute the laundry starch with about 1 L of water, and pour it directly into the
drum.
Press to turn on the power, and press to select the [FUZZY] program.
Set the cycles to [WASH (6 MIN)] and [SPIN (1 MIN)].
Load the laundry to be starched (1.5 kg or less) into the drum, and close the
door.
Press to start the operation.
After the starching operation: Clean the remaining starch off the drum
Press to turn on the power.
Press to select the [HEAVY] program.
Press to start the operation.
z Do not perform the above cleaning operation with detergent or laundry.
30
Page 31

Opening and Closing the Door
For safety, the door will remain locked during operations.
z Close the door completely before pressing the [START] button.
z If you press the [START] button before closing the door, the door may not close.
How to open and close the door
To open the door
Holding the door handle, pull the door open.
z In some cases, the door may stick due to the seal created by the door bellows.
Opening and Closing the Door
To close the door
Press the right middle area of the door, and close it completely.
Opening the door during operation
If the indicator is lit even when you turn on the power or press the [PAUSE] button, the DOOR
LOCK is set. Hold the
z If you open the door during an operation, water or foam adhered to the door may drip onto the floor. In
such cases, use a towel or rag to wipe the door.
z Depending on the water level during the operation, the door lock may not release.
z Warm air is blown on the laundry during the spin cycle of the [SOFT] program. The door will not open until the
cooling operation completes in such cases.
button for at least 3 seconds to release the DOOR LOCK. (P.33)
DOOR LOCK
During washing
English
Press to pause the operation.
When the indicator turns off, open the door and load the laundry.
If is blinking, the door cannot be opened.
Close the door, and press to restart the operation.
31
Page 32

Opening and Closing the Door (continued)
Opening the door during operation (continued)
During drying
z When the indicator is lit, the inside of the drum is very hot and the door cannot be opened until it cools down.
The cooling operation starts when the indicator blinks.
The door lock releases 3 to 15 minutes after the cooling operation starts.
z If you pause during a drying operation, depending on the elapsed time, water may be passed through to the drain
hose for about 1 to 2 minutes after the cooling operation finishes and before the power turns off.
(The elapsed time is 15 to 40 minutes after drying starts, and varies depending on the selected program and
wash load.)
z If you press the [PAUSE] button during Soft Guard operation, the door lock releases and the power turns off.
z If you pause during [WASH DRY] operation and add a large load of additional laundry (2 kg or more), the laundry
may not dry completely. In such cases, dry the laundry again.
z Do not touch the metallic parts of the drum or door, the top right portion of the machine, or the
laundry (zippers, metallic buttons, etc.) during or after drying operations.
Doing so may result in burns.
Releasing the door lock
When the power is [OFF]
z Turn the power [ON].
x If you turn off the power or a power outage occurs during operation, the door will remain locked.
x If the temperature inside the drum is high, the door lock will release after the cooling operation finishes.
When a washing operation is paused
z If water remains in the drum, drain it to a level at which the door can be opened.
Press , and then press .
Press to select the [FUZZY] program.
Press .
Press to drain the water.
When the drum starts rotating, press to pause the operation.
32
When the indicator turns off, open the door.
Page 33

Using the DOOR LOCK
To prevent children from opening the door and getting trapped inside the drum, you can manually
lock the door so that it cannot be opened when the power is off or before or during operations.
Press to turn on the power.
To set the DOOR LOCK To release the DOOR LOCK
Opening and Closing the Door
Close the door, and hold the
button for at least 3 seconds.
When the machine beeps twice
and you hear a click, the setting is
complete and the door is locked.
The indicator lights.
z This setting will be saved.
z The DOOR LOCK will remain set and the door will remain locked even when the power turns off after an
operation finishes. To open the door, turn on the power and release the setting.
DOOR LOCK
Hold the
button for at least 3
DOOR LOCK
seconds.
When the machine beeps once
and you hear a click, the setting is
released and the door is unlocked.
The indicator turns off.
Preventing the door from being closed
Use a coin or similar object to turn the door stopper on the back side of the door clockwise until
it clicks into place. This will prevent children from closing the door and getting trapped inside the
drum.
You can also use this to keep the door open to prevent mold growth.
Holding the door handle, pull the door open.
To use the door stopper To retract the door stopper
Use a coin or similar object to turn
the door stopper clockwise until it
clicks into place.
Use a coin or similar object to turn
the door stopper counterclockwise,
and return it to its original position.
Coin
Door stopper
The door stopper extends and locks into place.
Door stopper
(when in use)
z Make sure the door stopper is retracted before operating the machine.
Attempting to force the door closed while the door stopper is extended may result in malfunction.
Door stopper
The door stopper retracts to its original position.
Coin
Door stopper
(when not in
use)
English
33
Page 34

Washing
Desired operation
FUZZY
Normal laundry
SPEEDY
Fast washing of lightly soiled
laundry
HEAVY
Heavily soiled or thick laundry
Selecting the right program
Load [HOT WASH]
10.5kg
4.5 kg
10.5kg
function
Available
Recommended
detergent
Powder or
liquid synthetic
detergent
FAVORITE (P.54, 55)
Customized operation
BLANKET (P.40 to 43)
Acrylic blankets, comforters, bed
pads, curtains, etc.
DELICATE (P.44 to 47)
Washing clothes with “hand wash
only” labels
SOFT
Maintaining soft textures after wash
Notes on the [SOFT] program
z Warm air is blown on the laundry during the spin cycle for 30 minutes to reduce coarse textures in towels, etc.
(The operation time is longer than the [FUZZY] program.)
Do not use this program with laundry that cannot be dried. (P.16)
10.5kg
4.7kg
(1kg for
comforters)
1.5kg
4.5kg
Not available
Available
Liquid
synthetic
detergent
Dry cleaning
detergent or
neutral liquid
detergent
Powder
synthetic
detergent or
liquid neutral
detergent
Do not use the washing cap in the [SOFT] program.
The warm air during the spin cycle may warp it.
34
Page 35

DOOR LOCK
How to start
Washing
Preparation
Close the door, and press
Press
The selected (i.e., lit) program changes with each press of the button.
To change the [WASH], [RINSE], and [SPIN] settings, see (P.55, 60, 61).
To remove stubborn stains, see (P.65).
Open the tap, and load the laundry. (P.16, 18 to 21)
to turn on the power.
to select the program.
Press .
A sound is emitted before the wash load is detected, and the detergent indicator (guide) appears after
30sec to 2min.
English
Add the correct amount of detergent, bleach, and softener based on the
indicated recommendations. (P.26 to 29)
35
Page 36

Washing & Drying
Selecting the right program
Desired operation
FUZZY
Normal laundry
SPEEDY WASH & DRY
Fast washing and drying
Load [HOT WASH]
function
7 kg
7 kg
Recommended
detergent
HEAVY
Heavily soiled or thick laundry
7 kg
Available
Powder
or liquid
synthetic
detergent
FAVORITE (P.54, 55)
Customized operation
7 kg
SILENT
Silent operation
4.5 kg
BLANKET (P.40 to 43)
Acrylic blankets, comforters, bed
pads, curtains, etc.
Notes on the [SPEEDY WASH & DRY] program
z The heater turns on during the spin cycle, allowing the laundry to dry faster than in the [FUZZY] program.
Notes on the [SILENT] program
z The drum rotation speed and fan rotation speed are lowered during the spin cycle for quieter operation. The
heater also operates at a lower level.
(The operation time is longer than the [FUZZY] program, and more wrinkles will result.)
3 kg
Not available
Liquid
synthetic
detergent
36
Page 37

DOOR LOCK
How to start
Washing & Dr ying
Preparation
Close the door, and press
Press
The selected (i.e., lit) program changes with each press of the button.
To change the [WASH], [RINSE], [SPIN], and [DRY] settings, see (P.55, 60, 61).
To remove stubborn stains, see (P.65).
To adjust the level of drying, see (P.66).
Open the tap, and load the laundry. (P.16, 18 to 21)
to turn on the power.
to select the program.
Press .
A sound is emitted before the wash load is detected, and the detergent indicator (guide) appears after
30 sec to 2 min.
English
Add the correct amount of detergent, bleach, and softener based on the
indicated recommendations. (P.26 to 29)
37
Page 38

Drying
Selecting the right program
Desired operation Load
FUZZY
Normal laundry
FUZZY (10 MIN)
Removing pollen
HEAVY
Thick laundry
SILENT
Silent operation
BLANKET (P.40 to 43)
Acrylic blankets, comforters, bed pads, curtains, etc.
7 kg
2 kg
7 kg
4.5 kg
3 kg
STATIC DRY (P.48)
Drying clothes with dry-clean labels, shoes, etc.
Notes on the [SILENT] program
z The fan rotation speed is lowered for quieter operation. The heater also operates at a lower level.
(The operation time is longer than the [FUZZY] program, and more wrinkles will result.)
0.4 kg
Notes on shrinking
Some clothes will shrink simply from drying after getting wet or washed, but using a dryer can shrink the clothes
further.
z Clothes do not usually shrink further after the first washing and drying operation.
To reduce shrinkingItems that shrink easily Items that do not shrink easily
Sweaters
Wool sweaters,
skirts, etc.
z The degree of shrinking depends on the materials, fabric, stitching, and
processing of the item.
(Example: The ribbing of wool or cotton sweaters shrinks easily.)
Sports socks Shirts Blouses
Socks made of chemical
fiber mixtures, etc.
Cotton or mixed
fabric items, etc.
Polyester items,
etc.
z Before drying, check the
washing instructions and
textile labels on the clothes.
z Use the [STATIC DRY]
program for items with dryclean labels.
z Dry laundry in sunshine
beforehand. (You can finish
drying using the dryer.)
To r emo ve poll en
z Run the [DRY] > [FUZZY] program for 10 minutes.
z Keep the drying load under 2 kg. (The effect will be reduced with loads larger than 2 kg.)
z Do not run the operation for laundry that cannot be dried. (P.16)
38
Page 39

When setting the
duration
To run automatically To set the duration
How to start
Drying
DOOR LOCK
Preparation Preparation
Open the tap, and load the
laundry. (P.16, 18 to 21)
Close the door, and press to
turn on the power.
Press
The selected (i.e., lit) program changes with
each press of the button.
The operation will run automatically until the
laundry is dry.
To adjust the level of drying, see
(P.66).
to select the program.
Display
Press .
Close the door, and press to
turn on the power.
Press to select the [FUZZY]
program, and press
10, 30, 60, or 90 minutes for the
duration.
The duration can only
be changed in the
[FUZZY] program.
Select 10, 30, 60, or
90 minutes, and dry.
Press
Open the tap, and load the
laundry. (P.16, 18 to 21)
to select
Display
.
English
When drying laundry that was washed with bleach, etc.
Before drying, thoroughly rinse laundry that was washed with bleach, sodium hypochlorite, or other
chemical agents (i.e., until chemical smells are removed).
z Drying laundry on which bleach or chemical agents remain can shorten the life of the machine and damage laundry.
39
Page 40

BLANKET Program (WASH, WASH DRY, DRY)
Preparation
The loading method differs depending on the number and type of blankets you want to wash or dry.
Refer to the following table to determine whether a washing cap is necessary.
Blanket wash loads of 3 kg to 4.7 kg require the use of the optional
washing cap (MO-F102). (P.98)
z Failure to use a washing cap may result in damage to the laundry or malfunction of
the machine.
Ú For details on installing and removing the washing cap, see (P.41).
Blanket Comforter Washing cap
For the [WASH] operation
For the [WASH DRY]
operation
For the [DRY] operation
Blankets that can be washed
z Blankets with (gentle hand wash) on their labels.
z Acrylic blankets, polyester blankets, etc. (180 cm (W) x 230 cm (L) or less in size,
4.7kg or less each in weight)
z Do not wash pure wool, electric, or long-pile (10 mm or longer) blankets.
Less than 3 kg 1 kg or less
3 kg to 4.7 kg
Less than 3 kg
Less than 3kg
— Using the washing cap is required.
— Do not use the washing cap.
— Do not use the washing cap.
For the [WASH] operation
Items for [WASH] operations
Using the washing cap is optional.
4.7 kg or less
40
Comforters that can be washed
z Comforters that contain synthetic (e.g., polyester) stuffing.
(150 cm (W) x 210 cm (L) (single-size) or less in size, stuffing 1 kg or less in weight)
z Down comforters with
(Example: Comforter that contains 0.5 kg of stuffing, etc.)
z Do not wash comforters with wool stuffing or covers made of silk.
z Do not wash with any other items.
Other items that can be washed
z Bed pads or curtains with (gentle hand wash) on their labels. (4.7 kg or less in weight)
(machine wash) or (gentle hand wash) on their labels.
1 kg or less
Page 41

How to install or remove the washing cap ([WASH] operations only)
Bend the washing cap, and insert it from
1
its top.
Washing cap
Gently pull the outer rim of the washing cap toward
you and fit it to the inner rim of the drum.
3
Hold the bottom of the washing cap as
illustrated, and pull it toward you.
1
To i nst al l
2
4
To r emo ve
2
BLANKET Program (WASH, WASH DRY, DRY)
Bend and push in the bottom of the
washing cap as illustrated.
Check that the washing cap is completely inside the drum.
z Place you hands on the washing cap, and
check whether the drum moves smoothly.
When the bottom comes out, pull it out
toward you.
For the [WASH DRY] and [DRY] operations
Do not use the washing cap.
The dryer heat will melt the washing cap.
Items for [WASH DRY] and [DRY] operations
Blankets that can be dried
z Blankets with (gentle hand wash) on their labels.
z Acrylic blankets, polyester blankets, etc. (180 cm (W) x 230 cm (L) or less in size,
less than 3 kg each in weight)
z Do not use the [WASH DRY] and [DRY] operations for items that are 3 kg or more. (Doing
so will damage the laundry.)
Do not use the [WASH DRY] and [DRY] operations on comforters or electric blankets.
z Do not put blankets in mesh laundry bags or wash electric blanket covers.
Doing so will result in excessive vibration and insufficient drying during the spin cycle.
z Do not wash blankets together with other types of laundry.
z Wash small blankets (100 cm x 140 cm or less) together with other single-size blankets. Washing a
single blanket alone may result in excessive vibration and insufficient drying during the spin cycle.
Less than 3 kg
English
41
Page 42

BLANKET Program (WASH, WASH DRY, DRY)
How to start
DOOR LOCK
Do not use the washing cap during [WASH DRY] and [DRY] operations.
(continued)
For the [WASH] or [WASH DRY] operation
Preparation Preparation
Use the washing cap during [WASH]
operation (3 kg or more).
Close the door, and press to turn
on the power.
Press
[BLANKET] program.
Add the detergent and softener.
(P.26 to 29)
Do not use powder detergents.
Press
Open the tap, and load the
laundry. (P.40, 41)
or to select the
.Press .
For the [DRY] operation
Open the tap, and load the
laundry. (P.40, 41)
Close the door, and press
on the power.
Press to select the [BLANKET]
program.
Do not add detergent, bleach, or
softener.
to turn
Liquid detergent: 24 mL (when package recommends 20 mL per 30 L of water)
30 mL (when package recommends 25 mL per 30 L of water)
Softener: 9 mL (when package recommends 7 mL per 30 L of water)
13 mL (when package recommends 10 mL per 30 L of water)
For details, refer to the instructions on the detergent or softener’s packaging.
z If a [WASH DRY] or [DRY] operation results in uneven drying, fold the blanket so that the reverse side is
exposed, and dry again using the [DRY] > [BLANKET] program.
42
Page 43

How to load the blanket
Fold both sides inward. Fold in half.
Create an accordion fold (four
sections).
Load the blanket into the drum with
the ends inside.
BLANKET Program (WASH, WASH DRY, DRY)
Blanket ends
inside
z If the blanket ends are not inside, the blanket may be damaged during operation.
How to hang dry
z Air dry in a well-ventilated location.
(Drying will take about 4 hours for a comforter on a clear day.)
Hang in a
shape for quicker
drying.
z Turning comforters periodically will improve drying results.
Periodic fluffing will also produce fluffier results.
z Even out the stuffing in down comforters before hanging to produce fluffier results.
Cover the hanging comforter with a sheet to prevent deterioration of the down.
z Brushing a blanket in one direction while it is still damp will produce better results.
English
43
Page 44

DELICATE Program (WASH)
Preparation
Items that can be washed
Laundry symbols
Items with (gentle hand wash) or (machine wash) on their labels.
Items with
Some items that have the above symbols cannot be washed. (P.16)
We recommend consulting a professional dry cleaner.
z Wool sweaters, cardigans, etc.
z Mixed-fabric slacks, skirts, etc.
z Polyester blouses, shirts, dresses, etc.
z School uniforms, etc.
Ú Be aware that items with (do not wash) or (petroleum-based detergent) on their
labels cannot be washed.
(dry clean) paired with or on their labels.
44
Page 45

Notes on laundry
The [DELICATE] program operates with almost no rotation of the drum, and is intended gentle
washing of delicate clothes with
This program washes clothes without applying force, so please take note of the following before use.
z Treat heavy stains as soon as possible.
Stains become harder to remove as time passes. Partial cleaning of the stained area before wash may help
remove them.
z Turn clothes that have buttons or embroidery inside out.
z Close all buttons and fasteners.
z Test for color bleeding on items for which you suspect it might occur. Apply some detergent onto a white
towel, press it hard onto an inconspicuous area of the item, and check whether color was transferred to the
towel.
If color bleeding occurred, do not wash the item.
z Be especially careful of scarves and other items that are likely to bleed color.
(gentle hand wash) on their labels.
Preparing the laundry
Testing for color bleeding
Pretreating sweat and other stains
DELICATE Program (WASH)
Sweat stains on collars, cuffs, etc.
z Apply some detergent on the collar,
cuffs, lower hem, areas surrounding
pockets, or stained area, and brush
in a single direction.
z In case an item shrinks significantly, we recommend creating a cardboard cutout of its original
shape to use as a guide during restoration.
Other stains
z Place a towel underneath
the stained area, apply some
detergent, and gently tap the
stain out with a brush.
Tips for removing stains
z If a laundry item stains, soak the item in a 1:3 ratio solution of detergent and water.
Ú If the above treatment does not remove the stain, use the following types of commercially available bleaches.
z Bleach can be broadly classified into oxidizing types and reducing types. Oxidizing types can be
further classified into chlorine-based and peroxide-based.
Do not use chlorine-based bleach, except in the [TUB CLEAN] program, as doing so may result in
malfunction of the machine.
Each type of bleach can and cannot be used for certain types of laundry as follows, so be sure to
check the instructions on the bleach’s packaging for proper use beforehand.
• Oxidizing type
Peroxide-based: Can be used for colored or patterned clothes; powder type cannot be used for wool or silk.
• Reducing type
Can be used for yellowing caused by iron in water, rust stains, and yellowing in shirt collar linings caused by
chlorine-based bleach. Cannot be used for colored and patterned clothes.
English
Notes on detergent
z Use dry cleaning detergent (liquid) for clothes with (dry clean) on their labels. Neutral detergent (liquid) can
also be used for clothes with
z Determine the amount of detergent to use based on the indications.
z Use only liquid detergents.
(gentle hand wash) on their labels.
45
Page 46

DELICATE Program (WASH) (continued)
How to start
DOOR LOCK
Preparation
Close the door, and press
z Turn laundry items inside out.
z When washing a single sweater, for example, wash it together with other laundry.
Single items may gravitate to one side during the spin cycle and may be detected as such.
Open the tap, and load the laundry.
to turn on the power.
Press to select the [DELICATE] program.
Add the detergent and softener. (P.26 to 29)
Do not use powder detergents.
Liquid neutral detergent: 30 mL (when package recommends 40 mL per 30 L of water)
Softener: 6 mL (when package recommends 7 mL per 30 L of water) or
8 mL (when package recommends 10 mL per 30 L of water)
For details, refer to the instructions on the detergent or softener’s packaging.
46
Press .
z Do not use hot water.
Doing so may cause significant shrinking or color bleeding, so use cold tap water.
Page 47

After washing is finished
z For sweaters made of wool or
similar material, set the shape
and dry flat in a shaded place.
z Spreading on a flat board or
plate can prevent deformation.
How to finish (restoring shrunken or deformed laundry)
z Hold a steam iron above the
item, and apply steam to
restore the shape.
How to dry
DELICATE Program (WASH)
z For blouses and dresses, set
the shape and dry on a coat
hanger in a shaded place.
z After applying steam, place
the item on the cardboard
cutout you created before
washing, and gently stretch
the item to its original shape.
Cardboard
cutout
47
English
Page 48

STATIC DRY Program (DRY)
How to start
DOOR LOCK
Preparation
Close the door, and press
Press
Press
Open the tap, and load the laundry.
to select the [STATIC DRY] program.
.
to turn on the power.
48
Page 49

Items that can be dried (For items that cannot be dried, see (P.16))
z Wool sweaters, cardigans, etc.
z Mixed-fabric slacks, skirts, etc.
z Polyester blouses, shirts, dresses, etc.
z School uniforms, etc.
Ú The above items can be dried even if they have dry-clean
labels.
z Shoes and slippers
z Items can only be dried one at a time.
z For items without washing instructions or material labels, we recommend consulting a professional dry
cleaner.
z Certain shoes and slippers cannot be dried.
Follow the cleaning instructions on the product.
z Items on which oil has adhered cannot be dried.
How to fold the laundry
z Fold the laundry neatly, and place it evenly between the lifters in the drum.
STATIC DRY Program (DRY)
Shoes
(one pair)
Lifters
After drying is finished
If the drying results are uneven, fold the laundry so that the reverse side is exposed, and dry again using the
[STATIC DRY] program.
How to finish (restoring shrunken or deformed laundry)
z Hold a steam iron
above the item,
and apply steam to
restore the shape.
z After applying steam,
place the item on the
cardboard cutout you
created before washing,
and gently stretch the
item to its original shape.
Cardboard
cutout
English
49
Page 50

Using the CLEAN Function - DEODORANT
Desired operation Load Operation time
DEODORANT
Removing odors and germs
1 kg
Items that can be cleaned in the [DEODORANT] program (For items that cannot, see (P. 16))
z Wool and acrylic items (except hard twist yarn)
z Suits, slacks, etc.
z Hats and bags (except leather and fur items)
z Stuffed toys (except items with urethane stuffing)
z Shoes and slippers
x This program cannot be used for items that use adhesive glues.
The glue may melt and lose its adhesiveness.
40 minutes
z This program cannot be used for certain shoes and slippers.
Follow the cleaning instructions on the product.
How to load the item
z Fold the laundry neatly, and place it evenly between the lifters in the drum.
z Place items that you want especially sterilized on top.
Lifters
50
Page 51

DOOR LOCK
z If the drum is wet, wipe it dry.
How to start
Using the CLEAN Function - DEODORANT
Preparation
Open the tap, and load the laundry.
Close the door, and press
Press
to select the [DEODORANT] program.
(3 hours)
(11 hours)
Press .
to turn on the power.
Each time you
press the button,
the selected
setting will blink.
English
z Some odors cannot be removed.
z Some germs cannot be sterilized.
51
Page 52

Using the CLEAN Function – TUB CLEAN / TUB DRY
Selecting the right program
Desired operation Load Operation time
TUB CLEAN
Cleaning the drum and removing odors
3 hours
11 h ours
Do not load laundry
TUB DRY
Preventing mold growth
30 minutes
About the [TUB CLEAN] program
This program removes odors by washing off any soap or mold that has accumulated inside the
washing drum, and then running a drying operation for 30 minutes.
When to use the program
[TUB CLEAN] (3 hours) [TUB CLEAN] (11 hours)
z When the odor inside the
drum is a concern
z When the amount of lint on
laundry is a concern
z About once every two
months is recommended
z When the odor inside the
drum is overwhelming
z When you want to clean the
drum thoroughly
z When you want to remove
accumulated soap
Guide for washing drum detergents
z Use a commercially available washing drum detergent or chlorine-based bleach.
z If the detergent includes instructions on its packaging, follow those instructions.
z If the detergent does not include instructions, use about 200 mL.
z Do not use kitchen bleach, as it has little effect.
z When pouring chlorine-based bleach or washing drum detergent into the drum, be careful to avoid
spilling on the exterior of the machine.
About the [TUB DRY] program
This program dries the drum for 30 minutes to prevent mold growth.
52
Page 53

How to start
DOOR LOCK
For the [TUB CLEAN] operation For the [TUB DRY] operation
Using the CLEAN Function – TUB CLEAN / TUB DRY
Preparation
Press
Press
Open the tap.
to turn on the power. Press to turn on the power.
to select the [TUB CLEAN
(3HR)] or [TUB CLEAN (11HR)] program.
(3 hours)
The selected (i.e., lit) program changes with
each press of the button.
(11 hours)
Close the door, and press the
button.
After water is supplied and the drum
starts rotating, press
again to
pause.
Press the [Door OPEN] button to open the
door, and pour the chlorine-based bleach
or washing drum detergent directly into the
drum.
Press to select the [TUB DRY]
program.
(3 hours)
The selected (i.e., lit) program changes with
each press of the button.
(11 hours)
Close the door, and press the
button.
English
Close the door, and press the
button.
53
Page 54

Creating Your Own Program
How to start
You can change and save the settings of the [FAVORITE] program to create your own customized
operation.
After you save your settings, they will appear whenever you select the [FAVORITE] program without
having to be reset.
z If you change the program settings and press [START], the changed settings will be saved.
DOOR LOCK
Preparation
Close the door, and press
Press
To remove stubborn stains, see (P.65).
Open the tap, and load the laundry. (P.16, 18 to 21)
to turn on the power.
or to select the [FAVORITE] program.
Press the cycle buttons to change their settings. (P.55)
Press .
54
Add the correct amount of detergent, bleach, and softener based on the
indicated recommendations. (P.26 to 29)
Page 55

Selecting the right program
Changes to the [FAVORITE] program settings are saved.
(The settings in other programs can also be changed, but they are not saved.)
We recommend using the [FAVORITE] program for frequently used operations.
The rinse cycle of the [FAVORITE] program can be set to Normal Rinse or Water-Injection Rinse.
How to change the program settings
The settings change with each press of the button.
Initial setting
Normal Rinse Normal Rinse Normal Rinse Normal Rinse
Initial Settings
For [WASH DRY]
For [WASH]
Creating Your Own Program
z When the EX indicator is lit: Water-Injection Rinse (water is supplied and drained at the same time
during the rinsing process)
Initial setting for
[WASH]
z The time cannot be set for the [WASH DRY] operation (fixed at 1 minute).
When [AUTO]
is set, drying
Initial setting for
[WASH DRY]
operates
automatically until
laundry is dry.
English
55
Page 56

Partial Operation of the FUZZY Program
How to start
DOOR LOCK
Desired operation
To customize washing operation
WASHJRINSEJSPIN
To separate laundry
WASH only
To skip the spin cycle to prevent wrinkles
WASHJRINSE
To starch laundry
WASHJSPIN
To rinse washed laundry
RINSE only
To rinse and spin washed laundry
RINSEJSPIN
Power
Press the
[ON] button.
Press
[WASH]
to select
[FUZZY].
Select a cycle by
button.
Water is supplied for rinsing after
drainage/spin operation.
Water is supplied for rinsing after
drainage/spin operation.
To drain water in the drum or spin before
natural drying
DRAIN only, SPIN only
56
For drain only, press the [SPIN] button
to select 1 minute, press the [PAUSE]
button when spinning starts, and then
press the [OFF] power button.
Page 57

You can change the wash, rinse, and spin cycle settings and use different combinations for
operation.
(Setting changes cannot be saved.)
You can save frequently used setting combinations by setting the [FAVORITE] program. (P.54)
z If water remains in the drum, run the spin cycle in the [FUZZY] program for 1 minute before operation.
If you start an operation with water already inside the drum (3 L or more), the wash load size may not be
detected, the detergent indicator may not display, and the [HOT WASH] function may not operate.
z Do not reuse laundry water.
Doing so may result in excessive foaming and malfunction.
z When only the [WASH] cycle is set, you can pause the operation, but you cannot add the [RINSE] or [SPIN]
cycles or change settings such as the wash time.
z When only the [SPIN] cycle is set, the remaining time display will be longer than the spin cycle time setting.
(This is because water drainage and correction of uneven distribution for the spin operation consume time.)
You can perform partial operation of programs other than [FUZZY] by pressing the buttons for
the cycles you do not want to use and turning off their indicators. (This is not possible in some
programs.) (P.60)
Partial Operation of the FUZZY Program
pressing its
Set the
[HOT WASH]
function.
(When not
using this
function, skip
to
)
Ú
Do not use
the [HOT
WASH]
function when
starching
laundry.
Cannot be
set
Press the
[START]
button.
Resulting operation
The wash to spin cycles operate according to your
settings.
The laundry water is drained before operation stops.
The rinse water remains when the operation stops.
Washing and spinning is performed without rinsing.
Drainage and spinning is performed before the rinse, and
rinse water remains when the operation stops.
Drainage and spinning is performed before the rinse, and
spinning is performed again after rinse.
English
Drainage is performed before spinning.
57
Page 58

Using the DELAY START Function
How to change the delay time
The delay time indicates the time at which the operation will finish.
For example, if you want the operation to finish three hours later, set the delay time to 3 hours.
The setting changes with each press of the
Operation finishes 3 hours later
WASH
3 to 12 hours later For [WASH] operations
button.
3 HR LATER
4 HR LATER
5 HR LATER
WASH -DRY
Initial settings
6 HR LATER
12 HR LATER
11 HR LATER
Not set
5 to 12 hours later
For [WASH DRY] operations
The [BLANKET] and [DELICATE] wash programs and the [DRY] and [CLEAN] operations cannot
be delayed.
After setting the delay
z To check the delay time: Press button. (The delay time appears while the button is pressed.)
z To cancel the delay: Press
z To change the delay time: Press
z To add laundry: Add the laundry without turning the power off.
z The time at which the operation finishes may vary depending on the volume and type of laundry,
amount of water, water and air temperature, and drainage conditions.
z Do not wash laundry with items that are likely to bleed color using delayed operations.
z If the power plug is disconnected or a power outage occurs, the delay will be canceled.
z To reduce wrinkles, hang laundry as soon as possible after the operation finishes.
z The [PAUSE] button will be disabled until the DELAY START operation starts.
z Remove the laundry as soon as possible after the operation finishes.
Leaving the laundry inside after the operation finishes can result in odors.
We recommend using the Soft Guard function for delayed [WASH DRY] operations. (P.69)
z Do not add too much laundry after setting the delay time.
Doing so may reduce washing results and result in uneven drying.
z Even if you set a delay, the operation for large wash loads may start immediately after you press the [START]
button due to the longer operation time required for large loads.
to turn off the power.
to turn off the power, and start over.
58
Page 59

How to start
Set the machine to finish operation 3 to 12 hours later in 1-hour increments.
This can be useful for washing laundry while you are not at home or for washing at night when you
can hang the laundry in the morning.
DOOR LOCK
Using the DELAY START Function
Preparation
Close the door, and press
Press
The selected (i.e., lit) program changes with each press of the button.
To remove stubborn stains, see (P.65).
Open the tap, and load the laundry. (P.16, 18 to 21)
to turn on the power.
or to select a program.
Press to set the operation finish time.
Press
A sound is emitted before the door is locked and the wash load is detected, and the detergent
indicator (guide) appears after 30 sec to 2 min.
Ú The detergent indicator will not appear if water is already in the drum (about 3 L or more) when you
press [START], or for the [BLANKET] ([WASH], [WASH DRY]) program or [DELICATE] ([WASH]) program.
.
English
Add the correct amount of detergent, bleach, and softener based on the
indicated recommendations. (P.26 to 29)
The operation settings will appear briefly before disappearing, and only the delay indicator will be
displayed. The door lock will then be released.
59
Page 60

Full Auto Operation and Changeable Settings
Program
FUZZY
SPEEDY
WASH & DRY
SPEEDY
HEAVY
FAVORITE
SILENT
: Default settings
First Second Third Forth
15 to 70minutes Sprinkle Rinse Normal Rinse — —
3 to 70 minutes Normal (Sprinkle) or Water-Injection Rinse 1 to 4 times
6 minutes Sprinkle Rinse Normal Rinse — —
3 to 70 minutes Normal (Sprinkle) or Water-Injection Rinse 1 to 4 times
6 minutes
3 to 70 minutes Normal (Sprinkle) or Water-Injection Rinse 1 to 4 times
25 to 80 minutes Sprinkle Rinse Normal Rinse Normal Rinse —
3 to 70 minutes Normal (Sprinkle) or Water-Injection Rinse 1 to 4 times
Ú30minutes
3 to 70 minutes Normal or Water-Injection Rinse 1 to 4 times
15 minutes Sprinkle Rinse Normal Rinse Normal Rinse —
3 to 70 minutes Normal (Sprinkle) or Water-Injection Rinse 1 to 4 times
Water-Injection Rinse
ÚNormal Rinse — — —
: Changeable settings (via corresponding button)
———
BLANKET
DELICATE
20 minutes
9 minutes Normal Rinse Normal Rinse Normal Rinse —
15 minutes Sprinkle Rinse Normal Rinse — —
Water-Injection Rinse Water-Injection Rinse Water-Injection Rinse
SOFT
3 to 70 minutes Normal (Sprinkle) or Water-Injection Rinse 1 to 4 times
STATIC DRY
z The approximate required times include the water
supplying time (15L per minute) and drainage time. (The
times in the above table may not match the remaining
time display on the machine depending on the tap water
pressure, wash load size, distribution of laundry, amount of
foaming during operation, drainage conditions, etc.)
z In the [FUZZY], [SPEEDY WASH & DRY], [HEAVY],
[FAVORITE], [SILENT], and [SOFT] programs, the machine
detects the wash load size and type, and determines the
optimal operations settings automatically.
z When you turn the power on, the last program used will
be displayed (for the [FUZZY], [HEAVY], [FAVORITE], and
[SOFT] programs only).
z Program settings cannot be changed after the [WASH]
cycle finishes.
z The [FAVORITE] settings shown in the table (Ú) indicate the
factory default settings.
60
——
—
Notes on Sprinkle Rinse
z During the first rinse, water is showered onto the laundry
while the drum rotates, rinsing the laundry while conserving
water (except during the [FAVORITE] and [DELICATE]
programs). During the second and subsequent rinse
operations, water is collected for rinsing.
z Even when Water-Injection Rinse is selected, the first rinse
operation will always be Sprinkle Rinse (except during the
[FAVORITE] and [BLANKET] programs).
Rinse setting First rinse Second rinse Third rinse Forth rinse
1 time
2 times
3 times
4 times
Normal / Water-
Injection Rinse
Sprinkle
Rinse
Sprinkle
Rinse
Sprinkle
Rinse
–––
Normal / Water-
Injection Rinse
Normal / Water-
Injection Rinse
Normal / Water-
Injection Rinse
––
Normal / Water-
Injection Rinse
Normal / Water-
Injection Rinse
–
Normal / Water-
Injection Rinse
Page 61

Approximate required time
(may differ from actual time)
WASH WASH DRY WASH DRY DRY WASH WASH DRY DRY
Full Auto Operation and Changeable Settings
4 minutes
1 to 9 minutes
AUTO AUTO
1 minute
30/60/90 minutes, AUTO 10/30/60/90 minutes, AUTO
59 minutes
(19to
115minutes)
1 to 7 hours
10 minutes
— 1 minute AUTO — — 1 to 7 hours —
2 minutes
—— —
1 to 9 minutes
6 minutes
1 minute AUTO AUTO
1 to 9 minutes
Ú4 minutes
Ú1 minute
1 to 9 minutes
ÚAUTO
—
30/60/90 minutes, AUTO
— 1 minute AUTO AUTO — 1 to 8 hours
4 minutes
1 minute AUTO AUTO
1 to 9 minutes
27 minutes
(23to
86minutes)
81 minutes
(19to
115minutes)
59 minutes
(19 to
115minutes)
70 minutes
(59 to
68minutes)
——
2 to 7 hours
1 to 7 hours —
40 minutes
2 to 5 hours
3 minutes — — — 45 minutes — —
to 6 hours
1.5 to
6hours
to 7 hours
1 to
4hours
30 minutes
(displayed as “H”)
—— —
—— —
z Programs cannot be changed after they have started. To
change the program, turn off the power and restart.
z Depending on the wash load size and type, the laundry
may clump together, prolonging the drying time.
z The approximate times for drying are based 20 °C
environments (ambient and water temperatures).
z The remaining time display may fluctuate immediately after
the operation starts.
This indicates that adjustments are being made in
response to the tap water pressure and other conditions
detected during operation.
z In some cases, the remaining time display may blink at
10minutes, but the operation will continue for 1 to 2 hours
longer.
This is because drying operations continue until the sensor
detects a specific level of dryness.
100minutes
(displayed as
90minutes)
Remaining time display
Display example:
1 hour 30 minutes
Display example:
10 hours or more
The same display appears when the wash load size is
being detected.
68 minutes
(46to
——
113minutes)
——
Display example:
45 minutes
100minutes
English
61
Page 62

Full Auto Operation and Changeable Settings
(continued)
WASH cycle RINSE cycle
Operation overview
Dissolving the detergent [HOT WASH] function
Water is injected into the
detergent dispenser to
dissolve the detergent and
send it to the bottom of
the drum.
The drum rotates while
warm air blows. (Operation
time will increase by about
13 minutes, and more
power will be consumed.)
Beat washing
A pump circulates the
laundry water at the
bottom of the drum
to further dissolve the
detergent.
Prewash
The drum rotates while the
laundry water circulates.Ú
Normal Rinse
Spinning occurs after
drainage.
Water collected to
specific level
The drum rotates while the
water circulates to remove
the detergent.
Sprinkle Rinse (P.60)
Water-Injection Rinse
Spinning occurs after
drainage.
Water collected to
specific level
Drainage
Water is collected and
drained repeatedly, and
the drum rotates while the
water circulates to remove
the detergent.
62
The pump injects the
laundry water into the
laundry.
Main wash
Water is supplied to a
specific level, and the
drum rotates while the
laundry water circulates.Ú
Ú When additional water
is being added or during
certain parts of the
wash cycle, water is
not circulated while the
drum rotates.
A water shower rinses the
laundry while the drum
spins and water is drained.
(Water is not collected and
less of it is used than in
other rinsing methods.)
Page 63

SPIN cycle DRY cycle
Spinning [SOFT] program
Spinning occurs after
drainage.
Drainage and
untangle operation
([WASH] operations
only)
Lowspeed
reverse
rotation
Ú Excluding
large wash
loads
Spinning occurs after
drainage.
z If laundry is
concentrated on
one side, water
supply, drum
rotation, and
drainage may occur
during the spin
cycle to untangle
the laundry.
z The spinning
time setting
(e.g.,4minutes)
includes only the
time at which the
drum is spinning
at a constant high
speed. The actual
operation time will
also include the
untangle time and
time required for
drum acceleration.
Highspeed
rotation
Lowspeed
reverse
rotation
High
speed
warm
air
Lowspeed
reverse
rotation
Highspeed
warm
air
Lowspeed
reverse
rotation
[WASH DRY] [DRY]
Spin
or
warm
air spin
Lowspeed
reverse
rotation
Highspeed
warm
air
Lowspeed
reverse
rotation
In the [BLANKET ] program, the heater operates
at a low level.
Highspeed
air
Lowspeed
reverse
rotation
In the [SILENT] program, the heater operates at
a low level and the fan speed is reduced.
Highspeed
warm air
Lowspeed
reverse
rotation
Highspeed
air
Lowspeed
reverse
rotation
[STATIC DRY] program
Full Auto Operation and Changeable Settings
Highspeed
warm air
(low-level
heater)
Drum
remains
static
Highspeed
air
Drum
remains
static
English
63
Page 64

Other Settings
Changing or disabling the operation start/finish sounds
A sound is emitted when an operation starts or finishes.
You can select one of three settings for the sound.
To change the default setting
Press to turn on the power.
Hold the button for at least 3 seconds.
The setting changes as follows each time the button is held for 3 seconds.
Melody
(default setting)
Press to turn off the power.
Turning the power off completes the setting.
z This setting will be saved.
To change the setting, perform the same operation.
Buzzer
No sound
Disabling the 10-minute warning sound
About 10 minutes before an operation finishes, a warning sound is emitted as a notification.
(The remaining time before the sound is emitted may vary during [WASH DRY] and [DRY] operations, depending
on the selected program and settings.)
You can enable or disable the sound.
To change the default setting (i.e., to disable the sound)
Press to turn on the power.
Hold the button for at least 3 seconds.
The setting changes as follows each time the button is held for 3 seconds.
(Ignore the sound that is emitted when [START] is pressed.)
Sound enabled (default setting) Sound disabled
Beeps twice and emits the warning Beeps three times to indicate setting.
sound to indicate setting.
Ú The sound emitted to indicate change will differ depending on the operation start/finish sound setting.
Press to pause.
Press to turn off the power.
Turning the power off completes the setting.
z When a spin cycle is repeated to correct concentration of laundry to one side, the warning sound is not emitted.
z This setting will be saved.
To change the setting, perform the same operation.
64
Page 65

Using the [HOT WASH] function to remove stubborn stains
After spraying concentrated detergent onto the laundry, warm air is blown to activate the
detergent for more complete cleaning.
Enable
the [HOT
WASH]
Detergent
is
dissolved.
Detergent
is injected.
Detergent
is warmed.
Beat
washing
starts.
function.
Ú Operation
time will
increase
by about
13minutes.
The
circulation
pump
dissolves the
detergent.
Circulation
pump
The
detergent
is sprayed
onto the
laundry in a
concentrated
state.
Warm air is
blown onto
the laundry
to activate
the cleaning
enzymes in
the detergent
and break up
stains.
Warm
air
z Circulation
alternates
between
warm
air and
detergent
circulation.
Water is
added, and
detergent
that is about
twice as
concentrated
than in normal
operation is
circulated.
Other Settings
z When the [HOT WASH] function is used, the operation time will be about 13 minutes longer than usual, and
more power will be consumed.
z During operation, the [HOT WASH] indicator will blink for about 10 minutes and then turn off.
z If you press [PAUSE] during the [HOT WASH] operation, the door lock may not release immediately.
The inside of the drum is cooling down in such cases.
z In low-temperature environments (about 8°C or lower), the [HOT WASH] operation may take about 2 minutes
longer.
z The [HOT WASH] function cannot be used in the following cases:
• If water is already in the drum when you start
• [BLANKET] and [DELICATE] programs, and [DRY] and [CLEAN] operations
z When the [HOT WASH] function is set, you cannot change any other settings from the time the wash load is
detected and until the [HOT WASH] operation finishes.
z If you pause during a [HOT WASH] operation, the [HIGH] (temperature) indicator may light even if the door lock
releases.
65
English
Page 66

Other Settings (continued)
When you hold for at least 3 seconds, settings will appear to the left of the , , and
buttons.
The functions of these settings are as follows.
Example display:
Turn the temperature sensor control on or off.
(0: Off)
Ú The settings in parentheses are the factory default settings.
Adjust the spin speed for the dry cycle of [WASH DRY] operations.
(0: High-Speed Mode)
Adjust the spin startup conditions.
(1: Standard Mode)
Reducing uneven or over-dry drying results
The drying results for laundry will vary depending on the wash load size and type of laundry.
Before you start the operation, adjust the level of drying according to your situation.
To change the default setting
Press to turn on the power.
Press or to select the program.
Press to change the setting.
Press .
The operation starts.
z This setting will be saved.
To change the setting, perform the same operation.
Use when drying is uneven
Default setting
Use when laundry is over-dried
(resulting laundry may be
slightly moist)
Settings that can be changed via the [DELAY START] button
66
Page 67

Washing thoroughly in low-temperature environments (temperature sensor control)
This function detects the ambient temperature and controls the washing time accordingly.
When the ambient temperature is low, washing times will be longer.
To change the default setting
Press to turn on the power.
Hold the button for at least 3 seconds.
Press .
Press .
Pressing the [START] button completes the setting.
Press to turn off the power.
z This function operates in the [FUZZY] and [HEAVY] programs of [WASH] and [WASH DRY] operations.
It does not operate during [WASH] only operations, or when settings are changed.
z If multiple wash operations are performed in a row, the temperature sensor control function may not operate.
z This setting will be saved.
To change the setting, perform the same operation.
Ú The display changes with each press of
the [WASH] button.
Off (default setting)
(Temperature sensor control is
disabled.)
On
Other Settings
67
English
Page 68

Other Settings (continued)
Reducing vibration and noise during [WASH DRY] operations
You can change the spin speed during the dry cycle of [WASH DRY] operations.
Depending on the flooring strength and other factors, vibration during machine operation may
increase. Adjust this setting according to your operation environment.
To change the default setting
Press to turn on the power.
Hold the button for at least 3 seconds.
Press .
Press .
Pressing the [START] button completes the setting.
Press to turn off the power.
z This setting will be saved.
To change the setting, perform the same operation.
z The speed for the intermediary spin between the wash
and rinse cycles cannot be changed.
The display changes with each press of the [RINSE]
button.
High-Speed Mode (default setting)
Mid-Speed Mode (operation time will
be longer)
Low-Speed Mode (operation time will
be longer)
Reducing vibration and noise during spin or speeding up startup
In addition to the Standard Mode (default setting) for spin, a low vibration/noise mode and a
smooth startup mode are available.
To change the default setting
Press to turn on the power.
Hold the button for at least 3 seconds.
68
Press to change the setting.
Press .
Pressing the [START] button completes the setting.
Press to turn off the power.
z This setting will be saved.
To change the setting, perform the same operation.
The display changes with each press of the [SPIN]
button.
x
Low-Vibration Mode
Reduces the vibration noise during spin.
(operation time will be longer)
x Standard Mode (default setting)
x Smooth Mode
Spin startup is smoother. (Depending
on the type of laundry, vibration and
noise may increase.)
Page 69

Disabling the Tangle-Free Finish function after spin operations
This function untangles laundry (for 2 to 4 minutes) after the spin cycle of [WASH] operations.
(This does not operate in the [SOFT], [BLANKET], [DELICATE], [WASH DRY], [DRY], and [CLEAN]
programs.) The remaining time indicator blinks during Tangle-Free Finish operations.
To change the default setting
Press to turn on the power.
Hold the button for at least 3 seconds.
Press to turn off the power.
z This setting will be saved.
To change the setting, perform the same operation.
z The Tangle-Free Finish function may not operate for large wash loads (6 kg or more).
z The Tangle-Free Finish function will not operate for operations that do not include the wash cycle.
The setting changes as follows each time the button
is held for 3 seconds.
On (default setting)
Off
(The Tangle-Free Finish function
is disabled.)
Maintaining softness after drying operations (Soft Guard)
This function continues drum rotation until you remove the laundry to maintain softness after
drying operations.
The door is locked during Soft Guard operations, so press the [PAUSE] button before opening
the door. (This function does not operate in the [BLANKET], [STATIC DRY], [DEODORANT], and
[FUZZY (10 MIN)] programs.)
Soft Guard operation
The function operates for about 2 hours, rotating the drum for 12 seconds every
5minutes.
You can release the door lock by pressing the [PAUSE] button.
Other Settings
Operation finish sound
(melody or buzzer)
The remaining time indicator blinks
“000” during Soft Guard operation,
and
is lit.
To change the default setting
Press to turn on the power.
Hold the button for at least 3 seconds.
Press to turn off the power.
z This setting will be saved.
To change the setting, perform the same operation.
Soft Guard operation
Pause
About 5 min About 12 sec
The setting changes as follows each time the button
is held for 3 seconds (the beep length indicates the
setting).
Drum rotation
On
Off (default
setting)
Alternates between
pause and drum rotation
About 2 hr
Long beep sound
Short beep sound
English
69
Page 70

Other Settings (continued)
Changing the dehumidification mode
You can change the method of dehumidification used during drying operations.
• Air-Cooling Mode: Expels moisture and warm air from the drain hose during drying operations.
• Water-Cooling Mode: Uses water for dehumidification during drying operations. (More water is consumed.)
To change the default setting
Press to turn on the power.
Hold the button for at least 5 seconds.
Press to turn off the power.
z This setting will be saved.
Ú Water-Cooling Mode is always used during the [SILENT] and [DEODORANT] programs.
The setting changes as follows each time the
button is held for 5 seconds (the beep length
indicates the setting).
Water-Cooling Mode
Air-Cooling Mode
(default setting)
Long beep sound
Short beep sound
70
Page 71

Maintenance
Lint filter
Clean the lint filter regularly.
A clogged lint filter will result in poor detergent flow and drainage.
z Do not remove the lint filter during operations or when water remains in the drum or drain hose (e.g.,
after [WASH] only operations).
When the lint filter is removed, large amounts of water may spill out if water remains in the drum, if the drain hose
is elevated more than 10 cm off the ground, or if drain outlet is clogged.
z Perform a spin operation before removing the lint filter, and make sure the water has drained.
The spin operation cannot be performed if “C17” appears. In such cases, turn the power off and turn it on again.
z The [LINT FILTER] indicator will light and “C17” will appear if the lint filter is clogged or after the [WASH] and
[WASH DRY] operations are used. In such cases, turn off the power and clean the lint filter. When you turn on the
power again, the displays will disappear.
z You can perform operations while [LINT FILTER] and “C17” appear, but the circulation pump will not operate and
Water-Injection Rinse may be used. In such cases, turn off the power and clean the lint filter before operation.
Preparation
Perform a spin operation before removing the lint filter, and make sure the water has
drained. (P.55)
Lint filter cover
Open the lint filter cover.
Remove the lint filter.
Turn the lint filter knob about 360 degrees
counterclockwise.
Knob
Slowly pull out the lint filter.
Maintenance
Pull out
slowly
z Place a pan underneath to catch any remaining water.
z Be careful not to drop any of the lint from the lint filter into the
machine.
z If the lint filter port is dirty, wipe it clean with a rag.
Open the lint filter lid.
Remove the lint, and clear the clogged filter.
z If the filter is heavily clogged, use a toothbrush or similar tool to
brush it clean.
z Avoid cleaning the rubber seal, and only remove lint and other
debris. If you clean off the lubricant on the rubber seal, the lint
filter will be harder to turn.
Turn 360 degrees
counterclockwise
Pan
Filter lid
English
Rubber seal
71
Page 72

Maintenance (continued)
Lint filter (continued)
Close the lint filter lid.
z Make sure the two tabs are firmly secured.
z If the lint filter lid detaches, align the filter lid with the shaft on the
main body of the filter, and push it in vertically.
Orient the lint filter so that the “UP” mark on the filter is
facing up.
z Make sure that the rubber seal on the lint filter is still
attached.
z Make sure that there is no lint or debris on the lint filter
port and the rubber seal.
Reinsert the lint filter.
Tabs
If the lint filter lid detaches during cleaning
Shaft
Filter part
“UP” mark
Knob
Rubber seal
Insert the lint filter fully into the port.
Turn the knob clockwise until it clicks into place.
z If the knob is not turned until it clicks into place, “C16” will
appear and operation will not be possible. (P.80)
Insert fully
Turn clockwise until it
clicks into place
Knob
Close the lint filter cover.
z Do not remove the rubber seal.
Removing the rubber seal will result in water leakage.
z When reinserting the lint filter, make sure that there is no lint on the rubber seal.
Reinserting it with lint attached may result in water leakage.
z If the lint filter or rubber seal is damaged, replace it immediately. (P.98)
Failure to do so may result in water leakage or malfunction of the machine.
z If the lint filter is not securely attached, [LINT FILTER] and “C16” will appear and operation will be disabled to
prevent water leakage. (P.80)
72
Page 73

Dry filter
Clean the dry filter after every drying operation.
Pull out the dry filter to remove it.
Turn the dry filter over, release the lock lever, and lift
up filter B.
Dry filter
Maintenance
Lock lever
Filter B
Dry filter
Turn filter A over.
Remove the lint and debris attached to filter A and
filter B using a vacuum cleaner.
z If the filter is heavily clogged, use water to clean it.
z If you use water, dry the filter completely before reinserting
it.
Filter A
Filter B Filter A
Use water for heavy clogs
English
73
Page 74

Maintenance (continued)
Dry filter (continued)
Return the dry filter to its original state, and
If filter B detaches during cleaning
reinsert it securely.
z If filter B detaches, align filter B with the shafts on the
main body of the dry filter, and push it in vertically.
z Reinsert the dry filter securely.
If it is not securely inserted, steam may leak out of the area surrounding the filter during drying operations,
resulting in louder operation noise.
z If you continue operations while [DRY FILTER] and “C06” are displayed, longer drying times and poor drying may result. (P.80)
z When cleaning the dry filter with water, wash it gently with your hands. Do not use detergent or bleach.
z If [DRY FILTER] and “C06” still appear when you turn on the power after reinserting the dry filter, pressing the
[START] button will turn them off.
z These indications also appear after every 25 times the [WASH DRY] and [DRY] operations are used. (They will
appear even if lint buildup is low.)
Note
z The dry filter is a consumable part. If the filter mesh breaks, contact your dealer for a replacement.
(P.98)
Filter B
Shaft
Dry filter port
Clean the dry filter port when the [DRY FILTER] indicator does not turn off or when “C06” appears.
Lint may be present at the rear of the dry filter port. In such cases, use the supplied suction nozzle to clean the port.
Press to turn on the power.
Suction
nozzle
Hold the button for at least 3 seconds.
z After “---” appears in the remaining time indicator, the machine will
automatically turn off.
Remove the dry filter when the display disappears.
Attach the suction nozzle to the suction point of the vacuum
cleaner, and clean the rear of the dry filter port.
z Remove the lint from the top and bottom of the rear area.
z If the suction nozzle does not fit (i.e., is too small) the suction point of your vacuum cleaner, perform one of the
following depending on your vacuum cleaner.
Hitachi model: Attach the attachment (vacuum cleaner accessory) to the vacuum cleaner.
Non-Hitachi model: Attach the suction nozzle to the vacuum cleaner and attach tape to the base of the
nozzle.
z Clean the dry filter while it is dry.
Picking up lint that is moist may result in malfunction of the vacuum cleaner.
z Do not insert your hands or fingers in to the dry filter port.
Doing so may result in injuries, as the port is narrow.
Dry filter port
74
Page 75

Detergent dispenser
When detergent or softener is caked on the detergent dispenser, wash it off with water.
The solidified detergent may be flushed into the machine when water is injected into the dispenser during operation,
causing blockage and resulting in water leakage or water buildup in the liquid detergent inlet and softener inlet.
Wash off any leftover detergent, softener, or dirt with water.
Detergent
Remove the detergent dispenser.
Pull out the detergent dispenser until it stops.
Push slightly to the left while pulling the dispenser out
again.
z Water may remain in the detergent dispenser.
Be careful not to spill when pulling the dispenser out.
Remove the caps from the detergent dispenser, and clean.
z If the detergent is heavily caked, soak the dispenser in hot water (about
40°C) for about 5 minutes, and use a toothbrush or similar tool to
clean.
z If the detergent dispenser is frozen, soak it in hot water (40°C).
Cap
dispenser
Maintenance
Remove caps
Use toothbrush for heavy caking
Detergent
dispenser
Wipe the dispenser dry, and reinsert it in its original state.
z Make sure to reattach the 2 caps.
Detergent dispenser port
Wipe the area surrounding the detergent dispenser port with a damp cloth regularly (once per
week), or whenever detergent or softener is caked on or the area is dirty.
Top area of dispenser port
Remove the detergent dispenser.
Wipe the area surrounding the detergent
dispenser port with a damp cloth.
Bottom area of dispenser port
English
Reinsert the detergent dispenser in its
original state.
75
Page 76

Maintenance (continued)
Main body and drum
Clean the main body and drum whenever they are dirty.
z If there are water spots on the door and plastic parts, detergent or softener on the metallic parts, or the main
body of the machine is otherwise dirty, wipe the machine with a soft cloth. Failure to do so may result in rust and
damage.
z If the glass on the inside of the door is dirty, wipe it with a damp cloth.
z Do not splash water directly onto the machine.
z Do not wipe benzene, thinner, cleaning powder, alkaline detergents, low alkaline detergents, wax, or other
substances onto the machine, and do not use coarse scrubbers.
z Wipe off drum rust using a cream cleanser.
Do not use steel wool or other coarse scrubbers.
z The stainless steel drum and the metallic areas surrounding the door are rust resistant, but rust may occur in the
following cases.
• When hairpins or other metal objects are left in the drum and are in direct contact with it for prolonged periods,
or when water mixed with iron or rust particles is used.
• When chlorine-based bleach, detergent, or softener is left in the drum or on the metallic areas surrounding the
door for prolonged periods.
z After an operation finishes, leftover water from the water supply pipeline may drip out of the injection inlet, so wipe
the area with a soft cloth.
z Wipe off lint and debris on the areas surrounding the door and
the door bellows, behind the door bellows, and inside the drum
after each use.
Lint and debris attached between the door and the door bellows
may result in water leakage or adhere to laundry.
• If lint still adheres to laundry, run the [TUB CLEAN] program for
3 hours. (P.52)
(Washing drum detergent is not required in such cases.)
z Condensation may occur on the areas surrounding the door
and door bellows depending on your environment. If this is a
concern, wipe it off.
Door Glass Door bellows
76
Page 77

Water supply inlet
Clean the water supply inlet if water supply is not smooth.
Close the tap, and disconnect the water supply hose.
z To prevent water from spilling, perform the following.
Close the tap, and press to turn on the power.
Press to select the [TUB CLEAN] program.
Press to start.
Run the operation for about 10 seconds, press , and
then press
to turn off the power.
Loosen the union nut and remove it.
Remove any debris from the water supply inlet’s filter using
a toothbrush or similar tool.
z Remove the water supply inlet’s filter using pliers before cleaning it.
z After removing the water supply inlet’s filter and cleaning it, be sure
to reattach it. Failure to do so may result in damage to the water
valve.
Reconnect the water supply hose properly.
(Installation Instructions)
z Failure to do so will result in water leakage.
Close
Union nut
Water supply inlet filter
Water supply inlet filter
Maintenance
77
English
Page 78

Maintenance (continued)
Water tap, one-touch joint, and water supply hose
After years of use, the gasket on the tap may degrade or rust and eventually result in water leakage.
Check for leaks regularly (e.g., before each use).
In the event of a leak, close the tap and consult a service representative for inspection or repair.
Drain outlet
Clean the drain outlet about once per month, or whenever drying operations are unusually long or
“C02” appears.
z Check that there is no lint or debris around the drain outlet before installing the machine.
z If you remove the drain hose from the drain outlet hole, make sure that it is reinserted securely into the drainage
pipe. Failure to do so may result in water leakage. (Installation Instructions)
78
Page 79

Troubleshooting
Ú For details on displays not described below, see (P.91, 92).
Error codes in the remaining time indicator
zIn the following cases, the indicator will blink and a buzzer will be emitted.
Press [PAUSE] or [OFF] to stop the operation, and then press [START] or [ON] to restart the operation.
If the error code continues to appear, check the “Solution” column below.
Note on Auto
Power Off
z If you turn the power on and do not start an operation within 10 minutes, the power will turn
off automatically.
z If the machine remains in the pause state for more than 1 hour, the power will turn off
automatically.
z The power turns off automatically after an operation finishes.
z If the error code is left displayed for more than 12 hours, the power turns off automatically.
Indicator and meaning Possible cause and solution
z Make sure the tap is open.
z Make sure the water supply inlet’s filter is not
clogged. (P.77)
z Check whether a water outage has occurred.
z Make sure the water supply pipe or water supply
hose is not frozen. (P.97)
z Make sure the drain hose or drain outlet is not
clogged with lint or other debris. (P.78)
z Make sure the drain hose is installed properly.
(Installation Instructions)
• Make sure it is not pinched or frozen.
• Make sure it is laying flat.
• Make sure the end of the hose is not submerged in
water.
• Make sure it does not rise 10 cm or more above the
ground at any point.
z When using an extension hose, make sure the hose
does not exceed 2 m in length.
z Close the door.
For safety, the door is locked during operations.
z Make sure the door stopper is retracted.
Use a coin or similar object to turn the door stopper
counterclockwise until it clicks into place.
z Make sure the laundry is not concentrated on one
side.
Distribute the laundry in the drum as evenly as
possible. (Even if it appears even, items made of
cotton, for example, can become heavy with water,
causing imbalance if concentrated in one area.)
z Do not wash thick items (cotton blankets, jeans, etc.)
or items in mesh laundry bags alone.
Add 2 or 3 more items, and wash together. (Single
pieces of laundry tend to gravitate to one side.)
(P.18 to 21)
z Do not wash too many sheets or large items at one
time.
Reduce the number of large items. (P.18 to 21)
z Make sure the machine is stable and installed on a
level surface.
Make sure the air bubble in the spirit level is inside
the circle. (Installation Instructions)
z Do not load items that cannot be washed or dried.
Remove items that cannot be washed or dried. (P.16)
Such items can increase the vibration during the
spin cycle.
Water cannot be supplied.
Water cannot be drained.
The door is open.
Spinning is not possible.
Press
to pause.
Press
to pause.
Press
to pause.
Press
to pause.
Press
to start the
operation.
Press
to start the
operation
Press
to start the
operation.
Press
to start the
operation.
Troubleshooting
English
79
Page 80

Indicator and meaning Possible cause and solution
z Check whether there is lint in dry filter or dry filter
port.
If it is clogged, perform maintenance. (P.73, 74)
z Make sure the laundry has been spun and is not
tangled.
z Make sure water is being properly supplied. (Water is
used for cooling operations during drying.)
Refer to the solution for when “C01” is displayed.
z Make sure the drain hose is installed properly.
Refer to the solution for when “C02” is displayed.
z This appears after every 25 times the [WASH DRY]
and [DRY] operations are used (even if lint buildup is
low).
z Close the door completely.
z Make sure the laundry load is not too large.
Dr ying is not complete, even
after 6 hours of drying.
The door cannot be locked or
unlocked.
Press
to turn off
the power.
Press
to pause.
Press
to start the
operation.
Press
to start the
operation.
The lint filter is not inser ted
properly.
The lint filter is clogged.
Spinning is not possible.
The drying load is too large.
The drum cannot rotate.
The dry filter is clogged.
Press
to turn off
the power.
Press
to pause.
Press
to pause.
Press
to pause.
Press
turn off the
power.
to
z Insert the lint filter properly.
Turn the lint filter knob clockwise until it clicks into
place. (P.71, 72)
z Check whether the lint filter is clogged.
If it is clogged, perform maintenance. (P.71, 72)
z This appears after the [WASH] and [WASH DRY]
operations are used (even if lint buildup is low).
z Make sure the drain hose is installed properly.
Refer to the solution for when “C02” is displayed.
(P.79)
z Check whether there is excessive foaming.
Run a rinse operation before trying to spin again.
(P.55)
z Check the size of your laundry load.
Reduce the number of items.
The amount of laundry that can be dried depends
on the size and type of the items.
z Check the size of your laundry load.
Reduce the number of items.
z Check whether the laundry is tangled.
Untangle the laundry.
z Check whether there is excessive foaming.
Run a rinse operation before trying to spin again.
(P.55)
z Do not use an extension cord to connect the power
plug.
z Do not connect other appliances to the same power
outlet as the machine.
z Check whether there is lint in dry filter or dry filter
port.
If it is clogged, perform maintenance. (P.73, 74)
(The [DRY FILTER] indicator may light again, even
after you clean the dry filter and turn the power on.
In such cases, press [START] to turn it off.)
z This appears after every 25 times the [WASH DRY]
and [DRY] operations are used (even if lint buildup is
low).
Press
to start the
operation.
Press
to start the
operation.
Press
to start the
operation.
Press
to start the
operation.
Press
to start the
operation.
Press
to start the
operation.
If the following occurs, stop operations and contact a service representative.
z If the “CXX” indication persists even after performing the above solutions.
z If an “FXX” or “CXX” indication not described above persists even after turning the power off and turning it on
again.
80
Page 81

Troubleshooting (continued)
Frequently encountered problems
, etc. appears in the display
(P.79, 80)
Problems with particular parts of the machine
Sound guides and warnings ( :P.86)
Operation start/finish sounds and pre-finish sounds are
not emitted, etc.
Water supply inlet
(
:P.83, 84)
Problems with the
water supply, etc.
Detergent dispenser
(
:P.86)
Leftover water, etc.
Door ( :P.84, 85)
The door does not open,
etc.
Main body
(
:P.87)
Odors, etc.
Unusual sounds and
vibration
See next page
Troubleshooting
[START] button ( :P.86)
Operations do not start, etc.
Dry filter ( : P.86)
The filter is wet, etc.
Power ( :P.85, 85)
The power does not turn on, etc.
Drum ( :P.85)
The drum is wet even though you
are using it for the first time, etc.
Drain outlet ( :P.84)
The drain outlet is clogged, etc.
Problems during operation
Sounds and vibrations ( :P.82, 83)
Vibration and noise are too loud, etc.
Operations ( :P.88, 89)
Operations differ from your settings, etc.
Operation times ( :P.89, 90)
Operation times are long, etc.
Indicator displays ( ~ :P.91, 92)
Detergent indicator, operation indicators,
remaining time indicators, etc.
Problems with washing results
Leftover detergent ( :P.93)
Excessive lint (
Insufficient cleaning (
Darkening and yellowing (
Color bleeding and discoloration
(
:P.94)
Coarse textures (
Odors (
Uneven or insufficient drying (
Wrinkles after drying (
:P.95)
:P.93)
:P.93, 94)
:P.94)
:P.94)
:P.95)
:P.96)
English
81
Page 82

Troubleshooting (continued)
Unusual sounds
The following sounds are a result of normal operations during washing and drying. They do not
indicate malfunctions.
Sound Source of sound
During washing
operations
During drying
operations
Suction sound
Showering
Droning
High-pitched
whirring
Bubbling
Humming
High-pitched
whirring
Showering
Droning
Bubbling
Vacuum sound
The circulation pump is taking in air.
z This sound may be louder at certain points during operation.
A water shower is being sprayed during the wash or rinse cycle to reduce foaming.
The circulation pump is running.
The control board is being cooled.
The motors are running.
z The drum gradually accelerates during the spin cycle. The sound will get louder as the
rotation speed increases.
The water and air inside the drain hose is mixing.
The fan and motors are running.
z The fan noise may be louder at certain points during drying operations.
Cooling water is being sprayed for dehumidified drying.
The control board is being cooled.
The air released from the drain hose is mixing with the water inside the hose.
The dry filter is clogged, and the pressure inside the drum is changing.
Depending on the operating conditions, the amount of air that passes through the drain
hose increases, creating a louder sound.
Problems with particular parts of the machine
Check the following before requesting repairs.
Symptom
Water can be heard
Sounds and vibrations
when the drum
rotates.
The water supply
noise is loud.
A beep is emitted
during drying
operations.
z This is the sound of the water inside the 5-Ply
Liquid Load Balancer used for balancing during
the spin cycle.
This does not mean that there is leftover water
in the drum.
Did you open the tap too far?
z If the water pressure is high, the water supply
noise will be louder.
Is the dry filter inserted securely? Insert the dry filter securely. (P.73, 74)
Possible cause Solution
This is not a malfunction.
If this is a concern, close the tap slightly.
82
Page 83

Symptom
Unusual sounds
occur during
drying operations.
Possible cause Solution
z The fan rotation speed is adjusted during
drying operations, causing the sound to
fluctuate.
z The drum rotates at high speeds during drying
operations.
Is the machine stable and level?
This is not a malfunction.
You can adjust the spinning speed during the dry
cycle of [WASH DRY] operations and set it to LowSpeed Mode. (P.68)
Make sure the air bubble in the supplied spirit level
is inside the circle. (Installation Instructions)
Troubleshooting
Sounds and vibrations
Unusual vibration
and noise occurs.
The drain outlet
makes a noise
during drying
operations.
The noise
increases after the
operation finishes.
Water flow can
be heard after the
drying operation
finishes.
Are there hairpins, coins, or foreign objects
inside the drum?
Are the transport bolts attached?
z The drums of front loading washers rotate
horizontally. This transfers more vibration to the
floor when compared to top loading washers.
z The drum gradually accelerates during the spin
cycle. The sound will get louder as the rotation
speed increases.
z This is the sound of moist air being expelled
during drying operations.
z This is the sound of the machine checking
whether the fan is operating.
z After a drying operation finishes, water is
discharged to the drain outlet to prevent
backflow of odors from the drainage pipe.
Is the tap open? Did a water outage occur? Make sure the tap is open.
Remove any objects.
Remove the transport bolts. (Installation
Instructions)
This is not a malfunction.
You can adjust the startup operation for spinning
and set it to Low-Vibration Mode. (P.68)
This is not a malfunction.
This is not a malfunction.
This is not a malfunction.
This is not a malfunction.
Water is not
supplied.
Water supply inlet
The water supply
hose leaks.
Is the water supply inlet’s filter clogged? Remove any debris. (P.77)
Is the water supply pipe or water supply hose
frozen?
z If you started from a rinse operation, water is
supplied after drainage/spin operation.
Does the shape of the tap match the hose? Check the tap. (Installation Instructions)
Are the one-touch joint and union nut loose?
Is the tap leaking?
z After years of use, the gasket on the tap may
degrade or rust and eventually result in water
leakage.
Check the water supply pipe and water supply
hose. (P.97)
This is not a malfunction.
Check the water supply pipe and water supply
hose. (Installation Instructions)
This is not a malfunction.
English
83
Page 84

Troubleshooting (continued)
Symptom
Water is supplied
while washing
or rinsing is in
progress.
Water supply inlet
Water is supplied
before the spinning
operation of the
rinse cycle.
The water supply
does not stop.
The drain outlet
Drain outlet
clogs.
Possible cause Solution
z When the water level drops during washing,
water is supplied automatically.
Did you add excessive amounts of detergent?
z The foam sensor will detect excessive
amounts of foam and automatically drain and
supply water.
z During the first rinse operation, water is
supplied to reduce foaming before the
spinning operation.
Did you add excessive amounts of detergent?
z Water will be sprayed inside the drum to
reduce foaming for up to 15minutes. The
indicators to the left of the buttons will display a
rotating pattern during this operation. (P.8)
Do you clean the drain outlet regularly?
Did you wash several items, such as towels,
that produce significant amounts of lint?
z Lint may accumulate more easily depending
on the shape of your drain outlet.
This is not a malfunction.
Refer to the detergent indicator to determine the
appropriate amount of detergent. (P.26, 27)
This is not a malfunction.
Refer to the detergent indicator to determine the
appropriate amount of detergent. (P.26, 27)
Clean the drain outlet about once per month.
(P.78)
Clean the drain outlet about once per month.
(P.78)
The area
surrounding the
drain outlet is wet.
Door
The door does not
open.
Is the drain hose connected securely to the
drain outlet?
z Depending on the installation of the machine,
water may spill out of the drain outlet during
drying operations and wet the surrounding
area.
Is the
Did you turn off the power while the door was
locked?
Did you turn off the power during a spin
operation?
Did you press the [PAUSE] button during a spin
operation?
indicator on the control panel lit?
z If so, the door is locked and cannot be
opened.
z If so, the door will remain locked and cannot
be opened.
z If you turn on the power immediately after
in such cases, the door will remain locked
and cannot be opened until the drum stops
rotating.
z If so, the door will not open until the drum
stops rotating.
Connect the drain hose securely to the drain
outlet. (Installation Instructions)
Set the dehumidification mode during drying
operations to Water Cooling Mode. (P.70)
Press the [PAUSE] button to unlock the door. If
is still lit, wait for it to turn off. (P.31, 32)
Press the [ON] button to turn on the power. The
door will unlock.
Wait until the drum stops rotating. You can open
the door when
Wait until the drum stops rotating.
turns off.
HIGH
84
Did you turn off the power during a drying
operation?
z If so, the door will remain locked and cannot
be opened until the inside of the drum cools
down.
Press [ON] to turn on the power, and wait until the
inside of the drum cools down.
You can open the door when
(P.33)
and turn off.
HIGH
Page 85

Symptom
Possible cause Solution
The door does not
open.
Door
The door does not
close.
Is the
Is the DOOR LOCK set?
Is there water inside the drum?
Is air blowing?
Is “000” blinking in the remaining time
indicator?
Is there an obstruction stuck between the door
lock area?
indicator blinking?
HIGH
z When the inside of the drum is hot due to
drying operations and warm-air spinning,
a cooling operation is used to cool the
temperature down.
z The DOOR LOCK will remain set and the
door will remain locked even when the power
automatically turns off after an operation
finishes.
z Depending on the water level during the
operation, the door lock may not release.
z Even if you pause the operation, the door will
not open until the airflow stops.
z If so, Soft Guard operation is in progress.
z Is the door stopper extended?
Wait until the inside of the drum cools down. You
can open the door when
Release the DOOR LOCK. (P.33)
Run a spin operation to drain the water.
Wait until the airflow stops.
Press the [PAUSE] button to unlock the door. For
details on the Soft Guard setting, see (P.69).
Remove any objects.
Press the right middle area of the door, and close
it completely.
Return the door stopper to its original position.
(P.33)
turns off. (P.32)
HIGH
Troubleshooting
The drum and
drain hose are wet,
even though they
Drum
have never been
used.
The color of the
drum has changed.
The power does
not turn on.
The operation
Power
stops or the power
turns off while in
progress.
The display
does not appear
immediately after
turning on the
power.
z Moisture and condensation from function tests
performed at the factory may still remain in the
drum and drain hose.
z Contact with water and detergent can oxidize
and discolor the drum.
Is the power plug connected to a power outlet? Connect the power plug to a power outlet.
Did a power outage occur? Did a fuse blow or a
short circuit occur?
Is there an appliance that emits noise, such as
a television or radio, near the machine?
z If noise continuously enters the machine, the
power will turn off.
z If the temperature of the drum rotation
motor reaches a certain level, the power is
automatically turned off for safety.
z If you start a drying operation while the dry
filter is clogged, the power may turn off
automatically.
z The machine will beep twice when you press
the [ON] button, and the display will light about
1 second later.
This is not a malfunction.
If this is a concern, wipe the drum using a
stainless steel detergent.
Press the [ON] button, and restart the operation.
Disconnect the power plug and reconnect it,
and then press the [ON] button and restart the
operation. Do not place televisions and radios
near the machine.
This is not a malfunction.
Wait about 1 hour before restarting the operation.
This is not a malfunction.
Clean the dry filter. (P.73, 74)
This is not a malfunction.
The control board takes a few moments to
startup.
English
85
Page 86

Troubleshooting (continued)
Symptom
Operations do not
start even when
[START] button
the [START] button
is pressed.
The water drains
when the [START]
button is pressed.
Detergent dispenser
Water remains
in the detergent
dispenser.
The dry filter is
wet.
Dry filter
Possible cause Solution
Is the DELAY START function set?
z If the drum is full (about 29 L) when you start
an operation, it will be drained before the
operation starts.
z As liquid detergent and softener are added by
injecting water and creating a siphon effect,
water may remain in the detergent dispenser in
some cases.
Are the caps attached? Make sure the caps are attached securely.
Is the machine installation level? (Installation
Instructions)
z If the machine is not level, the siphon effect
will not occur and the water in the detergent
dispenser will not drain properly.
Did you stop an operation while it was in
progress?
z If you stop a drying operation before the
laundry is completely dry, the dry filter may be
wet.
Is the dry filter clogged?
z If so, the dry filter may get wet.
If you want to start the operation immediately,
cancel the delay. (P.58)
This is not a malfunction.
If this is a concern, empty the water or wipe it off,
or clean the dispenser. (P.75)
Make sure the air bubble in the spirit level is inside
the circle.
This is not a malfunction.
Clean the dry filter. (P.73, 74)
Dust does not
accumulate in the
dry filter.
The operation
Sound guides and warnings
start/finish sounds
and pre-finish
sounds are not
emitted.
The operation
start/finish sounds
and pre-finish
sounds are barely
audible.
z If you leave the dry filter in a wet state, mold
growth may occur.
Did you set the dehumidification mode during
drying operations to Water Cooling Mode?
z When the Water Cooling Mode is used, dust
is discharged together with the water used
for cooling dehumidification and may not
accumulate in the dry filter significantly.
Did you disable the operation start/finish
sounds and pre-finish sounds?
z Audibility may vary depending on the ambient
noise and machine operation noise.
Remove the dry filter, and allow it to dry naturally.
This is not a malfunction.
Set the operation start/finish sound to the melody
or buzzer setting. (P.64)
Enable the pre-finish warning sound setting.
(P.64)
The volume of the operation start/finish sounds
and pre-finish sounds cannot be adjusted.
86
Page 87

Symptom
Possible cause Solution
z After purchase, certain parts of the machine,
such as the rubber parts, may give off an odor
for some time.
The odors will gradually disappear over use.
Run the [TUB CLEAN] program periodically.
(P.52)
The machine emits
an odor.
Main body
The display fogs.
The upper right
side of the
machine is warm.
Do you clean the drum periodically?
z Soap accumulation and mold growth inside
the drum can result in odors.
Do you clean the drain outlet periodically?
z A clogged drain outlet can result in odors.
z Is the odor a concern?
Is the drain hose installed properly?
z Depending on the condition of the drainage
pipe, odors may be a concern.
Are you running a drying operation?
z The heat from the drum may cause the display
to fog from steam and humidity.
Are you running a drying operation?
z The dryer’s heater is located in the upper right
side of the machine and may cause that area
to be warm during drying operations.
We recommend leaving the door open after
operations to prevent mold growth. In such cases,
use the door stopper to prevent children from
getting trapped inside the drum. (P.33)
We recommend running the [TUB DRY] program
to dry the drum and prevent mold growth.
(P.52)
Clean the drain outlet about once per month.
(P.78)
We recommend leaving the door open. In such
cases, use the door stopper to prevent children
from getting trapped inside the drum. (P.33)
Depending on the installation conditions, odors
may rise out of the drain outlet during drying
operations. Try changing the dehumidification
mode from Air Cooling Mode to Water Cooling
Mode. (More water will be consumed during
drying in such cases.)
This is not a malfunction.
Wait until the drum cools down and the fog on the
display disappears.
As there is a risk of burn injuries, wait for the
machine to cool down after dr ying operations.
Troubleshooting
An object fell
inside the machine.
Did the object drop through the machine and
onto the floor?
If not, stop the operation, and contact a service
representative.
English
87
Page 88

Troubleshooting (continued)
Problems during operations
Symptom
Rinse operations
differ from the
settings.
[EX] is lit, but water
injection does not
occur.
The machine
Operations
returns to the rinse
operation during
the spin operation.
Possible cause Solution
Is the laundry concentrated on one side?
z If so, another rinse operation may be added
to correct this. (The remaining time indicator
will increase, but the display for the number of
rinse operations will not.)
Did you add excessive amounts of detergent?
z If foaming is excessive during the rinse and
spin operations, the setting will be changed to
Water-Injection Rinse to reduce the foam.
z If the laundry could not be evenly distributed
during the spin operation, the setting will
change to Water-Injection Rinse automatically.
z When two or more rinse cycles are set, the first
rinse operation will always be Sprinkle Rinse.
(P. 60)
z Softener is added during the final rinse. In
order to mix in the softener, Water-Injection
Rinse will automatically change to Normal
Rinse during the final rinse.
Did the laundry gravitate to one side during the
final spin?
z If so, the machine will return to the rinse
operation to correct this.
Load laundry into the drum carefully to avoid
concentration on one side. (P.19, 20)
Refer to the detergent indicator to determine the
appropriate amount of detergent. (P.26, 27)
This is not a malfunction.
This is not a malfunction.
This is not a malfunction.
This is not a malfunction.
The drum rotation
speed changes
during the spin
operation.
The
indicator
lights during spin
operations.
The Tangle-Free
Finish operation
does not occur
after spinning.
The spinning
operation seems
insufficient (i.e.,
laundry is still wet).
z The drum rotation speed adjusts automatically
according to the wash load size and
distribution.
Are you running the [SOFT] program?
z If so,
during the spin operation.
Did you disable the Tangle-Free Finish function?
z The Tangle-Free Finish function will not operate
for operations that do not include the wash
cycle.
Is the wash load large?
z The Tangle-Free Finish function may not
operate for large wash loads (6 kg or more).
Is the spin cycle set to a short running time?
will light because the heater is used
This is not a malfunction.
This is not a malfunction.
For details on the Tangle-Free Finish setting, see
(P.69).
This is not a malfunction.
This is not a malfunction.
Set the spin cycle to a longer running time.
(P.55)
88
Page 89

Symptom
Possible cause Solution
Socks and
handkerchiefs get
caught between
the inside of the
door and the door
bellows during
operations.
Drops of water
form on the inside
and bottom of
the door and the
door bellows after
operations.
Operations
Laundry sticks
to the walls of
the drum after
operations.
Is the wash load large?
z These drops of water are due to the splashing
that occurs during the wash and spin
operations.
Did you wash a lot of items made of cotton?
z Although Tangle-Free Finish is performed at
the end of the [FUZZY] program’s spin cycle,
cotton items may not untangle sufficiently.
Are you running [WASH DRY] for small loads of
laundry?
z The drying operation operates while the
laundry is stuck to the drum.
Did you disable the Tangle-Free Finish function?
When washing larger loads, separate socks,
handkerchiefs, and smaller items into a
commercially available mesh laundry bag.
Place smaller items into the back of the drum first,
and then load the remaining laundry.
Use the optional washing cap. (P.98)
If this is a concern, wipe the water with a dry cloth.
Use the [SOFT] program.
If the Tangle-Free Finish function is disabled,
enable it. (P.69)
Increase the number of laundry items.
For details on the Tangle-Free Finish setting, see
(P.69).
Troubleshooting
The power turns
off when spin
operations are
paused.
Water is consumed
during drying
operations.
Operation times
Operation times
are long.
z Does the laundry stick regardless of the
above?
Was Tangle-Free Finish in progress?
Are you running the [STATIC DRY] or [SILENT]
program?
Is the Water-Cooling Mode set?
z Depending on the operating environment and
pipe conditions, some water may be consumed.
Did the laundry gravitate to one side during the
spin operation?
z If so, the operation time will be longer, as
an operation to correct this is automatically
added.
Did you add additional laundry during a wash
operation?
z If you add laundry while an operation is in
progress, the increase to the original detected
weight may increase the operation time.
We recommend using a fabric softener.
This is not a malfunction.
When you pause during a Tangle-Free Finish
operation, the power turns off to end the
operation.
This is not a malfunction.
This is not a malfunction.
For details on the air / water cooling
dehumidification modes, see (P.70).
This is not a malfunction.
Load laundry into the drum carefully to avoid
concentration on one side. (P.19, 20)
English
This is not a malfunction.
z The actual operation time may differ from
the original remaining time indication, as it
changes depending on the type and size of
the laundry items and the temperature of the
air and water.
This is not a malfunction.
89
Page 90

Troubleshooting (continued)
Symptom
Operation times
are long.
The operation does
not finish at the
set DELAY START
time.
Operation times
Possible cause Solution
z The remaining time indicator automatically
adjusts and may change during operations.
Did you add excessive amounts of detergent?
z When excessive foaming occurs, operations
may be prolonged for up to 15 minutes, as
an operation to reduce foaming is performed
automatically.
Is the [HOT WASH] function set?
z When [HOT WASH] is in operation, the
operation time may increase automatically.
z Depending on the volume and type of laundry
and the amount of water supplied, the actual
operation finish time may be later than the set
DELAY START time.
Is the drying load large?
Is the dry filter clogged?
z A clogged dry filter may prolong drying times
or cause operations to finish while the laundry
is only half dry.
Is the tap open?
z Tap water is used, even during dry-only
operations. Lack of a water supply may
prolong drying times or cause operations to
finish while the laundry is only half dry.
This is not a malfunction.
Refer to the detergent indicator to determine the
appropriate amount of detergent. (P.26, 27)
This is not a malfunction.
For details on the [HOT WASH] function, see
(P.65).
For details on the DELAY START setting, see
(P.58).
Reduce the number of items. Drying thick items and
thin items separately will reduce the operation times.
Clean the dry filter af ter every drying operation.
(P.73, 74)
Open the tap before starting the operation. In
addition, make sure that a water outage has not
occurred and that the water supply pipe, supply
hose, and drain hose are not frozen. (P.97)
Drying operation
times are long.
Is the water supply inlet’s filter clogged?
z If the filter is clogged, the water supply will not
be smooth.
Is the drain hose installed properly?
z If proper drainage is not possible, proper
drying operation will not be possible.
Is the water supply temperature 30°C or higher?
Is the water being supplied from a water
heater?
z If the water supply temperature is 30°C or
higher, the dehumidification process is less
effective and drying times will be longer.
Is the ambient temperature of the installation
location 5°C or lower or 30°C or higher?
z If the temperature is too low or too high, drying
times will be longer.
Has the laundry been spun?
z Drying insufficiently spun laundry may prolong
drying times or cause operations to finish while
the laundry is only half dry.
Remove any debris. (P.77)
Install the drain hose properly. (Installation
Instructions)
• Clean the drain hose and drain outlet, and
remove any lint or debris. (P.78)
• Make sure that the hose is not pinched or frozen.
• Install the hose so that the end of the hose is not
submerged in water.
• Install the drain hose so that it is not elevated
more than 10cm above the ground at any point.
• When using an extension hose, make sure the
hose does not exceed 2m in length.
Make sure that the water supply temperature
during drying operation is less than 30°C.
This is not a malfunction.
Run drying operations after spinning the laundry.
90
Page 91

Problems in the control panel (For details on error codes (CXX), see (P.79, 80))
Symptom
The detergent
indicator
recommends a
large amount of
detergent, even for
small wash loads.
The detergent
indicator
recommends a
small amount of
Detergent indicator
detergent, even for
large wash loads.
The detergent
indicator is delayed
or does not appear.
Possible cause Solution
Did you load wet laundry?
z Moist or wet laundry may be detected as a
larger wash load.
Did you load a lot of thick items?
z Thick items may be detected as a larger wash
load due to their heavy weight.
Is the laundry concentrated on one side?
z If the laundry is concentrated on one side or
is tangled, the wash load cannot be properly
detected and may be detected as smaller.
Did you load a lot of items made of polyester or
other synthetic materials?
z Items made of polyester or other synthetic
materials may be detected as a smaller wash
load due to their light weight.
z Wash load detection can take anywhere
between 30 seconds to 2 minutes. When you
start an operation with water (about 3 L or
more) already in the drum, or when you are
using the [BL ANKET], [DELICATE], or [TUB
CLEAN] program, the indicator does not
appear.
This is not a malfunction.
Troubleshooting
This is not a malfunction.
Load laundry into the drum carefully to avoid
concentration on one side. (P.19, 20)
This is not a malfunction.
This is not a malfunction.
The 0.8 and 1.0
cup displays do
not appear for the
detergent indicator
when using
the [SPEEDY]
program.
Operation indicators
The display flickers
for a moment upon
starting.
The [ WASH] time
and number of
[RINSE] indicators
display a rotating
pattern.
z Only the 0.3 and 0.6 cup displays appear
for the detergent indicator when using the
[SPEEDY] program.
z The display may flicker for brief moments due
to the internal operations of the control panel.
Did you add excessive amounts of detergent?
z When excessive foaming occurs, operations
may be prolonged for up to 15 minutes, as
an operation to reduce foaming is performed
automatically.
The indicators will display a rotating pattern
during this operation.
This is not a malfunction.
This is not a malfunction.
This is not a malfunction.
See “Examples of indicator displays during
operation” (P.8).
Refer to the detergent indicator to determine the
appropriate amount of detergent. (P.26, 28)
English
91
Page 92

Troubleshooting (continued)
Symptom
The remaining time
indicator blinks
and does not
decrease during
drying operations.
The remaining
Remaining time indicator
time indicator
blinks after spin
operations.
The remaining
time indicator is
longer than the set
spinning time.
The remaining time
indicator displayed
immediately after
the operations
starts is longer
than the previous
time the operation
was used.
Possible cause Solution
z Operations may extend 1 to 2 hours after the
“10 minutes remaining” indicator appears.
This occurs automatically when the machine
detects that the laundry is not sufficiently dry.
Is the Tangle-Free Finish function set?
z This indicator display occurs during the
untangle process after spin operations.
Are you running the [SOFT] program?
z This indicator display occurs while warm air is
blowing onto laundry during spin operations.
z In addition to the actual operation time, the
remaining time indicator also includes the
time used for the correction of uneven laundry
distribution, the acceleration of the drum, etc.
z If the water pressure was low during the
previous operation (i.e., the water supply was
slow), the displayed time will be extended to
compensate for the longer water supply time.
z Is the water supply inlet’s filter clogged? Clean the water supply inlet. (P.77)
This is not a malfunction.
The power turns off automatically when you press
the [PAUSE] button, allowing you to remove the
laundry.
For details on the Tangle-Free Finish setting, see
(P.69).
This is not a malfunction.
This is not a malfunction.
This is not a malfunction.
92
Page 93

Problems with washing results
Symptom Possible cause Solution
Did you add excessive amounts of detergent?
z Depending on the brand, the detergent may
not dissolve easily in low-temperature water.
Did you pour the detergent directly into the
drum?
z If so, some detergent may remain in the drum.
Refer to the detergent indicator to determine the
appropriate amount of detergent. (P.26, 27)
Pour the detergent into the detergent dispenser.
Troubleshooting
Leftover detergent
Excessive lint
Did you add clumps of detergent into the
detergent dispenser?
Is the detergent dispenser wet?
Are you using powder soap made from natural
fats and oils?
z Is there leftover detergent regardless of the
above?
Is the lint filter clogged? Clean the lint filter. (P.71, 72)
Do you clean the drum periodically?
z Debris may have accumulated inside the drum.
z Lint is more noticeable on dark colored
laundry.
z Lint may be more noticeable when you wash
laundry (especially dark colors) immediately
after drying towels and other items that
produce significant lint.
Is the wash load large?
z The maximum wash load size varies
depending on the program you are using.
Break up clumps of detergent before adding it into
the powder detergent / powder bleach inlet.
Wipe the dispenser with a dry cloth before adding
the detergent.
Do not use powder soap. Such soaps may clog
the machine pipeline, resulting in malfunction or
water leakage.
Increase the number of rinse cycles or use the
Water-Injection Rinse function. (P.55)
Run the [TUB CLEAN] program periodically.
(P.52)
Increase the number of rinse cycles or use the
Water-Injection Rinse function. (P.55)
To remove lint on laundry, run the [DRY] > [FUZZY]
program for 30 minutes.
We recommend running the [TUB CLEAN]
program to clean the drum before washing
laundry. (P.52)
Adjust the size of your wash load based on the
program you are using. (P.34, 35)
Insufficient cleaning
Are there dirt, food, or other hard-to-remove
stains on the laundry?
Did you add excessive amounts of detergent?
z If excessive foaming occurs, the beat washing
effect may be reduced, and a defoaming
operation may occur (water is drained and
new water is supplied) during the washing
operation.
Use the [HOT WASH] function when washing
laundry with hard-to-remove stains such as food
stains. (P.65)
When washing laundry with hard-to-remove stains
such as dirt stains, pretreat the stains and set a
long washing time (P.55), or use the [HEAVY]
program. (P.34, 35)
Refer to the detergent indicator to determine the
appropriate amount of detergent. (P.26, 27)
93
English
Page 94

Troubleshooting (continued)
Symptom Possible cause Solution
Did you pour the detergent into the detergent
dispenser?
Insufficient cleaning
z If you pour the detergent directly into the drum,
the high-concentration detergent solution
cannot be created.
Pour the detergent into the detergent dispenser.
Darkening and
yellowing
Did you add excessive amounts of softener?
z Adding excessive amounts of softener may
result in darkened laundry.
Did you add excessive amounts of detergent?
z Adding excessive amounts of detergent may
result in darkened or yellowed laundry.
z Depending on the level of soiling, laundry
may darken or yellow even if you use the
appropriate amounts of detergent and
softener.
z Using liquid detergent may make the problem
more noticeable.
z Do you want to remove the darkening or
yellowing?
Note
Some laundry cannot be washed with bleach,
so be sure to check the washing instructions
or labels on each item. The treatment
described here may not remove all darkening
or yellowing.
Are you washing deep-colored laundry or
brand-new colored laundry together with other
laundry?
z Check the washing instructions and labels on
each item.
z Dyes may deepen, resulting in more noticeable
color bleeding.
Use the recommended amount of softener.
(P.26, 27)
Refer to the detergent indicator to determine the
appropriate amount of detergent. (P.26, 27)
Increase the washing time and number of rinse
cycles, or use the Water-Injection Rinse function.
(P.55)
If this is a concern, use a synthetic powder
detergent.
Try the following:
z Soak the item overnight in a 1:3 ratio solution of
detergent and water before washing.
z If the problem persists, soak whites in a
chlorine-based bleach or reducing bleach
solution, and soak colors and patterns in
a oxidizing bleach solution. (Soak for short
periods in a sink, for example.) Be sure to read
the instructions on the bleach’s packaging
carefully.
Wash deep-colored laundry and items that are
likely to bleed color separately from other laundry.
Avoid soaking for long periods.
Color bleeding and
discoloration
Coarse textures
94
Does the tap water contain rust from the
plumbing fixtures?
z Rusting in the plumbing fixtures may result in
discoloration of laundry.
z Do you want to remove the color bleeding or
discoloration?
Note
Some laundry cannot be washed with bleach,
so be sure to check the washing instructions
or labels on each item. The treatment
described here may not remove all color
bleeding or discoloration.
z The piles on towels and pile fabric can flatten,
resulting in coarse textures.
Run the tap water through a towel, for example,
and check for rust. If the water contains rust,
consult a professional service technician.
Try the following:
Soak whites in a chlorine-based bleach or
reducing bleach solution, and soak colors and
patterns in a oxidizing bleach solution. (Soak for
short periods in a sink, for example.) Be sure to
read the instructions on the bleach’s packaging
carefully.
We recommend using a fabric softener.
Use the [SOFT] program.
If coarse textures are a concern after drying,
run the [DRY] > [FUZZY] program again for
30minutes.
Page 95

Symptom Possible cause Solution
Run the [TUB CLEAN] program periodically. (P.52)
We recommend leaving the door open after
operations to prevent mold growth.
Do you clean the drum periodically?
z Soap accumulation and mold growth inside
the drum can result in odors.
In such cases, use the door stopper to prevent
children from getting trapped inside the drum.
(P.33)
We recommend running the [TUB DRY] program
to dry the drum and prevent mold growth.
(P.52)
Troubleshooting
Odors
Do you clean the drain outlet periodically?
z A clogged drain outlet can result in odors.
Is the drain hose installed properly?
z Depending on the condition of the drainage
pipe, odors may be a concern.
Are you using an excessively fragrant or thick
detergent or softener?
z The laundry may be absorbing the fragrance of
the detergent or softener.
Are you leaving laundry inside the drum for long
periods after operations?
z Freshly dried or warm half-dried laundry may
give off the smell of detergent and other odors.
z Laundry may absorb some odors from the
drain outlet during drying operations.
Does the wash load include a lot of items that
tangle easily, such as trousers and long-sleeve
shirts?
z If laundry is dried in a tangles state, uneven
drying may occur.
Clean the drain outlet about once per month.
(P.78)
Depending on the installation conditions, odors
may rise out of the drain outlet during drying
operations. Try changing the dehumidification
mode from Air Cooling Mode to Water Cooling
Mode. (More water will be consumed during
drying in such cases.)
If this is a concern, try reducing the amount of
detergent or softener.
Leaving laundry inside the drum after drying or
leaving half-dried laundry may result in odors.
Remove laundr y immediately after the drying
operations finish.
This is not a malfunction.
When washing items that tangle easily, untangle
the laundry manually after the spin cycle, and then
run the drying operation.
Uneven or
insufficient drying
Did you spin the laundry before running the
drying operation?
z If you dry laundry that has not been spun, the
laundry may not be completely dry when the
drying operation finishes.
Did you remove the dry filter during the drying
operation?
z Removing the dry filter during the drying
operation will change the pressure inside the
drum and reduce the performance.
z Uneven drying may occur depending on
the combination of items dried, and the
temperature and humidity of the installation
location.
Is the drain outlet is clogged?
z Lint clogs in the drain outlet and drain hose
can affect the drying operation.
When drying wet laundry, run the spin cycle once
before starting the drying operation. (P.55)
Do not remove the dry filter during the drying
operation.
English
Press the [DRY LEVEL] button to set the dryness
level to [EXTRA]. (P.66)
Run the drying operation in the [HEAVY] program.
(P.38)
Check the drain outlet and drain hose, and
remove any lint or debris.
95
Page 96

Troubleshooting (continued)
Symptom Possible cause Solution
If wrinkles are a concern, untangle the laundry
Did you dry the laundry in a tangled state?
manually and smooth out wrinkles after the spin
cycle, and then run the drying operation.
Use a program that includes the [WIND IRON]
function. (P.24)
Wrinkles after
drying
Did you dry items that wrinkle easily?
Is the wash load large?
Are you leaving laundry inside the drum for long
periods after operations?
Run the [DRY] > [FUZZY] program for 30 minutes.
The laundr y will be half dry when the operation
finishes. Hang dry the laundry after the operation.
Use the Soft Guard function. (P.69)
Reduce the wash load size to 3 kg or less before
drying.
Remove laundr y immediately after the drying
operations finish. The weight of other laundry may
cause wrinkles.
96
Page 97

Miscellaneous
Draining the water before a move (or to prevent freezing)
Close the tap.
Turn on the power, press
to select the
[TUB CLEAN] program, and then press
to start the operation.
Run the operation for about 10 seconds,
press
z Running the operation removes the water
from inside the water supply hose.
, and then turn off the power.
Disconnect the water supply hose, and
keep it facing down.
(Installation Instructions P. 21)
z Place a bucket or rag underneath the water
supply hose, as water may drip out.
Insert the drain hose into the drain outlet.
Turn on the power, press the [SPIN]
button to set spin only, press
, and
run the operation for about 30 seconds.
(P.56)
z This will remove the water from the drum and
drain hose.
Press , and then turn off the power.
If freezing is a concern when using the machine in a
cold environment, place a blanket, for example, on top
of the machine and cover the rear to keep the machine
warm.
Blanket
Miscellaneous
If the machine freezes
Disconnect the water supply hose.
Pour about 5 L of warm water (about
40°C) into the drum, and let it sit for
about 10 minutes.
Connect the water supply hose, and
open the tap.
Open
Turn on the power, press the [START]
button, and let the machine sit.
This will thaw the water supply valve.
z The heat from the machine will thaw the
water supply valve, and water supply will start
(after about 20 minutes).
Verify the following:
(1) Check whether you can rotate the drum with
your hands.
Verify rotation
(2) Turn on the power, press the [SPIN] button to
set spin only (P.56), start the operation, and
check whether water drains.
Verify drainage
Ú If the above are not possible, repeat steps
.
to
English
97
Page 98

Optional Accessories
Please contact Hitachi Customer Service if you would like to purchase the optional accessories.
Purpose Optional accessory
Used when the drain outlet is too small for the drain
hose to fit
Used to extend the drain hose Drain extension hose (approx. 83 cm)
Used for washing in the [BLANKET] program Washing cap (MO-F102)
Used as a replacement part for a broken lint filter Lint filter
L-Pipe
(Part number: BD-V2100L-062)
(Part number: BD-V3200L-044)
(Part number: MO-F102-001)
(Part number: NET-KV2-001)
Used as a replacement par t for a broken detergent
dispenser
Used as a replacement par t for a broken dry filter
or when the deodorizing effect has worn off
Detergent dispenser
(Part number: BD-W3500-908)
Dry filter
(Part number: BD-W3500-909)
98
Page 99

Specifications
Main body
Model BD-W3500
Power 220 V / 50 Hz
Normal washing
capacity
Normal spinning
capacity
Normal drying
capacity
Normal water
capacity
Normal water
consumption
Rated power
consumption
Washer type Drum type
Tap water pressure
10.5 kg (maximum capacity for dry laundry)
7.0 kg (maximum capacity for dry laundry)
28 L (during [FUZZY] wash program)
85 L (during [FUZZY] wash program)
WASH: 500W DRY: 1350W
0.03 to 0.8 Mpa (0.3 to 8 kgf/cm
Specifications
2
)
Dimensions 735 × 620 × 1050 mm (W×D×H)
Weight
Approx. 89 kg
Circulation pump (inside main body)
Rated power
consumption
Rated voltage 24 V DC Pump discharge 15 L per minute
20 W (50 to 60 Hz) Rated current 0.8 A DC
English
99
Page 100

ċēĄûĒì
àŅĎúàēĄĠéņæēú
z ãęôċĂûĒöĕ ............................................................................................................................................................................................................................. 102
z
àēĄĝöĄĖăĂĝãĄĘĥĎæêĒàýņē......................................................................................................................................................................................................... 103
·
øĆĊéčĐýâĕĆøė÷øĔĨè ............................................................................................................................................................................................................................103
z
éĕĦúċŅĈúĞĆđĎęüàĄôʼn ............................................................................................................................................................................................................. 104
z
ĀŊæàʼnéĒúöŅēæģ ûúĞýæãĈûãęĂ .............................................................................................................................................................................................. 106
z
áņĎãĈĄĄđĈĒæĝÿĘĥĎãĈēĂüĆĎõāĒă ........................................................................................................................................................................................... 108
z
áņĎãĈĄĄđĈĒæĠúàēĄĠéņæēú .................................................................................................................................................................................................... 113
z
àŅĎúĝĄĕĥĂêĒàýņē ...................................................................................................................................................................................................................... 114
z
ğüĄĞàĄĂàēĄêĒàĞĆđĎûĞČņæ ............................................................................................................................................................................................... 115
z
ĝãĆĤõĆĒûĠúàēĄêĒàýņēĠČņċđĎēõ ............................................................................................................................................................................................ 116
·
âĕĆğøĆĘąĄÿňĕìĔâ · ğåĈĦ÷ĈĔýĄĘþĆēġąëüŋ · ĊėûĘĢčŇÿňĕĈèĢüùĔèìĔâ ................................................................................................................................................. 116, 117
·
ğāĚħĐĢĎňĄĔħüĢéĊŇĕþŌŏüĠĎňèģ÷ňĐąŇĕèĆĕýĆĚħü · åĬĕĠüēüĬĕčĬĕĎĆĔýÿňĕìĔâ · üĬĨĕĎüĔâġ÷ąğêĈĘħąãĐèÿňĕìĔâ
· ãňĐčĔèğâøčĬĕĎĆĔýâĕĆĢëňùěèøĕãŇĕąìĔâÿňĕ ................................................................................................................................................................................... 118, 119
z
ĝãĆĤõĆĒûĠúàēĄĎûĞČņæĠČņċđĎēõ ......................................................................................................................................................................................... 120
·
âĕĆğĈĚĐâġþĆĠâĆĄĐýĠĎňèúĘħğĎĄĕēčĬĕĎĆĔýÿňĕìĔâ · ğåĈĦ÷ĈĔýĄĘþĆēġąëüŋ · ĊėûĘĈ÷ĢąÿňĕĠĈēģĂĂŃĕčùėø ................................................................................................120
·
ĊėûĘĈ÷ĆĐąąĔý · ĊėûĘĈ÷âĕĆĐýĠĎňèúĘħģĄŇčĄĬħĕğčĄĐ · ĊėûĘþŃĐèâĔüâĕĆĎ÷ ..................................................................................................................................................121
z
ĝàĖĥăĈàĒûàēĄĄĖõýņēõņĈăĆĂ ..................................................................................................................................................................................................... 122
·
ĊėûĘĈ÷ĆĐąąĔý · øĔĊĐąŇĕèÿňĕúĘħìĔâğčĆĦéĠĈňĊ ................................................................................................................................................................................. 122, 123
z
àēĄĠċŅýæêĒàĀĎàĞĆđúĪĦēăēüĄĒûýņēúęŅĂ .................................................................................................................................................................................. 124
·
ĆēýýøĆĊééĔýþĆėĄĕöÿňĕ ĠĈēøĔĊĆēýěÿèìĔâĂĐâ · þĆėĄĕöÿèìĔâĂĐâ üĬĨĕąĕþĆĔýÿňĕüěŇĄ ĠĈēÿèĂĐâãĕĊúĘħĠüēüĬĕ .................................................................. 124, 125
·
ĊėûĘğøėĄÿèìĔâĂĐâ ÿèĂĐâãĕĊ ĠĈēüĬĨĕąĕþĆĔýÿňĕüěŇĄ ............................................................................................................................................................................126
·
âĕĆĢëňĠþŃèìĔâÿňĕ .................................................................................................................................................................................................................................128
z
àēĄĝüļõĞĆđàēĄüļõüĄđöĚ .................................................................................................................................................................................................... 129
·
ĊėûĘğþľ÷ĠĈēþľ÷þĆēøĜ · âĕĆğþľ÷þĆēøĜĆēĎĊŇĕèâĕĆúĬĕèĕü ......................................................................................................................................................... 129, 129
·
âĕĆþĈ÷ĈĦĐâþĆēøĜ .............................................................................................................................................................................................................................130
·
âĕĆĢëň [DOOR LOCK] (þĆēøĜĈĦĐå) · âĕĆþŃĐèâĔüģĄŇĢĎňþĆēøĜþľ÷ ...............................................................................................................................................131
ĈĕùĖàēĄĠéņĝãĄĘĥĎæêĒàýņē
z àēĄêĒàýņē ............................................................................................................................................................................................................................. 132
·
FUZZY (ĐĔøġüĄĔøė) · SPEEDY (ìĔâ÷ŇĊü) · HEAVY (ğøėĄāĈĔè) · FAVORITE (þĆĔýøĔĨèğĐè) · BLANKET (ÿňĕüĊĄ) · DELICATE (ùüĐĄÿňĕ)
· SOFT (ìĔâüěŇĄüĊĈ) · âĕĆğĈĚĐâġþĆĠâĆĄúĘħğĎĄĕēčĄ · ĊėûĘğĆėħĄ
z àēĄêĒàýņēĞĆđàēĄĎûĞČņæ .................................................................................................................................................................................................... 134
·
FUZZY (ĐĔøġüĄĔøė) · SPEEDY WASH & DRY (ìĔâ/Đý ÷ŇĊü) · HEAVY (ğøėĄāĈĔè) · FAVORITE (þĆĔýøĔĨèğĐè) · SILENT (ğèĘąý)
· BLANKET (ÿňĕüĊĄ) · âĕĆğĈĚĐâġþĆĠâĆĄúĘħğĎĄĕēčĄ · ĊėûĘğĆėħĄ
z àēĄĎûĞČņæ .......................................................................................................................................................................................................................... 136
· FUZZY
· âĕĆğĈĚĐâġþĆĠâĆĄúĘħğĎĄĕēčĄ · ĊėûĘğĆėħĄ
z ğüĄĞàĄĂ BLANKET (ýņēúĈĂ) (WASH (êĒà), WASH DRY (êĒàĎû), DRY (ĎûĞČņæ)) ........................................................................................ 138
·
z
ğüĄĞàĄĂ DELICATE (÷úĎĂýņē) WASH (êĒà) ............................................................................................................................................................ 142
·
z
ğüĄĞàĄĂ STATIC DRY (ĎûĞČņæÿĕĝĉĊ ÷ĒæġĂŅČĂęú) DRY (ĎûĞČņæ) ........................................................................................................................... 146
·
z
àēĄĠéņĀŊæàʼnéĒú CLEAN (ğüĄĞàĄĂøĪēãĈēĂċđĎēõ) - DEODORANT (àĪēçĒõàĆĕĥú) ..................................................................................................... 148
·
z
àēĄĠéņĀŊæàʼnéĒú CLEAN (ğüĄĞàĄĂøĪēãĈēĂċđĎēõ) – TUB CLEAN (øĪēãĈēĂċđĎēõ÷ĒæêĒà) / TUB DRY (øĪēĠČņ÷ĒæêĒàĞČņæ) ................................. 150
·
· ĊėûĘğĆėħĄ ...................................................................................................................................................................................................................................... 150, 151
z
àēĄċĄņēæğüĄĞàĄĂáĎæãęôĝĎæ ............................................................................................................................................................................................. 152
·
z
àēĄøĪēæēúûēæċŅĈúáĎæğüĄĞàĄĂêĒà FUZZY (ĎĒöğúĂĒöĕ) ................................................................................................................................................. 154
·
· ĊėûĘğĆėħĄ .................................................................................................................................................................................................................................................154
z
àēĄĠéņĀŊæàʼnéĒú DELAY START (öĒĦæĝĈĆēêĒàĆŅĈæČúņē)..................................................................................................................................................... 156
·
z
àēĄøĪēæēúĎĒöğúĂĒöĕĝöĤĂĄĚüĞûû ĞĆđàēĄöĒĦæãŅēøĖĥĝüĆĖĥăúġõņ .................................................................................................................................................. 158
(ĐĔøġüĄĔøė) · HEAVY (ğøėĄāĈĔè) · SILENT (ğèĘąý) · BLANKET (ÿňĕüĊĄ) · STATIC DRY (ĐýĠĎňèāėğċČ ùĔèģĄŇĎĄěü)
âĕĆğøĆĘąĄğåĆĚħĐèìĔâÿňĕ · ĊėûĘøė÷øĔĨèĠĈēùĐ÷Āĕþľ÷âĔĨüÿňĕ · ĊėûĘğĆėħĄ ...........................................................................................................................................138~133
âĕĆğøĆĘąĄğåĆĚħĐèìĔâÿňĕ · ĎĄĕąğĎøěğâĘħąĊâĔýÿňĕúĘħìĔâ · ĊėûĘğĆėħĄ · ĎĈĔèéĕâìĔâÿňĕğčĆĦé ................................................................................................................ 142~145
ĊėûĘğĆėħĄ · ĊĔč÷ěúĘħčĕĄĕĆùĐýĠĎňè · ĎĈĔèéĕâĐýÿňĕğčĆĦé............................................................................................................................................................. 146, 147
ÿňĕúĘħčĕĄĕĆùúĬĕåĊĕĄčēĐĕ÷÷ňĊąġþĆĠâĆĄ [DEODORANT] (âĬĕéĔ÷âĈėħü) ģ÷ň · ĊėûĘğĆėħĄ .................................................................................................... 148, 149
âĕĆğĈĚĐâġþĆĠâĆĄúĘħğĎĄĕēčĄ · ğâĘħąĊâĔýġþĆĠâĆĄ [TUB CLEAN] (úĬĕåĊĕĄčēĐĕ÷ùĔèìĔâ) · ğâĘħąĊâĔýġþĆĠâĆĄ [TUB DRY] (úĬĕĢĎňùĔèìĔâĠĎňè)
ĊėûĘğĆėħĄ · âĕĆğĈĚĐâġþĆĠâĆĄúĘħğĎĄĕēčĄ · ĊėûĘğþĈĘħąüâĕĆøĔĨèåŇĕġþĆĠâĆĄ ................................................................................................................................ 152, 153
WASH
J
RINSEJSPIN (ìĔâ
·
RINSEJSPIN (Ĉňĕè
·
·
þŌŏüĠĎňè)
Ĉňĕè·þŌŏüĠĎňè)
·
·
WASH (ìĔâ) ĐąŇĕèğ÷ĘąĊ · WASHJRINSE (ìĔâ
DRAIN (ĆēýĕąüĬĨĕ) ĐąŇĕèğ÷ĘąĊ, SPIN (þŌŏüĠĎňè) ĐąŇĕèğ÷ĘąĊ
·
Ĉňĕè) · WASH
J
SPIN (ìĔâ
·
þŌŏüĠĎňè)
·
RINSE (Ĉňĕè) ĐąŇĕèğ÷ĘąĊ
ĊėûĘğþĈĘħąüğĊĈĕìĔâĈŇĊèĎüňĕ · ĊėûĘğĆėħĄ ......................................................................................................................................................................................... 156, 157
100
 Loading...