

Page 1

Colour LCD Television
with integrated DVD/CD-Player
Model Name
19LD5750U
22LD5750U
USER’S MANUAL
READ THE INSTRUCTIONS INSIDE CAREFULLY.
KEEP THIS USER’S MANUAL FOR FUTURE REFERENCE
For future reference, record the serial number of your television.
SERIAL NO.
This serial number is located on the rear of the television.
Ver. 1
Trademark of the DVB - Digital Video Broadcasting Project
Region
2
Page 2
Precautions
Important Warning
CAUTION:
A UNIT IS A CLASS 1 LASER PRODUCT. HOWEVER THIS UNIT USES A VISIBLE LASER BEAM
WHICH COULD CAUSE HAZARDOUS RADIATION EXPOSURE IF DIRECTED. BE SURE TO OPERATE THE PLAYER CORRECTLY AS INSTRUCTED.
THE FOLLOWING CAUTION LABEL IS LOCATED ON THE REAR PANEL OF THE UNIT.
CLASS 1
LASER PRODUCT
WHEN THIS UNIT IS PLUGGED INTO THE WALL OUTLET, DO NOT PLACE YOUR EYES CLOSE TO
THE OPENINGS TO LOOK INTO THE INSIDE OF THIS UNIT.
USE OF CONTROLS OR ADJUSTMENTS OR PERFORMANCE OF PROCEDURES OTHER THAN
THOSE SPECIFIED HEREIN MAY RESULT IN HAZARDOUS RADIATION EXPOSURE.
DO NOT OPEN COVERS AND DO NOT REPAIR YOURSELF. REFER SERVICING TO QUALIFIED
PERSONNEL.
WARNING:
TO REDUCE THE RISK OF FIRE OR ELECTRIC SHOCK, DO NOT EXPOSE THIS EQUIPMENT TO
RAIN OR MOISTURE.
TO REDUCE THE RISK OF FIRE OR ELECTRIC SHOCK, AND ANNOYING INTERFERENCE, USE
THE RECOMMENDED ACCESSORIES ONLY.
Headphone Warning
Loud music can damage your hearing irreversibly, therefore do not set the volume to a high level when
listening through headphones, particularly for extended listening periods.
Battery notice (valid in EU only)
Look after our environment - contact your local authorities for advice on how to safely dispose of exhausted
batteries. The crossed out wheelie bin symbol indicates that used batteries should not be disposed of
with your normal household waste! A separate collection system for used batteries is in place to allow the
correct treatment and recycling in accordance with current legislation. Please contact your local authority for
details on collection and recycling schemes in your area.
Information for the DVB-T function
Any function relative to the digital television (with the DVB logo) is available only within the country or area
•
where such signals are transmitted. Verify with the salesman if it is possible to receive a DVB-T signal in
the zone where you live.
A DVB-T antenna (not supplied) must be connected for DVB-T reception.
•
Even if the television conforms to the DVB-T specifications, the compatibility to future digital DVB-T
•
transmissions is not guaranteed.
Some digital television functions may not be available in some countries.
•
The DVB-T system present in this device is FTA (Free to air).
•
Waste Disposal Tip
The above mark is in compliance with the Waste Electrical and Electronic Equipment Directive
2002/96/EC (WEEE).
The mark indicates the requirement NOT to dispose the equipment including any spent or
discarded batteries as unsorted municipal waste, but use the return and collection systems
available. If the batteries or accumulators included with this equipment, display the chemical
symbol Hg, Cd, or Pb, then it means that the battery has a heavy metal content of more than
0.0005% Mercury, or more than 0.002% Cadmium or more than, 0.004% Lead.
* The “HD ready” Logo is a trademark of EICTA.
* DVB is a registered trademark of the DVB Project. This logo indicates that the product is compliant with
European Digital Broadcasting.
2
Page 3

Contents
Features
TV
•
LCD MONITOR
Resolution: 1366 x 768 pixels
•
On-Screen Language Display in 15
languages (English, Spanish, German,
French, Italian, Swedish, Dutch, Russian,
Portuguese, Turkish, Greek, Finnish, Polish,
Danish and Norwegian)
•
99 analogue plus 1000 DVB-T Channel
position memory
•
Videotext – Fastext/TOPtext
•
Remote control
•
Sleep timer plus EPG-Timer
•
Wide-aspect-screen
•
Scart socket
•
COMPONENT input
•
S-Video input
•
Headphone Jack (for mini plug)
•
PC Connection (VGA) (see page 39)
•
HDMI-connection
•
CE Symbol Guaranteeing Compliance to
Currently Effective European Standards
DVD Player
•
Digital output for Dolby Digital (AC-3)
Playback of DVD, VCD, SVCD, MP3/WMA/
•
JPEG and Audio-CD
Contents
Precautions .......................................................... 2
Features ................................................................ 3
Contents ............................................................... 3
Important safety information ................................ 4
Location of controls .............................................. 7
Remote Control .................................................... 8
Antenna connection ........................................... 10
Auto setup .......................................................... 11
Quick guide for ANALOG MENU operation ....... 11
Selecting the video input source ........................ 11
On-screen Language Selection .......................... 12
Automatic station presetting with the built-in Tuner
Changing the order of stored channels .............. 12
Manual TV station presetting .............................. 12
Basic Operation .................................................. 13
Teletext (analogue) .............................................. 13
Stereo reception with the built-in
analogue tuner .................................................... 14
Picture size and resolution ................................. 15
Picture format ..................................................... 16
Other convenience functions ............................. 17
Language Setup ................................................. 18
Auto Scan ........................................................... 18
Manual Scan ....................................................... 18
Carrier Setup ...................................................... 19
Channel Organizer .............................................. 19
Display Setup .....................................................21
Time Setup ......................................................... 21
Password Setup (Parental lock) ......................... 21
Version ................................................................ 21
Software Upgrade .............................................. 21
Common Interface .............................................. 22
Channel list ......................................................... 22
Channel banner .................................................. 22
Multi audio .......................................................... 23
DVB-Subtitle ....................................................... 23
EPG (Electronic Program Guide) ........................ 23
EPG Timer ..........................................................24
Using the Digital Service .................................... 24
Disc .................................................................... 25
Playing a disc .....................................................26
Zooming ............................................................. 27
Locating desired scene ...................................... 27
Marking desired scenes ..................................... 27
Repeat playback ................................................ 28
A-B Repeat playback ......................................... 28
Changing angles ................................................. 28
Title selection ..................................................... 28
DVD menu .......................................................... 28
Changing Soundtrack Language ........................ 29
Subtitles ............................................................. 29
Disc status .......................................................... 29
MP3/WMA/JPEG and Audio CD operation ........ 30
Program playback .............................................. 32
Random playback .............................................. 33
Customizing The Function Settings ................... 33
Temporary cancel the rating level by DVD disc .. 37
Language Code List ........................................... 38
PC connection .................................................... 39
Connecting an HDMI or a DVI device to the HDMI input
Connection to other equipment ......................... 41
Troubleshooting table ......................................... 44
Specifi cations ..................................................... 45
Signal Input ........................................................ 46
AV and HDMI Signal Compatibility
(Input Signal Types) ............................................ 47
... 12
.... 40
3
Page 4

Important safety information
This unit has been produced according to all current safety regulations. The following safety tips should
safeguard users against careless use and the dangers connected with such use.
Although this appliance has been carefully manufactured and rigorously checked prior to leaving the factory,
•
as with all electrical appliances it is possible for problems to develop. If you notice smoke, an excessive
build-up of heat or any other unexpected phenomena, you should disconnect the plug from the mains power
socket immediately.
Ensure that the unit is suffi ciently ventilated! Never place next to or underneath curtains!
•
This set should be only be connected to an AC 220~240V / 50Hz mains power supply - do not attempt to
•
connect it to any other type of supply.
The socket-outlet must be installed near the equipment and easily accessible.
•
Any repairs must be carried out by qualifi ed service personnel only.
•
Do not open this unit. A non-expert attempting to repair the unit could be dangerous and potentially cause a
•
fi re hazard.
Keep away from rodents. Rodents (and also cockatiels) enjoy biting into electric fl exes.
•
The animal can cause a short cut (fi re hazard!) and receive a fatal electric shock.
•
Always hold plug when pulling out plug from power mains supply system. Do not pull on fl ex. The fl ex can
•
become overloaded and cause a short cut.
Never wet clean. Only use a damp cloth, the same as when cleaning furniture.
•
Do not submerge in or under water!
•
Set up unit so that no one is able to trip over the fl ex.
•
This unit is recommended to be installed on shock-free benches in order to avoid any danger from falling.
•
Take note that toddlers can pull the unit down from the table or cupboard by means of its fl ex. Children can
•
hurt themselves when doing this.
Do not use the unit near heat sources. The casing and fl ex could be damaged by the impact of heat.
•
Watch out for kiddies copying what adults do! Do not stick any objects through the vents!
•
The vents must remain open! No newspapers or covers should be put on the unit!
•
The remote control is not a toy! Toddlers could swallow the batteries. If a battery has been swallowed, please
•
seek out a doctor immediately.
The screen is made of glass and can break if damage is done to it. Be careful when collecting sharp-edged
•
glass splitters.
You could be hurt or the unit could be damaged.
•
If the unit is mounted on the wall, contact the shop where you purchased the unit for advice, and leave the
•
installation work to experts. Incomplete installation work can cause you injuries.
Taking fall-prevention measures
•
- If these measures are not taken, the unit can fall and you could be injured.
- Contact the shop where you purchased the unit to obtain full details of the measures.
When a TV stand is used,
•
- Ensure the unit is fully on the stand and placed in the centre.
- Do not leave the stand doors open.
- You could be hurt as a result of the unit falling or breaking, or your fi ngers being caught or jammed. Take
extra precautions if you have children.
Avoid placing the unit on any surfaces that may be subject to vibrations or shocks.
•
To protect the unit during a thunder storm unplug the AC power cord and disconnect the antenna. Caution:
•
Do not touch the antenna connector.
When you leave your home for a long period of time, unplug the AC power cord for safety reasons.
•
The unit becomes warm when in operation. Do not place any covers or blankets on the unit in order to
•
prevent overheating. The ventilation holes are not to be blocked. Do not set up near radiators. Do not place
in direct sunshine. When placing on a shelf leave 10 cm free space around the whole unit. Make some space
around TV (Correct shelf assembly).
The apparatus shall not be exposed to dripping or splashing and that no objects fi lled with liquids, such as
•
vases, shall be placed on the apparatus.
Liquids spilled into the unit can cause serious damage. Switch the set OFF and disconnect the mains power
supply, then consult a qualifi ed service person before attempting to use the unit again.
Please pay attention to the following instructions in order to avoid receiving a life-threatening electric
shock:
•
Protect against moisture. Never use in the bath or sauna.
•
Never use near a bath, shower or swimming pool.
•
Never use the unit if it has got wet. This can also mean condensation moisture, which occurs in the winter
when the cold unit is brought into a heated fl at. Wait before operating the unit especially after it has been
transported in the winter, until the cold unit has adjusted to the room temperature.
•
Do not place any heavy objects on the fl ex. Electrical isolation could be damaged.
•
Never wrap insulating tape around damaged fl exes or on damaged plugs. These should be repaired or
replaced by qualifi ed service personnel.
•
Never use this unit if the cabinet is defective. Do not make provisional repairs if the cabinet is damaged - this
should be replaced by a new cabinet if necessary.
•
Unplug the unit from the mains power supply prior to the cleaning of the unit.
•
To prevent fi re, never place any type of candle or open fl ame on the top or near the TV set.
4
Page 5
Important safety information
Moving the unit or carrying by hand
When the unit is moved a long way, unplug the power cord and disconnect the antenna, connecting cables and any fall-prevention apparatus.
• Moving without doing so could result in damage to the power cord, a fi re, electric shocks or injuries
from dropping the unit.
When the TV stand has casters, remove caster cups from the stand and push it while supporting
the unit.
• Ensure that you support the unit when the stand is pushed, as this can cause the unit to fall and
you could be injured.
• The appliance could leave indentations in wooden tables with extremely soft wooden surfaces due
to its heavy weight.
• Furniture polish could corrode and dissolve rubber feet. Black imprints could be visible on the
table. You should therefore only use TV benches, which have been constructed for this specifi c
purpose.
Secure the casters when the unit is installed on a TV stand with casters.
• The stand can move and you could be hurt if the casters are not secured.
Remove casters when the stand is placed on a soft surface such as a mat and carpet.
The distance between eyes and the screen should be about 5 ~ 7 times as long as diagonal length
of the screen.
• Viewing from too close a distance can cause strain for your eyes.
When installing the Monitor on a table, be careful not to place the edge of its stand.
• This may cause the Monitor to fall, causing serious injury to a child or adult, and serious damage to
the Monitor.
How to attach the stand
NOTE:
• Unplug the AC cord from the AC INPUT terminal.
• Before performing work spread cushioning over the base area to lay the TV on.
• Do not touch or press the TV-screen, glass might break under pressure.
1) Place the TV on its back onto a table.
2) Align the stand’s bottom-plate (supplied) as seen here.
It will fi t in only one direction.
3) Press it in direction of arrow until ‘click’.
Finally secure the bottom-plate with 2
screws (included).
Please note “ ” mark on the stand is facing the LCD
panel side.
Dismantling the base
For wall mounting, the base must be dismantled. To do this, remove 2 screws (M, see page 10) from the
back. Take off the base entirely.
5
Page 6

Important safety information
Possible Adverse Effects on LCD Screen: If a fi xed (non-moving) pattern remains on the LCD screen
for long periods of time, the image can become permanently engrained in the LCD TV panel and cause
subtle but permanent ghost images. This type of damage is NOT COVERED BY YOUR WARRANTY.
Never leave your TV on for long periods of time while it is displaying the following formats or images:
• Fixed Images, such as stock tickers, video game patterns, TV station logos, teletext pages, and
websites.
• Special Formats that do not use the entire screen. For example, viewing letterbox style (16:9) media
on a normal (4:3) display (Black bars at top and bottom of screen); or viewing normal style (4:3)
media on a widescreen (16:9) display (Black bars on left and right sides of screen).
Attention!
Cleaning instructions for your LCD TV.
Safety note:
Before you start to clean, switch the set’s power off completely and disconnect the plug from the mains
power supply.
Be careful not to scratch the plastic coated front panel - it is highly vulnerable to accidental scratching
(e.g. by fi ngernails or other sharp items). (While cleaning, do not wear jewelry) that could cause surface
scratching (such as rings, wrist-watch, etc.). Use a lint-free cloth and pure water to clean with, but make
sure the cloth is thoroughly wrung out so that it is just damp and not soaking wet - also make sure that
the cloth is free from any dirt that could cause scratching to the surface.
Wipe the set clean using minimal pressure.
Do not use standard window cleaning fl uid. Its alcohol / ammonia will dissolve the front window’s coating.
Never use solvent or thinner. Never use special cleaners which are designed for cleaning PC Monitors or
CRT TVs. Finally carefully rub dry with a clean dry lint-free cloth.
Do not use paper towels or tissues to clean the set - paper can disintegrate when wet or may leave a trail
of dust behind. Some paper can also be abrasive and scratch your screen.
6
Page 7

Location of controls
DVD-Player
4
5
6
7
8
9
10
3
1
Description of Indicators and Controls
1. Remote sensor
(Standby/Timer/On) indicator: The LED indicator lights up red in standby mode, orange in
2.
standby mode when the timer is activated, and green in the power ON mode.
3.
Loudspeakers
4.
EJECT: Eject a disc.
(Volume) +/– buttons / In Menu: Setting.
5.
6.
(Channel) /PLAY (϶) button: Press to change to a higher numbered channel set into
memory. DVD mode : Playback. In Menu: Setting. In Standby: Turning on the unit.
7.
(Channel) /STOP (Ϯ) button: Press to change to a lower numbered channel set into
memory. DVD mode : Stop. In Menu: Setting. In Standby: Turning on the unit.
8. MENU button: To display the menu screen.
9. TV/AV/PC/ENTER button: Select input mode for TV/AV/COMPONENT/HDMI/PC/DVD. In Menu :
Using as ENTER button.
(Power)-key: Preparation: Connect power-cable to AC220~240V/50Hz.
10.
a) If standby-LED is red, you may power-off. To power-off, press power-key 1x and release.
For confi rmation, standby-LED will change to dark.
b) If standby-LED is off, you may power-on. To power-on, press power-key 1x and release.
For confi rmation, standby-LED will change to red and about 1 second later to green.
c) If the TV is currently working, press power-key 1x and release to power-off.
For confi rmation, standby-LED will change to dark.
In power-off-condition, the TV’s power-consumption is approx. 1 Watt.
If total disconnection from the mains is required, pls unplug.
2
7
Page 8
Remote Control
Function
Enter standby mode or turn on the power
Display program position number
Teletext time display
Select to operate TV/DVD
Eject a disc
Select channel
Select Teletext page
Enter password
Activate the channel organizer function
Select an input source
Switches between the analogue TV and the digital
TV
Display the EPG (Electronic Progr. Guide)
Sleep Timer
Turn the sound on/off
Exit the menu screen
Cancel marking
Volume
Page
11
13, 22,
29
26
26
13
13
11
18
23
13
13
27
13
Change the TV channel or Teletext page up or down
In Standby: Turn on the power
Cursor buttons
Memorize
Teletext page 100
CH LIST
Call Setup menu
Activate the analogue menu
Activate the digital menu
Switches between the present channel and the last
selected channel
Select picture format
Toggle between the TV and radio mode
Teletext ON / TV+Text / OFF
Remove DVD set up menu
Select menu of a DVD disc
Select title of a DVD disc
Display the subtitle
Display the multi audio menu
Change sound track language of DVD
Repeat playback between A and B (DVD/CD)
Select playback mode
Locating desired scene
Zoom (for DVD playback)
Hold the text page (DVB only)
Reverse slow motion
Change playback angle of a DVD disc
Reveal quiz page answers
Marking desired scene
Sub page selection
Teletext enlargement
Forward slow motion
DVD control buttons
Fastext/TOPtext buttons
8
DVD control buttons
13
11
14
13
33
11
18
13
16
22
13
33, 37
28
28
23, 29
23
29
28
28, 32
27
27
14
27
28
14
27
14
14
27
26, 27
13
26, 27
Page 9
Remote Control
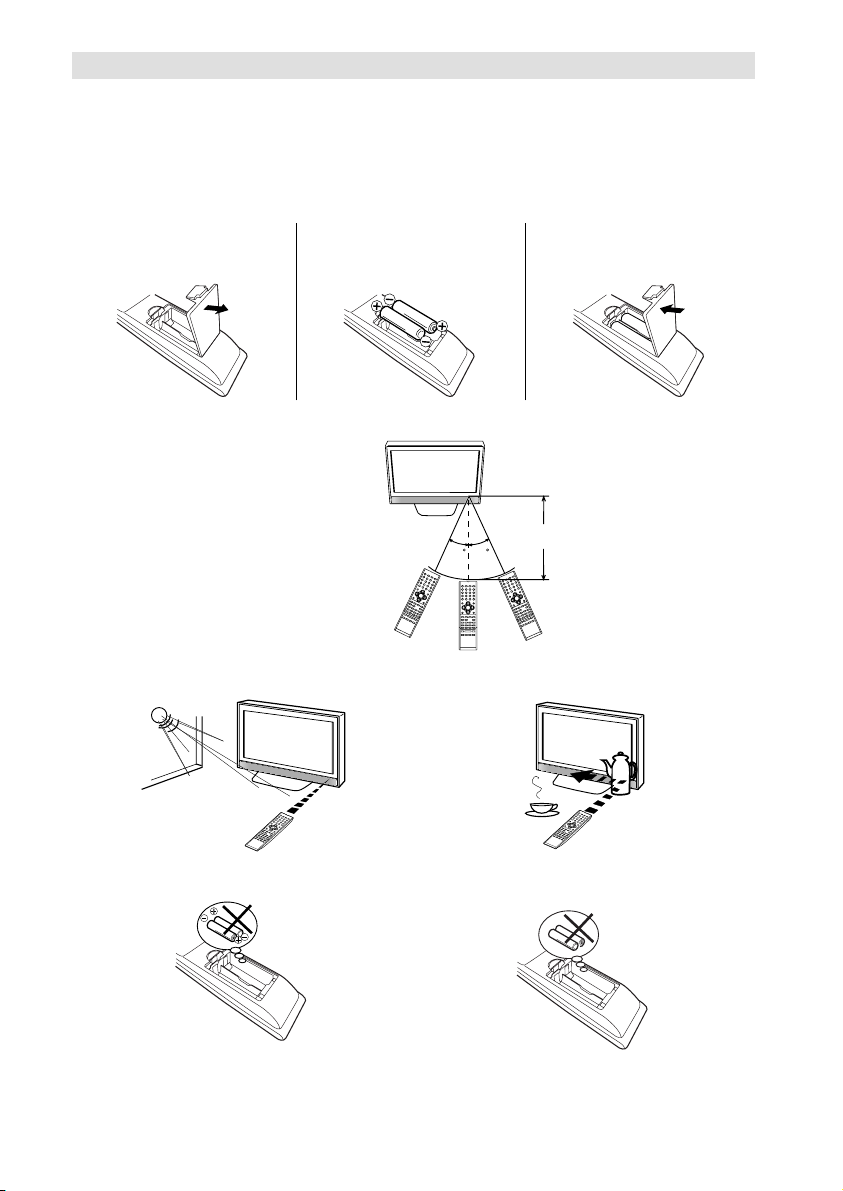
Install the batteries
Use batteries type UM3 (AA-Size).
Do not use old or weak batteries. The remote control may not work properly with a weak voltage from
such batteries. Replace exhausted batteries with new ones. Never try to recharge normal batteries - this
could cause an explosion.
Note:
Exhausted batteries can leak corrosive electrolyte, which may cause damage to the remote control therefore remove exhausted batteries immediately.
Open the battery
1
compartment.
Distance of Remote Control Operation
Install the batteries as
2
shown below, ensuring the
correct polarity.
Close the battery
3
compartment.
Remote sensor
Point the remote control
directly at the remote sensor.
The remote control handset will not work properly in the following cases:
a) If bright sunlight directly beams onto the unit
front.
c) If the batteries have not been installed according
to their polarities.
30 30
b) If an obstacle is placed between the unit and the
handset.
d) If the batteries are weak.
Maximum distance approx. 5m
Transmitter window
Z
Z
Z
Z
Z
Z
9
Page 10
Antenna connection
Note: Before you connect other appliances:
To avoid potentially damaging your set, make sure all items are switched off and disconnected from the
•
mains power when you make the connections.
•
Arrange the desired connection.
•
When you have finished making the connections, reconnect the mains power to the unit and switch it
back on.
Connect your antenna as shown below (J). Connections to other equipment is explained further on
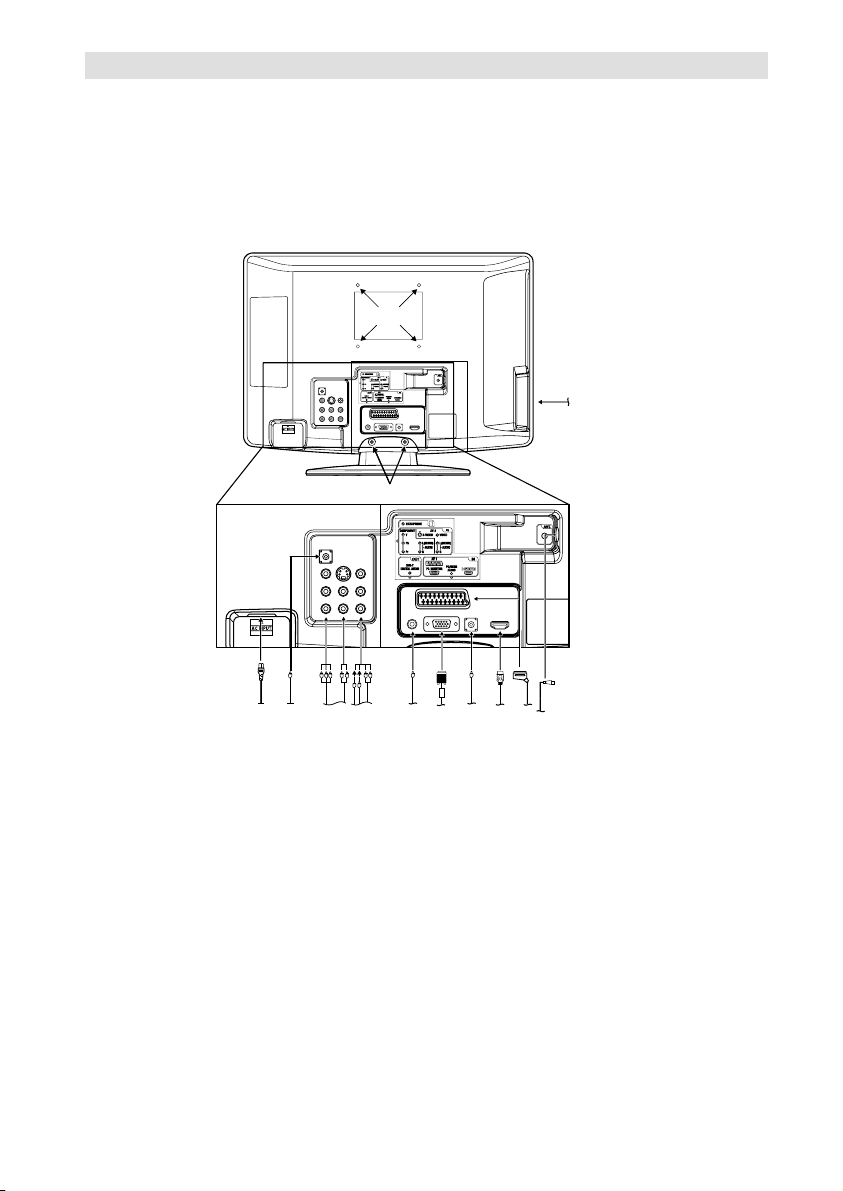
P.41~43. If you have problems with reception, consult a specialist of antenna.
Back Side
(L)
(K)
(M)
(J)
(A) (B) (C) (D) (F)
(E)
(G) (H)
(I)
(A) Power supply: Connect the supplied power cable to an AC 220-240V/50Hz mains power supply
only - do not attempt to connect it to any other type of supply. Never try to repair a damaged AC
power cord with insulation tape - this should be repaired by a specialist or replaced. Do not let your
pet loose near the cable. Animals biting into the cable could receive a fatal electric shock, and could
cause a hazard to others.
(B) HEADPHONE jack: Plug headphones with a mini plug (3.5 mm) into this jack.
(C) COMPONENT input: See P.43.
(D) AV2 input: Input for analogue AV-Signal (Composite or S-Video). See P.43.
(E) DVB-T Digital audio output: digital output for CD/DVD & DVB-T (see page 42).
(F) PC MONITOR input (PC): See P.39.
(G) PC/HDMI AUDIO input: See P.39, 40.
(H) HDMI input : See P.40.
(I) Scart socket (AV1): For the connection of scart cable. See P.41~43.
(J) ANT: Plug in the antenna (aerial) here.
(K) C.I. slot: for DVB-T-PayTV (see page 22).
(L) Bracket holes: Fix a wall mounting bracket (not supplied) here.
(M) To hang the television on a wall, remove these screws and then remove a stand.
Before performing work spread cushioning over the base area to lay the TV on.
10
Page 11
Auto setup
Your unit has an Automatic installation which
makes installation in your unit easy. When you
turn on the unit for the fi rst time, the Automatic
installation routine is activated. Using this
routine, you can select the on-screen language
and automatically search for and store all the
receivable analogue and digital (DVB) channels.
The Automatic station presetting feature is
for the set’s built-in tuner only. If you have a
device such as a digital decoder (eg. Satellite
or Digital Terrestrial) connected (see P.41), you
would need to tune it in separately according
to its own instructions.
Preparation:
Press
(Power) on the unit or press (On/Standby)
on the remote.
AUTO INSTALLATION menu
1
will appear.
Press or to select the
fi rst line, then press ENTER. Press or to
select desired language.
Then press ENTER.
Press or to select
2
COUNTRY, then press
ENTER.
or to select your
Press
country.
Then press ENTER.
Press or to select AUTO TUNING, then
3
press ENTER.
The confi rmation screen will be displayed.
Press ENTER to start automatic tuning.
Your TV will now automatically tune in all
available channels.
Your TV will tune the analogue channels fi rst,
then tune the digital channels.
Note:
Please be patient - the Auto Tuning process
•
can take several minutes to complete.
When the programme on the screen stops changing
and the sound comes on, the search process is
complete.
Note:
To cancel the Auto Tuning, press EXIT during the
•
process.
If on the “AUTO INSTALLATION (COUNTRY)” screen
•
“UK” is selected, “Change No.” and “Move To” cannot
be used in U.K. (see page 20)
THE AUTOMATIC TUNING PROCESS WILL
ONLY START BY ITSELF THE FIRST TIME YOU
SWITCH THE SET ON. HOWEVER YOU CAN
RESTART THIS PROCESS VIA THE MENU
SYSTEM (see page 12 for analogue channels,
and page 18 for digital channels).
AUTO INSTALLATION
LANGUAGE
AUTO INSTALLATION
LANGUAGE
COUNTRY
AUTO TUNING
ENGLISH
ENGLISH
UK
Quick guide for ANALOG MENU
operation
Make sure the antenna connection and power
supply are connected as per the description on
previous page.
Preparations:
Turn on the unit with the
•
unit. The
in green.
To change the unit to standby mode, press
remote control.
change from green to red. To turn on the unit from
standby mode, press
In standby mode, you can also turn the unit on with
control.
To turn off the unit press
unit - to completely switch it off, disconnect the mains
power supply.
(On/Timer/Standby) indicator will light up
(Channel) / on the unit or P + / – on the remote
(Power) button on the
(On/Timer/Standby) indicator will
on the remote control again.
(Power) button on the
on the
Call ANALOG MENU and for example: Select
AUTO TUNING.
Press INPUT SELECT.
1
Select ATV. Press ANALOG MENU.
2
Press or to select .
Press or to select AUTO
3
TUNING, then press ENTER
to enter the AUTO TUNING
menu.
AUTO TUNING
MANUAL TUNING
CH ALLOCATION
... on the following pages the
MENU can be called in the
same way as here.
Press EXIT to return to the normal screen.
4
Note:
If no buttons are pressed for more than approx. 60
•
seconds, the MENU disappears automatically.
Selecting the video input source
Press INPUT SELECT to view a signal from
another device connected to your TV, such as a
VCR or DVD player. You can select each input
source depending on which input jacks you used
to connect your devices.
To select the video input source,
press / .
Then press ENTER within 6
seconds.
INPUT SELECT
ATV
DTV
AV1
AV2
COMPONENT
HDMI
11
Page 12
On-screen Language Selection
Select LANGUAGE (unless
1
you have already selected
when the set was fi rst
switched on).
Then press ENTER.
Press or to select the desired language.
2
Press EXIT to return to the normal screen.
3
AUTO TUNING
MANUAL TUNING
CH ALLOCATION
LANGUAGE
ENGLISH
VERTICAL POSITION 0
AUTO 4:3 DEFAULT
ENGLISH
Automatic station presetting with the
built-in Tuner
Perform this feature to search for and store new
analogue TV programmes after the Automatic
installation. (P.11)
Preparation:
Make sure your antenna is connected to the antenna
input (see P.10). Select ATV (see P.11). Then press
ANALOG MENU.
Select AUTO TUNING, then press ENTER.
1
Select COUNTRY, then
2
press ENTER.
Press
or to select your
country, then press ENTER.
Select START. Then press ENTER.
3
The automatic tuning will search for available
broadcasts and should store the channels
in the correct order. During the search the
sound is muted. When all programs have been
stored, the normal TV screen will appear.
Note:
To restart digital auto tuning, see page 18.
•
When the COUNTRY is set to UK, the automatic
•
tuning will search for UHF broadcasts only.
COUNTRY
START
Changing the order of stored
channels
The Automatic station presetting stores the
stations in a specifi c order. However, this order
can be changed if you wish.
Press ANALOG MENU. Select CH
1
ALLOCATION.
Then press ENTER.
Select desired option, then
2
press ENTER.
After setting the each option,
3
press ANALOG MENU to
return to CH ALLOCATION
memu.
Press EXIT to return to the normal screen.
4
Note:
When changing the order of the channels, it is best to
•
start with CH1.
SORT
ERASE PROGRAM
SKIP
CH LABEL
Description about the each setting option:
SORT: Press
to move, then press ENTER.
Press or
the channel to, then press ENTER.
ERASE PROGRAM: Press
that you want to erase, then press ENTER.
SKIP: Press
16:9
to skip, then press ENTER.
CH LABEL: Press
to rename, then press ENTER. Press or to select
character, then press or . The cursor will move to the
next position. Press ENTER to set the channel label.
or to select the channel that you want
to select the position that you want to move
or to select the channel
or to select the channel that you want
mark will appear.
or to select channel that you want
Manual TV station presetting
I
f you like, you may manually tune a certain
station into a selected memory-cell, without
deleting or modifying other memory-cell’s
contents. Example: Store the BBC 2 into
memory-cell 2.
Preparation: Select ATV (see page 11). Select
1
memory-cell 2. Press key 2 (see page 13).
OSD will indicate
Eventually recently stored TV-channel’s name
might also appear.
UK
Press ANALOG MENU. Press or to select
2
tool-page. Press or
TUNING. Press ENTER.
COLOUR SYSTEM and SOUND SYSTEM has
3
already been preset to AUTO. Do not touch.
Press or to select
4
SEARCH. Press ENTER.
Press or -key, to start
tuning. Tuning will stop
automatically at next
available station. If this does
not happen to be the BBC 2,
press or -key again to continue tuning for
the BBC 2. Then press ENTER.
If you like use fi ne-tuning. Select FINE and
5
press ENTER. Press
the note on this page.
To store other stations in additional memory-
6
cells, repeat steps 1 to 5.
Press EXIT to return to the normal screen.
7
Note:
Usually fi ne tuning is not necessary, due to tuning’s
•
automatically stopping at the very best position. If you
fi ne-tune anyway, proper working of teletext-reception
with built-in tuner is no longer guaranteed.
2
in right upper corner.
to select MANUAL
or , to fi ne tune. See
SEARCH
FINE 168.30MHz
COLOUR SYSTEM
AUTO
SOUND SYSTEM
AUTO
BBC 2
175.30MHz
12
Page 13

Basic Operation Teletext (analogue)
Channel selection
With the numbered buttons.
Example:
No. 2: Press 0 and within 2 seconds, press 2.
•
No. 29: Press 2 and within 2 seconds, press 9.
•
Press P + or – to change up or down a channel.
This takes approx. 2 seconds. If the auto search
only stored 5 stations, only these 5 will appear.
Skipped channels will not appear (see P.12).
CH LIST
The CH LIST shows a list of all receivable
programmes. They are located in channels 1 to 99.
Press CH LIST to display the CH LIST.
Press
or to select the desired channel.
Press CH LIST to display the selected channel.
Press EXIT to exit.
QuickView
button allows you to go back to the last
selected channel.
Volume adjusting
Press
+ or – to adjust the volume.
MUTE
Press
. The sound will be cut off. MUTE will
appear for approx. 4 seconds.
The muting can be released by pressing
or
+ or –.
again
Information display
In the analogue TV mode: Press
. Channel
number and picture size setting will appear for
approx. 4 seconds.
In the digital TV mode: Press
. The program
information will appear (see ‘Channel banner’ on
page 22).
SLEEP TIMER
To set the sleep timer press
. SLEEP and the
minutes until shut-off will appear. Each time you
press
the SLEEP time shown will change. When
the displayed time runs out, the unit will switch to
standby.
To cancel the sleep timer:
Press
repeatedly until ‘0’ appears.
Note:
•
SLEEP TIMER can also be set in the SLEEP TIMERmenu (see p.17).
Note:
•
If the built-in tuner does not receive anything (e.g. if
no antenna is connected) during TV-operation, then
the TV-unit will change to standby after approx. 15
minutes.
Teletext is sent page by page. This unit is able to
automatically store up to 256 pages, but they can
only be accessed once they have been stored.
This can take a few moments.
Fastext/TOPtext
The Fastext/TOPtext is teletext with a special
directory.
On the lower part of the screen there are four
different coloured fi elds (red, green, yellow and
blue). These fi elds lead directly to the pages
shown within. The coloured buttons on the
remote control correspond to the coloured fi elds.
Press the appropriate coloured button in order to
activate the desired colour fi eld.
Switch on / off Teletext
Teletext is not transmitted by all channels.
Select a channel that shows teletext.
Press
. You will now see a teletext page. (If
“100” is shown without any text information, it
may mean that the channel you have selected
does not support teletext.)
Press
again. The TV-screen will be split into
two and both Teletext information and actual
broadcast will be displayed at the same time.
Press
again in order to switch off teletext.
Press
again in order to switch on teletext again.
The last page which was stored is now shown.
Note:
•
You cannot select any other channels as long as
teletext is switched on. Switch teletext off when you
want to switch over to another channel.
Select Page
Press P+ or – until the page you desire appears.
Or ... enter the requested page number by using
the 10 Number Buttons.
And if you mistype something, just enter the
complete 3-digit wrong page number then enter
the desired number again. Or ... press one of the
coloured teletext buttons so that a page from
Fastext/TOPtext is shown.
TELETEXT
TELETEXT
13
Page 14
Hold Pages
Some pages are divided up into subpages by the
channel.
Subpages are automatically shown in turn, as they
are transmitted. In order to hold the page, press
. Press again in order to display the next
subpage.
Directly Select Subpages
You can directly select the subpages if required.
Example:
Page 128 from ARD (German teletext) comprises
of 2 subpages. In the right upper corner you will,
for example, see 1/2. That means that page one of
2 subpages is being shown at the moment.
128 128 ARD-Text 21.07.03 15:01:38
1/2
Press in order to select subpage 2. 4 dashes
(----) are shown. Enter 0 0 0 2. It can take a minute
before subpage 0002 appears.
Press
again in order to switch off the
subpage feature.
You can only select other teletext pages when the
subpage feature is switched off.
Enlargement
In order to enlarge the display, press
.
Either the upper or lower half of the screen is
enlarged.
Each time you press
you switch between the
display of the upper or lower half of the screen or
the full picture.
Answering Quiz Questions
Some pages contain quiz questions with
concealed answers.
Press
in order to show the answers.
Page 100
Press ENTER in order to show page 100.
Stereo reception with the built-in
analogue tuner
The built-in Tuner can detect and receive
NICAM stereo broadcasts automatically.
NICAM stereo sound reception:
Select NICAM, then press
1
ENTER. Press
or to
select AUTO or OFF. Select
OFF if you do not want to
receive NICAM sound.
Press EXIT to return to the normal screen.
2
The following types of broadcast are possible with NICAM transmissions
‘NICAM ST’ illuminates for
approx. 4 seconds when a
NICAM STEREO broadcast signal
is received.
‘NICAM M1’ illuminates for
approx. 4 seconds when a
NICAM MONO A broadcast signal
is received.
‘NICAM M1/M2’ illuminates
for approx. 4 seconds when a
NICAM MONO A and MONO B
broadcast signal is received.
This will be displayed for approx.
4 seconds if a NICAM signal is
received when the ‘NICAM OFF’
option is selected.
Note:
In case of bad reception, the stereo sound also can be
•
disturbed.
NICAM AUTO
BASS 25
TREBLE 25
NICAM ST
NICAM M1
NICAM M1 / M2
NICAM OFF
14
Page 15
Picture size and resolution
Resolution and picture quality
Broadcast wide screen fi lms in different resolutions. The following table shows the resolution options for
wide screen fi lm broadcast media.
Broadcast media
Resolution of the wide
screen signal
432i x 704 (Letterbox) Yes Yes Yes Yes Yes Yes No
576i x 704 (anamorphic) No Yes Yes Yes Yes Yes No
720 x 1280 (HD) No No No No No Yes Yes
1080i x 1920 (HD) No No No No No Yes Yes
Best image quality results when the inputted resolution received corresponds with the resolution of
the used TV appliance. The 19LD5750U/22LD5750U has a resolution of 1366x768, its picture format
therefore corresponds with 16:9. As a result best image quality results with a picture signal of 1280x720
or higher.
The low resolution of analogue cable TV is not recommendable for HD ready appliances resulting in
poorest visual image quality. Analogue cable TV is however completely suffi cient for analogue tube TV
appliances.
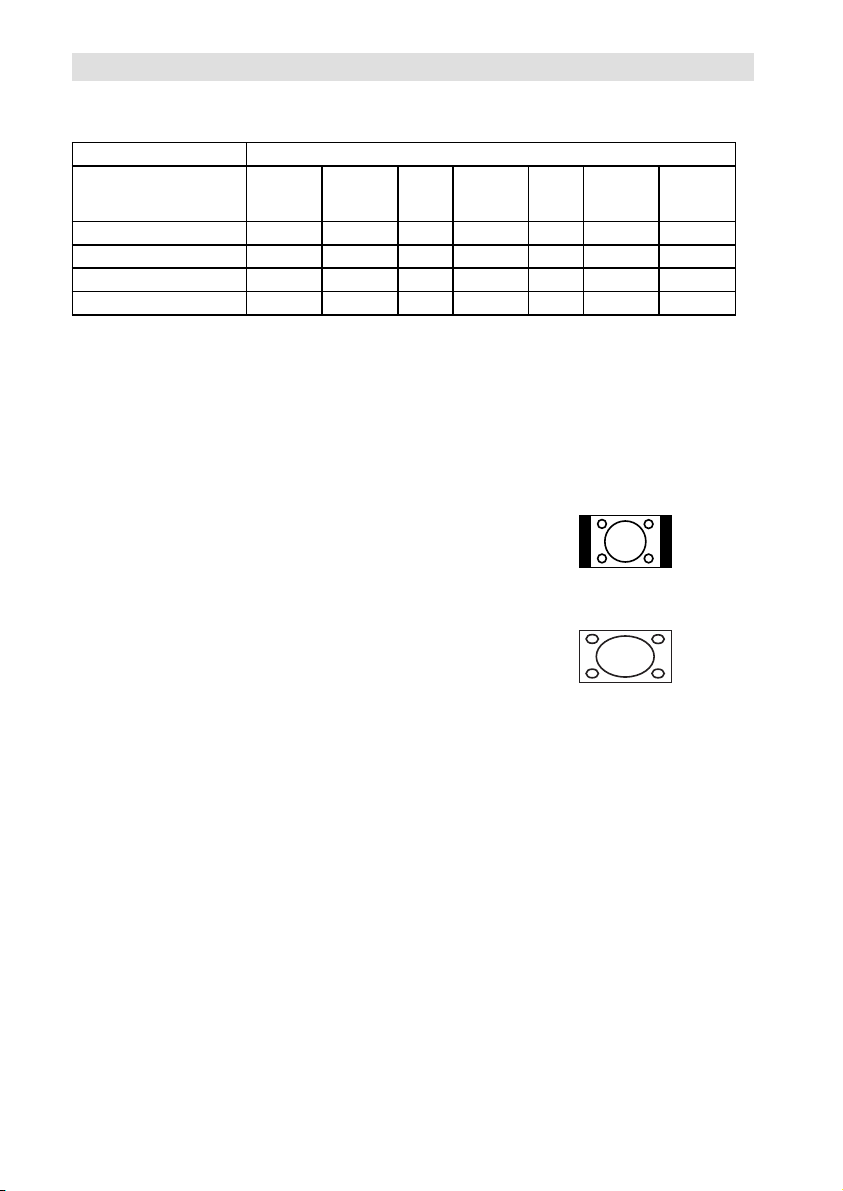
Picture quality and black bars
Wide screen fi lms come in different formats. The format is the
relationship between the width and height of the picture. For example,
with a 16:9 fi lm the width to height ratio is 16:9 or 1.78:1. Only 16:9 fi lms
can fi ll a HD ready screen without black bars. Therefore, black bars are
always visible when a format other than 16:9 is received. E.g. 4:3, A 4:3
displays vertical black bars to the right and left.
If a 4:3 picture is increased to 16:9 format then it either appears
distorted (see illustration) or some parts of the picture are cropped off at
the top and the bottom. This is completely normal and is not a fault in
the wide screen TV.
Super Cinemascope fi lms are wider than 16:9 fi lms. They are in the
format 2.4:1 or 22:9, for example. This is clearly wider than16:9.
Therefore, Super Cinemascope fi lms display black bars at the top and
bottom on any HD ready TV set. The 19LD5750U/22LD5750U cannot
remove the black bars from Super Cinemascope fi lms.
Analogue
cable TV
Digital
cable TV
DVB-T Satellite
(DVB-S)
DVD HDTV
Satellite
(DVB-S2)
4:3 picture 1:1 on
16:9 screen
4:3 picture zoomed on
16:9 screen
Blu-RayDisc
Picture format and resolution
There is no connection between the picture format and the resolution received. For example, the Super
Cinemascope format can be received in all resolutions, even in the HD resolution1080ix1920. For HDTV
reception too an HD ready set may display black bars at the top and bottom.
15
Page 16

Picture format
Picture Size
The required picture format can be set by pressing
the PICTURE SIZE button. Press PICTURE SIZE
until the required format is displayed.
Tip: The picture goes dark for a short time every
time the button is pressed before appearing in the
required format.
You move through the following formats when you
press the button: AUTO, 4:3, 16:9, CINEMA, 14:9
REAL (HDMI only).
AUTO
The picture is automatically only then shown in
a format-fi lling display when a WSS-TV signal is
received.
Example:
If the analogue tuner receives a letterbox image
with WSS signal then the resulting image looks like
this:
illustration 1:
Letterbox image is increased
WSS:
Public broadcasters include 16:9 identification,
the WSS signal (WideScreenSignalling), during
transmission in order to ensure automatic conversion
to 16:9.
Most private broadcasters do not transmit a WSS
signal. Their 16:9 fi lms are always broadcast in
letterbox format. AUTOmatic does not recognise
anything without WSS signal and does not
automatically alter the picture size. Use the
PICTURE SIZE button to set the required picture
size for private channels.
If AUTO is set then the built-in tuner checks whether
the WSS signal is present after every switch-over to
another programme.
If the WSS signal is rediscovered the screen goes
intermittently black.
The picture can also go black during adverts when
adverts are transmitted in both 4:3 and 16:9 .
Switch off AUTOmatic if you are bothered by the
intermittent darkness of the picture. Switch off
AUTOmatic by pressing the PICTURE SIZE button
until the required format appears, e.g. 16:9.
Other formats
Press PICTURE SIZE until the desired size is
reached.
4:3
The picture is displayed in 4:3
format with black bars to the
right and left.
16:9
The width of the picture will be zoomed evenly.
16:9 is particularly suitable for DVD players,
DVB-T, DVB-C and satellite receivers, which can
transmit and show 16:9 feature fi lms without black
bars. In the set-up menu of the set, adjust it to
show that a 16:9 TV set is connected.
CINEMA
Use CINEMA to increase a small 4:3 letterbox
signal. How do you recognise whether the
broadcasting station / the set operating is using
a 4:3 letterbox signal that is too low? Press the
PICTURE SIZE button on the remote control until
the 4:3 format appears. If the picture is surrounded
by a black border as in the illustration, this is a
4:3 letterbox signal. Limited by the broadcasting
station / the set operating, this signal is much too
low for a 16:9 HD ready screen. CINEMA increases
this picture that is too small as far as possible.
Natural visible poor focus emerges, rather as if
a postcard were being increased to poster size.
This unfocused appearance is conditioned by
input signals that are too low and is in no way a
production fault in this TV set.
4:3 Letterbox picture increased to CINEMA format.
14:9
The picture is increased somewhat but not up to
the full screen width. Black bars remain on the
right and left and also at the top and bottom.
REAL (HDMI mode only)
The picture is displayed with
original size.
Note:
The picture size cannot be adjusted in PC operation.
•
For 720p and 1080i signals the PICTURE SIZE feature
•
is available only for 16:9 or REAL (HDMI only) format.
External receivers can automatically adjust the picture
•
size via a SCART cable. Please read the instructions
for the external receiver.
16
Page 17

Other convenience functions
You can change the default settings to convenience use.
Icon Selected Items Setup hint
PICTURE
PREFERENCE
BRIGHTNESS / CONTRAST
/ COLOUR / TINT(NTSC) /
SHARPNESS
COLOUR TEMPERATURE Bluish (COOL) / Neutral (MEDIUM) / Reddish (WARM)
BLUE BACK ON / OFF You can set the TV to automatically change to a blue screen and
BACKLIGHT You can use the Back light feature to adjust the screen brightness
RESET Select “RESET” to reset PICTURE PREFERENCE, BRIGHTNESS,
NICAM See page 14.
BASS / TREBLE / BALANCE You can adjust the sound quality to your preference.
HDMI AUDIO See page 40.
RESET Select “RESET” to reset BASS, TREBLE and BALANCE to the
AUTO TUNING See page 12.
MANUAL TUNING See page 12.
CH ALLOCATION See page 12.
LANGUAGE See page 12.
VERTICAL POSITION When the CINEMA mode is selected (see page 16), you can adjust
AUTO 4:3
DEFAULT
SLEEP TIMER 0~120 min
AV1 OUTPUT This determines whether the AV1 outputs the signal from the internal
AV COLOUR
REC SCREEN
STATUS
RESET TV SETTING Prees ENTER to enter the RESET TV SETTING screen.
Note:
*1
AUTO 4:3 DEFAULT is available only for AUTO picture size setting.
*1
In COMPONENT and HDMI mode, AUTO 4:3 DEFAULT is available only for 480i/576i mode.
*2
PAL is the colour system used in UK. NTSC 3.58 is used in the USA, PAL 60 used in UK handled video recorders,
which play NTSC video tape recording.
If the picture shows horizontal stripes, set to AUTO.
SPORTS Bright and dynamic picture (factory-set)
STANDARD Standard picture quality (factory-set)
MOVIE Movie-like picture setting (factory-set)
MEMORY Your personal preferences
You can adjust the picture to your preference.
The “TINT(NTSC)” option can be selected if an NTSC 3.58MHz or
NTSC 4.43MHz signal is input through one of the AV sockets, and
NTSC or AUTO has been selected for the AV COLOUR option.
mute the sound if the signal is weak or absent.
for improved picture clarity.
CONTRAST, COLOUR, TINT(NTSC), SHARPNESS, COLOUR
TEMPERATURE and BACKLIGHT to the factory preset values.
factory preset values.
the vertical picture position. Press
4:3 / 16:9 This option selects the default way that a 4:3 signal is shown -
*1
(every 10
minutes)
position of the picture by up to +10 and downwards by up to -10.
either as normal “4:3” or expanded in the “16:9” mode, according
to your preferences.
You can set SLEEP TIMER to automatically turn off the TV.
To cancel the SLEEP TIMER, set to “0”.
or to adjust the vertical
tuner or whatever input is shown on the screen.
TV Outputs the last channel position selected.
MONITOR The picture displayed on TV-screen.
*2
ON / OFF This function is used in conjunction with the Timer function that
The AV Colour setting only applies when viewing devices
connected to the AV inputs.
is included as part of the Digital EPG. It determines whether the
TV screen switches on or not when a programmed Timer setting
begins - see page 23 for further details.
Prees or to select “YES”, then prees ENTER.
Reset the TV function will now begin, and this unit will
automatically turn off.
17
Page 18

Language Setup
Preparation:
Switch on appliance. Press TV/DVB-T.
The appliance switches over to DVB-T-mode.
Press DIGITAL MENU, the menu will appear
1
on the screen.
CH1
CH2
ABC
ABC
CH3
Language Setup
Texd
i
i
CI
Press or to select Language Setup option,
then press ENTER.
Language Setup menu will appear.
2
or to select the item you want to
Press
change.
Press or to select desired language.
Language Setup
Menu Language
Pref. Audio Language
When all changes are decided, press EXIT to
3
return to the normal screen.
English
English
Auto Scan
Preparation:
Please ensure that all the connections have been
made correctly (see page 10).
Press DIGITAL MENU. Press / or / to
1
select ‘Auto Scan’ then press ENTER.
The confi rmation banner will be displayed.
2
Press
or to select ‘Yes’ or ‘No’, then press
ENTER.
The Auto Scan process will now begin.
3
The scanning process will be displayed in the
progress bar.
Carrier :1
Frequency (kHz) :562000
Searching...
Progress
Note:
If “FINLAND” is selected on the “AUTO INSTALLATION
•
(COUNTRY)” screen, two languages are displayed for
each item and the fi rst selected language has priority.
The language output depends on the languages
contained in the broadcast.
All the channels will be deleted before the scanning
•
process begins.
You can cancel the scan process at any time by
•
pressing EXIT. The carriers and the services stored
before EXIT is pressed will be stored.
Navigate
Exit
Manual Scan
With the Manual Scan option, you can tune one
carrier at a time, by entering the carrier parameters
manually.
Press DIGITAL MENU. Press / or / to
1
puteSegaugnaLunemniaM
select ‘Manual Scan’, then press ENTER.
You can choose the carrier number from
2
the Channel list by using or and the
corresponding frequency set for the carrier will
be set for tuning.
Otherwise you can also directly enter the
frequency value to start the tuning.
Manual Scan
Channel li
st
Frequen
cy (kHz)
0..9
Navigate
After setting the carrier, press ENTER to start
3
the scanning. During the scan process, the list
of services (TV/Radio) collected for the carrier
will be listed.
Then the confi rmation banner will be
4
displayed.
Press
or to select ‘Yes’ or ‘No’, then press
ENTER.
Press EXIT to return to the normal screen.
5
Note:
•
If on the ‘AUTO INSTALLATION (COUNTRY)’ screen
‘FINLAND’ is selected, ‘Frequency (kHz)’ cannot be
used.
•
When the Country is set to FINLAND in the ‘AUTO
INSTALLATION (COUNTRY)’
If there is a Channel List in the data after Auto Scan
or Manual Scan, Channel Type Selection Menu will be
displayed and available to set Channel List Type.
Select the Channel List Type by pressing / and
press ENTER
If “FINLAND” is selected on the “AUTO INSTALLATION
•
(COUNTRY)” screen, Data is displayed on the “Carrier
Setup” screen.
Ch-21
474000
Enter Exit
18
Page 19

Carrier Setup
The Carrier setup option menu lists all the carriers
(multiplexes) that are currently available and
allows you to Rename, Delete or Rescan carriers
individually.
Press DIGITAL MENU. Press / or / to
1
select ‘Carrier Setup’ then press ENTER.
All the carriers are listed with their frequency
2
and service information - the user can scroll
through the carrier list and select each one
individually to Rename, Delete or Rescan.
Rename:
3
Select carrier, then press Red button. The
alphanumeric keypad will appear. You can
rename a service as per your preference (see
page 20).
Delete:
Select carrier, then press Green button. The
check mark (
) will be displayed for selected
carrier. Then press ENTER. The confi rmation
banner will be displayed.
Press or to select ‘Yes’ or ‘No’, then press
ENTER. If the option ‘Yes’ is selected then all
the marked carriers will be deleted from the
list.
Rescan:
Rescan allows to tune the already tuned
carrier, to collect any new programmes that
are currently available in the stream. Press
Blue button, to rescan the current selected
carrier.
Channel Organizer
The Channel Organizer feature provides options
to organise the channels. The following options
are supported: Lock, Skip, Go To, Delete,
Rename, Move, Change No. and Move To.
Press DIGITAL MENU. Press or to select
1
Channel Organizer option, then press ENTER.
The Channel Organizer menu will appear.
2
The available programmes will be listed,
depending on the current mode. The selected
programme will be highlighted.
To toggle within the service list, press or .
S.No Service Name Lock Skip Del Move
671 MNO
672 PQR
673 STU
674 TCM
679 VWXYZ
800 SAT.1
672 ARTE
rezinagrOlennahC
1. Lock 4. Delete 7. Change No.
2. Skip 5. Rename 8. Move To
3. Go To 6. Move
0..9
Navigate
D.Menu TV/RadioExit
TV
By pressing the corresponding Number
3
Button (1-8) key, you can activate the
following functions from this menu for each
channel: Lock, Skip, Go To, Delete, Rename,
Move, Change No. and Move To. (You can
deactivate each of these functions by pressing
the same number again.) See page 20 for
setting details.
Indications:
S.No Service Name Lock Skip Del Move
030 CBBC
Service
Service
name
Pay
channel
number
Note:
•
While in TV mode, only TV programmes will be
displayed and only radio programmes will be
displayed while in radio mode.
The displays of Channel / Service name will be
•
abbreviated depend on its size of the letter.
Locked
service
Skipped
service
Delete
mark
Move
mark
19
Page 20

Channel Organizer
Setting details
When the service is locked, you must enter your PIN whenever you tune to the service.
①
Press / to select the desired service.
②
Lock
Skip
Go To
Delete
Rename
Move
Change No. *
Move To *
Note:
* If on the “AUTO INSTALLATION (COUNTRY)” screen “UK” is selected, “Change No.” and “Move To” cannot be
used in U.K.
Press 1 on the remote control. If you already set the PIN, enter it here. If not, enter
the factory preset PIN “0000”.
An icon displays indicating the service is locked.
•
Pressing 1 will turn the lock icon on and off. (PIN entry is required.)
③
Press DIGITAL MENU.
Services that are set to skip will not be picked up when pressing P +/-.
①
②
③
Use this function to jump to the specifi c service in one step. This is useful when there
are many services displayed on screen to scroll through.
①
②
Delete the selected service(s) from the memory.
①
②
③
④
Change individual service names.
①
②
③
④
⑤
Sort the order of the selected service by moving the service position.
①
②
③
Change service number.
①
②
③
Sort the order of the selected service by modifying the service number.
①
②
③
/ to select the desired service.
Press
Press 2 on the remote control. An icon displays indicating the service to be skipped.
••
Pressing 2 will turn the skip icon on and off.
Press DIGITAL MENU.
To view services that are set to be skipped, use 0-9 or select from the Channel
List.
Press 3 on the remote control. Now you can change the service number on the left
side of the screen.
Enter the number using 0-9, and then press ENTER. The highlight moves to the
selected service.
/ to select the desired service.
Press
Press 4 on the remote control. An icon displays indicating the service to be deleted.
•
Pressing 4 will turn the delete icon on and off.
Press DIGITAL MENU. A confi rmation message displays.
Press
/ to select “Yes”, and then press ENTER.
/ to select the desired service.
Press
Press 5 on the remote control. A character set screen displays.
Enter new name for the service.
Press DIGITAL MENU. A confi rmation message displays.
Press /
Press
Press 6 on the remote control. An icon displays indicating the service to be moved.
Move the selected service to the desired position using
to register the change.
Press / to select the desired service.
Press 7 on the remote control. Now you can change the service number on the left
side of the screen.
Enter the number using 0-9, and then press ENTER.
Press
Press 8 on the remote control. Now you can change the service number on the left
side of the screen.
Enter the number using 0-9, and then press ENTER. The service moves to the new
position.
to select “Yes”, and then press ENTER.
/ to select the desired service.
•
Pressing 6 will turn the move icon on and off.
/ to select the desired service.
/ , and then press ENTER
20
Page 21

Display Setup
Press DIGITAL MENU. Press / or / to
1
select ‘Display Setup’, then press ENTER.
Display Setup menu will appear.
2
Press or to select the item you want to
change.
Then you can change each setting by pressing
or .
Banner
timeout
Banner
position
After all the changes are made, press EXIT to
3
return to the normal screen.
1 Sec,
2 Sec….
7 Sec
Top Select whether the service
Bottom
Select how long the service
banner information appears
on screen.
banner information appears
on top or bottom of the
screen.
Time Setup
If the time displayed on the Channel banner differs
from the actual time, it can be corrected.
Press DIGITAL MENU. Press / or / to
1
select ‘Time Setup’, then press ENTER.
Time Setup menu will appear.
2
If the time displayed on the Channel banner
differs from the actual time, adjust the time
offset with the
time is shown.
Note:
Normally, this would be done by selecting “Auto”.
•
After all the changes are made, press EXIT to
3
return to the normal screen.
or button until the correct
Password Setup (Parental lock)
This feature allows you to have a parental control
of the service viewing as per your preference.
Once a service is protected with a password, it
cannot be viewed unless the correct password is
provided.
Press DIGITAL MENU. Press / or / to
1
select ‘Password Setup’, then press ENTER.
‘Enter Password’ will appear. Press ‘0 0 0
2
0’ using the Number Buttons. (This is the
default password.)
Press or to select ‘Parental Lock’, then
3
press or to select desired parental rating
(see note). Then press EXIT to return to the
normal screen.
You can also change the password using the
4
next option.
Press
or to select ‘Change password’.
Then enter your chosen new password (be
sure to remember this password). After you
have entered the new password for the fi rst
time, you need to enter the same password
again for confi rmation. The Information banner
will then appear.
Press EXIT to return to the normal screen.
While toggling between channels, if a service
which has a parental rating is selected then you
will be asked to enter the correct password to
view that channel. If the channel you are currently
watching supports a parental rating then the rating
will also be displayed in the Channel banner menu
(see page 22).
Note:
•
There are 15 age-based ratings, ranging from ‘4’
(years old) to ‘18’ (years old) and ‘None’. Eg. If the
Parental Lock is set to ‘8’ (years old), only the services
which have the parental rating of ‘8’ (years old) or
under will be viewable without entering the Password.
•
You will be prompted to enter the password, when you
set new parental rating.
You can set the new parental rating only when you
enter the password correctly, otherwise the old
parental code will be retained.
Version
You can check the software and hardware
versions.
Press DIGITAL MENU. Press / or /to
1
select ‘Version’, then press ENTER.
The hardware and software versions are
displayed.
Software Upgrade
Software Upgrade allows you to download the latest
software available on the Engineering channel.
Press DIGITAL MENU. Press / or /to
1
select ‘Software upgrade’, then press ENTER.
If a software upgrade is available from an
2
Over- Air-Download (OAD) then the message
‘S/W available, do you want to download?’
will be displayed - you can then select ‘Yes’ or
‘No’ by pressing or , then press ENTER.
If you select the option ‘Yes’ then the
3
Software Upgrade process will be initiated.
It will take about 20 minutes and after this
process is complete, the TV will be rebooted
automatically.
If you select the option ‘No’ you can continue
to watch TV programmes as before.
Press EXIT to return to the normal screen.
4
Note:
Do not disconnect the AC cord when the software
•
upgrade is in progress, as this may cause the upgrade
to fail. At this time you cannot use any of the buttons.
When the unit searches for a software upgrade signal,
•
the message ‘Please wait...’ will be displayed.
21
Page 22

Common Interface
You can access the Common Interface module
information from this menu option.
Preparations
Insert CAM into the DVB Common Interface slot
on the backside of the TV (see page 10).
Press DIGITAL MENU. Press or to select
1
‘Common Interface’ option, then press
ENTER.
The CAM module name will be displayed.
2
You have to press ENTER to view further
information.
In the CI Menu, CAM specifi c information
3
such as Module information, Smart card
information, Language and Software
Download are shown.
Press
or to select information, then press
ENTER to see detail.
Press EXIT to return to the normal screen.
4
Channel list
Press CH LIST to display the Channel list
1
menu.
S.No Services
671 MNO
672 PQR
List of the
services
Select the Services:
2
List of the services will be displayed in the left
side of the menu.
Press
then press ENTER.
Toggle between the list of TV and Radio
services:
The TV/RADIO key is used to toggle between
the TV and Radio mode. If you press CH LIST
when you are in Radio mode then the channel
list menu will display the list of Radio services.
If you wish to view the list of TV services
without exiting the current menu, TV/RADIO
key should be pressed once.
Note:
The displays of Channel / Service name will be
•
abbreviated depend on its size of the letter.
673 STU
674 TCM
679 VWXYZ
800 SAT.1
Navigate
or to toggle within the service list,
VTtsillennahC
Enter TV/RadioExit
Channel banner
When you change from one channel to another,
the Channel banner will be displayed for the
selected service. In the channel banner menu,
information such as current date & time, channel
name, etc. will be displayed.
While watching the service, press to display
1
the Channel banner at any time. It will
disappear after the Banner timeout value (this
can be adjusted to your preferred value, see
page 21).
Service name
Service No.
Duration
graph
Undefined
Genre
Starting time/Ending time
of current programme
Press again to
2
display the Basic
Service Information.
You can verify the
signal strength
and quality of the
selected service
here.
If necessary, adjust the direction of the
antenna to obtain the maximum signal
strength.
•
When the Country setting has been set to
FINLAND,
press
once more to display the advanced
detailed information.
To remove the Channel banner immediately,
3
press
again.
Note:
Subtitles are displayed on the channel banner. Some
•
broadcasts may not provide this service.
DVB Teletext available
DVB Subtitle available
Lock status
251_ABC_Monosco_0... 17:17:37
Programme name
Pay TV
Audio mode
Parental rating
Basic Service Information DVB-T 64QAM
Service Name
671 MNO
Signal Quality
Signal S
t
ren
g
th
671 MNO 10S
t
ep 0820 0005 003
671 MN
O 10S
t
ep 0820 0
DE
FGHIJKLM
rstu
vwxyz
Enter Exit
NOPQR
005 0030 Audio2 AB
S
T
U
V
C
opq
W
01:egA
0 A
X
YZabcdefg
oeretSENOCBB100
9002/80/0283:7180:71
65%
63%
u
d
io2 AB...
hijklmn
Time and
date
22
Page 23

Multi audio
You can select your preferred Audio mode and
DVB (digital TV) subtitle Language.
The Multi audio menu will display the Audio mode
and Language options available with the current
broadcast.
Press AUDIO to display the Multi audio menu.
1
The Audio mode and Language code will be
displayed if available.
To select Audio mode, press or . In general
2
the below audio modes will be supported in a
service.
Stereo, Left, Right and L + R. Then press
ENTER.
To select a Language code, press or to
select code within Language code list.
Press EXIT. Your selected audio preferences
3
will be saved.
Note:
Dolby Digital audio can be selected for some language
•
options. There is no sound output from the main unit’s
speakers when Dolby Digital audio is selected. You
can only hear Dolby Digital audio through the amplifi er
equipped with a Dolby Digital decorder.
Dolby is a trademark of Dolby Laboratories.
•
Multi audio
Audio mode
No. Language Code
001 ENG
002 ENG (Dolby Digital)
Multi audio
Audio mode
No. Language Code
001 ENG
002 ENG (Dolby Digital)
Stereo
L+R
DVB-Subtitle
DVB-Subtitle is a feature supported in DVB
(Digital Video Broadcasting) applications in which
the service shown can be accompanied by a
text display on the screen in parallel with the
corresponding audio service. The DVB-Subtitle
feature can be enabled or disabled at anytime.
Press DIGITAL MENU. Press / or / to
1
select “Subtitle”, then press ENTER.
Press or to select your desired subtitle
2
language from the available languages.
To turn off the DVB-Subtitle, press or
3
repeatedly until ‘Off’ appears in the Subtitle
menu.
Press EXIT. Your selected subtitle language
will be saved.
Note:
DVB-Subtitle can also be changed by pressing of
•
repeatedly.
Subtitle
egaugnaL
Navigate
English
Enter Exit
EPG (Electronic Program Guide)
The Guide menu shows the available
programme listings for the next 8 days only,
including today. However, the guide menu
will show ‘No Event Name’ for programmes
which are more than 8 days ahead, or for
programmes within the 8 days when no
programme information is available.
Press GUIDE (EPG) to display the Guide
1
menu.
Guide 16:50 Sun 20/08/200 9 TV
Service list
671_MNO_10Step_0820_0100_0120_Audio2_0100_0120.. .
MNO
PQS
STU
TCM
VWXYZ
SAT.1
ARTE
DEF
01:00Channels
671_M...
671_M...
672_PQR_SMPTE_col...
673_STU_SDTV.. . 673_STU_SDTV Moving...
No Event Name
679_VWXYZ_Monosoo_0100_0300...
No Event Name
No Event Name
No Event Name
Page - Page + Prev.Day Next Day
Enter Exit Guide
Navigate
Highlighted programme
View Info
Service list :
Lists all the services that are currently
available.
As you scroll through the service list by
pressing or , the Event list will be
refreshed accordingly, and you will see the
programme information for the currently
highlighted programme.
To scroll through the service list page by page,
press Red or Green Key.
Events list :
List the events in a grid of rows and columns.
Each row shows the list of events that are
available, for the corresponding service in the
service list. Within each row, you can press
or to navigate through the rest of the events.
You can easily move to the Previous day or
Next day in the Events List by pressing Yellow
or Blue key (the date of the programme
information you are currently viewing is shown
in the top right hand corner).
The full Event name along with the duration of
the event will be displayed in the bar above.
From within the Guide menu, you can open
2
the Description menu for the currently
highlighted programme by pressing
The Guide/Description menu shows the
extended event description of an event.
You can scroll and view the complete event
description of the event using
To return to the Guide menu, press
To clear the menu screen, press EXIT.
9002/80/02nuS671 MNO
02:0001:30
671_MNO_10step
672_PQR_SMPTE_col...
TV/Radio
.
or .
.
Events
list
23
Page 24

EPG Timer
2
You can choose whether or not the screen
switches on when the timer event begins
- please see page 17 (Rec screen status (LCD
Power on/off)). This is so that if you are using
the timer to make a recording to your VCR or
other device, the TV screen will not switch on
unless you want it to.
If you try to switch to another channel while
a timer event is in progress, the following
message will appear: ‘WARNING: CHANGING
THE CHANNEL WILL INTERRUPT YOUR
EVENT TIMER. ARE YOU SURE YOU WANT
TO PROCEED? YES/NO’. Select Yes or No
according to your wishes.
Press GUIDE (EPG) to display the Guide
1
menu. Then press /
programme you want to set as a timer event,
then press ENTER.
Guide 16:50 Sun 20/08/2009 TV
671_MNO_10Step_0820_0100_0120_Audio2_0100_0120...
MNO
PQS
STU
TCM
VWXYZ
SAT.1
ARTE
DEF
Note:
If you select an event which has already started, the
•
selected program will be displayed on the screen, as
you cannot set the timer for a programme which has
already started.
To display the stored timer events, press GUIDE
•
(EPG) twice. The EPG Timer menu (see step
3 below) will appear. You can also delete or
change the frequency (Once / Daily / Weekly) of
the stored timer events (but please note that you
cannot edit the time details that have been set
from the EPG).
The confi rmation banner will be displayed.
2
Press
or to select ‘Yes’ or ‘No’, then press
ENTER (the selected option is shown in blue).
The EPG Timer menu will appear.
3
Press the Red key to set the Timer mode for a
selected event.
Event Timer
Service Name Mode Date Time Duration
BBC ONE Once 26/02/09 08:10 00:23
/ / to highlight the
01:00Channels
671_M...
672_PQR_SMPTE_col...
673_STU_SDTV... 673_STU_SDTV Moving...
No Event Name
679_VWXYZ_Monosoo_0100_0300...
No Event Name
No Event Name
No Event Name
Page - Page + Prev.Day Next Day
Enter Exit Guide
Navigate
View Info
671_M...
02:0001:30
671_MNO_10step
672_PQR_SMPTE_col...
9002/80/02nuS671 MNO
TV/Radio
The Timer mode specifi es the frequency of
4
Timer wake-up which can be set as Once,
Daily or Weekly.
Press ENTER to save the selected Timer
mode.
Event Timer
Service Name Mode Date
BBC ONE Once 26/0
Once
Daily
Weekly
Note:
To delete a timer event, select the specifi ed event,
then press the Green key.
To return to the Guide menu, press DIGITAL
5
MENU.
To clear the menu screen, press EXIT.
Note:
When the EPG Timer starts, the message “Event Timer
•
Started” will appear.
A maximum of eight Timers can be programmed.
•
If the EPG Timer starts when it is already switched on, it
•
will start at the exact time that is set. If it starts from the
standby mode, it will begin 20 seconds in advance of
the stated time.
You cannot hasten the start time from the original start
•
time of the Event.
You cannot set with the same date and time of another
•
Event.
Press the Yellow key to change the start time of the
•
event.
Press the Blue key to change the time duration of the
•
event.
If the EPG Timer begins during standby mode, the
•
(On/timer/Standby) indicator on the unit will be lit in
orange. This is to indicate that an EPG Timer event
has begun in standby mode.
When in power-off-condition, EPG Timer cannot be
•
activated.
Using the Digital Service
Some services bring you programmes with
the Digital Service, letting you experience DTV
interactively.
When provided, the Digital Service will start when
you press
.
24
Navigate
Delete Timer
Enter Exit
Timer mode
Edit Timer Edit Duration
BASKETBALL GAME 2009
FULL SCREEN BACK HELP MENU
News
Latest headlines from
Germany
Angola 0-1 Portugal
Serb&M 0-1 N’lands
Mexico 3-1 Iran
England water plea
Ballack set to return
World Football Interactive
TEXT to quit Use UP/DOWN and SELECT
Page 25

Disc
DVD discs must be Region 2 or Region ALL type to play on this unit.
The loaded Disc (DVD and Audio-CD) will be recognized automatically.
The suitable disc formats are: DVD-Video, DVD-R/-RW (Video format only), Audio CD, CD-R/CD-RW,
Video CD and SVCD.
Some CD-R/RW discs may be incompatible.
This unit can play an 8cm disc. Please do not use a disc adapter. It may cause trouble.
•
Please do not insert any disc of an irregular shape into the unit, as it may interfere with the function of the unit.
•
You may not be able to remove it.
•
Please do not use after market accessories, such as a ring protector, as this may cause trouble with
•
the operation of the unit.
Do not play DVD-ROM, DVD-Audio, CD-G or Photo CD to prevent accidental erasure of prerecorded
material.
Title
When two or more movies are recorded on a disc, the
disc is divided into two or more sections. Each section
is called a “TITLE”.
TITLE1 TITLE2
CHAPTER 1
CHAPTER 2 CHAPTER 2 CHAPTER 3CHAPTER 1
Chapter
The titles can be subdivided into many sections.
Each section is called a “CHAPTER”.
Track
TRACK 1 TRACK 2 TRACK 3 TRACK 4 TRACK 5
An Audio CD can contain several items.
These are assigned to tracks.
Removing Disc from Case
Be sure to hold the edge of disc. Do not touch the surface of the disc.
Pick up the disc gently from the case.
Do not scratch the disc.
•
Do not get dirt on the surface of the disc.
•
Do not stick a label or adhesive tape on the disc.
•
Do not drop or bend the disc.
•
Storing Disc
Store the disc in the case to avoid risk of scratches, dirt or damage.
•
Do not leave disc exposed to direct sunlight or in hot or humid places.
•
Cleaning Disc
Wipe the disc with a clean, dry cloth from center to edge.
Do not wipe in circular direction.
•
Do not use liquid or aerosol cleaners.
•
On Video CDs
This unit supports Video CDs equipped with the PBC (Version 2.0) function.
(PBC is the abbreviation of Playback Control.) You can enjoy two playback
variations depending on types of discs.
Video CD not equipped with PBC function
•
(Version 1.1) Sound and movie can be played on this TV/DVD in the same way as an audio CD.
Video CD equipped with PBC function
•
(Version 2.0) In addition to operation of a Video CD not equipped with the PBC function, you can enjoy
playback of interactive software with search function by using the menu displayed on the TV screen
(Menu Playback). Some of the functions described in this owner’s manual may not work with some discs.
To turn off the PBC
1.
Press PLAY MODE in the Stop mode.
2.
Press
3.
/ to select “Mode”, then press ENTER repeatedly until “Off” appears.
Press PLAY MODE again to clear the screen.
To turn on the PBC
Follow the above step 1~2, then press ENTER repeatedly until “PBC” appear.
DVD DISC
Audio-CD
25
Page 26

Playing a disc
This section shows you the basics on how to
play a disc.
Basic playback (DVD/VCD/Audio CD)
Preparation
Make sure that the
unit is pushed in (ON). (The
indicator lights up.)
Press TV/DVD on the remote control to select
1
the DVD mode.
Place the disc
2
in the disc slot
with the label
side facing
forward. (If
the disc has a
label.)
Do not place a disc which is unplayable in
•
this unit.
On the TV-screen, “ ” changes to “Reading”
3
and then playback commences.
A menu screen will appear on the TV screen
•
if the disc has a menu feature.
Press
•
ENTER.
Title is selected and play commences.
Press to end playback.
4
•
The unit records the stopped point,
depending on the disc. “
screen. Press
(from the scene point).
•
If you press again (“ ” appears on the
screen.), the unit will clear the stopped
point.
To start playback in the stop mode
Press PLAY (
Note:
•
If the unit does not operate property:
Static electricity, etc., may affect the player’s
operation.
Disconnect the AC power cord once, then
connect it again.
If a disc is inserted during some modes other
•
than DVD mode, it may switch to DVD mode and
then playback may be begun automatically.
To pause playback (still mode)
Press
during playback.
To resume normal playback, press PLAY (
The sound is muted during still mode.
•
(POWER) switch on the
(On/Timer/Standby)
/// to select title, then press
Reading
” appears on the
PLAY
( ) to resume playback
).
).
To stop playback
Press .
To remove the disc
.
Press
Remove the disc after the disc comes out.
Note:
If a non-compatible disc is loaded, “Incorrect Disc”,
•
“Region Code Error” or “Parental Error” will appear on
the TV screen according to the type of loaded disc.
In this case, check your disc again (see pages 25 and
36).
Some discs may take a minute or so to start playback.
•
When you set a single-faced disc label backwards
•
(i.e. the wrong way), “Reading” will appear on the
display for a few minutes and then “Incorrect Disc” will
continue to be displayed.
Some discs may not work the resuming facility.
•
Resuming cannot function when you play a PBC-
•
featured Video CD while the PBC is on. To turn off the
PBC, see page 25.
Some playback operations of DVDs may be
•
intentionally fi xed by software producers. Since this
unit plays DVDs according to the disc contents the
software producers designed, some playback features
may not be available. Also refer to the instructions
supplied with the DVDs.
Do not move the unit during playback. Doing so may
•
damage the disc.
In many instances, a menu screen will appear after
•
playback of a movie is completed. Prolonged display
of an on-screen menu may damage your television
set, permanently etching that image onto its screen.
To avoid this, be sure to press POWER (
remote control once the movie is completed.
There may be a slight delay between the button is
•
pressed and the function activates.
) on your
Playing in fast reverse or fast forward
directions (DVD/VCD/Audio CD)
Press
or during playback.
: Fast reverse playback
: Fast forward playback
Each time you press
or , the playback
speed changes.
To stop playback
Press .
Note:
The unit mutes sound during reverse and forward scan
•
of DVD/VCD discs.
The playback speed may differ depending on the disc.
•
Playing frame by frame (DVD/VCD)
Press
during still playback.
Each time you press
, the picture advances one
frame.
To resume normal playback
Press PLAY (
Note:
The sound is muted during frame by frame playback.•
).
26
Page 27

Playing in slow-motion (DVD/VCD)
Press
or during playback.
Each time you press
speed changes.
To resume normal playback
Press PLAY (
Note:
The sound is muted during slow-motion playback.
•
Reverse slow (
•
Locating a chapter or track (DVD/VCD/Audio
CD)
Press
or track number you want.
Press
chapter or track.
Press
Playback starts from the beginning of the current
chapter or track.
Note:
•
or repeatedly to display the chapter
to playback starts from the selected
to locate succeeding chapters or tracks.
A prohibition symbol “
right of the screen. This symbol means either the
feature you tried is not available on the disc, or the
unit cannot access the feature at this time. This does
not indicate a problem with the unit.
or , the slow-motion
).
) does not work on VCD.
” may appear at the upper
Zooming (DVD/VCD)
This unit will allow you to zoom in on the frame
image. You can then make selections by switching
the position of the frame.
Press ZOOM
1
during playback.
The centre part of the image will be zoomed in.
Each press of ZOOM will change the ZOOM
1(x 1.3), 2 (x 1.5) and 3 (x 2.0).
Press / / / to view a different part of the
2
frame.
You may move the frame from the centre
position to UP, DOWN, LEFT or RIGHT direction.
In the zoom mode, press ZOOM repeatedly to
3
return to a 1:1 view (
Note:
You can select the Pause or Slow in the zoom
•
mode.
Some discs may not respond to zoom feature.
•
Off).
1
Locating desired scene (DVD/VCD/
Audio CD)
Use the title, chapter and time recorded on the
DVD disc to locate the desired point to playback.
In the case of VCD/Audio CD discs, time and track
are used to locate the desired point to playback.
To check the title, chapter/track and time, press
Press JUMP
1
during playback
or resume stop
mode.
Title
Chapter
Time
Jump
Press or to select the “Title/Track”,
2
“Chapter” or “Time”.
Press Number buttons (0–9) to input the
3
number.
If you input a wrong number, press CANCEL.
•
Refer to the package supplied with the disc
•
to check the numbers.
Press ENTER. Playback starts.
4
When you change the title, playback starts
•
from Chapter 1 of the selected title.
•
Some discs may not work in the above
operation.
Note:
In case of the Audio CD and Video-CD, only Track
•
and Time can be selected.
In case of the Video-CD playback with PBC, the
•
JUMP does not work. Turn off the PBC (see page
26).
Marking desired scenes
Marking the scenes (DVD/VCD/Audio CD)
The unit stores the points that you want to watch
again up to 3 points. You can resume playback
from each scene.
Press MARKER
1
during playback.
Select the blank Marker using or .
2
Then press ENTER at the desired scene.
Repeat this procedure to set the other 2
•
scenes.
Press MARKER to clear this display.
3
Returning to the scenes (DVD/VCD/Audio CD)
Press MARKER
1
during playback
or stop mode.
Press ϳ or ϴ to select the Marker 1-3.
2
Press ENTER.
3
Playback starts from the marked scene.
To cancel the Marker
Follow the above steps 1~2, then press
CANCEL.
Note:
Some discs may not work with the marking operation.
•
The marking is cancelled when you eject the disc or
•
turn the power off.
Some subtitles recorded around the marker may fail
•
to appear.
.
In case of Video CD with PBC, Marker function is
•
prohibited.
Marker function does not work with MP3/JPEG CD.
•
Marker 1
Marker 2
Marker 3
Marker 1
Marker 2
Marker 3
01
02
2700 54
160825
31
27
Page 28

Repeat playback (DVD/VCD)
Press PLAY MODE during playback or stop
1
mode.
Press ENTER
2
repeatedly to
select “Chapter”
or “Title”.
The unit automatically starts repeat playback
after fi nishing the current title or chapter.
[Video CD]
Press to select “Repeat”.
Press ENTER to select “Track” or “All”.
If you set the repeat mode during stop
•
mode, press PLAY (
playback.
Press PLAY MODE again to clear the screen.
3
To resume normal playback
Select Repeat : “Off” in step 2.
Note:
•
Some discs may not work with the repeat
operation.
•
In case of Video CD with PBC, Repeat functions
are prohibited during playback.
•
Chapter/Track repeat function is cancelled
whenever SKIP (
Play Mode
Repeat : Off
) to start Repeat
) or SKIP ( ) is pressed.
A-B Repeat playback (DVD/VCD/
Audio CD)
A-B repeat playback allows you to repeat selection
between two selected points.
Press REPEAT A-
1
B during playback.
The start point is
selected.
Press REPEAT
2
A-B again.
The end point is selected. Playback starts
at the point that you selected. Playback
stops at the end point and returns to Point A
automatically, then starts again.
To resume normal playback
Press REPEAT A-B again.
Off
“
” appears on the screen.
Note:
In A-B Repeat mode, subtitles near the A or B
•
locations may not be displayed.
You may not be able to set A-B Repeat for the
•
scenes that include multiple angles.
A-B Repeat playback does not work when Repeat
•
playback is activated.
You may not be able to set A-B Repeat during
•
certain scenes of the DVD.
A
AB
Changing angles (DVD)
When playing back a disc recorded with multiangle facility, you can change the angle that you
are viewing the scene from.
Press ANGLE
1
during playback.
The current angle
will appear.
Press ANGLE repeatedly until the desired
2
angle is selected.
Note:
Depending on the DVD, you may not be
•
able to change the angles even if multiangles are recorded on the DVD.
1/2
Title selection (DVD)
Two or more titles are recorded on some discs.
If the title menu is recorded on the disc, you can
select the desired title.
Press TOP MENU during playback.
1
Title menu appears on the screen.
Press / / / to select the desired title.
2
Press ENTER or PLAY ( ).
3
The playback of the selected title will start.
Note:
Some DVDs allow you to select the disc contents
•
using the menu.
When you playback these DVDs, you can select
the subtitle language and soundtrack language,
etc. using the menu.
DVD menu (DVD)
Two or more titles are recorded on some discs.
If the title menu is recorded on the disc, you can
select the desired title.
Press DVD MENU during playback.
1
The DVD menu appears on the screen.
Press DVD MENU again to resume
•
playback at the scene when you pressed
DVD MENU.
Press / / / to select the desired item.
2
Press ENTER.
3
The menu continues to another screen.
Repeat steps 2 and 3 to set the item
completely.
Note:
Depending on the DVD, you may not be able to
•
resume playback from the scene point when you
press DVD MENU.
28
Page 29

Changing Soundtrack Language
(DVD/VCD)
You can select the language when you play a
multilingual disc.
Press AUDIO during
1
playback.
1/2 Eng Dolby Digital
The current soundtrack
language will appear.
Press AUDIO
2
repeatedly until the
2/2 Fre Dolby Digital
desired language is
selected.
The on screen display will disappear after a
•
few seconds.
In case of Video CD playback
Audio type changes as follows each time you
press AUDIO.
LR L
R
Subtitles (DVD)
When playing back a disc recorded with subtitles,
you can select the subtitle language or turn the
subtitle off.
Press repeatedly
1
during playback until
the desired language is
selected.
To turn off the subtitle,
2
press
until “Off”
appears.
The on screen display will disappear after a
•
few seconds.
1/5 Eng
Off
Disc status
With press of , the status of the disc will appear
on the screen. To cancel the display, press
[Video CD]
DISC
OPERATION
VCD 00:08:32 00:51:03
Track 3/15
TRACK NO.
ELAPSED
TIME
TOTAL
TIME
[DVD]
DISC
OPERATION
TITLE NO.
ANGLE NO.
Note:
•
If the desired language is not heard after pressing the
button several times, the language is not recorded on
the disc.
•
The selected soundtrack language is cancelled when
you eject the disc. The initial default language or
available language will be heard if the disc is played
back again.
•
Depending on the DVD, you may not be able to
change subtitles, or to turn subtitles on or off.
•
While playing a DVD, the subtitle may change when
you loaded or eject the disc.
In some cases, a selected subtitle language may not
•
be changed immediately.
DVD 00:15:25 01:41:39
Title 1/3 Chapter 2/24
1/1 Eng Dolby Digital 1/2 Eng
1/1
AUDIO LANGUAGE A KIND OF AUDIO
ELAPSED
TIME
TOTAL
TIME
SUBTITLE LANGUAGE
again.
CHAPTER NO.
29
Page 30

MP3/WMA/JPEG and Audio CD
operation
This unit can playback the MP3/WMA/JPEG-data
which has been recorded on CD-R/RW. Audio CD
also can be played back. To produce the MP3/WMA
JPEG-data, you need a Windows-PC with CD-RW
drive and a MP3/WMA/JPEG-encoding Software (not
supplied). The Apple-HFS-System cannot be played.
This unit requires discs/recordings to meet certain
technical standards in order to achieve optimal
playback quality.
There are many different types of recordable disc
formats (including CD-R containing MP3/WMA
fi les). Not all recordable discs will produce optimal
playback quality. The technical criteria set forth in
this instruction manual are meant only as a guide.
Use of CD-RW for MP3 fi les is not recommended.
MP3/WMA/JPEG - data information
Limitations on MP3/WMA/JPEG playback
•
MP3/WMA/JPEG CD are standardized by
ISO9660, its fi le name must include following
extensions; “.mp3”, “.wma”, “.jpg”.
•
MP3/WMA/JPEG CD must be corresponded to
the ISO standardized fi les.
•
This unit can read 2000 fi les per disc. If one disc
has more than 2000 fi les, it reads up to 2000
fi les, the remaining fi les will be omitted.
•
MP3/WMA/JPEG CDs cannot be used for the
purpose of recording on this unit.
•
It may take more than one minute for this unit
to read MP3/WMA/JPEG fi les depending on its
structure.
•
Music recorded by “Joliet Recording
Specifi cation” can be played back.
•
The music fi les recorded by “Hierarchical File
System” (HFS) cannot be played.
Limitations on displaying of the fi le name.
•
The maximum number for display is 15
characters. Long fi le names will be condensed.
•
Available characters for display are the
following:
capital or small alphabets of A through Z,
numbers of 0 through 9, and _ (under score).
•
Other characters than those above are replaced
in hyphen.
To playback MP3/WMA/JPEG CD in the
recorded order.
Use MP3/WMA/JPEG software that records
1.
data alphabetically or numerically.
Insert two or three digit number in the head of
2.
fi le name. (ex. “01” “02” or “001” “002”).
3.
Refrain from making too many sub-folders.
CAUTION:
Some MP3/WMA/JPEG CDs cannot be played
•
back depending on the recording conditions.
The CD-R/RW that has no music data or non
•
MP3/WMA/JPEG fi les cannot be played back.
Standard sampling frequency and the bit rate:
MP3
MPEG-1 Audio
32kHz, 44.1kHz, 48kHz
32kbps ~ 320kbps (constant bit rate or variable
bit rate)
The recommend recording setting for a highquality sound is 44.1kHz of sampling frequency
and 128kbps of constant bit rate.
WMA
WMA version 7 and 8
32kHz/48kbps, 44.1kHz/48kbps~192kbps,
48kHz/128kbps~192kbps
The fi le recorded by mono, 48kHz, 48 kbps is
not available to this unit.
Loading CD
Load a MP3/WMA/JPEG CD or an Audio CD
1
into the disc slot.
Afi le browser screen will appear on the
2
screen.
•
In case the current directory includes 9 fi les
or more, press or to scroll in the fi le list.
•
To see contents in folder, select the folder
and then press ENTER. To return to the
parent directory, select “
press ENTER.
•
In case of a CD containing a mixture of
MP3, WMA and fi les, the fi les are played
back by selecting them from the fi le
browser.
Operation status
File list
/MP3-5.MP3
MP3-5
MP3-6
WMA-11
WMA-12
Picture-1
Picture-2
Picture-3
Picture-4
File number
1/15 00:00:00
Elapsed time
Repeat :Off
Mode :Off
Music Playing
Preview windowCursor
Selected file name
Select Files
Go Up ...” then
Tool kit
window
File type
: Indicates Music file
(Audio CD/MP3/WMA)
: Indicates Picture file
(JPEG)
30
Page 31

MP3/WMA and Audio CD playback
In the fi le browser, press / to select the
1
desired fi le.
When PLAY (
is pressed after
displaying fi le
browser displayed,
playback begins
automatically starting
from the fi rst fi le. In
this case, if the
fi rst fi le is an MP3/WMA fi le, only MP3/WMA
fi les are played back in order.
If the fi rst fi le is a JPEG fi le, the fi rst JPEG
fi le is played back. If there is no fi le at a
root directory, playback does not begin
automatically.
Press ENTER.
2
The selected fi le starts playing back.
Press to end playback.
3
The selected fi le starts playing back.
•
The unit records the stopped point. “
appears on the screen. Press PLAY (
resume playback (from the scene point).
•
If you press
unit will clear the stopped point.
Select Files
The fi le type to make it display in the fi le browser
can be chosen.
Press
1.
•
1.
2.
Note:
•
•
or to select “Select Files” at right
column in the fi le browser.
Press ENTER, then press or to select fi le
type from the list (Music or Picture).
Press ENTER to add/remove check mark.
Checked fi le type will be displayed in the fi le
browser.
Press RETURN to save the setting.
During MP3/WMA/JPEG-Playback, you cannot use
JUMP and A-B Repeat functions.
You can use Repeat (Track or All), Random functions
and Program playback for MP3/WMA/JPEG-Playback
(See page 32)
)
/MP3-2.MP3
Folder-1
Folder-2
MP3-1
MP3-2
MP3-3
WMA-1
WMA-2
WMA-3
Select Files
Repeat :Off
Mode :Off
JPEG Preview
”
) to
again or unload the disc, the
JPEG playback
In the fi le browser, press / to select the
1
desired JPEG fi le.
To display a thumbnail list, press DVD MENU.
Press
/ / / to select the desired fi le.
(To return to the fi le browser, press TOP
MENU.)
When PLAY (
is pressed after
displaying the fi le
browser, playback
begins automatically
starting from the fi rst
fi le. In this case, if the
)
/Picture-01.JPG
Picture-01
Picture-02
Picture-03
Picture-04
Picture-05
Picture-06
Picture-07
Picture-08
Select Files
Repeat :Off
Mode :Off
JPEG Preview
W: 2048 H: 1536
fi rst fi le is a JPEG fi le, the fi rst JPEG fi le is
played back.
If the fi rst fi le is an MP3/WMA fi le, only MP3/
WMA fi les are played back in order. If there is
no fi le at a root directory, playback does not
begin automatically.
Press ENTER. The selected picture appears
2
on the screen.
Rotating an image
You can rotate an image by 90 degrees.
Press ANGLE during playback of the image.
“
”, “ ”, “ ” or “ ” appears on
the screen.
Zooming an image
Zoom function also can be used in viewing
JPEG fi les. Press ZOOM (See “Zooming” on
page 27).
Press to end playback.
3
The fi le browser appears on the screen. If you
want to watch the other fi le, repeat steps 1 ~ 2.
Slide show playback
The slide show enables you to view pictures (fi les)
one after another automatically.
Preparation
Set “JPEG Interval” setting to “Off”, “5 Seconds”,
“10 Seconds” or “15 Seconds” (See page 35).
Select your desired starting fi le for the slide
1
show in step 1 above.
Press ENTER or PLAY ( ) to start slide show
2
from the selected fi le.
If you press
•
slide show stops temporary. “
briefl y on the screen.
•
If the picture appears upside down or
sideways, press ANGLE repeatedly until it’s
right side up. “
“
•
Press PLAY (
resume the slide show.
•
When the slide show playback fi nished, the
fi le list appears.
•
To stop the slide show, press
appears.
Note:
•
During JPEG playback, you cannot use Jump
and A-B Repeat functions.
•
When an image exceeds 5760 x 3840 pixels, the
entire image (preview window or thumbnail list)
may not be displayed on a screen.
•
It may have a longer interval due to the size of
data.
during the slide show, the
” appears
”, “ ”,
” or “ ” appears on the screen.
) or SKIP ( ) again to
. The fi le list
31
Page 32

Repeat playback (Audio CD/MP3/
WMA/JPEG)
In the fi le browser,
1
press
/// to select
“Repeat” during stop
mode.
Press ENTER repeatedly to select “Track” or
2
“All”.
Press PLAY ( ).
3
The unit automatically starts repeat playback
Folder-1
Folder-2
MP3-1
after fi nishing the current track.
To resume normal playback
Select Repeat : “Off” in step 2.
Note:
The repeat or random function is cancelled when you
•
eject the disc or turn the power off.
The track repeat function is cancelled when
•
is pressed.
•
In case of Audio CD, the function of A-B Repeat also
can be used. See “A-B Repeat playback” (See page 28).
Random playback (Audio CD/MP3/
WMA/JPEG)
In the fi le browser, press /// to select
1
“Mode” during stop mode.
Press ENTER to select “Random”.
2
Press PLAY ( ).
3
The Random playback will start.
To resume normal playback
Select Mode : “Off” in step 2.
Program playback (Audio CD/MP3/
WMA/JPEG)
In the fi le browser,
1
press
/ / / to select
“Edit Mode”, then
press ENTER.
When “Edit Mode” is black color, you can
mark the fi les which you want to add into
Program list.
Press /// to select the fi le you want to
2
add into the program list.
Press ENTER. Selected fi le was marked.
Repeat this procedure to select the other fi les.
Press / // to select “Add To Program”.
3
Then press ENTER. All marked fi les are added
into the program list.
When you fi nish storing the fi les you want into
the Program list, select “Edit Mode” again and
press ENTER to release edit mode.
Press / to select “Program View”, then
4
press ENTER. Program View shows only the
programed fi les that you have added in Step 2
32
and 3.
Folder-1
Folder-2
MP3-1
Select Files
Repeat :Off
Mode :Off
Repeat :Off
Mode :Off
Edit Mode
or
Browser View Program View
Folder-1
Folder-2
MP3-1
MP3-2
In the Program View, press PLAY ( ). The
5
fi les start to playback in programmed order
Edit Mode
ProgramView
AddTo Program
Folder-1
MP3-1
MP3-2
WMA-1
Edit Mode
Browser View
Clear Program
that were added by you.
To remove fi le from program list in stop mode
In the Edit Mode, switch to Program View. Select
the fi les you want to remove, then press ENTER.
Select “Clear Program” and press ENTER. Marked
fi le is removed from program list.
Note:
The program function is canceled when you eject the
•
disc or turn the power off.
Program playback
You can arrange the playback order of tracks
or fi les on the disc. And the unit can also select
tracks or fi les at random and playback them.
These feature works for Video CD.
For Audio CD and MP3/WMA/JPEG CD, please
see “Random playback (Audio CD/MP3/WMA/
JPEG)” and “Program playback (Audio CD/
MP3/WMA/JPEG)”.
Press PLAY MODE
1
during stop mode.
Press / to select
2
“Mode”, then press
ENTER to select
“Program”.
Press / to select the
3
programming position.
Use Number buttons
(0–9) to input the
track numbers on sequentially.
If you input a wrong number, press CANCEL.
•
Press / to return to the left column, then
4
press
/ to select the “Program Playback”
and press ENTER.
The programs you selected will start to
playback in order.
To resume normal playback, select Mode
•
“Off” in step 2.
To change the program
1.
Select Mode to “Program” (as step 2),
press
/ / / to select the track number
you want to change, then press CANCEL.
2.
Press Number buttons (0–9) to overwrite
the new track number.
To clear the program one by one
Select Mode to “Program”, press / /
select the track number. Then press CANCEL.
To clear all the programs
In the above column, press / to select
“Clear Program”. Then press ENTER.
Play Mode
Mode : Off
Repeat : Off
Program Playback
Play Mode
Mode : Program
Repeat : Off
Program Playback
Play Mode
Mode : Program
Repeat : Off
Program Playback
1 – – –
2 – – –
3 – – –
1 – – –
2 – – –
3 – – –
1 9
2 – – –
3 – – –
/ to
Page 33

Random playback (VCD)
Press PLAY MODE during playback or stop
1
mode.
Press / to select “Mode”, then press
2
ENTER to select “Random”.
Press PLAY ( ).
3
The Random Playback will start.
If you set “Random” during playback mode,
•
Random playback will begin after the track
that is currently being played has ended.
To resume normal playback, select Mode
•
“Off” in step 2.
Note:
In case of Video CD with PBC, you cannot set
•
Program playback.
The program is cancelled when you eject the disc or
•
turn the power off.
In case of Video CD with PBC, you cannot set
•
Random function during playback.
Customizing The Function Settings
You can change the default settings to
customize performance to your preference.
Setting procedure
Press SETUP in stop
1
mode.
The following on-screen
display appears.
Parental : Off
DRC : Off
E.B.L. : Off
Menu : English
Set Password
QSound : On
TV Screen : 4:3
Subtitle : English
Output : Interlace
Display : On
Audio : English
DivX(R) VOD
Picture Mode : Auto
OSD : English
JPEG Interval : 5 Seconds
Screen Saver : On
Setting details
Section Option Details
Menu
Subtitle
Audio
OSD To select a preferred
TV
Screen
Display To turn On or Off the
Picture
Mode
JPEG
Interval
Night
Mode
Digital
Out
Parental To select a preferred
To select the language of
“Menu”, “Subtitle” and
“Audio” if more than one
languages are available
on the disc.
language for on screen
display.
To select a picture size
according to the aspect
ratio of your TV.
operational status
display on the screen.
To select a preferred
picture mode from
“Video”, “Film” or “Auto”.
To select a preferred
setting for the slide show
playback.
To select On or Off for
Night Mode.
To select a digital
output sound format
corresponding to your
system connection.
parental level for the
parental setting.
Password To change the password.
Page
34
35
36
Press or to select
2
the desired section, then
press or ENTER.
First option will be
3
highlighted.
Press
or to select the
desired option.
Then press or ENTER.
4
The selectable settings
will appear.
Change the selection using or , by referring
5
to the corresponding pages 34 ~ 36.
Parental : Off
DRC : Off
Menu : English
TV Screen : 16:9
Set Password
QSound : On
Subtitle : English
Display : On
Output : Interlace
Audio : English
Picture Mode : Auto
DivX(R) VOD
JPEG Interval : Off
Parental : Off
DRC : Off
Menu : English
TV Screen : 16:9
Set Password
QSound : On
Subtitle : English
Display : On
Output : Interlace
Audio : English
Picture Mode : Auto
DivX(R) VOD
JPEG Interval : Off
TV Screen 4:3
TV Screen 4:3
Display : On
Picture Mode : Aut
JPEG Interval : Off
Press ENTER to save the setting.
Repeat steps 3 - 5 to change other option.
•
To select another section, go back to step 2
•
by pressing or RETURN repeatedly.
To clear SETUP screen, press SETUP or press
6
RETURN repeatedly.
4:3
16:9
33
Page 34

Customizing The Function Settings
Menu, Subtitle, Audio
You can select the language of “Menu”, “Subtitle” and “Audio” if more
than one language is recorded onto the disc.
English, Deutsch, ȥɜɚɚɓɑɒ, Italiano, Espanol:
The selected language will be heard or seen.
Parental : Off
DRC : Off
E.B.L. : Off
Menu : English
Set Password
Subtitle : English
QSound : On
TV Screen : 4:3
Output : Interlace
Display : On
Audio : English
DivX(R) VOD
OSD : English
Picture Mode : Auto
JPEG Interval : 5 Seconds
Screen Saver : On
Other:
Other languages can be selected (see “Language code list” on page 38).
Off (Subtitle):
Subtitles do not appear.
Original (Audio):
The unit will select the fi rst priority language of each disc.
Note:
If the selected language is not recorded on the disc, the fi rst- priority
•
language is selected.
OSD
The setup language can be selected.
English: To display OSD language is English
Deutsch: To display OSD language is German
ȥɜɚɚɓɑɒ: To display OSD language is Russian
Italiano: To display OSD language is Italian
Espanol: To display OSD language is Spanish
TV Screen
You have the following screen sizes to choose from:
4:3
(Letterbox)
When playing back a wide screen-DVD disc, it displays the wide picture
with black bands at the top and bottom of screen.
Parental : Off
DRC : Off
TV Screen : 16:9
Set Password
QSound : On
Display : On
Output : Interlace
Picture Mode : Auto
DivX(R) VOD
JPEG Interval : Off
4:3
(Panscan)
It displays the wide picture on the whole screen with left and right edges
automatically cut off.
16:9
(Wide screen)
A wide screen picture is displayed full size, although the image on the
screen may be geometrically distorted in this mode because the TV
screen has an aspect ratio of 4:3 not 16:9.
Note:
If the DVD disc is not formatted in the pan & scan style, it displays 4:3
•
style.
34
Display
On screen display can be switched on or off when you press any
buttons.
Off: On screen displays do not appear when you press any buttons
except
On: On screen displays appear when you press the buttons (factory
setting).
, PLAY MODE, MARKER, , AUDIO and JUMP.
Page 35

Customizing The Function Settings
Picture Mode
There are two types of source content in pictures recorded in DVD
video discs: fi lm content (pictures recorded from fi lms at 24 frames per
second) and video content (video signals recorded at 30 frames per
second). Make this selection according to the type of content being
viewed.
Auto: Select this selection normally.
The DVD player automatically detects source content, fi lm
or video of playback source, and converts that signal in an
appropriate method.
Film: The DVD player converts fi lm content pictures appropriately.
Suitable for playback of fi lm content pictures.
Video: The DVD player fi lters video signal, and converts it appropriately.
Suitable for playback of video content pictures.
Note:
Depending on the disc, pictures may be cut off or doubled. In this
•
case, select “Video”.
JPEG Interval
You can continuously playback all JPEG fi les automatically.
After the selection below, the disc will start playback on JPEG fi les
which have been recorded.
Off: Plays back one fi le at a time.
5 Seconds: Plays back images in the form of a slide show at 5 second
10 Seconds: Plays back images in the form of a slide show at 10
15 Seconds: Plays back images in the form of a slide show in 15
intervals.
second intervals.
second intervals.
Parental : Off
Menu : English
E.B.L. : Off
Night Mode : Off
Set Password
Subtitle : English
TV Screen : 4:3
Digital Out : PCM
Output : Interlace
Audio : English
Display : On
DivX(R) VOD
Picture Mode : Auto
JPEG Interval : 5 Seconds
Screen Saver : On
Night Mode
Night Mode enables you to control the dynamic range so as to achieve a
suitable sound for your equipment.
Off: It plays back at the recording level on the disc.
On: Loud sound such as explosion is toned down slightly when played
back. This is suitable when it is connected to a stereo.
Note:
This function works only when the disc recorded with Dolby Digital is
•
played back.
The level of Night Mode may differ depending on DVD video disc.
•
Digital Out
You can select the digital output sound format corresponding to your
system connection.
Off: There is no sound output from DIGITAL AUDIO OUT jack.
PCM: Change Dolby Digital to PCM for the output.
Select when connected to a 2 channel digital stereo
Bitstream: Disc audio bitstream data will be output.
Note:
Even if you select “Bitstream”, MPEG Audio will be output in PCM
•
format.
amplifi er.
35
Page 36

Customizing The Function Settings
Parental
Some discs are specifi ed as not suitable for children. Such discs can be
limited not to playback with the unit.
1) Press
or to select “Parental”, then press ENTER. “Enter
Password” screen will appear.
2) Press “0000” using Number buttons (0–9). (Please note, this is pre-
DRC : Off
E.B.L. : Off
Menu : English
Parental : Off
QSound : On
TV Screen : 4:3
Subtitle : English
Password : Change
Display : On
Audio : English
Picture Mode : Auto
OSD : English
JPEG Interval : 5 Seconds
Screen Saver : On
setting password of this unit). Then press ENTER. The parental level
list will appear.
Level 1: DVD software for adults cannot be played back.
Level 8: Virtually all DVD software can be played back.
Level Off: The parental control setting does not function.
3) Press
or to select from the level 1 to level 8. The limitation will be
more severe as the level number is lower. Then press ENTER.
4) Press
to activate Parental control setting.
Note:
If each setup (pages 34 ~ 36) has been completed, the unit can always
•
work under the same condition (especially with DVD discs).
Each setup will be retained in the memory even if you turn the power
off.
Depending on the discs, the unit cannot limit playback.
•
Some discs may not be encoded with specifi c rating level information
•
though its disc jacket says “adult.” For those discs, the age restriction
will not work.
The password is required every time when you change the parental
•
level.
If you input a wrong number, press CANCEL.
•
Password
1) Press or to select “Password”, then press ENTER. “Enter Current
Password” screen will appear.
2) Press Number buttons (0–9) to input the current password (If the
password has not been set yet after you purchase this unit, it is
“0000”).
3) Then press ENTER. “Enter New Password” screen will appear. Press
Number buttons (0–9) to input the new password.
4) Press ENTER. Now your new password has been set. Be sure to
remember this number!
If you forget the password.
1) Press
2) While holding 7 down on the remote control and at the same time
to remove the disc.
press STOP (DVD) on the unit. “Password Clear” appears on the
screen. Now the password has been returned to the initial value
(“0000”).
36
Page 37

Temporary cancel the rating level by
DVD disc
Depending on the DVD disc, the disc may try
to temporarily cancel the rating level that you
have set.
It is up to you to decide whether to cancel the
rating level or not.
Load a DVD
1
disc.
If the DVD disc has been designed to
2
temporarily cancel the Rating level, the screen
which follows the “Reading” screen will
change, depending on which disc is played.
If you select “YES” with the ENTER key,
password input screen will then appear.
Enter the password
3
with Number buttons
(0–9). Then press
ENTER.
To exit from the entry, press RETURN.
Playback will commence if the entered
4
password was correct.
Note:
This temporary cancellation of rating level will be
•
kept until the disc is ejected.
When the disc is ejected, the original rating level
will be set again automatically.
Enter Password
37
Page 38

Language Code List
Enter the appropriate code number for the initial settings “Menu”, “Subtitle” and/or “Audio” (see page
34).
Language Name Code Language Name Code Language Name Code Language Name Code
Abkhazian 1112 Fiji 1620 Lingala 2224 Singhalese 2919
Afar 1111 Finnish 1619 Lithuanian 2230 Slovak 2921
Afrikaans 1116 French 1628 Macedonian 2321 Slovenian 2922
Albanian 2927 Frisian 1635 Malagasy 2317 Somali 2925
Amharic 1123 Galician 1722 Malay 2329 Spanish 1529
Arabic 1128 Georgian 2111 Malayalam 2322 Sundanese 2931
Armenian 1835 German 1415 Maltese 2330 Swahili 2933
Assamese 1129 Greek 1522 Maori 2319 Swedish 2932
Aymara 1135 Greenlandic 2122 Marathi 2328 Tagalog 3022
Azerbaijani 1136 Guarani 1724 Moldavian 2325 Tajik 3017
Bashkir 1211 Gujarati 1731 Mongolian 2324 Tamil 3011
Basque 1531 Hausa 1811 Nauru 2411 Tatar 3030
Bengali; Bangla 1224 Hebrew 1933 Nepali 2415 Telugu 3015
Bhutani 1436 Hindi 1819 Norwegian 2425 Thai 3018
Bihari 1218 Hungarian 1831 Oriya 2528 Tibetan 1225
Breton 1228 Icelandic 1929 Panjabi 2611 Tigrinya 3019
Bulgarian 1217 Indonesian 1924 Pashto, Pushto 2629 Tonga 3025
Burmese 2335 Interlingua 1911 Persian 1611 Turkish 3028
Byelorussian 1215 Irish 1711 Polish 2622 Turkmen 3021
Cambodian 2123 Italian 1930 Portuguese 2630 Twi 3033
Catalan 1311 Japanese 2011 Quechua 2731 Ukrainian 3121
Chinese 3618 Javanese 2033
Corsican 1325 Kannada 2124 Romanian 2825 Uzbek 3136
Croatian 1828 Kashmiri 2129 Russian 2831 Vietnamese 3219
Czech 1329 Kazakh 2121 Samoan 2923 Volapük 3225
Danish 1411 Kirghiz 2135 Sanskrit 2911 Welsh 1335
Dutch 2422 Korean 2125 Scots Gaelic 1714 Wolof 3325
English 1524 Kurdish 2131 Serbian 2928 Xhosa 3418
Esperanto 1525 Laothian 2225 Serbo-Croatian 2918 Yiddish 2019
Estonian 1530 Latin 2211 Shona 2924 Yoruba 3525
Faroese 1625 Latvian, Lettish 2232 Sindhi 2914 Zulu 3631
Rhaeto-Romance
2823 Urdu 3128
38
Page 39

PC connection
Follow these steps: On your PC monitor choose a resolution of 1280 x 768 at 60Hz and save this
confi guration. Shut down your PC and connect the shut off LCD TV.
Use a screensaver to avoid burning-in of static picture content.
Select PC input
Switch on the LCD-TV.
Select the PC input mode (see page 11).
Note:
If no signal or a signal with a non-
•
supported resolution is connected, NO
SIGNAL is displayed
As this LCD-TV is not a PC monitor
•
correct display cannot be guaranteed for
every PC / graphics card.
Digital PC connection to HDMI-input is
•
not supported.
If by any chance the PC should create
•
a picture on the HDMI-input then there
can be no guarantees for its correct
representation. Digital PC connection
is not an assured function of this TV
appliance.
Select WXGA ‘ON’ in the menu
•
according to the following table:
Supported PC resolutions
WXGA resolution fps (Hz)
OFF 640x480 60
OFF 800x600 60
OFF 1024x768 60
ON 1280x720 60
ON 1280x768 60
ON 1360x768 60
Use a PC-VGA cable (not supplied) to connect the LCDMonitor to your PC. Make the connections carefully so as not
to break or bend the contacts inside the plug.
TV
(Back side view)
PC
to PC/HDMI
AUDIO input
Audio cable
(not supplied)
VGA cable
(not supplied)
Example: Adjust the contrast.
During PC mode press ANALOG
1
MENU.
The Menu will appear on the
screen.
Select CONTRAST, then press ENTER. Press or to
2
BRIGHTNESS 25
CONTRAST 40
HOR POSITION 0
VER POSITION
PHASE 25
CLOCK
adjust CONTRAST.
Press EXIT to return to the normal screen.
3
0
0
Description about the each setting option:
PICTURE Menu
BRIGHTNESS and CONTRAST: You can adjust
these according to your personal preferences.
HOR POSITION and VER POSITION: to adjust
the horizontal and vertical placing of the image.
PHASE and CLOCK: eliminates the horizontal
(PHASE) and vertical (CLOCK) interfering lines
(Picture width).
RED/GREEN/BLUE: infl uences the colour
balance.
BACKLIGHT: Press
or to adjust the level you
require.
WXGA INPUT: When you input an WXGA signal,
set this option to “ON”.
RESET: Press ENTER to reset BRIGHTNESS,
CONTRAST, RED, GREEN, BLUE and BACKLIGHT
to the factory preset values.
AUDIO Menu
BASS/TREBLE/BALANCE: Tone setting menu.
RESET: Press ENTER to reset BASS, TREBLE and
BALANCE to the factory preset values.
39
Page 40

Connecting an HDMI or a DVI device to the HDMI input
The HDMI input receives digital audio and uncompressed video from a HDMI equipped device or
uncompressed digital video from a DVI equipped device.
When you connect to a DVI device with a HDMI-to-DVI adapter cable, it only transfers the video signal,
so it is necessary to use separate analogue leads to transfer the audio signals.
Select the HDMI input mode (see P.11).
TV
(Back side view)
To PC/
HDMI
AUDIO
input
Selecting the HDMI audio input source
You must choose the appropriate HDMI audio input setting
for each connection, depending on whether the source is
equipped with a DVI or HDMI socket.
Select HDMI AUDIO then press
1
ENTER.
Press or to select HDMI or DVI.
HDMI cable (type A connector)
(not supplied)
To HDMI output
HDMI - to - DVI adapter cable
(HDMI type A connector) (not supplied)
To DVI
output
Audio cable
(not supplied)
HDMI device
or
DVI device
NICAM AUTO
BASS 25
TREBLE 25
BALANCE 0
HDMI AUDIO HDMI
RESET
HDMI
Note:
•
This set is classed as “HD-Ready”. This
means that it is capable of displaying HD
(High Defi nition) signals when connected
to a suitable HD source, such as an
HD receiver or DVD player that has HD
capability, via HDMI, DVI, or Component
Video connections.
•
Some devices may not operate properly
with the TV.
HDMI, the HDMI logo and HighDefi nition Multimedia Interface are
trademarks or registered trademarks
of HDMI Licensing LLC.
40
Press EXIT to return to the normal screen.
2
Note:
1080p is not supported and any device set to this resolution will
•
produce a blank screen on the set.
Follow the user’s manual that came with the HDMI-system, which
•
you try to connect to this TV.
If there is no picture available via HDMI-connection, do connect via
SCART-cable fi rst. Use the HDMI-system’s remote-control to call
the HDMI-system’s setup-menu onto the screen.
Follow the HDMI-system’s manual, to set its video-output to HDMI.
When successfully set to HDMI, select this TV’s HDMI-input, as
described in here on page 11 (Select Video Input).
Page 41

Connection to other equipment
1. Connecting to other equipment
Attention: Preparation:
• Disconnect all equipment from the AC-supply, to prevent any possible damage.
• Make the necessary connections.
• Make sure all connections are safe & secure before reconnecting your equipment the AC-supply.
Pls connect your satellite-receiver or DVD player via SCART (unless equipped with HDMI or DVI).
Make sure your SCART cable’s cross-section is at least 1 cm or more. SCART cables with less
thickness may cause visible noise.
Pls make the following settings inside your receiver’s / DVD-player’s setup-menu:
Video signal: RGB
TV-Format: 16:9
If you miss to make these settings properly, picture quality will be inferior and parts of the picture
might be missing. This is not a fault of this TV-set.
In case you need help to make this adjustment with your satellite-receiver / DVD-player, pls consult
the related instructions or contact the supplier or maker of those apparatus for support.
Pls use the satellite’s remote-control handset to select Teletext or desired TV-station. Generally it is
not possible to store satellite TV-stations into a standard TV.
If the TV does not automatically switch to AV-1, please select INPUT AV1 manually, as seen on page
11.
Satellite antenna
Satellite
receiver
2. Connecting a DVD player
TV (Back side view)
Video recorder
VCR
TV
(All illustrated SCART cables and
antenna cables are not supplied)
TV
(SCART cable, not supplied)
DVD Player
41
Page 42

Connection to other equipment
3. Connecting an audio system
You can supply the TV sound to the stereo equipment with the scart socket. Use a special scart cable for
the connection which sold at the accessory shop. (please consult your hi-fi instructions for details).
Note:
The Bass/Treble/Balance adjustments (see
•
P.17) only function with the sound from the TV
speakers - it does not affect the audio output
sockets.
4. Connection of a digital amplifier or digital A/V receivers
Note:
In earlier years Dolby Digital was known as AC-3. Nowadays only the name has changed. To enjoy
•
Dolby Digital you may still use your “old” AC-3 decoder. Also the commercially available AC-3 DVDs
can still be played with any Dolby Digital DVD player.
TV (Back side view)
Audio digital cable
(not supplied)
TV (Back side view)
(Scart-RCA cable,
not supplied)
Stereo amplifier
Audio input
A/V receiver with (AC-3)
Dolby Digital decoder
After connecting a DD decoder please select in the DVD menu the Dolby Digital (DD) sound track option.
•
Several DVDs may be pre-recorded on both sides however only one side contains the DD sound track.
•
Please insert the correct DVD side.
Digital audio output is active only when receiving DVB-T, not when receiving analog cable TV
•
broadcasting.
42
Page 43

Connection to other equipment
5. Connecting Video camera and Video recorder
Select the “MONITOR” option in the AV1 OUTPUT menu (see page 17).
Select the AV2 input mode (see P.11). You can see the playback picture from video camera.
This signal is output via AV1 and can be recorded by video recorder.
With this arrangement, Video recorder will record exactly what is shown on the screen.
Note:
• If you have a camcorder with
S-video, use an S-video cable
TV (Back side view)
(S-VIDEO cable, not supplied)
instead of a standard video cable.
Do not connect both a standard
video cable and an S-video cable
(AV cable, not supplied)
at the same time, or the picture
performance will be unacceptable.
TV (Back side view)
(SCART cable, not supplied)
6. Connecting to a DVD player or other AV device with Component Video outputs
If your DVD player (or other device) has Component Video output jacks, use a suitable set of leads (RCA/
Phono) to connect these to the Component Video inputs on this TV as shown - it can greatly enhance
the picture quality and performance. Please remember that you will also need to connect separate leads
(RCA/Phono) for the audio signals. Select the COMPONENT input mode (see P.11).
TV (Back side view)
To COMPONENT IN
Audio output
DVD player
Audio cable
(not supplied)
Component output
Video cable (not supplied)
Video camera to AV2
Playback
AV output
Video recorder to AV1
Recording
YPbPr
Note:
The Component Video input of this unit are for use with equipment which outputs interlaced signals (PAL:
•
576i/1080i or NTSC: 480i/1080i) and progressive signals (PAL: 576p/720p or NTSC: 480p/720p).
43
Page 44

Troubleshooting table
Please check the following list before requesting service.
Symptom Possible solution Page
TV
No picture, no sound Switch on the set.
No reception Have you tuned in the TV stations?
The TV switches off with
missing antenna input signal
menu, the TUNING
In
option cannot be selected.
Wrong Colours Colour and Brightness errors can occur when the viewing angle
While viewing a DVB (digital)
channel, there is sound but
no picture.
Blocky image or image stops
intermittently.
Some digital channels cannot
be viewed.
“Database empty” message
appears on the screen.
DVD
The playback picture has
occasional distortion.
The unit does not start
playback.
appears on the screen.
The LCD panel is a very high technology product, giving you fine picture details. Occasionally, a few nonactive pixels
•
may appear on the screen as a fixed point of blue, green or red. Please note that this does not affect the performance
of your product.
Check that the mains power outlet is properly connected.
Select appropriate input mode.
Unplug unit for 1 minute, then plug it back in.
Press 1 on the remote control.
Connect the antenna.
Make sure the set is ON and not in Standby mode
This is normal.
15 minutes after the antenna signal has disappeared, the set will
change to standby mode.
The unit is set to AV mode. Press 1 on the remote control. 12
/ ambient air temperature (see technical specifi cations) are
exceeded.
Some channel offers audio content only. It is normal.
Check all antenna connections.
Move the antenna away from areas of possible interference.
Try using an antenna booster.
Contact the service provider to subscribe.
Check all antenna connections and try auto tuning again. 10, 18
The disc is dirty. Eject the disc and clean it.
Some times a small amount of picture distortion may appear. This
is not a malfunction.
No disc is inserted. Insert a disc.
An unplayable disc is inserted. Insert a playable disc (Check the
disc type and colour system).
Place the disc in the disc slot with the label side facing forward.
The disc is dirty. Clean the disc.
Cancel the parental lock function or change the parental lock level.
The function is prohibited with the unit or the disc. 27
7
11
10
11
13
10
25
26
25
26
25
36
* This product incorporates copyright protection technology that is protected by U.S. patents and other intellectual
property rights. Use of this copyright protection technology must be authorized by Macrovision, and is intended
for home and other limited viewing uses only unless otherwise authorized by Macrovision. Reverse engineering or
disassembly is prohibited.
* Manufactured under license from Dolby Laboratories. Dolby and the double-D symbol are trademarks of Dolby
Laboratories.
is a trademark of DVD Format/Logo Licensing Corporation.
*
* This product is protected by certain intellectual property rights of Microsoft. Use or distribution of such
technology outside of this product is prohibited without a license from Microsoft.
44
Page 45

Specifi cations
TV 19LD5750U 22LD5750U
System: Analogue: PAL UK, IR, CCIR, FRENCH System, B/G, D/K, I/I, L
Video Colour System: PAL/SECAM/NTSC 3.58/NTSC 4.43/PAL 60
Preset channels: Analogue channels (99) + Digital channels (Carrier 200/Service1000)
Frequency Range: Analogue: IreE2~E4, X~Z+2, S1~S10, E5~E12, S11~S41, E21~E69
LCD: 18.5” TYPE (47.0cm visible) 21.6” TYPE (54.8cm visible)
HDMI input: HDMI compliant (type A connector)
Audio Output Power: approx. 1.5W (MAX) x 2
DVD
Signal system: NTSC, PAL (Region 2)
Applicable disc: DVD (12cm, 8cm), CD (12cm, 8cm)
Output: Audio : (RCA) –12.0 dBm, 1 k ź
Pickup: CD : Wavelength: 775 - 805 nm
GENERAL
Power Source: AC 220-240V, 50Hz
Power Consumption:
Weight:
Dimensions:
Surrounding
temperature:
Operating Humidity:
ACCESSORIES
2 batteries (AA/R6/UM-3)/Remote control unit/AC cord/Stand/2 screws for stand
Weight and Dimensions are approximate. Because we continuously strive to improve our products we
may change specifi cations and designs without prior notice.
Digital: DVB-T (OFDM 2k/8k 16QAM/64QAM)
Digital: E5~E12, ItaD~H2, Fra1~6, Rus6~12, E21~E69
TFT low-glass Active Matrix Colour LCD, 1366 x 768 Pixel
HDCP compliant
Supported scan rates: PAL: 576i/576p/720p/1080i
NTSC: 480i/480p/720p/1080i
HDMI Audio: 2-channel PCM, 32/44.1/48 kHz sampling frequency
16/20/24 bits per sample
Digital Audio : 0.5Vp-p/75 ź
Maximum output power: 0.5 mW
DVD : Wavelength: 640 - 660 nm
Maximum output power: 1.0 mW
Operation: approx. 38W at AC230V, 50Hz Operation: approx. 52W at AC230V, 50Hz
Standby: approx. 0.8W at AC230V, 50Hz
4.2 kg 5.1 kg
47(W)x36(H)x17(D)cm 54(W)x40(H)x17(D)cm
Operation: 5°C ~ 40°C/Storage: –20°C ~ 60°C
Less than 80%RH
45
Page 46

Signal Input
RGB terminal (D-sub 15-pin connector)
Pin Input signal
1R
2 G or sync on green
3B
4 No connection
5 GND
6 GND
7 GND
8 GND
9 No connection
10 GND
11 No connection
12 No connection
13 H. sync
14 V.sync.
15 No connection
HDMI connector pin specifications
Pin Input signal Pin Input signal
1 TMDS Data2+ 11 TMDS Clock Shield
2 TMDS Data2 Shield 12 TMDS Clock-
3 TMDS Data2- 13 CEC
4 TMDS Data 1+ 14 Reserved(N.C. on device)
5 TMDS Data1 Shield 15 SCL
6 TMDS Data1- 16 SDA
7 TMDS Data0+ 17 DDC/CED Ground
8 TMDS Data0 Shield 18 +5V Power
9 TMDS Data0- 19 Hot Plug Detect
10 TMDS Clock+
SCART1 connector pin specifications
Pin
1 AUDIO OUT (RIGHT) 12 NOT USED
2 AUDIO IN (RIGHT) 13 GND
3 AUDIO OUT (LEFT / MONO) 14 GND
4 GND 15 RGB-R IN
5 GND 16 BLANKING SIGNAL
6 AUDIO IN (LEFT / MONO) 17 GND
7 RGB-B IN 18 GND
8
9 GND 20 COMPOSITE VIDEO IN
10 NOT USED 21 GND/SHIELD (CHASSIS)
11 RGB-G IN
Input signal
AUDIO VIDEO SW/WIDE
SCREEN
Pin
19 COMPOSITE VIDEO OUT
S-input connector pin specifications
Pin Input signal
1Y
2 Y-GND
3C
4 C-GND
Frame GND
When different kinds of input signals are
Input signal
simultaneously input to the television via a graphics
board or the like, the television only support H/V
separate sync signal.
46
Page 47

AV and HDMI Signal Compatibility (Input Signal Types)
Source Supported Signals
SCART
YPbPr
HDMI
Note: In some cases a signal on the LCD TV may not be displayed properly. The problem may be an
inconsistency with standards from the source equipment (DVD, Set-top box, etc). If you do experience such
a problem please contact your dealer and also the manufacturer of the source equipment.
PAL 50/60
NTSC 60
RGB 50
RGB 60
480I 60Hz
480P 60Hz
576I 50Hz
576P 50Hz
720P 50Hz
720P 60Hz
1080I 50Hz
1080I 60Hz
480I 60Hz
480P 60Hz
576I 50Hz
576P 50Hz
720P 50Hz
720P 60Hz
1080I 50Hz
1080I 60Hz
47
Page 48

QUICK SET-UP GUIDE
MODEL 19LD5750U/22LD5750U
1. CONNECTING YOUR AERIAL
Back Side
(L)
(K)
(M)
(J)
(A) (B) (C) (D) (F)
(A) Power supply: Connect the supplied power cable to
an AC 220-240V/50Hz mains power supply only - do
not attempt to connect it to any other type of supply.
Never try to repair a damaged AC power cord with
(E)
(G) (H)
(I)
2. INSTALLING BATTERIES
1. Open the battery compartment. 3. Close the battery compartment.2. Install the R6 (AA-Size) batteries as
shown below.
insulation tape - this should be repaired by a specialist
or replaced. Do not let your pet loose near the cable.
Animals biting into the cable could receive a fatal
electric shock, and could cause a hazard to others.
(B) HEADPHONE jack: Plug headphones with a mini
plug (3.5 mm) into this jack.
(C) COMPONENT input: See P.43.
(D) AV2 input: Input for analogue AV-Signal (Composite
or S-Video). See P.43.
(E) DVB-T Digital audio output: digital output for CD/
DVD & DVB-T (see page 42).
(F) PC MONITOR input (PC): See P.39.
(G) PC/HDMI AUDIO input: See P.39, 40.
(H) HDMI input : See P.40.
(I) Scart socket (AV1): For the connection of scart cable.
See P.41~43.
ANT: Plug in the antenna (aerial) here.
(J)
(K) C.I. slot: for DVB-T-PayTV (see page 22).
(L) Bracket holes: Fix a wall mounting bracket (not
supplied) here.
(M) To hang the television on a wall, remove these screws
and then remove a stand.
Before performing work spread cushioning over the
base area to lay the TV on.
3. AUTO SETUP
Your television has an Automatic Tuning System which makes tuning in your television easy. This Automatic
tuning System scans the entire reception range in your area and automatically stores all available analogue
and digital channels of
will tune into channel 2, etc.
THE AUTOMATIC TUNING PROCESS WILL ONLY START BY ITSELF THE FIRST TIME YOU SWITCH
THE SET ON. HOWEVER YOU CAN RESTART THIS PROCESS VIA THE MENU SYSTEM. (see next
page.)
1. Press
Press ϳ or ϴ to select LANGUAGE, then press ENTER. Press ϵ or ϶ to select desired language, then
2. Press ϳ or ϴ to select COUNTRY, then press ENTER. Press ϵ or ϶ to select your country, then press
3. Press ϳ or ϴ to select AUTO TUNING, then press ENTER. The confirmation screen will be displayed.
on the TV or remote control. The Auto Installation menu will appear first.
press ENTER.
ENTER.
Press ENTER to start automatic tuning.
Your TV will now automatically tune in all available channels.
Note: Please be patient - the Auto Tuning process can take several minutes to complete.
4. When the programme on the screen stops changing and the sound comes on, the tuning process is
complete.
suitable signal strength in the correct order e.g. BBC 1 will tune into channel 1, BBC 2
AUTO INSTALLATION
LANGUAGE ENGLISH
COUNTRY UK
AUTO TUNING
ENGLISH
EXIT : END MENU: RETURN
AUTO INSTALLATION
LANGUAGE ENGLISH
COUNTRY UK
AUTO TUNING
UK
EXIT : END MENU: RETURN
AUTO INSTALLATION
LANGUAGE ENGLISH
COUNTRY UK
AUTO TUNING
AUTO TUNING
1%
EXIT : END MENU: RETURN
Page 49

4. ON-SCREEN LANGUAGE SELECTION
[ANALOGUE MODE]
1. Press TV/DVB-T to select the analogue TV
mode.
2. Press ANALOG MENU,
then press ϵ or ϶ to select
(SETUP) menu.
3. Press ϳ or ϴ to select LAN-
GUAGE, then press ENTER.
Press ϵ or ϶ to select
desired language.
AUTO TUNING
MANUAL TUNING
CH ALLOCATION
LANGUAGE ENGLISH
VERTICAL POSITION 0
AUTO 4:3 DEFAULT
EXIT : END MENU: RETURN
AUTO TUNING
MANUAL TUNING
CH ALLOCATION
LANGUAGE ENGLISH
VERTICAL POSITION 0
AUTO 4:3 DEFAULT
EXIT : END MENU: RETURN
4. Press EXIT to return to the normal screen.
5. AUTO TUNING
[ANALOGUE MODE]
1.
Press TV/DVB-T to select the analogue TV mode.
2. Press ANALOG MENU, then
press ϵ or ϶ to select
(SETUP) menu.
3. Press ϳ or ϴ to select
AUTO TUNING, then press
ENTER. Press ϳ or ϴ to
select COUNTRY, then
press ENTER. Press ϵ or ϶
to select your country, then
press ENTER.
4. Press ϳ or ϴ to select
START, then press ENTER.
The automatic tuning
will search for available
broadcasts and should store
the channels in the correct
order. During the search the
sound is muted.
5. When all programs have
been stored, the normal TV
screen will appear.
AUTO TUNING
MANUAL TUNING
CH ALLOCATION
LANGUAGE ENGLISH
VERTICAL POSITION 0
AUTO 4:3 DEFAULT
EXIT : END MENU: RETURN
COUNTRY UK
START
EXIT : END MENU: RETURN
COUNTRY UK
START
EXIT : END MENU: RETURN
ENGLISH
UK
AUTO TUNING
17%
[DIGITAL MODE]
1. Press TV/DVB-T to select the digital TV mode.
2. Press DIGITAL MENU,
then press ϵ or ϶ to
select
Setup) option.
(Language
ABC
ABC
Press ENTER.
16:9
3. Press ϳ or ϴ to select
the item you want to
change.
Press ϵ or ϶ to select
16:9
desired language.
Main menu Language Setup
CH1
CH2
ABC
ABC
CH
3
Language Setup
Enter Exit
Navigate
Language Setup
Menu Language
Pref. Audio
Language
Pref. Subtitle Language
Pref. Digital Service
Language
Navigate
Texd
i
i
English
English
English
English
Enter Exit
CI
4. When all changes are decided, press EXIT to
return to the normal screen.
[DIGITAL MODE]
1. Press TV/DVB-T to select the digital TV mode.
2. Press DIGITAL MENU,
then press ϵ or ϶to
select
option.
16:9
3. Press ϳ or ϴ to select
‘Auto Scan’, then press
ENTER.
(Installation)
Main menu Installation
ABC
ABC
CH1
CH2
CH
3
Auto Scan
Manual Scan
Carrier Setup
Navigate
Texd
i
i
Enter Exit
CI
4. Press ϵ or ϶ to select ‘Yes’ or ‘No’ in the
confirmation screen, then press ENTER (the
selected option is shown in blue).
Auto Scan
5. The Auto Scan process
will now begin.
The scanning process
will be displayed in the
progress bar.
When the search has
been completed ‘Scan
completed’ message will be displayed.
And the Auto Scan menu will exit automatically.
DVB-T 16QAM
TV
:003
001 BBC ONE
002 BBC TWO
007 BBC THREE
Carrier :1
Frequency (kHz) :562000
Searching...
Progress
Navigate
Radio
070 BBC Radio 1
:001
Exit
Page 50

19LD5750U/22LD5750U Warranty
Hitachi Europe Ltd.
If there is something about your appliance which you do not understand and you live in the UK, you can
phone our helpline during normal hours on: 0844 8009595. (COMET HELPLINE)
If Something doesn’t seem to work
Calls are charged at standard rates.
Guarantor: Comet Group plc
Comet House Three Rivers Court
Rickmansworth, Hertfordshire,
WD3 1FX
 Loading...