

Page 1

22LD4500
Instructions for use
GB
Page 2

Contents
Wiring The Plug...........................................2
Remote Control Buttons.............................3
Control Panel...............................................4
Preparation.................................................6
Features...................................................8
Safety Precautions.....................................9
Before Switching on your TV....................11
Power connection...................................11
Aerial Connections.................................11
How to connect other devices................11
Inserting batteries in the remote control
handset..................................................11
Switching the TV ON/OFF..........................12
To switch the TV on..................................12
To switch the TV off..................................12
PREPARATION:..........................................13
TUNNING IN...........................................13
Everyday Operation:..................................15
CHANGING CHANNELS........................15
CHANNEL LIST......................................17
ELECTRONIC PROGRAMME
GUIDE....................................................18
SOUNDTRACK LANGUAGE...................21
DIGITAL TELETEXT.....................................22
ADVANCED OPERATION............................24
CONFIGURING YOUR TV.......................24
IDTV UPGRADE......................................26
EDITING THE CHANNEL LIST...............30
CHANNEL AND MENU
PROTECTION.........................................32
FAVOURITE CHANNELS........................34
PROGRAMME REMINDERS AND TIMERS35
RE-INSTALLATION.................................38
COMMON INTERFACE MENU................42
Operating the TV.......................................45
Operating with the onset buttons...........45
Operating with Remote Control..............45
Menu System............................................46
Sound Menu...........................................46
Picture Menu...........................................49
Feature Menu.........................................50
Installation Menu....................................52
Program Menu........................................53
Source Menu..........................................54
PIP Picture Menu....................................54
Other Features..........................................55
TV Status.................................................55
Programme Swap (P<P)........................55
Double-digit (- -).....................................55
Personal Preferences (PP)....................55
Sound Indicator......................................55
Picture and Picture (PAP).......................55
Picture Mode...........................................56
Mute Indicator.........................................56
Volume Bar.............................................56
AV Modes................................................56
PC MODE...................................................57
Installation..............................................57
Switching from TV to PC.........................57
Main Menu in PC mode..........................57
Sound Menu...........................................57
Picture Menu...........................................57
PIP Picture..............................................58
PC and Picture (PAP)..............................58
Feature Menu.........................................58
Geometry Menu......................................58
Source Menu..........................................59
PIP Source Menu....................................59
TELETEXT..................................................60
To operate Teletext..................................60
To select a page of Teletext....................60
To Select Index Page..............................60
To Select Double Height Text..................60
To Reveal “concealed”
Information.............................................60
To Stop Automatic Page Change............60
To Select a Subcode Page.....................60
Fastext....................................................61
To exit Teletext.........................................61
To Display the Time................................61
Connect Peripheral Equipment................62
PC Sound Connection............................62
Via the Euroconnector............................62
Via Ant Input............................................62
Decoder..................................................62
TV and Video Recorder..........................62
Search for and store the test signal
of the video recorder...............................63
Camera and Camcorder........................63
Connect the decoder to the video
recorder..................................................63
Connecting Headphones.......................63
Connecting PC.......................................63
Antenna Connections...............................64
PC INPUT TYPICAL DISPLAY MODES........65
Tips / Troubleshooting Guide....................66
On Digital mode.....................................66
On TV and monitor mode.......................66
Specifications...........................................68
UK Guarantee............................................69
1
Page 3

wiring the plug
If your TV is fitted with a non-rewireable plug and you need to change the fuse, you will
need to refit the fuse cover. If you lose or damage the fuse cover, do not use the plug
until you have replaced the cover with a new one. You can get one from us. Make sure
you replace the fuse cover with one which is the same colour as the markings on the
fuse.
If you have to change the plug because it is not suitable for your socket or it is
damaged, cut off the plug and fit another one following the wiring instructions below.
Please throw away the plug you have removed, as insertion into a mains socket
could cause injury.
For your own safety, read the following instructions carefully before attempting to
connect this unit to the mains.
WIRING INSTRUCTIONS
Your TV is designed to operate on 220
to 240V, 50Hz current only. Connecting it
to another power source may damage
the TV.
The wires in the mains lead are coloured
as follows.
Blue = NeutralBrown = Live
WARNING
To prevent electric shocks,
remove the plug from the
mains socket before you
take off its cover.
IMPORTANT
The colours of the wires in the mains
lead from your TV may not be the same
as the coloured markings
identifying the terminals in your plug. So
please follow these instructions.
Connect the blue wire to the terminal
marked with the letter N or coloured
black.
Connect the brown wire to the terminal
marked with the letter L or coloured red.
Do not connect any wire to the other terminal on the plug.
If you use a 13 Amp (BS1363) plug, you
will need a 5 Amp fuse.
If you use any other type of plug, you
will also need a 5 Amp fuse either in the
plug or on the distribution board.
FUSE
BLUE
(Neutral)
BROWN
(Live)
2
Page 4
OK
56789101112131415162224252627282930313223
171819203
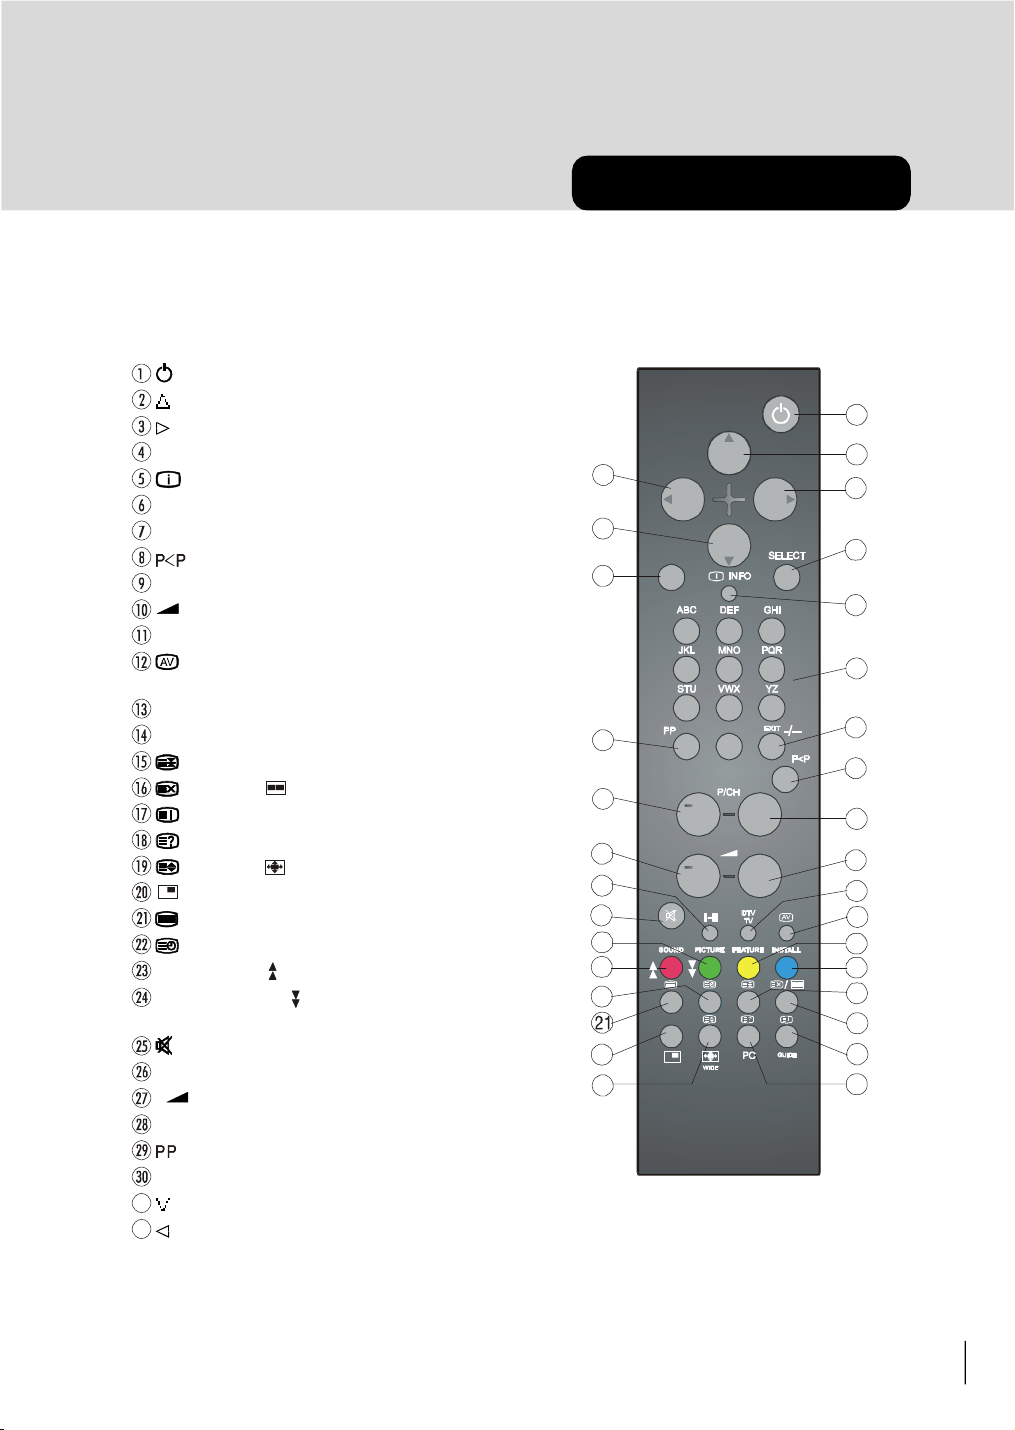
= Stand By
31
32
= Cursor Up
= Cursor Right
OK / SELECT = Okay (Store)
INFO= Info (Program Menu)
0 - 9 = Direct Program
-/-- / EXIT = Double Digit
=Previous Programme
P/CH + = Programme Up
+ = Volume +
DTV / TV = TV / DTV mode
= External Source
(AV-1, AV-2, AV-3, S-VIDEO, PC)
Yellow (FEATURE) = Feature Menu
Blue (INSTALL) = Installation Menu
= Hold
= Update , / = PAPAP
/ GUIDE = Index Page
= Reveal, PC = Switch from TV to PC
= Expand, WIDE = Aspect ratio
= PIP on / PIP off
= Teletext
= Time
Red (SOUND) / =Sound Menu/ Page up
Green (PICTURE) / = Picture Menu /
Page down
= Mute
I-II = Mono/Stereo - Dual I-II
- = Volume -
- P/CH = Programme Down
= Personal Preference
M = Menu
= Cursor Down
= Cursor Left
remote control
1
2
4
M
213
546
879
0
3
Page 5
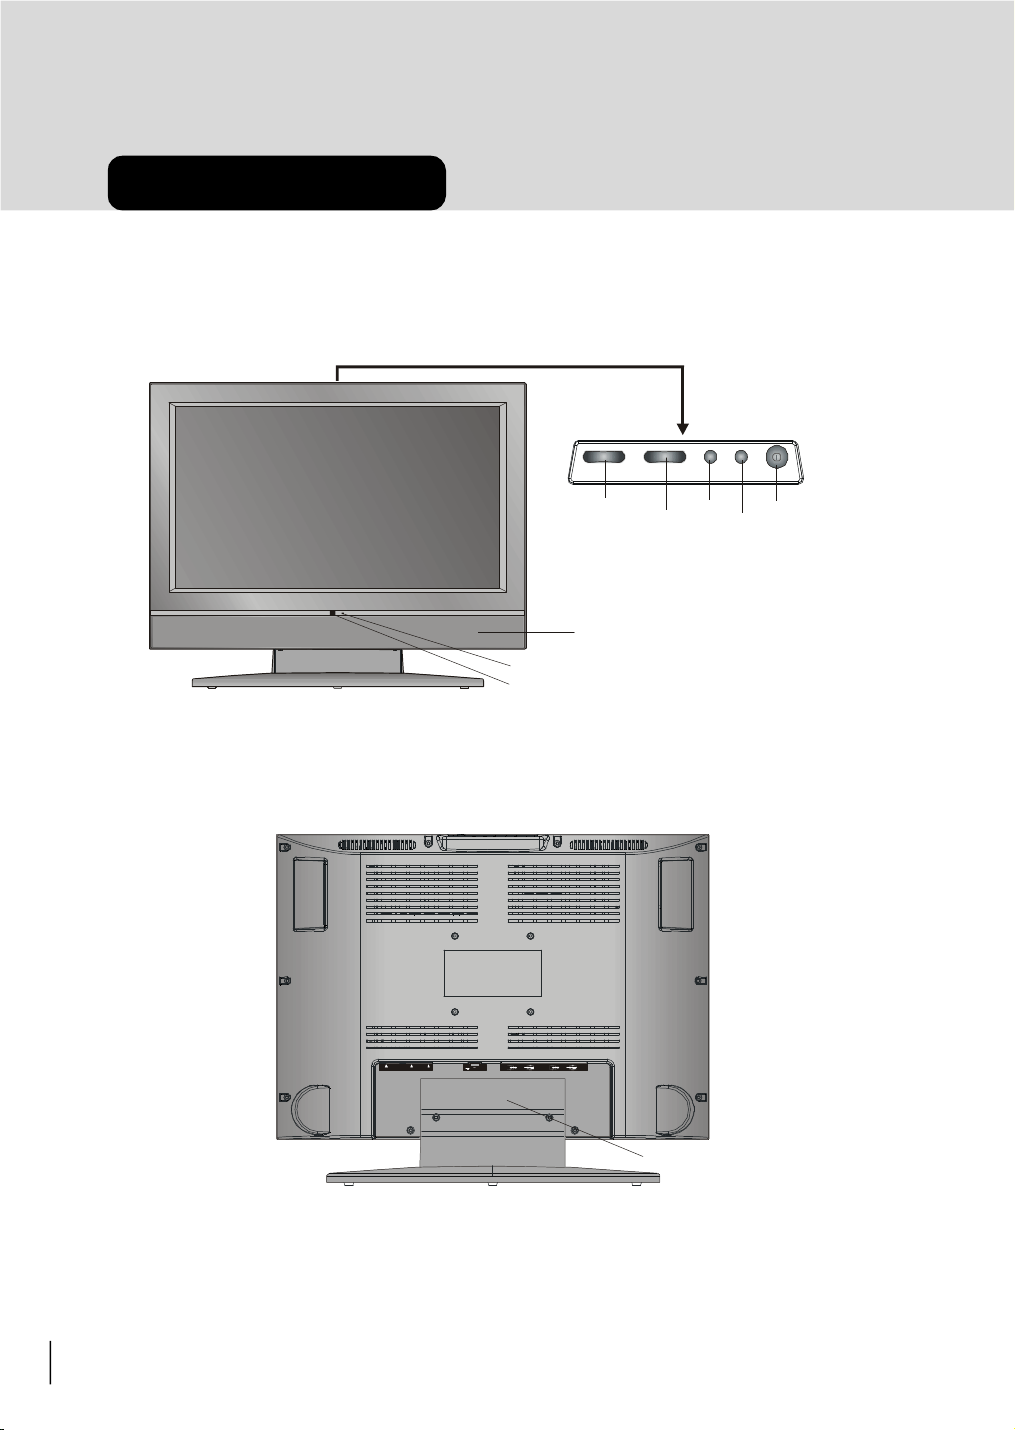
Control Panel
- VOLUME +
INFRARED RECEIVER
SPEAKER
FOOT TOP COVER
1/
- VOLUME +- P/Ch +MENUTV/AV
PC INPUT
DC 15V
PC AUDIO ANT. 75 W
LED
2/
- P/Ch +
MENU
TV/AV
POWER
4
Page 6
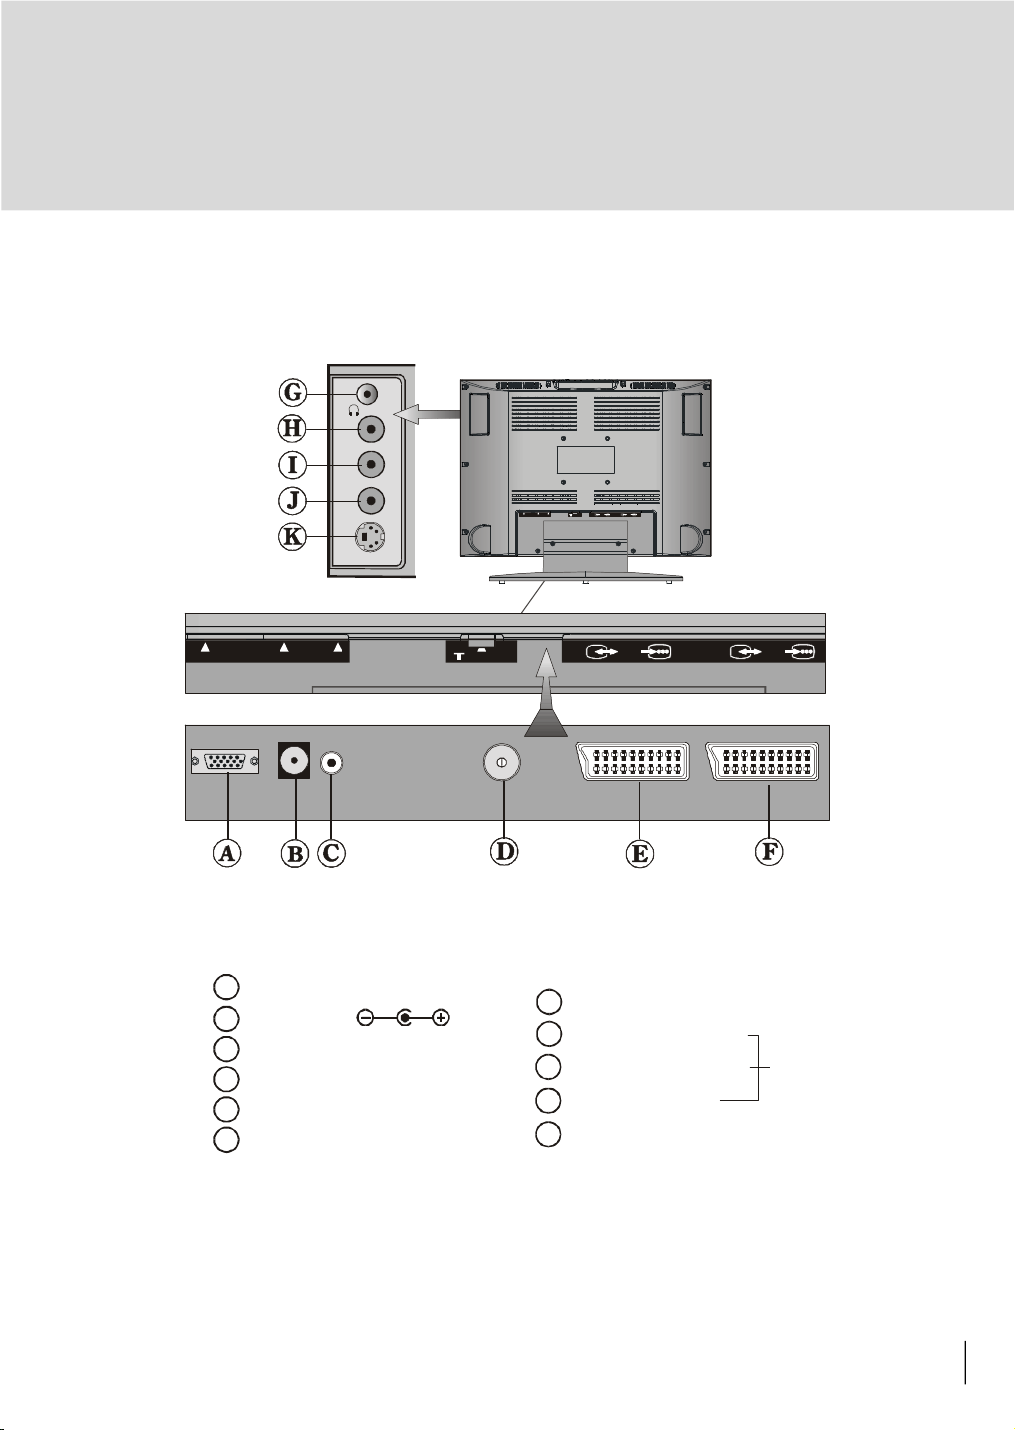
GHIJK
HEADPHONE
(AV-3)
PC INPUT
2/
1/
S-VHS
DC 15V
PC AUDIO ANT. 75
PC INPUT
A
DC 15 V
B
PC AUDIO INPUT
C
AERIAL
D
SCART SOCKET 2 (AV-2)
E
F
SCART SOCKET 1 (AV-1)
DC 15V
PC INPUT
W
PC AUDIO ANT. 75 W
2/ 1/
AUDIO INPUT (L)
AUDIO INPUT (R)
VIDEO INPUT
S-VIDEO INPUT
5
Page 7
foot assembly
Preparation
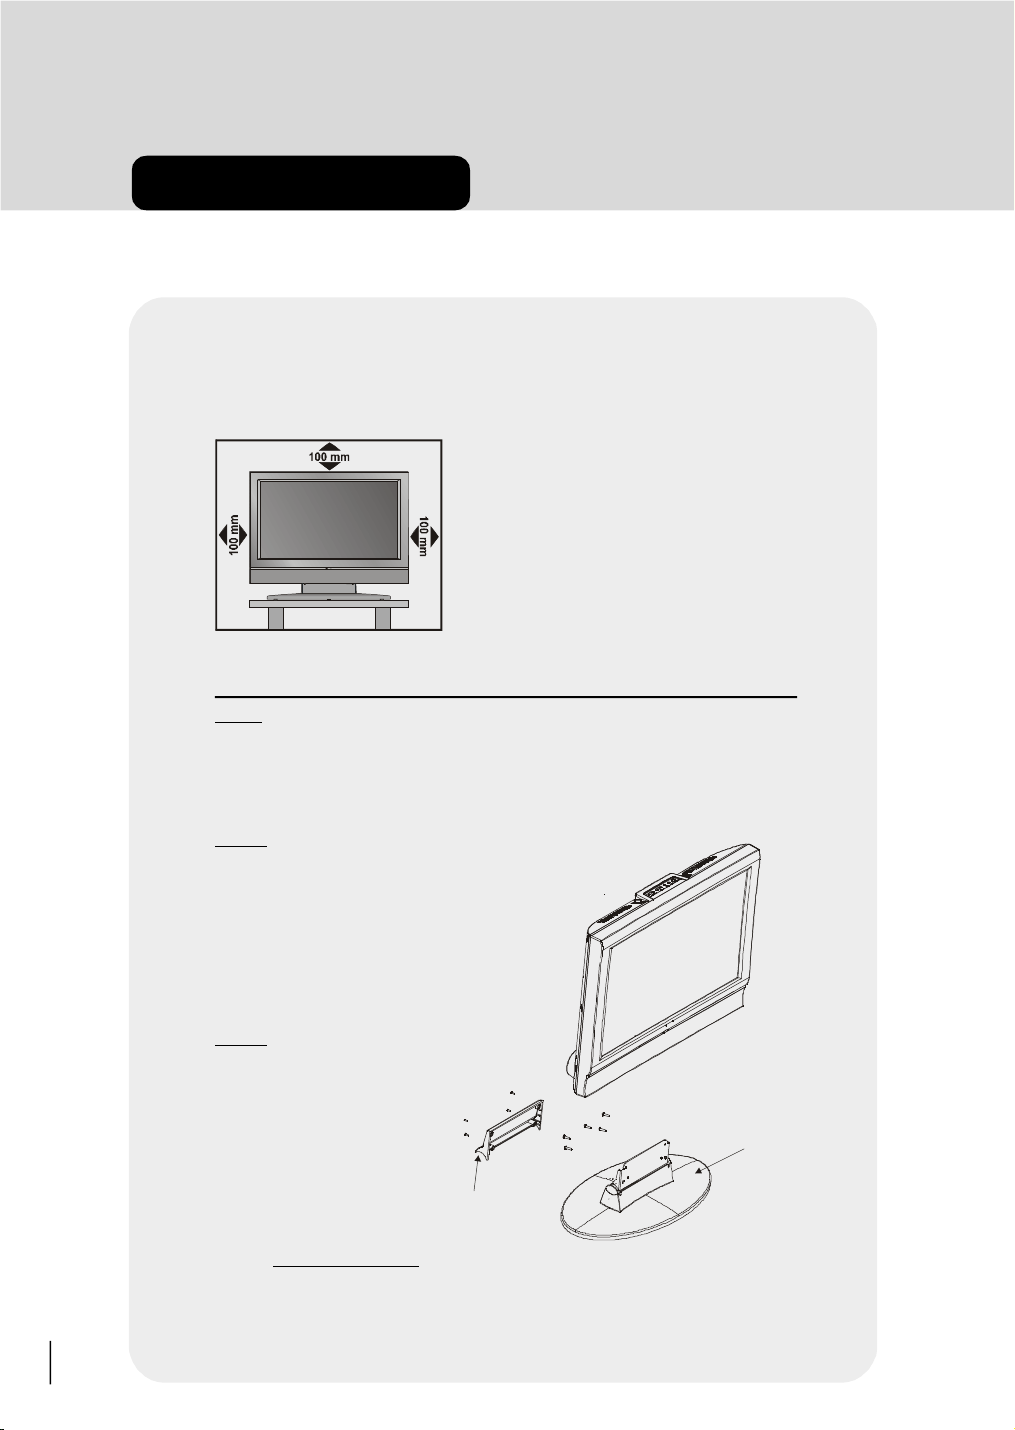
Install Display on solid horizontal surface such as a table or desk.
For ventilation, leave a space of at least 10 cm free all around the set. To prevent any fault and
unsafe situations, please do not place any objects on top of the set.
Installation of device on the wall
Step1:
Invert the flat monitor screen and placed it on a flat surface. Remove the foot top cover. Remove the back support from the screen. Replace the support with the mounting bracket align
the holes from the bracket with the mounting holes found on the back of the monitor chassis.
Secure the bracket with the same four (4) 4 (mm) head screws.
Step 2:
Choose the wall where the monitor
would be located. Level and mark
with a pencil the four (4) mounting
points found on the wall bracket.
Drill pilot holes for the plastic anchors then secure the wall bracket
with the four (4) L=32 mm x D=5
mm screws (supplied).
Step 3:
Raise the monitor with the mounting
bracket attached and slip the top
opening to the safety flange on the
secured wall bracket. Let the monitor fall in place safely and secure the
two (2) D=4 mm x L=10 mm
safety screws (supplied) with a long
screwdriver for additional security.
Note: Do not over tighten!
back support
6
Page 8
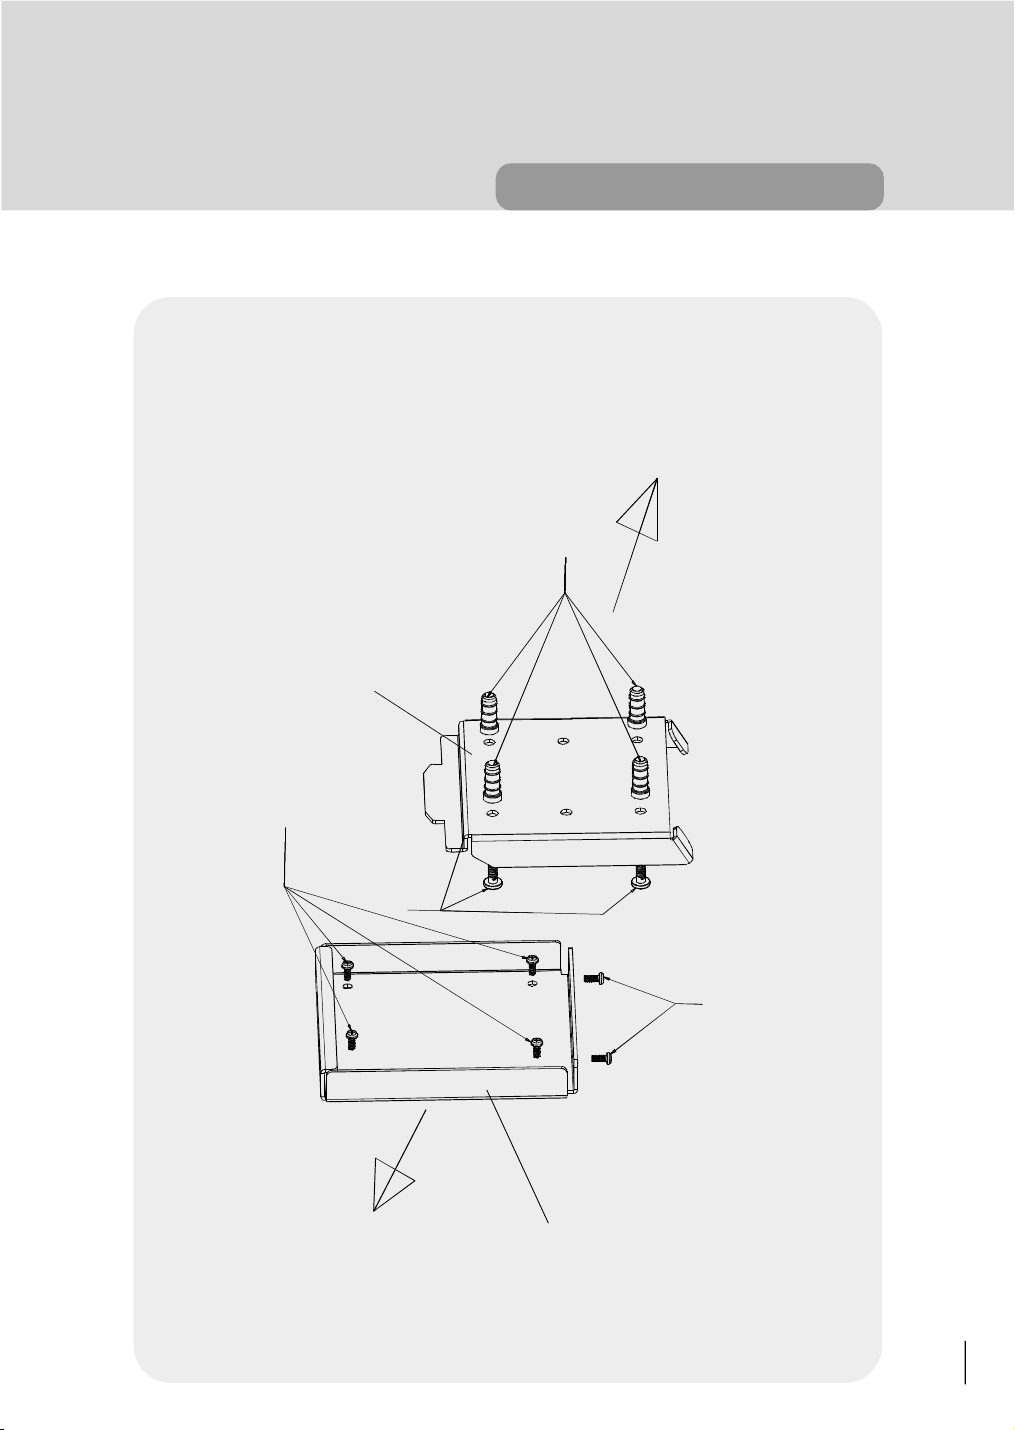
2-) Plastic anchors
1-) D=4mm x L=10mm screws
WALL STRUCTUR
E
preparation
Wall bracket
2-) L=32mm x D=5mm screws
3-) D=4mm x L=10mm screws
Mounting bracket
LCD MONITOR
7
Page 9

preparation
Place TV on a solid surface.
For ventilation, leave a space of at least 10 cm free all around the set. To prevent
any fault and unsafe situations, please do not place any objects on top of the set.
Use this apparatus in tropical and/or moderate climates.
Features
• Remote Controlled Colour television and PC Monitor.
• Fully integrated Digital TV (DVB-T)
• 100 programmes from VHF, UHF bands or cable channels can be preset.
• Controlling the TV is very easy by its menu driven system.
• 2 Euroconnector sockets for external devices (such as video, video games, audio set, etc.)
• To use as a monitor, 15 Pin Mini D-Sub connector for computer. (Optional)
• Stereo sound system (German+Nicam) is available.
• Integrated Stereo Speakers.
• Multilanguage OSD.
• Teletext (Fastext, 7 pages).
• Headphone Socket.
• A.P.S. (Automatic programming system)
• All programmes can be named.
• Forward or backward automatic tuning.
• Sleep timer.
• Child lock
• Auto, 4:3, 16:9, Cinema, Subtitle, Zoom and Panorama modes are available at TV
and AV (WSS is available with Auto, 4:3, 16:9 and Cinema modes).
• Auto, 4:3 and 16:9 modes are available at PC.
• Automatic sound mute when no transmission.
• No Signal Standby Mode
• NTSC Playback.
• Universal power supply range is a standard feature on this model.
• PAP (picture and picture) (TV & IDTV, TV & PC, IDTV & PC)
• PIP (Picture in picture) (TV in IDTV, IDTV in TV, TV in PC, IDTV in PC)
• PLL (Channel Search)
• Electronic Programme Guide (EPG)
• MHEG-5 (Digital Text)
• Automatic software upgrade from broadcast signal
• Two CI (Common Interface) module slots.
• PC input (Support Up to WXGA 1280 x 720)
• Stereo PC Audio Input
• Plug & Play for Windows 9X, ME, 2000, XP
• 4H Comb filter
Panel Features
• High resolution, 22-inch TFT LCD display.
• High contrast ratio (500:1 Typical)
• Brightness: 450 cd/m
• High-speed response time : 23 msec.
• Wide viewing angle (typical) 170° (horizontal) and 170° (vertical).
8
• 8-bit colour depth, display 16.7 million colours.
2.
Page 10

Safety Precautions
IMPORTANT SAFETY INFORMATION
ON OPERATING YOUR TV
Do’s and Don’ts
DO’s
This Television has been designed and manufactured
to meet international safety standards, but like any
electrical equipment, care must be taken if you are to
obtain the best results and safety is to be assured.
DO read the operating instructions before you attempt to use the equipment.
DO consult your dealer if you are in any doubt about
installation, operation or safety of your equipment.
DO be careful with glass panels or doors on equipment.
This TV is supplied with a fitted mains plug. This plug
must not be cut off as it may contain a special radio
interference filter, the removal of which could lead to
impaired performance. If you wish to extend the lead,
obtain an appropriate safety approved extension lead
or consult your dealer.
Observe the manufacturers instructions when connecting extension leads to the TV. Check the fuse rating on the new plug, this should be fitted with a 5 Amp
fuse which conforms to either ASTA or BSI (BS1 362)
approvals, these are easily identifiable by either the
or symbols. If you are in any doubt about
the installation of an extension lead, please consult a
competent electrician.
DON’Ts
DON’T continue to operate the equipment if you are
in any doubt about it working normally, or if it is damaged in any way switch off, withdraw the mains plug
and consult your dealer.
DON’T place water filled vessels on top of T.V. cabinets.
DON’T remove any fixed cover as this may expose
dangerous voltages.
DON’T leave equipment switched on when it is unattended unless it is specifically stated that it is designed for unattended operation or has a stand-by
mode. Switch off using the switch on the equipment
and make sure your family know how to do this.
Special arrangements may need to be made for infirm or handicapped people.
DON’T use equipment such as personal stereos or
radios so that you are distracted from the requirements of traffic safety. It is illegal to watch television
whilst driving.
DON’T obstruct the ventilation of the equipment, for
example with curtains or soft furnishings. Overheating will cause damage and shorten the life of the
equipment.
DON’T use makeshift stands and NEVER fix legs or
stands to the TV with any screws other than those
provided - to ensure complete safety always use the
manufacturers approved stand with the fixings provided.
DON’T allow electrical equipment to be exposed to
rain or moisture.
ABOVE ALL
•NEVER let anyone, especially children
push anything into holes, slots or any other
opening in the case - this could result in a
fatal electric shock.
• NEVER guess or take chances with electrical equipment of any kind - it is better to be
safe than sorry!
9
Page 11

1. Power Source
The TV set is designed to operate on 15 V DC. The
adaptor should be operated from a 220-240V AC,
50 Hz. outlet. Ensure you select the correct voltage
setting for your convenience.
2. Power Cord
The power supply cord should be placed so that it is
not likely to be walked on or pinched by items placed
upon them or against it. Pay particular attention to
cord where it enters the plug, power outlet, and the
point where it exits from the receiver.
3. Moisture and Water
Do not use this equipment in a humid and damp
place (avoid the bathroom, the sink in the kitchen,
and near the washing machine). Do not expose this
equipment to rain or water, as this may be dangerous
and do not place objects filled with liquids on.
4. Cleaning
Before cleaning, unplug the adaptor from the main
supply, outlet. Do not use liquid or aerosol cleaners.
Use soft and dry cloth.
5. Ventilation
The slots and openings on the receiver are intended
for ventilation and to ensure reliable operation. To prevent overheating, these openings must not be
blocked or covered in anyway.
6. Lightning
In case of storm and lightning or when going on holiday, disconnect the power cord from the wall outlet.
7. Replacement Part
When replacement parts are required, be sure the
service technician has used replacement parts which
are specified by the manufacturer or have the same
specifications as the original one. Unauthorised substitutions may result in fire, electrical shock, or other
hazards.
8. Servicing
Please refer all servicing to qualified personnel. Do
not remove cover as this may result in electric shock.
9. Naked Flame Sources
Do not place naked flame sources on the apparatus.
WARNING: When the device is not in use for a long
time, disconnect from power.
Instructions for waste disposal:
• Packaging and packaging aids are recyclable and
should principally be recycled. Packaging materials,
such as foil bag, must be kept away from children.
• Battery, including those which is heavy metal-free,
should not be disposed of with household waste.
Please dispose of used battery in an environmentally
sound manner. Find out about the legal regulations
which apply in your area.
• Cold cathode fluoresant lamp in LCD PANEL contains a small amount of mercury, please follow local
ordinates or regulations for disposal.
“DO NOT LEAVE YOUR TV AT STAND-BY
OR OPERATING WHEN YOU LEAVE YOUR
HOUSE”
"The LCD panel is very high technology
product with about a million thin film transistors, giving you fine picture details. Occasionally, a few non-active pixels may appear
on the screen as a fixed point of blue, green
or red. Please note that this does not affect
the performance of your product."
10
Page 12
Before Switching on your TV
2/
1/
75
TV REAR PANEL
Before Switching on your TV
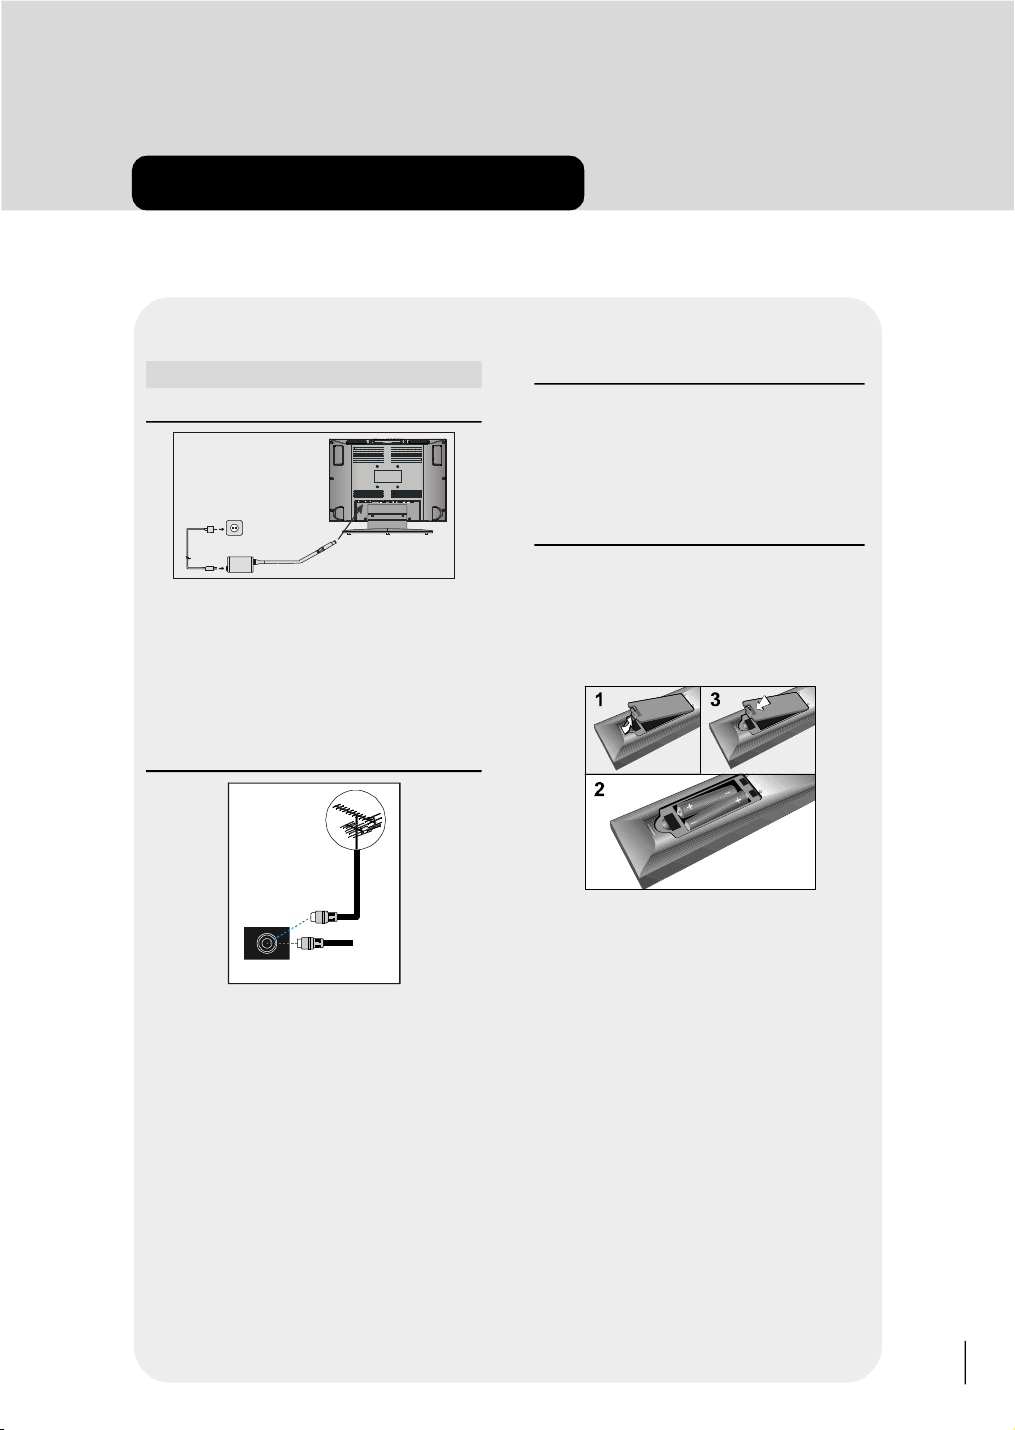
Power connection
DC 15V
PC INPUT
PC AUDIO ANT. 75 W
AC adapter
IMPORTANT: The TV set is designed to operate on
15 V DC. For this, an adaptor is used which
gives 15V DC voltage. Connect this adaptor
to a system that supplies 220-240V AC, 50
Hz.
• After unpacking, allow the TV set to reach the ambient room temperature before you connect the set to
the mains.
Connections to the Aerial socket
VHF/UHF
To POWER
INPUT DC 15 V
terminal
W
CABLE TV
How to connect other devices
IMPORTANT: Switch off the TV before connecting
any external device.
Sockets for external connections are at the back of
the TV. For connection of other devices via Euroconnector refer to the manuals of the related devices.
Inserting batteries in the remote
control handset
• Remove the battery cover located on the back of
the handset by gently pulling upwards from the indicated part.
• Insert two AAA (R03) or equivalent type of batteries
inside.
• Replace the battery cover.
NOTE: Remove battery from remote control handset
when it is not to be used for a long period.Otherwise it
can be damaged due to any leakage of battery.
• Connect the aerial or cable TV plug to the aerial
socket on the back of the TV. If you are also connecting a video recorder or satellite receiver you
should connect the aerial or cable plug to this device
first and then connect the RF out socket on the device to the aerial socket on the TV (see P27 for more
details).
11
Page 13

Switching the TV ON/OFF
To switch the TV on:
Your TV will switch on in two steps:
1- Connect the power supply cord to the system.
Press the “POWER” button at the top of the TV.
Then the TV switches itself to stand-by mode and
the led becomes red located on the front of the TV.
2- To switch on the TV from stand-by mode either:
Press a digit key on the remote control so that a programme number is selected,
or,
Press “-P/Ch” or “P/Ch+” key at the top of the TV
or press “-P/CH” or “P/CH+” key on the remote
control, so that last switched off programme is selected.
In either case the TV will switch on and the led becomes green.
To switch the TV off:
• Press the “stand-by” key on the remote control, so
the TV will switch to stand-by mode and the
GREEN LED will become RED,
or,
Press the “POWER” button located on the top of the
TV, so the TV will switch off and the GREEN LED will
turn off.
12
Page 14

preparation
Yes
SILENCE MODE:
"When you turn off your IDTV by pressing Stand-by key (on RC) , IDTV switches into
SILENCE mode and the led on the front of IDTV starts blinking. Also, IDTV switches
into SILENCE mode automaticallly everyday at 3.00 a.m.
In the silence mode IDTV searches for a new software. If a new software is found, it is
loaded onto the old s/w without any warning message. TV exits from stand-by mode
after loading process.
You can terminate silence mode any time you want by pressing “P/CH+ / - P/CH”
or numeric keys.
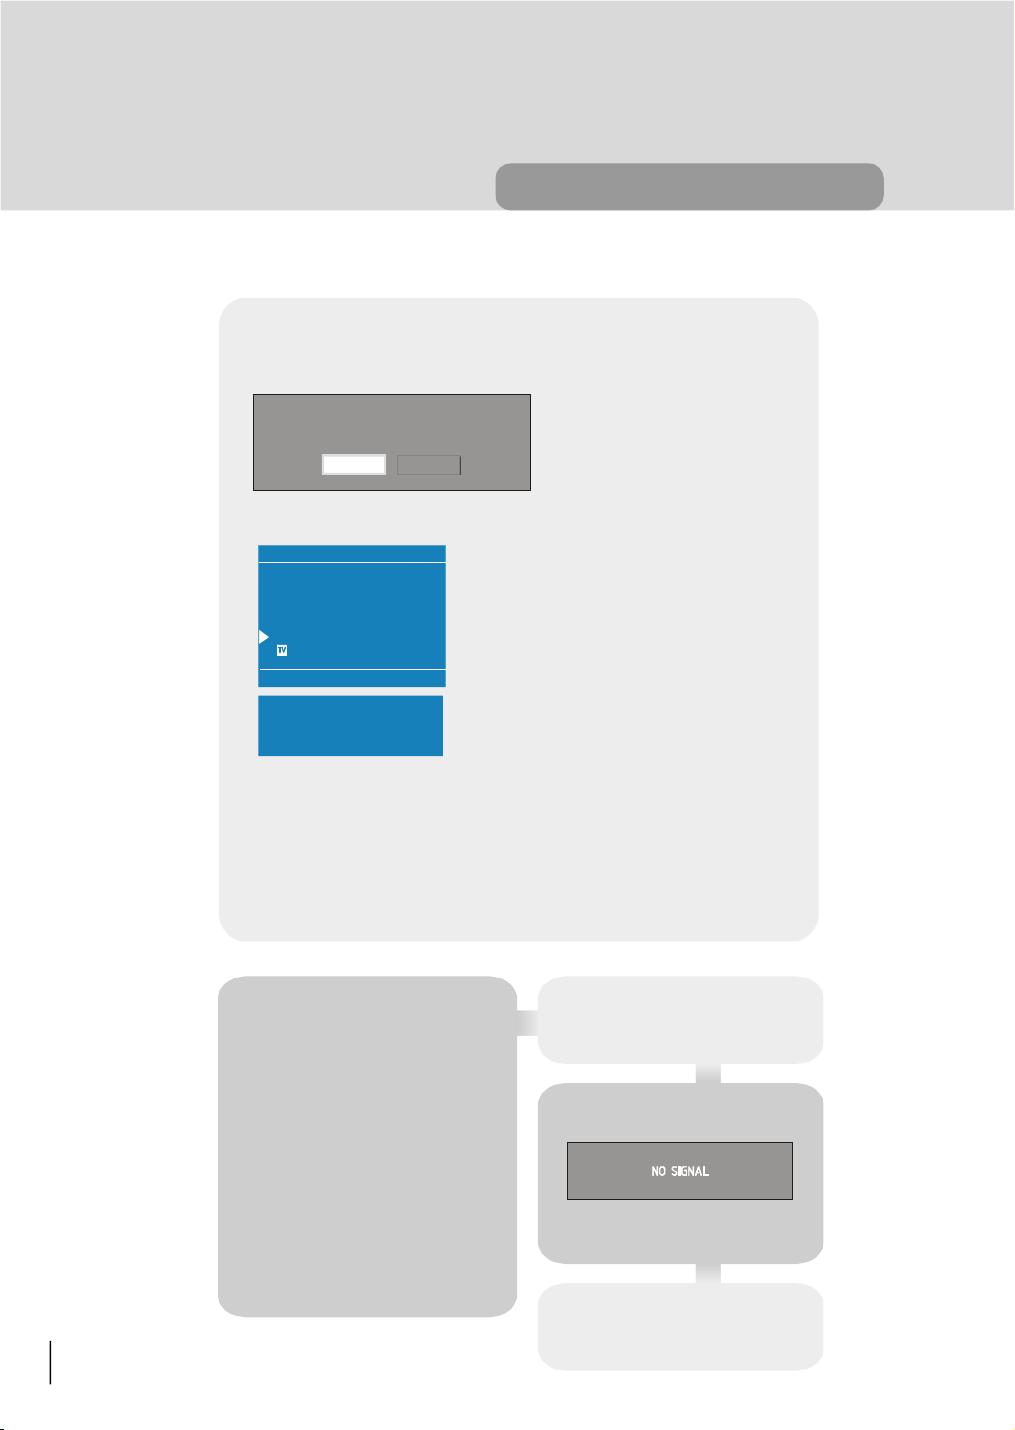
TUNING IN
Your TV will switch on in the digital mode. Because this is the first time that the TV has
been used, there are no channels stored in the memory and the First Time Installation menu is displayed on the screen.
Do you want to start automatic search?
No
Using the “ “ or “ ” keys on the remote control, make sure that the YES button
is highlighted in yellow, and press the “SELECT” key to start the automatic search.
The TV will automatically tune to the UHF transmission channels 21 to 68 looking for
digital terrestrial TV broadcasts and displaying the names of channels found. This
process will take about three minutes.
AUTOMATIC SEARCH
Channels:
Codec 4:3
Codec 16:9
BBC ONE
BBC TWO
BBC CHOICE
BBC NEWS 24
BBCi
BBC PARLMNT
BBC Knowledge
Searching UHF Channel: 49. Please wait. This will take a few minutes.
0 %
100 %
MENU
Cancel Search
13
Page 15
preparation
Yes
All Prestored Programmes
After Automatic search is finalized the following menu appears.
Do you want to search for
analogue channels ?
No
If you select “Yes”
Warning
Will Be Erased
Country
Language
Continue
Cancel
A.P.S. Is Running
Please Wait
14
After A.P.S. is completed program table is displayed on the screen. See the
“Programming” menu in terrestrial TV section.
If you select “No”, the first channel of the channel list and the information
banner is displayed you can now watch digital terrestrial television, selecting
the channel you require as described in the next section.
HINT
Depending on the reception conditions
If no digital terrestrial television
broadcasts are found the TV will
display a message:
in your particular area, you may find
that the list of channels found includes
one or more repeated names. This is
because the TV may detect and store
some channels, including those it cannot receive clearly, from adjacent areas
alongside the strong channels from a
transmitter nearby. This is not a problem and the weaker channels can be
deleted from the TV later, as described
in “ADVANCED OPERATION - Editing
the channel list” section.
You should then refer to the Tips/
Troubleshooting Guide to establish
the cause of the problem.
Page 16

everyday operation
There are a great many keys to use in different situations. Many of the menu
screens displayed by the TV have reminders as to which keys do what, at the base
of the screen. In addition, many screens have further help available which is dis-
played when the “ INFO” key is pressed, as prompted at the bottom right of
the screen.
Pressing the “DTV/TV” key at any time while watching television programmes will
switch the TV set between displaying the digital terrestrial television programme and
its normal analogue television reception.
CHANGING CHANNELS
You can select the channel you wish to watch in one of four ways - stepping through
the channel list, selection by number, from the on-screen channel list, and using the
electronic programme guide (EPG).
To move through the channel list, press the “P/CH+” or “- P/CH” keys on the
remote control. Pressing the “P/CH+” key will select the channel next in the channel
list. Pressing the “- P/CH” key will select the previous channel in the list.
Pressing the “P/CH+” key when the last channel in the list is being viewed will select
the first channel. Similarly, pressing the “- P/CH” key when the first channel is displayed will select the last channel in the channel list.
You can also select the required channel using its channel list number. Channel numbers are entered using the number keys on the remote control handset and can be
up to three digits long.
Hint
The channel list numbers are assigned by the broadcasters. Because not all channels are broadcast
free-to-air and stored by the TV, the
channel list numbers do not run continuously.
The fifteenth channel in the list, for example, may not be channel number
15 but channel number 17.
When you press a number key on the
remote control, a small box appears in
the top left of the screen to show the
entered number. After each digit is entered, the TV will wait up to two seconds for the next digit to be pressed
until either three digits have been entered or you do not press a digit in
time. The channel corresponding to the
entered number in the box will then be
selected.
Hint
If you enter a number which does not
correspond to a stored channel, the next
valid channel number is selected instead. If you enter a number greater than
the highest numbered channel in the
channel list, the TV will select the last
channel in the list.
15
Page 17
everyday operation
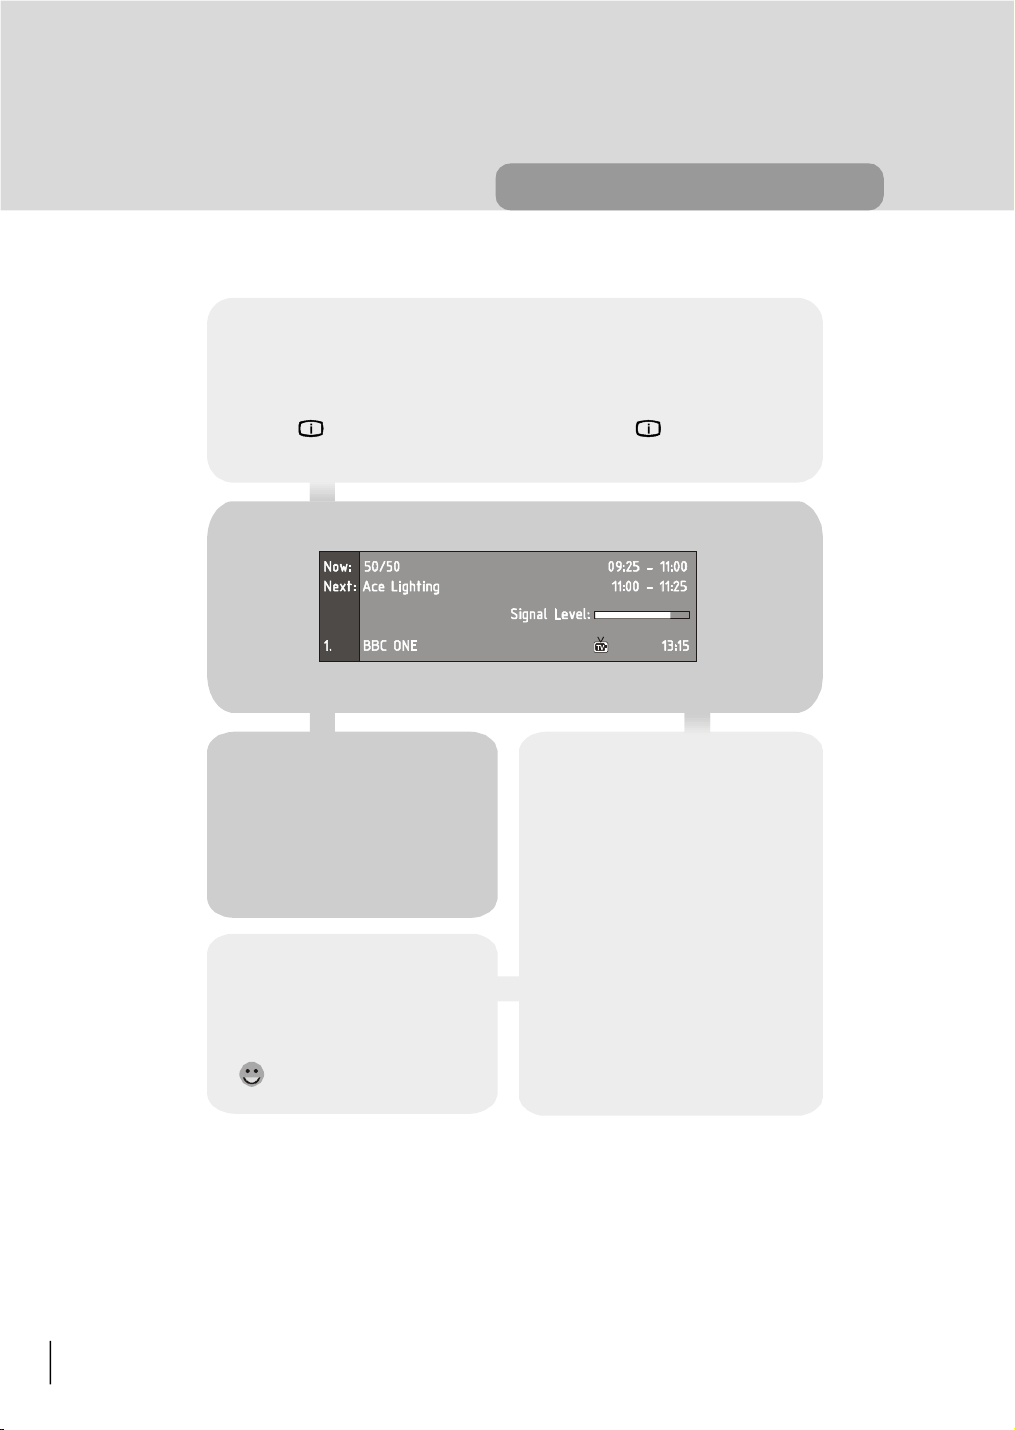
INFORMATION BANNER
Whenever you change channel, using the “P/CH+” and “- P/CH” keys or the num-
ber keys, the TV displays the channel picture along with an information banner at the
bottom of the screen. This will remain on the screen for approximately three seconds.
The information banner can also be displayed at any time while watching TV by press-
ing the “ INFO” key on the remote control. Pressing the “ INFO” key again
removes the banner.
16
Hint
Not all channels broadcast the programme data. If the name and times
of the programme is not available then
“No Information Available” is displayed
in the information banner.
Icons are also displayed in the information banner and if this channel is a
favourite channel (see ADVANCED
OPERATION - Favourite Channels
section).
favourite channel
The information banner gives a number
of facts on the channel selected and the
programmes on it. The name of the
channel is displayed, along with its
channel list number and an indication of
the strength of the signal received on
this tuning channel.
The name and the start and finish time
of the programme currently showing on
the selected channel are given, and the
current time.
Page 18
everyday operation
SELECT
i
If the selected channel is locked (see
Advanced operation- Channel protection), you must enter the correct
four digit code to view the channel.
Alternatively, the “P/CH+“ or “- P/
CH” keys are used to move to another, unlocked channel.
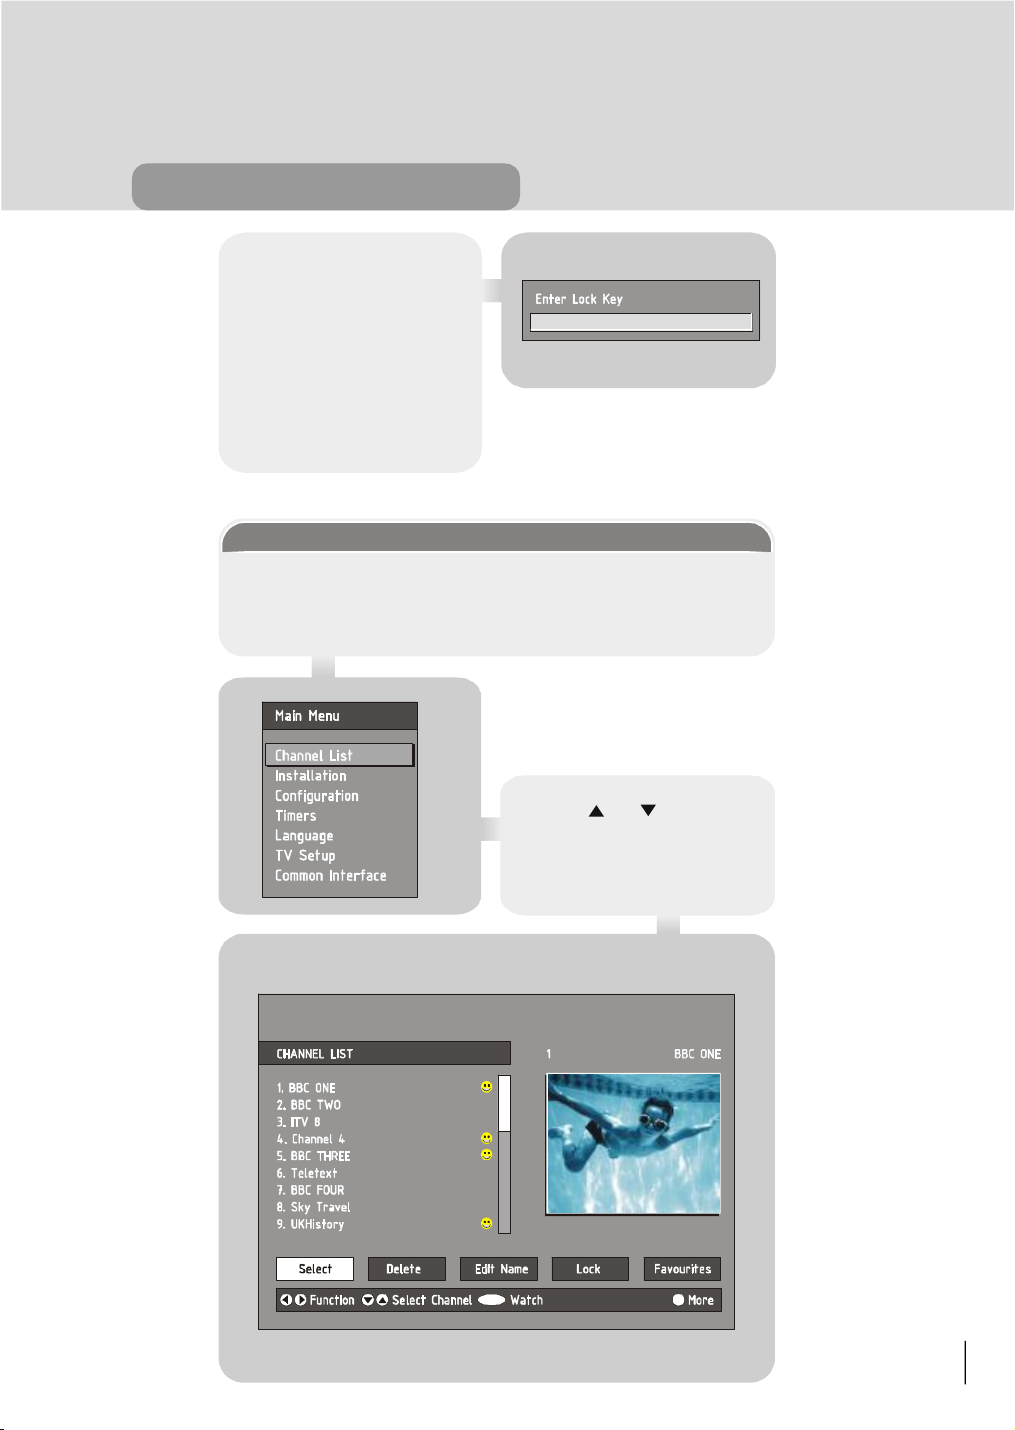
CHANNEL LIST
You can also select the required channel directly from the on-screen channel list.
First bring up the menu with the “M” key on the remote control handset.
*
Using the “ “ or “ ” keys on the remote control, make sure that the first
item, Channel List, is highlighted in yellow and press the “SELECT” key, to
display the channel list.
17
Page 19
Here, you can preview any channel
SELECT
i
stored by the TV before viewing it full
screen. The complete list of channels is
displayed in pages of 10 channels at a
time, with their channel list number and
a favourite channel icon if appropriate.
(see Advanced operation-Favourite
channels). The name and a quarterscreen image of the channel last
viewed is displayed on the upper right
of the screen.
Using the “ “ or “ ” keys, the highlight is moved through the list to the
channel required. The “Red” and
“Green” keys can also be used to
move forward or backward a complete page (ten channels) at a time.
Pressing “SELECT” key now changes
the quarter-screen display to show the
highlighted channel.
everyday operation
Hint
From the Channel List screen, it is
possible to edit the channel list,
including changing the name of stored
channels or deleting them. Editing the
list is covered in Advanced operationEditing The Channel List.
When using the Channel List to select
channels, use the “ “ or “ ” keys to
ensure that the highlighted button at
the bottom of the screen is SELECT,
so no editing functions are accidentally
begun.
When you leave the Channel List
screen, by pressing “M” key the
channel showing on the quarter
screen is selected for normal viewing
on the whole screen.
18
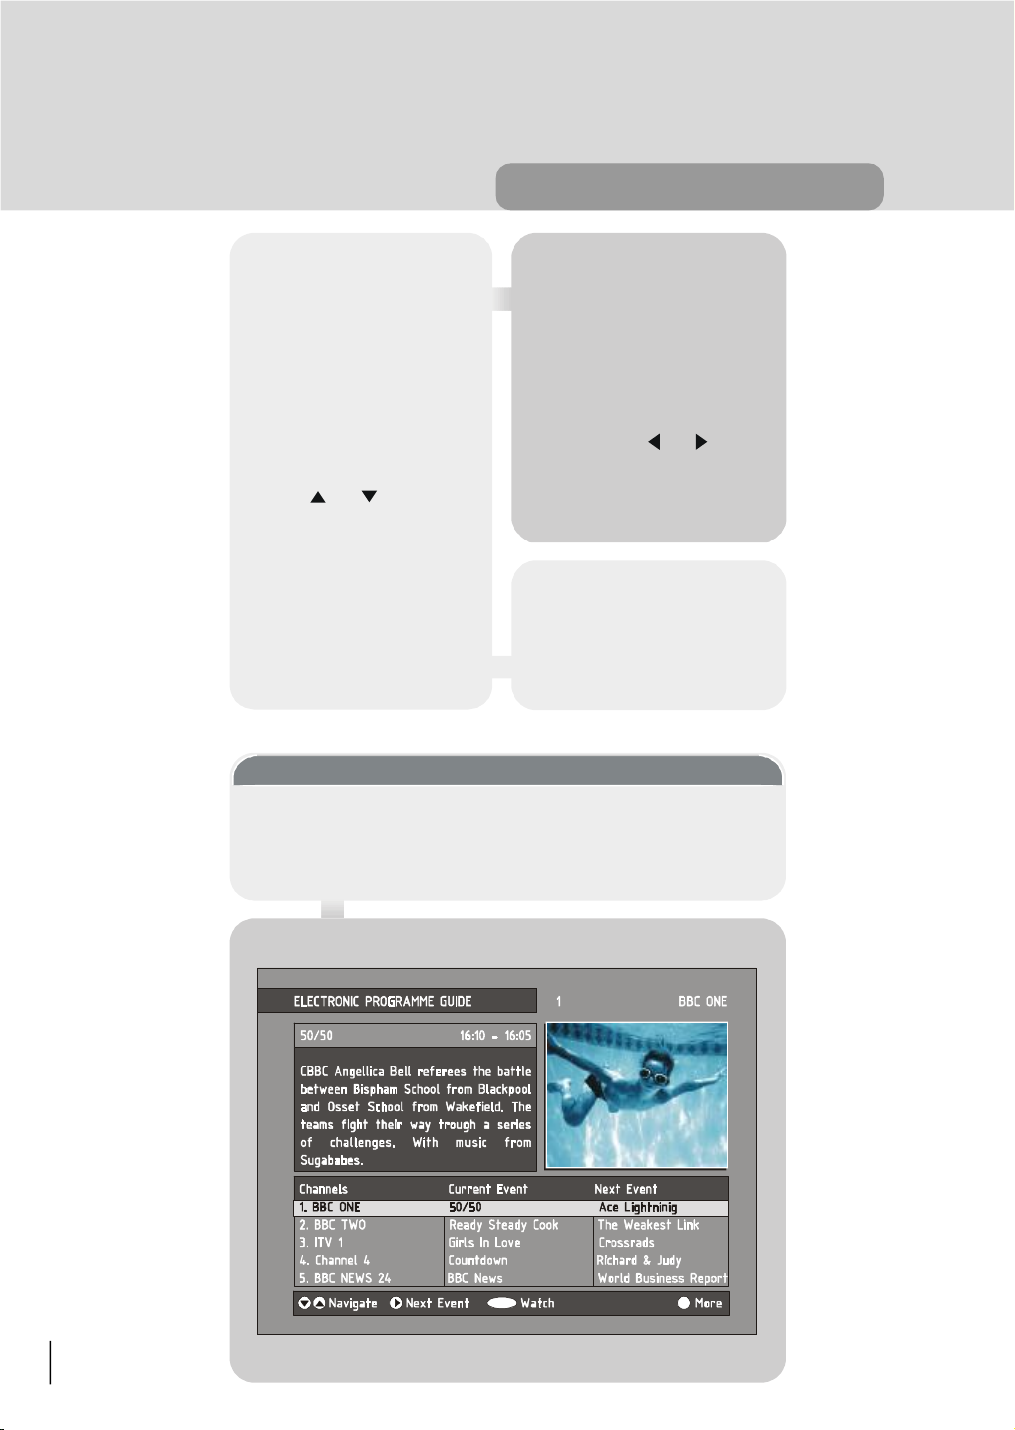
ELECTRONIC PROGRAMME GUIDE
The fourth way of selecting a channel is with the electronic programme guide, or
EPG. The EPG is accessed by pressing the “GUIDE” key. Like the Channel List,
the EPG screen displays a list of the stored channels (in pages of five channels)
along with information on what programmes are being broadcast.
Page 20

everyday operation
CURRENT PROGRAMME
The channels are listed at the bottom of the screen, each with the 'current event'
(the name of the programme showing at that time) and the 'next event' (the following
programme). When the EPG screen is first displayed, the channel last watched is
highlighted in the list of channels. A quarter-screen image of this channel is displayed
at the upper right of the screen along with the channel name and channel list number.
Hint
If the channel you have been viewing is a digital teletext channel then
no picture will appear in the
quarter-screen window.
Hint
Not all channels broadcast all the
programme information data.
Some channels do not provide the
current and next event data and/or
the programme details. In this case
the programme names and/or the
details are not displayed. This is not
a fault with your TV.
Details of the current programme
on that channel (the name of the
programme and, typically, a synopsis
with details of the stars involved, the
teams playing, or similar information)
along with the start and finish times are
displayed at the top left inside the dark
blue text window.
Moving the highlight through the list of
channels using the “ “ and “ ” keys
will change the programme details in
the text window to reflect the channel
highlighted. The quarter-screen window
continues to show the channel last
watched, so you can stay watching a
programme while at the same time
browse the details of what's on, on other channels.
You may then select the highlighted
channel for viewing on the quarterscreen window by pressing the “SE-
LECT” key.
You can leave the EPG screen, to enjoy
normal full-screen viewing of the channel in the quarter-screen window by
pressing the “GUIDE” key again, or
the “M” key.
19
Page 21
everyday operation
SELECT
i
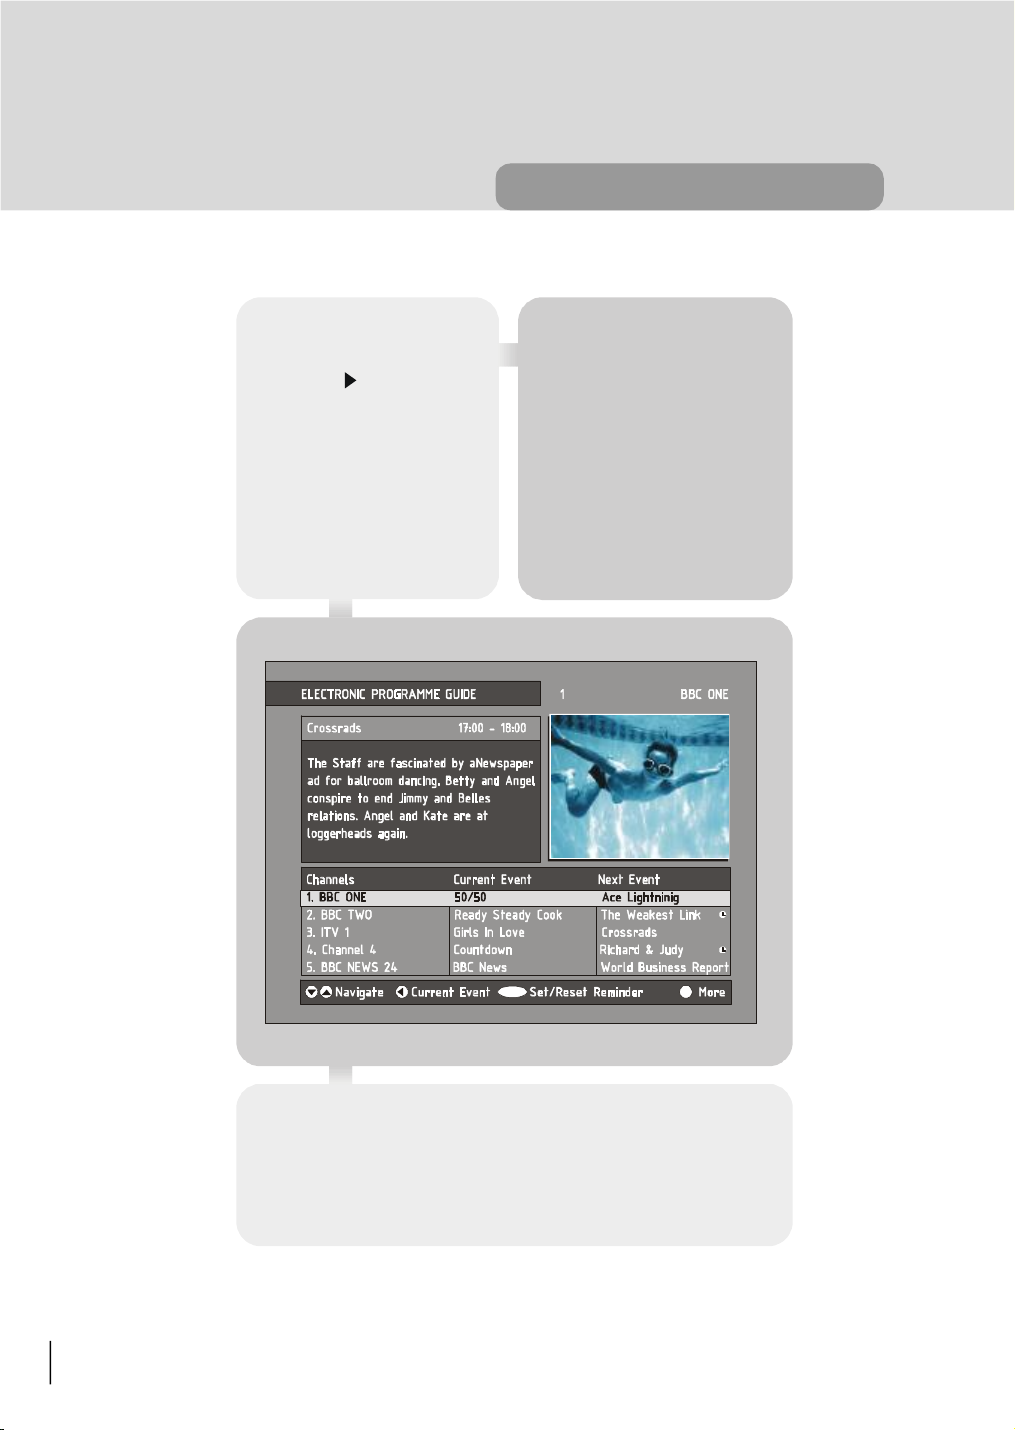
NEXT PROGRAMME
While the EPG screen is displayed,
pressing the “ ” key highlights, in
dark blue, the next event name in the
list of channels and displays the highlighted channel's programme details
for the next event (the programme
following the current programme) in
the text window.
As before, you can browse through
the list, checking the programmes
coming up next on all the channels.
Hint
If the programme details text for the current or next event is too long to fit into
the text window on the EPG screen, a
scroll bar appears on the right hand
side of the window and the text can be
scrolled up or down using the “YEL-
LOW” and “BLUE” keys on the remote
control. Using “Red” or “Green”
keys will display the next/previous 5
channels in the list.
Pressing the “SELECT” key while the next event details are displayed will set a
reminder to watch that programme. See Advanced operation- Programme Reminders And Timers.
You can return to normal television viewing (to watch the channel last selected in
the EPG screen) by pressing the “GUIDE” key again, or the “M” key.
20
Page 22

everyday operation
SOUNDTRACK LANGUAGE
Some programmes are broadcast in two or more languages simultaneously.
The language heard can be selected from the Language Menu. Press “M” key to
display the Main Menu and use the “ “ or “ ” keys to highlight the Language
line and press “SELECT” key. Use the “ “ or “ ” keys to highlight the
soundtrack language required and press “SELECT” key. Normal viewing, with the
required language soundtrack, can be resumed by pressing the “M” key.
If the programme has no alternative language soundtrack broadcast, the Language Menu will not be available, but a message, 'No Multi Language Available' is
displayed briefly.
21
Page 23

everyday operation
DIGITAL TELETEXT
Many digital terrestrial television channels not only broadcast pictures and sound
for programmes but also pages of information on the programmes, the weather,
news and many other topics.
Some channels are entirely given over to digital teletext and carry no normal TV
programme at all. These dedicated digital teletext channels will not give a quarterscreen image in the EPG or the Channel List screen. When such a channel is selected, after a brief pause, they will usually display the opening page of information
automatically.
Other channels have digital teletext pages broadcast alongside the television programme and often include a reduced-size broadcast picture within digital teletext
pages. These usually require the teletext keys to be pressed to activate the digital
teletext pages.
In both cases, moving through the
different pages of information is accomplished in a variety of ways,
dependent on the individual broadcasters, but including use of the
“ “, “ ”, “ “, “ ” and “SE-
LECT” keys to select items from
on-screen menus, and the coloured keys to jump directly to particular pages.
You can exit any digital teletext
channel by changing channel in any
of the normal ways. You can leave
the digital teletext function of a combined digital teletext/programme
channel, to return to normal television viewing of that channel, by
pressing the “ ” key..
Hint
Calling for the information banner or any
menu on-screen stops the TV from displaying the digital teletext pages and
they are temporarily replaced by a blank
picture while the banner or menu is displayed. Digital teletext cannot be accessed when the Subtitles are enabled
(See Advanced operation - Configuring
Your Receiver.
22
Page 24

everyday operation
SUBTITLE
Subtitle key Shows/hides subtitles of channel. When the subtitle key is pressed,
subtitle ON/OFF message is displayed.
DTV / TV KEY
If there is no connected VCR device, The DTV/TV key is used to
toggle TV and DIGITAL TV modes.
When the IDTV is in TV mode, the
TV scart is not switched and the TV
operates in analog mode.
When the IDTV is in DIGITAL TV
mode, this time the TV scart is
switched on and the TV is switched to
AV/RGB mode. And also, when there
is no menu on the screen , pressing
DTV/TV key will manually toggle the
IDTV between VCR mode and TV
mode. In VCR mode IDTV will display
the output of VCR device , In TV
mode IDTV displays its own outputs.
If IDTV scart mode is not changed by
pressing DTV/TV key , scart mode
will be automatically detected . (For
example if a dvd player is connected
to VCR scart and powered on , then
the IDTV will immediately switch to
VCR mode. The IDTV will switch to TV
mode if dvd player is switched off )
TIME ( ) KEY
When the TV is in analog mode; if TIME
key is pressed, time information that
comes from the analog teletext is displayed on the screen.
If TIME key is pressed when the TV is in
digital mode, digital broadcasting time
information is displayed.
23
Page 25

advanced operation
i
CONFIGURING YOUR TV
The Configuration menu screen is accessed from the Main Menu. Press the “M”
key to display the Main Menu and the “ ” key twice to highlight Configuration,
then press “SELECT” key to display the Configuration menu screen.
The various configuration functions are displayed in a list, along with a quarter-screen
image of the currently selected channel. You can select a function by highlighting the
corresponding menu line with the “ “ or “ ” keys. There are five configuration
functions.
AUDIO LANGUAGE
Digital terrestrial television channels
can broadcast simultaneous
soundtracks in more than one language. This function selects which
language soundtrack you will hear
when switching to a channel broadcasting with multiple soundtracks.
See also Everyday operation - Audio
Control.
Highlight the Audio Language line in
the Configuration menu and use the
“ “ or “ ” keys to cycle through
the language options.
Return to normal TV viewing by
24
pressing the “M” key.
Digital terrestrial television channels
can broadcast with subtitles displayed
on screen for the hard-of-hearing.
This function selects the desired subtitle language and enables the automatic display of subtitles whenever subtitle information is broadcast.
Highlight the subtitle line in the Config-
uration menu and use the “ “ or “ ”
keys to cycle through the disable and
language options.
Return no menu to normal TV viewing
by pressing the “M” key.
Page 26

advanced operation
Yes
SUBTITLE:
Selecting subtitle language other than “Off” will activate the subtitle language. When
the subtitle language is activated, subtitle will be displayed on the screen if any
matching subtitles are available.
Digital teletext and subtitles can not be activated at the same time. When you set the
subtitle language from the configuration menu and try to activate digital teletext by
pressing “ ” or colour buttons the following message appears.
Interactive services cannot be used
while subtitles are on. Would you like
to turn subtitles off now?
Therefore if you want to activate the digital teletext, you should set the subtitles off
from the configuration menu.
No
FAVOURITE MODE
This function enables or disables the favourite channel list mode. See Advanced
operation - Favourite Channels.
PARENTAL SETTINGS
This function enables or disables the
menu protection system and allows
the PIN code to be changed. See
Advanced operation - Channel And
Menu Protection.
*
If wrong Lock key is entered, the following message is displayed on the
screen.
25
Page 27

advanced operation
i
IDTV UPGRADE
The IDTV can be upgraded via the configuration menu, entered from the main menu.
In the configuration menu, there is the "IDTV Upgrade" button. Upgrade process can
be started by pressing this button.
There are two possibilities for IDTV software to be upgraded: automatic and manual.
Automatic upgrade can be enabled or disabled by pressing “ “/“ ” buttons. If it is
enabled, then there are two ways for automatic upgrade. The first one is checking the
existence of a new software every time the IDTV goes to standby. The second one is
waking up at 03:00 a.m. every night, provided that the IDTV is left in standby mode.
Both automatic upgrade methods result in standby mode either upgraded or not. If the
automatic upgrade is set to 'Disable' then this function will not work.
Manual upgrade starts if the 'Search for New Version' button is pressed.
Automatic Download
Search for New Version
MENU
After pressing the 'Search for New Version' button, the IDTV tunes to each frequency
that have been stored in its database and looks for the new software. Since this process takes some time, a warning message is displayed.
Enabled
Software Upgrade
Searching for upgrade. Please wait, or
press MENU to cancel.
Search Progress:
Depending on the existence of a new software, two different messages can appear on
the screen: 'No new software was found’ or 'New software found! Upgrade?'
26
Page 28

advanced operation
Yes
IDTV returns to the configuration menu if there is no new software.
Software Upgrade
Completed searching for upgrade.
No new sotware was found.
If there is a new software, pressing "Yes" will cause upgrading to be started.
By, pressing "No" user can return to the configuration menu.
New software found! Upgrade?
Loading will be displayed on the screen by a message and a progress bar, together with
a percentage button will indicate the status.
User can cancel the upgrade any time by pressing the “M” key.
No
Searching for upgrade. Please wait, or
press MENU to cancel.
75%
If the upgrade is cancelled or any error is occurred during the loading process, a warning
message is displayed and user is asked to press the “SELECT” key for returning the last
watched channel.
27
Page 29

advanced operation
75%
After loading the software into memory, it will be written permanently. This situation will
be shown displaying a message.
When the upgrade is finished a message box indicating this will appear and the IDTV will
go to standby in order the changes to take place.
28
Page 30

advanced operation
29
Page 31

advanced operation
SELECT
i
EDITING THE CHANNEL LIST
The digital terrestrial television channels found by the TV when first installed are
stored in its memory as a channel list. This list can be altered and amended to
remove unwanted channels and to suit your own preferences.
First bring up the Main Menu with the “M” key on the remote control handset.
Then, using the “ “ or “ ” keys on the remote control, make sure that the first
item, Channel List, is highlighted in yellow and press the “SELECT” key, to display
the Channel List.
30
The Channel List screen displays the
list of channels in the TV’s memory,
with a quarter-screen image window
showing the selected channel, and
can be used to change channels for
viewing, delete channels from the
memory, edit the name of the channel as it appears in the list and onscreen, lock a channel against viewing by younger members of the
family, and set up favourite channels.
Channel List functions are carried out
on one channel at a time. The channel
to be affected is first highlighted in the
list using the “ “ or “ ” keys. Youou
can move faster through the list using
the “Red” or “Green” keys to move
up or down a complete page of 10
channels in one jump.
Page 32

advanced operation
SELECT
This function selects a channel for
viewing and is an alternative to using
the “P/CH+” and “- P/CH” keys,
channel number or EPG. Highlight
the channel to be viewed, highlight
the “SELECT” button at the base of
the screen using the “ “ or “ ”
keys and press “SELECT” key. The
highlighted channel now appears in
the image window and you can leave
the Channel List to view the channel
by pressing “M” key.
EDIT NAME
The channel names which appear in
the channel list and the information
banner are assigned by the broadcasters and some longer names are
abbreviated to become unrecognisable. You can edit the names to suit
your preferences with the Edit Name
function.
Highlight the channel to be renamed,
highlight the EDIT NAME button at the
base of the screen using the “ “ or
“ ” keys, and press “SELECT”
key. The highlighted channel name
appears on the right of the screen
with the first character highlighted by
a cursor. Any of the 16 characters
that make up a channel name can be
highlighted using the “ “ or “ ”
keys and the highlighted character
changed by pressing the “ “ or
“ ” keys to cycle through the alphabet, numbers and other characters available.
DELETE
Duplicate entries can be produced in
the channel list from transmitters operating at different frequencies in adjacent areas, and you may wish to delete these duplicate entries from the list.
In addition, the channel list may include
the channels which you do not want in
the list.
Highlight the channel to be deleted,
highlight the DELETE button at the
base of the screen using the “ “ or
“ keys, and press “SELECT” key..
The warning message “The select-
ed service will be permanently
deleted. Are you sure?” is dis-
played on the screen. Press “SELECT” key. The highlighted channel is
deleted from the list.
You can now perform further editing
on the channel list, or return to normal
broadcast viewing by pressing the
“M” key.
Hint
You can also enter a channel name
using the number keys on the remote control. Each key represents
several letters (as marked on the remote control) and pressing a key
several times will enter each letter (in
both capitals and lower case), and
the number, in turn, in the character
position marked by the cursor. The
zero key enters all the punctuation
marks available and a blank space.
With practise, this is a very quick
means of entering the required letters into the channel name.
When the required changes have been made, pressing “SELECT” key stores the
new name and returns to the Channel List screen. Alternatively, pressing “M” key will
abandon the name change and return to the previous name.
You can now perform further editing on the channel list, or return to normal broadcast viewing by pressing the “M” key.
Using the other two functions of the Channel List menu screen - LOCK and FAVOURITES - is dealt with in the next sections.
31
Page 33

advanced operation
CHANNEL AND MENU PROTECTION
CHANNEL LOCK
Some channels broadcast material which you do not want younger members of the
family to watch. Any channel can be 'locked' so that it cannot be selected for viewing
without first a four-digit PIN code being entered. In this way any channel not suitable
for younger viewers can be protected.
The channel lock is applied with the Channel List menu. Press the “M” key on the
remote control handset to display the Main Menu and then, using the “ “ or “ ”
keys on the remote control, make sure that the first item, Channel List, is highlighted in
yellow and press the “SELECT” key.
Highlight the channel to be locked using the “ “ or “ ” keys. You can move
through the list 10 channels in one jump using “Red” or “Green” keys. Now select
the LOCK button at the base of the screen with the “ “ or “ ” keys and press “SE-
LECT” key.
A window requesting the PIN code
is displayed and the four-digit code
should be entered using the number keys on the remote control, followed by the “SELECT” key. A
lock icon is then displayed alongside the channel name in the channel list.
You can now leave the Channel List
screen and return to normal TV
viewing by pressing “M” key. Any
attempt to change channel to the
locked channel will now display the
same window requesting the PIN
code and the channel will only be
displayed on entry of the correct
code. To remove the lock on a
channel, repeat the same process
as to lock the channel.
Hint
The PIN is factory set to 0000.
This code should be reset (as described below) to another sequence
of numbers, known only to you, when
you have finished setting up the TV.
*
32
Page 34

advanced operation
MENU LOCK
Simply locking a channel will not deflect a determined would-be viewer. Re-installing
the complete channel list, for example, will bypass the channel lock. However, the
menus can be locked out of use too, to prevent this.
Display the Main Menu by pressing the “M” key, highlight Configuration, and press
“SELECT” key to display the Configuration menu screen. Highlight the Parental
Settings line of the menu (press “ ” key four times) and press “SELECT” key to
display the Parental Settings menu (after the PIN code has been entered). Here the
menu lock-out can be set and the PIN code changed.
With the Menu Lock line highlighted, use the “ “ or “ ” key to cycle the menu
lock setting through Disabled, Main Menu and Installation. The Main Menu setting
will lock out the complete menu system; the Installation Menu setting locks only the
Installation menu (see Advanced operation - Re-installation); and the Disabled setting allows free access to any of the menus.
Hint
If you want the channel and menu
locks to work efficiently and actually protect channels from access,
do change the PIN code from the
factory default. Make sure that you
choose a number that is not obvious to others but one that can be
remembered by you.
You must return to normal TV viewing by pressing the “M” key (three
times) to activate the lock. Now
any attempt to access the locked
menus will display the PIN request
window and the menus will only be
displayed on entry of the correct
PIN code.
*
The same Parental Settings menu is
used to change the PIN code. With the
Set Lock Key line highlighted, press
“SELECT” key to display the Set Lock
Key window. This requests the new
four-digit code to be entered twice (for
confirmation) and the new code comes
in effect when you return to the Configuration menu by pressing “M” key.
33
Page 35

advanced operation
SELECT
i
FAVOURITE CHANNELS
There will be some channels that you tend to watch more often and some only
occasionally. Although some duplicate or scrambled channels you may want to
delete from the channel list, others although not watched frequently, you will not
want to do away with altogether. The favourite mode allows the most-watched
channels to accessed more easily, leaving the less-watched channels accessible
but out of the way.
When the favourite mode is activated, the “P/CH+” and “- P/CH” keys cycle
through the favourite channels only and the EPG will list the favourite channels
only (other channels can still be accessed by channel list number or from the
Channel List menu screen).
Any channel can be a favourite channel and the Channel List menu is used to label
those channels you want as favourites.
Display the Channel List menu screen by highlighting Channel List on the Main
Menu and pressing “SELECT” key.
Use the “ “ or “ ” keys to highlight the “Favourites” button at the base of the
screen and then, in turn, highlight each channel that is required to be a favourite
channel, using the “ “ and “ ” keys (and the “Red” or “Green” keys), and
press “SELECT” key. A channel selected as a favourite appears in the main channel list with a favourites icon against the channel name.
34
Page 36

advanced operation
A channel can have its favourites status removed by repeating this procedure, to remove the icon. Leave the Channel List menu by pressing “M”
key.
Once the required channels have been marked as favourite channels, the favourite
mode can be activated to allow easy access to them. Press the “M” key to
display the Main Menu, the “ ” key twice to highlight Configuration, and press
“SELECT” key to display the Configuration screen. Press the “ ” key two times
to highlight the Favourite Mode line and using the “ “ or “ ” keys change the
setting from Off to On.
When you leave the Configuration menu by pressing “M” key the favourite mode is
activated. Now, changing channel using the “P/CH+” or “- P/CH” keys will switch
to only those channels marked as favourites in the channel list. Similarly, the onscreen list in the electronic programme guide contains only the favourite channels.
You can still access all the channels in
the channel list by keying in their channel list number or by selection from
the Channel List screen. Alternatively
you can switch off the favourite mode
from the Favourite Mode line of the
Configuration menu.
Hint
The favourite mode can only be
activated if one or more channels
in the channel list are marked as
favourites. Similarly, if the favourite
status is removed from all the
channels in the Channel List, the
favourite mode is turned off automatically.
PROGRAMME REMINDERS AND TIMERS
With the greatly extended channel choice that digital terrestrial television brings, it is
all too easy to miss a favourite programme. The TV has two facilities built in to help
you make sure you catch all the TV shows you want.
PROGRAMME REMINDERS
Programme reminders can be set to signal that a programme is about to start
when you are watching another channel. A reminder is set from the Electronic
Programme Guide screen.
Press the “GUIDE” key to display the EPG screen and press “ ” key to display
the next programme details in the text window and highlight the name of the next
programme in the list of channels. Press “SELECT” key when a programme you
want to watch is highlighted and the reminder icon is displayed against that programme's name. You can exit the EPG screen in the normal way - pressing
“GUIDE” key or “M” key. Later, shortly before the programme is due to start,
the TV will display a reminder on the screen over the picture of the channel being
viewed.
Use the “ “ or “ ” keys to highlight the YES or NO buttons as appropriate and
press “SELECT” key. If you select the YES button, the TV switches over to the reminder channel.
35
Page 37

advanced operation
SELECT
i
EVENT TIMER
You can also set a timer to switch the TV to any channel without your intervention.
This is intended for making video recordings of programmes when you are out. If
a single programme is to be recorded, the TV can be left switched to the required
channel and the timer set on the VCR. However, if two or more programmes on
different channels are to be recorded then the timer is set as well, to select the
required channel when it is needed.
Display the Main Menu by pressing the “M” key and highlight and select the Timers line to display the Timer menu screen. Up to five separate timer events can be
set and each is displayed in the Timer screen, showing the event number, the
channel to be selected, the start time, end time, date and the mode - whether that
event is active (and will be acted on) or not.
MENU
To set an event, highlight its mode button using the “ “ or “ ”keys and press
“SELECT” key to display the timer entry window. Here the five settings of channel name, start time, end time, date and frequency mode can be set. You can
move freely between each setting using the “ “ and “ ” keys. The channel
name is set using the “ “ or “ ” keys to display the channel which broadcasts
the programme to be recorded. The start time, end time and date are each set
with the number keys on the remote control in 24-hour format. The frequency
mode determines how often the TV operates this event and is set with the “ “ or
“ ” keys to be either Once, Daily or Weekly..
36
Page 38

advanced operation
Pressing “M” or “SELECT” key returns to the Timer screen with the settings in
place in the timer event list. The event mode is automatically set to Active and you
can now return to normal viewing (press the “M” key) and at the appointed time
the TV will switch over to the required channel and at the end of the event, switch
the TV to previous channel.
Hint
If an invalid number for the start or
end times or the date is entered,
“Entered time is not valid.” message
is displayed on the screen.
When the Timer screen is displayed, any event can be set to be
Inactive (so it will not occur) or the
channel, times and frequency
mode altered by highlighting the
event's Mode button and pressing
“SELECT” key as before.
You can exit the Timer screen and
return to normal TV viewing by
pressing “M” key.
Event Timer:
If timer action occurs when the TV is in stand-by mode, the TV turns on but no picture
is seen and no sound is heard.
Selected digital channel will be at the Scart-2 output. The selected channel can be
watched or copied via Scart-2. If timer action occurs while tv is watched, tv switches to
the selected channel. When timer expires, the TV switches to the channel which it is
switched from.
While watching Analog TV broadcasting, you can get Digital TV broadcasting from
EXT-2. For this option you must set Av-2 Output in Feature menu to DIGITAL mode.
(See Analog TV section - Feature menu) Start and end time of Digital TV programmes
can be set in Timers menu.
While watching Digital TV broadcasting, you can get Analog TV broadcasting at that
time from EXT-2. For this option you must set Av-2 Output in Feature menu to TV.
(See Analog TV section - Feature menu)
Hint
If you are watching digital terrestrial
TV at the time the timer event starts,
a message is flashed onto the
screen announcing that the TV is
'Switching to timer channel' so you
understand what is happening.
37
Page 39

RE-INSTALLATION
Although your TV will not lose its settings or stored channels when switched off,
you may wish to re-install the TV because you have moved to a different area with
different broadcast frequencies, you wish to reinstate a channel previously deleted
from the channel list, or you want to watch new channels which have started broadcasting.
Press the “M” key to display the Main Menu and using the “ “ or “ ” keys,
highlight the Installation line and press “SELECT” key to display the Installation
Menu.
You can either perform a First Time Installation, effectively resetting the TV to its exfactory condition, or just search for channels.
38
Page 40

advanced operation
FIRST TIME INSTALLATION
To reset the TV, highlight the First Time Installation line in the menu and press “SELECT” key. A warning screen is displayed in case of accidental operation.
Highlight the YES button with the “ “ or “ ” key and press “SELECT” key to
erase all the channels and settings and switch the TV to standby. You can now start
again as detailed in Preparation - Tuning In.
ADD CHANNELS
Your TV can search for channels automatically (searching all the broadcast frequencies for free-to-air channels) or manually (searching one specified broadcast frequency only for any channels to be found there).
Press the “M” key to display the Main Menu and using the “ “ or “ ” keys,
highlight the Installation line and press “SELECT” key to display the Installation
Menu. Highlight the Add New Channels line and press “ ” key to display the
options. Select Automatic Search with the “ “ or “ ” keys and press “SE-
LECT” key. This starts the automatic tuning process as described in “Tuning In”,
and searches through all the available broadcast frequencies for free-to-air channels.
Highlight the YES button with the “ “ or “ ” key and press “SELECT” key to
start the automatic search.
39
Page 41

advanced operation
AUTOMATIC SEARCH
Channels:
Codec 4:3
Codec 16:9
BBC ONE
BBC TWO
BBC CHOICE
BBC NEWS 24
BBCi
BBC PARLMNT
BBC Knowledge
Searching UHF Channel: 49. Please wait. This will take a few minutes.
0 %
MENU
Cancel Search
If, alternatively, from the search options menu the Manual Search line is highlighted and “SELECT” key pressed, the manual search screen is displayed.
100 %
40
This is for searching for digital channels on a single broadcast frequency. The frequency channel number
(21-68) is entered in the box at the
top left of the screen and the received signal level and signal quality
can be observed on the two bar
graphs at the bottom. When “SE-
LECT” key is pressed, the TV
searches that frequency and display
a list of the channels found. Before
Hint
The bar graphs of signal quality and
signal level give a good indication of
whether any channels are likely to be
found. If only the signal level graph
shows a high value then it is likely that
an analogue channel occupies that
broadcast frequency. If the signal
quality bar is high as well then it is a
digital frequency and digital channels
will probably be found.
returning to the Installation menu.
Again, channels which duplicate those already in the channel list are ignored.
However, the manual channel search will find all channels on the broadcast frequency.
When either search is finished, press the “M” key to return to normal broadcast
viewing, to watch the new digital terrestrial television channels found.
Page 42

If no digital terrestrial television
HINT
Depending on the reception conditions
in your particular area,
you may find that the list of channels
found includes one or more repeated
names. This is because the IDTV may
detect and store some channels, including those it cannot receive
clearly, from adjacent areas alongside
the strong channels from a transmitter
nearby. This is not a problem and the
weaker channels can be deleted from
the IDTV later.
When you have finished watching digital terrestrial TV, you may wish to switch the
IDTV to standby to save power - even when the television is turned off, without
harm to the television or itself. The IDTV is returned to standby by pressing the
“ ” key on the remote control handset.
broadcasts are found the IDTV will
display a message:
Press “SELECT” key to install channels. If no channel is found,you
should then refer to the Troubleshooter Guide to establish the cause of the
problem.
Hint
In standby, the TV still consumes power and thereby contributes to air and
water pollution and the exhaustion of
the World's natural resources. Overnight, or when your IDTV is not going
to be used for long periods of time,
you can turn it off at the mains and this
will save energy (and save you money).
You will not have to re-install the IDTV
when it is turned on again.
41
Page 43

advanced operation
COMMON INTERFACE MENU
Common Interface Menu is entered from the Main Menu when the Common Interface
button is selected by the user. Just after the selection, a new menu appears on the TV
including the names of the common interface modules inserted to the slots. If there is no
module inserted into the slots, common interface button on the main menu is disabled
by the system. The MediaGuard names are selected for demostration so you may see
different names on this Common Interface menu. Our IDTV has two slots for insertion of
modules, however you can see up to two names of modules in this menu option.
Common Interface
Figure 1. Common Interface Menu with
modules inserted into the slots.
42
Common Interface
Figure 2. Common Interface without any
module inserted.
The user can choose one of the buttons to enter that module's menu. The buttons
and the information seen on the screen come from the common interface module
and the user can navigate among the buttons by using the “ “/“ ” keys of the
remote control device.
Page 44

advanced operation
Consultations
Authorizations
Module information
Cancel
Profile1 Modules display three types of items on the TV monitor.
1) Module Menu (Figure 4)
2) Inquiry Box (Figure 6)
One of them is the Module Menu as you can see an example of this type in Figure 4
Also the common interface module can display a list of items (channel list, subscription information, module information etc.) and an inquiry message for pin control,
changing module ratings etc. You can see List box and Inquiry box taken from the
Viaccess module. This section can only demonstrate a few of the modules' information and for each of the module you want to use, you will see different names, buttons , lists , menus , etc.
Viaccess Module
Select the item
OK
Figure 4. Module Menu (this menu is identical for the Viaccess Common Interface Module)
43
Page 45

advanced operation
Common Interface
Please, enter your PIN code
? ? ?
Figure 6. Module Inquiry (this list is identical for the Viaccess Common
Interface Module)
LANGUAGE
Digital terrestrial television channels can broadcast simultaneous soundtracks in more
than one language. This function selects which language soundtrack you will hear when
switching to a channel broadcasting with multiple soundtracks.
The Language menu screen is accessed from the Main Menu. Press the “M” key to
display the Main Menu and the “ ” key to highlight Language, then press “SELECT”
key to display the Language menu screen.
Then, using the “ “ or “ ” keys on the remote control, make sure that the selected
language is highlighted in yellow and press the “SELECT” key to change the language.
Return to the Main Menu by pressing the “M” key.
44
TV SETUP:
To be able to go through TV menu functions, you can use this item.
The digital TV setup menu screen is accessed from the main menu. Press the “M” key
to display the main menu and use the “ ” key to highlight TV Setup, press “SE-
LECT” key to display TV Setup menu screen.
Page 46

P - -
Operating the TV
You can operate your TV both using the remote control handset and onset buttons.
Operating with the buttons on the TV
set
Volume setting and programme selection can be
made by using the buttons at the control panel on the
top of the TV.
Volume Setting
• Press “- VOLUME” button to decrease volume or
“VOLUME +” button to increase volume, so a volume level scale (slider) will be displayed at the
middle of the bottom on the screen.
Programme Selecting
• Press “P/Ch +” button to select the next programme or “- P/Ch” button to select the previous
programme.
Entering Main Menu
• Press "MENU" button to enter Main menu. In the
Main menu select submenu using
“- P/Ch” or “P/Ch +” button and enter the sub-
menu using “- VOLUME” or “VOLUME +” but-
ton. To learn the usage of the menus, refer to the
Menu System section.
For Analog TVFor Digital menuNo menu
-P/Ch
P/Ch+
-VOLUME
VOLUME+
MENU
Cursor down
Cursor up
Select
Menu off
Previous menu
Cursor down
Cursor up
Select
Cursor right
Menu off
Previous menu
Program down
Program up
Volume down
Volume upSelect
Menu open
Operating with Remote Control
The remote control handset of your TV is designed to
control all the functions of the model you selected. The
functions will be described in accordance with the
menu system of your TV.
Functions of the menu system are described in Menu
System section.
Volume Setting
Press “ +” key to increase volume. Press “-
” key to decrease volume. A volume level scale
(slider) will be displayed at the middle of the bottom
on the screen.
Programme Selecting
(Previous or next programme)
• Press “-P/CH” key to select the previous pro-
gramme.
• Press “P/CH+“ key to select the next
programme.
Programme Selecting (direct access):
Press digit keys on the remote control handset to select programmes between 0 and 9. TV will switch to
the selected programme. To select programmes between 10 - 99, you must use the double digit key "- / -
-".
this OSD is displayed at the left hand upper
on the screen.
Press the digit buttons consecutively for the channel
you wish to select. (eg for programme 27, first press
2 then 7). If you do not press the second digit within 3
secs of pressing the first, the display will disappear.
Press directly the programme number to reselect
single digit programmes.
Programme Swapping
• Press "P<P" (programme swap) key to select the
last selected programme. This key provides swapping between last two selected programmes. For
example, select programme 8, then select
programme 2. Now, if you press "P<P" key, programme 8 will be selected. If you press the same
key again, programme 2 will be selected and so on.
press the same key again, programme 2 will be selected and so on.
45
Page 47

213
546
879
0
Menu System
Your TV has been designed with a menu system to
provide an easy manipulation of a multi-function system. The TV is controlled by choosing the commands, which are displayed on the screen.
Press the "M" key. The main menu will be displayed at
the middle of the screen.
Menu
To select a sub-menu use “ ” or “ ” key, and press
“ ” or “ ” key or directly press “OK” key..
MAIN MENU
The menu system is described below.
The short way in order to enter the menus, press :
"M" Key,Main Menu.
Red Key,Sound Menu.
Green Key,Picture Menu.
Yellow Key,Feature Menu.
Blue Key,Install Menu.
" INFO" Key,,Programme Menuin
TV mode or, Source Menu In AV mode
“M” key has two functions; first is opening or closing
the main menu, and the second is closing the submenu and then opening its parent menu.
Sound Menu
To change sound settings
• Enter the Sound Menu directly by pressing the Red
key or,
• As you enter the main menu, sound will be the first
item. In the main menu, select Sound using “ ” or
“ ” key, then enter the sound menu pressing “ ” ,
“ ” or “OK” key..
Setting Volume:
As you enter the sound menu, Volume will be the first
selected option.
• Press “ ” key to increase volume.
• Press “ ” key to decrease volume.
Or you can directly change the volume settings using
“ +” (to increase) or
“- ” (to decrease) key..
Sound
Setting Balance
It allows adjusting the distribution between the left and
right speakers.
• Using “ ” or “ ” key select Balance.
• Press “ ” key to change balance to the right.
• Press “ ” key to change balance to the left.
When balance control is in mid position, the cursor is
displayed with one arrow.
46
Page 48

Sound
Selecting Sound Mode
• Using “ ” or “ ” key select Sound Mode.
• Press “ ” or “ ” key to change Sound Mode.
You can choose Mono, Stereo or Dual
(I-II) mode, only if the selected channel supports that
mode.
You can also change sound mode directly pressing
“I-II” button on your remote control.
Sound
Mono
In case of bilingual broadcast (Dual Sound), you can
select original or dubbed language using mode option.
Setting Effect
You can use this feature to switch the sound effect on
and off. Pressing “ ” or “ ” key will turn on and off
this feature. If the current sound system is Mono and
the sound effect is set ON, then the sound will be
heard as if it is Stereo. If the current sound system is
Stereo, switching this effect on will give a more spatial sound.
Sound
On
To Change Headphone Sound Settings
• Using “ ” or “ ” key select Headphone.
• Press “ ” or “ ” key or directly press “OK” key
on Headphone, to enter the Headphone menu.
This is a sub-menu of Sound menu, and all options
in this menu are working as the same in the Sound
menu.
Sound
Setting Headphone Volume
• As you enter the Headphone sound menu, Volume
will be the first selected option.
• Press “ ” key to increase volume.
• Press “ ” key to decrease volume.
H. Phone
Setting Headphone Sound Mode
• Using “ ” or “ ” key select Mode.
Pressing “ ” or “ ” key will change the current
sound mode. (e.g.: If the current sound mode is stereo, it will be stereo or visa versa).
47
Page 49

In case of bilingual broadcast, you can select original
Stored
or dubbed language again using mode menu. So
when somebody listens to the original language from
the loudspeakers, somebody else can listen to the
dubbed language from headphone.
To Store the Settings
• Press “OK” key on the remote control to store the
settings directly.
or,
• Using “ ” or “ ” key select Store. Press “ ”,
“ ” or “OK” key to store current headphone vol-
ume and sound mode. The stored values will be
valid for all the programmes.
Equalizer
• Using “ ” or “ ” key select Equalizer..
• Press “ ” or “ ” key or directly press “OK” key
to enter Equalizer sub-menu.
Sound
Equalizer . . .
the value, or “ ” key to decrease the value. In mid
position, cursor is displayed with one arrow.
To store the Equalizer settings, press “ ” or “ ”
key or directly press “OK” key on “Store” option.
The settings will be stored and you can recall them by
selecting "USER" in the MODE item.
Setting AVL
• Using “ ” or “ ” key select AVL.
• Pressing “ ” or “ ” key will turn on and off this
feature.
Automatic Volume Limiting (Avl) function normalises
sound to obtain fixed output level between programmes, having different sound levels.
Sound
On
To Store the Settings
• When the cursor is on any item which has no submenu press “OK” key on the remote control to
store the settings directly.
or,
• Press “ ”, “ ” or “OK” key on “Store” option to
store Sound menu settings.
Sound
In Mode item there are five predefined and one user
defined options. These are User, Classic, Jazz, Rock,
Pop and Flat. The predefined options can not be
changed by the user. If you want to change one of the
frequency values of the predefined options, the Mode
must be switched to User option.
The 5 items below the Mode are available to adjust
the sound settings in 5 frequency values: 120 Hz, 500
Hz, 1.5 kHz, 5 kHz and 10 kHz. To change the values
of 5 frequency options, select one of the options by
“ ” or “ ” key, and then press “ ” key to increase
48
Page 50

Picture Menu
• To enter the Picture menu directly, press the Green
key, or
• Press "M" key, now you are in main menu. In the
Main menu, select “Picture” using “ ” or “ ” key,,
then enter the Picture menu pressing “ ” / “ ” or
“OK” key.
Menu
Setting Colour
• Using “ ” or “ ” key select Colour..
• Press “ ” key to increase colour level.
• Press “ ” key to decrease colour level.
Picture
Setting Brightness
• As you enter the picture menu, Brightness will be the
first item.
• Press “ ” key to increase brightness.
• Press “ ” key to decrease brightness.
Picture
Setting Contrast
• Using “ ” or “ ” key select Contrast.
• Press “ ” key to increase contrast level.
• Press “ ” key to decrease contrast level.
Picture
Setting Sharpness
• Using “ ” or “ ” key select Sharpness.
• Press “ ” key to increase peaking level.
• Press “ ” key to decrease peaking level.
Picture
Setting Picture Mode:
• Using “ ” or “ ” key select Picture Mode.
• Press “ ” or “ ” key to set Picture Mode. Picture
Mode can be set to Auto, 4:3, 16:9, Cinema,
Subtitle, Zoom or Panorama.
Picture
4:3
49
Page 51

Setting Noise Reduction
Stored
• Using “ ” or “ ” key select Noise Reduction.
• Press “ ” or “ ” key to select Noise Reduction
level “Off” or “Minimum” or “Medium” or “Maxi-
mum” then select “store” and press “ ” or “ ”
key to save your setting.
Note 1:
At low signal level, the changings on the Noise Reduction function
are not effective when there is menu on the screen. If the menu is removed, the effect of this function is seen. At normal broadcasting,
Noise Reduction changings are effective at once.
Note 2:
At moving pictures, while Noise Reduction is at maximum level,
some picture distortions may occur. If Noise Reduction is set to medium or minimum, the picture will improve.
Picture
Medium
Setting Hue
(During Playback NTSC system, this will appear in AV
mode only when NTSC video source is applied. Otherwise, HUE option is invisible in Picture menu.):
• Using “ ” or “ ” key select Hue.
• Press “ ” key to increase hue level.
• Press “ ” key to decrease hue level.
Center value is indicated with one arrow.
Picture
To Store the Settings
• When the cursor is on any item which has no submenu press “OK” key on the remote control to
store the settings directly.
or,
• Press “ ”, “ ” or “OK” key on Store option to
store Picture menu settings.
Picture
Feature Menu
• To enter the Feature menu directly, press the Yellow
key, or
• Press "M" key, now you are in main menu. In the
main menu, select Feature using “ ” or “ ” key..
Then enter the Feature menu pressing “ ” / “ ” or
“OK” key.
Menu
Sleep Timer
As you enter the Feature menu, Sleep Timer will be
the first selected option. Use “ ” or “ ” key to
change the Sleep Timer values between Off, 0:15,
0:30, 0:45, 1:00,
1:15, 1:30, 1:45 and 2:00.
If sleep timer is activated it is displayed with the TV
status on the upper right of the screen.
0:15
50
Page 52

Feature
English
TV
PC
Off
Once the time set with the sleep timer has elapsed, the
set will go to standby.
Child Lock
You can use this feature to prevent children turning on/
off TV or changing programmes or adjustments etc.
without remote control.
The Child Lock feature can be set On or Off by
“ ” or “ ” key. When Off is selected, there will be
no difference in the operation of your TV. When On is
selected, the TV can only be controlled by the remote
control handset. In this case the control panel keys at
the top of the TV will not work.
Feature
Off
Selecting Menu Language
Menu language can be chosen by pressing “ ” or
“ ” key on Language item.
Feature
Feature
PC Sound Mode
PC sound can be chosen by pressing “ ” or “ ”
key on PC Sound Mode item.
You can select sound that comes from TV, AV-1, AV2, AV-3 or PC to hear in PC mode.
Feature
To Store Settings
In Feature menu all settings are stored automatically.
Installation Menu
• To enter the Installation menu directly, press the
Blue key, or
• Press "M" key, now you are in main menu. In the
main menu, select “Install.” using “ ” or “ ” key..
Then enter the Install menu pressing “ ” / “ ” or
“OK” key.
Menu
Av-2 Output
From Av-2 Output; DIGITAL, TV, AV-1 or AV-3 can be
given. DIGITAL, TV, AV-1 or AV-3 can be chosen by
pressing “ ” or “ ” key on "Av-2 Output".
When any item is selected with “ ” or “ ” key in the
install menu, the selected item will be highlighted on
the bottom bar. Changes by pressing “ ” or “ ”
key will be result only at highlighted item on the bottom bar.
51
Page 53

Selecting Programme
P 02 C-36 C 36 252
To select programme number, you can use “ ” or
“ ” key, Digit Keys or The Double Digit key with digit
keys.
Install.
Selecting Band
Band, can be chosen either,
• “C” or “S” by “ ” or “ ” key..
Selecting Channel
Channel can be changed by “ ” or “ ” key, by
Digit Keys or by the Double Digit key with digit keys.
For band C,
01 - 83, WEST EUROPE.
01 - 12, 21 - 69, EAST EUROPE .
01 - 17, 21 - 73, UK.
01 - 76, FRANCE.
04 - 09, FRANCE 2.
For band S,
01 - 41, for all channel tables.
Selecting Search
To start the search process, press “ ” key for for-ward search or “ ” key for backward search. If a
signal is found or reaches to end of the band after
searching, press “ ” or “ ” keys to continue
search process. To stop the search process when
you want, press “ ” or “ ” keys again.
Selecting Fine Tuning
You can use the Fine Tuning process for fine adjustment (after coarse adjustment), if you are not happy
about the image on the screen.
Use “ ” or “ ” key on Fine Tuning item, until get-ting the best image on the screen.
Normally the Fine Tuning cursor is placed next to the
left side on the slider and this is indicated with one arrow.
Setting VCR ( Video Cassette Recorder )
Mode
• This item can be seen in TV, AV-1, AV-2, AV-3, SVIDEO modes.
• If you want to watch a VCR source from one of
these modes, then it will be better to set VCR
mode “on”. For this, while the cursor is on this item
press the “ ” or “ ” keys to set it “On”.
• If you want to watch a DVD , then you must set this
item “off”; because DVD is not a source like a VCR
and to see the picture better, you must set the VCR
mode “Off”.
To Store Settings
• Press “OK” key on the remote control to store the
settings directly.
or,
• Press “ ”, “ ” or “OK” key on Store option to
store Install menu settings.
Programme Menu
• To enter Programme menu directly, press the "
INFO" key in TV mode, or
• Press "M" key, now you are in main menu. In the
main menu, select “Program.” using “ ” or “ ”
key. Then enter the Programme menu, press “ ” /
“ ” or “OK” key..
52
Page 54

Menu
Moving cursor to four direction you can reach 20 pro-
Program. P 02
Name
Delete
Insert
grammes in the same page. By scrolling the pages
up or down by pressing the navigation keys you can
select all the programmes in TV mode (except the AV
mode).
By cursor action, programme selection is done automatically. It is also possible to select programme by
using digit or double-digit button. In this way programme selection is also automatic. The TV Status is
changed by the programme selection too. When using double-digit button in order to select a programme, the Programme Number in TV Status OSD
is displayed in "P --" form, and by pressing digit buttons they are displayed in it.
Programme Number is between 00 and 99. Programme Name has a name string with 4 characters.
After autostore process the Programme Names are
set to:
• Channel search "C-01" or "S-01" (band and channel number) or name of the tuned channel if defined.
Autostore
At the bottom of the menu there is a programme sort
functions section. Each function is activated by coloured button (seen above). Name allows changing
the programme name. By Delete you can delete
programmes that you do not require. Insert section
is for inserting programmes into another programme
spaces. By selecting Autostore section, Autostore
menu will be available.
Name:
To change the name of a programme, select the programme and then press the RED (Name) key. The
first letter begins to blink on the selected name. To
change that letter “ ” or “ ” key can be used, and
to select the other letters, “ ” or “ ” key can be
used. If the cursor is at the last letter of the Pro-
gramme Name, pressing “ ” key moves the cursor
at the beginning. On the contrary, if the cursor is at
the beginning of the Programme Name, pressing
“ ” key moves the cursor at the end.
After changing the name press the RED (Store) key.
After activating the name process the “Insert”,
“Delete” and “Autostore” processes will be
inactive and "Cancel" option will be valid. If you do
want to store the new name, press the BLUE
(Cancel) key.
Store
Cancel
Insert:
When the Green (Insert) key is pressed, "Name",
"Autostore" and "Delete" functions are erased, the
selected programme (A) is displayed with an arrow.
From now on, the automatic selection is cancelled.
With navigation keys, the decided programme space
(B) can be selected and by pressing the green key
again, the selected programme will be inserted.
Press Blue key to activate "Cancel " function of "In-
sert" process.
Delete:
To start the "Delete" process, press the yellow "Delete"
key, (“Name”, “Insert” and “Autostore” functions
are inactive). Pressing yellow key again erases the
selected programme from the programme list, and
the programmes below shift one up. Pressing Blue
key cancels the activated “Delete” process.
53
Page 55

Autostore:
Menu
PIP Picture
To enter Autostore menu, press the blue key. To learn
the features of this function see "Autostore" below.
Autostore, searches and stores all channels automatically on your TV, according to the transmission of
programme systems in your area.
Warning
All Prestored Programmes
Will Be Erased
Country
Continue
Cancel
In main menu, firstly use “ ” or “ ” key then use
“ ” / “ ” or “OK” key to enter Source menu. In
source menu, move the cursor by “ ” or “ ” key
and then press “OK” key or “ ” or “ ” keys when
the cursor is on the required item. The selected mode
comes automatically on the screen.
TV
AV-1
AV-2
AV-3
S-VIDEO
PC
DIGITAL
PIP Picture Menu
A.P.S. Is Running
Please Wait
First of all choose the “Country” by using “ ” or
“ ” key..
To cancel Autostore before starting, press “TV”
key. To select “Continue” use “ ” or “ ” key and
press “ ” or “ ” key..
After Autostore is finalized, a programme list will appear on the screen. In the programme list you will see
the programme numbers and names assigned to the
programmes.
If you do not accept the locations and/or the programme names of programmes, you can change
them in Programme menu.
Source Menu
You can switch your TV to AV modes by pressing directly “AV” key or by selecting in source menu from
the main menu.
While in AV mode, you can also switch your TV to TV
or other AV modes by selecting in source menu from
the main menu.
Setting Brightness
• As you enter the PIP Picture menu, Brightness will
be the first item.
• Press “ ” key to increase brightness of PIP Picture.
• Press “ ” key to decrease brightness of PIP Picture.
Setting Contrast
• Using “ ” or “ ” key select Contrast.
• Press “ ” key to increase contrast level of PIP Picture.
• Press “ ” key to decrease contrast level of PIP
Picture.
Setting Sharpness
• Using “ ” or “ ” key select Sharpness.
• Press “ ” key to increase peaking level of PIP Picture.
• Press “ ” key to decrease peaking level of PIP
Picture.
54
Page 56

To Store the Settings
P 01
PR 01
P - -
Dual - I
• When the cursor is on any item which has no submenu press “OK” key on the remote control to
store the settings directly.
or,
•Press “ ”, “ ” or “OK” key on Store option to
store PIP Picture menu settings.
Other Features
TV Status
Programme Number, Programme Name (or
AV), (they are displayed on the upper left of the
screen) and Sleep Timer (shows the time left on the
upper right screen if enabled). The sound indicator
and picture mode are displayed with them too.
They are displayed after programme change for 3
seconds.
Programme Number
Programme Name (4 characters)
These OSD’s are displayed when a new programme
is entered by digit key or by pressing “P<P”, “-P/
CH”, “P/CH+”, “TV”, “AV” or “ ” key..
Programme Swap (P<P)
This button is used to go to the previously entered
programme again. Pressing "P<P" consecutively allows to swap into two last entered programmes.
213
546
879
0
Double-digit (- / - -)
This OSD is displayed when the "Double-Digit" key
pressed in place of the programme number indicator.
In order to enter a two digit programme number you
must push both numbers within 3 seconds. If the second number is not entered within 3 secs the display
will disappear.
Personal Preferences (PP)
All the preset values will be restored, when pressing
"PP" key.
PP
Sound Indicator
The alternatives of the indicator are Mono, Stereo,
Dual I and Dual II. This indicator is displayed under
the programme number indicator on the screen. "I-
II" key is used to select Mono or Stereo, or Dual I or
Dual II.
Mono
In Mono broadcast or in forced-mono (for stereo
broadcast).
Stereo
In Stereo broadcast.
If dual broadcast detected. Dual I is selected in default and also can be selected after Dual II by Remote
Control.
Dual - II
If Dual II selected by Remote Control.
Picture and Picture (PAP)
PAP layout is displayed on the screen by pressing
" ". The screen is divided into two parts at this layout. DTV window is selected as the active window automatically and the border colour of the other window is blue. By pressing "OK" key the other window
can be selected and its border will become green.
Pictures are replaced with each other by pressing the
" " or " " key. Only the sound of the active window
can be heard during PAP.
To remove PAP layout from the screen, first select
DTV window as the active window and then press the
"TV/DTV" key.
55
Page 57

Picture Mode
Picture mode OSD is displayed when “ WIDE”
key is pressed. Picture mode can be changed to
Auto, 4:3, 16:9, Cinema, Subtitle, Zoom or
Panorama by pressing “ WIDE” key..
Sleep Timer Indicator
It is displayed on the upper right of the screen when a
new programme is entered by digit key or by pressing “P<P”, “-P/CH”, “P/CH+”, “TV”, “AV” or
“ ” key. If sleep timer is activated it is displayed
with the TV status and erased with it after 3 seconds.
Once the time set with the sleep timer has elapsed,
the set will go to standby.
0:15
Mute Indicator
It is placed in the upper middle of the screen when
enabled, and it stays there until it is disabled.
No-Signal Detection (PC)
If no valid signal detected for 5 minutes system goes
to Stand-By mode. To switch on the system press
“ ” key..
As the last status feature, system starts from TV or
PC, whichever was the status before stand-by or
switch-off. Note that SCART inputs have the precedence on both TV and PC.
Volume Bar
It is displayed in the lower middle of the screen. When
a volume command is received (pressing “ +”
or “ -” by Remote Control or Control panel at
the top of the TV) and no menu is active, it stays on
the screen for 3 seconds, after the last volume command or until another command is received in between.
56
To cancel mute, there are two alternatives; the first one
is pressing " " key, the volume is set to the preced-
ing value. The second one is increasing the volume
level, whereby it starts at the minimum level to increase. By decreasing the volume level in mute state,
mute will not be ignored, only the volume level will decrease. If mute is cancelled after decreasing the volume level, the volume will be set the decreased level.
No-Signal Detection (TV)
If no valid signal detected, it takes 5 minutes for the
set to switch to Standby mode unless a signal is detected or a command is received from the remote
control.
After a Remote Control command (if No-Signal Timer
is active) the timer stops and if no signal detected
again the timer is initialized to 5 minutes and starts 3
seconds later again to count down.
It is not valid in AV mode.
4:31
AV Modes
By pressing the “AV“ key you can switch your TV to
AV modes (except being in Teletext). Pressing this key
will consecutively switch the TV in one of the optional
AV modes: AV-1, AV-2, AV-3, S-VIDEO, PC.
In order to quit the AV mode press the “TV”, digit
keys or “-P/CH” or “P/CH+” .
Signal Out Of Range
When the PC input signal is not supported by LCDTFT TV, a message is displayed like “Signal out of
range” and screen is blanked.
Page 58

PC MODE
15 Pin Mini D-Sub Connector
Installation
• Power off both Computer and Display before making any connections.
• Connect one end of the optional 15 pin signal cable
to the 15 pin connector on the PC and the other end
to the 15 pin socket on the TV.
Sound Menu
In the main menu select “Sound” using “ ” or “ ”
key then enter the Sound menu pressing “ ”, “ ” or
“OK” keys.
The items in this menu are described at Sound menu
starting page 45.
Sound
• Tighten the screws of the Display cable until the connectors are fastened securely (finger-tighten only).
• If you are using Windows operating system running
on a PC with a Microsoft Plug & Play compatible
video card, your system will select the appropriate
timing for your monitor.
Switching from TV to PC
Press “PC” key to swich directly PC mode.
Main Menu in PC mode:
Enter the main menu by pressing the “M” key on the
remote control.
Picture Menu
In the Main menu, select “Picture” using “ ” or “ ”
key, then enter the Picture menu pressing “ ”, “ ” or
“OK” keys.
All adjustment in this menu except Picture Mode is
identical to adjustment defined TV picture menu (on
page 48). Picture Mode can be set to Auto, 4:3 and
16:9 in PC mode.
Picture
PIP Picture
In the Main menu, select “PIP Picture” using “ ” or
“ ” key, then enter the PIP Picture
menu pressing “ ”, “ ” or “OK” keys.
The items in this menu are described at PIP Picture
menu starting page 53 and Colour and Hue adjustments are the some with the picture menu in TV mode
(page 48 and 49).
This menu is displayed when PIP is displayed on the
screen and otherwise “PIP No Signal” message will be
displayed at the bottom of menu.
57
Page 59

PIP Picture
Feature
PIP picture is displayed on the screen with “ ” key..
By pressing “OK” key, PIP window is selected and
border of the PIP window becomes green. PIP posi-
tion is changed by “
ferent PIP positions. PIP size is decreased by “
key and increased by “
size are available.
Programme in the PIP window is increased / decreased by “P/CH+” / “-P/CH” keys. AV mode is
also available in PIP window. Digit keys are inactive for
PIP window. PIP window is removed from the screen
by “
” key..
PIP is available in Digital, terrestrial and PC mode.
” / “ ” key. There are six dif--
” key. Three different PIP
PC and Picture (PAP)
PC and Picture layout is displayed on the screen by
pressing "
parts at this layout. PC window is selected as the active window automatically and the border colour of
the Picture window is blue. By pressing "OK" key, Picture window can be selected and its border will become green. PC and picture are replaced with each
other by pressing "
the active window can be heard during PC and Picture.
To remove PC and Picture layout from the screen,
press "PC" key.
" key. The screen is divided into two
" or " " key. Only the sound of
Feature Menu
In the main menu select “Feature” using “ ” or “ ”
key then enter the Feature menu pressing “
or “OK” keys.
The items in this menu are described at Feature menu
starting page 49.
”, “ ”
PC SOUND MODE:
This item selects the sound source for PC mode. But
when the PIP is displayed and highlighted in green
border, sound switches to whatever is displayed in
”
the PIP. Whenever you close the PIP or make the PIP
border blue again by disselecting the PIP, sound
switches back to PC Sound Mode.
Geometry Menu
In the Main menu, select “Geometry” using “ ” or
“
” key, then enter the Geometry menu pressing
”, “ ” or “OK” keys.
“
Geometry
Adjust the required horizontal or vertical position or
Hsync Phase by “
You can make position adjustment directly by Auto
position.
Select Auto position by “
” or “
“
“Please wait” is displayed at the bottom of the menu
After a few seconds screen geometry is adjusted
automatically.
Warning: Auto posit ion a djustme nt recommended
to be done w i th the full scre en image for the proper
adjustment.
To store th is menu se tt ing select “Store” by “
“
” keys and then press “OK” key, “Stored” will be
displayed for few seconds at the bottom of menu.
”, “ ” keys.
” or “ ” keys and press
” key..
” or
58
Page 60

Source Menu
In the Main menu, select “Source” using “ ” or “ ”
key, then enter the Source menu pressing “ ”, “ ”
or “OK” keys.
Source
Select the available sources of TV, AV-1,
AV-2, AV-3, S-Video, PC or Digital by pressing “ ”,
“ ” or “OK” keys.
PIP Source Menu
This menu is available when the PIP displayed.
In the Main menu, select “PIP Source” using “ ” or
“ ” key, then select the any available source of TV,,
AV-1, AV-2, AV-3, S-Video or Digital by pressing “ ”,
“ ” then “OK” keys.
TV
• When the TV is in TV mode, only Digital mode is
watched in PIP window.
• When the TV is in Digital mode, TV and AV are
watched in PIP window.
59
Page 61

Teletext
Teletext is an information system that displays text on
your TV screen. Using the Teletext information system
you can view a page of information on a subject that
is available in the list of contents (index).
On screen display is not available in text mode.
Contrast, brightness or colour control is not available,
but volume control is available in text mode.
To operate Teletext
• Select a TV station on which Teletext is being transmitted.
• Press (TELETEXT) “ ” key. Usually the list of
contents (index) is displayed on the screen.
To select a page of Teletext
• Press the appropriate digit keys for the required
Teletext page number.
The selected page number is displayed at the top left
corner of the screen. The Teletext page counter
searches until the selected page number is located,
so that the desired page is displayed on the screen.
• Press “P/CH +” key to move the Teletext screen
forward one page at a time.
• Press “- P/CH” key to move the Teletext screen
backward one page at a time.
To Select Index Page
• To select the page number of the index (generally
page 100), press “ “ key..
To Select Double Height Text
• Press “ “ key for the top half of the information
page to be displayed in double height text.
• Press “ “ key again for the bottom half of the
information page to be displayed in double height
text.
• Press “ “ key once more for the full page of
normal height text.
To Reveal “concealed” Information
• Pressing “ “ key once will reveal answers on a
quiz or games page.
• Pressing “ “ key again will conceal the revealed
answers.
To Stop Automatic Page Change
The teletext page you have selected may contain
more information than what is on the screen; the rest
of the information will be
displayed after a period of time.
• Press “ “ key to stop the automatic page
change.
• Press “ “ key again to allow the next page to be
displayed.
To Select a Subpage
Subpages are subsections of long Teletext pages that
can only be displayed on the screen one section at a
time.
• Select the required Teletext page.
• Press “ “ key..
• Select the required subpage number by pressing
four digit keys (e.g. 0001).
• If the selected subpage is not displayed in a short
time, press “ “ key. TV programme will be dis-
played on the screen.
• Teletext page number will be displayed on the upper
left corner of the screen when the selected page is
found.
• Press “ “ key to display the selected Teletext
page.
60
Page 62

• Teletext page number will be displayed on the upper
left corner of the screen when the selected page is
found.
• Press “ “ key to display the selected Teletext
page.
Fastext
(This is applicable if your TV is equipped with FASTEXT feature)
Your TV supports the 7 page Teletext system. When
the page number of any of the 7 pages in memory is
entered, the system will not search for the requested
page; instead it will display the page automatically.
• Press “P/CH +” key to move the Teletext screen
forward one page at a time.
• Press “- P/CH” key to move the Teletext screen
backward one page at a time.
For Fastext
The subject-heading for the information may have a
particular colour.
• Press an appropriate Red, Green, Yellow or
Blue key in order to reach the relevant page
quickly.
To exit Teletext
• Press “TV” or “ ” key. The screen will switch to
TV mode.
To Display the Time
• While watching a TV programme with Teletext transmission press “ “ key. The current time infor-mation, captured from Teletext will be displayed at
the upper right of the screen until the “ “, “AVV”
or “M” key pressed.
• If the programme being watched does not have
Teletext transmission, no information will be displayed.
61
Page 63

PC side
PC Audio Output
Connect Peripheral Equipment
There is a wide range of audio and video equipment
that can be connected to your TV.
Connection diagrams at the and of this section show
you where the different equipment should be connected at the back side of the TV.
PC Sound Connection
• Connect the PC Audio output to the TFT PC Audio
In socket with stereo connection cable.
• In the main menu select "Feature" by using “ ” or
“ ” key then enter the Feature menu by pressing
“ ”, “ ” or “OK” key. Come on "PC Sound
Mode" by using “ ” or “ ” key and select PC
from the TV, AV-1, AV-2, AV-3 and PC options by using “ ”, “ ” or “OK” key..
• Source also should be selected as PC in the main
menu.
TFT side
PC Audio In
Via the Euroconnector
Your TV set has 2 Euroconnector sockets. If you
want to connect peripherals (e.g. video, decoder,
etc.) which have Euroconnectors, to your TV, use
SCART input.
If an external device is connected via Euroconnector
sockets TV is switched to AV mode automatically. In
this case if both sockets are connected SCART-1 has
the precedence.
In AV mode if you press the “ ” key the TV status
OSD is displayed on the screen.
Via Aerial Input
If you want to connect to your TV, peripherals like video recorders or decoders, but the device you want
to connect does not have Euroconnector, you should
connect it to the Aerial input of your TV set.
If the VCR is connected via aerial input it is
suggested to use the Programme 0.
Decoder
Cable TV offers you a wide choice of programmes.
Most of them are free, others are to be paid for by
the viewer. This means that you will need to subscribe
to the broadcasting organisation whose programmes you wish to receive. This organisation will
supply you a corresponding decoder unit to allow the
programmes to be unscrambled.
For further information ask your dealer. See also the
booklet supplied with your decoder.
Connect a decoder with an aerial socket
to the TV
• Connect the aerial cable.
Connect a decoder without an aerial
socket to the TV
• Connect the decoder to your TV with a eurocable
(RCA Jack Cable) to EXTERNAL (RCA Jack).
When your decoder has a Euroconnector / RCA
Jack you can obtain better picture quality if you
connect a eurocable (RCA Jack Cable) to
EXTERNAL (RCA Jack).
TV and Video Recorder
• Connect the aerial cables.
Better picture quality can be obtained if you also connect a eurocable to EXTERNAL socket.
Playback NTSC
Connect NTSC VCR player to one of two Euroconnectors at the back of the TV.
Then, press “AV“ key to select AV-1 or
AV-2.
62
Page 64

Search for and store the test signal of
the video recorder
• Unplug the aerial cable from the aerial socket
“Aerial” of your video recorder.
• Switch on your TV and put the video recorder on
the test signal. (See the handbook for your video recorder.)
• Search for the test signal of your video recorder in
the same way as you searched for and stored the
TV signals. See Install, Search and Store TV channels. Store the test signal under programme number
0.
– Replace the aerial cable in the aerial socket “Aerial”
of your video recorder once you have stored the
test signal.
Camera and Camcorder
To connect to (AV-3) input
Connect your camera or camcorder at the rear side
of your TV.
• Connect your equipment to the TV via VIDEO (yellow), AUDIO R (red) and AUDIO L (white) inputs.
You should connect the jacks to the input in the
same colour.
Connect the decoder to the video
recorder
Some video recorders have a special euroconnector
for decoder.
• Connect a eurocable to the euroconnector of your
decoder and to the special euroconnector of your
video recorder. See also the handbook of your
video recorder.
• To connect your video recorder to the TV, see TV
and Video Recorder section.
If you want to connect more equipment to your TV,
consult your dealer.
Connecting Headphones
Use the stereo headphone socket on the rear side of
your TV, to connect headphones.
Connecting the PC
Connect PC monitor with 15-pin PC cable to the 15pin connector on the rear of the computer. For detail
installation procedure see Installation in PC mode.
To connect to S-Video input
Connect your camera or camcorder at the rear side
of your TV.
• Connect your equipment to the TV via S-Video input at the back side by using S-Video cables.
63
Page 65

Aerial Connections
VHF/UHF
75
Round 75 ohm coaxial cable
Round 75-ohm coaxial cable
Flat 300-ohm twin lead cable
VHF/UHF
75
Outdoor Aerial Connections
VHF Aerial
VHF/UHF Aerial
Connect Peripheral Equipment
W
Rear of TV
W
Rear of TV
64
ANT.IN
CAMERA
VIDEO
DECODER
HEADPHONE
(optional)
AUDIO
EXTERNAL SPEAKER
(optional)
FOR SATELLITE RECEIVER
Page 66

PC INPUT TYPICAL DISPLAY MODES
The display has a maximum resolution of 1280 x 720, vertical sync. frequency range of 50-75
Hz and a horizontal sync. frequency range of 30-69 KHz.
The following table is an illustration of some of the typical video display modes.
Mode
HorizontalVerticalHor. (kHz)Ver. (Hz)Hor.Ver.
164040031.570-+
264048031.560--
364048037.972--
464048037.575--
572040031.570-+
680060035.256++
780060037.960++
880060048.172++
980060046.975++
10102476848.460--
11102476856.570++
12102476860.075++
13128072044,860-+
The resolution of the TFT-LCD Panel is 1280 x 720. Therefore using Mode 13 is advised to get
the best PC input display quality.
Frequency Resolution
Sync. Polarity
65
Page 67

Tips / Troubleshooting Guide
- Aerial is disconnected
- Re-install channels to cancel
- Mains lead unplugged
No response to
On Digital mode
PROBLEMPOSSIBLE CAUSEWHAT TO DO
No Signal mode
No Picture or Sound- Tuned to digital teletext channel- Retune to another channel
Scrambled channel message- Channel is scrambled- Select alternative channel
Forgotten channel lock code
Forgotten menu lock code- Contact help line
PROBLEMPOSSIBLE CAUSEWHAT TO DO
Standby light not lit
remote control
- Aerial is damaged/misaligned - Check aerial lead
- Out of Signal area- Check with dealer
- Receiver off- Plug in and turn on receiver
- Handset not aimed correctly- Aim handset at front panel
- Front panel obstructed
- Handset batteries exhausted- Replace handset batteries
- Check aerial lead
channel lock
- Check mains lead
- Check that there is nothing in the way of
the path between the remote control and
the receiver
On TV and monitor mode
Care of the Screen
Clean the screen with a slightly damp, soft cloth. Do not use abrasive solvents as they may
damage the TV screen coating layer
Colours of image on screen are abnormal
For TV :
Have you selected the correct TV system? Is your TV set or house aerial located too close to
the loudspeakers, non-earthed audio equipment or neon lights, etc. ?
Mountains or high buildings can cause double pictures or ghost images. Sometimes you can
improve the picture quality by changing the direction of the aerial.
Is the picture or Teletext unrecognisable? Check if you have entered the correct frequency.
The picture quality may degrade when two peripherals are connected to the TV at the same
time. In such a case, disconnect one of the peripherals.
For Monitor :
• Check that Video (Signal) Cable from the Display has been securely and correctly connected
to the 15-pin Video Connector on the rear panel of the Computer.
• If you have used an adaptor to convert the 15-pin Video (Signal) Cable Connector from the
Display to fit the connector on the rear of the Computer, check the pin assignment of the
Display.
66
Page 68

No Image on Display Screen
For TV :
Is the aerial connected properly? Are the plugs connected tightly to the aerial socket? Is the
aerial cable damaged? Are suitable plugs used to connect the aerial? If you are in doubt,
consult your dealer.
No Image means that your TV is not receiving any transmission. Have you pressed the
correct keys on the remote control? Try once more.
For Monitor :
• Check that power cord of the Display has been connected securely into wall outlet or
grounded extension cable or strip.
• Display is equipped with electronic power switch, it will remain power-off in case of any
power failure. It is necessary to push power switch again to power-on the display. Check
that LED on front of display is green.
• Check that Video (Signal) Cable from the Display has been securely and correctly connected to the 15-pin Video Connector on the rear panel of the Computer.
• Check that Video Card is firmly seated in card slot of Computer motherboard.
• Check that the Brightness and/or the Contrast adjustments of the Display have not been
turned down to minimum levels.
Sound
You can not hear any sound. Did you perhaps interrupt the sound, pressing “ ” key? Are
external speakers connected to the TV?
Sound is coming from only one of the speakers. Is the balance set to one direction extreme?
See Sound menu.
Remote Control
Your TV no longer responds to the remote control. Press the “TV” key on the remote control
once more. Perhaps the batteries are exhausted. If so you can still use the keys on the control
panel at the top of your TV.
Have you selected the wrong menu? Press “TV” key to return to TV mode or press “M” key
to return to the previous menu.
No solution:
Switch your TV set off and on. If this does not work, call the service personnel; never attempt
to repair it yourself.
67
Page 69

Specifications
TV BROADCASTING
PAL I/I’
RECEIVING CHANNELS
VHF (BAND I: CH2-4, BAND III: CH5-12)
UHF (CH21-69)
CABLE CHANNEL (S1-S41)
Input Signal
Video: Analog 0.7 Vp-p 75 ohm positive
Sync: TTL Level positive or negative,
Separate sync.
Horizontal Timing 30 - 69 KHz
Vertical Timing 50 - 75 Hz
Dot Rate
78.75 MHz max.
Video Cable/Input Connector
15 pin mini D cable
PANEL
Size :22“ (56 cm) diagonal
Displayable Resolution
1280 x 720 maximum
Non-interlaced
NUMBER OF PRESET CHANNELS
100
CHANNEL INDICATOR
On Screen Display
RF AERIAL INPUT
75 Ohm (unbalanced)
OPERATING VOLTAGE
For adaptor: 220-240 V AC, 50 Hz.
For TV : 15 V DC
AUDIO
Nicam Stereo
AUDIO OUTPUT POWER
2 x 3 W
(%10 THD)
RMS.
POWER CONSUMPTION (W) (max.)
94
Dimensions (WxHxD)
W 570 mm.
H 463 mm.
D 240 mm.
Weight 9.6 Kg.
Compliance:
CE, MPR II Low Emissions, ISO-9001.
68
Active Display Area
487,68 mm horizontal x 274,32 mm Vertical
Page 70

UK Guarantee
Your Guarantee of Excellence
Thank you for purchasing this Hitachi Television.
In the unlikely event that this product should develop a fault, we undertake to replace or repair any
part of the product which fails due to a manufacturing defect within 12 months of the date of purchase
provided that:
i) The product has been installed and used only in accordance with the instructions supplied with the
product
ii) The product has not been repaired, maintained, or modified by any person other than an Hitachi
authorised engineer
iii) The product serial number has not been removed or altered
This guarantee does not apply to product acquired second hand or for commercial or communal
use
This guarantee does not cover the replacement of exhausted batteries, the adjustment of user controls, or aerial alignment.
Any parts replaced under this guarantee shall become the property of Hitachi Europe Ltd.
Please note that evidence of the date of purchase will be required before any service under this guarantee is carried out.
THIS GUARANTEE DOES NOT AFFECT YOUR STATUTORY RIGHTS.
IN ALL CASES OF DIFFICULTY PLEASE CONSULT YOUR HITACHI DEALER
69
Page 71

Hitachi, Ltd. Tokyo, Japan
International Sales Division
THE HITACHI ATAGO BUILDING,
No. 15 –12 Nishi Shinbashi, 2 – Chome,
Minato – Ku, Tokyo 105-8430, Japan.
HITACHI EUROPE LTD,
Whitebrook Park
Lower Cookham Road
Maidenhead
Berkshire
SL6 8YA
UNITED KINGDOM
Tel: 01628 643000
Fax: 01628 643400
Email: consumer-service@hitachi-eu.com
HITACHI EUROPE GmbH
Munich Office
Dornacher Strasse 3
D-85622 Feldkirchen bei München
GERMANY
Tel: +49-89-991 80-0
Fax: +49-89-991 80-224
Hotline: +49-180-551 25 51 (12ct/min)
Email: HSE-DUS.service@hitachi-eu.com
HITACHI EUROPE srl
Via Tommaso Gulli N.39, 20147
Milano, Italia
ITALY
Tel: +39 02 487861
Tel: +39 02 38073415 Servizio Clienti
Fax: +39 02 48786381/2
Email: customerservice.italy@hitachi-eu.com
HITACHI EUROPE S.A.S
Lyon Office
B.P. 45, 69671 BRON CEDEX
FRANCE
Tel: +33 04 72 14 29 70
Fax: +33 04 72 14 29 99
Email: france.consommateur@hitachi-eu.com
HITACH EUROPE AB
Egebækgård
Egebækvej 98
DK-2850 Nærum
DENMARK
Tel: +45 43 43 6050
Fax: +45 43 60 51
Email: csgnor@hitachi-eu.com
Hitachi Europe Ltd
Bergensesteenweg 421
1600 Sint-Pieters-Leeuw
BELGIUM
Tel: +32 2 363 99 01
Fax: +32 2 363 99 00
Email: sofie.van.bom@hitachi-eu.com
www.hitachidigitalmedia.com
Tel: 03 35022111
HITACHI EUROPE S.A.
364 Kifissias Ave. & 1, Delfon Str.
152 33 Chalandri
Athens
GREECE
Tel: 1-6837200
Fax: 1-6835964
Email: service.hellas@hitachi-eu.com
HITACHI EUROPE S.A.
Gran Via Carlos III, 86, planta 5
Edificios Trade - Torre Este
08028 Barcelona
SPAIN
Tel: +34 93 409 2550
Fax: +34 93 491 3513
Email: atencion.cliente@hitachi-eu.com
HITACHI Europe AB
Box 77 S-164 94 Kista
SWEDEN
Tel: +46 (0) 8 562 711 00
Fax: +46 (0) 8 562 711 13
Email: csgswe@hitachi-eu.com
HITACHI EUROPE LTD (Norway) AB
STRANDVEIEN 18
1366 Lysaker
NORWAY
Tel: 67 5190 30
Fax: 67 5190 32
Email: csgnor@hitachi-eu.com
HITACHI EUROPE AB
Neopoli / Niemenkatu 73
FIN-15140 Lahti
FINLAND
Tel : +358 3 8858 271
Fax: +358 3 8858 272
Email: csgnor@hitachi-eu.com
HITACHI EUROPE LTD
Na Sychrove 975/8
101 27 Pr aha 10 – Bohdalec
CZECH REPUBLIC
Tel: +420 267 212 383
Fax: +420 267 212 385
Email: csgnor@hitachi-eu.com
 Loading...