

Page 1

USER'S MANUAL
MANUEL UTILISATEUR
BEDIENUNGSANLEITUNG
READ THE INSTRUCTIONS INSIDE CAREFULLY.
KEEP THIS USER'S MANUAL FOR FUTURE REFERENCE.
For future reference, record the serial number of your monitor.
SERIAL NO.
The serial number is located on the rear of the monitor.
This monitor is ENERGY STAR® compliant when used with a computer equipped with
VESA DPMS.
The ENERGY STAR® emblem does not represent EPA endorsement of any product or
service.
As an ENERGY STAR® Partner, Hitachi,Ltd. has determined that this product meets
the ENERGY STAR® guidelines for energy efficiency.
LCD Colour Television
Model
17LD4200
MANUAL DE USUARIO
MANUALE D'USO
BRUKSANVISNING
Page 2

Table of Contents
Chapter 1 Introduction......................................................................................................1
1.1 Important Safety Precautions........................................................................................................... 1
1.2 Some Dos And Don'ts On The Safe Use Of Equipment.................................................................. 3
1.3 Important Notices............................................................................................................................ 4
1.4 Product Functions............................................................................................................................ 4
1.5 Package Contents ............................................................................................................................ 4
1.6 Pull down the base........................................................................................................................... 4
1.7 Set up to LCD-TV........................................................................................................................... 4
1.8 Viewing Angle Adjustment............................................................................................................. 5
1.9 Detaching main body from Its Stand............................................................................................... 5
1.10 Wall Mounting .............................................................................................................................. 5
Chapter 2 Installation........................................................................................................6
2.1 Product Description......................................................................................................................... 6
2.2 System Installation:......................................................................................................................... 7
Chapter 3 Operation Instruction....................................................................................... 8
3.1 IR Control ....................................................................................................................................... 8
3.2 Advanced Setting .......................................................................................................................... 10
Chapter 4 Technical Information ...................................................................................16
4.1 Specifications ................................................................................................................................ 16
4.2 Standard Timing Table.................................................................................................................. 17
Chapter 5 Other Information .......................................................................................... 18
5.1 Specifications ................................................................................................................................ 18
Chapter 6 Troubleshooting .............................................................................................18
Guarantee ......................................................................................................................143
ENGLISH
Chapter 1 Introduction
Thanks for your purchase of this product. With this product, you can use your computer monitor to watch
TV/CATV, VCR, LD, and DVD or play video game. Without turning on your computer, the system set up is very
easy and there is no additional requirement for hardware or software. You don't need to learn a complicated set up
procedure and you can enjoy your product with just plug and play.
1.1 Important Safety Precautions
Electricity is used to perform many useful functions, but it can also cause personal injuries and property damage if
improperly handled. This product has been engineered and manufactured with the highest priority on safety.
However, improper use can result in electric shock and/or fire. In order to prevent potential danger, please observe
the following instructions when installing, operating and cleaning the product. To ensure your safety and prolong
the service life of your LCD colour TV product, please read the following precautions carefully before using the
product.
Read instructions—All operating instructions must be read and understood before the product is operated.
Keep this manual in a safe place—These safety and operating instructions must be kept in a safe place for future
reference.
Observe warnings—All warnings on the product and in the instructions must be observed closely.
Follow instructions—All operating instructions must be followed.
Attachments—Do not use attachments not recommended by the manufacturer. Use of inadequate attachments
can result in accidents.
Power source—This product must operate on a power source specified on the specification label. If you are not
sure of the type of power supply used in your home, consult your dealer or local power company. For units
designed to operate on batteries or another power source, refer to the operating instructions.
Power cord protection—The power cords must be routed properly to prevent people from stepping on them or
objects from resting on them. Check the cords at the plugs and product.
If the AC adapter is misplaced or needs to be replaced, obtain the same type of adapter.
1
Page 3

ENGLISH
Overloading—Do not overload AC outlets or extension cords. Overloading can cause fire or electric shock.
Entering of objects and liquids—Never insert an object into the product through vents or openings. High
voltage flows in the product, and inserting an object can cause electric shock and/or short internal parts. For the
same reason, do not spill water or liquid on the product.
Servicing—Do not attempt to service the product yourself. Removing covers can expose you tohigh voltage and
other dangerous conditions. Request a qualified service person to perform servicing.
Repair—If any of the following conditions occurs, unplug the power cord from the AC outlet, and request a
qualified service person to perform repairs.
a. When the power cord or plug is damaged.
b. When a liquid was spilled on the product or when objects have fallen into the product.
c. When the product has been exposed to rain or water.
d. When the product does not operate properly as described in the operating instructions. Do not touch the
controls other than those described in the operating instructions. Improper adjustment of controls not
described in the instructions can cause damage, which often requires extensive adjustment work by a
qualified technician.
e. When the product has been dropped or damaged.
f. When the product displays an abnormal condition. Any noticeable abnormality in the product indicates that
the product needs servicing.
Replacement parts—In case the product needs replacement parts, make sure that the service person uses
replacement parts specified by the manufacturer, or those with the same characteristics and performance as the
original parts. Use of unauthorized parts can result in fire, electric shock and/or other danger.
Safety checks—Upon completion of service or repair work, request the service technician to perform safety
checks to ensure that the product is in proper operating condition.
Polarization—This AC adapter may be equipped with a polarized alternating current line plug (a plug having
one blade wider than the other). This plug will fit into the power outlet only one way. This is a safety feature. If
you are unable to insert the plug fully into the outlet, try reversing the plug. If the plug should still fail to fit,
contact your electrician to replace your obsolete outlet. Do not defeat the safety purpose of the polarized plug.
For use only with AC adapter, Li-shin 0111B1275 (PSU 17LD4000).
1.1.1 Trademark Acknowledgement:
VGA is a registered trademark of International Business Machines Corporation.
VESA is a trademark of a nonprofit organization, Video Electronics Standard Association.
E
NERGY STAR
®
is a trademark of Environmental Protection Agency (EPA).
1.1.2 Important Safety Instructions
1) Read these instructions.
2) Keep these instructions.
3) Heed all warnings.
4) Follow all instructions.
5) Do not use this apparatus near water.
6) Clean only with dry cloth.
7) Do not block any ventilation openings. Install in accordance with the manufacturer’s instructions.
8) Do not install near any heat sources such as radiators, heat registers, stoves, or other apparatus
(including amplifiers) that produce heat.
9) Protect the power cord from being walked on or pinched particularly at plugs, convenience receptacles,
and the point where they exit from the apparatus.
10) Only use attachments/accessories specified by the manufacturer.
11) Use only with the cart, stand, tripod, bracket, or table specified by the manufacturer, or sold with the
apparatus. When a cart is used, use caution when moving the cart/apparatus combination to avoid
injury from tip-over.
2
Page 4

ENGLISH
12) Unplug this apparatus during lightning storms or when unused for long periods of time.
13) Refer all servicing to qualified service personnel. Servicing is required when the apparatus has been
damaged in any way, such as power-supply cord or plug is damaged, liquid has been spilled or objects
have fallen into the apparatus, the apparatus has been exposed to rain or moisture, does not operate
normally, or has been dropped.
14) WARNING: To reduce the risk of fire or electric shock, do not expose this apparatus to rain or
moisture.
15) Apparatus shall not be exposed to dripping or splashing and no objects filled with liquids, such as
vases, shall be placed on the apparatus.
16) CAUTION – Danger of explosion if battery is incorrectly replaced. Replace only with the same or
equivalent type.
1.2 Some Dos And Don'ts On The Safe Use Of Equipment
This equipment has been designed and manufactured to meet international safety standards but, like any electrical
equipment, care must be taken if you are to obtain the best results and safety is to be assured.
DO read the operating instructions before you attempt to use the equipment.
DO ensure that all electrical connections (including the mains plug, extension leads and inter-connections between
the pieces of equipment) are properly made and in accordance with the manufacturer's instructions. Switch off and
withdraw the mains plug before making or changing connections.
DO consult your dealer if you are ever in doubt about the installation, operation or safety of your equipment.
DO be careful with glass panels or doors on equipment.
DO route the mains lead so that it is not likely to be walked on, crushed, chafed, or subjected to excessive wear and
tear or heat.
DON'T remove any fixed cover as this may expose dangerous voltages.
DON'T obstruct the ventilation openings of the equipment with items such as newspapers, tablecloths, curtains, etc.
Overheating will cause damage and shorten the life of the equipment.
DON'T allow electrical equipment to be exposed to dripping or splashing, or objects filled with liquids, such as
vases, to be placed on the equipment.
DON'T place hot objects or naked flame sources such as lighted candles or nightlights on, or close to equipment.
High temperatures can melt plastic and lead to fires.
DON'T use makeshift stands and NEVER fix legs with wood screws - to ensure complete safety always fit the
manufacturer's approved stand or legs with the fixings
provided according to the instructions.
DON'T use equipment such as personal stereos or radios so that you are distracted from the requirements of traffic
safety. It is illegal to watch television whilst driving.
DON'T listen to headphones at high volume, as such use can permanently damage your hearing.
DON'T leave equipment switched on when it is unattended unless it is specifically stated that it is designed for
unattended operation or has a stand-by mode. Switch off using the switch on the equipment and make sure that
your family know how to do this. Special arrangements may need to be made for infirm or handicapped people.
DON'T continue to operate the equipment if you are in any doubt about it working normally, or if it is damaged in
any way - switch off, withdraw the mains plug and consult your dealer.
ABOVE ALL
--- NEVER let anyone especially children push anything into holes, slots or any other opening in the case -
this could result in a fatal electrical shock;
--- NEVER guess or take chances with electrical equipment of any kind
--- it is better to be safe than sorry!
**************
**************
*************
3
Page 5
ENGLISH
1.3 Important Notices
Please use the product under a normal environment
1. Try to avoid the following circumstances.
* Heat or direct sunlight places
* Location with large magnetic field
2. For the unauthorized person, please don't serve this product: otherwise the damage caused by
unauthorized servicing is not covered by warranty.
3. Unplug this product from AC outlet and remove batteries from IR control, when this product is left
unused for a long time.
* Places that are unstable or subject to vibration
* Exposure to rain or moisture
1.4 Product Functions
z With the advanced video processing technology, the TV composite VIDEO, S-VIDEO signal can be
displayed on PC monitor.
z Double scan conversion (15.75 KHz to 31.5 KHz).
z With built-in audio loop, the audio signal coming from PC can pass through to PC speakers at any
circumstance.
z Full screen, true colour display.
z TV systems: PAL / Secam.
z Built-in TV tuner for receiving terrestrial or cable TV.
z Easy operation - With one button to switch signals coming from composite VIDEO, S-VIDEO,
COMPONENT VIDEO, CABLE/TV or PC.
z Automatic channel scan to detect the program channels.
z On screen display operation with IR remote controller.
z NICAM supported for PAL system.
1.5 Package Contents
As you unpack the product, please make sure the following items were included. If any of these items are
missing, call your local dealer.
▪ Main unit x1 ▪ IR control x1 ▪ Power cord x1
▪ Power supply x1 ▪ User manual x1 ▪ Scart to 3 phono lead x 1
▪ AAA batteries x2
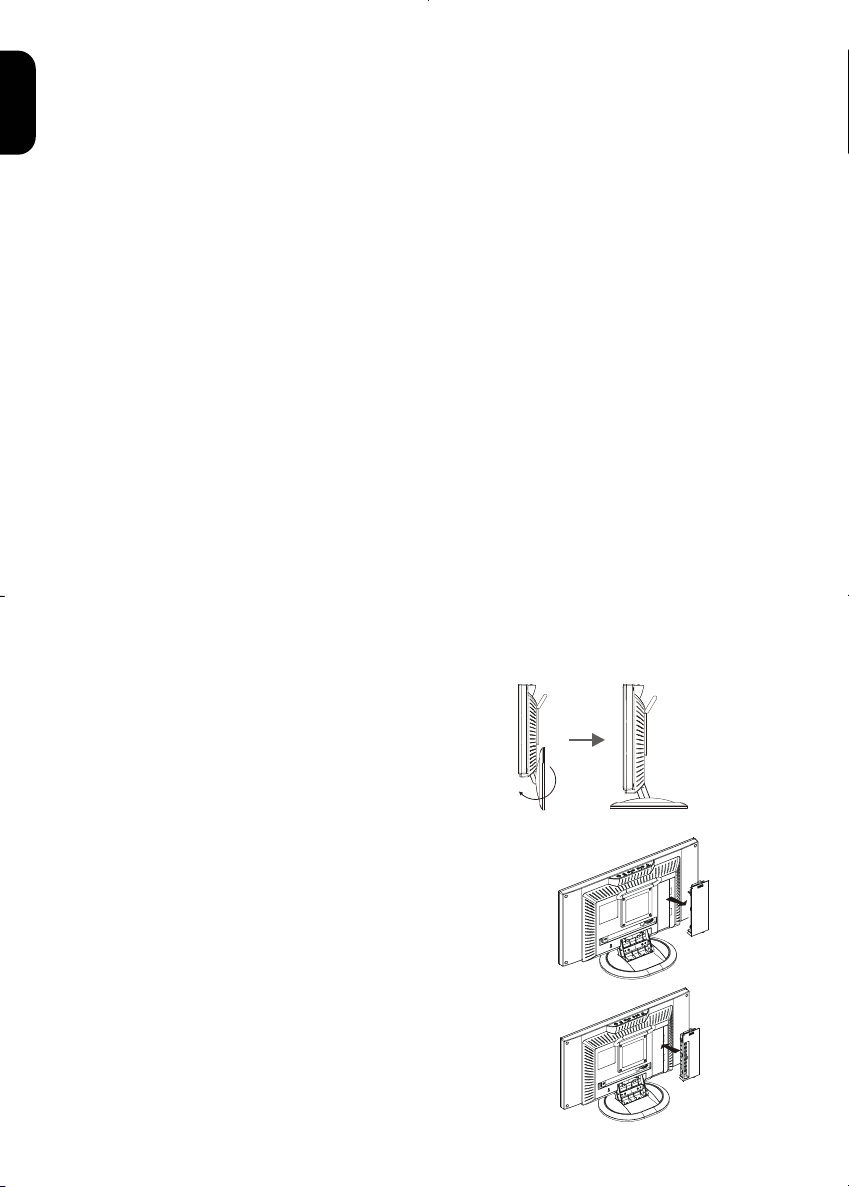
1.6 Pull down the base
When you open the box to take the product out then
pull down the base first (See figure 1-1)
1.7 Set up to LCD-TV
1. To remove the tuner cover. (See figure 1-2)
2. To connect the TV tuner. (See figure 1-3)
Figure 1-1
Figure 1-2
Figure 1-3
4
Page 6
3. Remove the protective label. (See figure 1-4)
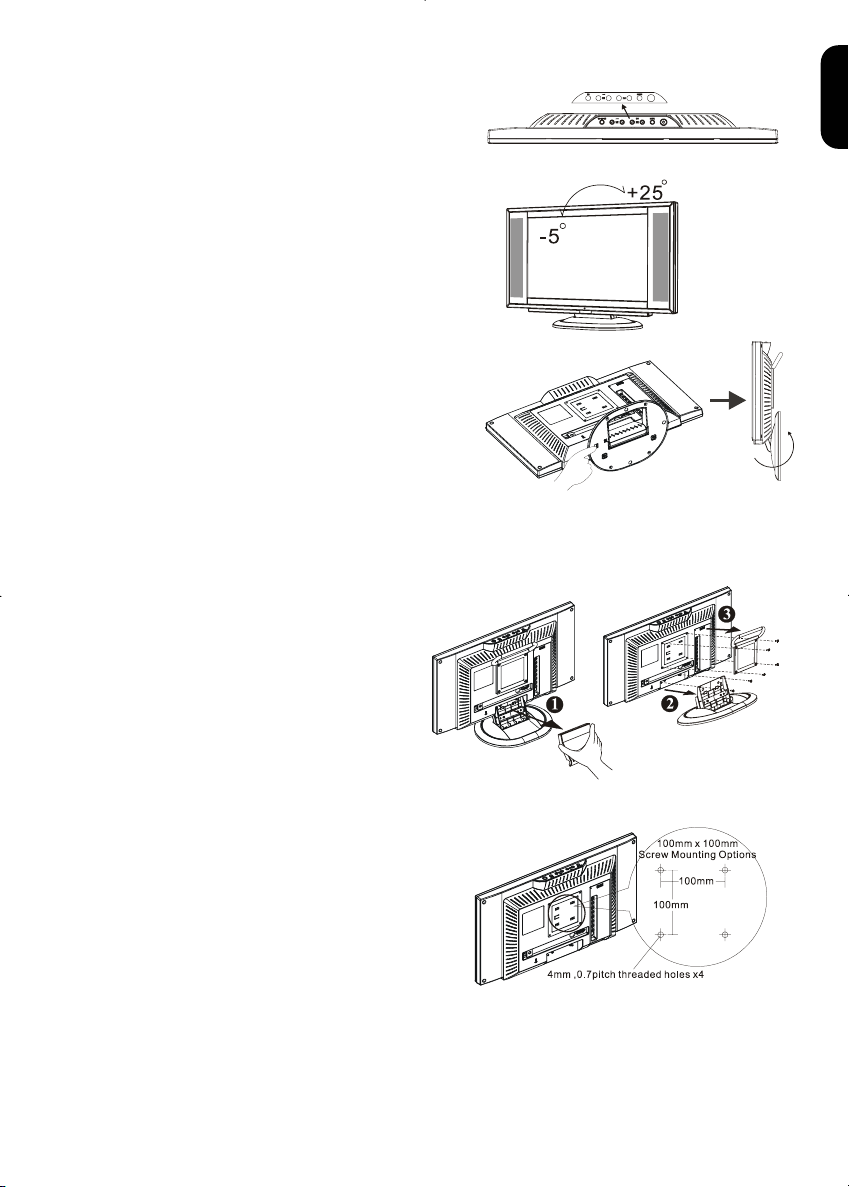
1.8 Viewing Angle Adjustment
This product is designed to allow users to have a
comfortable viewing angle. The viewing angle can
be adjusted from -5°to +25°. (See Figure 1-5).
Figure 1-4
ENGLISH
When you want to close the base and body to 90°, you need
to release a button from 25°. (See fig. 1-6)
Warning: Do not force the LCD Monitor over its maximum viewing angle settings as stated above. Attempting this
will result in damaging the Monitor and Monitor stand.
Figure 1-6
1.9 Detaching main body from Its Stand
Figure 1-5
1. Remove the rear cover from neck n (See
Figure 1-7)
2. Unscrew screws of the hinge bracket
3. Remove the stand from main body
o
p
Figure 1-7
1.10 Wall Mounting
Before installing to mounting device, please refer to
Fig.1-7.
The rear of this LCD display has four integrated 4 mm,
0.7 pitches threaded nuts, as well as four 5 mm access
holes in the plastic covering as illustrated in Figure 1-8.
These specifications meet the VESA Flat Panel Monitor
Physical Mounting Interface Standard (paragraphs 2.1
and 2.1.3, version 1, dated 13 November 1997).
Note :Please using Ø 4mm x 8mm (L) screw for this application.
Figure 1-8
5
Page 7
ENGLISH
Chapter 2 Installation
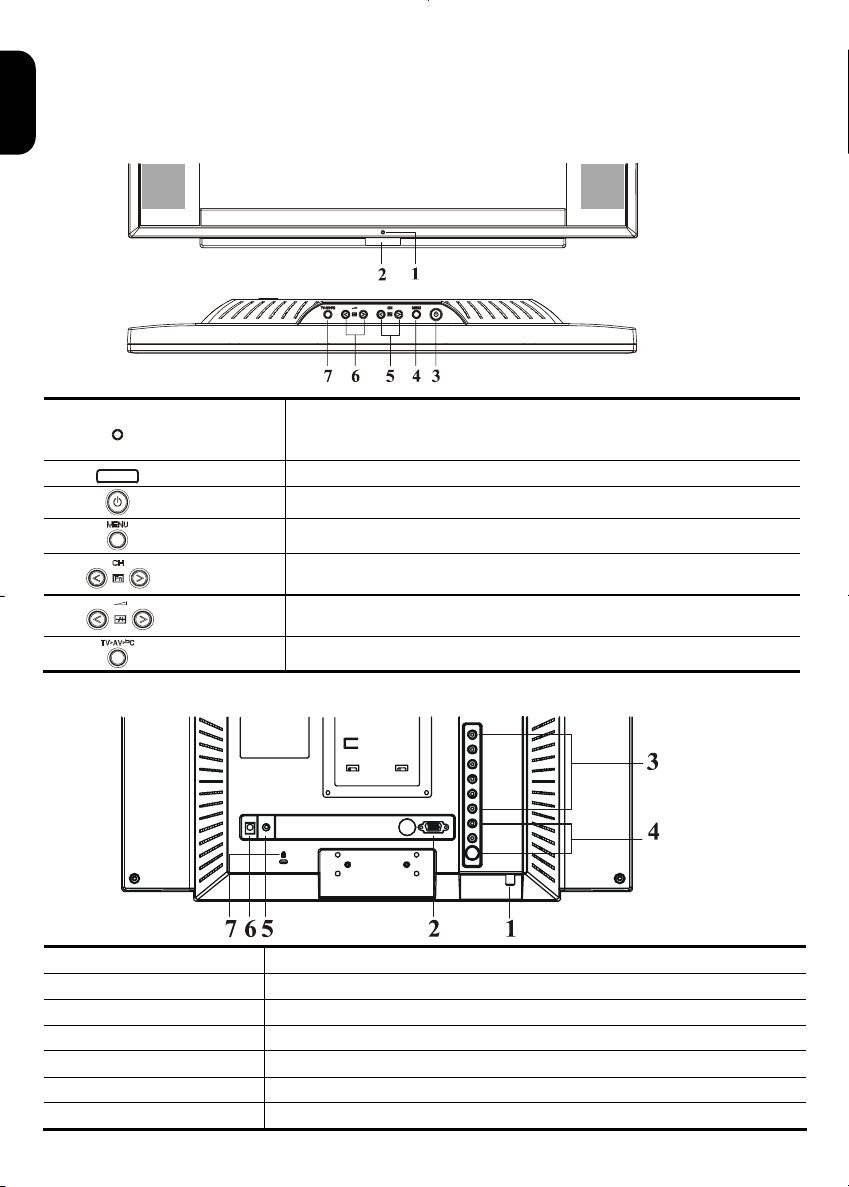
2.1 Product Description
2.1.1 Front view of main body
Figure 2-1
Figure 2-2
1
2
3
4
5
6
7
Indicator for
Power
IR receiver
Power
Menu
Channel
Volume
Source
2.1.2 Rear view of main body
1 RF in
2 VGA input
3 AV2- IN
4 AV1- IN
5 Phone in
6 DC in
7 Kensington Lock hole
Please connect to antenna or cable TV signal.
Please use 15-pin VGA cable (Optional) to connect to PC.
For composite (CVBS), component (Y, Cb, Cr) video input and audio.
For S-video input and audio.
Please connect the audio from sound card to PHONE IN. (Optional)
Please connect to your 12V power supply.
It can be secured with Kensington lock.
LED lights Green colour --- Power is ON.
LED lights Orange --- Monitor is in "Power Saving Mode".
LED is off --- Power is OFF.
IR receiver.
Turn on or off the main unit.
Open or Close the OSD menu.
Select the next lower channel / higher channel (TV/AV mode) ; OSD
function for selecting (PC mode).
Lower / Raise the volume (TV/AV mode) ; OSD function for adjusting
(PC mode).
Selection CABLE/TV, AV-1(S –VIDEO), AV-2(C-VIDEO) or PC.
Figure 2-3
6
Page 8

2.2 System Installation:
Please refer to the example closest to your configuration
Please turn off the power of all devices before connection. For audio connection, please use RCA audio
(L+R) connector. For video connection, please choose either RCA video connector or s-video connector.
Moreover, for connection to monitor alone please omit those connections associated with PC.
ENGLISH
Scart to 3 phono lead (supplied) can be used to connect devices with a scart
socket to the LCD TV via AV2. Yellow plug to yellow socket, red to red and
black or white plugs to white socket
7
Page 9

ENGLISH
Chapter 3 Operation Instruction
3.1 IR Control
POWER
Switch between power-on and
power-off.
MUTE INDEX
Turn the sound on/off. Turn page to index page.
MPX MODE
Select the language and the
sound output
VOLUME REVEAL
Adjust the volume. Turn ON/OFF conceal
CHANNEL
Select channels up or down. Turn on/off the OSD menu.
TV/AV/PC ← →
Select input sources of TV,
AV1, AV2, and PC.
SLEEP ↑ ↓
Select timer to turn power off.
The default timer is 10, 20, 30,
40, 50, 60, and 90 minutes (Only
enable in TV function).
LAST CH Teletext colour Keys
Turn back the last select
channel.
DISPLAY 0~9 Number Keys
Show the information on screen. Used to select cable TV or
WIDE
Select the screen format.
TEXT
Turn the Teletext function
ON/OFF
Turn ON/OFF list mode.
information
Adjust the selected item on menu
or adjust the volume.
* Press to select desired item on
the menu
* Press to select desired page on
the text mode
For special teletext functions
Terrestrial programs.
8
Page 10

3.1.1 Teletext
Teletext is a free service broadcast by most TV stations which gives up-to-the-minute information on news,
weather, television programs, stock prices and many other topics.
The teletext decoder of this TV can support the SIMPLE, TOP and FASTEXT systems. SIMPLE (standard
teletext) consists of a number of pages which are selected by directly entering the corresponding page
number. TOP and FASTEXT are more modern methods allowing quick and easy selection of teletext
information.
Switch ON/ OFF
Press the TEXT button to switch the teletext. The initial page or last page appears on the screen.
Two page numbers, TV station name, date and time are displayed on the screen headline. The first page
number indicates your selection, while the second shows the current page displayed.
Press the TEXT
SIMPLE text
Page selection
1. Enter the desired page number as a three-digit number with the NUMBER buttons. If you press a
wrong number during selection, you must complete the three-digit number and then reenter the correct
page number.
2. The ↑ / ↓ button can be used to select the previous or next page.
Programming a colour button in LIST mode
If the TV is in SIMPLE text, TOP text or FASTEXT mode, press the “MODE
LIST mode.
Four teletext page numbers of your choice can be coloured and easily selected by pressing the
corresponding coloured button on the remote control handset.
1. Press a coloured button.
2. Using the NUMBER buttons to select the page you wish to program.
3. Press the
From now on, you can select this page with the same coloured button.
4. The three other coloured buttons are programmed in the way.
TOP text
The User’s Guide displays four fields-red, green, yellow and blue at the bottom of the screen. The yellow
field denotes the next group and blue field indicates the next block.
Block/ group/ page selection
1. With the blue button you, can progress from block to block.
2. Use the yellow button to proceed to the next group with automatic overflow to the next block.
3. With the green button, you can proceed to the next existing page with automatic overflow to the next
group. (Alternatively the ↑ button can be used.)
4. The red button permits you to return to the previous selection. (Alternatively the ↓ button can be used.)
Direct page selection
In the SIMPLE teletext mode, you can select a page by using the NUMBER buttons in TOP mode to enter
the three-digit numbe.r.
FASTEXT
The teletext pages are colour coded along the bottom of the screen and are selected by pressing the
corresponding coloured button.
or TV/AV/PC button to switch off teletext. The previous mode reappears.
” button to switch to
button. Then the selected page is stored as the selected page number with blinking once.
ENGLISH
9
Page 11

ENGLISH
Page selection
1. Press the “INDEX
2. You can select the pages which are colour coded along the bottom line with the same coloured buttons.
3. Corresponding to the SIMPLE teletext mode, you can select a page by entering its three-digit page
number with the NUMBER buttons in FASTEXT mode.
4. The ↑ / ↓ button can be used to select the previous or next page.
” button to select the index page.
REVEAL
Press this button to display hidden information, such as solution of riddles or puzzles.
Press this button again to remove the information from the display.
3.2 Advanced Setting
3.2.1 TV settings
The OSD shown below displays when you press "MENU" (on main body) or "►" (on remote control)
button. You can see four options shown as below.
AUDIO: Treble, Bass and Balance.
PICTURE: Bright, Contrast, Colour and Sharpness .
SETUP: Language, Sleep, Channel search, Channel memory, Fine Tune, Channel Swap and Recall.
SYSTEM: PAL / SECAM / SECAM L, Sound, NICAM.
LANGUAGE
When you start using your set for the first time, you must
select the language which will be used for displaying menus
and indications.
Press "←, →" (on remote control) button to select English,
German, French, Spanish, or Italian as your preferred OSD
language.
AUDIO
TREBLE
1. Press "MENU" (on main body) or "►" (on remote
control) button.
2. Press "
control) button to select TREBLE.
3. Press "
control) button to lower or raise the treble.
BASS
1.Press "MENU" (on main body) or "►" (on remote
control) button.
2.Press "
control) button to select BASS.
3.Press "
control) button to lower or raise the bass.
" (on main body) or "↑, ↓" (on remote
" (on main body) or "←, →" (on remote
" (on main body) or "↑, ↓" (on remote
" (on main body) or "←, →" (on remote
10
Page 12

BALANCE
1.Press "MENU" (on main body) or "►" (on remote
control) button.
2.Press "
control) button to select BALANCE.
3.Adjust the speaker balance on Left/Right by pressing "
" (on main body) or "←, →" (on remote control)
button.
" (on main body) or "↑, ↓" (on remote
ENGLISH
PICTURE
BRIGHT
1. Press "MENU" (on main body) or "►" (on remote
control) button.
2. Press "
control) button to select PICTURE.
3. Press "
control) button to select BRIGHT.
4. Press "
control) button to increase or decrease the screen
brightness.
CONTRAST
1.Press "MENU" (on main body) or "►" (on remote
control) button.
2.Press "
button to select PICTURE.
3.Press "
control) button to select CONTRAST.
4.Press "
control) button to increase or decrease the screen contrast.
COLOUR
1.Press "MENU" (on main body) or "►" (on remote
control) button.
2.Press "
button to select PICTURE.
3.Press "
control) button to select COLOUR.
4.Press "
control) button to lower or higher the screen colour
intensity.
SHARP
1.Press "MENU" (on main body) or "►" (on remote
control) button.
2.Press "
button to select PICTURE.
3.Press "
control) button to select SHARP.
4.Press "
control) button to adjust the contrast for soft or sharp.
" (on main body) or "→" (on remote
" (on main body) or "↑, ↓" (on remote
" (on main body) or "←, →" (on remote
" (on main body) or "→" (on remote control)
" (on main body) or "↑, ↓" (on remote
" (on main body) or "←, →" (on remote
" (on main body) or "→" (on remote control)
" (on main body) or "↑, ↓" (on remote
" (on main body) or "←, →" (on remote
" (on main body) or "→" (on remote control)
" (on main body) or "↑, ↓" (on remote
" (on main body) or "←, →" (on remote
11
Page 13

ENGLISH
SETUP
CH. SEARCH
1. Press "MENU" (on main body) or "►" (on remote
control) button.
2. Press " " (on main body) or "→" (on remote
control) button to select SETUP.
3. Press " " (on main body) or "↑, ↓" (on remote
control) button to select CH. SEARCH.
4. Press " " (on main body) or "←, →" (on remote
control) button to select NO or YES. If you select YES,
the TV will scan program channels automatically.
CH. MEMORY
1. Press "MENU" (on main body) or "►" (on remote
control) button.
2. Press " " (on main body) or "→" (on remote
control) button to select SETUP.
3. Press " " (on main body) or "↑, ↓" (on remote
control) button to select CH. MEMORY.
4. Press " " (on main body) or "←, →" (on remote
control) button to select NO or YES. If you select YES,
the TV will add the you are currently watching to the
memory.
FINE TUNE
If the reception is clear, you do not have to fine-tune the
channel, as this is done automatically during the search
and store operation. If however the signal is weak or
distorted, you may have to fine-tune the channel manually.
1. Press "MENU" (on main body) or "►" (on remote
control) button.
2. Press "
control) button to select SETUP.
3. Press “
control) button to select FINE TUNE.
4. Press “
control) button to fine-tune the channel manually if the
reception is not very clear. You can increase or decrease
the number to achieve the best picture.
CH. SWAP
1. Press “MENU” (on main body) or “►” (on remote
control) button.
2. Press “
control) button to select SETUP.
3. Press “
control) button to select CH. SWAP.
4. Press “
numbers on remote control to select the original channel
number you’d like to change.(eg 001).
5. Repeat the last operation to assign the target channel
number to the original channel.
" (on main body) or "→" (on remote
“ (on main body) or “↑, ↓” (on remote
“ (on main body) or “←, →” (on remote
“ (on main body) or “→” (on remote
“ (on main body) or “↑, ↓” (on remote
“ (on main body) or, press the appropriate
12
Page 14

RECALL
1. Press “MENU” (on main body) or “►” (on remote
control) button.
2. Press “ “ (on main body) or “→” (on remote
control) button to select SETUP.
3. Press “ “ (on main body) or “↑, ↓” (on remote
control) button to select RECALL.
4. Press “ “ (on main body) or “←, →” (on remote
control) button to select NO or YES. If you select YES,
the TV will recall all the picture settings to default.
SYSTEM
1. Press “MENU” (on main body) or “►” (on remote
control) button.
2. Press “ “ (on main body) or “→” (on remote
control) button to select SETUP.
3. Press “ “ (on main body) or “↑, ↓” (on remote
control) button to select SYSTEM.
4. Press “ “ (on main body) or “←, →” (on remote
control) button to select OFF or ON. If you select
OFF, the SYSTEM menu will have no function when
you push the menu button. This menu is not normally
needed once you have tuned the set in for the first time.
To see the SYSTEM menu select ON in the SETUP
menu.
SYSTEM
Please make sure the SYSTEM menu is ON status before selecting it. (Please refer to above SYETEMOFF ON setting in the SETUP menu.)
PAL/SECAM/SECAM L
1. Press "MENU" (on main body) or "►" (on remote
control) button.
2. Press "
control) button to select SYSTEM.
3. Press "
control) button to select PAL / SECAM / SECAM L.
4. Press "
control) button to select the appropriate PICTURE signal
type from PAL, SECAM, and SECAM L.
SOUND
1. Press "MENU" (on main body) or "►" (on remote
control) button.
2. Press "
control) button to select SYSTEM.
3. Press "
control) button to select SOUND.
4. 4.Press "
control) button to select the appropriate sound system
from B/G, D/K, or I. The sound system will display on
top-righter coner of screen “B”, “D” or “I” of your
choice.
" (on main body) or "→" (on remote
" (on main body) or "↑, ↓" (on remote
" (on main body) or "←, →" (on remote
" (on main body) or "→" (on remote
" (on main body) or "↑, ↓" (on remote
" (on main body) or "←, →" (on remote
ENGLISH
13
Page 15

ENGLISH
NICAM
1. Press "MENU" (on main body) or "►" (on remote
control) button.
2. Press "
control) button to select SYSTEM.
3. Press "
control) button to select NICAM.
4. Press "
control) button to select ON or OFF. You can select ON
if your set is equipped with the receiver for NICAM
reception. The high quality NICAM
C
ompanded Audio Multiplex)
received.
" (on main body) or "→" (on remote
" (on main body) or "↑, ↓" (on remote
" (on main body) or "←, →" (on remote
(Near Instantaneous
digital sound can be
3.2.2 PC settings
The OSD shown below displays when you press "MENU"(on main body) or "►" button (on remote
control).
To adjust the picture brightness.
1. Press "
select item.
2. Then press "
button to adjust brightness.
" (on main body) or "↑, ↓" (on remote control) button to
" (on main body) or "←, →" (on remote control)
You can display a sub picture in the PC screen which can be selected
from TV or external A/V devices such as VCR or DVD. In this way you
can watch a TV program or monitor the video input from any connected
devices whilst looking at the display from the PC.
1. Press "
select item.
2. Choose “PIP”, then press "MENU" (on main body) or "►" (on remote
control) to enter second page. There are five options to set the PIP
preference.
SOURCE: To select the picture source from TV, AV1, AV2 or to turn
AUDIO: To select sound from PC (MAIN) or Video (SUB).
MUTE: To turn the sound on or off of the picture window.
SCALE: To choose between 4 picture sizes.
H-POS: To move the picture window left or right.
V-POS: To move the picture window up or down.
3. After finishing adjustment, press "MENU" (on main body) or "►" (on
remote control) retune to main menu.
S: When an image of TV, AV1 or AV2 is displayed in PIP mode, the
picture may appear to be a little stretched.
To adjust the colour temperature.
1.Press "
select item.
2.When you choose the user mode in colour temperature, then press
"MENU" (on main body) or "►" (on remote control) to enter second
page to adjust the R, G, B.
3.After finishing adjustment to press “MENU” (on main body) or "►"
(on remote control) retune to main menu.
" (on main body) or "↑, ↓" (on remote control) button to
off PIP mode.
" (on main body) or "↑, ↓" (on remote control) button to
14
Page 16

3.2.3 PC OSD function description
Function Function Description
Icon
BRIGHTNESS
CONTRAST
H-POSITION
This function increases or decreases the brightness of the image.
This function increases or decreases the difference between the dark and light
content.
This function shifts the entire display image left or right.
ENGLISH
V-POSITION
AUTO
ADJUSTMENT
PHASE
CLOCK
PICTURE IN
PICTURE
SOURCE
AUDIO
SCALE
H-POS.
V-POS.
OSD H-POSITION
OSD V-POSITION
GRAPH TEXT
RECALL
LANGUAGE
TEMPERATURE
EXIT
Icon Description
9300
6500
USER
Set CIE coordinated at 9300°K colour temperature.
Set CIE coordinated at 6500°K colour temperature.
There are 3 colours (Red, Green, Blue) for user to adjust from OSD menu.
Adjust Red colour on screen.
R
Adjust Green colour on screen.
G
Adjust Blue colour on screen.
B
This function shifts the entire display image up or down.
This function will adjust the display size automatically to fit full screen.
This function is available to adjust the focus and clarity of the display.
This function carries a frequency-tracking feature that offers the user to have
better stability and clarity. Increasing Clock value can be up to +50 scales.
The number of decreasing Clock (minus) is depending on the input timing.
The function is to open video picture in screen.
This function is to select video source.
This function is to select sound from PC (Main) or Video (Sub).
This function is to choose 4 scales size for picture.
This function is to move the video window left or right.
This function is to move the video window up or down.
This function moves the OSD menu window left or right.
This function moves the OSD menu window up or down.
This function is to choose a display that allows maximum graphics text
quality. The resolution selection can either be 640 x 400 or 720 x 400. Please
refer to Chapter 3 “ Standard Timing” Table for of different timing modes.
The recall function will return all adjusted parameters to factory preset
values.
Five OSD languages options are available:
English, French , German , Spain , Italian.
To select a different colour temperature. Please see the diagram below for
function and description.
Exits the OSD menu function.
15
Page 17

ENGLISH
Chapter 4 Technical Information
4.1 Specifications
LCD Panel
Size 17" (43 cm)
Display Type Active matrix colour TFT LCD
Resolution 1280 x 768
Display Dot 1280 x (RGB) x 768
Display Area (mm) 369.6 x 221.7 (H x V)
Display Colour 262K
Brightness 400 cd/m
Contrast Ratio 400:1 (typical)
Response Time Ta=25°C T on=15ms T off=10ms
Lamp Voltage 630 Vrms (typical)
Lamp Current 10.5 mA rms. (typical)
Viewing Angle Vertical: -80° ~ +80°
Display colours
CVBS/S-Video Inputs
S-Video Type Y/C
Level 0.7Vpp
Impedance 75 ohm terminated
Composite Video Type Composite
Level 0.7Vpp
Impedance 75 ohm terminated
Component Type Y , Cb ,Cr
Level 0.7Vpp
Impedance 75 ohm terminated
Audio In put.
Audio Out put.
Max. 3.0 watt. < 10% distortion.
Control
Power switch (hard and soft types) On/Off switch with LED indicator
OSD
Brightness Digital
Contrast Digital
Horizontal Position Digital
Vertical Position Digital
Phase Digital
Clock Digital
Display Mode Setup Use EEPROM to save settings in memory
OSD Format 20 characters x 9 rows
Power Management
Mode Power Consumption* AC Input LED Colour
On 75W maximum 220-240 V AC, 50 Hz Green
Off 5W maximum 220-240 V AC, 50 Hz Orange
Soft switch off 5W maximum 220-240 V AC, 50 Hz Dark
Disconnected 5W maximum 220-240 V AC, 50 Hz
* Meeting VESA DPMS requirements measured from AC Input end of AC power cord.
2
(typical)
Horizontal: -80° ~ +80°
16.7M with FRC or Dithering
In put level. 0.7Vp-Vp
Response. 120 Hz—20Khz.
Std. 2.5 Watt < 0.2% distortion.
Orange: Standby, Suspend, Off
Dark: DC Power off
16
Page 18

Sync Input
Signal Separate TTL compatible horizontal and vertical synchronization
Polarity Positive and negative
Plug & Play
External Connection
Power Input (AC input) AC socket
Video Cable 1.5M with 15-pin D-sub connector
Environment
Operating Condition:
Storage Condition:
Power Supply (AC Input)
Input Voltage Single phase, 100 ~ 240VAC, 50 / 60 Hz
Input Current 1.2 A maximum
Pin Assignment
6
1
5
11
15
10
Supports VESA DDC1 and DDC2B functions
Temperature 5°C to 40°C/41°F to 104°F
Relative Humidity 20% to 85%
Temperature -20°C to 60° C/-4°F to140° F
Relative Humidity 5% to 85%
Signal Signal
PIN Description PIN Description
1
2
3
4
5
6
7
8
Red
Green
Blue
NC
Digital GND
Red Rtn
Green Rtn
Blue Rtn
9
10
11
12
13
14
15
+5V
Hot Plug Detect
NC
SDA
H. Sync.
V. Sync.
SCL
ENGLISH
4.2 Standard Timing Table
If the selected timing is NOT included in table below, this LCD monitor will use the most suitable available
timing.
Mode Resolution Total
Nominal
Frequency
(KHz)
Horizontal Vertical
Sync
Polarity
Nominal
Freq.
(Hz)
Sync
Polarity
VESA MODES
VGA
SVGA
XGA
IBM MODES
DOS* 720x400@70Hz 900 x 449 31.469 N 70.087 P 28.322
DOS 640x350@70Hz 800 x 449 31.469 P 70.087 N 25.175
Note: When the in put display mode is not 1280 x 768, the image is smoothly expanded to 1280 x 768 dots with the
scaling engine. After expansion from 650x350, 640x400, 640x480, 720x400, 832x624, 800x600, and 1024x768
640x480@60Hz 800 x 525 31.469 N 59.940 N 25.175
640x480@72Hz 832 x 520 37.861 N 72.809 N 31.500
640x480@75Hz 840 x 500 37.500 N 75.00 N 31.500
800x600@56Hz 1024 x 625 35.156 N/P 56.250 N/P 36.000
800x600@60Hz 1056 x 628 37.879 P 60.317 P 40.000
800x600@72Hz 1040 x 666 48.077 P 72.188 P 50.000
800x600@75Hz 1056x625 46.875 P 75.000 P 49.500
1024x768@60Hz 1344x806 48.363 N 60.004 N 65.000
1024x768@70Hz 1328x806 56.476 N 70.069 N 75.000
1024x768@75Hz 1312x800 60.023 P 75.029 P 78.750
17
Nominal
Pixel
Clock
(MHz)
Page 19

ENGLISH
resolution, the text may look not so sharp, and the Graphics may look not so proportional.
Chapter 5 Other Information
5.1 Specifications
POWER IN 12VDC 5A
VIDEO INPUT Composite /Component video RCA connector
S-VIDEO INPUT S-Video 4-pin mini DIN
AUDIO INPUT Stereo L+R RCA connectors
PHONE IN Phone Jack 3.5
RF IN IEC-Female connector for PAL System
VGA INPUT D-Sub 15 pin connector
Power Consumption 75W maximum
Operating Temperature 5 ~ 35°C
Operating Humidity 5% ~ 80%
IR Control 35 Buttons (AAA batteries x2)
Dimensions 518 (W) x 333 (H) x 198 (D) mm
Net Weight
Gross Weight
5 ± 0.3 kg
6.8 ± 0.3 kg
Chapter 6 Troubleshooting
This LCD Monitor has pre-adjusted using factory standard VGA timings. Due to the output timing
differences among various VGA cards in the market, users may initially experience an unstable or unclear
display whenever a new display mode or new VGA card is selected.
Attention
This LCD Monitor Supports Multiple VGA Modes.
Refer to the Standard Timing Table for a listing of modes supported by this LCD Monitor.
PROBLEM Picture is unclear and unstable
The picture is unclear and unstable, please perform the following steps :
1. Enter PC to “Shut Down Windows” status while you’re in MS-Windows environment.
2. Check the screen to see if there’s any black vertical stripes appear. If there are, take advantage of the
“Clock” function in OSD menu and adjust (by increment or decrement numbers) until those bars
disappear.
3. Move to “Phase” function in OSD menu again and adjust the monitor screen to its most clear display.
4. Click “No” on “Shut Down Windows” and back to the normal PC operating environment.
PROBLEM There is no picture on LCD Monitor
If there’s no picture on the LCD Monitor, please perform the following steps:
1. Make sure the power indicator on the LCD Monitor is ON, all connections are secured, and the system is
running on the correct timing. Refer to Chapter 3 for information on timing.
2. Turn off the LCD Monitor and then turn it back on again. If there is still no picture, press the Adjustment
Control button several times.
3. If step 2 doesn’t work, connect your PC system to another external CRT. If your PC system Functions
properly with a CRT Monitor but it does not function with the LCD Monitor, the output timing of the
VGA card may be out of the LCD’s synchronous range. Please change to an alternative mode listed in
the Standard Timing Table or replace the VGA card, and then repeat steps 1 and 2.
PROBLEM There is no picture on LCD Monitor
If you have chosen an output timing that is outside of the LCD Monitor’s synchronous range (Horizontal: 30
~ 60 KHz and Vertical: 50 ~ 75 Hz), the OSD will display a “Over Range” message. Choose a mode that is
supported by your LCD Monitor.
PROBLEM The IR control can't control product
Make sure if batteries installed are not weak batteries
If you still have difficulties that you can't resolve using the tips described above, please unplug and plug in
the AC cord to reset your product. Otherwise, please call your local agency for servicing.
18
Page 20

Also, if the signal cable is not connected to LCD monitor at all or properly, the monitor screen will display a
message “No Signal ”.
ENGLISH
19
Page 21

Page 22

Guarantee
Your Guarantee of Excellence
Thank you for purchasing this Hitachi Television.
In the unlikely event that this product should develop a fault, we undertake to replace or repair any
part that of the product which fails due to a manufacturing defect within 12 months of the date of
purchase provide that:
i) The product has been installed and used only in accordance with the instructions supplied with the
product.
ii) The product has not been repaired, maintained, or modified by any person other than an Hitachi
authorised engineer.
iii) The product serial number has not been removed or altered.
This guarantee does not apply to product acquired second hand or for commercial or communal use.
This guarantee does not cover the replacement of exhausted batteries, the adjustment of user controls
or aerial alignment.
Any parts replaced under this guarantee shall become the property of Hitachi Europe Ltd.
Please note that evidence of the date of purchase will be required before any service is carried out.
THIS GUARANTEE DOES NOT AFFECT YOUR STATUTORY RIGHTS.
IN ALL CASES OF DIFFICULTY PLEASE CONSULT YOUR HITACHI DEALER.
ENGLISH
143
Page 23

Hitachi, Ltd. Tokyo, Japan
International Sales Division
THE HITACHI ATAGO BUILDING,
No. 15 –12 Nishi Shinbashi, 2 – Chome,
Minato – Ku, Tokyo 105-8430, Japan.
Tel: 03 35022111
HITACHI EUROPE LTD,
Whitebrook Park
Lower Cookham Road
Maidenhead
Berkshire
SL6 8YA
UNITED KINGDOM
Tel: 01628 643000
Fax: 01628 643400
Email: consumer-service@hitachi-eu.com
HITACHI EUROPE GmbH
Munich Office
Dornacher Strasse 3
D-85622 Feldkirchen bei München
GERMANY
Tel: +49-89-991 80-0
Fax: +49-89-991 80-224
Hotline: +49-180-551 25 51 (12ct/min)
Email: HSE-DUS.service@hitachi-eu.com
HITACHI EUROPE srl
Via Tommaso Gulli N.39, 20147
Milano, Italia
ITALY
Tel: +39 02 487861
Tel: +39 02 38073415 Servizio Clienti
Fax: +39 02 48786381/2
Email: customerservice.italy@hitachi-eu.com
HITACHI EUROPE S.A.S
Lyon Office
B.P. 45, 69671 BRON CEDEX
FRANCE
Tel: 04 72 14 29 70
Fax: 04 72 14 29 99
Email: france.consommateur@hitachi-eu.com
HITACH EUROPE AB
Egebækgård
Egebækvej 98
DK-2850 Nærum
DENMARK
Tel: +45 43 43 6050
Fax: +45 43 60 51
Email: csgnor@hitachi-eu.com
Hitachi Europe Ltd
Bergensesteenweg 421
1600 Sint-Pieters-Leeuw
BELGIUM
Tel: +32 2 363 99 01
Fax: +32 2 363 99 00
Email: sofie.van.bom@hitachi-eu.com
www.hitachidigitalmedia.com
HITACHI EUROPE S.A.
364 Kifissias Ave. & 1, Delfon Str.
152 33 Chalandri
Athens
GREECE
Tel: 1-6837200
Fax: 1-6835964
Email: service.hellas@hitachi-eu.com
HITACHI EUROPE S.A.
Gran Via Carlos III, 86, planta 5
Edificios Trade - Torre Este
08028 Barcelona
SPAIN
Tel: 93 409 2550
Fax: 93 491 3513
Email: atencion.cliente@hitachi-eu.com
HITACHI Europe AB
Box 77 S-164 94 Kista
SWEDEN
Tel: +46 (0) 8 562 711 00
Fax: +46 (0) 8 562 711 13
Email: csgswe@hitachi-eu.com
HITACHI EUROPE LTD (Norway) AB
STRANDVEIEN 18
1366 Lysaker
NORWAY
Tel: 67 5190 30
Fax: 67 5190 32
Email: csgnor@hitachi-eu.com
HITACHI EUROPE AB
Neopoli / Niemenkatu 73
FIN-15140 Lahti
FINLAND
Tel : +358 3 8858 271
Fax: +358 3 8858 272
Email: csgnor@hitachi-eu.com
HITACHI EUROPE LTD
Na Sychrove 975/8
101 27 Pr aha 10 – Bohdalec
CZECH REPUBLIC
Tel: +420 267 212 383
Fax: +420 267 212 385
Email: csgnor@hitachi-eu.com
 Loading...